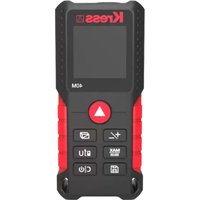
KI201 - Rangefinder KRESS - Free user manual and instructions
Find the device manual for free KI201 KRESS in PDF.
| Product Type | Laser Distance Meter |
| Brand | KRESS |
| Model | KI201 |
| Measuring Range | 0.2 to 70 m |
| Accuracy | ±1.5 mm |
| Laser Class | 2 (630-670 nm, <1 mW) |
| Measurement Units | m, ft, in, ft+in |
| Measurement Functions | Single distance, continuous, area, volume, Pythagoras (2 and 3 points), auto horizontal/vertical, addition/subtraction, max/min |
| Display | 4-line with backlight |
| History Memory | Last 20 measurements |
| Power Supply | 2 AAA 1.5 V batteries |
| Dimensions | 120 x 48 x 27 mm |
| Weight | 120 g |
| Operating Temperature | 0 °C to 40 °C |
| Storage Temperature | -10 °C to 60 °C |
| Auto Power Off | Laser after 30 s, instrument after 3 min |
| Measurement Reference | Front, rear, tripod thread |
| Maintenance | Clean cloth, no detergent or solvent |
| Safety | Do not look into beam, use target plate if reflective surfaces |
| Spare Parts and Repairability | Repair by authorized technician only; standard AAA batteries available |
| General Information | Compliant with directives 2014/30/EU, 2011/65/EU; standards EN 61010-1, EN 60825-1, EN 61326-1 |
Frequently Asked Questions - KI201 KRESS
User questions about KI201 KRESS
0 question about this device. Answer the ones you know or ask your own.
Ask a new question about this device
Download the instructions for your Rangefinder in PDF format for free! Find your manual KI201 - KRESS and take your electronic device back in hand. On this page are published all the documents necessary for the use of your device. KI201 by KRESS.
USER MANUAL KI201 KRESS
text_image
Kress +/_ MAX min C/U C/O| Laser range finder EN | P03 | |
| Laser-Entfernungsmesser DE | P20 | |
| Détecteur de portée laser FR | P39 | |
| Telemetro laser IT | P57 | |
| Telémetro láser ES | P75 | |
| Medidor de distâncias Laser PT | P93 | |
| Laserafstandsmeter | NL | P111 |
| Лазерная рулетка | RU | P129 |
| Dalmierz laserowy PL | P148 | |
| Laserafstandsmåler | DK | P166 |
| Laseravständsmätare | SV | P183 |
GENERAL SAFETY WARNINGS FOR YOUR LASER MEASURING TOOL

WARNING: Read all safety warnings and all instructions.
Failure to follow the warnings and instructions may result in serious injury.
Save all warnings and instructions for future reference.
These lasers do not normally present an optical hazard although staring at the beam may cause flash blindness.
Do not stare directly at the laser beam. A hazard may exist if you deliberately stare into the beam, please observe all safety rules as follows:
- Laser radiation, do not stare into beam.
- The laser shall be used and maintained in accordance with the manufacturer's instructions.
- Never aim the beam at any person or an object other than the work piece.
- The laser beam shall not be deliberately aimed at another person and shall be prevented from being directed towards the eye of a person for longer than 0.25 seconds area.
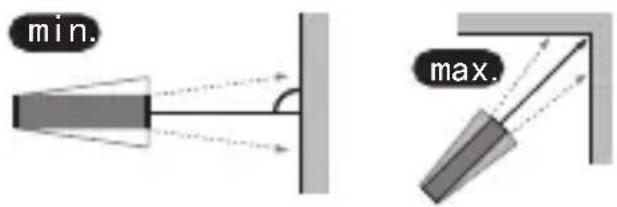
- Always ensure the laser beam is aimed at a sturdy work piece without reflective surfaces, e.g. wood or rough-coated surfaces are acceptable. Bright shiny reflective sheet steel or similar is not suitable for laser applications as the reflective surface may direct the laser beam back at the operator.
- Do not change the laser device with a different type. The manufacturer or an authorized agent must carry out repairs.
- CAUTION: Use of controls or adjustments other than those specified herein may result in hazardous radiation exposure.
- Do not use this product in flammable, explosive, corrosive environments or near medical equipment or aircraft.
SAFETY WARNINGS FOR BATTERY
- Use the recommended type of dry
battery, different type of batteries may cause damage.
- Do not expose the battery to an overheating environment, such as sunlight or fire, which may explode, cause fire or personal injury.
- Do not short-circuit or disassemble the battery, which may explode, cause fire or personal injury.
- The battery may leak if the device is not used properly. In case of battery leakage, carefully remove the liquid with a cloth. Once contact battery liquid, wash with running water immediately, and seek medical help immediately if liquid splashes into eyes.
- Do not charge for batteries that are not suitable for recharging.
- Keep the battery away from children because of the risk of swallowing.
- Children are not allowed to use the tool, which is not a toy.
- Remove the batteries to prevent battery leakage if you do not intend to use the tool for a long time.
SYMBOL
 | To reduce the risk of injury, user must read instruction manual |
 | DO NOT STARE INTO BEAM |
 | Waste electrical products must not be disposed of with household waste. Please recycle where facili- ties exist. Check with your local authorities or retailer for recycling advice. |
 | WARNING! |
 | LASER RADIATION |
text_image
Kress 3 4 5 6 7 8 MAX min 9 10 1 2 3 4 5 6 7 OPEN5 EN
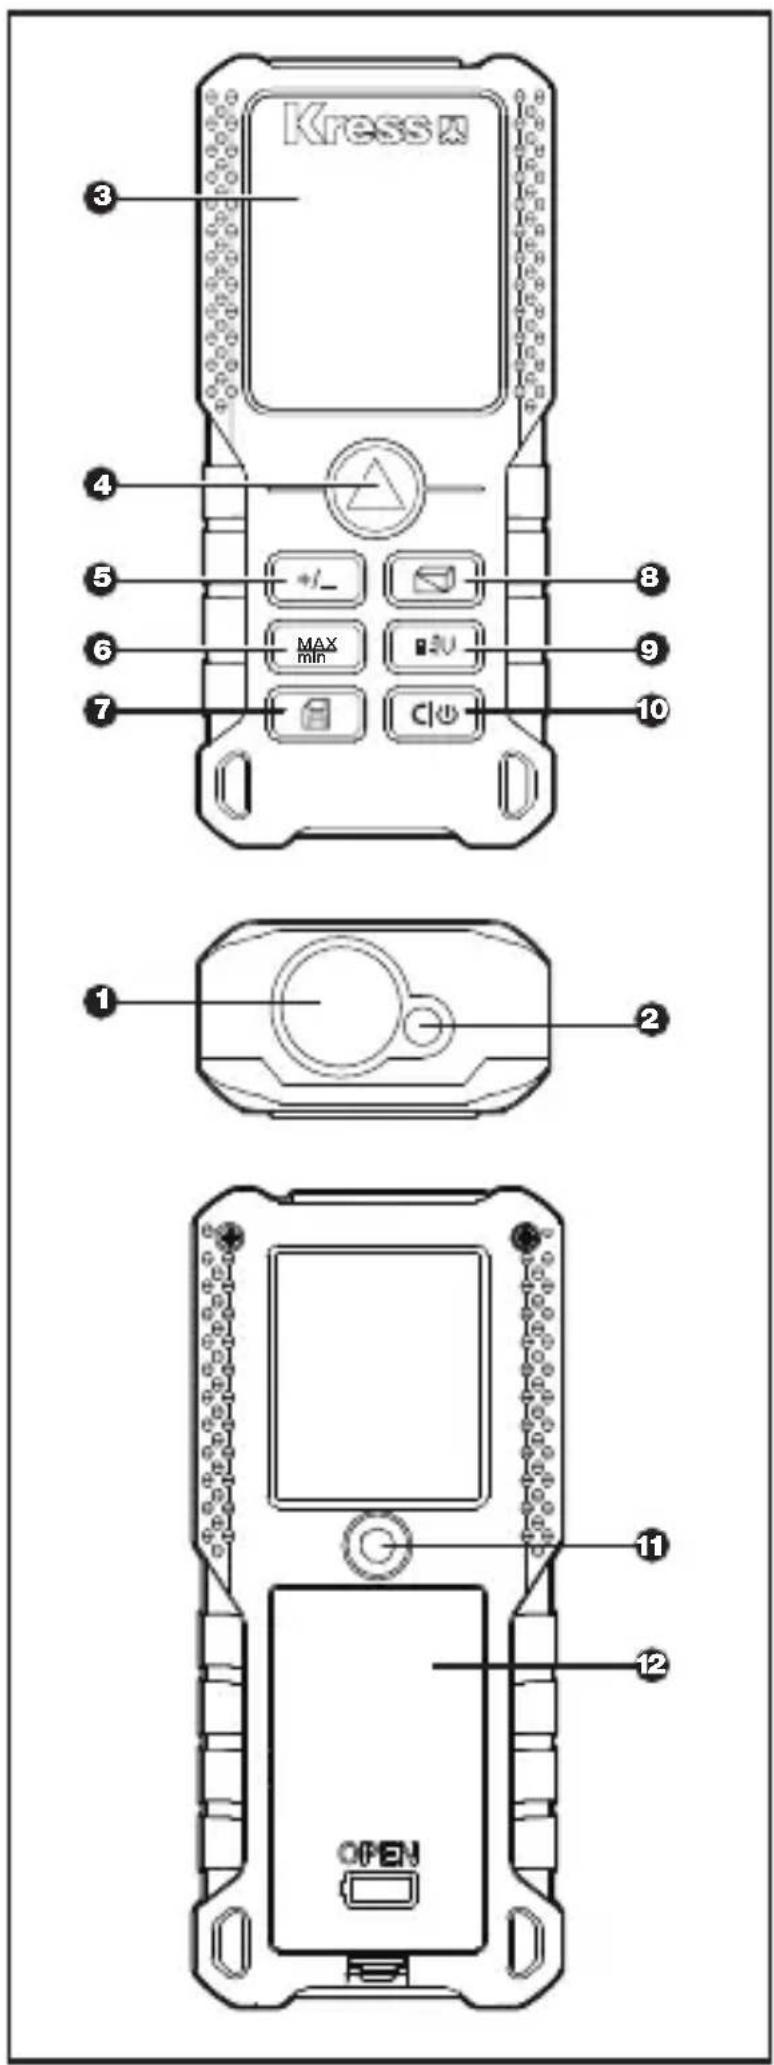
PRODUCT COMPONENTS:
| 1. | LASER RECEIVING LENS | |
| 2. | LASER-EXIT APERTURE | |
| 3. | DISPLAY SCREEN | |
| 4. | MEASURE BUTTON | |
| 5. | ADDITION/SUBTRACTION | |
| 6. | CONTINUOUS MEASUREMENT / MAXIMUM VALUE, MINIMUM VALUE | |
| 7. | HISTORICAL MEMORY | |
| 8. | AREA/VOLUME/INDIRECT MEASURING BUTTON | |
| 9. | REFERENCE/UNIT | |
| 6 | 10. | CLEAR / ON/OFF |
| EN | 11. | 1/4 INCH TRIPOD THREADED HOLE |
| 12. | BATTERY COMPARTMENT COVER |
text_image
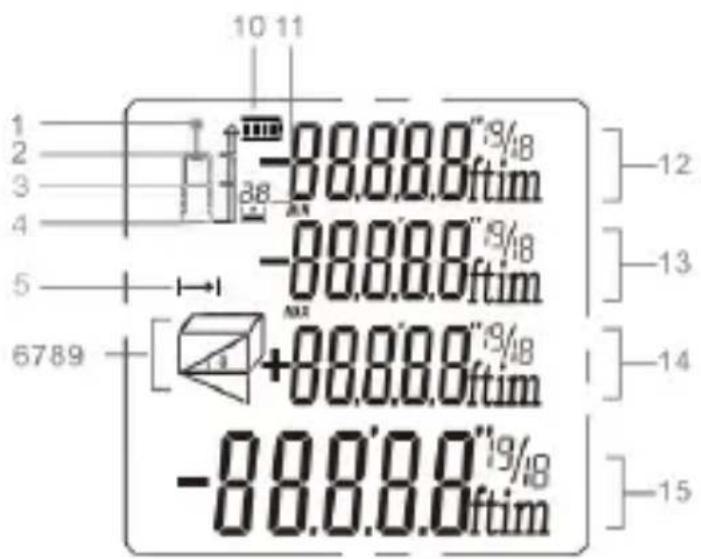
10 11 1 2 3 4 5 6789 -88.00ftim -88.00ftim -88.00ftim -88.00ftim -88.00ftim -88.00ftim -88.00ftim -88.00ftim -88.00ftim -88.00ftim -88.00ftim -88.00ftimDISPLAY SCREEN
| 1. | LASER ON |
| 2. | REFERENCE POINT (FRONT END FACE) |
| 3. | REFERENCE POINT (TRIPOD THREADED HOLE) |
| 4. | REFERENCE POINT (REAR END FACE) |
| 5. | DISTANCE/CONTINUOUS MEASUREMENT |
| 6,7,8,9 | MEASURING MODE INDICATION |
| 10. | BATTERY STATUS |
| 11. | HISTORICAL MEMORY |
| 12. | VALUE 1 |
| 13. | VALUE 2 / MIN. VALUE |
| 14. | VALUE 3 / MAX. VALUE |
| 15. | SUMMARY LINE / LATEST VALUE / CALCULATION RESULT |
7
EN
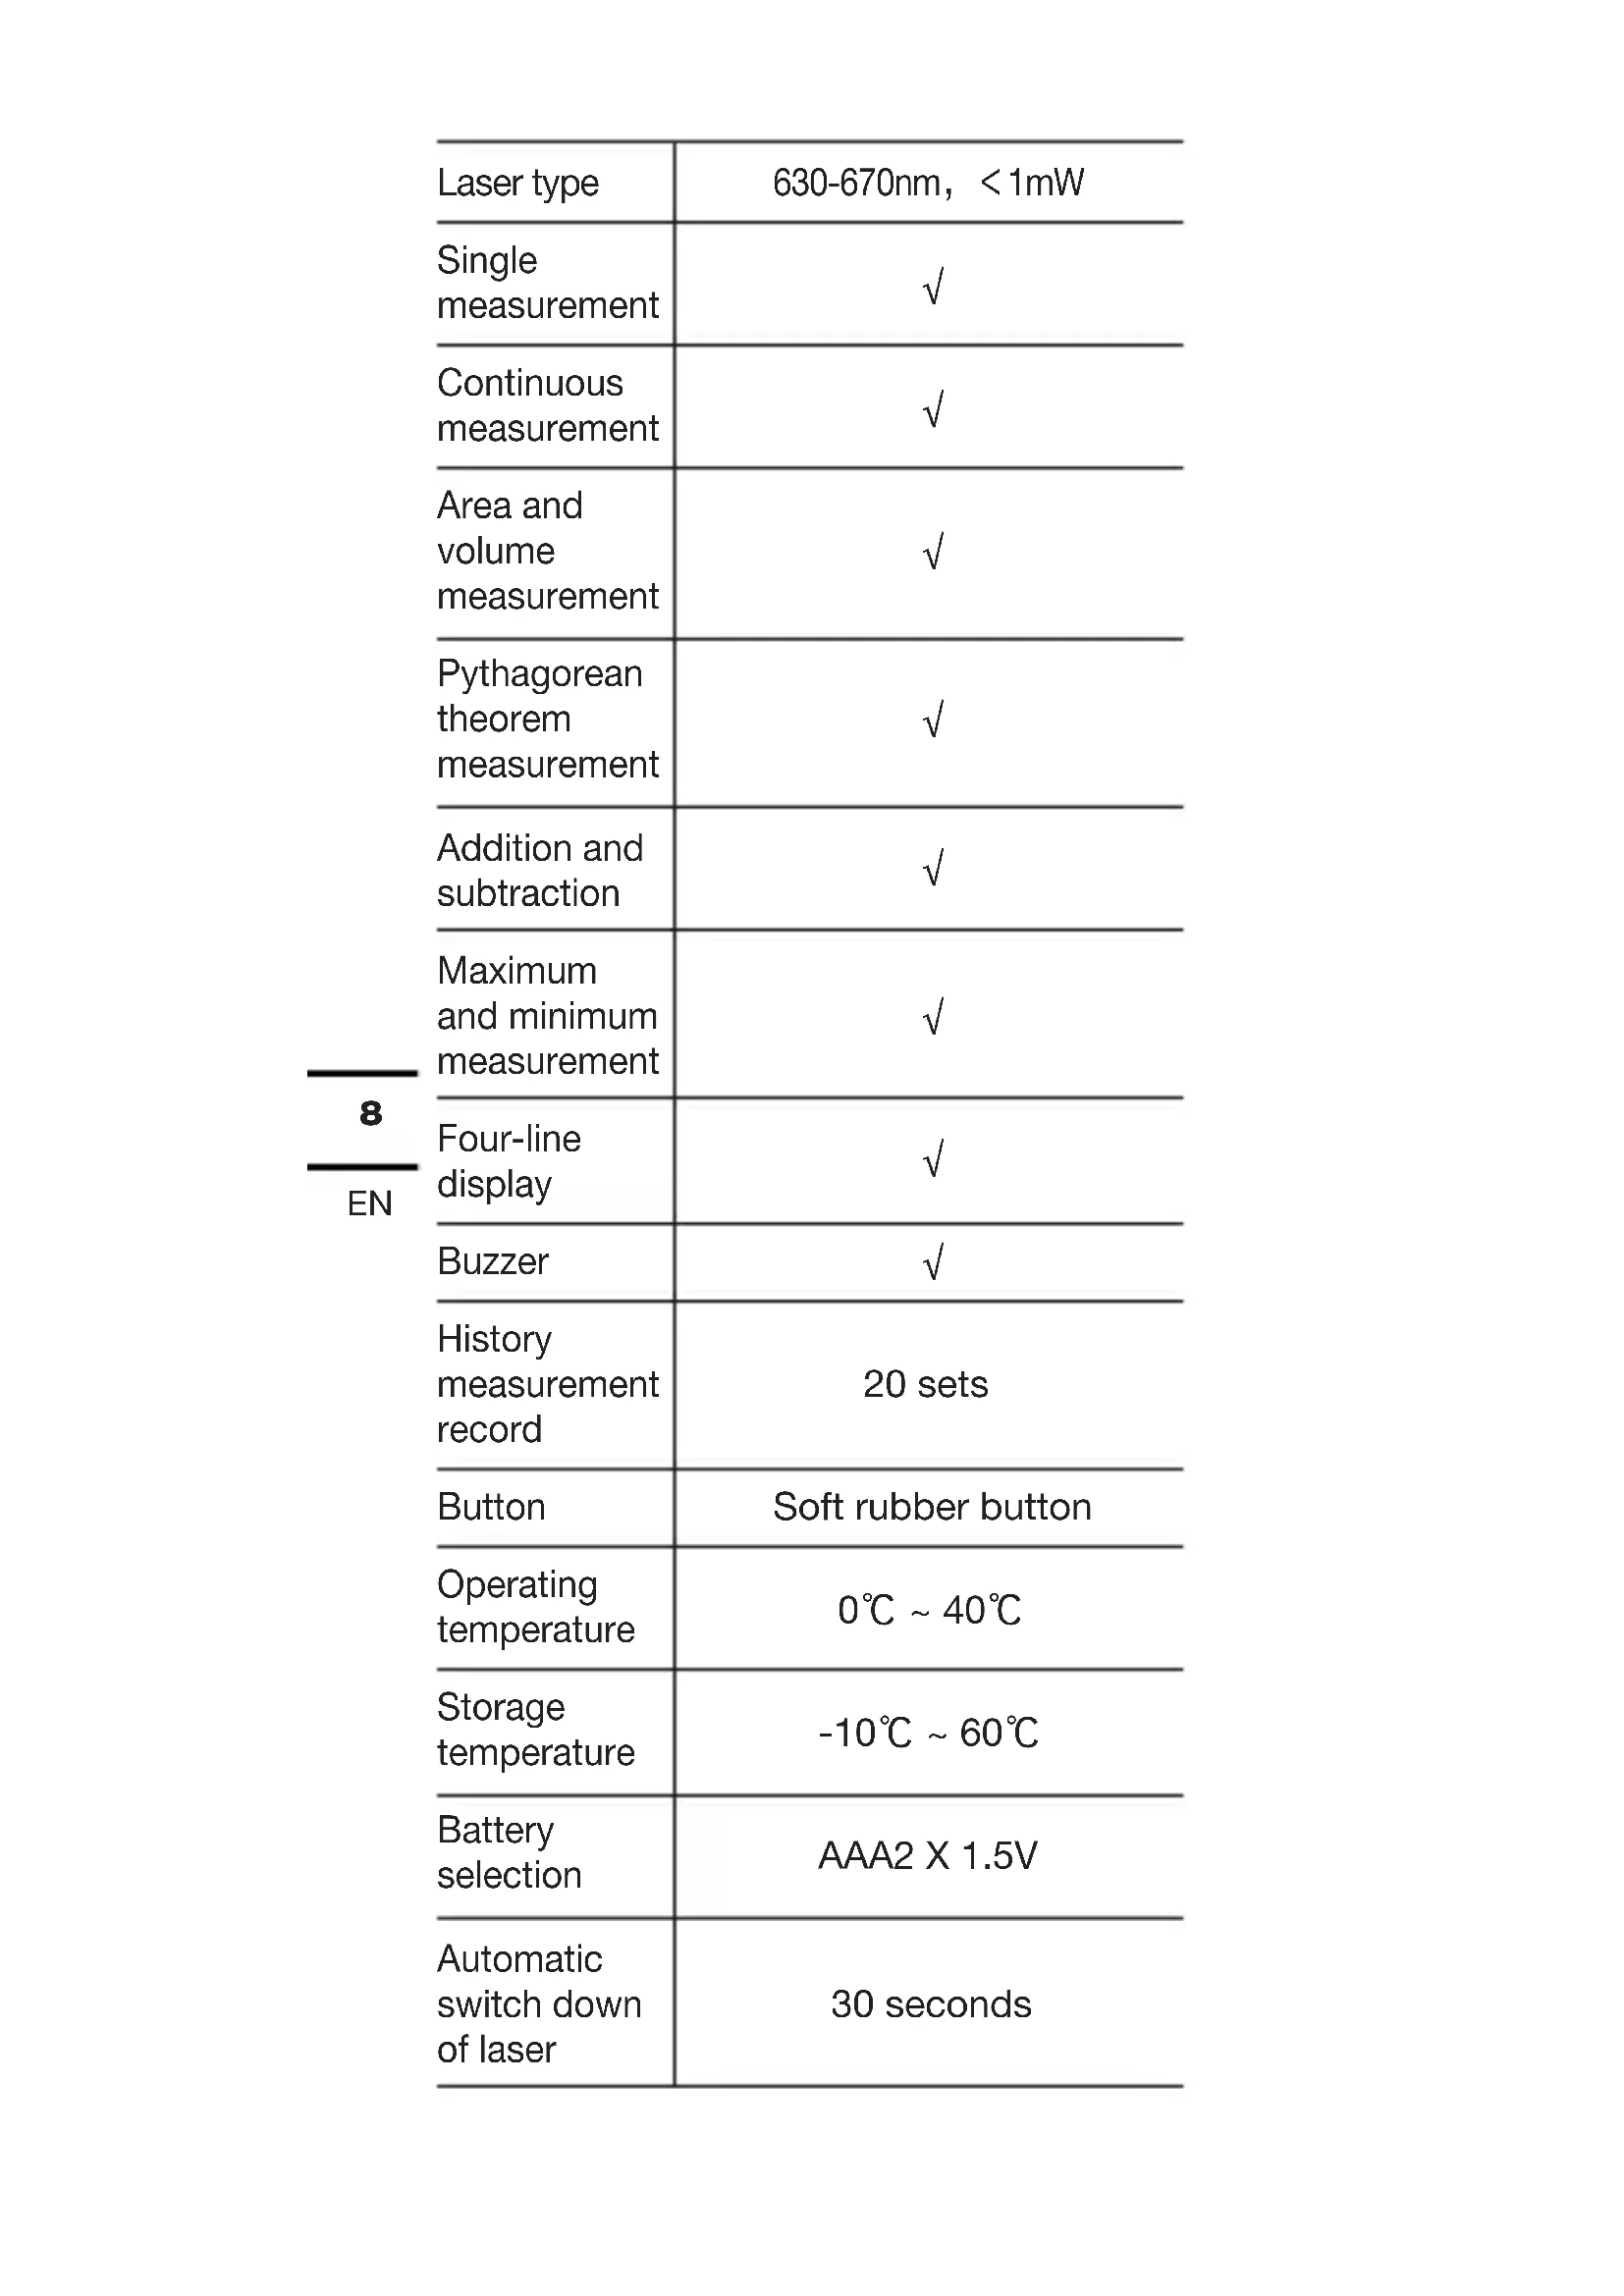
TECHNICAL PARAMETERS
| Model KI200 KI201 | KI202 | ||
| Maximum measuring range 1 | 0.2~40m | 0.2~70m | 0.2~100m |
| Measuring accuracy | ±1.5 mm, ±0.4° | ||
| Measuring unit M/ft/in/ft + in | |||
| Laser level Class 2 | |||
| 8EN | Laser type | 630-670nm, <1mW |
| Single measurement | √ | |
| Continuous measurement | √ | |
| Area and volume measurement | √ | |
| Pythagorean theorem measurement | √ | |
| Addition and subtraction | √ | |
| Maximum and minimum measurement | √ | |
| Four-line display | √ | |
| Buzzer | √ | |
| History measurement record | 20 sets | |
| Button | Soft rubber button | |
| Operating temperature | 0°C ~ 40°C | |
| Storage temperature | -10°C ~ 60°C | |
| Battery selection | AAA2 X 1.5V | |
| Automatic switch down of laser | 30 seconds |
| Automatic switch down of instrument | 3 minutes |
| Length × width × height (mm) | 120*48*27 |
| Weight (g) | 120 |
- The measuring range is based on the default rear reference
- The measuring range will be reduced when used in unfavorable conditions (such as outdoor or excessive ambient light, poorly reflecting measuring surface, coarse surface or excessive temperature difference), which may also lead to a large deviation.
OPERATING INSTRUCTIONS
Initial operation and setup
-
Turning on and off
Long press ⬆ to turn on/off the instrument. The instrument switches of automatically after three minutes of inactivity. -
Measure button
Short press ▲ to turn on the laser, and then press ▲ again to trigger single measurement.
- Return/Clear button
Short press ⬊ to undo the last action or clear measured value.
- Setting measuring reference
The default reference setting is from the rear of the instrument. Press 📋 to switch the reference point to the front reference or tripod reference. Press it again to switch back and forth between the front, middle and rear.
*The reference point will be set to default every time when it is rebooted.
text_image
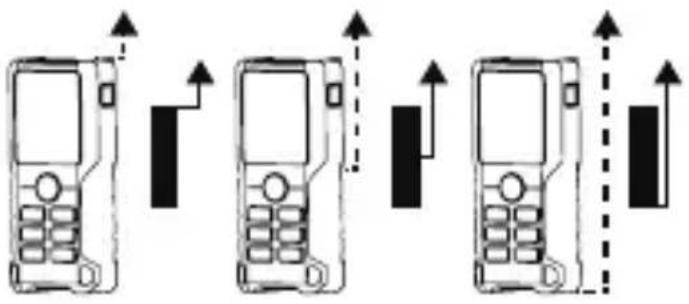
Diagram showing three variations of a mobile phone with directional arrows indicating movement or change.5. Unit setting
Long press ☐ to change distance unit between m, ft, in and ft+in.
The measuring unit will automatically switch to "m" after restarting.
FUNCTIONS AND OPERATIONS
1. Single distance measurement
Press ▲ to activate the laser, and then press ▲ again to trigger single measurement.
The laser is turned off after completion of measurement, and the measured value is displayed immediately.
Note: After power on, the instrument enters the single measurement mode by default. After selection of measuring position, press ; in other measurement modes, press to go back to single measurement.
- Continuous measurement (Max/Min) Press ☐ on to activate continuous measurement. The continuous measurement symbol is shown on the screen. At the same time, the maximum and minimum distances measured are shown in the display. Users can press or click stop the function.
*This function will be stopped automatically after 5 minutes of inactivity.
text_image
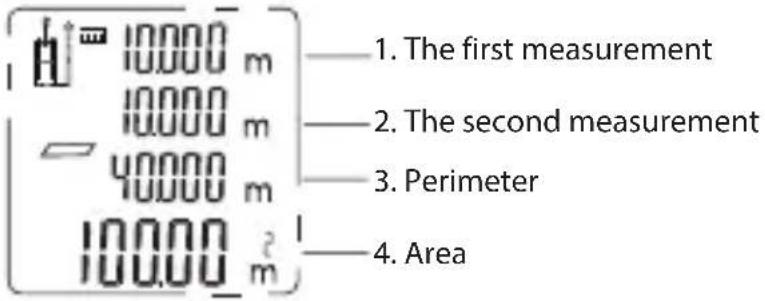
min. max.3. Area measurement
Press once, the symbol appears in the display. Press to take the first distance measurement (e.g. length). Press again to take the second distance measurement (e.g. width). After the second measurement, the results of area/perimeter are shown in the main display.
text_image
10.000 m 10.000 m 40.000 m 10.000 m² 1. The first measurement 2. The second measurement 3. Perimeter 4. Area4. Volume measurement
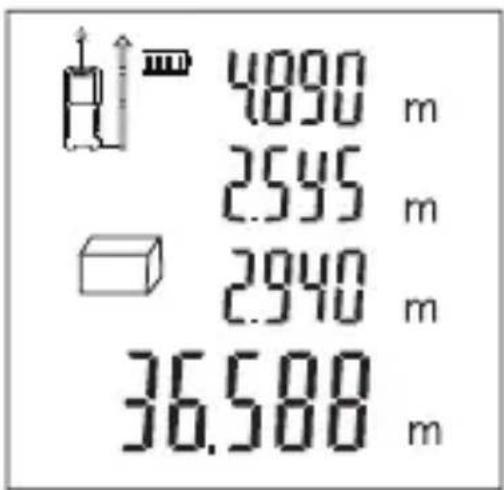
Press service, the symbol appears in the display. Press to take the first distance measurement (e.g. length). Press again to take the second distance measurement (e.g. width), and press to take the third distance measurement (e.g. height).
After three measurements, the result of volume is automatically shown in the summary line.
other
| Value | m | |---|---| | 4890 | | | 2595 | | | 2940 | | | 36.588 | |5. Indirect measurement
☐ The instrument can calculate the distance using the Pythagorean theorem. This
function allows you to measure distances for inaccessible locations.
Note:
- All the points to be measured should be on the same horizontal or vertical plane. In order to get more accurate measurement results, it is recommended to use a tripod to rotate the instrument on the same axis for measurement (for example, the instrument's corner is fully unwound against the wall for measurement).
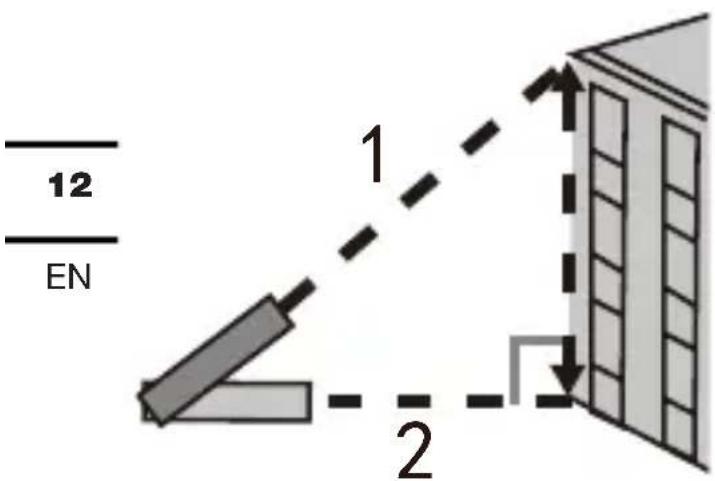
Indirect measurement: Pythagorean method two points
As shown in the figure below, measure the height or width of a building, or when a height needs to be determined by two distances, it can be achieved by indirect measurement.
text_image
12 EN 1 2Press 📄 times, the symbol appears on the screen. Take the first measurement by referring to the blinking side (as shown in the figure above, aiming at the top point), and the measured value will be displayed as value 2; keep the instrument level which performs horizontal measurement by default; take the second measurement by referring to the blinking side (as shown in the figure above, aiming at the bottom point), and the measured value will be displayed as value 3.
The calculated height is displayed in the summary line.
text_image
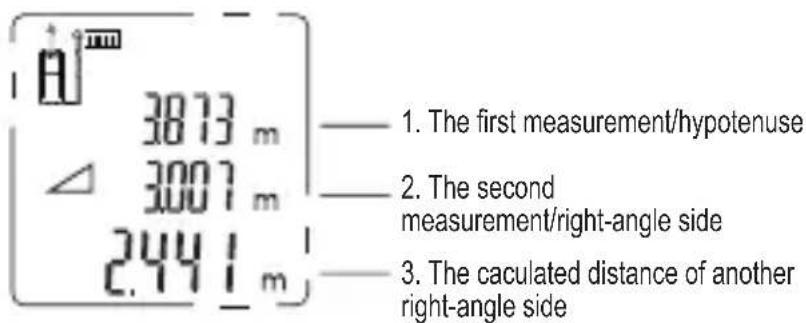
3873 m 3007 m 2441 m 1. The first measurement/hypotenuse 2. The second measurement/right-angle side 3. The calculated distance of another right-angle sideIndirect measurement: Pythagorean method three points
As shown in the figure below, measure the height or width of a building, or when a height needs to be determined by three distances, it can be achieved by using Pythagorean method three points indirect measurement.

text_image
Press times, the symbol 1 2 3 13 ENappears on the screen. Take the first measurement by referring to the blinking side (as shown in the figure above, aiming at the top point), and the measured value will be displayed as value 1; keep the instrument level which performs horizontal measurement by default; take the second measure by referring to the blinking side (as shown in the figure above, aiming at the middle vertical point), and the measured value will be displayed as value 2; then make the third measurement (aiming at the bottom point), and the measured value will be displayed as value 3. The calculated distance result will be displayed on the summary line.
text_image
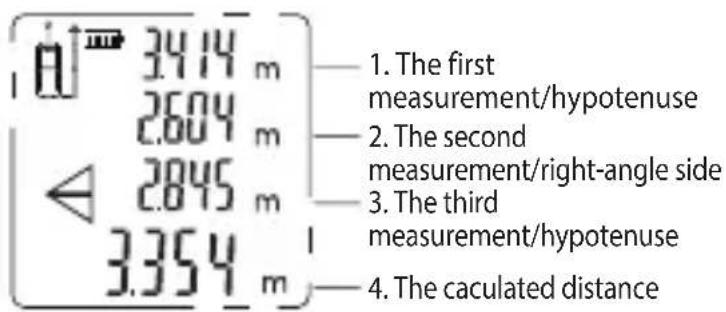
34.14 m 2604 m 2845 m 3354 m 1. The first measurement/hypotenuse 2. The second measurement/right-angle side 3. The third measurement/hypotenuse 4. The calculated distanceThe instrument can also calculate the distance by using the angle measurement and Pythagorean theorem. This function allows you to measure distances for inaccessible locations.
Note:
- All the points to be measured should be on the same vertical plane. (The angle sensor can only measure the angle of vertical line)
- In order to get more accurate measurement results, it is recommended to use a tripod to rotate the instrument on the same axis for measurement.
The angle between the instrument and the horizontal plane is displayed on the screen in real time.
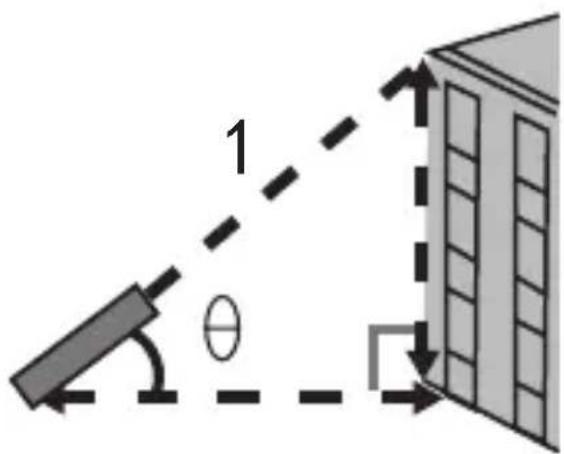
Indirect measurement: auto horizontal
Press five times in a row, once, the auto
horizontal symbol appears in the screen.
As shown in the figure, press to measure the length of the bevel edge 1. The angle, bevel distance, vertical distance, horizontal distance will be displayed on the screen.
text_image
1 θ
text_image
50.0° 8570 m 6540 m 5.536 mIndirect measurement: auto vertical
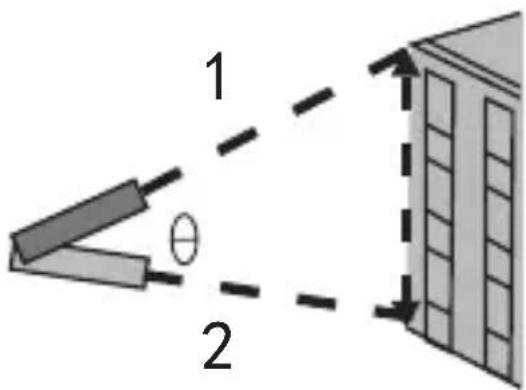
Press six times in a row, once, the auto vertical symbol appears on the screen.
As shown in the figure:
Press ▲ button to measure the distance to the first side; press ▲ again to measure the distance to the second side; then, the angle, distance to the first and the second side, automatic vertical distance results are displayed on the screen in sequence.
text_image
1 θ 2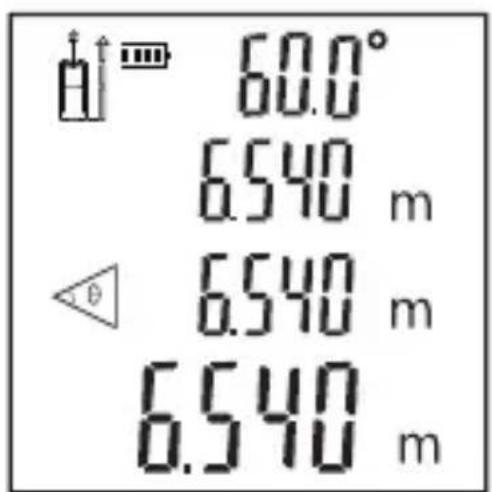
text_image
60.0° 6.540 m 6.540 m 6.540 mEN
- Addition/Subtraction
Addition: short press +/- ;
Subtraction: long press +/-.
Distance addition/subtraction:
Take a measurement first, then press +/- , the addition/subtraction symbol will appear on the screen and blinks continuously.
Take the second measurement, the second distance value will be automatically added to/subtracted from the first one. The result will be displayed in the summary line.
Area/volume addition/subtraction
During area/volume measurement, press +/– button, the instrument will continue to measure the next distance/area/volume, and add the value to/subtract it from the current measured value.
Measure an area/volume first, press +/- button, the area/volume value will appear on the screen as an addend. The plus or minus sign will also appear on the screen and blinks continuously.
Measure the second area/volume, then the area/volume will appear on the screen as another addend which will be added to/subtracted from the first addend. The result will be displayed in the summary line.
All the addition/subtraction functions can be operated repeatedly as required.
6. Historical memory
View: Press 📄 button in a row, the last 20 measured/calculated values will be displayed in a reverse order.
Trouble shooting
All errors or failures will be shown as codes. The following table explains the meaning of codes and solutions.
| Code | Cause | Solution |
| 204 | Calculation error | Refer to user manual, repeat the procedures. |
| 208 | Excessive current | Please contact your distributor |
| 220 | Low battery capacity | Replace the battery |
| 252 | Temperature too high | Let the instrument cool down to operating temperature at 0°C ~ 40°C |
| 253 | Temperature too low | Warm up the instrument to operating temperature |
| 255 | Received light too weak or measurement time to long | Use target plate or change a good reflective surface. |
| 256 | Received signal too strong | Target too reflective, user target plate or do not aim at strong light objective. |
| 261 | Outside of the range of measurement | Select the measurement distance within the range of measurement. |
| 500 | Hardware fault | Switch on/off the instrument several times, if the symbol still appears, please contact your dealer for assistance. |
17
EN
Maintenance
- The instrument can only be repaired by authorized service personnel.
- Please remove the battery from the
instrument and store as required if it is not going to be used for an extended period of time
- Use only replacement parts and accessories recommended by the manufacturer.
- Keep the instrument dry, clean and free of grease. Use a clean cloth when cleaning, and do not use detergent, gasoline, oil to clean.
Precautions
- Operating in unfavorable environment (such as outdoor or ambient light, measuring surface is to weak in reflection, the surface is too rough etc) may lead to large errors in measurement.
- When the instrument is not in use, store it in a place out of reach of children.
- Avoid using this product for a long time in humid, dusty or other harsh environment.
- Highly reflective surfaces may skew the laser beam and cause errors.
- It may cause errors when passing or directly measuring light colored liquid (such as water), clear glass, polystyrene foam or other similar translucent and low density materials.
DECLARATION OF CONFORMITY
We,
Positec Germany GmbH
Postfach 32 02 16, 50796 Cologne,
Germany
Declare that the product
Description laser measuring tool
Type KI200 KI201 KI202
Function measuring the distance
Complies with the following Directives:
2014/30/EU, 2011/65/
EU&(EU)2015/863
Standards conform to
EN 61010-1, EN 60825-1, EN 61326-
1, EN 50689, EN IEC 63000

text_image
A#
text_image
C€2023/06/27
Allen Ding
Deputy Chief Engineer, Testing &
Certification
Positec Technology (China) Co., Ltd
18, Dongwang Road, Suzhou Industrial
Park, Jiangsu 215123, P. R. China
EN
ALLGEMEINE
text_image
Diagram showing three identical mobile phone models with upward arrows indicating movement or signal flow, each accompanied by a black bar symbol.text_image
Diagram showing a mechanical setup with labeled components and directional arrows, likely illustrating a motion or force system.text_image
60.0° 6.540 m 6.540 m 6.540 m18, Dongwang Road, Suzhou Industrial
Park, Jiangsu 215123, P. R. China
AVERTISSEMENTS DE SÉCURITÉ GÉNÉRAUX POUR VOTRE OUTIL DE MESURE LASER

text_image
Diagram showing a mechanical setup with labeled components and directional arrows, likely illustrating a motion or force system.text_image
60.0° 6.540 m 6.540 m 6.540 m- Addition / Soustraction
Addition : appui court +/- ;
Soustraction: appui long

18, Dongwang Road, Suzhou Industrial
Park, Jiangsu 215123, P. R. China
text_image
Diagram showing three variations of a mobile phone with directional arrows indicating movement or change.text_image
1 θ 50.0° 85.70 m 65.40 m 5.536 mtext_image
60.0° 6.540 m 6.540 m 6.540 m18, Dongwang Road, Suzhou Industrial
Park, Jiangsu 215123, P. R. China
text_image
Diagram showing three identical mobile phone models with upward arrows indicating directional movement or signal flow.- Ajuste de la unidad
text_image
Diagram showing two labeled components (1 and 2) with arrows indicating direction of movement or force, possibly illustrating a physics or engineering concept.text_image
A 60.0° 6.540 m 6.540 m 6.540 m- Añadir / Sustraer
text_image
Diagram showing three variations of a mobile phone with directional arrows indicating movement or change.text_image
Diagram showing a mechanical device with labeled components and directional arrows, likely illustrating a motion or assembly process.103
PT
text_image
A= 60.0° 6.540 m 6.540 m 6.540 m- Adição/Subtração
18, Dongwang Road, Suzhou Industrial
Park, Jiangsu 215123, P. R. China
ALGEMENE VEILIGHEID WAARSCHUWINGEN VOOR JOUW LASER METEN GEREEDSCHAP

text_image
Diagram showing four different mobile phone models with directional arrows indicating movement or signal flow.text_image
Diagram showing a mechanical setup with labeled components and directional arrows, likely illustrating a motion or force system.text_image
60.0° 6.540 m 6.540 m 6.540 mNL
18, Dongwang Road, Suzhou Industrial
Park, Jiangsu 215123, P. R. China
natural_image
Pure technical diagram of a mechanical component with two labeled ports (no text or symbols)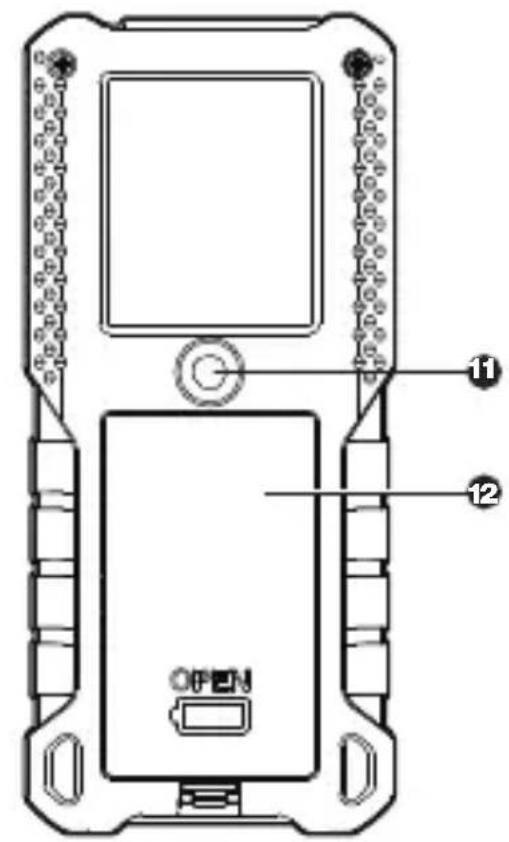
text_image
OPEN 11 12text_image
Diagram showing three variations of a mobile phone with directional arrows indicating movement or change.text_image
Diagram showing a mechanical setup with labeled components and directional arrows, likely illustrating a motion or force system.text_image
60.0° 6.540 m 6.540 m 6.540 m18, Dongwang Road, Suzhou Industrial
Park, Jiangsu 215123, P. R. China
OGÓLNE OSTRZEŻENIA DOTYCZĄCE BEZPIECZEŃSTWA DLA LASEROWEGO PRZYRZĄDU POMIAROWEGO

text_image
Diagram showing four variations of a mobile phone with directional arrows indicating movement or change.PL
text_image
A=60.0° 6.540 m 6.540 m 6.540 m18, Dongwang Road, Suzhou Industrial
Park, Jiangsu 215123, P. R. China
PL
GENERELLE RETNINGSLINJER FOR SIKKERHED FOR DIT LASERMÅLEVÆRKT∅J

text_image
Diagram showing three identical mobile phone models with directional arrows indicating movement or signal flow.- Enhedsindstilling
text_image
IndireKte for anstaining.text_image
60.0° 6.540 m 6.540 m 6.540 m6. Tilføje/trække
18, Dongwang Road, Suzhou Industrial
Park, Jiangsu 215123, P. R. China
GENERELLA
SÄKERHETSVARNINGAR FÖR DITT MÄTINSTRUMENT

WARNING! Läs alla
text_image
50.0° 85.70 m 65.40 m 5.536 mtext_image
60.0° 6.540 m 6.540 m 6.540 m- Addition/Subtraktion
Copyright © 2023, Positec.
All Rights Reserved.