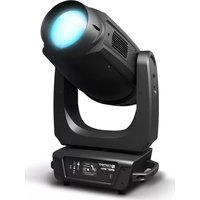
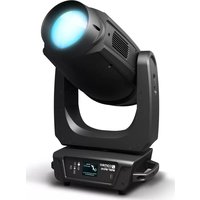
OPUS X WASH - Lamp Cameo - Free user manual and instructions
Find the device manual for free OPUS X WASH Cameo in PDF.

Download the instructions for your Lamp in PDF format for free! Find your manual OPUS X WASH - Cameo and take your electronic device back in hand. On this page are published all the documents necessary for the use of your device. OPUS X WASH by Cameo.
USER MANUAL OPUS X WASH Cameo
SET-UP AND INSTALLATION 20
DMX TECHNOLOGY 21 TECHNICAL DATA 22
MANUFACTURER´S DECLARATIONS 23
DMX DEUTSCHFRANCAIS ESPAÑOL ENGLISH ITALIANO POLSKI ENGLISH YOU HAVE MADE THE RIGHT CHOICE! This device was developed and produced under the highest standards of quality in order to ensure smooth operation for many years. Please read these operating instructions carefully so that you can use your new Cameo Light product quickly and optimally. You can find more information on Cameo Light on our website WWW.CAMEOLIGHT.COM. INTENDED USE! The product is a device for event technology! The product has been specially developed for professional use in the area of event technology and is not suitable for use in a household setting! Furthermore, this product is only intended for qualified users with expertise in event tech- nology! Use of the product contrary to the specified technical data and operating conditions is considered improper! Liability for damages or third-party damage to persons and property due to improper use is excluded! SAFETY INFORMATION
1. Please read through these instructions carefully.
2. Store all information and instructions in a secure location.
3. Follow the instructions.
4. Heed all warnings. Do not remove any safety warnings or other information from the device.
5. Use the device only in the intended manner.
6. Use only stable and suitable stands and/or mounts (for fixed installations). Make sure that wall mounts are properly installed and secured. Make sure that the device is securely installed and will not fall.
7. During installation, heed all safety provisions that apply in your country.
8. Do not install and operate the device in the vicinity of heaters, heat reservoirs, ovens, or other heat sources. Make sure that the device is installed in such a way that it is sufficiently cooled and will not overheat.
9. Do not place any ignition sources, e.g. candles, on the device.
10. Do not block the ventilation slits.
11. The device was designed to be used only in interior spaces, do not operate the device in the direct vicinity of water (this does not apply to specialty outdoor devices - in this case, please note the special instructions given in the following). Do not bring the device into contact with combustible materials, fluids, or gases. 12. Make sure that no water can drop or splash into the device. Do not place any containers filled with fluids, such as vases or drinking vessels, onto the device.
13. Ensure that no objects can fall into the device.
14. Operative the device using only those accessories recommended and specified by the manufacturer.
15. Do not open the device, and do not modify it.
16. After connecting the device, inspect all cable paths in order to avoid damage or accidents, such as those caused by tripping over said cables.
17. During transport, ensure that the device will not fall and potentially cause material damage and personal harm.
18. If your device no longer functions properly, fluids or objects have made their way into the device interior, or the device is otherwise damaged, switch it off immediately and remove it from the power outlet (provided the device is active). This device is to be repaired only by authorized specialists.
19. Use a dry towel to clean the device.
20. Follow all laws on disposal applicable in your country. Please separate plastic and paper or cardboard when disposing of the packaging.
21. Plastic bags must be kept out of reach of children.
FOR DEVICES CONNECTED TO A POWER SUPPLY: 22. ATTENTION: If the device power cable is equipped with a ground pin, it must be inserted into an outlet with a grounding conductor. Never disable the grounding conductor of a power cable. 23. Do not immediately switch on the device when it has been exposed to stark temperature deviations (for example after transport). Humidity and condensation could damage the device. Switch on the device only when it has reached room temperature. 24. Before you connect the device to the outlet, first ensure that voltage and frequency of the power supply complies with the values given on the device. If the device has a voltage selector switch, connect the device to the outlet only if the device values comply with the values of the power supply. If the provided power cable or power adapter does not fit your power outlet, contact an electrician. 25. Do not step on the power cable. Make sure that live cables, in particular those at the power socket or at the power adapter and the device socket, are not bent. 26. With regard to the device cables, always make sure that the power cable or power adapter is always freely accessible. Always separate the device from the power supply when the device is not in use or when you would like to clean the device. Always unplug the power cable and power adapter from the power outlet using the plug or adapter, not the cord. Never touch the power cable and power adapter with wet hands.
27. If possible, do not switch the device on and off quickly because this may impair the service life of the device.
28. IMPORTANT INFO: Replace fuses only with fuses of the same type and value. If a fuse trips repeatedly, please contact an authorized service center. 29. In order to completely separate the device from the power supply, remove the power cable or power adapter from the outlet. 30. If your device is equipped with a Volex power cord, release the correct Volex device connector before removing the cord. However, this also means that the device may slide and fall when removing the power cord, which may cause personal harm and/or material damage. Therefore, always lay cables carefully. 31. Remove the power cable and power adapter from the outlet when there is a risk of lighting or when you no longer want to use the device.
32. The device may only be installed when it carries no voltage (separate the power plug from the power supply).4
DMX ITALIANO POLSKI ESPAÑOL FRANCAIS DEUTSCHENGLISH 33. Dust and other debris within the device may damage it. The device should be serviced or cleaned regularly by qualified specialists depending on the environmental conditions (dust, nicotine, smoke, etc.) in order to avoid overheating.
34. The distance to combustible materials must be at least 0.5 m.
35. Power cables for powering multiple devices must have a core cross-section of at least 1.5 mm². In the EU, lines must be H05VV-F or similar. Adam Hall provides suitable cables. Using these cables, you can connect multiple devices via the Power Out connection with the Power In connection of another device. Ensure that the total power consumption of all connected devices does not exceed the specified value (printed on the device). Be sure to keep power lines as short as possible. 36. The appliance is not to be used by persons (including children) with reduced physical, sensory or mental capabilities, or lack of experience and knowledge.
37. Children must be instructed not to play with the device.
38. If the power cord of the device is damaged, do not use the device. The power cord must be replaced by an adequate cable or assembly from an authorized service center. CAUTION: To reduce the risk of electric shock, do not remove cover (or back). There are no user serviceable parts inside. Maintenance and repairs should be exclusively carried out by qualified service personnel. The warning triangle with lightning symbol indicates dangerous uninsulated voltage inside the unit, which may cause an electrical shock. The warning triangle with exclamation mark indicates important operating and maintenance instructions. Warning! This symbol indicates a hot surface. Certain parts of the housing can become hot during operation. After use, wait for a cool-down period of at least 10 minutes before handling or transporting the device. Warning! This device is designed for use below 2000 metres in altitude. Warning! This product is not intended for use in tropical climates. Caution! Intense LED light source! Risk of eye damage. Do not look into the light source. CAUTION! IMPORTANT INFORMATION ABOUT LIGHTING PRODUCTS!
1. Do not stare, even temporarily, directly into the light beam.
2. Do not look at the beam directly with optical instruments such as magnifiers.
3. Stroboscope effects may cause epileptic seizures in sensitive people! People with epilepsy should definitely avoid places where strobes are used. SIGNAL TRANSMISSION VIA RADIO (E.G., W-DMX OR WIRELESS AUDIO SYSTEMS): The quality and performance of wireless signal transmission is generally dependent on the ambient conditions. The following variables, for example, have an influence on the range and signal stability:
- Shielding (e.g., masonry, metal structures, water)
- High radio frequency (e.g., strong WI-FI networks)
- Electromagnetic radiation (e.g., LED video walls) All range specifications refer to free-field application with visual contact between transmitter and receiver without interference!5 DMX DEUTSCHFRANCAIS ESPAÑOL ENGLISH ITALIANO POLSKI INTRODUCTION
- 29-channel and 48-channel DMX control
- Master / slave operation
- Color wheel 1 with 6 brilliant colors + open and split colors
- Color wheel 2 with 5 correction filters and UV + open and split colors
- Focusing and zoom function controllable via DMX
- Frost filter and iris
- Pan and tilt motors with 16-bit resolution
- Battery-powered display for configuration when not connected to power
- Automatic position correction
- Temperature-controlled fans
- 3-pin and 5-pin DMX connectors
- RJ45 network connectors
- 2 Omega mounting brackets included
- Operating voltage: 100–240 V AC
- 1200 W power consumption
- The spotlight complies with the RDM standard (Remote Device Management). Remote device management allows the user to view the status and configuration of RDM terminals via an RDM-enabled controller.6 DMX ITALIANO POLSKI ESPAÑOL FRANCAIS DEUTSCHENGLISH
POWER IN Neutrik powerCON TRUE1 mains input socket. Operating voltage 100–240 V AC / 50–60 Hz. A suitable mains cable with powerCON TRUE1 plug is included.
POWER OUT Neutrik powerCON TRUE1 mains output socket. Facilitates power supply to other CAMEO lights. Ensure that the total power consumption of all devices connected to the device does not exceed the given ampere (A) value.
FUSE Fuse holder for 5 x 20 mm micro fuses. IMPORTANT: Replace the fuse only with a fuse of the same type and value. In the event of repeated fuse failure, please contact an authorised service centre.
DMX IN Male 3-pin and 5-pin XLR sockets for connection of a DMX control device (e.g. DMX console). Only use the ports alternatively.
DMX OUT Female 3-pin or 5-pin XLR sockets for sending the DMX control signal. Only use the ports alternatively.
NET IN RJ45 network connector for connecting to an Art-Net or sACN network. Use CAT 5e or better cables to set up the network.
NET OUT RJ45 network connector for connecting additional Art-Net or sACN-capable devices to the network. Use CAT 5e or better cables to set up the network.
The antenna for control via W-DMX™ remains in the holder (= operating position) during operation.
Thanks to the pressure-sensitive LC display, the device can be operated directly from the display (glove-compatible). The LCD display shows the currently activated mode (main display), the menu items in the selection menu and the numerical value or operating mode in certain menu items. If there is no control signal to the device, the display starts flashing; the flashing stops as soon as a control signal is present (DMX and slave operation, ArtNet and sACN).7 DMX DEUTSCHFRANCAIS ESPAÑOL ENGLISH ITALIANO POLSKI
Rotary-push encoder for navigating in the editing menu, adjusting system settings and changing values and status in the corresponding menu items. Starting from the main display, press the encoder to enter the main menu. Select the individual menu items in the main menu (Control, Settings, Info, etc.) and in the sub-menus by turning the encoder and confirm the selection by pressing the encoder. Change the value or status in a menu item by turning the encoder and confirm the change by pressing the encoder.
BACK Press BACK to go up one level in the menu structure. To go directly from the sub-menus to the main display, press and hold the BACK button for about 2 seconds.
USB INTERFACE USB interface for updating the device firmware. In the Service menu, set the status for USB Update to Yes. When available, download the latest firmware from the product page at www.cameolight.com, unzip it and copy the files to a folder without special characters on a USB stick. Disconnect the Moving Head from the mains and all input connections (DMX / Ethernet), connect the USB stick to the USB interface and reconnect the Moving Head to the mains. The USB stick is automatically recognised and shown in the display. Now navigate to the corresponding folder on the USB stick and confirm with ON. The update procedure begins. If updates are required for several components, the procedure must be carried out individually for all updates. Do not remove the USB stick or disconnect the Moving Head from the mains during the update procedure. BATTERY-POWERED DISPLAY The battery-powered display can be activated, even if the device is not connected to the mains. To do this, briefly press the rotary push encoder. You can now access device information to change and save system settings without mains connection. External control of the spotlight is not activated in this case. For this reason, the display shows that there is no DMX signal even if a DMX signal is present at the device.
PAN LOCK Mechanical locking device used to prevent the rotation of the head in the horizontal direction during transport. Disconnect the unit from the mains and slide the locking lever in the direction of the pan rotation axis, moving the head of the unit horizontally until one of the 8 locking positions is found and the locking lever engages LOCK . Unlock the device before startup UNLOCK
TILT LOCK Mechanical locking device used to prevent the rotation of the head in the vertical direction during transport. Disconnect the unit from the mains and slide the locking lever in the direction of the tilt rotation axis, moving the head of the unit vertically until one of the 7 possible locking positions is found and the locking lever engages LOCK . Unlock the device before startup UNLOCK
RECESSED GRIPS In addition to the two transport handles on the base of the unit, there are practical recessed grips at the top of the inner sides of the two device arms.
DMX ITALIANO POLSKI ESPAÑOL FRANCAIS DEUTSCHENGLISH OPERATION NOTES When the lamp is correctly connected to the mains supply, the Cameo logo is shown on the display during start-up and motor reset along with details of the device model. After this process, the spotlight is ready for operation and the previously activated operating mode is launched. The main display is activated automatically after approximately two minutes without input. Press BACK to go up one level in the sub-menus. In the event of a technical fault, the warning triangle symbol appears in the top right-hand corner (tap for further information). The spotlight is operated firstly by means of the rotary push-pull encoder and the BACK button next to the display, and secondly the pressure-sensitive (glove-compatible) display itself can be used to access all menu items and configure settings intuitively as desired. The control panels in the main display and in the main menu or sub-menus and their functions are shown in the illustrations below. The fields marked grey in the illustration of the main display are control panels with direct access. EnterBack DMX Address
DMX DEUTSCHFRANCAIS ESPAÑOL ENGLISH ITALIANO POLSKI MAIN DISPLAY DMX AND W-DMX OPERATING MODE The top line of the display shows whether a control signal is available at the device, the middle field shows the DMX start address, the DMX mode and the address following the start address set in the device, corresponding to the number of channels of the DMX mode. The bottom line displays the temperature of the LED unit, the fan mode and W-DMX status. As soon as the control signal is interrupted, the characters in the display start flashing and “None” is shown after “Controlled by” in the top line (no signal); when the control signal is available again, the flashing stops.The fields marked grey in the figure are control panels with direct access to the corresponding menu item.MAIN DISPLAY ART-NET AND SACN OPERATING MODE The top line of the display shows whether a control signal is available at the device, the middle field shows the operating mode, the DMX start address, the DMX mode and the address following the start address set in the device, corresponding to the number of channels of the DMX mode. Below this, the DMX universe, IP address and subnet mask are displayed. The bottom line displays the temperature of the LED unit, the lamp mode and W-DMX status. As soon as the control signal is interrupted, the characters in the display start flashing and “None” is shown after “Controlled by” in the top line (no signal); when the control signal is available again, the flashing stops.The fields marked grey in the figure are control panels with direct access to the corresponding menu item. EnterBack DMX Address
Temperature of the LED unit Fan mode W-DMX statusA warning triangle is displayed in the event of malfunction. Tap for further informationControl signal displayTap -> main menuDMX start addressDMX modeFollowing DMX start address EnterBack DMX Address
Temperature of the LED unit Fan mode W-DMX statusA warning triangle is displayed in the event of malfunction. Tap for further informationControl signal displayTap -> main menuDMX start addressDMX mode and the follo-wing DMX start addressUniverseIP addressSubnet mask10 DMX ITALIANO POLSKI ESPAÑOL FRANCAIS DEUTSCHENGLISH
MAIN DISPLAY SLAVE AND STATIC MODE
The top line of the display shows whether a control signal is available on the device and the middle field shows the SLAVE or STATIC mode with the selected scene (Run Scene x). The bottom line displays the temperature of the LED unit, the fan mode and W-DMX status. If the control signal is interrupted in slave mode, the characters in the display start flashing and “None” is shown after “Controlled by” in the top line (no signal); when the control signal is available again, the flashing stops. W-DMX™ To pair a W-DMX receiver with a W-DMX compatible transmitter, the Reset command must be executed in the menu item WDMX under Receiver (select Reset and confirm). The receiver is now in pairing standby and waiting for a pairing request from a transmitter. Start the pairing by selecting Link in the menu of the transmitter and confirming; the pairing now takes place automatically. In the same way, several receivers can be paired simultaneously or one after the other to a transmitter (e.g. for master / slave operation). A W-DMX connection is always maintained until the connection is disconnected by means of the Reset command in the receiver or the Unlink command in the transmitter, regardless of whether a device has been disconnected from the power supply in the meantime. W-DMX™ STATUS W-DMXdeactivatedW-DMXas receiver activated,not pairedW-DMXas receiver activated and paired,Transmitterswitched offor out ofrangeW-DMXas receiver activated and paired, DMX signalW-DMXas receiver activated and paired,DMX signalis presentW-DMXas trans-mitter with G3 standardactivated,DMX signalis presentW-DMXas trans-mitter with G4s standardactivated,DMX signalis presentW-DMXas trans-mitter with G3 standardactivated, DMX signalW-DMXas trans-mitter with G4s standardactivated, DMX signal The following is a description of how to operate the spotlight using the rotary-push encoder and the BACK button next to the display. EnterBack DMX Address
Temperature of the LED unit Fan mode W-DMX statusA warning triangle is displayed in the event of malfunction. Tap for further informationControl signal displayTap -> main menuOperating mode11 DMX DEUTSCHFRANCAIS ESPAÑOL ENGLISH ITALIANO POLSKI CONTROL MENU (Control) The control menu enables selection of the various operating modes and their settings in the relevant sub-menus.
DMX OPERATION VIA XLR INPUT
Starting from the main display, press the rotary-push encoder to enter the main menu. Select the Control menu by turning and pressing the encoder. By turning the encoder you can now select the menu item Protocol, confirm by pressing the encoder and then select DMX by turning the encoder and confirm by pressing the encoder. Information on the sub-menu items in the DMX menu and the relevant setting options can be found in the table below. Protocol DMX Select by turning the encoder, confirm by pressing, change value or status by turning, confirm by pressing. Back with BACK. DMX Address Setting the DMX start address 001–512 DMX Mode Selecting the DMX mode 29 ch / 48 ch W transmitter Activate (On) or deactivate (Off) forwarding of the DMX signal via W-DMX. On Off Establish (Linking) or release (Unlink) a connection to other W-DMX devices. Linking Unlink W-DMX standard Setting the W-DMX standard (G3 / G4s) G3 G4s
DMX OPERATION VIA W-DMX
Starting from the main display, press the rotary-push encoder to enter the main menu. Select the Control menu by turning and pressing the encoder. By turning the encoder you can now select the menu item Protocol, confirm by pressing the encoder and then select WDMX by turning the encoder and confirm by pressing the encoder. See the table below for information on the sub-menu items in the W-DMX menu and the relevant setting options. Protocol WDMX Select by turning the encoder, confirm by pressing, change value or status by turning, confirm by pressing. Back with BACK. DMX Address Setting the DMX start address 001–512 DMX Mode Selecting the DMX mode 29 ch / 48 ch Receiver Activate (On) and deactivate (Off) W-DMX On Off Reset = Terminate the connection to all paired W-DMX transmitters and put them on pairing standby Reset ------------------- Menu ------------------ Control Settings Info Service Quicklight Help ----------------- Control ----------------- Protocol DMX DMX Address DMX Mode W-Transmitter W-DMX Standard
Starting from the main display, press the rotary-push encoder to enter the main menu. Select the Control menu by turning and pressing the encoder. By turning the encoder you can now select the menu item Protocol, confirm by pressing the encoder and then select ArtNet by turning the encoder and confirm by pressing the encoder. See the table below for information on the sub-menu items in the W-DMX menu and the relevant setting options. Protocol Art-Net Select by turning the encoder, confirm by pressing, change value or status by turning, confirm by pressing. Back with BACK. DMX Address Setting the DMX start address 001–512 DMX Mode Selecting the DMX mode 29 ch / 48 ch Universe Group Setting the Universe Group 000–127 Universe Setting the universe 000–255 IP Address Setting the IP address: Set 1st block, confirm, set 2nd block, confirm ... xxx.xxx.xxx.xxx Subnet Mask Adjustment of the subnet mask: Set 1st block, confirm, set 2nd block, confirm ... xxx.xxx.xxx.xxx W transmitter Activate (On) or deactivate (Off) forwarding of the DMX signal via W-DMX. On Off Establish (Linking) or release (Unlink) a connection to other W-DMX devices. Linking Unlink W-DMX standard Setting the W-DMX standard (G3 / G4s) G3 G4s DMX XLR Out Forward the control signal via XLR Out Activate (On) and Deactivate (Off) On Off
OPERATION VIA SACN PROTOCOL
Starting from the main display, press the rotary-push encoder to enter the main menu. Select the Control menu by turning and pressing the encoder. By turning the encoder you can now select the menu item Protocol, confirm by pressing the encoder and then select sACN by turning the encoder and confirm by pressing the encoder. ------------------- Menu ------------------ Control Settings Info Service Quicklight Help ----------------- Control ----------------- Protocol DMX DMX Address DMX Mode W-Transmitter W-DMX Standard
G4s ----------------- Control ----------------- Protocol Static Run Scene 1 Record Scene Edit Scene DMX WDMX ArtNet sACN Slave Static13 DMX DEUTSCHFRANCAIS ESPAÑOL ENGLISH ITALIANO POLSKI Information on the sub-menu items in the sACN menu and the relevant setting options can be found in the table below. Protocol sACN Select by turning the encoder, confirm by pressing, change value or status by turning, confirm by pressing. Back with BACK. DMX Address Setting the DMX start address 001–512 DMX Mode Selecting the DMX mode 29 ch / 48 ch Universe Group Setting the Universe Group 000–255 Universe Setting the universe 001-256 IP Address Setting the IP address: Set 1st block, confirm, set 2nd block, confirm ... xxx.xxx.xxx.xxx Subnet Mask Adjustment of the subnet mask: Set 1st block, confirm, set 2nd block, confirm ... xxx.xxx.xxx.xxx W transmitter Activate (On) or deactivate (Off) forwarding of the DMX signal via W-DMX. On Off Establish (Linking) or release (Unlink) a connection to other W-DMX devices. Linking Unlink W-DMX standard Setting the W-DMX standard (G3 / G4s) G3 G4s DMX XLR Out Forward the control signal via XLR Out Activate (On) and Deactivate (Off) On Off SLAVE MODE Starting from the main display, press the rotary-push encoder to enter the main menu. Select the Control menu by turning and pressing the encoder. By turning the encoder, select the menu item Protocol, confirm by pressing the encoder and then select Slave by turning the encoder and confirm by pressing the encoder. Connect the slave and the master unit (same model, same software version) with a DMX cable (Master DMX OUT – Slave DMX IN) and enable the standalone mode Static on the master unit. The slave unit will now follow the master unit.
STANDALONE OPERATION STATIC
Starting from the main display, press the rotary-push encoder to enter the main menu. Select the Control menu by turning and pressing the encoder. By turning the encoder you can now select the menu item Protocol, confirm by pressing the encoder and then select Static by turning the encoder and confirm by pressing the encoder. ------------------- Menu ------------------ Control Settings Info Service Quicklight Help ----------------- Control ----------------- Protocol DMX DMX Address DMX Mode W-Transmitter W-DMX Standard
G4s ----------------- Control ----------------- Protocol Static Run Scene 1 Record Scene Edit Scene DMX WDMX ArtNet sACN Slave Static14 DMX ITALIANO POLSKI ESPAÑOL FRANCAIS DEUTSCHENGLISH Information on the sub-menu items in the Static menu and the relevant setting options can be found in the tables below. Protocol Static Select by turning, confirm by pressing, change value by turning, confirm by pressing. Back with BACK. Run Scene Scene selection 1–8 Record Scene Record scene (activate DMX, W-DMX, Art-Net, or sACN mode, change desired setting in the relevant controller, select and confirm desired scene) 1–8 Edit Scene Editing a scene 1–8 Edit Scene Rotate to select, press to confirm, rotate to change value or status, press to confirm. Go back with BACK. Pan Panning setting 000–255 Tilt Tilt setting 000–255 Dimmer Brightness 000–255 Strobe Stroboscope 000–255 Segment dim LED segment selection 000–255 Sparkle FX LED segment effect 000–255 Cyan CMY color mixing 000–255 Magenta 000–255 Yellow 000–255 CTO CTO 000–255 Color wheel Color wheel 000–255 Color wheel 2 Color wheel 2 000–255 Zoom Zoom 000–255 Focus Focus 000–255 Iris Iris 000–255 Frost Frost filter 000–255 Blade 1A Blade 1A 000–255 Blade 1B Blade 1B 000–255 Blade 2A Blade 2A 000–255 Blade 2B Blade 2B 000–255 Blade 3A Blade 3A 000–255 Blade 3B Blade 3B 000–255 Blade 4A Blade 4A 000–255 Blade 4B Blade 4B 000–255 Blade rot. Rotation of framing shutter 000–255 Pan Tilt Macro Pan/tilt preset 000–255 Pan Tilt Speed Pan/tilt speed 000–25515 DMX DEUTSCHFRANCAIS ESPAÑOL ENGLISH ITALIANO POLSKI SYSTEM SETTINGS (Settings) Starting from the main display, press the rotary-push encoder to enter the main menu. Turn the encoder to select the system Settings menu and press the encoder. This will take you to the sub-menu for editing the sub-menu items, see table: Settings Select by turning, confirm by pressing, change value or status by turning, confirm by pressing. Back with BACK. Display Reverse Off No display rotation On Rotate display by 180° Auto Automatic display rotation Backlight Off Deactivation of display illumination after approx. 1 minute without input On Display lighting permanently on Dim- mer Curve Linear Light intensity increases linearly with DMX value Exp Light intensity can be finely adjusted at lower DMX values and broadly adjusted at higher DMX values Log Light intensity can be broadly adjusted at lower DMX values and finely adjusted at higher DMX values S-curve Light intensity can be finely adjusted at lower and higher DMX values and broadly adjusted at medium DMX values Response LED Lamp responds abruptly to changes in DMX value Halogen Spotlight behaves in a similar way to a halogen spotlight with soft brightness changes PWM Frequency 650 Hz Select LED PWM frequency 1530 Hz 3600 Hz 12 kHz
------------------- Menu ------------------ Control Settings Info Service Quicklight Help ------------------ Help -------------------- Shortcuts Turn encoder in the home screento change the DMX addressPush & turn right to jump to the latest selected menu pointPush BACK for 3 seconds to jump to the home screen without saving Cameo Opus XWCameo® is a brand of the Adam Hall Group www.adamhall.com ------------------ Help -------------------- In home screen: Press left upper corner to jump into main menu or symbols for appropriate pointIn menu: Each area works as button for navigatingEnterBack Touchscreen16 DMX ITALIANO POLSKI ESPAÑOL FRANCAIS DEUTSCHENGLISH Motor Pan Reverse Off Pan movement direction does not reverse On Pan movement direction reverses Tilt Reverse Off Tilt movement direction does not reverse On Tilt movement direction reverses Pan Angle 630 630° pan angle 540 540 ° pan angle Feedback Off Automatic position correction deactivated On Automatic position correction activated Color Position Status (standard) Default color wheel rotation at color change Short Color wheel turns shortest path when color changes Color Wheel Scroll Color wheel can be turned continuously Snap When the corresponding value is reached, the color wheel jumps directly to the desired color filter. Blackout P/T Off No blackout when head moves On Blackout when head moves Blackout Color Off No blackout when value changes in the color wheel channel On Blackout when value changes in the color wheel channel Opera. Fan Auto The fan speed is adjusted depending on the temperature Silent Reduced maximum fan speed, resulting in reduced noise. Reduced brightness, if necessary Off Deactivate the fans, resulting in greatly reduced brightness Motor Speed Normal Normal operation of pan and tilt motor Silent Reduced maximum speed of pan and tilt motor, resulting in reduced noise Misc Auto Lock Off Deactivates automatic locking of the control elements On Automatically locks the control elements after approx. 1 minute of inactivity Lock: Press encoder for approx. 5 sec. Signal Fail Hold Last command is held during control signal interruption Scene 1 When control signal is interrupted, Scene 1 is activated Fa.Out When control signal is interrupted, spotlight dims slowly Bla.out Immediate blackout in case of control signal interruption Temp Unit °C Displays the temperature in Celsius °F Displays the temperature in Fahrenheit Set Def. Values User A Save user settings A User B Save user settings B User C Save user settings C17 DMX DEUTSCHFRANCAIS ESPAÑOL ENGLISH ITALIANO POLSKI Motor Pan Reverse Off Does not reverse pan direction On Reverses pan direction Tilt Reverse Off Does not reverse tilt direction On Reverses tilt direction Pan Angle 630 630° pan angle 540 540° pan angle Feedback Off Automatic position correction is disabled On Automatic position correction is enabled Colour position Stand (standard) Standard rotation of colour wheel on colour change Short Colour wheel turns the shortest distance on colour change Gobo position Stand (standard) Standard rotation of gobo wheel on gobo change Short Gobo wheel turns the shortest distance on gobo change Colour wheel Scroll Colour wheel offers continuously variable rotation Snap Colour wheel jumps directly back to the desired colour filter when the relevant value is reached Gobo wheel Scroll Gobo wheel offers continuously variable rotation Snap Gobo wheel jumps directly back to the desired gobo when the relevant value is reached Blackout P/T Off No blackout during head movement On Blackout during head movement Blackout Prism Off No blackout when value is changed in prism channel On Blackout when value is changed in prism channel Blackout Gobo Off No blackout when value is changed in gobo channel On Blackout when value is changed in gobo channel Blackout Colour Off No blackout when value is changed in colour wheel channel On Blackout when value is changed in colour wheel channel Opera. Fan Auto The fan speed is automatically adjusted according to temperature Silent Reduced maximum fan speed, resulting in quieter operation Reduced brightness if required Off Deactivates fan, resulting in greatly reduced brightness Motor Speed Normal Normal operation of pan and tilt motor Silent Reduced maximum speed of pan and tilt motor, resulting in quieter operation Misc. Auto Lock Off Automatic locking of the controls is disabled
------------------- Menu ------------------ Control Settings Info Service Quicklight Help ------------------ Help -------------------- Shortcuts Turn encoder in the home screento change the DMX addressPush & turn right to jump to the latest selected menu pointPush BACK for 3 seconds to jump to the home screen without saving Cameo Opus XWCameo® is a brand of the Adam Hall Group www.adamhall.com ------------------ Help -------------------- In home screen: Press left upper corner to jump into main menu or symbols for appropriate pointIn menu: Each area works as button for navigatingEnterBack Touchscreen20 DMX ITALIANO POLSKI ESPAÑOL FRANCAIS DEUTSCHENGLISH If the Quicklight mode is activated, the display does not automatically change to the main display; when leaving the Quicklight menu, Quicklight mode is automatically terminated. The settings in the Quicklight menu are retained until the next restart of the spotlight; as a result, Quicklight can be accessed repeatedly with the same settings as long as the spotlight remains switched on. After restart, the values in the Quicklight settings are reset (PAN = 127, TILT = 127, DIMMER = 000, ZOOM = 127, FOCUS = 127). HELP (Help menu) In the Help menu you will find three pages with 1. Information on quick commands that take you directly to specific menu items, 2. Information on the division of the display into control panels in the main menu and sub-menus, and 3. Information about the device itself. Starting from the main display, press the rotary-push encoder to enter the main menu. Select Help by turning the encoder and press the encoder to confirm. Select the desired information again by turning the encoder.
SET-UP AND INSTALLATION
Thanks to its integrated rubber feet, the spotlight can be positioned in a suitable location on a firm and level surface. Traverse installation can be achieved with the help of two Omega brackets, which are attached to the base of the device
. 2 x Omega brackets are included. Suitable beam clamps are available as an option. Ensure firm connections and secure the spotlight to the securing lug with a suitable safety cable
A21 DMX DEUTSCHFRANCAIS ESPAÑOL ENGLISH ITALIANO POLSKI DMX TECHNOLOGY DMX-512 DMX (Digital Multiplex) is the designation for a universal transmission protocol for communications between corresponding devices and controllers. A DMX controller sends DMX data to the connected DMX device(s). The DMX data is always transmitted as a serial data stream that is forwarded from one connected device to the next via the "DMX IN" and "DMX OUT" connectors (XLR plug-type connectors) that are found on every DMX-capable device, provided the maximum number of devices does not exceed 32 units. The last device in the chain needs to be equipped with a terminator (terminating resistor). DMX CONNECTION DMX is the common "language" via which a very wide range of types and models of equipment from various manufacturers can be connected with one another and controlled via a central controller, provided that all of the devices and the controller are DMX compatible. For optimum data transmission, it is necessary to keep the connecting cables between the individual devices as short as possible. The order in which the devices are integrated in the DMX network has no influence on the addresses. Thus the device with the DMX address 1 can be located at any position in the (serial) DMX chain: at the beginning, at the end or somewhere in the middle. If the DMX address 1 is assigned to a device, the controller "knows" that it should send all data allocated to address 1 to this device regardless of its position in the DMX network.
SERIAL CONNECTION OF MULTIPLE LIGHTS
1. Connect the male XLR connector (3-pin or 5-pin) of the DMX cable to the DMX output (female XLR socket) of the first DMX device (e.g. DMX-Controller). 2. Connect the female 3-pin XLR connector of the DMX cable connected to the first projector to the DMX input (male 3-pin socket) of the next DMX device. In the same way, connect the DMX output of this device to the DMX input of the next device and repeat until all devices have been connected. Please note that as a rule, DMX devices are connected in series and connections cannot be shared without active splitters. The maximum number of DMX devices in a DMX chain should not exceed 32 units. The Adam Hall 3 STAR, 4 STAR, and 5 STAR product ranges include an extensive selection of suitable cables. DMX CABLES When fabricating your own cables, always observe the illustrations on this page. Never connect the shielding of the cable to the ground contact of the plug, and always make certain that the shielding does not come into contact with the housing of the XLR plug. If the shielding is connected to the ground, this can lead to short-circuiting and system malfunctions. PIN ASSIGNMENT DMX cable with 3-pin XLR connectors: DMX cable with 5-pin XLR connectors (pin 4 and 5 are not used): Shield
Shield DMX TERMINATORS (TERMINATING RESISTORS) To prevent system errors, the last device in a DMX chain needs to be equipped with a terminating resistor (120 ohm, 1/4 Watt). 3-pin XLR connector with a terminating resistor: K3DMXT3 5-pin XLR connector with a terminating resistor: K3DMXT5 PIN ASSIGNMENT 3-pin XLR connector: 5-pin XLR connector:
DMX ADAPTER The combination of DMX devices with 3-pin connectors and DMX devices with 5-pin connectors in a DMX chain is possible with suitable adapters. PIN ASSIGNMENT DMX Adapter 5-pin XLR male to 3-pin XLR female: K3DGF0020 Pins 4 and 5 are not used. PIN ASSIGNMENT DMX Adapter 3-pin XLR male to 5-pin XLR female: K3DHM0020 Pins 4 and 5 are not used.22 DMX ITALIANO POLSKI ESPAÑOL FRANCAIS DEUTSCHENGLISH TECHNICAL DATA Article number: CLOXW Product type: LED moving light Type: Profile washer Number of lamps: 1 Type of lamps: 750 W LED Color temperature: Cold white 6100 K LED PWM frequency: 650 Hz, 1530 Hz, 3600 Hz, 12 kHz, 18.9 kHz, 25 kHz (configurable) Color mix function: CMY + CTO Color wheel, number of colors: 2 x 6 + open and continuous positioning Number of gobos: None Beam angle: 5°–46° Effects: Iris, heavy frost, rotatable shutter blades, LED segment FX Interfaces: 3-pin XLR (in/out) 5-pin XLR (in/out) RJ-45 Ethercon (in/out) Wireless DMX (transceiver) DMX mode: 29 CH / 48 CH DMX functions: Pan/tilt, pan/tilt fine, dimmer, dimmer fine, LED segment dimmer, Sparkle FX, multifunctional strobe, cyan, cyan fine, magenta, magenta fine, yellow, yellow fine, CTO, CTO fine, color wheel 1, color wheel 2, zoom, zoom fine, focus, focus fine, iris, frost, shutter blades, shutter blade rotation, pan/tilt macros, pan/tilt speed, system settings Stand-alone functions: Static mode, Master/Slave mode System settings: Display reverse, display illumination on/off, signal fail, pan reverse, tilt reverse, pan angle, feedback, movement blackout, test, reset, user default values, blackout functions, color/gobo wheel scroll/snap, auto lock, PWM frequency, fan, motor speed, dimmer curves, dimmer response Controller: DMX512, RDM enabled, W-DMX™ (transceiver), Art-Net, sACN Control elements: Encoder wheel + back button / touchscreen Display elements: Backlit color LC display, battery-powered to configure system settings without being connected to power Operating voltage: 100–240 V AC / 50–60 Hz Power consumption: 1200 W Luminous flux: 32,000 lm Power supply connection: Neutrik powerCON TRUE1 in and out (max. output 3 A) Fuse: T15AL / 250 V (5 x 20 mm) Ambient temperature in use: 0°C–40°C Relative humidity: < 85%, non-condensing Housing material: Metal, ABS Housing color: Black Housing cooling: Temperature-controlled fans Dimensions (W × H × D, without mounting bracket): 436 x 800 x 312 mm Weight: 41 kg Additional features: 1 m power cable with Neutrik powerCON TRUE1 plug and 2 Omega mounting brackets included in delivery23 DMX DEUTSCHFRANCAIS ESPAÑOL ENGLISH ITALIANO POLSKI