
78894 - Measuring equipment Lund - Free user manual and instructions
Find the device manual for free 78894 Lund in PDF.

| Product type | Polystyrene hot knife |
| Brand | Lund |
| Model | 78894 |
| Rated voltage (cutter) | 6 V DC |
| Rated power | 9 W |
| Heating time | 5 to 10 minutes |
| Weight (cutter) | 60 g |
| Insulation class (cutter) | III |
| Mains power supply | 100-240 V~, 50-60 Hz |
| Adapter output voltage | 6 V DC / 1.5 A |
| Weight (adapter) | 60 g |
| Insulation class (adapter) | II |
| Included accessories | Wire blade, heating rod, engraving tool, stand |
| Intended use | Cutting and engraving expanded polystyrene |
| Material to cut | Pure expanded polystyrene (without glue, paint) |
| Operating temperature | Automatic heating to rated temperature |
| Minimum safety distance | 10 cm from flammable materials |
| Body maintenance | Slightly damp cloth, do not immerse |
| Blade cleaning | Copper or brass brush |
| Replacing the heating wire | Possible, removable with pliers |
| Recommended storage | Dry, shaded, well-ventilated place, out of reach of children |
Frequently Asked Questions - 78894 Lund
User questions about 78894 Lund
0 question about this device. Answer the ones you know or ask your own.
Ask a new question about this device
Download the instructions for your Measuring equipment in PDF format for free! Find your manual 78894 - Lund and take your electronic device back in hand. On this page are published all the documents necessary for the use of your device. 78894 by Lund.
USER MANUAL 78894 Lund
natural_image
Close-up of a medical or laboratory probe with wires and a circular base (no visible text or symbols)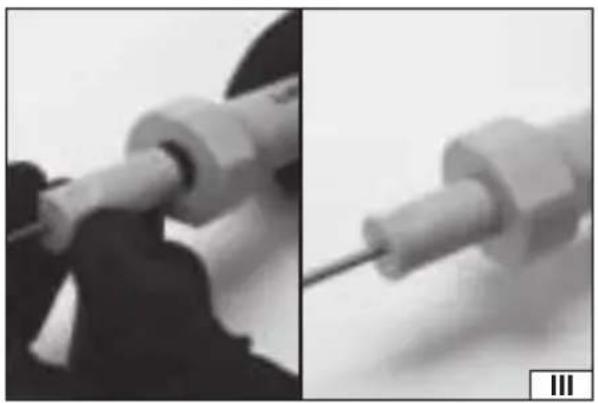
natural_image
Close-up of a mechanical component with two views (left and right) showing internal parts, no visible text or symbols.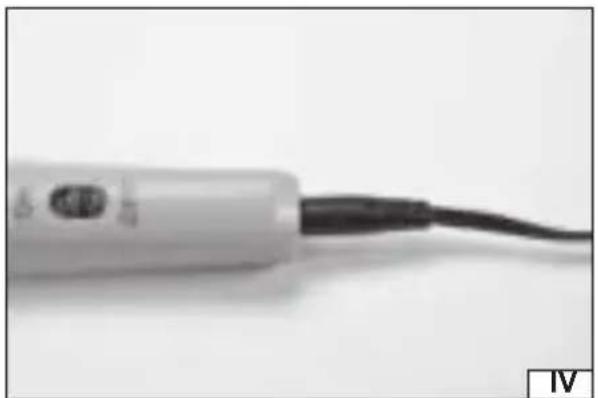
natural_image
Close-up of a white electric shaver with a black cable, no visible text or symbols
natural_image
Close-up of a vertical metallic rod with a visible wire or wire termination, against a plain background (no text or symbols)Correct disposal of this product: This marking shown on the product and its literature indicates this kind of product mustn't be disposed with household wastes at the end of its working life in order to prevent possible harm to the environment or human health. Therefore the customers is invited to supply to the correct disposal, differentiating this product from other types of refusals and recycle it in responsible way, in order to re-use this components. The customer therefore is invited to contact the local supplier office for the relative information to the differentiated collection and the recycling of this type of product.
UMWELTSCHUTZ
WYPOSAŻENIE PRODUKTU
The Hot Knife Cutter features a heated blade for efficient and fast cutting of polystyrene-based materials. Different types of blades allow both cutting and engraving foamed polystyrene. The tool is designed for household use only and must not be used professionally, i.e. in workplaces or for paid work. Because a correct, reliable and safe operation of the device depends on proper use, follow the guidelines below.
Read and keep the entire Manual before the first use of the tool.
The supplier shall not be held liable for any damage or injury resulting from improper use of the tool, failure to observe the safety regulations or instructions in this Manual. The use of the tool for purposes other than those intended in this Manual shall void the user's rights under warranty and goods non-conformity.
ACCESSORIES
The product is delivered complete, but requires carrying out a number of preliminary actions described in further sections of the Manual. The Hot Knife Cutter comes with a thin wire blade stretched on a frame, a hot rod blade, an adapter for engraving, and a stand for the safe setting aside the heated tool.
SPECIFICATION
| Parameter Units Value | ||
| Catalogue No. 78894 | ||
| Rated voltage [VDC] 6 | ||
| Rated power [W] 9 | ||
| Heating Time [min] 5 - 10 | ||
| Weight | [g] | 60 |
| Protection class | III | |
| Power supply | ||
| Rated voltage | [V~] | 100-240 |
| Rated frequency | [Hz] 50 – 60 | |
| Output voltage | [VDC] 6 | |
| Output current | [A] | 1.5 |
| Weight | [g] | 60 |
| Protection class | II |
GENERAL SAFETY CONDITIONS
Caution! Read all of the following instructions. Failure to do so may result in electric shock, fire, or personal injury.
FOLLOW THE INSTRUCTIONS BELOW
Do not use the product in an explosive environment containing flammable liquids, gases, or vapours.
Before starting the product for the first time, make sure that the product, its accessories, and the power cord have not been damaged. If any damage is discovered, it is not allowed to start working with the product. Any damaged components, including the power cord, must be replaced at an authorized facility. It is not allowed to repair the product on your own.
The product is intended for indoor use only. Do not expose the product to any precipitation or moisture. If water and moisture enters the product, the risk of an electric shock is significantly increased. Do not immerse the product in water or
GB
any other liquid.
Connect the product to the power network providing the voltages and frequencies indicated on the nameplate of the unit, exclusively. The plug of the power cord must match the power socket. Do not modify the plug. Do not use any power adapters to adapt the plug to the socket. An unmodified plug, which matches the socket, reduces the risk of an electric shock.
A product with first class electrical insulation must always be connected to an outlet equipped with a protective conductor. The mains power supply should be equipped with a residual current fuse with a tripping current of 30 mA or less.
After each application, unplug the power cord from the power socket. Always disconnect the device from the power supply, if it is left unattended, and before putting it away, disassembling, or cleaning.
Do not leave the device unattended when it is connected to the power supply.
Do not overload the power cord. Do not use the power cord to carry the product, connect, or disconnect the plug from the power socket. Avoid any contact between the power cord and heat sources, oil, sharp edges, and moving parts.
Damage to the power cord increases the risk of an electric shock. If the power cord is damaged (e.g. it is cut, its insulation is melted), immediately unplug it from the wall socket, and return it to an authorised service facility. It is not allowed to use the product with a damaged power cord. It is not allowed to have the power cord repaired. It must be changed for a new one at an authorized service centre.
Disconnect the power cord from the power socket, before installing, removing, or adjusting any of the product accessories.
Make sure that the selected accessory has been installed correctly, before starting the product.
Do not overload the product. The temperature of the housing must not exceed 60^ C. Overloading the product will accelerate its wear and tear, lead to its damaging, and increase the risk of an electric shock.
The product must be kept under supervision at all times during operation.
The product is not to be used by children. Keep the product and its power cord out of the reach of children. It is important to ensure that children do not see the product as a toy.
Children should not be allowed to clean or maintain the product without the supervision of an adult.
Keep the device out of reach of children if it is powered or is cooling down.
This product cannot be used by people with impaired physical and/or mental abilities, and by people without any experience in or understanding of the operation of the product, unless they are supervised or instructed in the safe use of the product, so that they understand the relevant operating risks.
PRODUCT OPERATION
Preparing the tool for operation
Caution! The procedure described in this section must be carried out when the tool is unplugged from power supply. Make sure that the power cord has been unplugged from the mains socket. Ensure that the shaft of the tool cools down completely.
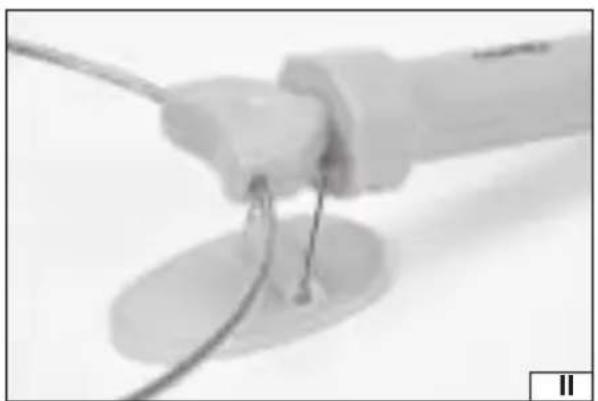
Lift the wire part of the stand so that it rests on the protrusions of the hinge. This will allow the tool to be placed in a wire recess. Place the tool so that the recess is between the handle housing and the adapter, while the shaft is directed upwards (II). The weight of the tool should prevent the stand from closing.
Select one of the adapter for your job. The wire stretched on the frame is used for cutting where the lowest thickness possible matters most, e.g. when cutting small parts. The size of the part is limited by the shape formed between the frame and wire.
GB
The hot rod adapter is used for free cutting of polystyrene foams and the thickness of cut is greater than in the case of wire cutting, while there are no size limits.
The engraving adapter is used to cut low-thickness foamed polystyrene or to cut different shapes in foamed polystyrene.
Connect the selected adapter to the handle by inserting it in the handle socket (III).
Switching the device on and off
Note! As soon as the unit is switched on, it will start to heat up and then maintain the rated temperature automatically when it is reached.
Therefore, make sure that the switch is in the OFF setting, and then connect the selected adapter to the tool. Connect the power supply plug (IV) to the socket at the end of the handle. Switch the tool ON and then keep the tool on the stand so that the cutting blade does not come into contact with any object and is not close to any fl ammable materials. Keep away at least 10 cm from the cutting blade.
Place the tool stand on a non-fl ammable surface.
Caution! The cutting blade is very hot. It can cause severe burns when in contact with the skin. Avoid contact with random objects, as high temperatures can damage them and cause fire.
Caution! It is forbidden to use any power supply other than the one included in the set. In case of loss of or damage to the power supply, contact the manufacturer for a new one.
Tool operation
The tool can be used only to cut foamed polystyrene which is clean, without any residues of glue, paint, varnish or other dirt. Dirt can prevent cutting or catch fire when in contact with the hot knife.
Start cutting after the heating up phase is completed. The heating time depends on the adapter used, while the wire heats up faster than the rod blades.
Cut with a smooth motion and adjust the cutting speed to suit a thickness of the material. Do not pause the cutting when the blade is in the material.
It is recommended to carry out cutting tests on waste material.
When cutting through the material, make sure that the hot knife does not damage the surface. Put the polystyrene material on the edge of your worktable to make the cut on the part of the material protruding beyond that edge.
After fi nishing the work and when the tool is not in use, place it on the stand.
Cooling and replacing the cutting blade
If you need to replace the cutting blade during operation, put the tool on the stand, switch it OFF, and then allow some time until the cutting unit has cooled down completely. Do not accelerate the cooling by immersing the cutting blade in water or other liquid for instance.
MAINTENANCE AND STORAGE
After use, put the tool on the stand, disconnect it from the power supply by unplugging the power supply plug and allow it to cool down completely. Clean the housing of the unit with a slightly damp cloth, then dry or leave to dry. Never immerse the tool housing in water or other liquids. Do not use alcohol, solvents, corrosive or abrasive agents for cleaning. Clean the cutting blade with a copper or brass brush. If you notice damage to the shaft, contact the manufacturer to obtain spare parts. Using the tool with a damaged cutting blade (e.g. bent, burnt) is not allowed.
Store the product in dry, shaded and well aired places. Ensure that the storage room protects the device from unauthorised access, especially by children. It is recommended to store the product in the packaging it was delivered in.
GB
Replacing the heating wire
If the cutting wire is deformed permanently, broken or there is too much dirt on it, replace it with a new one. Replace the cutting blade only after it has cooled down completely and the tool switched off and unplugged.
Use pliers to remove the whole worn wire. Be careful not to damage the wire frame.
The ends of the frame come with grooves. Wind several coils of wire on the first groove. Then drag the free, longer end of the wire to the groove at the other end of the frame and wound a few coils around it. Wrap the free ends of the wire around the wire for approx. 1 cm (V) and cut off the rest with pliers.
GERÄTEBESCHREIBUNG
CARACTÉRISTIQUES DU PRODUIT


- UMWELTSCHUTZ
- WYPOSAŻENIE PRODUKTU
- Read and keep the entire Manual before the first use of the tool.
- ACCESSORIES
- SPECIFICATION
- GENERAL SAFETY CONDITIONS
- FOLLOW THE INSTRUCTIONS BELOW
- GB
- PRODUCT OPERATION
- Switching the device on and off
- Tool operation
- Cooling and replacing the cutting blade
- MAINTENANCE AND STORAGE
- GERÄTEBESCHREIBUNG
- CARACTÉRISTIQUES DU PRODUIT
Brand : Lund
Model : 78894
Category : Measuring equipment