
DK705 - Microphone SAMSON - Free user manual and instructions
Find the device manual for free DK705 SAMSON in PDF.
| Product type | 5-piece drum microphone kit |
| Brand | Samson |
| Model | DK705 |
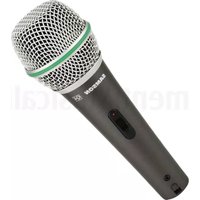
| Composition | 1 Q71 microphone (bass drum) + 4 Q72 microphones (snare/toms) |
| Microphone type | Dynamic |
| Polar pattern | Supercardioid |
| Frequency response | 50 Hz – 16 kHz (Q71 and Q72) |
| Sensitivity Q71 | -62 dBV/Pa (0.8 mV/Pa) |
| Sensitivity Q72 | -55 dBV/Pa (0.78 mV/Pa) |
| Nominal impedance | 200 Ω (Q71 and Q72) |
| Max SPL Q71 | 147 dB SPL (THD ≤ 0.5% @ 1 kHz) |
| Max SPL Q72 | 133 dB SPL (THD ≤ 0.5% @ 1 kHz) |
| Weight Q71 | 370 g |
| Weight Q72 | 150 g (with DMC200 clamp) |
| Mounting clip | DMC200 (included, for each Q72) |
| Usage | Live performances and recording |
| Power supply | Passive (no phantom power required) |
| Maintenance | Clean with a soft, dry cloth |
| Safety | Do not expose to moisture, do not open the housing |
| Warranty | Limited warranty (see included warranty card) |
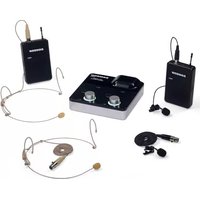
| Included accessories | 5 microphones, 4 DMC200 clips, warranty card |
| Manual | Available for free download |
Frequently Asked Questions - DK705 SAMSON
User questions about DK705 SAMSON
0 question about this device. Answer the ones you know or ask your own.
Ask a new question about this device
Download the instructions for your Microphone in PDF format for free! Find your manual DK705 - SAMSON and take your electronic device back in hand. On this page are published all the documents necessary for the use of your device. DK705 by SAMSON.
USER MANUAL DK705 SAMSON
natural_image
Six black audio recording devices labeled Q71, Q72, and a CROMON clip attached to a stand (no text or symbols on devices)OWNER'S MANUAL
Introduction
Congratulations on your purchase of your DK705 5-piece drum microphone kit from Samson. We understand that the sound of your drum kit is extremely personal and important, so we carefully designed the DK705 series as a complete solution specifically for miking your drum kit.
The DK705 includes the Q71 for your kick drum and four Q72s for your snare drum and tom-toms. Special attention in the construction of the neodymium elements, together with precise capsule porting produces a frequency response that has been carefully contoured for each of the specific drums in your kit. Thunderous low end from the kick drum, crisp and punchy attack on snare plus thick and defined tom-tom sounds are easy to get with this powerful complement of percussion mics. In addition to the great sound, the Q72s come with the DMC200 mounting clip that easily installs on any standard drum rim. The multi-adjustable mounting clip allows you to carefully position the mic and completely eliminates the need for external mic stands which can be difficult to position around cymbal stands. Thanks to the great sound and flexible mounting solution, the DK705 excels in both live performance and recording applications.
If your DK705 Drum Mic Kit was purchased in the United States, you'll find a warranty card enclosed, please don't forget to follow the instructions so that you can receive online technical support, and so that we can send you updated information about this and other Samson products. Also, be sure to check out our website
(www.samsontech.com) for complete information about our full product line.
We recommend that you record your serial number in the space provided below, for future reference.
Serial number:
Date of purchase: ____
Should your microphones ever require servicing, a Return Authorization (RA) number must be obtained before shipping your unit to Samson. Without this number, the unit will not be accepted. Please call Samson at 1-800-3SAMSON (1-800-372-6766) for an RA number prior to shipping your unit. Please retain the original packing materials and, if possible, return the unit in the original carton. If you purchased your Samson product outside the United States, please contact your local distributor for warranty information and service.
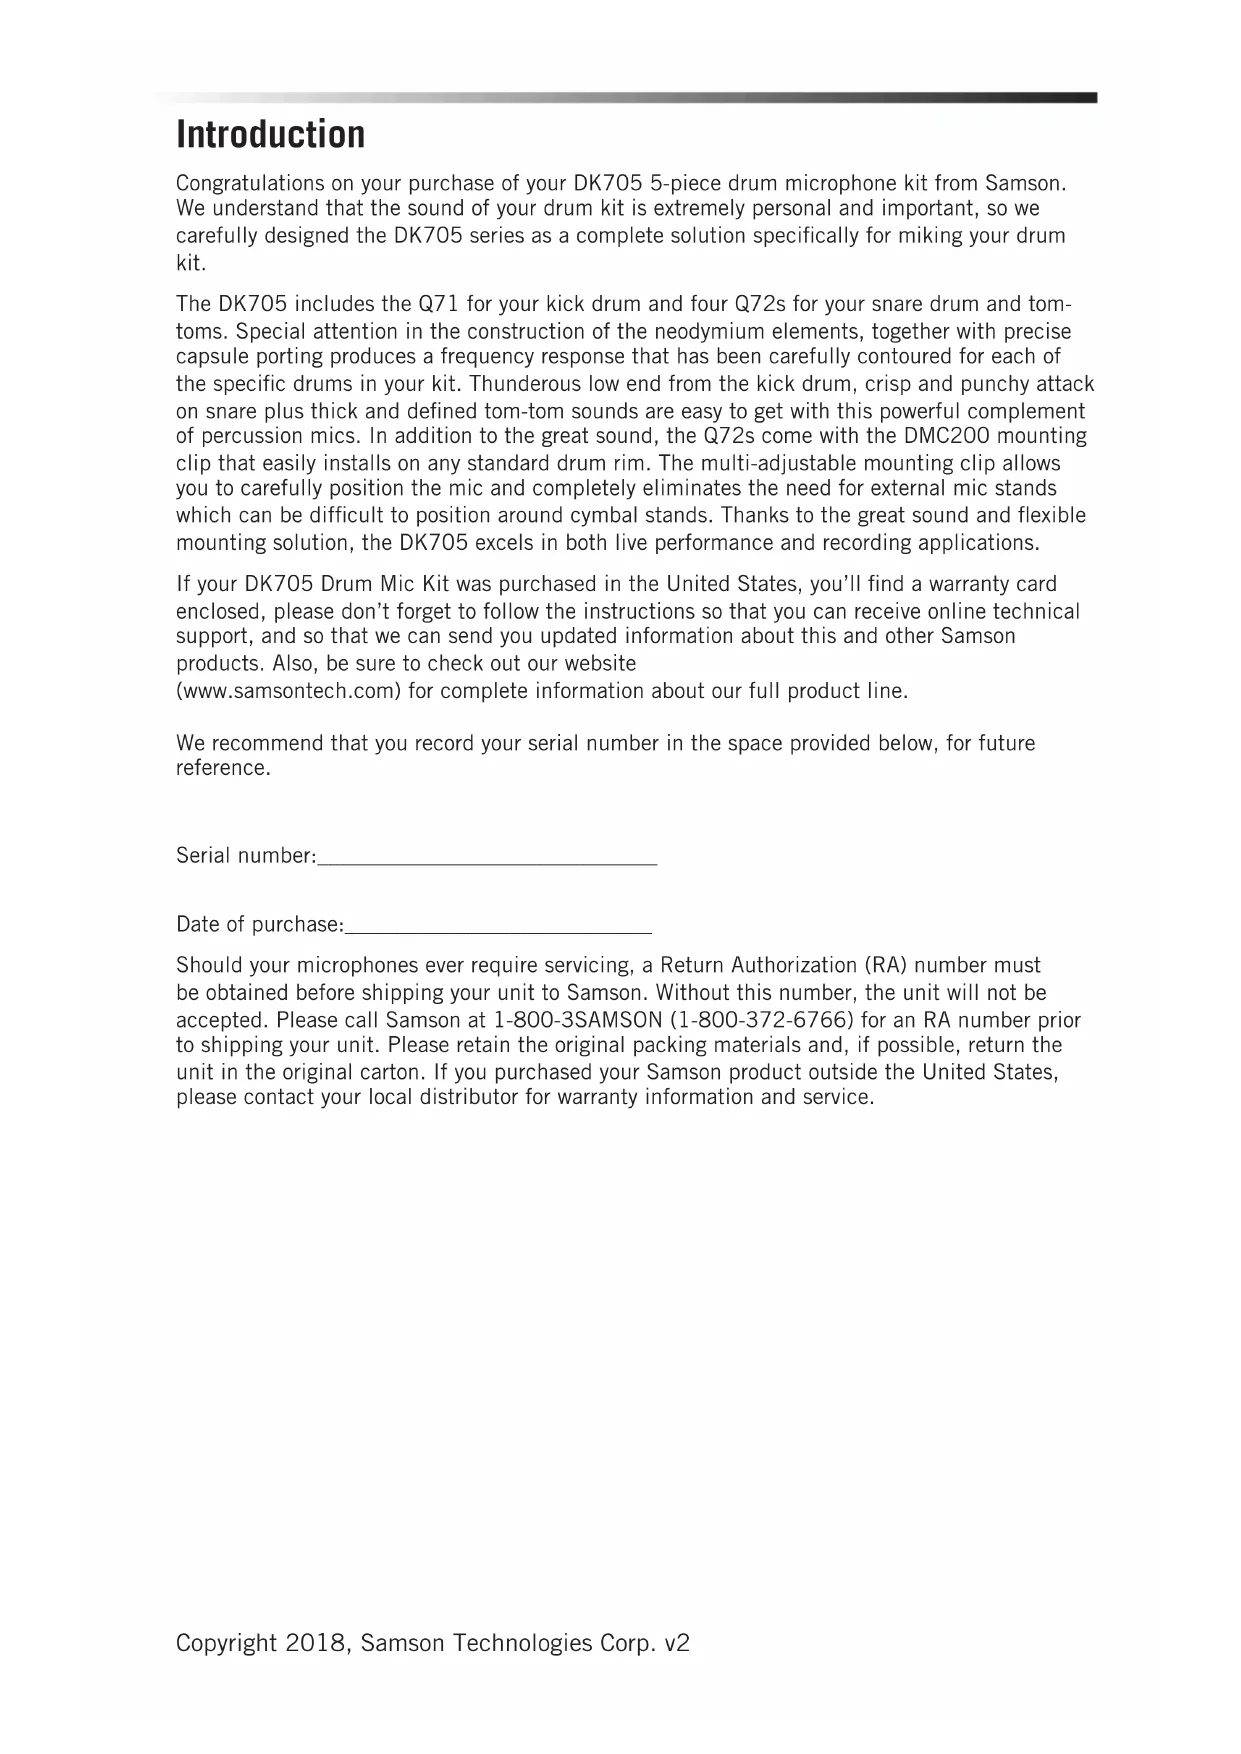
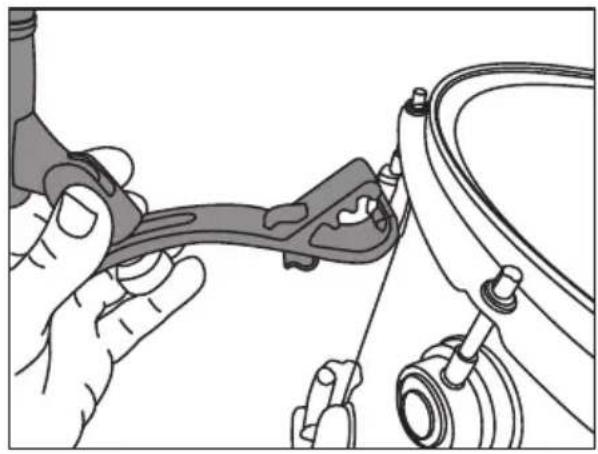
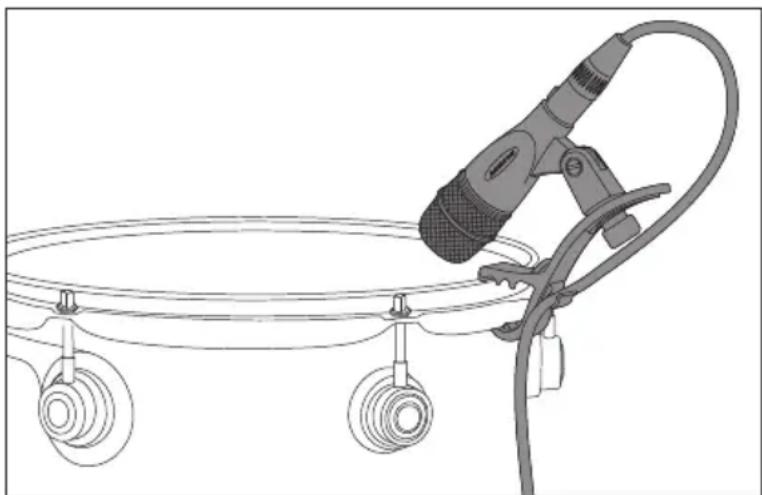
Mounting the Q72 to a Drum
Installing the Q72 to your drums with the integral DMC200 mic clip is easy. Follow the simple steps below to install the DMC200 mic clips to your drum kit.
Place the bottom claw the under the bottom edge of the upper drum rim, then push the DMC200 forward until the top claw moves over the rim and you feel it click into place.
Adjust the height of the Q72 and tighten the upper thumbscrew in place.
Once the DMC200 clip is fixed in place and the height is set, you can adjust the angle of the microphone.
Note: While adjusting the angle, you will want to place the mic in a position that is least likely to interfere with your playing style. Because of the Q72's supercardioid pick-up pattern, the microphone is subject to the phenomenon called proximity effect, slight adjustments of the microphone position and angle can make a big difference in sound. For further information on positioning your microphone see the section "Microphone Placement".
Connect the Q72 to a mixer or audio interface using a standard XLR mic cable and dress the wire away from your drum.
natural_image
Illustration of hands connecting a mechanical component to a car (no text or symbols visible)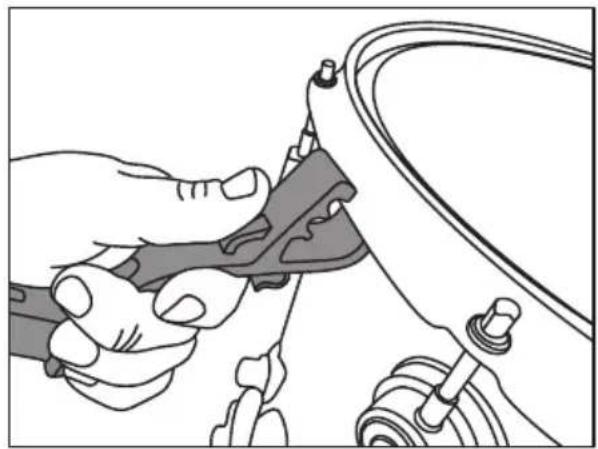
natural_image
Illustration of hands using a tool to adjust or install a mechanical component (no text or symbols visible)
natural_image
Mechanical assembly diagram showing a clamp securing a cable with a handle (no text or symbols)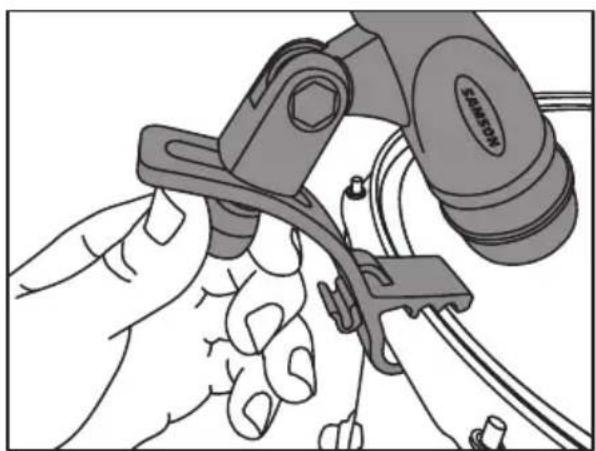
natural_image
Illustration of a hand using a tool to adjust or install a component, with no visible text or symbols.Microphone Placement
When you position your mics on the drums, it will be easy to get a great sound since, in general, they are positioned so close to the sound source. You can make slight adjustments to the height and angle that will have an effect on the sound. The changes in sound may be difficult to notice at first, especially in live sound applications, however the more you use your microphones and listen to the sound, the more you will understand, and hear, the effect the microphone placement has on the sound. As always, experimentation and experience are the best teachers.
Obviously, in live sound applications you can't always hear the final results of the sound you're getting because most of the time your drum kit will be positioned behind the PA speakers, so rely on a band mate or sound engineer to help you dial up the sound. In recording applications, record some scratch tracks and check the sound by listening to your headphones or to the control room monitors.
Be sure that you pay careful attention to the tuning, and if necessary, the dampening of your drums. Miking your drums is similar to putting the sound under a microscope. Any unwanted buzzes and rattles coming from your instruments may be much more noticeable when you mic the kit.
You'll get a great sound just by positioning the mics close to your drums however, there are some basic principles and fundamentals that should be followed. The following section will describe some basic miking techniques for the various drums in your kit. Use this as a guideline, but remember every sound system, every room, every drum kit and every drummer is slightly different, so experiment until you find the sound that's right for you.
Microphone Placement
Kick Drum
The Q71 can be positioned outside the bass drum for more of an ambient sound, which is sometimes desired for recording, or inside the drum for a tighter sound like in live sound applications. When positioning the Q71 you will notice that changing the distance the mic is placed from the head will have an effect on the low frequency response. You can use the proximity effect to your advantage by moving the mic closer to the head if the sound is too boomy, or try moving the Q71 back a bit to add more low end. If you want more of the click attack sound from your bass drum, try aiming the Q71 directly at the beater. Positioning the mic in between the beater and the edge of the drum will provide a more balanced sound than pointing the mic directly at the center of the drum head.
Snare Drum
When you mount the Q72 on your snare drum rim you'll be well on your way to getting a great sound due to the close placement of the mic. You can experiment by changing the angle of the mic to change sound. If you want to get more stick attack try lifting the mic slightly so that it is pointing bit way from the rim and aim it more in the direction towards the center of the drum head. Directing the mic towards the rim captures more overtones. You can use the proximity effect to your advantage to increase the low-end response by pointing the mic further downward. For recording and advanced live sound applications try a second Q72 under the snare drum to pick up more of the sound from the snares. When using the second Q72 under the drum, be sure to reverse the phase polarity on the mic input, otherwise some of the sound will actually cancel.
Tom-toms
When you mount the Q72 on your tom-tom rim you'll be well on your way to getting a great sound thanks to the close placement of the mic. You can experiment by changing the angle of the mic to change sound. If you want to get more stick attack try lifting the mic slightly so that it is pointing bit way from the rim and aim it more in the direction towards the center of the drum head. You can use the proximity effect to your advantage to increase the low-end response by pointing the mic further downward.
natural_image
Line drawing of a handheld device with three circular wheels and a curved cable, no text or symbols presentPolar Pick-up Pattern
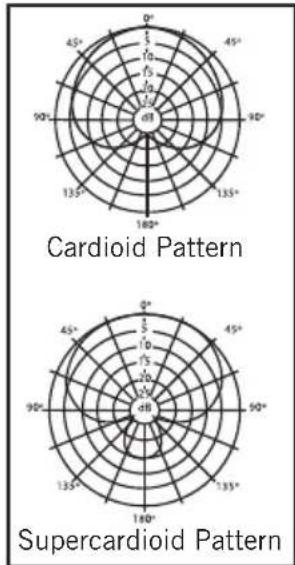
Every microphone has a characteristic polar pattern that determines how well it accepts or rejects signal coming from various areas around the microphone. For example, omnidirectional mics accept all signals regardless of wherever those signals originate (in front of the mic, behind it, to the side, etc.). In contrast, directional cardioid mics are specifically designed to accept mostly signal coming from directly in front, and to reject signal coming from behind or from the side. The Q71 and Q72 have a supercardioid pattern, which is a slight variation of the standard cardioid pattern with a slightly tighter pick-up pattern that helps increase the side-to-side rejection giving better isolation from drum to drum. For this reason, the Q71 and Q72 excel in environments where there is a good deal of unwanted ambient sound (like a live sound stage) as they deliver those signals originating directly in front of the mic capsule itself while rejecting those that originate from behind.
radar
| Angle | Cardioid Pattern (d1) | Supercardioid Pattern (d1) | |-------|------------------------|----------------------------| | 0° | 0.5 | 0.5 | | 45° | 0.5 | 0.5 | | 90° | 0.5 | 0.5 | | 135° | 0.5 | 0.5 | | 180° | 0.5 | 0.5 | | 225° | 0.5 | 0.5 | | 270° | 0.5 | 0.5 | | 315° | 0.5 | 0.5 | | 360° | 0.5 | 0.5 | | 405° | 0.5 | 0.5 | | 45° | 0.5 | 0.5 | | 90° | 0.5 | 0.5 | | 135° | 0.5 | 0.5 | | 180° | 0.5 | 0.5 | | 225° | -0.5 | -0.5 | | 270° | -0.5 | -0.5 | | 315° | -0.5 | -0.5 | | 360° | -0.5 | -0.5 | | 405° | -0.5 | -0.5 | | 45° | -0.5 | -0.5 | | 90° | -0.5 | -0.5 | | 95° | -0.5 | -0.5 | | 135° | -0.5 | -0.5 | | 180° | -0.5 | -0.5 | | 225° | -0.5 | -0.5 | | 270° | -0.5 | -0.5 | | 315° | -0.5 | -0.5 | | 360° | -0.5 | -0.5 | | 405° | -0.5 | -0.5 | | 45° | -0.5 | -0.5 | | 90° | -0.5 | -0.5 | | 95° | -0.5 | -0.5 | | 135° | -0.5 | -0.5 | | 180° | -0.5 | -0.5 | | Note: The values for 'Cardioid Pattern' and 'Supercardioid Pattern' are estimated based on the provided code snippet in the image.In addition, the polar pattern also determines how prone a particular mic is to inducing feedback. Feedback is that nasty howling sound that occurs when a mic is placed too close to a loudspeaker. The signal from the loudspeaker is fed into the mic, then into the loudspeaker, then into the mic, over and over again until an oscillating tone is generated. Because the supercardioid pattern utilized by the Q71 and Q72 is so good at rejecting signal not coming from directly in front of the mic, you'll find that using these mics will greatly minimize feedback problems.
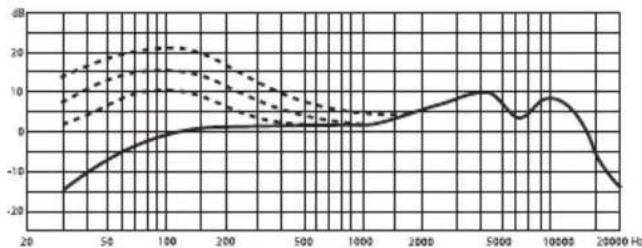
Frequency Response
Each of the Q71 and Q72 microphone has been designed with a frequency response that has been tailored for the drums it will be placed on. The response is created by the careful consideration of the microphone element and the design of the capsule porting. You can see the individual frequency response of each mic included in the specification pages.
Proximity Effect
Unidirectional or cardioid microphones, exhibit a phenomenon known as “proximity effect.” Very simply put, proximity effect is a resulting change in the frequency response of a microphone based on the position of the mic capsule relative to the sound source. Due to the result of the proximity effect, slight adjustments of the microphone position and angle can make a big difference in sound. Specifically, when you point a cardioid mic directly at the sound source (on axis) you will get the best frequency response, however when you start pointing the microphone slightly away (off axis) you will notice the low frequency response dropping off and the microphone will start to sound thinner. Knowing that the bass will decrease as you change the mic angle can be a big help if you are getting a “boomy” sound from your drum.
line
| Frequency (Hz) | Solid Line (dB) | Dashed Line (dB) | | -------------- | --------------- | ---------------- | | 20 | -18 | 14 | | 50 | -5 | 16 | | 100 | 0 | 20 | | 200 | 2 | 18 | | 500 | 3 | 10 | | 1000 | 5 | 5 | | 2000 | 10 | 3 | | 5000 | 8 | 2 | | 10000 | 5 | 1 | | 20000 | -18 | -5 |Specifications
Q71 - Kick Drum Microphone
Type Dynamic Microphone
Polar Pattern Super Cardioid
Frequency Response 50\~16000 Hz
Sensitivity -62 dBV/pa (0.8mv/pa)
Rated Impedance 200Ω
Max. SPL 147 dB (THD≤0.5% 1000 Hz)
Weight
370g
Q72 - Snare/Tom-Tom Microphone
Type Dynamic Microphone
Polar Pattern Super Cardioid
Frequency Response 50\~16000 Hz
Sensitivity -55 dBV/pa (0.78mv/pa)
Rated Impedance 200Ω
Max. SPL 133 dB (THD≤0.5% 1000 Hz)
Weight 150g (with DMC 100)
Frequency Graphs & Polar Plots
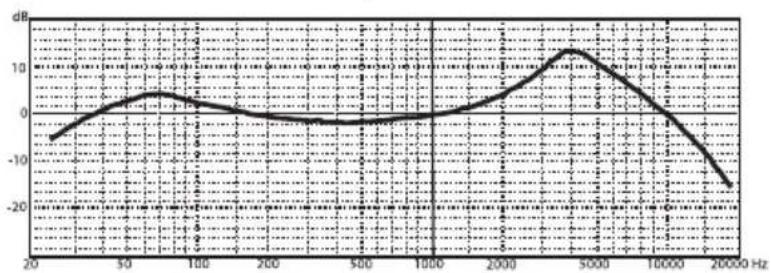
Q71 - Kick Drum Microphone
line
| Frequency (Hz) | Value (dB) | |---|---| | 20 | -5.0 | | 50 | 2.0 | | 100 | 4.0 | | 200 | -1.0 | | 500 | -2.0 | | 1000 | -1.0 | | 2000 | 3.0 | | 5000 | 12.0 | | 10000 | 3.0 | | 20000 | -16.0 |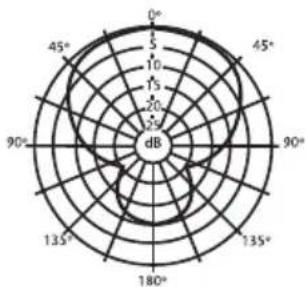
radar
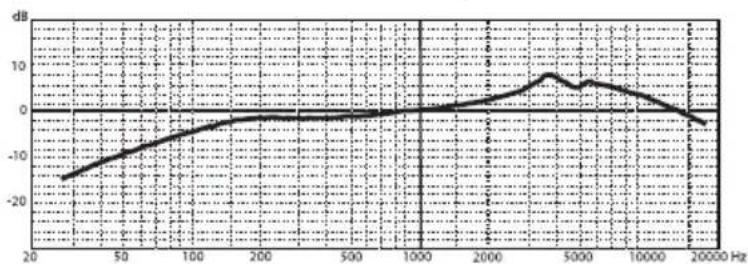
| Angle | Value | |---|---| | 0° | 15 | | 45° | 20 | | 90° | 25 | | 135° | 20 | | 180° | 15 | | 225° | 10 | | 280° | 5 | | 325° | 5 | | 370° | 10 | | 415° | 15 | | 460° | 20 | | 505° | 25 | | 550° | 30 | | 605° | 35 | | 650° | 40 | | 705° | 45 | | 750° | 50 | | 805° | 55 | | 860° | 60 | | 915° | 65 | | 960° | 70 | | 1015° | 75 | | 1070° | 80 | | 1125° | 85 | | 1170° | 90 | | 1225° | 95 | | 1280° | 100 | | 1335° | 105 | | 1380° | 110 | | 1435° | 115 | | 1490° | 120 | | 1545° | 125 | | 1600° | 130 | | 1655° | 135 | | 1710° | 140 | | 1765° | 145 | | 1820° | 150 | | 1875° | 155 | | 1930° | 160 | | 1985° | 165 | | 2040° | 170 | | 2095° | 175 | | 2150° | 180 | | 2205° | 185 | | 2260° | 190 | | 2315° | 195 | | 2370° | 200 | | 2425° | 205 | | 2480° | 210 | | 2535° | 215 | | 2590° | 220 | | 2645° | 225 | | 2700° | 230 | | 2755° | 235 | | 2810° | 240 | | 2865° | 245 | | 2920° | 250 | | 2975° | 255 | | 3030° | 260 | | 3085° | 265 | | 3140° | 270 | | 3195° | 275 | | 3250° | 280 | | 3305° | 285 | | 3360° | 290 | | 3415° | 295 | | 3470° | 300 | | 3525° | 305 | | 3580° | 310 | | 3635° | 315 | | Note: The last row is a duplicate of the first row to close the circle in the radar chart. The values for 'Value' are estimated based on the provided data. There is no additional data series present in this image. The values for 'Frequency' and 'Circular Frequency' are estimated based on the provided data.Q72 - Snare/Tom-Tom Microphone
line
| Frequency (Hz) | Value (dB) | |---|---| | 20 | -15 | | 50 | -10 | | 100 | -5 | | 200 | -2 | | 500 | -1 | | 1000 | 0 | | 2000 | 2 | | 5000 | 8 | | 10000 | 6 | | 20000 | -2 |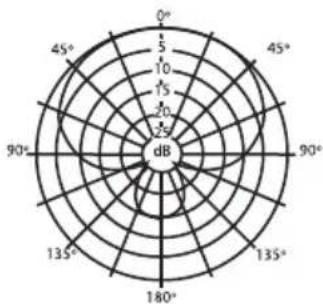
radar
| Angle | Value | |---|---| | 0° | 5 | | 45° | 10 | | 90° | 15 | | 135° | 20 | | 180° | 25 | | 225° | 20 | | 270° | 15 | | 315° | 10 | | 360° | 5 | | 405° | 5 | | 450° | 5 | | 495° | 5 | The chart displays a single data series with no trend or comparison across angles. The y-axis is labeled 'dB' and the x-axis is labeled 'θ'. The values are estimated based on the current value 'dB'.Introduction
natural_image
Illustration of hands connecting a mechanical component to a car (no text or symbols visible)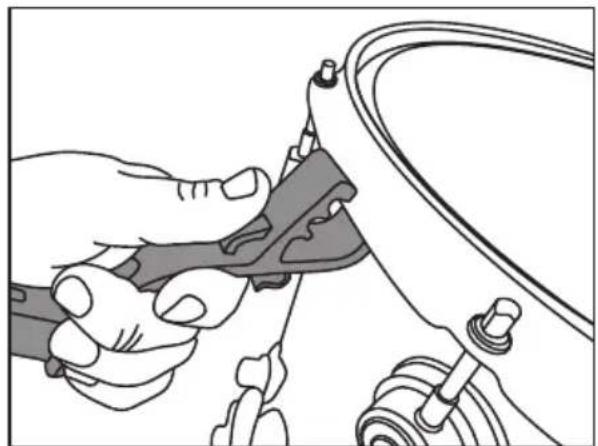
natural_image
Illustration of a hand using a tool to adjust or install a mechanical component (no text or symbols visible)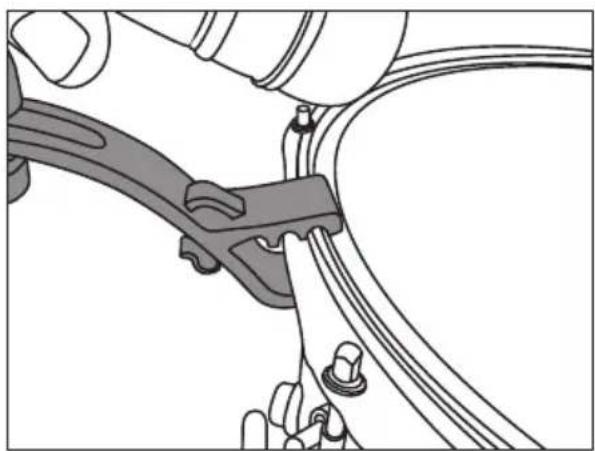
natural_image
Mechanical assembly diagram showing a clamp securing a cable with a handle (no text or symbols)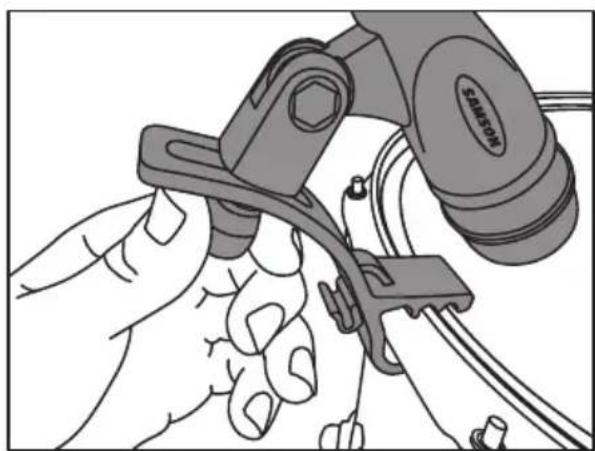
natural_image
Illustration of a hand using a tool to adjust or install a mechanical component (no text or symbols visible)natural_image
Line drawing of a medical or laboratory setup with a device attached to a circular component, no text or symbols present.Directivité polaire
natural_image
Illustration of hands connecting a mechanical component to a car wheel (no text or symbols visible)
natural_image
Illustration of a hand using a tool to adjust or install a mechanical component (no text or symbols visible)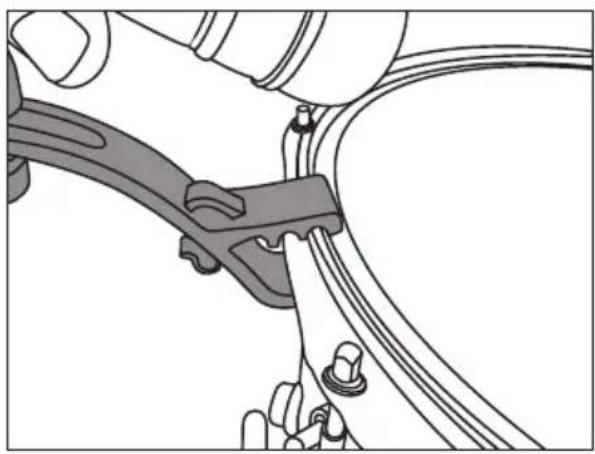
natural_image
Mechanical assembly diagram showing a clamp securing a cable with a knob (no text or symbols)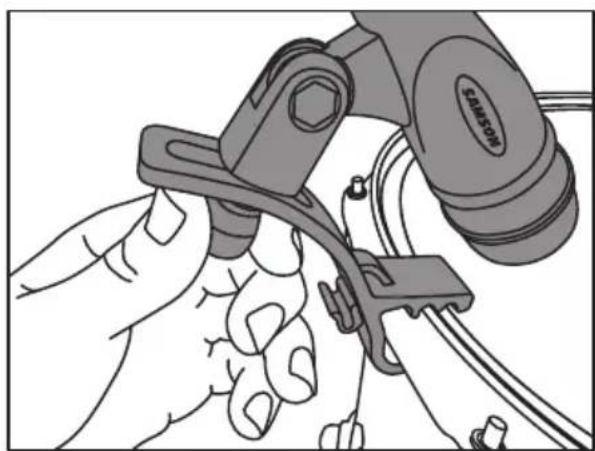
natural_image
Illustration of a hand using a tool to adjust or install a mechanical component (no text or symbols visible)Mikrofonplatzierung
natural_image
Line drawing of a medical or laboratory setup with a device attached to a circular component, no text or symbols present.Richtcharakteristika
natural_image
Illustration of hands connecting a mechanical component to a car (no text or symbols visible)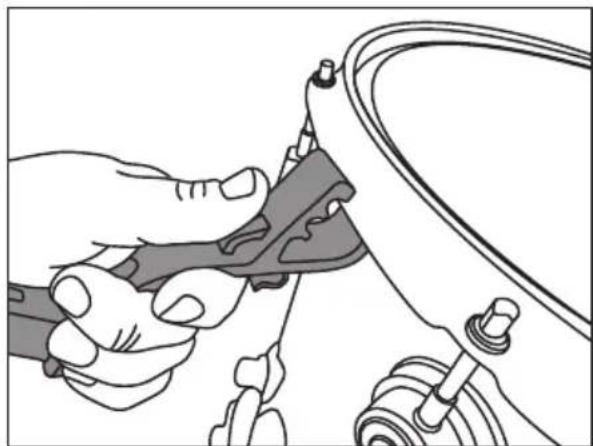
natural_image
Illustration of a hand using a tool to adjust or install a mechanical component (no text or symbols visible)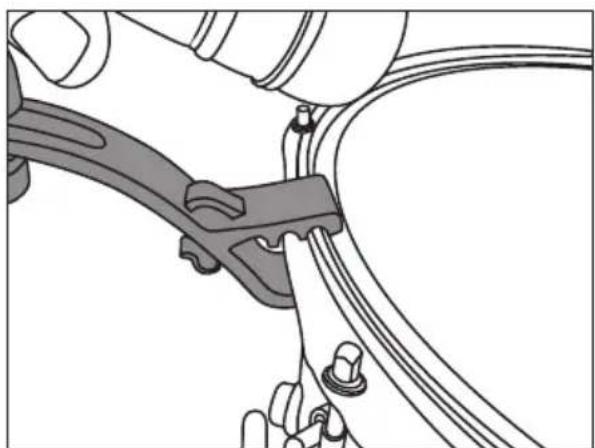
natural_image
Mechanical assembly diagram showing a clamp and bracket assembly (no text or symbols)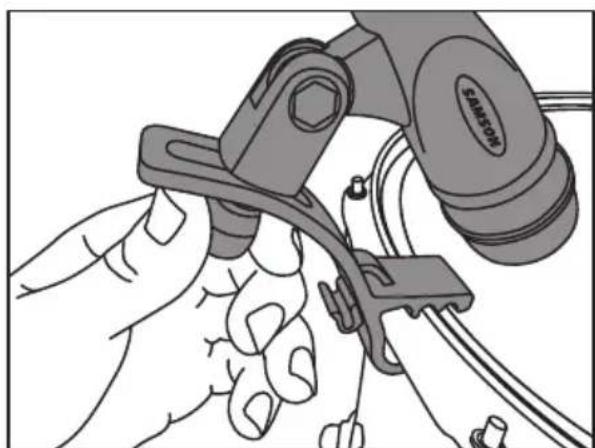
natural_image
Illustration of a hand using a tool to adjust or install a component, no text or symbols visiblenatural_image
Line drawing of a medical or laboratory setup with a device attached to a circular component, no text or symbols present.natural_image
Illustration of hands connecting a mechanical component to a car (no text or symbols visible)
natural_image
Illustration of a hand using a tool to adjust or install a mechanical component (no text or symbols visible)
natural_image
Mechanical assembly diagram showing a clamp securing a cable (no text or symbols present)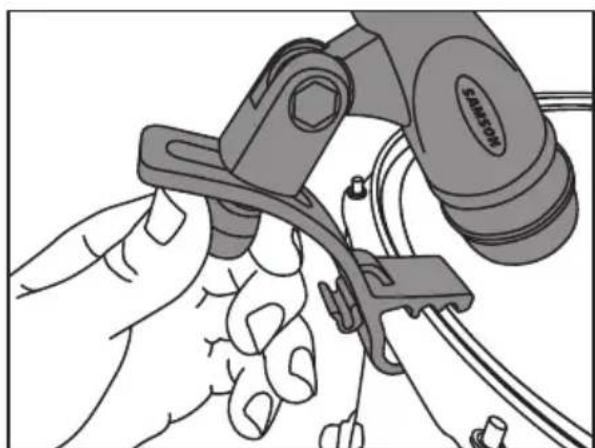
natural_image
Illustration of a hand using a tool to adjust or install a mechanical component (no text or symbols visible)natural_image
Line drawing of a medical or laboratory setup with a handheld device connected to a circular component, no text or symbols present.Peso 150 g (with DMC 100)
- Introduction
- Mounting the Q72 to a Drum
- Microphone Placement
- Kick Drum
- Snare Drum
- Tom-toms
- Polar Pick-up Pattern
- Frequency Response
- Proximity Effect
- Specifications
- Q71 - Kick Drum Microphone
- Q72 - Snare/Tom-Tom Microphone
- Frequency Graphs & Polar Plots
- Directivité polaire
- Mikrofonplatzierung
- Richtcharakteristika
Brand : SAMSON
Model : DK705
Category : Microphone