
POWXG3025 - Hedge Trimmers PowerPlus - Free user manual and instructions
Find the device manual for free POWXG3025 PowerPlus in PDF.

| Product type | 3-in-1 petrol hedge trimmer (brush cutter, grass trimmer, hedge trimmer) |
| Brand | PowerPlus |
| Model | POWXG3025 |
| Displacement | 33 cm³ |
| Power | 1.0 kW |
| Speed | 11000 min⁻¹ |
| Cutting width (hedge trimmer) | 450 mm |
| Cutting width (grass trimmer) | 430 mm |
| Cutting width (brush cutter) | 255 mm |
| Blade spacing (hedge trimmer) | 25 mm |
| Engine type | Powerplus 2-stroke engine |
| Fuel | Petrol/oil mixture 40:1 |
| Fuel tank capacity | 0.45 L |
| Spool diameter (cutting line) | 2.4 mm |
| Spool length (cutting line) | 6 m |
| Vibration damping system | Yes |
| Quick stop | Yes |
| Sound pressure level (LpA) | 96 dB(A) |
| Sound power level (LwA) | 113 dB(A) |
| Vibrations (aw) | 4 m/s² (K=1.5 m/s²) |
| Handle type | Fixed with adjustable auxiliary handle |
| Warranty | 36 months |
| Periodic maintenance | Clean air filter every 25 hours, regular spark plug check |
| Included accessories | Blade, spool, shoulder strap, keys, screwdriver, mixing cup |
Frequently Asked Questions - POWXG3025 PowerPlus
User questions about POWXG3025 PowerPlus
0 question about this device. Answer the ones you know or ask your own.
Ask a new question about this device
Download the instructions for your Hedge Trimmers in PDF format for free! Find your manual POWXG3025 - PowerPlus and take your electronic device back in hand. On this page are published all the documents necessary for the use of your device. POWXG3025 by PowerPlus.
USER MANUAL POWXG3025 PowerPlus
natural_image
Three different types of manual grasshoppers with metal blades and black bases, shown against a plain background (no text or symbols visible)POWXG3025

NL NEDERLANDS VERTAALDE VERSIE VAN DE ORIGINELE HANDLEIDING
FR FRANÇAIS TRADUCTION DU MODE D'EMPLOI D'ORIGINE
EN ENGLISH ORIGINAL INSTRUCTION MANUAL


natural_image
Mechanical tool with a long rod and metal bracket, labeled '33' (no text or symbols on the tool itself)

natural_image
Illustration of three different mechanical or robotic components: a tool, a worker in safety gear, and a device with motion arrows (no text or symbols)

Fig. 8
natural_image
Technical line drawing of a mechanical component with three views (top and side), no text or symbols present.Fig. 9

natural_image
Technical line drawing of a mechanical component with a separate circular base and cable (no text or symbols)Fig. 11

Fig. 12

Fig. 13


Fig. 17

natural_image
Technical line drawing of a mechanical assembly with no visible text or symbolsFig. 18

Fig. 19
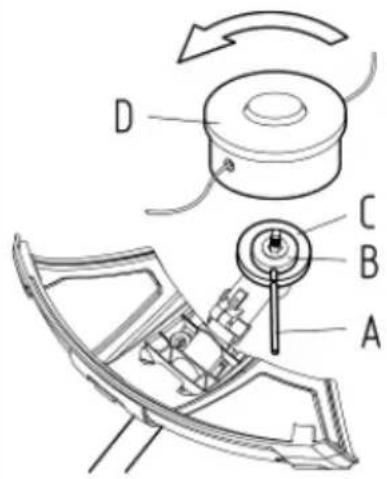
Fig. 20

Fig. 21

natural_image
Line drawing of a person in full protective gear holding a long pole, no text or symbols presentFig. 22

natural_image
Mechanical device diagram showing a lever mechanism with motion arrows (no text or symbols)Fig. 23

Fig. 24

Fig. 25

natural_image
Diagram of a mechanical device with directional arrows indicating motion or force (no text or symbols)Fig. 26 / 28

natural_image
Illustration of a person in safety gear performing a physical maneuver (no text or symbols)Fig. 27

natural_image
Technical line drawing of a mechanical assembly with no visible text or symbolsFig. 29

natural_image
Technical line drawing of a mechanical device with directional arrows indicating motion (no text or symbols)Fig. 30

natural_image
Simple line drawing of a grassy field with a tool, no text or symbols presentFig. 31

natural_image
Simple line drawing of a tool digging in grass, no text or symbols presentFig. 32

natural_image
Simple line drawing of a grassy field with a small mechanical component (no text or symbols)Fig. 33

natural_image
Diagram of a person using a mechanical lever system with directional arrows (no text or labels)Fig. 34

natural_image
Line drawing of a person in protective gear spraying a spray gun, with no text or symbols present.Fig. 35

natural_image
Illustration of a person holding a tool with a chain and directional arrows indicating movement (no text or symbols)Fig. 36

natural_image
Illustration of a mechanical device with a labeled intake container and a separate housing (no text or symbols beyond the label)Fig. 37

natural_image
Technical line drawing of a mechanical assembly with no visible text or symbolsPOWXG3025 NL
1 TOEPASSINGSGEBIED....3
2 BESCHRIJVING (FIG. A)....3
3 INHOUD VAN DE VERPAKKING....4
4 TOELICHTING VAN DE SYMBOLEN 4
5 ALGEMENE VEILIGHEIDSVOORSCHRIFTEN 5
5.1 Werkplaats....5
7 VEILIGHEIDSWAARSCHUWINGEN VOOR BENZINE....7
8 VEILIGHEIDSVOORZIENINGEN VAN DE MACHINE....7
8.1 Gashendelontgrendeling....7
8.2 Motorschakelaar (Fig. 6)....8
8.3 Trillingsdemping (Fig. 7)....8
8.4 Snelontgrendeling....8
8.5 Geluidsdemper....8
9 SNIJ-UITRUSTING (SNIJGEREEDSCHAP & GRASTRIMMER) ..... 8
2 BESCHRIJVING (FIG. A)
15 PROBLEEMOPLOSSING
18 DÉCLARATION DE CONFORMITÉ


VARO N.V. - Joseph Van Instraat 9 - BE2500 Lier - BELGIQUE, déclare que :
2 DESCRIPTION (FIG. A)....3
3 PACKAGE CONTENT LIST .... 3
4 SYMBOLS....4
5 GENERAL SAFETY WARNINGS....5
5.1 Work area .... 5
5.2 Personal safety .... 5
5.3 Engine tool use and care....5
5.4 Service....6
6 ADDITIONAL SAFETY INSTRUCTIONS FOR PETROL HEDGE TRIMMERS......6
7 SAFETY WARNINGS GASOLINE 6
8 MACHINE'S SAFETY EQUIPMENT....7
8.1 Throttle lockout....7
8.2 Engine switch (Fig. 6)....7
8.3 Vibration damping system (Fig. 7)....7
8.4 Quick release....7
8.5 Muffler....7
9 CUTTING EQUIPMENT (CUTTING ATTACHMENT & GRASS TRIMMER)......8
9.1 Cutting attachment ....8
9.2 Sharpening grass cutters and grass blades ....8
9.3 Trimmer head....9
10 CUTTING EQUIPMENT (LONG REACH HEDGE TRIMMER)......9
11 OPERATING INSTRUCTIONS....9
11.1 Prepare the machine....9
11.1.1 Assembling the front handle....9
11.1.2 Connecting the tube (Fig. 13)....9
11.1.3 Fitting blades and trimmer heads 10
11.1.4 Fitting the guard extension....10
POWXG3025 EN
11.1.5 Fitting the grass blade....10
11.1.6 Fitting the trimmer guard and trimmer head (Fig. 19)....10
11.1.7 Fitting the hedge trimmer (Fig. 20-21)....11
11.1.8 Adjusting the harness (Fig. 21)....11
11.2 Fuel handling....11
11.2.1 Fuel safety 11
11.2.2 Transport and storage....11
11.2.3 Fuel 12
11.2.4 Petrol 12
11.2.5 Two-stroke oil....12
11.2.6 Mixing....12
11.2.7 Fuelling....12
11.3 Using the machine....13
11.3.1 Check and starting....13
11.3.2 Starting and stopping....13
11.4 General working instructions.... 14
11.4.1 Basic working techniques....14
11.4.2 Grass clearing using a grass blade 15
11.4.3 Grass trimming with a trimmer head....15
11.4.4 Trimming branch or leaves with Long-reach hedge trimmer 16
11.5 Routine maintenance.... 16
11.5.1 Air filter....16
11.5.2 Fuel filter (Fig. 37)....16
11.5.3 Spark plug....16
12 MAINTENANCE TIMESCALE 17
13 TECHNICAL DATA....18
14 NOISE....19
15 TROUBLESHOOTING....19
16 WARRANTY....20
17 ENVIRONMENT 20
18 DECLARATION OF CONFORMITY 21
POWXG3025 EN
LONG REACH 3-IN-1 COMBI: BRUSH CUTTER, GRASS TRIMMER, HEDGE TRIMMER 33 CC POWXG3025
1 APPLICATION
This appliance is designed for the following applications:
- Brush cutter (when fitted with metal circular blade): The brush cutter is intended to cut weed and climbing plants. Do not use it for other purposes, never use it for cutting wood. Never cut objects with a diameter exceeding 13 mm.
- Grass trimmer (when fitted with nylon line cutting head): The grass trimmer is intended for trimming grass. Do not use it for other purposes.
- Hedge trimmer (when fitted with reciprocating blade): The trimmer is intended to be used for trimming hedges and bushes with diameter not more than 24 mm.
Do not use this appliance for other purpose than those described in this manual.

WARNING! Read this manual and general safety instructions carefully before using the appliance, for your own safety. Your tool should only be passed on together with these instructions.
2 DESCRIPTION (FIG. A)
- Trimmer head
- Top gear cover
- Gear box
- Fixing plate
- Cutting attachment guard
- Front drive shaft tube
- Lock pin
- Lock knob
- Connector
- Barrier
- Front handle
- Rear drive shaft tube
- Engine switch
- Throttle lock
- Throttle trigger lockout
- Auxiliary handle
- Suspension ring
- Output flange
- Spark plug
- Engine
- Starter handle
- Fuel tank
- Choke knob
- Primer bulb
- Filter cover
- Throttle trigger
- Locking nut
- Bottom cap
- Bottom clamping plate
- Metal blade
- Top clamping plate
- Carrying belt
- Blade cover
- Cutting blade
- Grease nozzle
- Transmission
- Locking lever
- Grip
- Safety lever
- Gear box
3 PACKAGE CONTENT LIST
■ Remove all packing materials
■ Remove remaining packaging and transit supports (if existing)
- Check the completeness of the packing content
- Check the appliance, the power cord, the power plug and all accessories for transportation damages.
- Keep the packaging materials as far as possible till the end of the warranty period. Dispose it into your local waste disposal system afterwards.
POWXG3025 EN

WARNING Packing materials are no toys! Children must not play with plastic bags! Danger of suffocation!
LONG REACH 3-in-1 combi: brush cutter, grass trimmer, hedge trimmer 33 CC
Safety blade cover
Carrying belt
Manual
Spark plug wrench
Auxiliary handle
Blade
Spool
Open-end wrench 8-10 mm
2 x Torx wrench 25-30
Screwdriver
Mixing cup

When parts are missing or damaged, please contact your dealer.
4 SYMBOLS
In this manual and/or on the machine the following symbols are used:
 | Denotes risk of personal injury or damage to the tool. | |
 | Read instructions carefully. | |
 | Wear safety glasses and ear protection. | |
 | Wear gloves. | |
 | Wearing of protective shoes advised. | |
 | Never operate the machine in the rain or in damp or wet condition. Moisture is a shock hazard. | |
 | Warning! Flying objects! | |
 | Don't use the trimmer in any position that causes any part to come within 10m of overhead electrical line. | |
 | Keep hands away from blades. Don't touch the blades when starting or while operating the unit. | |
 | Keep a minimum distance of 15 m between the machine and third parties during use. |

Extremely hot surface. Do not touch a hot muffler, gear box or cylinder. You may get burned. These parts get extremely hot from operation and remain hot a short time after the unit is turned off.
5 GENERAL SAFETY WARNINGS

Read all safety warnings and all instructions. Failure to follow all warnings and instructions may result in electric shock, fire and/or serious injury. Save all warnings and instructions for future reference.
5.1 Work area
- Keep work area clean and well lit. Cluttered and dark areas invite accidents.
- Do not operate tools in explosive atmospheres, such as in the presence of flammable liquids, gases or dust. Tools create sparks which may ignite the dust or fumes.
- Keep children and bystanders away while operating a tool. Distractions can cause you to lose control.
5.2 Personal safety
- Stay alert, watch what you are doing and use common sense when operating a tool. Do not use a tool while you are tired or under the influence of drugs, alcohol or medication. A moment of inattention while operating tools may result in serious personal injury.
- Use safety equipment. Always wear eye protection. Safety equipment such as dust mask, non-skid safety shoes, hard hat, or hearing protection used whenever conditions require will reduce personal injuries.
- Avoid accidental starting. Ensure the switch is in the off position before plugging in. Carrying tools with your finger on the switch or plugging in tools that have the switch on invites accidents.
- Remove any adjusting key or wrench before turning the tool on. A wrench or a key left attached to a rotating part of the tool may result in personal injury.
- Do not overreach. Keep proper footing and balance at all times. This enables better control of the tool in unexpected situations.
- Dress properly. Do not wear loose clothing or jewelry. Keep your hair, clothing and gloves away from moving parts. Loose clothes, jewelry or long hair can be caught in moving parts.
- If devices are provided for the connection of dust extraction and collection facilities, ensure these are connected and properly used. Use of these devices can reduce dust related hazards.
5.3 Engine tool use and care
- Use the correct tool for your application. The correct tool will do the job better and safer at the rate for which it was designed.
- Store idle tools out of the reach of children and do not allow persons unfamiliar with the tool or these instructions to operate the tool. The tools are dangerous in the hands of untrained users.
- Maintain tools. Check for misalignment or sticking of moving parts, breakage of parts and any other condition that may affect the tool's operation. If damaged, have the tool repaired before use. Many accidents are caused by poorly maintained tools.
- Keep cutting tools sharp and clean. Properly maintained cutting tools with sharp cutting edges are less likely to stick and are easier to control.
POWXG3025 EN
- Use the tool, accessories and tool bits etc., in accordance with these instructions and in the manner intended for the particular type of tool, taking into account the working conditions and the work to be performed. Use of the tool for operations different from intended could lead to a hazardous situation.
5.4 Service
- Have your tool serviced by a qualified person using only identical replacement parts. This will ensure that the safety of the tool is maintained.
6 ADDITIONAL SAFETY INSTRUCTIONS FOR PETROL HEDGE TRIMMERS
- Do not operate in a hazardous location. Such areas include where there is a risk of explosion of petrol fumes, leaking gas or explosive dust.
- Do not operate in a confined area. Exhaust gases, smoke or fumes could reach dangerous concentrations.
- Protect your tool. This hedge trimmer is NOT WEATHERPROOF and should not be exposed to direct sunlight, high ambient temperature and damp, wet or high humidity conditions.
- Do not smoke while refueling. This is potentially dangerous as it may ignite the fuel and cause an explosion.
- Take care not to spill fuel. When refueling the hedge trimmer ensure that the motor has been switched off. Prevent the spilling of fuel as this may also ignite with the hot motor. Never refuel whilst the engine running.
- Be careful where you store the hedge trimmer. Store the hedge trimmer in a dry area away from flammable liquids.
- Keep your distance. The hedge trimmer emits exhaust fumes. Ensure bystanders keep a safe distance.
- Ensure you use oil-mix fuel. Ensure that you mix 40 parts unleaded fuel to 1 part 2-stroke oil. If not, the engine will overheat and cause damage to your hedge trimmer.
7 SAFETY WARNINGS GASOLINE

WARNING: Use extra care in handling fuels. They are flammable and the vapours are explosive. The following points must be observed.
- Use only an approved container.
- Never remove the fuel cap or add fuel with the power source running. Allow engine exhaust components to cool before refueling.
- Do not smoke.
■ Never refuel the machine indoors. - Never store the machine or fuel containers inside, where is an open flame, such as a water heater.
- If fuel is spilled, do not attempt to start the power source, but move the machine away from the area of spillage before starting.
■ Always replace and securely tighten the fuel cap after refueling. - If the tank is drained, this should be done outdoors.
8 MACHINE'S SAFETY EQUIPMENT

WARNING! Never use a machine with faulty safety equipment. The machine's safety equipment must be checked and maintained as described in this section. If your machine fails any of these checks contact your service agent to get it repaired.
8.1 Throttle lockout
- The throttle lockout is designed to prevent accidental operation of the throttle control. When you press the lock-out (A) (i.e. when you grasp the handle) it releases the throttle trigger (B). When you release the handle the throttle control and the throttle lockout both move back to their original positions. This movement is controlled by two independent return springs. This arrangement means that the throttle control is automatically locked at the idle setting. (Fig. 1)
■ Make sure the throttle control is locked at the idle setting when (Fig. 2) - Press the throttle lockout and make sure it returns to its original position when you release it. (Fig. 3)
- Check that the throttle control and throttle lockout move freely and that the return springs work properly. (Fig. 4)
- See instructions under the heading Start. Start the machine and apply full throttle. Release the throttle and check that the cutting attachment stops and remains at a standstill. If the cutting attachment rotates with the throttle in the idle position then the carburetor idle setting must be checked. (Fig. 5)
8.2 Engine switch (Fig. 6)
Press down the "O" side of the engine switch to stop the engine.
Start the engine and make sure the engine stops when you move the engine switch to the stop setting.
8.3 Vibration damping system (Fig. 7)
Your machine is equipped with a vibration damping system that is designed to minimize vibration and make operation easier.
Using incorrectly wound cord or a blunt or incorrect cutting attachment (wrong type or incorrectly filed, see instructions under the heading Filing the blade) increases the level of vibration.
The machine's vibration damping system reduces the transfer of vibration between the engine unit/cutting equipment and the machine's handle unit.
Regularly check the vibration damping units for cracks or deformation.
Check that the vibration damping element is undamaged and securely attached.
8.4 Quick release
There is an easily accessible, quick release fitted near the suspension ring as a safety precaution in case the engine catches fire, or in any other situation that requires you to free yourself from the machine.
8.5 Muffler
The muffler is designed to keep noise levels to a minimum and to direct exhaust fumes away from the user.
Never use a machine that has a faulty muffler.
Regularly check that the muffler is securely attached to the machine.
POWXG3025 EN

The inside of the muffler contain chemicals that may be carcinogenic. Avoid contact with these elements in the event of a damaged muffler.

Bear in mind that: The exhaust fumes from the engine are hot and may contain sparks which can start a fire. Never start the machine indoors or near combustible material!
9 CUTTING EQUIPMENT (CUTTING ATTACHMENT & GRASS TRIMMER)
This section describes how to choose and maintain your cutting equipment in order to:
- Reduce the risk of blade thrust.
- Obtain maximum cutting performance.
- Extend the life of cutting equipment.
IMPORTANT: Only use cutting attachments with the guards we recommend! See the chapter on Technical data. Refer to the instructions for the cutting attachment to check the correct way to load the cord and the correct cord diameter.
Keep the teeth of the blade correctly sharpened! Follow our recommendations. Also refer to the instructions on the blade packaging.

Always stop the engine before doing any work on the cutting attachment. This continues to rotate even after the throttle has been released. Ensure that the cutting attachment has stopped completely and disconnect the HT lead from the spark plug before you start to work on it. Using an incorrect cutting attachment or an incorrectly sharpened blade increases the risk of blade thrust.
9.1 Cutting attachment
Grass blades and grass cutters are intended for cutting coarse grass. (Fig. 8)
A trimmer head is intended for trimming grass. (Fig. 9)
General rules
- Only use cutting attachments with the guards we recommend! See the chapter on Technical data.
- Keep the teeth of the blade correctly sharpened! Follow our instructions and use the recommended file gauge. An incorrectly sharpened or damaged blade increases the risk of accidents.
- Check the cutting attachment for damage or cracks. A damaged cutting attachment should always be replaced.
9.2 Sharpening grass cutters and grass blades
- Sharpen blades and cutters using a single-cut flat file.
- Sharpen all edges equally to maintain the balance of the blade.

Always discard a blade that is bent, twisted, cracked, broken or damaged in any other way. Never attempt to straighten a twisted blade so that it can be reused. Only use original blades of the specified type.
POWXG3025 EN
9.3 Trimmer head
IMPORTANT: Always ensure the trimmer cord is wound tightly and evenly around the drum, otherwise the machine will generate harmful vibration.
Only use the recommended trimmer heads and trimmer cords. These have been tested by the manufacturer to suit a particular engine size. This is especially important when a fully automatic trimmer head is used. Only use the recommended cutting attachment. See the chapter on Technical data.
Smaller machines generally require small trimmer heads and vice versa. This is because when clearing using a cord the engine must throw out the cord radially from the trimmer head and overcome the resistance of the grass being cleared.
The length of the cord is also important. A longer cord requires greater engine power than a shorter cord of the same diameter.
Make sure that the cutter on the trimmer guard is intact. This is used to cut the cord to the correct length.
To increase the life of the cord it can be soaked in water for a couple of days. This will make the line tougher so that it lasts longer.
10 CUTTING EQUIPMENT (LONG REACH HEDGE TRIMMER)
To ensure good cutting results it is important that the contact pressure between the blades is correct. The contact pressure is adjusted by turning the screws on the underside of the bar clockwise as far as they will go. Then turn the screws anticlockwise a 1/4 turn. Lock the screws using the locking nut on the top of the bar. Check that the screws are loose enough to allow the washers under the screw heads to slide sideways.
When the blades are correctly adjusted the play between the blades should be 0,2–0,4 mm, measured at the screws.
The edges of the blades are too hard to be filed. Dull blades should be sharpened using a grinder.
Replace the blades if they are bent or damaged.
11 OPERATING INSTRUCTIONS
11.1 Prepare the machine
11.1.1 Assembling the front handle
Fit the front handle absorber (A) on the rear tube (C). Fit the barrier on the rear handle. Make sure the barrier on the left side of the machine. (Fig. 11)
Push down the front handle (G), and then turn four screws (H) clockwise to tighten the front handle securely. (Fig. 12)
11.1.2 Connecting the tube (Fig. 13)
Align the hole (A1) on the front tube (A) with the lock pin (B). Then, pull out the lock pin, and rotate it to the right to lock the lock pin into place. Put the front tube in the connection (D) all the way to the end. Rotate the lock pin to the left (C), it will automatically return to its original position and insert into the hole on the front tube. If this is not the case, rotate the front tube to the left and the right until the lock pin clicks into place. Make sure the front tube can't be rotated after the lock pin came back to its original position.
11.1.3 Fitting blades and trimmer heads

When fitting the cutting attachment it is extremely important that the raised section on the top clamping plate/support flange engages correctly in the centre hole of the cutting attachment. If the cutting attachment is fitted incorrectly it can result in serious and/or fatal personal injury.

Never use a cutting attachment without an approved guard. See the chapter on Technical data. If an incorrect or faulty guard is fitted this can cause serious personal injury.
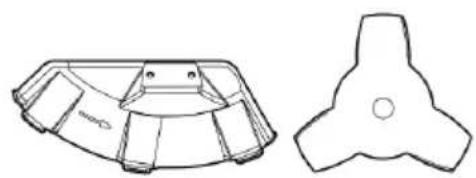
11.1.4 Fitting the guard extension
- The guard extension shall always be fitted when using the trimmer head. The guard extension shall always be removed when using the grass blade. (Fig. 15)
- Hook the trimmer's guard onto the holder at the end of the shaft and secure with 3 bolts.. (Fig. 15)
- Enter the guard extension in the slot of the guard. Then click the guard extension into position using the hooks on the guard. (Fig. 15)
- The trimmer's guard extension can be removed easily using a screwdriver, see illustration. (Fig. 16)
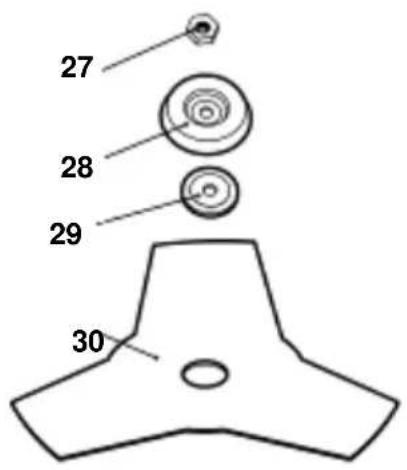
11.1.5 Fitting the grass blade
Unhook the guard extension from the cutting attachment guard.

CAUTION! Ensure that the guard extension is removed.
■ Fit the top clamping plate (B) on the output shaft.
- Turn the blade shaft until one of the holes in the top clamping plate aligns with the corresponding hole in the top cutting attachment guard.
- Insert the locking pin (A) in the hole to lock the shaft.
- Place the blade (C), bottom clamping plate (D) and bottom cutting attachment guard (E) on the output shaft. (Fig. 18)
- Fit the nut (F). The nut must be tightened to a torque of 35-50 Nm. Use the socket spanner in the tool kit. Hold the shaft of the spanner as close to the blade guard as possible. To tighten the nut, turn the spanner in the opposite direction to the direction of rotation (Caution! left-hand thread).
- Pull out the locking pin after all installation process has been finished.
11.1.6 Fitting the trimmer guard and trimmer head (Fig. 19)
- Hook the trimmer guard onto the cutting attachment guard.
■ Fit the top clamping plate (B) on the output shaft. - Turn the blade shaft until one of the holes in the top clamping plate aligns with the corresponding hole in the top cutting attachment guard (C).
- Insert the locking pin (A) in the hole to lock the shaft.
- Screw on the trimmer head (D) in the opposite direction to the direction of rotation.
- To dismantle, follow the instructions in the reverse order.
POWXG3025 EN
11.1.7 Fitting the hedge trimmer (Fig. 20-21)
Fit the hedge trimmer on the shaft tube (12) (see Fig. 21).
Set the hedge trimmer's angle (Fig. 20).
Press the safety lever (E). Then press the lock lever (F), at the same time hold the grip (G) while rotating the hedge trimmer to the desired angle ( ).
11.1.8 Adjusting the harness (Fig. 21)

WARNING! When using the machine it must always be hooked securely to the harness. Otherwise you will be unable to control the brush cutter safely and this can result in injury to yourself or others. Never use a harness with a defective quick release.
Single shoulder harness: Put on the harness. Hook the machine onto the harness support hook. Adjust the length of the harness so that the support hook is roughly level with your right hip.
11.2 Fuel handling
11.2.1 Fuel safety
Never start the machine:
- If you have spilt fuel on it. Wipe off the spillage and allow remaining fuel to evaporate.
- If you have spilt fuel on yourself or your clothes, change your clothes. Wash any part of your body that has come in contact with fuel. Use soap and water.
- If the machine is leaking fuel. Check regularly for leaks from the fuel cap and fuel lines.
11.2.2 Transport and storage
- Store and transport the machine and fuel so that there is no risk of any leakage or fumes coming into contact with sparks or naked flames, for example, from electrical machinery, electric motors, electrical relays/ switches or boilers.
- When storing and transporting fuel always use approved containers intended for this purpose.
- When storing the machine for long periods the fuel tank must be emptied. Contact your local petrol station to find out where to dispose of excess fuel.
- Ensure the machine is cleaned and that a complete service is carried out before long-term storage.
- The transport guard must always be fitted to the cutting attachment when the machine is being transported or in storage.
- Secure the machine during transport.
- In order to prevent unintentional starting of the engine, the spark plug cap must always be removed during long-term storage, if the machine is not under close supervision and when performing all service measures.

Take care when handling fuel. Bear in mind the risk of fire, explosion and inhaling fumes.
POWXG3025 EN
11.2.3 Fuel
The machine is equipped with a two-stroke engine and must always been run using a mixture of petrol and two-stroke oil. It is important to accurately measure the amount of oil to be mixed to ensure that the correct mixture is obtained. When mixing small amounts of fuel, even small inaccuracies can drastically affect the ratio of the mixture.

Fuel and fuel fumes are highly inflammable and can cause serious injury when inhaled or allowed to come in contact with the skin. For this reason observe caution when handling fuel and make sure there is adequate ventilation.
11.2.4 Petrol
Always use a quality petrol/oil mixture at least 90 octane (RON).
Use low-emission petrol, also known as alkylate petrol, if it is available.
The lowest octane recommended is 90 (RON). If you run the engine on a lower octane grade than 90 so-called knocking can occur. This gives rise to a high engine temperature, which can result in serious engine damage.
When working at continuous high revs a higher octane rating is recommended.
11.2.5 Two-stroke oil
For best results and performance use two-stroke engine oil, which is specially formulated for our air-cooled two-stroke engines.
Never use two-stroke oil intended for water-cooled engines, sometimes referred to as outboard oil (rated TCW).
Never use oil intended for four-stroke engines.
A poor oil quality and/or too high oil/fuel ratio may jeopardize function and decrease the life time of catalytic converters.
| Petrol, litre | Two-stroke oil, millilitre |
| 2.5% (1:40) | |
| 1 | 25 |
| 5 | 125 |
| 10 | 250 |
| 20 | 500 |
11.2.6 Mixing
- Always mix the petrol and oil in a clean container intended for fuel.
- Always start by filling half the amount of the petrol to be used. Then add the entire amount of oil. Mix (shake) the fuel mixture. Add the remaining amount of petrol.
- Mix (shake) the fuel mixture thoroughly before filling the machine's fuel tank.
- Do not mix more than one month's supply of fuel at a time.
- If the machine is not used for some time the fuel tank should be emptied and cleaned.
11.2.7 Fuelling
Taking the following precautions, will lessen the risk of fire:
- Do not smoke or place hot objects near fuel.
■ Always shut off the engine before refueling.
- Always stop the engine and let it cool for a few minutes before refueling.
POWXG3025 EN
- When refueling, open the fuel cap slowly so that any excess pressure is released gently.
- Tighten the fuel cap carefully after refueling.
- Always move the machine away from the refueling area before starting.
■ Always use a fuel container with an anti-spill valve. - Clean the area around the fuel cap. Contamination in the tank can cause operating problems.
- Ensure that the fuel is well mixed by shaking the container before filling the tank.
11.3 Using the machine
11.3.1 Check and starting
- Never use the machine without a guard nor with a defective guard.
- All covers must be correctly fitted and undamaged before you start the machine.
- Check the blade to ensure that no cracks have formed at the bottom of the teeth or by the centre hole. The most common reason why cracks are formed is that sharp corners have been formed at the bottom of the teeth while sharpening or that the blade has been used with dull teeth. Discard a blade if cracks are found.
- Check that the support flange is not cracked due to fatigue or due to being tightened too much. Discard the support flange if it is cracked.
- Check that the blade guard is not damaged or cracked. Replace the blade guard if it is exposed to impact or is cracked.
- Check that the trimmer head and trimmer guard are not damaged or cracked. Replace the trimmer head or trimmer guard if they have been exposed to impact or are cracked.
11.3.2 Starting and stopping
The complete clutch cover and shaft must be fitted before the machine is started, otherwise the clutch can come loose and cause personal injury.
Always move the machine away from the refueling area before starting. Place the machine on a flat surface. Ensure the cutting attachment cannot come into contact with any object.
Make sure no unauthorized persons are in the working area, otherwise there is a risk of serious personal injury. The safety distance is 15 meters.
11.3.2.1 Cold starting:
A "cold" start of the engine means starting it after at least 5 minutes from when it was switched off or after refueling.
■ Starting: Ignition: Press down the "I" side of the engine switch. (Fig. 22)
- Primer bulb: Press the primer bulb repeatedly until fuel the bulb is filled with fuel.-(Fig. 23)
- Choke: Set the choke knob in the choke position. (Fig. 24)
- Throttle lock button: When pressing throttle or her lock-out and throttle trigger, press the throttle lock button simultaneously, and then release throttle trigger and throttle trigger lock-out. (Fig. 25)

The throttle lock will automatically release by pressing the throttle trigger again. If you manually turn the choke knob from choke position to run position before releasing the throttle lock button, the cutting attachment will start to rotate immediately when the engine is started.
- Hold the body of the machine on the ground using your left hand (CAUTION! Not with your foot!). Grip the starter handle, slowly pull out the cord with your right hand until you feel some resistance (the starter pawls grip), now quickly and powerfully pull the cord. Never
POWXG3025 EN
twist the starter cord around your hand. Repeat pulling the cord until engine firing occur. (Fig. 26/28)
- Choke: Set the choke knob in the open position. (Fig. 27)
- Repeat pulling the cord until engine starts. When the engine starts, allow the engine to warm up with the throttle lock engaged. Then, pressing throttle trigger to release the throttle lock. (Fig. 29)
Do not pull the starter cord all the way out and do not let go of the starter handle when the cord is fully extended. This can damage the machine.
Do not put any part of your body in marked area. Contact can result in burns to the skin, or electrical shock if the spark plug cap has been damaged. Always use gloves. Do not use a machine with damaged spark plug cap.

IMPORTANT If the starter rope is pulled repeatedly with the choke on, it may flood the engine and make starting difficult.
If you happen to food the engine, repeat the hot start procedure a few times to eliminate any excess fuel.
11.3.2.2 Hot starting
To hot start the engine immediately after it has stopped, follow steps a -d - g of the above procedure.
11.3.2.3 Stopping: (Fig. 29)
Stop the engine by switching off the ignition.
11.4 General working instructions

IMPORTANT! This section describes the basic safety precautions for working with brush cutters and trimmers.
If you encounter a situation where you are uncertain how to proceed you should ask an expert. Contact your dealer or your service workshop.
Avoid all usage which you consider to be beyond your capability.
You must understand the difference between forestry clearing, grass clearing and grass trimming before use.
11.4.1 Basic working techniques
Always slow the engine to idle speed after each working operation. Long periods at full throttle without any load on the engine can lead to serious engine damage.

Sometimes branches or grass get caught between the guard and cutting attachment. Always stop the engine before cleaning.
Machines fitted with grass blades can be thrown violently to the side when the blade comes into contact with a fixed object. This is called blade thrust. A blade thrust can be violent enough to cause the machine and/or operator to be propelled in any direction, and possibly lose control of the machine.

POWXG3025 EN
Blade thrust can occur without warning if the machine snags, stalls or binds. Blade thrust is more likely to occur in areas where it is difficult to see the material being cut.

Avoid cutting with the area of the blade between the 12 o'clock and 3 o'clock positions. Because of the speed of rotation of the blade, blade thrust can occur if you attempt to cut thick stems with this area of the blade.
11.4.2 Grass clearing using a grass blade
Grass blades and grass cutters must not be used on woody stems.
A grass blade is used for all types of tall or coarse grass.
The grass is cut down with a sideways, swinging movement, where the movement from right-to-left is the clearing stroke and the movement from left-to-right is the return stroke. Let the left-hand side of the blade (between 8 and 12 o'clock) do the cutting.
If the blade is angled to the left when clearing grass, the grass will collect in a line, which makes it easier to collect, e.g. by raking.
Try to work rhythmically. Stand firmly with your feet apart. Move forward after the return stroke and stand firmly again.
Let the support cup rest lightly against the ground. It is used to protect the blade from hitting the ground.
Reduce the risk of material wrapping around the blade by following these instructions:
■ Always work at full throttle.
- Avoid the previously cut material during the return stroke.
Stop the engine, unclip the harness and place the machine on the ground before you start to collect the cut material.
11.4.3 Grass trimming with a trimmer head
11.4.3.1 Trimming (Fig. 30)
Hold the trimmer head just above the ground at an angle. It is the end of the cord that does the work. Let the cord work at its own pace. Never press the cord into the area to be cut.
The cord can easily remove grass and weeds up against walls, fences, trees and borders, however it can also damage sensitive bark on trees and bushes, and damage fence posts.
Reduce the risk of damaging plants by shortening the cord to 10-12 cm and reducing the engine speed.
11.4.3.2 Clearing (Fig. 31)
The clearing technique removes all unwanted vegetation. Keep the trimmer head just above the ground and tilt it. Let the end of the cord strike the ground around trees, posts, statues and the like.

CAUTION! This technique increases the wear on the cord.
The cord wears quicker and must be fed forward more often when working against stones, brick, concrete, metal fences, etc., than when coming into contact with trees and wooden fences.
When trimming and clearing you should use less than full throttle so that the cord lasts longer and to reduce the wear on the trimmer head.
POWXG3025 EN
11.4.3.3 Cutting (Fig. 32)
The trimmer is ideal for cutting grass that is difficult to reach using a normal lawn mower. Keep the cord parallel to the ground when cutting. Avoid pressing the trimmer head against the ground as this can ruin the lawn and damage the tool.
Do not allow the trimmer head to constantly come into contact with the ground during normal cutting. Constant contact of this type can cause damage and wear to the trimmer head.
11.4.3.4 Sweeping (Fig. 33)
The fan effect of the rotating cord can be used for quick and easy clearing up. Hold the cord parallel to and above the area to be swept and continuously move the tool from left to right. When cutting and sweeping you should use full throttle to obtain the best results.
11.4.4 Trimming branch or leaves with Long-reach hedge trimmer
- Work with a swinging action from the bottom upwards when trimming sides. (Fig. 34)
■ Always work at full throttle. - When trimming a hedge the engine should always face away from the hedge.
- Hold the machine as close to your body as possible to get the best balance. (Fig. 35)
■ Make sure that the tip does not touch the ground. (Fig. 35) - Do not rush the work, but work steadily until all the branches have been cut back cleanly.
11.5 Routine maintenance
11.5.1 Air filter
The air filter must be regularly cleaned to remove dust and dirt in order to avoid:
■ Carburetor malfunctions
- Starting problems
■ Loss of engine power
■ Unnecessary wear to engine parts
■ Excessive fuel consumption
Clean the filter every 25 hours, or more regularly if conditions are exceptionally dusty.
11.5.1.1 Cleaning the air filter (Fig. 36)
Remove the air filter cover and take out the filter. Wash it clean in warm, soapy water. Ensure that the filter is dry before refitting it.
An air filter that has been in use for a long time cannot be cleaned completely. The filter must therefore be replaced with a new one at regular intervals. A damaged air filter must always be replaced.
11.5.2 Fuel filter (Fig. 37)
When the engine runs short of fuel supply, check the fuel cap and the fuel filter for blockage.
11.5.3 Spark plug
The spark plug condition is influenced by:
Incorrect carburettor adjustment.
An incorrect fuel mixture (too much or incorrect type of oil).
A dirty air filter.
These factors cause deposits on the spark plug electrodes, which may result in operating problems and starting difficulties.
If the machine is low on power, difficult to start or runs poorly at idle speed: always check the spark plug first before taking any further action. If the spark plug is dirty, clean it and check that the electrode gap is 0.6-0.7 mm.
POWXG3025 EN
The spark plug should be replaced after about a month in operation or earlier if necessary.
Recommended Spark plug type:
Always use the recommended spark plug type! Use of the wrong spark plug can damage the piston/ cylinder. Check that the spark plug is fitted with a suppressor.
12 MAINTENANCE TIMESCALE
| The following intervals apply to normal operating conditions only. If your daily working time is longer or operating conditions are difficult (very dusty work area, etc.), shorten the specified intervals accordingly. | Before starting working | After finishing work daily | After each refueling stop | Weekly | Monthly | Every 12 months | If problem | If damaged | If required | |
| Complete machine | Visual inspection (condition, wear, leaks) | * | * | |||||||
| Clean | * | |||||||||
| Control handle | Check operation | * | * | |||||||
| Air filter | Clean | * | * | * | ||||||
| Replace | * | * | ||||||||
| Filter in fuel tank | Check | * | ||||||||
| Replace filter | * | * | * | |||||||
| Spark plug | Readjust electrode gap | * | ||||||||
| Replace after 100 hours of operation | ||||||||||
| Cooling inlets | Clean | * | ||||||||
| Guide bar | Check | * | ||||||||
| Repair or replace | * | * | ||||||||
| Blade | Check | * | ||||||||
| Repair or replace | * | * | ||||||||
| All accessible screws | Check | * | ||||||||
| Retighten | * | |||||||||
| Anti-vibration elements | Check | * | * | * | ||||||
| Replace ^1) | * | |||||||||
| Safety labels | Replace | * | ||||||||
| Muffler | Clean ^1) | * | ||||||||
POWXG3025 EN
13 TECHNICAL DATA
| Rotation Speed (n) grass trimmer | 11000 min-1 |
| Blade Size | 450 mm |
| Cylinder Capacity | 33 cc |
| Engine Power | 1.0 kW |
| Cutting width grass trimmer | 430 mm |
| Cutting width brush cutter | 255 mm |
| Cutting width hedge trimmer | 450 mm |
| Engine type | Powerplus 2-stroke engine |
| Oil tank capacity | 0.8 l |
| Fuel tank capacity | 0.45 l |
| Knife distance | 25 mm |
| Quick stop | Yes |
| Thread lengthening type | Tap&Go |
| Spool diameter | 2.4 mm |
| Spool length | 6 m |
| Low vibration system | Yes |
| Easy start | Yes |
| Heavy duty clutch | Yes |
| Fuel mixing ratio | 40:1 |
| Crank Engine | Yes |
| Carburetor type | Hualong |
| Number of teeth/ blades | 12x2 |
| Soft grip | Yes |
| Safety guard | Yes |
| Handle type | Fixed |
| Second handle type | Adjustable auxiliary handle |
| Shaft type | Straight |
| Adjustable head | Yes |
| Flower protection | Yes |
| Laser cut blade | Yes |
| Two hand operation | Yes |
| Double action blade | Yes |
| E10 fuel proof | yes |
POWXG3025 EN
14 NOISE
Noise emission values measured according to relevant standard. (K=3)
| Acoustic pressure level LpA | 96 dB(A) |
| Acoustic power level LwA | 113 dB(A) |

ATTENTION! Wear hearing protection when sound pressure is over 85 dB(A).
aw (Vibration)
4 m/s²
K = 1.5 ~m / s^2
15 TROUBLESHOOTING
| What to do when.... | |||
| Source of problem | Corrective action | Source of problem | Corrective action |
| 1. The engine will not start or will not keep running | 4. The engine runs irregularly and lacks in power when revved | ||
| Incorrect starting procedure | Follow the instructions (see chapter 3) | Dirty spark plug or incorrect distance between the electrodes | Check the spark plug (see chapter 5) |
| Dirty spark plug or incorrect distance between the electrodes | Check the spark plug (see chapter 5) | ||
| Carburation problems | Contact your Dealer | ||
| 5. The engine makes too much smoke | |||
| Incorrect composition of the fuel mixture | Prepare the fuel mixture according to the instructions (see chapter 2) | ||
| Air filter clogged | Clean or replace the filter (see chapter 5) | ||
| Carburation problems | Contact your Dealer | ||
| 2. The engine starts but is lacking in power | Carburation problems | Contact your Dealer | |
| 6. The machine starts to vibrate abnormally | |||
| Air filter clogged | Clean or replace the filter (see chapter 5) | Damaged or loose parts | Stop the machine and disconnect the spark plug cable. Inspect for damage. Check for and tighten any loose parts. Have all checks, repair work and replacements carried out by a specialized Centre only. |
| Carburation problem | Contact your Dealer | ||
POWXG3025 EN
16 WARRANTY
- This product is warranted for a 36-month period effective from the date of purchase by the first user.
- This warranty covers all material or production flaws excluding : batteries, chargers, defective parts subject to normal wear & tear such as bearings, brushes, cables, and plugs, or accessories such as drills, drill bits, saw blades, etc. ; damage or defects resulting from maltreatment, accidents or alterations; nor the cost of transportation.
- Damage and/or defects resulting from inappropriate use also do not fall under the warranty provisions.
- We also disclaim all liability for any bodily injury resulting from inappropriate use of the tool.
- Repairs may only be carried out by an authorised customer service centre for Powerplus tools.
- You can always obtain more information at the number 00 32 3 292 92 90.
- Any transportation costs shall always be borne by the customer, unless agreed otherwise in writing.
- At the same time, no claim can be made on the warranty if the damage of the device is the result of negligent maintenance or overload.
- Definitely excluded from the warranty is damage resulting from fluid permeation, excessive dust penetration, intentional damage (on purpose or by gross carelessness), inappropriate usage (use for purposes for which the device is not suitable), incompetent usage (e.g. not following the instructions given in the manual), inexpert assembly, lightning strike, erroneous net voltage. This list is not exhaustive.
- Acceptance of claims under warranty can never lead to the prolongation of the warranty period nor commencement of a new warranty period in case of a device replacement.
■ Devices or parts which are replaced under the warranty therefore remain the property of Varo NV.
- We reserve the right to reject a claim whenever the purchase cannot be verified or when it is clear that the product has not been properly maintained. (Clean ventilation slots, carbon brushes serviced regularly, etc.).
- Your purchase receipt must be kept as proof of date of purchase.
- Your appliance must be returned undismantled to your dealer in an acceptably clean state, (in its original blow-moulded case if applicable to the unit), accompanied by proof of purchase.
17 ENVIRONMENT
Should your appliance need replacement after extended use, do not dispose of it with the household refuse, but in an environmentally safe way.
Please dispose of used motor oil in a manner that protects the environment. We suggest you take it in a sealed container to your local service station for recycling. Do not throw it into the refuse or pour it on the ground.
18 DECLARATION OF CONFORMITY


VARO N.V. - Joseph Van Instraat 9 - BE2500 Lier - BELGIUM, declares that, product: LONG REACH 3-in-1 combi: brush cutter, grass trimmer, hedge trimmer 33 CC trade mark: POWERplus model: POWXG3025
is in conformity with the essential requirements and other relevant provisions of the applicable European Directives, based on the application of European harmonized standards. Any unauthorized modification of the apparatus voids this declaration.
European Directives (including, if applicable, their amendments up to the date of signature): 2006/42/EC 2014/30/EU 2000/14/EC Annex V LwA 110dB(A) / 113dB(A)
European harmonized standards (including, if applicable, their amendments up to the date of signature): EN ISO 10517 : 2009 – A1 : 2013 EN ISO 11806-1 : 2011 EN ISO 11860-1 : 2011 EN ISO 14982 : 2009
Keeper of the Technical Documentation : Philippe Vankerkhove, VARO – Vic. Van Rompuy N.V.
The undersigned acts on behalf of the company CEO,

Philippe Vankerkhove Regulatory Affairs – Compliance Manager 30/09/16
POWXG3025 DE
1 EINSATZBEREICH....3
Gabelschlüssel 8-10 mm
2 x Torx-Schlüssel 25-30
Schraubendreher
Mischbecher

natural_image
Simple hand-drawn sketch of a rounded rectangular shape with a small protrusion (no text or symbols)Philippe Vankerkhove
Regulatory Affairs – Compliance Manager
30/09/16
POWXG3025 PT
1 APLICACÃO ....4
3 PAKKENS INNHOLD....3
4 SYMBOLFORKLARING 4
5 GENERELLE SIKKERHETSADVARSLER....5
12 TIDSPLAN FOR VEDLIKEHOLD
natural_image
Simple hand-drawn sketch of a rounded rectangular shape with a curved line on the left (no text or symbols)Philippe Vankerkhove
Regulatoriske saker - Samsvarsleder
30/09/16
POWXG3025 DA
1 ANVENDELSE 3
2 BESKRIVELSE (FIG. A) 3
3 MEDF∅LGENDE INDHOLD 4
4 SYMBOLER 4
5 ALMINDELIGE SIKKERHEDSANVISNINGER FOR VÄERKT∅J ..... 5
2 POPIS (OBR. A)....3
3 SEZNAM OBSAHU BALENÍ 4
4 SYMBOLY 4
5 OBECNÁ BEZPEČNOSTNÍ UPOZORNĚNÍ PRO NÁSTROJE......5
natural_image
Three different types of manual grasshoppers with different angles and designs, shown against a plain white background (no text or symbols visible)
WWW.VARO.COM
DESIGNED AND MARKETED BY VARO
©copyright by varo
VARO - VIC. VAN ROMPUY nv
JOSEPH VAN INSTRAAT 9 - 2500 LIER - BELGIUM
OFFICES:


- POWXG3025 NL
- BESCHRIJVING (FIG. A)
- PROBLEEMOPLOSSING
- DÉCLARATION DE CONFORMITÉ
- POWXG3025 EN
- LONG REACH 3-IN-1 COMBI: BRUSH CUTTER, GRASS TRIMMER, HEDGE TRIMMER 33 CC POWXG3025
- APPLICATION
- DESCRIPTION (FIG. A)
- PACKAGE CONTENT LIST
- SYMBOLS
- GENERAL SAFETY WARNINGS
- Work area
- Personal safety
- Engine tool use and care
- Service
- ADDITIONAL SAFETY INSTRUCTIONS FOR PETROL HEDGE TRIMMERS
- SAFETY WARNINGS GASOLINE
- MACHINE'S SAFETY EQUIPMENT
- Throttle lockout
- Engine switch (Fig. 6)
- Vibration damping system (Fig. 7)
- Quick release
- Muffler
- CUTTING EQUIPMENT (CUTTING ATTACHMENT & GRASS TRIMMER)
- Cutting attachment
- Sharpening grass cutters and grass blades
- Trimmer head
- CUTTING EQUIPMENT (LONG REACH HEDGE TRIMMER)
- OPERATING INSTRUCTIONS
- Prepare the machine
- Assembling the front handle
- Connecting the tube (Fig. 13)
- Fitting blades and trimmer heads
- Fitting the guard extension
- Fitting the grass blade
- CAUTION! Ensure that the guard extension is removed.
- Fitting the trimmer guard and trimmer head (Fig. 19)
- Fuel handling
- Fuel
- Petrol
- Two-stroke oil
- Mixing
- Fuelling
- Using the machine
- Check and starting
- Starting and stopping
- Cold starting:
- Hot starting
- Stopping: (Fig. 29)
- General working instructions
- Basic working techniques
- Grass clearing using a grass blade
- Grass trimming with a trimmer head
- Trimming (Fig. 30)
- Clearing (Fig. 31)
- CAUTION! This technique increases the wear on the cord.
- Cutting (Fig. 32)
- Sweeping (Fig. 33)
- Trimming branch or leaves with Long-reach hedge trimmer
- Routine maintenance
- Air filter
- Cleaning the air filter (Fig. 36)
- Fuel filter (Fig. 37)
- Spark plug
- NOISE
- WARRANTY
- ENVIRONMENT
- DECLARATION OF CONFORMITY
- POWXG3025 DE
- POWXG3025 PT
- POWXG3025 DA
Brand : PowerPlus
Model : POWXG3025
Category : Hedge Trimmers