
POWXG2016 - Hedge Trimmers PowerPlus - Free user manual and instructions
Find the device manual for free POWXG2016 PowerPlus in PDF.


| Product type | Cordless hedge trimmer |
| Brand | PowerPlus |
| Model | POWXG2016 |
| Power source | 20 V lithium-ion battery |
| Blade length | 60 cm |
| Max cutting capacity | 25 mm |
| Weight (with battery) | 3.2 kg |
| Sound pressure level | 90 dB(A) |
| Vibration level | 2.5 m/s² |
| Average runtime | 50 minutes |
| Charging time | 60 minutes |
| Battery type | Lithium-ion, interchangeable |
| Handle | 180° rotating |
| Anti-pinch protection | Yes |
| Safety | Safety lock and two-hand trigger |
| Maintenance | Clean after each use, sharpen the blade regularly |
| Warranty | 2 years |
| Spare parts available | Blade, battery, charger |
| Recommended use | Medium hedges and small shrubs |
Frequently Asked Questions - POWXG2016 PowerPlus
User questions about POWXG2016 PowerPlus
0 question about this device. Answer the ones you know or ask your own.
Ask a new question about this device
Download the instructions for your Hedge Trimmers in PDF format for free! Find your manual POWXG2016 - PowerPlus and take your electronic device back in hand. On this page are published all the documents necessary for the use of your device. POWXG2016 by PowerPlus.
USER MANUAL POWXG2016 PowerPlus
natural_image
Product photo of a powerChris electric shaver with black and yellow blade (no visible text or symbols)POWXG2016

NL NEDERLANDS VERTAALDE VERSIE VAN DE ORIGINELE HANDLEIDING
FR FRANÇAIS TRADUCTION DU MODE D'EMPLOI D'ORIGINE
EN ENGLISH ORIGINAL INSTRUCTION MANUAL
natural_image
Line drawing of a hand inserting a small component into a device (no text or symbols)Fig. 1

Fig. 2

Fig. 3

Fig. 4

Fig. 5

natural_image
Illustration of a person using a power shaver to cut through a hedge with arrows indicating direction (no text or symbols)Fig. 6

Fig. 7
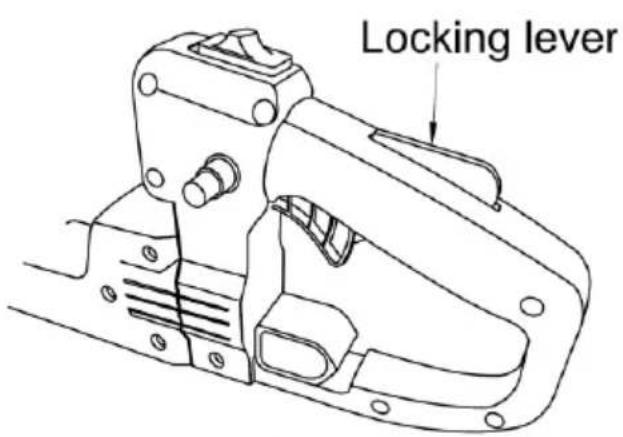
Fig. 8

natural_image
Technical line drawing of a mechanical assembly with no visible text or symbolsFig. 9

natural_image
Line drawing of a mechanical assembly with no visible text or symbols
Fig. 10

natural_image
Line drawing of a hand using a tool to adjust or install a mechanical component (no text or symbols present)Fig. 11
POWXG2016 NL
1 TOEPASSING 3
2 BESCHRIJVING....3
3 INHOUD VAN DE VERPAKKING....3
4 TOELICHTING VAN DE SYMBOLEN 4
5 ALGEMENE VEILIGHEIDSVOORSCHRIFTEN ....4
5.1 Werkplaats....4
16 PROBLEEMOPLOSSING
19 DÉCLARATION DE CONFORMITÉ
CE

VARO N.V. - Joseph Van Instraat 9 - BE2500 Lier - BELGIQUE, déclare que :
5 GENERAL SAFETY WARNINGS....4
5.1 Work area 4
5.2 Personal safety 4
5.3 Engine tool use and care....5
5.4 Service....5
6 PETROL SAFETY WARNINGS....5
7 FUEL 6
7.1 Fuel and oil mixture....6
7.1.1 Mixing fuel....6
7.2 Refuelling 6
7.3 Storage of fuel....6
7.4 Recommended petrol 7
8 OPERATING INSTRUCTIONS 7
8.1 Starting the engine....7
8.1.1 Cold starting....7
8.1.2 Hot starting 7
8.2 Stopping the engine....8
8.3 Angle change of rear handle....8
8.3.1 How to change the angle (Fig. 5) 8
8.3.2 Vertical operation (Fig. 6)....8
8.3.3 Horizontal operation (Fig. 7)....8
9 MAINTENANCE 9
9.1 Blade lubrication....9
9.2 Safety lock (Fig. 8)....10
9.3 Air cleaner (Fig. 9)....10
9.4 Air cooling....10
POWXG2016 EN
9.5 Sparking Plug (Fig. 10)....10
9.6 Gearbox 10
9.7 Silencer (Fig. 11)....10
9.7.1 After 100 hours of use....10
9.7.2 Maintenance before storage....11
10 CLEANING....11
11 STORAGE....11
12 STARTING UP AFTER LONGER PERIODS OF INACTIVITY .....11
13 TECHNICAL DATA....11
14 NOISE 12
15 SERVICE DEPARTMENT 12
16 TROUBLE SHOOTING 12
17 WARRANTY....13
18 ENVIRONMENT 14
19 DECLARATION OF CONFORMITY 14
HEDGE TRIMMER 26cc POWXG2016
1 APPLICATION
The hedge trimmer should be used only for trimming hedges, bushes and shrubs. Other uses of the trimmer not mentioned in this manual may damage the trimmer or seriously injure the operator and are therefore expressly excluded from the application range. It is not designed for commercial use.

WARNING! For your own safety, read this manual and the general safety instructions carefully before using the appliance. Your power tool should only be given to other users together with these instructions.
2 DESCRIPTION
- Blades
- Shield
- Front handle
- Choke lever
- Silencer cover
- Air filter cover
- Primer pump
-
Starter rope
-
Fuel tank
-
Fuel cap
-
Ignition switch
-
Throttle lock
-
Throttle trigger
-
Rear handle
-
Adjustment trigger (rotatable handle)
-
Cold start button
3 PACKAGE CONTENT LIST
■ Remove all packaging materials.
- Remove remaining packaging and packing inserts (if included).
- Check that the package contents are complete.
- Check the appliance, the power cord, the power plug and all accessories for transportation damage.
- Keep the packaging materials as far as possible until the end of the warranty period. Then take it to your local waste disposal system.

WARNING Packaging materials are not toys! Children must not play with plastic bags! There is a danger of suffocation!
Manual machine screwdriver
socket wrench one fuel mixing bottle

If any parts are missing or damaged, please contact your dealer.
4 SYMBOLS
The following symbols are used in this manual and/or on the machine:
 | Denotes risk of personal injury or damage to the tool. |  | Wear a mask In dusty conditions |
 | Read manual before use |  | Never operate the machine in the rain or in damp or wet conditions. Moisture is an electrical shock hazard. |
 | Wear noise protection |  | Wear gloves |
 | Wear eye protection |  | Wearing of protective shoes advised |
 | In accordance with essential safety standards of applicable European directives |  | No smoking |
 | No naked flame |  | Fuel and oil mixture |
 | Keep hands away from blades. Do not touch the blades when starting or while operating the unit. | ||
5 GENERAL SAFETY WARNINGS

Read all safety warnings and all instructions. Failure to follow all warnings and instructions may result in electric shock, fire and/or serious injury. Save all warnings and instructions for future reference.
5.1 Work area
- Keep work area clean and well lit. Cluttered and dark areas invite accidents.
- Do not operate tools in explosive atmospheres, such as in the presence of flammable liquids, gases or dust. Tools create sparks which may ignite the dust or fumes.
- Keep children and bystanders away while operating a tool. Distractions can cause you to lose control.
5.2 Personal safety
- Stay alert, watch what you are doing and use common sense when operating a tool. Do not use a tool while you are tired or under the influence of drugs, alcohol or medication. A moment of inattention while operating tools may result in serious personal injury.
- Use safety equipment. Always wear eye protection. Safety equipment such as dust mask, non-skid safety shoes, hard hat, or hearing protection used whenever conditions require will reduce personal injuries.
- Avoid accidental starting. Ensure the switch is in the off position before plugging in. Carrying tools with your finger on the switch or plugging in tools that have the switch on invites accidents.
POWXG2016 EN
- Remove any adjusting key or wrench before turning the tool on. A wrench or a key left attached to a rotating part of the tool may result in personal injury.
- Do not overreach. Keep proper footing and balance at all times. This enables better control of the tool in unexpected situations.
- Dress properly. Do not wear loose clothing or jewellery. Keep your hair, clothing and gloves away from moving parts. Loose clothes, jewellery or long hair can be caught in moving parts.
- If devices are provided for the connection of dust extraction and collection facilities, ensure these are connected and properly used. Use of these devices can reduce dust related hazards.
5.3 Engine tool use and care
- Use the correct tool for your application. The correct tool will do the job better and safer at the rate for which it was designed.
- Store idle tools out of the reach of children and do not allow persons unfamiliar with the tool or these instructions to operate the tool. The tools are dangerous in the hands of untrained users.
- Maintain tools. Check for misalignment or sticking of moving parts, breakage of parts and any other condition that may affect the tool's operation. If damaged, have the tool repaired before use. Many accidents are caused by poorly maintained tools.
- Keep cutting tools sharp and clean. Properly maintained cutting tools with sharp cutting edges are less likely to stick and are easier to control.
- Use the tool, accessories and tool bits etc., in accordance with these instructions and in the manner intended for the particular type of tool, taking into account the working conditions and the work to be performed. Use of the tool for operations different from intended could lead to a hazardous situation.
5.4 Service
- Have your tool serviced by a qualified person using only identical replacement parts. This will ensure that the safety of the tool is maintained.
6 PETROL SAFETY WARNINGS
- Do not operate in a hazardous location. Such areas include where there is a risk of explosion of petrol fumes, leaking gas or explosive dust.
- Do not operate in a confined area. Exhaust gases, smoke or fumes could reach dangerous concentrations.
- Protect your tool. This hedge trimmer is NOT WEATHERPROOF and should not be exposed to direct sunlight, high ambient temperature and damp, wet or high humidity conditions.
- Do not smoke while refueling. This is potentially dangerous as it may ignite the fuel and cause an explosion.
Take care not to spill fuel. When refueling the hedge trimmer ensure that the motor has been switched off. Prevent the spilling of fuel as this may also ignite with the hot motor. Never refuel whilst the engine running. - Be careful where you store the hedge trimmer. Store the hedge trimmer in a dry area away from flammable liquids.
- Keep your distance. The hedge trimmer emits exhaust fumes. Ensure bystanders keep a safe distance.
- Ensure you use oil-mix fuel. Ensure that you mix 40 parts unleaded fuel to 1 part 2-stroke oil. If not, the engine will overheat and cause damage to your hedge trimmer.
7 FUEL
7.1 Fuel and oil mixture
For best results use regular unleaded petrol mixed with 2-stroke air-cooled engine oil on a ratio of 40:1.

WARNING: Never use unmixed petrol in your engine. This will cause permanent damage and void the manufacturer's warranty for the product. Never use a fuel mixture that has been stored for more than 30 days.

WARNING: 2-stroke lubricant must be a premium grade oil for 2-stroke air-cooled engines mixed at a 40:1 ratio. Do not use any 2-stroke oil product with a recommended mix ratio of 100:1. If insufficient lubrication is the cause of engine damage, it voids the manufacturer's engine warranty.
7.1.1 Mixing fuel
Pour oil into an approved fuel canister followed by the petrol so that the petrol can mix with the oil. Shake container to ensure a thorough mix.

WARNING: Lack of lubrication voids engine warranty. Petrol and oil must be mixed at a 40:1 ratio.
7.2 Refuelling
■ The engine must be switched off.
- Stop the engine during refuelling, keep away from naked flames and do not smoke.
Take care not to spill either fuel or oil in order to prevent soil contamination (environmental protection). Clean the hedge trimmer immediately after fuel has been spilt.
- Do not spill any fuel onto the engine. Wipe up if necessary to avoid fire.
- Avoid any fuel contact with your clothing. Change your clothing instantly if fuel has been split on it (to prevent it catching fire).
- Inspect the fuel cap at regular intervals, making sure that it can be securely fastened and does not leak.
- Carefully tighten the fuel tank cap. Change location to start the engine (at least 3 metres away from the place of refuelling).
- Never refuel in enclosed rooms. Fuel vapours accumulate at ground level. (risk of potential explosions).
- Transport and store fuel only in approved containers. Make sure the fuel stored is not accessible to children.
- Thoroughly clean the area around the tank cap to prevent dirt from getting into the fuel tank.
■ Unscrew the plug and fill the tank with fuel. Use a gauge funnel to filter the fuel.
■ Tightly screw on the plug by hand only.
■ Clean around the screw plug and the tank after refuelling.
■ Always wipe up any spilt fuel to prevent a fire.
7.3 Storage of fuel
■ Fuel cannot be stored for an unlimited period of time.
■ Purchase only the quantity required for a 4-week operating period.
■ Use approved fuel storage containers only.
7.4 Recommended petrol
- Some standard petrol are enriched with oxygen-containing compounds such as alcohol or ether to comply with regulations on clean air. The motor is designed to work well on any car petrol, including these enriched petrol, on the condition that the above mixing ratios are observed!
8 OPERATING INSTRUCTIONS
8.1 Starting the engine
Move at least 3 metres away from the place of refuelling. Place the hedge trimmer on a clean area of ground and make sure that the cutting tool does not come into contact with the ground or any other objects.

Keep the blades clear of everything around, since they will start moving as soon as the engine starts.
8.1.1 Cold starting
If the engine is cold or if it has been stopped for more than 5 minutes or if fuel has been added to the engine.
- Push the primer pump gently (7 to 10 times) until fuel begins to flow into it. (Fig. 1)
■ Move the choke lever (4) to position “|” (Fig. 2)
(a) choke lever
(b) open
(c) close
- Set the ignition switch to the "START" position. (Fig. 3)
- Hold the unit down firmly so that you will not lose control while cranking the engine. If not held down properly, the engine could make you lose your balance or swing the cutting blade into a nearby object or your body.
- Pull out the starter handle slowly (10 to 15 cm), and check the pressure. Pull strongly when you feel the pressure and start the engine.
- When the engine starts, return the choke lever to "|↑|". Run the engine for approximately one minute at a moderate speed before moving up to full speed

Note: When restarting the engine immediately after stopping it, leave the choke open.

Note: Overchoking can make it hard to start the engine due to excess fuel. If the engine fails to start after several attempts, open the choke and pull the rope again, or remove the sparking plug and dry it.
8.1.2 Hot starting
Restarting immediately after the engine has stopped.
- Set the ignition switch to the "START" position. (Fig. 3)
■ Make sure the choke lever is open - Pull out the starter handle slowly (10 to 15 cm), and check the pressure.
- Pull strongly when you feel the pressure and start the engine.
If the engine does not start, repeat the above steps

Do not pull the rope to the end or return it by releasing the knob. This can cause starter failures.
8.2 Stopping the engine
■ Release the throttle lever completely.
- Move the engine switch to the "STOP" position. The engine will now slow down and stop (Fig. 4)

Note: If the engine does not stop after moving the switch, close the choke to make it stop.
8.3 Angle change of rear handle
To permit vertical operation of the unit, the angle of the rear handle can be changed. To reduce fatigue when trimming hedges, the handle can be swivelled 45^ to the left or 90^ to the right.
8.3.1 How to change the angle (Fig. 5)
- Push back the throttle lever, and rotate the rear handle, pulling the adjustment trigger.
- Rotate the rear handle 90 or 45 degrees to the right or to the left.
- After completing the rotation, release the adjustment trigger To secure the rear handle, hold the adjustment trigger gently with one finger
- Use only as much throttle as is needed to do the job. Excessive engine speed is unnecessary.
- Always keep your body to the carburettor side of your trimmer, and never to the silencer side.
- During the first few minutes when a new machine is first used, grease may come out of the gearbox. Since this is excess grease, it is not a cause for alarm. Just wipe it off when the engine is switched off.
8.3.2 Vertical operation (Fig. 6)
- When rotating the rear handle to the right, hold the rear handle with your right hand, and the front handle with your left hand.
- When rotating the rear handle to the left, hold the front handle with your right hand, and the rear handle with your left hand. Cut using a circular movement.
8.3.3 Horizontal operation (Fig. 7)
- Tilting the trimmer 5 to 10^ towards the object to be cut will make things easier and produce good results.
9 MAINTENANCE
Our machines have been designed to operate for a long period of time with a minimum of maintenance. Continuous and satisfactory operation presupposes proper machine care and regular cleaning.
| System / component | Procedure | Before use | Every 25 hours | Every 50 hours | Every 100 hours | note | |
| Engine | Fuel leaks, fuel spillage | Wipe up | V | ||||
| Fuel tank, air filter, fuel filter | Inspect/clean | V | V | Replace if necessary | |||
| Idle adjusting screw | See adjusting idling speed | V | Replace carburettor if necessary. | ||||
| Sparking plug | Clean and readjust electrode gap | V | GAP: 0,6-0,7mm, replace if necessary | ||||
| Cylinder fins, intake air cooling vent | Clean | V | |||||
| Silencer, spark arrester, cylinder exhaust port | Clean | V | |||||
| Shaft | Throttle lever, ignition switch | Check operation | V | ||||
| Cutting parts | Replace if something is wrong | V | |||||
| Gearbox | Grease | V | |||||
| Screw/nuts/bolts | Tighten/replace | V | V | Not adjusting screws |

Warning: Before cleaning, inspecting, or repairing the unit, make sure that the engine has stopped and is cool.
9.1 Blade lubrication

Warning: before lubricating, be sure your unit is switched off and that the blade has come to a complete stop.
- For easier operation and longer blade life, lubricate the blade before and after each use. Apply light machine oil along the edge of the blade bar
9.2 Safety lock (Fig. 8)

Warning: Stop using the trimmer if the safety lock is defective
Safety lock is the device which stops the throttle lever from being activated unintentionally. If you push the safety lock, you will activate the throttle lever.
Safety lock:
- Check that the throttle lever does not move if you do not push the safety lock.
- Check that the throttle lever moves if you activate or release it while pushing the safety lock.
- Check that the safety lock returns to its original position if you take your hand from safety lock.
- If these checks reveal any defects, contact your nearest dealer and ask to have them repaired
9.3 Air cleaner (Fig. 9)
Release the air cleaner cover and remove the dust. If the element is dirty, clean it by tapping it or by blowing away the dirt. If the element is bent or damaged, replace it. After you have cleaned the element reattach it to the cleaner body with the stamp on the outside (facing the cleaner cover). After that, replace the cleaner cover
Important: a clogged air cleaner reduces engine performance. Operating with no element or with a bent or damaged element causes irregular wear and tear of the engine mechanism
9.4 Air cooling
This engine is air-cooled. Dust clogging up the air cooling inlet port and the cylinder fins will cause the engine to overheat. Periodically check and clean the cylinder fins after removing the air cleaner and the cylinder cover.
9.5 Sparking Plug (Fig. 10)
Starting problems and misfiring are often caused by a fouled sparking plug. Periodically clean the sparking plug, and replace with a new one as and when required.

Important: When dismounting the plug cap, be careful not to remove the seal. Operating the engine without the seal may cause the engine to overheat.

Important: When inserting the sparking plug, first screw it in with your fingers, and then tighten it with the help of a suitable plug spanner. Overtightening will damage the cylinder and the piston
9.6 Gearbox
Apply multipurpose grease after every 50 hours of use.
9.7 Silencer (Fig. 11)
9.7.1 After 100 hours of use
Check to see if any oil or grease has worked its way in between the clutch lining and drum, and if it has, wipe it away using oil-free and unleaded petrol
9.7.2 Maintenance before storage
Use a dry rag to wipe away any fuel which has been spilt onto the unit.
- Extract fuel from the tank and run the engine until it stops naturally.
- Remove the sparking plug and put in 1-2cc of 2- stroke oil in the engine. Pull the starter rope 2-3 times, set the plug back, and stop it at the contraction position.
Apply anti-rust oil to the metal parts such as the throttle wire, etc., put the cover on the blade, and keep it indoors to avoid exposing it to dampness.
10 CLEANING
- Use a damp cloth to clean the plastic parts.
- Do not use any detergents, solvents or pointed objects.
11 STORAGE
So that the hedge trimmer will work again after a long period of inactivity, you should observe the following points:
- Empty the petrol tank. To do this, start the engine and let it run until it reaches a standstill. Dispose of the remaining petrol in an environmentally friendly way.
- Let the engine cool and take out the sparking plug.
- Pour a small spoonful of 2-stroke mixture into the sparking plug opening and slowly pull the starter cord right through to the end several times. This gets rid of small deposits of rust and lubricates the piston and cylinder.
- Check the sparking plug and replace it if too much of the firing tip has been burnt off.
- Keep the blade in a dry place – out of the reach of fire.
12 STARTING UP AFTER LONGER PERIODS OF INACTIVITY
■ Remove the sparking plug.
- Quickly pull the starter cord right through several times in order to remove oil and deposits in the engine compartment.
- Check the sparking plug, replace it if necessary and screw it in.
- Fill the petrol tank with the 2-stroke mixture.
13 TECHNICAL DATA
| displacement | 26cc |
| Construction | Hand-held |
| Weight | 5,6 kg |
| Fuel tank capacity | 500ml |
| Blade length | 600mm |
| Blade speed | 2300r/min |
| Max. engine speed | 7000r/min |
| Engine idle speed | 3200r/min |
| Clutch engagement speed | 4500r/min |
| Output power | 750W |
| Engine oil / gasoline mixed ratio | 1:40 |
14 NOISE
Noise emission values measured according to relevant standard. (K=3)
Acoustic pressure level LpA
88 dB(A)
Acoustic power level LwA
110 dB(A)

ATTENTION! Wear hearing protection when sound pressure is over 85 dB(A).
aw (Vibration):
0,9 m/s²
K = 1.5 ~m / s^2
15 SERVICE DEPARTMENT
Damaged switches must be replaced by our after-sales service department. If the connecting cable (or mains plug) is damaged, it must be replaced by a special connecting cable which is available from our service department. Replacement of the connecting cable should only be carried out by our service department (see last page) or by a qualified specialist (qualified electrician).
16 TROUBLE SHOOTING
| PROBLEM | PROBABLE CAUSE | CORRECTIVE ACTION |
| Unit won’t start or starts but will not run. | Incorrect starting procedures.Incorrect carburettor mixture adjustment setting.Fouled sparking plug.Empty fuel tank.Primer bulb was not pressed enough. | Follow instructions in the User Manual.Have carburettor adjusted by an Authorized Service Centre.Clean/gap or replace plug.Fill fuel tank with properly mixed fuel.Press primer bulb fully and slowly 10 times. |
| Unit starts, but engine has low power. | Fuel filter is plugged.Incorrect lever position.Dirty spark arrester screen.Dirty air filter.Incorrect carburettor mixture adjustment setting service dealer. | Replace the fuel filter.Move to RUN position.Replace spark arrester screen.Remove, clean and reinstall filter.Have carburettor adjusted by an Authorized Service Centre. |
| Engine sputters. ! | Incorrect carburettor mixture adjustment setting.Air filter is plugged.Old or improperly mixed fuel. | Have carburettor adjusted by an Authorized Service Centre.Replace or clean the air filter.Drain gas tank/add fresh fuel mixture. |
POWXG2016 EN
| No power under load. | Incorrect carburettor mixture adjustment setting.Old or improperly mixed fuel.Air filter is plugged.Fouled spark plug. | Have carburettor adjusted by an Authorized Service Centre.Drain gas tank /add fresh fuel mixture.Replace or clean the air filter.Clean/gap or replace plug. |
| Runs erratically | Incorrectly gapped sparking plug.Plugged spark arrester.Dirty air filter. | Clean/gap or replace plug.Clean or replace spark arrester.Clean or replace air filter. |
| Smokes excessively. | Incorrect carburettor mixture adjustment setting.Incorrect fuel mixture. | Have carburettor adjusted by an Authorized Service Centre.Use properly mixed fuel (40:1 mixture). |
17 WARRANTY
- This product is warranted for a 36-month period effective from the date of purchase by the first user.
- This warranty covers all material or production flaws excluding : batteries, chargers, defective parts subject to normal wear & tear such as bearings, brushes, cables, and plugs, or accessories such as drills, drill bits, saw blades, etc. ; damage or defects resulting from maltreatment, accidents or alterations; nor the cost of transportation.
- Damage and/or defects resulting from inappropriate use also do not fall under the warranty provisions.
- We also disclaim all liability for any bodily injury resulting from inappropriate use of the tool.
- Repairs may only be carried out by an authorised customer service centre for Powerplus tools.
- You can always obtain more information at the number 00 32 3 292 92 90.
- Any transportation costs shall always be borne by the customer, unless agreed otherwise in writing.
- At the same time, no claim can be made on the warranty if the damage of the device is the result of negligent maintenance or overload.
- Definitely excluded from the warranty is damage resulting from fluid permeation, excessive dust penetration, intentional damage (on purpose or by gross carelessness), inappropriate usage (use for purposes for which the device is not suitable), incompetent usage (e.g. not following the instructions given in the manual), inexpert assembly, lightning strike, erroneous net voltage. This list is not exhaustive.
- Acceptance of claims under warranty can never lead to the prolongation of the warranty period nor commencement of a new warranty period in case of a device replacement.
- Devices or parts which are replaced under the warranty therefore remain the property of Varo NV.
- We reserve the right to reject a claim whenever the purchase cannot be verified or when it is clear that the product has not been properly maintained. (Clean ventilation slots, carbon brushes serviced regularly, etc.).
- Your purchase receipt must be kept as proof of date of purchase.
POWXG2016 EN
- Your appliance must be returned undismantled to your dealer in an acceptably clean state, (in its original blow-moulded case if applicable to the unit), accompanied by proof of purchase.
18 ENVIRONMENT
Should your appliance need replacement after extended use, do not dispose of it with the household refuse, but in an environmentally safe way.
Please dispose of used motor oil in a manner that protects the environment. We suggest you take it in a sealed container to your local service station for recycling. Do not throw it into the refuse or pour it on the ground.
19 DECLARATION OF CONFORMITY


VARO N.V. - Joseph Van Instraat 9 - BE2500 Lier - BELGIUM, declares that,
Product: Hedge trimmer 26cc
Trade mark: POWERplus
Podel: POWXG2016
is in conformity with the essential requirements and other relevant provisions of the applicable European Directives, based on the application of European harmonized standards. Any unauthorized modification of the apparatus voids this declaration.
European Directives (including, if applicable, their amendments up to the date of signature);
2014/30/EU
2006/42/EC
2000/14/EC Annex V LwA 108dB(A) / 110dB(A)
European harmonized standards (including, if applicable, their amendments up to the date of signature);
EN ISO 10517:2009-A1:2013
EN55012:2007
EN61000-6-1:2007
Keeper of the Technical Documentation : Philippe Vankerkhove, VARO – Vic. Van Rompuy N.V.
The undersigned acts on behalf of the company CEO,

Philippe Vankerkhove
Regulatory Affairs – Compliance Manager
Date: 01/08/2016
POWXG2016 DE
1 EINSATZBEREICH .... 3
8.2 Motor stoppen....8
HECKENSCHERE 26 cc POWXG2016
1 EINSATZBEREICH
Regulatory Affairs – Compliance Manager
Data: 01/08/2016
POWXG2016 PT
1 APLICAÇÃO....3
2 DESCRIÇÃO ....3
3 LISTA DE CONTEÚDO DA EMBALAGEM....3
4 SÍMBOLOS....4
5 PROCEDIMENTOS GERAIS DE SEGURANÇA......4
natural_image
Yellow and black manual shaver with spiral blade and mechanical components (no visible text or symbols)
WWW.VARO.COM
DESIGNED AND MARKETED BY VARO
©copyright by varo
VARO - VIC. VAN ROMPUY nv
JOSEPH VAN INSTRAAT 9 - 2500 LIER - BELGIUM
OFFICES:


- POWXG2016 NL
- PROBLEEMOPLOSSING
- DÉCLARATION DE CONFORMITÉ
- CE
- POWXG2016 EN
- HEDGE TRIMMER 26cc POWXG2016
- APPLICATION
- DESCRIPTION
- PACKAGE CONTENT LIST
- SYMBOLS
- GENERAL SAFETY WARNINGS
- Work area
- Personal safety
- Engine tool use and care
- Service
- PETROL SAFETY WARNINGS
- FUEL
- Fuel and oil mixture
- Mixing fuel
- Refuelling
- Storage of fuel
- Recommended petrol
- OPERATING INSTRUCTIONS
- Starting the engine
- Cold starting
- Hot starting
- Stopping the engine
- Angle change of rear handle
- How to change the angle (Fig. 5)
- Vertical operation (Fig. 6)
- Horizontal operation (Fig. 7)
- MAINTENANCE
- Blade lubrication
- Safety lock (Fig. 8)
- Warning: Stop using the trimmer if the safety lock is defective
- Air cleaner (Fig. 9)
- Air cooling
- Sparking Plug (Fig. 10)
- Gearbox
- Silencer (Fig. 11)
- After 100 hours of use
- Maintenance before storage
- CLEANING
- STORAGE
- STARTING UP AFTER LONGER PERIODS OF INACTIVITY
- NOISE
- ATTENTION! Wear hearing protection when sound pressure is over 85 dB(A).
- SERVICE DEPARTMENT
- TROUBLE SHOOTING
- WARRANTY
- ENVIRONMENT
- DECLARATION OF CONFORMITY
- POWXG2016 DE
- HECKENSCHERE 26 cc POWXG2016
- EINSATZBEREICH
- POWXG2016 PT
Brand : PowerPlus
Model : POWXG2016
Category : Hedge Trimmers