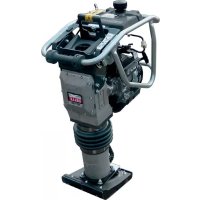
BELLE RTX 66 - Vibratory compactor Lescha - Free user manual and instructions
Find the device manual for free BELLE RTX 66 Lescha in PDF.



| Product type | Vibratory tamper (plate compactor) |
| Brand | Lescha (Altrad Belle) |
| Model | BELLE RTX 66 |
| Engine | Honda GX120, 4-stroke, single-cylinder, air-cooled |
| Engine power | 2.6 kW |
| Fuel | Unleaded petrol |
| Fuel tank capacity | 2.5 L |
| Carburetor type | Float chamber type |
| Starting | Recoil starter |
| Dimensions (L x W x H) | 705 x 345 x 1040 mm |
| Weight | 70 kg |
| Compaction shoe width | 165 mm (standard), options 230 mm and 280 mm |
| Compaction shoe length | 335 mm |
| Vibration frequency | 10 Hz |
| Impact force | 16.5 kN |
| Blows per minute | 450 - 600 bpm |
| Stroke | 52 mm |
| Sound level | 108 dB(A) |
| Vibration (3 axes) | 7.25 m/s² |
| Recommended engine oil | SAE 10W-30, capacity 0.8 L |
| Tamper cylinder oil | SAE 10W-30, capacity 0.7 L |
| Warranty | 1 year (12 months) |
| Routine maintenance | Air filter cleaning, level checks, oil change |
| Required safety equipment | Ear protection, gloves, goggles, safety shoes |
| Spare parts | Available at www.Belle247.com |
Frequently Asked Questions - BELLE RTX 66 Lescha
User questions about BELLE RTX 66 Lescha
0 question about this device. Answer the ones you know or ask your own.
Ask a new question about this device
Download the instructions for your Vibratory compactor in PDF format for free! Find your manual BELLE RTX 66 - Lescha and take your electronic device back in hand. On this page are published all the documents necessary for the use of your device. BELLE RTX 66 by Lescha.
USER MANUAL BELLE RTX 66 Lescha
- Spare Parts Book
• Pièces Détachées - Libro Despiece
- Lista de Peças
• Onderdelen Boekje - Reservedele Skrift
• Ersatzteilhandbuch - Manuale dei Ricambi
• Bruksanvisning - Varaosaluettelo
- Lista Części Zamiennych
• Запасные Части Книга
• Varuosade Nimekiri - Rezerves Dalu Saraksts
- Atsarginiu Daliu Sarašas
• Част Списък - Část Barevný Pruh
• Lista Pieselór De Schimb
• Részek Oldalra Dől - Rezervni Djelovi Knjiga
300
GB Operators Manual
US Operators Manual
F Manuel De L'Opérateur
E Manual del Operador
P Manual de Operação
NL Handleiding
DK Betjeningsvejledning
D Bedienungshandbuch
① Manuale Dell'Operatore
s Bruksanvisning
SF Käyttöohje
PL Instrukcja Obstugi
RUS Руководство для оператора
EST Kasutusjuhend
LV Lietotāja rokasgrāmata
LT Naudojimo Instrukcija
BG Оператор Ръчен
cz Na'vod K Obzluze
RO Manual de Utilizare
HUN Kezelők Kézi
HR Uputstvo za rukovatelja
6
20
34
48
62
76
90
104
118
132
146
160
174
188
202
216
230
244
258
272
286
EC DECLARATION OF CONFORMITY / DECLARATION CE DE CONFORMITE / DECLARACIÓN DE CONFORMIDAD CE / DECLARAÇÃO CE DE CONFORMIDADE / EG-VERKLARING VAN OVEREENSTEMMING / EF OVERENSSTEMMELSESERKLAERING

We, Belle Group Sheen UK, Sheen, Nr. Buxton, Derbyshire, SK17 0EU, GB, hereby certify that if the product described within this certificate is bought from an authorised Belle Group dealer within the EEC, it conforms to the following EEC directives: 2006/42/CE (This directive replaces directive 98/37/EC), Electromagnetic Compatibility Directive 2004/108/CE (as amended by 89/336/EEC, 92/31/EEC & 93/68 EEC). The Waste Electrical and Electronic Equipment (WEEE) 2002/96/CE, the low voltage directive 2006/95/CE, BS EN ISO 12100-1:2003 Safety of machinery and associated harmonised standards, where applicable. Noise emissions conform to directives 2000/14/EC Annex VI & 2005/88/EC, for machines under article 12 the notified body is AVT Reliability, Unit 2 Easter Court, Europa Boulevard, Warrington, Cheshire, WA5 7ZB, GB. Noise Technical files are held by Ray Neilson at the Belle group Head Office address which is stated above.

PRODUCT TYPE ...... TYPE DE PRODUIT...... TIPO DE PRODUCTO......
MODEL...... MODELE...... MODELO......
SERIAL No..... N° DE SERIE..... N° DE SERIE.....
Signed by:
Signature:
Medido por:
Assinado por:
Getekend door:
Uunderskrevetaf:
Ray Neilson
Managing Director - On behalf of BELLE GROUP (SHEEN) UK.
Date of Declaration - 2012
Unterzeichnet vo:
Firmato da:
Undertecknat:
Signatur:
Allekirjoitus:
Podpisat:
Подпись :
Alla kirjutanud:
Paraksts:
Pasiraše:
Подпис:
Υπογραφή:
Ray Neilson
Podepsal:
Semnat de:
Aláírás:
Potpisao:
Imzalayan:
Podpísal:
Ray Neilson
Director General - in numele BELLE GROUP (SHEEN), UK
This manual has been written to help you operate and service the RTX Rammer safely. This manual is intended for dealers and operators of the RTX Rammer.
Foreword
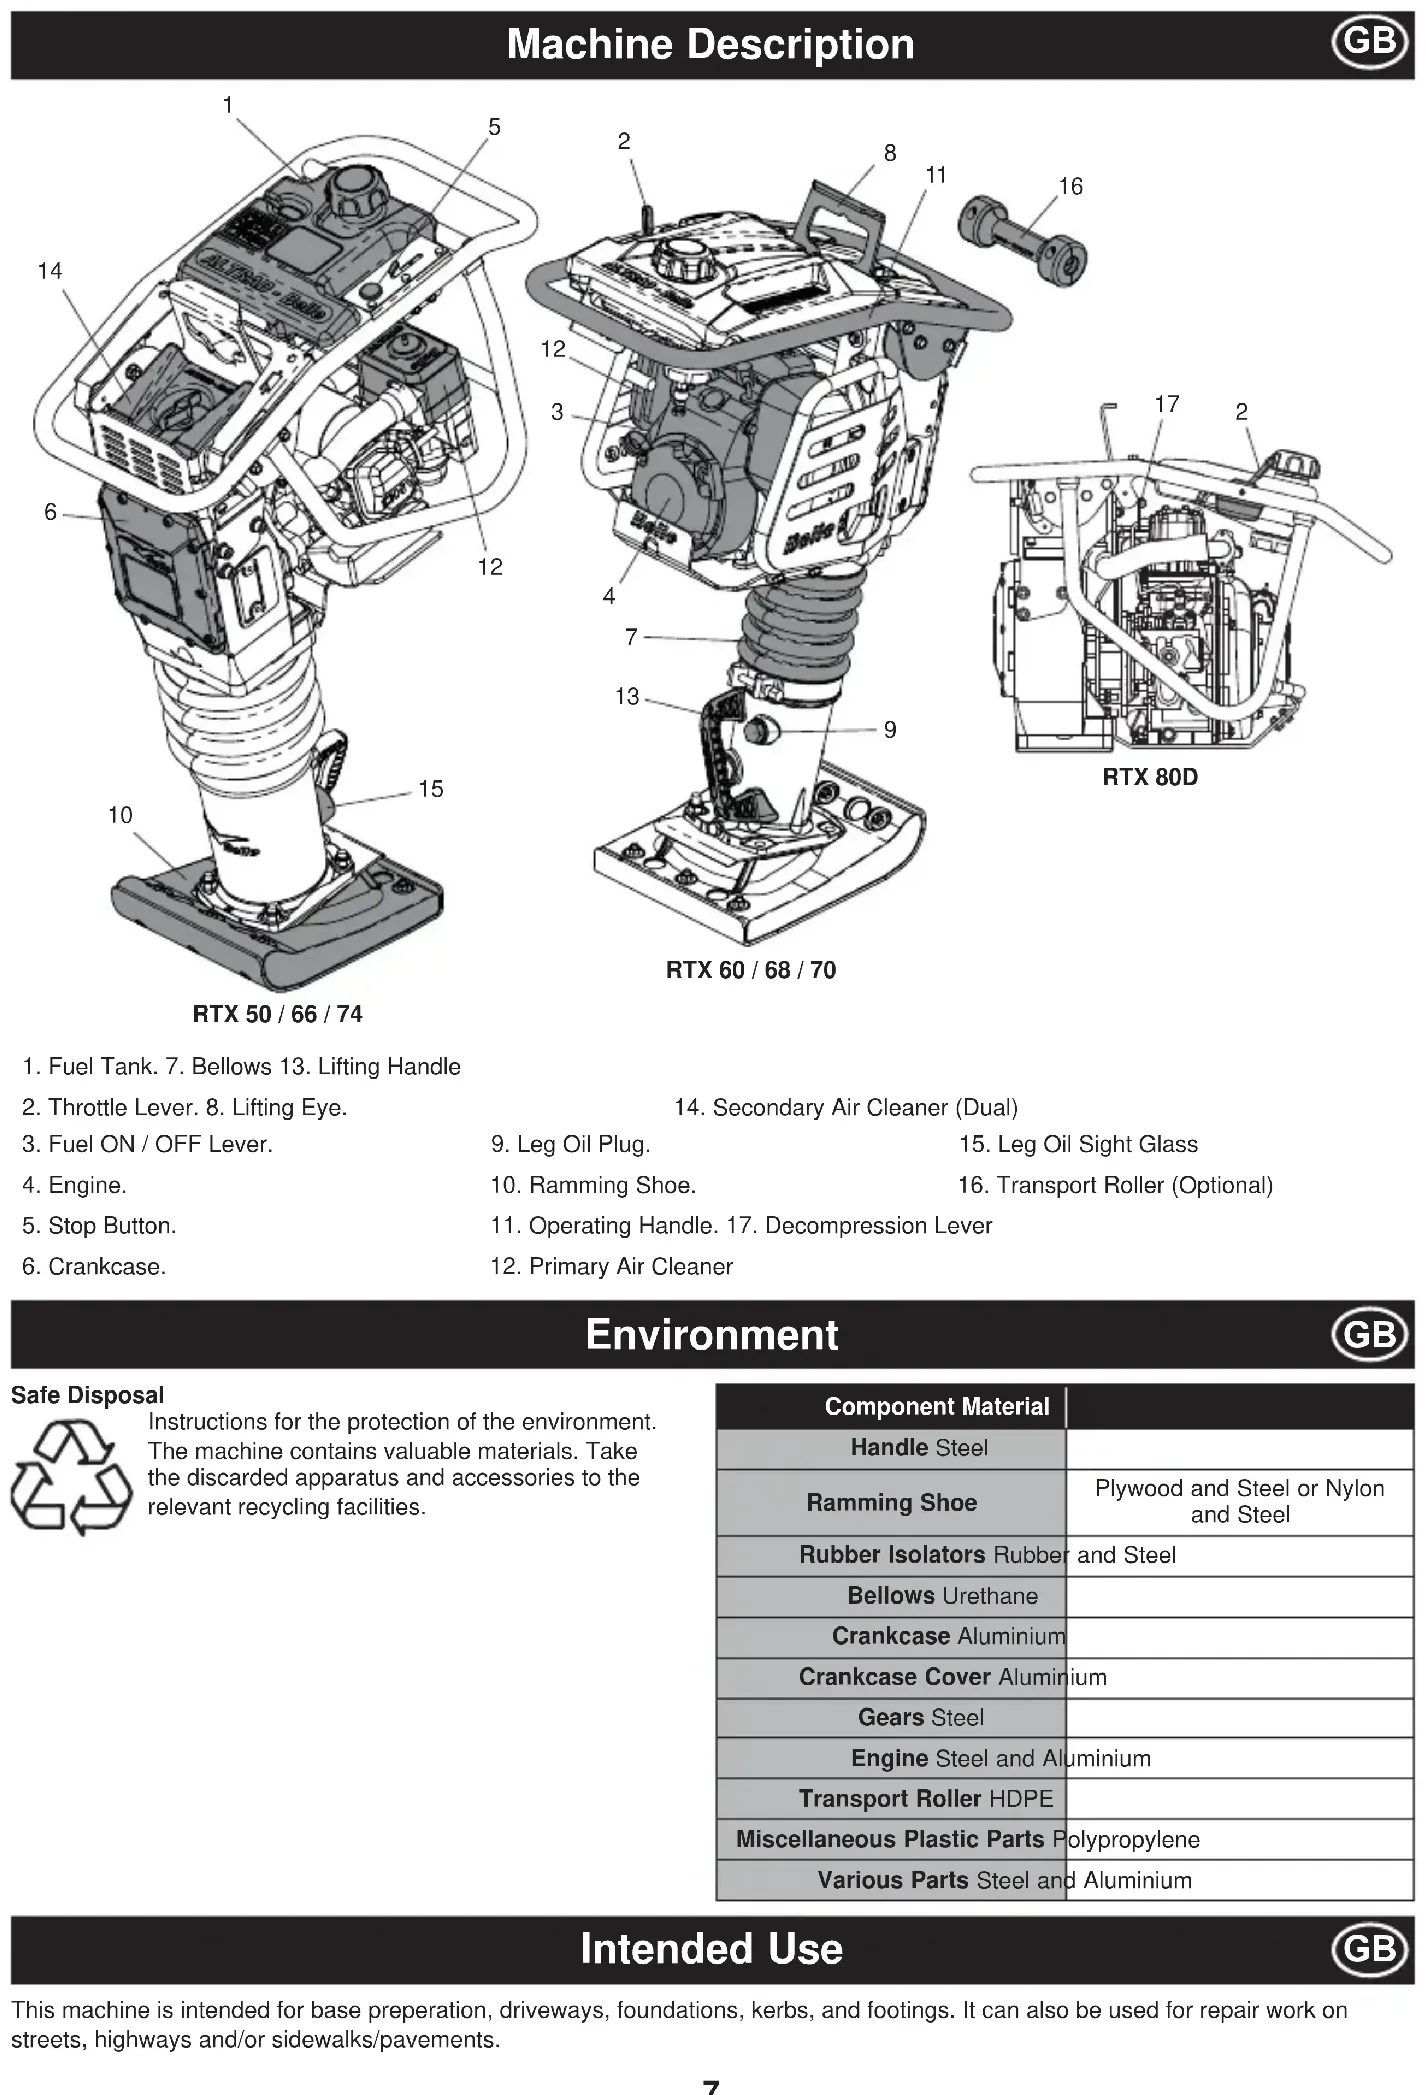
The ‘Machine Description’ section helps you to familiarise yourself with the machine's layout and controls.
The ‘Environment’ section gives instructions on how to handle the recycling of discarded apparatus in an environmentally friendly way.
The ‘General Safety’ and ‘Health and Safety’ sections explain how to use the machine to ensure your safety and the safety of the general public.
The 'Start and Stop Procedure' helps you with starting and stopping the machine.
The ‘Trouble Shooting Guide’ helps you if you have a problem with your machine.
The 'Service & Maintenance' section is to help you with the general maintenance and servicing of your machine.
The ‘Warranty’ section details the nature of the warranty cover and the claims procedure.
The ‘Declaration of Conformity’ section shows the standards that the machine has been built to.
Directives with regard to the notations.
Text in this manual to which special attention must be paid are shown in the following way:

CAUTION
The product can be at risk. The machine or yourself can be damaged or injured if procedures are not carried out in the correct way.

WARNING
The life of the operator can be at risk.

WARNING

WARNING
Before you operate or carry out any maintenance on this machine YOU MUST READ and STUDY this manual.
KNOW how to safely use the unit's controls and what you must do for safe maintenance. (NB Be sure that you know how to switch the machine off before you switch on, in case you get into difficulty.)
ALWAYS wear or use the proper safety items required for your personal protection. If you have ANY QUESTIONS about the safe use or maintenance of this unit, ASK YOUR SUPERVISOR OR CONTACT: Altrad Belle (UK): +44 (0) 1298 84606

Contents
How to use this manual....6
Warning 6
Machine Description....7
Environment 7
Intended Use 7
Decals....8 - 10
Technical Data....11
General Safety 12
Health and Safety....12
Pre-Start Safety Checks....13
Long Term Storage....13
Start & Stop Procedure 14 - 15
Operation....15
Trouble Shooting Guide....16
Service & Maintenance 16 - 17
Transport....18
Warranty 19
Declaration of Conformity....2
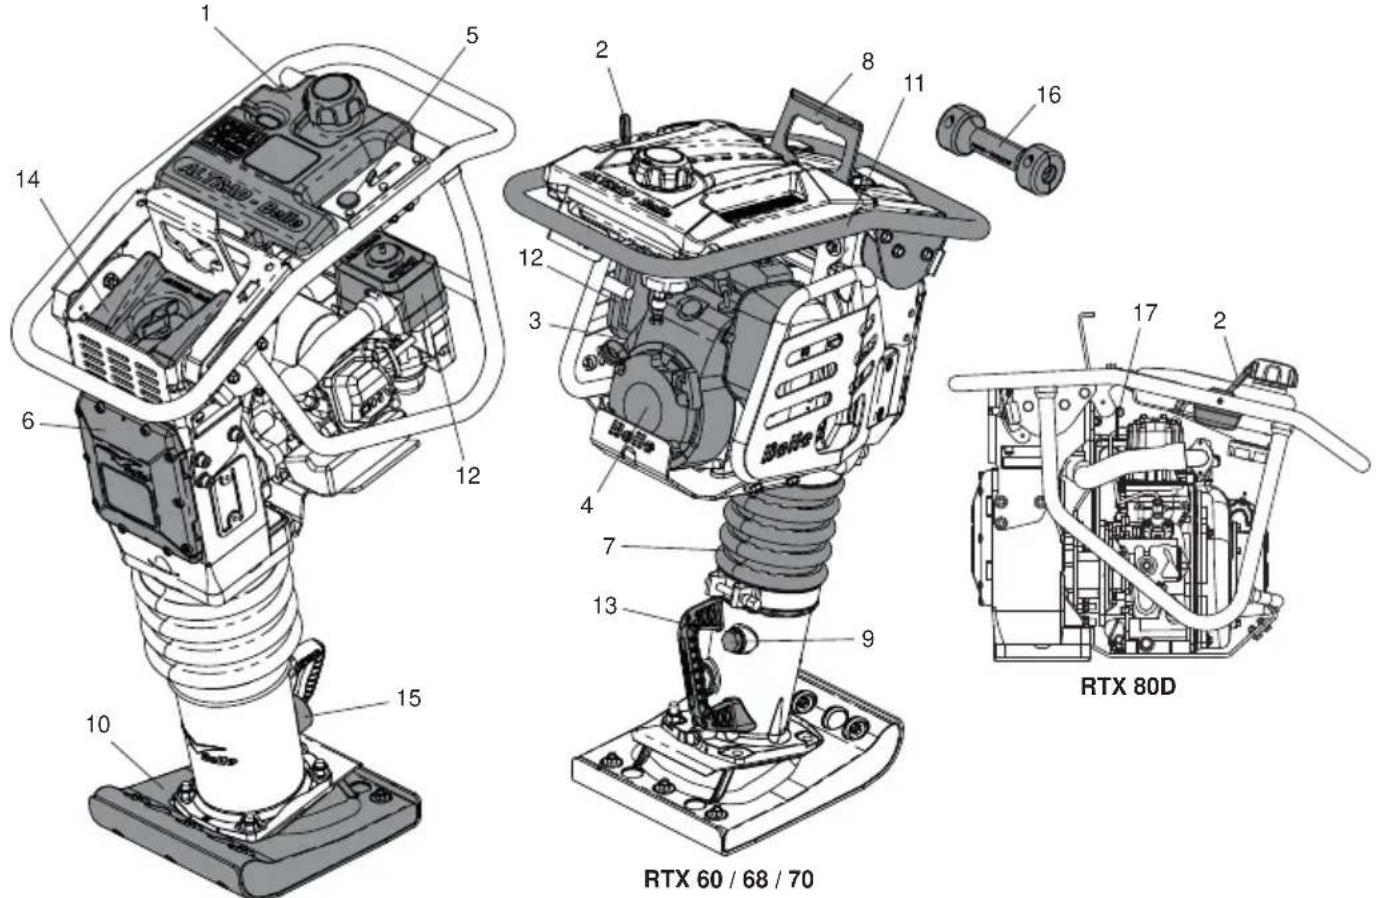
RTX 50 / 66 / 74
- Fuel Tank. 7. Bellows 13. Lifting Handle
- Throttle Lever. 8. Lifting Eye.
- Fuel ON / OFF Lever.
- Engine.
- Stop Button.
-
Crankcase.
-
Secondary Air Cleaner (Dual)
-
Leg Oil Plug.
- Leg Oil Sight Glass
- Ramming Shoe.
- Transport Roller (Optional)
- Operating Handle. 17. Decompression Lever
- Primary Air Cleaner
Environment

Safe Disposal

Instructions for the protection of the environment. The machine contains valuable materials. Take the discarded apparatus and accessories to the relevant recycling facilities.
| Component Material | |
| Handle Steel | |
| Ramming Shoe | Plywood and Steel or Nylon and Steel |
| Rubber Isolators Rubber and Steel | |
| Bellows Urethane | |
| Crankcase Aluminium | |
| Crankcase Cover Aluminium | |
| Gears Steel | |
| Engine Steel and Aluminium | |
| Transport Roller HDPE | |
| Miscellaneous Plastic Parts Polypropylene | |
| Various Parts Steel and Aluminium | |
Intended Use

This machine is intended for base preparation, driveways, foundations, kerbs, and footings. It can also be used for repair work on streets, highways and/or sidewalks/pavements.
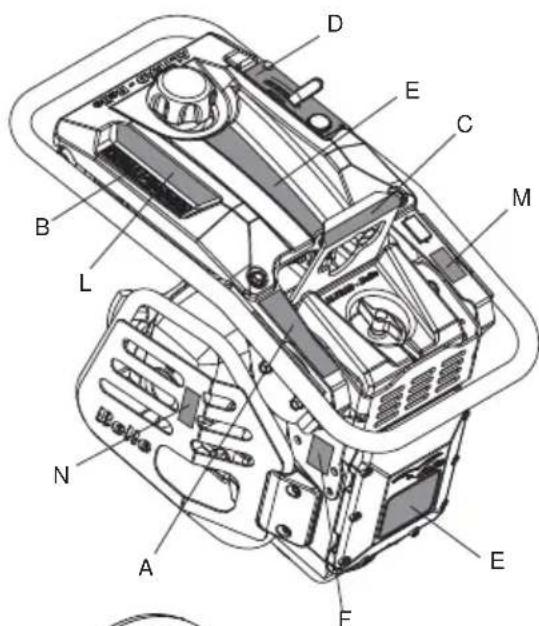
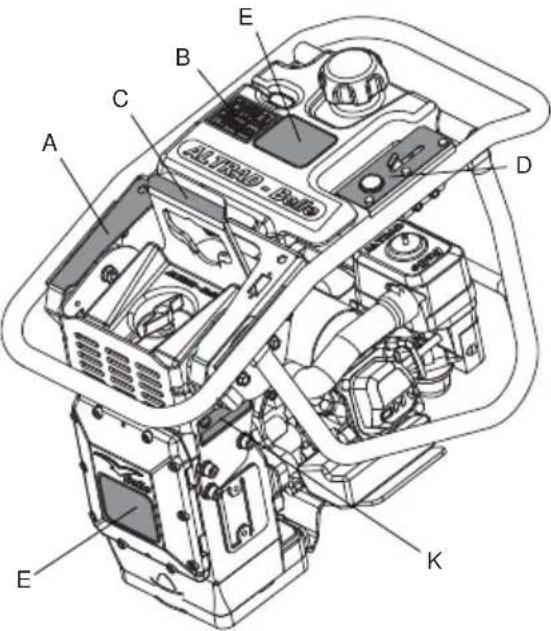
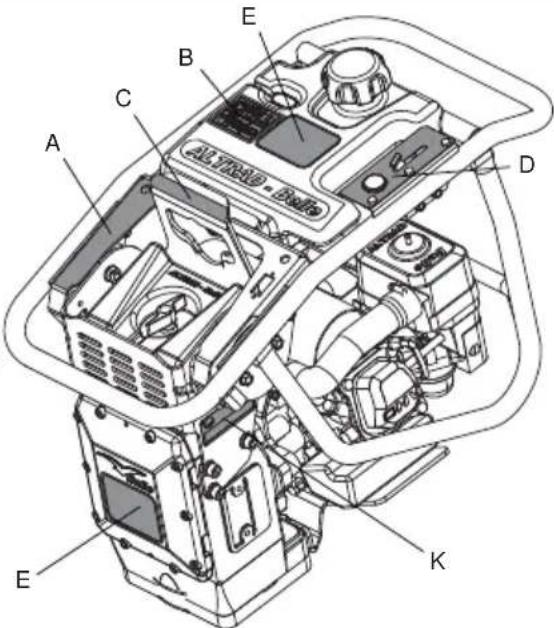
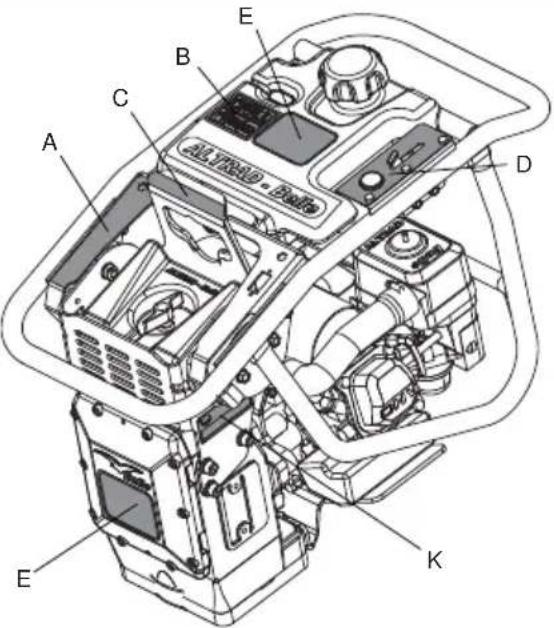
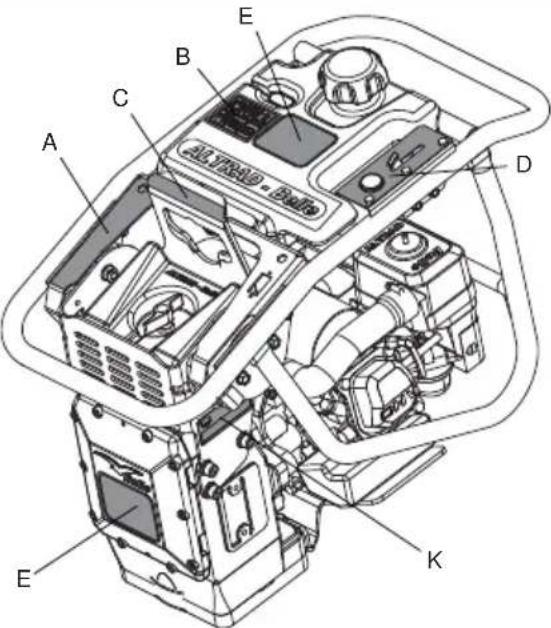
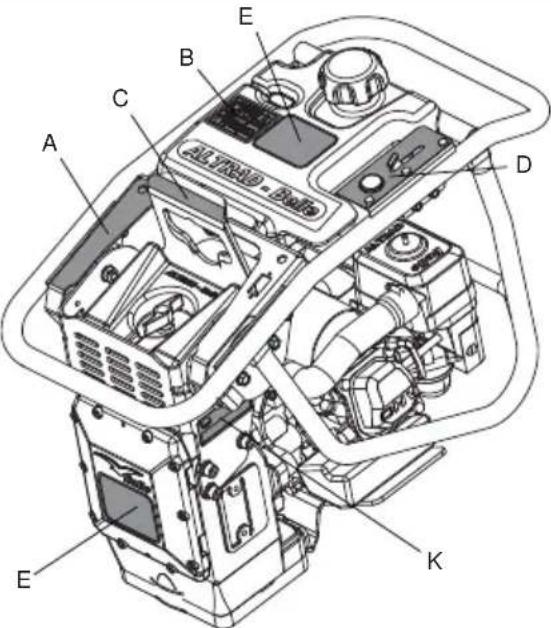
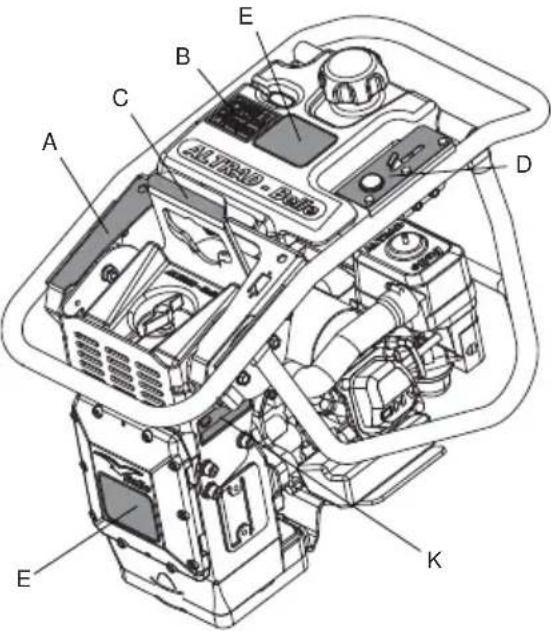
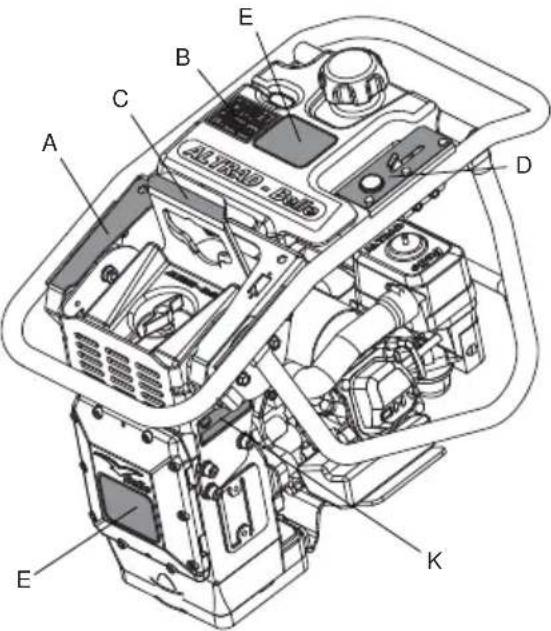
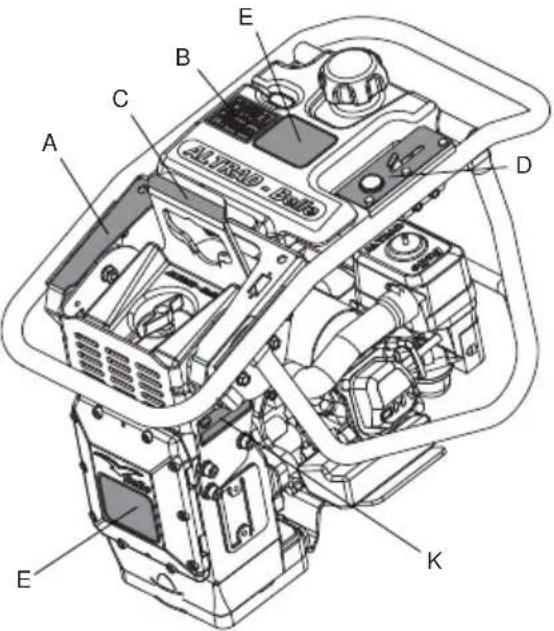
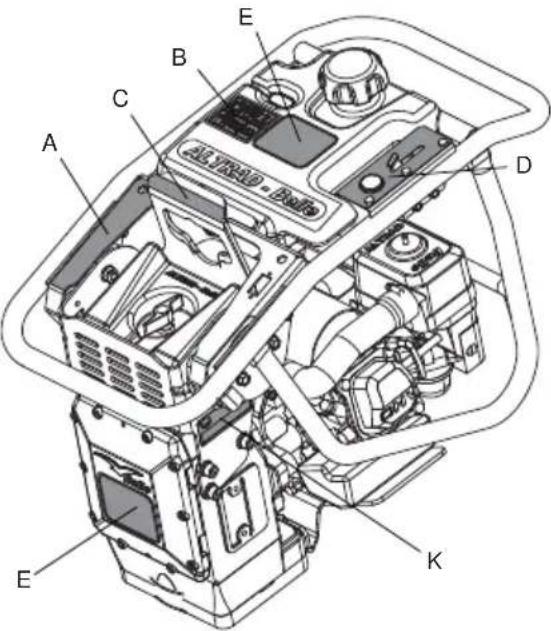
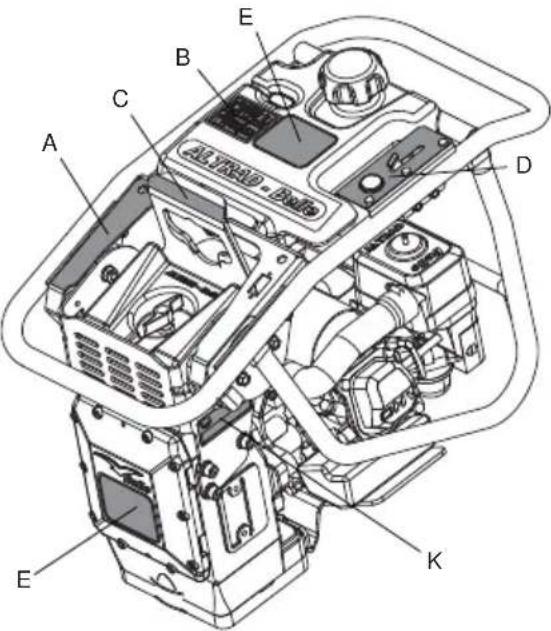
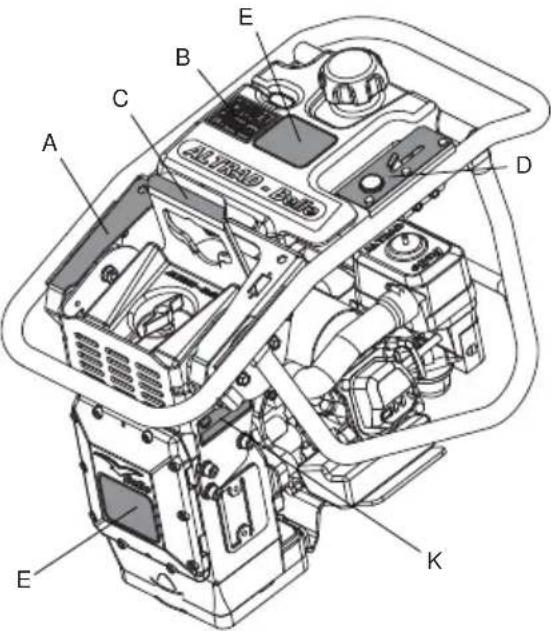
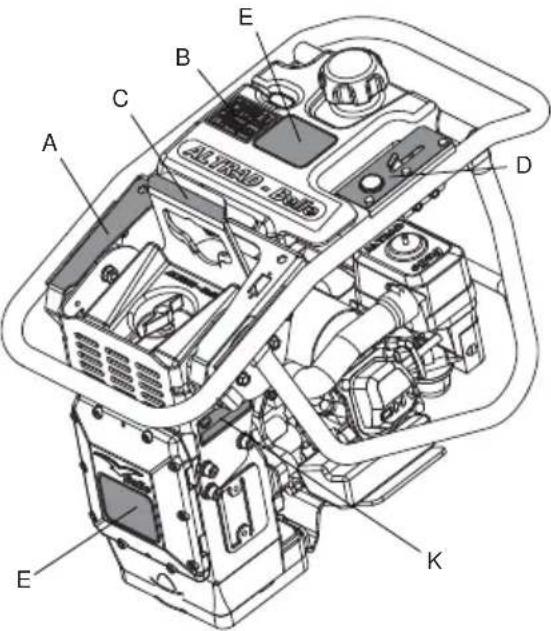
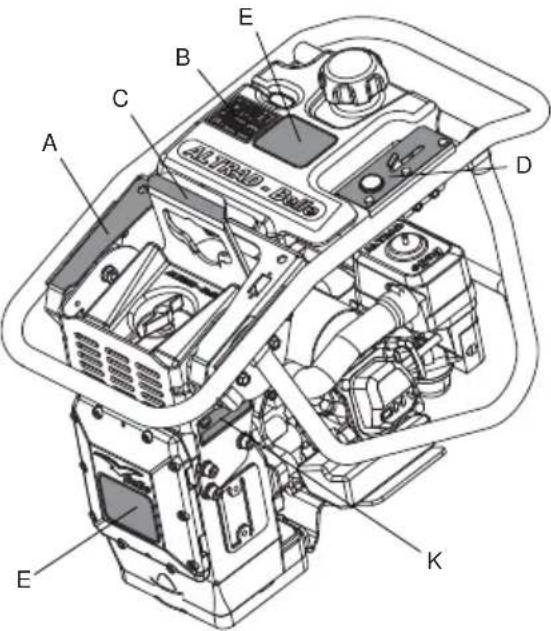
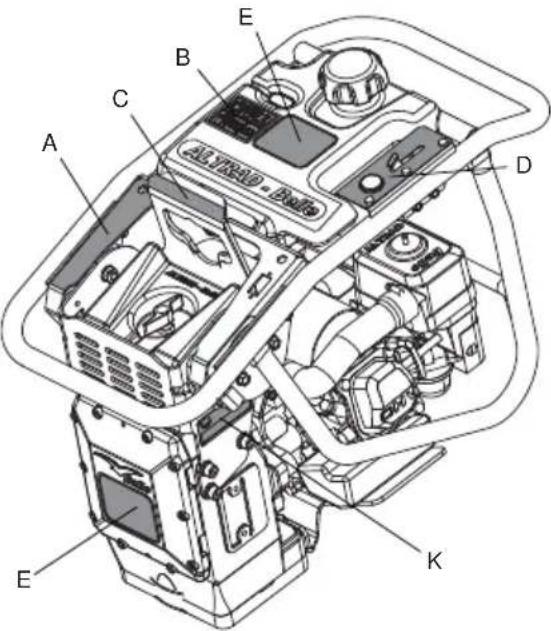
A - Transport Decal (Part No. 800-99631)
On-Site Transport
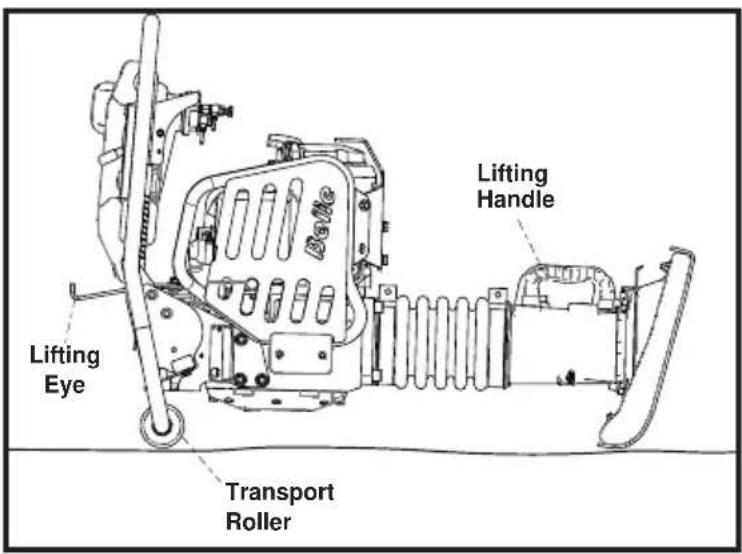
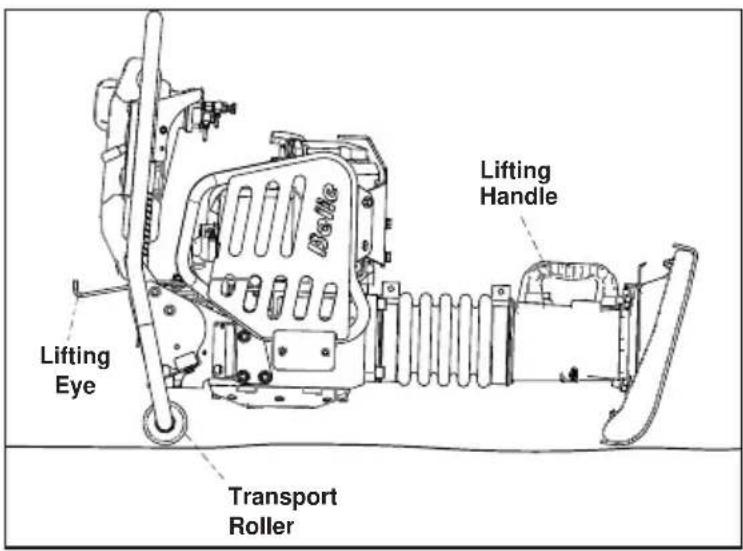
The RTX Rammer may be moved vertically by 2 people, laid on the Transport Roller (if fitted) and pulled using the Lifting Handle or by using a Sling or Hoist on the Lifting Eye. NOTE:- A sling or hoist must not be used on the Lifting Handle.
Road Transport
The RTX Rammer must be transported as far as possible standing up, strapped to the body side board of the truck, or strapped inside a lorry (panel truck). If not possible, it may be laid down only on the Transport Rollers or front bar of the Operating Handle, in stable position and strongly strapped down to guard against rolling or sliding.
B - Safety Symbols
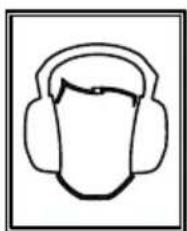
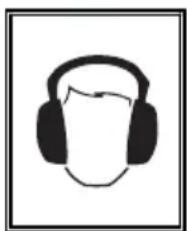
Wear Ear Protection

Wear Eye Protection
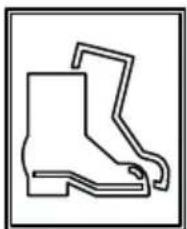
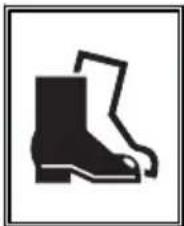
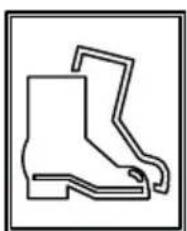
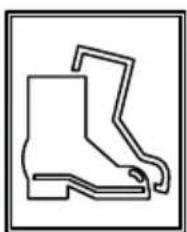
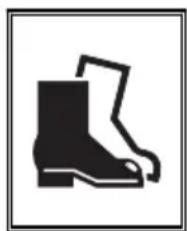
Wear Protective Footwear

Wear Protective Gloves

Please Read Operators Manual

CE Compliant

Please
Recycle
C - Lifting Eye Decal (Part No. 800-99630)
Lifting Eye for use with a Sling or Mechanical Hoist.
D - Throttle Decal (Part No. 800-99628)
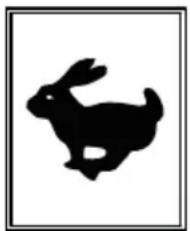
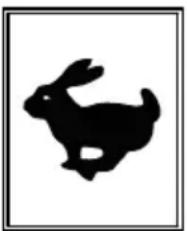
Max. RPM Position

Idle Position

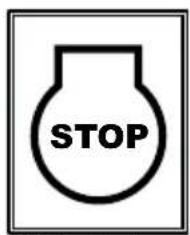
Emergency Stop Position
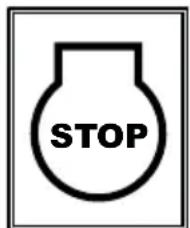
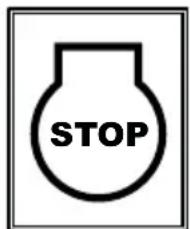
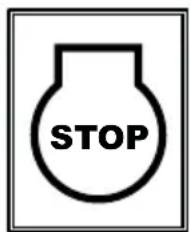
Engine Stop Button (Petrol Only)
E - Branding Decal
Branding Decal to identify the Model of RTX Rammer.
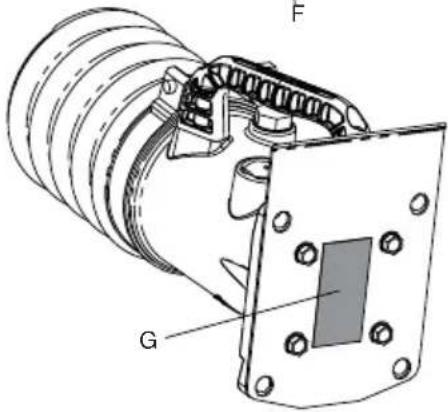
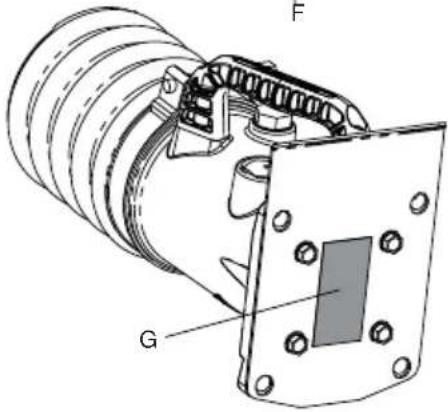
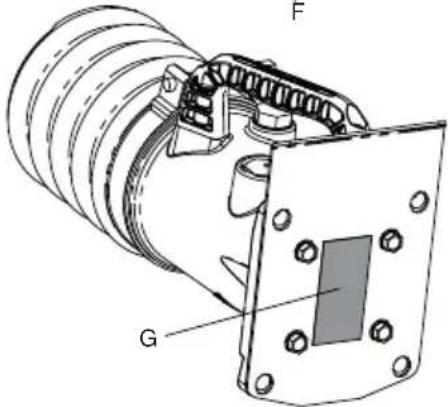
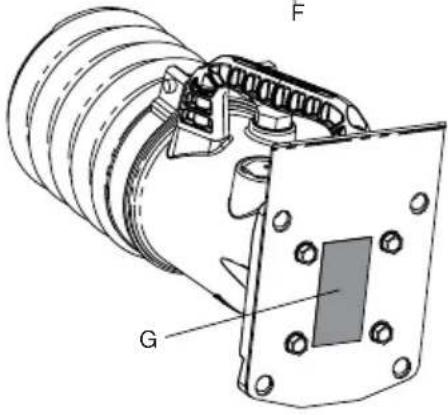
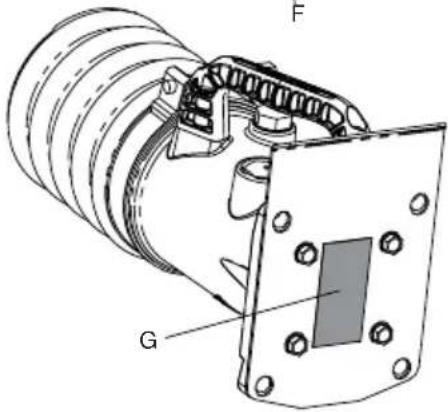
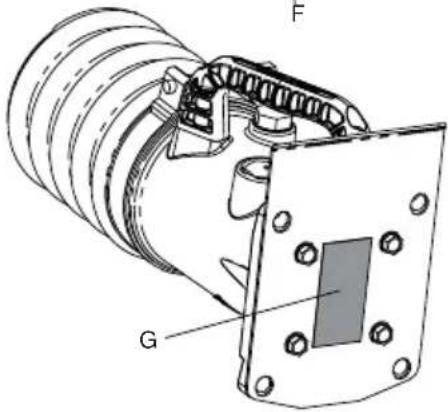
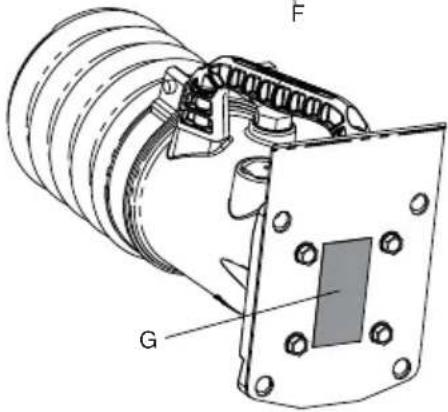
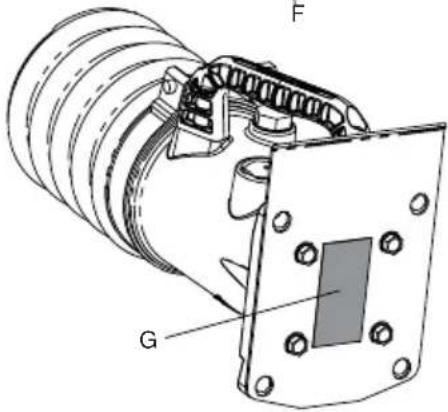
F - Noise Decal
Guaranteed Sound Power Level of the machine in dB(A).
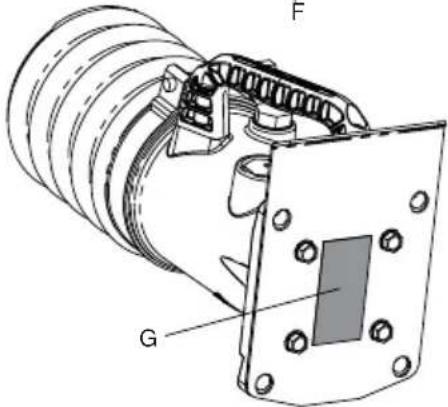
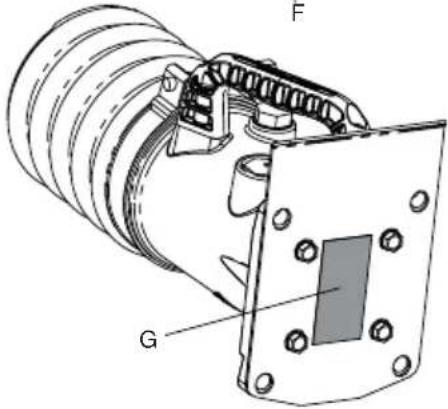
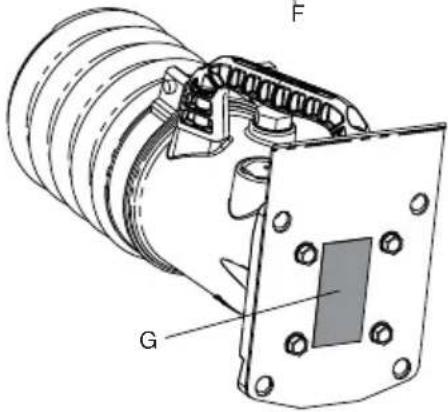
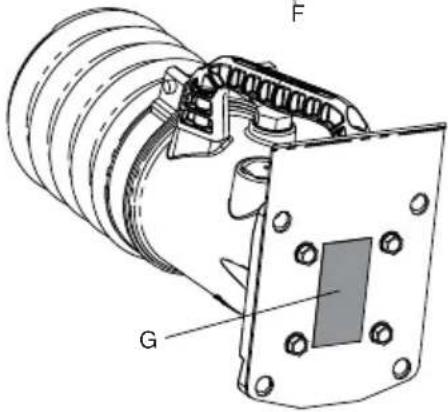
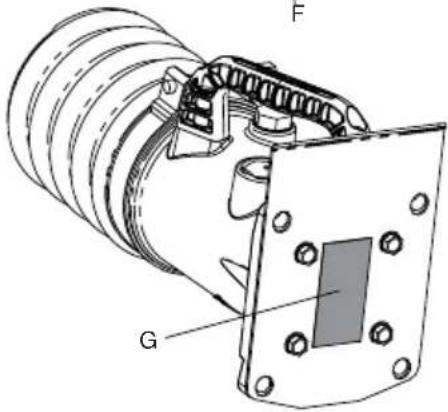
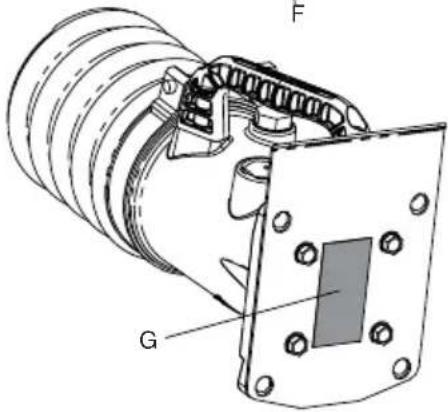
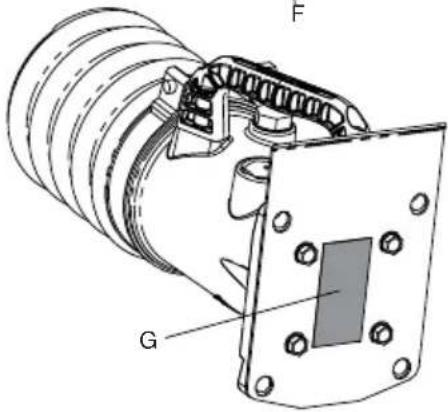
G - Spring Safety Decal (Part No. 800-99619)
DO NOT loosen or remove any of the Screws from the underside of the Rammer Leg. The Rammer Leg contains a highly compressed Spring which may cause serious injury if released by loosening or removing any of the Screws. Contact dealer for more information.
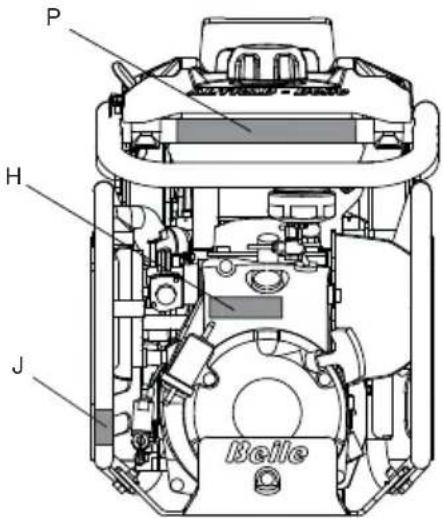
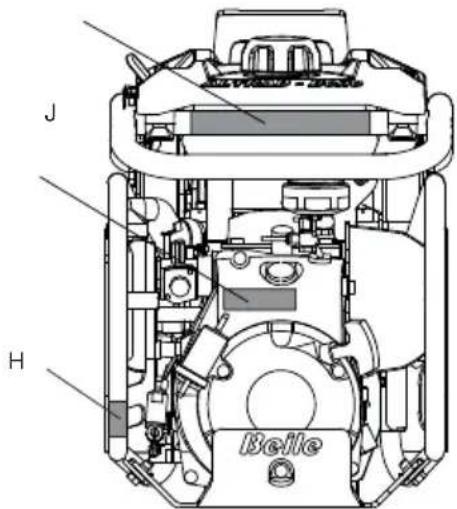
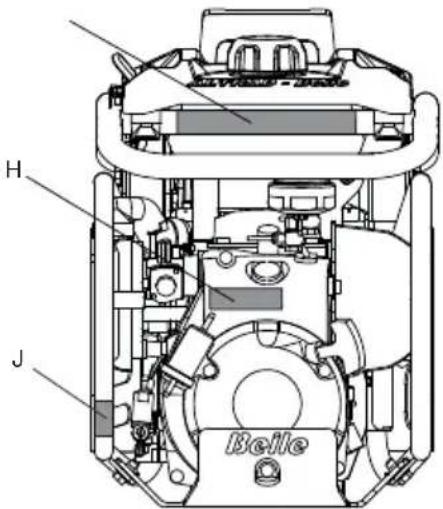
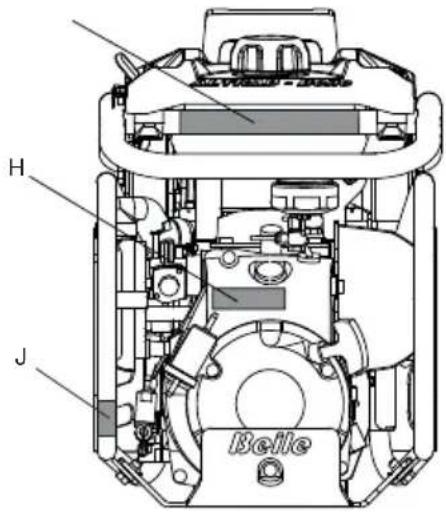
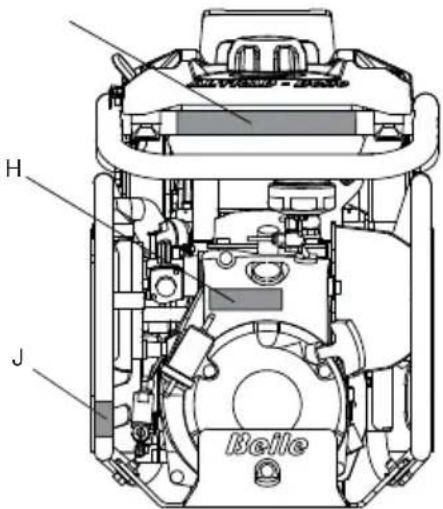
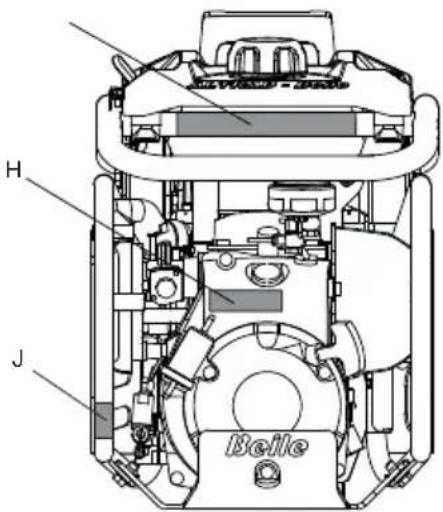
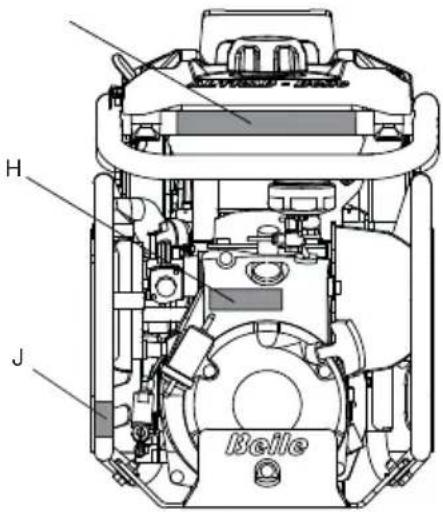
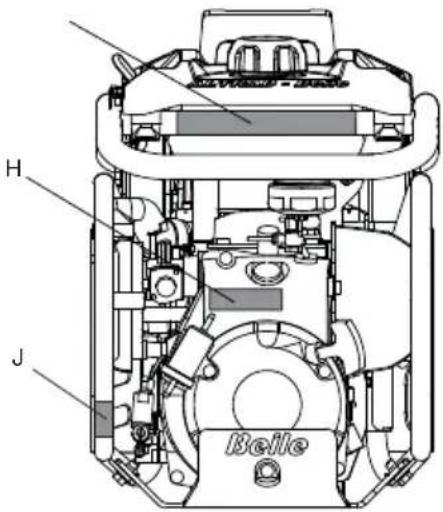
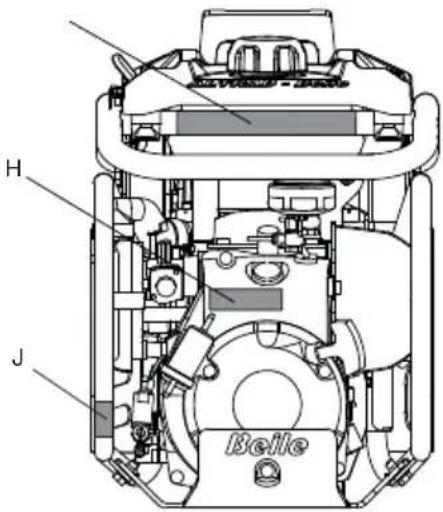
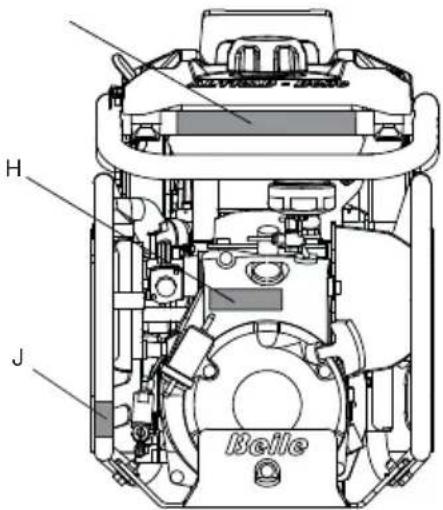
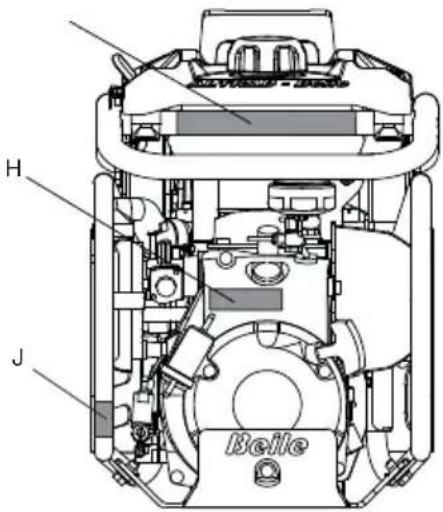
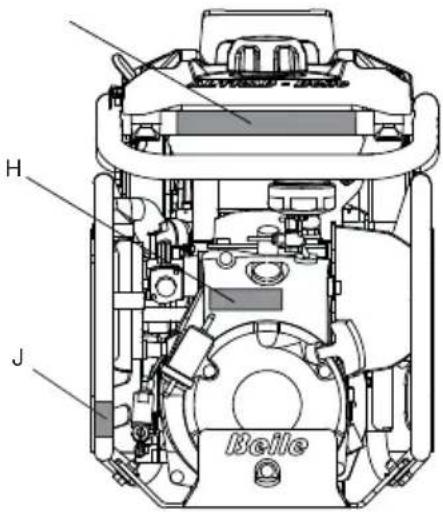
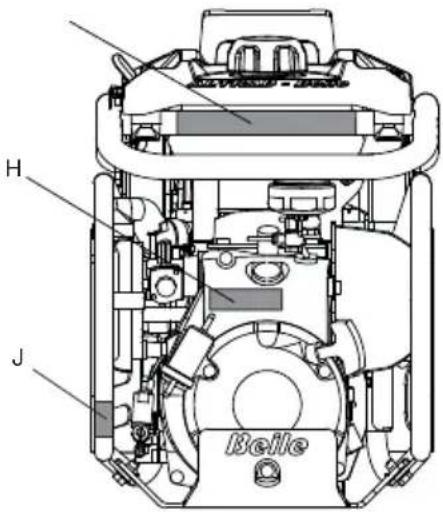
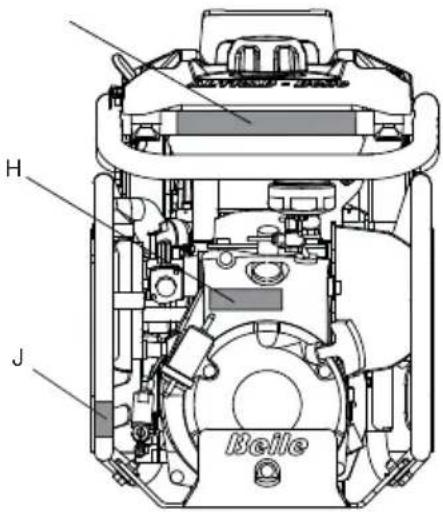
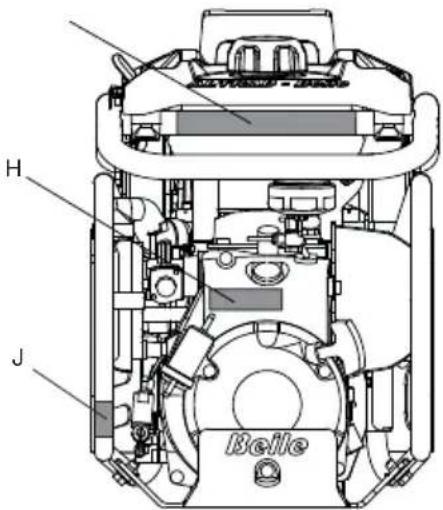
H - Engine Start Decal (Part No. 800-99625)
To Start the Engine, push the Carburettor Primer Bulb 4 times and then pull the Recoil Handle until the Engine fires.
J - Fuel Valve Decal (800-99634-0)
Fuel Valve 'ON' and 'OFF' positions.
- To START the machine, the Fuel Valve must be in the 'ON' position.
- When the machine is not in use or being transported, the Fuel Valve must be in the 'OFF' position.
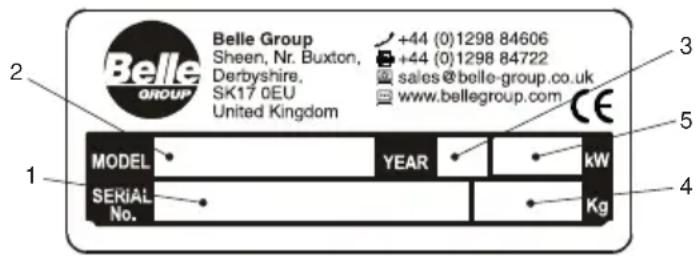
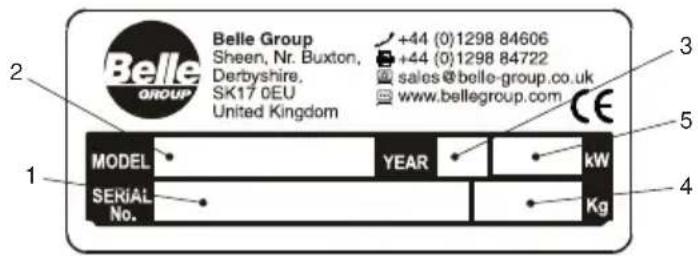
K - Serial Plate (Part No. 800-99844)
The Serial Plate contains the machine Serial Number and all other information that you may require when contacting Altrad Belle regarding your machine.
- Serial Number.
- RTX Rammer Model.
- Year of Manufacture.
- Machine Weight.
- Machine Power.
L - Safety Decal (Part No. 800-99831)

WARNING! Please

Read Operators Manual
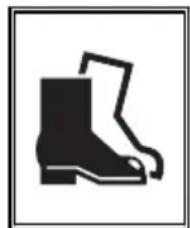
Wear Protective Footwear
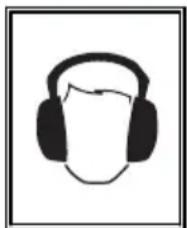
Wear Ear Protection

Wear Eye Protection
M - Exhaust Fumes Warning Decal (Part No. 800-99520)
Engines emit carbon monoxide; operate only in well-ventilated areas.
N - Hot Surface Decal (Part No. 800-99520)
CAUTION! Beware of hot surfaces around the Engine and Exhaust area.
P - Diesel Only Decal (Part No. 800-99524)
CAUTION! Only Diesel must be used in this machine (Diesel models only).
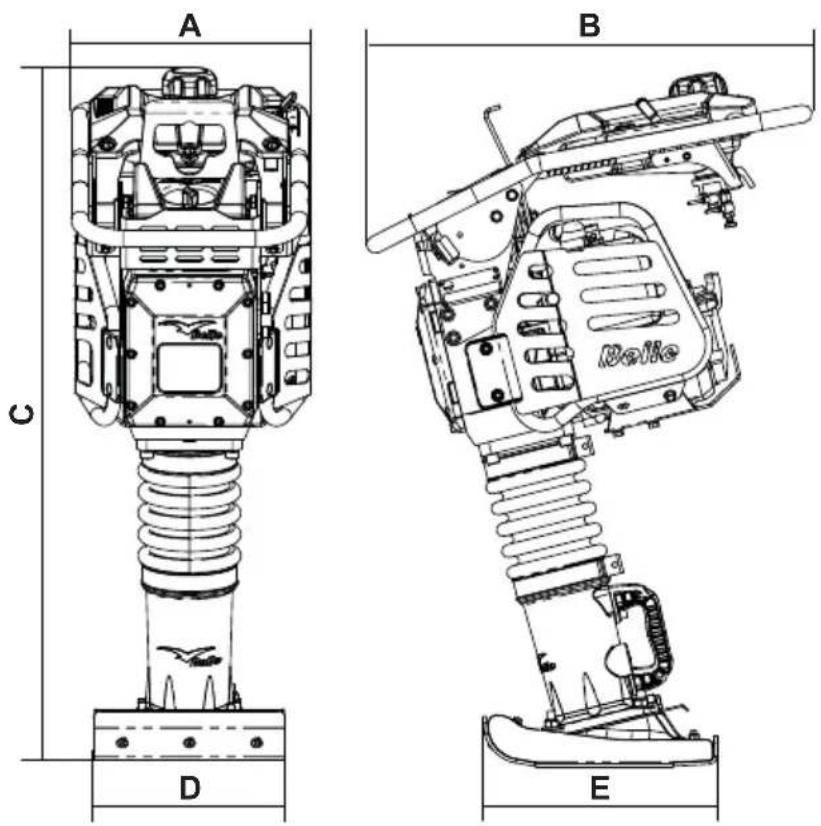
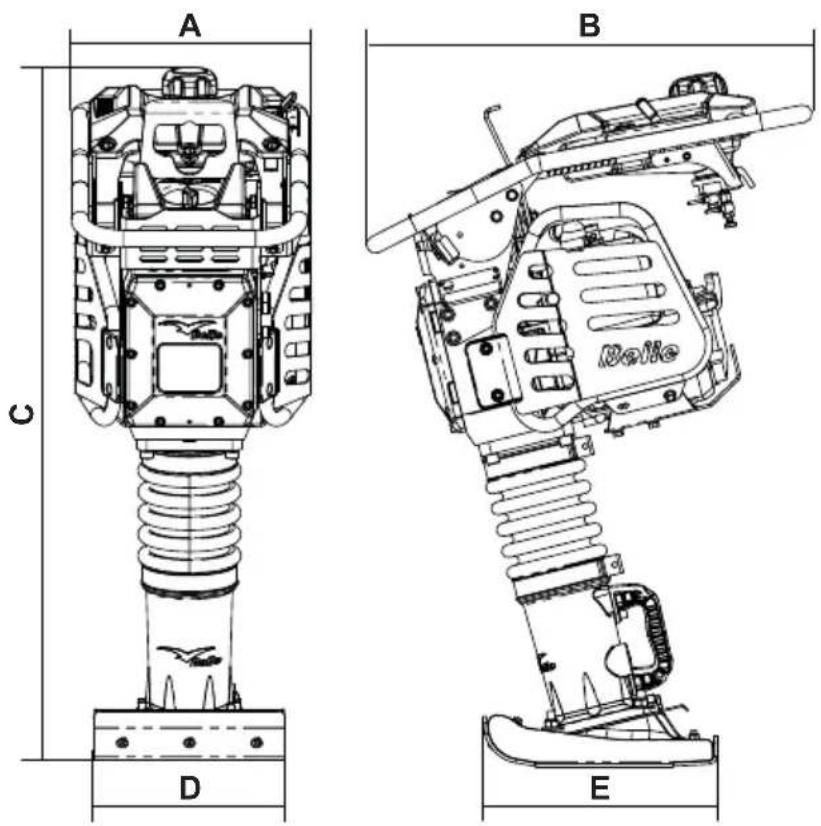
| Model RTX 50 RTX 60C RTX 60 RTX 66 RTX 68 RTX 70 RTX 74 RTX 80D | ||||||||
| A - Width (mm) 345 425 345 345 425 | ||||||||
| B - Length (mm) 670 705 700 705 714 700 | ||||||||
| C - Height (mm) 975 975 1065 1040 | 1040 1065 | 1081 | ||||||
| D - Ramming Shoe Width* (mm) | 230 | 165 | 280 | |||||
| E - Ramming Shoe Length* (mm) | 335 | |||||||
| Engine Models | Honda GX100 | Honda GX120 | Honda GX100 | Honda GX120 | Yanmar L48 | |||
| Engine Type | 4 Stroke, OHC, Air Cooled | Single Cylinder | ||||||
| Maximum Output (kW) | 2.3 | 2.6 | 2.3 | 2.6 | 3.5 | |||
| Fuel Type | Unleaded | Diesel | ||||||
| Fuel Tank Capacity (Ltrs) | 2.5 | 2.5 | ||||||
| Carburettor Type | Diaphragm | Float Chamber | Diaphragm | Float Chamber | Injection | |||
| Starting Mechanism | Recoil | |||||||
| Operational Weight (kg) | 57.7 | 60 | 79 | 70 | 72 | 84 | 86 | |
| Vibration Frequency (Hz) | 11 | 10 | 11 | 11 | 10 | 10 | ||
| Impact Force (kN) | 12.5 | 13.6 | 13.6 | 16.5 | 16 | 17 | 18.6 | 20.5 |
| Blows Per Minute (bpm) | 450 - 660 | 450 - 600 | 450 - 660 | 450 - 700 | 450 - 600 | 450 - 600 | ||
| Stroke (mm) | 52 | |||||||
| Noise Level (dB(A)) | 108 | |||||||
| 3 Axis Vibration (m/s2) | 9.82 | 7.25 | 7.25 | 7.61 | 7.45 | 7.49 | 11.3 | 11.8 |
Vibration Level: Minimum Level - EN500 Part 4.
* - Other Shoe options are available. Sizes are:- 165mm (W) x 335mm (L), 230mm x 335mm & 280mm x 335mm.
For your own personal protection and for the safety of those around you, please read and ensure you fully understand the following safety information. It is the responsibility of the operator to ensure that he/she fully understands how to operate this equipment safely. If you are unsure about the safe and correct use of your RTX, consult your supervisor or Altrad Belle of companies.

CAUTION
Improper maintenance or use can be hazardous. Read and Understand this section before you perform any maintenance, service or repairs.
• This machine must only be used for its intended purpose. This machine must be operated only by well trained personnel.
- The owner of this machine must observe, and train the user of the machine to observe, the effective Labour Protection Regulation in the country of application.
• This equipment is heavy and must not be lifted single-handedly, either GET HELP or use suitable lifting equipment.
- This machine must be operated on ground where stability is guaranteed.
• Cordon off the work area and keep members of the public and unauthorised personnel at a safe distance.
- Personal Protective Equipment (PPE) must be worn by the operator whenever this equipment is being used (See Health & Safety Section).
• Make sure you know how to safely switch this machine OFF before you switch it ON in case you get into difficulty.
• Always switch OFF the engine and CLOSE the fuel tap before transporting, moving it around the site or servicing it.
- During use the engine becomes very hot, allow the engine to cool before touching it.
- Never leave the engine running and unattended.
- Never remove or tamper with any guards fitted, they are there for your protection. Always check guards for condition and security, if any are damaged or missing, DO NOT USE THE RTX until the guard has been replaced or repaired.
- Do not operate the RTX when you are ill, feeling tired, or when under the influence of alcohol or drugs.
- This machine is designed to eliminate the possible risks arising from its use. However, risks DO reside, and these residual risks are not clearly recognisable and may cause personal injury, property damage and possible death. If such unpredictable and unrecognisable risks become apparent, the machine must be stopped immediately, and the operator or his supervisor must take the appropriate measures to eliminate such risks. It is sometimes necessary for the manufacturer to be informed of such an event for future counter measuring.

WARNING
Fuel is flammable. It may cause injury and property damage. Shut down the engine, extinguish all open flames and do not smoke while filling the fuel tank. Always wipe up any spilled fuel.
- Before refuelling, switch off the engine and allow it to cool.
- When refuelling, DO NOT smoke or allow naked flames in the area.
- When refuelling, use a proper funnel, and avoid spilling fuel over the engine.
- Spilt fuel must be made safe immediately, using sand. If fuel is spilt on your clothes, change them.
- Store fuel in an approved, purpose made container away from heat and ignition sources.

Health & Safety
Vibration
Some vibration from the machines operation is transmitted through the handle to the operator's hands. The Altrad Belle RTX range has been specifically designed to reduce hand/arm vibration levels. Refer to specifications & technical data for vibration levels and usage times (recommended maximum daily exposure time). DO NOT exceed the maximum usage times.
PPE (Personal Protective Equipment)
Personal injury or property damage may be caused by knocks, crushing, slipping, tripping, falling, or by flying chips due mainly to the improper or careless handling of the machine, or working in a confined area.
Suitable PPE must be worn when using this equipment i.e. Safety Goggles, Gloves, Ear Defenders, Dust Mask and Steel Toe capped footwear.
Wear clothing suitable for the work you are doing. Tie back long hair and remove any jewellery which may catch in the equipment's moving parts.
Dust
The compaction process can produce dust, which may be hazardous to your health. Always wear a mask that is suited to the type of dust being produced.
Fuel
Oil and fuel used in this machine may cause the following hazards.
- Poisoning if the fuel or oil vapour is inhaled.
- Allergies if the fuel or oil spills on the skin.
- Fire and explosion if the fuel and oil is handled near smoking or open fires.
- Do not ingest fuel or inhale fuel vapours and avoid contact with your skin. Wash fuel splashes immediately. If you get fuel in your eyes, irrigate with copious amounts of water and seek medical attention as soon as possible.
Exhaust Fumes

WARNING
The exhaust fumes produced by this equipment are highly toxic and can kill!
Do not operate your RTX Rammer indoors or in a confined space, make sure the work area is adequately ventilated.
Pre-Start Checks
Pre start-up inspection
The following Pre-start-up inspection must be performed before the start of each work session or after every four hours of use, whichever is first. Please refer to the service section for detailed guidance. If any fault is discovered, the RTX must not be used until the fault is rectified.
- Thoroughly inspect the RTX for signs of damage.
- Check Hoses, filler openings, Drain Plugs and any other areas for signs of leakage. Fix any leaks before operating.
- Check the Engine Oil level and top up as necessary.
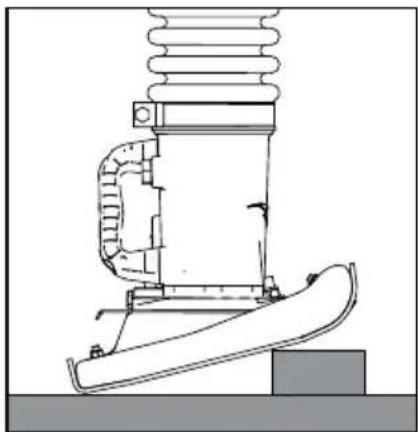
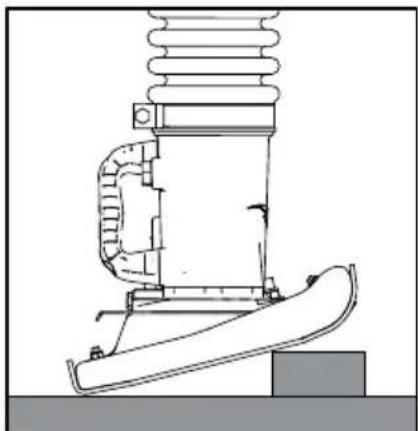
3.1 To check the Engine Oil level, place the machine on a flat surface ensuring the Engine is level. To achieve this place the Rammer in the position shown below.
3.2 Remove the Oil Gauge, and observe that the Oil is up to the rim of the filler port. Use Engine Oil with the correct viscosity. (SAE 10W-30 Mineral Oil recommended) - Check the Engine Fuel level and top up as necessary. Use clean Fuel. Use of contaminated Fuel may damage the Fuel system.
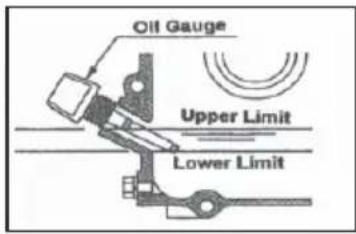

CAUTION
NOTICE: This machine uses Unleaded Gasoline/Petrol. NEVER fill the fuel tank with a mixture of Oil and Gasoline/Petrol.
- Check that the Air Filter is clean. Excessive dust/dirt accumulation within the filter element will cause erratic Engine operation. Clean the Air Filter element when it is contaminated (See Maintenance section).
- Check the Rammer Leg Oil level and top up as necessary (Rammer must have been idle for at least 10 minutes before checking)
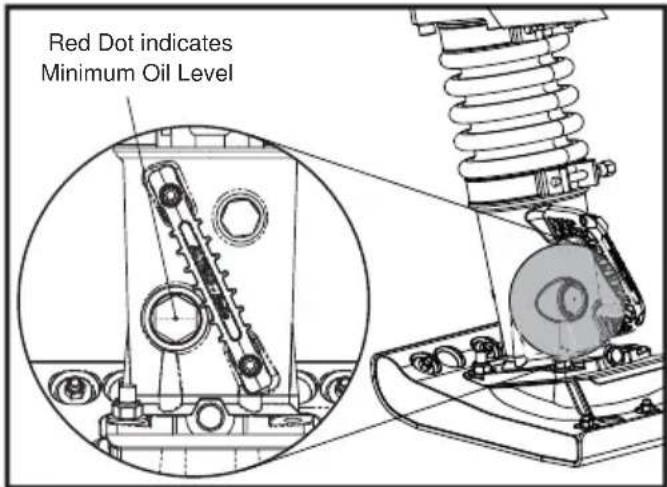
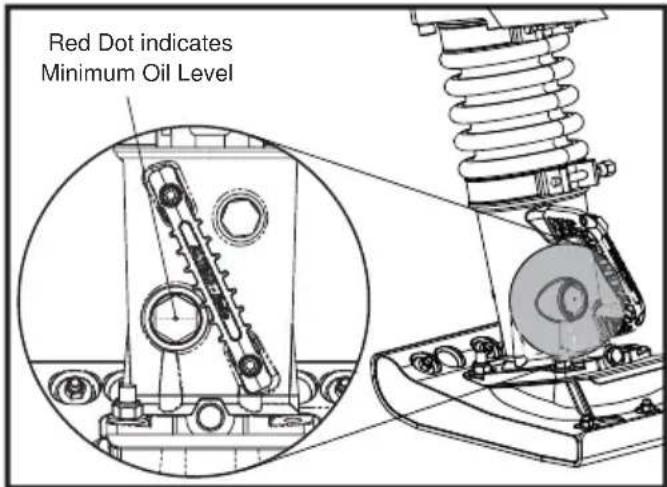
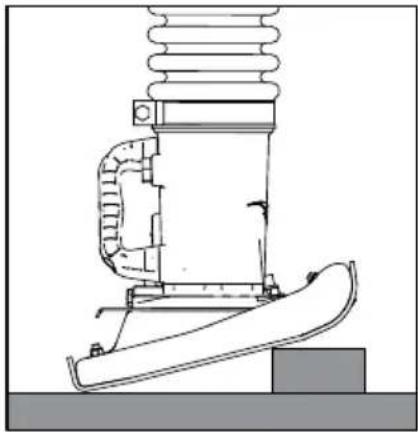
6.1 To check the Rammer Leg Oil level, place the machine on a flat surface ensuring the Foot is flat to the ground, as shown below.
6.2 The minimum level is shown by the Red Dot on the Oil Sight Glass within the Rammer Leg. (SAE 10W-30 Mineral Oil recommended)
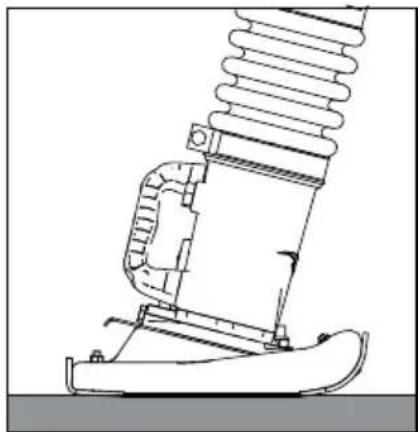
Rammer Leg Oil Check Position
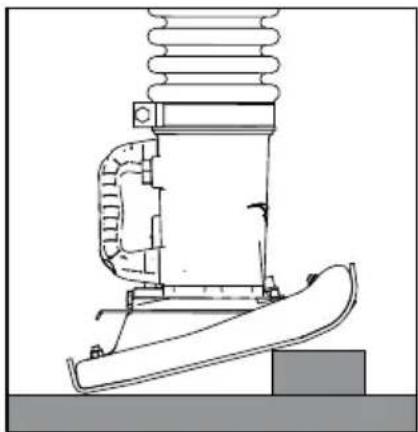
Engine Oil Check Position
Long Term Storage
GB
For long term storage, empty the fuel in the carburettor by running the engine with the fuel tap being closed (Petrol Only)
The chemical composition of fuel will deteriorate after prolonged storage. When the machine needs to be stored for a long time, remove all fuel from the fuel tank. Also remove the fuel from the float chamber of the carburettor by draining the fuel out from the drain plug (see diagram) (Petrol Only)
Clean up oil and dust accumulation on rubber parts.
Clean the ramming shoe and apply a light coating of oil to prevent rust formation.
Cover the machine and store in a dry place.
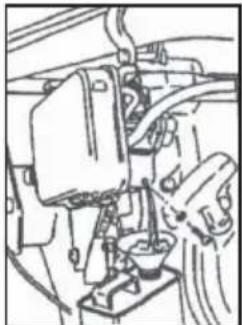

CAUTION
Improper operation can be hazardous. Read and understand this section before you start the machine.

WARNING
To stop the machine in an emergency, move the Throttle Lever to the Emergency Stop position. This will immediately stop the machine from vibrating.
Honda GX100 & GX120
- Open the fuel cock/tap.
- Set the speed control lever to the STARTING position (Halfway between HIGH and LOW position).
- Move the choke lever to the CLOSED position.
- Push the Carburettor Primer Bulb 4 times (or at least 10 times when the machine is new or after machine has had the fuel drain).
- Taking a firm hold of the Operating handle with one hand, grasp the recoil starter handle with the other, Pull the recoil starter handle until engine resistance is felt, then allow the starter to return.
- Taking care not to pull the starter rope fully out, pull the starter handle briskly.
- Repeat until the engine fi res.
- Once the engine fires gradually set the choke lever to the OPEN position.
- Allow the engine run at idle for a few minutes to warm up.
- After the engine has warmed up, the machine is ready for operation.
- Move the throttle lever to the high speed position quickly to prevent damage from occurring to the clutch. The 'Full Throttle' position of this machine has been preset at the factory to achieve optimum machine performance.
- With the engine running in the full throttle position, the machine will move forward and compact loose 'lifts'
- In preparation for stopping the engine, move the throttle lever to the LOW position.
- Allow the engine to idle for 1-3 minutes.
- Push and hold the RED Engine Stop button.
- Close the fuel cock/tap.
- Pull the recoil starter slowly until you feel resistance. Then release your hand from the starter knob to set it back to its original position. This will prevent any air or humidity from entering into the cylinder.
Yanmar L48
- Slide the Engine Speed Control Lever to the RUN position.
- Taking a firm hold of the Operating handle with one hand, grasp the recoil starter handle with the other, Pull the recoil starter handle until engine resistance is felt, then allow the starter to return.
- Push the decompression lever down and release it. The decompression lever will automatically return to the original position when the engine starts.
- Taking care not to pull the starter rope fully out, pull the starter handle briskly.
- Repeat until the engine fi res.

CAUTION
In cold weather if you have trouble starting the engine, remove the Oil Plug and add 2cc of engine oil to the oil port and reinsert the oil plug.
- Allow the engine run at idle for a few minutes to warm up.
- After the engine has warmed up, the machine is ready for operation.
- Move the throttle lever to the high speed position quickly to prevent damage from occurring to the clutch. The 'Full Throttle' position of this machine has been preset at the factory to achieve optimum machine performance.
- With the engine running in the full throttle position, the machine will move forward and compact loose 'lifts'
- In preparation for stopping the engine, move the throttle lever to the LOW position.
- Allow the engine to idle for 1-3 minutes.
- To stop the engine, set the engine speed lever to the slide the Engine Speed Control Lever to the STOP position
Start & Stop Procedure
NOTICE: The optimum maximum engine revolution has been set at the factory as follows:
| Model Engine | Maximum RPM | ||
| Optimum Upper Limit | |||
| RTX 50 Honda GX100 3,800 +/- 50 3,850 | |||
| RTX 60 Honda GX100 3,800 +/- 50 3,850 | |||
| RTX 66 Honda GX120 3,400 + 0 / - 50 3,400 | |||
| RTX 68 Honda GX100 3,800 +/- 50 3,850 | |||
| RTX 70 Honda GX100 4,050 +/- 50 4,100 | |||
| RTX 74 Honda GX120 3,400 + 0 / - 50 3,400 | |||
| RTX 80D Yanmar L48 | |||
The Max RPM, as shown above is the number of ignitions per minute. The Honda GX120 engine for RTX66 and RTX74 have the final gears at the ration of 17/16, and the number of ignitions per minute is different from the number of rotations of the engines Power Take-Off Shaft.

CAUTION
DO NOT alter this setting since irregular vibration or damage to the gear transmission mechanism can result, and both engine and machine warranties will be automatically voided.

Operation
Lifting
Where it is necessary to use lifting equipment to position the RTX, check and confirm that the rubber mounts on the operation handle are not damaged or cracked. If they are damaged or cracked, replace the rubber mounts before attempting to lift the machine. Also make sure that the lifting equipment has a WLL (Working Load Limit) suitable for the RTX's weight (See specification chart or the machine Serial Plate). Attach suitable chains or slings ONLY to the lifting point on top of the RTX's operating handle.
- NEVER leave the engine running whilst transporting or moving the RTX's, even if it is only a short distance.
Once the checks listed in the 'Pre-Start' section have been carried out, you may start the engine.
The Altrad Belle RTX range of tampers are fitted with a centrifugal clutch, this allows the engine to run at idle without driving the crank mechanism. As the engine speed is increased the clutch will engage and the engine will drive the crank mechanism.
- To avoid damage to the centrifugal clutch, move the throttle lever quickly from the L to H position.

CAUTION
For correct operation, the engine speed should be set to maximum.
- Avoid operating the machine on a fully compacted, hard, or non-yielding surface. Otherwise, the gear transmission mechanism will be damaged, and the life of the machine will be greatly reduced.
- When working in a narrow trench, if the ramming shoe should get caught between the walls of the trench, the rammer may miss-strike and can be severely damaged. The ramming shoe may especially be damaged severely.
- Ensure that the rammer is steered only by using the handle grip. It should only be pushed. The rammer must not be pressed into the materials being compacted. Excessive pressure on the operating handle will lead to unsatisfactory compaction due to the fact that the jumping action is reduced.
Transportation.
When transporting or storing the machine, place the machine in an upright position if at all possible. Should the machine be required to be laid down, NEVER attempt to transport the machine in a manner that the air cleaner faces downwards. Otherwise, the oil in the cylinder may get into the combustion chamber or in the air cleaner, which may result in starting difficulties. Laying the machine forwards (The crankcase cover of the rammer facing downwards) may not cause any spill of the engine oil into the cylinder or air cleaner of the engine. However, if the engine is still hot, spilt fuel on the engine may cause fire. Lay the machine after the machine is completely cooled.
The machine fitted with the transporting roller on the operating handle may be easily loaded and unloaded from a vehicle. Tilt the machine forwards until the transporting roller touches the floor of the vehicle. Lift the lower part of the machine using the grab handle provided at the ramming shoe, and push forward to load the machine. During transportation, the machine should be tied firmly, and placed in an upright position if at all possible. To unload the machine, tilt the machine forward, until the roller touches the floor. Slightly lift the lower part of the machine, and pull the machine out.
Operation at High Altitude
For continuous High-Altitude operation above 1,000m (3,000FT), it will be necessary to change the engine main jet to a type that will allow for correct fueling of the engine. Otherwise, the unit will suffer from a lack of engine power and not work correctly (Petrol Only)
| Problem Cause Remedy | ||
| Engine will not start | No fuel Fill Fuel Tank | |
| Fuel Tap has been closed Open fuel tap. | ||
| Engine not primed. (GX100 Only) | Push the Carburettor Primer Bulb 4 times and pull the Recoil Handle until the Engine fi res | |
| Engine not primed. (Diesel Only) | See the Service & Maintenance section of this Manual. | |
| Spark Plug contaminated or damaged. (Petrol Only) | Replace spark plug. | |
| Faulty Carburettor. (Petrol Only) Service | the Carburettor | |
| Engine stops suddenly, or stops when the engine rpm is increased. | See Above See Above | |
| Main jet of the Carburettor clogged with dirt. (GX120 Only) | Take out the main jet of the Carburettor and clean with Compressed air. | |
| Air fi Iter element dirty. Clean the element. | ||
| Spark plug cap is loose. (Petrol Only) | Tightly fit cap to plug. | |
| Engine runs, but machine does not produce impact. | Lack of engine power See above. | |
| Clutch is slipping | Dismantle clutch assembly, Clean shoe and drum with proper solvent. Replace clutch shoe if necessary. | |
| Crank mechanism is damaged Contact Dealer. | ||

Service & Maintenance
Maintenance
The Altrad Belle RTX Range is designed to give many years of trouble free operation. It is, however, important that the simple regular maintenance listed in this section is carried out.
It is recommended that an approved Altrad Belle dealer carries out all major maintenance and repairs. Always use genuine Altrad Belle replacement parts, the use of spurious parts may void your warranty.
Before any maintenance is carried out on the machine, switch off the engine. If working on a petrol engined machine, disconnect the HT lead from the sparkplug.
Always set the RTX on level ground to ensure any fluid levels will be correctly read. Only use recommended oils (see chart).
Servicing the Engine
Service the engine according to the engine manufacturer's specifications. Refer to the engine operation and maintenance manual.
Yanmar L48 Engine Priming
In the event of running out of Diesel or after a change of the Fuel Filter, the Yanmar engine will need to be primed. Please follow the below instructions.

CAUTION
Before starting the Priming procedure, please ensure the Fuel Tank is full and the Fuel Cap is not fitted to the tank.
- Open the fuel cock/tap.
- Slide the Engine Speed Control Lever to the RUN position.
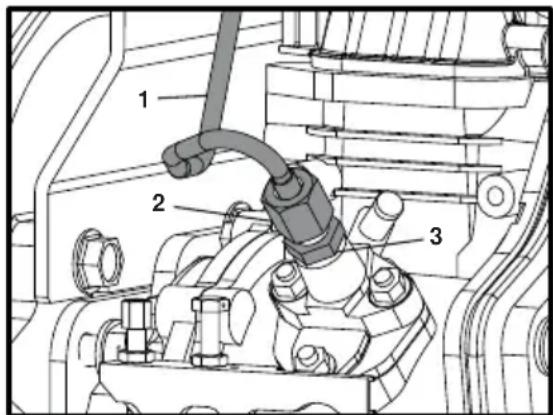
- Using 2 x 17mm Spanners, unlock the Injector Pipe (Item 1) by loosening the Injector Pipe Nut (Item 2).
- Slacken the Injector Pump Nozzle (Item 3) by 2 full revolutions
NOTE:- DO NOT remove the Injector Pump Nozzle. - Hold the Injector Pipe away from the Injector Pump Nozzle and wait until Diesel is running freely without any air bubbles.
- Re-tighten the Injector Pump Nozzle to a setting of 12Nm.
- Re-fi t the Injector Pipe and tighten to 12Nm.
8 Re-fit the Fuel Cap and start the engine using the Start and Stop Procedure section of this manual.
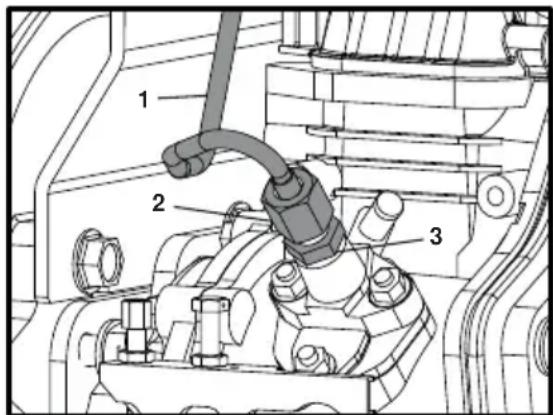
Service & Maintenance
Every 8 Hours or Daily
- Check for loose bolt and nuts, retighten if necessary.
- Check and clean air filter element, re-lube the element according to the engine manufacturer's recommendations. If operating conditions are unusually dusty and severe, filter element cleaning should be done more frequently.
- Check oil level in crankcase of engine and replenish as necessary. Check oil level in the ramming cylinder as per following procedures.
3a. Make sure that the machine has not been run in the last 10 minutes.
3b. Set the machine on a level surface and remove the oil plug.
3c. The top surface of the oil must be seen just below the lower rim of the hole for oil plug. Replenish as necessary.
NOTICE: Care should be taken not to overfill the ramming cylinder with oil. Overfilling will cause excessive load on the engine, which may result in poor or irregular vibration.
First 20 Hours of Operation
- Replace the Oil in the Ramming Cylinder
Every 50 Hours or Weekly
- Check for loose Bolts and Nuts. Retighten if necessary.
Every 200 Hours.
- Change the Ramming Cylinder Oil. Do not overfi II.
Fuel and Lubricant
| Model | Fuel Engine Crankcase Ramming Cylinder | ||||||
| Type of Oil Capacity Type Of Oil Engine Capacity Type of Oil Capacity | |||||||
| RTX 50 | 100Unleaded Petrol | 2.5 Litres | 10W-30, API, SF/CC, CD | GX100 | 0.6 Litres | 10W-30, API, SF/CC, CD | 0.7 Litres |
| RTX 60 GX | |||||||
| RTX 66 GX | 0.8 Litres | ||||||
| RTX 68 | GX100 | ||||||
| RTX 70 | |||||||
| RTX 74 GX | |||||||
| RTX 80D Diesel L48 0.8 Litres | |||||||

CAUTION
Please ensure that you have read and fully understand the information below before attempting to transport the RTX Rammer.
On-Site Transport
The RTX Rammer may be moved vertically by 2 people, laid on the Transport Roller (if fitted) and pulled using the Lifting Handle or by using a Sling or Hoist on the Lifting Eye. NOTE:- A sling or hoist must not be used on the Lifting Handle. Alternatively, use the optional Wheel Kit - see below for details.
Road Transport
The RTX Rammer must be transported as far as possible standing up, strapped to the body side board of the truck, or strapped inside a lorry (panel truck). If not possible, it may be laid down only on the Transport Rollers or front bar of the Operating Handle, in stable position and strongly strapped down to guard against rolling or sliding.
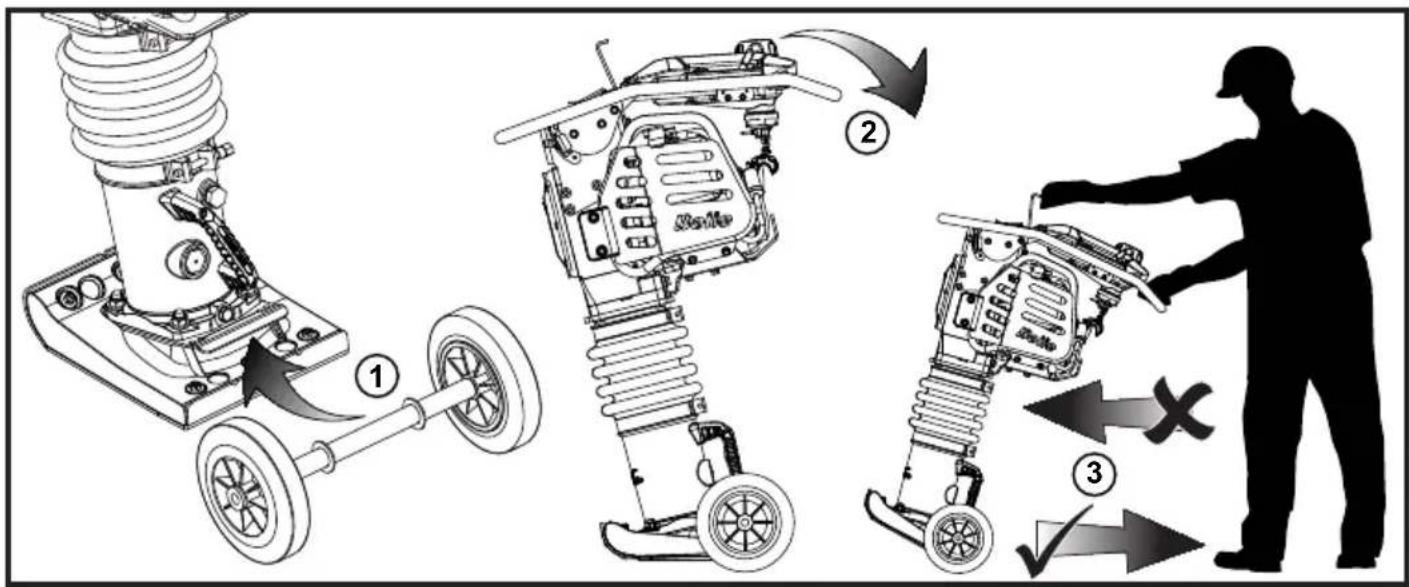
Wheel Kit Option
- Place the Wheel Kit under the lip of the plate on the lower Ramming Leg.
- Once the Wheel Kit is engaged, tilt the Rammer backwards slightly until the Wheels take the weight of the Rammer.
- ONLY moving the Rammer backwards, transport to the required location.

WARNING
DO NOT leave the Wheel Kit engaged whilst unattended or during operation as this will make the Rammer unstable. For transportation purposes only!
KEY

USE
LOCTITE
USE OIL

USE
SILICONE
For information regarding Spare Parts availability for this machine, please visit www.Belle247.com or contact the ALTRAD Belle using the following contact details:-
Tel:- +44 (0)1298 84606 Fax:- +44 (0)1298 84073 Email:- sales@ALTRAD-Belle.com
Warranty

Your new Altrad Belle Rammer Tamper is warranted to the original purchaser for a period of one-year (12 months) from the original date of purchase.
The Altrad Belle warranty is against defects in design, materials an workmanship.
The following are not covered under the Altrad Belle warranty:
-
Damage caused by abuse, misuse, dropping or other similar damage caused by or as a result of failure to follow assembly, operation or user maintenance instructions.
-
Alterations, additions or repairs carried out by persons other than Altrad Belle or their recognised agents.
-
Transportation or shipment costs to and from Altrad Belle or their recognised agents, for repair or assessment against a warranty claim, on any machine.
-
Materials and/or labour costs to renew, repair or replace components due to fair wear and tear.
The following components are not covered by warranty.
- Engine air fi Iter
- Engine spark plug
Altrad Belle and/or their recognised agents, directors, employees or insurers will not be held liable for consequential or other damages, losses or expenses in connection with or by reason of or the inability to use the machine for any purpose.
Warranty Claims
All warranty claims should firstly be directed to Altrad Belle, either by telephone, by Fax, by Email, or in writing.
For warranty claims:
Tel : +44 (0)1298 84606, Fax : +44 (0)1298 84073, Email : Warranty@belle-group.co.uk
or Write to:
Altrad Belle Warranty Department,
Sheen, No Buxton
Derbyshire
SK17 0EU
England
Warranty Registration:
In the bid for ALTRAD Belle to become greener and more eco friendly, we have now introduced online Warranty registration. To access the registration page of our website, please use the following address:-
http://www.bellegroup.com/index.php?p=warranty_registration
Alternatively, please scan the adjacent QR Code (Quick Response Code) using your smartphone to access the registration page.

This manual has been written to help you operate and service the RTX Rammer safely. This manual is intended for dealers and operators of the RTX Rammer.
Foreword
The ‘Machine Description’ section helps you to familiarise yourself with the machine's layout and controls.
The ‘Environment’ section gives instructions on how to handle the recycling of discarded apparatus in an environmentally friendly way.
The ‘General Safety’ and ‘Health and Safety’ sections explain how to use the machine to ensure your safety and the safety of the general public.
The 'Start and Stop Procedure' helps you with starting and stopping the machine.
The ‘Trouble Shooting Guide’ helps you if you have a problem with your machine.
The 'Service & Maintenance' section is to help you with the general maintenance and servicing of your machine.
The ‘Warranty’ section details the nature of the warranty cover and the claims procedure.
The ‘Declaration of Conformity’ section shows the standards that the machine has been built to.
Directives with regard to the notations.
Text in this manual to which special attention must be paid are shown in the following way:

CAUTION
The product can be at risk. The machine or yourself can be damaged or injured if procedures are not carried out in the correct way.

WARNING
The life of the operator can be at risk.

WARNING

WARNING
Before you operate or carry out any maintenance on this machine YOU MUST READ and STUDY this manual.
KNOW how to safely use the unit's controls and what you must do for safe maintenance. (NB Be sure that you know how to switch the machine off before you switch on, in case you get into difficulty.)
ALWAYS wear or use the proper safety items required for your personal protection. If you have ANY QUESTIONS about the safe use or maintenance of this unit, ASK YOUR SUPERVISOR OR CONTACT: Altrad Belle (UK): +44 (0) 1298 84606

Contents
How to use this manual....20
Warning 20
Machine Description....21
Environment 21
Intended Use 21
Decals....22 - 24
Technical Data....25
General Safety 26
Health and Safety....26
Pre-Start Safety Checks....27
Long Term Storage....27
Start & Stop Procedure 28 - 29
Operation....29
Trouble Shooting Guide ....30
Service & Maintenance 30 - 31
Transport 32
Warranty 33
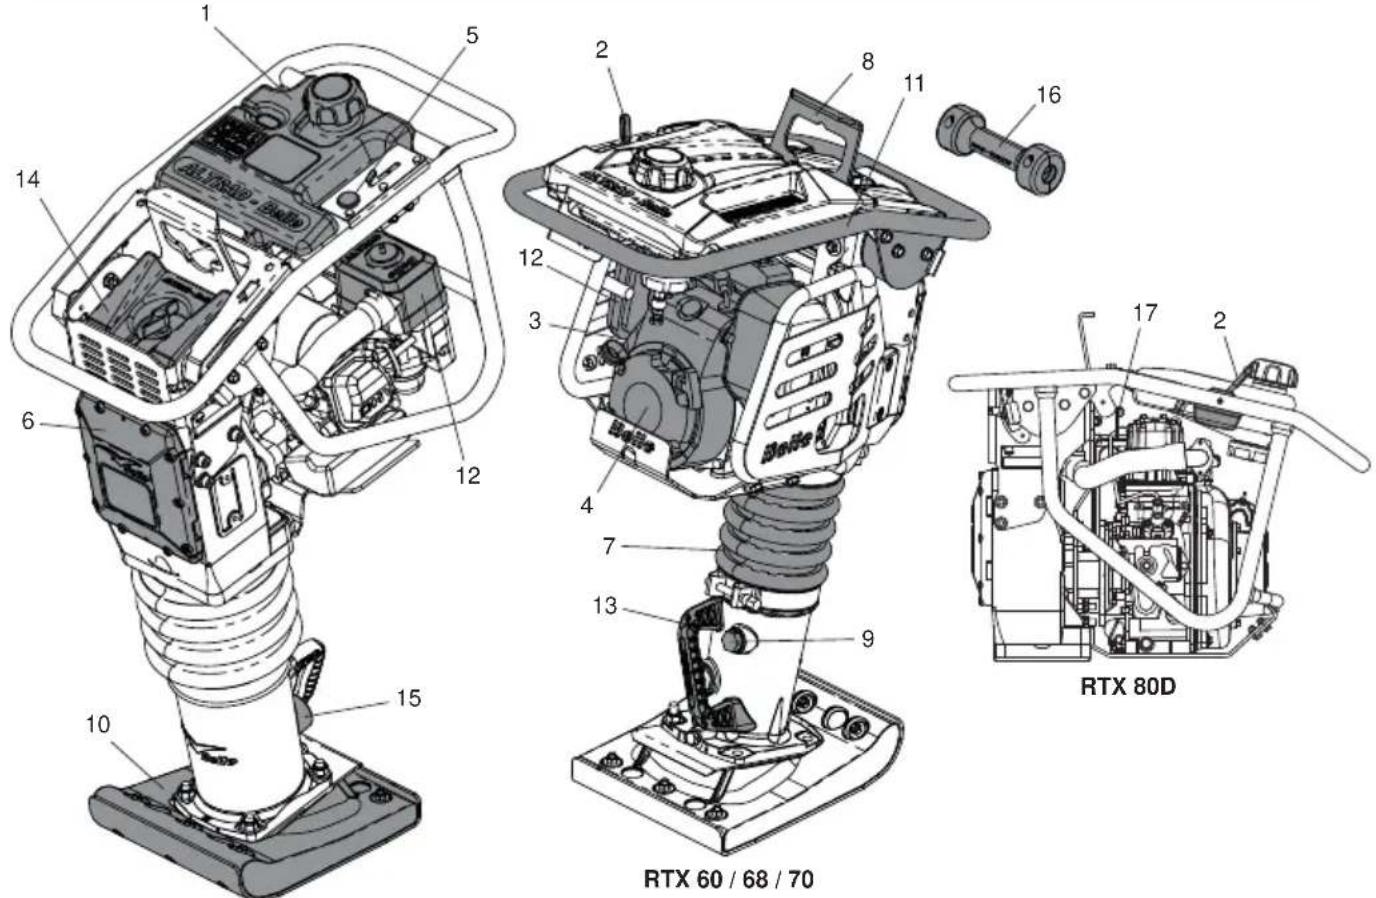
RTX 50 / 66 / 74
- Fuel Tank. 7. Bellows 13. Lifting Handle
- Throttle Lever. 8. Lifting Eye.
- Fuel ON / OFF Lever.
- Engine.
- Stop Button.
-
Crankcase.
-
Secondary Air Cleaner (Dual)
-
Leg Oil Plug.
- Ramming Shoe.
- Operating Handle.
-
Primary Air Cleaner
-
Leg Oil Sight Glass
- Transport Roller (Optional)
- Decompression Lever
Environment

Safe Disposal

Instructions for the protection of the environment. The machine contains valuable materials. Take the discarded apparatus and accessories to the relevant recycling facilities.
| Component Material | |
| Handle Steel | |
| Ramming Shoe | Plywood and Steel or Nylon and Steel |
| Rubber Isolators Rubber and Steel | |
| Bellows Urethane | |
| Crankcase Aluminium | |
| Crankcase Cover Aluminium | |
| Gears Steel | |
| Engine Steel and Aluminium | |
| Transport Roller HDPE | |
| Miscellaneous Plastic Parts Polypropylene | |
| Various Parts Steel and Aluminium | |
Intended Use

This machine is intended for base preparation, driveways, foundations, kerbs, and footings. It can also be used for repair work on streets, highways and/or sidewalks/pavements.
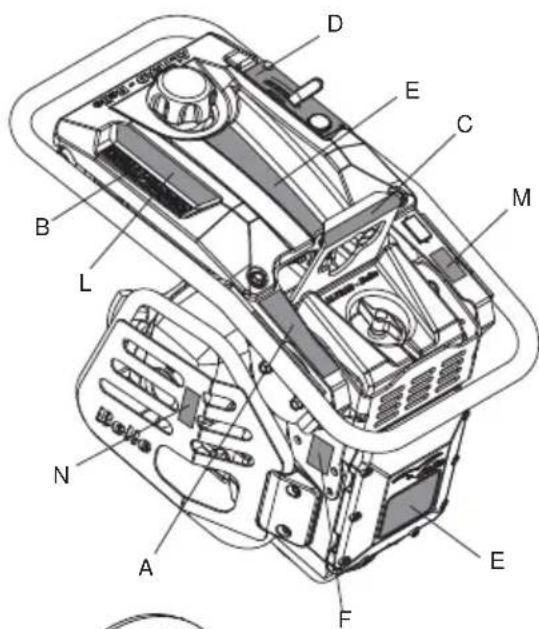
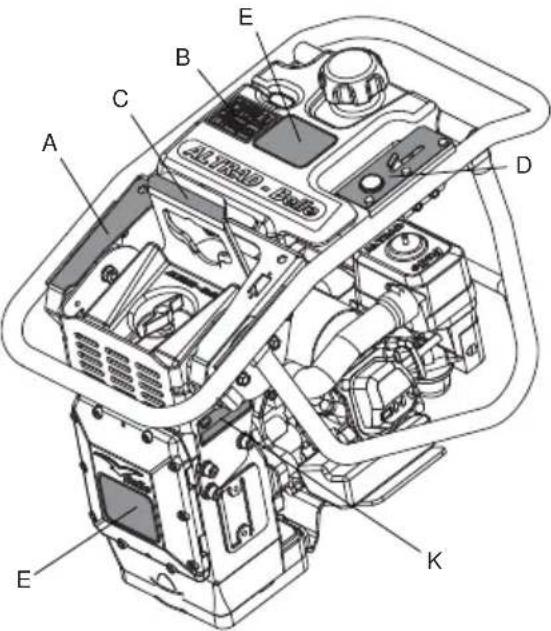
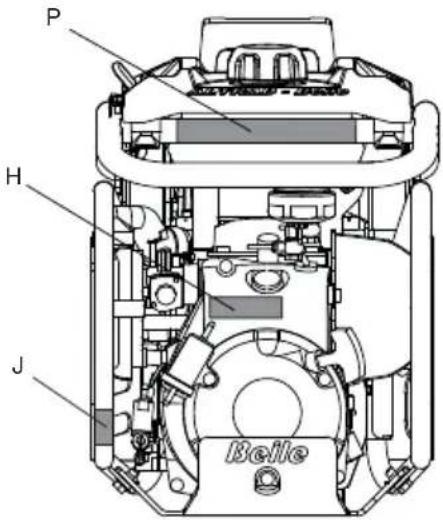
A - Transport Decal (Part No. 800-99631)
On-Site Transport
The RTX Rammer may be moved vertically by 2 people, laid on the Transport Roller (if fitted) and pulled using the Lifting Handle or by using a Sling or Hoist on the Lifting Eye. NOTE:- A sling or hoist must not be used on the Lifting Handle.
Road Transport
The RTX Rammer must be transported as far as possible standing up, strapped to the body side board of the truck, or strapped inside a lorry (panel truck). If not possible, it may be laid down only on the Transport Rollers or front bar of the Operating Handle, in stable position and strongly strapped down to guard against rolling or sliding.
B - Safety Symbols
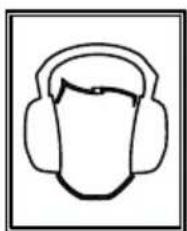
Wear Ear Protection

Wear Eye Protection
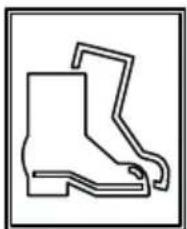
Wear Protective Footwear

Wear Protective Gloves

Please Read Operators Manual

CE Compliant

Please
Recycle
C - Lifting Eye Decal (Part No. 800-99630)
Lifting Eye for use with a Sling or Mechanical Hoist.
D - Throttle Decal (Part No. 800-99628)
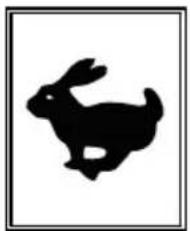
Max. RPM Position

Idle Position

Emergency Stop Position
Engine Stop Button (Petrol Only)
E - Branding Decal
Branding Decal to identify the Model of RTX Rammer.
F - Noise Decal
Guaranteed Sound Power Level of the machine in dB(A).
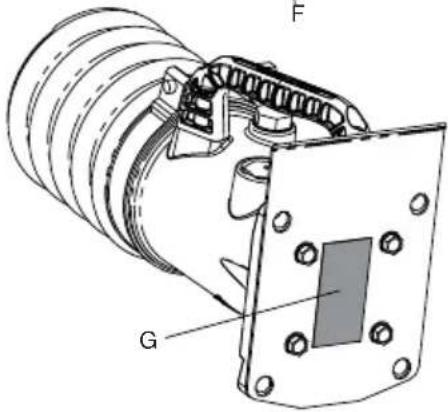
G - Spring Safety Decal (Part No. 800-99619)
DO NOT loosen or remove any of the Screws from the underside of the Rammer Leg. The Rammer Leg contains a highly compressed Spring which may cause serious injury if released by loosening or removing any of the Screws. Contact dealer for more information.
H - Engine Start Decal (Part No. 800-99625)
To Start the Engine, push the Carburettor Primer Bulb 4 times and then pull the Recoil Handle until the Engine fires.
J - Fuel Valve Decal (800-99634-0)
Fuel Valve 'ON' and 'OFF' positions.
- To START the machine, the Fuel Valve must be in the 'ON' position.
- When the machine is not in use or being transported, the Fuel Valve must be in the 'OFF' position.
K - Serial Plate (Part No. 800-99844)
The Serial Plate contains the machine Serial Number and all other information that you may require when contacting Altrad Belle regarding your machine.
- Serial Number.
- RTX Rammer Model.
- Year of Manufacture.
- Machine Weight.
- Machine Power.
L - Safety Decal (Part No. 800-99831)

WARNING! Please

Read Operators Manual
Wear Protective Footwear

Wear Ear Protection

Wear Eye Protection
M - Exhaust Fumes Warning Decal (Part No. 800-99520)
Engines emit carbon monoxide; operate only in well-ventilated areas.
N - Hot Surface Decal (Part No. 800-99520)
CAUTION! Beware of hot surfaces around the Engine and Exhaust area.
P - Diesel Only Decal (Part No. 800-99524)
CAUTION! Only Diesel must be used in this machine (Diesel models only).
| Model RTX50 RTX60C RTX60 RTX66 RTX68 RTX74 RTX80D | |||||||
| A - Width (in) 13.5 16.7 13.5 16.7 | |||||||
| B - Length (in) 26.3 27.7 27.5 27.7 | 27.5 | ||||||
| C - Height (in) 38.3 38.3 42 41 42 | 42.5 | ||||||
| D - Ramming Shoe Width* (in) | 9.0 | 6.5 | 11 | ||||
| E - Ramming Shoe Length* (in) | 13 | ||||||
| Engine Models | Honda GX100 | Honda GX120 | Honda GX100 | Honda GX120 | Yanmar L48 | ||
| Engine Type | 4 Stroke, OHC, Air Cooled | Single Cylinder | |||||
| Maximum Output (kW) | 2.3 | 2.6 | 2.3 | 2.6 | 3.5 | ||
| Fuel Type | Unleaded | Diesel | |||||
| Fuel Tank Capacity (Gals) | 0.66 | 0.5 | |||||
| Carburettor Type | Diaphragm | Float Chamber | Diaphragm | Float Chamber | Injection | ||
| Starting Mechanism | Recoil | ||||||
| Operational Weight (lbs) | 127.2 | 132.2 | 174.1 | 154.3 | 185.1 | 189 | |
| Vibration Frequency (Hz) | 11 | 10 11 10 | 10 | ||||
| Impact Force (kN) | 12.5 | 13.6 | 13.6 | 16.5 | 16 | 18.6 | 20.5 |
| Blows Per Minute (bpm) | 450 - 660 | 450 - 600 | 450 - 660 | 450 - 600 | |||
| Stroke (mm) | 52 | ||||||
| Noise Level (dB(A)) | 108 | ||||||
| 3 Axis Vibration (m/s2) | 9.82 7.25 | 7.25 | 7.6 | 7.45 11.3 11.8 | |||
Vibration Level: Minimum Level - EN500 Part 4.
* - Other Shoe options are available. Sizes are:- 6.5in (W) x 13in (L), 9in x 13in & 11in x 13in.
For your own personal protection and for the safety of those around you, please read and ensure you fully understand the following safety information. It is the responsibility of the operator to ensure that he/she fully understands how to operate this equipment safely. If you are unsure about the safe and correct use of your RTX, consult your supervisor or Altrad Belle of companies.

CAUTION
Improper maintenance or use can be hazardous. Read and Understand this section before you perform any maintenance, service or repairs.
• This machine must only be used for its intended purpose. This machine must be operated only by well trained personnel.
- The owner of this machine must observe, and train the user of the machine to observe, the effective Labour Protection Regulation in the country of application.
• This equipment is heavy and must not be lifted single-handedly, either GET HELP or use suitable lifting equipment.
- This machine must be operated on ground where stability is guaranteed.
• Cordon off the work area and keep members of the public and unauthorised personnel at a safe distance.
- Personal Protective Equipment (PPE) must be worn by the operator whenever this equipment is being used (See Health & Safety Section).
• Make sure you know how to safely switch this machine OFF before you switch it ON in case you get into difficulty.
• Always switch OFF the engine and CLOSE the fuel tap before transporting, moving it around the site or servicing it.
- During use the engine becomes very hot, allow the engine to cool before touching it.
- Never leave the engine running and unattended.
- Never remove or tamper with any guards fitted, they are there for your protection. Always check guards for condition and security, if any are damaged or missing, DO NOT USE THE RTX until the guard has been replaced or repaired.
- Do not operate the RTX when you are ill, feeling tired, or when under the influence of alcohol or drugs.
- This machine is designed to eliminate the possible risks arising from its use. However, risks DO reside, and these residual risks are not clearly recognisable and may cause personal injury, property damage and possible death. If such unpredictable and unrecognisable risks become apparent, the machine must be stopped immediately, and the operator or his supervisor must take the appropriate measures to eliminate such risks. It is sometimes necessary for the manufacturer to be informed of such an event for future counter measuring.

WARNING
Fuel is flammable. It may cause injury and property damage. Shut down the engine, extinguish all open flames and do not smoke while filling the fuel tank. Always wipe up any spilled fuel.
- Before refuelling, switch off the engine and allow it to cool.
- When refuelling, DO NOT smoke or allow naked flames in the area.
- When refuelling, use a proper funnel, and avoid spilling fuel over the engine.
- Spilt fuel must be made safe immediately, using sand. If fuel is spilt on your clothes, change them.
- Store fuel in an approved, purpose made container away from heat and ignition sources.

Health & Safety
Vibration
Some vibration from the machines operation is transmitted through the handle to the operator's hands. The Altrad Belle RTX range has been specifically designed to reduce hand/arm vibration levels. Refer to specifications & technical data for vibration levels and usage times (recommended maximum daily exposure time). DO NOT exceed the maximum usage times.
PPE (Personal Protective Equipment)
Personal injury or property damage may be caused by knocks, crushing, slipping, tripping, falling, or by flying chips due mainly to the improper or careless handling of the machine, or working in a confined area.
Suitable PPE must be worn when using this equipment i.e. Safety Goggles, Gloves, Ear Defenders, Dust Mask and Steel Toe capped footwear.
Wear clothing suitable for the work you are doing. Tie back long hair and remove any jewellery which may catch in the equipment's moving parts.
Dust
The compaction process can produce dust, which may be hazardous to your health. Always wear a mask that is suited to the type of dust being produced.
Fuel
Oil and fuel used in this machine may cause the following hazards.
- Poisoning if the fuel or oil vapour is inhaled.
- Allergies if the fuel or oil spills on the skin.
- Fire and explosion if the fuel and oil is handled near smoking or open fires.
- Do not ingest fuel or inhale fuel vapours and avoid contact with your skin. Wash fuel splashes immediately. If you get fuel in your eyes, irrigate with copious amounts of water and seek medical attention as soon as possible.
Exhaust Fumes

WARNING
The exhaust fumes produced by this equipment are highly toxic and can kill!
Do not operate your RTX Rammer indoors or in a confined space, make sure the work area is adequately ventilated.
Pre-Start Checks
Pre start-up inspection
The following Pre-start-up inspection must be performed before the start of each work session or after every four hours of use, whichever is first. Please refer to the service section for detailed guidance. If any fault is discovered, the RTX must not be used until the fault is rectified.
- Thoroughly inspect the RTX for signs of damage.
- Check Hoses, filler openings, Drain Plugs and any other areas for signs of leakage. Fix any leaks before operating.
- Check the Engine Oil level and top up as necessary.
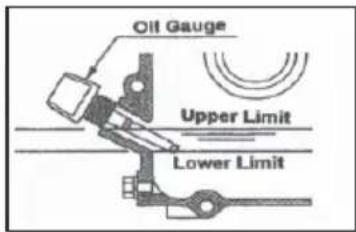
3.1 To check the Engine Oil level, place the machine on a flat surface ensuring the Engine is level. To achieve this place the Rammer in the position shown below.
3.2 Remove the Oil Gauge, and observe that the Oil is up to the rim of the filler port. Use Engine Oil with the correct viscosity. (SAE 10W-30 Mineral Oil recommended) - Check the Engine Fuel level and top up as necessary. Use clean Fuel. Use of contaminated Fuel may damage the Fuel system.

CAUTION
NOTICE: This machine uses Unleaded Gasoline/Petrol. NEVER fill the fuel tank with a mixture of Oil and Gasoline/Petrol.
- Check that the Air Filter is clean. Excessive dust/dirt accumulation within the filter element will cause erratic Engine operation. Clean the Air Filter element when it is contaminated (See Maintenance section).
- Check the Rammer Leg Oil level and top up as necessary (Rammer must have been idle for at least 10 minutes before checking)
6.1 To check the Rammer Leg Oil level, place the machine on a flat surface ensuring the Foot is flat to the ground, as shown below.
6.2 The minimum level is shown by the Red Dot on the Oil Sight Glass within the Rammer Leg. (SAE 10W-30 Mineral Oil recommended)
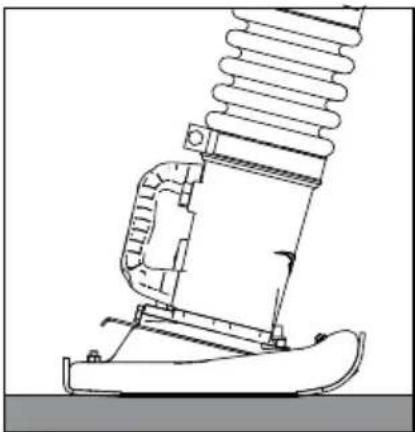
Rammer Leg Oil Check Position
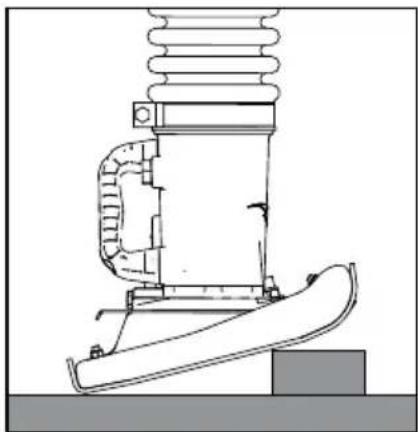
Engine Oil Check Position
Long Term Storage

For long term storage, empty the fuel in the carburettor by running the engine with the fuel tap being closed (Petrol Only)
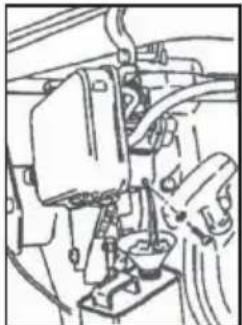
The chemical composition of fuel will deteriorate after prolonged storage. When the machine needs to be stored for a long time, remove all fuel from the fuel tank. Also remove the fuel from the float chamber of the carburettor by draining the fuel out from the drain plug (see diagram) (Petrol Only)
Clean up oil and dust accumulation on rubber parts.
Clean the ramming shoe and apply a light coating of oil to prevent rust formation.
Cover the machine and store in a dry place.

CAUTION
Improper operation can be hazardous. Read and understand this section before you start the machine.

WARNING
To stop the machine in an emergency, move the Throttle Lever to the Emergency Stop position. This will immediately stop the machine from vibrating.
Honda GX100 & GX120
- Open the fuel cock/tap.
- Set the speed control lever to the STARTING position (Halfway between HIGH and LOW position).
- Move the choke lever to the CLOSED position.
- Push the Carburettor Primer Bulb 4 times (or at least 10 times when the machine is new or after machine has had the fuel drain).
- Taking a firm hold of the Operating handle with one hand, grasp the recoil starter handle with the other, Pull the recoil starter handle until engine resistance is felt, then allow the starter to return.
- Taking care not to pull the starter rope fully out, pull the starter handle briskly.
- Repeat until the engine fi res.
- Once the engine fires gradually set the choke lever to the OPEN position.
- Allow the engine run at idle for a few minutes to warm up.
- After the engine has warmed up, the machine is ready for operation.
- Move the throttle lever to the high speed position quickly to prevent damage from occurring to the clutch. The 'Full Throttle' position of this machine has been preset at the factory to achieve optimum machine performance.
- With the engine running in the full throttle position, the machine will move forward and compact loose 'lifts'
- In preparation for stopping the engine, move the throttle lever to the LOW position.
- Allow the engine to idle for 1-3 minutes.
- Push and hold the RED Engine Stop button.
- Close the fuel cock/tap.
- Pull the recoil starter slowly until you feel resistance. Then release your hand from the starter knob to set it back to its original position. This will prevent any air or humidity from entering into the cylinder.
Yanmar L48
- Slide the Engine Speed Control Lever to the RUN position.
- Taking a firm hold of the Operating handle with one hand, grasp the recoil starter handle with the other, Pull the recoil starter handle until engine resistance is felt, then allow the starter to return.
- Push the decompression lever down and release it. The decompression lever will automatically return to the original position when the engine starts.
- Taking care not to pull the starter rope fully out, pull the starter handle briskly.
- Repeat until the engine fi res.

CAUTION
In cold weather if you have trouble starting the engine, remove the Oil Plug and add 2cc of engine oil to the oil port and reinsert the oil plug.
- Allow the engine run at idle for a few minutes to warm up.
- After the engine has warmed up, the machine is ready for operation.
- Move the throttle lever to the high speed position quickly to prevent damage from occurring to the clutch. The 'Full Throttle' position of this machine has been preset at the factory to achieve optimum machine performance.
- With the engine running in the full throttle position, the machine will move forward and compact loose 'lifts'
- In preparation for stopping the engine, move the throttle lever to the LOW position.
- Allow the engine to idle for 1-3 minutes.
- To stop the engine, set the engine speed lever to the slide the Engine Speed Control Lever to the STOP position
Start & Stop Procedure
NOTICE: The optimum maximum engine revolution has been set at the factory as follows:
| Model Engine | Maximum RPM | ||
| Optimum Upper Limit | |||
| RTX 50 Honda GX100 3,800 +/- 50 3,850 | |||
| RTX 60 Honda GX100 3,800 +/- 50 3,850 | |||
| RTX 66 Honda GX120 3,400 + 0 / - 50 3,400 | |||
| RTX 68 Honda GX100 3,800 +/- 50 3,850 | |||
| RTX 74 Honda GX120 3,400 + 0 / - 50 3,400 | |||
| RTX 80D Yanmar L48 | |||
The Max RPM, as shown above is the number of ignitions per minute. The Honda GX120 engine for RTX66 and RTX74 have the final gears at the ration of 17/16, and the number of ignitions per minute is different from the number of rotations of the engines Power Take-Off Shaft.

CAUTION
DO NOT alter this setting since irregular vibration or damage to the gear transmission mechanism can result, and both engine and machine warranties will be automatically voided.
Operation

Lifting
Where it is necessary to use lifting equipment to position the RTX, check and confirm that the rubber mounts on the operation handle are not damaged or cracked. If they are damaged or cracked, replace the rubber mounts before attempting to lift the machine. Also make sure that the lifting equipment has a WLL (Working Load Limit) suitable for the RTX's weight (See specification chart or the machine Serial Plate). Attach suitable chains or slings ONLY to the lifting point on top of the RTX's operating handle.
- NEVER leave the engine running whilst transporting or moving the RTX's, even if it is only a short distance.
Once the checks listed in the 'Pre-Start' section have been carried out, you may start the engine.
The Altrad Belle RTX range of tampers are fitted with a centrifugal clutch, this allows the engine to run at idle without driving the crank mechanism. As the engine speed is increased the clutch will engage and the engine will drive the crank mechanism.
- To avoid damage to the centrifugal clutch, move the throttle lever quickly from the L to H position.

CAUTION
For correct operation, the engine speed should be set to maximum.
- Avoid operating the machine on a fully compacted, hard, or non-yielding surface. Otherwise, the gear transmission mechanism will be damaged, and the life of the machine will be greatly reduced.
- When working in a narrow trench, if the ramming shoe should get caught between the walls of the trench, the rammer may miss-strike and can be severely damaged. The ramming shoe may especially be damaged severely.
- Ensure that the rammer is steered only by using the handle grip. It should only be pushed. The rammer must not be pressed into the materials being compacted. Excessive pressure on the operating handle will lead to unsatisfactory compaction due to the fact that the jumping action is reduced.
Transportation.
When transporting or storing the machine, place the machine in an upright position if at all possible. Should the machine be required to be laid down, NEVER attempt to transport the machine in a manner that the air cleaner faces downwards. Otherwise, the oil in the cylinder may get into the combustion chamber or in the air cleaner, which may result in starting difficulties. Laying the machine forwards (The crankcase cover of the rammer facing downwards) may not cause any spill of the engine oil into the cylinder or air cleaner of the engine. However, if the engine is still hot, spilt fuel on the engine may cause fire. Lay the machine after the machine is completely cooled.
The machine fitted with the transporting roller on the operating handle may be easily loaded and unloaded from a vehicle. Tilt the machine forwards until the transporting roller touches the floor of the vehicle. Lift the lower part of the machine using the grab handle provided at the ramming shoe, and push forward to load the machine. During transportation, the machine should be tied firmly, and placed in an upright position if at all possible. To unload the machine, tilt the machine forward, until the roller touches the floor. Slightly lift the lower part of the machine, and pull the machine out.
Operation at High Altitude
For continuous High-Altitude operation above 1,000m (3,000FT), it will be necessary to change the engine main jet to a type that will allow for correct fueling of the engine. Otherwise, the unit will suffer from a lack of engine power and not work correctly (Petrol Only)
| Problem Cause Remedy | ||
| Engine will not start | No fuel Fill Fuel Tank | |
| Fuel Tap has been closed Open fuel tap. | ||
| Engine not primed. (GX100 Only) | Push the Carburettor Primer Bulb 4 times and pull the Recoil Handle until the Engine fires | |
| Engine not primed. (Diesel Only) | See the Service & Maintenance section of this Manual. | |
| Spark Plug contaminated or damaged. (Petrol Only) | Replace spark plug. | |
| Faulty Carburettor. (Petrol Only) Service | the Carburettor | |
| Engine stops suddenly, or stops when the engine rpm is increased. | See Above See Above | |
| Main jet of the Carburettor clogged with dirt. (GX120 Only) | Take out the main jet of the Carburettor and clean with Compressed air. | |
| Air filter element dirty. Clean the element. | ||
| Spark plug cap is loose. (Petrol Only) | Tightly fit cap to plug. | |
| Engine runs, but machine does not produce impact. | Lack of engine power See above. | |
| Clutch is slipping | Dismantle clutch assembly, Clean shoe and drum with proper solvent. Replace clutch shoe if necessary. | |
| Crank mechanism is damaged Contact Dealer. |

Service & Maintenance
Maintenance
The Altrad Belle RTX Range is designed to give many years of trouble free operation. It is, however, important that the simple regular maintenance listed in this section is carried out.
It is recommended that an approved Altrad Belle dealer carries out all major maintenance and repairs. Always use genuine Altrad Belle replacement parts, the use of spurious parts may void your warranty.
Before any maintenance is carried out on the machine, switch off the engine. If working on a petrol engined machine, disconnect the HT lead from the sparkplug.
Always set the RTX on level ground to ensure any fluid levels will be correctly read. Only use recommended oils (see chart).
Servicing the Engine
Service the engine according to the engine manufacturer's specifications. Refer to the engine operation and maintenance manual.
Yanmar L48 Engine Priming
In the event of running out of Diesel or after a change of the Fuel Filter, the Yanmar engine will need to be primed. Please follow the below instructions.

CAUTION
Before starting the Priming procedure, please ensure the Fuel Tank is full and the Fuel Cap is not fitted to the tank.
- Open the fuel cock/tap.
- Slide the Engine Speed Control Lever to the RUN position.
- Using 2 x 17mm Spanners, unlock the Injector Pipe (Item 1) by loosening the Injector Pipe Nut (Item 2).
- Slacken the Injector Pump Nozzle (Item 3) by 2 full revolutions NOTE:- DO NOT remove the Injector Pump Nozzle.
- Hold the Injector Pipe away from the Injector Pump Nozzle and wait until Diesel is running freely without any air bubbles.
- Re-tighten the Injector Pump Nozzle to a setting of 12Nm.
- Re-fi t the Injector Pipe and tighten to 12Nm.
8 Re-fit the Fuel Cap and start the engine using the Start and Stop Procedure section of this manual.
Service & Maintenance
Every 8 Hours or Daily
- Check for loose bolt and nuts, retighten if necessary.
- Check and clean air filter element, re-lube the element according to the engine manufacturer's recommendations. If operating conditions are unusually dusty and severe, filter element cleaning should be done more frequently.
- Check oil level in crankcase of engine and replenish as necessary. Check oil level in the ramming cylinder as per following procedures.
3a. Make sure that the machine has not been run in the last 10 minutes.
3b. Set the machine on a level surface and remove the oil plug.
3c. The top surface of the oil must be seen just below the lower rim of the hole for oil plug. Replenish as necessary.
NOTICE: Care should be taken not to overfill the ramming cylinder with oil. Overfilling will cause excessive load on the engine, which may result in poor or irregular vibration.
First 20 Hours of Operation
- Replace the Oil in the Ramming Cylinder
Every 50 Hours or Weekly
- Check for loose Bolts and Nuts. Retighten if necessary.
Every 200 Hours.
- Change the Ramming Cylinder Oil. Do not overfi II.
Fuel and Lubricant
| Model | Fuel Engine Crankcase Ramming Cylinder | ||||||
| Type of Oil Capacity Type Of Oil Engine Capacity Type of Oil Capacity | |||||||
| RTX 50 | 100120 K1 Gasoline100120 K1 | 0.66 Gals | 10W-30, API, SF/CC, CD | GX100 | 0.15 Gals | 10W-30, API, SF/CC, CD | 0.18 Gals |
| RTX 60 GX | |||||||
| RTX 66 GX | 0.21 Gals | ||||||
| RTX 68 GX | |||||||
| RTX 74 GX | |||||||
| RTX 80D Diesel L48 0.2 Gals | |||||||

CAUTION
Please ensure that you have read and fully understand the information below before attempting to transport the RTX Rammer.
On-Site Transport
The RTX Rammer may be moved vertically by 2 people, laid on the Transport Roller (if fitted) and pulled using the Lifting Handle or by using a Sling or Hoist on the Lifting Eye. NOTE:- A sling or hoist must not be used on the Lifting Handle. Alternatively, use the optional Wheel Kit - see below for details.
Road Transport
The RTX Rammer must be transported as far as possible standing up, strapped to the body side board of the truck, or strapped inside a lorry (panel truck). If not possible, it may be laid down only on the Transport Rollers or front bar of the Operating Handle, in stable position and strongly strapped down to guard against rolling or sliding.
Wheel Kit Option
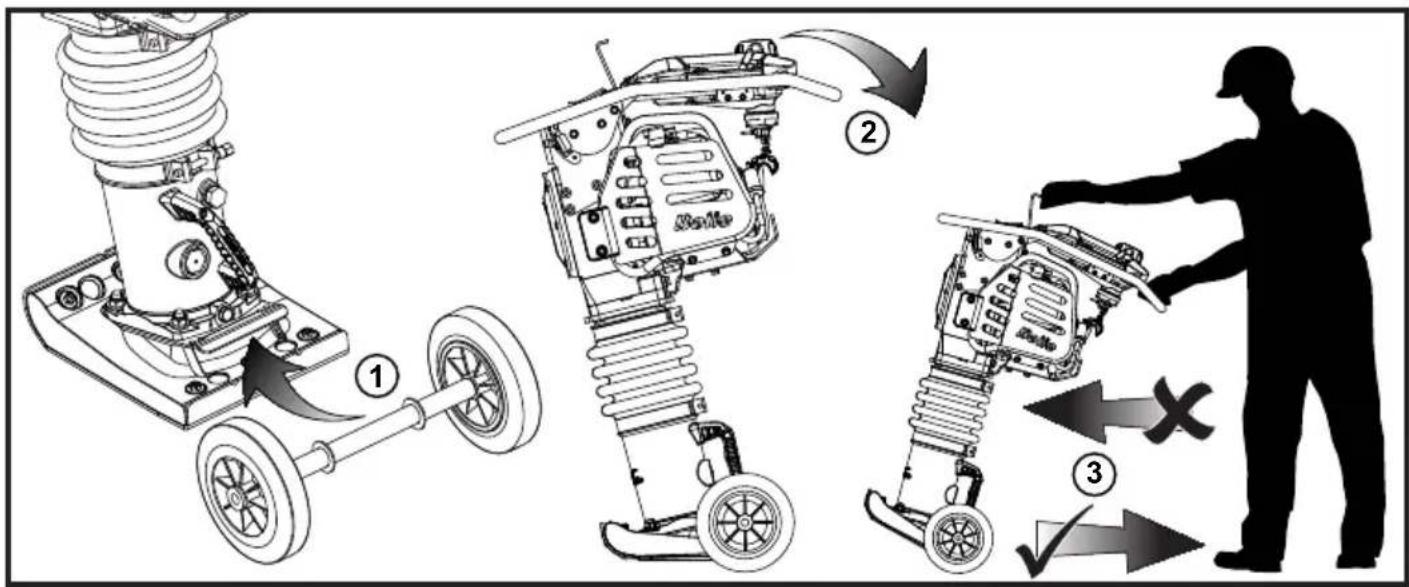
- Place the Wheel Kit under the lip of the plate on the lower Ramming Leg.
- Once the Wheel Kit is engaged, tilt the Rammer backwards slightly until the Wheels take the weight of the Rammer.
- ONLY moving the Rammer backwards, transport to the required location.

WARNING
DO NOT leave the Wheel Kit engaged whilst unattended or during operation as this will make the Rammer unstable. For transportation purposes only!
KEY

USE
LOCTITE
USE
OIL

USE
SILICONE
For information regarding Spare Parts availability please contact ALTRAD Belle Inc. using the following contact details:-
Altrad Belle Inc, PO Box 13225, Roanoke, VA, 24032, USA
Tel:-(+) 1 866 540 5090 Fax:-(+) 1 866 540 5091 Email:- sales@bellegroup.net
Warranty

Your new Altrad Belle Rammer Tamper is warranted to the original purchaser for a period of one-year (12 months) from the original date of purchase.
The Altrad Belle warranty is against defects in design, materials an workmanship.
The following are not covered under the Altrad Belle warranty:
- Damage caused by abuse, misuse, dropping or other similar damage caused by or as a result of failure to follow assembly, operation or user maintenance instructions.
- Alterations, additions or repairs carried out by persons other than Altrad Belle or their recognised agents.
- Transportation or shipment costs to and from Altrad Belle or their recognised agents, for repair or assessment against a warranty claim, on any machine.
- Materials and/or labour costs to renew, repair or replace components due to fair wear and tear.
The following components are not covered by warranty.
- Engine air fi Iter
- Engine spark plug
Altrad Belle and/or their recognised agents, directors, employees or insurers will not be held liable for consequential or other damages, losses or expenses in connection with or by reason of or the inability to use the machine for any purpose.
Warranty Claims
All warranty claims should firstly be directed to Altrad Belle, either by telephone, by Fax, by Email, or in writing.
For warranty claims:
Tel:- (+) 1 866 540 5090 Fax:- (+) 1 866 540 5091 Email:- sales@bellegroup.net
or Write to:
Altrad Belle Inc
PO Box 13225
Roanoke
VA 24032
USA
Warranty Registration:
In the bid for ALTRAD Belle to become greener and more eco friendly, we have now introduced online Warranty registration. To access the registration page of our website, please use the following address:-
http://www.bellegroup.com/index.php?p=warranty_registration
Alternatively, please scan the adjacent QR Code (Quick Response Code) using your smartphone to access the registration page.

A - Décalcomanie Transport (Part No. 800-99631)
Port De Lunettes De Protection
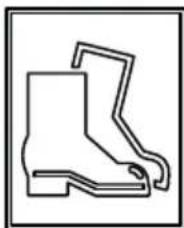
Port De Chaussures De Protection

Conforme CE

Position tr/min Max.

Position Ralenti

ATTENTION!

Port De Chaussures De Protection

Port De Lunettes De Protection

ATTENTION
Entretien Et Révision


AVERTISSEMENT
Altrad Belle Warranty Department,
Sheen, No Buxton
Derbyshire
SK17 0EU
England
Posición de ralentí


ATENCIÓN

ATENCIÓN

AVISO
Altrad Belle Warranty Department,
Sheen, No Buxton
Derbyshire
SK17 0EU
Inglaterra
Registro de Garantia :
http://www.bellegroup.com/index.php?p=warranty_registration
Por Favor Leia o Manual do Operador

Conformidade CE

Posição RPM Máximas

AVISO!

Por Favor Leia o Manual do Operador

AVISO!

Por Favor Leia o Manual do Operador


CUIDADO
Nota: Esta máquina utiliza gasolina sem chumbo.

CUIDADO
Assistência

AVISO
Draag be- schermend schoeisel

Overeen- komstig CE

Vrijstand

Stand voor noodstop
Uitschake-Iknop
WAARSCHU- WING!

Lees de bedieningshan- dleiding

Engines emit carbon monoxide; operate only in well-ventilated areas.

VOORZICHTIG

VOORZICHTIG
Onderhoud


WAARSCHUWING
Altrad Belle Warranty Department,
Sheen, Nr. Buxton
Derbyshire
SK17 0EU
England
A - Transport Etiket (Del nr. 800-99631)
Bær Øreværn

CE- kompatibel

Maks. RPM position

Tomgangs-position

Nødstop- sposition
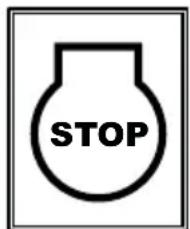
Engine Stop Button
E - Fabrikatsmærkat
Fuel Valve 'ON' and 'OFF' positions.
L - Sikkerheds Etiket (Del nr. 800-99831)


Bær Øreværn

Kontrolposition for stamperbensolie
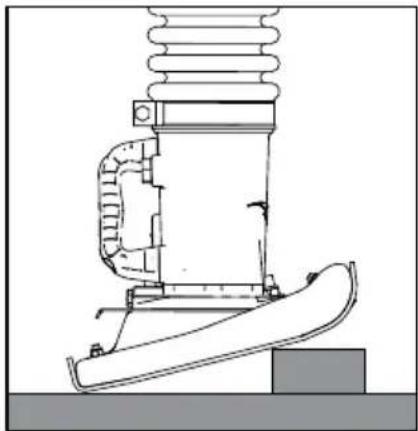
Kontrolposition for motorolie
Lang Tids Opbevaring


FORSIGTIG
Start- Og Stopprocedure
Eftersyn


ADVARSEL
ALTRAD Belle Warranty Department,
Sheen, No Buxton
Derbyshire
SK17 0EU
England
Garantiregistrering:
Leerlauf

Not-Stopp- Position

Engine Stop Button
E - Markenaufkleber
WARNUNG!


WARNEN
Wartung


WARNUNG
Altrad Belle Warranty Department,
Sheen, No Buxton
Derbyshire
SK17 0EU
England
I
Riciclare
C - Gancio di sollevamento Decal (Parte N. 800-99630)
Posizione di riposo

AVVERTIMENTO!

Manutenzione

AVVERTENZA
ALTRAD Belle Warranty Department,
Sheen, No Buxton
Derbyshire
SK17 0EU
England
http://www.bellegroup.com/index.php?p=warranty_registration

A - Transport Dekal (Del nr. 800-99631)
Använd skyddsskor

Max. RPM läge

Tomgång- släge

Nödstop- pläge
Engine Stop Button
E - Varumärkesdekal

WARNING! Läs

bruksanvisningen
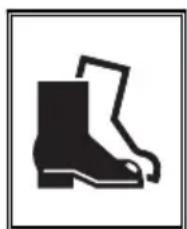
Använd skyddsskor
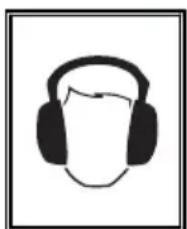
Använd hörselskydd

WARNING! Läs

bruksanvisningen

Använd skyddsskor
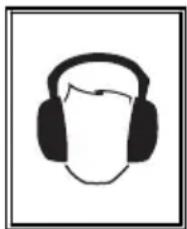
Använd hörselskydd


SE UPP

SE UPP
Service & Underhåll


WARNING
Altrad Belle Warranty Department,
Sheen, No Buxton
Derbyshire
SK17 0EU
England
Garantiregistrering:
A - Kuljetustarra (Osa Nro 800-99631)
Kuljetus työmaalla
Joutokäyn- tiasento

L - turvasymbolit



VAARA
Huolto


VAROITUS
Altrad Belle Warranty Department,
Sheen, No Buxton
Derbyshire
SK17 0EU
England
Noś gogle ochronne
Noś obuwie ochronne

OSTRZEŻENIE!

Noś obuwie ochronne

Noś gogle ochronne

UWAGA

OSTRZEŻENIE
Altrad Belle Warranty Department
Sheen, Nr. Buxton,
Derbyshire,
SK17 0EU
England.
Предупреждение


Предупреждение

ВНИМАНИЕ

Предупреждение
Altrad Belle Warranty Department
Sheen, Nr. Buxton
Derbyshire
SK17 0EU
England
A - transpordikleeps (varuosa nr 800-99631)
Kandke silmakait-seid
Kandke turvajalat- seid

Kandke kaitsekin-daid.

Soovitame taaskas-utada
C - tösteasa silt (osa nr 800-99630)
Max P/MIN asend

Tühikäig- uasend

Hädasei- skamisa- send
Seiskami- snupp
E – kaubamärgi silt
HOIATUS!

Lugege kasutusjuhendit
Kandke turvajalatseid
HOIATUS!

Lugege kasutusjuhendit

Kandke turvajalatseid


HOIATUS
Tihendustambi vedrujala õlitaseme kontrollimise asend
Mootoriõli kontrollimise asend

ETTEVAATUST
Hooldus

Mootori hooldus

HOIATUS
Altrad Belle Warranty Department, Sheen, Nr. Buxton
Derbyshire
SK17 0EU
England
Garantii Registreerimine
Jāvalkā aizsargcimdi

C – pacelšanas cilpas uzlime (detajas Nr. 800-99630)
Maks. apgr./min pozicija

Tukšgaitas pozīcija


UZMANIBU! Beware of hot surfaces around the Engine and Exhaust area.
P - uzlime tikai dizelim (Detala Nr. 800-99524)

UZMANIBU

UZMANIBU
Serviss un apkope

BRĪDINĀJUMS
E-pasts: Warranty@belle-group.co.uk
Rakstiski
Altrad Belle Warranty Department,
Sheen, Nr. Buxton
Derbyshire
SK17 0EU
England
Perdirbti
C - asos lipdukas (dalies Nr. 800-99630)
Kélimo ąsa naudojama su virve arba mechaniniu keltuvu.
D - Droselio lipdukas (dalies No 800-99628)
Maks. aps./min. padëtis

¡SPÉJIMAS!


CAUTION
NOTICE: This machine uses Unleaded Gasoline/Petrol. NEVER fill the fuel tank with a mixture of Oil and Gasoline/Petrol.

ATSARGIAI
Techninė priežiūra
kas 8 valandos arba kasdien
Please ensure that you have read and fully understand the information below before attempting to transport the RTX Rammer.

ISPÉJIMAS
el. paštas: Warranty@belle-group.co.uk
Rašykite:
Altrad Belle Warranty Department,
Sheen, Nr. Buxton
Derbyshire
SK17 0EU
England.

A - Знак транспорт (Част No. 800-99631)
Предупреждение!

Предупреждение!


ВНИМАНИЕ

ВНИМАНИЕ

Предупреждение
Altrad Belle Warranty Department,
Sheen, Nr. Buxton,
Derbyshire,
SK17 0EU
England.
http://www.bellegroup.com/index.php?p=warranty_registration
Chraň si sluch

Použij ochrannou obuv

Noste ochranné rukavice

Čti návod k obsluze

CE Prosím,

pozice: max. otáčky

pozice: neutrál

VAROVÁNÍ!

Čti návod k obsluze

Použij ochrannou obuv
Chraň si sluch


VÝSTRAHA

VÝSTRAHA

VAROVÁNÍ
Altrad Belle Warranty Department,
Sheen, Nr. Buxton,
Derbyshire,
SK17 0EU
England
Registrace Záruky:
A - Afisaj transport (nr. Parte 800-99631)
Transport la şantier
Max. RPM Position
Idle Position

Emergency Stop Position
Button de Oprire
L - Afişaj siguranță (Prod. nr. 800-99831)

AVERTISMENT!

Pre start-up inspection

ATENTIE
Pozitie verificare nivel ulei motor
Depozitare


ATENTIE

AVERTISMENT
Altrad Belle Warranty Department,
Sheen, Nr. Buxton
Derbyshire
SK17 0EU
England.
Viseljen fülvédőt

Üresjárati helyzet


Viseljen fülvédöt


VIGYÁZAT

VIGYÁZAT
Karbantartás

FIGYELEM
Altrad Belle Warranty Department,
Sheen, Nr. Buxton
Derbyshire
SK17 0EU
England.
http://www.bellegroup.com/index.php?p=warranty_registration
Nosite zaštitne naočale
Nosite zaštitne rukavice

Reciklirajte
C - Naljepnica podiznog prstena (kat.br. 800-99630)
Podizni prsten koji se upotrebljava s omčom ili mehaničkom dizalicom.
Položaj maksimal-nog broja okretaja

Položaj za zaustavljan-je u nuždi
L - Sigurnosni natpis (kat. br. 800-99831)

Nosite zaštitne naočale
M - Naljepnica upozorenja na ispušne plinove (kat. br. 800-99520)
Motori ispuštaju ugljikov monoksid; koristite samo u dobro prozračenim prostorima
Položaj za kontrolu ulja noge nabijača

PAŽNJA
Start & Stop Procedura
Servis i održavanje

Održavanje : svakih 8 sati ili dnevno.

UPOZORENJE
Altrad Belle Warranty Department,
Sheen, Nr. Buxton,
Derbyshire,
SK17 0EU
England.
Registracija Jamstva:
U nastojanju da ALTRAD Belle postane zeleniji i ekološki osvješteniji, uveli smo registraciju jamstva putem interenta. Kako biste pristupili našoj internetskoj stranici za registraciju, koristite sljedeću poveznicu:
http://www.bellegroup.com/index.php?p=warranty_registration.
Handle Assembly, Ensemble Poignée, Cto. de Manillar, Conj. do Punho
Gearbox Assembly, Ensemble Boîte de Vitesses,
Gearbox Assembly, Ensemble Boîte de Vitesses,
4-01
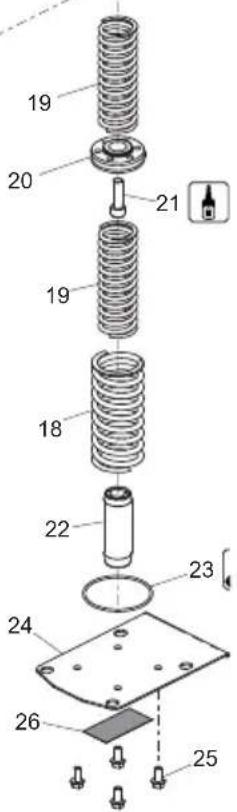
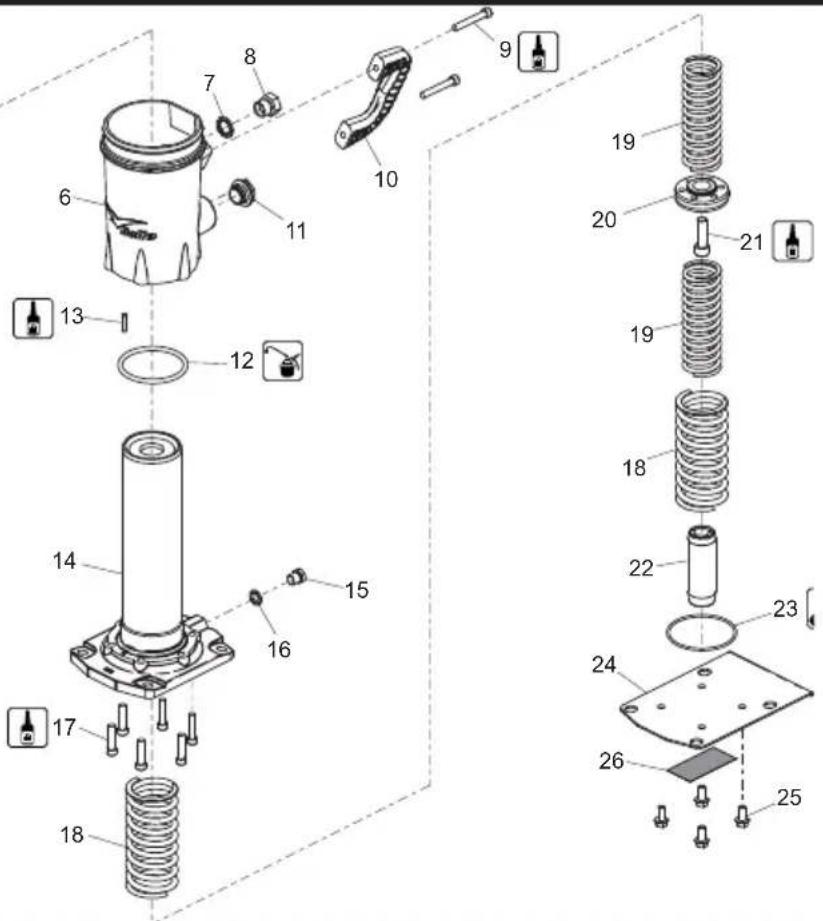
Leg Assembly, Ensemble de Jambes, Conjunto de Piernas, Conjunto de Pernas
| 1 | 3/7051 | Clamp | Serrage | Mordaza | Grampo | 2 |
| 2 | 980/99913 | Bellows | Soufflet | Fuelles | Fole | 1 |
| 3 | 980/00302 | Piston Rod | Piston | Pistón | Pistão | 1 |
| 4 | 980/00303 | Dowel | Goujon Prisonnier | Clavija | Espigão | 1 |
| 5 | 980/00204 | Cap | Capuchon | Casquete | Tampa | 1 |
| 6 | 980/99915 | Lower Support Casting .. | Pièce Moulée Support Inférieur | 1 | ||
| 7 | 5/0002 | Seal | Joint d'étanchéité | Obturador | Vedação | 1/2" |
| 8 | 10-601-0800 | Plug | Bougie | Tapón | Bujão | 1/2" |
| 9 | 7/8029 | Screw | Vis | Tornillo | Parafuse | M8 x 55 |
| 10 | 980/99902 | Handle | Guidon | Manillar | Punho | 1 |
| 11 | 40/00005 | Gauge | Jauge | Calibrar | Ajuizar | 1 |
| 12 | 5/0076 | O-Ring | Jeu Joint torique | Juego Junta tórica | Jogo Anel Vedante | 99.3 x 5.7 |
| 13 | 3/8004 | Dowel | Goujon Prisonnier | Clavija | Espigão | 6 x 25 |
| 14 | 980/00400 | Tube | Tube | Tubo | Tubo | 1 |
| 15 | MS12 | Bung | Obturateur | Tapón | Tampão | 1 |
| 16 | 5/0011 | Seal | Joint d'étanchéité | Obturador | Vedação | 1/4" |
| 17 | 7/8032 | Screw | Vis | Tornillo | Parafuse | M8 x 35 |
| 18 | 2/0067 | Spring | Ressort | Resorte | Mola | 2 |
| 19 | 2/0066 | Spring | Ressort | Resorte | Mola | 2 |
| 20 | 980/00301 | Boss | Bossage | Resalte | Cubo | 1 |
| 21 | 7/12010 | Screw | Vis | Tornillo | Parafuse | M12 x 40 |
| 22 | 980/99975 | Stop Moulding | 1 | |||
| 23 | 5/0074 | O-Ring | Jeu Joint torique | Juego Junta tórica | Jogo Anel Vedante | 84.5 x 3 |
| 24 | 980/99914 | Plate | Plaque | Placa | Placa | 1 |
| 25 | 7/8037 | Screw | Vis | Tornillo | Parafuse | M8 x 20 |
| 26 | 800/99619 | Decal | Autocollant | Rótulo | Decalque | Caution - Springs |
RTX 50 & 60
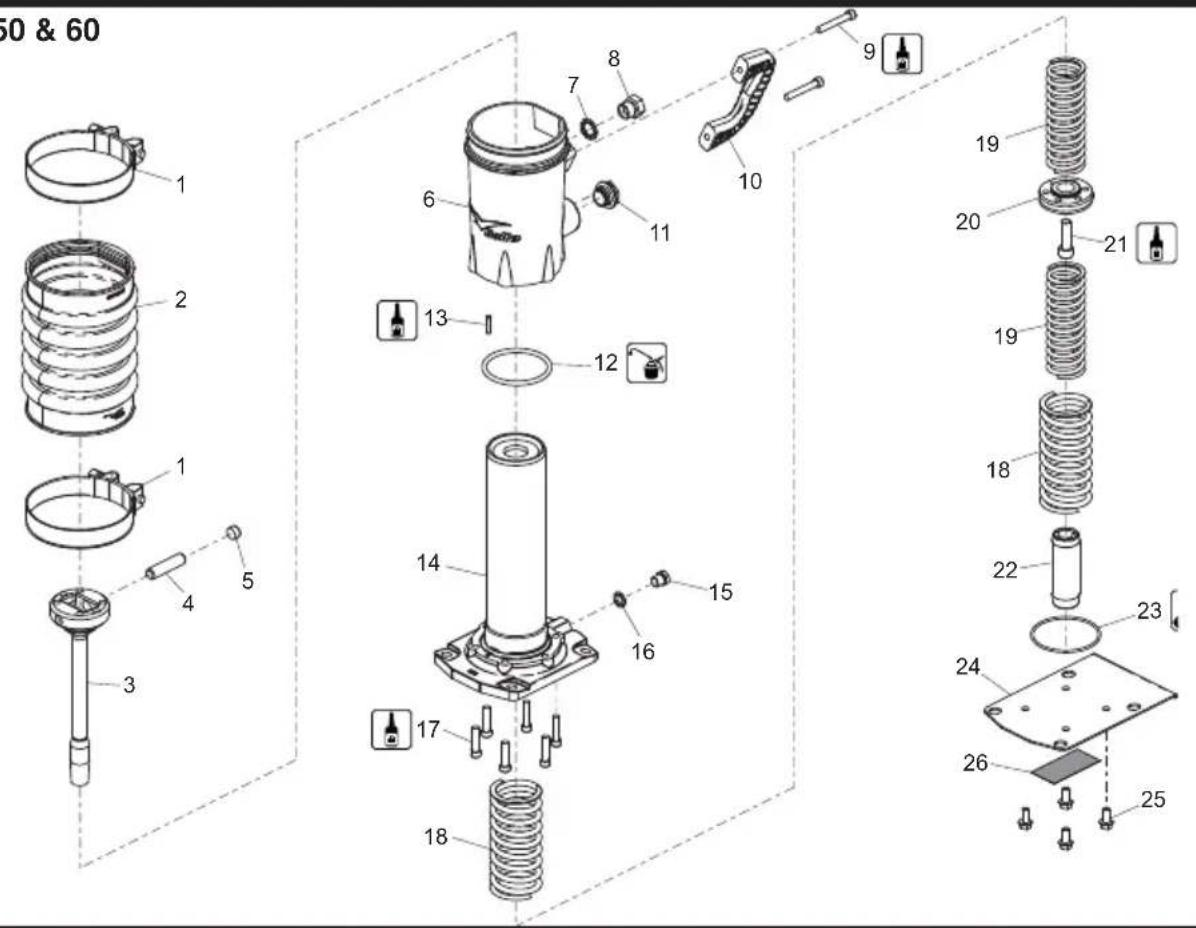
4-01
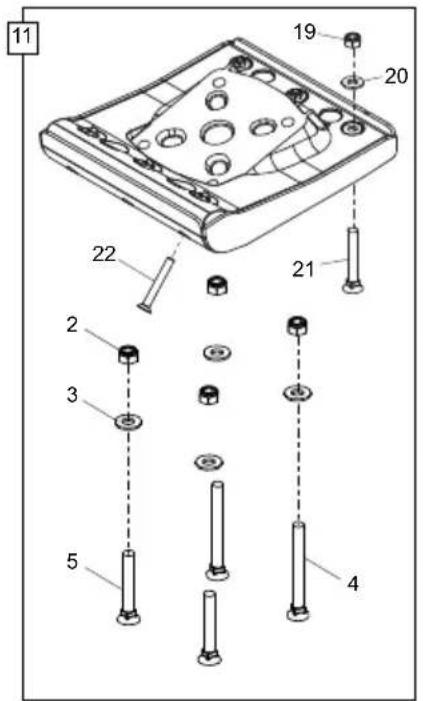
Note:- If you are buying a Wooden Foot to replace a Plastic Foot you will also need to buy a Wedge.
Foot Assembly, Ensemble Pied, Conjunto del Pié, Conjunto de Pé
| #1 | 980/90300 | Plastic Foot | Pied en Plastique | Pié de plástico | Pé Plástico | 165mm - 14° | 1 |
| #1 | 980/90200 | Plastic Foot | Pied en Plastique | Pié de plástico | Pé Plástico | 230mm - 14° | 1 |
| #1 | 980/90100 | Plastic Foot | Pied en Plastique | Pié de plástico | Pé Plástico | 280mm - 14° | 1 |
| ##1 | 980/91200 | Plastic Foot | Pied en Plastique | Pié de plástico | Pé Plástico | 165mm - 12° | 1 |
| ##1 | 980/91100 | Plastic Foot | Pied en Plastique | Pié de plástico | Pé Plástico | 230mm - 12° | 1 |
| ##1 | 980/91000 | Plastic Foot | Pied en Plastique | Pié de plástico | Pé Plástico | 280mm - 12° | 1 |
| 2 | 8/12006 | Nut | Ecrou | Tuerca | Porca | M12 | 4 |
| 3 | 4/1201 | Washer | Rondelle | Arandela | Anilha | M12 | 4 |
| 4 | 9/12040 | Bolt | Boulon | Perno | Perno | 2 | |
| 4 | 9/12040 | Bolt | Boulon | Perno | Perno | → 210546 (RTX 70) | 2 |
| 4 | 9/12051 | Bolt | Boulon | Perno | Perno | → 210547 (RTX 70) | 2 |
| 5 | 9/12041 | Bolt | Boulon | Perno | Perno | 2 | |
| 5 | 9/12041 | Bolt | Boulon | Perno | Perno | → 210546 (RTX 70) | 2 |
| 5 | 9/12050 | Bolt | Boulon | Perno | Perno | → 210547 (RTX 70) | 2 |
| 6 | 980/99939 | Wedge | Cale | Cuña | Calço | 1 | |
| 7 | 980/90700 | Wooden Foot | Pied en Bois | De madera del pie | Pé de madeira | 165mm | 1 |
| 7 | 980/90600 | Wooden Foot | Pied en Bois | De madera del pie | Pé de madeira | 230mm | 1 |
| 7 | 980/90500 | Wooden Foot | Pied en Bois | De madera del pie | Pé de madeira | 280mm | 1 |
| 7 | 980/60500 | Wooden Foot | Pied en Bois | De madera del pie | Pé de madeira | 165mm - RTX 70. | 1 |
| 7 | 980/60600 | Wooden Foot | Pied en Bois | De madera del pie | Pé de madeira | 230mm - RTX 70. | 1 |
| 7 | 980/60700 | Wooden Foot | Pied en Bois | De madera del pie | Pé de madeira | 280mm - RTX 70. | 1 |
| #8 | 980/03300 | Plastic Foot | Pied en Plastique | Pié de plástico | Pé Plástico | 165mm - 14° | 1 |
| #8 | 980/02400 | Plastic Foot | Pied en Plastique | Pié de plástico | Pé Plástico | 230mm - 14° | 1 |
| #8 | 980/02500 | Plastic Foot | Pied en Plastique | Pié de plástico | Pé Plástico | 280mm - 14° | 1 |
| ##8 | 980/03800 | Plastic Foot | Pied en Plastique | Pié de plástico | Pé Plástico | 165mm - 12° | 1 |
| ##8 | 980/03700 | Plastic Foot | Pied en Plastique | Pié de plástico | Pé Plástico | 230mm - 12° | 1 |
| ##8 | 980/03600 | Plastic Foot | Pied en Plastique | Pié de plástico | Pé Plástico | 280mm - 12° | 1 |
| 9 | 980/02600 | Wooden Foot | Pied en Bois | De madera del pie | Pé de madeira | 165mm | 1 |
| 9 | 980/02700 | Wooden Foot | Pied en Bois | De madera del pie | Pé de madeira | 230mm | 1 |
| 9 | 980/02800 | Wooden Foot | Pied en Bois | De madera del pie | Pé de madeira | 280mm | 1 |
| 9 | 980/60400 | Wooden Foot | Pied en Bois | De madera del pie | Pé de madeira | 165mm - RTX 70. | 1 |
| 9 | 980/60300 | Wooden Foot | Pied en Bois | De madera del pie | Pé de madeira | 230mm - RTX 70. | 1 |
| 9 | 980/60200 | Wooden Foot | Pied en Bois | De madera del pie | Pé de madeira | 280mm - RTX 70. | 1 |
| 10 | 8/12001 | Nut | Ecrou | Tuerca | Porca | M12 | 4 |
| 11 | 980/70900 | Heavy-Duty Foot | Lourds Pied | Pie de Servicio Pesado | Pesado pé Direito | 175mm - 14° | 1 |
| 11 | 980/70700 | Heavy-Duty Foot | Lourds Pied | Pie de Servicio Pesado | Pesado pé Direito | 240mm - 14° | 1 |
| 11 | 980/80300 | Heavy-Duty Foot | Lourds Pied | Pie de Servicio Pesado | Pesado pé Direito | 290mm - 14° | 1 |
| 11 | 980/70500 | Heavy-Duty Foot | Lourds Pied | Pie de Servicio Pesado | Pesado pé Direito | 175mm - 12° | 1 |
| 11 | 980/70300 | Heavy-Duty Foot | Lourds Pied | Pie de Servicio Pesado | Pesado pé Direito | 240mm - 12° | 1 |
| 11 | 980/70100 | Heavy-Duty Foot | Lourds Pied | Pie de Servicio Pesado | Pesado pé Direito | 290mm - 12° | 1 |
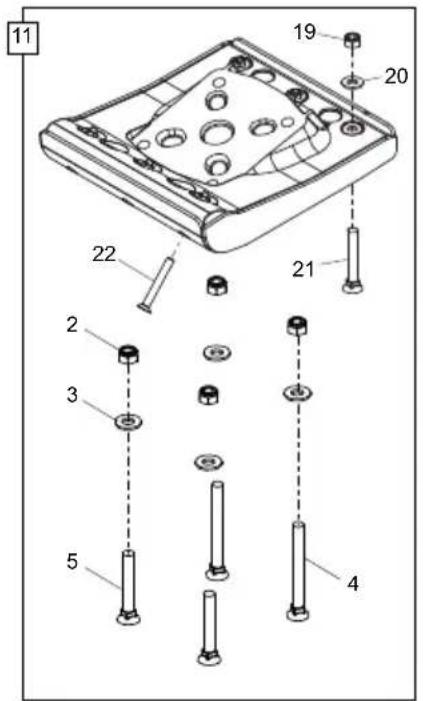
Note:- If you are buying a Wooden Foot to replace a Plastic Foot you will also need to buy a Wedge.
Foot Assembly, Ensemble Pied, Conjunto del Pié, Conjunto de Pé
| 12 | 8/8002 | Nut | Ecrou | Tuerca | Porca | 7 |
| 12 | 8/10001 | Nut | Ecrou | Tuerca | Porca | RTX 70 |
| 13 | 4/8006 | Washer | Rondelle | Arandela | Anilha | 7 |
| 13 | 4/1005 | Washer | Rondelle | Arandela | Anilha | RTX 70 |
| 14 | 7/8087 | Bolt | Boulon | Perno | Perno | 7 |
| 14 | 7/8078 | Bolt | Boulon | Perno | Perno | RTX 70 |
| 15 | 4/8004 | Washer | Rondelle | Arandela | Anilha | 4 |
| 16 | 7/8091 | Bolt | Boulon | Perno | Perno | M8 x 45 |
| 17 | 7/8085 | Bolt | Boulon | Perno | Perno | M8 x 60 |
| 18 | 8/8002 | Nut | Ecrou | Tuerca | Porca | 4 |
| 19 | 8/12001 | Nut | Ecrou | Tuerca | Porca | M12 |
| 20 | 4/1201 | Washer | Rondelle | Arandela | Anilha | M12 |
| 21 | 9/12041 | Bolt | Boulon | Perno | Perno | M12 x 80 |
| 22 | 9/12040 | Bolt | Boulon | Perno | Perno | M12 x 110 |
5-01
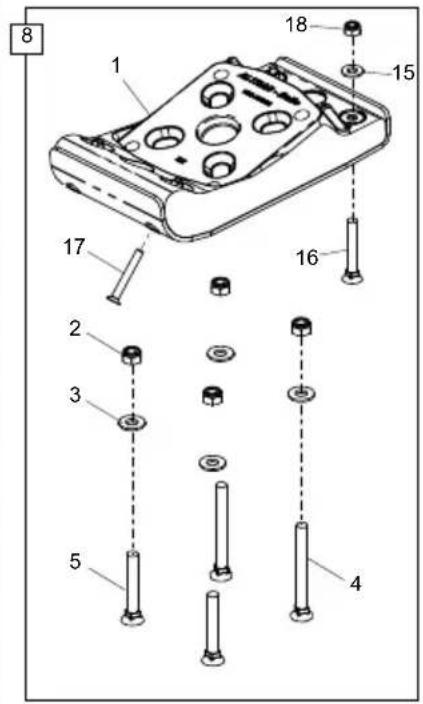
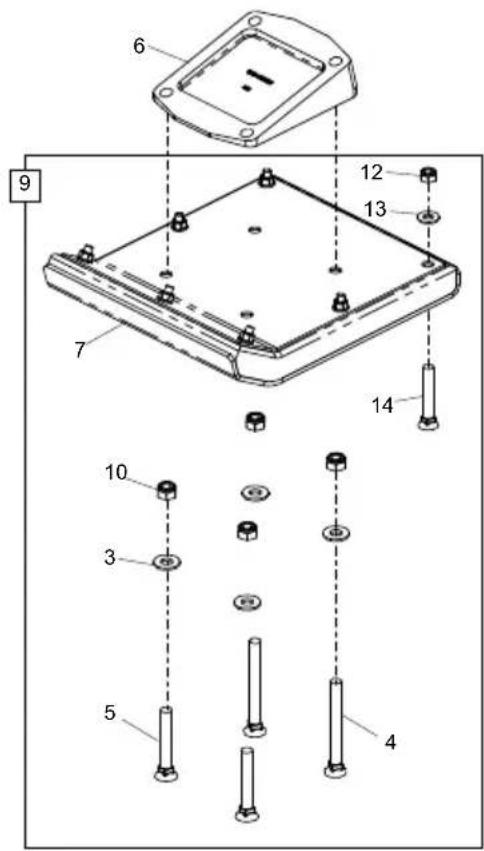
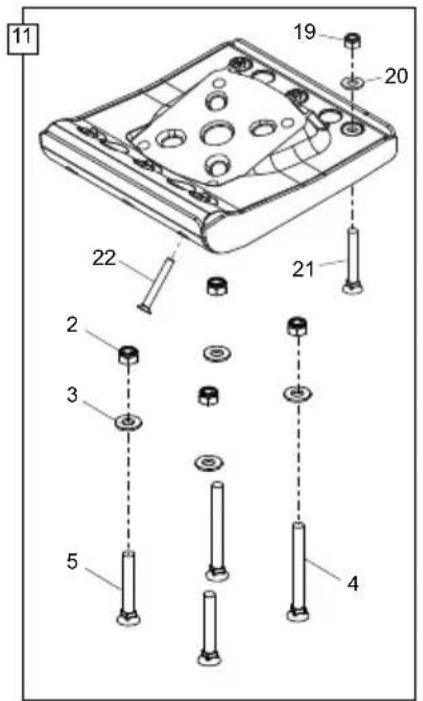
Note:- If you are buying a Wooden Foot to replace a Plastic Foot you will also need to buy a Wedge.
Voet Montage, Fuß Montage, Stampesko Monteres, Gruppo Piede
| #1 | 980/90300 | Kunststof Voet | Kunststoff Fuß | Plast Stampesko | Piedi di Plastica | 165mm - 14° | 1 |
| #1 | 980/90200 | Kunststof Voet | Kunststoff Fuß | Plast Stampesko | Piedi di Plastica | 230mm - 14° | 1 |
| #1 | 980/90100 | Kunststof Voet | Kunststoff Fuß | Plast Stampesko | Piedi di Plastica | 280mm - 14° | 1 |
| ##1 | 980/91200 | Kunststof Voet | Kunststoff Fuß | Plast Stampesko | Piedi di Plastica | 165mm - 12° | 1 |
| ##1 | 980/91100 | Kunststof Voet | Kunststoff Fuß | Plast Stampesko | Piedi di Plastica | 230mm - 12° | 1 |
| ##1 | 980/91000 | Kunststof Voet | Kunststoff Fuß | Plast Stampesko | Piedi di Plastica | 280mm - 12° | 1 |
| 2 | 8/12003 | Moer | Mutter | Møtrik | Dado | M12 | 4 |
| 3 | 4/1201 | Afdichtring | Scheibe | Spændeskive | Rondella | M12 | 4 |
| 4 | 9/12040 | Bouten | Bolzen | Skruebolt | Bullone | 2 | |
| 4 | 9/12040 | Bouten | Bolzen | Skruebolt | Bullone | → 210546 (RTX 70) | 2 |
| 4 | 9/12051 | Bouten | Bolzen | Skruebolt | Bullone | → 210547 (RTX 70) | 2 |
| 5 | 9/12041 | Bouten | Bolzen | Skruebolt | Bullone | 2 | |
| 5 | 9/12041 | Bouten | Bolzen | Skruebolt | Bullone | → 210546 (RTX 70) | 2 |
| 5 | 9/12050 | Bouten | Bolzen | Skruebolt | Bullone | → 210547 (RTX 70) | 2 |
| 6 | 980/99939 | Spie | Keil | Kile | Cuneo | 1 | |
| 7 | 980/90700 | Wooden Foot | Pied en Bois | De madera del pie | Pé de madeira | 165mm | 1 |
| 7 | 980/90600 | Wooden Foot | Pied en Bois | De madera del pie | Pé de madeira | 230mm | 1 |
| 7 | 980/90500 | Wooden Foot | Pied en Bois | De madera del pie | Pé de madeira | 280mm | 1 |
| 7 | 980/60500 | Wooden Foot | Pied en Bois | De madera del pie | Pé de madeira | 165mm - RTX 70 | 1 |
| 7 | 980/60600 | Wooden Foot | Pied en Bois | De madera del pie | Pé de madeira | 230mm - RTX 70 | 1 |
| 7 | 980/60700 | Wooden Foot | Pied en Bois | De madera del pie | Pé de madeira | 280mm - RTX 70 | 1 |
| #8 | 980/03300 | Kunststof Voet | Kunststoff Fuß | Plast Stampesko | Piedi di Plastica | 165mm - 14° | 1 |
| #8 | 980/02400 | Kunststof Voet | Kunststoff Fuß | Plast Stampesko | Piedi di Plastica | 230mm - 14° | 1 |
| #8 | 980/02500 | Kunststof Voet | Kunststoff Fuß | Plast Stampesko | Piedi di Plastica | 280mm - 14° | 1 |
| ##8 | 980/03800 | Kunststof Voet | Kunststoff Fuß | Plast Stampesko | Piedi di Plastica | 165mm - 12° | 1 |
| ##8 | 980/03700 | Kunststof Voet | Kunststoff Fuß | Plast Stampesko | Piedi di Plastica | 230mm - 12° | 1 |
| ##8 | 980/03600 | Kunststof Voet | Kunststoff Fuß | Plast Stampesko | Piedi di Plastica | 280mm - 12° | 1 |
| 9 | 980/02600 | Wooden Foot | Pied en Bois | De madera del pie | Pé de madeira | 165mm | 1 |
| 9 | 980/02700 | Wooden Foot | Pied en Bois | De madera del pie | Pé de madeira | 230mm | 1 |
| 9 | 980/02800 | Wooden Foot | Pied en Bois | De madera del pie | Pé de madeira | 280mm | 1 |
| 9 | 980/60400 | Wooden Foot | Pied en Bois | De madera del pie | Pé de madeira | 165mm - RTX 70 | 1 |
| 9 | 980/60300 | Wooden Foot | Pied en Bois | De madera del pie | Pé de madeira | 230mm - RTX 70 | 1 |
| 9 | 980/60200 | Wooden Foot | Pied en Bois | De madera del pie | Pé de madeira | 280mm - RTX 70 | 1 |
| 10 | 8/12001 | Moer | Mutter | Møtrik | Dado | M12 | 4 |
| 11 | 980/70900 | Zware Voet | Schwerlast-Fuß | Tung Pligt Stampesko | Piede Pesante | 175mm - 14° | 1 |
| 11 | 980/70700 | Zware Voet | Schwerlast-Fuß | Tung Pligt Stampesko | Piede Pesante | 240mm - 14° | 1 |
| 11 | 980/80300 | Zware Voet | Schwerlast-Fuß | Tung Pligt Stampesko | Piede Pesante | 290mm - 14° | 1 |
| 11 | 980/70500 | Zware Voet | Schwerlast-Fuß | Tung Pligt Stampesko | Piede Pesante | 175mm - 12° | 1 |
| 11 | 980/70300 | Zware Voet | Schwerlast-Fuß | Tung Pligt Stampesko | Piede Pesante | 240mm - 12° | 1 |
| 11 | 980/70100 | Zware Voet | Schwerlast-Fuß | Tung Pligt Stampesko | Piede Pesante | 290mm - 12° | 1 |
- Niet van toepassing op RTX 70 / Nicht anwendbar auf RTX 70 / Ikke aktuelt at RTX 70 / Non applicabile al RTX 70
- RTX 68 Alleen / RTX 68 Lediglich / RTX 68 Kun / RTX 68 Solo
5-01
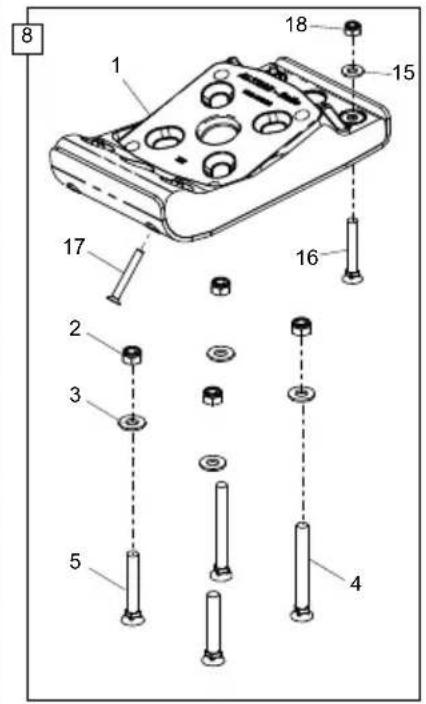
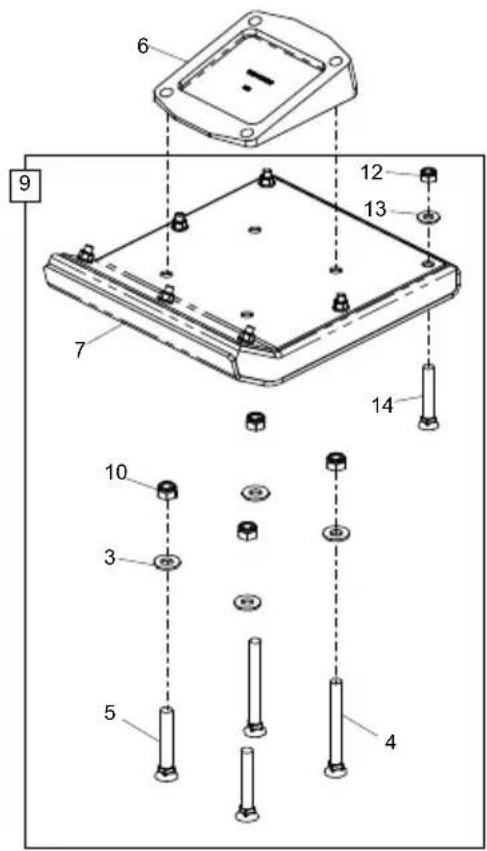
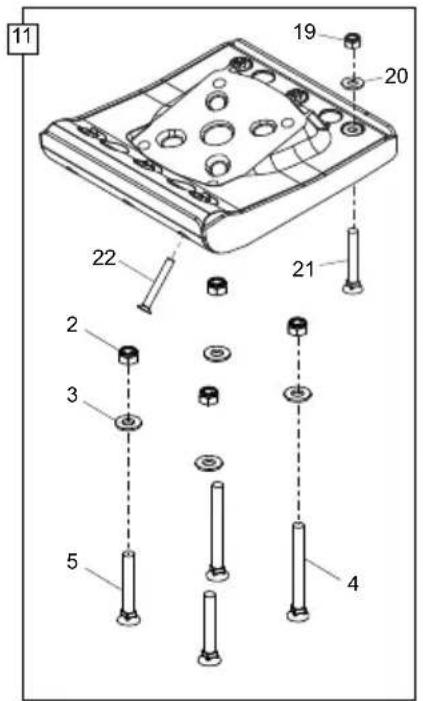
Note:- If you are buying a Wooden Foot to replace a Plastic Foot you will also need to buy a Wedge.
Voet Montage, Fuß Montage, Stampesko Monteres, Gruppo Piede
| 12 | 8/8002 | Moer | Mutter | Møtrik | Dado | 7 |
| 12 | 8/10001 | Moer | Mutter | Møtrik | Dado | RTX 70 |
| 13 | 4/8006 | Afdichtring | Scheibe | Spændeskive | Rondella | 7 |
| 13 | 4/1005 | Afdichtring | Scheibe | Spændeskive | Rondella | RTX 70 |
| 14 | 7/8087 | Bouten | Bolzen | Skruebolt | Bullone | 7 |
| 14 | 7/8078 | Bouten | Bolzen | Skruebolt | Bullone | RTX 70 |
| 15 | 4/8004 | Afdichtring | Scheibe | Spændeskive | Rondella | 4 |
| 16 | 7/8091 | Bouten | Bolzen | Skruebolt | Bullone | M8 x 45 |
| 17 | 7/8085 | Bouten | Bolzen | Skruebolt | Bullone | M8 x 60 |
| 18 | 8/8002 | Moer | Mutter | Møtrik | Dado | 4 |
| 19 | 8/12001 | Moer | Mutter | Møtrik | Dado | M12 |
| 20 | 4/1201 | Afdichtring | Scheibe | Spændeskive | Rondella | M12 |
| 21 | 9/12041 | Bouten | Bolzen | Skruebolt | Bullone | M12 x 80 |
| 22 | 9/12040 | Bouten | Bolzen | Skruebolt | Bullone | M12 x 110 |
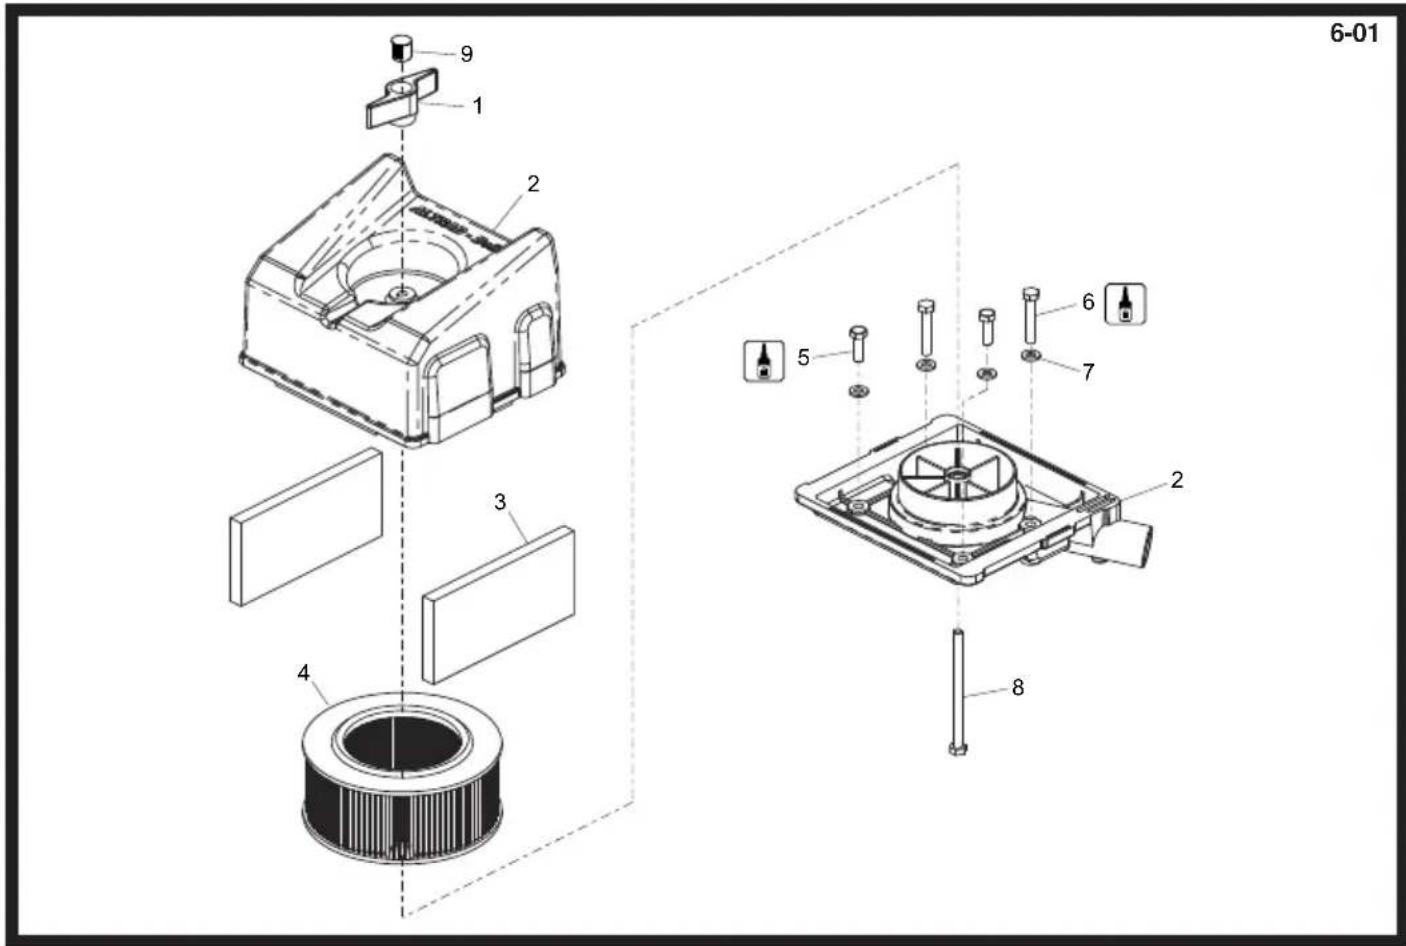
Air Filter Assembly, Ensemble Filtre à Air, Conjunto de Filtro de Aire, Montagem do Filtro de Ar
| 1 | 8/6018 | Nut | Ecrou | Tuerca | Porca | M6 | 1 |
| 2 | 980/02200 | Filter Housing | Carter de filtre | Caja de filtro | Cárter do Filtro | 1 | |
| 3 | 21/0302 | Filter Element | Elément filtre | Elemento filtro | Elemento filtrante | 2 | |
| 4 | 21/0303 | Filter Element | Elément filtre | Elemento filtro | Elemento filtrante | 1 | |
| 5 | 7/6037 | Screw | Vis | Tornillo | Parafuse | M6 | 2 |
| 6 | 7/6003 | Screw | Vis | Tornillo | Parafuse | M6 x 20 | 2 |
| 7 | 4/6007 | Washer | Rondelle | Arandela | Anilha | M6 | 4 |
| 8 | 9/6026 | Bolt | Boulon | Perno | Perno | M6 x 90 | 1 |
| 9 | 3/4079 | Plug | Bougie | Tapón | Bujão | 1 |
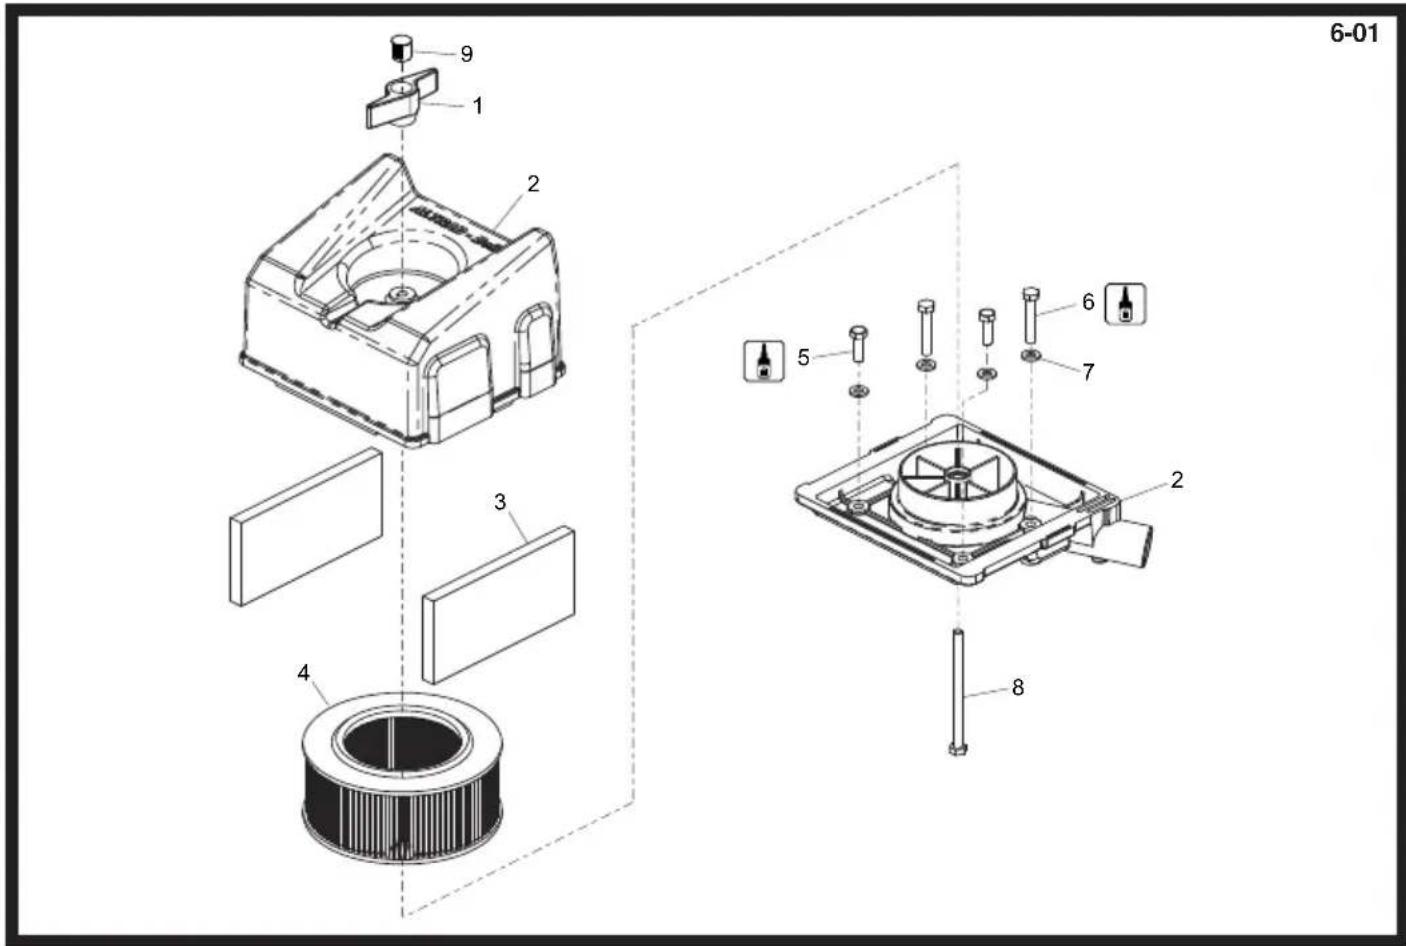
Anti-Vibration Mount Assembly, Montage Anti-Vibrations, Montaje Antivibración, Conjunto de Montagem Anti-Vibração
| 1 | 980/99921 | Bracket | Patte de montage | Escuadra | Suporte | RTX 50, 60, 68 & 70 | 1 |
| 1 | 980/99956 | Bracket | Patte de montage | Escuadra | Suporte | RTX 66 & 74 | 1 |
| 1 | 980/99973 | Bracket | Patte de montage | Escuadra | Suporte | RTX 80D | 1 |
| 2 | 21/0299 | Anti-Vibration Mount | Tampon antivibratoire | Montura antivibratoria | Bloco Anti-vibração | RTX 50, 60, 68, 70 & 80D | 1 |
| 2 | 21/0332 | Anti-Vibration Mount | Tampon antivibratoire | Montura antivibratoria | Bloco Anti-vibração | →I 204274 (RTX 66 & 74) | 1 |
| 2 | 21/0299 | Anti-Vibration Mount | Tampon antivibratoire | Montura antivibratoria | Bloco Anti-vibração | →I 204275 (RTX 66 & 74) | 1 |
| 3 | 980/99946 | Plate | Plaque | Placa | Placa | RTX 50, 60, 68 & 70 | 2 |
| 3 | 980/99948 | Plate | Plaque | Placa | Placa | RTX 66 & 74 | 2 |
| 4 | 7/6059 | Screw | Vis | Tornillo | Parafuse | RTX 50, 60, 68 & 70 | 4 |
| 4 | 9/6008 | Bolt | Boulon | Perno | Perno | RTX 66 & 74 | 4 |
| 5 | 4/6007 | Washer | Rondelle | Arandela | Anilha | RTX 66 & 74 | 4 |
| 6 | 8/8002 | Nut | Ecrou | Tuerca | Porca | RTX 50, 60, 66, 68, 70 & 74 | 1 |
| 6 | 8/8002 | Nut | Ecrou | Tuerca | Porca | RTX 80D | 2 |
| 7 | 4/8004 | Washer | Rondelle | Arandela | Anilha | RTX 50, 60, 66, 68, 70 & 74 | 1 |
| 7 | 4/8004 | Washer | Rondelle | Arandela | Anilha | RTX 80D | 2 |
| 8 | 7/8086 | Screw | Vis | Tornillo | Parafuse | RTX 50, 60, 66, 68, 70 & 74 | 1 |
| 8 | 7/8086 | Screw | Vis | Tornillo | Parafuse | RTX 80D | 2 |
| 9 | 8/10001 | Nut | Ecrou | Tuerca | Porca | M10 | 4 |
| 10 | 4/1005 | Washer | Rondelle | Arandela | Anilha | M10 | 4 |
| 11 | 8/6002 | Nut | Ecrou | Tuerca | Porca | M6 | 4 |
| 12 | 4/1005 | Washer | Rondelle | Arandela | Anilha | M10 | 6 |
| 13 | 4/1003 | Washer | Rondelle | Arandela | Anilha | M10 | 6 |
| 14 | 3/0082 | Rivet | Rivet | Roblon | Rebite | 4 | |
| 15 | 7/10012 | Screw | Vis | Tornillo | Parafuse | M10 x 40 | 4 |
| 16 | 7/10016 | Screw | Vis | Tornillo | Parafuse | M10 x 30 | 4 |
| 17 | 01154 | Decal | Autocollant | Rótulo | Decalque | 108dB(A) | 1 |
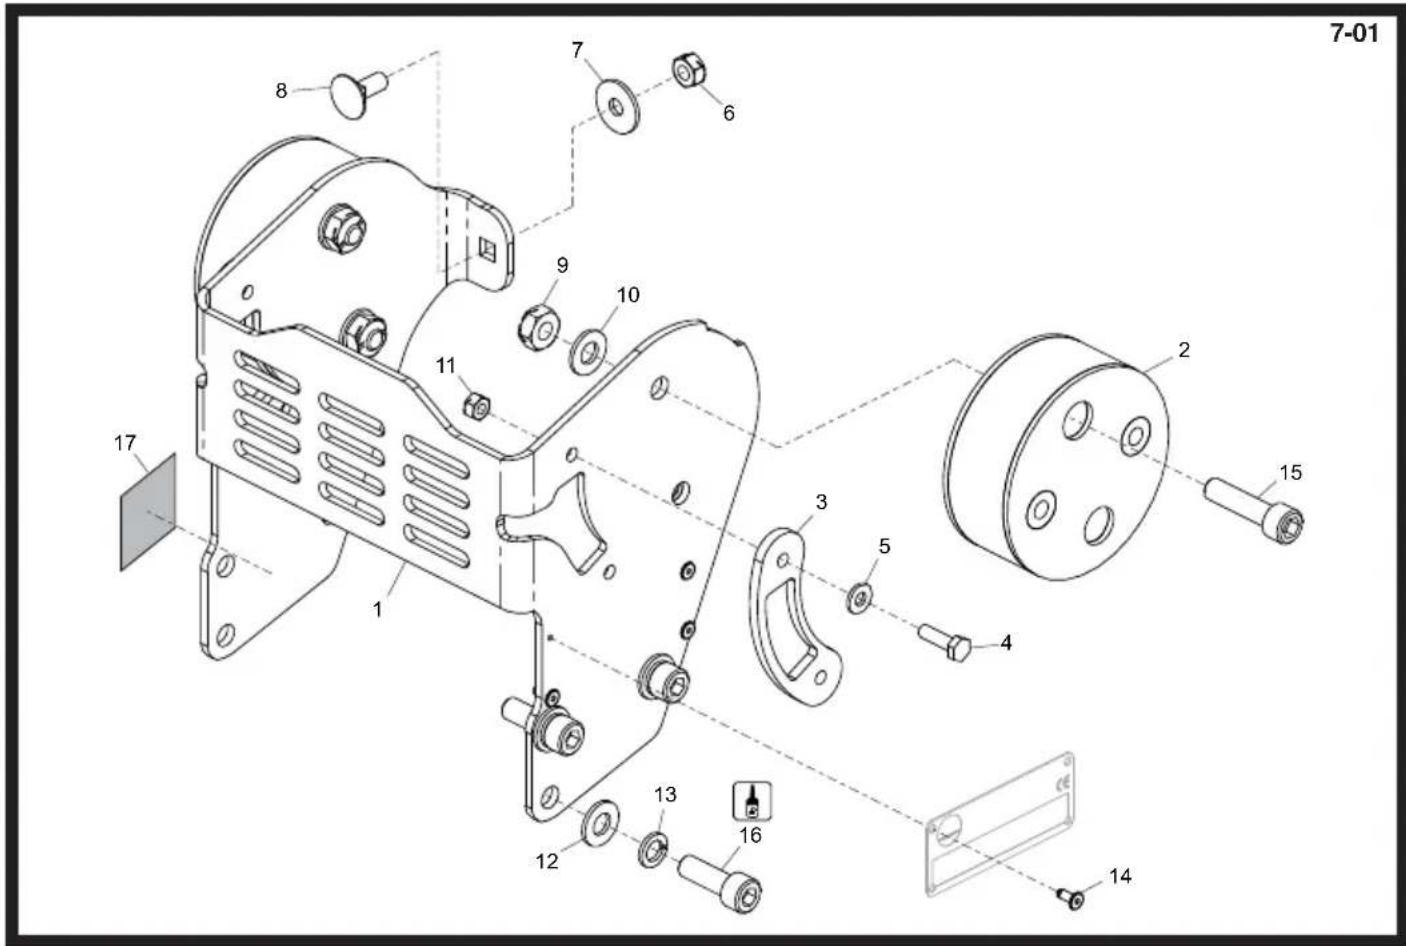
Anti-Vibratie Montage Assemblage, Schwingungsdämpfende Montage, Antivibrationsophæng, Montaggio Antivibrazione Assemblaggio
| 1 | 980/99921 | Steun | Halterung | Beslag | Staffa | RTX 50, 60, 68 & 70 | 1 |
| 1 | 980/99956 | Steun | Halterung | Beslag | Staffa | RTX 66 & 74 | 1 |
| 1 | 980/99973 | Steun | Halterung | Beslag | Staffa | RTX 80D | 1 |
| 2 | 21/0299 | Anti-trilbevestiging | Schwingungsdämpfer | Antivibrationsophæng | Supporto antivibrazioni | RTX 50, 60, 68, 70 & 80D | 1 |
| 2 | 21/0332 | Anti-trilbevestiging | Schwingungsdämpfer | Antivibrationsophæng | Supporto antivibrazioni | →I 204274 (RTX 66 & 74) | 1 |
| 2 | 21/0299 | Anti-trilbevestiging | Schwingungsdämpfer | Antivibrationsophæng | Supporto antivibrazioni | →I 204275 (RTX 66 & 74) | 1 |
| 3 | 980/99946 | Plaat | Platte | Plade | Piastra | RTX 50, 60, 68 & 70 | 2 |
| 3 | 980/99948 | Plaat | Platte | Plade | Piastra | RTX 66 & 74 | 2 |
| 4 | 7/6059 | Schroef | Schraube | Skrue | Vite | RTX 50, 60, 68 & 70 | 4 |
| 4 | 9/6008 | Bouten | Bolzen | Skruebolt | Bullone | RTX 66 & 74 | 4 |
| 5 | 4/6007 | Afdichtring | Scheibe | Spændeskive | Rondella | RTX 66 & 74 | 4 |
| 6 | 8/8002 | Moer | Mutter | Møtrik | Dado | RTX 50, 60, 66, 68, 70 & 74 | 1 |
| 6 | 8/8002 | Moer | Mutter | Møtrik | Dado | RTX 80D | 2 |
| 7 | 4/8004 | Afdichtring | Scheibe | Spændeskive | Rondella | RTX 50, 60, 66, 68, 70 & 74 | 1 |
| 7 | 4/8004 | Afdichtring | Scheibe | Spændeskive | Rondella | RTX 80D | 2 |
| 8 | 7/8086 | Schroef | Schraube | Skrue | Vite | RTX 50, 60, 66, 68, 70 & 74 | 1 |
| 8 | 7/8086 | Schroef | Schraube | Skrue | Vite | RTX 80D | 2 |
| 9 | 8/10001 | Moer | Mutter | Møtrik | Dado | M10 | 4 |
| 10 | 4/1005 | Afdichtring | Scheibe | Spændeskive | Rondella | M10 | 4 |
| 11 | 8/6002 | Moer | Mutter | Møtrik | Dado | M6 | 4 |
| 12 | 4/1005 | Afdichtring | Scheibe | Spændeskive | Rondella | M10 | 6 |
| 13 | 4/1003 | Afdichtring | Scheibe | Spændeskive | Rondella | M10 | 6 |
| 14 | 3/0082 | Klinken | Niet | Klinke | Biglietto non vincente | 4 | |
| 15 | 7/10012 | Schroef | Schraube | Skrue | Vite | M10 x 40 | 4 |
| 16 | 7/10016 | Schroef | Schraube | Skrue | Vite | M10 x 30 | 4 |
| 17 | 01154 | Label | Abziehbild | Skilt | Decalcomania | 108dB(A) | 1 |
8-01
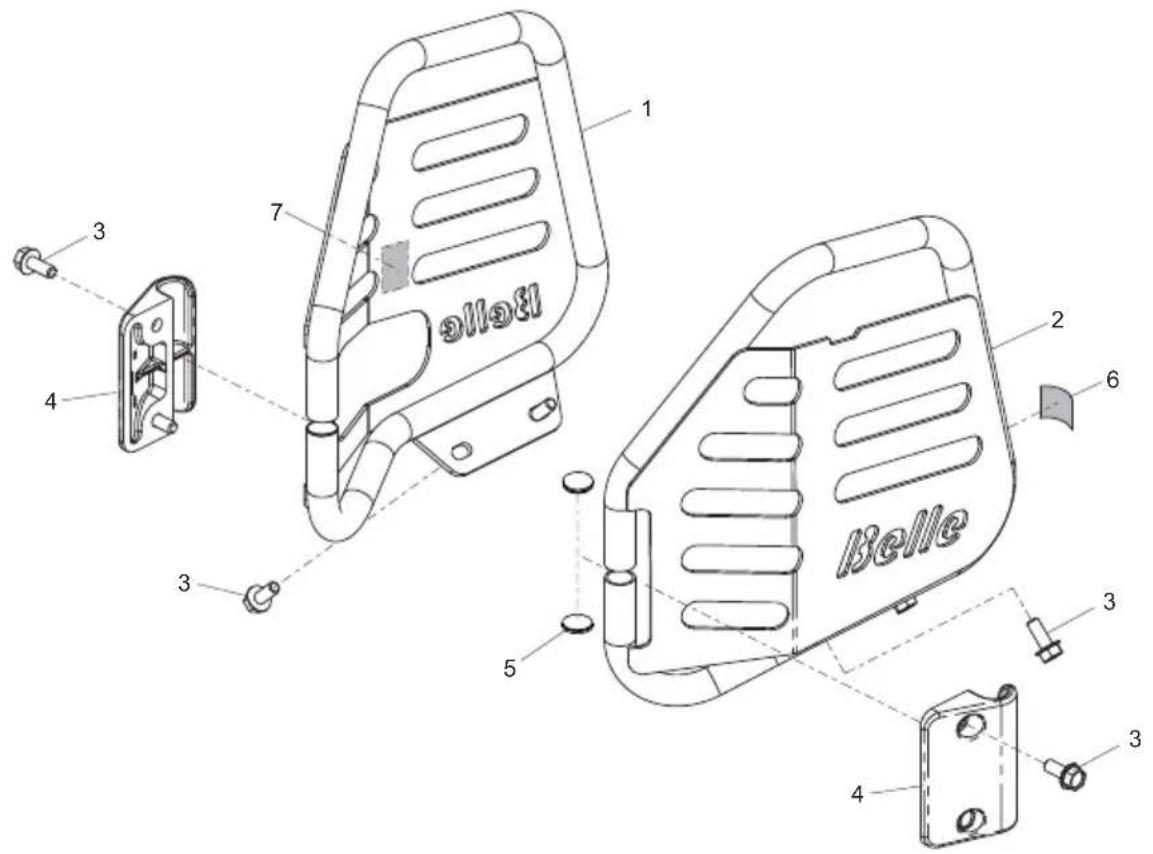
Side Guard, Carène Latéral, Defensa Lateral, Guarda Lateral
| 1 | 980/00900S....Side Guard (Orange)....Carène Lateral (Orange) . Defensa Lateral (Naranja)....Guarda Lateral (Laranja).... | |||
| 1 | 980/00900G....Side Guard (Green)....Carène Lateral (Vert)....Defensa Lateral (Verde)....Guarda Lateral (Verde).... | |||
| 1 | 980/00900R....Side Guard (Red)....Carène Lateral (Rouge)...Defensa Lateral (Roja)....Guarda Lateral (Vermelho).... | |||
| 1 | 980/00900Y....Side Guard (Yellow)....Carène Lateral (Jaune) ...Defensa Lateral (Amarillo)....Guarda Lateral (Amarelo).... | |||
| 2 | 980/00800S....Side Guard (Orange)....Carène Lateral (Orange) .Defensa Lateral (Naranja)....Guarda Lateral (Laranja).... | |||
| 2 | 980/00800G....Side Guard (Green)....Carène Lateral (Vert)....Defensa Lateral (Verde)....Guarda Lateral (Verde).... | |||
| 2 | 980/00800R....Side Guard (Red)....Carène Lateral (Rouge)...Defensa Lateral (Roja)....Guarda Lateral (Vermelho).... | |||
| 2 | 980/00800Y....Side Guard (Yellow)....Carène Lateral (Jaune) ...Defensa Lateral (Amarillo)....Guarda Lateral (Amarelo).... | |||
| 3 | 7/8037....Screw....Vis....Tornillo....Parafuse....M8 x 20....8 | |||
| 4 | 980/99929....Hinge....Charnière....Bisagra....Dobradiça....2 | |||
| 5 | 3/4044....Grommet....Passe-fil....Ojal....Anel Isolante....16mm....4 | |||
| 6 | 800/99634....Decal....Autocollant....Rótulo....Decalque....1 | |||
| 7 | 800/99519....Decal....Autocollant....Rótulo....Decalque....1 | |||
8-01
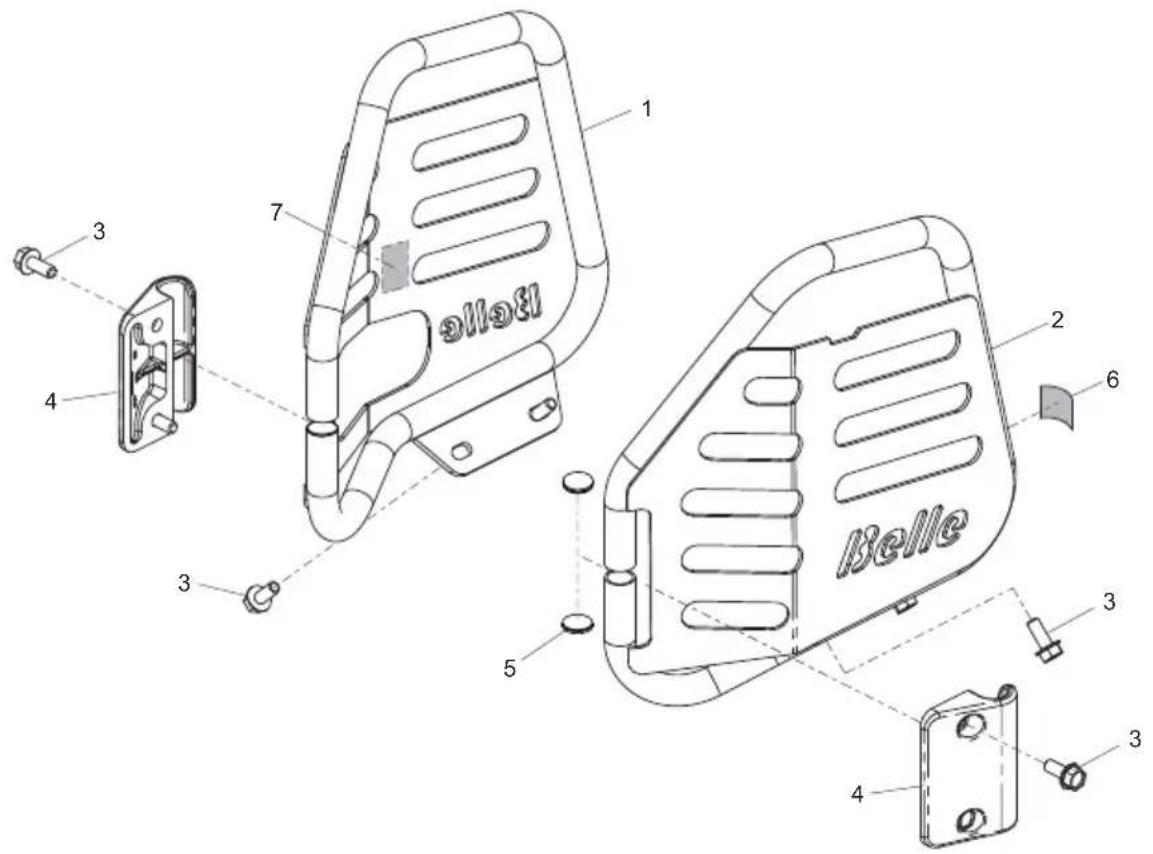
Side Guard, Seitenschutz, Side Vagt, Protezione Laterale
| 1 | 980/00900S....Side Guard (Oranje) ....Seitenschutz (Orange) ....Side Vagt (Orange)....Protezione Laterale (Arancia).... | 1 |
| 1 | 980/00900G....Side Guard (Groen)....Seitenschutz (Grün)....Side Vagt (Grøn)....Protezione Laterale (Verde).... | 1 |
| 1 | 980/00900R....Side Guard (Rood)....Seitenschutz (Rot)....Side Vagt (Rød)....Protezione Laterale (Rosso).... | 1 |
| 1 | 980/00900Y....Side Guard (Geel)....Seitenschutz (Gelb)....Side Vagt (Gul)....Protezione Laterale (Giallo).... | 1 |
| 2 | 980/00800S....Side Guard (Oranje) ....Seitenschutz (Orange) ....Side Vagt (Orange)....Protezione Laterale (Arancia).... | 1 |
| 2 | 980/00800G....Side Guard (Groen)....Seitenschutz (Grün)....Side Vagt (Grøn)....Protezione Laterale (Verde).... | 1 |
| 2 | 980/00800R....Side Guard (Rood)....Seitenschutz (Rot)....Side Vagt (Rød)....Protezione Laterale (Rosso).... | 1 |
| 2 | 980/00800Y....Side Guard (Geel)....Seitenschutz (Gelb)....Side Vagt (Gul)....Protezione Laterale (Giallo).... | 1 |
| 3 | 7/8037....Schroef....Schraube....Skrue....Vite....M8 x 20.... | 8 |
| 4 | 980/99929....Hinge....Charnière....Bisagra....Dobradiça.... | 2 |
| 5 | 3/4044....Pakkingring....Auge....Kordelstrop....Anello in gomma....16mm.... | 4 |
| 6 | 800/99634....Label....Abziehbild....Skilt....Decalcomania.... | 1 |
| 7 | 800/99519....Label....Abziehbild....Skilt....Decalcomania.... | 1 |
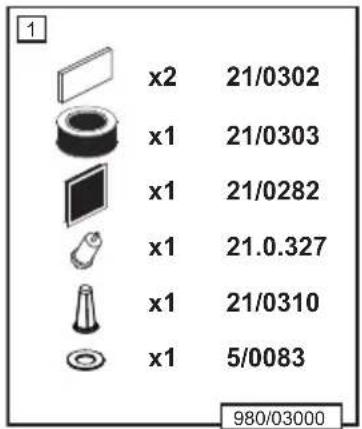
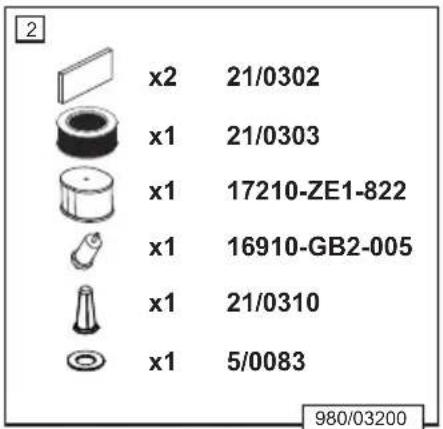
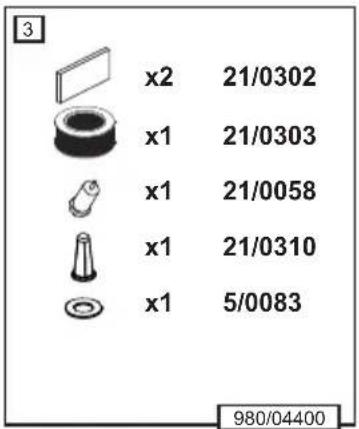
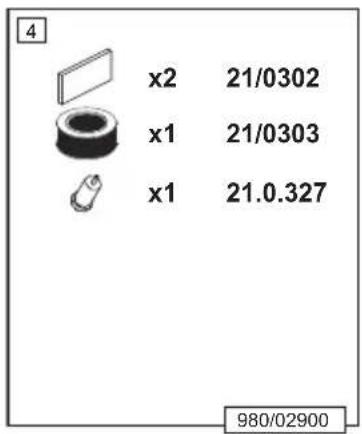
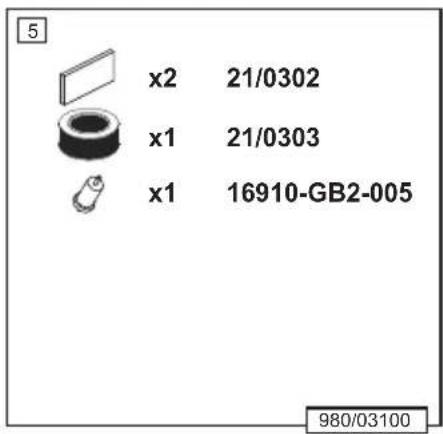
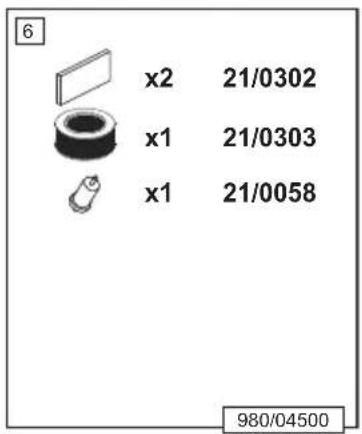
Filtration Kits, Kits de Filtration, Kits de Filtración, Kits de Filtragem
| 1 | 980/03000....Engine Service Kit....Kit d'Entretien Moteur.... | |
| - GX100 (Main)....- GX100 (Principal).... | RTX 50, 60, 68 & 70 ....1 | |
| 2 | 980/03200....Engine Service Kit....Kit d'Entretien Moteur.... | |
| - GX120 (Main)....- GX120 (Principal).... | RTX 66 & 74 ....1 | |
| 3 | 980/04400....Engine Service Kit....Kit d'Entretien Moteur.... | |
| - Yanmar L48 (Main)....- Yanmar L48 (Principal).... | RTX 80D ....1 | |
| 4 | 980/02900....Engine Service Kit....Kit d'Entretien Moteur.... | |
| - GX100 (50Hrs)....- GX100 (50Hrs).... | RTX 50, 60, 68 & 70 ....1 | |
| 5 | 980/03100....Engine Service Kit....Kit d'Entretien Moteur.... | |
| - GX120 (50Hrs)....- GX120 (50Hrs).... | RTX 66 & 74 ....1 | |
| 6 | 980/04500....Engine Service Kit....Kit d'Entretien Moteur.... | |
| - Yanmar L48 (50Hrs)....- Yanmar L48 (50Hrs).... | RTX 80D ....1 |
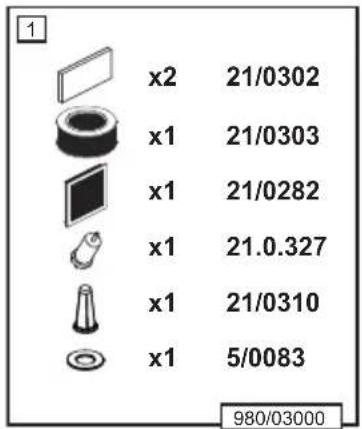
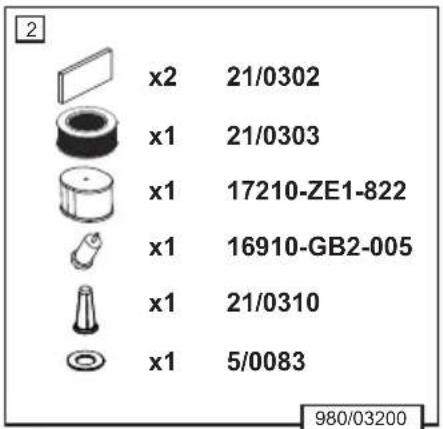
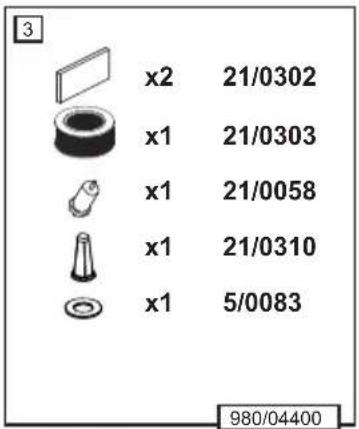
9-01
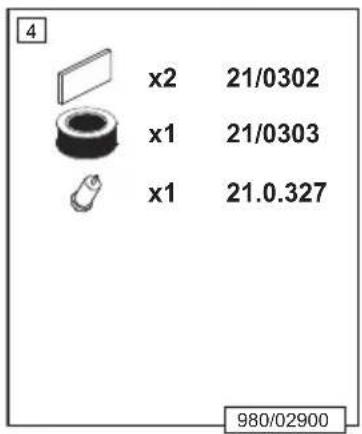
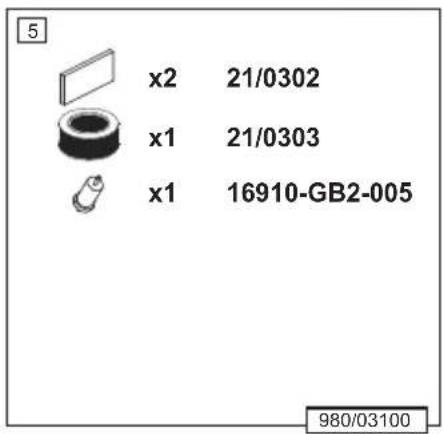
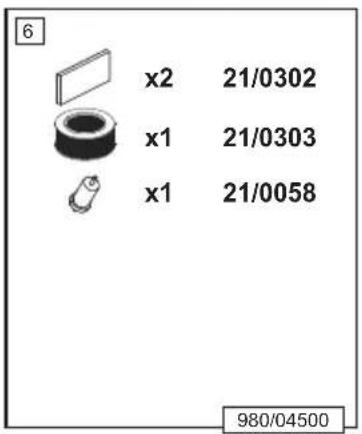
Filtratie Kits, Filtration Kits, Filtrering Kits, Kit di Filtrazione
1 980/03000.....Engine Service Kit.....
- GX100 (Main) RTX 50, 60, 68 & 70 ...1
2 980/03200....Engine Service Kit.... RTX 66 & 74 ....1
.... - GX120 (Main)....
3 980/04400.....Engine Service Kit.....
....- Yanmar L48 (Main)....RTX 80D....1
4 980/02900.....Engine Service Kit.....
- GX100 (50Hrs) RTX 50, 60, 68 & 70 ...1
5 980/03100.....Engine Service Kit.....
- GX120 (50Hrs) RTX 66 & 74 1
6 980/04500.....Engine Service Kit.....
.... - Yanmar L48 (50Hrs) .... RTX 80D ....1
10-01
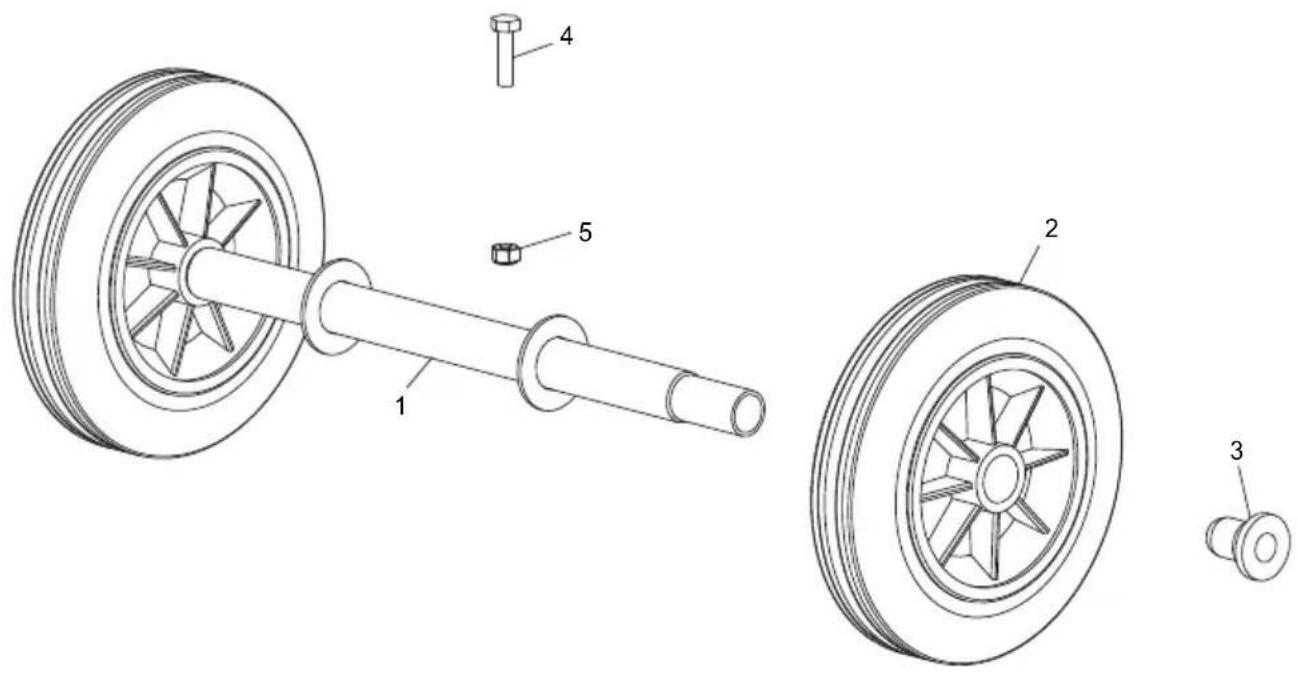
Transport Attachment, Fixation de Transporteur, Conexión para Transportador, Acessorio do Transportador
1 980/01200.....Axle.....Essieu.....Eje.....Eixo.....1
2 60/0285 Wheel Roue Rueda Roda 2
3 900/11400.....Wheel Melainer....Molette de retenue ....Helen - Rueda....Relenior - Roda....2
4 7/8009.....Screw.....Vis.....Tornillo.....Parafuse.....M8 x 30.....2
5 8/8008....Nut....Ecrou....Tuerca....Porca....M8....2
10-01
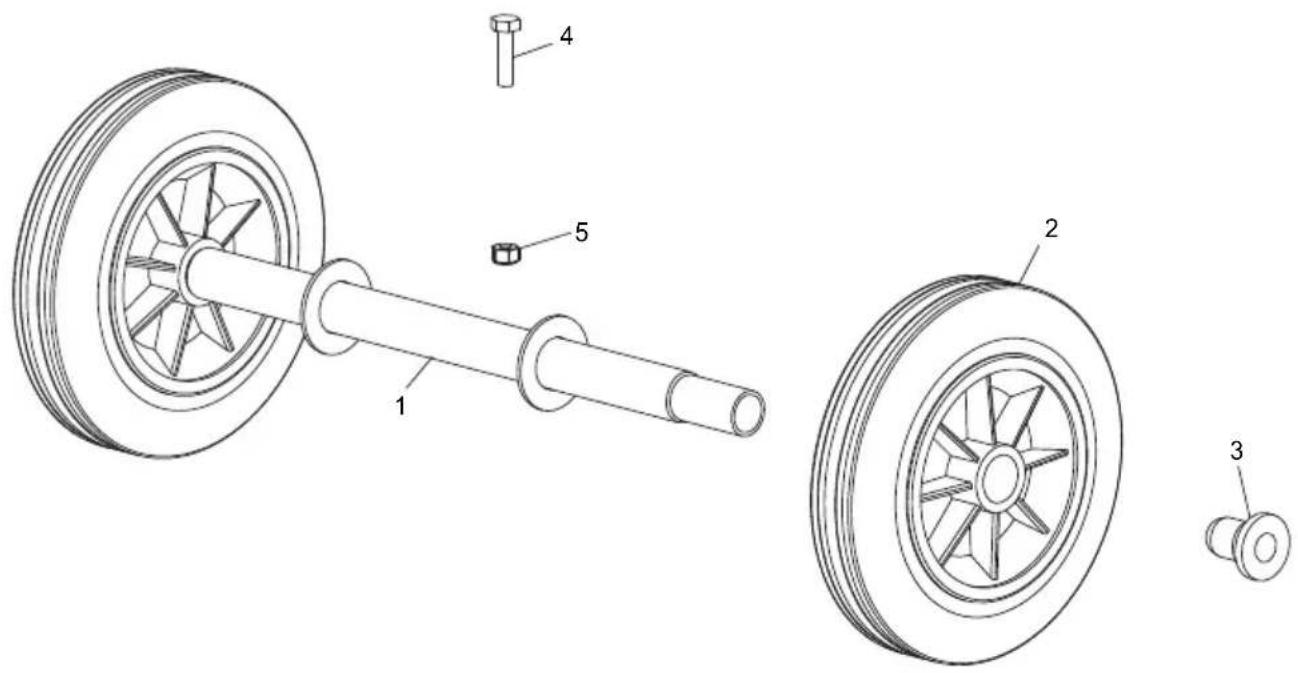
Transporthulpstuk, Transportvorrichtung, Transportørudstyr, Trasportatore
1 980/01200....As....Achse....Aksel....Assale....1
2 60/0285 Wiel Rad Hjul Ruota 2
3 900/11400.....Aanslag - wiel.....Halterung - Rad.....Boit - Hjul.....Fermo - ruota.....2
4 7/8009....Schroef....Schraube ....Skrue....Vite ....M8 x 30....2
5 8/8008....Moer....Mutter....Motrik....Dado....M8....2
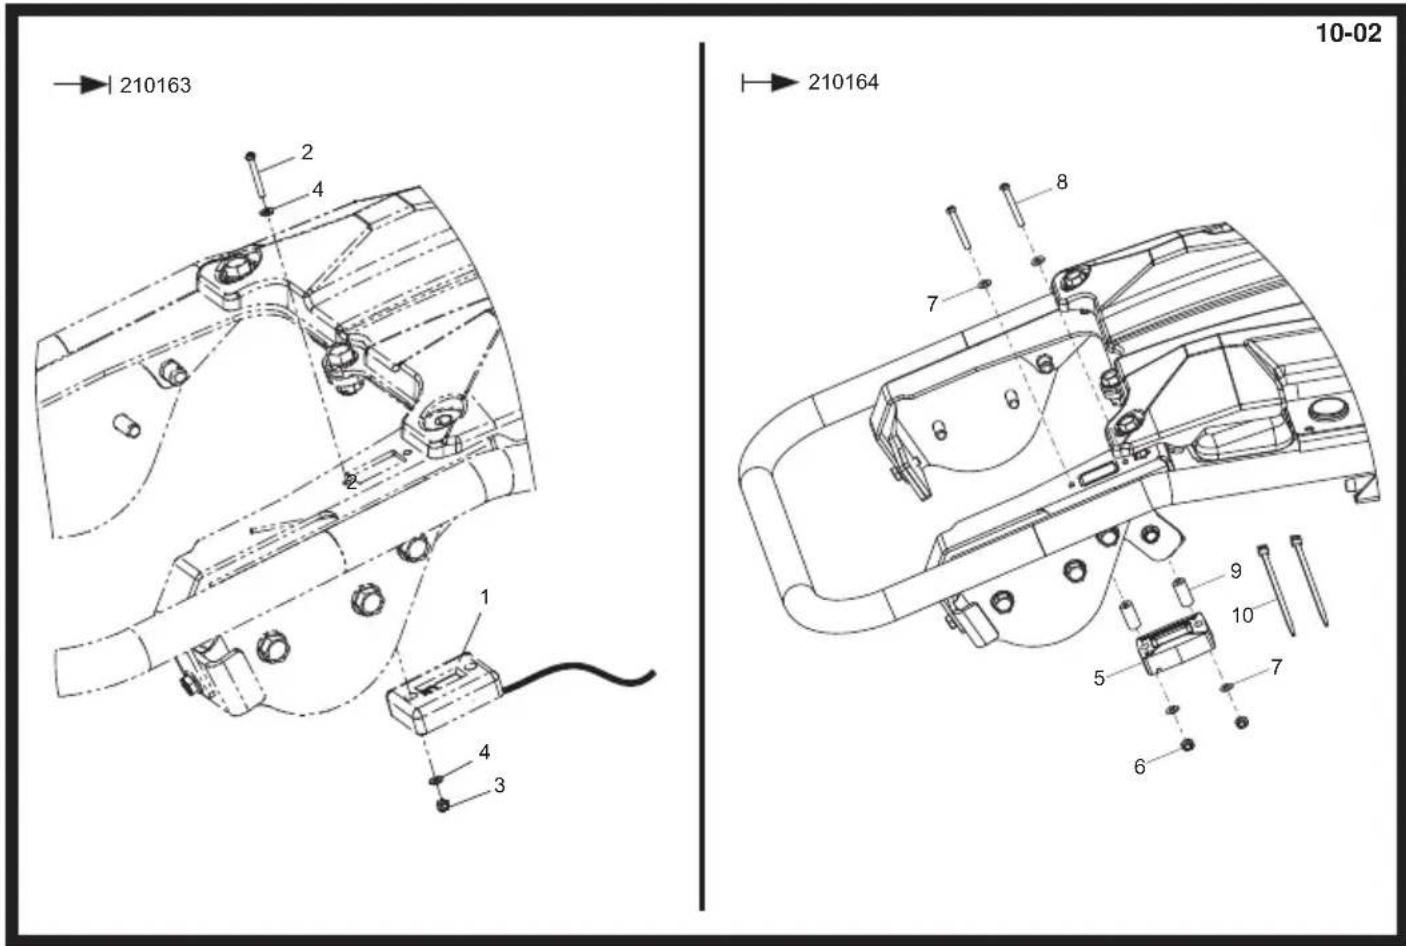
Trolley, Chariot, Carretilla, Trole
| 1 | 980/05300 | Trolley Frame | Cadre de Chariot | Marco de la Carretilla | Armação de Trole | 1 |
| 2 | 60/0439 | Wheel | Roue | Rueda | Roda | 2 |
| 3 | 980/05400 | Latch | Verrou | Cerrojo | Trinco | 1 |
| 4 | XS35 | Handle Grip | Poignée De Main | Empuñadura | Aperto De Mão | 2 |
| 5 | 19.0.834 | Locking Handle | Molette de verrouillage | Manillar inmovilizador | Punho de Aperto | 1 |
| 6 | 4/2501 | Washer | Rondelle | Arandela | Anilha | 25mm |
| 7 | 800/00300 | Decal | Autocollant | Rótulo | Decalque | Belle Logo |
| 8 | 4/1015 | Washer | Rondelle | Arandela | Anilha | M10 X 35 X 6 |
| 9 | 800/99314 | Decal | Autocollant | Rótulo | Decalque | 1 |
10-03

Urenteller, Stundenzähler, Timetæller, Contaore
| 1 | 980/05300 | Rolwagentje Chassis | Wagen Rahmen | Vogen Ramme | Telaio del carrello | 1 |
| 2 | 60/0439 | Wiel | Rad | Hjul | Ruota | 2 |
| 3 | 980/05400 | Grendel | Riegel | Grendel | Dispositivo di bloccaggio | 1 |
| 4 | XS35 | Handgrepen | Handgriffe | Håndgreb | Guancette | 2 |
| 5 | 19.0.834 | Grendelhefboom | Arretiergriff | Låsehändtag | Impugnatura bloccante | 1 |
| 6 | 4/2501 | Afdichtring | Scheibe | Spændeskive | Rondella | 25mm |
| 7 | 800/00300 | Label | Abziehbild | Skilt | Decalcomania | Belle Logo |
| 8 | 4/1015 | Afdichtring | Scheibe | Spændeskive | Rondella | M10 X 35 X 6 |
| 9 | 800/99314 | Label | Abziehbild | Skilt | Decalcomania | 1 |



- EC DECLARATION OF CONFORMITY / DECLARATION CE DE CONFORMITE / DECLARACIÓN DE CONFORMIDAD CE / DECLARAÇÃO CE DE CONFORMIDADE / EG-VERKLARING VAN OVEREENSTEMMING / EF OVERENSSTEMMELSESERKLAERING
- FOREWORD
- DIRECTIVES WITH REGARD TO THE NOTATIONS
- CAUTION
- WARNING
- CONTENTS
- ENVIRONMENT
- SAFE DISPOSAL
- INTENDED USE
- ON-SITE TRANSPORT
- ROAD TRANSPORT
- E - BRANDING DECAL
- F - NOISE DECAL
- G - SPRING SAFETY DECAL (PART NO. 800-99619)
- H - ENGINE START DECAL (PART NO. 800-99625)
- J - FUEL VALVE DECAL (800-99634-0)
- K - SERIAL PLATE (PART NO. 800-99844)
- HEALTH & SAFETY
- VIBRATION
- PPE (PERSONAL PROTECTIVE EQUIPMENT)
- DUST
- FUEL
- EXHAUST FUMES
- PRE-START CHECKS
- PRE START-UP INSPECTION
- LONG TERM STORAGE
- GB
- HONDA GX100 & GX120
- YANMAR L48
- START & STOP PROCEDURE
- OPERATION
- LIFTING
- ONCE THE CHECKS LISTED IN THE 'PRE-START' SECTION HAVE BEEN CARRIED OUT, YOU MAY START THE ENGINE
- TRANSPORTATION
- OPERATION AT HIGH ALTITUDE
- SERVICE & MAINTENANCE
- MAINTENANCE
- SERVICING THE ENGINE
- YANMAR L48 ENGINE PRIMING
- EVERY 8 HOURS OR DAILY
- FIRST 20 HOURS OF OPERATION
- EVERY 50 HOURS OR WEEKLY
- EVERY 200 HOURS
- WHEEL KIT OPTION
- KEY
- WARRANTY
- WARRANTY CLAIMS
- FOR WARRANTY CLAIMS
- OR WRITE TO
- WARRANTY REGISTRATION
- HTTP://WWW.BELLEGROUP.COM/INDEX.PHP?P=WARRANTY_REGISTRATION
- ATTENTION
- ENTRETIEN ET RÉVISION
- AVERTISSEMENT
- ATENCIÓN
- AVISO
- REGISTRO DE GARANTIA
- CUIDADO
- ASSISTÊNCIA
- VOORZICHTIG
- ONDERHOUD
- WAARSCHUWING
- E - FABRIKATSMÆRKAT
- LANG TIDS OPBEVARING
- FORSIGTIG
- START- OG STOPPROCEDURE
- EFTERSYN
- ADVARSEL
- GARANTIREGISTRERING
- E - MARKENAUFKLEBER
- WARNEN
- WARTUNG
- WARNUNG
- I
- C - GANCIO DI SOLLEVAMENTO DECAL (PARTE N. 800-99630)
- MANUTENZIONE
- AVVERTENZA
- E - VARUMÄRKESDEKAL
- SE UPP
- SERVICE & UNDERHÅLL
- A - KULJETUSTARRA (OSA NRO 800-99631)
- KULJETUS TYÖMAALLA
- VAARA
- HUOLTO
- VAROITUS
- OSTRZEŻENIE
- ПРЕДУПРЕЖДЕНИЕ
- ВНИМАНИЕ
- E – KAUBAMÄRGI SILT
- HOIATUS
- ETTEVAATUST
- HOOLDUS
- MOOTORI HOOLDUS
- GARANTII REGISTREERIMINE
- UZMANIBU
- SERVISS UN APKOPE
- BRĪDINĀJUMS
- RAKSTISKI
- ATSARGIAI
- TECHNINĖ PRIEŽIŪRA
- KAS 8 VALANDOS ARBA KASDIEN
- ISPÉJIMAS
- RAŠYKITE
- VÝSTRAHA
- VAROVÁNÍ
- REGISTRACE ZÁRUKY
- A - AFISAJ TRANSPORT (NR. PARTE 800-99631)
- TRANSPORT LA ŞANTIER
- ATENTIE
- DEPOZITARE
- AVERTISMENT
- VIGYÁZAT
- KARBANTARTÁS
- FIGYELEM
- PAŽNJA
- START & STOP PROCEDURA
- SERVIS I ODRŽAVANJE
- ODRŽAVANJE : SVAKIH 8 SATI ILI DNEVNO
- UPOZORENJE
- REGISTRACIJA JAMSTVA
- HANDLE ASSEMBLY, ENSEMBLE POIGNÉE, CTO. DE MANILLAR, CONJ. DO PUNHO
- GEARBOX ASSEMBLY, ENSEMBLE BOÎTE DE VITESSES
- NIET VAN TOEPASSING OP RTX 70 / NICHT ANWENDBAR AUF RTX 70 / IKKE AKTUELT AT RTX 70 / NON APPLICABILE AL RTX 70
- RTX 68 ALLEEN / RTX 68 LEDIGLICH / RTX 68 KUN / RTX 68 SOLO
- AIR FILTER ASSEMBLY, ENSEMBLE FILTRE À AIR, CONJUNTO DE FILTRO DE AIRE, MONTAGEM DO FILTRO DE AR
- ANTI-VIBRATION MOUNT ASSEMBLY, MONTAGE ANTI-VIBRATIONS, MONTAJE ANTIVIBRACIÓN, CONJUNTO DE MONTAGEM ANTI-VIBRAÇÃO
- ANTI-VIBRATIE MONTAGE ASSEMBLAGE, SCHWINGUNGSDÄMPFENDE MONTAGE, ANTIVIBRATIONSOPHÆNG, MONTAGGIO ANTIVIBRAZIONE ASSEMBLAGGIO
- SIDE GUARD, CARÈNE LATÉRAL, DEFENSA LATERAL, GUARDA LATERAL
- SIDE GUARD, SEITENSCHUTZ, SIDE VAGT, PROTEZIONE LATERALE
- FILTRATION KITS, KITS DE FILTRATION, KITS DE FILTRACIÓN, KITS DE FILTRAGEM
- FILTRATIE KITS, FILTRATION KITS, FILTRERING KITS, KIT DI FILTRAZIONE
- TRANSPORT ATTACHMENT, FIXATION DE TRANSPORTEUR, CONEXIÓN PARA TRANSPORTADOR, ACESSORIO DO TRANSPORTADOR
- TRANSPORTHULPSTUK, TRANSPORTVORRICHTUNG, TRANSPORTØRUDSTYR, TRASPORTATORE
- TROLLEY, CHARIOT, CARRETILLA, TROLE
- URENTELLER, STUNDENZÄHLER, TIMETÆLLER, CONTAORE
Brand : Lescha
Model : BELLE RTX 66
Category : Vibratory compactor