
LIMEX 125 LP - Concrete Mixer Lescha - Free user manual and instructions
Find the device manual for free LIMEX 125 LP Lescha in PDF.


| Product Type | Concrete Mixer |
| Brand | Lescha |
| Model | LIMEX 125 LP |
| Drum Capacity | 125 liters |
| Motor Power | 550 W |
| Voltage | 230 V |
| Frequency | 50 Hz |
| Mixing Speed | 28 rpm |
| Weight | 45 kg |
| Dimensions (L x W x H) | 70 x 50 x 90 cm |
| Drum Material | Steel |
| Mobility | Wheels and handle |
| Noise Level | 85 dB |
| Vibration | < 2.5 m/s² |
| Safety Features | Overload protection, emergency stop |
| Maintenance | Lubricate bearings monthly |
| Spare Parts Availability | Genuine parts from Lescha |
| Warranty | 2 years |
Frequently Asked Questions - LIMEX 125 LP Lescha
User questions about LIMEX 125 LP Lescha
0 question about this device. Answer the ones you know or ask your own.
Ask a new question about this device
Download the instructions for your Concrete Mixer in PDF format for free! Find your manual LIMEX 125 LP - Lescha and take your electronic device back in hand. On this page are published all the documents necessary for the use of your device. LIMEX 125 LP by Lescha.
USER MANUAL LIMEX 125 LP Lescha
GB Instructions for use - Concrete mixer
HR
CE-Izjava Poštovani kupče,
kupili ste novu miješalicu za beton i mort proizvedene u Altrad-Limex d.o.o., Hrvatska, 31550 Donji Miholjac, Vukovarska 77a. Altrda-Limex d.o.o. vam jamči vrhunsku kakvoću osiguranu potpunom kontrolom tjekom proizvodnje i montaže.
Miješalica je izrađena u skladu s EU normama o gradnji takovih uređaja i to: EN 12151; 2000/14/EG; EN ISO 3744:1995; EN 292-1; EN 292-2; EN-60204-1; EN 2004/108 EC; EN 2006/42 EC.
| TEHNIČKE KARAKTERISTIKE | |||||
| Motor | P1= 550W/S6=(6-25%) ED;230 V/50Hz/2,6A; 2700 min -1 P1= 700W/S6=(6-25%) ED;230 V/50Hz/2,6A; 2700 min -1 P1= 850W/S6=(6-25%) ED;230 V/50Hz/3,9A; 2700 min -1 P1=1000W/S6=(6-25%) ED;230 V/50Hz/4,1A; 2700 min -1 | ||||
| Tip miješalica | OPTIMIX120 LP/LS | 125 LP/LS | 165 LP/LS | 195 LP/LS;LPS/LSA | |
| Klasa zaštite | II | II | II | II | |
| Tip zaštite | IP 44 | IP 44 | IP 44 | IP 44 | |
| Teoretski volumen m 3 ±5% | 0,072 | 0,085 | 0,165 | 0,190 | |
| Nivo buke dB (A) | 74 | 74 | 74 | 74 | |
| Nivo buke naradnom mjestu dB (A) | 70 | 70 | 70 | 70 | |
| Težina kg | 35/40,5 | 40/45 | 46/54 | 49/56 | |
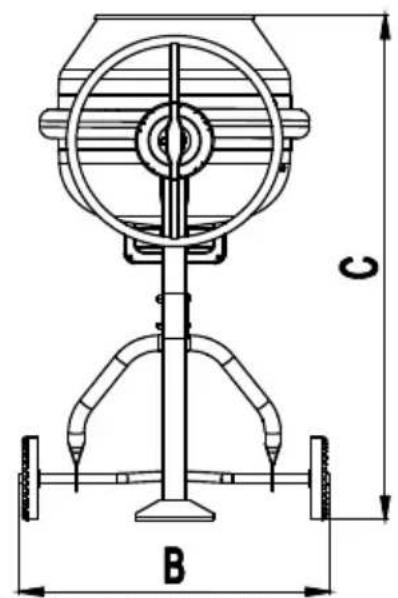
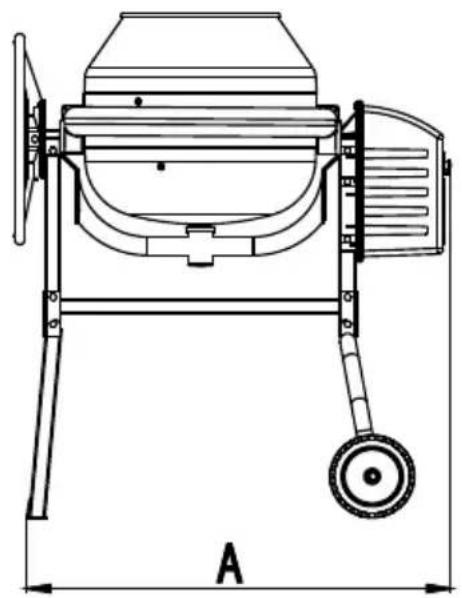
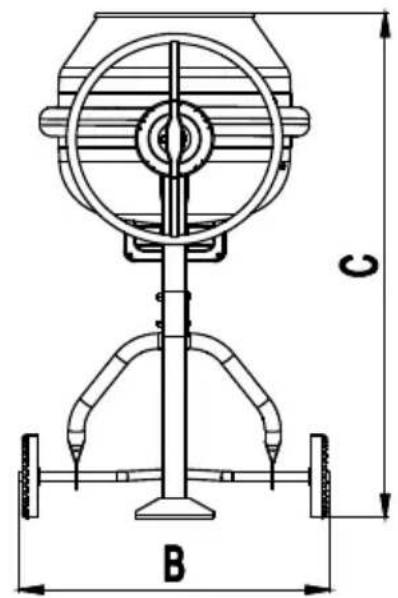
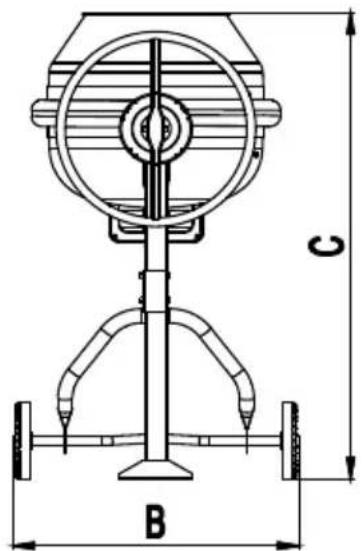
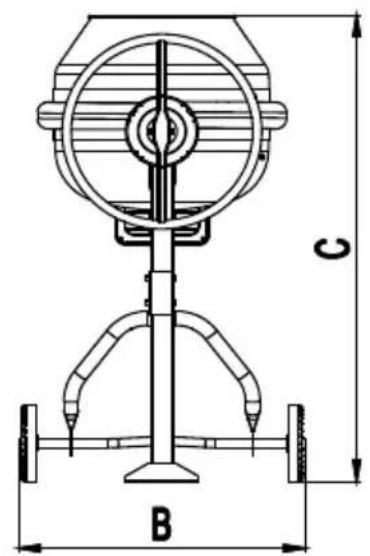
| Dimenzije AxBxC (cm) | 114x65x120 | 114x72x134 | 122x79x135,5 | 122x79x143,5 | |
| GS-TÜV Certifikat | S 60087471 | ||||
ZNAČENJE SIMBOLA


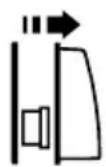





POZOR!
Prije puštanja u pogon pročitati naputke!
POZOR!
PROIZVODNJA BETONA I MORTA
Odbraviti zakretni mehanizam povlačenjem poluge prema sebi.
Bubanj lagano zakretati pomoću poluge mehanizma.
Dovesti bubanj u položaj za pražnjenje tako da mješavina ne teče naglo van.
Polugu mehanizma povucite da bi se odbravio bubanj u okomitom položaju. Zakretanjem poluge zauzmite jedan od položaja miješanja (beton ili mort).
POLOŽAJI NA PLOČI POZICINERA
You have just bought a new mixer produced by Altrad-Limex d.o.o. Croatia, 31550 Donji Miholjac, Vukovarska 77a. Altrad-Limex d.o.o. guarantees top quality assured complete control during manufacturing and assembly.
The construction of our mixer complies with the European regulations EN 12151; 2000/14/EG; EN ISO 3744:1995; EN 292-1; EN 292-2; EN-60204-1; EN 2004/108 EC; EN 2006/42 EC.
| TECHNICAL SPECIFICATIONS: | |||||
| Engine | P1= 550W/S6=(6-25%) ED;230 V/50Hz/2,6A; 2700 min -1 P1= 700W/S6=(6-25%) ED;230 V/50Hz/2,6A; 2700 min -1 P1= 850W/S6=(6-25%) ED;230 V/50Hz/3,9A; 2700 min -1 P1=1000W/S6=(6-25%) ED;230 V/50Hz/4,1A; 2700 min -1 | ||||
| Type of mixser | OPTIMIX120 LP/LS | 125 LP/LS | 165 LP/LS | 195 LP/LS;LPS/LSA | |
| Protection Class | II | II | II | II | |
| Typ of protection | IP 44 | IP 44 | IP 44 | IP 44 | |
| Theoretical volume m 3 ±5% | 0,072 | 0,125 | 0,165 | 0,190 | |
| Sound level (dB) | 70 | 74 | 74 | 74 | |
| The level of noise in the workplace dB (A) | 70 | 70 | 70 | 70 | |
| Weight approximately (kg) | 35/40,5 | 40/45 | 46/54 | 49/56 | |
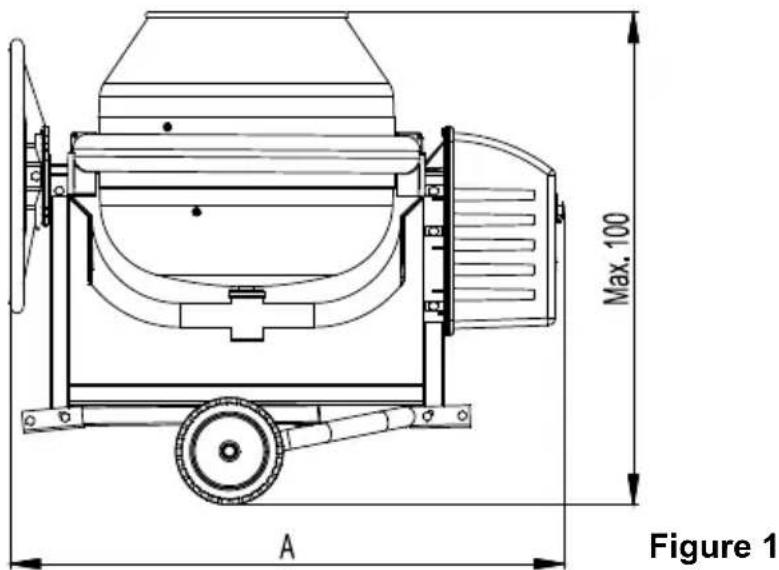
| Dimensions AxBxC (cm) | 114x65x120 | 114x72x134 | 122x79x135,5 | 122x79x143,5 | |
| GS-TÜV Certificate | S 60087471 | ||||
Before you open the housing, unplug the mixer.
ATTENTION!
Do not start the mixer before the engine housing cover is mounted on the housing with the screws intended for that purpose.
ATTENTION!
Unplug the mixer before any maintenance or repairs.

ATTENTION!
Never grease the crown gear
Please observe these instructions in order to preserve your mixer in a good working condition for years.
Before you start the mixer, read carefully the instructions for use. Be sure that you have fully understood these instructions!
PURPOSE OF THE MIXER


The mixer is intended for the preparation of concrete and mortar for hobby and home use

It is forbidden to use this mixer in a way other than described in these INSTRUCTIONS. It is forbidden to use this mixer to mix combustible or explosive materials or food stuffs.
- WE MUST EMPHASIZE -
THAT THE USER ALONE WILL BE LIABLE FOR ANY CONSEQUENCES AND DAMAGE CAUSED BY THE NON-OBSERVANCE OF THESE INSTRUCTIONS FOR USE OR ANY IMPROPER USE!!!
RESTRICTIONS
In spite of the purpose and proper use and design of the mixer, there is still a certain risk when using the mixer. The danger of a power failure, if improper connecting wires are used. Damage which can result in certain parts of the mixer or the whole mixer being charged with power. The danger resulting from the rotating parts of the engine or the drum. In particular if the safety device of the contact between the crown gear of the engine and the crown gear of the drum is removed or damaged intentionally or unintentionally. The risks mentioned above can be minimized if the user observes these “PURPOSE OF THE MIXER”, “SAFETY INSTRUCTIONS” and the “INSTRUCTIONS FOR USE”.

SAFETY INSTRUCTIONS
PAY ATTENTION TO THE FOLLOWING INSTRUCTIONS. BY READING CAREFULLY AND OBSERVING THESE INSTRUCTIONS, THE REQUIREMENTS FOR YOUR SAFETY AND THE SAFETY OF OTHERS WILL BE MET.

Observe these instructions and the safety regulations in the WORK AREA of the mixer. When working with concrete or additives, make sure that there is no excessive dust. Wear personal safety equipment (clothes, gloves, goggles and dust protection mask), when filling or emptying the mixing drum.

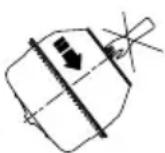
Do not reach into the mixing drum with your hand or any tool when it is rotating.
ROTATING PARTS!

Do not fill or empty the mixing drum when the drum is rotating Observe the direction of rotation of the mixing drum. SEE THE INDICATION on the mixing drum!
The mixer is not intended for road transport or towing. It is intended for transport on a vehicle or trailer. On a construction site it can only be moved manually.

ATTENTION: DANGER! MAKE SURE TO PULL OUT THE PLUG BEFORE:
- moving or transport,
- cleaning, maintenance or repair work,
- opening the engine housing.
Protection IP 44 (Protection Class II)
MECHANICAL SAFETY
- The mixer is so designed that it can not reach the entrapment of body parts between mobile and fixed
parts of the mixer:
- When charging and discharging.
- When rotating parts drum drive.
- When you shut down your engine.
- When transporting or moving by crane does not have parts that can fall off or run.
- All screws are connected with self-locking nuts DIN 985 with cartridge
-
All screws on the drum with pan head DIN 7380 and there is no danger of getting stuck in the rotating drum.
-
Mechanism for rotation is designed to always I bring in the “locked” regardless of the position of the drum. This ensures that during the operation, maintenance, and transportation to listen to drum found in the same intermediate position automatically lead and locked position.

ELECTRICAL SAFETY DANGER FOR LIFE IN CASE OF NON-OBSERVANCE OF THESE INSTRUCTIONS!
Protection IP 44
(Protection Class II)
The protection class will be preserved only if original parts are used for repairs and if insulation distances remain unchanged.
POWER CONNECTION
Thanks to its protective insulation, the mixer can be hooked up directly to a household socket. No special socket is necessary for use on a construction site. An ordinary socket (230 V) protected with a 10 A fuse is sufficient. The mixer can only be used if the engine housing and its elements are mounted as indicated. The connecting cable must comply with IEC 245-4 1980 (DIN 57 282) and be marked H 07 RN-F, or a
comparable model. The cross-section of wires must be at least 2 x 1,5 mm 2 . This cross-section is sufficient for a connecting cable of a length of at least 25 m. For cables longer than 25 m, the cross-section must be at least 3 x 2,5 mm 2 . Cables must be protected against mechanical damage and against spraying water. Check the cable before use: it must fulfill the two conditions mentioned above. Never use a damaged or non-compliant connecting cable in any circumstances whatsoever. When laying the connecting cable, make sure that it is not crushed or bent. Also make sure that there are no foreign parts or impurities on the contacts in order to avoid a short-circuit. Never use provisional electrical connections. Never bridge over the safety devices or put them out of operation. Only a licensed electrician, who is obliged to observe the regulations in force, is authorized to make all repairs on electrical connections. Only the manufacturer or qualified technician can repair the electrical parts.
MOTOR PROTECTION
Electric motor has a built-in motor overload protection. For motor overload comes automatically to its disconnection with protection built into the electro magnetic switches. Before restarting by squeezing the switch, it is necessary to wait a short while for the engine to cool down. Electro magnetic switch stocked with STOP ALL switch.
ADDITIONAL SAFETY MEASURES

- To have completed all the required safety measures and that all parts are properly assembled,
- You have read and understood and memorized information on safety,
- Switch-OFF switch is in the same housing as the plug. The same is connected to the electric motor carrier switch is protected against splash water.
- The mixer must be inspected at least annually by a professional.
PREPARING FOR OPERATION

READ ALL INSTRUCTIONS ON SAFETY BEFORE YOU START THE SAME UNDERSTOOD


FORBIDDEN TO START WORK WITH FULL DRUM BEFORE YOU START CHECK IF DRUM FULL
SETTING UP THE MIXER
- Set the mixer on a solid, level base. Check that the mixer is stable.
- When setting up the mixer, make sure that the mixing drum cannot be emptied by accident
- The working area around the mixer to keep it clean so not arrive the fall of the server mixer for mixing or other person.
- It is necessary to ensure sufficient light intensity in the work area around the mixer. Workspace about mixing secure than other people.
- This unit can be used by children aged 8 years and above but not by persons with reduced physical, sensory or mental capabilities or with the lack of
GB
experience and knowledge. At the moment of given permission, the person who allowed the user the usage of the appliance, is fully aware of the resulting risks and was instructing user to the safe usage of the appliance and understanding of the resulting risks. Children must not play with the appliance. Cleaning and user maintenance should not be performed by children without supervision.
- Mixer or parts not repaired. Destroyed or damaged items to replace only with the original parts.
- Mixer used only with proper mechanical and electrical protections.
For assembling mixers see attachment with instructions. If there are no conditions for instability mixer for uneven surfaces, then there is danger of falling. Check the stability of the mixer. When installing mixers careful to avoid unexpected discharge drum mixers.
PROCEDURE TO MAKE CONCRETE OR MORTAR
In the production of concrete or mortar for each of these blends drum must be positioned into a fortified position. Only the quality of these positions will be filled with a mixture. Also will be avoided specific problems when using the mixers.
EMPTYING ONLY WHEN MIXER DRUM ROTATES!

MAKE SURE THE DIRECTION OF ROTATION ON THE DRUM! LEVER MECHANISM HOLD STRONG!
Mechanism of positioning the locking lever and rotate the drum.
Drum slowly rotated using a lever mechanism.
Lead drum in position for discharge to a mixture does not flow out rapidly.
Discharge procedure repeated.
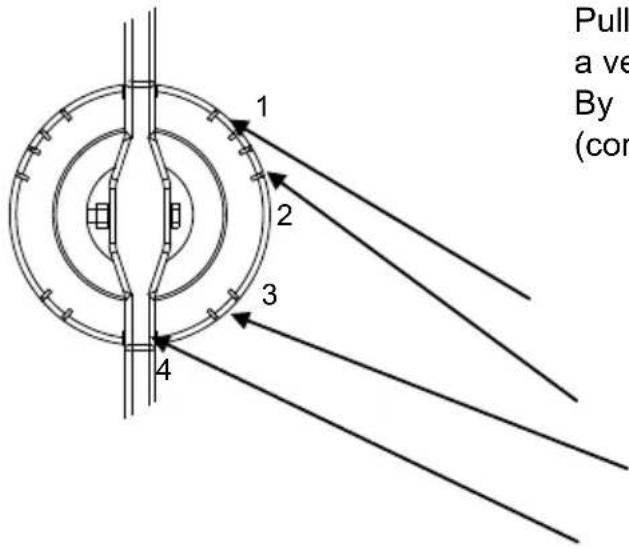
Pull the lever mechanism to unlock the drum in a vertical position.
By turning the lever seize a position mixing (concrete or mortar).
POSITIONS ON THE ADJUSTING DISC
- Mortar
- concrete
- emptying - cleaning
- transport
Procedure to make concrete or mortar
- Pour in water and base material (gravel, sand).
- Add the binding agent (cement, lye).
- Repeat steps 1 and 2 until you reach the required quantity.
- Mix the materials until you reach a homogenous mix.
Consult a professional to check the exact quantities of base material, binding agent and water that are necessary to obtain a mix of quality.
TRANSPORT


Disconnect the power cord before transporting or moving
Preparation for transport or replacing
The mixer is not intended for road transport. Just do the same with proper Vehicle. According to the site can be moved manually or by crane. Before transporting or moving the mixer to position as it is the top view.
GB
In both cases, set the lever pivot drum in 4 position Set the stirrer in position Fig.1.
CLEANING

Pull the plug each time before cleaning.
leaning forbidden, especially with water, as long as the cap of the engine housing has not been placed back.
Switch off the mixer and pull the plug if you have to touch the mixer with your hands or any tool for the purpose of cleaning. Do not switch on the mixer during cleaning. Do not expose the engine housing and the switch to direct water jet. This also applies to the ventilation apertures to cool the engine.
With the rotating lever rotate the mixer into position 3. Clean obligatorily after each use. To clean the inside of the mixing drum, use a scraper and a metallic brush, and rinse with water jet. Remove immediately all concrete or mortar residues on the crown gears.
MAINTENANCE

Before cleaning the mains plug out of the socket mixer.
The mixer has been designed and manufactured in such a way that it does not need any particular maintenance. NEVER GREASE THE CROWN GEARS!!!! Observe the INSTRUCTIONS on the control of the operation of the mixer which are given in the INSTRUCTIONS on safety and operation, use and storage. Make sure that the mixing drum is rotating gently. Check that the screws are properly tightened. To extend the service life of the mixer and a trouble-free operation, they should adhere to the following notes. After cleaning, the movements in position No.: 4 make (see transport instructions.) The mixer in the dry and airy room store. If you not are using their mixer length of time, it is necessary to relax by the drive belts. Loosen the you have relieved the belt screws and slow lifting of housing the drive device for approx. 2 mm. With this relaxation of the drive belt, you must take care that you raise the housing of drive device not too much because the belt could otherwise fall. If it happens but you raise the housing quite and hire belts properly. Take otherwise there may be damage to good fit of the belt.
REPAIRS


Always pull the plug before any repair work
Switch off the mixer by pulling the plug. Never switch on the mixer during any repair work. If it is necessary to remove or switch off any safety devices, they must be remounted upon completion of the repair work. Only the manufacturer or authorized technician may repair electrical parts. Use only original spare parts.
| MALFUNCTIONS | ||
| PROBLEM | POSSIBLE CAUSE | REMEDY |
| The engine does not start up. | No power. Defective cables. The thermostat is not connected. The engine is overloaded. The ventilation apertures are obstructed or considerably reduced. Foreign part in the conduct or mechanical deformed of the conduct. | Check the fuse. Check the cable (electrician). Let the engine cool down. Check the are obstructed or considerably reduced. ventilation apertures (obstructed or Foreign part in the conduct or mechanical deformed). |
| The engine starts up (hums) but the mixing drum does not rotate. | The crown gear is blocked. The belt is not tightened enough. The belt is broken. The elastic pin on the small crown gear is broken. The elastic pin on the pulley is broken. Defective condenser. | Switch off the mixer. Pull the plug. Tighten the pulley. Check the pin on the small crown gear. Replace it, if necessary. Remove the cap of the engine housing. Check the belt and the pin of the pulley. Replace them, if necessary. If the mixing drum still does not rotate, call an expert (defective condenser). |
SPARE PARTS
| 1. | 01 | Engine housing | |
| 2. | 01 | Small crown gear | Z=12 |
| 3. | 01 | Drum Gear | Z=132 |
| 4. | 01 | Single phase electric motor | P1=700/850/1000W;S1=(6-25%)ED;IP00 |
| 5. | 01 | Driving axle | ∅17 |
| 6. | 02 | Engine bearing | 6003 (2RSR) |
| 7. | 01 | Plug | P224-7 |
| 8. | 01 | Electro magnetic emergency STOP switch | DKLD DZ-6;IP 55 |
GB
| 9. | 01 | Pulley | ∅145 |
| 10. | 01 | Belt Poly | Poly V6-PJ 660 |
| 11. | 02 | Elastic pin | ∅6x40; DIN 7346 |
| 12. | 01 | Drum frame | |
| 13. | 01 | Jaram stabilni | |
| 14. | 01 | Mixer frame | |
| 15. | 01 | Suport for wheel | |
| 16. | 02 | Wheel, load1000 N (100 kg) | |
| 17. | 02 | Drum bearing | 125-6006(2RSR);165;190-6008(2RSR) |
| 18. | 01 | Control lever | |
| 19. | 01 | Spring | galavnized |
| 20. | 01 | Drum up | |
| 21. | 01 | Drum bottom | |
| 22. | 02 | Wing mixing |
WARRANATY STATEMENT
- ____ assumes the warranty of 1 calendar year from the date of sale registered at the warranty card.
- The product will function properly, long as you follow the instructions on the work.
- For a product to be secured all the necessary service and spare parts during the warranty period and even five years after warranty.
- The product that is not repaired within 45 days will be replaced at the request of the buyer.
- The warranty is valid from the date when purchased the product, as verified by certified warranty card and the audited accounts for the purchased product.
When Mixer failure following information must specify:
- Name and type of product
- Date of purchase
• Description of failure - Exact Address
The warranty is not otherwise Recognized!
Generally, the warranty will not admit if the mixer is not used according to the allegations in this
Instruction:
- Failure to follow the instructions,
- Overload of the mixer,
-
Damages caused by poor packaging and improper handling during transportation to the service. for replacement parts that are damaged or lost in transport to the user (customer),
-
for spare parts that are damaged or lost in transport to the user (customer)
- due to repair within the warranty period by the user or other unauthorized person or legal entity.
CHANGES, THE contribute to technical progress,
we reserve
PROCEDIMIENTO PARA HACER HORMIGÓN O MORTERO


- HR
- CE-IZJAVA POŠTOVANI KUPČE
- ZNAČENJE SIMBOLA
- POZOR
- PROIZVODNJA BETONA I MORTA
- POLOŽAJI NA PLOČI POZICINERA
- ATTENTION
- PLEASE OBSERVE THESE INSTRUCTIONS IN ORDER TO PRESERVE YOUR MIXER IN A GOOD WORKING CONDITION FOR YEARS
- PURPOSE OF THE MIXER
- RESTRICTIONS
- SAFETY INSTRUCTIONS
- ATTENTION: DANGER! MAKE SURE TO PULL OUT THE PLUG BEFORE
- MECHANICAL SAFETY
- ELECTRICAL SAFETY DANGER FOR LIFE IN CASE OF NON-OBSERVANCE OF THESE INSTRUCTIONS
- POWER CONNECTION
- MOTOR PROTECTION
- ADDITIONAL SAFETY MEASURES
- PREPARING FOR OPERATION
- READ ALL INSTRUCTIONS ON SAFETY BEFORE YOU START THE SAME UNDERSTOOD
- FORBIDDEN TO START WORK WITH FULL DRUM BEFORE YOU START CHECK IF DRUM FULL
- SETTING UP THE MIXER
- GB
- PROCEDURE TO MAKE CONCRETE OR MORTAR
- EMPTYING ONLY WHEN MIXER DRUM ROTATES
- MAKE SURE THE DIRECTION OF ROTATION ON THE DRUM! LEVER MECHANISM HOLD STRONG
- POSITIONS ON THE ADJUSTING DISC
- TRANSPORT
- PREPARATION FOR TRANSPORT OR REPLACING
- CLEANING
- MAINTENANCE
- REPAIRS
- ALWAYS PULL THE PLUG BEFORE ANY REPAIR WORK
- WARRANATY STATEMENT
- WHEN MIXER FAILURE FOLLOWING INFORMATION MUST SPECIFY
- THE WARRANTY IS NOT OTHERWISE RECOGNIZED
- CHANGES, THE CONTRIBUTE TO TECHNICAL PROGRESS
- WE RESERVE
- PROCEDIMIENTO PARA HACER HORMIGÓN O MORTERO
Brand : Lescha
Model : LIMEX 125 LP
Category : Concrete Mixer