
Airfryer XXL Connected HD9875 - Deep fryer PHILIPS - Free user manual and instructions
Find the device manual for free Airfryer XXL Connected HD9875 PHILIPS in PDF.
| Product type | Air fryer |
| Brand | Philips |
| Model | Airfryer XXL Connected HD9875 |
| Capacity | Up to 2 kg of fries (max fill level 6) |
| Power supply | 220-240 V, 1500 W (estimation) |
| Connectivity | Wi-Fi 2.4 GHz 802.11 b/g/n, NutriU app |
| Automatic programs | 8 built-in programs (frozen fries, homemade fries, chicken legs, fish, chops, whole chicken, vegetables, muffins) + downloadable programs via the app |
| Cooking modes | Manual, automatic programs, food thermometer (optional) |
| Temperature range | 40 °C to 200 °C |
| Timer | 1 to 180 minutes |
| Special functions | Keep warm, shake reminder, high/low air flow, automatic shut-off, preheating, remote control via app |
| Food thermometer | Optional (HD9958), measures core temperature (30-99 °C) |
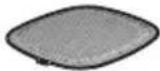
| Basket material | Non-stick coating, removable honeycomb bottom |
| Cleaning | Drawer and basket are dishwasher-safe; exterior and interior cleaned with a damp sponge |
| Safety | Automatic shut-off after 10 min of inactivity, hot surfaces indicated, child lock not specified |
| Warranty | 2 years (Versuni) |
| Dimensions (L x D x H) | Approximately 400 x 300 x 300 mm (estimation) |
| Weight | Approximately 10 kg (estimation) |
| Included accessories | Basket, drawer, removable honeycomb bottom |
Frequently Asked Questions - Airfryer XXL Connected HD9875 PHILIPS
User questions about Airfryer XXL Connected HD9875 PHILIPS
0 question about this device. Answer the ones you know or ask your own.
Ask a new question about this device
Download the instructions for your Deep fryer in PDF format for free! Find your manual Airfryer XXL Connected HD9875 - PHILIPS and take your electronic device back in hand. On this page are published all the documents necessary for the use of your device. Airfryer XXL Connected HD9875 by PHILIPS.
USER MANUAL Airfryer XXL Connected HD9875 PHILIPS
natural_image
Black Philips air fryer with digital display and control buttons (no visible text or symbols on device body)English 6
Čeština 32
Dansk 59
Deutsch 86
Eesti 116
Español 142
Français 171
Hrvatski 199
Italiano 226
Latviešu 255
Lietuviškai 282
Magyar 309
Nederlands 337
Norsk 365
Polski 391
Português 420
Română 448
Shqip 476
Slovenščina 504
Slovensky 531
Srpski 558
Suomi 585
Svenska 612
Türkçe 638
Ελληνικά 664
Български 694
Македонски 723
Українська 753
Important
Read this important information carefully before you use the appliance and save it for future reference.
Danger

- Do not place the appliance on or near a hot gas stove or all kinds of electric stove and electric cooking plates, or in a heated oven.
- Never immerse the appliance in water nor rinse it under the tap.
- Do not let any water or other liquid enter the appliance to prevent electric shock.
- Always put the ingredients to be fried in the basket, to prevent them from coming into contact with the heating elements.
- Do not cover the air inlet and the air outlet openings while the appliance is operating.
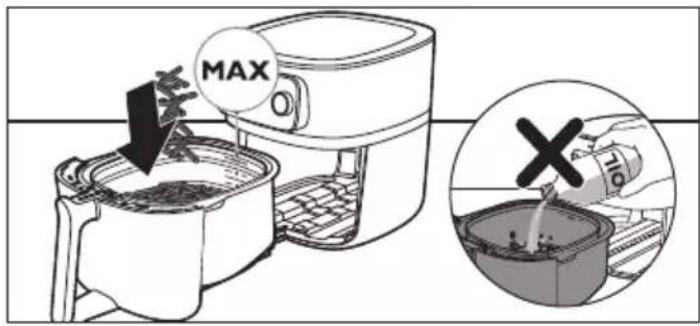
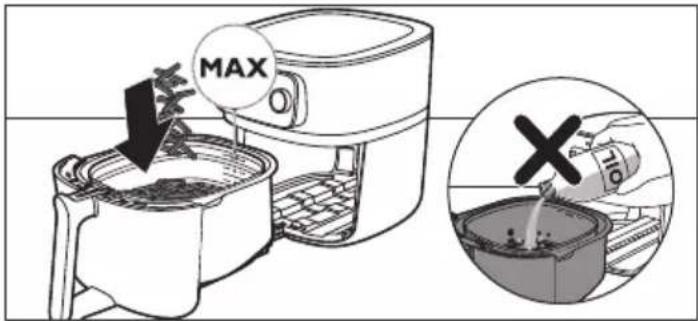
- Do not fill the pan with oil as this may cause a fire hazard.
- Do not use the appliance, if the plug, the mains cord or the appliance itself is damaged.
- Never touch the inside of the appliance while it is operating.
- Never put any amount of food that exceeds the maximum level indicated in the basket.
- Always make sure heater is free and no food stuck in heater.
Warning
- If the supply cord is damaged, it must be replaced by Philips, its service agent or similarly qualified persons in order to avoid a hazard.
- Only connect the appliance to an earthed wall socket. Always make sure that the plug is inserted into the wall socket properly.
- This appliance is not intended to be operated by means of an external timer or a separate remote-control system.
- The accessible surfaces may become hot during use.
- This appliance can be used by children aged from 8 years and above and persons with reduced physical, sensory or mental capabilities or lack of experience and knowledge if they have been given supervision or instruction concerning use of the appliance in a safe way and understand the hazards involved. Children shall not play with the appliance. Cleaning and user maintenance shall not be made by children unless they are older than 8 and supervised.
- Keep the appliance and its cord out of the reach of children less than 8 years.
- Do not place the appliance against a wall or against other appliances. Leave at least 10 cm free space at the back, on both sides and above the appliance. Do not place anything on top of the appliance.
- During hot air frying, hot steam is released through the air outlet openings. Keep your hands and face at a safe distance from the steam and from the air outlet openings. Also, be careful of hot steam and air when you remove the pan from the appliance.
- Never use light ingredients or backing paper in the appliance.
- Accessible surfaces may become hot during use.
Caution
- Storage of potatoes: The temperature shall be appropriate to the potato variety stored and it shall be above 6 °C to minimize the risk of acrylamide exposure in the prepared foodstuff.
- Never fill the pan with oil.
- This appliance is designed to be used at ambient temperatures between 5°C and 40°C.
- Check if the voltage indicated on the appliance corresponds to the local mains voltage before you connect the appliance.
- Keep the mains cord away from hot surfaces.
- Do not place the appliance on or near combustible materials such as a tablecloth or curtain.
- Do not use the appliance for any other purpose than described in this manual and use only original Philips-accessories.
- Do not let the appliance operate unattended.
- The pan, basket and accessories becomes hot during and after use of the appliance, always handle carefully.
-
Thoroughly clean the parts that come into contact with food before you use the appliance for the first time. Refer to the instructions in the manual.
-
This appliance is intended for normal household use only. It is not intended for use in environments such as staff kitchens of shops, offices, farms or other work environments. Nor is it intended to be used by clients in hotels, motels, bed and breakfasts and other residential environments.
- Always disconnect the appliance from the supply if it is left unattended and before you assemble, disassemble, store or cleaning.
- Place the appliance on a horizontal, even and stable surface.
- If the appliance is used improperly or for professional or semi-professional purposes or if it is not used according to the instructions in the user manual, the guarantee becomes invalid and Philips refuses any liability for damage caused.
- Always return the appliance to a service center authorised by Philips for examination or repair. Do not attempt to repair the appliance yourself, otherwise the guarantee becomes invalid.
- Always unplug the appliance after use.
- Let the appliance cool down for approximately 30 minutes before you handle or clean it.
- Make sure the ingredients prepared in this appliance come out golden yellow instead of dark or brown. Remove burnt remnants. Do not fry fresh potatoes at a temperature above 180°C (to minimise the production of acrylamide).
- If the appliance is equipped with a basket release button, this button shall not be pressed during shaking.
- Be careful when cleaning the upper area of the cooking chamber: Hot heating element, edge of Metal parts, and splatter shield.
- Always make sure that the food is fully cooked in the Airfryer.
- Always make sure that you have the control over your Airfryer, also when using the remote function or delayed start.
-
When cooking fatty food, the Airfryer could emit smoke. Pay special attention when using the remote control function or delayed start.
-
Make sure that only one person at a time is using the remote control function.
- Be cautious when cooking easy perishable food with the delayed start function (bacteria may breed).
Electromagnetic fields (EMF)
This appliance complies with the applicable standards and regulations regarding exposure to electromagnetic fields.
Automatic Shut-Off
The Airfryer is equipped with an automatic shut-off function. When the appliance is switched on but not in the cooking or keep warm mode, it will go to standby mode after 10 minutes of no user interaction. To switch off the appliance manually, long press the rotary button.
Recycling
- This symbol means that electrical products shall not be disposed of with normal household waste.
- Follow your country's rules for the separate collection of electrical products.
Warranty and Support
Versuni offers a two-year warranty after purchase on this product. This warranty is not valid if a defect is due to incorrect use or poor maintenance. Our warranty does not affect your rights under law as a consumer. For more information or for invoking the warranty, please visit our website www.philips.com/support.
Declaration of Conformity
Hereby, DAP B.V. declares that the Airfryer HD9875 is in compliance with Directive 2014/53/EU.
The full text of the EU declaration of conformity is available at the following internet address: https://www.philips.com.
The Airfryer HD9875 is equipped with a WiFi module, 2.4GHz 802.11 b/g/n with a maximum output power of 92,9mW EIRP.
Software and firmware updates
Updating is essential to safeguard your privacy and the proper functioning of your Airfryer and the app.
Please always update the app to the latest version.
The Airfryer is updating the appliance firmware automatically.
Note: To enable the Airfryer to update to the latest firmware version, make sure your Airfryer is connected to your home WiFi.
Note: Always use the latest app and firmware.
Note: Updates are made available when there are software improvements.
Note: A firmware update is started automatically when the Airfryer is in stand-by mode. This update takes a few minutes. During this time the Airfryer cannot be used.
Device compatibility
For detailed information about the compatibility of the app, please refer to the information in the app Store.
Factory reset
You can set your firmware back to its default settings by simultaneously pressing the keep warm button and the rotary button for 10 seconds.
Your Airfryer is then no more connected to your home WiFi and not paired with your smart device anymore.
Introduction
Congratulations on your purchase and welcome to Philips!
To fully benefit from the support that Philips offers, register your product at www.philips.com/welcome.
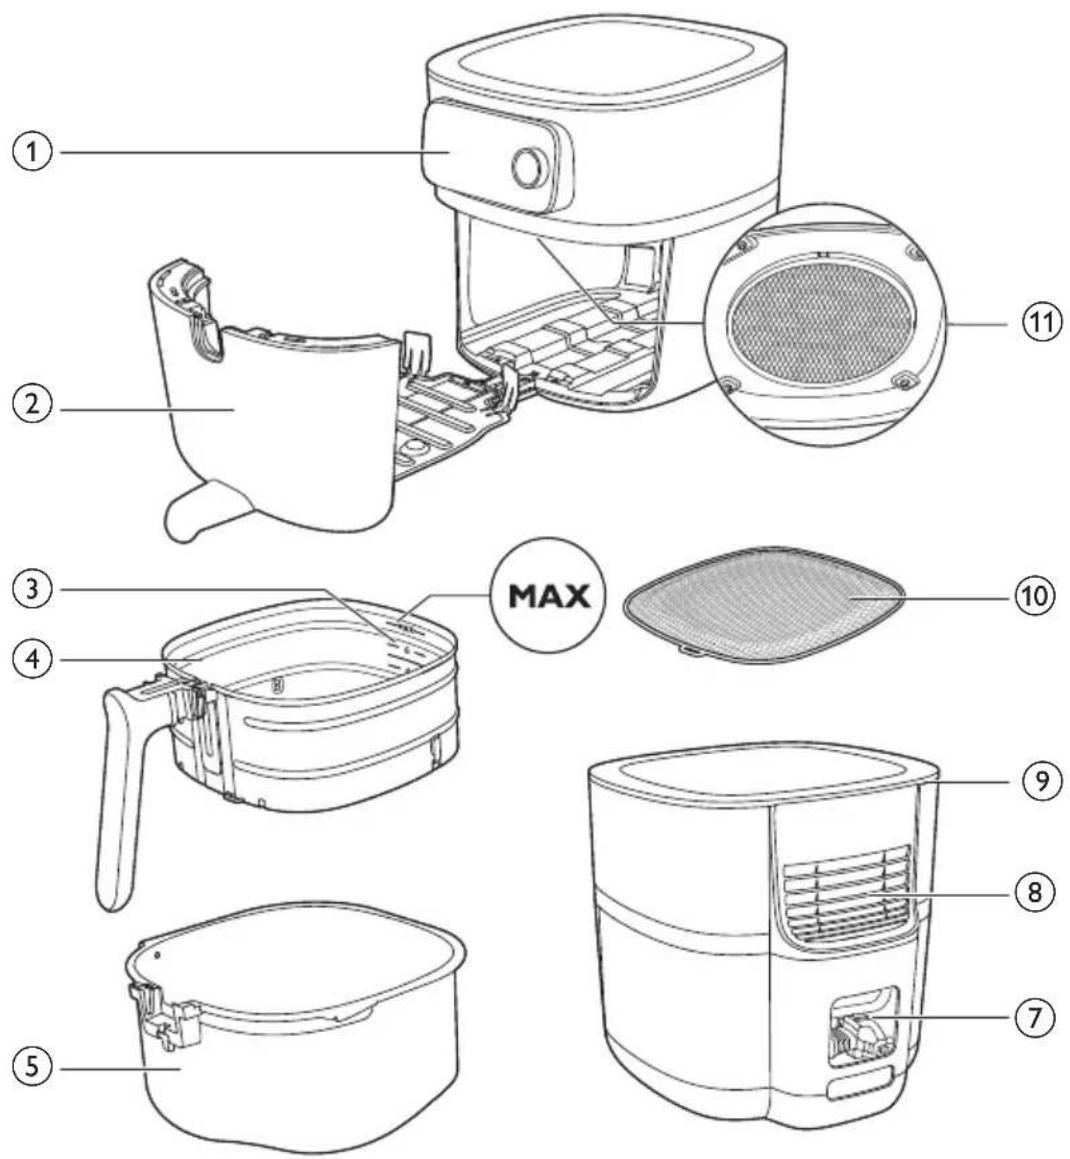
Overview

HD9958

www.philips.com/parts-and-accessories
1 Control panel
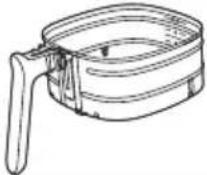
2 Drawer
3 Filling level indication
4 Basket with removable mesh bottom
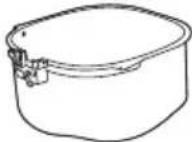
5 Pan
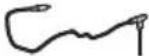
6 Food thermometer (HD9958, sold separately)
7 Cord storage compartment
8 Air outlets
9 Air inlet
10 Removable mesh bottom
11 Splatter shield
Control panel overview

1 Temperature button
2 Keep warm button
3 Shaking reminder button
4 Back button
5 Food thermometer socket
6 Air speed button
7 Auto cook programs
8 Keep warm indicator
9 Low air speed indicator
10 High air speed indicator
11 Shaking reminder indicator
12 Rotary button
13 Light ring
14 Pieces indicator
15 Wifi indicator
16 Filling level indicator
17 Weight indicator
18 Food thermometer indicator
19 Time button
Description of functions
Rotary and back button
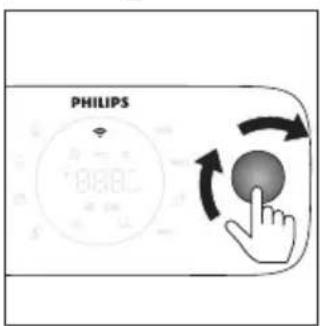
The rotary button is your central control. You can turn and press it to go through different menu options and confirm an action.
- Short press the rotary button: turn on the appliance.
- Long press the rotaty button: turn off the appliance.
After the appliance is switched on:
- Press the rotary button: confirm an action.
- Turn the rotary button: go through different menu options or change the cooking setting.
- Press the back button: go back to the previous step.
Auto-Cook programs
The Auto-Cook programs are one of the key features of your Airfryer, which allows you to cook a variety of food items.
By selecting the desired food item and adjusting the filling level or specifying the quantity of ingredients, the Airfryer will automatically set the appropriate temperature and cooking time for your meal. Additionally, the Airfryer will alert you if any interaction is required during cooking, such as shaking fries.
Important: The Airfryer comes with eight default auto-cook programs that can be initiated directly from the appliance. However, for a wider selection of options, you can access and download more auto-cook programs via the NutriU app. Simply connect your Airfryer to your network and pair your smart device with your appliance to begin exploring new culinary possibilities.
Food Thermometer (HD9958, sold separately)
natural_image
Line drawing of a mechanical device with a handle and lever (no text or symbols)The separately sold food thermometer can be used to cook your food to the desired doneness level.
Put one end of the food thermometer to the food and the other end to the food thermometer socket (see chapter "food thermometer").
Cooking time
In cooking mode "Manual cooking", you can set the cooking time from 1 minute to 180 minutes.
In Auto-Cook programs, you do not need to set a cooking time as the Auto-Cook program cooks your food based on your portion sizes or desired doneness level.
In cooking mode "Food thermometer", you do not need to set a cooking time as the cooking is automatically finished as soon the set core temperature of the food thermometer is reached.
Cooking temperature
In cooking mode "Manual cooking" you can set the cooking temperature from 40^ C to 200^ C.
In cooking mode "Auto-Cook programs", you do not need to set a cooking temperature because the cooking temperature is set automatically.
Core temperature
In cooking mode "Food thermometer", you can set the core temperature of the food between 30°C and 99°C. The temperature at the center of the food will reach the set core temperature at the end of the cooking process.
Note: The core temperature does not equal to the cooking temperature.
High and low air speeds
Your Airfryer comes with two different air speed settings, a low air Speed and a high air Speed.
In cooking mode "Auto-Cook programs", the air speed is set automatically.
In cooking modes "Manual cooking" or "Food Thermometer", you need to set the air speed manually by pressing the air speed button.
For typical oven dishes, such as lasagna, roasts, cakes etc., and for a long cooking time, use the low air speed. For typical Airfryer applications, such as fries, chicken nuggets, fish fingers etc. and for a shorter cooking time, use the high air speed.
Note: If you choose the low air speed, the appliance is working in the silent mode.
Keep warm function
Your Airfryer has a keep warm mode. To activate this mode, simply press the "keep warm" button at any point during the cooking process - whether it's before you begin cooking, in between stages, or at the end of a cooking session. For more info see chapter "Keep warm".
Shaking reminder
Your Airfryer comes with a shaking reminder feature that can be activated prior to starting your cooking session. This feature sends a notification halfway through the cooking time, reminding you to shake your food to ensure an evenly cooked result. This feature is especially useful when cooking foods with multiple pieces, such as various types of fries. Additionally, it can be utilized as a reminder to turn foods like chicken drumsticks.
By default the shaking reminder is deactivated. You can activate it before or during the cooking process by pressing the "shaking reminder" button.
Sound notifications
Sometimes you hear a sound, for example when the appliance has finished cooking, or when there is an action required during cooking, e.g., shaking or turning food.
Light ring
Your Airfryer comes with an animated light ring, which enhances the usability of your Airfryer.
Spinning mode: The light ring is spinning around when an update is running.
Breathing mode: The light ring is blinking slowly if you have pressed the rotary button during cooking. In this case the appliance is in the pause mode.
Blinking fast: Either if the drawer is open when the ring is blinking fast; or for instance during the pairing process, the appliance is waiting for your action to press the rotary button to confirm.
Focus mode: e.g if the appliance is asking for the filling level.
Preheating
Your Airfryer comes with a preheating function, which can be used to preheat your Airfryer to your desired temperature.
If you press the rotary button without setting a time, the preheat mode will be activated and you will receive a sound notification when the desired temperature is reached.
Before first use
1 Remove all packing material.
2 Remove any stickers or labels (if applicable) from the appliance.
3 Remove the protection foil from the display.
4 Thoroughly clean the appliance before first use (see chapter "cleaning").
Preparations before first use
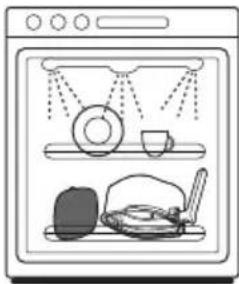
Placing the removable mesh bottom
natural_image
Illustration of a kitchen appliance with a grater and a refrigerator (no text or symbols)1 Open the drawer by pulling the handle.

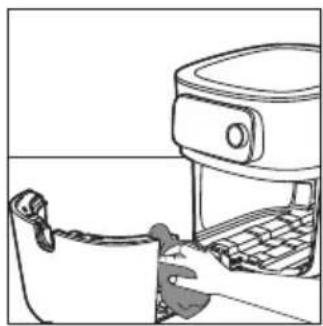
natural_image
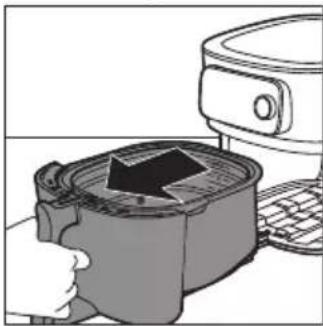
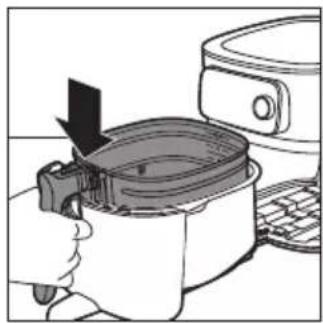
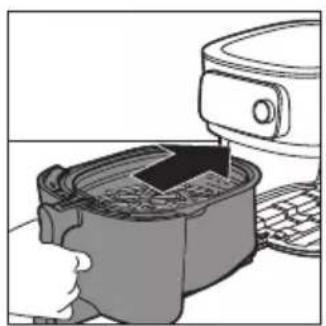
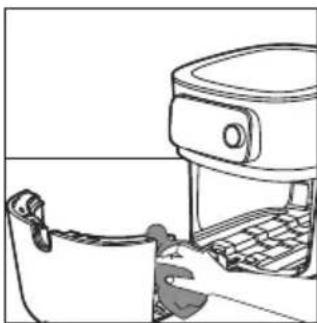
Illustration of a hand using an air fryer to press down a pan, with a refrigerator and keyboard visible (no text or symbols)2 Remove the basket by lifting the handle.
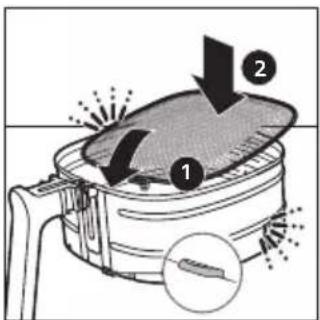
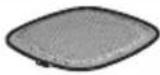
3 Insert the removable mesh bottom into the slot on the right bottom side of the basket. Push the mesh bottom down until it locks into position ("click" on both sides).
natural_image
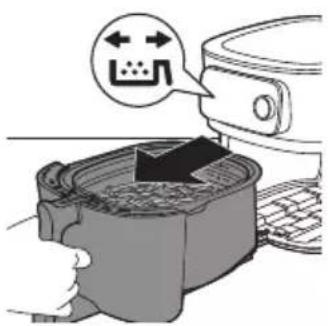
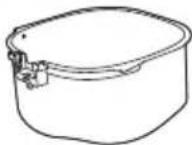
Illustration of a hand pressing down on a cooking pot with a downward arrow, next to a kitchen appliance (no text or symbols)4 Put the basket in the pan.

natural_image
Illustration of a hand washing a cup with a lid, next to a kitchen appliance (no text or symbols visible)5 Slide the drawer back into the Airfryer by the handle.
Note: Never use the pan without the basket.
Connecting the Airfryer to the NutriU app
Important: Make sure that your smart phone is connected to your home WiFi network before you start the WiFi set-up process.
Important: Make sure to connect your Airfryer to a 2.4 GHz 802.11 b/g/n home WiFi network.

Pair your Airfryer with the NutriU app
1 Scan the QR code to download the NutriU app. You can also get the NutriU app from the App Store or on the website www.philips.com/NutriU.

2 Start the Philips NutriU app on your smart phone.
3 Follow the onscreen instructions until you reach the "Set up appliance" page.
Note: We recommend downloading the NutriU app and add your Airfryer to the app as soon as you set up your appliance for the first time. This enables you to use the Airfryer to its full extent, for example, to enjoy remote cooking (start recipes or Auto-Cook programs from the app, get notifications when food is done, etc.) and to get the latest firmware updates.
Note: To make use of connectivity features, you need an account. During the onboarding process, you need to register a new account or log in with an existing one.
natural_image
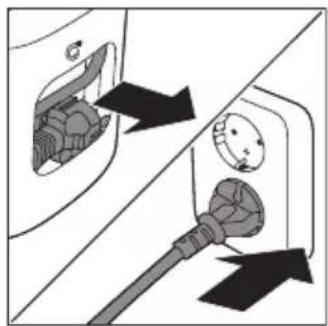
Diagram showing two electrical plug connections with arrows indicating direction (no text or symbols)4 Plug in the appliance.

5 Press the rotary button to turn on the appliance.
6 Follow the steps in the app to connect your Airfryer to your WiFi and pair your Airfryer with your smart phone.
Note: Along this process in the NutriU app, you will be asked at some point to make an extra long press (4 seconds) on the appliance to initialize the setup process. So make sure that you stay close to your Airfryer until your Airfryer is connected.
Important: Remote control: you can remotely control your Airfryer through the app (e.g. send a recipe, pause cooking, etc.) only if you have checked off the “remote consent” in the NutriU app, to be found in your NutriU profile.
Important: Single user pairing: the Airfryer can be remotely controlled by only one user at the same time. If a second user wants to control the Airfryer and use the NutriU app, this user has to follow the pairing process. Once paired, the first user will be unpaired automatically.
Important: The WiFi setup process can be cancelled via the app or by unplugging the Airfryer.
WiFi indicator
The WiFi indicator is off. WiFi is disabled.
The WiFi indicator is on. WiFi is enabled and connected to the router.
The WiFi indicator is blinking slowly. WiFi connection is ongoing. The device is in the pairing process or connecting to the router.
The WiFi indicator is blinking fast. WiFi connection error.
Note: You can start the paring process by long pressing the time button for 4 seconds.
Note: If you encounter any difficulties during the WiFi setup process - such as pausing midway through and failing to complete the process, or experiencing connectivity issues with your Wi-Fi network - you can restart the process by long pressing the time button for 4 seconds.
Note: If you need to reset your firmware to its default settings, simply press and hold the keep warm button and the rotary button simultaneously for 10 seconds.
Food table
The table below helps you select the basic settings for the types of food you want to prepare.
Note: Keep in mind that these settings are suggestions. As ingredients differ in origin, size, shape as well as brand, we cannot guarantee the best setting for your ingredients.
Note: When preparing larger amount of food (e.g. fries, prawns, drumsticks, frozen snacks), shake, turn, or stir the ingredients in the basket 2 to 3 times in order to achieve a consistent result.
Note: Most of the ingredients in this list can be found in the Automatic Cooking programs in the NutriU app.
| Ingredients Min. – Max. amount | Time (min) | Tempera-ture | Fan speed | Note | |
| Home-made fries (10 x 10 mm/0.4 x 04 in) | Filing level 1 - 6 (300g - 2000g) | 18 - 45 | 160 - 180 °C | High speed | Soak 30 minutes in cold water or 3 minutes in luke warm water (40°C/104°F), dry and then add 1 tbsp of oil per 500 g/18 oz.Shake twice. |
| Homemade potato wedges | Filing level 1 - 6 (300g - 2000g) | 20 - 45 | 160 - 180 °C | High speed | Soak 30 minutes in water, dry and then add 1/4 to 1 tbsp of oil. Shake, turn, or stir twice. |
| Frozen snacks (chicken nuggets) | Filling level 1-6 (6 - 50 pieces) | 12 - 19 | 200 °C High | speed | Ready when golden yellow and crispy outside. Shake, turn, or stir halfway. |
| Frozen snacks (small spring rolls around 20 g/0.7 oz) | 100 - 600 g (5 - 30 pieces) | 14 - 16 | 180 °C High | speed | Ready when golden yellow and crispy outside. Shake, turn, or stir halfway. |
| Chicken breast Around 160 g/6 oz | 1 - 6 pieces 20 - 25 | 180 °C High | speed | ||
| Chicken fingers bread crumbed homemade | 3 - 18 pieces | 15 - 20 | 180 °C High | speed | Add oil to the breadcrumbs. Ready when golden yellow. |
| Chicken wings Around 100 g/3.5 oz | 2 - 25 pieces | 15 - 40 | 200 °C High | speed | Shake, turn, or stir halfway. |
| Meat chops without bone Around 150 g/5.3 oz | 1 - 5 chops | 19 - 25 | 200 °C High | speed | |
| Hamburger Around 200 g (diameter 10 cm/4 in) | 1 - 4 patties | 15 - 18 | 200 °C High | speed | |
| Ingredients Min. – Max. amount | Time (min) | Tempera-ture | Fan speed | Note |
| Thick sausages Around 100 g/3.5 oz (diameter 4 cm/1.6 in) | 1 - 12 pieces 12 - 20 200 °C High | speed | ||
| Thin sausages Around 70 g/2.5 oz (diameter 2 cm/0.8 in) | 1 - 12 pieces 10 - 18 200 °C High | speed | ||
| Pork roast 800 - 2400 g | 90 - 140 160 °C Low | speed | Let it rest for 5 minutes before cutting. | |
| Fish filets (Salmon) Around 200 g | 1 - 5 pieces 18 - 22 200 °C High | speed | In order to avoid sticking, place the skin side to the bottom and add some oil. | |
| Fish filets (Cod, shellfish) | 1 - 4 pieces 7 - 14 200 °C High | speed | ||
| Cake (butter cake) using backing accessory | Baking accessory 30 - 60 150 °C Low Filling level 1 - 2 600 - 1200 g | speed | Use a baking accessory. | |
| Muffins Around 50 g/1.8 oz | 1 - 9 pieces 13 - 15 180 °C High | speed | Use heat-proof silicone muffin cups. | |
| Pre-baked toast / bread rolls | 1 - 12 6 - 13 180 °C High | speed | ||
| Fresh bread 500 - 1700 g | 35 - 80 180 °C Low | speed | The shape should be as flat as possible to avoid that the bread touches the heating element when rising. | |
| Homemade rolls Around 80 g/2.8 oz | 1 - 6 pieces 12-16 180 °C Low | speed | ||
| Chestnuts Filling level | 1 - 4 15 - 24 200 °C High | speed | Shake, turn, or stir halfway. | |
| Mixed vegetable (roughly chopped) | Filling level 2 - 8 15 - 38 160 °C High | speed | Shake, turn, or stir halfway. |
Using the Airfryer
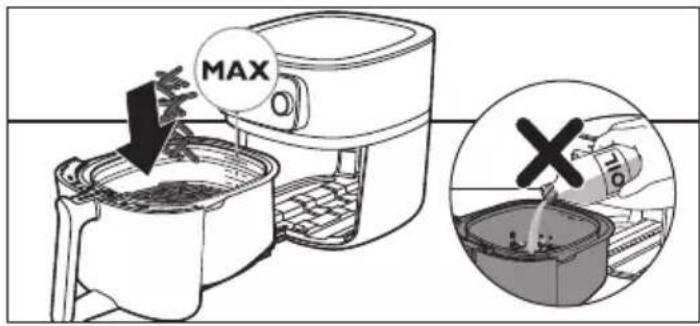
Caution: This is an Airfryer that works on hot air. Do not fill the pan with oil, frying fat or any other liquid.
Caution: Do not touch hot surfaces. Use handles or knobs. Handle the hot pan with oven-safe gloves.
Caution: This appliance is for household use only.
Caution: This appliance may produce some smoke when you use it for the first time. This is normal.
1 Place the appliance on a stable, horizontal, level and heat-resistant surface. Make sure the drawer can be opened completely.
Note: Do not put anything on top or on the sides of the appliance. This could disrupt the airflow and affect the frying result.
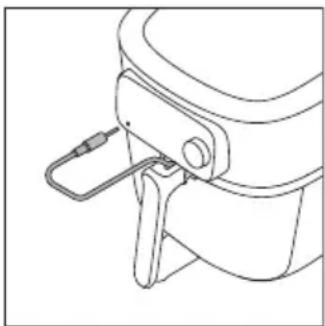
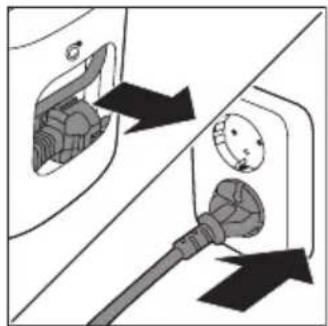
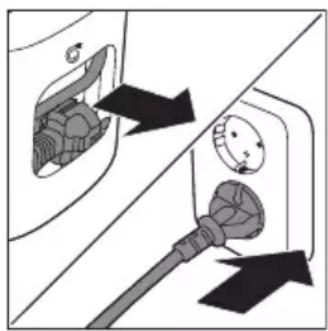
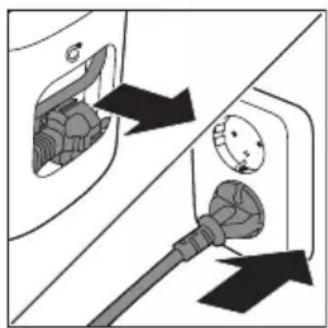
2 Pull the power cord out of the cord storage compartment at the back of the appliance.
3 Put the plug in the wall outlet.
natural_image
Diagram showing two electrical plug connections with arrows indicating direction (no text or symbols)
natural_image
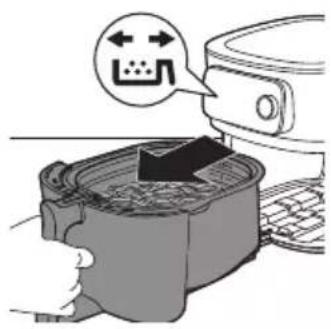
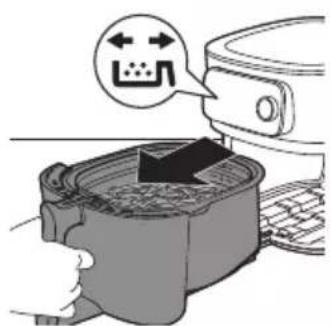
Illustration of a hand pressing a square oven with a black arrow indicating the process (no text or symbols present)4 Open the drawer by pulling the handle.
5 Put the ingredients in the basket.
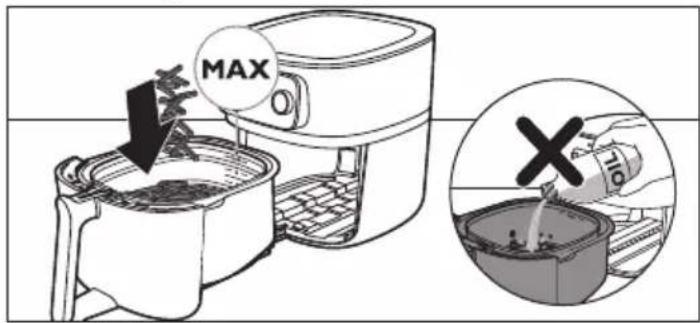
Note: Do not overfill the basket beyond the "MAX" indication as this could affect the quality of the end result.
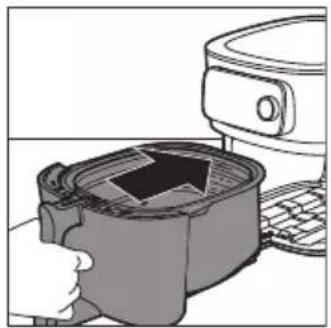
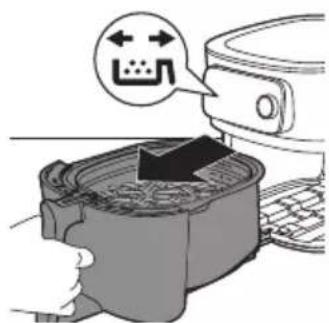
6 Slide the drawer back into the Airfryer.
natural_image
Illustration of a hand using a microwave oven to press or install a container with a rising arrow (no text or symbols)
7 Press the rotary button to turn on the appliance.
8 Select the cooking mode you would like to use (see chapter "Cooking Modes").
9 Decide whether you want to use the manual mode, choose an auto-cook program or use the temperature probe to cook (see "Cooking Modes").
Caution: Never use the pan without the basket in it. If you heat up the appliance without basket, use oven gloves to open the drawer. The edges and inside of the drawer become very hot.
Caution: Do not touch the pan and basket during and for some time after use, as they get very hot.
10 Press the rotary button to start cooking.
Note: You can press the rotary button to pause cooking process and turn it to change the cooking settings. Press the rotary button again to resume cooking.
11 When you hear the timer bell, it is time to shake your food or the cooking time has elapsed.
Note: Always make sure that your food is fully cooked before serving.
Note: Some Auto-Cook programs notify you when shaking or turning of your food is required. The Airfryer will send out a sound signal when it is time to shake or turn.
Note: The best way to shake is to open the drawer and lift the basket out of the pan and shake it. Then slide the pan with the basket back into the appliance. The appliance will automatically resume cooking.
Note: To cancel any ongoing process, go back to the main menu by pressing the return button.

natural_image
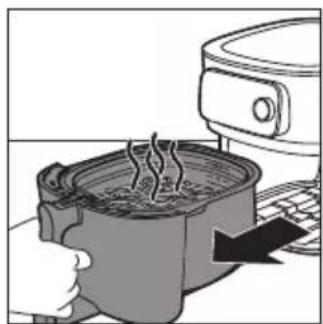
Illustration of a cooking pot with steam rising, next to a kitchen appliance (no text or symbols)12 Open the drawer by pulling the handle and check if the ingredients are ready.
Note: If the food is not cooked to your desired doneness level, you can add more time by pressing the time button and set a time. Press the rotary button to start cooking for a few more minutes.
natural_image
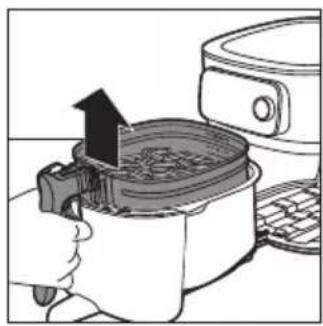
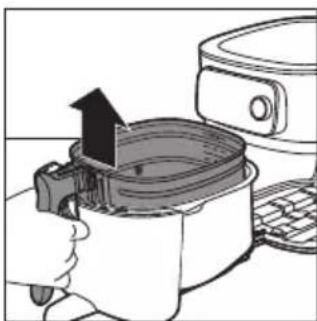
Illustration of a cooking pot being heated by an air fryer, with a hand holding the lid (no text or symbols visible)13 To remove small ingredients (e.g. fries), lift the basket out of the pan by the handle.
Caution: After the cooking process is finished, the pan, the basket, interior housing and the ingredients are hot. Depending on the type of ingredients in the Airfryer, steam may escape from the pan.

natural_image
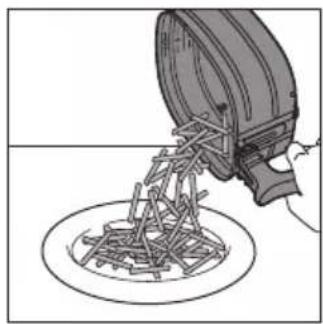
Illustration of a hand pouring liquid into a circular container (no text or symbols)14 Empty the basket contents into a bowl or onto a plate. Always remove the basket from the pan to empty contents as hot oil may be at the bottom of the pan.
Note: To remove large or fragile ingredients, use a pair of tongs to lift out ingredients.
Note: Excess oil or rendered fat from the ingredients is collected on the bottom of the pan.
Note: Depending on the type of ingredients cooked, you may want to carefully pour off any excess oil or rendered fat from the pan after each batch or before shaking or re-placing the basket in the pan. Place the basket on a heat-resistant surface. Wearing oven-safe gloves, lift the pan off tracks and place on heat-resistant surface. Pour off excess oil or rendered fat. Return the pan to the drawer and the basket to the pan.
Note: When a batch of ingredients is ready, the Airfryer is instantly ready for preparing another batch.
Using the food thermometer (HD9958, sold separately)
Placing the food thermometer
The food thermometer can be used for steak, meat chops, chicken breast, fish fillet, etc.
1 Clean the food thermometer before and after use - use warm and soapy water.
2 Insert the thermometer into the center of the thickest part of the food.

natural_image
Line drawing of two hands holding a rounded object, no text or symbols presentCaution: The tip of the food thermometer is pointed.
Note: Make sure the tip of the thermometer is inserted straight into the center of the thickest part of the food, not angled toward the bottom or top of it.
Note: Make sure the thermometer is close to but not touching the bone and away from any fat or gristle.
Note: The thickest part of the fillet may not be the center. It is important that the end of the thermometer hits the thickest part so desired results are achieved.
Note: When airfrying a whole chicken, make sure that the probe does not go all the way through the breast into the cavity.
Note: Do not use the food thermometer if your food is less than 2cm thick.
Follow the steps below to guide the probe to the center of the food.
natural_image
Hand holding a cable with a rectangular object inserted into it, no text or symbols visible1 Grab the metal stem of the thermometer and locate the tip to the center of the food.
natural_image
Illustration of a hand holding a small object with a ruler, no text or symbols present2 Keep your fingers on the same grab position and insert the probe to the center of the thickest part of the food.
Note: Depending on the food item, it is not always necessary to insert the metal stem of the food thermometer completely.
Dos Don'ts
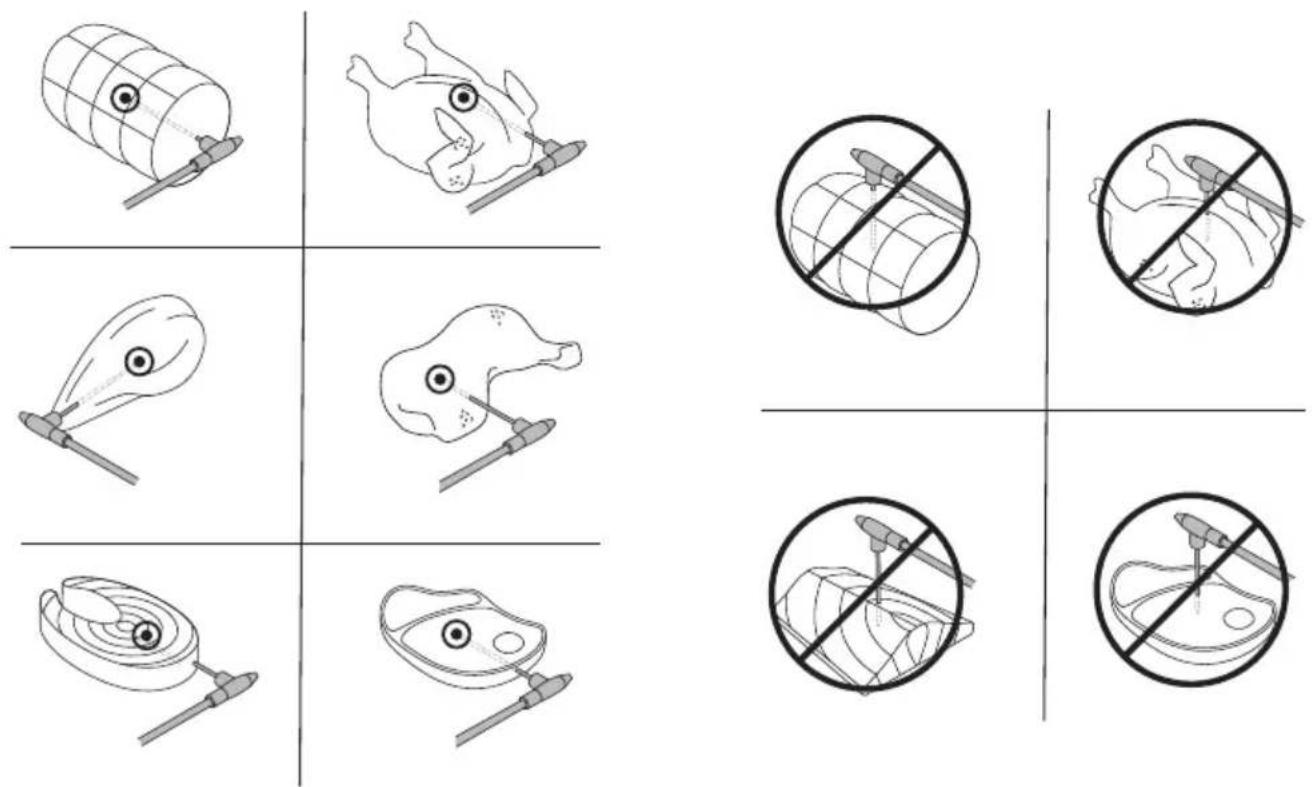
Note: For a whole chicken ensure that the probe does not go all the way through the breast into the cavity.
Note: You can also use the markings to determine first the center of the thickest part of your food. Use your fingers to remember how deeply you need to insert the food thermometer.
Note: Keeping your fingers marked on the food thermometer, insert the food thermometer through the center of your food.
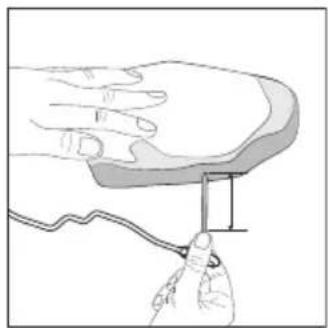
Measure the thickness of your food
natural_image
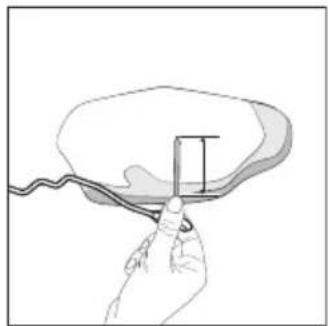
Diagram of a spiral-patterned object being processed with a tool, no text or symbols presentYou can use the food thermometer to measure the thickness of your food.
1 Place the food thermometer next to the food and check which marking reaches the top of the food.
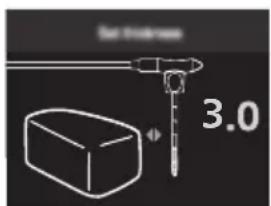
2 Set the value 1 to 6 when you get asked about the thickness when cooking with an Auto-Cook program in the NutriU app.
Note: This function is only available when you use the NutriU app and start the Auto-Cook program from there.
Note: Do not use the food thermometer if your food is less than 2cm thick.
Cooking modes
Mode How to
Auto-Cook Programs Select the Auto-Cook program. Set filling level, number of pieces or weight, then start cooking.
Manual cooking Set cooking time, temperature and air speed manually and start cooking.
Food Thermometer Set core temperature, cooking temperature and air speed manually and start cooking.
Auto-Cook Programs
1 When you switch on your Airfryer by pressing the rotary button, you are in mode "Auto-Cook programs" by default.
Note: If you have already cooked something else before you want to cook with an Auto-Cook program, you can enter mode "Auto-cook programs" by clicking the back button.
2 You can choose among 8 Auto-Cook programs on your Airfryer. Turn the rotary button to choose one program.
- Frozen fries ≈※
- Home-made fries ≈0
- Chicken drumsticks ♂
- Fish
- Meat chop
- Whole chicken
- Vegetables
- Muffins
3 Turn the rotary button to choose the Auto-Cook program you need. Press the rotary button to confirm.
4 Depending on the food, you may be asked to set the filling level, number of pieces, or weight. Turn the rotary button to select the amount of food you have put into the basket.
5 Push the rotary button to confirm.
Note: Use the markings indicated in the basket as a reference to set the correct filling level.
Note: Before you choose the filling level, make sure that you always distribute the food evenly in the basket.
Note: When you use the "Whole chicken" Auto-Cook program, you need to input the weight of the food item. Use a scale to determine the weight or you might also find the weight on the pack of your food.
6 The Airfryer will display the temperature and time that it has automatically calculated based on your selection. You can easily access this information on your device as it alternates between the two. Additionally, the Airfryer will indicate if low or high air speed has been selected.
Making home-made fries
To make great home-made fries in the Airfryer:
- Choose a potato variety suitable for making fries, e.g. fresh, (slightly) floury potatoes.
- It is best to air fry the fries in portions of up to filling level 4 for an even result.
1 Peel the potatoes and cut into sticks. Larger fries tend to be less crispy than smaller fries.
2 Soak the potato sticks in a bowl of water for at least 30 minutes.
3 Empty the bowl and dry the potato sticks with a dish towel or paper towel.
4 Pour one tablespoon of cooking oil into the bowl, put the sticks in the bowl and mix until the sticks are coated with oil.
5 Remove the sticks from the bowl with your fingers or a slotted kitchen utensil so excess oil remains in the bowl.
Do not tilt the bowl to pour all the sticks in the basket at once to prevent excess oil from going into the pan.
6 Put the sticks into the basket.
7 Start the Auto-Cook program of homemade fries and shake when notified.
Manual cooking
1 To enter manual cooking mode, simply press either the temperature or time button.
2 If you have selected the temperature button, turn the rotary button to set your desired temperature between 40^ C and 200^ C, then press the rotary button to confirm.
3 Set the cooking time by turning the rotary button. You can choose a time between 1 and 180 minutes.
Note: If you press the rotary button without setting a time, the pre-heat mode will be activated and you'll receive a sound notification when the desired temperature is reached.
4 Choose high or low air speed by pressing the air speed button and selecting your preference.
5 Press the rotary button to confirm your selection and start cooking.
Note: To receive a shaking reminder after half of the cooking time, enable the shaking reminder button.
Note: If you need to pause the cooking process to shake the food, add ingredients, or adjust cooking parameters, simply press the rotary button. To resume cooking, press the rotary button again.
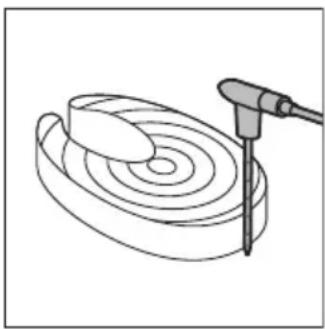
Food thermometer
Please note that in order to use the Food Thermometer feature, you'll need to purchase the food thermometer (HD9959) separately. Once you have the thermometer, follow these steps.
1 Place the food thermometer in your food as described in the "How to Place the Food Thermometer" section of the manual.
Note: It is essential to place it correctly to achieve accurate results.
2 Put the food with the thermometer in the basket.
3 Use the groove in the pan to guide the cable into the correct position.
4 Plug the thermometer into the dedicated plug on the Airfryer.
5 Close the drawer and check that the cable is not being squeezed.
6 Turn the rotary button to set the desired core temperature, which will be measured at the tip of the food thermometer. You can choose a temperature from 30^ C to 99^ C.
7 Press the rotary button to confirm.
8 Adjust the cooking temperature by turning the rotary button. You can choose a temperature between 40^ C and 200^ C.
9 Press the rotary button to confirm.
10 Choose the desired air speed by pressing the air speed button. You can select between high and low air speed.
Note: During cooking, you can see the cooking temperature and core temperature alternatively on the display screen.
11 The cooking process ends automatically when the core temperature has been reached.
The table below gives you a guidance on which core temperature to set.
Food item Doneness level Core temperature
| Poultry in general Done 80-85°C | |
| Breast of poultry Juicy 70-74°C | |
| Rare 45-50°C | |
| Medium 55-60°CBeef, veal, lamb, venison | |
| Well-Done 65-70°C | |
| Pork in general Done 70-73°C | |
| Pork loin Medium 58-63°C | |
| Fish | Translucent 50-55°C |
| Done 60-65°C | |
| Whole potato Done 92-95°C | |
| Bread Done 90-95°C | |
Note: The suggested core temperature does not correspond necessarily to the safe minimum internal temperature of the food.
Note: The internal temperature of the cooked food will continue to rise a few degrees after the food is taken out of the appliance.
Keep warm
The keep warm function of your Airfryer can be activated at any time - before starting a cooking session, during cooking, or after the cooking process is complete.
1 Press the keep warm button.
Note: To change the keep warm time, turn the rotary button to set a time from 1 to 30 minutes. Press the rotary button to confirm the set keep warm time.
2 Press the rotary button to start keep warm.
Note: You can pause keep warm by pressing the rotary button.
Note: Please note that using the keep warm function may affect the doneness level of certain foods, such as steak, which require a specific level of cooking.
Cleaning
Warning: Let the basket, pan and the inside of the appliance cool down completely before you start cleaning.
Warning: The pan and basket of the appliance have a non-stick coating. Do not use metal kitchen utensils or abrasive cleaning materials as this may damage the non-stick coating.
Tip: Remove the pan and basket to let the Airfryer cool down faster.
1 Dispose of rendered fat or oil from the bottom of the pan.
2 Clean the pan, basket in a dishwasher. You can also clean them with hot water, dishwashing liquid and a non-abrasive sponge (see "cleaning table").
Tip: If food residues stuck to the pan or basket, you can soak them in hot water and dishwashing liquid for 10–15 minutes. Soaking loosens the food residues and makes it easier to remove. Make sure you use a dishwashing liquid that can dissolve oil and grease. If there are grease stains on the pan or basket and you have not been able to remove them with hot water and dishwashing liquid, use a liquid degreaser.
Tip: If necessary, fat residues that stuck to the splatter shield, can be removed with a sponge or a bristle brush.
Tip: Put the basket in the pan, and place them upside down when washing them in the dishwasher to save space in the dishwasher.
natural_image
Illustration of a kitchen sink with laundry items including a plate, cup, and dish (no text or symbols)
natural_image
Line drawing of a hand cleaning a kitchen air fryer with a cloth (no text or symbols)
natural_image
Line drawing of a hand using a device to press or install a component, with no visible text or symbols.3 Wipe the outside of the appliance with a moist cloth. Make sure no moisture remains on the control panel. Dry the control panel with a cloth after you have cleaned it.
4 Clean the splatter shield with a sponge or a cleaning brush to remove any fat residues.
natural_image
Line drawing of a person using a portable food machine (no text or symbols)5 Clean the drawer and inside of the appliance with hot water and a non-abrasive sponge.
 |  |  | |
 |  |  |  |
 |  |  |  |
 |  |  |  |
 HD9958 HD9958 |  |  |  |
Storage
1 Unplug the appliance and let it cool down.
2 Make sure all parts are clean and dry before storing.
3 Insert the cord into the cord storage compartment.
Note: Always hold the Airfryer horizontally when you carry it. Make sure that you also hold the drawer on the front part of the appliance as it can slide out of the appliance if accidentally tilted downwards. This can lead to damaging of the drawer.
Note: Always make sure that the removable parts of the Airfryer e.g. removable mesh bottom, etc. are fixed before you carry and/or store it.
Troubleshooting
This chapter summarizes the most common problems you could encounter with the appliance. If you are unable to solve the problem with the information below, visit www.philips.com/support for a list of frequently asked questions or contact the Consumer Care Centre in your country.
Problem Possible cause Solution
| The outside of the appliance becomes hot during use. | The heat inside radiates to the outside walls. | This is normal. All handles and knobs that you need to touch during use stay cool enough to touch. |
Problem Possible cause Solution
| The pan, the basket, and the inside of the appliance always become hot when the appliance is switched on to ensure the food is properly cooked. These parts are always too hot to touch. | ||
| If you leave the appliance switched on for a longer time, some areas get too hot to touch. These areas are marked on the appliance with the following icon: | ||
| As long as you are aware of the hot areas and avoid touching them, the appliance is completely safe to use. | ||
| My home-made fries do not turn out as I expected. | You did not use the right potato type. | To get the best results, use fresh floury potatoes. If you need to store the potatoes, do not store them in a cold environment like in a fridge. Choose potatoes whose package states that they are suitable for frying. |
| The amount of ingredients in the basket is too big. | Do not overfill the basket or exceed the maximum filling level 6. | |
| Certain types of ingredients need to be shaken halfway through the cooking time. | The fuller the basket the more frequent shaking is recommended. | |
| The Airfryer does not switch on. The appliance is not plugged in. Check if the plug is inserted in the wall outlet properly. | ||
| Several appliances are connected to one outlet. | The Airfryer has a high wattage. Try a different outlet and check the fuses. | |
| I see some peeling off spots inside my Airfryer. | Some small spots can appear inside the pan of the Airfryer due to the incidental touching or scratching of the coating (e.g. during cleaning with harsh cleaning tools and/or while inserting the basket). | You can prevent damage by lowering the basket into the pan properly. If you insert the basket at an angle, its side may knock against the wall of the pan, causing small pieces of coating to chip off. If this occurs, please be informed that this is not harmful as all materials used are food-safe. |
| White smoke comes out of the appliance. | You are cooking fatty ingredients. | Carefully pour off any excess oil or fat from the pan and then continue cooking. |
Problem Possible cause Solution
| The pan still contains greasy residues from previous use. | White smoke is caused by greasy residues heating up in the pan. Always clean the pan and the basket thoroughly after every use. | |
| Breading or coating did not adhere properly to the food. | Tiny pieces of airborne breading can cause white smoke. Firmly press breading or coating to food to ensure it sticks. | |
| Marinade, liquid or meat juices are splattering in the rendered fat or grease. | Pat food dry before placing it in the basket. | |
| The WiFi LED on my Airfryer is not shining anymore. | - The Airfryer is not connected to your home WiFi anymore.- You have changed your home WiFi network." | Start the WiFi set up process and follow the instructions in the app. |
| The app shows that the pairing process is not successful. | Another user has paired the Airfryer with a different smart device and is currently cooking. | Wait until the other user has finished the current cooking process and re-pair your smart device with the Airfryer. |
| The screen on the Airfryer shows "E1". | Your Airfryer might be stored in a place where it is too cold. | If your device was stored at a low ambient temperature, let it warm up to room temperature for at least 15 minutes before you plug it in again.If your display still shows "E1", call the Philips service hot line or contact the Consumer Care Center in your country. |
| E2 You have entered the wrong WiFi credentials. | Enter the correct WiFi credentials. | |
| E3 The connectivity feature has a defect. | Use the appliance without the connectivity feature. Call the Philips service hotline or contact the Consumer Care Center in your country. | |
| E5, E6, E8, E9, E12 There might be a software issue. Unplug the Airfryer and plug it in again. If your display still shows the error code, call the Philips service hot line or contact the Consumer Care Center in your country. | ||
Problem Possible cause Solution
| E10 A problem occurred while cooking with an auto-cook program. | Unplug the Airfryer and plug it in again. Please make sure you are connected to your WiFi so that the Airfryer can perform a firmware update if available. Restart the auto-cook program.If your display still shows the error code, call the Philips service hot line or contact the Consumer Care Center in your country. | |
| E11 The Airfryer was operated at power voltages outside the specified boundaries. | Unplug the Airfryer and plug it in again. Try using another socket.Unplug other appliances that are using the same socket.If your display still shows the error code, call the Philips service hot line or contact the Consumer Care Center in your country. | |
| The following error codes applies to the food thermometer (HD9958) only. | ||
| A1 The food thermometer is not properly plugged into the Airfryer. | Plug in the end of the food thermometer into the food thermometer socket on the left side of the display of the Airfryer. | |
| A2 The food thermometer is not inserted into the food properly. | Insert the food thermometer from the side and make sure the pointed tip reaches the center of the thickest part of the food.Ensure the food is at least 2 centimeters thick. | |
| A3 The food thermometer is placed outside the basket when cooking in the food thermometer mode. | Insert the food thermometer into the food and place it in the basket for cooking or select a cooking mode without food thermometer. | |
| A4 The drawer of the Airfryer was opened although the target temperature of the food has not been reached yet. | Please close the drawer again and wait until the Airfryer indicates that cooking is finished. | |
| A5 The food thermometer is overheating. | Please remove the food thermometer from the basket during cooking if it is not in use. | |
Důležité informace

HD9958

www.philips.com/parts-and-accessories
natural_image
Line drawing of a mechanical component with a handle and lever (no text or symbols)Focus mode: e.g if the appliance is asking for the filling level.
Předehřívání
natural_image
Illustration of a hand pressing down on a mechanical component with a black arrow indicating direction (no text or symbols)natural_image
Illustration of a hand holding a cooking pot with an upward arrow, next to a kitchen appliance (no text or symbols)natural_image
Illustration of a hand using an air fryer to press down a pan, with a refrigerator and keyboard visible (no text or symbols)4 Vložte košík do nádoby.

natural_image
Illustration of a hand pressing down on a device with a lid and keyboard (no text or symbols visible)natural_image
Diagram showing two electrical plug connections with arrows indicating direction (no text or symbols)natural_image
Diagram showing a plug inserted into a socket with arrows indicating direction (no text or symbols)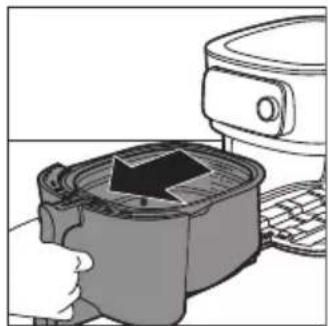
natural_image
Illustration of a microwave oven with a hand inserting a fan into a container, next to a kitchen appliance (no text or symbols visible)natural_image
Illustration of a kitchen grater being heated by a digital kitchen (no text or symbols visible)natural_image
Illustration of a hand pressing a pot with steam rising, next to a kitchen appliance (no text or symbols visible)natural_image
Illustration of a hand using an air fryer to press food from a microwave oven (no text or symbols visible)natural_image
Illustration of a hand pouring liquid into a container with a lid (no text or symbols)natural_image
Illustration of two hands holding a brain-like object (no text or symbols)natural_image
Hand holding a thin wire with a rectangular object inside, no text or symbols visiblenatural_image
Illustration of a hand holding a small object with a ruler, no text or symbols presentnatural_image
Diagram of a spiral object being cut with a tool, no text or symbols presentnatural_image
Illustration of a kitchen sink with laundry and food items (no text or symbols)natural_image
Line drawing of a hand cleaning a kitchen appliance with a cloth (no text or symbols)natural_image
Line drawing of a kitchen appliance with a lid and keyboard (no text or symbols)natural_image
Line drawing of a hand using a portable kitchen appliance to press or install a keyboard (no text or symbols)
HD9958

www.philips.com/parts-and-accessories
natural_image
Line drawing of a mechanical component with a handle and lever (no text or symbols)natural_image
Illustration of a hand pressing down on a small container with a black arrow, next to a mounted appliance (no text or symbols visible)natural_image
Illustration of a hand holding a cooking pot with an upward arrow, next to a microwave oven (no text or symbols)natural_image
Illustration of a hand using a cooking pot to add liquid into a microwave oven, with a toaster visible in the background (no text or symbols)4 Sæt kurven i fedtopsamlingsbeholderen.
natural_image
Illustration of a hand inserting a device into a container with an arrow, next to a computer monitor (no text or symbols visible)natural_image
Green square icon with white cooking utensils and the word 'PHILIPS' below (no other text or symbols)NutriU
natural_image
Diagram showing two electrical plug connections with arrows indicating direction (no text or symbols)natural_image
Diagram showing two electrical plug connections with arrows indicating direction (no text or symbols)natural_image
Illustration of a kitchen appliance with a grater and a refrigerator (no text or symbols)natural_image
Illustration of a hand pressing down on a container with an arrow indicating process (no text or symbols)6 Skub skuffen tilbage i din Airfryer.

natural_image
Illustration of a cooking pot with steam rising, next to a kitchen appliance (no text or symbols)natural_image
Illustration of a cooking step showing a pan with a rising arrow and a side mirror (no text or symbols)natural_image
Illustration of a hand pouring liquid into a container with a lid (no text or symbols)natural_image
Line drawing of two hands holding a rounded object, no text or symbols presentnatural_image
Hand holding a thin wire with a rectangular object attached, no text or symbols visiblenatural_image
Illustration of a hand holding a small rectangular object with a string, next to a wavy line (no text or symbols)natural_image
Diagram of a spiral object being cut with a tool, no text or symbols presentnatural_image
Illustration of a kitchen sink with shower, plate, cup, and dish (no text or symbols)natural_image
Line drawing of a hand cleaning a mounted air fryer with a cloth (no text or symbols)natural_image
Line drawing of a hand using a device to interact with a circular component (no text or symbols)natural_image
Line drawing of a person using a portable device with a lid (no text or symbols)
HD9958

www.philips.com/parts-and-accessories
natural_image
Line drawing of a mechanical device with a clip and handle (no text or symbols)natural_image
Illustration of a kitchen appliance with a grater and a microwave oven, showing a hand pressing down (no text or symbols)natural_image
Illustration of a hand using a tool to press or install a cooking pot, next to a refrigerator (no text or symbols visible)natural_image
Illustration of a hand using a cooking pot to add liquid into a microwave oven, with a toaster visible in the background (no text or symbols)natural_image
Illustration of a hand inserting a device into a container with an arrow, next to a computer monitor (no text or symbols visible)natural_image
Green square icon with white cooking utensils and the word 'PHILIPS' below (no other text or symbols)NutriU
natural_image
Diagram showing two electrical plug connections with arrows indicating direction (no text or symbols)natural_image
Diagram showing two electrical plug connections with arrows indicating direction (no text or symbols)
natural_image
Illustration of a hand pressing down on a small container with an arrow, next to a kitchen appliance (no text or symbols)natural_image
Illustration of a hand pressing down on a mechanical component with a magnified view (no text or symbols)

natural_image
Illustration of a hand using a steaming pot to press down a surface, with a kitchen appliance visible above (no text or symbols)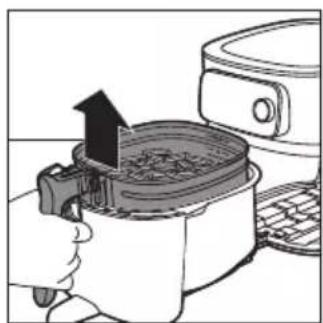
natural_image
Illustration of a hand using a cooking pot to fill food, with a rising arrow indicating the process (no text or symbols present)natural_image
Diagram of a robotic arm pouring material into a circular container (no text or symbols)natural_image
Illustration of two hands holding a rounded object with a small hole, no text or symbols presentnatural_image
Hand holding a cable with a rectangular object inserted, no text or symbols visiblenatural_image
Illustration of a hand holding a small object with a ruler, no text or symbols presentnatural_image
Diagram of a spiral-patterned object with a tool inserted, no text or symbols presentnatural_image
Illustration of a kitchen sink with shower, plate, cup, and dish (no text or symbols)natural_image
Line drawing of a hand cleaning a kitchen air fryer with a cloth (no text or symbols)natural_image
Line drawing of a device with a speaker and keyboard, no text or symbols presentnatural_image
Line drawing of a hand inserting a device into a microwave oven (no text or symbols)https://www.philips.com.

HD9958

www.philips.com/parts-and-accessories
natural_image
Line drawing of a mechanical device with a handle and lever (no text or symbols)Focus mode: e.g if the appliance is asking for the filling level.
Eelkuumutamine
natural_image
Illustration of a hand pressing down on a device with a black arrow indicating the process (no text or symbols present)natural_image
Illustration of a hand using a cooking pan to lift a lid, with a kitchen appliance nearby (no text or symbols)natural_image
Illustration of a hand using a cooking pot to press down a lid, with a refrigerator and keyboard nearby (no text or symbols)4 Asetage korv poti sisse.

natural_image
Illustration of a microwave oven with a lid removed from a sink (no text or symbols)5 Libistage sahtel käepidemest lükates tagasi Airfryerisse.
Airfryeri sidumine NutriU rakendusega
natural_image
Diagram showing two electrical plug connections with arrows indicating direction (no text or symbols)natural_image
Diagram showing two electrical plug connections with arrows indicating direction (no text or symbols)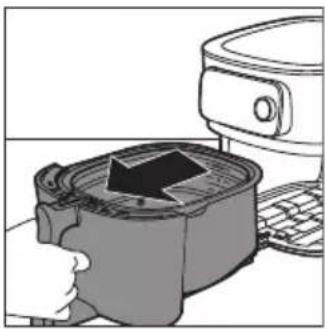
natural_image
Illustration of a kitchen appliance with a downward arrow indicating cooling or cooling process (no text or symbols)natural_image
Illustration of a hand pressing down on a mechanical component with an arrow indicating force (no text or symbols present)6 Lükake korv Airfryerisse tagasi.


natural_image
Illustration of a hand using a steaming pot to press or steam from a microwave oven (no text or symbols)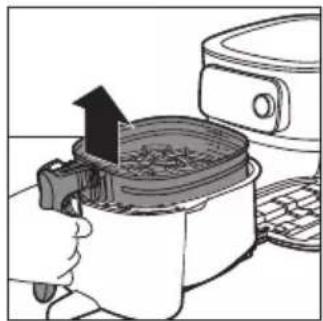
natural_image
Illustration of a cooking process showing a hand pressing a pan with an upward arrow, next to a microwave oven (no text or symbols)natural_image
Illustration of a hand pouring liquid into a circular container with mechanical components (no text or symbols)natural_image
Illustration of two hands holding a rounded object, possibly a bone or abstract form (no text or symbols)natural_image
Hand holding a cable with a rectangular object inserted into it, no text or symbols visiblenatural_image
Illustration of a hand holding a small object with a ruler, no text or symbols present
natural_image
Diagram of a spiral-patterned object being processed with a tool, no text or symbols presentnatural_image
Illustration of a kitchen sink with shower, plate, and dish (no text or symbols)
natural_image
Line drawing of a hand cleaning a food oven with a cloth (no text or symbols)
natural_image
Line drawing of a hand using a cleaning or cleaning tool to clean a circular component (no text or symbols present)natural_image
Line drawing of a person using a food grater (no text or symbols)
HD9958

www.philips.com/parts-and-accessories
natural_image
Line drawing of a mechanical device with a clip and handle (no text or symbols)natural_image
Illustration of a hand pressing a cup into a microwave oven with a paper lid (no text or symbols)natural_image
Illustration of a hand using a cooking pot to lift a steamer (no text or symbols visible)natural_image
Illustration of a hand using a cooking pot to lift a baking pan, with a refrigerator nearby (no text or symbols)natural_image
Illustration of a hand pressing down on a microwave oven with a lid removed (no text or symbols)
natural_image
Diagram showing two electrical plug connections with arrows indicating direction (no text or symbols)
natural_image
Diagram showing two connected electrical outlets with arrows indicating connection points (no text or symbols present)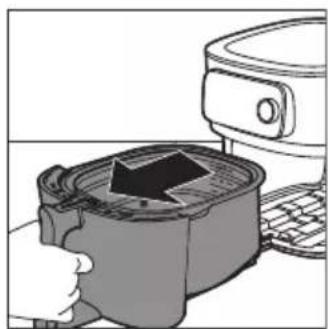
natural_image
Illustration of a hand pressing down on a cooking pot with a downward arrow, next to a kitchen appliance (no text or symbols)natural_image
Illustration of a hand pressing down on a container with an arrow indicating process (no text or symbols)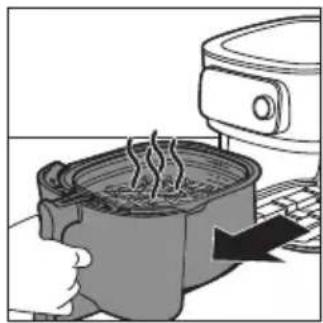
natural_image
Illustration of a hand using a steaming pot to press a hot pot next to a kitchen appliance (no text or symbols visible)natural_image
Illustration of a cooking pot being heated by an electric oven (no text or symbols visible)natural_image
Illustration of a hand pouring a cylindrical container into a circular tank (no text or symbols)natural_image
Illustration of two hands holding a rounded object with a small oval shape inside (no text or symbols)natural_image
Hand holding a thin wire with a rectangular object attached, resembling a stylized lamp or device (no text or symbols visible)natural_image
Illustration of a hand holding a small rectangular object with a string, next to a curved surface (no text or symbols)natural_image
Diagram of a mechanical device interacting with a spiral-patterned object (no text or symbols)natural_image
Illustration of a kitchen sink with laundry items including a plate, cup, and dish (no text or symbols)natural_image
Line drawing of a hand cleaning a kitchen air fryer with a cloth (no text or symbols)natural_image
Line drawing of a mechanical device with a circular component and ladder (no text or symbols)natural_image
Line drawing of a kitchen appliance with a hand inserting a tool (no text or symbols)
HD9958

www.philips.com/parts-and-accessories
natural_image
Line drawing of a mechanical device with a handle and lever (no text or symbols)natural_image
Illustration of a kitchen appliance with a downward arrow indicating cooling or ventilation (no text or symbols)
natural_image
Diagram showing two electrical plug connections with arrows indicating direction (no text or symbols)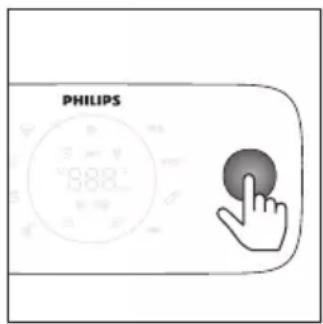
natural_image
Diagram showing two electrical plug connections with arrows indicating direction (no text or symbols)
natural_image
Illustration of a hand pressing a square oven with a black arrow indicating the process (no text or symbols present)natural_image
Illustration of a hand using a digital kitchen to press or install a grater with a rising arrow (no text or symbols)
natural_image
Illustration of a hand using a steaming pot to press or steam from a kitchen appliance (no text or symbols visible)natural_image
Illustration of a hand using an electric stove to press air, with a refrigerator and keyboard nearby (no text or symbols)natural_image
Diagram of a hand pouring liquid into a circular container (no text or symbols)natural_image
Illustration of two hands holding a rounded object, possibly a brain or anatomical structure (no text or symbols)natural_image
Hand holding a cable with a rectangular object inserted into it, no text or symbols visiblenatural_image
Illustration of a hand holding a small object with a ruler, no text or symbols presentnatural_image
Diagram of a spiral object being cut with a tool, no text or symbols presentnatural_image
Illustration of a kitchen sink with laundry and food items (no text or symbols)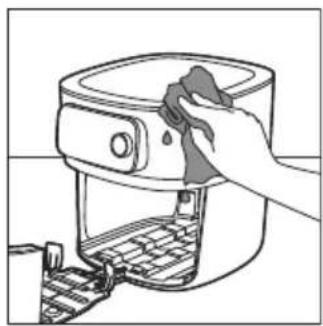
natural_image
Line drawing of a hand cleaning a kitchen air fryer with a cloth (no text or symbols)natural_image
Line drawing of a mechanical device with a circular component and a tool inserted (no text or symbols)natural_image
Line drawing of a kitchen appliance with a handle and lid (no text or symbols)| [IMAGE] | [IMAGE] | [IMAGE] | |
| √ | √ | × | |
| √ | √ | × | |
| √ | √ | × | |
| HD9958 | √ | × | √ |
Rangement

HD9958

www.philips.com/parts-and-accessories
1 Upravljačka ploča
2 Ladica
3 Indikator razine napunjenosti
4 Košara s odvojivim dnom s mrežicom
5 Posuda
6 Termometar za hranu (HD9958, prodaje se zasebno)
7 Odjeljak za spremanje kabela
8 Izlazi zraka
9 Ulaz zraka
10 Odvojivo dno s mrežicom
11 Zaštita od prskanja
natural_image
Line drawing of a mechanical device with a handle and lever (no text or symbols)Termometar za hranu koji se prodaje zasebno možete upotrijebiti za pripremu hrane do željene razine pečenosti.
Jedan kraj termometra za hranu postavite u hranu, a drugi u ulaz termometra za hranu (pogledajte poglavlje „termometar za hranu“).
Vrijeme kuhanja
U načinu kuhanja „Ručno kuhanje“ možete odabrati vrijeme kuhanja između 1 i 180 minuta.
U načinu kuhanja „Programi automatskog kuhanja” ne morate postaviti vrijeme kuhanja jer će program automatskog kuhanja hranu pripremiti na temelju veličine porcije ili željene razine pečenosti.
U načinu kuhanja „Termometar za hranu“ ne morate postaviti vrijeme kuhanja jer se kuhanje automatski dovršava čim termometar za hranu otkrije da je dosegnuta postavljena unutarnja temperatura.
Temperatura kuhanja
U načinu kuhanja „Ručno kuhanje“ možete postaviti temperaturu kuhanja između 40 °C i 200 °C.
U načinu kuhanja „Programi automatskog kuhanja“ ne morate postaviti temperaturu kuhanja jer se temperatura kuhanja postavlja automatski.
Unutarnja temperatura
U načinu kuhanja „Termometar za hranu“ možete postaviti unutarnju temperaturu hrane od 30 °C do 99 °C. Temperatura u središtu hrane unutarnju će temperaturu koja je postavljena dosegnuti na kraju postupka kuhanja.
Napomena: Unutarnja temperatura ne odgovara temperaturi kuhanja.
Male i velike brzine protoka zraka
Focus mode: e.g if the appliance is asking for the filling level.
Prethodno zagrijavanje
natural_image
Illustration of a kitchen appliance with a grater and a refrigerator (no text or symbols)1 Otvorite ladicu povlačenjem drške.

natural_image
Illustration of a hand using a cooking pan to lift a steamer (no text or symbols visible)natural_image
Illustration of a hand pressing down on a cooking pot with a downward arrow, next to a kitchen appliance (no text or symbols)natural_image
Illustration of a kitchen sink with a computer monitor above it, showing a hand holding the sink (no text or symbols present)5 Guranjem drške umetnite ladicu natrag u Airfryer.
Napomena: Posudu nikad nemojte upotrebljavati bez košare.
Uparite svoj Airfryer s aplikacijom NutriU
natural_image
Diagram showing two electrical plug connections with arrows indicating direction (no text or symbols)natural_image
Diagram showing a plug inserted into a socket, with arrows indicating direction of insertion or disassembly (no text or symbols present)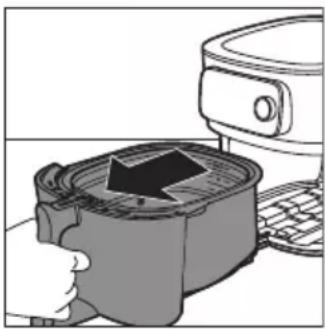
natural_image
Illustration of a kitchen appliance with a hand pressing down on a side panel (no text or symbols visible)4 Otvorite ladicu povlačenjem drške.
5 Sastojke stavite u košaru.

natural_image
Illustration of a hand pressing down on a container with an arrow indicating process (no text or symbols)
Napomena: Nemojte puniti košaru iznad indikatora MAX jer to može utjecati na kvalitetu krajnjih rezultata.
6 Vratite ladicu u Airfryer.
7 Pritisnite okrugli gumb kako biste uključili aparat.
8 Odaberite željeni način kuhanja (pogledajte poglavlje „Načini kuhanja“).
9 Odlučite želite li upotrebljavati ručni način rada, odabrati program automatskog kuhanja ili upotrijebiti temperaturni sondu za kuhanje (pogledajte „Načini kuhanja”).
Oprez: Posudu nikad nemojte upotrebljavati bez košare. Ako aparat zagrijete bez košare, ladicu otvorite s rukavicama za pećnicu. Rubovi i unutrašnjost ladice jako se zagriju.
natural_image
Illustration of a hand holding a cooking pot with steam rising, next to a kitchen appliance (no text or symbols)natural_image
Illustration of a cooking process showing a hand using a cooking pot with an upward arrow, next to a refrigerator (no text or symbols)13 Kako biste izvadili male sastojke (primjerice krumpiriće), podignite košaru iz posude držeći je za dršku.
Oprez: Posuda, košara, unutrašnjost kućišta i sastojci vrući su nakon postupka kuhanja. Ovisno o vrsti namirnica u aparatu Airfryer, iz posude može izlaziti para.
natural_image
Illustration of a hand pouring liquid into a container with a metal structure (no text or symbols)natural_image
Simple line drawing of two hands holding a rounded object, no text or symbols presentnatural_image
Hand holding a small rectangular object with a curved line above, resembling a stylized map or diagram (no text or symbols present)Slijedite korake u nastavku i provedite sondu u središte hrane.
1 Primate metalnu bazu termometra i postavite vrh u središte hrane.

natural_image
Illustration of a hand holding a small object with a coiled cable, no text or symbols presentNapomena: Za cijelo pile, uvjerite se da sonda ne prolazi kroz prsa u šupljinu.
natural_image
Diagram of a spiral-shaped object with a central rod inserted, no text or symbols presentTermometrom za hranu možete izmjeriti debljinu hrane.
1 Termometar za hranu postavite pokraj hrane i provjerite koja oznaka dopire do vrha hrane.
Napomena: Ova je funkcija dostupna samo ako upotrebljavate aplikaciju NutriU i pokrenete program automatskog kuhanja u njoj.
Napomena: Termometar za hranu nemojte rabiti ako je hrana tanja od 2 cm.
Načini kuhanja
Način rada Kako
| Programiautomatskog kuhanja | Odaberite program automatskog kuhanja. Postavite razinunapunjenosti, broj komada ili težinu, zatim počnite kuhati. |
| Ručno kuhanje Ručno postavite vrijeme kuhanja, temperaturu i brzinuprotoka zraka te pokrenite postupak pripreme hrane. | |
| Termometar za hranu Ručno postavite unutarnju temperaturu, temperaturukuhanja i brzinu protoka zraka te pokrenite postupakkuhanja. | |
Programi automatskog kuhanja
1 Kada svoj Airfryer uključite pritiskom okruglog gumba, zadano se nalazite u načinu rada „Programi automatskog kuhanja”.
Napomena: Ako ste već pripremili nešto što želite pripremiti s pomoću programa automatskog kuhanja, možete ući u način rada programa automatskog kuhanja pritiskom na gumb za povratak.
2 Možete odabrati između 8 programa automatskog kuhanja na svojem aparatu Airfryer. Okrenite okrugli gumb kako biste odabrali jedan program.
- Zamrznuti krumpirići ≈※
- Domaći krumpirići
- Pileći bataci ♂
- Riba
- Mesni kotlet
- Cijelo pile
- Povrće
- Muffini
natural_image
Illustration of a kitchen sink with shower, plate, cup, and dish (no text or symbols)natural_image
Line drawing of a hand cleaning a kitchen air fryer with a cloth (no text or symbols)3 Vanjske dijelove aparata obrišite vlažnom krpom. Pazite da na upravljačkoj ploči ne ostane vlage. Upravljačku ploču nakon čišćenja obrišite krpom.

natural_image
Line drawing of a device with a speaker and keyboard, no text or symbols present4 Zaštitu od prskanja očistite spužvicom ili četkicom za čišćenje kako biste uklonili ostatke masnoće.
natural_image
Line drawing of a hand inserting a device into a rack (no text or symbols)5 Ladicu i unutrašnjost aparata očistite vrućom vodom i neabrazivnom spužvom.
 |  |  | |
 |  |  |  |
 |  |  |  |
 |  |  |  |
 |  |  |  |
Spremanje
1 Iskopčajte aparat iz napajanja i ostavite ga da se ohladi.
2 Prije spremanja provjerite jesu li svi dijelovi čisti i suhi.
3 Umetnite kabel u pretinac za kabel.
Napomena: Airfryer uvijek držite vodoravno kada ga nosite. Pazite i da držite ladicu s prednje strane aparata jer bi mogla skliznuti iz aparata ako se on slučajno nagne prema dolje. To može dovesti do oštećenja ladice.
Napomena: Prije nošenja i/ili spremanja obavezno provjerite jesu li odvojivi dijelovi aparata Airfryer, primjerice odvojivo dno s mrežicom itd., fiksirani.
Rješavanje problema
U ovom poglavlju opisani su uobičajeni problemi vezani uz uporabu aparata.

HD9958

www.philips.com/parts-and-accessories
natural_image
Line drawing of a mechanical component with a handle and lever (no text or symbols)natural_image
Illustration of a kitchen appliance with a lid and side panel, showing a hand pressing down on a surface (no text or symbols)natural_image
Illustration of a hand using a cooking pot to press an upward arrow, next to a kitchen appliance (no text or symbols)natural_image
Illustration of a hand using a microwave oven to press a cylindrical object, with a downward arrow indicating the process (no text or symbols present)natural_image
Illustration of a kitchen appliance with a lid and keyboard, no text or symbols presentnatural_image
Green square icon with white cooking utensils and the word 'PHILIPS' below (no other text or symbols)NutriU
natural_image
Diagram showing two electrical plug connections with arrows indicating direction (no text or symbols)natural_image
Diagram showing a plug inserted into a socket and outlet, with arrows indicating direction (no text or symbols)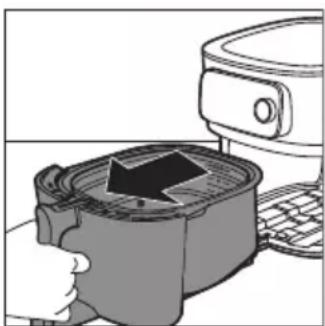
natural_image
Illustration of a kitchen appliance with a downward arrow indicating cooling or ventilation (no text or symbols)natural_image
Illustration of a hand pressing down on a container with an arrow indicating process (no text or symbols)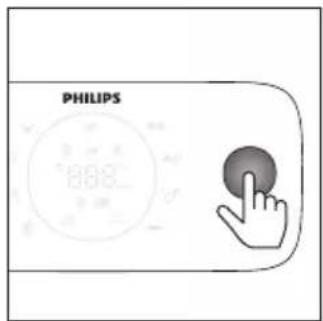
natural_image
Illustration of a hand using a steaming pot to press down a kitchen appliance (no text or symbols visible)natural_image
Illustration of a cooking pot being placed with an upward arrow, next to a microwave oven (no text or symbols)natural_image
Illustration of a hand pouring liquid into a container with a magnifying glass (no text or symbols)natural_image
Line drawing of two hands holding a flat object, no text or symbols presentnatural_image
Hand holding a cable with a rectangular object inserted into it, no text or symbols visiblenatural_image
Illustration of a hand holding a small object with a string, no text or symbols presentnatural_image
Diagram of a spiral object being cut with a tool, no text or symbols presentnatural_image
Illustration of a kitchen sink with laundry items including a plate, cup, and dish (no text or symbols)natural_image
Line drawing of a hand cleaning a kitchen appliance with a cloth (no text or symbols)natural_image
Line drawing of a device with a speaker and keyboard, no text or symbols presentnatural_image
Line drawing of a kitchen appliance with a hand inserting a bag into the drawer (no text or symbols)https://www.philips.com.

HD9958

www.philips.com/parts-and-accessories
natural_image
Line drawing of a mechanical device with a handle and lever (no text or symbols)Focus mode: e.g if the appliance is asking for the filling level.
Uzkarsēšana
natural_image
Illustration of a hand inserting a device into a container with a black arrow (no text or symbols)1 Atveriet atvilktni, velkot aiz roktura.
natural_image
Illustration of a hand holding a cooking pot with an upward arrow, next to a kitchen appliance (no text or symbols)natural_image
Illustration of a cooking pot being placed with a knife, next to a kitchen appliance (no text or symbols visible)natural_image
Illustration of a hand pressing down on a mechanical component with a lid, next to a kitchen appliance (no text or symbols visible)5 levietojiet atvilktni atpakal Airfryer ierīcē, turot aiz roktura.
natural_image
Diagram showing two electrical plug connections with arrows indicating direction (no text or symbols)natural_image
Diagram showing two electrical plug connections with arrows indicating direction (no text or symbols)
natural_image
Illustration of a kitchen appliance with a lid and keyboard, showing a hand pressing down (no text or symbols)4 Atveriet atvilktni, velkot aiz roktura.
5 lelieciet produktus grozā.
natural_image
Illustration of a kitchen appliance being processed with a grater (no text or symbols visible)6 lelieciet atvilktni atpakal ierīcē Airfryer.

natural_image
Illustration of a cooking pot with steam rising, next to a kitchen appliance (no text or symbols)natural_image
Illustration of a hand using a cooking pot to press or fill a mixture, next to a microwave oven (no text or symbols visible)natural_image
Illustration of a hand pouring liquid into a container with a magnifying glass (no text or symbols)natural_image
Simple line drawing of two hands holding a rounded object, no text or symbols presentnatural_image
Hand holding a cable with a rectangular object inserted into it, no text or symbols visiblenatural_image
Illustration of a hand holding a small object with a ruler, no text or symbols presentnatural_image
Diagram of a spiral object being cut with a tool, no text or symbols presentPiezīme. Šī funkcija ir pieejama tikai tad, ja izmantojat NutriU lietotni un tur palaižat Auto-Cook programmu.
natural_image
Illustration of a kitchen sink with laundry and food items (no text or symbols)natural_image
Line drawing of a hand cleaning a kitchen appliance with a cloth (no text or symbols)natural_image
Line drawing of a kitchen appliance with a speaker and keyboard (no text or symbols)natural_image
Line drawing of a hand using a portable food grater (no text or symbols)https://www.philips.com.

HD9958

www.philips.com/parts-and-accessories
natural_image
Line drawing of a mechanical component with a handle and lever (no text or symbols)Focus mode: e.g if the appliance is asking for the filling level.
Išankstinis pakaitinimas
natural_image
Illustration of a hand pressing a container with an arrow, next to a kitchen appliance (no text or symbols)natural_image
Illustration of a hand using a microwave oven to press a mounted appliance (no text or symbols visible)2 lšimkite krepšelj keldami už rankenos.
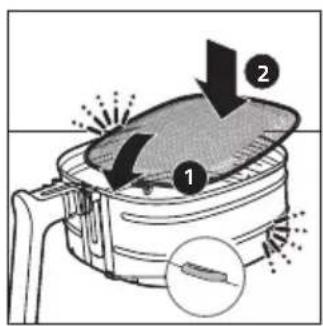
natural_image
Illustration of a hand using a cooking pot to press a baking pan, with a refrigerator nearby (no text or symbols)natural_image
Illustration of a hand inserting a device into a container with an arrow, next to a computer monitor (no text or symbols visible)Susiekite „AirFryer“ su programèle „NutriU“
natural_image
Green square icon with white cooking utensils and the word 'PHILIPS' below (no other text or symbols)NutriU
natural_image
Diagram showing two electrical plug connections with arrows indicating direction (no text or symbols)natural_image
Diagram showing two electrical plug connections with arrows indicating direction (no text or symbols)natural_image
Illustration of a kitchen appliance with a pot and keyboard, showing a hand pressing down (no text or symbols)natural_image
Illustration of a hand pressing down on a container with an arrow indicating process (no text or symbols)natural_image
Illustration of a cooking pot with steam rising, next to a mounted appliance (no text or symbols)natural_image
Illustration of a hand using a cooking pot to press or install a tray, with no visible text or symbols.natural_image
Illustration of a hand pouring material into a circular container (no text or symbols)natural_image
Illustration of two hands holding a rounded object, possibly a biological or anatomical structure (no text or symbols)natural_image
Hand holding a thin wire with a rectangular object inside, no text or symbols visiblenatural_image
Illustration of a hand holding a small object with a wavy line, no text or symbols presentnatural_image
Diagram of a spiral-patterned object with a tool inserted, no text or symbols presentMaisto produkto storj galite pamatuoti maisto termometru.
natural_image
Illustration of a kitchen sink with shower, plate, cup, and dish (no text or symbols)natural_image
Line drawing of a hand cleaning a food appliance with a cloth (no text or symbols)natural_image
Line drawing of a hand using a device to interact with a circular component (no text or symbols visible)natural_image
Line drawing of a kitchen appliance with a hand operating the counter (no text or symbols)
HD9958

www.philips.com/parts-and-accessories
natural_image
Line drawing of a mechanical device with a handle and lever (no text or symbols)Focus mode: e.g if the appliance is asking for the filling level.
Előmelegítés
natural_image
Illustration of a hand pressing down on a small container with an arrow, next to a kitchen appliance (no text or symbols visible)natural_image
Illustration of a hand holding a cooking pot with a black arrow pointing to the lid (no text or symbols)natural_image
Illustration of a cooking pot being heated by a kitchen appliance (no text or symbols visible)natural_image
Illustration of a hand pressing down on a device with an arrow indicating process (no text or symbols)natural_image
Green square icon with white cooking utensils and the word 'PHILIPS' below (no other text or symbols)NutriU
natural_image
Diagram showing two electrical plug connections with arrows indicating direction (no text or symbols)natural_image
Diagram showing two electrical plug connections with arrows indicating direction (no text or symbols)natural_image
Illustration of a hand pressing down on a container with an arrow, next to a computer monitor (no text or symbols present)natural_image
Illustration of a hand using a digital kitchen tool to press or install a container with a black arrow (no text or symbols visible)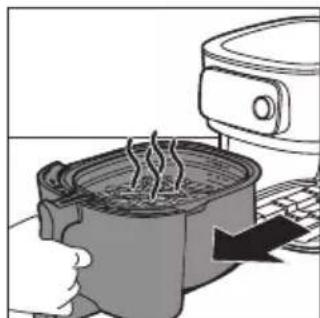
natural_image
Illustration of a cooking pot with steam rising, next to a kitchen appliance (no text or symbols)
natural_image
Illustration of a hand using a cooking pot to press or spread food from a microwave oven (no text or symbols visible)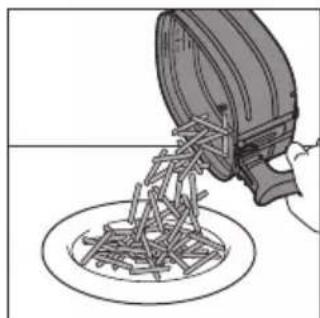
natural_image
Illustration of a mechanical device pouring material into a circular plate (no text or symbols)natural_image
Line drawing of two hands holding a flat object, no text or symbols presentnatural_image
Hand holding a thin wire with a rectangular object attached, no text or symbols visiblenatural_image
Illustration of a hand holding a small rectangular object with a wavy line, no text or symbols presentnatural_image
Diagram of a spiral-patterned object with a tool inserted, no text or symbols presentnatural_image
Illustration of a kitchen sink with shower, plate, cup, and dish (no text or symbols)natural_image
Line drawing of a hand cleaning a kitchen air fryer with a cloth (no text or symbols)natural_image
Line drawing of a kitchen appliance with a circular component inserted, showing hands and a mesh handle (no text or symbols)natural_image
Line drawing of a hand using a portable device to press or install a keyboard (no text or symbols visible)
HD9958

www.philips.com/parts-and-accessories
natural_image
Line drawing of a mechanical device with a clip and handle (no text or symbols)natural_image
Illustration of a hand pressing a button into a container with a black arrow, next to a microwave oven (no text or symbols)natural_image
Illustration of a hand inserting a cooking pot into a microwave oven with a mounted device (no text or symbols visible)natural_image
Illustration of a hand using a cooking pot to press down a baking pan, with a refrigerator and keyboard nearby (no text or symbols)natural_image
Illustration of a hand inserting a device into a container with an arrow, next to a computer monitor (no text or symbols present)natural_image
Diagram showing a car plug inserted into a socket and connected to a plug outlet, with arrows indicating direction (no text or symbols present)natural_image
Diagram showing two electrical plug connections with arrows indicating direction (no text or symbols)natural_image
Illustration of a kitchen appliance with a grater and a refrigerator (no text or symbols)natural_image
Illustration of a hand pressing down on a container with an arrow indicating process (no text or symbols)6 Schuif de lade terug in de Airfryer.
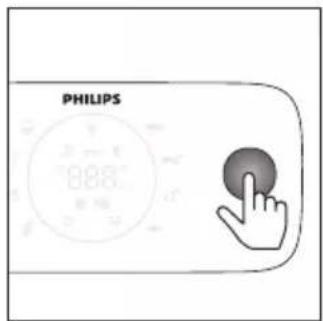
natural_image
Illustration of a cooking pot with steam rising, next to a kitchen appliance (no text or symbols)natural_image
Illustration of a hand using a cooking pot to press or install a baking pan, with a refrigerator and keyboard nearby (no text or symbols)natural_image
Illustration of a hand pouring liquid into a circular container with a magnifying glass (no text or symbols)natural_image
Illustration of two hands holding a rounded object, possibly a biological or anatomical structure (no text or symbols)natural_image
Hand holding a thin wire with a rectangular object attached, no text or symbols visible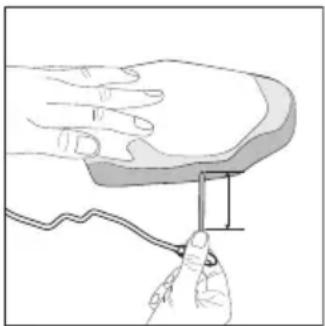
natural_image
Illustration of a hand holding a small rectangular object with a wavy line, no text or symbols presentnatural_image
Diagram of a spiral object being cut with a tool, no text or symbols presentnatural_image
Illustration of a kitchen appliance with showerware and utensils (no text or symbols)natural_image
Line drawing of a hand cleaning a kitchen appliance with a cloth (no text or symbols)natural_image
Line drawing of a robotic device with a circular sensor and mechanical components (no text or symbols)natural_image
Line drawing of a kitchen appliance with a hand inserting a bag into the drawer (no text or symbols)https://www.philips.com.
Airfryer HD9875 er utstyrt med en Wi-Fi-modul, 2,4 GHz 802.11 b/g/n med en maksimal utgangseffekt på 92,9 mW EIRP.

HD9958

www.philips.com/parts-and-accessories
natural_image
Line drawing of a mechanical device with a handle and lever (no text or symbols)natural_image
Illustration of a kitchen appliance with a grater and a refrigerator (no text or symbols)natural_image
Illustration of a hand using a cooking pan to lift a steamer (no text or symbols visible)natural_image
Illustration of a hand pressing down on a cooking pot with a downward arrow, next to a kitchen appliance (no text or symbols)4 Sett kurven i pannen.
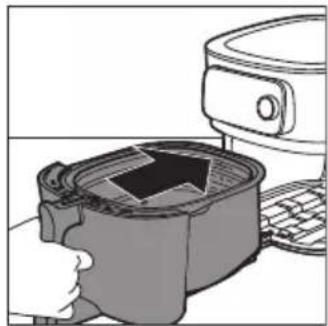
natural_image
Illustration of a hand pressing down on a device with a black arrow symbol (no text or labels)natural_image
Diagram showing two electrical plug connections with arrows indicating direction (no text or symbols)natural_image
Diagram showing two connected electrical plugs with arrows indicating direction of connection (no text or symbols)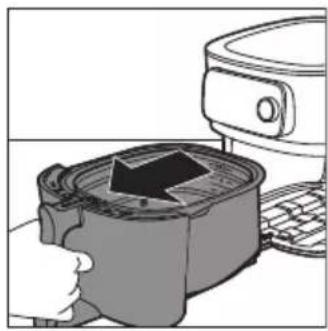
natural_image
Illustration of a hand pressing down on a device with a black arrow, next to a microwave oven (no text or symbols)natural_image
Illustration of a hand pressing down on a container with an arrow indicating process (no text or symbols)Merk: Du må aldri fylle kurven over MAX-merket, da det kan påvirke kvaliteten på sluttresultatet.
6 Skyv skuffen tilbake i Airfryer.
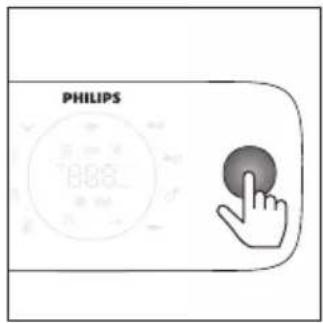

natural_image
Illustration of a steaming hot pot with a digital kitchen appliance nearby (no text or symbols)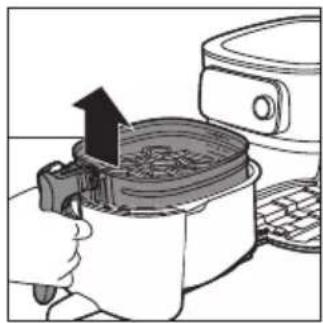
natural_image
Illustration of a cooking pot being placed on an electric stove, with a hand holding the lid (no text or symbols visible)natural_image
Illustration of a hand pouring liquid into a circular container (no text or symbols)natural_image
Line drawing of two hands holding a flat object, no text or symbols presentAdvarsel: Enden på mattermometeret er spiss.
natural_image
Hand holding a cable with a rectangular object inserted, no text or symbols visiblenatural_image
Illustration of a hand holding a small object with a ruler, no text or symbols presentnatural_image
Diagram of a spiral-patterned object being processed with a tool, no text or symbols present2 Hvis du lager maten med et Auto-Cook-program og blir spurt om tykkelsen på maten, angir du en verdi mellom 1 og 6 i NutriU-appen.
natural_image
Illustration of a kitchen sink with showerware and dish (no text or symbols)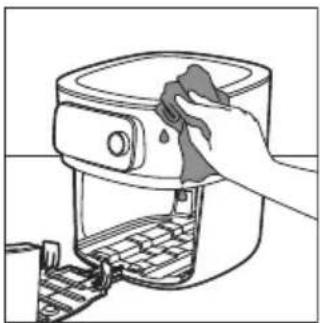
natural_image
Line drawing of a hand cleaning a kitchen appliance with a cloth (no text or symbols)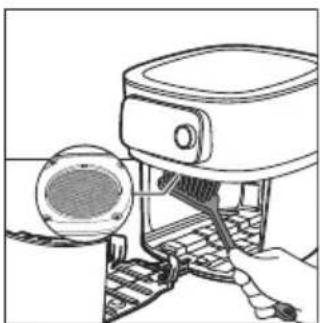
natural_image
Line drawing of a hand using a cleaning tool to clean or install a component, with no visible text or symbols.natural_image
Line drawing of a person using a food grater (no text or symbols)
HD9958
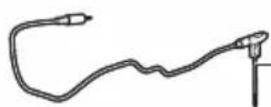
www.philips.com/parts-and-accessories
natural_image
Line drawing of a mechanical component with a spring attached (no text or symbols)Focus mode: e.g if the appliance is asking for the filling level.
natural_image
Illustration of a hand pressing down on a small container with an arrow indicating flow or movement (no text or symbols)natural_image
Illustration of a hand using a cooking pan to press an airfoil, with a mounted upward arrow indicating the process (no text or symbols present)natural_image
Illustration of a hand using an air fryer to press down a pan, with a kitchen appliance visible nearby (no text or symbols)natural_image
Illustration of a microwave oven with a lid removed from a container (no text or symbols)
natural_image
Green square icon with white cooking utensils and steaming bowl, labeled 'PHILIPS' below (no other text or symbols)NutriU
natural_image
Diagram showing a plug inserted into a socket and outlet, with arrows indicating direction (no text or symbols)natural_image
Diagram showing two electrical plug connections with arrows indicating direction (no text or symbols)natural_image
Illustration of a kitchen appliance with a grater and a refrigerator (no text or symbols)natural_image
Illustration of a hand pressing down on a container with an arrow indicating pressure or flow (no text or symbols)natural_image
Illustration of a hand using a grater to press or steam from a kitchen appliance (no text or symbols visible)natural_image
Illustration of a cooking pot being placed with an upward arrow, next to a toaster (no text or symbols)natural_image
Illustration of a hand pouring liquid into a container with a magnifying glass (no text or symbols)natural_image
Illustration of two hands holding a rounded object, possibly a bone or abstract form (no text or symbols)natural_image
Hand holding a thin wire with a rectangular object inside, no text or symbols visible
natural_image
Illustration of a hand holding a small object with a curved line, no text or symbols presentnatural_image
Diagram of a spiral-patterned object with a tool inserted, no text or symbols presentnatural_image
Illustration of a kitchen sink with showerware and food items (no text or symbols)natural_image
Line drawing of a hand cleaning a kitchen appliance with a cloth (no text or symbols)natural_image
Line drawing of a kitchen appliance with a circular component inserted, showing a handle and keyboard (no text or symbols)natural_image
Line drawing of a hand using a food grater to press or install a tray (no text or symbols)
HD9958

www.philips.com/parts-and-accessories
natural_image
Line drawing of a mechanical device with a clip and handle (no text or symbols)natural_image
Illustration of a hand pressing down on a small container with an arrow indicating flow or movement (no text or symbols)1 Abra a gaveta puxando a pega.
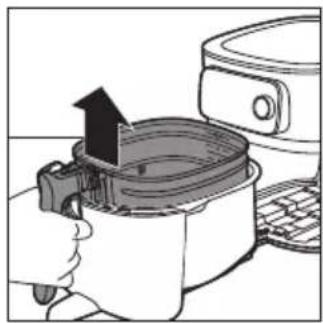
natural_image
Illustration of a hand using a cooking pot to press or install a baking pan, with a kitchen appliance visible nearby (no text or symbols)2 Retire o cesto levantando a pega.

natural_image
Illustration of a hand using a cooking pan to lift a baking pan, with a refrigerator nearby (no text or symbols)natural_image
Illustration of a hand pressing down on a microwave oven with a lid removed (no text or symbols)

natural_image
Diagram showing two electrical plug connections with arrows indicating direction (no text or symbols)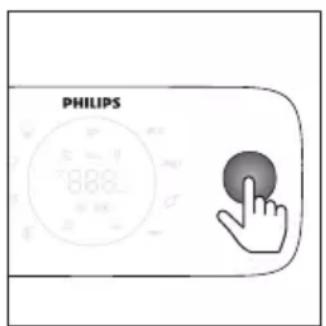
natural_image
Diagram showing two electrical plug connections with arrows indicating direction (no text or symbols)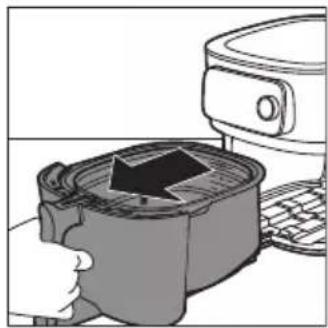
natural_image
Illustration of a hand inserting a device into a container with a black arrow (no text or symbols)
natural_image
Illustration of a hand pressing down on a container with a device above it (no text or symbols visible)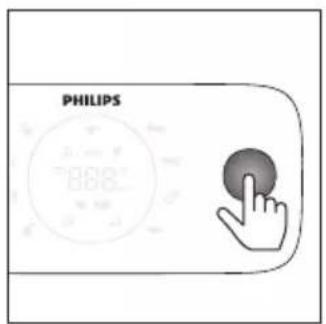
natural_image
Illustration of a hand using a steaming pot to press or steam from a kitchen appliance (no text or symbols)natural_image
Illustration of a cooking process showing a hand pressing a pan with an upward arrow (no text or symbols)natural_image
Illustration of a hand pouring liquid into a container with a magnifying glass (no text or symbols)natural_image
Line drawing of two hands holding a rounded object, no text or symbols presentnatural_image
Hand holding a small rectangular object with a curved line above, resembling a device or component (no text or symbols visible)natural_image
Illustration of a hand holding a small object with a curved line, no text or symbols presentnatural_image
Diagram of a spiral-patterned object with a protruding rod extending upward (no text or symbols)1 Coloque o termómetro alimentar junto aos alimentos e verifique qual a marca que alcança a parte superior dos alimentos.
natural_image
Illustration of a kitchen appliance with shower, plate, cup, and food items (no text or symbols)
natural_image
Line drawing of a hand cleaning a kitchen appliance with a cloth (no text or symbols)
natural_image
Line drawing of a mechanical device with a circular component inserted, showing internal components and a base mechanism (no text or symbols)natural_image
Line drawing of a person using a portable food machine (no text or symbols)
HD9958

www.philips.com/parts-and-accessories
natural_image
Line drawing of a mechanical device with a clip and handle (no text or symbols)Focus mode: e.g if the appliance is asking for the filling level.
Preîncălzire
natural_image
Illustration of a hand pressing a cooking pot with an arrow indicating the process (no text or symbols present)natural_image
Illustration of a hand using a cooking pot to lift a steamer (no text or symbols visible)natural_image
Illustration of a hand using a cooking pan to lift a baking pan, with a refrigerator nearby (no text or symbols)natural_image
Illustration of a hand pressing down on a microwave oven with a lid removed (no text or symbols)
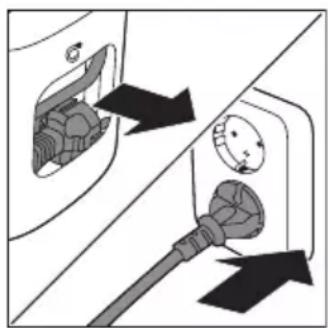
natural_image
Diagram showing two electrical plug connections with arrows indicating direction (no text or symbols)
natural_image
Diagram showing two electrical plug connections with arrows indicating direction (no text or symbols)
natural_image
Illustration of a hand pressing a square oven with a black arrow indicating the process (no text or symbols present)natural_image
Illustration of a hand using a digital kitchen tool to press or install a container with a rising arrow (no text or symbols present)
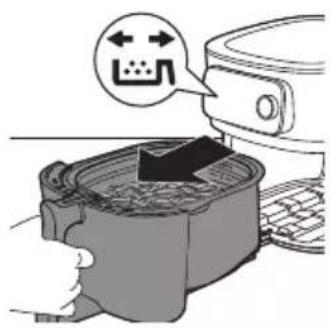

natural_image
Illustration of a cooking pot with steam rising, next to a microwave oven (no text or symbols)
natural_image
Illustration of a cooking process showing a hand pressing a pan with an upward arrow, next to a microwave oven (no text or symbols)natural_image
Illustration of a hand pouring liquid into a circular container with mechanical components (no text or symbols)natural_image
Line drawing of two hands holding a rounded rectangular object, no text or symbols presentnatural_image
Hand holding a thin wire with a rectangular object inside, no text or symbols visiblenatural_image
Illustration of a hand holding a small object with a wavy line, no text or symbols presentnatural_image
Diagram of a spiral-patterned object being processed with a tool, no text or symbols presentnatural_image
Illustration of a kitchen sink with shower, plate, cup, and dish (no text or symbols)
natural_image
Line drawing of a hand cleaning a kitchen appliance with a cloth (no text or symbols)natural_image
Line drawing of a hand using a device to interact with a circular component (no text or symbols)natural_image
Line drawing of a person using a portable food grater (no text or symbols)
HD9958

www.philips.com/parts-and-accessories
natural_image
Line drawing of a mechanical component with a handle and lever (no text or symbols)Focus mode: e.g if the appliance is asking for the filling level.
Ngrohja paraprake
natural_image
Illustration of a kitchen appliance with a hand pressing a pan, showing a black arrow indicating the process (no text or symbols present)natural_image
Illustration of a hand using a cooking pot to press an airfoil, with a refrigerator nearby (no text or symbols)2 Hiqni koshin duke ngritur dorezën.
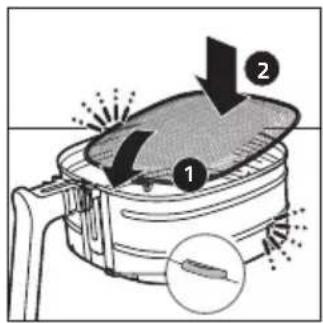
natural_image
Illustration of a hand using an air fryer to press down a pan, with a refrigerator and keyboard visible (no text or symbols)natural_image
Illustration of a hand pressing down on a computer monitor with a handle (no text or symbols visible)Çiftoni Airfryer-in me aplikacionin NutriU
natural_image
Green square icon with white cooking pot and steaming bowl, labeled 'PHILIPS' below (no other text or symbols)NutriU
natural_image
Diagram showing two connected electrical outlets with arrows indicating connection points (no text or symbols present)natural_image
Diagram showing a car plug inserted into a socket and connected to an outlet, with arrows indicating direction (no text or symbols)natural_image
Illustration of a kitchen appliance with a pot and a side mirror (no text or symbols)natural_image
Illustration of a hand pressing down on a container with an arrow indicating process (no text or symbols)
natural_image
Illustration of a hand using a steaming pot to press or steam from a kitchen appliance (no text or symbols visible)natural_image
Illustration of a cooking pot being placed with an upward arrow, next to a microwave oven (no text or symbols)natural_image
Illustration of a hand pouring liquid into a container with a magnifying glass (no text or symbols)natural_image
Illustration of two hands holding a small, textured object (no text or symbols)natural_image
Hand holding a thin wire with a rectangular object attached to it, no text or symbols visible
natural_image
Illustration of a hand holding a small object with a ruler, no text or symbols presentnatural_image
Diagram of a spiral-patterned object with a tool inserted, no text or symbols presentnatural_image
Illustration of a kitchen sink with laundry items including a plate, cup, and dish (no text or symbols)natural_image
Line drawing of a hand cleaning a kitchen appliance with a cloth (no text or symbols)natural_image
Line drawing of a mechanical device with a circular component inserted, showing internal components and a base mechanism (no text or symbols)natural_image
Line drawing of a kitchen appliance with a keyboard and a bag attached (no text or symbols)
HD9958

www.philips.com/parts-and-accessories
natural_image
Line drawing of a mechanical device with a handle and lever (no text or symbols)Focus mode: e.g if the appliance is asking for the filling level.
Predgretje
natural_image
Illustration of a hand pressing down on a small container with an arrow, next to a microwave oven (no text or symbols)natural_image
Illustration of a hand using a microwave oven to press or install a refrigerator (no text or symbols visible)2 Odstranite košaro tako, da dvignete ročaj.
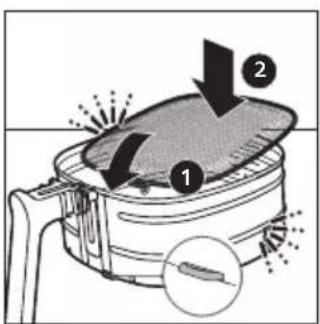
natural_image
Illustration of a hand using a cooking pot to press down a lid, with a refrigerator and keyboard nearby (no text or symbols)4 Položite košaro v posodo.
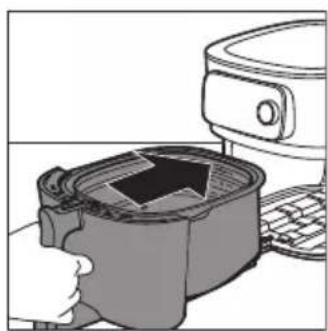
natural_image
Illustration of a microwave oven with a lid removed from a sink (no text or symbols)5 Z držanjem za ročaj potisnite predal nazaj v Airfryer.
natural_image
Diagram showing two electrical plug connections with arrows indicating direction (no text or symbols)4 Aparat priključite v električno omrežje.
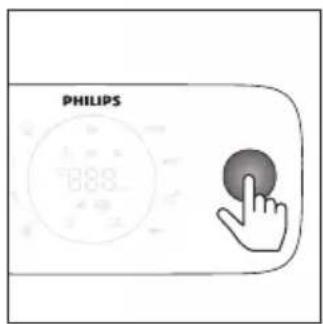
5 Aparat vklopite tako, da pritisnete vrtljivi gumb.
natural_image
Diagram showing two electrical plug connections with arrows indicating direction (no text or symbols)
natural_image
Illustration of a hand pressing a cup into a microwave oven with a paper airplane flying (no text or symbols)natural_image
Illustration of a hand using a computer to press a container with a downward arrow (no text or symbols)

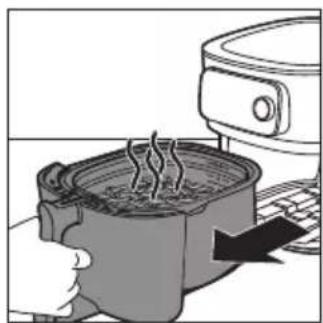
natural_image
Illustration of a hand using a steaming pot to press down a kitchen appliance (no text or symbols visible)6 Predal potisnite nazaj v Airfryer.
natural_image
Illustration of a cooking pot being placed on a keyboard with an upward arrow indicating the process (no text or symbols present)natural_image
Illustration of a hand pouring liquid into a circular container (no text or symbols)natural_image
Line drawing of two hands holding a rounded object, no text or symbols presentnatural_image
Hand holding a small rectangular object above a curved surface, no text or symbols visiblenatural_image
Illustration of a hand holding a small object with a ruler inserted, no text or symbols presentnatural_image
Diagram of a spiral-patterned object being processed with a tool, no text or symbols presentOpomba: Ta funkcija je na voljo samo, će uporabljate aplikacijo NutriU in zaženete program za samodejno pripravo jedi iz nje.
natural_image
Illustration of a kitchen sink with shower, plate, cup, and dish (no text or symbols)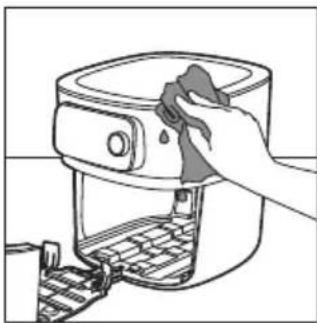
natural_image
Line drawing of a hand cleaning a food appliance with a cloth (no text or symbols)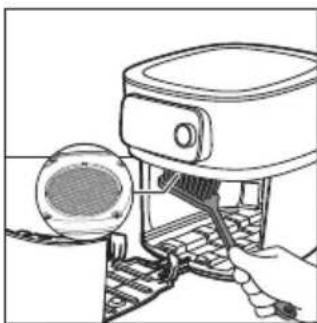
natural_image
Line drawing of a hand using a microwave oven to interact with a circular component (no text or symbols)natural_image
Line drawing of a person using a food grater (no text or symbols present)5 Predal in notranjost aparata očistite z vročo vodo in gladko gobico.
 |  |  | |
 |  |  |  |
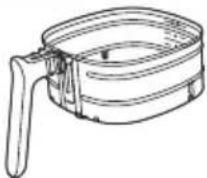 |  |  |  |
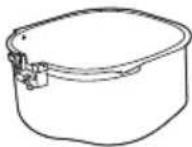 |  |  |  |
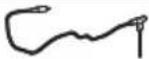 HD9958 HD9958 |  |  |  |
Shranjevanje
1 Aparat izključite iz električnega omrežja in ga pustite, da se ohladi.
2 Pred shranjevanjem poskrbite, da so vsi deli čisti in suhi.
3 Kabel vstavite v prostor za shranjevanje kabla.

HD9958

www.philips.com/parts-and-accessories
natural_image
Line drawing of a mechanical component with a handle and lever (no text or symbols)Focus mode: e.g if the appliance is asking for the filling level.
Predhrievanie
natural_image
Illustration of a hand pressing down on a mechanical component with a black arrow indicating direction (no text or symbols)1 Potiahnite rukovät a otvorte zásuvku.
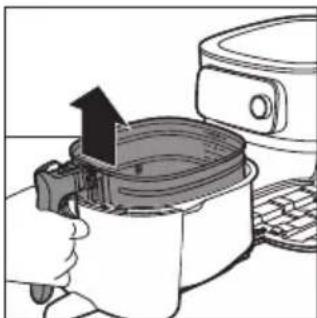
natural_image
Illustration of a hand using a cooking pot to lift a lid, with a kitchen appliance nearby (no text or symbols)2 Zdvihnite rukovät a košík vyberte.

natural_image
Illustration of a hand using a cooking pot to add liquid into a microwave oven, with a refrigerator visible in the background (no text or symbols)4 Košík vložte do nádoby.

natural_image
Illustration of a hand inserting a device into a container with an arrow (no text or symbols)5 Zásuvku zatlačte spät pomocou rukoväti do fritézy Airfryer.
Spárovanie fritézy Airfryer s aplikáciou NutriU
natural_image
Diagram showing a car plug inserted into a socket, with arrows indicating direction of insertion or disassembly (no text or symbols present)natural_image
Diagram showing a plug inserted into a socket with arrows indicating direction (no text or symbols)
natural_image
Illustration of a kitchen appliance with a lid and keyboard, showing a hand pressing down (no text or symbols)4 Potiahnite rukovät a otvorte zásuvku.
5 Suroviny vložte do košíka.
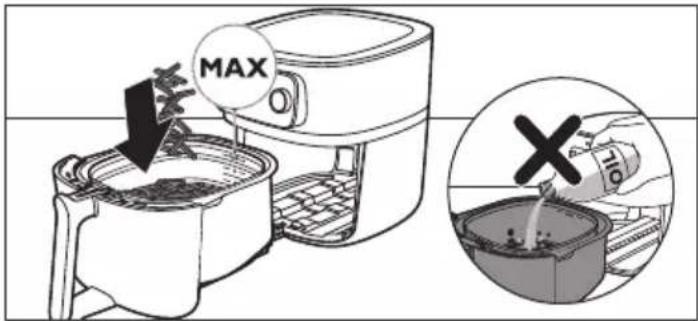
natural_image
Illustration of a kitchen appliance being processed with a griddle (no text or symbols visible)6 Zásuvku zasuňte do fritézy Airfryer.
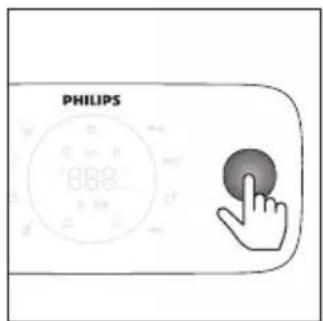
natural_image
Illustration of a hand holding a cooking pot with steam rising, next to a kitchen appliance (no text or symbols)natural_image
Illustration of a cooking pot being heated by an air fryer, with a hand holding the lid (no text or symbols visible)natural_image
Illustration of a hand pouring a cylindrical container into a circular tank (no text or symbols)natural_image
Line drawing of two hands holding a rounded object, no text or symbols presentnatural_image
Hand holding a small rectangular object above a curved surface, no text or symbols visible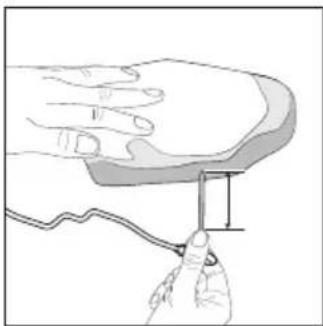
natural_image
Illustration of a hand holding a small object with a ruler, no text or symbols presentnatural_image
Diagram of a spiral object being processed with a tool, no text or symbols presentnatural_image
Illustration of a kitchen sink with laundry and food items (no text or symbols)natural_image
Line drawing of a hand cleaning a mounted air fryer with a cloth (no text or symbols)natural_image
Line drawing of a hand using a device to interact with a circular component (no text or symbols)natural_image
Line drawing of a person using a portable device with a lid (no text or symbols)
HD9958

www.philips.com/parts-and-accessories
1 Kontrolna tabla
2 Fioka
3 Indikator nivoa napunjenosti
4 Korpa sa uklonjivim mrežastim dnom
5 Posuda
6 Termometar za hranu (HD9958, prodaje se odvojeno)
7 Pregrada za odlaganje kabla
8 Otvor za izlaz vazduha
9 Ulazni otvor za vazduh
10 Uklonjivo mrežasto dno
11 Štitnik protiv prskanja
Pregled kontrolne table
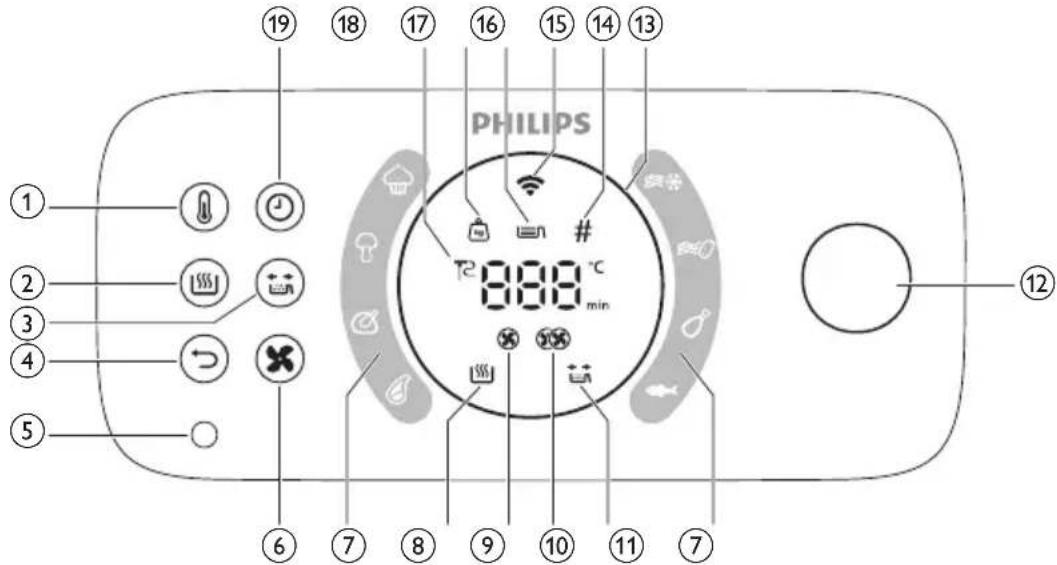
1 Dugme za temperaturu
2 Dugme za održavanje temperature
3 Dugme podsetnika za protresanje
4 Dugme za povratak
5 Priključak za termometar za hranu
6 Dugme za brzinu protoka vazduha
7 Automatski programi za kuvanje
8 Indikator održavanja temperature
9 Indikator male brzine protoka vazduha
10 Indikator velike brzine protoka vazduha
11 Indikator podsetnika za protresanje
12 Točkić
13 Osvetljeni prsten
14 Indikator komada
15 Wi-Fi indikator
16 Indikator nivoa napunjenosti
17 Indikatori težine
18 Indikator termometra za hranu
19 Dugme za vreme
Opisi funkcija
natural_image
Line drawing of a mechanical device with a handle and lever (no text or symbols)Termometar za hranu koji se prodaje odvojeno možete da koristite kako biste postigli željeni nivo pripremljenosti hrane.
Jedan kraj termometra za hranu stavite u hranu, a drugi kraj u ležište za termometar za hranu (pogledajte poglavlje „Termometar za hranu“).
Vreme kuvanja
U režimu kuvanja „Ručno kuvanje“, vreme kuvanja možete da podesite između 1 i 180 minuta.
U režimu „Automatski programi za kuvanje“, nema potrebe da podesite vreme kuvanje zato što automatski program kuvanja priprema hranu na osnovu veličine porcije ili željenog nivoa pripremljenosti.
Focus mode: e.g if the appliance is asking for the filling level.
Zagrevanje
Airfryer ima funkciju zagrevanja koju možete da koristite da biste Airfryer zagrejali na željenu temperaturu.
natural_image
Illustration of a hand pressing down on a device with a black arrow indicating motion (no text or symbols)natural_image
Illustration of a hand using a microwave oven to press a refrigerator (no text or symbols visible)3 Umetnite uklonjivo mrežasto dno u otvor sa desne strane korpe. Gurnite mrežasto dno nadole dok ne legne na mesto („klik“ sa obe strane).
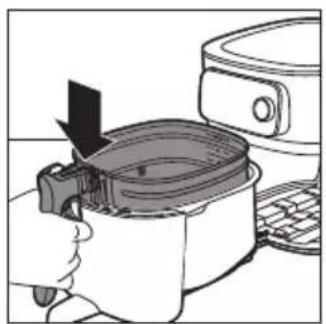
natural_image
Illustration of a hand using an air fryer to press down a pan, with a refrigerator and keyboard visible (no text or symbols)4 Stavite korpu u posudu.

natural_image
Illustration of a hand pressing down on a computer monitor with a handle (no text or symbols visible)5 Držite fioku za ručku i vratite je u Airfryer.
Napomena: Nikada nemojte da koristite posudu bez korpe.
natural_image
Green square icon with white cooking pot and steaming bowl, labeled 'PHILIPS' below (no other text or symbols)NutriU
2 Pokrenite aplikaciju Philips NutriU na pametnom telefonu.
3 Pratite uputstva na ekranu dok ne budete došli do stranice „Podešavanje aparata“.
natural_image
Diagram showing a car plug inserted into a socket, with arrows indicating direction of insertion or disassembly (no text or symbols present)natural_image
Diagram showing two electrical plug connections with arrows indicating direction (no text or symbols)natural_image
Illustration of a kitchen appliance with a lid and keyboard, showing a hand holding the lid (no text or symbols present)natural_image
Illustration of a hand pressing down on a container with an arrow indicating process (no text or symbols)6 Vratite fioku u Airfryer.

natural_image
Illustration of a cooking pot with steam rising, next to a microwave oven (no text or symbols)12 Otvorite fioku tako što ćete povući ručku i proverite da li su namirnice pripremljene.
Napomena: Ako niste postigli željeni nivo pripremljenosti hrane, možete da dodate dodatno vreme tako što ćete pritisnuti dugme za vreme i podesiti vreme. Pritisnite točkić da biste pokrenuli kuvanje još nekoliko minuta.
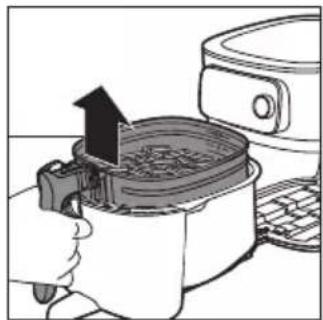
natural_image
Illustration of a hand using a cooking pot to press or install a tray, with no visible text or symbols.13 Da biste uklonili manje namirnice (npr., pomfrit), izvadite korpu iz posude držeći je za dršku.
Oprez: Nakon završetka procesa kuvanja, vrući su posuda, korpa, unutrašnjost kućišta i namirnice. U zavisnosti od vrste namirnica u aparatu Airfryer, para može da izlazi iz posude.
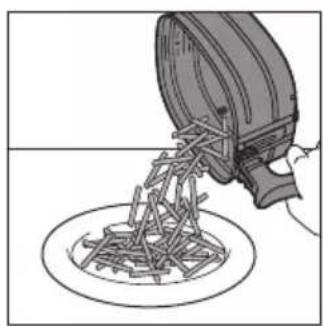
natural_image
Illustration of a hand pouring liquid into a circular container with a lid (no text or symbols)natural_image
Illustration of two hands holding a rounded object, possibly a brain or anatomical structure (no text or symbols)Oprez: Vrh termometra za hranu je špicast.
Napomena: Proverite da li je vrh termometra umetnut direktno u sredinu najdebljeg dela hrane i da nije nagnut prema donjem ili gornjem delu.
Napomena: Proverite da li je termometar blizu kosti, ali da je ne dodiruje, kao i da li je dalje od masnoće i hrskavice.
Napomena: Najdeblji deo fileta možda nije sredina. Važno je da vrh termometra bude u najdebljem delu radi postizanja željenih rezultata.
natural_image
Hand holding a thin wire with a rectangular object attached to it, against a curved background (no text or symbols)Pratite donje korake da biste sondu naveli u sredinu hrane.
1 Uhvatite metalnu šipku termometra i pronadite vrh sredine hrane.
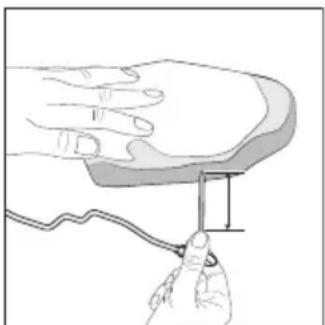
natural_image
Illustration of a hand holding a small object with a ruler, no text or symbols present2 Držite prste tamo gde ste uhvatili i umetnite sondu u sredinu najdebljeg dela hrane.
natural_image
Diagram of a spiral object being cut with a tool, no text or symbols present2 Podesite vrednost od 1 do 6 kada dobijete pitanje o debljini, ako koristite automatski program za kuvanje u aplikaciji NutriU.
natural_image
Illustration of a kitchen sink with laundry items including a plate, cup, dish, and pot (no text or symbols)vrućom vodom i deterdžentom za sudove, upotrebite tečno sredstvo za uklanjanje masnoće.
Koristan savet: Po potrebi, masne ostatke koji su se zalepili za štitnik protiv prskanja možete da uklonite sunderom ili četkom.
Koristan savet: Stavite korpu u posudu, pa ih postavite naopako kada ih perete u mašini za sudove kako biste uštedeli prostor.
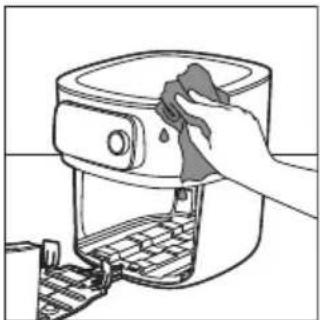
natural_image
Line drawing of a hand cleaning a kitchen appliance with a cloth (no text or symbols)3 Spoljašnji deo aparata obrišite vlažnom krpom. Uverite se da na upravljačkoj ploči nema zaostale vlage. Osušite upravljačku ploču krpom nakon što je očistite.

natural_image
Line drawing of a robotic device with a sensor and mechanical components (no text or symbols)4 Očistite štitnik protiv prskanja sunderom ili četkom za čišćenje kako biste uklonili masne ostatke.
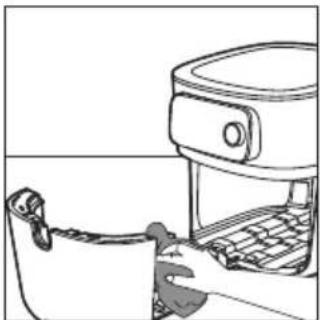
natural_image
Line drawing of a hand inserting a device into a rack (no text or symbols)5 Očistite fioku i unutrašnjost aparata vrućom vodom i neabrazivnim sunderom.
 |  |  | |
 | √ | √ | × |
 |  |  |  |
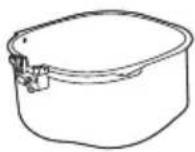 |  |  |  |
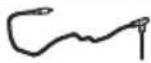 HD9958 HD9958 |  |  |  |
Odlaganje
1 Isključite aparat iz električne mreže i ostavite ga da se ohladi.
2 Uverite se da su svi delovi čisti i suvi pre odlaganja.
3 Kabl stavite u pregradu za odlaganje.
Napomena: Airfryer uvek držite horizontalno kada ga nosite. Uverite se da takođe pridržavate fioku sa prednje strane aparata jer može da isklizne iz aparata ako se slučajno nagne nadole. To može da dovede do oštećenja fioke.
Napomena: Uvek proverite da li su uklonjivi delovi aparata Airfryer, npr. uklonjivo mrežasto dno itd. fiksirani pre nošenja i/ili odlaganja.
Rešavanje problema
U ovom poglavlju ukratko su navedeni najčešći problemi do kojih može da dođe sa aparatom. Ako ne uspete da rešite problem pomoću informacija navedenih u nastavku, posetite www.philips.com/support da biste pronašli listu najčešćih pitanja ili se obratite centru za korisničku podršku u svojoj zemlji.

HD9958
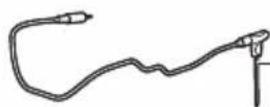
www.philips.com/parts-and-accessories
natural_image
Line drawing of a mechanical device with a handle and lever (no text or symbols)natural_image
Illustration of a hand pressing down on a cooking pot with a lid, next to a toaster (no text or symbols)natural_image
Illustration of a hand using a cooking pot to press or lift a grater, with a kitchen appliance visible nearby (no text or symbols)2 Poista paistokori nostamalla kahvasta.

natural_image
Illustration of a cooking step showing a pan being inserted into a microwave oven with a downward arrow indicating the process (no text or symbols present)natural_image
Illustration of a kitchen appliance with a pot and keyboard, no text or symbols presentnatural_image
Diagram showing two electrical plug connections with arrows indicating direction (no text or symbols)natural_image
Illustration of a hand pressing down on a cooking pot with a kitchen appliance (no text or symbols visible)
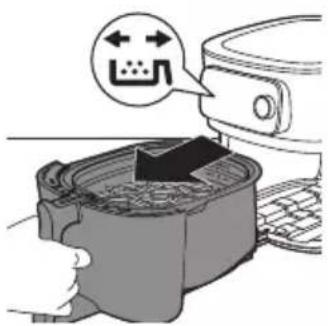
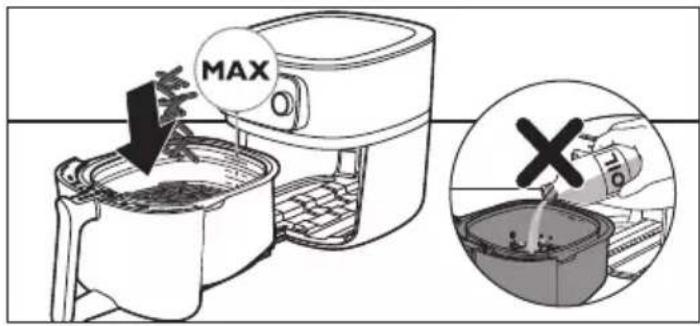
natural_image
Illustration of a hand holding a pot with steam rising, next to a kitchen appliance (no text or symbols)natural_image
Illustration of a cooking pot being heated by an air fryer, with a hand holding the lid (no text or symbols visible)natural_image
Illustration of a hand pouring a cylindrical container into a circular tank (no text or symbols)natural_image
Simple line drawing of two hands holding a rounded object, no text or symbols presentnatural_image
Hand holding a small rectangular object above a curved surface, possibly a device or component (no text or symbols visible)natural_image
Illustration of a hand holding a small object with a ruler, no text or symbols presentnatural_image
Diagram of a spiral object being cut with a tool, no text or symbols presentnatural_image
Illustration of a kitchen sink with shower, plate, cup, and dish (no text or symbols)natural_image
Line drawing of a hand cleaning a kitchen air fryer with a cloth (no text or symbols)natural_image
Line drawing of a device with a speaker and keyboard, no text or symbols presentnatural_image
Line drawing of a hand inserting a device into a rack (no text or symbols)
HD9958

www.philips.com/parts-and-accessories
natural_image
Line drawing of a mechanical device with a handle and lever (no text or symbols)natural_image
Illustration of a hand pressing down on a small container with an arrow, next to a microwave oven (no text or symbols)natural_image
Illustration of a hand holding a cooking pot with an upward arrow, next to a kitchen appliance (no text or symbols)natural_image
Illustration of a hand using a cooking pot to press down a pan, with a kitchen appliance visible nearby (no text or symbols)4 Placera korgen i pannan.
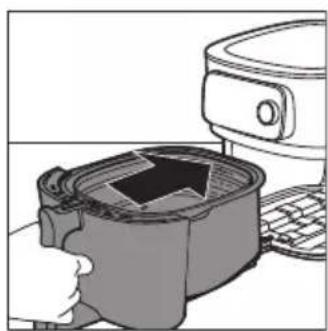
natural_image
Illustration of a microwave oven with a lid and front-mounted top (no text or symbols)Parkoppla Airfryern med NutriU-appen
natural_image
Diagram showing two electrical plug connections with arrows indicating direction (no text or symbols)natural_image
Diagram showing two connected electrical plugs with arrows indicating direction of connection (no text or symbols)
natural_image
Illustration of a hand pressing down a container with an arrow, next to a kitchen appliance (no text or symbols)natural_image
Illustration of a hand pressing down on a container with an arrow indicating process (no text or symbols)
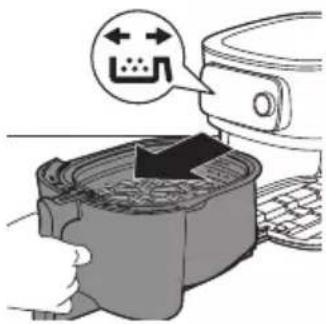
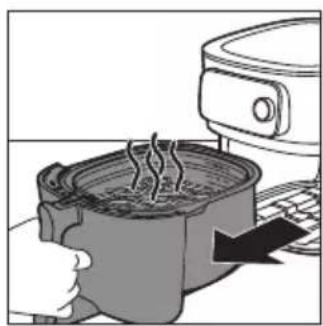
natural_image
Illustration of a hand using a portable kitchen to press a steaming pot (no text or symbols visible)natural_image
Illustration of a cooking pot being placed with an upward arrow, next to a microwave oven (no text or symbols)13 Om du vill ta ur mindre ingredienser (t.ex. pommes frites) kan du lyfta ut korgen ur pannan med handtaget.
natural_image
Illustration of a hand pouring liquid into a circular container (no text or symbols)natural_image
Line drawing of two hands holding a rounded object, no text or symbols presentnatural_image
Hand holding a cable with a rectangular object inserted, no text or symbols visiblenatural_image
Illustration of a hand holding a small object with a ruler, no text or symbols presentnatural_image
Diagram of a spiral-patterned object being processed with a tool, no text or symbols presentnatural_image
Illustration of a kitchen sink with shower, plate, cup, and dish (no text or symbols)natural_image
Line drawing of a hand cleaning a kitchen appliance with a cloth (no text or symbols)natural_image
Line drawing of a mechanical device with a circular component inserted, showing internal components and a handle (no text or symbols)natural_image
Line drawing of a kitchen appliance with a hand operating the counter (no text or symbols)https://www.philips.com.

HD9958

www.philips.com/parts-and-accessories
natural_image
Line drawing of a mechanical device with a handle and lever (no text or symbols)natural_image
Illustration of a hand pressing down on a small container with an arrow, next to a kitchen appliance (no text or symbols)natural_image
Illustration of a hand holding a cooking pot with an upward arrow, next to a refrigerator (no text or symbols)natural_image
Illustration of a hand using a cooking pot to press down a lid, with a refrigerator and keyboard nearby (no text or symbols)natural_image
Illustration of a microwave oven with a lid removed from a sink (no text or symbols)natural_image
Diagram showing two electrical plug connections with arrows indicating direction (no text or symbols)natural_image
Diagram showing two electrical plug connections with arrows indicating direction (no text or symbols)
natural_image
Illustration of a hand pressing down on a container with a black arrow, next to a computer monitor (no text or symbols visible)natural_image
Illustration of a hand pressing down on a device with a black arrow indicating compression (no text or symbols present)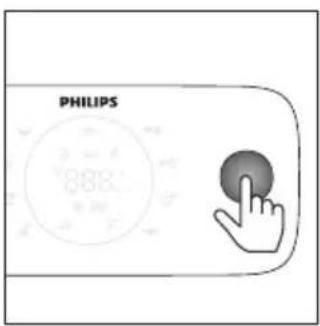
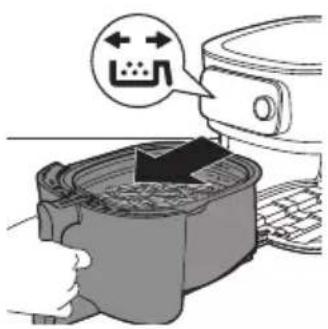
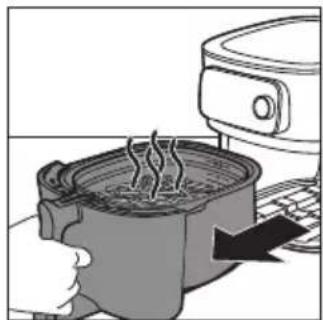
natural_image
Illustration of a cooking pot with steam rising, next to a kitchen appliance (no text or symbols)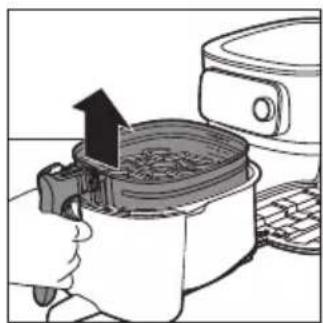
natural_image
Illustration of a cooking step showing a hand pressing a pan with an upward arrow, next to a toaster (no text or symbols)natural_image
Illustration of a hand pouring liquid into a circular container (no text or symbols)natural_image
Line drawing of two hands holding a flat object, no text or symbols presentnatural_image
Hand holding a cable with a rectangular object inserted, no text or symbols visiblenatural_image
Illustration of a hand holding a small object with a ruler, no text or symbols presentnatural_image
Diagram of a spiral-patterned object being processed with a tool, no text or symbols presentnatural_image
Illustration of a kitchen sink with shower, plate, cup, and dish (no text or symbols)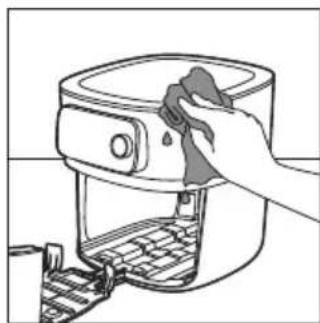
natural_image
Line drawing of a hand cleaning a food appliance with a cloth (no text or symbols)
natural_image
Line drawing of a hand operating a mechanical device with a circular component inserted (no text or symbols)natural_image
Line drawing of a person using a food grater (no text or symbols present)
HD9958
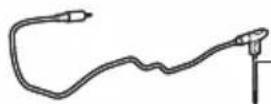
www.philips.com/parts-and-accessories
natural_image
Line drawing of a mechanical device with a spring attached to a bracket (no text or symbols)natural_image
Illustration of a hand inserting a device into a container with an arrow, next to a microwave oven (no text or symbols)natural_image
Illustration of a hand pressing a cooking pot with an upward arrow, next to a kitchen appliance (no text or symbols)natural_image
Illustration of a hand using a cooking pan to press or adjust a baking pan (no text or symbols visible)natural_image
Illustration of a hand inserting into a container with an arrow, next to a kitchen appliance (no text or symbols)
natural_image
Green square icon with white cooking utensils and steam, labeled 'PHILIPS' below (no other text or symbols)NutriU
natural_image
Diagram showing two electrical plug connections with arrows indicating direction (no text or symbols)natural_image
Diagram showing a plug inserted into a socket with arrows indicating direction (no text or symbols)natural_image
Illustration of a hand pressing a container with an arrow, next to a computer monitor (no text or symbols visible)natural_image
Illustration of a hand pressing down on a container with an arrow indicating process (no text or symbols)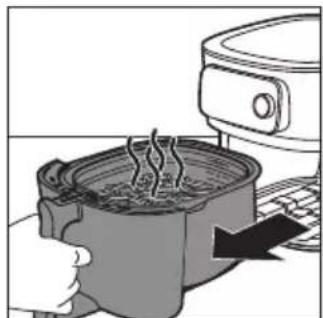
natural_image
Illustration of a cooking pot with steam rising, next to a kitchen appliance (no text or symbols)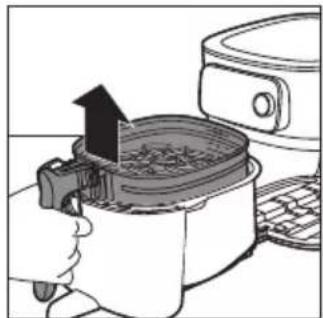
natural_image
Illustration of a cooking pot being placed on a grater with an upward arrow indicating heating (no text or symbols)natural_image
Illustration of a hand pouring liquid into a circular container with mechanical components (no text or symbols)natural_image
Illustration of two hands holding a rounded object with a small hole, no text or symbols presentnatural_image
Hand holding a cable with a rectangular object inserted into it, no text or symbols visiblenatural_image
Illustration of a hand holding a small object with a ruler, no text or symbols presentnatural_image
Diagram of a spiral object being cut with a tool, no text or symbols presentnatural_image
Illustration of a kitchen sink with shower, plate, cup, and dish (no text or symbols)natural_image
Line drawing of a hand cleaning a kitchen appliance with a cloth (no text or symbols)natural_image
Line drawing of a device with a speaker and keyboard, no text or symbols presentnatural_image
Line drawing of a kitchen appliance with a hand inserting a bag into the front pan (no text or symbols)
HD9958

www.philips.com/parts-and-accessories
natural_image
Line drawing of a mechanical device with a handle and lever (no text or symbols)Focus mode: e.g if the appliance is asking for the filling level.
natural_image
Illustration of a kitchen appliance with a lid and side panel, showing a hand pressing down on the lid (no text or symbols)natural_image
Illustration of a hand using a griddle to press a cooking pan, next to a refrigerator (no text or symbols visible)natural_image
Illustration of a hand using an air fryer to press down a pan, with a refrigerator nearby (no text or symbols)natural_image
Illustration of a kitchen appliance with a lid removed from it, showing a hand inserting into a container (no text or symbols present)natural_image
Green square icon with white cooking utensils and steaming bowl, labeled 'PHILIPS' below (no other text or symbols)NutriU
natural_image
Diagram showing a plug inserted into a socket with arrows indicating direction (no text or symbols)natural_image
Diagram showing two electrical plug connections with arrows indicating direction (no text or symbols)natural_image
Illustration of a hand pressing down on a container with an arrow, next to a computer monitor (no text or symbols present)natural_image
Illustration of a hand using a digital kitchen to press a container with a black arrow (no text or symbols)natural_image
Illustration of a hand using a portable stove to press or steam from a kitchen appliance (no text or symbols visible)natural_image
Illustration of a cooking step with an upward arrow on a steamer (no text or symbols)natural_image
Illustration of a hand pouring liquid into a container with a magnifying glass (no text or symbols)natural_image
Line drawing of two hands holding a rounded object, no text or symbols presentnatural_image
Hand holding a thin wire with a rectangular object inside, no text or symbols visible
natural_image
Illustration of a hand holding a small object with a wavy line, no text or symbols present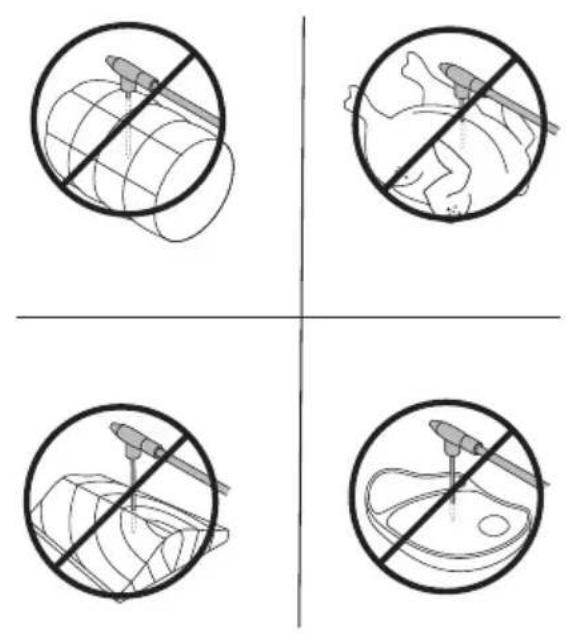
natural_image
Four-panel diagram showing a globe with a tool crossed out, and three cross-sections of a fish inside a bowl, all without any text or symbols.natural_image
Diagram of a mechanical device interacting with a spiral-patterned object (no text or symbols)natural_image
Illustration of a kitchen sink with shower, plate, cup, and dish (no text or symbols)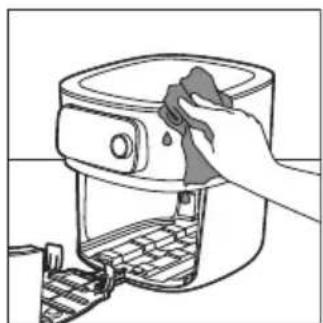
natural_image
Line drawing of a hand cleaning a kitchen air fryer with a cloth (no text or symbols)natural_image
Line drawing of a hand operating a portable device with a circular component inserted (no text or symbols)natural_image
Line drawing of a hand inserting a device into a rack (no text or symbols)
HD9958

www.philips.com/parts-and-accessories
natural_image
Line drawing of a mechanical device with a handle and lever (no text or symbols)Focus mode: e.g if the appliance is asking for the filling level.
Претходно загревање
natural_image
Illustration of a kitchen appliance with a lid and side panel, showing a hand pressing down (no text or symbols)natural_image
Illustration of a hand pressing a pan with an arrow indicating the process (no text or symbols present)natural_image
Illustration of a hand using an air fryer to press down a pan, with a refrigerator nearby (no text or symbols)natural_image
Illustration of a hand inserting a bag into a microwave oven (no text or symbols)natural_image
Green square icon with white cooking utensils and steaming bowl, labeled 'PHILIPS' below (no other text or symbols)NutriU
natural_image
Diagram showing two electrical plug connections with arrows indicating direction (no text or symbols)natural_image
Diagram showing two electrical plug connections with arrows indicating direction (no text or symbols)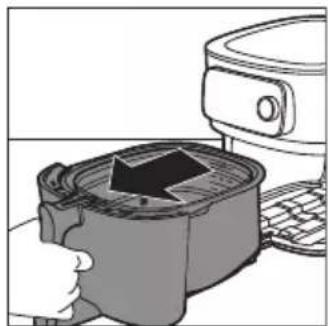
natural_image
Illustration of a hand pressing down on a gridded container with a black arrow, next to a kitchen appliance (no text or symbols visible)
natural_image
Illustration of a hand pressing down on a device with a black arrow indicating motion (no text or symbols)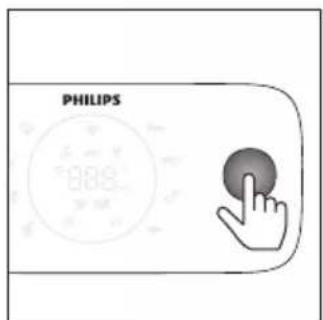
natural_image
Illustration of a cooking pot with steam rising from a microwave, next to a kitchen appliance (no text or symbols)natural_image
Illustration of a cooking pot being heated by an air fryer, with a refrigerator nearby (no text or symbols)natural_image
Diagram of a hand pouring liquid into a container with a mechanical component (no text or symbols)natural_image
Simple line drawing of two hands holding a rounded object, no text or symbols presentnatural_image
Hand holding a cable with a rectangular object inserted into it, no text or symbols visiblenatural_image
Illustration of a hand holding a small object with a wavy line, no text or symbols presentnatural_image
Diagram of a spiral-patterned object with a central rod inserted, no text or symbols presentnatural_image
Illustration of a kitchen sink with shower, plate, cup, and dish (no text or symbols)natural_image
Line drawing of a hand cleaning a kitchen appliance with a cloth (no text or symbols)natural_image
Line drawing of a kitchen appliance with a side panel and handle (no text or symbols)natural_image
Line drawing of a hand inserting a device into a rack (no text or symbols)
HD9958

www.philips.com/parts-and-accessories
natural_image
Line drawing of a mechanical device with a clip and handle (no text or symbols)Focus mode: e.g if the appliance is asking for the filling level.
natural_image
Illustration of a kitchen appliance with a hand pressing down on a tray (no text or symbols visible)natural_image
Illustration of a cooking pot being placed on a keyboard with an upward arrow indicating the process (no text or symbols present)natural_image
Illustration of a hand using a cooking pot to lift a baking pan, with a kitchen appliance nearby (no text or symbols)natural_image
Illustration of a hand inserting a device into a container with an arrow (no text or symbols)

natural_image
Diagram showing two electrical plug connections with arrows indicating direction (no text or symbols)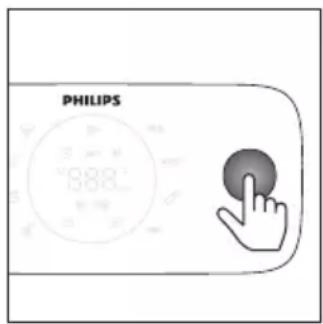
natural_image
Diagram showing two electrical plug connections with arrows indicating direction (no text or symbols)
natural_image
Illustration of a hand pressing down on a container with an arrow, next to a microwave oven (no text or symbols)natural_image
Illustration of a hand pressing down on a container with an arrow indicating process (no text or symbols present)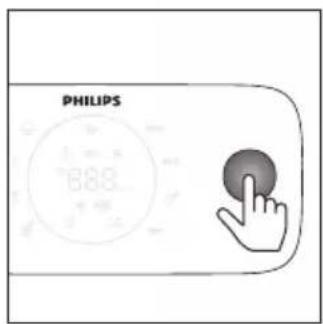
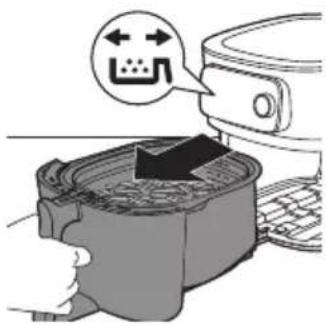

natural_image
Illustration of a cooking pot with steam rising, next to a kitchen appliance (no text or symbols)natural_image
Illustration of a cooking pot being placed with an upward arrow, next to a kitchen appliance (no text or symbols)natural_image
Illustration of a hand pouring a container into a circular plate (no text or symbols)natural_image
Line drawing of two hands holding a rounded object, no text or symbols presentnatural_image
Hand holding a cable with a rectangular object inserted into it, no text or symbols visiblenatural_image
Illustration of hands holding a small object with a wavy line, no text or symbols presentnatural_image
Six-panel grid showing food preparation methods: slicing meat, boiling pan, serving fish, and cutting flat (no text or symbols)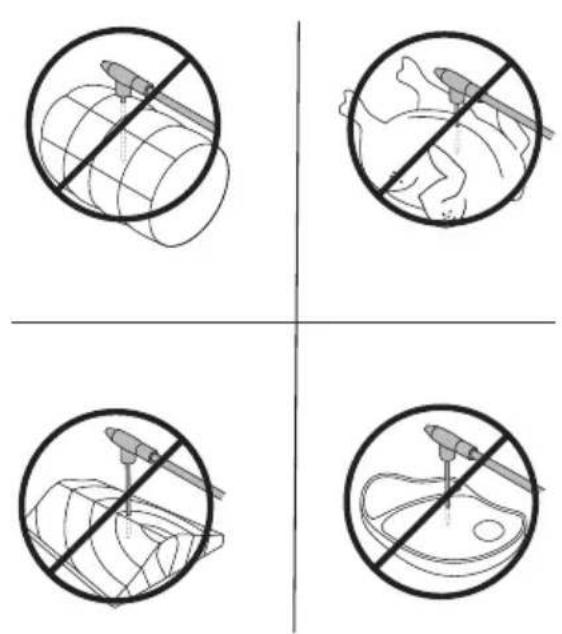
natural_image
Diagram of a spiral mechanical component with a tool inserted, no text or symbols presentnatural_image
Illustration of kitchen appliances including a shower, plate, cup, and dish (no text or symbols)
natural_image
Line drawing of a hand cleaning a kitchen air fryer with a cloth (no text or symbols)natural_image
Line drawing of a mechanical device with a circular component and a handle, no text or symbols presentnatural_image
Line drawing of a kitchen appliance with a handle and lid (no text or symbols)PHILIPS and the Philips Shield Emblem are registered trademarks of Koninklijke Philips N.V. and are used under license.
This product has been manufactured by and is sold under the responsibility of Versuni Holding B.V., and Versuni Holding B.V. is the warrantor in relation to this product.
(10/2023)