M15W - To scan AVERMEDIA - Free user manual and instructions
Find the device manual for free M15W AVERMEDIA in PDF.

| Product Type | Visualizer / Document Scanner |
| Brand | AVerMedia |
| Model | M15W |
| Sensor | 1/3.06 inch CMOS, 13 megapixels |
| Max Resolution | 4K (3840x2160) at 30 fps |
| Max Frame Rate | 60 fps (at 1080p) |
| Focus | Auto, manual, area (software) |
| Zoom | Up to 23x (digital) |
| Field of View | 426 x 313 mm at 330 mm distance |
| HDMI Output | 4K, 1080p, 720p |
| WiFi Connectivity | Yes, dual band 2.4/5 GHz, 802.11a/b/g/n/ac |
| Miracast | Yes |
| LED Light | Built-in |
| Microphone | Built-in |
| Ports | USB 2.0 Type-A (WiFi dongle), USB mini-B, DC 5V input |
| Power Supply | DC 5V/2A, 100-240V power adapter included |
| Power Consumption | 4 W (light on), 3.5 W (light off) |
| Dimensions (operating) | 518 x 84 x 351 mm (± 2 mm) |
| Weight | 0.68 kg |
| Package Contents | Power adapter, USB cable, warranty card, software CD, user manual |
| Software Features | Capture, annotation, recording, ePTZ, time-lapse, cloud |
| Safety | Do not expose to moisture, use correct voltage, do not drop |
| Maintenance | Clean with a soft, dry cloth |
| Spare Parts | Battery not user-replaceable |
Frequently Asked Questions - M15W AVERMEDIA
User questions about M15W AVERMEDIA
0 question about this device. Answer the ones you know or ask your own.
Ask a new question about this device
Download the instructions for your To scan in PDF format for free! Find your manual M15W - AVERMEDIA and take your electronic device back in hand. On this page are published all the documents necessary for the use of your device. M15W by AVERMEDIA.
USER MANUAL M15W AVERMEDIA
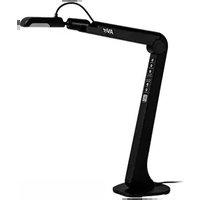
natural_image
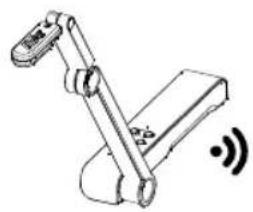
Line drawing of a robotic arm and a rectangular device labeled 'AVER' (no text or symbols on the device itself)M15W

The items below are included with this product. If any item is missing, contact the dealer from whom you purchased this product.
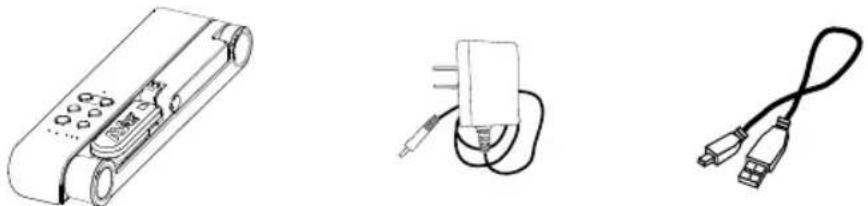
M15W unit Power adapter/ Power plug USB cable
Warranty card* Instruction manual Software CD**
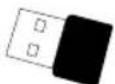
Wi-Fi Dongle (Optional)
*Only for Japan, Taiwan, and Europe
**Only for Japan and Europe
Optional Accessories

Carrying bag Anti-glare sheet
More Help
For FAQs, technical support, software and instruction manual download, please visit:
Global:
http://presentation.aver.com/download-center/
Technical Support:
https://aver.com/technical-support
Hardware Parts
text_image
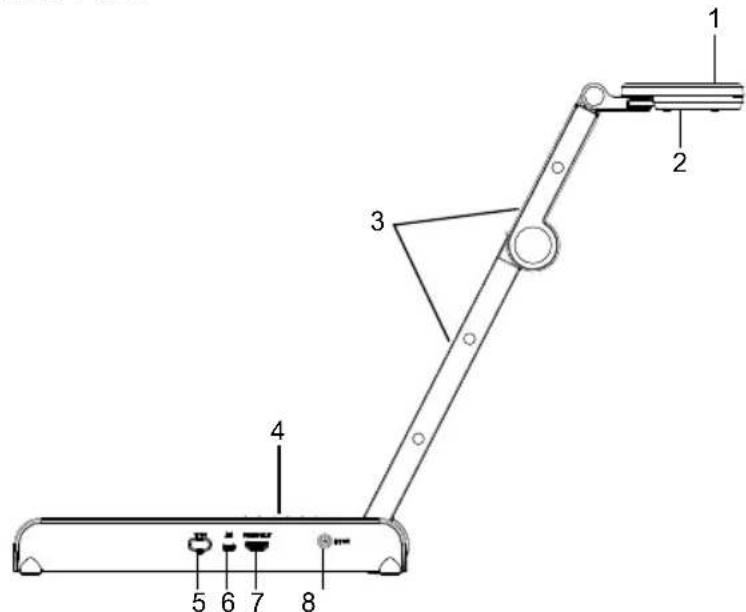
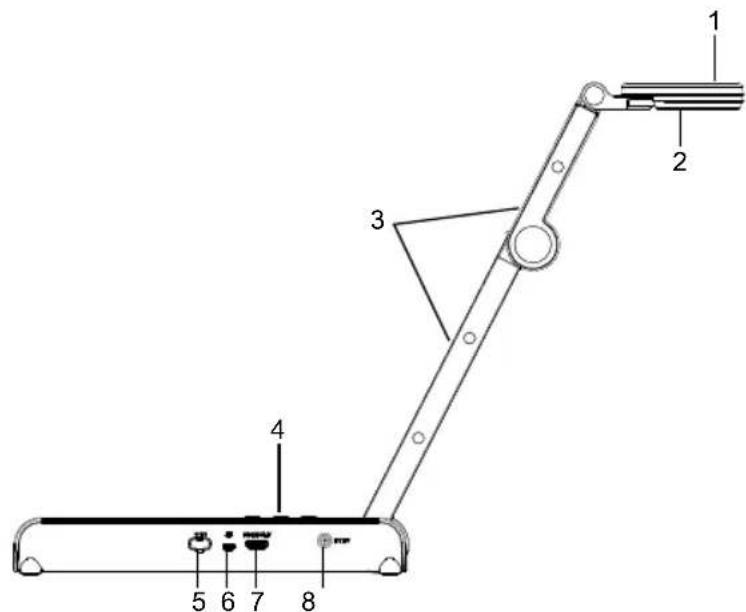
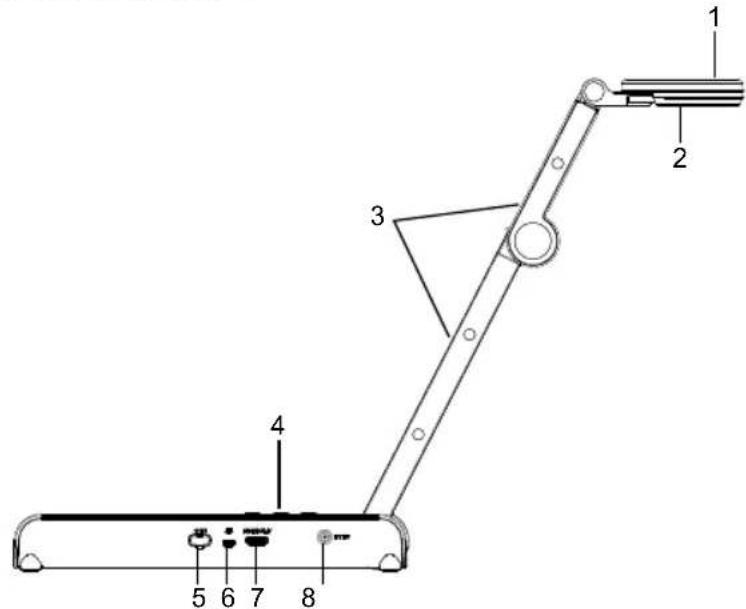
1 2 3 4 5 6 7 8| 1. Camera head 2. | LED lighting |
| 3. Arm 4. Control panel | |
| 5. Wi-Fi dongle 6. | USB port |
| 7. HDMI output 8. DC power jack |
Control Panel
text_image
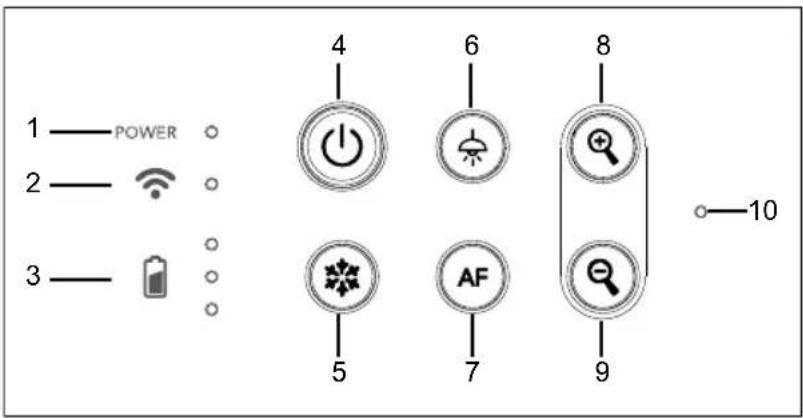
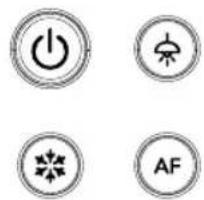
1 POWER 2 WiFi 3 4 6 8 5 7 9 10- Power indicator 6. Lamp(on/off)
- Wi-Fi indicator 7. Auto focus
- Battery indicator 8. Zoom in
- Power button 9. Zoom out
(on/off/standby*) 10. Built-in MIC - Freeze
* Standby mode is supported when power plugged in.
English-2
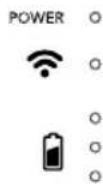
LED Indicator
| Power | Solid green: Power onNo light: Power offSolid red: Standby mode** Standby mode is supported when power plugged in. |
Wi-Fi | Solid blue: AP Mode Ready / STA connectedSlow flashing blue: Software connection with cameraShort flashing blue: Create AP mode / STA connectingSolid green: Miracast mode readySlow flashing green: Miracast streaming startQuick flashing green: Miracast device scan / connecting |
Battery | Solid green(x3): Battery is full(100% ~ 60%)Solid green(x2): Battery is 60% ~ 30%Solid green(x1): Battery is 30% ~ 5%Solid red (x1): Battery is 5% ~ 0%Flashing red (x1): Battery is out of powerSolid orange(x3): Battery is abnormal |
[Note]
The battery will be exhausted for long-term usage. Do not replace the battery yourself. Please contact your dealer.
Compound Key
Press and hold for 3 seconds to operate the compound key function.

MORE INFO / BATTERY
: Display system information and battery power status.

CAPTURE
: Snapshot the current screen image to software or cloud.
Press keys to operate the compound key function.
FACTORY RESET

RESOLUTION

MODE

: Back to factory default settings.
: Press to switch between following modes:
- Auto detects the best resolution(4K, 720P, 1080P)
- 1024x768 (If HDMI device support)
- 4K 60Hz (If HDMI device support)
:Press to switch between following modes:
- Normal: Adjust the gradient of image.
- Motion: Increase frame rate. Sufficient lighting is required when using this mode.
- High quality: Better image quality.
Device Connection
1
Plug in power adapter and turn on M15W.

text_image
Diagram showing connection between a device via USB cable, alongside a power rating and control buttons with icons.[Note]
■ Please fully charge the camera for the first time use.
■ When the camera is power on, the camera is in "Standby" mode. In standby mode, it can be charging with the USB connection between other devices; but the power supply is required 5V2A and the charging time will be longer.
■ The laptop, projector, or monitor cannot provide the power through the USB connection to the camera while the camera is operating.
■ When the camera is charging with the wall outlet, the battery indicator is in green flashing.
■ Press AF + 📞 to reboot when the camera doesn't work properly.
2
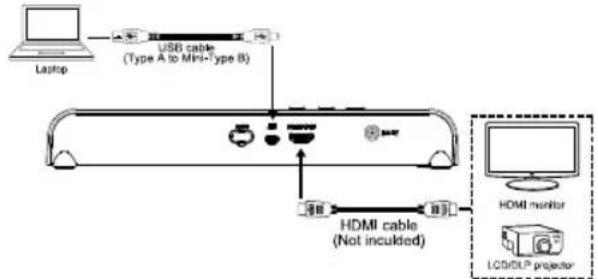
Connect M15W to laptop and HDMI display.
text_image
Laptop USB cable (Type A to Mini-Type B) HDMI cable (Not incuiled) HDMI monitor LCD/DLP projector[Note]
■ The Wi-Fi mode is on when the camera is powered up.
■ When camera connects to a laptop through the USB port, the Wi-Fi mode is disabled. Please follow the direction on HDMI device.
P2P connection via Wi-Fi Dongle(Optional)
1 Plug-in the WiFi dongle to PC/laptop and Install the AVerTouch application.
natural_image
Mechanical linkage device with sensor icon and signal waves (no text or symbols)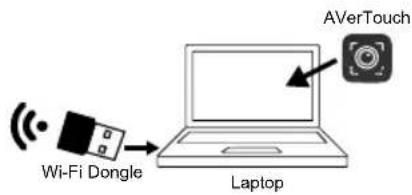
text_image
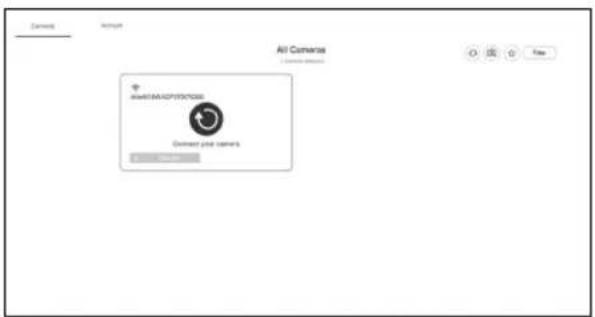
Wi-Fi Dongle Laptop AVerTouch2 Open AVerTouch application, click to connect the camera.
text_image
All Commands Send to MAIPY/07/2028 Send your command[Note] Check serial number at bottom of the camera to find your camera.
3 Click Next to continue.

text_image
AfterTouch You can change your user to access your own image OK Cancel Next4
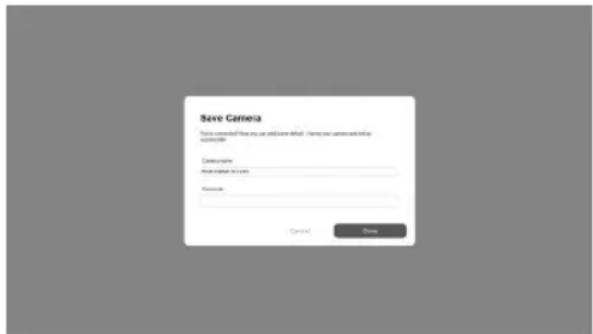
Entering the Camera Name and Passcode, click Done to continue.
text_image
Save Camera You can be saved if you can add some bullet. Have your camera and how apply to Camera name An image of this tool Photo. Cancel Save5
Click Done button to connect camera.
text_image
Start at 10:00 ✓ Take place it to get your home to get your home to get your home to get your home to get your home to get your home to get your home to get your home to get your home to get your home to get your home to get your home to get your home to get your home to get your home to get your home to get your home to get your home to get your home to get your home to get your home to get your home to get your home to get your home to get your home to get your house.[Note] It takes about 60 seconds to complete connection.
6
Select X can exit the live view page.
natural_image
Black-and-white photo of a dense, cloud-like organic material with no visible text or symbols[Note] When connecting is successful, you should see the live view of the camera.
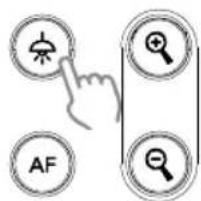
1
Power on the camera.
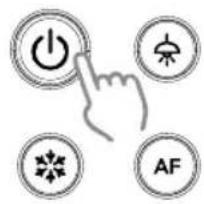
text_image
Diagram showing a hand pressing four circular icons with power, snowflake, leaf, and AF symbols, likely representing a control or automation interface.
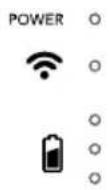
Check the Wi-Fi status – Blue light on.

natural_image
Four circular icons with basic symbols: power, snowflake, and AF (no text or labels)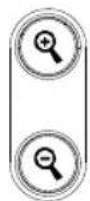
2
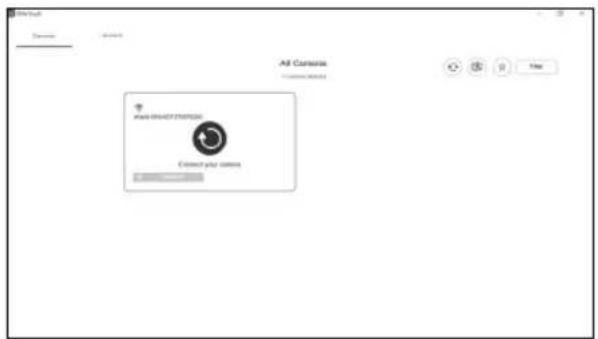
Open AVerTouch and follow on-screen instruction to enable Wi-Fi function on camera.
text_image
All Controls Add Capture Extension Connect your controls[Note]
■ The software will auto detect the camera on your network.
■ Select the camera that you want to connect with it.
■ The camera name will be "AVer 'model name' - WiFi dongle Mac address". The Mac address will be different from the device.
Wi-Fi Connection(Cont.)
3
Select to make a connection with camera.
![AVERMEDIA M15W - [Note] - 1](/content/2026/04/631601/images/6b9da10dadf1805c4979536265019f0af12216643a70f8b3f922acf742cf20b2.jpg)
text_image
All Currents Download Options Connect your cables4
Select to switch to camera live screen.
![AVERMEDIA M15W - [Note] - 2](/content/2026/04/631601/images/659572d52c556d89515ba75b711a03369947f754f9695eeb48fa9d16587715af.jpg)
text_image
All Cameras Control buttonsMiracast Connection
1
Press

to enter selection menu.

text_image
AF[Note]
■ Using ⬆ and ⬆ button to go to the selection and press
button to confirm the selection.
■ A commercial Miracast Dongle (Wireless Adapter) is required for the display device.
![AVERMEDIA M15W - [Note] - 1](/content/2026/04/631601/images/9af619df30b71fb0540aef2b02aa2dfab914c3624db2fa34d6705e789f11704d.jpg)
2
Select Wireless > Mode > Miracast to enable Miracast mode.
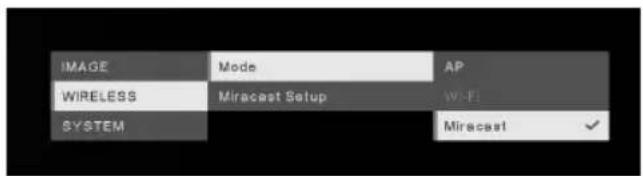
text_image
IMAGE Mode AP WIRELESS Miracast Setup W-FF SYSTEM Miracast ✓3
Select Miracast > display device.
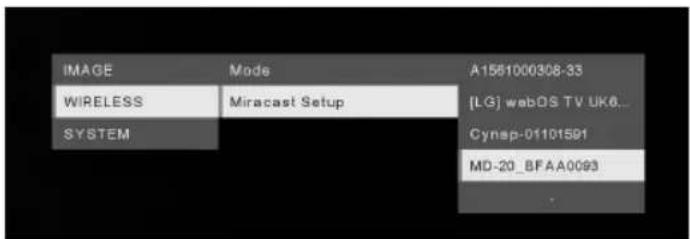
text_image
IMAGE Mode A1561000308-33 WIRELESS Miracast Setup [LG] webOS TV UK6... SYSTEM Cynsp-01101591 MD-20_BFAA0093[Note]
■ The detected display devices will be list out.
■ Press ( ) back to the menu.
■ The camera image will display on the display device's screen after connecting.
Using the Camera
Storage the Camera
![AVERMEDIA M15W - [Note] - 1](/content/2026/04/631601/images/90ac31685de900e42fc0e6d53357354ec64669e093b2c073dba139df5e5673b3.jpg)
Using the Camera (continue)
Using Angle of the Camera
![AVERMEDIA M15W - [Note] - 2](/content/2026/04/631601/images/96e0ad1d6ee7d3ce6e2e881b0020f10457dee0f34017e29cebcbce404191c5b0.jpg)
Mounting the Camera on a Flat Surface
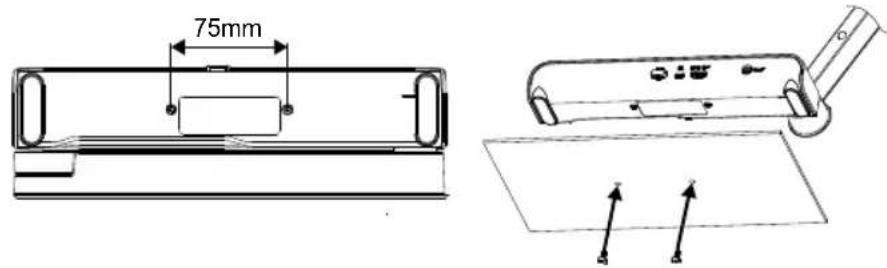
text_image
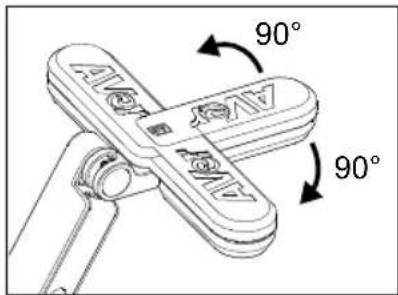
75mmRotate the Camera Head
Move the camera head as figure shown.
[CAUTIION] To avoid damage the camera head, hold the edge of the camera head to rotation the camera head.
text_image
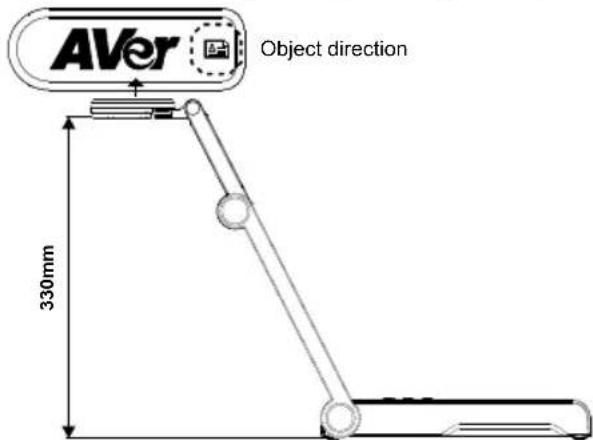
90° AVG AVG 90°Shooting Area
When camera position is 330mm high, the shooting area will be A3 size. Place the object as illustrate show, the object image is in positive direction.
text_image
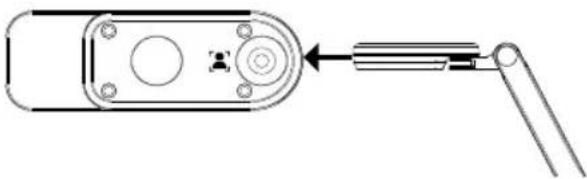
AVer Object direction 330mmImage Shooting Direction
To shoot people, adjust the camera lens as illustrate shown; the people image is in positive direction.
natural_image
Pure mechanical component diagram without any text, numbers, or symbolsEnglish-11
Specification
| Sensor 1/3.06" CMOS | |
| Pixel Count | 13 megapixels |
| Frame Rate | 60 fps (max.) |
| Image mode Normal | / High Frame / High Quality |
| Effect Rotate / Freeze | |
| HDMI Output 4K; 1080p 60Hz; 720p 60Hz | |
| Focusing Auto / Manual/ Area (SW) | |
| Shooting Area 426mm x313mm @ 330 mm | |
| Zooming Total 23X maximum | |
| Dual Mode AP / Station DHCP(Server/Client) | |
| WiFi Streaming 1080P@30fps, up to 4K@30fps | |
| Dual Band 5GHz/2.4GHz | |
| Miracast Yes | |
| Compatibility | 802.11a/b/g/n/ac (45 ft effective range) |
| Wireless Security | SUPPORT WEP, WPA/WPA2-PSK, WPA/WPA2-Enterprise* *EAP-PEAP, EAP-TLS |
| Power Source | DC5V/ 2A, AC 100-240V |
| Consumption | 4 Watts(lamp on) 3.5 Watts(lamp off) |
| Lamp Type | LED light |
| USB | USB2.0 Type-A(WiFi Dongle) USB Type mini-B x 1 |
| DC 5V Input | Power Jack |
| MIC | Built-in |
| Operating | 518mm(L)*84 mm(W)*351mm(H) (+/-2mm include rubber foot) |
| Folded | 280mm(L)*84mm(W)*42mm(H) (+/-2mm include rubber foot) |
| Weight 0.68 kg (about 1.5lbs) | |
| Software Supported | ePTZ Image/ Area capture Picture by Picture Timer Cloud library Recording Annotation |
NOTE: This equipment has been tested and found to comply with the limits for a Class A digital device, pursuant to part 15 of the FCC Rules. These limits are designed to provide reasonable protection against harmful interference when the equipment is operate in a commercial environment. This equipment generates, uses, and can radiate radiofrequency energy and, if not installed and used in accordance with the instruction manual, may cause harmful interference to radio communications. Operation of this equipment in a residential area is likely to cause harmful interference in which case the user will be required to correct the interference at his own expense.
FCC Caution: Any changes or modifications not expressly approved by the party responsible for compliance could void the user's authority to operate this equipment.
This device complies with part 15 of the FCC Rules.
Operation is subject to the following two conditions:
(1) This device may not cause harmful interference, and
(2) this device must accept any interference received, including interference that may cause undesired operation.
CE Class A
Warning:
This is a class A product. In a domestic environment this product may cause radio interference in which case the user may be required to take adequate measures.
NOTICE
SPECIFICATIONS ARE SUBJECT TO CHANGE WITHOUT PRIOR NOTICE. THE INFORMATION CONTAINED HEREIN IS TO BE CONSIDERED FOR REFERENCE ONLY.
COPYRIGHT
©2020 AVer Information Inc. All rights reserved.
TRADEMARKS
“AVer” is a trademark owned by AVer Information Inc. Other trademarks used herein for description purpose only belong to each of their companies.
CAUTION
Risk of Explosion if Battery is replaced by an Incorrect Type. Dispose of Used Batteries According to the Instructions.
DISCLAIMER
No warranty or representation, either expressed or implied, is made with respect to the contents of this documentation, its quality, performance, merchantability, or fitness for a particular purpose. Information presented in this documentation has been carefully checked for reliability; however, no responsibility is assumed for inaccuracies. The information contained in this documentation is subject to change without notice.
In no event will AVer be liable for direct, indirect, special, incidental, or consequential damages arising out of the use or inability to use this product or documentation, even if advised of the possibility of such damages.
WARNING
■ Do not drop the camera or subject it to physical shock.
■ Use the correct power supply voltage to avoid the damaging camera.
■ Do not place the camera where the cord can be stepped on as this may result in fraying or damage to the lead or the plug.
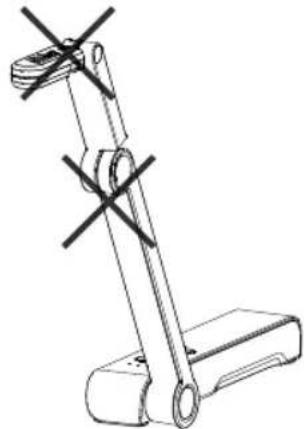
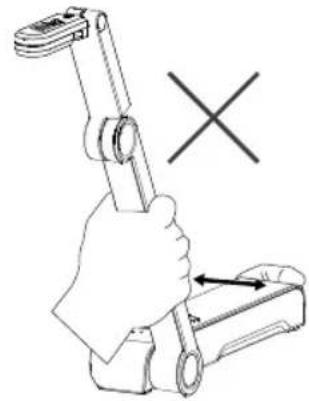
■ Do not pull the mechanical arm and camera part in the opposite direction.
natural_image
Technical line drawing of a mechanical support structure with no visible text or symbols■ To reduce the risk of fire or electric shock, do not expose this appliance to rain or moisture. Warranty will be void if any unauthorized modifications are done to the product.
■ Hold the bottom of the camera with both hands to move the camera. Do not grab the lens or Flexible arm to move the camera.
natural_image
Illustration of a hand holding a mechanical clamp or tool, with a cross symbol indicating no text or labels.RADIO FREQUENCY
FOR PORTABLE DEVICE USAGE (<20m from body/SAR needed eg. BT dongle, smartphone)
Radiation Exposure Statement:
The product comply with the FCC portable RF exposure limit set forth for an uncontrolled environment and are safe for intended operation as described in this manual. The further RF exposure reduction can be achieved if the product can be kept as far as possible from the user body or set the device to lower output power if such function is available.
FOR MOBILE DEVICE USAGE (>20cm/low power eg. AP routers)
Radiation Exposure Statement:
This equipment complies with FCC radiation exposure limits set forth for an uncontrolled environment. This equipment should be installed and operated with minimum distance 20cm between the radiator & your body.
RADIO FREQUENCY
Europe – EU Declaration of Conformity
This device complies with the essential requirements of the Radio Equipment Directive (2014/53/EU). The following test methods have been applied in order to prove presumption of conformity with the essential requirements of the Radio Equipment Directive (2014/53/EU)
THE MARK OF CROSSED-OUT WHEELED BIN INDICATES THAT THIS PRODUCT MUST NOT BE DISPOSED OF WITH YOUR OTHER HOUSEHOLD WASTE. INSTEAD, YOU NEED TO DISPOSE OF THE WASTE EQUIPMENT BY HANDING IT OVER TO A DESIGNATED COLLECTION POINT FOR THE RECYCLING OF WASTE ELECTRICAL AND ELECTRONIC EQUIPMENT. FOR MORE INFORMATION ABOUT WHERE TO DROP OFF YOUR WASTE EQUIPMENT FOR RECYCLING, PLEASE CONTACT YOUR HOUSEHOLD WASTE DISPOSAL SERVICE OR THE SHOP WHERE YOU PURCHASED THE PRODUCT.
CONTACT INFORMATION
Global
AVer Information Inc.
www.aver.com
8F, No.157, Da-An Rd., Tucheng Dist.,
New Taipei City
Taiwan
European Headquarters
AVer Information Europe B.V.
Westblaak 140, 3012KM, Rotterdam, Netherland
Tel: +31(0)10 7600 550
Technical support: EU.RMA@aver.com
内容包装物
text_image
Diagram showing network device connections with power, wireless, and control icons alongside a battery port[註]
natural_image
Microscopic view of a fibrous or cellular structure with no visible text or symbolstext_image
POWER Wireless Battery Power Power AF確認無線連線狀態為「藍燈恆亮」狀態。
![AVERMEDIA M15W - [註] - 1](/content/2026/04/631601/images/7796cdb7638b716219dcaa898bf17395f75c1ff2979e61949bf9eae9f884a2c0.jpg)
text_image
POWER Wireless Signal Battery Power Power Power AFtext_image
Scanned screenshot of a software interface with Chinese text, showing a login dialog box and file path input.4
選擇
切換到實務攝影機即時影像畫面。
![AVERMEDIA M15W - [註] - 2](/content/2026/04/631601/images/4ffdc992c459c9e933f498963a72466ff8ac890544ed469ae299bbc2be299b64.jpg)
natural_image
Technical line drawing of a mechanical device with two arrows indicating force or movement (no text or symbols present)繁體中文-25
旋轉鏡頭
natural_image
Technical line drawing of a mechanical component with a lever and adjustment knob (no text or symbols)規格
natural_image
Technical line drawing of a mechanical device with no visible text or symbols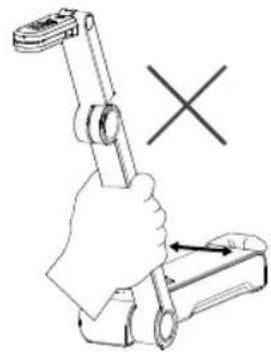
natural_image
Illustration of a hand holding a tool with a cross symbol indicating no change or error (no text or symbols present)免責聲明
natural_image
Technical line drawing of a mechanical component with no visible text or symbols
http://presentation.aver.com/download-center/
日本:
http://jp.aver.com/download-center
ハードウェア部位 名称
text_image
Technical diagram of a mechanical device with numbered components and labeled partstext_image
Diagram showing network device connections with labeled ports and icons, including a USB cable and power control buttons.[注意]
text_image
POWER Wireless Battery Power Power Power AFtext_image
POWER Wireless Power Battery Power Power AF2
natural_image
Technical line drawing of a handheld device with two arrows pointing to a blank sheet (no text or symbols)日本語-37
カメラを使用する(続き)
カメラヘッドの回転
図のようにカメラヘッドを動かします。
natural_image
Pure mechanical component diagram without any text, numbers, or symbols仕様
natural_image
Illustration of a hand holding a tool with a cross mark symbol (no text or labels)natural_image
Technical line drawing of a mechanical device with no visible text or symbolsnatural_image
Technical line drawing of a mechanical component with no visible text or symbolsM15W-Gerät
Netzadapter/Netzstecker
USB-Kabel

Garantiekarte*
Bedienungsanleitung
Software-CD**
WLAN-Dongle(Option)
http://presentation.aver.com/download-center/
text_image
Technical diagram of a mechanical device with numbered components and labeled partstext_image
Diagram showing wireless device ports and connected cables with power, network, and control icons[Hinweis]
natural_image
Technical line drawing of a mechanical device with no visible text or symbols![AVERMEDIA M15W - [Hinweis] - 1](/content/2026/04/631601/images/a0de60a032715018521e133822823432231cc6f437af4fb7cbc64f53edc9d5bb.jpg)
text_image
WLAN-Dongle Laptop AVerTouch2
text_image
Ase Kamera Harbin-SCOT/NEUTRAL Teholder As New Camera
text_image
AfterTouch By version 10.0.000000000000000000000000000000000000000000000000000000000000000000000000000000000000000000000000000 Appendix Finish4
text_image
Kamera speichern He entered into the name in the image. Please check up - before to the name and image document displayed. Name: Ameriprot of size Password: Konzerns Check5
text_image
www.essence.com ✓ Use of information to access a user account or a password, or further access to a link to a link between the account or a link to a link to a link to a link to a link to a link to a link to a link to a link to a link to a link to a link to a link to a link to a link to a link to a link to a link to a link to a link to a link to a link to a link to a link to a link to a link to a link to a link to a link to a link to a link to a link to a link to a link to an email address: 017-5328natural_image
Microscopic view of a fibrous or cellular structure with no visible text or symbolstext_image
POWER Wireless Signal Battery Power Power AFtext_image
POWER WiFi Power Power Power Power Power Power Power Power Power Power Power Power Power Power Power Power Power Power Power Power Power Power Power Power Power Power Power Power Power Power Power Power Power Power Power Power Power Power Power Power Power Power Power Power Power Power Power Power Power Power AF2
text_image
Ate Kamera Add to the AI Section Add to the User Camera[Hinweis]
text_image
Ade Software Add to: 0177777777777 Add to: 017777777777 Add to: 01777777777 Add to: 0177777777 Add to: 0177777777 Add to: 0177777777 Add to: 0177777777 Add to: 0177777777 Add to: 0177777777 Add to: 0177777777 + Add to: 017777777 + Add to: 017777777 + Add to: 017777777 + Add to: 017777777 + Add to: 01777777 + Add to: 01777 + Add to: 0177 + Add to: 017 + Add to: 01 + Add to: 01 + Add to: 01 + Add to: 01 + Add to: 01 + Add to: 01 + Add to: 01 + Add to: 01 + Add to: 01 + Add to: 01 + Add to: 01 + Add to: 01 + Add to: 01 + Addto: + Add to: + Add to: + Add to: + Add to: + Add to: + Add to: + Add to: + Add to: + Add to: + Add to: + Add to: + Add to: + Add to: + Add to: + Add to: + Add to: + Add to: + Add to: + Add to: + Add to: + Add to: + Add to: + Add to: + Add to: + Add to: + Add o + Add o + Add o + Add o + Add o + Add o + Add o + Add o + Add o + Add o + Add o + Add o + Add o + Add o + Add o + Add o + Add o + Add o + Add o + Add o + Add o + Add o + Add o + Add o + Add o + Add o4
■ A commercial Miracast Dongle (Wireless Adapter) is required for the display device.
2
natural_image
Technical line drawing of a mechanical device with two arrows indicating force or movement (no text or symbols present)Kamerakopf drehen
natural_image
Pure mechanical diagram showing a lever and handle without any text, numbers, or symbolsTechnische Daten
natural_image
Technical line drawing of a mechanical device with no visible text or symbolsnatural_image
Illustration of a hand using a tool to lift a cylindrical component, with an 'X' symbol indicating no text or labels.natural_image
Technical line drawing of a mechanical component with no visible text or symbolsAppareil M15W
http://presentation.aver.com/download-center/
Support Technique :
text_image
Technical diagram of a mechanical device with numbered components and labeled partstext_image
Diagram showing wireless device connections with labeled ports and power indicators[Remarque]
natural_image
Diagram of a mechanical device with a sensor signal icon (no text or symbols)![AVERMEDIA M15W - [Remarque] - 1](/content/2026/04/631601/images/800fd85c76cb08338164b9021084071cf0f4d8a36a3ad7d34494fdc4b62a7a3c.jpg)
text_image
Dongle Wi-Fi Ordinateur portable AVerTouch2
text_image
After Touch You have been your own customer's first, but it is already closed. Finish Finish4
text_image
Image showing a circular checkmark icon with text below it, likely indicating approval or completion status.natural_image
Microscopic view of a fibrous or cellular structure with no visible text or symbolstext_image
Diagram showing a hand pressing a button with four icons: power button, snowflake, flame, and alarm symbol.![AVERMEDIA M15W - [Remarque] - 2](/content/2026/04/631601/images/4254b65b582823983bf43d3b71bafcbc8ce0deb4ee2d1941af530e7cb79962be.jpg)
text_image
Turner to command 0 1 2 OK CancelConnexion Miracast
1
natural_image
Technical line drawing of a mechanical device with two arrows indicating movement or force (no text or symbols present)Français-64
natural_image
Pure mechanical component diagram without any text, numbers, or symbolsCaractéristiques
natural_image
Technical line drawing of a mechanical device with articulated arms and mounting base (no text or symbols)natural_image
Illustration of a hand holding a tool with a cross mark, no text or symbols presentnatural_image
Technical line drawing of a mechanical component with no visible text or symbolsUnidad M15W
http://presentation.aver.com/download-center/
Soporte técnico:
text_image
Diagram showing connections between a device and its power, wireless, and AF indicators with labeled ports and icons.[Nota]
natural_image
Simple line drawing of a mechanical device with a sensor icon and signal waves (no text or symbols)![AVERMEDIA M15W - [Nota] - 1](/content/2026/04/631601/images/b14e2393a4a0fa3df210534b34e4f92f5b1af6dc7dd8a5fe15d4e2ff51c4c8ff.jpg)
flowchart
graph LR
    A["Llave Wi-Fi"] --> B["Portátil"]
    C["AVerTouch Sensor"] --> B
    B --> D["Output"]
2
text_image
RiverTouch The image does not contain any text, labels, or symbols in the image.4
text_image
Guardar camera Do you make it a custom Fiscauward operator against the ability. August Camera is used to configure size as needed. Render size: 500 Prepare size in your Size as needed. Cancel Finish5
text_image
✓ Use language to access the user in a community We have been ready to access your own user.natural_image
Microscopic view of a fibrous or cellular structure with no visible text or symbolstext_image
Hand icon pointing at a power button with four circular icons labeled A, B, C, D and a snowflake symbol.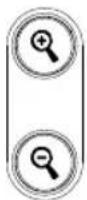
text_image
Four circular icons with power, snowflake, and AF symbols, likely representing control or operation buttons.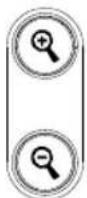
2
text_image
MAGEN Mode AP WIRELESS Configuration de Miraceast Mirecast SISTEMA3
natural_image
Technical line drawing of a mechanical device with two arrows indicating force or movement (no text or symbols present)Español-77
natural_image
Technical line drawing of a mechanical component with a lever and adjustment knob (no text or symbols)Especificaciones
natural_image
Technical line drawing of a mechanical device with no visible text or symbolsnatural_image
Illustration of a hand holding a mechanical clamp with a cross mark, no text or symbols presentnatural_image
Technical line drawing of a mechanical component with no visible text or symbolsUnità M15W
http://presentation.aver.com/download-center/
Assistenza tecnica:
https://aver.com/technical-support
Componenti hardware
text_image
Technical diagram of a mechanical device with numbered components and labeled partstext_image
Diagram showing connections between a device with labeled ports and control buttons including power, wireless, and AF indicators.[Nota]
flowchart
graph TD
    A["Portable"] --> B["Cavo USB (Type A to Mini-Type 8)"]
    B --> C["Cavo HDMI (no Included)"]
    C --> D["Monitor HDMI"]
    D --> E["Product LCD/OLP"]
[Nota]
natural_image
Simple line drawing of a mechanical device with a sensor icon (no text or symbols)![AVERMEDIA M15W - [Nota] - 1](/content/2026/04/631601/images/ed75086a33666aef0953493e95c029885ec4bb56f4304f4a6d2922d60b502738.jpg)
text_image
Wi-Fi Dongle Laptop AVerTouch2
text_image
AfterTouch To be completed, you can't change your following steps. OK Cancel4
text_image
Salva telecomera Do not consider? Do you want to access email: Please note that the email will be used to create a new email client or your email client. You can use email to create a new email client or your email client.5
text_image
Online Server 2014 ✓ We have been done to access, please call for the following: You can get your own website (http://www.123.com/) You can get your own website (http://www.123.com/) You can get your own website (http://www.123.com/) You can get your own website (http://www.123.com/) You can get your own website (http://www.123.com/) You can get your own website (http://www.123.com/) You can get your own website (http://www.123.come/) You can get your own website (http://www.123.come/) You can get your own website (http://www.123.come/) You can get your own website (http://www.123.come/) You can get your own website (http://www.123.come/) You can get your own website (http://www.123.come/) You can get your own website (https://www.123.come/) You can get your own website (http://www.123.come/) You can get your own website (http://www.123.come/) You can get your own website (http://www.123.come/) You can get your own website (http://www.123.come/) You can get your own website (http://www.123.come/)natural_image
Microscopic view of a fibrous or cellular structure with no visible text or symbolstext_image
POWER Wireless Battery Power AFtext_image
POWER Wireless Battery Power AF2
text_image
Tutu is telecommere www.tutu.com Tutu is telecommere http://tutu.com Tutu is telecommere http://tutu.com Tutu is telecommere[Nota]
text_image
Tubo is telecommen Login screen a764180102737579200 Cotabo is to telecommen http://www.tubo.com44
text_image
IMAGE Mode AP WIRELESS Miracast Setup Wi-Fi SYSTEM Miracast ✓3
natural_image
Mechanical lever diagram showing a rotating arm and base mechanism (no text or symbols)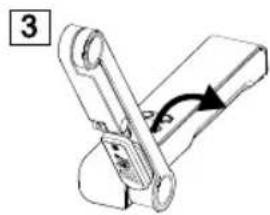
natural_image
Mechanical assembly diagram showing a lever mechanism with a curved arrow indicating rotational motion (no text or symbols)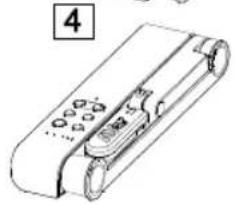
natural_image
Line drawing of a mechanical component with no visible text or symbolsnatural_image
Technical line drawing of a mechanical device with directional arrows indicating motion or force (no text or symbols)Italiano-91
natural_image
Pure mechanical assembly diagram showing a lever and handle without any text or symbolsSpecifiche tecniche