
AVerTV 3D USB (A867R-3D) - TV receiver AVERMEDIA - Free user manual and instructions
Find the device manual for free AVerTV 3D USB (A867R-3D) AVERMEDIA in PDF.


| Product Type | USB TV Receiver |
| Brand | AVerMedia |
| Model | AVerTV 3D USB (A867R-3D) |
| Color | Black |
| Dimensions (L x W x H) | 85 mm x 25 mm x 12 mm |
| Weight | 30 g |
| Power Supply | USB bus-powered (5V, 500mA) |
| TV Standard | DVB-T (Terrestrial) |
| 3D Support | Yes (Side-by-Side, Top-and-Bottom) |
| Remote Control | Included (IR) |
| Recording Function | Yes (scheduled recording, timeshift) |
| Software | AVerMedia TVCenter (Windows) |
| Input | Antenna (coaxial) |
| Output | USB 2.0 |
| Operating System Compatibility | Windows XP/Vista/7/8/10 |
| Maintenance | Clean with soft dry cloth; avoid liquids |
| Safety | Do not expose to moisture; unplug during storms |
| Spare Parts | Remote control, antenna, USB cable |
| Repairability | Limited; contact support for service |
| General Information | Compact portable TV tuner for PCs |
Frequently Asked Questions - AVerTV 3D USB (A867R-3D) AVERMEDIA
User questions about AVerTV 3D USB (A867R-3D) AVERMEDIA
0 question about this device. Answer the ones you know or ask your own.
Ask a new question about this device
Download the instructions for your TV receiver in PDF format for free! Find your manual AVerTV 3D USB (A867R-3D) - AVERMEDIA and take your electronic device back in hand. On this page are published all the documents necessary for the use of your device. AVerTV 3D USB (A867R-3D) by AVERMEDIA.
USER MANUAL AVerTV 3D USB (A867R-3D) AVERMEDIA
natural_image
Logo design featuring a stylized letter 'A' with colorful abstract elements and the text 'AVer MediaCenter 3D' below (no readable document text in the graphic itself)AVerMedia®
A Ver Media Center 3D
User Manual
Disclaimer
All the screen shots in this documentation are only example images. The images may vary depending on the product and software version. Information presented in this documentation has been carefully checked for reliability; however, no responsibility is assumed for inaccuracies. The information contained in this documentation is subject to change without notice.
Copyright
©2010 by AVerMedia Technologies, Inc. All rights reserved.
No part of this document may be reproduced or transmitted in any form, or by any means without the prior written permission of AVerMedia Technologies Inc. AVerMedia Technologies Inc. reserves the right to modify its models, including their characteristics, specifications, accessories and any other information stated herein without notice. The official printout of any information shall prevail should there be any discrepancy between the information contained herein and the information contained in that printout.
"AVerMedia" is a trademark (or registered trademark) of AVerMedia Technologies, Inc. Other trademarks used herein for description purpose only belong to each of their companies.
International Headquarter
Address No. 135, Jian-Yi Road Chung-Ho City, Taipei County Taiwan
Website www.avermedia.com
Telephone 886-2-2226-3630
Table of Contents
Chapter 1 Introduction....1
1.1 Device Introduction......2
1.2 System Requirements....3
1.3 Activating AVer MediaCenter 3D ....4
1.4 Overview of AVer MediaCenter 3D ....5
The Main Screen....5
The Main Control Buttons 6
Navigation Tree 7
1.5 Remote Control....8
Overview of the Remote Control (model 1)......8
Overview of the Remote Control (continued)....9
Overview of the Remote Control (model 2)....10
Overview of the Remote Control (continued)....11
Overview of the Remote Control (model 3)....12
1.6 Running AVer MediaCenter 3D for the First Time....13
Chapter 2 Getting Started....15
2.1 TV....16
Scanning TV Channels 16
Watching Live TV 17
Selecting a TV Channel 18
Adjusting Volume 18
Specifying a Channel Name or Description 18
Fine Tuning Color and Quality of the Display....20
Deleting a Channel....22
Editing the Channel Group Table 23
Managing the Channel Groups....24
Using OverScan Function 26
Changing the TV Channel Order....27
Capturing Images....27
Recording a TV Program Directly 27
Playing a Recorded TV Program 28
Viewing Teletext Information (Available for PAL / SECAM or DVB-T System) ...... 29
Viewing EPG Information (Only Available for Digital TV) 30
2.2 3DTV (for Microsoft Vista / Windows 7 only)....32
3D Watching Operations 34
Watching a 3D Source TV Program in 2D Mode .... 37
Watching a 2D Source TV Program in 3D Illusion via AVer MediaCenter 3D...... 38
Recording a 3DTV Program....40
Playing a Recorded 2D Source TV Program in 3D Simulation....41
Playing a Recorded 3DTV Program....44
2.3 Radio....46
Scanning FM Radio Frequencies (Only available for FM Radio)...... 46
Listening to the Radio 47
Manually Scanning Specific FM Channels (Only available for FM Radio) 47
Selecting a Radio Channel....48
Adjusting Volume 48
Deleting a Channel....48
Changing the Radio Channel Order 49
Recording a Radio Program Directly 49
Playing a Recorded Radio Program 50
Setting the Audio Mode (Only Available for FM Radio)....50
Viewing RDS Information (Optional) 51
2.4 Video....53
Playing Video Files....53
2.5 Music ....54
Adding Music to Your Playlist....54
Playing Music 55
2.6 Pictures ....56
Viewing the Captured Images....56
Playing Slide Show 56
Chapter 3 Advanced Operations....57
3.1 TV....58
Using Schedule Recording....58
Using TimeShift....60
Switching Between TV and External Video....61
Multi-Source Display (Only Available for Multi-Source Tuner Series Users) 61
Multi-Channel Display (Only Available for Multi-Card/Dual Tuner Series Users) ..... 64
Multi-Program Display (Only Available for Digital TV)....66
3.2 Radio....68
Using Schedule Recording....68
Using TimeShift....70
3.3 Video....71
Picture-in-Picture(PIP) / Picture-by-Picture(PBP) Display 71
Chapter 4 More Settings....73
4.1 General Settings....74
Configure Storage 74
Configure Snapshot 75
Video Device (Only Available for Multi-Card / Dual Tuner Series Users) 76
More Options....77
4.2 TV Settings....78
Configure Analog TV / Configure Digital TV → Configure TV Signal ...... 78
Configure Analog TV / Configure Digital TV → Manage Programs 79
Configure Analog TV / Configure Digital TV / HD Input Source→ Configure Recording. 80
Configure Analog TV → Configure Timeshift 83
Configure HD Input Source → Configure Timeshift....83
Configure Analog TV / Configure Digital TV → Configure Color Adjustment...... 84
More TV Options 85
4.3 Radio Settings 86
Manage FM Radio Programs / Manage Digital Radio Programs....86
Configure FM Radio Recording / Configure Digital Radio Recordings....87
4.4 Video Settings....88
4.5 Picture Settings....89
4.6 About....90
Appendix 91
Hot Keys....92
Glossary 93
Satellite Internet Access....95
Universal DVB Plug-in....98
Video Gaming Plug-in (for Microsoft Vista MCE / Windows 7 only)....99
Video Quality Enhancement Plug-in (for Microsoft Vista MCE / Windows 7 only)... 100
Chapter 1 Introduction
Thanks for purchasing AVer MediaCenter 3D. This powerful application allows you to watch TV, listen to the radio, create slide shows, record favorite programs and enjoy other features on your PC. With our easy-to-use remote control, you can enhance your PC experience. Turn your computer system into a real multimedia entertainment center.
This Chapter will guide you through the essential information of AVer MediaCenter 3D. Please do read this chapter before using this application.
Please be noted the functions and images may vary depending on the product you purchase and the area you live.
Device Introduction......2
System Requirement......3
Activating AVer MediaCenter 3D .....4
Overview of AVer MediaCenter 3D ...5
Remote Control......8
Running AVer MediaCenter 3D for the
First Time ....13
1.1 Device Introduction
Thanks for purchasing AVerMedia's product. Please be noted that the functions or the remote control mentioned in this manual may vary depending on the product you purchase and the area you live.
| Product Name | AVerTV 3D USB |
| Model No. A867R | |
| TV System | ☑ Digital TV (☑ DVB-T □ ATSC □ DVB-S)□ Analog TV (□ NTSC □ PAL □ SECAM) |
| Audio Mode | ☑ Stereo ☑ Mono ☑ SAP |
| FM Radio | □ Support ☑ Not Support |
| Remote Control | ☑ Support (□ Model 1 ☑ Model 2 □ Model 3)□ Not Support |
| External Signal Source | □ S-Video □ Composite □ Component □ HDMI |
| Others | ☑ Teletext □ MHEG-5☑ EPG □ iEPG□ Closed Caption ☑ Digital Subtitle□ CI/CA (optional)☑ Multi-Source Display☑ 3DTV (☑ Real3D ☑see3D) (for Microsoft Vista / Windows 7 only) |
| Note | iEPG is only supported in USA |
| Appendix | □ Satellite Internet Access (for Window XP only)□ Universal DVB Plug-in (for Microsoft XP / Vista MCE, 32 bit only)□ Video Gaming Plug-in (for Microsoft Vista / Windows 7 MCE only)□ Video Quality Enhancement Plug-in (for Microsoft Vista / Windows 7 MCE only)□ Common Interface for Conditional Access (optional) |
√ Note: DVB is a registered trademark of the DVB Project.
1.2 System Requirements
System requirements are described in detail below. Before using AVer MediaCenter 3D, verify that your PC meets the requirements below.
| Live TV Viewing | TimeShift and Recording in MPEG-2 | HDTV (H.264) Preview | 3DTV Viewing / Recording | 2D-3D Video Conversion | |
| CPU | Intel® Pentium® 4 1.7 GHz or AMD AthlonXP 1700+ Pentium Mobile 1.0 GHz or AMD equivalent | Intel® CoreTM2 Duo E6600 2.4 GHz or AMD AthlonTM 64X2 Processor 5600+ 2.8GHz | Intel® CoreTM2 Duo or AMD AthlonTM X2 CPU or higher | Intel® Core i3 530® 2.93GHz or AMD Athlon II X3 445 | |
| VGA Card | VGA card with 128M memory supports DirectX 9.0 or above. | VGA card* with 512M memory supports DirectX 9.0 or above. For HDTV, VGA card should support DXVA. | |||
| RAM | 256MB RAM or above 1G RAM or above | 1 GB or above 2 GB or above | |||
| OS | Windows® XP SP2 / Windows® VistaTM / Windows® 7 | Windows® VistaTM or Windows 7 32/64 bit | |||
| *Anaglyph, polarized, and shutter display modes are all supported. To watch 3DTV or videos without any hardware upgrade, choose anaglyph display mode. To get the best 3D effect, we strongly recommend to use NVIDIA® 3D VisionTM Kit, 3D-supported graphics card (NVIDIA® GeForce® GT 240 recommended or above) and 3D-ready display. | |||||
1.3 Activating AVer MediaCenter 3D
To run the application, click Start, point to Programs, choose AVerMedia, select AVer MediaCenter 3D and then click AVer MediaCenter 3D. Another way is to double-click the AVer MediaCenter 3D program icon “💡” on the desktop. Or, you can double-click the AVer Quick “💡” launcher located in the lower right corner of the screen.
Note: AVerQuick allows to set the desired default application, which means you can choose either AVerTV 6 or AVer MediaCenter 3D as the default application when double clicking AVerQuick icon. To do this, right click AVerQuick, choose "Setting", and select the preferred application in the "Application" tab.
1.4 Overview of AVer MediaCenter 3D
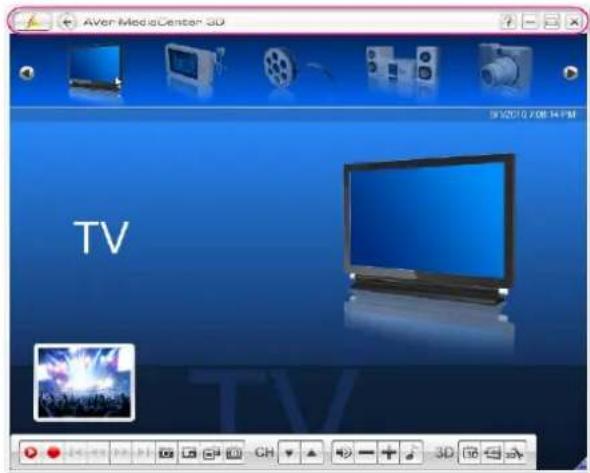
After running the software, the main screen of AVer MediaCenter 3D appears, which includes TV, Radio, Video, Music, Pictures and Settings. This section briefly introduces main menu, sub menus and setting items. For more details, please refer to Chapter 2.

The Main Screen

Description
① Title bar
② Main menu
③ Main window
④ TV monitor and control panel
⑤ Display the system time

Note: You will not see the TV monitor and control panel until scanning TV channels.

The Main Control Buttons
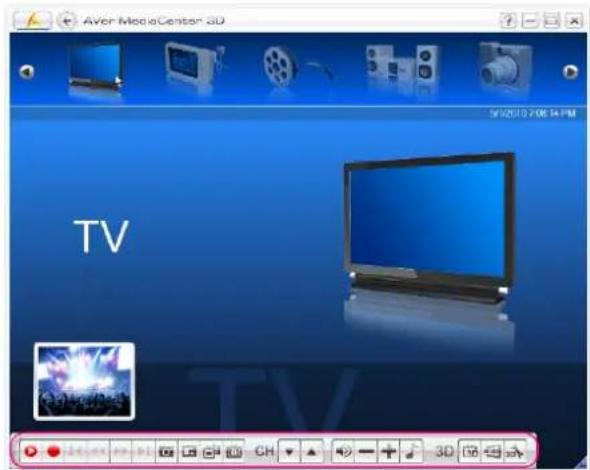
| Description | |
| Go back the main menu | |
| Go back one level | |
| Open user manual | |
| Minimize the application | |
| Restore the previous size | |
| Exit the application | |
| Description | |
| Switch from real-time TV or Radio to TimeShift mode. / Freeze the playback temporarily. | |
| Stop the playback, recording, TimeShift, etc. | |
| Play the selected file | |
| Record the current program. | |
| Play the previous/next file in the playlist. | |
| Move backward or skip forward in intervals. | |
| Capture a single image or a sequence of images. | |
| Enable the PIP or multiple channel display function. | |
| Switch to display all the programs that are under the same frequency simultaneously. (This function is only available for digital TV.) | |
| Switch to different aspect ratios. | |
| Go to the next upper or lower active channel. | |
| Turn on / off the sound. | |
| Increase or decrease the sound. | |
| Choose between available audio modes | |
| Watch or record 3DTV | |
| Watch or record a 2D source TV program in 3D simulation | |
| Open 3DTV Setting page |

flowchart
graph TD
    A["Main Menu"] --> B["TV"]
    B --> C["Live"]
    C --> D["TimeShift"]
    D --> E["Recorded Files"]
    E --> F["Schedule Recording"]
    F --> G["EPG"]
    G --> H["Teletext"]
    H --> I["Program List"]
    I --> J["Multi Programs"]
    A --> K["Radio"]
    K --> L["Recorded Files"]
    L --> M["Schedule Recording"]
    M --> N["Add program"]
    N --> O["RDS"]
    A --> P["Video"]
    P --> Q["Sort by Date"]
    Q --> R["Sort by Name"]
    R --> S["More Videos"]
    A --> T["Music"]
    T --> U["Sequential"]
    U --> V["Random"]
    V --> W["Loop"]
    W --> X["Add Music"]
    X --> Y["Remove All"]
    A --> Z["Picture"]
    Z --> AA["Play Slide Show"]
    AA --> AB["Sort by Date"]
    AB --> AC["Sort by Name"]
    AC --> AD["More Pictures"]
    Z --> AE["Settings"]
    AE --> AF["General"]
    AF --> AG["TV"]
    AG --> AH["Radio"]
    AH --> AI["Video"]
    AI --> AJ["Pcitures"]
    AJ --> AK["About"]

    B --> AL["Sort by Date"]
    AL --> AM["Sort by Title"]
    AM --> AN["Sort by Status"]
    AN --> AO["Remove All"]

    C --> AP["New Schedule"]
    AP --> AQ["Sort by Date"]
    AQ --> AR["Sort by Title"]
    AR --> AS["Remove All"]

    F --> AT["Update"]
    AT --> AU["Search Programs"]

    K --> AV["Sort by Date"]
    AV --> AW["Sort by Title"]
    AW --> AX["Sort by Status"]
    AX --> AY["Remove All"]

    M --> AZ["New Schedule"]
    AZ --> BA["Sort by Date"]
    BA --> BB["Sort by Title"]
    BB --> BC["Remove All"]

    P --> BD["Sort by Date"]
    BD --> BE["Sort by Name"]
    BE --> BF["Change Disk"]

    U --> BG["OK"]
    BG --> BH["Sort by Date"]
    BH --> BI["Sort by Name"]
    BI --> BJ["Change Disk"]

    AA --> BK["Play Slide Show"]
    BK --> BL["Sort by Date"]
    BL --> BM["Sort by Name"]
    BM --> BN["Change Disk"]

    AF --> BO["Configure Storage"]
    BO --> BP["Configure Snapshot"]
    BP --> BQ["Video Device"]
    BQ --> BR["More Options"]
    BR --> BS["Run Wizard Again"]

    AH --> BT["Configure TV Signal"]
    AH --> BU["Manage Programs"]
    AH --> BV["Configure Recording"]
    AH --> BW["Configure Timeshift"]
    AH --> BX["Configure Color Adjustment"]

    AI --> BY["Configure TV Signal"]
    AI --> BZ["Manage Programs"]
    AI --> CA["Configure Recording"]
    AI --> CB["Configure Color Adjustment"]

    AJ --> CC["Configure Analog TV ▶"]
    AJ --> DC["Configure Digital TV ▶"]
    AJ --> DD["More TV Options"]

    AK --> DE["Manage FM Radio"]
    AK --> DF["Manage Digital Radio"]
☑ Note: The items may vary depending on the product you use and the area you live.
1.5 Remote Control
The remote control supports all the features of AVer MediaCenter 3D. To use, just point the remote control at the receiver, and press button.

Overview of the Remote Control (model 1)

| Button Description | ||
| (1) |  | Turn on/off the application. |
| (2) | Sleeen[W8ZZ] | Set the time to put your computer into Standby/Hibernate mode, exit the application or turn off the computer. |
| (3) | Text | View Teletext / Close Caption information. |
| (4) | Pos | PIP Mode: Turn on/off the PIP-positioning function. When enabled, you can move the selected screen using the arrow buttons. |
| (5) |  | Use numeric buttons to select a channel. Use Clear to delete the unwanted digit or letters. |
| (6) | Back | Go back to the previous page.Exit 3DTV mode. |
| (7) | Info | Display the current program's information. (This function is not available for this device.) |
| (8) |  | Channel up and channel down. |
| (9) |  | View EPG information.(This function is only available for digital TV and radio) |
| (10) | [56HB] | Capture an image or a continuous sequence of images. |
| (11) |   | Main Screen: A shortcut to the main menu--"TV".Teletext Mode: Jump to the teletext page of the corresponding color according to this button. |
| (12) |  | Main Screen: A shortcut to the main menu-- "Video".Teletext Mode: Jump to the teletext page of the corresponding color according to this button. |
 | ||
| (13) |  | Switch from real-time TV or Radio to TimeShift mode. |
| (14) |  | Play the selected file or temporarily freeze the playback. |
| (15) | [GSCC] | Go to the previous item in the playlist. |
| (16) |  | Move backwards in intervals. |
| (17) | Source | Change between available signal sources. |

Overview of the Remote Control (continued)
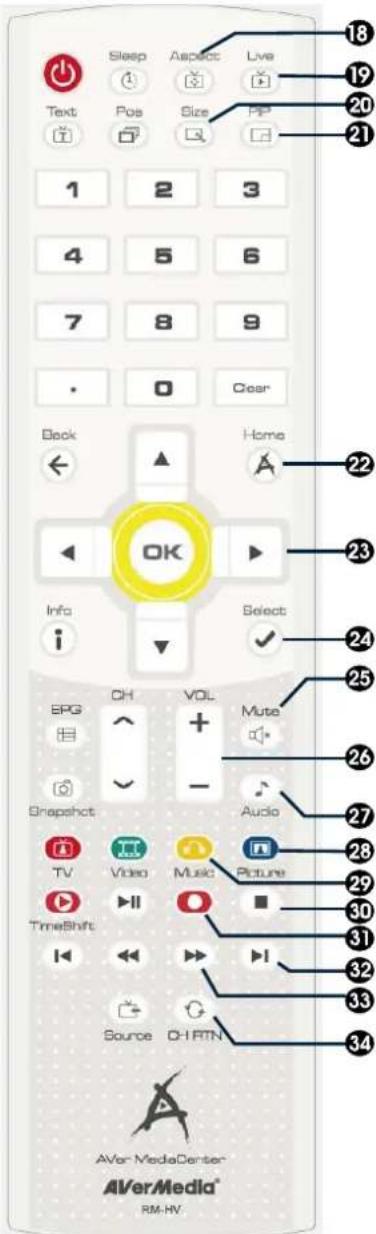
Button Description
| (18) | Aspect | Switch to different aspect ratios (4:3, 16:9, Full Screen, Keep Aspect Ratio). |
| (19) | Live | Switch to live TV source in full screen. |
| (20) | Size | PIP Mode: Turn on/off the PIP-sizing function. When enabled, you can enlarge or shrink the selected screen using the arrow buttons. |
| (21) |  | Activate the Picture in Picture(PIP) / Multi-Channel Display function. |
| (22) | Home | Go to the main menu. |
| (23) |  | Main Screen: Use the arrow button to navigate all on-screen items. Use OK to confirm the selection.PIP Mode: Move or change size of the selected screen by the arrow buttons. |
| (24) |  | - Confirm the selection.- Choose item from the drop-down list. |
| (25) |  | Turn off/on the sound. |
| (26) |  | Volume up / Volume down. |
| (27) |  | Change between available audio modes. |
| (28) | [KCBH] | Main Screen: A shortcut to your main menu--“Pictures”.Teletext Mode: Jump to the teletext page of the corresponding color according to this button. |
| (29) |  | Main Screen: A shortcut to your main menu--“Music”.Teletext Mode: Jump to the teletext page of the corresponding color according to this button. |
| (30) |  | Stop the playback, recording, TimeShift, etc. |
| (31) |  | Record the current program. |
| (32) |  | Go to the next item in the playlist. |
| (33) |  | Skip forward in intervals. |
| (34) |  | Return to previously accessed channel. |

Overview of the Remote Control (model 2)

| Button Description | ||
| (1) |  | Turn on/off the application. |
| (2) | [40WX] | Turn off/on the sound. |
| (3) |  | Use numeric buttons to select a channel. |
| (4) |  | Display TV in full screen. |
| (5) |  | Change between available audio modes. |
| (6) |  [7KBC] [7KBC] | Main Screen: Use the arrow button to navigate all on-screen items. Use OK to confirm the selection.PIP Mode: Change size or position of the selected screen by the arrow buttons. |
| (7) |  | Volume up / Volume down. |
| (8) |  Video[6GBT] Video[6GBT] | Main Screen: A shortcut to the main menu--“Video”.Teletext Mode: Jump to the teletext page of the corresponding color according to this button. |
| (9) |  TV[K770] TV[K770] | Main Screen: A shortcut to the main menu--“TV”.Teletext Mode: Jump to the teletext page of the corresponding color according to this button. |
| (10) |  | View Teletext / Close Caption information. |
| (11) |  | View EPG information. (This function is only available for digital TV) |
| (12) | [GZZZ] | Record the current program. |
| (13) | [75XG] | Play the selected file or temporarily freeze the playback. |
| (14) |   [XTZK] [XTZK] | - Go to the previous item in the playlist.- Set the time to bring your computer out of Stand By or Hibernate mode.(This function is only available for AVerTV 6) |
| (15) |  | Move backwards in intervals. |
Overview of the Remote Control (continued)

| Button Description | ||
| (16) | Skip forward in intervals. | |
| (17) | - Go to the next item in the playlist.- Set the time to put your computer into Stand By / Hibernate mode, exit the application or turn off the computer. (This function is only available for AVerTV 6) | |
| (18) | Stop the playback, recording, TimeShift, etc. | |
| (19) | - Switch from real-time TV or Radio to TimeShift mode.- Temporarily freeze the playback. (This function is only available for AVerTV 6) | |
| (20) | Activate the Picture in Picture (PIP) / Multi-Channel Display function. | |
| (21) | Capture an image or a continuous sequence of images. | |
| (22) | Main Screen: A shortcut to the main menu--“Pictures”.Teletext Mode: Jump to the teletext page of the corresponding color according to this button. | |
| (23) | Main Screen: A shortcut to the main menu--“Music”.Teletext Mode: Jump to the teletext page of the corresponding color according to this button. | |
| (24) | Channel up and channel down. | |
| (25) | Go back to the previous page.Exit 3DTV mode. | |
| (26) | - Go to the main menu.- Exit from CI/CA Information dialog. (This function is only available for CI/CA) | |
| (27) | Return to previously accessed channel. | |
| (28) | Change between available signal sources. | |
Overview of the Remote Control (model 3)

| Button Description | |
| 1. SOURCE | Switch between available signal sources. |
| 2. FULL SCREEN | Display TV in full screen. |
| 3. ● (Record) | Switch to PVR mode and record the current program or video into your hard drive. |
| 4. ◀(Rewind) | Rewind the playback. |
| 5. ■ (Stop) | - End the Playback or recording.- End the TimeShift mode and return to real-time TV or Radio mode. |
| 6. DISPLAY | Display information. |
| 7. VOL+ /— | Volume up/down. |
| 8. Numeric Buttons - Select a TV channel.- Under the 16-Channel preview mode, use 2 4 6 8 to highlight the intended channel. (This function is only available for AVerTV 6) | |
| 9. CH RTN | Go to the previously selected channel. |
| 10. MUTE | Turn on/off the sound. |
| 11. CH ▲/▼ | Go up or down to the next active channel. |
| 12. EPG | Launch the Electronic Program Guide. (DVB-T only) |
| 13. ▶ (Play) / PAUSE | Play the last recorded or played file. / Freeze the playback. |
| 14. ▶(Forward) | Advance the playback. |
| 15. AUDIO | Switch between available audio modes. |
| 16. POWER | Turn on/off the application |
1.6 Running AVer MediaCenter 3D for the First Time
When you run the AVer MediaCenter 3D for the first time, a set up wizard will automatically appear and take you through all the necessary settings step by step.
- When a dialog box appears, click Yes.
- Choose the primary device or tuner for watching TV or listening to the radio and then select Next (as shown on the right). Then choose Next again to continue.
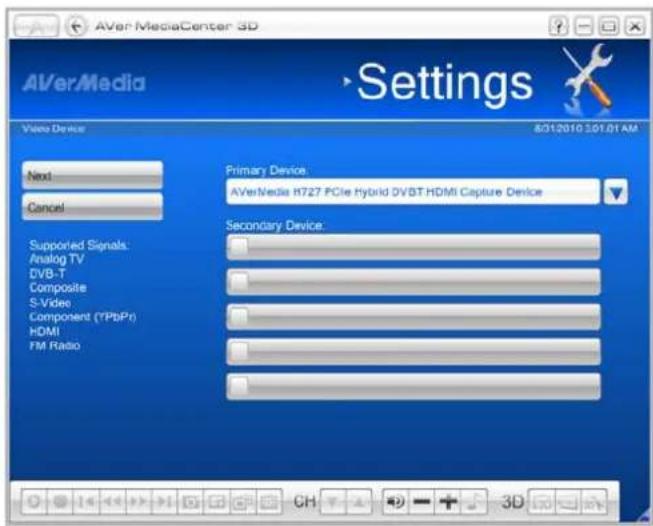
- Choose the country where you located and select the correct S-Video, Composite, Component Video, and HD Input Source Standard. Then select Next.
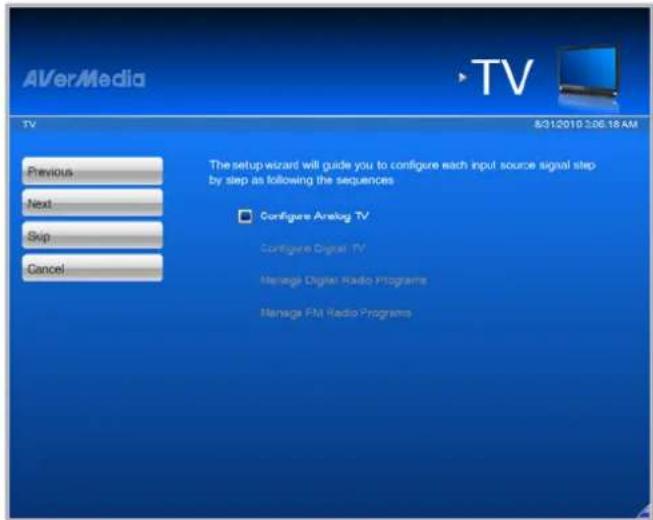
- Then the wizard will show the setting process and lead you to set up all available signal sources (As shown on the right). Select Next to continue the process or select Skip to ignore the setting.
- Determine the Signal Type and select Next.
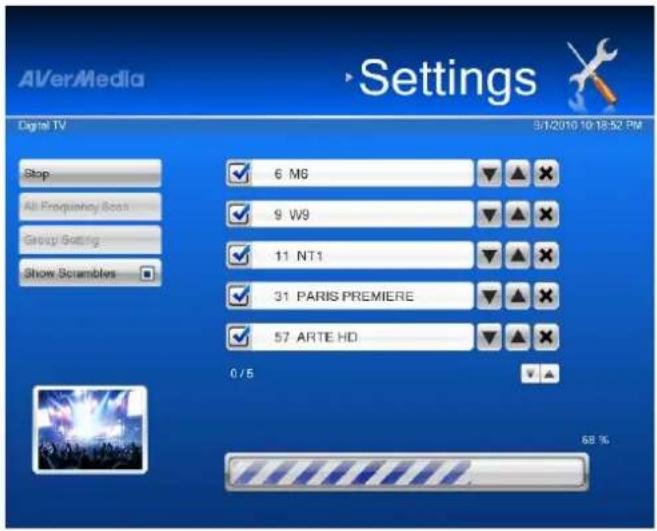
- Select AutoScan to start scanning (As shown on the right). After scanning, select Next to continuously set up other signal sources if any.
- After finishing all settings, select Finish.
- Select Next to continuously set up other device if any.
- If you want to re-configure all the settings again, go the main page and select Settings→ General → Run Wizard Again.

Chapter 2 Getting Started
This Chapter will start with the basic usage of AVer MediaCenter 3D, including scanning programs, playing music, recording a TV/ Radio program, and so on.
Before using the application, it is necessary to understand all the basic operations in this chapter.
TV....16
3DTV 32
Radio....46
Video....52
Music 54
Pictures ....56
2.1 TV
Under the TV main menu, you can enjoy watching TV, record your favorite program and so on.
Scanning TV Channels
If you didn't run the setting up wizard, a dialog box will appear to prompt you to scan for channels when selecting the main menu "TV".
- When the Program Information dialog box appears, select Yes.
- Then the wizard leads you to the "Settings" page to automatically scan channels.

- You can check the scanning progress from the progress bar. After scanning, the active TV channels will be listed inside the box.
- Terminate the scanning, simply select Stop.
- If there are channels missing, select All Frequency Scan. This may take you a while, please be patient.

Note:
- If you didn't follow the wizard to automatically scan channels, you can select Settings → TV → Configure Analog TV or Configure Digital TV → Manage Programs and choose Auto Scan to scan for channels.
- After Media Center Edition scan, you may not be able to lock channels with AVerTV 6. Please
restart the computer to make it function normally.

Watching Live TV
You can enjoy analog TV, digital TV or both of them depending on what your product is.
-
After scanning, go to the TV page and you can see a preview TV window in the right-hand section of the screen.
-
To switch the preview mode to the full-screen mode, select Live.

- If you want to go back the preview mode, press Back on the remote control or select in the top-left corner of the screen.

natural_image
Crowd at a concert with stage lights and dramatic lighting (no visible text or symbols)
Note: To watch or record 3DTV, please refer to the section entitled "3DTV".
Selecting a TV Channel
There are four ways of switching between TV channels:
- Use the numeric keys on the remote control to get your desired channel.
- Use the Channel Up/Down buttons ( on the remote control or CH ▼ ▲ on the control panel) repeatedly until reaching your desired channel.
- Enter the number on your numeric keypad to get your desired channel.
- Select the Program List and select the channel you want.
Adjusting Volume
To increase or decrease volume when watching TV, press ☐ on the remote control or click ☐ on the control panel.
To disable the sound of the program, press 📄 on the remote control or click 📄 on the control panel. Press the same button again to turn on the sound.
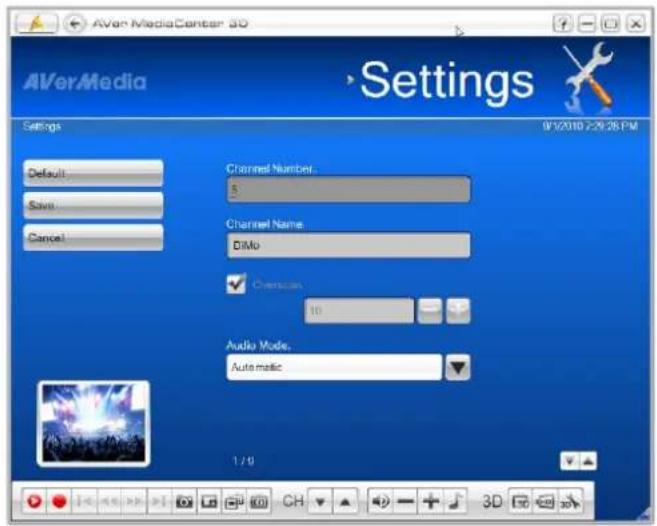
Specifying a Channel Name or Description
To assign a channel name or specify description:
-
Select "Settings" → "TV" → "Configure Analog TV" or "Configure Digital TV" → "Manage Programs"
-
Select the desired channel you want to assign a name or description.

- Enter the name or description under the Channel Name.
- Choose the preferred audio mode from the drop down list.
- Select Save to save the settings or select Cancel to abort without saving. If you want to revert to factory settings, select Default.
Fine Tuning Color and Quality of the Display
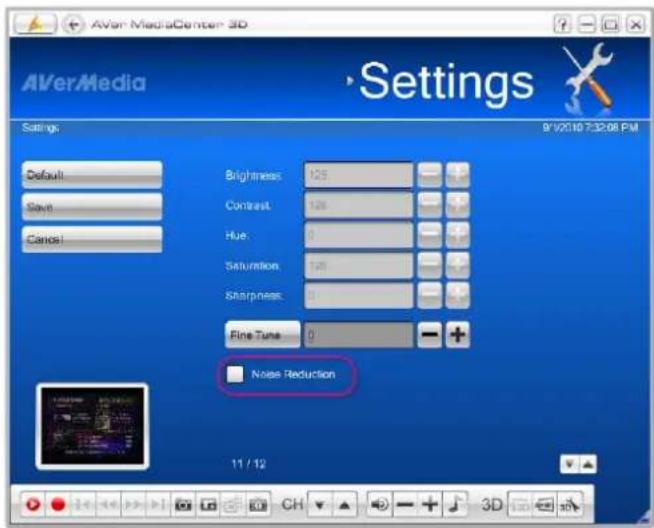
If the color and quality of a particular channel needs to be adjusted, please do the following.
- Select Settings → TV → Configure Analog TV or Configure Digital TV → Manage Programs.
- Select the desired channel.
- Select √ in the bottom-right of the screen to go to the second page.

- Then use to adjust the Brightness, Contrast, Hue, Saturation and Sharpness until the image color is accurate.
- You will need to perform fine-tune only if the reception of the selected channels is not clear. Use - + to get a clear TV picture.

-
If the device you use can watch analog TV, here you can also select the Noise Reduction check box to obtain the better quality.
-
Select Save to save the settings or select Cancel to abort without saving. If you want to revert to factory settings, select Default.
☑ Note: By default, the system is set to disable the color adjustment items. To adjust image color of one specific channel, you need to go to Settings → TV → Configure Analog TV or Configure Digital TV → Configure Color Adjustment and clear the Apply All check box. After clearing the Apply All check box and select Save, you can now adjust the setting of a specific channel.
Deleting a Channel
If you want to exclude undesirable channels from your channel list, do the followings:
- Select Settings → TV → Configure Analog TV or Configure Digital TV → Manage Programs.
- Select the unwanted channel.
- Choose: This channel will be removed and that means you won't be able to access these programs anymore. If you want to watch that channel again in some day, you need to rescan all channels.
- If you just want to skip a particular channel, simply clear the check box.

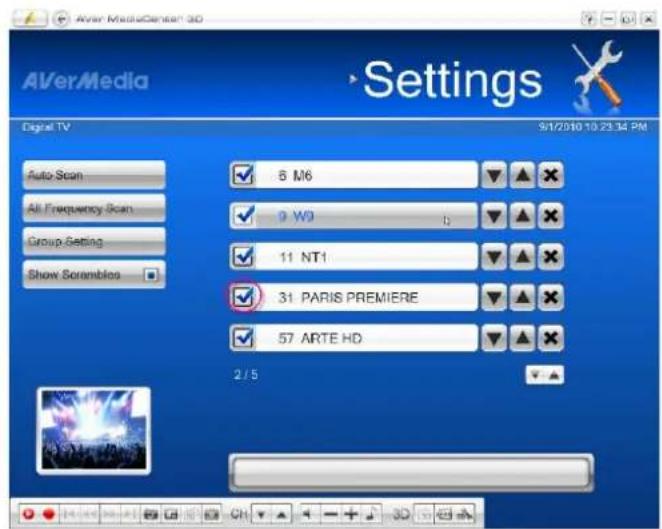
Editing the Channel Group Table
To add or remove channels from the channel group, do the following:
- Select Settings → TV → Configure Analog TV or Configure Digital TV → Manage Programs → Group Setting.
- The default and the first channel group*Note are listed in the Group Setting table.
- You can see all groups in this table. (To see more groups in the table, use arrow buttons ▼▲◀▶ in the right bottom corner of the screen).
- If you choose Configure Digital TV in step, there will be an additional option By Content Provider on this page. This option allows you to classify channels that are under the same frequency into one group.
- Click the cell to add the desired channel in the channel group. The mark V appearing indicates that channel has been added in the group.
- Click the cell again to remove the channel from the channel group.
- The new setting will be saved automatically.

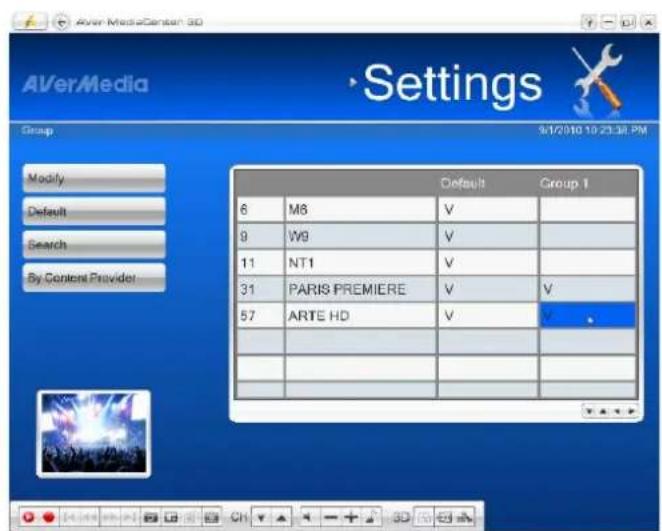
☑ Note: If you want to search a channel by channel name, select Search.
Managing the Channel Groups
Channel groups are used to organize and group channels that suit your needs. To manage your channel groups, do the following:
-
Select Settings → TV → Configure Analog TV or Configure Digital TV → Manage Programs → Group Setting → Modify.
-
If you want to create a new channel group, select Add. You can also select the existed group to enter the next page to modify the group name.
-
Type in a group name and click Save.
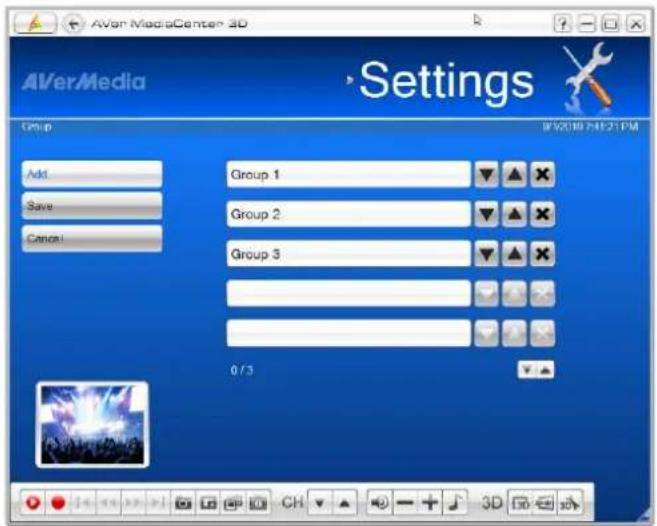
![AlVerMedia TV 9/1/2010:7:41:40PM Save Cancel My Favorite 1 2 3 4 5 6 7 8 9 0 1 a b c d e f g h i j 2 k l m n o p q r s t 3 u v w x y z 4 1 2 3 4 5 6 7 8 9 0 5 ` - = \ [ ] ; ', . 6 / 7 ← ◀ ▶ 8 Caps Shift Alt](/content/2026/06/1264581/images/7bf7ca0d69b1be625677896a209bdfdf84f0ded5ae31bd5432b997b89fab188b.jpg)
-
You can use ✗ to remove a channel group or use ▼ ▲ to move the channel group to the desired location.
-
The first channel group will be shown in the Group Setting table.
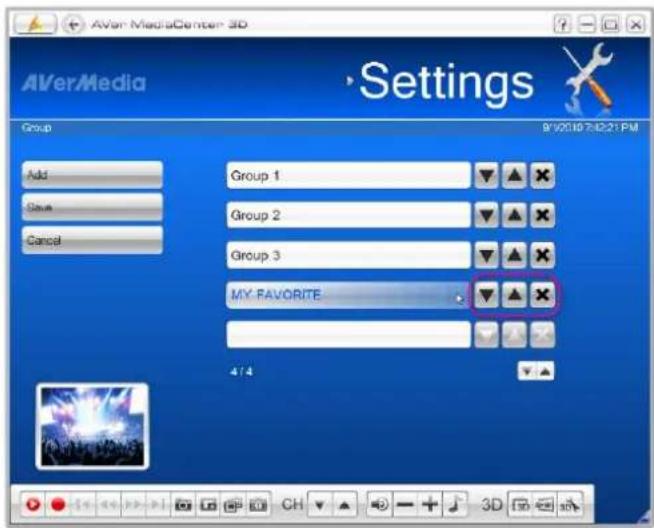
Using OverScan Function
On some broadcast channels, you might see distorted lines or black spaces on the top, sides, or bottom of the screen. These video artifacts derive from the source signal, and can be masked using the OverScan feature.
-
Select Settings → TV → Configure Analog TV or Configure Digital TV → Manage Programs.
-
Select the channel you want to hide the edges of the picture.
-
Specify an appropriate number (0\~20) to get the better quality.
-
Select Save to save the settings or select Cancel to abort without saving. If you want to revert to factory settings, select Default.

☑ Note: By default, the system is set to disable the Overscan item. To apply the overscan setting to one specific channel, you need to go to Settings → TV → Configure Analog TV or Configure Digital TV → Configure TV Signal and clear the Apply All check box. After clearing the Apply All check box and select Save, you can now adjust the setting of a septic channel.
Changing the TV Channel Order
You may change the sequence of channels as you prefer.
- Select Settings → TV → Configure Analog TV or Configure Digital TV → Manage Programs.
- Select the channel you want to move.
- Use ▼ to move upward or downward until the selected channel moves to the desired location.

Capturing Images
While you watch TV or recorded video from your PC monitor, you can use the application to capture images for your document, presentation or web page.
- Select TV.
- Press ☐ on the remote control or select ☐ on the control panel to capture a still image. To capture another image, press that button again.
- To view the captured images, go back the Main Menu and select main menu "Pictures". All the pictures are listed in the right-hand section of the screen.
☑ Note: For details, refer to the section titled Pictures in Chapter 2.
Recording a TV Program Directly
To record a program now:
When watching TV, select ● to record a program immediately. To stop recording, select .
Playing a Recorded TV Program
- Select TV → Recorded Files.
- All the recorded files are listed here.
- You can view those file by date, title or status.
- Choose the desired file.
- If you want to delete all recorded files, click Remove All → Yes.
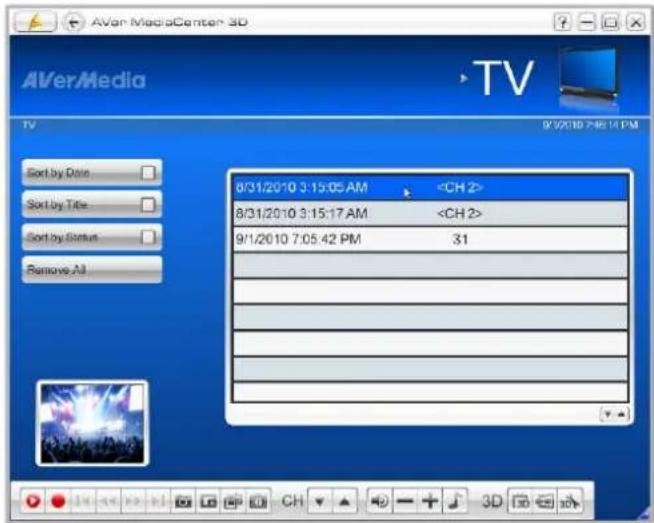
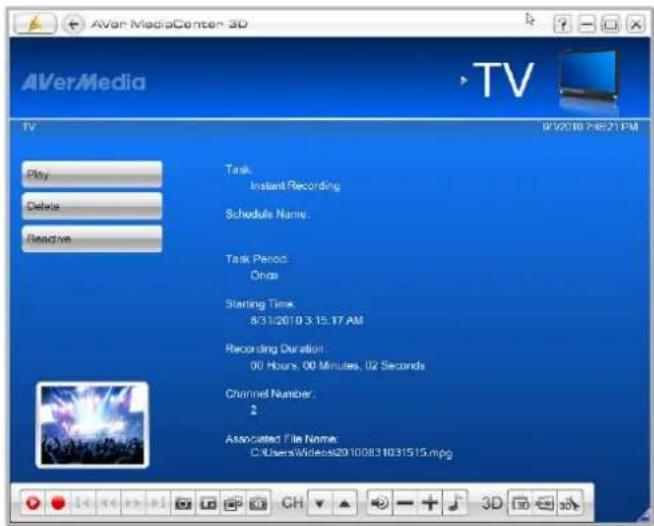
- Select Play.
- To switch to the full-screen, double-click the small TV monitor.
- To temporarily pause the playback, select □. To stop the playback, select □.
Note:
- For the related information, refer to Video → Playing Video Files in Chapter 2.
- For playing and watching recorded TV programs in 3D simulation, refer to 3DTV in Chapter 2.
Viewing Teletext Information (Available for PAL / SECAM or DVB-T System)
Teletext makes TV viewing a unique experience. It allows you to view teletext broadcasts from your television programs to get the most updated information on TV Schedules, News, Stock Market Prices, Concert & Theatre information and so on. Teletext information may not be available if there is no such service provided in your region or country.
- Select TV → Teletext.
- Teletext information overlays on the TV monitor.
- Press on the
remote control to jump to the Teletext page of the corresponding color. - Or press the numeric buttons on the remote control to go to your desired page.

Viewing EPG Information (Only Available for Digital TV)
Electronic Program Guide (EPG) is a service that allows you to check the next succeeding program schedule and even the program schedules of the whole week. If the EPG service is provided in your region/country, do the following to view the EPG information. (For Analog TV: if the country you choose is the United States in Chapter 1.6, the iEPG function will be enabled.)
- Select TV → EPG.
- You can use ▼ to choose the desired day.
- Then Use in the lower right of the screen to find the channel you want. To select other period of time, use ▼.
- Select Update to download the latest program schedule.
- Select the desired program.
- To record the program for future viewing, use Scheduling.
- To tune into the program for some time in the future, use Activate Live TV.


- Use to go back the EPG page.
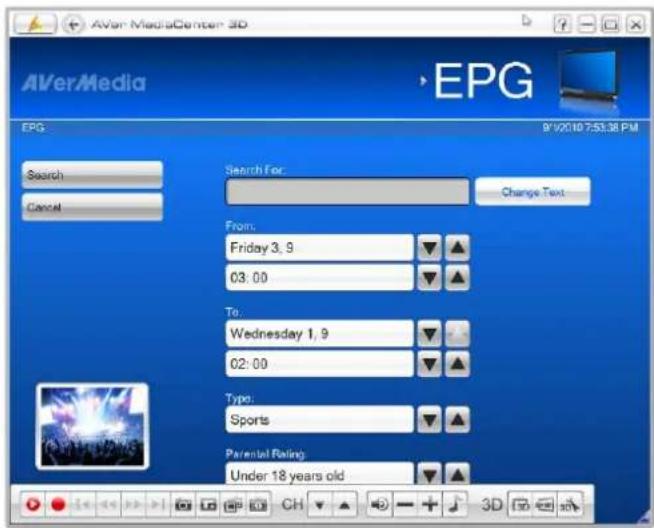
- Select Search Programs to have the advance searching function.
- On the next page (as shown on the right), you can search by key words, time, program type and the parental rating.
- After setting all conditions, select Search.
Note:
- For more details on establishing a schedule, refer to Using Schedule Recording in Chapter 3.
- Type and Parental Rating are only effective when your EPG system transmits information about the program type and parental rating.
2.2 3DTV (for Microsoft Vista / Windows 7 only)
AVerMedia is honored to present to you the latest 3D TV watching technology in the latest version of AVer MediaCenter 3D. Not only are you able to watch the vivid representation of programs with 3D sources, but also transform a 2D TV program into a 3D one via the 3D simulation technology by AVer MediaCenter 3D.
Before diving into the whole new 3D world, make sure your PC system meets the requirements (please refer to the System Requirement at the beginning of this manual), pay attention to the health reminder concerning your personal welfare, and read the information on 3D technology to fully enjoy the entertainment that AVer MediaCenter 3D brings to you.
Health reminder
Watching 3D programs with the 3D glasses under correct usage and circumstances is not harmful to your eyes; however, some people might suffer from dizziness, nausea, headache or other uncomfortable feelings. To avoid suffering from any discomfort as such, or should any of these symptoms happen to you, please refer to the health notices below and consult the medical professionals if necessary.
- Do not wear the 3D glasses for any purpose other than 3D program watching. Wearing the 3D glasses for any activity not intended for 3D glasses application might cause serious damage or injury.
● Take regular breaks during long watching period. - Keep a distance no less than 2.5 feet between you and the display while watching 3D program
- If symptoms continue, stop wearing the 3D glasses and take the 3D glasses to the medical professionals for further examinations and medical advices.
3D technology application 101
1. 3D illusion and 3D technology
The 3D illusion in the real world for the human eyes usually refers to the depth caused by the compound of the two slightly different images seen through our eyes. Our eyes being spaced apart and each seeing a slightly different picture of the object, the human brain puts the received signals back together to calculate the distance, i.e., the depth, and this is exactly what a 3D video do: to recreate how the human eyes see things in the real world.
To recreate the human binocular vision on a 2D medium, we need images provided as how the human eyes perceive them and some gadgets that help us to put the artificial binocular images back to one, just as the brain works for us in the real world.
2. How 3D video signals are provided
To provide the images that the binocular vision requires, a technology called stereoscopic 3D is employed. Two images with slightly different perspectives of a video frame are provided simultaneously, with one sent to the left eye and the other to the right eye. The 3DTV broadcasts are either encoded as single video stream in side-by-side format or over/under format, or each view should be encoded as separate video stream. These two formats, which are known as "Frame Compatible," are adopted for the high bandwidth efficiency and better compatibility with existing hardware.
* Please be noted that blu-ray video 3D illusion is not supported in AVer MediaCenter 3D.
3. Different kinds of 3D glasses
The stereoscopic 3D technology described above requires the help of the 3D glasses, either passive or active ones, to properly filter the signals and then send the correct image to each eye to recreate the binocular vision.
The most commonly seen passive glasses are those with a pair of red and blue (or green) lenses. The color filtered image is then perceived by each eye to produce the three-dimensional effects. Because of the employment of color complementary, this method inevitably causes discolor.
The other kind of more advanced passive glasses are polarized glasses. Each lens of the polarized glasses blocks certain wavelength of the visible light, creating the difference of images perceived by each eye to produce the 3D effects. The linear polarized glasses use the combination of vertical and horizontal polarization, while the circular polarized glasses use the combination of clockwise and counter-clockwise polarization.
To create a more vivid and life-like binocular image and avoid discolor problem come the active glasses. The LC (liquid crystal) shutter glasses work with a transmitter or emitter connected to the computer and the each lens blinks on and off by turns in sync with the display at half of the display refreshing rate. Each eye seeing an image, from a slightly different angle, creates the binocular vision.
3D Watching Operations
Watching in 3D Mode
To watch a live 3D source TV program via AVer MediaCenter 3D
- Click TV on the main menu bar to enter the TV main screen.
- Select a TV signal from the drop-down list.
- Switch to the channel of 3D source.
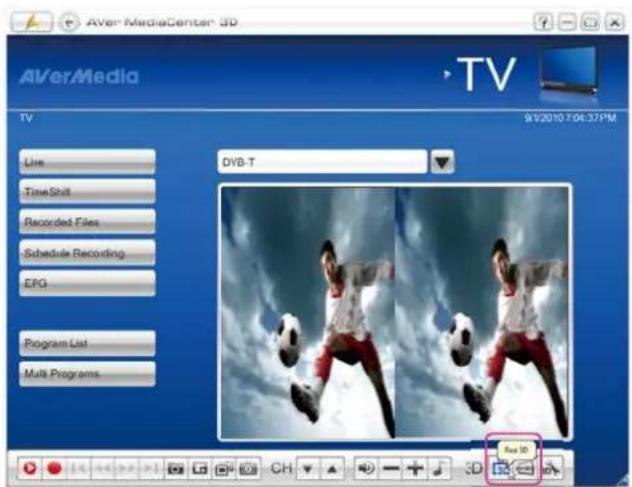
- Select 3D Red/Cyan, Micro-polarized 3D, or NVIDIA® 3D Vision™ from the Display Mode drop-down menu according to your 3D watching equipments and click OK to confirm and go back to AVer MediaCenter 3D main TV screen.

-
Click on the control bar at the lower right of the screen and select View to start. Now you can put on the 3D glasses and enjoy the vivid 3D program.
-
To end 3D watching, double click on the screen, press Esc key on your keyboard, or use the Back key on the remote control.

natural_image
Action photo of a soccer player kicking a ball against a cloudy sky (no text or symbols visible)√ Note: During 3D watching, operations such as channel switch, TimeShift are not available except for volume control.
"NVIDIA® 3D Vision™ Settings
If you are using a NVIDIA® 3D Vision™, please follow the instructions below to complete the necessary settings for successful 3DTV watching.
- Go to Start → All Programs → NVIDIA Corporation → NVIDIA Control Panel.

Or
Right-click on the desktop to bring up the quick menu and select NVIDIA Control Panel.

- Go to Set up stereoscopic 3D and check Enable stereoscopic 3D to activate 3D relevant settings.

Watching a 3D Source TV Program in 2D Mode
If you prefer 2D TV watching for a live 3D source TV program, follow the instructions below to turn a 3D source TV program in 2D.
- Click TV on the main menu bar to enter the TV main screen.
- Select a TV signal from the drop-down list.
- Switch to the channel of 3D source.

- Select 2D from the Display Mode drop-down menu and click OK to confirm and go back to AVer MediaCenter 3D main TV screen.

- Click on the control bar at the lower right of the screen and select View to start.

natural_image
Cityscape at sunset with a prominent illuminated tower, colorful sky, and no visible text or symbols.- To end TV watching, double click on the screen, press Esc key on your keyboard, or use the Back key on the remote control.
Watching a 2D Source TV Program in 3D Illusion via AVer MediaCenter 3D
AVer MediaCenter 3D allows you to enjoy the 3DTV watching fun even with the common 2D source TV programs. Follow the instructions below to turn a 2D source TV program into a 3D simulation one.
- Click TV on the main menu bar to enter the TV main screen.
- Select a TV signal from the drop-down list.
- Switch to a channel of 2D source.
-
Click 3D on the control bar at the lower right of the screen and the 3D Setting dialogue box appears.
-
Select 3D Red/Cyan, Micro-polarized 3D, or NVIDIA® 3D Vision™ from the Display Mode drop-down menu according to your 3D watching equipments.
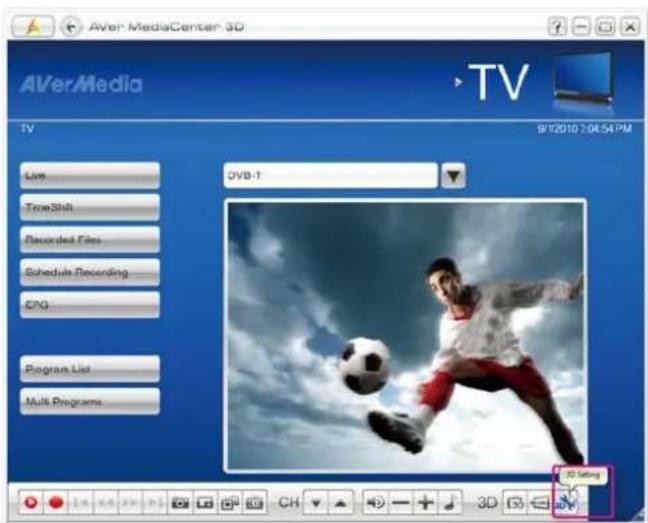

- Select a value from both the drop-down menu of Depth Field and Depth Position to your liking.
- The value of Depth Field that you choose alters the sharpness and focus of the images represented on your PC screen, so the higher value you choose, the deeper of the image effects the see3D simulates.
- The value of Depth Position that you choose alters the distance you perceived between the images represented on your PC screen and yourself. The higher value you choose, the closer distance you feel from the screen.
- Click OK to confirm and go back to AVer MediaCenter 3D main TV screen.
- Click 2D+3D and select View to start watching a 2D program in 3D mode.
- To end see3D watching, double click on the screen, press Esc key on your keyboard, or use the Back key on the remote control.


Note: If you select 2D from the Display Mode drop-down menu on the 3D Setting page, you will see
a 2D TV image when you click

and select View.

Recording a 3DTV Program
To record a 3DTV program
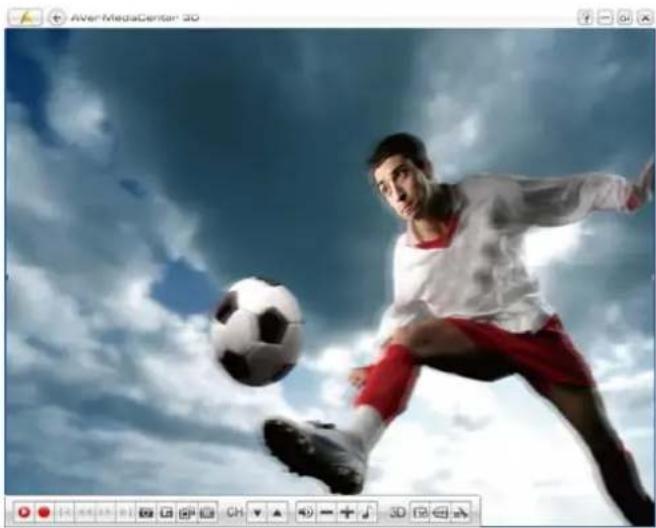
- If the screen hasn't gone into 3D watching full screen mode, click / 2D+3D on the control bar at the lower right of the screen and select Record to start.
natural_image
Action photo of a soccer player kicking a ball against a cloudy sky (no text or symbols visible)- To end 3D recording, double click on the screen, press Esc key on your keyboard, or use the Back key on the remote control.

Note:
- The screen goes into full screen mode after you start recording.
- Please DO NOT exit full screen mode during 3D video recording or the recording will be stopped.
- Any system messages will end 3D video recording or 3DTV viewing.
Playing a Recorded 2D Source TV Program in 3D Simulation
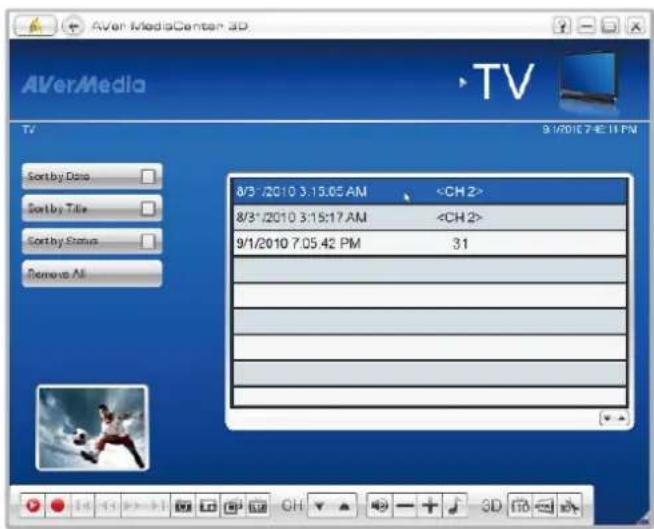
- Select TV → Recorded Files.
- All the recorded files are listed here.
- You can view those file by date, title or status.
- Select the desired file.
- If you want to delete all recorded files, click Remove All → Yes.
OR,
- Select Video.
- You may see some recorded video files are listed on the right hand section of the screen. Or you can select More Videos to choose other folders.
- Select the file you want.

-
Click 3On the control bar at the lower right of the screen and the 3D Setting dialogue box appears.
-
Select a value from both the drop-down menu of Depth Field and Depth Position to your liking.
-
The value of Depth Field that you choose alters the sharpness and focus of the images represented on your PC screen, so the higher value you choose, the deeper of the image effects the see3D simulates.
-
The value of Depth Position that you choose alters the distance you perceived between the images represented on your PC screen and yourself. The higher value you choose, the closer distance you feel from the screen.


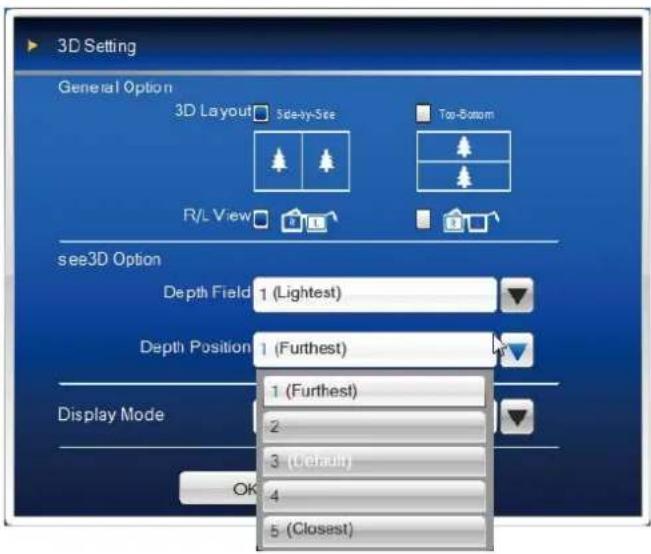
- Select 3D Red/Cyan, Micro-polarized 3D, or NVIDIA® 3D Vision™ from the Display Mode drop-down menu according to your 3D watching equipments and click OK to confirm and go back to AVer MediaCenter 3D main TV screen.

-
Click and put on your 3D glasses to start watching a 2D program in 3D mode.
-
To end see3D watching, double click on the screen, press Esc key on your keyboard, or use the Back key on the remote control.

natural_image
Action photo of a soccer player kicking a ball against a cloudy sky (no text or symbols visible)Playing a Recorded 3DTV Program
- Select TV → Recorded Files.
- All the recorded files are listed here.
- You can view those file by date, title or status.
- Select the desired file.
- If you want to delete all recorded files, click Remove All → Yes.

OR,
- Select Video.
-
You may see some recorded video files are listed on the right hand section of the screen. Or you can select More Videos to choose other folders.
-
Select the file you want.
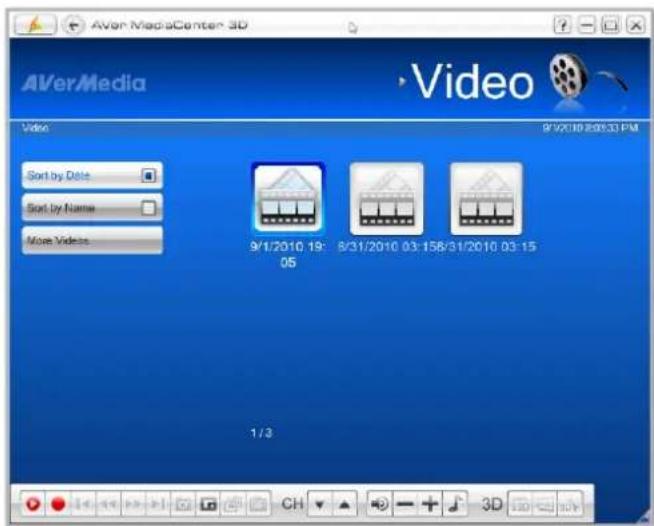
- Click ^3D on the control bar at the lower right of the screen and the 3D Setting dialogue box appears.

- Select 3D Red/Cyan, Micro-polarized 3D, or NVIDIA® 3D Vision™ from the Display Mode drop-down menu according to your 3D watching equipments and click OK to confirm and go back to AVer MediaCenter 3D main TV screen.

- Click on the control bar at the lower right of the screen to start. Now you can put on the 3D glasses and enjoy the vivid 3D program.

natural_image
Action photo of a soccer player kicking a ball against a cloudy sky (no text or symbols visible)- To end 3D watching, double click on the screen, press Esc key on your keyboard, or use the Back key on the remote control.
2.3 Radio
If the product you purchase with radio function, then you can read this chapter to learn more knowledge about this.
Scanning FM Radio Frequencies (Only available for FM Radio)
If this is your first time running the application, a dialog box will appear to prompt you to scan for channels when selecting the main menu "Radio".
- When the Program Information dialog box appears, select Yes.
- Then the wizard leads you to the Settings menu to auto scan channels.

- You can check the scanning progress from the progress bar. After scanning, the active FM Radio channels will be listed inside the box.
- If there are channels missing, select All Frequency Scan. This may take you a while, please be patient.

√ Note: If you didn't follow the wizard to automatically scan channels, you can select Settings → Radio → Configure FM Radio or Configure Digital Radio → Manage Programs and choose Auto Scan to scan for channels.
Listening to the Radio
You can enjoy listening to the FM Radio, digital radio or both of them depending on what product you purchase.
- After scanning, go to the Radio page and you can see all available channels listed in the right-hand section of the screen.
- Select the channel you want.
- Select Live Radio to listen to the live program.

Manually Scanning Specific FM Channels (Only available for FM Radio)
Instead of scanning all channels, you can manually scan one or a few channels only.
- Select Radio → Add Program.
- Enter the channel frequency that you want to start scanning in the text box.
- In the Seek section, use to scan upward or to scan downward from the selected channel frequency. The scanning will stop when the application finds the closest ACTIVE FM frequency.
- Or in the Tune section, select + or - to increase or decrease the frequency to search your preferred channel.
- Select Save if you'd like to keep the

newly scanned frequency. Or select
Cancel to abort without saving.
Selecting a Radio Channel
There are three ways of switching between radio channels:
- Use the numeric keys on the remote control to get your desired channel.
- Press the Channel Up/Down buttons ( on the remote control or CH ▼ ▲ on the Control Panel) repeatedly until reaching your desired channel.
- Enter the number on your numeric keypad to get your desired channel.
Adjusting Volume
To increase or decrease volume when listening to the FM radio, press the Volume +/- on the remote control or press the button ☐+ on the control panel.
To disable the sound of the program, press 📂 on the remote control or select 📋 on the control panel. Press the same button again to turn on the sound.
Deleting a Channel
If you want to exclude undesirable channels from your channel list, do the following:
- Select Radio.
- Select the unwanted channel.
- Select Delete to remove the undesired channel. This channel will be removed and that means you won't be able to access these programs anymore. If you want to listen to that channel again in some day, you need to rescan all channels.

- If you just want to skip a particular channel, do the following:
- Select Settings → Radio → Configure FM Radio or Configure Digital Radio → Manage Programs.
- Choose the unwanted channel and clear the check box.

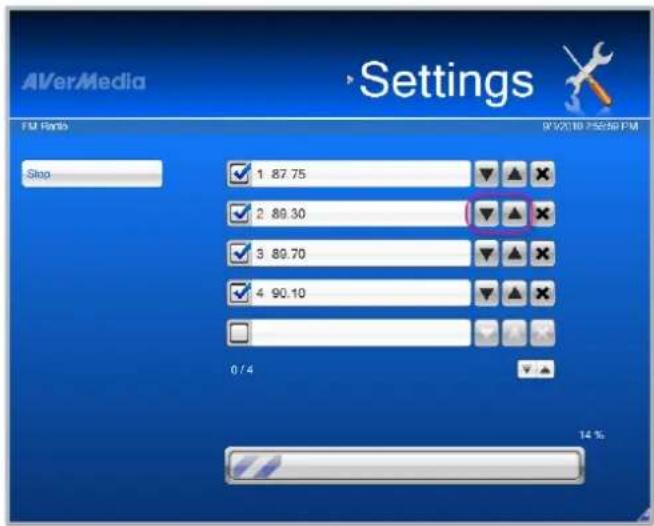
Changing the Radio Channel Order
You may change the sequence of channels as you prefer.
- Select Settings → Radio → Configure FM Radio or Configure Digital Radio → Manage Programs.
- Select the channel you want to move.
- Use ▼ to move upward or downward until the selected channel moves to the desired location.
Recording a Radio Program Directly
To record a program now: When listening to the radio, select ☐ to record a program immediately. To stop recording, select
Playing a Recorded Radio Program
- Select Radio → Recorded Files.
- All the recorded files are listed here.
- You can view those files by date, title or status.
- Choose the desired file.
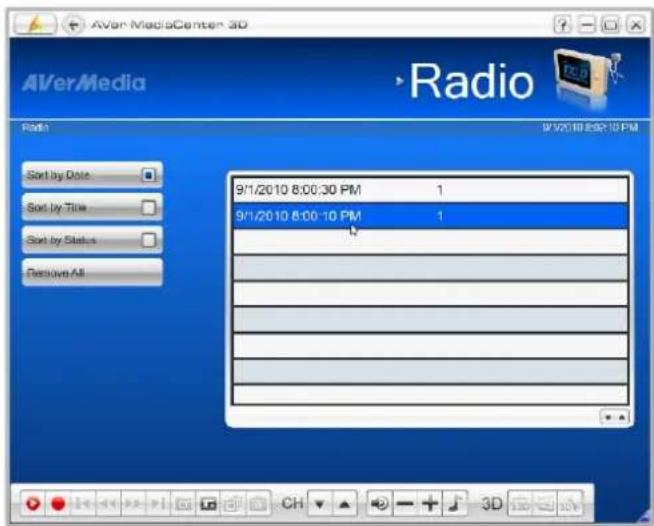
- Select Play.
- To temporarily pause the playback, select □. To stop the playback, select □.

Setting the Audio Mode (Only Available for FM Radio)
The application will automatically set each FM radio channel to Mono or Stereo based on the audio mode of the FM radio signals received.
- Select Settings → Radio → Configure FM Radio → Manage Programs.
- Click on the channel. Select Mono or Stereo to get better audio quality.
- Select Save to save the settings or select Cancel to abort without saving.

Viewing RDS Information (Optional)
RDS (Radio Data System) is an international standard for transmitting the digital data along with FM Radio signal. An RDS-capable radio can display name of the station, program types, local traffic information or commercials, etc. To view RDS information, please do the followings:
- After scanning, go to the Radio page and you can see all available channels listed in the right-hand section of the screen.
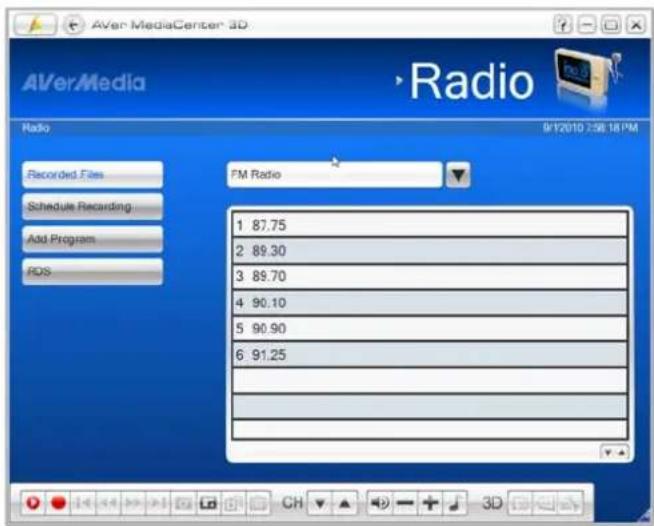
- For those channels whose radio stations transmit RDS data, you will see a RDS button and the display name of the channel on the left-hand section of the screen.
- Click RDS, and you can see more information about the radio channels.

2.4 Video
With this function, you can view recorded programs or other video files.
Playing Video Files
- Select Video.
- You may see some recorded video files are listed on the right hand section of the screen. Or you can select More Videos to choose other folders.
- Select the file you want.
- Select on the control panel to stop the playback and return to live program. To pause the playback, press ▶ on the remote control or select ▶ on the control panel.
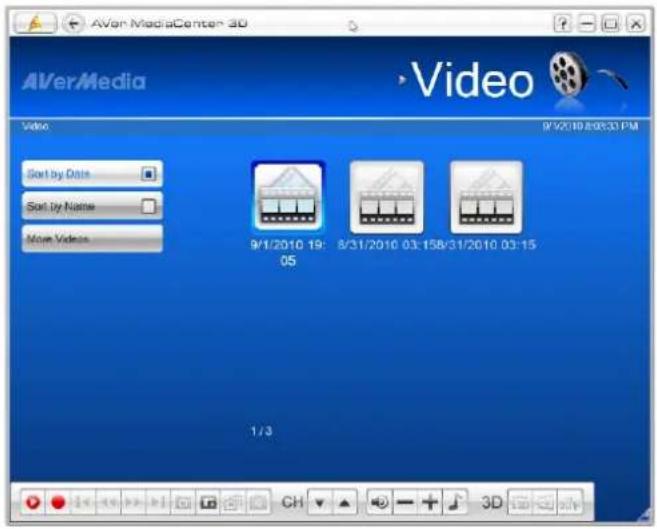
☑ Note: For playing and watching video files in 3D simulation, refer to 3DTV in Chapter 2.
2.5 Music
You can create your music library and enjoy music with our AVer MediaCenter 3D.

Adding Music to Your Playlist
Add your favorite music to AVer MediaCenter 3D music playlist and then you can playback music from the playlist next time.
- Select Music Add Music and then select the desired folder.
- Choose the tracks you wish to play. Press ☑ on the remote control or Space button on your keyboard to confirm the selected file or folder.
-
Select OK to go back one level.
-
Then you can see the added files displayed in the right-hand section of the screen.
-
Use ✗ to remove one track or select Remove All to delete all tracks in the playlist.


Playing Music
To playback music:
- Select Music.
- Enable Sequential to play tracks in order or Random to shuffle the order.
- To continue playing all the tracks, select Loop check box.
- Use ▼ to determine the order of the tracks in your playlist.

-
Then select to start to listen to the music.
-
Use the following buttons to control your playback.


2.6 Pictures
In this section, we introduce methods to view your pictures and play a slide show.
Viewing the Captured Images
- Select Pictures.
- The captured thumbnails are displayed in the right-hand section.
- By clicking on the thumbnails, you can view images in a full-screen window.
- Select More Pictures to find the folder that contains the desired pictures if your images are not saved in the default folder.
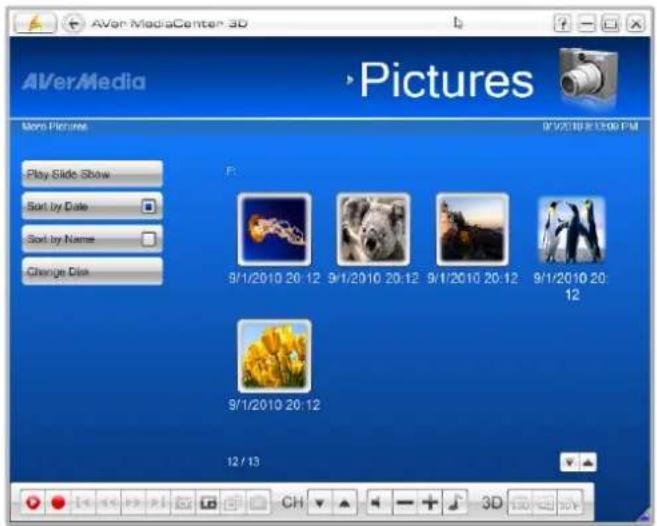
☑ Note: You can view thumbnails and enjoy live TV / radio or music at the same time.
Playing Slide Show
- Select Pictures.
- Select Play Slide Show to start a slide show.
- To stop the slide show and go back to the previous page, press the button ↻.

Chapter 3
Advanced
Operations
Beyond basic usage, what else you can do with AVer MediaCenter 3D? In this chapter, we take you to the next level and explain the advanced features of this application.
TV....58
Radio....68
Video....71
3.1 TV
Using Schedule Recording
You may need to record a program for some time in the future, first go to the TV page, select Schedule Recording and then select New Schedule.
- Choose the appropriate device. For instance, if you want to record digital TV program, you should choose the device that can receive digital signals.
- Type the desired name for the recording in the Schedule Name text box.
- From the Task drop-down list, select Active TV Application to tune into the desired channel. You can also select Silent Recording to perform background recording or select Recording to save a program for future viewing.
-
In the After Recording Mode option, it automatically switches to the selected power control mode when the schedule recording is completed. Choose an appropriate power control status listed below:
-
Launch Live TV: Switch to real-time TV mode.
- Exit: Turn off the Application.
- Log Off: Log off from windows.
- Stand By: Turn off your monitor and hard disks.
- Hibernate: Save everything and then turn off your computer.
• Power Off: Shut down your
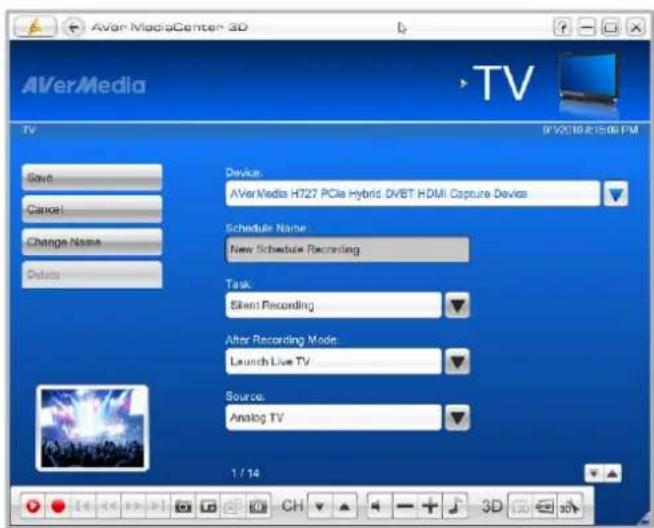

computer.
- Next, determine the signal source and channel.
- In the Task Period, you can set the schedule once or on a daily/weekly basis.

- Determine the file format and recording duration.
- This application lets you to divide the recording files into parts for burning onto removable optical media, such as CD (650 MB) and DVD (4096 MB) discs. Select the Split File Size option and select the appropriate video file size from the drop-down list so that each video file will not exceed the limit. Or you can choose Customize to assign the file size you want.
- Finally, choose the destination folder to save the recorded file.
- Select Save to save the settings or select Cancel to abort without saving.

Note:
-
Before establishing a schedule, please make sure that your system time is correct.
-
While you are away from your desk, you can put your computer into Stand By or Hibernate mode. When it comes to your setting time, your computer will come out of Stand By or Hibernate mode and start to execute the schedule recording. For details about configuring the power options, please refer to the documentation that came with your operating system.
Using TimeShift
The TimeShift function performs background recording of a program, and lets you return to any part of the recorded program. At the same time, the live program continues to be recorded and played back so you won't miss any part of the show. You can also advance forward to skip commercials or rewind to replay scenes again.
- Select TV.
- On this page, you can select TimeShift, press TimeShift on the remote control or select ▶ on the control panel. Then on the upper-right corner of the main screen displays the background recording time and the current-show time.
- Select to move backward in fixed intervals until reaching the part where you left off.
- To advance forward and skip some parts of the recording, select ➞ to move forward in fixed intervals.
- To temporarily pause the playback, press ▶ on the remote control or choose ▶ on the control panel. To resume, select ▶
- To return to the real-time program, select ■. This switches off the TimeShift function and returns you to the live program.
√ Note: The application will create a temporarily recorded file when the TimeShift function is being performed for a program. This file will be removed when you select □.
Switching Between TV and External Video
If the device you use has external signals, you can watch video from an external source such as a VCR or camcorder:
- Select TV.
- From the drop-down list, choose the type of video source.

Multi-Source Display (Only Available for Multi-Source Tuner Series Users)
With the PIP/PBP feature, when you are using multi-source tuner series (such as AVerTV CaptureHD), you are able to watch many video sources (TV and external video) at the same time. To do so, please do the followings:
- Select TV.
- From the drop-down list, choose the type of video source.

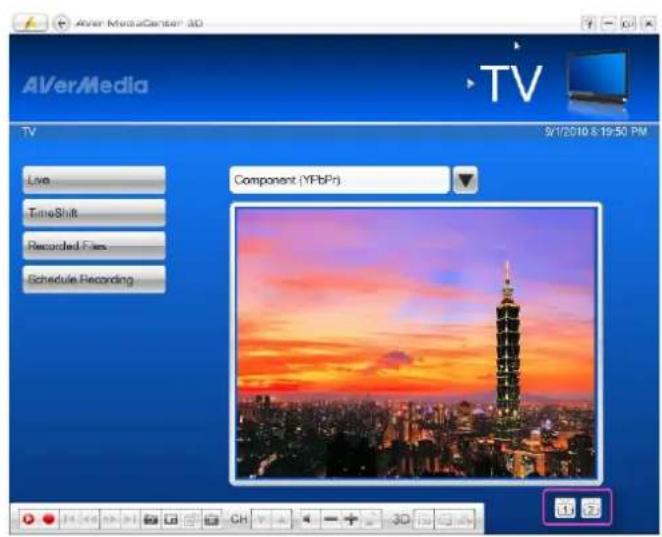
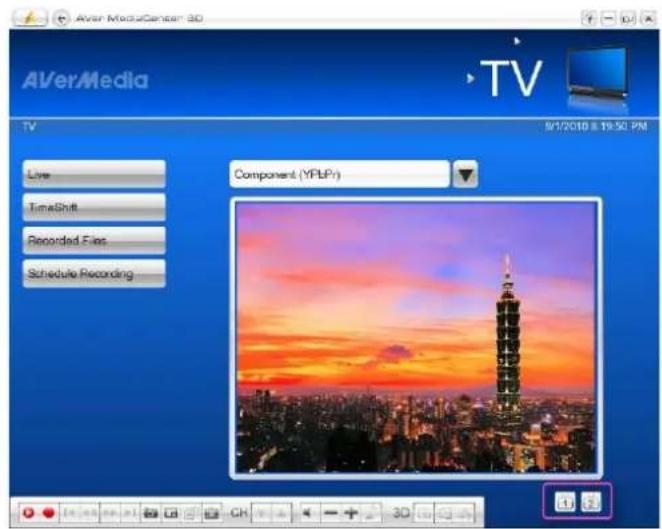
- On this page, press on the remote control or use on the control panel. You can see TV icons on the bottom-right corner of the screen. In this example, two TV icons appearing indicate two video sources.
- Select and choose the type of video source from the drop-down list (Analog, DVB-T Composite, S-Video).
- Select and choose the type of video source from the drop-down list (Component, HDMI).
- You can choose either or to switch between different video sources.
- Then, to display all available video sources simultaneously, select Live.
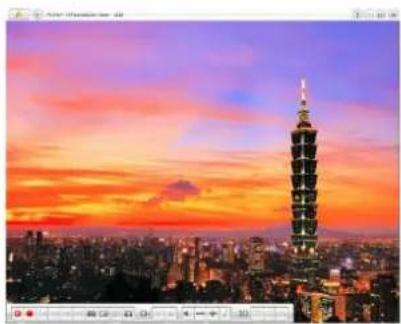
- Select for repeatedly to switch between Full screen mode, PIP mode and PBP mode (as shown on the right).

natural_image
Panoramic cityscape at sunset with illuminated skyscrapers and vibrant orange and purple sky (no visible text or symbols)(Full Screen Mode)
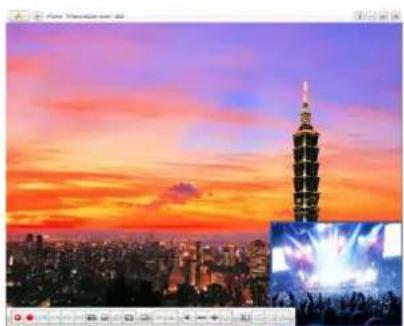
natural_image
Cityscape at sunset with illuminated skyscrapers and a colorful sky (no visible text or symbols)(PIP Mode)
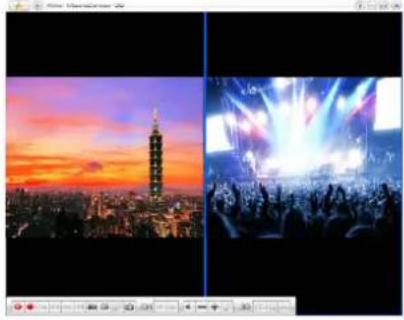
natural_image
Split image showing a city skyline at sunset with a tall tower and a crowd watching a nighttime concert (no visible text or symbols)(PBP Mode)
- To change the video source, right click on the selected screen. When a pop-up menu appears, point to Source and select the type of video source you prefer.

- Under PIP mode, to change size of the PIP screen, first press on the remote control. Then use to shrink the image or use to enlarge the image. To exit the PIP-sizing mode, press again.

☑ Note: Record function is not available in PIP/PBP display mode.
Multi-Channel Display (Only Available for Multi-Card/Dual Tuner Series Users)
When you install two or more TV tuner cards or devices in the computer, this function allows you to watch many channels at the same time.
- Select TV.
-
On this page, press on the remote control or use on the control panel. You can see TV icons on the bottom-right corner of the screen. In this example, two TV icons appearing indicate two devices are installed in this computer.
-
You can choose either or to switch between different TV signals.
-
To display all available TV signals simultaneously, select Live.
-
Select for repeatedly to switch between Full screen mode, PIP mode and PBP mode (as shown on the right).
-
To switch and listen to the sound of another TV signal, simply use the arrow button to select the PIP/PBP screen.
natural_image
Panoramic cityscape at sunset featuring the Taipei Tower, with vibrant orange and purple sky (no visible text or symbols)(Full Screen Mode)

natural_image
Cityscape at sunset with a prominent tower and colorful sky, accompanied by an inset photo of a crowd under a stage lighting (no visible text or symbols)(PIP Mode)
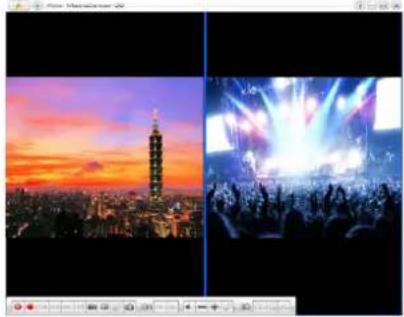
natural_image
Split image showing a city skyline at sunset with a tall tower and crowd, alongside a nighttime cityscape with colorful lighting (no visible text or symbols)(PBP Mode)
- Under PIP mode, to change size of the PIP screen, first press on the remote control. Then use to shrink the image or use to enlarge the image. To exit the PIP-sizing mode, press again.

Multi-Program Display (Only Available for Digital TV)
In the digital terrestrial field, a single channel (frequency) is able to carry more than one TV program at the same time. That's why usually there are only a few active channels found, but many programs are listed. This section tells you how to watch different programs that are under the same frequency (channel) simultaneously.
- Select TV.
-
On this page, use ☐ on the control panel. You can see TV icons ☐ on the bottom-right corner of the screen. In this case, three TV icons appearing means under the same frequency, there are three different programs.
-
You can choose TV icons to switch between different programs.

- To display all available TV signals simultaneously, select Live.
- Select repeatedly to switch between Full screen mode, PIP mode and PBP mode (as shown on the right).
- To switch and listen to the sound of another TV signal, simply use the arrow button to select the PIP/PBP screen.

natural_image
Cityscape at sunset with a prominent illuminated tower, no visible text or symbols(Full Screen Mode)
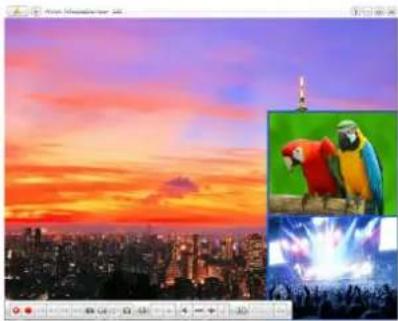
natural_image
City skyline at sunset with colorful parrot and a large explosion in the foreground (no text or symbols visible)(PIP Mode)

natural_image
Composite image showing a concert with a stage, a colorful parrot, and a city skyline at sunset (no text or symbols)(PBP Mode)
- Under PIP mode, to change size of the PIP screen, first press on the remote control. Then use to shrink the image or use to enlarge the image. To exit the PIP-sizing mode, press again.

3.2 Radio
Using Schedule Recording
You may need to record a program for some time in the future, first go to the Radio page, select Schedule Recording and then select New Schedule.
- Choose the appropriate device. For instance, if you want to record digital radio program, you should choose the device that can receive digital signals.
- Type the desired name in the Schedule Name text box.
- From the Task drop-down list, select Active TV Application to tune into the desired channel. You can also select Silent Recording to perform background recording or select Recording to save a program for future listening.
-
In the After Recording Mode option, it automatically switches to the selected power control mode when the schedule recording is completed. Choose an appropriate power control status listed below:
-
Launch Live TV: Switch to real-time FM Radio mode.
- Exit: Turn off the Application.
- Log Off: Log off from windows.
- Stand By: Turn off your monitor and hard disks.
- Hibernate: Save everything and then turn off your computer.
Power Off: Shut down your computer.


- Next, determine the signal source and channel.
- In the Task Period, you can set the schedule once or on a daily/weekly basis.
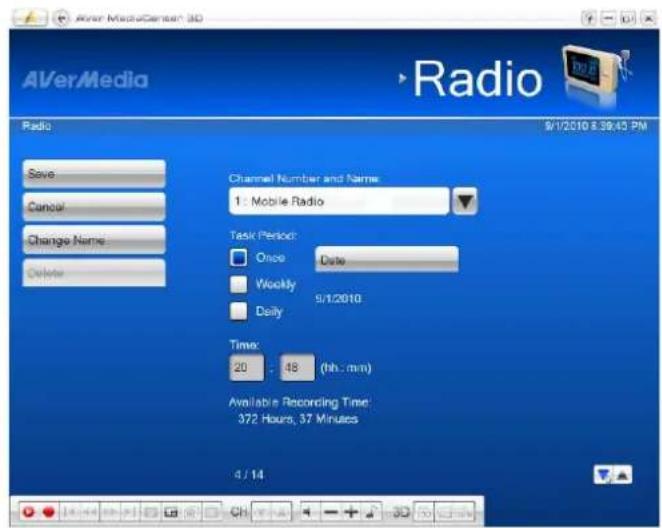
- Determine the file format and recording duration.
- This application lets you to divide the recording files into parts for burning onto removable optical media, such as CD (650 MB) and DVD (4096 MB) discs. Select the Split File Size option and select the appropriate video file size from the drop-down list so that each video file will not exceed the limit. Or you can choose Customize to assign the file size you want.
- Finally, choose the destination folder to save the recorded file.
- Select Save to save the settings or select Cancel to abort without saving.
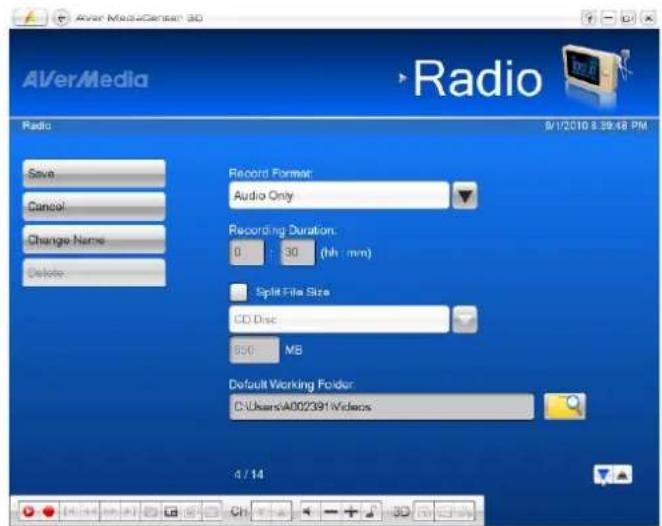
Note:
- Before establishing a schedule, please make sure that your system time is correct.
- While you are away from your desk, you can put your computer into Stand By or Hibernate mode.
When it comes to your setting time, your computer will come out of Stand By or Hibernate mode and start to execute the schedule recording. For details about configuring the power options, please refer to the documentation that came with your operating system.

Using TimeShift
You can use the TimeShift function to perform background recording of a radio program and even replay.
To start the TimeShift Function:
- Select Radio.
- Choose the desired channel to go to the next page.
-
On this page, you can select Radio TimeShift, press TimeShift on the remote control or select on the control panel. Then on the upper-right corner of the main screen displays the background recording time and the current-show time.
-
Select to move backward in fixed intervals until reaching the part where you left off.
-
To advance forward and skip some parts of the recording, select ➤ to move forward in fixed intervals.
-
To temporarily pause the playback, press ▶ on the remote control or choose ▶. To resume, select ▶
-
To return to the real-time program, select . This switches off the TimeShift function and returns you to the live program.

Note: The application will create a temporarily recorded file when the TimeShift function is being performed for a program. This file will be removed when you select
3.3 Video
Picture-in-Picture(PIP) / Picture-by-Picture(PBP) Display
With the PIP/PBP feature, you are able to playback recorded video files, and at the same time, watch live TV.
- Select Video.
- On this page, choose the desired file. Or select More Videos to find other video files.
-
When playing the video file, press on the remote control or use 📄 on the control panel to enable the PIP function.
-
Select or repeatedly to switch between Full screen mode, PIP mode and PBP mode (as shown on the right).
-
By default, the playback recorded video is displayed on the main screen, and live TV is on the PIP/PBP screen.
-
To switch and listen to the sound of live TV, simply use the arrow button to select the PIP/PBP screen.
-
Meanwhile, the control buttons on the screen may vary depending on the selected screen mode.

natural_image
Cityscape at sunset with a prominent illuminated tower and colorful sky (no visible text or symbols)(Full Screen Mode)
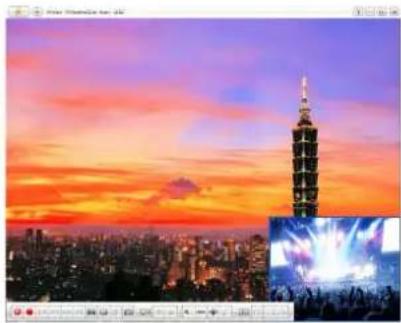
natural_image
City skyline at sunset with a prominent tower and colorful sky, alongside a small inset image of a live performance with stage lighting (no text or symbols visible)(PIP Mode)

natural_image
Split image showing a city skyline at sunset with a tall tower and a crowd watching a stage (no visible text or symbols)(PBP Mode)
- Under PIP mode, to change size of the PIP screen, first press 📄 on the remote control. Then use 📋 to shrink the image or use 🌐 to enlarge the image. To exit the PIP-sizing mode, press 📄 again.

Chapter 4 More Settings
Before scanning channels, recording programs, or capturing images, check the settings page to see if they meet your needs. With our explanation in this chapter, you can easily customize all the settings of AVer MediaCenter 3D.
General Settings....74
TV Settings....78
FM Radio Settings ....86
Video Settings......88
Picture Settings 89
About 90
4.1 General Settings
Here you can select the destination folder for saving recorded files, determine recording time and file size, assign the number of image you want to capture, setting the Windows power options, etc.

Configure Storage
- Select Settings → General → Configure Storage.
- Use the default folder for saving the recorded files
- Or select to look for your desired folder.

-
On the next page, you can use to go up one level to find other folders or select Change Disk to choose other hard drives.
-
Then Choose OK to confirm the selection.

-
Determine the length of recording time otherwise the system will record the largest clip that your hard drive can accommodate.
-
This application lets you to divide the recording files in parts for burning onto removable optical media, such as CD Disc (650 MB) and DVD Disc (4096 MB) discs. Select the Split File Size check box and choose the appropriate video file size from the drop-down list so that each video file will not exceed the limit. Or you can choose Customize to assign the file size you want.

- Select Save to save the settings or select Cancel to abort without saving. If you want to revert to factory settings, select Default.
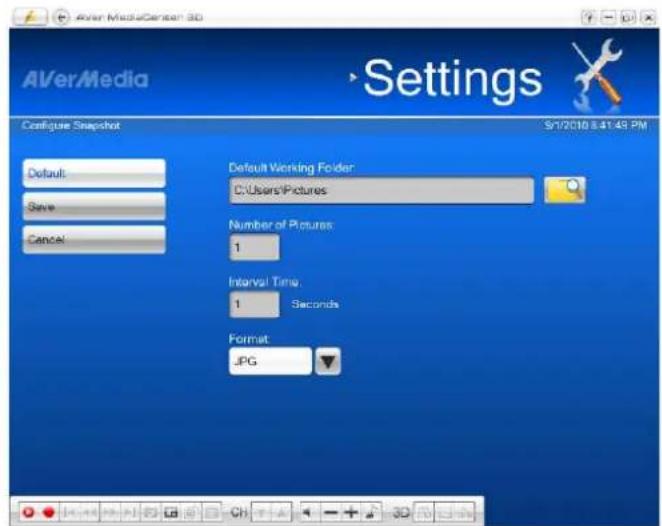
Configure Snapshot
- Select Settings → General → Configure Snapshot.
- In the Number of Pictures box, assign the number of images that you want to capture.
- In the Interval Time box, specify the interval between captures. For instance, if you specify 10 seconds, an image will be captured every 10 seconds.
- Choose the format you want for saving the captured images.
- Use the default folder for saving images.
- Or select to look for your desired folder.
- On the next page, you can use to go up one level to find other folders or select Change Disk to choose other hard drives.
- Choose OK to confirm your selection.
- Select Save to save the settings or select Cancel to abort without saving. If you want to revert to factory settings, select Default.

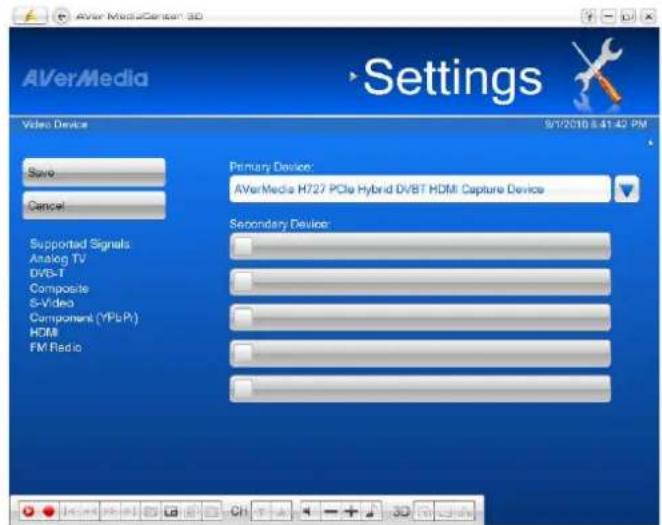
Video Device (Only Available for Multi-Card / Dual Tuner Series Users)
If you install two or more devices in your computer, for example AVerTV GO 007 Plus (M15C) and AVerTV Hybrid+FM Cardbus (E506R), you need to determine which device you want to use for watching TV, listening to the radio and other multimedia functions. For dual tuner series users, you also need to determine which tuner you want to use for watching TV.
-
Select Settings → General → Video Device.
-
Choose the primary device from the drop-down list.
-
To use Multi-Channel Display function, you need to select the secondary devices. (For more details on this function, refer to Multi-Channel Display in chapter 3)
-
Select Save to save the settings or select Cancel to abort without saving.
-
To find out if your AVerMedia product supports multi-card feature, please refer to AVerMedia's website.
More Options
This page allows you to set the power mode. Then you can put your computer in Stand By, Hibernate or other modes while you are away from the computer.
- Select Settings → General → More Options.
- You can select the UI language you want from the Language drop-down list.
- Select Display AVerMedia Logo check box to show AVerMedia Logo on the upper left corner of the TV screen.
- By default, the system is set to select Enable Stand By / Hibernate Support.
- In the second page, determine the sleep function and choose the desired power-saving settings, including Exit, Stand By, Hibernate and Power Off.
- Select the Keep Sleep function after TV application closed check box to enable the function.
- Select the preferred video renderer from the drop-down list.
- Select Save to save the settings or select Cancel to abort without saving. If you want to revert to factory settings, select Default.


Note:
- If your computer has problem with being out of Stand By or Hibernate mode, clear the Enable Stand By / Hibernate Support option.
- Under Window Vista system, Enhanced Video Renderer (EVR) is provided for better synchronization. (By default, Overlay Mixer is chosen in Windows XP system and Enhanced Video Renderer in Windows Vista system.)
4.2 TV Settings
All TV setting tips are included within this section.
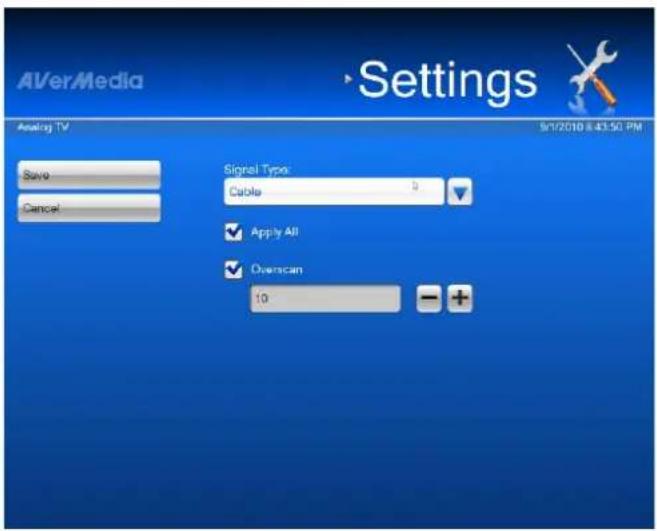
Configure Analog TV / Configure Digital TV → Configure TV Signal
- Select Settings → TV → Configure Analog TV or Configure Digital TV → Configure TV Signal.
- If you choose Configure Analog TV in step 1, you need to determine the signal type: Antenna or Cable. (If the country you choose in Chapter 1.6 is USA or Canada, you can determine the signal type: Antenna, Cable-Standard and Cable-HRC.)
- To apply the Overscan function to all channels at a time, first select Apply All check box.
- Specify an appropriate number (0\~20) to get the better quality.
- Select Save to save the settings or select Cancel to abort without saving.
Configure Analog TV / Configure Digital TV → Manage Programs
- Select Settings → TV → Configure Analog TV or Configure Digital TV → Manage Programs.
- Choose the desired channel.
- If you choose "Configure Analog TV" in steps 1 and there are two or more TV systems in your area, try to select other TV system standard when the channel display looks abnormal.
- Select Save to save the settings or select Cancel to abort without saving. If you want to revert to factory settings, select Default.
- Under this menu (Manage Program), you can also scan channels, determine the channel name, change the channel order, adjust color of the display and so on. For details, refer to Chapter 2.

Configure Analog TV / Configure Digital TV / HD Input Source→ Configure Recording
- Select Settings → TV → Configure Analog TV, Configure Digital TV or HD Input Source → Configure Recording.
-
Choose the default file format from the Record Format drop-down list.
-
Some formats allow you to select Edit to create your own file format.
- Select Save to save the settings or select Cancel to abort without saving.
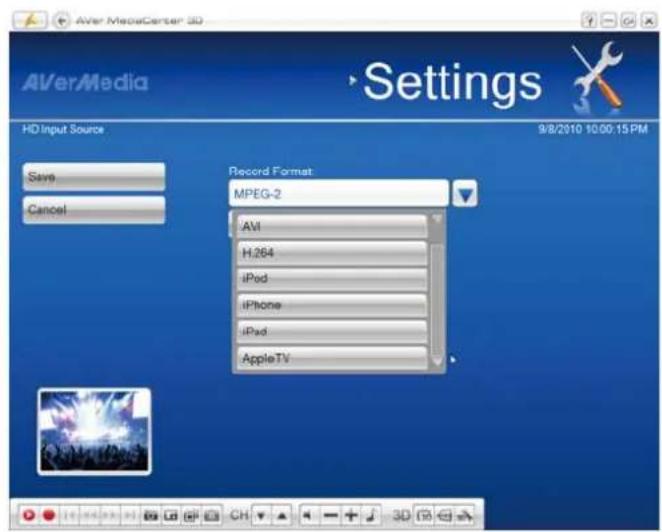
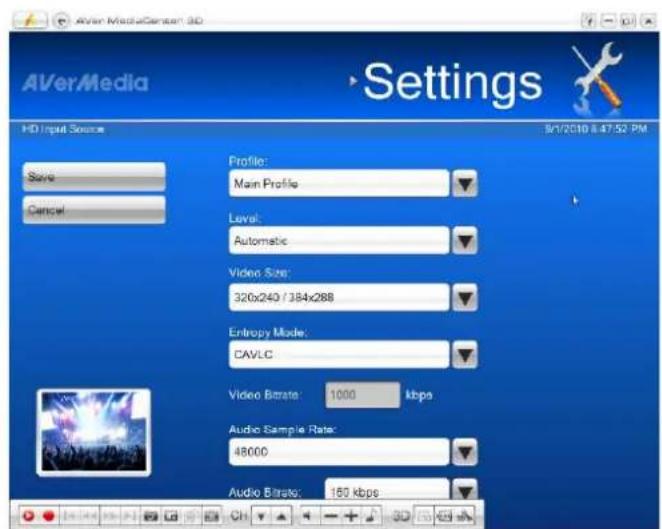
Here is a list of supported recording formats in "Configure HD Input Source" (Recording from HDMI and Component input sources):
| Recording Format | Estimated File Size (per hour) | Option* (for advanced users) | |
| 1. | MPEG-2 6.9G | Video Size | |
| Video Quality | |||
| Audio Sample Rate | |||
| Audio Quality | |||
| 2. | H.264 1G | Profile | |
| Level | |||
| Video Size | |||
| Entropy Mode | |||
| Video Bitrate | |||
| Audio Sample Rate | |||
| Audio Bitrate | |||
| 3. | iPod 350MB | None | |
| 4. | iPhone 1.2G | None | |
| 5. | iPad 2.4G | None | |
| 6. | Apple TV 2.4G | None |
Note:
- The above estimated file size is calculated based on the default settings and only for your references. Actual file size will vary depending on your configuration.
- Please be noted that if your video source is in H.264 format, you can only record it as H.264 file. Saving it as other formats is invalid.
Here is a list of descriptions for those advanced options above (for advanced users):
| Option* Description | |
| Video Encoder A tool of video compression. A better video encoder produces higher video resolutions with less video distortion and smaller file size. | |
| Video Size Here you can choose the video display size of the recorded file. Bigger video size will have larger file size, but better video quality will be gained. Some displayers may not support large video size. Please choose one based on your needs. | |
| Video Quality | Adjust the video quality with [IMAGE]. Higher numbersindicate better video quality but bigger file size. |
| Video Bitrate Video | bitrate refers to the number of bits used per second. Higher bitrate means a bigger file size and generally better video quality. |
| Entropy Mode CALVC | or CABAC are two modes of entropy encoding, a data compression scheme, for H.264. CAVLC, supported in all H.264 profiles, is the lower-quality, easier-to-decode option. CABAC delivers higher-quality video and compresses data more efficiently than CAVLC but takes more processing to decompress. CABAC is not supported in Baseline and Extended profiles. |
| Profile The profile defines the configurations for encoding the files. | |
| Level The level specifies a limit for a variable such as the maximum resolutions and data rates. | |
| Windows Media Format Windows Media Format means the compression type developed by Microsoft. | |
| Audio Encoder A tool of audio compression. A better audio encoder produces higher audio resolutions with less audio distortion and smaller file size. | |
| Audio Attribute Audio attribute contains a coding mode, a sampling rate, the number of channels, and a quantization level. | |
| Audio Sample Rate Audio Sample Rate refers to the numbers of times the analog audio signal is sampled per second when being converted to digital one. Higher numbers means better audio quality but bigger file size. | |
| Audio Quality Select one from the audio quality menu. Higher numbers indicate better audio quality but bigger file size. | |
| Audio Bitrate Audio bitrate refers to the numbers of bits used per second. Higher bitrate means a bigger file size and generally better audio quality. | |
Configure Analog TV → Configure Timeshift
- Select Settings → TV → Configure Analog TV → Configure Timeshift.
- Choose Normal or Good video quality for timeshifting. (The default option may vary depending on the level of your CPU. For CPU of Intel Pentium D, AMD Athlon 64x2 or above, "Good" is chosen by default. Otherwise, "Normal" is set as the default option.)
- Select Save to save the settings or select Cancel to abort without saving.
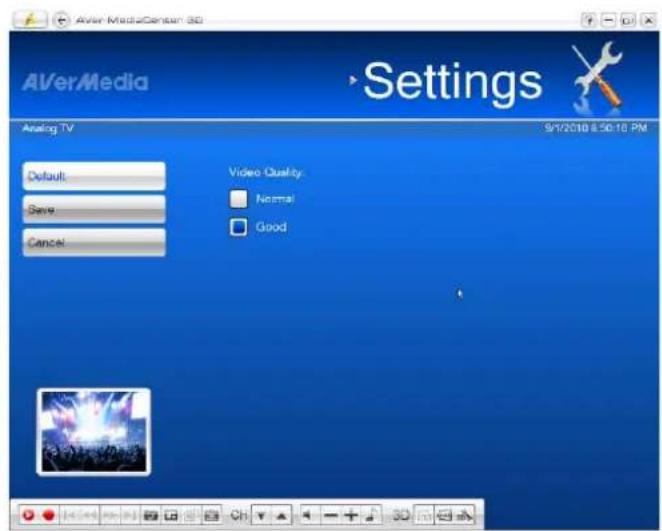
Configure HD Input Source → Configure Timeshift
- Select Settings → TV → Configure HD Input Source → Configure Timeshift.
- Choose Normal, Good or Best video quality for timeshifting. (The default option may vary depending on the level of your CPU.)
- Select Save to save the settings or select Cancel to abort without saving.

Configure Analog TV / Configure Digital TV → Configure Color Adjustment
- Select Settings → TV → Configure Analog TV or Configure Digital TV → Configure Color Adjustment.
- Then use to adjust the Brightness, Contrast, Hue, Saturation and Sharpness until the image color is accurate.
- To adjust the color of all channels at a time, select Apply All check box.
- Select Save to save the settings or select Cancel to abort without saving. If you want to revert to factory settings, select Default.
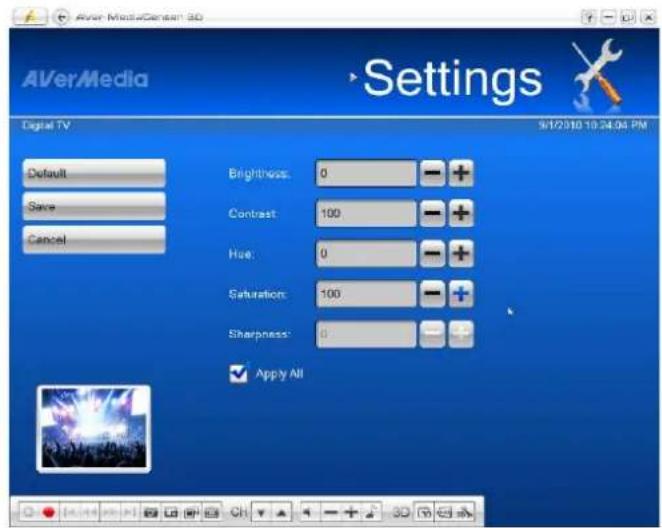
Note: For digital TV, if all items (Brightness, Contrast, Hue, Saturation, Sharpness) can't be adjusted, try to update VGA driver.
More TV Options
- Select Settings → TV → More TV Options.
- Make sure that your country or region is correct if you cannot get any channels after scanning.
- If you connect to an external video device, you need to select the correct video standard.
- If you connect to a HD device, you need to select the correct HD input source.
- Select Save to save the settings or select Cancel to abort without saving.

4.3 Radio Settings
This section gives you more setting properties when you listening to the radio.
Manage FM Radio Programs / Manage Digital Radio Programs
- Select Settings → Radio → Configure FM Radio or Configure Digital Radio → Manage Programs.
- Select All Frequency Scan when there are channels missing from the channel memory. This may take you a while, please be patient.
- To terminate scanning, select Stop.
- If you choose Configure FM Radio in step 1, select the desired channel to go to the next page.
- You can change the audio mode of a stereo FM radio signal. Select Mono or Stereo to get better audio quality.
- Select Save to save the settings or select Cancel to abort without saving.

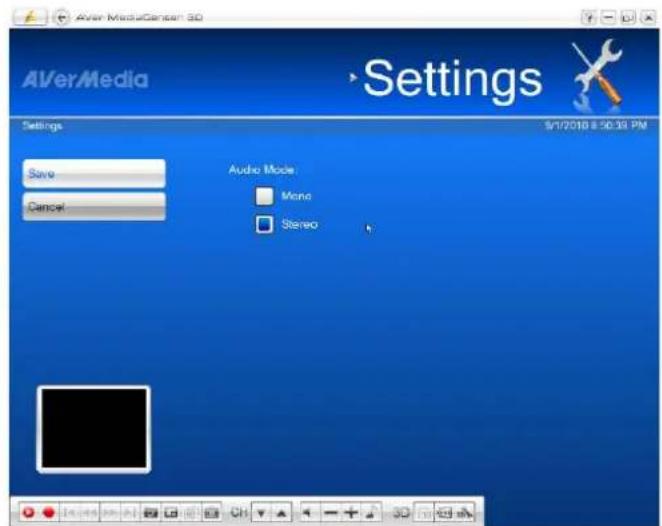
Configure FM Radio Recording / Configure Digital Radio Recordings
- Select Settings → Radio → Configure FM Radio or Configure Digital Radio → Configure Recording.
- Choose the record format from the drop down list.
- If you choose the WMA record format in step 2, you can click the Edit icon to choose the preferred type of Window Media formation.
- Select Save to save the settings or select Cancel to abort without saving.
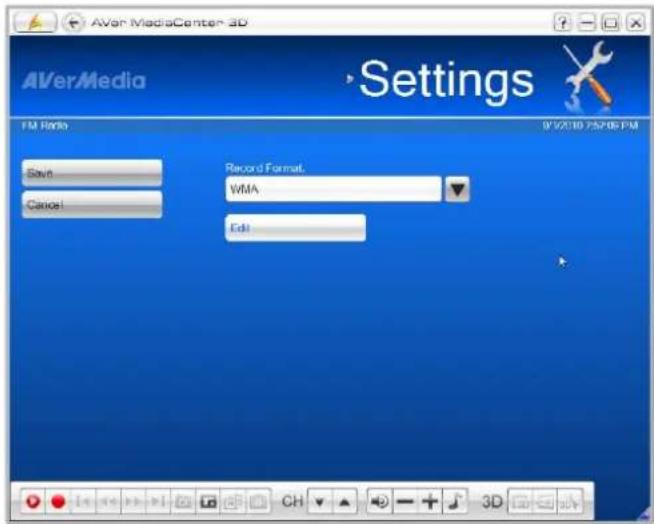
4.4 Video Settings
- Select Settings → Video.
- Use the default folder for saving the recorded video file.
- Or select to look for your desired folder.

- On the next page, you can use to go up one level to find other folders or select Change Disk to choose other hard drives.
- Then Choose OK to confirm your selection.
- Select Save to save the settings or select Cancel to abort without saving. If you want to revert to factory settings, select Default.
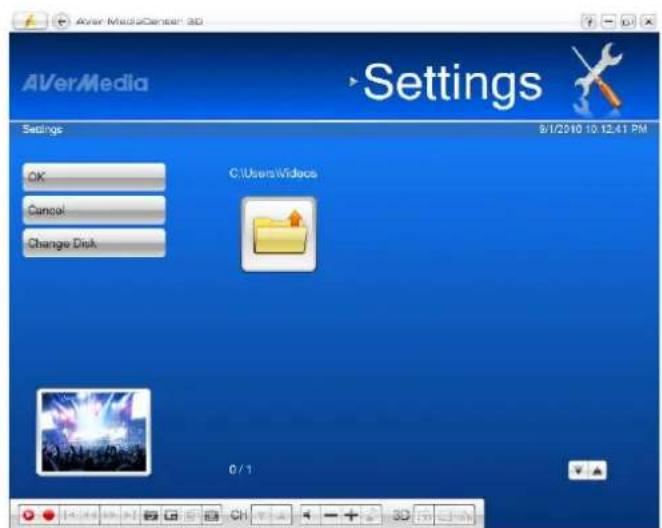
4.5 Picture Settings
Before you start playing slide show, first check its settings to see if they fit your needs.
- Select Settings → Picture.
- From the Play Settings drop-down list, select Sequential to play a slide show in order or select Random to shuffle the order.
- Type a value in the Interval Time text box to determine how long you want to display each picture.
- Select the transition you want to use from the Transition Effect drop-down list.
- Select to look for your desired folder.
- On the next page, you can use to go up one level to find other folders or select Change Disk to choose other hard drives.
- Choose OK to confirm your selection.


- To create a slide show using all pictures in the current folder and subfolder, select Including Sub-Folder Pictures check box.
- Select the Hide window on slide show mode check box to view pictures without video windows.
- Select Save to save the settings or select Cancel to abort without saving. If you want to revert to factory settings, select Default.
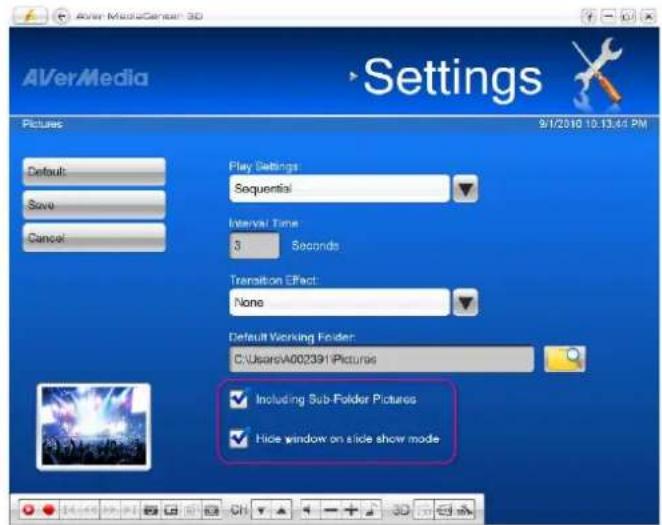
4.6 About
The AVerTV application provides a convenient tool, which allows users to ask questions via AVerMedia's website easily.
- Select Settings → About.
-
Make sure you have accessed to the Internet and then click Product Information to access the product information webpage. Or you can click Technical Support to connect to our technical support webpage.
-
On our web page, please enter your product version and driver version so that we can solve your problem efficiently.
![AVerMedia Settings About 9/1/2010 10:14:12 PM Product Information Technical Support AVer MediaCenter 3D Product Version:1.7.9 Beta [Build: 10082901] AVerMedia H727 PCIe Hybrid DVBT HDMI Capture Device Driver Version: 1.12.0.30 AVerMedia Technologies, Inc. Copyright (c) 2000-2010](/content/2026/06/1264581/images/0949bd34127fa0d992acb79c17a0a629677088db74fa6215afc9d40fbda8bf81.jpg)
Appendix
More tips and explanations are included in this chapter.
Hot Keys 92
Glossary 93
Satellite Internet Access 95
Universal DVB Plug-in....98
Video Gaming Plug-in 99
Video Quality Enhancement Plug-in.100
Hot Keys
| Hot Keys Description | |
| Up/Down/Left/Right arrow | Move up, down, left or right to select the desired item. |
| Tab Move to next item. | |
| Numeric keys | Use NUMERIC KEYS to directly enter the TV/Radio channel number. |
| Space | Confirm the selected tracks or folders when under the main menu -Music. |
| Page Up/Down Channel Up / Channel Down | |
| F1 Open the user manual. | |
| F8 Turn off / on the sound. | |
| F9 Volume Down | |
| F10 Volume Up | |
| Back Back to previous page | |
| Ctrl + A Choose between available audio modes. | |
| Ctrl + Shift + A Change aspect ratio | |
| Ctrl + D Display the channel number. | |
| Ctrl + Shift + D | Move backward in intervals. |
| Ctrl + E | A shortcut to your main menu-- "Video". |
| Ctrl + F A shortcut to your main menu-- "Radio" | |
| Ctrl + Shift + F Skip forward in intervals. | |
| Ctrl + G | View EPG information. |
| Ctrl + I | A shortcut to your main menu-- "Pictures" |
| Ctrl + M | A shortcut to your main menu-- "Music" |
| Ctrl + N Capture an image or a continuous sequence of images. | |
| Ctrl + Shift + N | Play next file in the playlist. |
| Ctrl + O | View the recorded file list. |
| Ctrl + P | Freeze the playback temporarily. |
| Ctrl + Shift + P | Play the selected file. |
| Ctrl + S | Stop the playback, recording, TimeShift, etc. |
| Ctrl + Shift + S | Enable the TimeShift function. |
| Ctrl + T A shortcut to your main menu-- "TV" | |
| Ctrl + Shift + T | Show TV/Video programs in full screen. |
| Alt + Home | Go to the main page of AVer MediaCenter 3D |
| Ctrl + L | Go to the previously accessed TV/Radio channel. |
| Ctrl + R Record the current program. | |
| Ctrl + Shift + R | Play previous file in the playlist. |
| Alt + T | View Teletext information. |
| Alt + B | Jump to the Blue Teletext page. |
| Alt + G | Jump to the Green Teletext page. |
| Alt + R | Jump to the Red Teletext page. |
| Alt + Y | Jump to the Yellow Teletext page. |
| Alt + Shift + S | Set the time to put your computer into Stand By/Hibernate mode, exit the application or turn off the computer. |
| Alt + S | Turn on/off the PIP-sizing function. |
| Alt + P | Turn on/off the PIP-positioning function. |
| Alt + M | Activate the Picture in Picture function (PIP). |
Ctrl + Shift + C Switch between available signal sources.

Glossary
AVI
AVI is the most common video file format for playback on the computer. It can be saved in uncompressed form if you want high quality video, or compressed using any of the available codecs if you want to minimize the file size.
Aspect Ratio
Aspect ratio indicates the ratio of the width of an image to its height. The two most common aspect ratio of home video is 4:3 and 16:9.
DVD
When you choose this format, the recorded video file will be saved in MPEG-2 format that is compliant with DVD standards. Standard DVD frame size and frame rate are 720 x 480 pixels at 29.97 fps for NTSC and 720 x 576 at 25 fps for PAL.
DxVA
DxVA stands for DirectX Video Acceleration, which is an application programming interface (API) defined by Microsoft. It allows decoders to accelerate video playback directly on the graphics processors instead of the main CPU. This means DxVA technology can reduce the CPU usage.
H.264
Videos compressed using MPEG-4 standard are two or three times more efficient than MPEG-2. This format can be applied to a wide variety of applications or networks and systems like HD-DVD, Digital TV, Broadcast and Streaming applications.
Hibernate
Hibernation is a state in which your computer shuts down to save power but first saves everything in memory on your hard disk.
iPod
A video format base on H.264 standard but has smaller video bit rate. It's an iPod-compatible format.
MPEG-1
Choose MPEG-1 format for video files that are intended for CD-ROM playback on a computer or for Internet transmission. MPEG-1 allows file compression and offers VHS quality picture. Just about every system available today can play MPEG-1 and does not need special software or hardware.
MPEG-2
Videos compressed using MPEG-2 have extremely high quality pictures and full CD-quality sound. Choose MPEG-2 format for video files that are intended for DVD-ROM playback on a computer or if you want broadcast quality videos.
PIP (Picture in Picture)
PIP allows you to view two or more video sources at the same time wherein the small inset screens overlaid on the main screen.
PBP (Picture by Picture)
PBP allows you to view two or more video sources side by side on a display so that all channels are visible.
Stand By
Stand By is a state in which your monitor and hard disks turn off, so that your computer uses less power.
SVCD
When you choose this format, the recorded video file will be saved in MPEG-2 format that is compliant with SVCD standards. Standard SVCD frame size and frame rate are 480 x 480 pixels at 29.97 fps for NTSC and 480 x 576 at 25 fps for PAL.
VCD
When you choose this format, the recorded video file will be saved in MPEG-1 format that is compliant with VCD standards. Standard VCD frame size and frame rate are 352 x 240 pixels at 29.97 fps for NTSC and 352 x 288 pixels at 25 fps for PAL.
WAV
A common audio file format for Windows computers. It was created by Microsoft and has become a standard PC audio file format.
Satellite Internet Access
Satellite Internet Access allows users to get faster connection to the internet via satellite. Simply follow the steps below:

If you are using one specific satellite service to watch satellite TV and access to the internet, click Insert > Import to apply the existing satellite data from AVerTV 6.x or AVer MediaCenter 3D and you may skip step 1 to 4.
-
In the Satellite Internet Access dialog by click Insert and an Insert dialog box appears.
-
Enter the desired name in the Service Name text box.
-
In the Switch Type section, choose the ty that is used by your satellite system.
-
In the LNB (MHz) section, configure your own LNB information, such as input range.
-
In the Tuner section, specify the correct frequency, symbol rate, and polarization.
-
In PID section, enter the correct PID value.
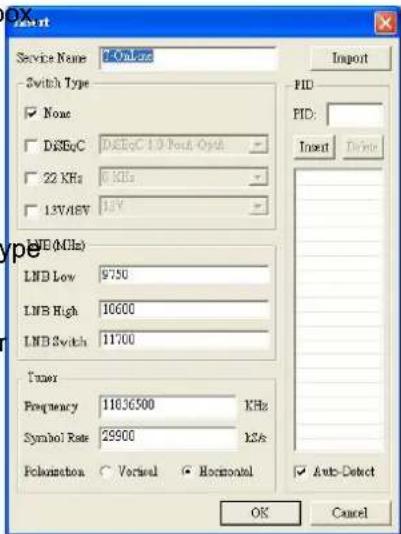
If there are PID values missing, it is recommended to use Auto-Detect to search for more PID values. After searching, all active PID will be displayed inside the box.
-
Click OK to save the settings or Cancel to leave without saving.
-
In the Satellite Internet Access dialog box, click Edit to modify the data or Delete to permanently remove the selected data.
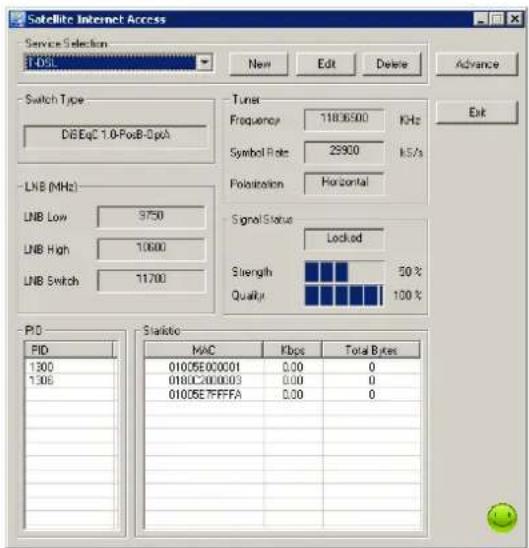

Different lamp indicates different status:
'Dark Red indicates your satellite configuration is at wrong setting.
Dark Green indicates the satellite signal is available but no Internet data transmission occurring that time.
Light Green indicates you have connected to the Internet successfully.
- Click Advance to customize the Satellite Internet Access.
- Start to Tray: Select to minimize the application and an icon will appear in the notification area.
- Notify When Close: Select to inform you when exiting the application.
- MAC Address: By default, the system detects MAC value automatically. Or click EDIT to enter your MAC value.
FAQ
Q: Before setting up, what should I prepare?
A : Satellite Internet Service requires you to have an ISP account and a Modem for sending commands to the Internet.
Q: Should I pay for Satellite Internet Access?
A : The charge for the service will be mainly determined by your Internet Service Provider (ISP). For details about the fee rate, please contact your ISP.
Q: Why can't I activate Satellite Internet Access?
A : You cannot activate AVerTV 6.x/AVer MediaCenter 3D and Satellite Internet Service at the same time so please make sure you have already exited the AVerTV 6.0/AVer MediaCenter 3D.
Q:Why can't I still access the Internet after setting up?
A : Our default IP address is 192.168.14.61. If there is something wrong with connecting to the website, please make sure that there is no IP address conflict in your computer.
Q: How can I get the PID value?
A : Please contact your ISP to obtain the related data.
Q: Where can I find the LNB information?
A : Refer to the documentation that comes with your LNB device.
Universal DVB Plug-in
Some devices (such as AVerTV Satellite PCI / AVerTV Satellite Hybrid + FM) are shipped with a “Universal DVB” plug-in program for Windows XP or Vista Media Center Edition (MCE), providing you to watch or record DVB-S programs directly under MCE UI.
Video Gaming Plug-in (for Microsoft Vista MCE / Windows 7 only)
MCE "Video Gaming Plug In" support is for Vista MCE only. After installing the driver, you can access it through the program library in Online Media. This function enables you to watch composite/S-Video signal source or play games in Vista MCE platform. (Playing games with MCE may cause delay, but you can choose "Video Gaming Plug In" to avoid it and enjoy real-time game play.)
- Start the Media Center in Vista.
- Select "Online Media" → "program library".

- Select "Video Gaming Plug In".
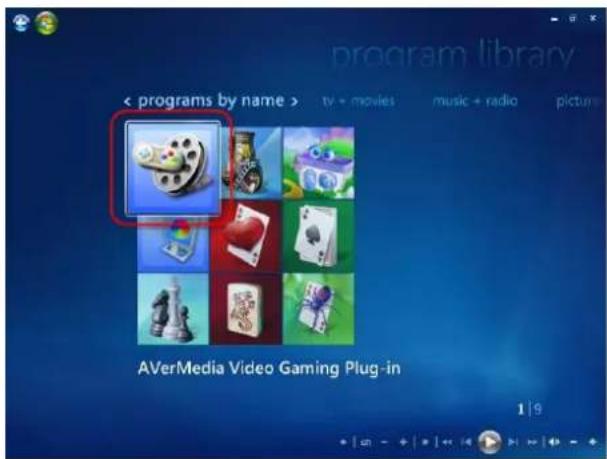
-
Select the video source you want to view via "Video Gaming Plug In".
-
Click button to view images in a full-screen window. Press ESC to exit the full-screen mode.
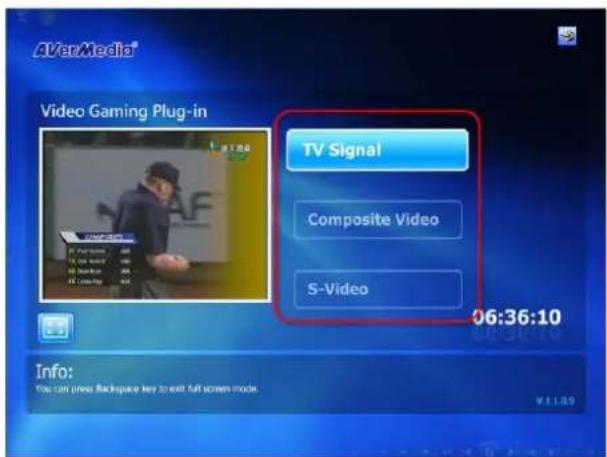
Video Quality Enhancement Plug-in (for Microsoft Vista MCE / Windows 7 only)
MCE "Video Quality Enhancement Plug-in" support is for Vista MCE only. After installing the driver, you can access it through the program library in Online Media. This function enables you to adjust the Brightness, Contrast, Hue, Saturation and Sharpness until the image color is accurate. The setting you made will be applied to Analog TV, and composite/S-Video signal source.
- Start the Media Center in Vista.
- Select "Online Media" → "program library".

- Select "Video Quality Enhancement Plug-in".

- Select the item you want to adjust.
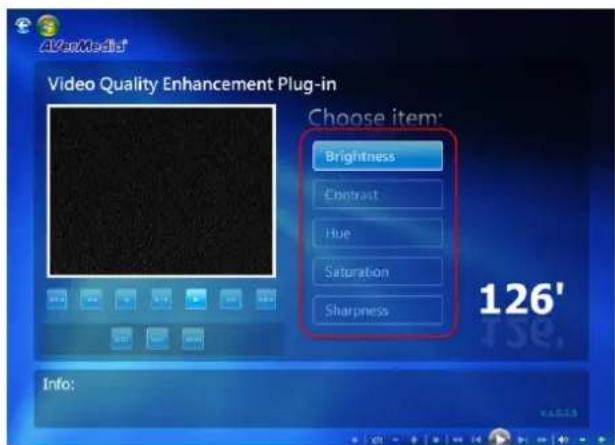
5. Use the following buttons to adjust the value of the item.

Decrease Brightness and Hue values by 32.
Decrease Contrast and Saturation values by 16.
Decrease Sharpness value by 8.
Decrease Brightness and Hue values by 16.
Decrease Contrast and Saturation values by 8.
Decrease Sharpness value by 4.
Decrease the item value by 1.
Reset the item value back to its default.

Increase the item value by 1.
Increase Brightness and Hue values by 16.
- Increase Contrast and Saturation values by 8.
Increase Sharpness value by 4.
• Increase Brightness and Hue values by 32.
- Increase Contrast and Saturation values by 16.
- Increase Sharpness value by 8.
• Increase Brightness and Hue values by 32.
- Increase Contrast and Saturation values by 16.
- Increase Sharpness value by 8.


6. Click button to reset all items back to their default settings.
7. Or click button to save all the settings.
8. If you want to exit without saving, click button ABORT.




- AVerMedia®
- A Ver Media Center 3D
- Disclaimer
- Copyright
- International Headquarter
- Table of Contents
- Chapter 1 Introduction....1
- Chapter 2 Getting Started....15
- Radio....46
- Video....53
- Music ....54
- Pictures ....56
- Chapter 3 Advanced Operations....57
- TV....58
- Radio....68
- Video....71
- Chapter 4 More Settings....73
- General Settings....74
- TV Settings....78
- Radio Settings 86
- Video Settings....88
- Picture Settings....89
- About....90
- Appendix 91
- Chapter 1 Introduction
- Device Introduction
- System Requirements
- Activating AVer MediaCenter 3D
- Overview of AVer MediaCenter 3D
- The Main Screen
- Description
- The Main Control Buttons
- Remote Control
- Overview of the Remote Control (model 1)
- Overview of the Remote Control (continued)
- Overview of the Remote Control (model 2)
- Overview of the Remote Control (model 3)
- Running AVer MediaCenter 3D for the First Time
- Chapter 2 Getting Started
- TV
- Scanning TV Channels
- Note:
- Watching Live TV
- Selecting a TV Channel
- Adjusting Volume
- Specifying a Channel Name or Description
- Fine Tuning Color and Quality of the Display
- Deleting a Channel
- Editing the Channel Group Table
- Managing the Channel Groups
- Using OverScan Function
- Changing the TV Channel Order
- Capturing Images
- Recording a TV Program Directly
- Playing a Recorded TV Program
- Viewing Teletext Information (Available for PAL / SECAM or DVB-T System)
- Viewing EPG Information (Only Available for Digital TV)
- 3DTV (for Microsoft Vista / Windows 7 only)
- Health reminder
- 3D technology application 101
- 3D illusion and 3D technology
- How 3D video signals are provided
- Different kinds of 3D glasses
- 3D Watching Operations
- Watching in 3D Mode
- "NVIDIA® 3D Vision™ Settings
- Watching a 3D Source TV Program in 2D Mode
- Watching a 2D Source TV Program in 3D Illusion via AVer MediaCenter 3D
- Recording a 3DTV Program
- Playing a Recorded 2D Source TV Program in 3D Simulation
- Playing a Recorded 3DTV Program
- Radio
- Scanning FM Radio Frequencies (Only available for FM Radio)
- Listening to the Radio
- Manually Scanning Specific FM Channels (Only available for FM Radio)
- Selecting a Radio Channel
- Changing the Radio Channel Order
- Recording a Radio Program Directly
- Playing a Recorded Radio Program
- Setting the Audio Mode (Only Available for FM Radio)
- Viewing RDS Information (Optional)
- Video
- Playing Video Files
- Music
- Adding Music to Your Playlist
- Playing Music
- Pictures
- Viewing the Captured Images
- Playing Slide Show
- Chapter 3
- Advanced
- Operations
- TV
- Using Schedule Recording
- Using TimeShift
- Switching Between TV and External Video
- Multi-Source Display (Only Available for Multi-Source Tuner Series Users)
- Multi-Channel Display (Only Available for Multi-Card/Dual Tuner Series Users)
- Multi-Program Display (Only Available for Digital TV)
- Radio
- Video
- Picture-in-Picture(PIP) / Picture-by-Picture(PBP) Display
- Chapter 4 More Settings
- General Settings
- Configure Storage
- Configure Snapshot
- Video Device (Only Available for Multi-Card / Dual Tuner Series Users)
- More Options
- TV Settings
- Configure Analog TV / Configure Digital TV → Configure TV Signal
- Configure Analog TV / Configure Digital TV → Manage Programs
- Configure Analog TV / Configure Digital TV / HD Input Source→ Configure Recording
- Configure Analog TV → Configure Timeshift
- Configure HD Input Source → Configure Timeshift
- Configure Analog TV / Configure Digital TV → Configure Color Adjustment
- More TV Options
- Radio Settings
- Manage FM Radio Programs / Manage Digital Radio Programs
- Configure FM Radio Recording / Configure Digital Radio Recordings
- Video Settings
- Picture Settings
- About
- Appendix
- Hot Keys
- Glossary
- AVI
- Aspect Ratio
- DVD
- DxVA
- H.264
- Hibernate
- iPod
- MPEG-1
- MPEG-2
- PIP (Picture in Picture)
- PBP (Picture by Picture)
- Stand By
- SVCD
- VCD
- WAV
- Satellite Internet Access
- FAQ
- Universal DVB Plug-in
- Video Gaming Plug-in (for Microsoft Vista MCE / Windows 7 only)
- Video Quality Enhancement Plug-in (for Microsoft Vista MCE / Windows 7 only)
- Use the following buttons to adjust the value of the item.
- Click button to reset all items back to their default settings.
- Or click button to save all the settings.
- If you want to exit without saving, click button ABORT.
Brand : AVERMEDIA
Model : AVerTV 3D USB (A867R-3D)
Category : TV receiver