
AVerTV Digi Express 54 - TV receiver AVERMEDIA - Free user manual and instructions
Find the device manual for free AVerTV Digi Express 54 AVERMEDIA in PDF.


| Product Type | USB TV Receiver |
| Brand | AVerMedia |
| Model | AVerTV Digi Express 54 |
| Category | TV Receiver |
| Dimensions (approx.) | 80 x 25 x 10 mm (3.15 x 0.98 x 0.39 in) |
| Weight (approx.) | 20 g (0.7 oz) |
| Power Supply | USB bus power (5V DC) |
| TV Standard | DVB-T (Digital Video Broadcasting - Terrestrial) |
| Frequency Range | VHF: 174-230 MHz, UHF: 470-862 MHz |
| Antenna Input | Coaxial (IEC) connector |
| Remote Control | Included with CR2032 battery |
| Software | AVerTV application for Windows |
| Recording | Scheduled recording and timeshift support |
| EPG (Electronic Program Guide) | Supported |
| Teletext | Supported |
| Audio Output | Analog stereo via 3.5mm jack |
| Supported OS | Windows 2000, XP, Vista, 7 |
| Safety | Low voltage device; avoid exposure to moisture |
| Cleaning | Wipe with a dry, soft cloth. Do not use liquids or solvents. |
| Spare Parts & Repairability | No user-serviceable parts. Contact authorized service center for repairs. |
Frequently Asked Questions - AVerTV Digi Express 54 AVERMEDIA
User questions about AVerTV Digi Express 54 AVERMEDIA
0 question about this device. Answer the ones you know or ask your own.
Ask a new question about this device
Download the instructions for your TV receiver in PDF format for free! Find your manual AVerTV Digi Express 54 - AVERMEDIA and take your electronic device back in hand. On this page are published all the documents necessary for the use of your device. AVerTV Digi Express 54 by AVERMEDIA.
USER MANUAL AVerTV Digi Express 54 AVERMEDIA
User Manual • English
DISCLAIMER
All the screen shots in this documentation are only example images. The images may vary depending on the product and software version. Information presented in this documentation has been carefully checked for reliability; however, no responsibility is assumed for inaccuracies. The information contained in this documentation is subject to change without notice.
COPYRIGHT
© 2008 by AVerMedia TECHNOLOGIES, Inc. All rights reserved. No part of this publication may be reproduced, transmitted, transcribed, stored in a retrieval system, or translated into any language in any form by any means without the written permission of AVerMedia TECHNOLOGIES, Inc.
AP-6.0.18
200811
Table of Contents
Chapter 1 Device Introduction......1
Chapter 2 AVerTV 6 Introduction ...... 2
Chapter 3 Introducing the AVerTV 6 Application....3
3.1 Launching the AVerTV 6 Application .... 3
3.2 Running the AVerTV 6 Application for the First Time ....4
3.2.1 Scanning for Analog Programs....4
3.2.2 Scanning for Digital Programs 6
3.3 Introducing the User Interface 7
3.4 The Control Panel 8
3.5 Remote Control (Optional)....10
3.5.1 Remote Control Buttons (Model RM-FP/RM-KH/RM-K4) 11
3.5.2 Remote Control Buttons (Model RM-JX) 13
3.5.3 Remote Control Buttons (Model RM-KS)....15
3.5.4 Remote Control Buttons (Model RM-KV)....16
3.6 Changing TV Monitor Resolution....18
3.7 Resizing the TV Monitor Window 18
3.8 Changing Display Aspect Ratio....18
3.9 Always on Top....18
3.10 Setting Windows ^® Power Options.... 19
3.11 Setting Time for Turning on the Application 20
3.12 Minimize the Application....21
3.13 Changing Video Renderer 21
Chapter 4 TV....22
4.1 Analog TV 22
4.1.1 Scanning Channels 22
4.1.2 Scanning Channels (For Advanced Users) 23
4.1.3 Customize Video Recording Settings....24
4.1.4 Fine Tuning Color and Display Quality 28
4.1.5 Enhancing the Video Quality....29
4.2 Digital TV....30
4.2.1 Scanning Channels 30
4.2.2 Scanning Channels (For Advanced Users) 32
4.2.3 Customize Video Recording Settings.... 33
4.2.4 Using the EPG Function 37
4.2.5 Fine Tuning Color and Display Quality 37
4.2.6 Enabling the Subtitle Function 38
4.3 Adding and Deleting Channel Groups....39
4.4 Selecting a TV/ Digital Radio Channel 40
4.5 Adding and Deleting Program Grouping List....41
4.6 Adjusting Volume....42
4.7 Specifying a Channel Name or Description 42
4.8 Modifying a Program List Name.... 42
4.9 Removing Unwanted Channels 43
4.10 Using the OverScan Function....43
4.11 16-Channel Preview....44
4.12 Changing the OSD Attributes....45
4.13 Changing Signal Source 46
4.14 Sound Controlling (Optional).... 47
Chapter 5 AM/FM Radio 48
5.1 AM/FM Radio Controls....48
5.2 How to Auto Scan AM/FM Radio Channels 49
5.3 Manually Scanning Specific AM/FM Channels 49
5.4 Selecting a Channel 50
5.5 Skipping Unwanted Channels.... 50
5.6 Adding a Radio Frequency 50
5.7 Modifying a Channel Name.... 50
5.8 Adding and Deleting Channel Groups....51
5.9 Customizing Audio Recording Settings 51
Chapter 6 TimeShift....54
6.1 TimeShift Controls 54
6.2 Customizing TimeShift Recording Settings 55
6.3 Customizing TimeShift Video Quality Settings (Analog TV only) 55
6.4 Using the TimeShift Function 56
Chapter 7 PVR....57
7.1 PVR Controls....57
7.2 Recording Settings....58
7.3 Using the Recording Function....58
7.4 Playing the Recorded Programs....58
7.5 Picture-in-Picture Display 59
Chapter 8 Image Capture 60
8.1 Before Capturing 60
8.2 Capturing a TV/ Video Image 60
8.3 Multiple Image Sequence Capture....62
Chapter 9 Teletext / MHEG-5....63
9.1 MHEG-5 Support (UK Digital Teletext Service)....63
9.2 Teletext....64
9.2.1 Customize the Display Mode....64
9.2.2 Overview 65
9.2.3 Toolbar Buttons....66
9.2.4 LED Lamp....66
9.2.5 Using Teletext 67
Chapter 10 Scheduler....69
10.1 Schedule Management....69
10.2 Adding Schedules 70
Chapter 11 Hot Keys....72
Chapter 12 Customer Service....73
Chapter 13 Appendix....74
13.1 Video Gaming Plug-in (for Microsoft Vista MCE only)....74
13.2 Video Quality Enhancement Plug-in (for Microsoft Vista MCE only)....75
13.3 AVerIR Set Up (optional installation features) 77
13.3.1 Install the AVerIR 77
13.3.2 Uninstall the AVerIR....77
13.3.3 Remote Control Button Mapping in Windows Vista Media Center....79
Chapter 1 Device Introduction
Thanks for purchasing AVerMedia's product. The table below lists an overview of the product you purchased. From this table, you can quickly learn about your product features and know which chapter you need to read. Please do read this table before using AVerTV 6 application.
| Product Name AVerTV Digi Express 54 | |
| Model No. E554R | |
| TV System | ☑ Digital TV (☑ DVB-T □ ATSC □ DVB-S)□ Analog TV (□ NTSC □ PAL □ SECAM) |
| Audio Mode | ☑ Stereo ☑ Mono ☑ SAP |
| AM/FM Radio | □ Support ☑ Not Support |
| Remote Control | ☑ Support :☑ Model RM-FP / RM-KH / RM-K4□ Model RM-JX□ Model RM-KS□ Model RM-KV□ Not Support |
| External Signal Source | □ S-Video □ Composite |
| Others | ☑ Teletext ☑ MHEG-5 (UK only)☑ EPG □ iEPG (USA only)□ Closed Caption (USA only)☑ Digital Subtitle |
| Reference Chapter | ☑ Chapter 1☑ Chapter 2☑ Chapter 3 (☑3.1 ☑3.2.2 ☑3.3 - 3.4 ☑3.5.1 ☑3.6 - 3.13)☑ Chapter 4 (☑4.2 - 4.13)□ Chapter 5☑ Chapter 6☑ Chapter 7☑ Chapter 8☑ Chapter 9☑ Chapter 10☑ Chapter 11☑ Chapter 12□ Chapter 13 |
| Appendix | |
Chapter 2 AVerTV 6 Introduction
Now, with this product, you can watch TV, listen to the radio, record your favorite programs and enjoy other features on your PC. Turn your computer system into a real multimedia entertainment center.
You'll never miss your favorite ball games, soaps or game shows anymore because the TimeShift function performs background recording of a TV program. This means you can return and watch from the part of the program where you left off.
To enjoy high quality TV or radio programs, AVerMedia® product is your best choice.
Please be noted that the functions or the remote control mentioned in this manual may vary depending on the product you purchase and the area you live.
Chapter 3 Introducing the AVerTV 6 Application
The AVerTV 6 application allows you to watch TV, listen to the radio, record programs, and capture still images while you work on your computer.
3.1 Launching the AVerTV 6 Application
Run the AVerTV 6 application from the Programs menu.

To run the application, click Start, point to Programs, choose AVerMedia, AVerTV 6, and then click AVerTV 6. Another way is to double-click the AVerTV 6 program icon
“”on the desktop. Or, you can double-click the AVerQuick launcher located in the lower right corner of the screen.
Note: AVerQuick allows to set the desired default application, which means you can choose either AVerTV 6 or AVer MediaCenter as the default application when double clicking AVerQuick icon. To do this, right click AVerQuick, choose "Setting", and select the preferred application in the "Application" tab.
3.2 Running the AVerTV 6 Application for the First Time
If this is your first time running the application, the Setup dialog box will appear to prompt you to scan for channels. (For details, please refer to the section Scanning Channels).
3.2.1 Scanning for Analog Programs
- Select Analog TV (or Programs) on the left pane of the Setup dialog box.
Note: Before choosing the signal input, please make sure that your country/region is correct. For more information, please refer to "Scanning Channels" in Chapter 4.
a.First, select an available AVerMedia device in the left pane.
b. From the Region/Country drop-down list, select your country or region.
c.Click Apply to save the settings.

(This picture is only for reference.)
-
On this page, choose the TV option to search only for air channels or select CATV to scan for cable channels.
-
Click New and the Program List dialog box will appear. Type in the desirable name and click OK.

-
Click Program Scan for searching for available channels/programs in your area.
-
After scanning, the active TV channels will be listed inside the box. Click Apply to save the scanned channels.
- To exit the current dialog box, click OK.
Note: After Media Center Edition scan, you may not be able to lock channels with AVerTV 6. Please restart the computer to make it function normally.
3.2.2 Scanning for Digital Programs
- Select Digital TV (or Programs) on the left pane of the Setup dialog box.
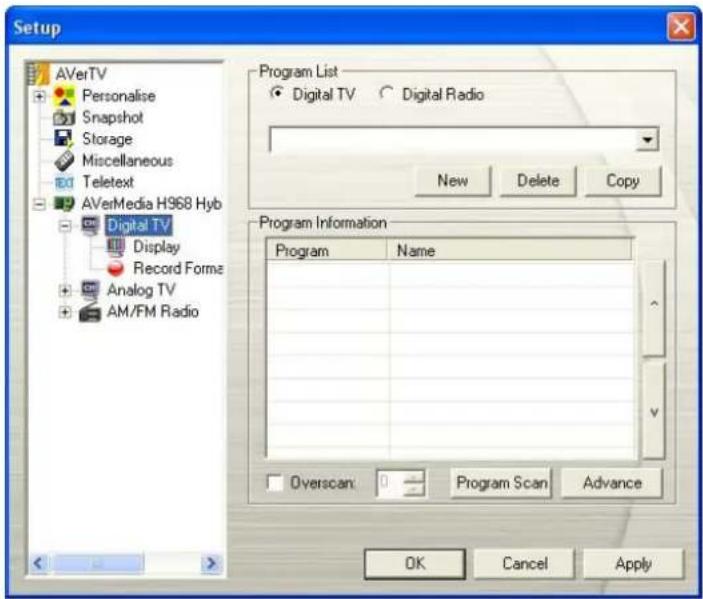
(This picture is only for reference.)
- Click New and the Program List dialog box will appear. Type in the desirable name and click OK.

- Click Program Scan for searching for available channels/programs in your area.
- After scanning, the active TV channels will be listed inside the box. Click Apply to save the scanned channels.
- To exit the current dialog box, click OK.

Note:
- This can only supports DVB-T Radio Broadcasts, not the Digital Audio Broadcast system.
- When scanning digital signals and if your country broadcasts logical channel data, the scanned channel will be allocated based on the assigned logical channel number.
3.3 Introducing the User Interface
The TV monitor allows you to watch live TV or video.

natural_image
A white deer standing in a snowy forest with bare trees, viewed through a video player interface (no text or symbols on the image itself)| 1 | Panel On / Off 8 Channel Up/Down | ||
| 2 | Playback Seek Slider 9 Resize Window | ||
| 3 | Play / Pause 10 Show / Hide Video Frame | ||
| 4 | Stop 11 Minimize | ||
| 5 | TimeShift 12 Full Screen | ||
| 6 | Record 13 Exit | ||
| 7 | Volume |
The Control Panel provides button controls for selecting channels, adjusting volume, capturing images, and more. It has a panel display that shows the current channel number and channel name.
To display or hide the Control Panel, click the button located in the lower left corner of the TV Monitor.
3.4 The Control Panel
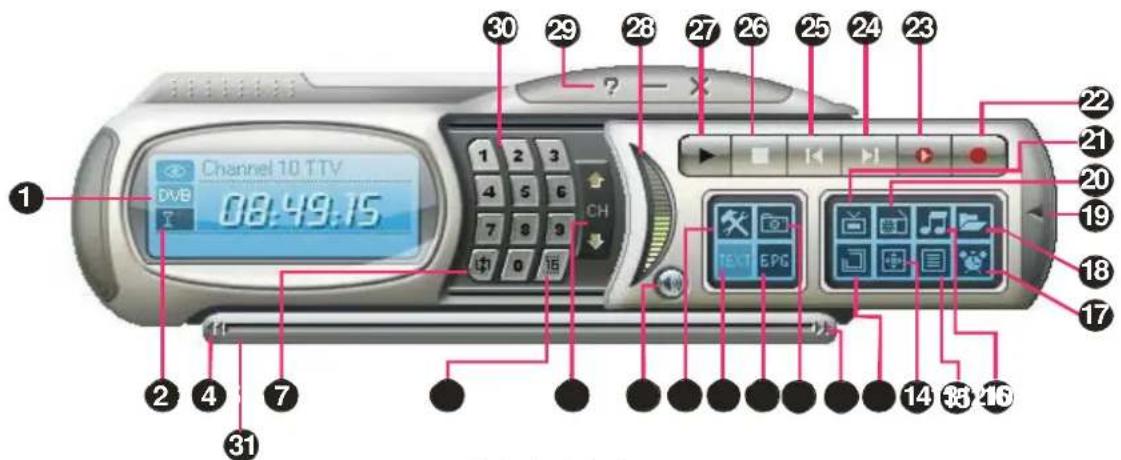
(This picture is only for reference.)
The table below describes functions of the buttons on the Control Panel.
| BUTTON FUNCTION | ||
| 1 | Signal Status /Enable or disable Repeat Play | TV/Radio mode: Display the current signal status.Playback mode: Right click and enable the Repeat function. The system will continuously playback the files in the playlist. |
| 2 | Signal Strength Display signal | strength. |
| 3 | Backward Move backwards in | intervals. |
| 4 | Channel Loop | Return to previously accessed channel. |
| 5 | 16-Channel Preview | Display 16 consecutive TV channels on the TV Monitor window. |
| 6 | Channel Up/ Down | Go to the next upper or lower active channel. |
| 7 | Mute | Turn off the sound. |
| 8 | Setup | Allows you to:* Scan channels.* Set the Windows power options.* Configure snapshot settings.* Customize recording settings.* Customize the TimeShift function. |
| 9 | Teletext | View Teletext/MHEG-5/Closed Caption information |
| 10 | EPG | View EPG information. |
| 11 | Snapshot | Capture a single image or a sequence of images. |
| 12 | Forward | Skip forward in intervals. |
| 13 | Always on Top Make the TV | monitor float over the top of other program windows. |
| 14 | Full Screen Show TV/Video | programs in full screen. |
| 15 | Program List | Display the program list. |
| 16 | Audio Mode | Switch between available audio modes. |
| 17 | Schedule | Display Schedule dialog box. |
| 18 | Play List | Create a playlist of video files to playback. |
| 19 | Show/ Hide Numeric Panel | Toggle between displaying or hiding the Numeric Panel. |
| 20 | Radio Source | Switch to radio mode. (AM/FM or Digital Radio) |
| 21 | Change Video Source Switch | between available video sources. |
| 22 | Record Record the current program. | |
| 23 | TimeShift / Pause Performs background recording of the live program. This function lets you view the recorded parts, while at the same time, recording is in progress. / Freeze the TimeShift temporarily. | |
| 24 | Next File Play the next file in the playlist. | |
| 25 | Previous File Play the previous file in the playlist. | |
| 26 | Stop Stop the playback, recording, TimeShift, etc. | |
| 27 | Play / Pause Play back recorded video files. / Freeze the playback temporarily. | |
| 28 | Volume Control | Drag your mouse up/down to increase/decrease the volume level. |
| 29 | Help View User's Manual. | |
| 30 | Numeric Buttons Select channels/programs. | |
| 31 | Playback Seek Drag the slider tab to move to any part of the recorded TV program. | |
3.5 Remote Control (Optional)
After installing drivers and applications, you can use remote control to turn on/off the programs, select channels, adjust volume and so on.
(The remote control can only be used on AVerMedia AVerTV 6 application.)
Note: To control two or more than two cards/devices with a remote control, it is recommended to enable the multiple infrared receiver function first. To do this, right click AVerQuick icon at the lower right corner of the screen, choose "Setting", "Remote control" tab and select check boxes next to the device name. Please check your supported remote control model before activating this function.
3.5.1 Remote Control Buttons (Model RM-FP/RM-KH/RM-K4)
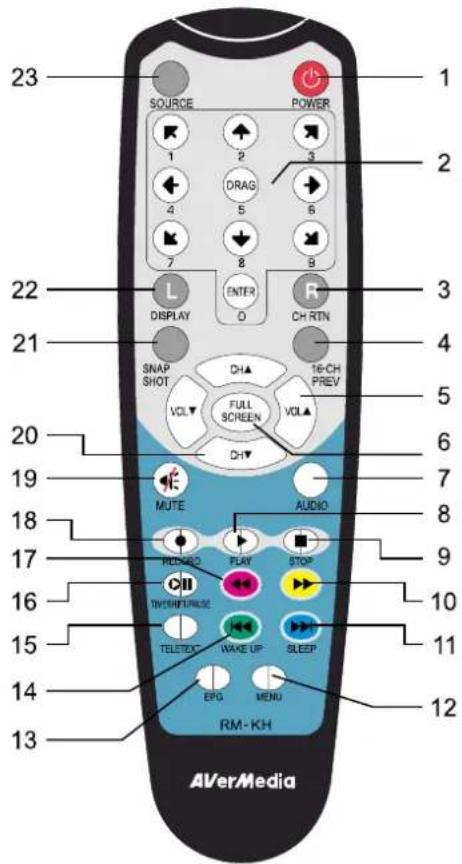
| Button | Description |
| 1. Power Turn on/off the application | |
| 2. Numeric Buttons - Select a TV channel.- Under the 16-Channel preview mode, use↑↓← → to highlight the intended channel. | |
| 3. CH RTN Go to the previously selected channel. | |
| 4. 16-CH PREV 16-Channel Preview. | |
| 5. VOL ▲/▼ | Volume up/down. |
| 6. FULL SCREEN Display TV in full screen. | |
| 7. AUDIO Switch between available audio modes. | |
| 8. ▶ (Play) | Play the last recorded or played file. |
| 9. ■ (Stop) | - End the Playback or recording.- End the TimeShift mode and return to real-time TV or Radio mode. |
| 10. ▶ (Forward) | - Advance the playback.- Jump to the Teletext page of the corresponding color according to this button. |
| 11. SLEEP ▶ | - Go to the next file in the playlist.- Set the time to put your computer in Stand By or Hibernate mode.- Jump to the Teletext page of the corresponding color according to this button. |
| 12. MENU | Display or hide the Control Panel. |
| 13. EPG | Launch the Electronic Programme Guide. |
| 14. WAKE UP◀◀ | - Go to the previous file in the playlist.- Set the time to bring your computer out of Stand By or Hibernate mode.- Jump to the Teletext page of the corresponding color according to this button. |
| 15. TELETEXT | View Teletext/MHEG-5/ Closed Caption information. |
| 16. TIMESHIFT /PAUSE | - Freeze the playback.- Switch from real-time TV or Radio to TimeShift mode. |
| 17. ←Rewind) | - Rewind the playback.- Jump to the Teletext page of the corresponding color according to this button. |
| 18. ● (Record) | Switch to PVR mode and record the current program or video into your hard drive. |
| 19. MUTE | Turn on/off the sound. |
| 20. CH ▲/▼ | Go up or down to the next active channel. |
| 21. SNAPSHOT | Capture the on-screen image to a bitmap file. |
| 22. DISPLAY | Display information. |
| 23. Source | Switch between available signal sources. |
3.5.2 Remote Control Buttons (Model RM-JX)
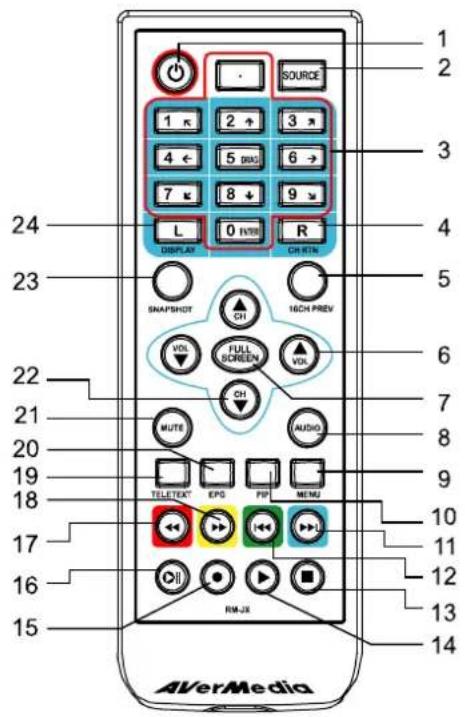
| Button Description | |
| 1. POWER | Turn on/off the application |
| 2. SOURCE | Switch between available signal sources. |
| 3. Numeric Buttons | - Select a TV channel.- Under the 16-Channel preview mode, use↑↓← → to highlight the intended channel. |
| 4. CH RTN | Go to the previously selected channel. |
| 5. 16-CH PREV | 16-Channel Preview. |
| 6. VOL▲/▼ | Volume up/down. |
| 7. FULL SCREEN | Display TV in full screen. |
| 8. AUDIO | Switch between available audio modes. |
| 9. MENU | Display or hide the Control Panel. |
| 10. PIP | Display or hide the PIP window. |
| 11.SLEEP ▶ | - Go to the next file in the playlist.- Set the time to put your computer in Stand By or Hibernate mode.- Jump to the Teletext page of the corresponding color according to this button. |
| 12.WAKE UP ◀◀ | - Go to the previous file in the playlist.- Set the time to bring your computer out of Stand By or Hibernate mode.- Jump to the Teletext page of the corresponding color according to this button. |
| 13.■ (Stop) | - End the Playback or recording.- End the TimeShift mode and return to real-time TV or Radio mode. |
| 14. ▶ (Play) | Play the last recorded or played file. |
| 15. ● (Record) | Switch to PVR mode and record the current program or video into your hard drive. |
| 16. TIMESHIFT /PAUSE | - Freeze the playback.- Switch from real-time TV or Radio to TimeShift mode. |
| 17.◀◀ (Rewind) | - Rewind the playback.- Jump to the Teletext page of the corresponding color according to this button. |
| 18.▶ (Forward) | - Advance the playback.- Jump to the Teletext page of the corresponding color according to this button. |
| 19. TELETEXT | View Teletext/MHEG-5/ Closed Caption information. |
| 20. EPG | Launch the Electronic Program Guide. |
| 21. MUTE | Turn on/off the sound. |
| 22.CH ▲/▼ | Go up or down to the next active channel. |
| 23. SNAPSHOT | Capture the on-screen image to a bitmap file. |
| 24. DISPLAY | Display information. |
3.5.3 Remote Control Buttons (Model RM-KS)

| Button Description | |
| 1. SOURCE | Switch between available signal sources. |
| 2. FULL SCREEN | Display TV in full screen. |
| 3. ● (Record) | Switch to PVR mode and record the current program or video into your hard drive. |
| 4. ◀ Rewind) | Rewind the playback. |
| 5. ■ (Stop) | - End the Playback or recording.- End the TimeShift mode and return to real-time TV or Radio mode. |
| 6. DISPLAY | Display information. |
| 7. VOL +/− | Volume up/down. |
| 8. Numeric Buttons | - Select a TV channel.- Under the 16-Channel preview mode, use 2 4 6 8 to highlight the intended channel. |
| 9. CH RTN | Go to the previously selected channel. |
| 10. MUTE | Turn on/off the sound. |
| 11. CH ▲/▼ | Go up or down to the next active channel. |
| 12. EPG | Launch the Electronic Program Guide. (DVB-T only) |
| 13. ▶ (Play) / PAUSE | Play the last recorded or played file. / Freeze the playback. |
| 14. (Forward) | Advance the playback. |
| 15. AUDIO | Switch between available audio modes. |
| 16. POWER | Turn on/off the application |
3.5.4 Remote Control Buttons (Model RM-KV)

| Button Description | ||
| (1) | Power | Turn on/off the application. |
| (2) |  | Turn off/on the sound. |
| (3) |  | Use numeric buttons to select a channel. |
| (4) |  | Display TV in full screen. |
| (5) |  | Change between available audio modes. |
| (6) |  | X |
| (7) |  | Volume up / Volume down. |
| (8) |  | Jump to the teletext page of the corresponding color according to this button. |
| (9) |  | Jump to the teletext page of the corresponding color according to this button. |
| (10) |  | View Teletext / Close Caption information. |
| (11) |  | View EPG information. (This function is only available for digital TV) |
| (12) |  | Record the current program. |
| (13) |  | Play the selected file or temporarily freeze the playback. |
| (14) |  Wake up Wake up | Go to the previous item in the playlist.Set the time to bring your computer out of Stand By or Hibernate mode. |
| (15) |  | Move backwards in intervals. |
| (16) |  | Skip forward in intervals. |
| (17) |  Sleep Sleep | Go to the next item in the playlist.Stand By / Hibernate mode, exit the application or turn off the computer. |
| (18) |  | Stop the playback, recording, TimeShift, etc. |
| (19) |  | Freeze the playback.Switch from real-time TV or Radio to TimeShift mode. |
| (20) |  | Activate the Picture in Picture (PIP) / Multi-Channel Display function. |
| (21) |  | Capture an image or a continuous sequence of images. |
| (22) |  | Jump to the teletext page of the corresponding color according to this button. |
| (23) |  | Jump to the teletext page of the corresponding color according to this button. |
| (24) |  | Channel up and channel down. |
| (25) |  | X |
| (26) |  | X |
| (27) | [A2HB] | Return to previously accessed channel. |
| (28) |  | Change between available signal sources. |
3.6 Changing TV Monitor Resolution
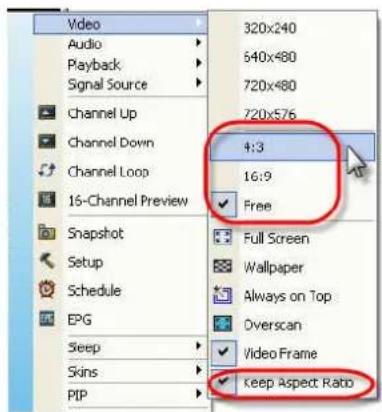
To switch the resolution of the TV monitor, simply right click on the TV monitor. When a pop-up menu appears, point to Video and choose an appropriate resolution (320x240, 640x480, 720x480, 720x576).

3.7 Resizing the TV Monitor Window
To enlarge or reduce the size of the TV Monitor window, click and drag the lower right edge of the window.
Double-click the TV Monitor window to display it in full screen or click the Full Screen button 📋 on the Control Panel.
When in full screen mode, just double-click anywhere on the screen to revert to the normal TV window size.
3.8 Changing Display Aspect Ratio
Aspect ratio indicates the ratio of the width of an image to its height. To switch the aspect ratio of the display, Right click on the TV monitor. When a pop-up menu appears, point to Video and choose a desired option.
4:3 and 16:9 is the two most common aspect ratio of home video. You can choose Free to adjust the aspect ratio as you want. Or select Keep Aspect Ratio to preserve the original width and height of an image.
3.9 Always on Top
To make the TV monitor window float over the top of other program windows, right-click on the TV monitor. In the pop-up menu, point to Video and choose Always on Top. OR,
Click the Always on Top button 📄 on the Control Panel.
3.10 Setting Windows® Power Options
This option allows you to put your computer in Stand By / Hibernate mode, power off, exit the application or log off from the computer while you are away from the computer.

Note:
Stand By: Stand By is a state in which your monitor and hard disks turn off, so that your computer uses less power.
Hibernate: Hibernation is a state in which your computer shuts down to save power but first saves everything in the memory on your hard disk.
Please do the following:
-
First, Click the Setup button and in the Setup dialog box, click on the Miscellaneous icon on the left pane.
-
By default, the system is set to enable the Enable Stand By/Hibernate Support option. What you have to do is to choose the desired power-saving settings. If your computer has problem with being out of Stand By or Hibernate mode, please clear the Enable Stand By/Hibernate Support option.
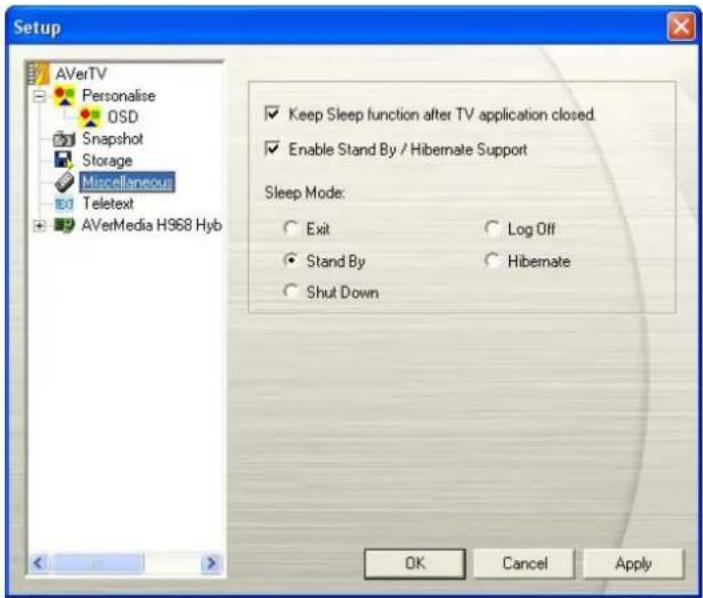
(This picture is only for reference.)
There are two ways to set the time to put the computer into Stand By or Hibernation.
◆ If the product you purchase with a remote control, you can press the Sleep button repeatedly on the remote control.
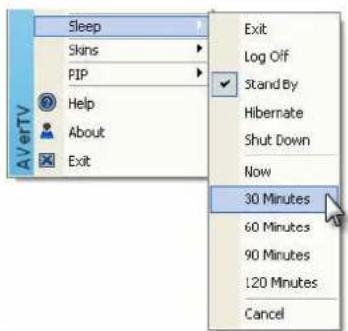
◆ Or you can right click on the TV monitor, point to Sleep and select the desired mode. Then right click on the TV monitor again, point to Sleep and choose an execution time. The time setting will be displayed on the TV monitor. For details, please see the description below.
| Time setting mode Description |
| Now Your computer will go into the selected mode in about 10 seconds. |
| Sleep 30/60/90/120 Minute($) Your computer will go into the selected mode 30/60/90/120 minutes. |
| Cancel Your computer will return to original settings. |
3.11 Setting Time for Turning on the Application
If your product with a remote control, this function allows you to turn on the application at a preset time.
- Press the Wake Up button (the green one) on the remote control.
- Set the time you want by pressing the Wake Up button continuously. (For more information, please refer to the table below.) Then the application will be turned on automatically at the time you want.
| Description | |
| Cancel Wake Up Disable the Wake Up function. | |
| Wake Up after 30/60/90/120 min(s) | The application will be turned on in 30/60/90/120 minutes. |
3.12 Minimize the Application
To minimize AVerTV 6 application to the system tray (notification area), click the Setup button and in the Setup dialog box, click Personalise icon on the left pane. Then Select the Minimize to Tray check box. Otherwise clear the check box to minimize the application to a taskbar button.

(This picture is only for reference.)
3.13 Changing Video Renderer
To select the video renderer you prefer, click the Setup button and in the Setup dialog box, click Personalise icon on the left pane. Then select the preferred video renderer from the drop-down list.
By default, the renderer is set to Automatic (Overlay Mixer is chosen in Windows XP system and Enhanced Video Renderer (EVR) in Windows Vista system.)

(This picture is only for reference.)
Chapter 4 TV
In this chapter, we will introduce methods to scan programs, select a TV/Radio program, create a group and so on.
4.1 Analog TV
4.1.1 Scanning Channels
If you haven't done channel scanning when you first run the application, please follow the steps to complete this procedure.
- Click the Setup button and in the Setup dialog box, select an available AVerMedia device in the left pane.
Note:
Make sure that your Country/Region is correct.
a. First, select an available Avermedia device in the left pane.
b. From the Region/Country drop-down list, select your country or region.
c. Click Apply to save the settings.
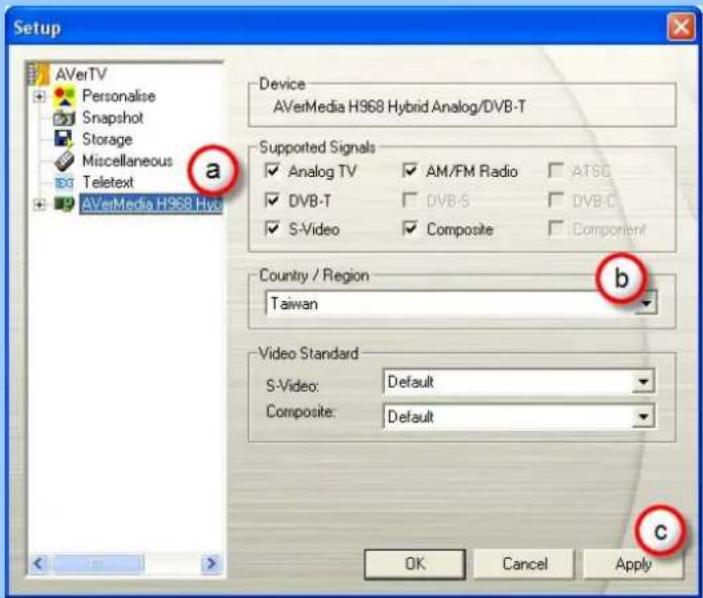
(This picture is only for reference.)
- Then select Analog TV (or Programs). On this page, choose the TV option to search only for air channels or select CATV to scan for cable channels.
- Click New and the Program List dialog box will appear. Type in the desirable name and click OK.

- Then Click Program Scan to start the searching process.
The application comes with a default frequency table therefore the application will use this table to search for active channels/programs. If you want to terminate the searching process, just click Stop.
- You can check the scanning progress from the progress bar. After scanning, the active TV/Radio channels will be listed inside the box. Click Apply to save the scanned channels.
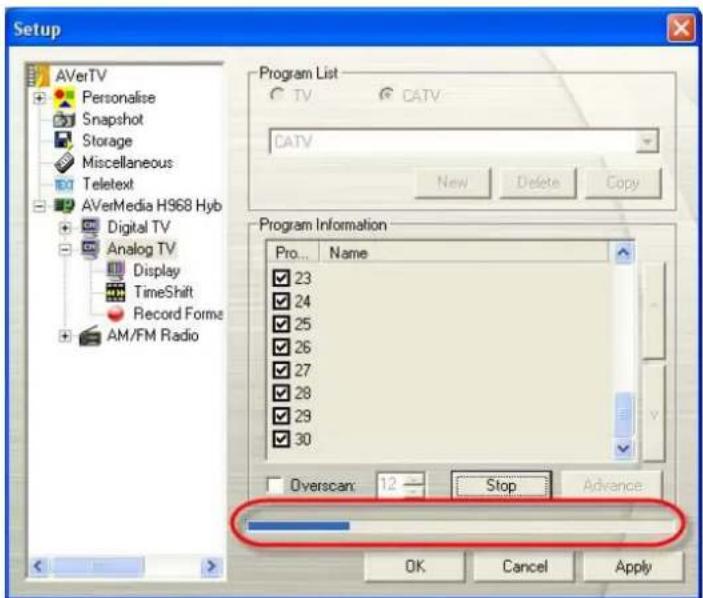
(This picture is only for reference.)
Note: After Media Center Edition scan, you may not be able to lock channels with AVerTV 6. Please restart the computer to make it function normally.
4.1.2 Scanning Channels (For Advanced Users)
- Click Advance located at right-lower corner in the Programs Information section. Then the Advance Program Configuration dialog box will appear.

- If you don't want to miss any channels, click All Frequencies Scan.

-
When a warning message appears, click Yes to continue the procedure or click No to abort this operation.
-
After scanning, new active channels/programs will be memorized and listed in the left pane of the dialog box.
-
Click Apply to save the scanned channel.
4.1.3 Customize Video Recording Settings
To customize the video recording settings, please do the following.
-
Click the Setup button and in the Setup dialog box, click Analog TV (or Programs) icon on the left pane.
-
Select the Record Format option.
-
Determine the video file format you wish to use for saving the recorded video file.
-
You can use the default format or select New to create your own file format.

(This picture is only for reference.)
- Click New and the Format dialog box appears. In the Format dialog box, select the file format you want and enter the desired name in the text box. Then click Next.
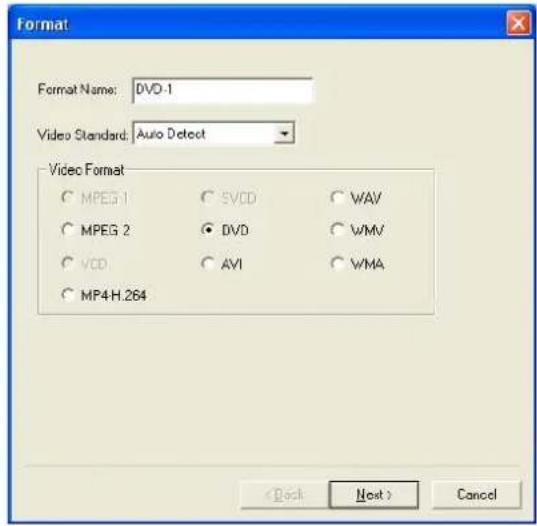
(This picture is only for reference.)
- In the Video dialog box, you can set the video format and audio format. The setting options in the Video dialog box will vary according to the video format you chose.
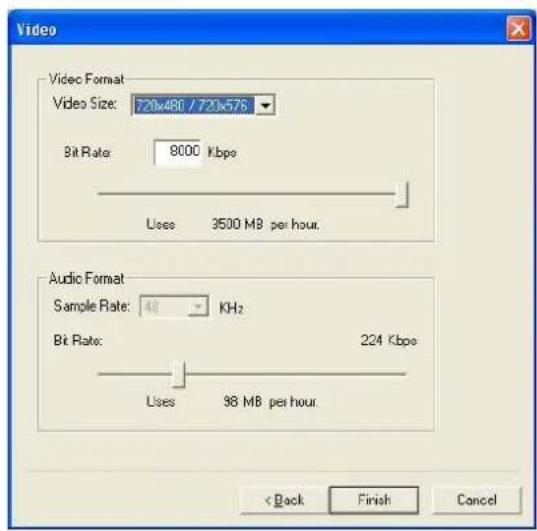
(This picture is only for reference.)
-
Click Finish to save the settings. To abort this operation, click Cancel.
-
If you want to change the settings of your own file format, click Modify or you can click Delete to remove the unwanted file format that you created earlier.
Information:
| File Format Description | |
| MPEG-1 | Choose MPEG-1 format for video files that are intended for CD-ROM playback on a computer or for Internet transmission. MPEG-1 allows file compression and offers VHS quality picture. Just about every system available today can play MPEG-1 and does not need special software or hardware. |
| MPEG-2 | Videos compressed using MPEG-2 have extremely high quality pictures and full CD-quality sound. Choose MPEG-2 format for video files that are intended for DVD-ROM playback on a computer or if you want broadcast quality videos. |
| VCD | When you choose this format, the recorded video file will be saved in MPEG-1 format that is compliant with VCD standards. Standard VCD frame size and frame rate are 352 x 240 pixels at 29.97 fps for NTSC and 352 x 288 pixels at 25 fps for PAL. |
| DVD | When you choose this format, the recorded video file will be saved in MPEG-2 format that is compliant with DVD standards. Standard DVD frame size and frame rate are 720 x 480 pixels at 29.97 fps for NTSC and 720 x 576 at 25 fps for PAL. |
| AVI | AVI is the most common video file format for playback on the computer. It can be saved in uncompressed form if you want high quality video, or compressed using any of the available codecs if you want to minimize the file size. |
| WMA | Windows Media Audio. An audio compression format, which can offer higher quality than MP3 at the same bit rate. |
| WAV | A common audio file format for Windows computers. It was created by Microsoft and has become a standard PC audio file format. |
| WMV | WMV is a video format encoded with Microsoft ISO MPEG-4 video codec and Windows Media Audio codec. It can be used to provide downloadable or streaming video. |
| MPEG4-H.264 | Videos compressed using MPEG-4 standard which is two or threetimes more efficient than MPEG-2. This format can be applied to a wide variety of applications or networks and systems like HD-DVD, Digital TV, Broadcast and Streaming applications. |
| iPod | A video format base on H.264 standard but has smaller video bit rate. It's an iPod -compatible format. |
--To record program in MPEG-4 format--
-
If you want to record program in MPEG-4 format, you need to download codec from the website first. We recommend downloading the DivX codec from www.divx.com or XviD codec from www.xvid.org. Then install the codec.
-
Ne xt, run the AVerTV 6 and click the Setup button In the Setup dialog box, click Analog TV (or Programs) icon on the left pane.
-
Select the Record Format option.

(This picture is only for reference.)
- When you click New and the Format dialog box appears. In the Format tab, select AVI and enter the desired name in the text box.

(This picture is only for reference.)
- In the Video tab, you can choose the desired codec, such as XviD MPEG-4 codec, and click OK to confirm your selection.
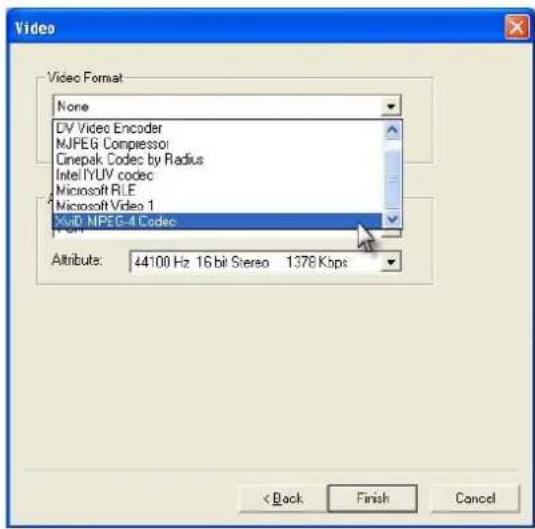
(This picture is only for reference.)
- If you want to change the settings of your own file format, click Modify. Or click Delete to remove the unwanted file format that you created.
- Click Apply to save the settings and click OK to exit the current dialog box. To abort this operation, click Cancel.
Note:
- To determine the length of recording and to choose a destination folder in which to save the recorded audio, please refer to the section titled Recording Settings in Chapter 7.
- The codecs are not developed by AVerMedia. Therefore, AVerMedia could not guarantee the function of MPEG-4 recording.
4.1.4 Fine Tuning Color and Display Quality
If the color or picture quality of the TV display needs to be adjusted, please do the following.
- Click the Setup button and in the Setup dialog box, click Analog TV (or Programs) icon on the left pane.
- Select the Display option.
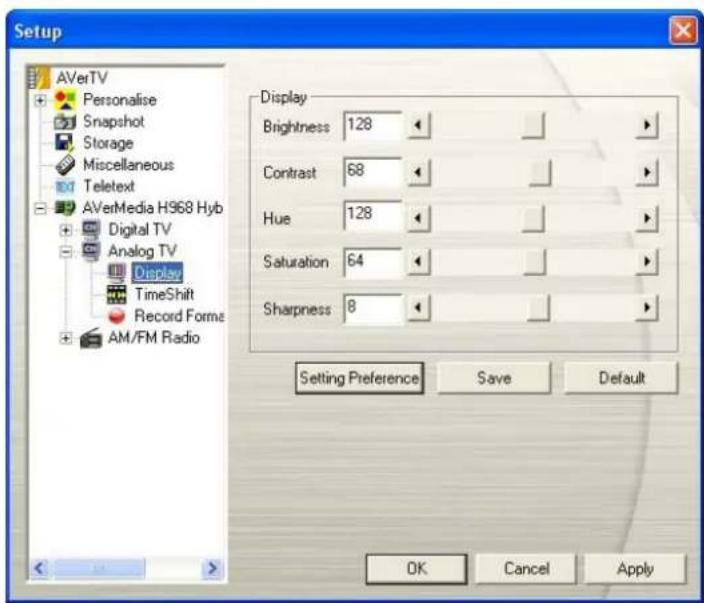
(This picture is only for reference.)
- Then you can adjust the Brightness, Contrast, Hue, Saturation and Sharpness sliders until you get an accurate color.
Click Save to create your own settings. Next time, you can simply click Preference Setting to get your preferred settings.
- If you want to revert to default settings, please click Factory Setting.
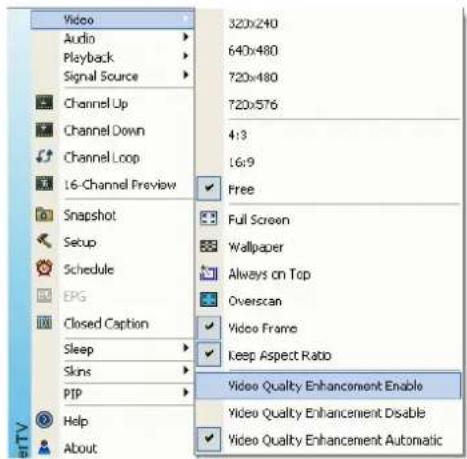
4.1.5 Enhancing the Video Quality
This function can reduce noise. Choose an appropriate option listed below.
- Video Quality Enhancement Enable: Activate to improve the video quality.
- Video Quality Enhancement Disable: Disable the video quality enhancement function.
- Video Quality Enhancement Automatic: Automatically adjust video quality depending on the video screen size.
4.2 Digital TV
4.2.1 Scanning Channels
If you haven't done channel scanning when you first run the application, please follow the steps to complete this procedure.
- Click the Setup button and in the Setup dialog box, select an available Avermedia device in the left pane.

Note:
Make sure that your Country/Region is correct.
a. First, select an available AVermedia device in the left pane.
b. From the Region/Country drop-down list, select your country or region.
c. Click Apply to save the settings.

(This picture is only for reference.)
- Then select Digital TV (or Programs).
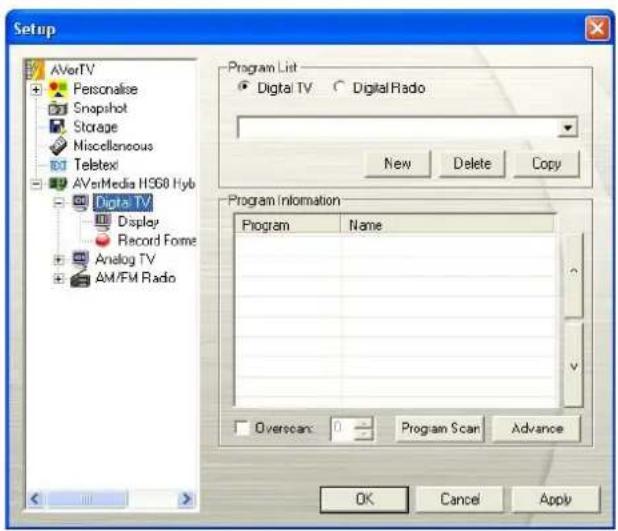
(This picture is only for reference.)
- Click New and the Program List dialog box will appear. Type in the desirable name and click OK.

- Then click Program Scan to start the searching process.
The application comes with a default frequency table therefore the application will use this table to search for active channels/programs. If you want to terminate the searching process, just click Stop.
- You can check the scanning progress from the progress bar. After scanning, the active TV/Radio channels will be listed inside the box. Click Apply to save the scanned channels.

(This picture is only for reference.)
Note: All programs automatically classify into two categories (Digital TV and Digital Radio). Select Digital TV to display TV programs; select Digital Radio to display radio programs.
4.2.2 Scanning Channels (For Advanced Users)
- Click Advance located in the lower right corner of the Program Information section. Then the Advance Program Configuration dialog box will appear.
- When there are channels missing from the channel memory, select All Frequencies or Single Frequency.
- Once you select Single Frequency, you need to specify the correct Frequency, for example 533000 (KHz), and Bandwidth.
- Then click Scan.
- After scanning, new active channels/programs will be memorized and listed in the left pane of the dialog box.
- Click Apply to save the scanned channels.
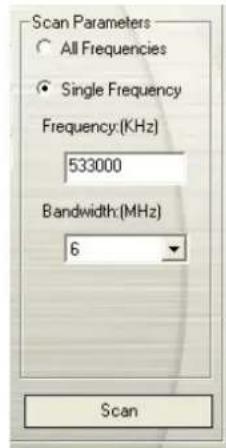
Note: All Frequencies Scanning may take you a while. Please be patient.
4.2.3 Customize Video Recording Settings
To customize the video recording settings, please do the following.
- Click the Setup button and in the Setup dialog box, click the Digital TV icon on the left pane.
- Select the Record Format option.
- Select recording type. You can use the default format or select New to create your own file format. Or you can choose Audio Only for sound recording.
![Setup AVerTV Personalise Snapshot Storage Miscellaneous Teletext AVerMedia H968 Hyb Digital TV Display Record Forms Analog TV AM/FM Radio Format : MP4 Video : Video Average Bitrate : 2000 Kbps Video Max. Bitrate : 2000 Kbps Entropy Coding Mode : CAVLC DownScale Mode : Fix to 320x240 Audio : Sample Rate : 48 KHz Audio Bitrate[Each Channel] : 160 Kbps Format Source Format(MP2/MP4) Audio Only MP4-H.254 Other iPod New Modify Delete OK Cancel Apply](/content/2026/06/1264364/images/b925e6070efc2c5b86c1f3d9024ba2de7998ffcba96b2681482743b1c446765d.jpg)
(This picture is only for reference.)
- Click New and the Format dialog box appears. In the Format dialog box, select the file format you want and enter the desired name in the text box. Then click Next.

(This picture is only for reference.)
- In the Video dialog box, you can set the video format and audio format. The setting options in the Video dialog box will vary according to the video format you chose.
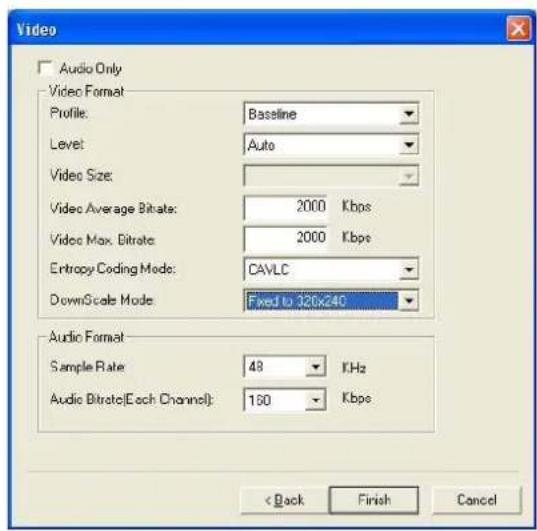
(This picture is only for reference.)
-
Click Finish to save the settings. To abort this operation, click Cancel.
-
If you want to change the settings of your own file format, click Modify or you can click Delete to remove the unwanted file format that you created earlier.
Information:
| File Format Description | |
| Source Format (MP2/MP4) | Record the signal according to the source format, MP2 or MP4.MPEG-2:Videos compressed using MPEG-2 have extremely high quality pictures and full CD-quality sound. Choose MPEG-2 format for video files that are intended for DVD-ROM playback on a computer or if you want broadcast quality videos.MPEG-4:Videos compressed using MPEG-4 standard are two or three times more efficient than MPEG-2. This format can be applied to a wide variety of applications or networks and systems like HD-DVD, Digital TV, Broadcast and Streaming applications. |
| MP4-H.264 | MP4-H.264 is a much more effectively compression techniques in the MPEG-4 standard. It delivers excellent video quality across the entire bandwidth. |
| Audio Only | Compress audio in MPEG-2 standard. |
| iPod | A video format base on H.264 standard but has smaller video bit rate. It's an iPod -compatible format. |
--External Video Source—
- Click the Setup button and in the Setup dialog box, click Auxiliary Input icon on the left pane.
- Select the Record Format option.
- Determine the video file format to use for saving the recorded video file.
- You can use the default format or select Other to create your own file format.
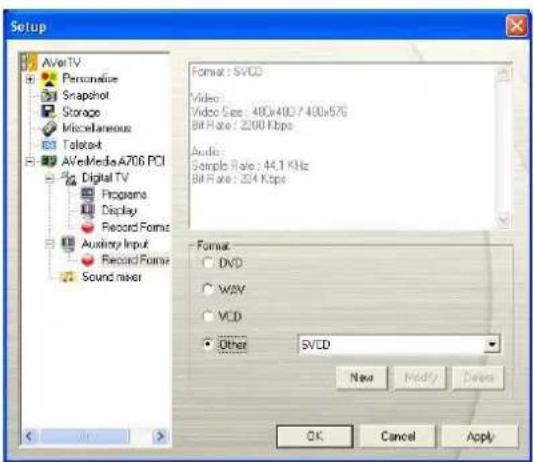
(This picture is only for reference.)
-
Click New and the Format dialog box appears. Then select the file format you want and enter the desired name in the text box.
-
In the Video dialog, you can also select the Video Size or Sample Rate.

(This picture is only for reference.)
-
If you want to change the setting of your own file format, click Modify. Or click Delete to remove the unwanted file format that you created.
-
Click Apply to save the setting and click OK to exit the current dialog box. To abort this operation, click Cancel.
To adjust the quality of the Auxiliary Input display:
-
Click the Setup button and in the Setup dialog box, click Auxiliary Input icon on the left pane.
-
Then you can adjust the Brightness, Contrast, Hue and Saturation sliders until you get an accurate color.
Click Save to create your own settings. Next time, you can simply click Setting Preference to get your preferred settings.
- If you want to revert to default settings, please click Default.
Note: To determine the length of recording and to choose a destination folder in which to save the recorded audio, please refer to the section titled Recording Settings in Chapter 7.
4.2.4 Using the EPG Function
Electronic Program Guide (EPG) is a service that allows you to check the next succeeding program schedule and even the program schedules of the whole week. If the EPG service is provided in your region/country, simply click the EPG button to open the EPG window.
First, select the desired program from the Program drop-down list and the EPG window will display the schedule for one week. You can also see the related information such as program name, time, and description about the program on the right pane of the window.
In addition, when switching channels, the TV screen can show the current and succeeding program information.

| Description |
| 1 The current program |
| 2 The program will be recorded on the preset time. |
Our EPG window also allows you to preset a schedule for watching or recording programs. Just select your favorite programs and click Record button or the Active TV Application button And the system will execute your command on schedule.
If you want to download the latest program schedule, please click the Update button
Click 📋 to sort the EPG list by time or by channel
4.2.5 Fine Tuning Color and Display Quality
If the color or picture quality of the TV display needs to be adjusted, please do the following.
- Click the Setup button and in the Setup dialog box, click Digital TV icon on the left pane.
- Select the Display option.

(This picture is only for reference.)
- Then you can adjust the Brightness, Contrast, Hue and Saturation sliders until you get an accurate color.
Click Save to create your own settings. Next time, you can simply click Setting Preference to get your preferred settings.
- If you want to revert to default settings, please click Default.
4.2.6 Enabling the Subtitle Function
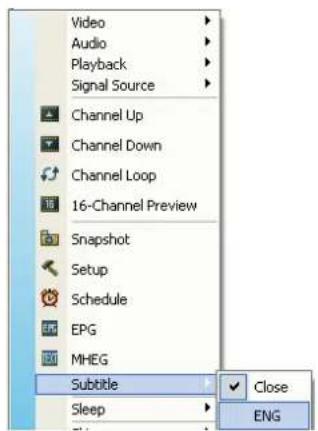
If your local broadcasters provide a subtitle service, you can view them by doing the followings:
Right click the TV screen, point to Subtitle and choose the desired language.
To hide the subtitles, please right click the TV screen, point to Subtitle and choose Close.
4.3 Adding and Deleting Channel Groups
Selecting a Channel Group allows you to switch between the channels of the selected group only when pressing the Channel Up/Down button. If you want to add or delete a channel group, do the following:
To add a new channel group:
-
Click the Setup button and in the Setup dialog box, click Analog TV or Programs icon on the left pane.
-
Click New and the Program List dialog box will then appear (as shown on the right).
-
Type in a group name and click OK.
-
Click Program Scan and click Yes to continue the scanning process.
-
Available channels will then be listed in the Program Information and now you can delete the unwanted programs by clearing the check box.


- Click Apply to save the settings and click OK to exit the current dialog box. Or you can click Cancel to revert to the original settings.
OR,
If you don't want to scan programs every time you create a new channel group, you can use the Copy function.
-
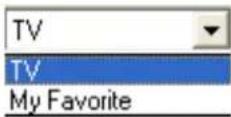
From the program drop-down list, select the group that you want to duplicate.
-
Click Copy and the Program List dialog box will appear.
-
Type in desired name and click OK.
-
Finally, just like the steps described above, clear the check mark next to the unwanted channels.
To delete a channel group:
-
Click the Setup button and in the Setup dialog box, click Analog TV or Programs icon on the left pane.
-
From the program drop-down list, select the name of the group that you want to remove.
-
Click Delete to remove the selected group.
4.4 Selecting a TV/ Digital Radio Channel
There are three ways of switching between TV/Radio channels:
◆Click the Channel Up/Down buttons (☑ on the TV monitor window or [icon] on the Control Panel) repeatedly until reaching your desired channel.
◆Click to open the Numeric Panel (as shown on the right). Then click on the Numeric buttons to get your desired channel number.

OR,
◆Click the Program List button. When the Program Panel appears, first choose the desired group from the drop-down list and then double-click on the desired channel.

(This picture is only for reference.)
Note: Locked channels (eg. Adult channel) are in red text. If you select the Lock/Unlock button located on the bottom right corner of the program panel, the system will hide all the pay channels in the program list. (Lock function is only available for digital TV.)
4.5 Adding and Deleting Program Grouping List
Click the Program List button
If you click on the display mode button located on the bottom right corner of the program panel, the program panel will be switched from Program List to Program Grouping List.

(This picture is only for reference.)
To add or modify grouping list:
- Select the Setup button located on the bottom right corner of the program panel and the program group setup dialog will appear.
- The channels are listed on the left pane of the program group setup dialog.
- Click on the New button to create or the Delete button to remove a new group shown on the right pane. (The default name is "New Group." Identical group names are acceptable.)
- Select the channel you want and then click on the Insert button to add it to the program grouping list or click on the Remove button to remove it.

(This picture is only for reference.)
- Click the Save button √ to save the settings or click on the Cancel button ✗ to leave without saving.
4.6 Adjusting Volume
On the Panel, click and drag your mouse over the Volume meter to increase the volume level. You can also press the + / - keys on the number read to adjust the volume.

4.7 Specifying a Channel Name or Description
To assign a channel name or specify a description:
- Click the Setup button and in the Setup dialog box, click Analog TV or Programs icon on the left pane.
- Under the Name column, double-click the text box of the channel you want to assign a name or description.
- Type in the channel name or description, then press Enter.
- Press Apply to save the setting and click OK to exit the dialog box.
| Program | Name |
| 1 | CTS- |
| 2 | CTS_Edu |
| 3 | CTS_UNEWS |
4.8 Modifying a Program List Name
Surely, you can change a program list name. To rename a program list, follow the steps described below:
- Click the Setup button and in the Setup dialog box, click Analog TV or Programs icon on the left pane.
- Click Advance located in the lower right corner of the Program Information section. Then the Advance dialog box will appear.
- Type the desired name in the Program List Name text box.
- Press Apply to save the setting and click OK to exit the dialog box. Or press Cancel to abort the saving.

4.9 Removing Unwanted Channels
If you want to exclude undesirable channels from your channel list, do the following:
-
Click the Setup button and in the Setup dialog box, click Analog TV or Programs icon on the left pane.
-
Click Advance located in the lower right corner of the Program Information section. Then the Advance dialog box will appear.
-
In the Program Information section, select the unwanted channel and then click Delete. This channel will be removed and that means you won't be able to access these programs anymore.
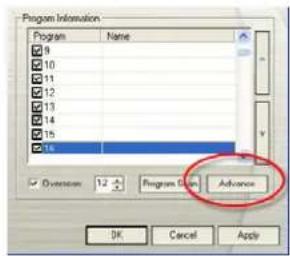
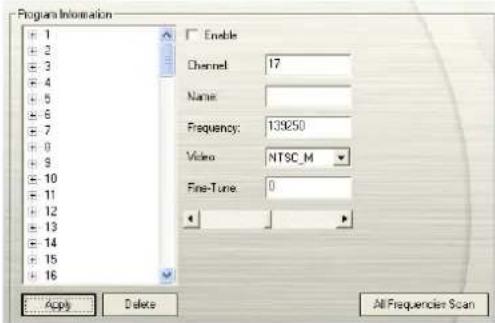
(This picture is only for reference.)
OR,
If you just want to skip a certain channel, do the following:
-
First, select the unwanted channel in the Program Information section.
-
Clear the Enable check box so that you will not access that channel when you press Channel Up/Down buttons.

- However, you can still see the channel in your program list. If you want to watch that channel again at some point, just select the Enable check box.
4.10 Using the OverScan Function
On some broadcast channels, you might see distorted lines or black spaces on the top, sides, or bottom of the screen. These video artifacts device from the source signal, and can be masked using the OverScan feature.
To hide the edges of the picture:
- Right-click on the TV Monitor and choose OverScan to have it enable it.
OR,
- Click the Setup button and in the Setup dialog box, click Analog TV or Programs icon on the left pane. Enable Overscan and specify get better quality.

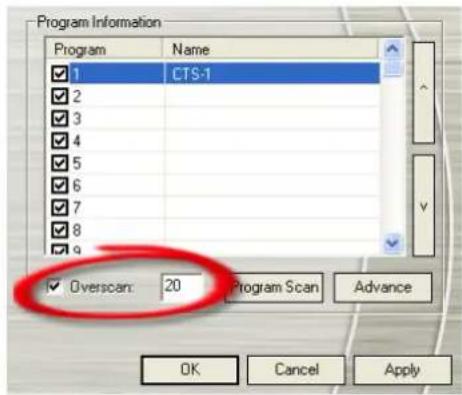
(This picture is only for reference.)
You can see the difference from the pictures below:
| Bcforc using OverScan function | After using OverScan function |
 | 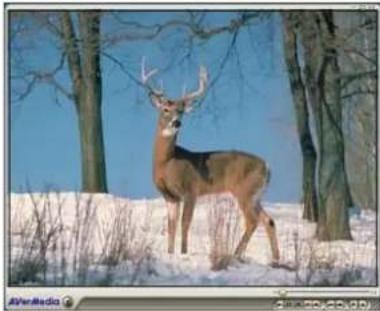 |
4.11 16-Channel Preview
natural_image
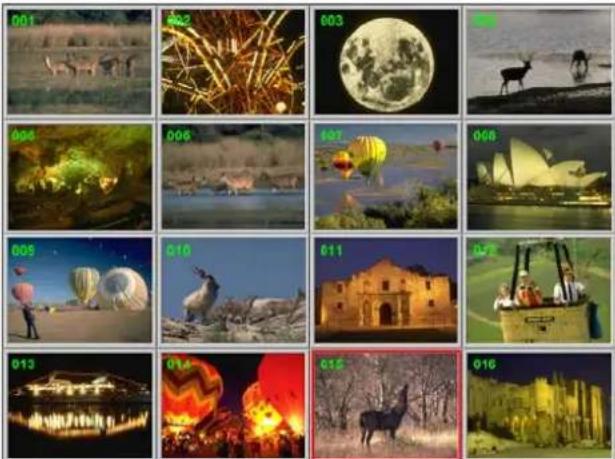
Grid of 16 colorful nature and tourism images including animals, landscapes, and architecture (no text or symbols)The 16-Channel Preview function can display 16 TV channels on-screen at the same time. You can see clearly which TV programs are currently showing on these channels.
To preview the channels:
-
Click to open the Numeric Panel.
-
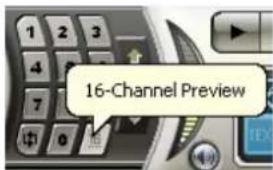
Click the 16-Channel Preview button.
-
The screen will be gradually filled up with 16 TV channels, starting from the currently selected channel.
- Select a channel and press the numeric button "5" on the remote control to view it only and freeze the other channels. If you want to continue to display other channels just press C letter on the keyboard.
- To display a channel on the TV Monitor window, select any one of the 16 channels on-screen and double-click on that channel, or use the arrow ↑, ↓, ←, → button of your keyboard and then press Enter. You will then be tuned in to that channel.
- Or, click the right mouse button or press ESC to return to the originally selected TV channel.
4.12 Changing the OSD Attributes
- Click the Setup button and in the Setup dialog box, click on the Personalise icon on the left pane.
- In this page, you can customize menu effect (Fade In/Fade Out), set the speed of marquee (LCD Speed), and change the appearance of the TV monitor and the control panel (Skins).

(This picture is only for reference.)
- Then select OSD. In this page, you can choose the TV system from the drop-down list for different display information on the TV monitor. You can also adjust OSD color (Text, Edge, Background).

(This picture is only for reference.)
- Click Apply to save settings or click Cancel to abort without settings.
4.13 Changing Signal Source
There are two ways to change signal source:
• To switch between TV, radio or external video signals, click the Radio Source button
or Video Source button 📄 on the control panel.

- Right click on the left pane of the control panel and a pop-up menu appears. Choose the desired signal source.

4.14 Sound Controlling (Optional)
Click the Setup button and in the Setup dialog box, click Sound Mixer icon on the left pane.
This function provides a variety of sound effects including “Dolby Surround”, “Incredible Mono” and “Incredible Stereo”. You can also drag the slider to control the “Stereo”, “Bass” and “Treble” level.
Please be noted this function is only available for analog signals, eg. Analog TV, AM/FM and so on.

(This picture is only for reference.)
Chapter 5 AM/FM Radio
If the product you purchase with AM/FM function, then you can read this chapter to learn more knowledge about this.
5.1 AM/FM Radio Controls
Click the AM/FM Radio button to listen to your favorite radio station.
Use the following button controls for selecting AM/FM radio channels, adjusting volume, scanning AM/FM channels, recording radio programs and more.
To change back to live TV, click the Video Source button.

(This picture is only for reference.)
| 1. | Signal Status/Enable or Disable Repeat Play | 14. | Play List |
| 2. | Signal Strength | 15. | Show/Hide Numeric Panel |
| 3. | Backward | 16. | Video Source |
| 4. | Channel Loop | 17. | Record |
| 5. | 16-Channel Preview | 18. | TimeShift / Pause |
| 6. | Channel Up/Down | 19. | Next File |
| 7. | Mute | 20. | Previous File |
| 8. | Setup | 21. | Stop |
| 9. | Forward | 22. | Play / Pause |
| 10. | Radio Source | 23. | Volume Control |
| 11. | Program List | 24. | Help |
| 12. | Audio Mode | 25. | Numeric Buttons |
| 13. | Schedule | 26. | Playback Seek |
5.2 How to Auto Scan AM/FM Radio Channels
If you are using AM/FM radio for the first time, perform an auto scan to search and memorize active AM/FM radio stations in your area.
To auto scan AM/FM radio stations:
-
Click the Setup button and in the Setup dialog box, click AM/FM Radio icon on the left pane.
-
Click New and the Program List dialog box will appear. Type in the desirable name and click OK.
Note: The system will assign a default name (AM/FM-Radio) if you don't create a new program list before scanning.

-
Click Scan. All active channels will be automatically scanned and memorized.
-
To terminate the scanning, click Stop.
-
Click Apply to save the settings and click OK to exit the current dialog box. To abort the settings, click Cancel.
5.3 Manually Scanning Specific AM/FM Channels
Instead of scanning all channels, you can choose to manually scan one or a few channels only. To do this, follow this procedure.
To manually rescan specific AM/FM radio channels:
-
Click the Setup button and in the Setup dialog box, click AM/FM Radio icon on the left pane.
-
Enter the channel frequency that you want to start scanning in the text box.

(This picture is only for reference.)
-
Select 0.01 MHz, 0.05MHz or 0.1MHz as your tuning increment.
-
Click >> to scan upward or to scan downward from the selected channel frequency. The scanning will stop when the application finds the closest ACTIVE AM/FM frequency.
-
Or click □ or □ to increase/decrease the frequency to search your preferred channel.
-
Click the Modify button if you'd like to keep the newly scanned frequency.
5.4 Selecting a Channel
To select a channel:
-
Click to open the Numeric Panel.
-
There are a number of ways to select a channel:
- Click on the Numeric buttons to select a channel.
- Click the Channel Up/Down button repeatedly until reaching your desired channel.
OR,
• Use the numeric keys on your keyboard to select a channel.
5.5 Skipping Unwanted Channels
If you want to exclude undesirable channels from your AM/FM channel list, do the following:
-
Click the Setup button and in the Setup dialog box, click AM/FM Radio icon in the left pane.
-
In the Program column, click the unwanted channel. The check mark will be removed, indicating that the channel will be excluded from your channel list and that you won't be able to access and hear them through the Channel Up/D

5.6 Adding a Radio Frequency
If the desired channel cannot be found through scanning, follow the instructions below.
-
Click the Setup button and in the Setup dialog box, click AM/FM Radio icon in the left pane.
-
Specify the correct frequency in the text box (as shown below) and click Save.

5.7 Modifying a Channel Name
You can manually modify any existing AM/FM radio channel.
-
Click the Setup button and in the Setup dialog box, click on the AM/FM Radio icon in the left pane.
-
Double click on the Name column of the existing AM/FM channel which you want to modify.
-
Enter the name or description you want in the provided text box and then press Enter.
| Program | Frequency | Name |
| 1 | 87.50 | My Favorite |
| 3 | 88.30 | 88.30 |
| 4 | 100.10 | 100.10 |
| 5 | 88.50 | 88.50 |
| 6 | 89.30 | 89.30 |
-
To modify more channels, repeat step 2 to 3.
-
Click Apply to save the settings and click OK to exit the current dialog box.
5.8 Adding and Deleting Channel Groups
Selecting a Channel Group allows you to switch between the channels of the selected group only when pressing the Channel Up/Down button. If you want to add or delete an AM/FM channel group, do the following:
To add a new channel group:
-
Click the Setup button and in the Setup dialog box, click AM/FM Radio icon in the left pane.
-
Click New and the Program List dialog box appears. Type in a group name and click OK.
-
Now you can start to scan AM/FM radio channels and manage the scanned AM/FM data for this new channel group. For more information, refer to How to Auto Scan AM/FM Radio Channels.
-
To add more channel groups, repeat steps 2 to 3.
To delete a channel group:
-
Click the Setup button and in the Setup dialog box, click on the AM/FM Radio icon in the left pane.
-
From the drop-down list, select the name of the group that you want to remove.
-
Click Delete to remove the selected group.
5.9 Customizing Audio Recording Settings
To customize audio recording settings:
-
Click the Setup button and in the Setup dialog box, click on the AM/FM Radio icon in the left pane.
-
Then select Record Format. You can use the default format or select New to create your own file format.
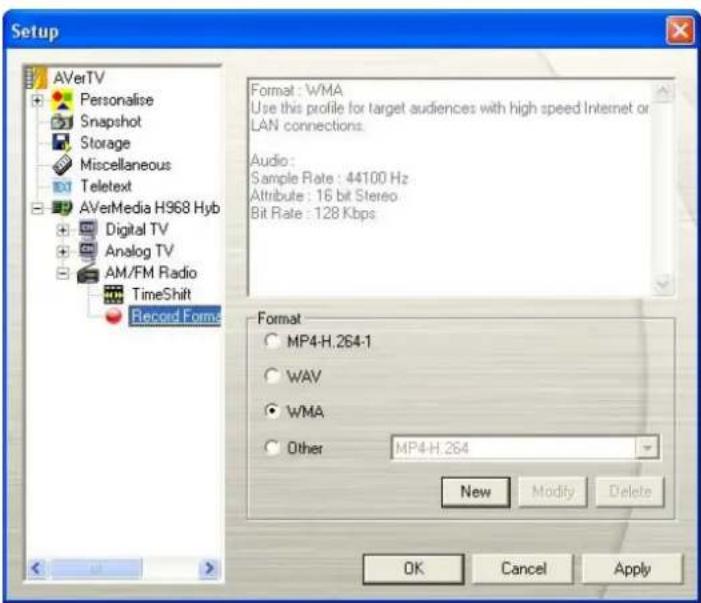
(This picture is only for reference.)
- Click New and the Format dialog box appears. In the Format dialog box, select the file format you want and enter the desired name in the text box. Then click Next.
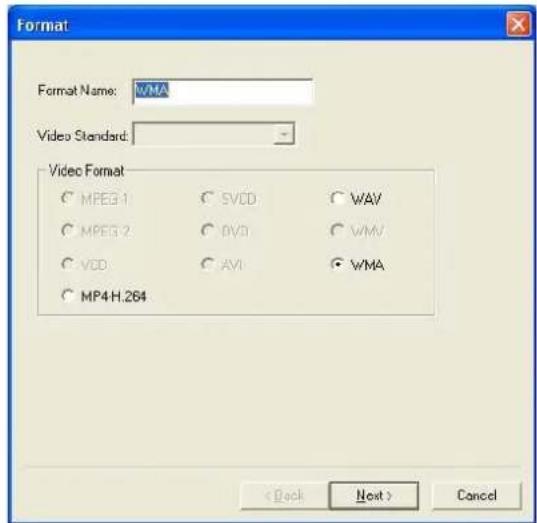
(This picture is only for reference.)
- In the Video dialog box, you can set the audio format. The setting options in the Video dialog box will vary according to the audio format you chose.
![Video Format: WNV GUID: (4A380124-8F10-4E4F-SAFD-4329A7395CFF) Use for high-quality video and audio content, or with content intended for local playback or download and play. Target audience has a LAN, cable modem, or xDSL connection. Video: Video Size: 640x480 Bit Rate: 1868 Kbps Format Video for broadband NTSC [2 Mbps total] Video for broadband NTSC [2 Mbps total] Video for broadband film content (760 Kbps) Video for broadband film content (1500 Kbps total) Video for color PDA devices (225 Kbps) Video for color PDA devices (150 Kbps) Windows Media Video 8 for Color Pocket PCs (225 Kbps) Windows Media Video 8 for Color Pocket PCs (150 Kbps) < Back Finish Cancel](/content/2026/06/1264364/images/de7b81d40af28216e3e611ff9f2e804ad7e8aee2cc57c3dd0866d7d823d96638.jpg)
(This picture is only for reference.)
- Click Finish to save the settings. To abort this operation, click Cancel.
- If you want to change the settings of your own file format, click Modify or you can click Delete to remove the unwanted file format that you created earlier.
Note: To determine the length of recording and to choose a destination folder in which to save the recorded audio, please refer to the section titled Recording Settings in Chapter 7.
Chapter 6 TimeShift
The TimeShift function performs background recording of a TV /Radio program, and lets you return and watch any part of the recorded program. At the same time, the live TV /Radio program continues to be recorded and played back so you won't miss any part of the show. You can also advance forward to skip commercials or rewind to replay scenes one more time.
6.1 TimeShift Controls
Use the following button controls in the Control Panel to start recording a live program, play back the program from where you left off, advance forward, rewind, and more.

| BUTTON | FUNCTION | |
| 1 | Backward | Click to move backward in intervals |
| 2 | Playback Seek | Drag the slider tab to move to any part of the recorded program. |
| 3 | Volume | Drag your mouse up/down to increase/decrease the volume level. |
| 4 | Mute | Turn off the sound. |
| 5 | Setup | Allows you to:* Scan channels.* Set for Windows power option.*Configure snapshot settings.*Customize recording settings.*Customize the TimeShift function. |
| 6 | Forward | Click to skip forward in intervals |
| 7 | TimeShift / Pause | Click to perform background recording of the live program and play it back simultaneously. / Click to temporarily freeze the playback. |
| 8 | Stop | Click to terminate recording and return to the live program. |
6.2 Customizing TimeShift Recording Settings
Before you start using the TimeShift function, first check its recording settings to see if they fit your needs.
To check and customize recording settings:
- Click the Setup button and in the Setup dialog box, click the Storage icon on the left pane. You will then see the following settings.

(This picture is only for reference.)
- By default, TimeShift performs recording of the TV program by creating a temporary video file and deletes this file once you click the Stop button. If you want to save the video file, select the Keep TimeShift Files check box.
- In the Record section, you can determine your file name format, recording time, file size and destination folder.
- Click Apply to save the new settings and click OK to exit the current dialog box. Or, click Cancel to use the original settings.
6.3 Customizing TimeShift Video Quality Settings (Analog TV only)
To customize video and audio quality settings:
- Click the Setup button and in the Setup dialog box, click the Timeshift icon on the left pane.
- Determine the video and audio quality for timeshifting.

(This picture is only for reference.)
-
If you want to revert to default settings, please click Default.
-
Click Apply to save the new settings and click OK to exit the current dialog box. Or, click Cancel to use the original settings.
6.4 Using the TimeShift Function
To pause the live program:
-
Click the TimeShift button on the Control Panel. The application will begin to record the program.
-
When you want to rewind, use the Playback Seek slider bar to move back to the part you want to watch or listen to again. Click and drag the slider tab to the left until you see the part of the show you wish to watch or listen to, then release the mouse button.

-
You can also click the Backward button to move backward in fixed intervals until you reach the part where you left off.
-
To advance forward and skip some parts of the recording (for example TV commercials), drag the slider tab to the right. You can also click the Forward button to move forward in fixed intervals.
-
To temporarily pause the playback, click the Pause button ☐. Click the Pause button again to resume.
-
To return to the real-time viewing or listening of the live program, click the Stop button ■. This switches off the TimeShift function and returns you to live program.
Chapter 7 PVR
You can use your computer as a personal video recorder, and record your favorite TV programs or capture video from an external source into your hard drive. Besides, you can also divide the recording files in proper sizes to facilitate burning onto removable optical media, such as CD-R and DVD disks.
7.1 PVR Controls
Use the following button controls for recording and video playback.
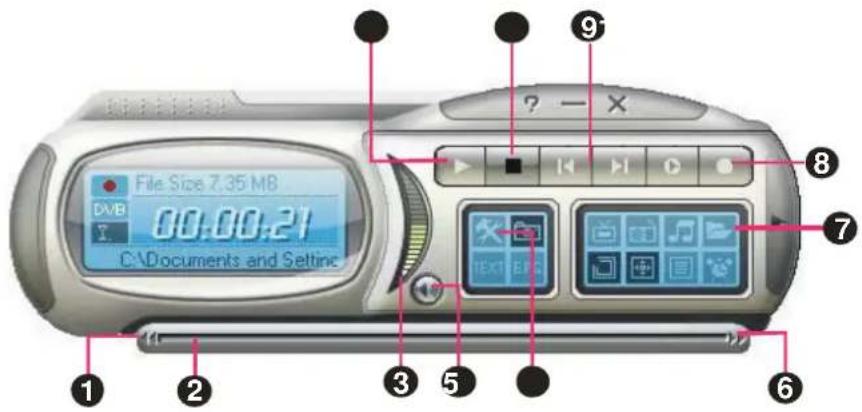
| BUTTON | FUNCTION | |
| 1 Backward Click to move backward in intervals. | ||
| 2 Playback Seek Drag the slider tab to move to any part of the recorded file. | ||
| 3 Volume Drag your mouse up/down to increase/decrease the volume level. | ||
| 4 Mute Turn off the sound. | ||
| 5 Setup Allows you to: | * Scan channels.* Set Windows power options.* Configure snapshot settings.* Customize recording settings.* Customize the TimeShift function. | |
| 6 Forward Click to skip forward in intervals. | ||
| 7 Play List Click to create a playlist of video files to play back. | ||
| 8 Record Click to start recording. | ||
| 9 | Play Previous/Next File | Click to go to the previous/next video file in the playlist. |
| 10 | Stop | Click to stop recording or playback. |
| 11 | Play / Pause | Click to playback. / Click to temporarily freeze the playback. |
7.2 Recording Settings
Before recording, check if the settings meet your needs.
- Click the Setup button 🎨 In the Setup dialog box, click the Storage icon on the left pane.
- By default, the system sets the recording "Date" and "Time" as the file name format. To create your own file name format, please click Custom.
- The Duration option allows you to specify a recording duration otherwise the system will record the largest clip that your hard drive can accommodate.
-
This application lets you to divide the recording files in parts for burning onto removable optical media, such as CD (650 MB) and DVD (4096 MB) discs. Enable the Split File Size option and select the appropriate video file size from the dropdown list so that each video file will not exceed the limit. Or you can choose Custom to assign the file size you want.
-
Determine the destination folder. Click ... to choose a folder you want.
-
Click Apply to save the settings and click OK to exit the current dialog box. To abort this operation, click Cancel.
Note: To hide the sound of the TV program when recording, click the Mute button on the Control Panel.
7.3 Using the Recording Function
To record a TV/Radio program that you want, do the following:
- Click the Record button 📋 on the Control Panel.
- You can click the Stop button to terminate the recording and return to the live TV program.
7.4 Playing the Recorded Programs
Each TV program that you recorded will be saved as a video file in the assigned destination folder.
To play back the recorded video files:
Click the Play button ▶ or drag the recorded video file to AverTV TV monitor or User Panel to play back.
OR,
Drag the recorded video file to AVerTV desktop icon to run the application and play back.
OR,
(1) Click the Play List button, and you may see some recorded video files listed in the top rightpane of the Playback List window.
(2) To add more video files to the playback list, first navigate the file in the left pane to find the folder that contains the desired video files. When you have located the folder, the
media files will then be displayed on the top right pane. Select the files that you want, then click Insert, or click Insert All to add all media files in the folder to the playback list.
(3) To delete files from the Playback List, select them from the list in the right bottom pane and click Delete, or click Delete all to delete all files in the playback list.

(This picture is only for reference.)
7.5 Picture-in-Picture Display
With the picture-in-picture window feature, you will be able to play back recorded video files, and at the same time, watch live TV.
To enable PIP function, right click the TV monitor, select PIP and choose Enable. You can also point to PIP and select a desired position of the PIP window. Select Close to disable the PIP function.

| Position Description | |
| Top-left Corner / [IMAGE] | Display the PIP window on the top-left corner |
| Top-right Corner / [IMAGE] Display the PIP window on the top- right corner | |
| Bottom-left Corner / [IMAGE] Display the PIP window on the bottom-left corner | |
| Bottom-right Corner / [IMAGE] Display the PIP window on the bottom-right corner | |
| Movable / [IMAGE] Resize the PIP window and separate it from the main window | |
By default, you will be able to play back recorded video files on the main window, and at the same time, watch live TV in the PIP window. If you want to switch the video playback to the PIP window and the live TV to the main window, press the button. You can also press the button to fix the size of the PIP window and the distance between the main window and the PIP window. To exit the PIP window, press
Chapter 8 Image Capture
While you watch TV or recorded video from your PC monitor, you can use the AVerTV 6 application to capture images for your document, presentation or web page.
8.1 Before Capturing
Before you start capturing images, first set the destination folder for saving captured images.
Click the Setup button, and select the Snapshot icon in the left pane. Then click to choose a folder where you want to save captured images.
8.2 Capturing a TV/ Video Image

To capture a still image, click the Snapshot button on the Control Panel. The Album will then appear, displaying thumbnails of the captured image.
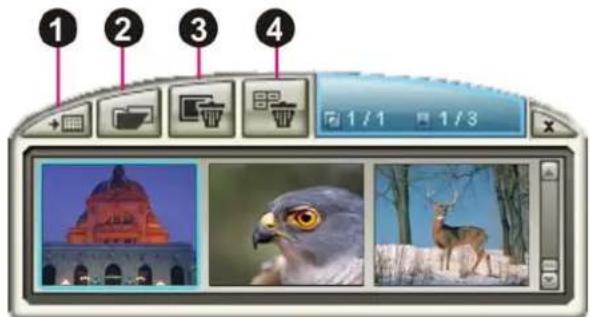
| BUTTON |
| 1 Wallpaper |
| 2 Save as |
| 3 Remove |
| 4 Remove All |
To capture another image, click the Snapshot button on the Control Panel again. New thumbnails will be added to the Album as you capture more images.
By double-clicking on the thumbnails, you can view images in a full-screen window with default image viewer.
To display the captured image as your desktop wallpaper :
- Select the thumbnail of the desired image and then click the Wallpaper button

- The selected image will be displayed as your wallpaper, the background of your desktop.
To save the captured image:
- Select the thumbnail of the image and then click the Save As button. The Save As dialog box will then appear.

(This picture is only for reference.)
-
From the File Format drop-down menu, select the format for saving the captured image.
-
Choose the Color format.
-
Choose 24-bit to capture image in 16M colors.
- Choose 8-bit to capture image in 256 colors.

- Click Browse to scan for folders and select a destination location for saving the image. Then specify a file name for saving the captured image.

(This picture is only for reference.)
- Choose the image size.
- In the Size section, select the Standard option and choose a desirable image size from the drop-down list.

(This picture is only for reference.)
- If you want to set your own image size, select Customize and enter the image Width and Height. If you want to maintain relative width and height, select the Keep Proportion option. Choose a measurement unit
from the Unit drop-down list. You can specify any image size you want. The maximum capture size can be 1600×1200.

(This picture is only for reference.)
- Click OK to save the image. Click Cancel if you do not want to save the image.
8.3 Multiple Image Sequence Capture
To capture a continuous sequence of images, do the following:
- Click the Setup button. In the Setup dialog box, click the Snapshot icon in the left pane.
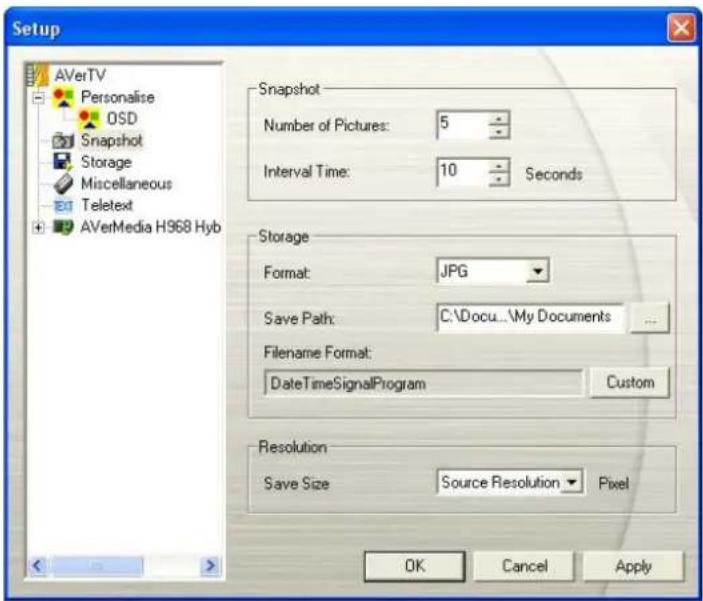
(This picture is only for reference.)
- In the Number of Pictures box, specify the number of images you want to capture.
- In the Interval Time box, specify the interval between captures. For instance, if you specify 10 seconds, an image will be captured every 10 seconds.
- On this page, you can choose the file format, destination folder, file name format and image resolution in advance.
- Click Apply to save the new settings and click OK to exit the current dialog box. Or Click Cancel if you do not want to change the settings.
- Click the Snapshot button 📄 on the Control Panel to start capturing.
Chapter 9 Teletext / MHEG-5
Teletext or MHEG-5 (digital Teletext) makes TV viewing a unique experience. It views teletext broadcast from your television programs offering the most updated information on TV Schedules, News, Stock Market Prices, Concert & Theatre information and so on. Teletext/MHEG-5 information may not be available if there is no such service provided in your area.
9.1 MHEG-5 Support (UK Digital Teletext Service)
Click Teletext button on the control panel and then the MHEG-5 Window will appear.
To activate the service, simply press the R key or red button once this window opens.

The table below is a list of keyboard shortcuts that you may find useful while using MHEG-5.
| Press Correspond to | |
| R | Red |
| G | Green |
| Y | Yellow |
| B | Blue |
| 0~9 / ↑↓← → | numeric keys / arrow keys |
| T | TEXT |
| ESC | Cannel |
| Enter | Select |
☑ Note: MHEG-5 Support will only function in the UK.
9.2 Teletext
9.2.1 Customize the Display Mode
-
Click the Setup button and in the setup dialog box, click the Teletext icon in the left pane.
-
From the Display Mode drop-down list, choose Other Window Display to open a new Teletext window or choose Main Window Display to overlay the Teletext window on the TV monitor.
-
Select the Transparent check box to make the Teletext window transparent.

(This picture is only for reference.)
9.2.2 Overview
Click the Teletext button on the control panel to open the Teletext application as shown below. For more information about Teletext, please see below in this chapter.

| BUTTON FUNCTION | ||
| 1 | Menu Bar This contains the names of the available drop-down list option menus. To access any of the menu items, simply click on it or hold down Alt and press the first character of each item. | |
| 2 | Toolbar It includes buttons that gives quick access to perform certain frequently used functions from the Menu Bar. | |
| 3 | Status Bar The status bar is located in the lower left corner of the window. It contains a short text message or explanation of the currently selected menu command. | |
| 4 | Title Bar This is located at the top of the window. It contains the current displayed page number or in hexadecimal page number of an active window. | |
| 5 | Teletext Browser | Teletext information is displayed in this area. The information would be the TV schedules, news, stock market reports, concert & theater information and so on. |
9.2.3 Toolbar Buttons

Lock Sub page
Locks the current sub page. The upcoming transmitted sub pages will be stored in the Teletext Cache for later use.

Previous Sub page/ Next Sub page
Switches to the next or the previous sub page.

Home (Ctrl+H)
Connects to the teletext home page which always goes to page 100, but page 100 may not be the primary teletext source.

Previous Page (-) / Next Page (+)
Displays the preceding or the succeeding teletext in hexadecimal page number.

History Back / History Forward
Retrieves the previous page in the history list.
Moves a page forward in the history list. The command is usable after one or more back steps in the history list.

TV Scale
Changes the proportion of the Teletext window to 4 by 3.

Always On Top
Makes Teletext Window float over the top of other applications.

Teletext File
Switches between the Teletext file which is opened from the previously saved file and the most recent Teletext information.
9.2.4 LED Lamp
Different LED color indicates different states.
Left LED Lamp:
Gray -- The system does not receive the teletext broadcast data.
Green -- The system is receiving the teletext broadcast data.
Right LED Lamp:
Green -- The cache in Teletext application is running less than 90% usage.
Yellow -- The cache in Teletext application is running over 90% usage.
Red -- The cache in Teletext application is running out.
9.2.5 Using Teletext
The following briefly describes how to use the Teletext feature.
Teletext Page
There are two page numbers displayed on the first line of each teletext page. The page number on the left is the page number that you have selected or keyed in. The other one in the middle of line is the page number of the currently displayed teletext data.
The newly selected page number will appear on the upper left corner of the page. Sometimes, this may take a while to retrieve the newly selected teletext page. There will be no changes on the page when there is no page data transmitted with the number you have selected.
A teletext page can be selected with one of the following methods:
- Key in the hexadecimal or teletext page number using the numeric buttons of your keyboard or AVerMedia TV remote control.
- Press the + (positive) or - (negative) button to move to the succeeding or preceding teletext page.
Copying a Teletext Page
- Simply click and drag over the text or the area that you want to copy using the mouse.
- Choose Copy from the Edit menu (Alt+E, C) or press Ctrl+C.
- You can then paste the contents of the teletext page in TXT or BMP format to a document you are working with.
Saving a Teletext Page
Some teletext pages include a number of subpages. If the file has subpages, teletext will also save the existing subpages.
- A teletext page can be saved using one of the following ways:
- To automatically save the file using the displayed teletext page as the filename and the default file format, choose Save from the File menu or press Ctrl+S.
- To save the file by specifying your own filename and different file format, choose Save As from the File menu or press Ctrl+A.
- A save as dialog box will appear:

- Select the file format to use for saving the teletext page. You can save the teletext page in :
TXT Text file format
BMP Windows bitmap file format
TLT Teletext file format
TLX Teletext file format
- Enter a filename and click OK.
Opening a Teletext Page
-
Choose Open from the File menu or press Ctrl+O.
-
From the Open dialog box, select the file containing the teletext page you want and click OK.

Opening Another Teletext Window
To open another teletext window, choose New Window from the File menu or press Ctrl+W.
Closing the Active Teletext Window
Choose Close Window from the File menu or press Ctrl+L to close the active teletext page window.
Chapter 10 Scheduler
The Scheduler allows you to create a list of preset schedules for watching and recording your favorite TV/Radio programs. You can set the day and time to record the TV/Radio program and specify the length of recording.
To run this application, click the Schedule button on the Control Panel. Then the Scheduler dialog box will appear.
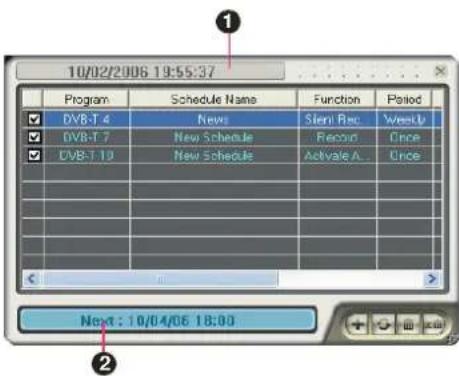
| BUTTON |
| 1 Current Time |
| 2 Selected Schedule |
The check box next to the Program column (as shown at right) indicates the schedule will be executed at a preset time. Once the application starts to execute a scheduled task, the system will clear the check mark automatically. If you want to skip the schedule temporarily, just clear the check box.

10.1 Schedule Management
This displays a list of preset schedules you have created.
Modify
Select a preset schedule and click this button to make changes.
Delete
Click this to delete the selected schedules.
Delete All
Click this to delete all schedules.
10.2 Adding Schedules
To create a new schedule:
- Click the Add button

- The following dialog box will then appear:

(This picture is only for reference.)
-
Type the desired name in the Schedule Name text box.
-
From the Function drop-down list, select Activate AVerTV to watch a TV program or listen to a radio broadcast. Otherwise, select Record to save a TV/Radio program for future viewing/listening. You can also select Silent Record which means the system will perform background recording instead of activating the TV/Radio program.
☑ Note: If you select Silent Record, when the application is performing the recording task, the icon will appear on the task bar (the lower right corner of the screen). To immediately watch or listen to the TV/Radio program which is being recorded, just double-click this icon.
- In the After Record-Schemes, it automatically switches to the selected power control mode when the schedule recording is completed. Choose an appropriate power control status listed below:
• Watch TV: Switch to real-time TV mode.
- Exit: Turn off the AVerTV Application.
- Stand By: Turn off your monitor and hard disks.
- Shut Down: Turn off your computer.
- Hibernate: Save everything and then turn off your computer.
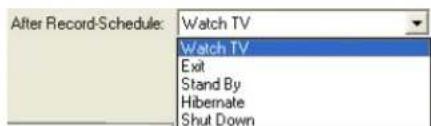
Note: If you choose Watch TV from the drop-down list, after completing the Silent Record task, the icon will appear on the task bar (the lower right corner of the screen). Just double-click this icon, you can immediately watch live TV or listen to the radio.
-
In the Program Setting section, select the device, video source, group and channel you want.
-
Set the schedule to tune in live TV or to perform recording. You can set the schedule on Once, Daily or Weekly.
-
Choose Once to perform schedule at a preset day and a preset time.
- Choose Weekly to perform schedule every week, at a preset day and time.
-
Choose Everyday to perform schedule everyday at a preset time.
-
If you choose Activate AVerTV in step 4, click Insert to complete the settings. If you choose Record or Silent Record, you need to do the following.
-
Click the Advance icon.
-
In the Record Setting section, you can determine the file format, recording duration, file size, destination folder or audio mode.
-
Click Insert to save the new schedule or click Cancel to abort the saving.
Chapter 11 Hot Keys
| Hot Key Description | Function | |
| UP/DOWN ARROW | Channel or FrequencyUp/Down | Press to go to the next upper/lower TV/Radio channel. |
| L Channel Loop Press | to go to the previously accessed | TV/Radio channel. |
| NUMERIC KEYS Select Channel Use NUMERIC KEYS | to directly enter the TV/Radio channel number. | |
| ESC | Stopor, Change back to Normal View | Stop ( playback, recording, TimeShift, or 16-Channel Preview). Or change full screen back to normal view. |
| F1 Help Open the Users Manual. | ||
| F2 | Minimize | Minimize the application and an icon will appear in the notification area. To return to the previous screen, double click the icon again. |
| F5 Full Screen Show TV/Video in full screen. | ||
| F6 Display (OSD) information Display information on the TV monitor. | ||
| F8 16-Channel Preview | Press to perform 16-Channel Preview function. | |
| +/- (on your numeric keypad) | Volume Press to increase or decrease the volume level. | |
| LEFT/ RIGHTARROW | Rewind/Fast Forward | Press to rewind or fast forward (for playback and TimeShift). |
| A | Audio Mode | Choose between available languages. |
| D | Show/Hide the Control Panel | Toggles between showing and hiding the control panel. |
| M | Mutc | Turn off/on the sound. |
| Ctrl + N | Play Next File | Play the next file in the playlist. |
| Ctrl + P | Play Previous File | Play the previous file in the playlist. |
| Ctrl + R | Record | Start recording. |
| P Play / Pause | Play/Pause (for playback, recording, and TimeShift). | |
| Ctrl + S | Snapshot | Capture an image (or a continuous sequence of images). |
| Ctrl + T | TimeShift | Enable the TimeShift function. |
| Insert | Transparent | Make Teletext window transparent. (Only available for Teletext overlay mode.) |
| Page Up | Previous page Go to the preceding | Teletext page. |
| Page Down | Next page | Go to the succeeding Teletext page. |
| Home | Home page | Go the Teletext home page. |
Chapter 12 Customer Service
The AVerTV 6 application provides a convenient tool, which allows users to contact AVerMedia's customer service department easily via the website. Please make sure that you have already connected to the Internet.
To contact the customer service:
-
Right-click on the TV monitor window. When a menu list pop-up, choose About (as shown at right).
-
When an information dialog box appear, click 📄 to access the product information webpage. Or you can click 🔒 to connect to our technical support webpage.
![AVerMedia® AVerTV Version 6.0.18 Beta [08093003] AVerMedia H968 Hybrid Analog/DVB-I Driver Version:2.9010.0.10 Product Information Technical Support AVerMedia Technologies, Inc. Copyright (c) 2000-2008](/content/2026/06/1264364/images/d67dd01aabe8f16d31300032c75acc133adec595a650d9410075c3809abc6f19.jpg)
- To exit the current dialog box, click

Chapter 13 Appendix
13.1 Video Gaming Plug-in (for Microsoft Vista MCE only)
MCE “Video Gaming Plug In” support is for Vista MCE only. After installing the driver, you can access it through the program library in Online Media. This function enables you to watch composite/S-Video signal source or play games in Vista MCE platform. (Playing games with MCE may cause delay, but you can choose “Video Gaming Plug In” to avoid it and enjoy real-time game play.)
- Start the Media Center in Vista.
- Select "Online Media" → "program library".
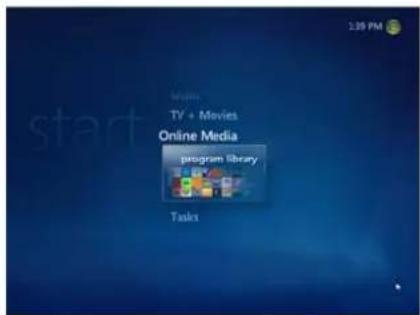
- Select "Video Gaming Plug In".

-
Select the video source you want to view via "Video Gaming Plug In".
-
Click button to view images in a full-screen window. Press ESC to exit the full-screen mode.
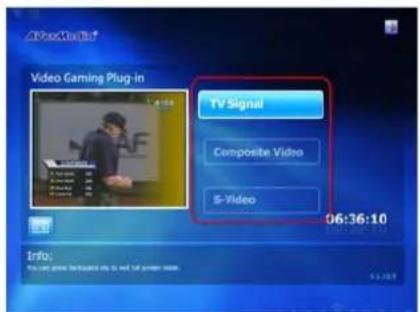
13.2 Video Quality Enhancement Plug-in (for Microsoft Vista MCE only)
MCE “Video Quality Enhancement Plug-in” support is for Vista MCE only. After installing the driver, you can access it through the program library in Online Media. This function enables you to adjust the Brightness, Contrast, Hue, Saturation and Sharpness until the image color is accurate. The setting you made will be applied to Analog TV, and composite/S-Video signal source.
- Start the Media Center in Vista.
- Select "Online Media" → "program library".

- Select "Video Quality Enhancement Plug-in".
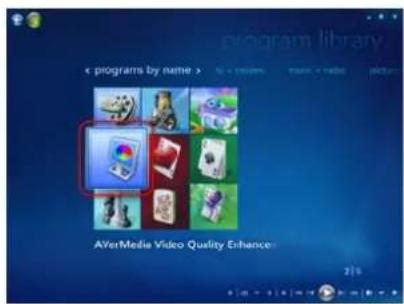
- Select the item you want to adjust.

- Use the following buttons to adjust the value of the item.

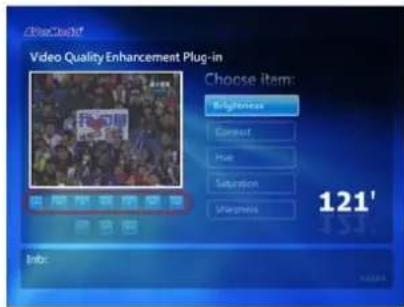

- Increase Brightness and Hue values by 16.
- Increase Contrast and Saturation values by 8.
- Increase Sharpness value by 4.
- Increase Brightness and Hue values by 32.
- Increase Contrast and Saturation values by 16.
- Increase Sharpness value by 8.

ek button to reset all items back to their ault settings.
click button to save all the settings.
- Or click button to save all the settings.
- If you want to exit without saving, click button
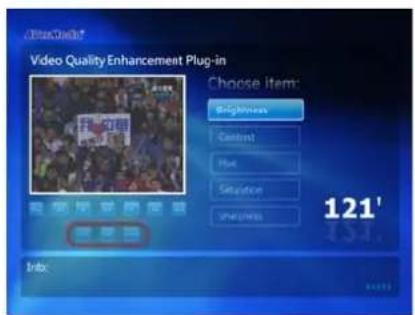
13.3 AVerIR Set Up (optional installation features)
The remote control is compatible with Microsoft Vista Media Center Edition. If you want to use the remote control on Windows Vista Media Center, you need to install the driver with AVerIR function and set Windows Vista Media Center as the default TV application. To activate the AVerIR function, please visit AVerMedia website (http://www.avermedia.com) for the most updated driver and follow the steps below:
13.3.1 Install the AVerIR
- Download the driver with AVerIR function according to your device model from AVerMedia website.
- Double-click the name of the .exe file you downloaded to install the driver
Note: It will overwrite your existing driver.
- If installation success, you can see an added "AVerMedia Infrared Receiver" item in Device Manager.

- Right-click AVerQuick, choose "Setting", and select the preferred application in the "Application" tab. Then you can use the remote control packaged with AVerMedia product to remote the Windows Media Center.
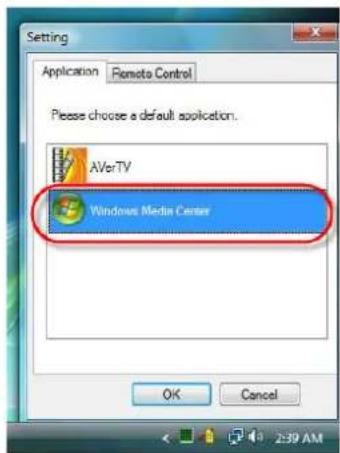
13.3.2 Uninstall the AVerIR
If you want to remove the AVerIR function, do the following:
- Go to Control Panel>Program and Features.
- Select the driver with "AVerIR" function of your device and click Uninstall/Change.

- Then you need to install the driver without AVerIR function again to work AVerMedia device normally.
NOTE:
If you reinstall the driver without AVerIR function without removing the driver with AVerIR first, this may cause a device manager error from can not find the AVerIR device, so we recommend to uninstall the driver with AVerIR first.

13.3.3 Remote Control Button Mapping in Windows Vista Media Center

| Button | Description (for AVerTV) | Description(for Windows Media Center on Vista) | |
| (1) |  | Turn on/off the application. If the computer is on, put the computer in standby mode. | |
| (2) | [WZH0] | Turn off/on the sound. Turn off/on the sound. | |
| (3) |  | Use numeric buttons to select a channel. | Use numeric buttons to select a channel. |
| (4) |  | Display TV in full screen. Switch to live TV if TV is off. If TV is paused, resume to real time TV programming. | |
| (5) |  | Change between available audio modes. | X |
| (6) |  | X | Use the arrow button to navigate all on-screen items. Use OK to confirm the selection. |
| (7) |  | Volume up / Volume down. Volume up / Volume down. | |
| (8) |  | Jump to the teletext page of the corresponding color according to this button. | Go to My Videos. |
| (9) |  | Jump to the teletext page of the corresponding color according to this button. | Go to the Recorded TV page. |
| (10) |  | View Teletext / Close Caption information. | Turn on/off the Teletext. |
| (11) | View EPG information. (This function is only available for digital TV) | View EPG information. (This function is only available for digital TV) | |
| (12) | Record the current program. | Go to the Manual Record page. | |
| (13) | Play the selected file or temporarily freeze the playback. | Play | |
| (14) | - Go to the previous item in the playlist.- Set the time to bring your computer out of Stand By or Hibernate mode. | For TV, go back 5 seconds. | |
| (15) | Move backwards in intervals. Rewind | currently playing media; if pressed repeatedly, it cycles to 3 rewind speeds from slowest to fastest | |
| (16) | Skip forward in intervals. Speed up currently playing media; if pressed repeatedly, it cycles to 3 fast forward speeds from slowest to fastest | ||
| (17) | - Go to the next item in the playlist.- Stand By / Hibernate mode, exit the application or turn off the computer. | For Playlist, skip to the next item.For Recorded TV, skip ahead of 29 sec. | |
| (18) | Stop the playback, recording, TimeShift, etc. | Stop currently playing media. | |
| (19) | Switch from real-time TV or Radio to TimeShift mode. | Pause | |
| (20) | Activate the Picture in Picture (PIP) / Multi-Channel Display function. | X | |
| (21) | Capture an image or a continuous sequence of images. | X | |
| (22) | Jump to the teletext page of the corresponding color according to this button. | Go to My Pictures. | |
| (23) | Jump to the teletext page of the corresponding color according to this button. | Go to My Music. | |
| (24) | Channel up and channel down. Change the channel | ||
| (25) | X | Go to previous screen. | |
| (26) | X | Go to Start screen. | |
| (27) | Return to previously accessed channel. | X | |
| (28) | Change between available signal sources. | X | |
www.avermedia.com
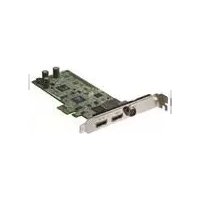


- User Manual • English
- DISCLAIMER
- COPYRIGHT
- Table of Contents
- Chapter 1 Device Introduction......1
- Chapter 2 AVerTV 6 Introduction ...... 2
- Chapter 3 Introducing the AVerTV 6 Application....3
- Chapter 4 TV....22
- Chapter 5 AM/FM Radio 48
- Chapter 6 TimeShift....54
- Chapter 7 PVR....57
- Chapter 8 Image Capture 60
- Chapter 9 Teletext / MHEG-5....63
- Chapter 10 Scheduler....69
- Chapter 11 Hot Keys....72
- Chapter 12 Customer Service....73
- Chapter 13 Appendix....74
- Chapter 1 Device Introduction
- Chapter 2 AVerTV 6 Introduction
- Chapter 3 Introducing the AVerTV 6 Application
- Launching the AVerTV 6 Application
- Running the AVerTV 6 Application for the First Time
- Scanning for Analog Programs
- Scanning for Digital Programs
- Note:
- Introducing the User Interface
- The Control Panel
- Remote Control (Optional)
- Remote Control Buttons (Model RM-FP/RM-KH/RM-K4)
- Remote Control Buttons (Model RM-JX)
- Remote Control Buttons (Model RM-KS)
- Remote Control Buttons (Model RM-KV)
- Changing TV Monitor Resolution
- Resizing the TV Monitor Window
- Changing Display Aspect Ratio
- Always on Top
- Setting Windows® Power Options
- Setting Time for Turning on the Application
- Minimize the Application
- Changing Video Renderer
- Chapter 4 TV
- Analog TV
- Scanning Channels
- Scanning Channels (For Advanced Users)
- Customize Video Recording Settings
- --To record program in MPEG-4 format--
- Fine Tuning Color and Display Quality
- Enhancing the Video Quality
- Digital TV
- Scanning Channels
- Scanning Channels (For Advanced Users)
- Customize Video Recording Settings
- --External Video Source—
- Using the EPG Function
- Fine Tuning Color and Display Quality
- Enabling the Subtitle Function
- Adding and Deleting Channel Groups
- Selecting a TV/ Digital Radio Channel
- Adding and Deleting Program Grouping List
- Adjusting Volume
- Specifying a Channel Name or Description
- Modifying a Program List Name
- Removing Unwanted Channels
- Using the OverScan Function
- 16-Channel Preview
- Changing the OSD Attributes
- Changing Signal Source
- Sound Controlling (Optional)
- Chapter 5 AM/FM Radio
- AM/FM Radio Controls
- How to Auto Scan AM/FM Radio Channels
- Manually Scanning Specific AM/FM Channels
- Selecting a Channel
- Skipping Unwanted Channels
- Adding a Radio Frequency
- Modifying a Channel Name
- Adding and Deleting Channel Groups
- Customizing Audio Recording Settings
- Chapter 6 TimeShift
- TimeShift Controls
- Customizing TimeShift Recording Settings
- Customizing TimeShift Video Quality Settings (Analog TV only)
- Using the TimeShift Function
- Chapter 7 PVR
- PVR Controls
- Recording Settings
- Using the Recording Function
- Playing the Recorded Programs
- Picture-in-Picture Display
- Chapter 8 Image Capture
- Before Capturing
- Capturing a TV/ Video Image
- Multiple Image Sequence Capture
- Chapter 9 Teletext / MHEG-5
- MHEG-5 Support (UK Digital Teletext Service)
- Teletext
- Customize the Display Mode
- Overview
- Toolbar Buttons
- Lock Sub page
- Previous Sub page/ Next Sub page
- Home (Ctrl+H)
- Previous Page (-) / Next Page (+)
- History Back / History Forward
- TV Scale
- Always On Top
- Teletext File
- LED Lamp
- Left LED Lamp:
- Right LED Lamp:
- Using Teletext
- Teletext Page
- Copying a Teletext Page
- Saving a Teletext Page
- Opening a Teletext Page
- Opening Another Teletext Window
- Closing the Active Teletext Window
- Chapter 10 Scheduler
- Schedule Management
- Adding Schedules
- Chapter 12 Customer Service
- Chapter 13 Appendix
- Video Gaming Plug-in (for Microsoft Vista MCE only)
- Video Quality Enhancement Plug-in (for Microsoft Vista MCE only)
- AVerIR Set Up (optional installation features)
- Install the AVerIR
- Uninstall the AVerIR
- Remote Control Button Mapping in Windows Vista Media Center
Brand : AVERMEDIA
Model : AVerTV Digi Express 54
Category : TV receiver