M70W - To scan AVERMEDIA - Free user manual and instructions
Find the device manual for free M70W AVERMEDIA in PDF.

| Product type | Document visualizer/scanner |
| Brand | AVerMedia |
| Model | M70W |
| Sensor | CMOS 1/3.2 inch, 13 megapixels |
| Maximum HDMI output resolution | 4K at 60 Hz |
| Maximum frame rate | 60 fps |
| Total zoom | Up to 33x (10x optical + 23x digital) |
| Image modes | Normal, High Frame Rate, High Quality, Microscope, Infinity, Macro |
| Integrated LED lamp | Yes, adjustable |
| Built-in microphone | Yes |
| Wireless connectivity | Dual-band 2.4/5 GHz Wi-Fi, Miracast, optional Wi-Fi dongle |
| Wired connectivity | HDMI input/output, USB 2.0 Type-A x2, mini-USB, DC 5V input, anti-theft jack |
| Power supply | AC 100-240V power adapter, DC 5V / 2A output |
| Built-in battery | Yes, rechargeable (do not replace yourself) |
| Power consumption | 8.7W (lamp on) / 7.7W (lamp off) |
| Dimensions in use (L x H x D) | 587 x 159 x 546 mm (±2 mm) |
| Folded dimensions (L x H x D) | 363.5 x 159 x 76.3 mm (±2 mm) |
| Weight | Approximately 2.6 kg |
| Field of view at 470 mm | 480 x 345 mm (A3 size) |
| Supported software | AVerTouch (ePTZ, capture, annotation, recording) |
| Package contents | Device, remote control, power adapter, power cable, USB cable, AAA batteries, software CD, quick guide, warranty card, Wi-Fi dongle (optional) |
| Maintenance and cleaning | Use a soft, dry cloth. Do not use solvents. Disconnect before cleaning. |
| Safety | Do not expose to rain or moisture. Use the correct voltage. Do not pull on the mechanical arm. Keep out of reach of children. |
| Spare parts and repairability | Battery not user-replaceable. Contact your dealer for repairs. Optional accessories: carrying case, microscope adapter. |
Frequently Asked Questions - M70W AVERMEDIA
User questions about M70W AVERMEDIA
0 question about this device. Answer the ones you know or ask your own.
Ask a new question about this device
Download the instructions for your To scan in PDF format for free! Find your manual M70W - AVERMEDIA and take your electronic device back in hand. On this page are published all the documents necessary for the use of your device. M70W by AVERMEDIA.
USER MANUAL M70W AVERMEDIA
natural_image
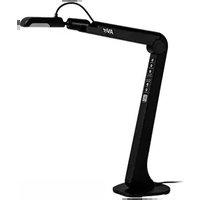
Line drawing of a desktop computer with a scroll and control panel (no text or symbols)M70W
The items below are included with this product. If any item is missing, contact the dealer from whom you purchased this product.
| M70W unit Remote controller | Power Adaptor Power cord* | USB Cable | ||
 | 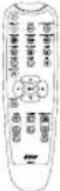 | 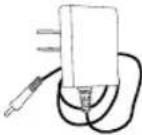 | 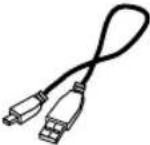 | |
| AAA Batteries | Software CD** | Quick Guide | Warranty card*** | Wi-Fi Dongle (Optional) |
*The power cord will vary depending on the standard power outlet of the country where it is sold.
**Only for Japan and Europe
** Only for Europe, Japan, and Taiwan
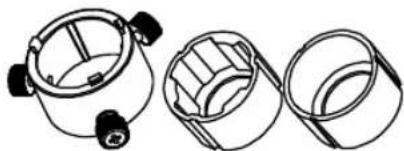
Optional Accessories

Carrying Bag

natural_image
Simple line drawing of a folded paper or sheet (no text or symbols)Anti-glare Sheet
natural_image
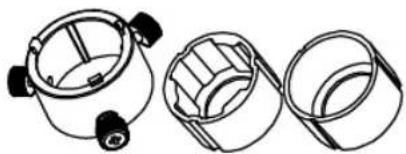
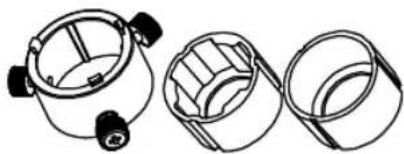
Three technical line drawings of mechanical components or enclosures, showing internal structures with no visible text or symbols.Microscope Adapter
(28mm and 34mm Rubber Coupler are included)
More Help
For FAQs, technical support, software and instruction manual download, please visit:
Global:
http://presentation.aver.com/download-center/
Technical Support:
https://aver.com/technical-support
Overview
text_image
Technical diagram of a device with numbered parts, likely an MRI scanner or digital camera module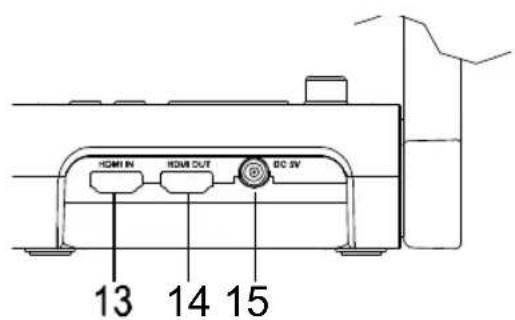
text_image
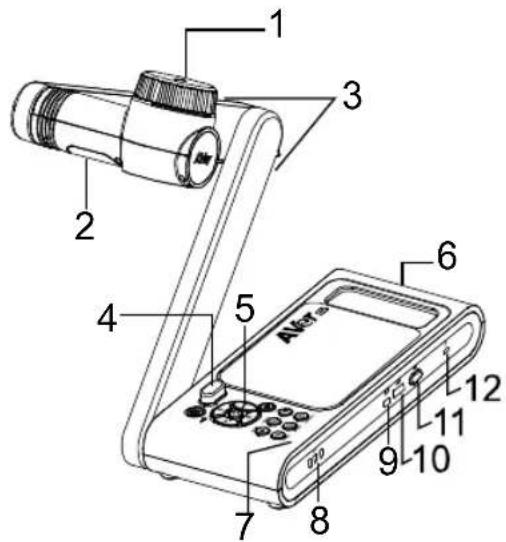
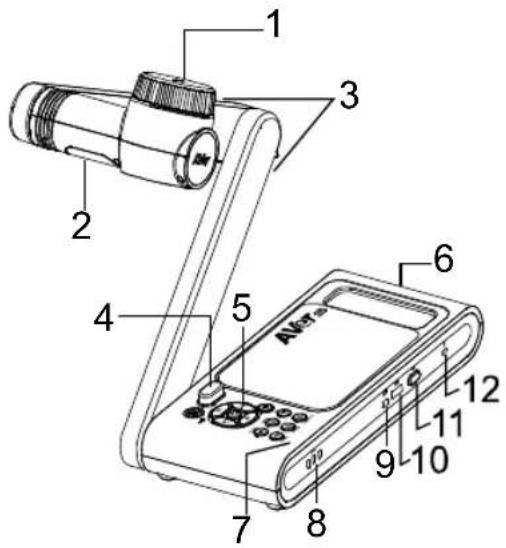
HDMI IN HDMI OUT DC 3V 13 14 15| 1. Camera head 2. | LED lighting |
| 3. Arm 4. IR sensor | |
| 5. Control panel 6. | Handle |
| 7. Built-in MIC 8. Battery Indicator | |
| 9. USB mini port 10. USB port | |
| 11.Wi-Fidongle12.Anti-theftSlot | |
| 13.HDMIInput14.HDMIOutput | |
| 15. DC power jack |
Compound Key
Press keys to operate the compound key function.
FACTORY RESET

RESOLUTION

MODE

: Back to factory default settings.
: Press to switch between following modes:
- Auto detects the best resolution(4K, 720P, 1080P)
- 1024x768 (If HDMI device support)
- 4K 60Hz (If HDMI device support)
:Press to switch between following modes:
Norma, Motion, High quality, Microscope, Infinity, Marco
Remote Control
text_image
1 2 3 4 5 6 7 8 9 10 AVer 11 12 13 14 15 16 17 18 19 20 21 22 INPUT/USB WRITE CAMERA / PC CASHORE RECORD RESOLUTION FREEZ AT LOCK AM* MOSER OKL AUTO/DC VOLUME R Sunshine 1x 20X 21X 22X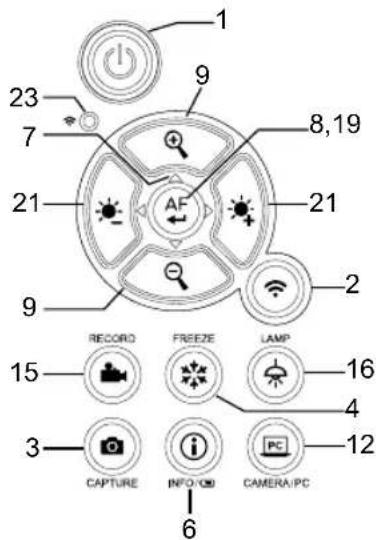
text_image
1 23 7 21 9 8,19 21 AF 2 2 15 RECORD FREEZE LAMP 16 4 3 CAPTURE INFO/OD CAMERA/PC 12 6| Name Function | |
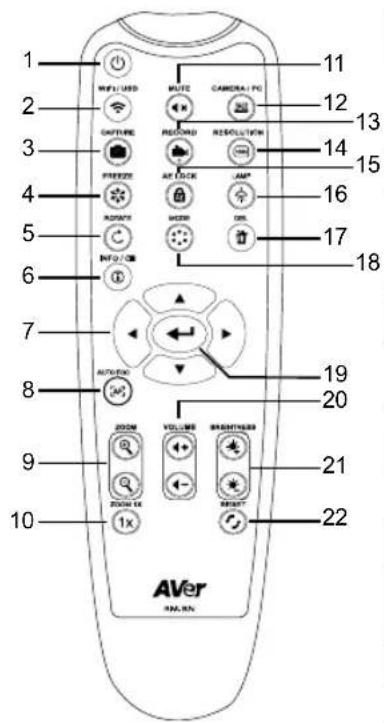
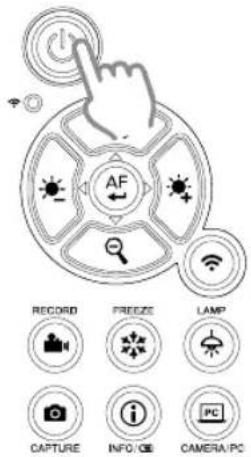
| 1. POWER | Turn the unit on/off/standby*.*Standby mode is supported when power plugged in. |
| 2. WiFi/USB | Switch between WiFi and USB mode. |
| 3. CAPTURE | Capture still image in Camera mode. In continuous capture mode, press this button again to stop. |
| 4. FREEZE | Freeze live images. |
| 5. ROTATE | Rotate the image by 0/180° in Camera mode. |
| 6. INFO/ | Press to view system information and battery power status. |
| 7. ▲,▼,◀, & ▶ | Pan and zoom-in image in live streaming. |
| 8. AUTO FOC | Adjust the focus automatically. |
| 9. ZOOM +/- | Increase/decrease the image magnification in camera mode. |
| 10. ZOOM 1X | Reset zoom level to 100%. |
| 11. MUTE | Set the volume to mute. |
| 12. CAMERA / PC | Switch the video signal between camera and computer from the HDMI Input port |
| 13. RECORD | Start/Stop audio & video recording. Video recording can only be saved in a USB flash drive. |
| 14. RESOULTION | Press to switch between following modes:- Auto detects the best resolution(4K, 720P, 1080P)- 1024x768 (If HDMI device support)- 4K 60Hz (If HDMI device support) |
| 15. AE LOCK | Lock the exposure to stop M70W attempting to find optimal exposure. |
| 16. LAMP | Turn the overhead light on/off. |
| 17. DEL | Delete the selected picture/video in Playback mode. |
| 18. MODE | Press to switch between Normal, High frame, and High quality, Microscope, Infinity, or Marco mode. |
| 19. | Make a selection. |
| 20. VOLUME +/- | Adjust the volume. |
| 21. BRIGHTNESS +/- | Adjust the brightness. |
| 22. RESET +/- | Reset to factory default setting. |
| 23. WiFi indicator | WiFi status indicator: Please refer toLED Indicatorsection. |
LED Indicator
| Name Status indicator | |
Power  | Solid green: Power onNo light: Power offSolid red: Standby mode**Standby mode is supported when power plugged in. |
Battery  | Solid green(x3): Battery is full(100% ~ 60%)Solid green(x2): Battery is 60% ~ 30%Solid green(x1): Battery is 30% ~ 5%Solid red (x1): Battery is 5% ~ 0%Flashing red (x1): Battery is out of powerSolid orange(x3): Battery is abnormal |
 | Solid blue: AP Mode Ready / STA connectedSlow flashing blue: Software connection with cameraShort flashing blue: Create AP mode / STA connectingSolid green: Miracast mode readySlow flashing green: Miracast streaming startQuick flashing green: Miracast device scan / connecting |
[Note]
The battery will be exhausted for long-term usage. Do not replace the battery yourself. Please contact your dealer.
Device Connection
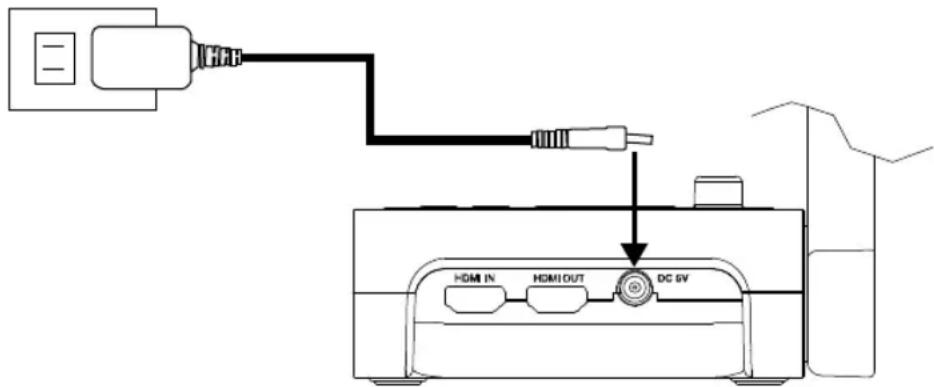
Power Connection and Charging
1
Plug in power adapter and turn on M70W.
text_image
HDMI IN HDMI OUT DC 6V[Note]
■ Please full charge the camera for the first time use.
When the camera is power on, the camera is in "Standby" mode. In standby mode, it can be charging with the USB connection between other devices; but the power supply is required 5V2A and the charging time will be longer.
■ The laptop, projector, or monitor cannot provide the power through the USB connection to the camera while the camera is operating.
■ When the camera is charging with the wall outlet, the battery indicator is in green flashing.
■ Press AF + 🔒 to reboot when the camera doesn't work properly.
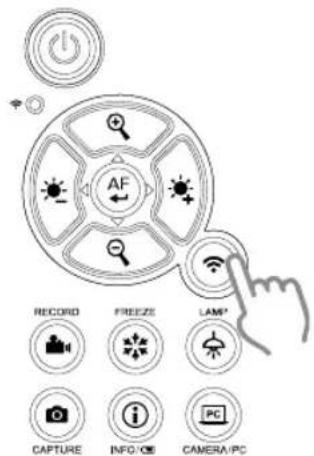
USB Connection
1
Press Wi-Fi button to disable Wi-Fi mode.
text_image
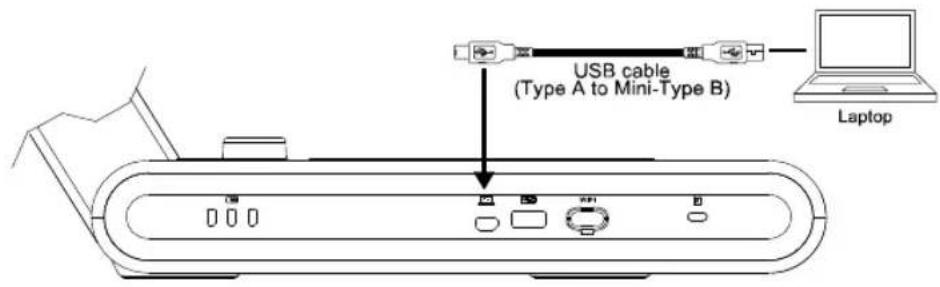
AF RECORD FREEZE LAMP* CAPTURE INFO/CM CAMERA/PCConnect M70W to laptop/PC with USB port.
text_image
USB cable (Type A to Mini-Type B) Laptop2
Connect USB pen drive to USB port to save the recording file.
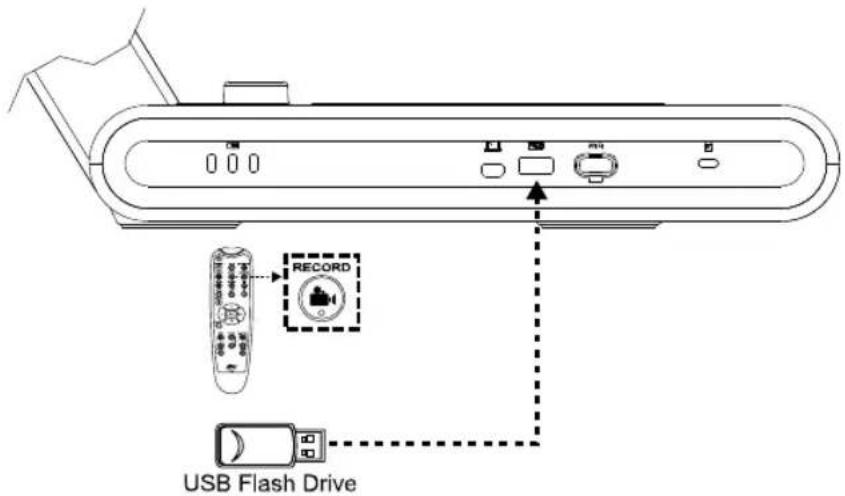
text_image
RECORD USB Flash DriveHDMI Connection
1
Connect M70W to HDMI display with HDMI output port.
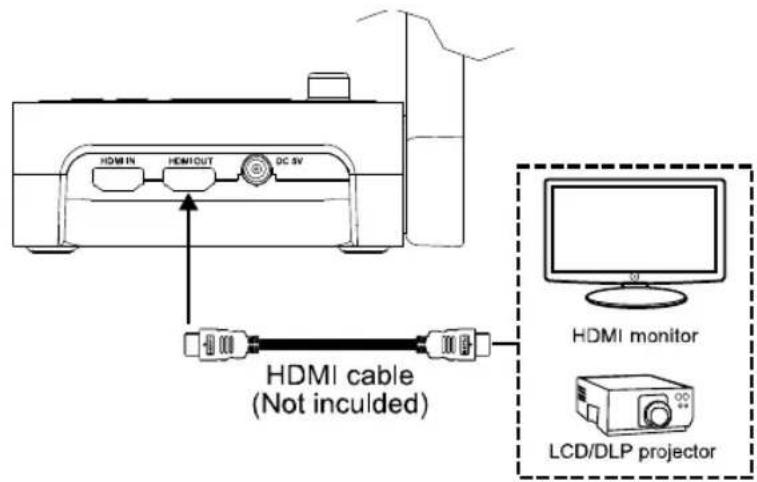
text_image
HDMI IN HDMI OUT DC 5V HDMI cable (Not incuiled) HDMI monitor LCD/DLP projector2
Connect M70W to laptop/PC with HDMI input port.
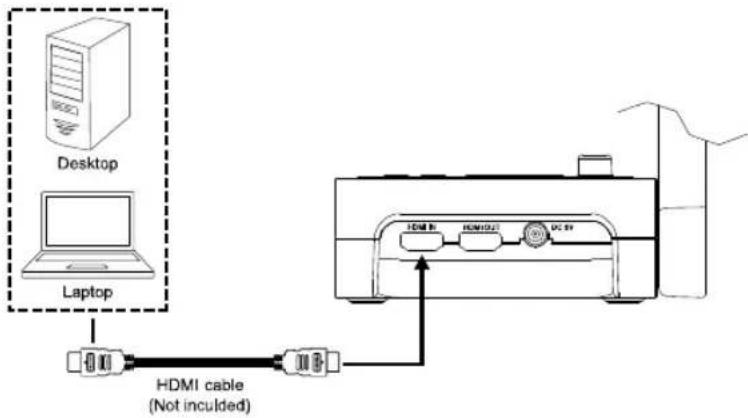
text_image
Desktop Laptop HDMI cable (Not incuiled)P2P connection via Wi-Fi Dongle(Optional)
1
Plug-in the WiFi dongle to PC/laptop and Install AVerTouch application.
natural_image
Line drawing of a handheld electronic device with a sensor icon and signal symbol (no text or labels)
text_image
Wi-Fi Dongle Laptop AVerTouch2
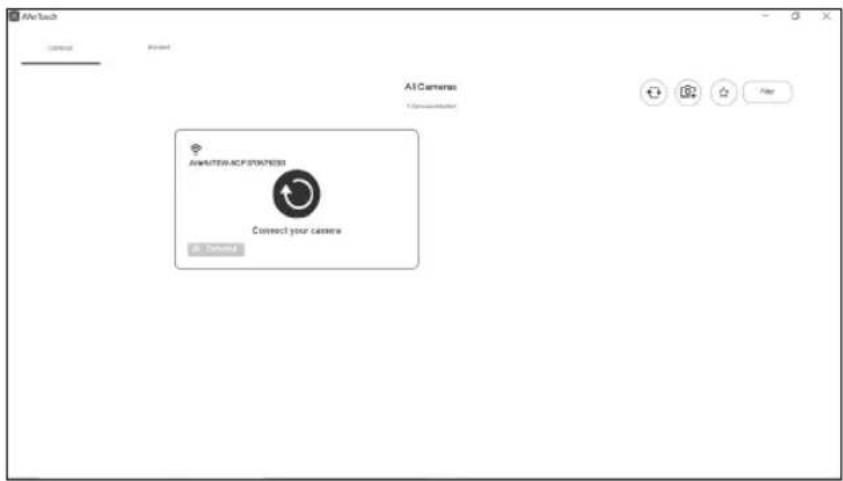
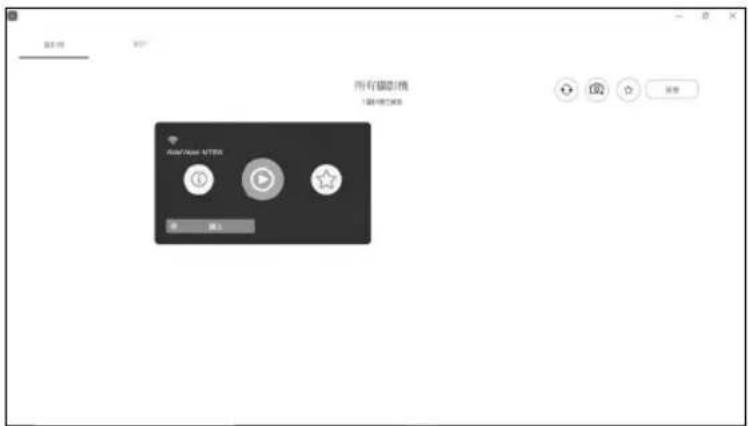
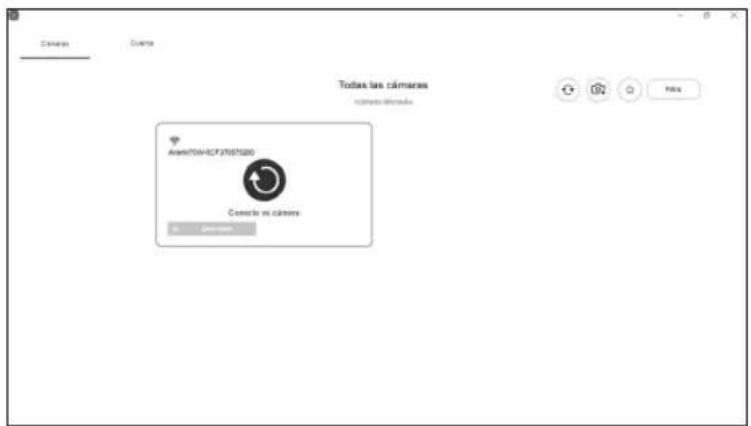
Open AVerTouch application, click to connect the camera.
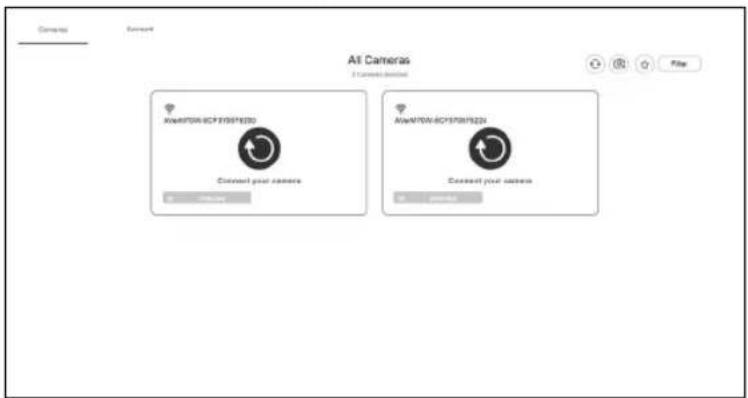
text_image
Alt Cameras Connect your camera XuWATON-ACY105F1230 Connect your camera XuWATON-ACY105F1229 Connect your camera[Note] Check the serial number at bottom of the camera to find your camera.
3
Click Next to continue.
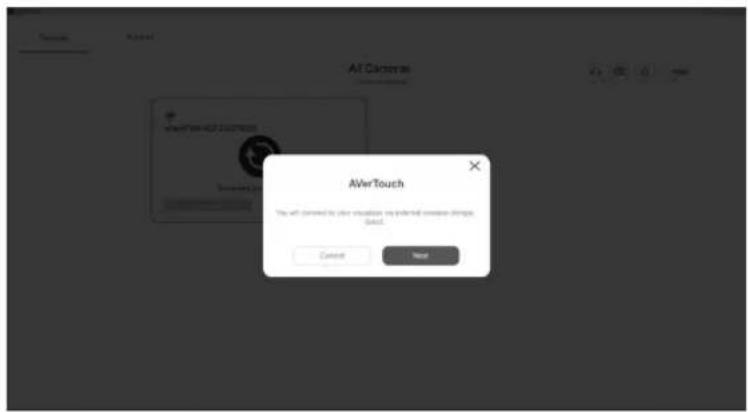
text_image
AVerTouch This will be saved by your application on external version images (except) Cancel Next4
Entering the Camera Name and Passcode, click Done to continue.
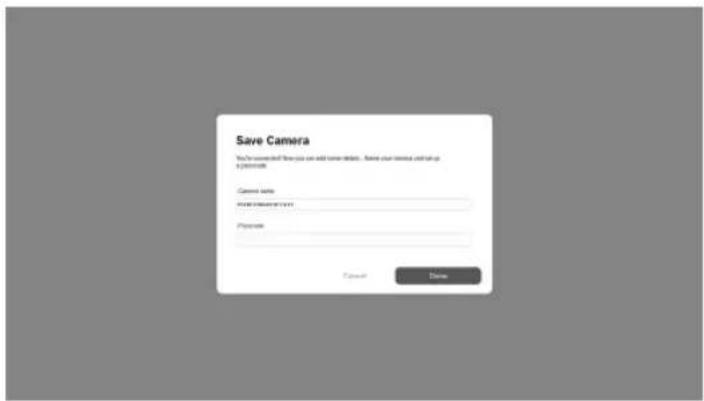
text_image
Save Camera You can change if you can add camera details. Save your camera and take up to password. Camera info: I have a name of this image. Phone: Password Name:5
Click Done button to connect camera.
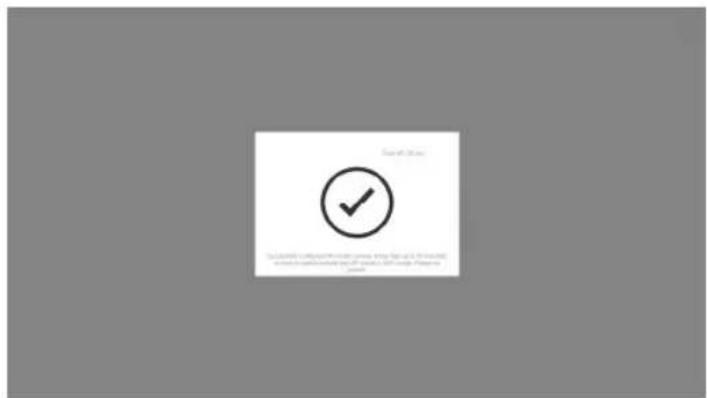
text_image
Research 2016 ✓ This is currently completed by the company's first session of the 2016 system. It is now to be completed by the company's first session of the 2016 system. Please note in this image.[Note] It takes about 60 seconds to complete connection.
6
Select X can exit the live view page.
natural_image
Black and white abstract cloud-like texture with no visible text or symbols[Note] When connecting is successful, you should see the live view of the camera.
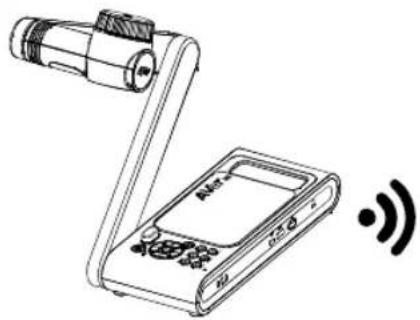
Wi-Fi Connection
1
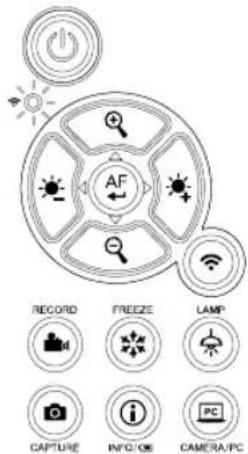
Power on the camera.
text_image
AF RECORD FROZZE LAMP CAPTURE INFO/CE CAMERA/PCCheck the Wi-Fi status – Blue light on.
text_image
AF RECORD FREDZE LAMP CAPTURE INFO/OS CAMERA/PC2
Open AVerTouch and follow on-screen instruction to enable Wi-Fi function on camera.
text_image
AirTouch Connect AirCamers 120000000000000000000000000000000000000000000000000000000000000000000000000000000000000000000000000000 AMASTER-ACF STATION Connect your camera[Note]
■ The software will auto detect the camera on your network.
■ Select the camera that you want to connect with it.
The camera name will be "AVer 'model name' - WiFi dongle Mac address". The Mac address will be different from the device.
3
Select the
![AVERMEDIA M70W - [Note] - 1](/content/2026/04/631602/images/29d2454b3c59c237b8da543f30b019f1f5ce26dc9c22710fbadb67e90873dc45.jpg)
to make a connection with the camera.
![AVERMEDIA M70W - [Note] - 2](/content/2026/04/631602/images/19124ddbf2b11b780bf75a1ec93be3a0b25b3f047dbdccbbb2625c95e3f1f474.jpg)
text_image
All Cameras All Cameras Connect your sensors4
Select to switch to camera live screen.
![AVERMEDIA M70W - [Note] - 3](/content/2026/04/631602/images/6a9d4125699fe5504be829ecfd289fc7d8bce3fc1df8beee50212aabb21ead66.jpg)
text_image
Camera AutoSoft All Cameras 12 Cameras Display FileMiracast Connection
1
Press tp enter selection menu.
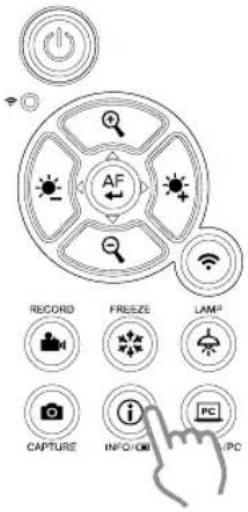
text_image
AF RECORD FREEZE LAMP CAPTURE INFO/COMM PC PC[Note]
Use
![AVERMEDIA M70W - [Note] - 1](/content/2026/04/631602/images/b79d23849c6b34afd26ca2573aa4a2f0bea40a1555f54f69495172163795930e.jpg)
, , and
![AVERMEDIA M70W - [Note] - 2](/content/2026/04/631602/images/060fc361b398672f476474a842a11f21885c02aaeaa64a40de3ca9da3a4711e7.jpg)
move between the selections and press AF button to confirm the selection.
■ A commercial Miracast Dongle (Wireless Adapter) is required for the display device.
2
Select Wireless > Mode > Miracast to enable Miracast mode.
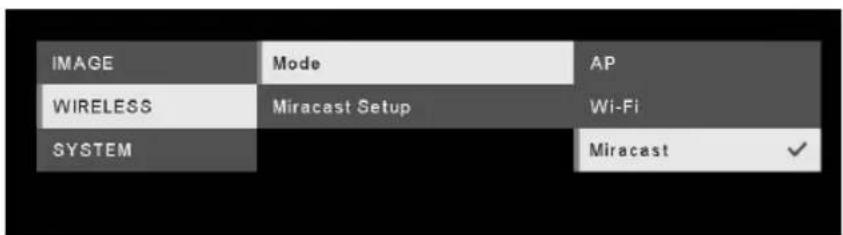
text_image
IMAGE MODE AP WIRELESS Miracast Setup Wi-Fi SYSTEM Miracast3
The camera image will display on the display device's screen.
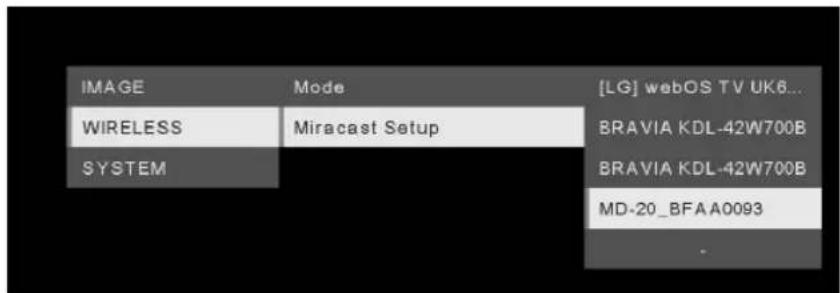
text_image
IMAGE Mode [LG] webOS TV UK6... WIRELESS Miracast Setup BRAVIA KDL-42W700B SYSTEM BRAVIA KDL-42W700B MD-20_BFAA0093 .[Note]
■ Press back to the menu.
■ The detected display devices will be listed out.
■ The camera image will display on the display device's screen after connecting.
Using the Camera
Object Position
The icon on top of camera head can help user to place object in positive direction.
The direction adjust wheel can turn 90° to change the icon in 2 positions (refer to figure).
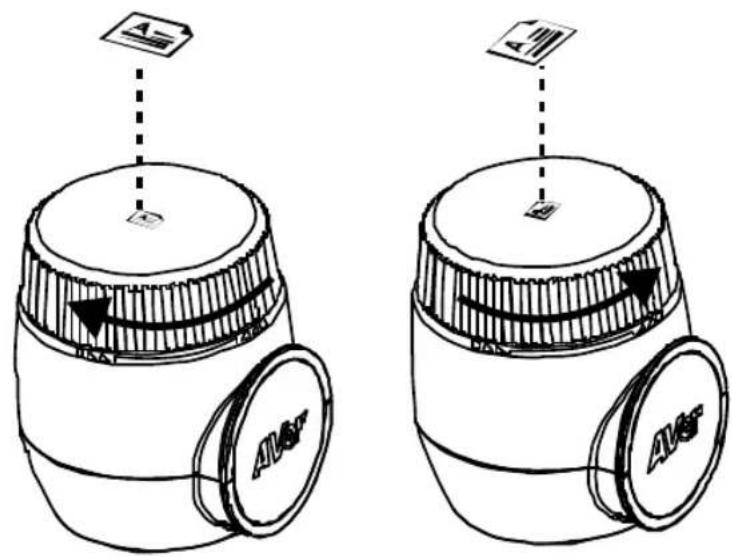
text_image
Diagram showing two identical containers with labeled parts and directional arrows, likely illustrating a mechanical or optical setup.Shooting Area
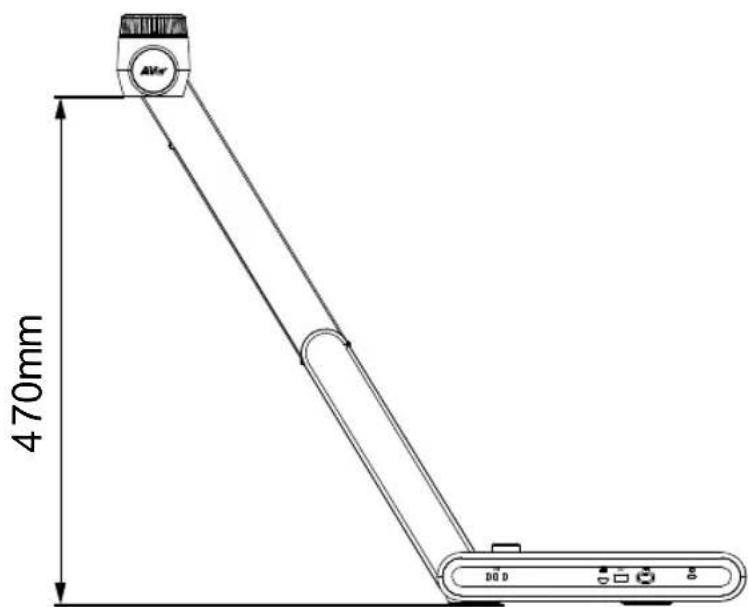
When camera position is 470mm high, the shooting area will be A3 size.
text_image
470mm AVer DO DEnglish-13
Storage the Camera
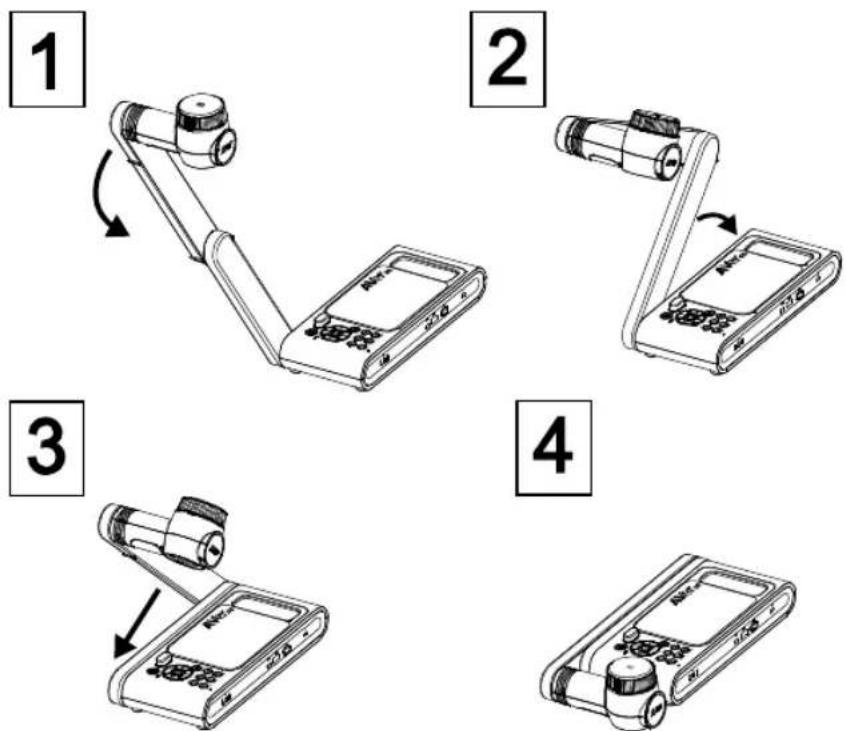
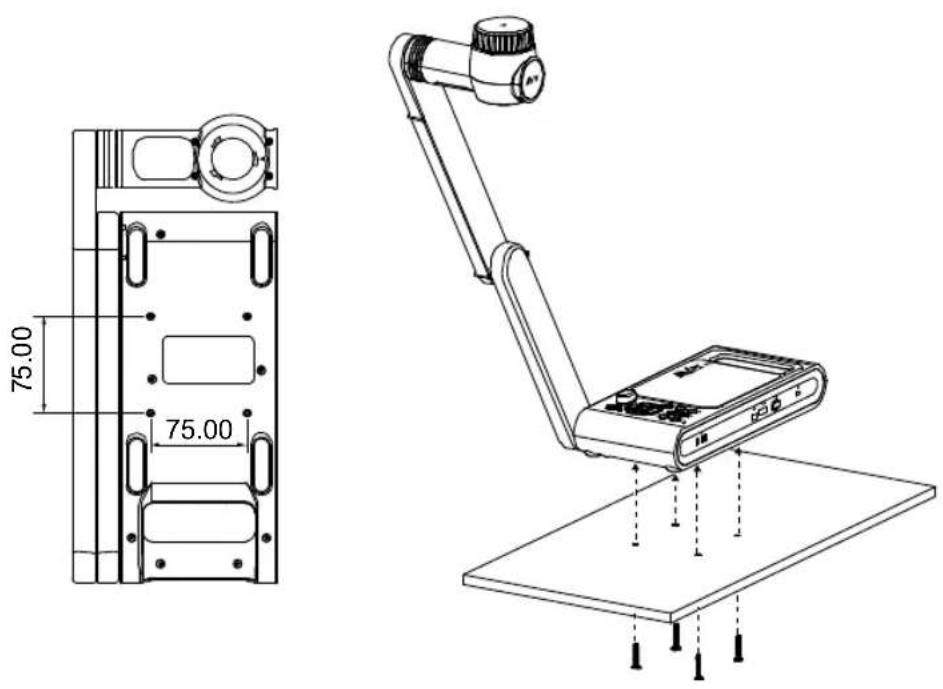
Mounting the Camera on a Flat Surface
[Note] M4 screw x4, depth is5mm
English-14
Specification
| Sensor 1/3.2 CMOS | |
| Pixel Count | 13 megapixels |
| Frame Rate | 60 fps (max.) |
| Image mode Normal | / High Frame / High Quality/ Microscope/Infinity/Marco |
| Effect Rotate / Freeze | |
| HDMI Output 4K; 1080p 60Hz; 720p 60Hz | |
| Focusing Auto / Manual/ Area (SW) | |
| Shooting Area 480mm x345mm @ 470 mm | |
| Zooming Total 33X maximum(10x AVerZOOM ^TM + 23X Digital zoom) | |
| Dual Mode AP / Station DHCP(Server/Client) | |
| WiFi Streaming 1080P@30fps, up to 4K@30fps | |
| Dual Band 5GHz/2.4GHz | |
| Miracast Yes | |
| Compatibility 802.11a/b/g/n/ac (45 ft effective range) | |
| Wireless Security | Support WEP, WPA/WPA2-PSK, WPA/WPA2-Enterprise* *EAP-PEAP, EAP-TLS |
| Power Source | DC5V/ 2A, AC 100-240V |
| Consumption | 8.7 Watts(lamp on)7.7 Watts(lamp off) |
| Lamp Type | LED light |
| USB | USB2.0 Type-A x2 (WiFi Dongle, USB storage)USB Type mini-B x 1 |
| DC 5V Input | Power Jack |
| MIC | Built-in |
| Operating | 587mm(L)*159 mm(W)*546mm(H) (+/-2mm include rubber foot) |
| Folded | 363.5mm(L)*159mm(W)*76.3mm(H)(+/-2mm include rubber foot) |
| Weight 2.6 kg (about 5.7lbs) | |
| Software Supported | ePTZImage/ Area capturePicture by PictureTimerCloud libraryRecordingAnnotation |
WARNING
■ To reduce the risk of fire or electric shock, do not expose this appliance to rain or moisture. Warranty will be void if any unauthorized modifications are done to the product.
■ Do not drop the camera or subject it to physical shock.
■ Use the correct power supply voltage to avoid the damaging camera.
■ Do not place the camera where the cord can be stepped on as this may result in fraying or damage to the lead or the plug.
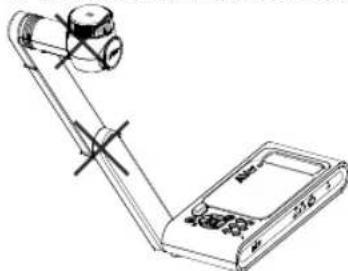
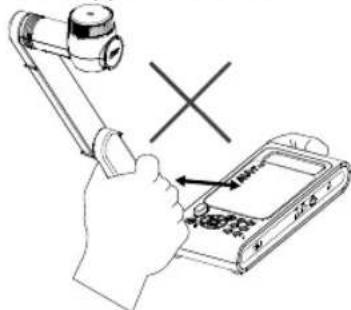
■ Hold the bottom of the camera with both hands to move the camera. Do not grab the lens or Flexible arm to move the camera.
natural_image
Line drawing of a handheld electronic device with a mounted screen and two circular components (no text or symbols)■ Do not pull the mechanical arm and camera part in the opposite direction.
text_image
Diagram showing a hand using a robotic arm to adjust a device with a cross symbol indicating cancellation or error.RADIO FREQUENCY
FOR PORTABLE DEVICE USAGE (<20m from body/SAR needed eg. BT dongle, smartphone)
Radiation Exposure Statement:
The product comply with the FCC portable RF exposure limit set forth for an uncontrolled environment and are safe for intended operation as described in this manual. The further RF exposure reduction can be achieved if the product can be kept as far as possible from the user body or set the device to lower output power if such function is available.
FOR MOBILE DEVICE USAGE (>20cm/low power eg. AP routers)
Radiation Exposure Statement:
This equipment complies with FCC radiation exposure limits set forth for an uncontrolled environment. This equipment should be installed and operated with minimum distance 20cm between the radiator & your body.
RADIO FREQUENCY
Europe – EU Declaration of Conformity
This device complies with the essential requirements of the Radio Equipment Directive (2014/53/EU). The following test methods have been applied in order to prove presumption of conformity with the essential requirements of the Radio Equipment Directive (2014/53/EU)
DISCLAIMER
No warranty or representation, either expressed or implied, is made with respect to the contents of this documentation, its quality, performance, merchantability, or fitness for a particular purpose. Information presented in this documentation has been carefully checked for reliability; however, no responsibility is assumed for inaccuracies. The information contained in this documentation is subject to change without notice.
In no event will AVer be liable for direct, indirect, special, incidental, or consequential damages arising out of the use or inability to use this product or documentation, even if advised of the possibility of such damages.
FEDERAL COMMUNICATIONS COMMISSION
This device complies with Part 15 of the FCC Rules. Operation is subject to the following two conditions: (1) This device may not cause harmful interference, and (2) this device must accept any interference received, including interference that may cause undesired operation.
This equipment has been tested and found to comply with the limits for a Class B digital device, pursuant to Part 15 of the FCC Rules. These limits are designed to provide reasonable protection against harmful interference in a residential installation. This equipment generates uses and can radiate radio frequency energy and, if not installed and used in accordance with the instructions, may cause harmful interference to radio communications. However, there is no guarantee that interference will not occur in a particular installation. If this equipment does cause harmful interference to radio or television reception, which can be determined by turning the equipment off and on, the user is encouraged to try to correct the interference by one of the following measures:
- Reorient or relocate the receiving antenna.
- Increase the separation between the equipment and receiver.
- Connect the equipment into an outlet on a circuit different from that to which the receiver is connected.
- Consult the dealer or an experienced radio/TV technician for help.
FCC Caution: Any changes or modifications not expressly approved by the party responsible for compliance could void the user's authority to operate this equipment.

THE MARK OF CROSSED-OUT WHEELED BIN INDICATES THAT THIS PRODUCT MUST NOT BE DISPOSED OF WITH YOUR OTHER HOUSEHOLD WASTE. INSTEAD, YOU NEED TO DISPOSE OF THE WASTE EQUIPMENT BY HANDING IT OVER TO A DESIGNATED COLLECTION POINT FOR THE RECYCLING OF WASTE ELECTRICAL AND ELECTRONIC EQUIPMENT. FOR MORE INFORMATION ABOUT WHERE TO DROP OFF YOUR WASTE EQUIPMENT FOR RECYCLING, PLEASE CONTACT YOUR HOUSEHOLD WASTE DISPOSAL SERVICE OR THE SHOP WHERE YOU PURCHASED THE PRODUCT.
CAUTION
- Risk of explosion if battery is replaced by an incorrect type.
- Dispose of used batteries in a safe and proper manner.
COPYRIGHT
©2020 AVer Information Inc. All rights reserved.
CONTACT INFORMATION
Headquarter
AVer Information Inc.
www.aver.com
8F, No.157, Da-An Rd., Tucheng Dist.
New Taipei City, Taiwan
Tel: +886-2-2269-8535
European Headquarters
AVer Information Inc. Europe B.V.
Westblaak 140, 3012KM, Rotterdam, Netherlands
Tel: +31(0)10 7600 550
Technical support: EU.RMA@aver.com
包装内容物
natural_image
Three technical line drawings of mechanical components or enclosures, showing internal structures without any text or symbols.text_image
Technical diagram of a device with numbered parts, likely an AR/AR mobile phone or tablet.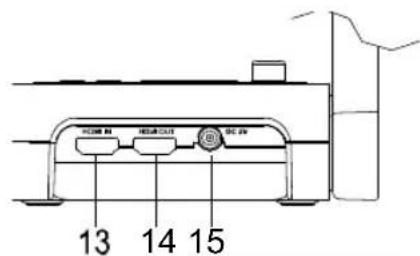
text_image
13 14 15natural_image
Line drawing of a handheld electronic device with a sensor icon and signal symbol (no text or labels)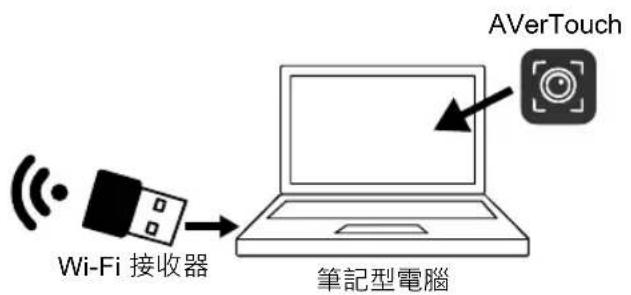
natural_image
Abstract grayscale texture resembling smoke or cloud formation (no text or symbols)text_image
AirTouch All Cameras All Camera Connect your sensors4
選擇 切換到實務攝影機即時影像畫面。
text_image
Diagram showing two identical containers with labeled parts and directional arrows indicating rotation or movement.拍攝範圍
text_image
75.00 75.00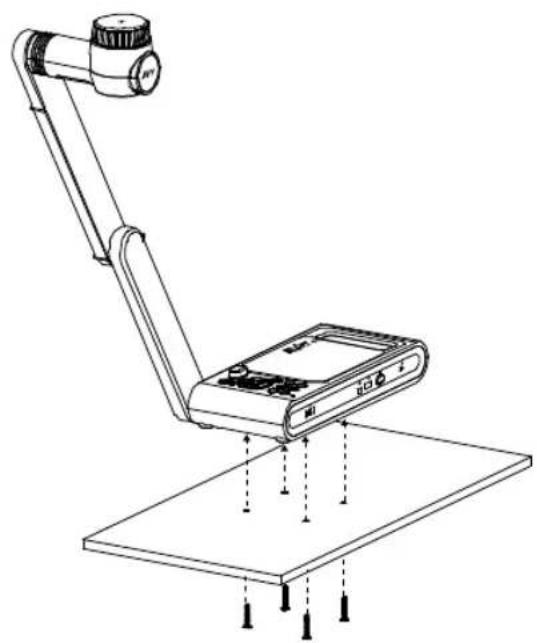
natural_image
Line drawing of a desktop computer with an adjustable arm and display unit, no text or symbols present繁體中文-30
規格
natural_image
Line drawing of a handheld device with two circular components and a rectangular base (no text or symbols)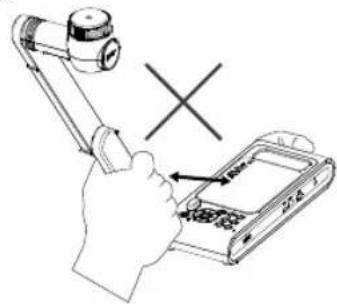
natural_image
Illustration of a hand using a handheld device to press or install a device with a cross mark (no text or symbols present)免責聲明
http://presentation.aver.com/download-center/
連絡資訊
圓展科技股份有限公司
natural_image
Three technical line drawings of mechanical components or enclosures, showing internal structures without any text or symbols.http://presentation.aver.com/download-center/
日本:
http://jp.presentation.aver.com/download-center
製品外觀
text_image
Labeled diagram of an electronic device with numbered parts for identification
text_image
HORN IN HORN OUT DC IV 13 14 15natural_image
Two identical diagrams of a container with lid and side caps, showing internal movement arrows (no text or symbols)撮影範囲
natural_image
Line drawing of a handheld electronic device with two circular components and a control panel (no text or symbols)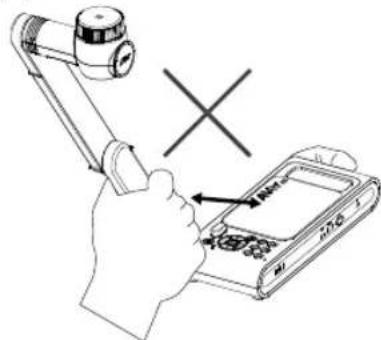
text_image
Diagram showing a hand using a robotic arm to press a device with a 'X' symbol, indicating no readable text or labels.告知
http://jp.aver.com/technical-support
natural_image
Simple line drawing of a folded paper or document (no text or symbols)Blendschutz
natural_image
Three technical line drawings of mechanical components or enclosures, showing internal structures without any text or symbols.Mikroskop-Adapter
http://presentation.aver.com/download-center/
text_image
Labeled diagram of a device showing numbered parts for identification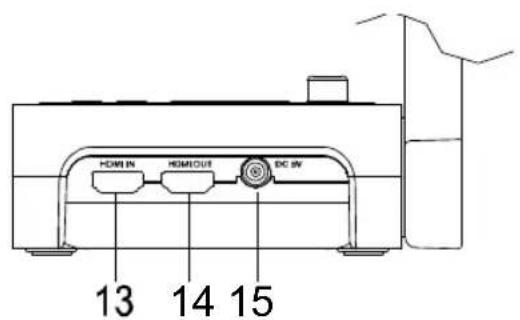
text_image
HORN IN HORN OUT DC IN 13 14 15text_image
NO NO: No test Good, healthy, 100% positive, 30% negative, and 50% negative of these to ensure, enabled the best performance to find out. Please do perform![Note] It takes about 60 seconds to complete connection.
6
natural_image
Black and white close-up of a dense, cloud-like organic structure against a dark background (no visible text or symbols)text_image
Diagram of a mechanical component with labeled parts and a dashed line indicating a reference or alignment point.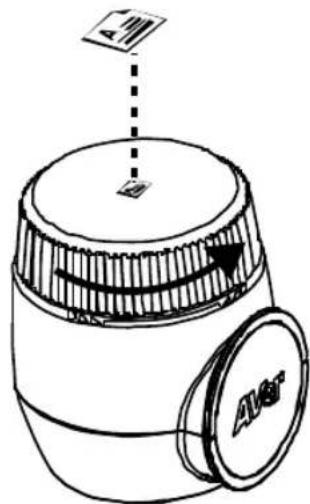
text_image
A BAufnahmebereich
natural_image
Line drawing of a handheld electronic device with a mounted sensor and control panel (no text or symbols)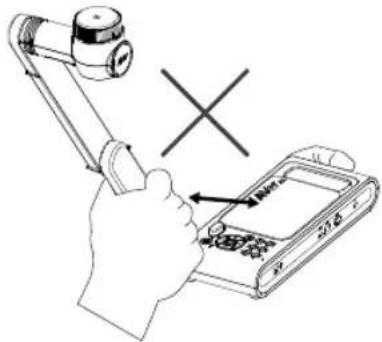
text_image
Diagram showing a hand using a handheld device to switch a device with a cross symbol indicating cancellation or disconnection.HINWEIS
natural_image
Simple line drawing of a folded paper or document (no text or symbols)Film antireflet
natural_image
Three technical line drawings of mechanical components or enclosures, no text or symbols presenthttp://presentation.aver.com/download-center/
Support Technique :
text_image
Labeled diagram of a device with numbered parts, showing internal components and parts of the device.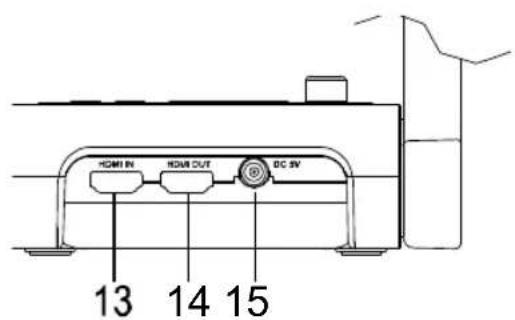
text_image
HDMI IN HDMI OUT DC 5V 13 14 15natural_image
Line drawing of a handheld device with a sensor and wireless signal icon (no text or symbols)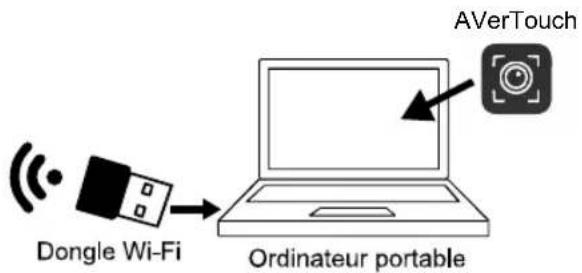
text_image
AVerTouch Dongle Wi-Fi Ordinateur portable2
text_image
All Carbrelax AVerTouch My own version of the AI/VerTouch device is also closed. Close NextFrançais-72
4
text_image
Test performed 2018-03 ✓ Less improvement is added on the ADR to ensure, it is completely closed by the target of the system. It is not necessary for the system. But it is completed.natural_image
Black and white abstract cloud-like texture with no visible text or symbolstext_image
Diagram showing two identical containers with labeled 'AVS' and directional arrows, likely illustrating a mechanical or optical setup.Champ de vision
natural_image
Technical line drawing of a mechanical device with no visible text or symbolsnatural_image
Illustration of a hand holding a handheld device with a cross symbol indicating cancellation or disassembly (no text or symbols present)REMARQUES
LES CARACTÉRISTIQUES SONT SUSCEPTIBLES DE MODIFICATIONS SANS AVIS PRÉALABLE. LES INFORMATIONS CONTENUES DANS LE PRÉSENT DOCUMENT DOIVENT ÊTRE CONSIDÉRÉES COMME N'AYANT QU'UNE VALEUR DE RÉFÉRENCE.
ATTENTION
natural_image
Three technical line drawings of mechanical components or enclosures, showing internal structures without any text or symbols.http://presentation.aver.com/download-center/
Soporte técnico:
text_image
Technical diagram of a device with numbered parts for identification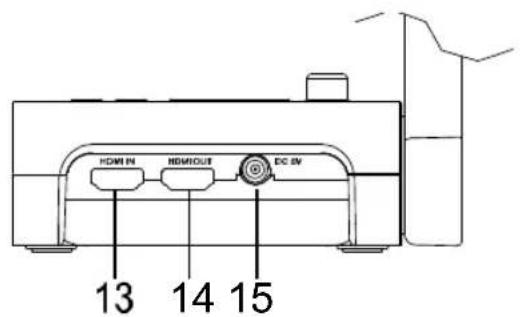
text_image
HDMI IN HDMI OUT DC IN 13 14 15text_image
Toute le telecamere Alain/TOW-BCF370575224 College la bus telocamera Alain/TOW-BCF370575224 College la bus telocameratext_image
AverTouch To complete the version selection version single or even version single. Options Avail4
text_image
Transaktional Edition Transaktiona is completed, APP is called to save instructions, which allows the request to be accepted. The system will not use any other method to test the system's performance. This is completed by: 36,000,000. To analyze.natural_image
Monochrome abstract smoke plume with soft gradients and no visible text or symbolsOpen AVerTouch and follow on-screen instruction to enable Wi-Fi function on camera.
text_image
Camera Cuenta Todas las câmaras Camera óbrado Aram170V-ICF370V5200 Conector su camera 8.000mm[Nota]
natural_image
Line drawing of a cylindrical container with a lid and a small inset showing a label (no text or symbols present)![AVERMEDIA M70W - [Nota] - 1](/content/2026/04/631602/images/7782224d47609429b48c66c2aa477c3504241e685d52f9bdb297ee5e58383bf5.jpg)
text_image
AVSUso de la cámara
Área de disparo
natural_image
Technical line drawing of a mechanical device with no visible text or symbolsnatural_image
Illustration of a hand holding a handheld device with a cross symbol indicating cancellation or disassembly (no text or labels present)AVISO
natural_image
Simple line drawing of a folded paper or sheet (no text or symbols)natural_image
Three technical line drawings of mechanical components or enclosures, showing internal structures without any text or symbols.http://presentation.aver.com/download-center/
Assistenza tecnica:
https://aver.com/technical-support
Italiano-97
Panoramica

text_image
Labeled diagram of a device showing numbered parts for identification
text_image
HDMI IN HDMI OUT DC 3V 13 14 15text_image
Camera Amount All Cameras 1 Camera selected All Cameras Connect your cameratext_image
AVerTouch Next will be ready for installation. You can continue to get access. OK Next4
text_image
Save Camera You're coming off here you can add some details. Name your camera and set up a postcode. Camera name: AleriViseu NTSW Produce: Cancel Done5
natural_image
Black-and-white abstract cloud-like texture with no visible text or symbolstext_image
Telecamere AUGLANT Tuite le telecomere Telecamere : https://tute.org/10.10.10 Rue/Apple-UTRAL 5.0000text_image
IMAGE Mode AP WIRELESS Miracast Setup Wi-Fi SYSTEM Miracast ✓3
text_image
Diagram of a coffee jar with a label showing 'AVS' and a paper icon above it, indicating a coffee cup or container.Area di ripresa
natural_image
Technical line drawing of a handheld device with two circular components and a rectangular base (no text or symbols)text_image
Diagram showing a hand using a robotic arm to adjust a device with a cross symbol indicating cancellation or error.INFORMATIVA
LE SPECIFICHE SONO SOGGETTE A VARIAZIONI SENZA PREAVVISO. LE INFORMAZIONI QUI CONTENUTE SONO PRESENTATE UNICAMENTE A SCOPO DI RIFERIMENTO.