Sap - Juicer Zeegma - Free user manual and instructions
Find the device manual for free Sap Zeegma in PDF.
| Product type | Slow juicer |
| Brand | Zeegma |
| Model | Sap |
| Power supply | 220-240 V ~ 50-60 Hz |
| Power | Approx 200 W |
| Dimensions | 30 x 20 x 40 cm (estimated) |
| Weight | Approx 5 kg |
| Capacity | 1 L container (estimated) |
| Main functions | Slow extraction, juice/pulp separation, forward/reverse |
| Suitable fruits and vegetables | Soft to medium-hard fruits and vegetables (carrot, apple, celery, spinach, etc.) |
| Unsuitable fruits and vegetables | Sugarcane, persimmon, stone fruits (peach, avocado) |
| Maximum usage time | 20 minutes, then 5 minutes cooling before reuse |
| Safety | Turn off and unplug before cleaning, do not immerse motor |
| Maintenance and cleaning | Clean by hand with a brush, not dishwasher safe |
| Materials | ABS plastic, stainless steel for the auger |
| Included accessories | Pusher, cover with dispenser, auger, 3 strainers, container with outlets, base, brush, 2 containers, anti-spill plug |
| Warranty | 2 years |
Frequently Asked Questions - Sap Zeegma
User questions about Sap Zeegma
0 question about this device. Answer the ones you know or ask your own.
Ask a new question about this device
Download the instructions for your Juicer in PDF format for free! Find your manual Sap - Zeegma and take your electronic device back in hand. On this page are published all the documents necessary for the use of your device. Sap by Zeegma.
USER MANUAL Sap Zeegma
Thank you for placing trust in us and choosing Zeegma.
We provide you with a product perfect for everyday use thanks to the use of high-quality materials and modern solutions.
We are convinced that the product will satisfy your requirements as it has been designed with utmost care.
Before you use the product, please read this manual carefully.
Should you have any remarks or questions concerning the product, please do not hesitate to contact us:
support@zeegma.com
Important
Please read this manual before you start using the product to see its functions and use them in accordance with intended use.
- Keep this manual for future reference.
- Appliances can be used by persons with reduced physical, sensory or mental capabilities or lack of experience and knowledge if they have been given supervision or instruction concerning use of the appliance in a safe way and if they understand the hazards involved.
• Children must not play with this appliance. - Do not use the product for more than 20 minutes. If you do so, leave the appliance for 5 minutes until it cools down and then use again.
- Keep the product out of reach of children to limit the suffocation risk or electric shock risk.
- Do not repair the product on your own (does not apply to suggestion in the chapter: Troubleshooting). If the appliance malfunctions, contact the manufacturer's authorized service center.
- Do not wash the motor under running water and do not immerse it in water to avoid electric shock.
If:
• the product or any of its parts is overheated,
- the feeder cable smells like burning or vibrates irregularly,
• the tank or any other item is broken,
• the appliance acts up,
please unplug the product and contact the authorized service center.
- Do not pull the feeder cable rapidly and remember to dust it.
- To unplug the product, pull a plug instead of a cable.
- If the product is inactive, unplug it.
- Do not use the appliance if the feeder cable or plug are damaged.
- Do not wrap the feeder cable around the product.
- Do not keep the appliance and its feeder cable near fire or sources of heat.
- The feeder cable plug must be inserted into the socket properly; otherwise it may lead to fire.
- Do not use parameters other than 220-240 V \~ 50-60 Hz to power the device.
- During operati on do not place such items as teaspoons, sti cks, cleaning brushes in the tank. Do not put fi ngers in either.
- The appliance must be stored on a stable and horizontal surface.
- Do not use the appliance if it stands on an unstable surface.
- Do not use the appliance near furniture or walls as the product may make them dirty.
- When assembling accessories, the product must be inacti ve.
- Do not use the product to crush hard fruits or vegetables.
- Do not use the product if there are no fruits or vegetables inside.
- Do not open the product cover when it operates.
- None of the product components must be used in the microwave.
- Do not expose the product to sunlight because it may fade.
- Use the components supplied only.
- If you want to move the appliance, unplug it and remove the tank.
- Always disconnect the appliance from the supply if it is left unatt ended and before assembling, disassembling or cleaning.
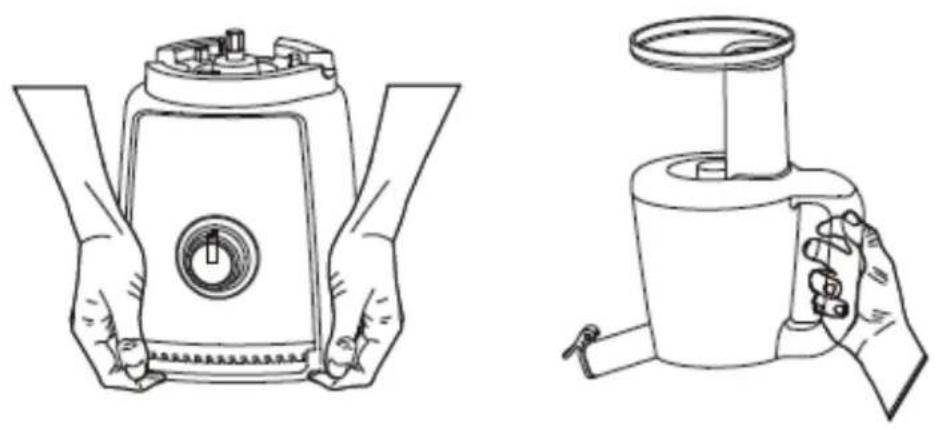
How to move the product properly:
EN
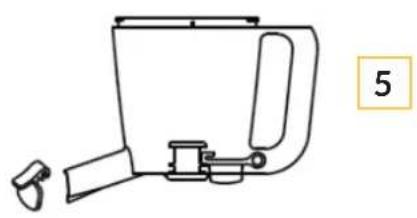
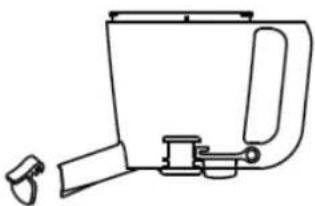
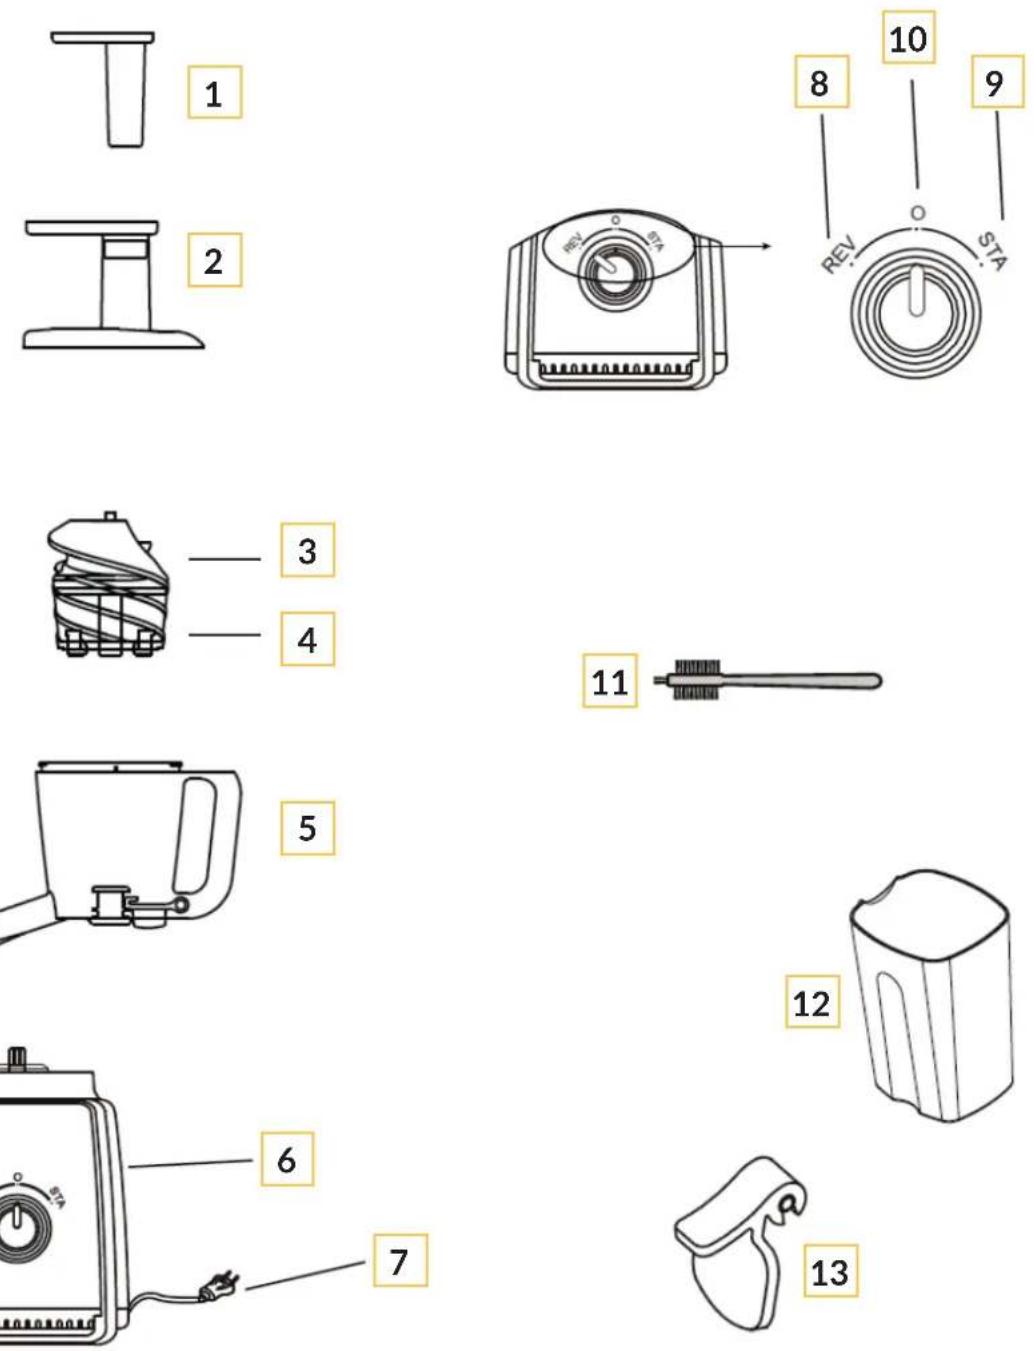
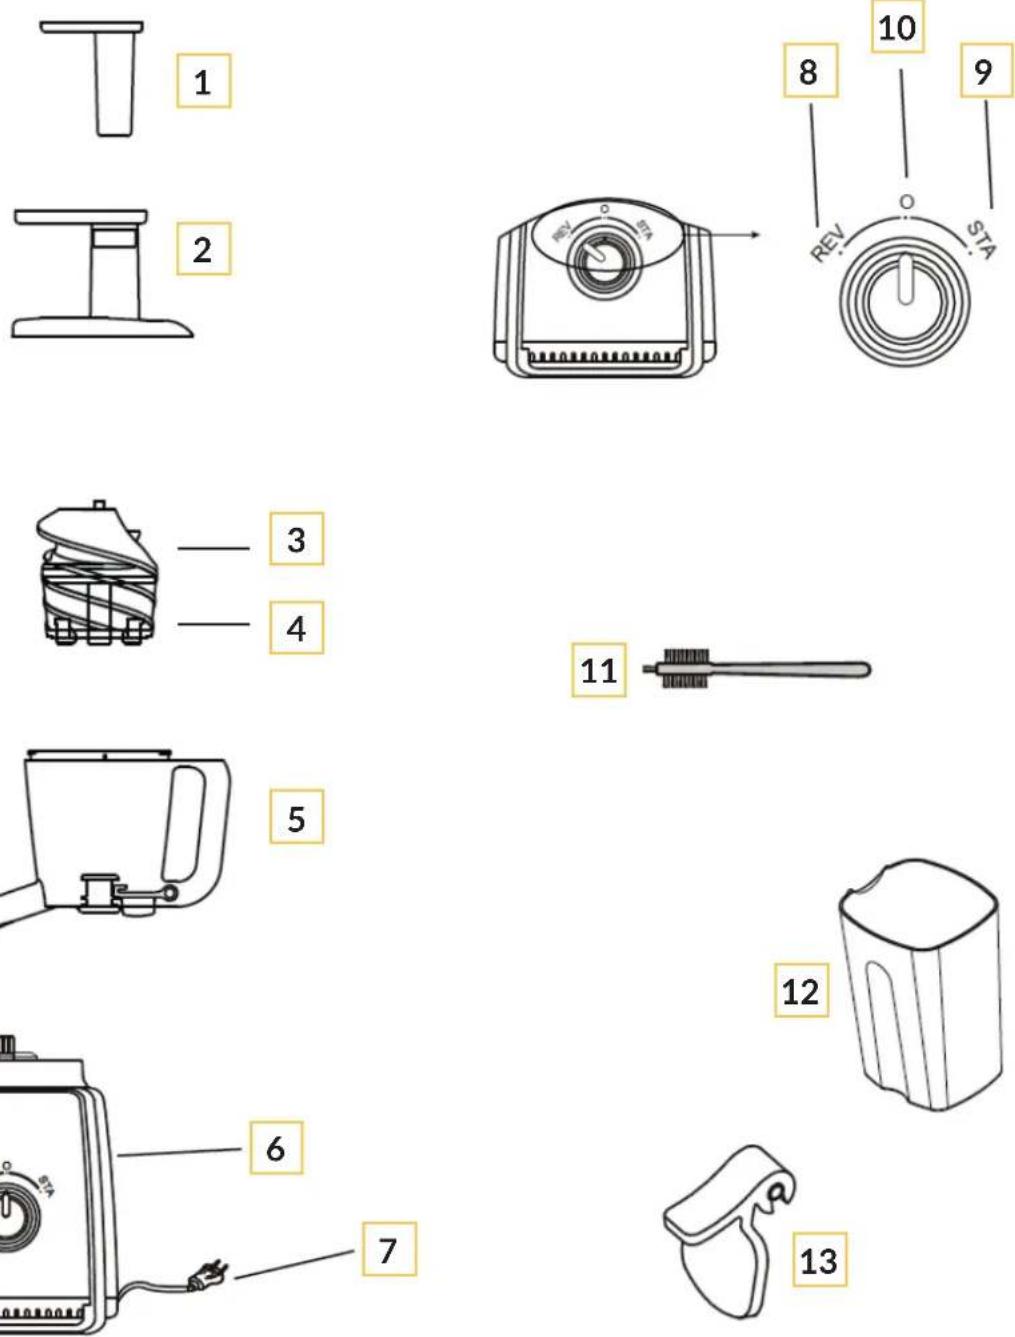
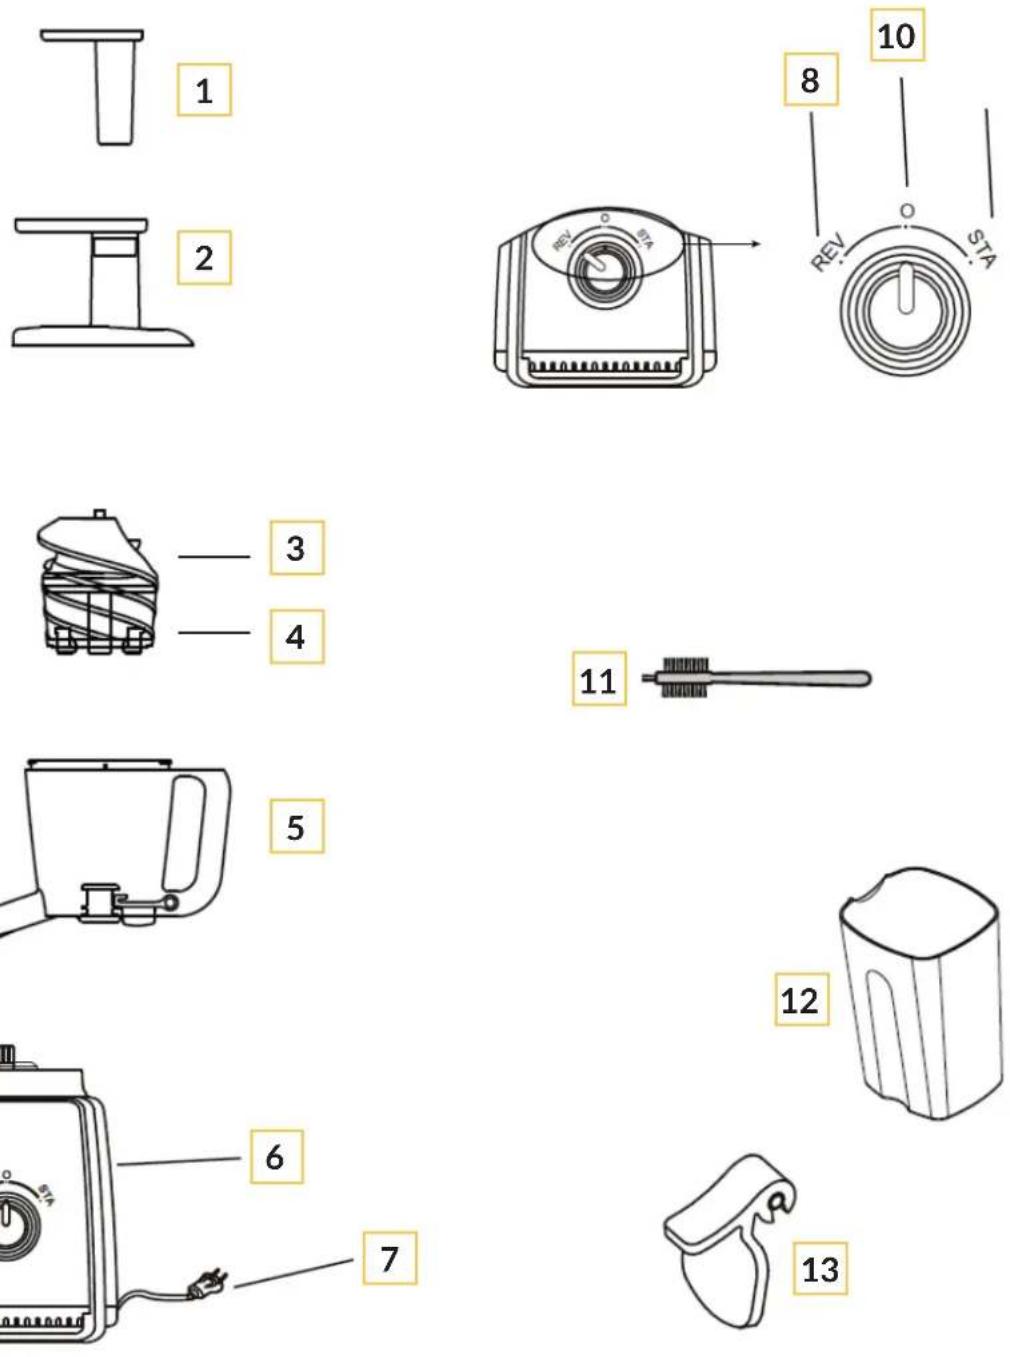
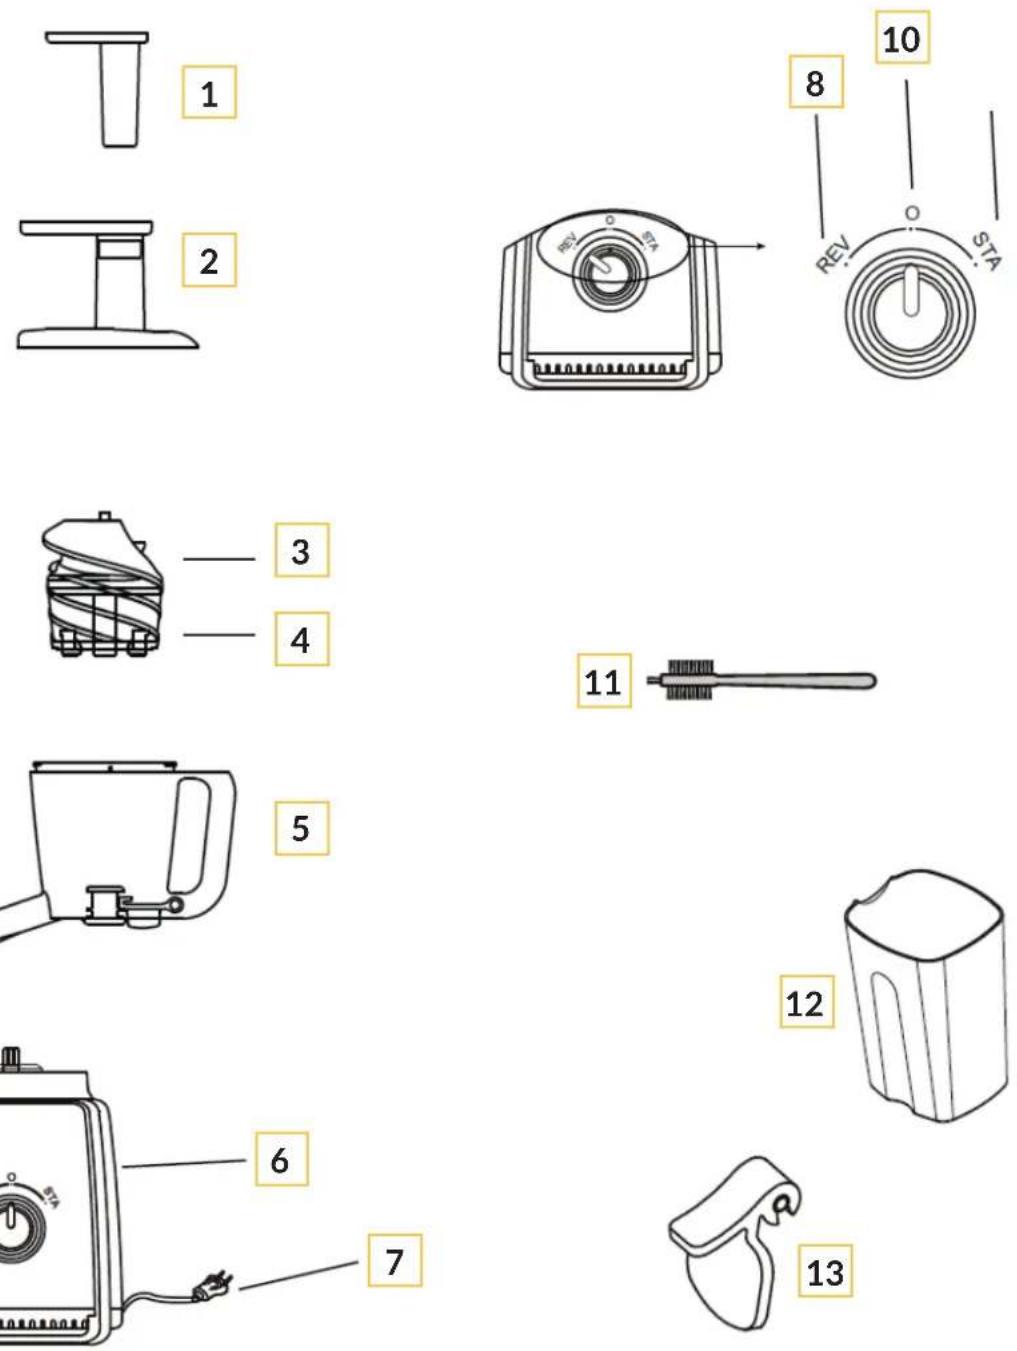
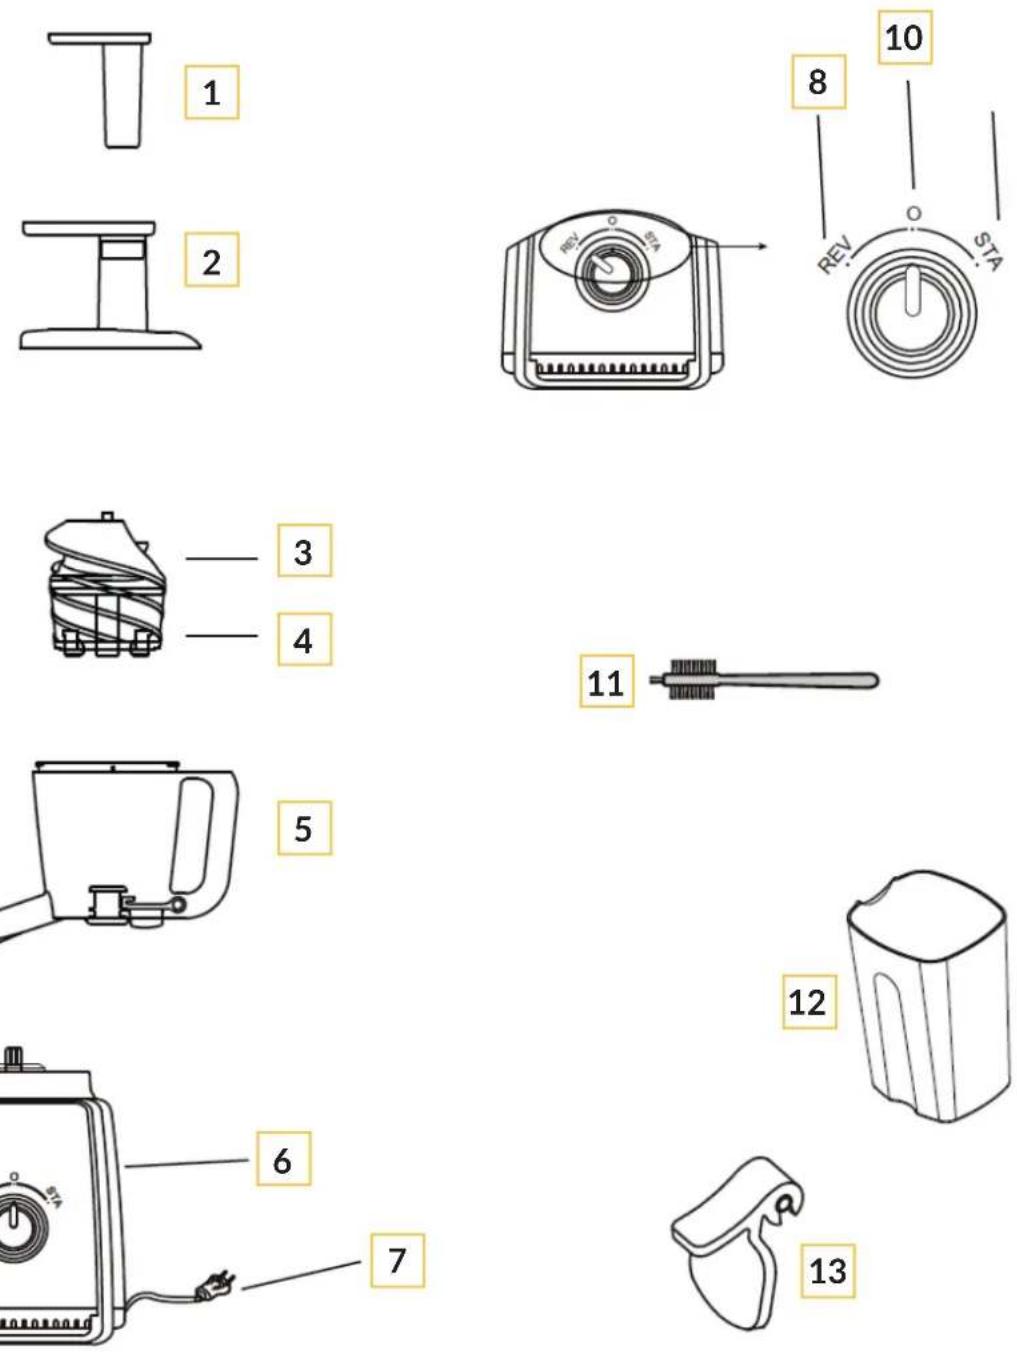
Description


natural_image
Line drawing of a portable kitchen fan with handle and side arm, no text or symbols present
text_image
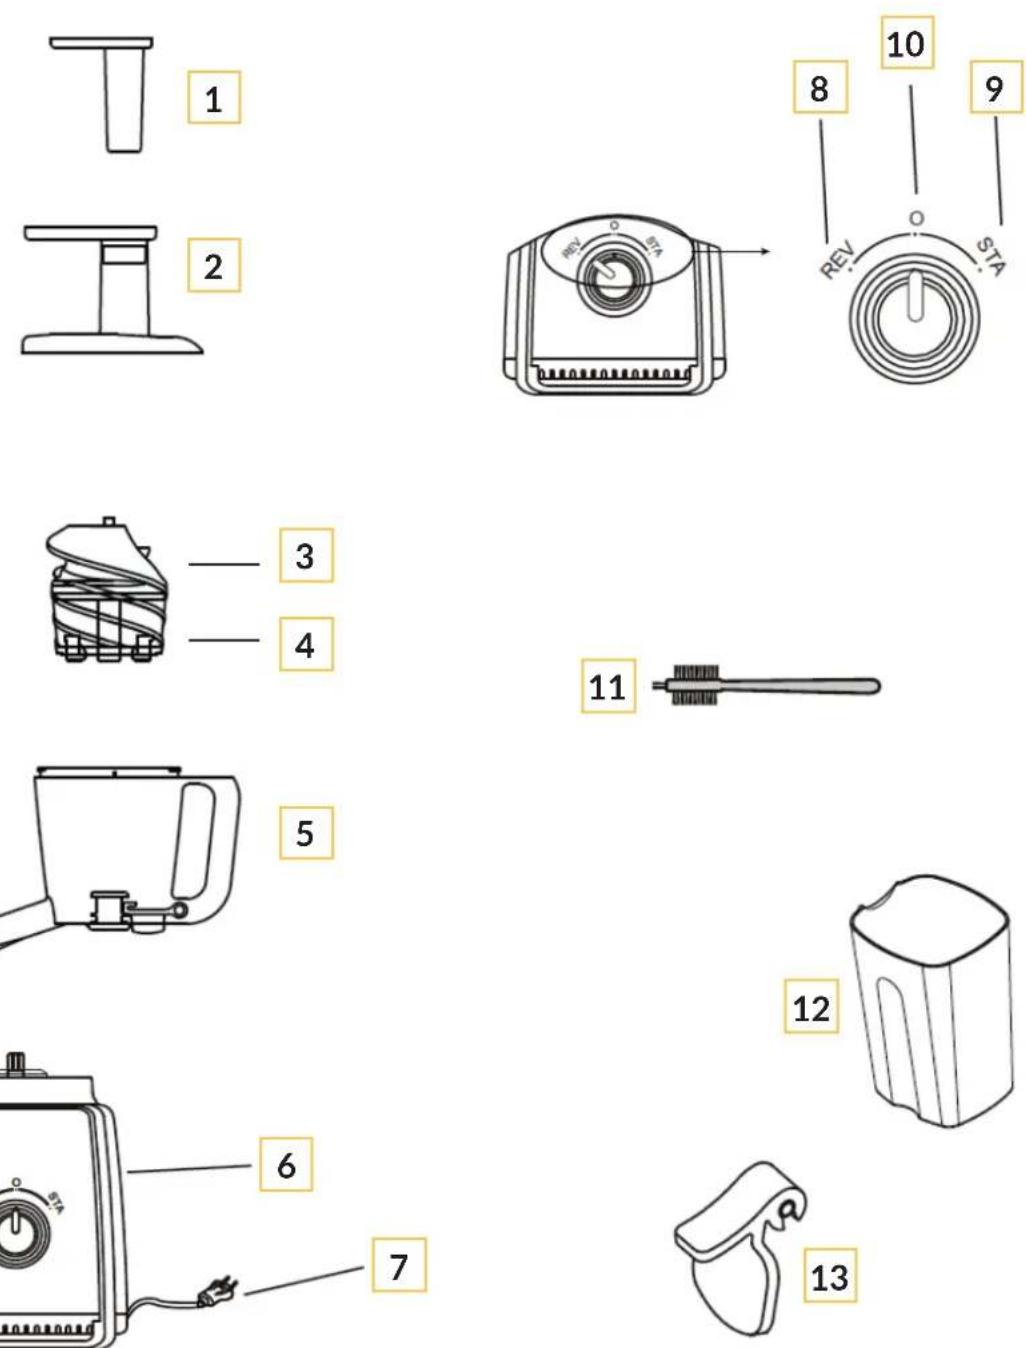
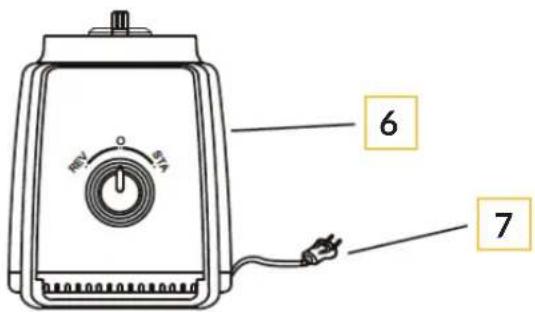
6 7- Pushrod
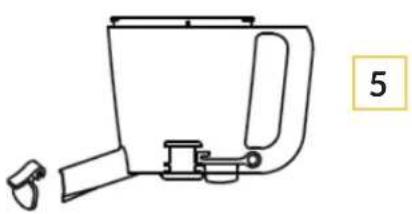
- Feeder with cover
- Auger
- Sieve x3
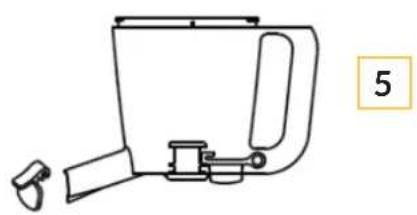
- Tank with pulp and juice outlets
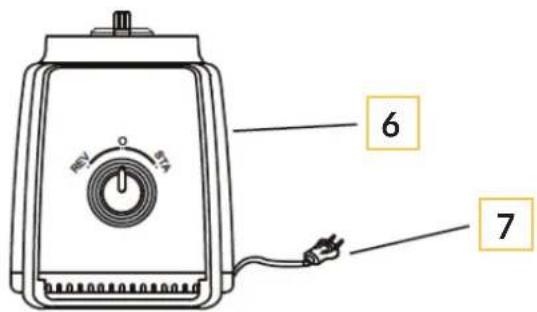
- Base with motor
-
Feeder cable
-
Reverse gear switch
- Regular gear switch
- Off switch
- Cleaning brush
- Tank x2
- Non-drip plug
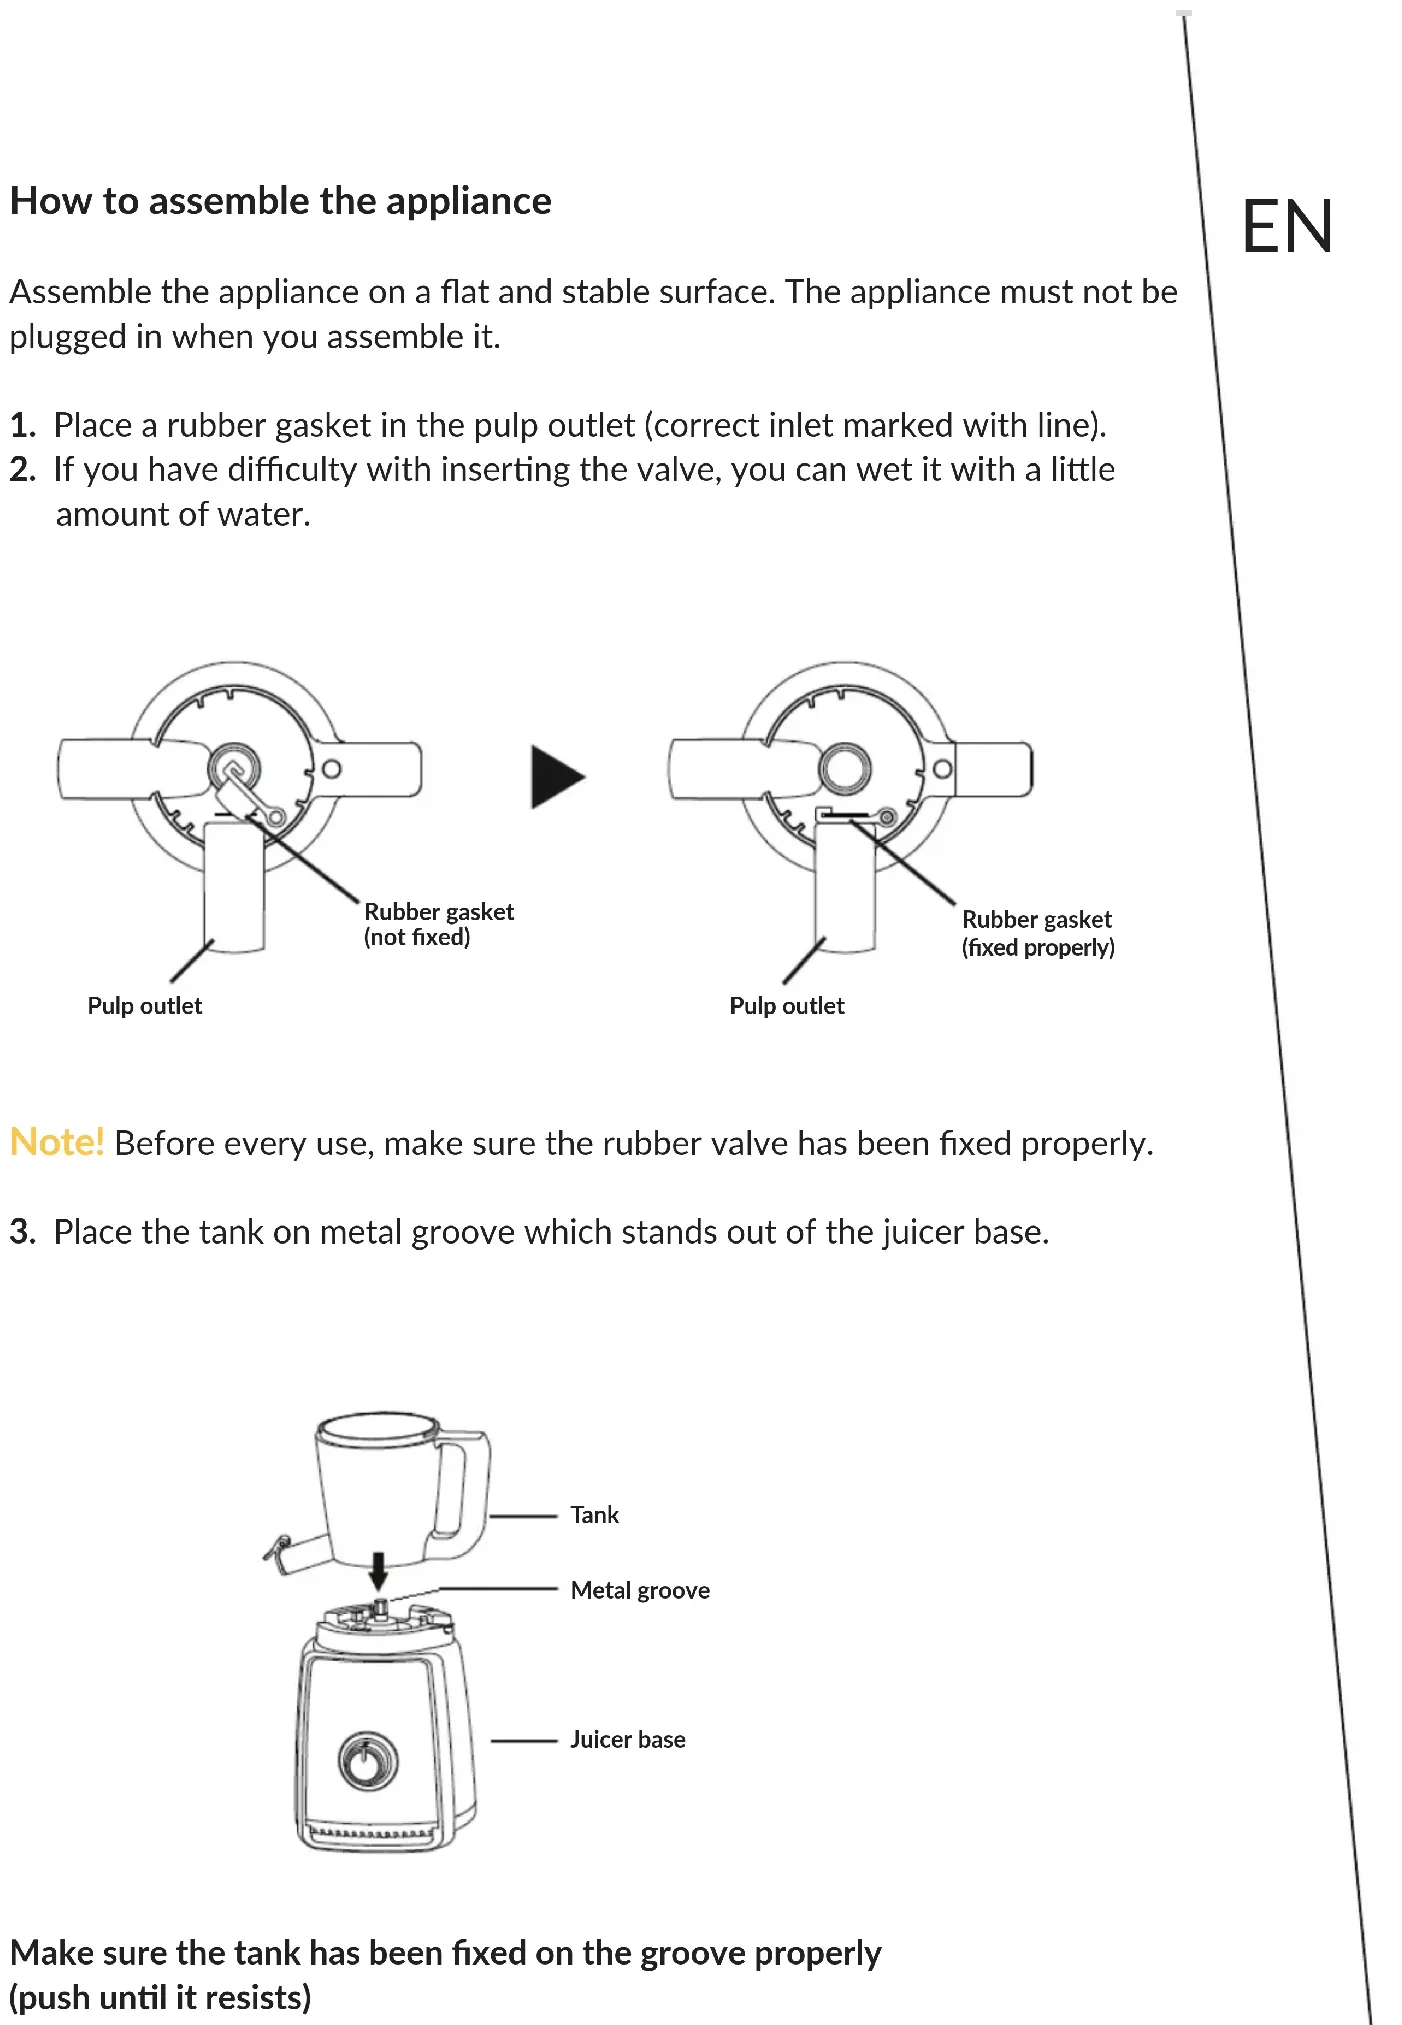
How to assemble the appliance
Assemble the appliance on a flat and stable surface. The appliance must not be plugged in when you assemble it.
-
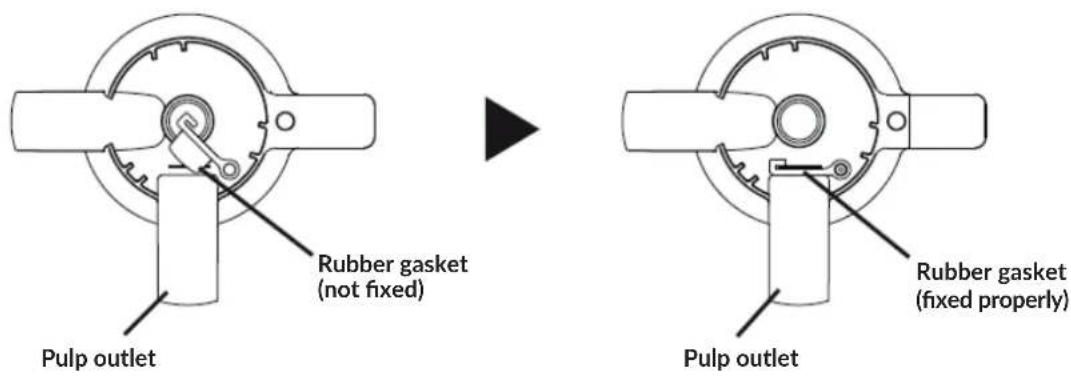
Place a rubber gasket in the pulp outlet (correct inlet marked with line).
-
If you have difficulty with inserting the valve, you can wet it with a little amount of water.
text_image
Rubber gasket (not fixed) Pulp outlet Rubber gasket (fixed properly) Pulp outletNote! Before every use, make sure the rubber valve has been fixed properly.
- Place the tank on metal groove which stands out of the juicer base.
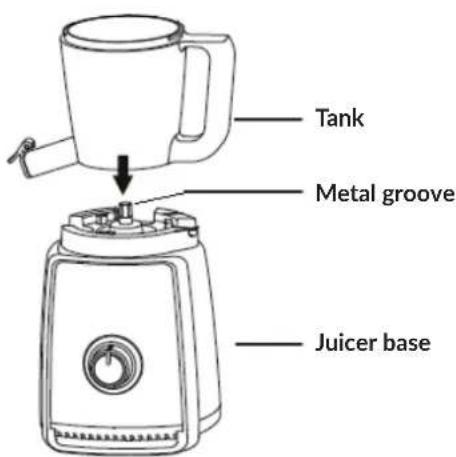
text_image
Tank Metal groove Juicer baseMake sure the tank has been fixed on the groove properly (push until it resists)
EN
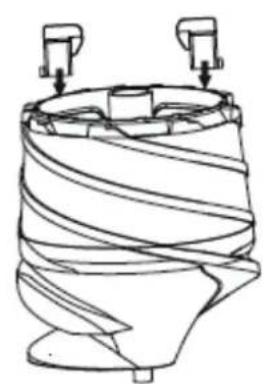
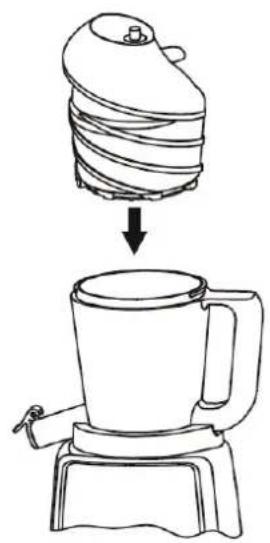
- Insert the auger in the tank (push until it resists).
If there are any difficulties, wet the auger with a litt le amount of water.
natural_image
Line drawing of a blender with a lid and base, showing a drop from top to bottom (no text or symbols)If you fail to install the appliance properly, the juice will leak. Also, the feeder with cover will not be closed properly.
Note! Never put the hand inside the tank when the appliance works!
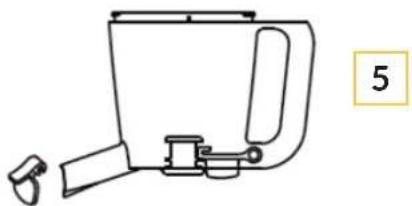
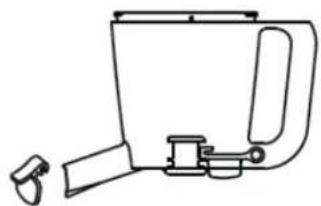
- Place the feeder with cover on the tank. Next slide the cover in a clockwise direction on until it engages in the groove on the handle.
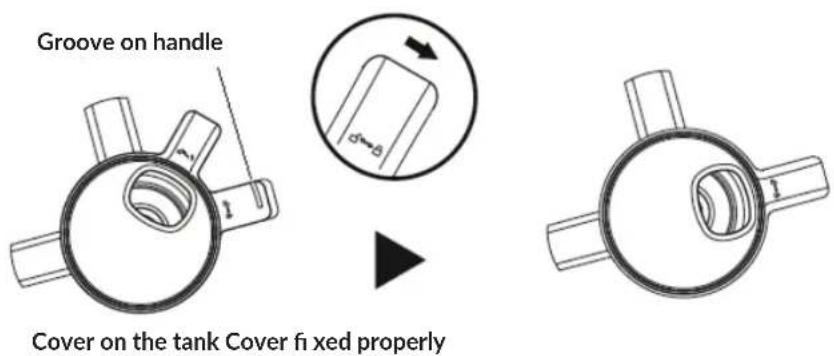
text_image
Groove on handle Cover on the tank Cover fixed properlyHow to disassemble the appliance
To disassemble the appliance, follow the steps presented in the assembly manual in a reversed order.
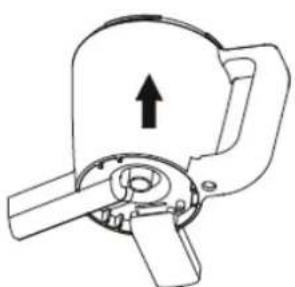
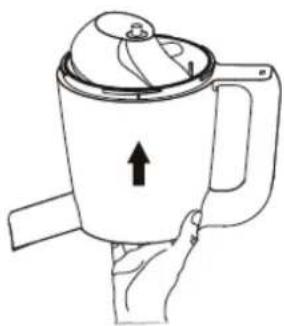
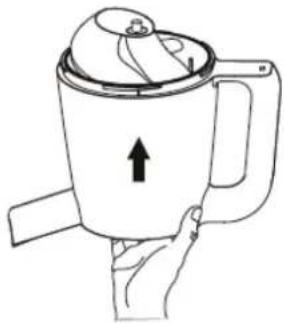
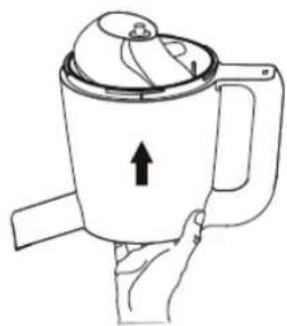
If you have difficulty in pulling the auger out of the tan:
natural_image
Technical line drawing of a mechanical component with an upward arrow indicating motion (no text or symbols)Bottom of the tank
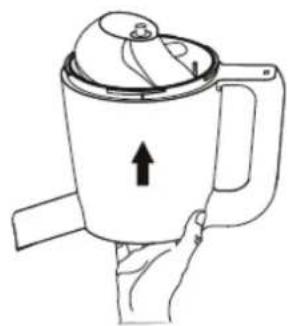
natural_image
Line drawing of a hand holding a container with an upward arrow indicating motion (no text or symbols)- Remove the tank from the juicer base.
- Remove the cover.
- Push the auger metal rod from the bottom.
How to use
Sap slow juicer is equipped with a revolutionary mechanism thanks to which you can have fresh juice by squeezing fruits and vegetables rather than grinding them. When compared to a traditional juice extractor, Sap relies on low-speed squeezing which lets the juice retain natural color, natural flavor as well as nutrients and vitamins.
The juicer separates the juice from pulp with two different outlets and guarantees high-purity juice. The machine is able to extract juice from celery, spinach, carrots, apples, bananas, tomatoes, cucumbers, pears, oranges and other similar fruits or vegetables.
The pushrod serves to cram leaf ingredients into the tank.
- The product is not intended for starchy fruits and vegetables. Do not squeeze sugar cane, persimmon and other too hard products in the appliance.
- Do not put a few items at a time into the tank as you may clog it.
- You can put fruits with small seeds (e.g. apples, grapes, watermelon) inside the juicer. Do not place fruits and vegetables if their seeds are large (e.g. peach, avocado). These stones must be removed beforehand.
EN
- Boiled soya pulp may be more difficult to remove than other pulps.
- Some fruits and vegetables may leave traces of pulp in the juice.
- In case of any doubts, follow the instructions.
natural_image
Line drawing of a blender with three cups and a power outlet (no text or symbols)
natural_image
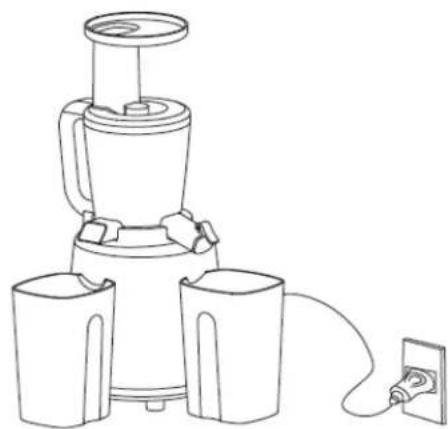
Line drawing of a blender with a handle and spout (no text or symbols)- Check all components of the set. Make sure they have been assembled in accordance with the manual.
- Place the tank under the pulp and juice outlets.
- Lift the non-drip plug at the juice outlet.
- Plug the product in.
Put ingredients into the juicer slowly. If necessary, use a pushrod.
text_image
REV STA REV STA
text_image
REV STA REV STA
text_image
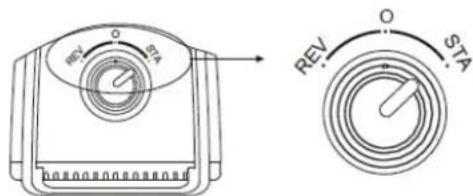
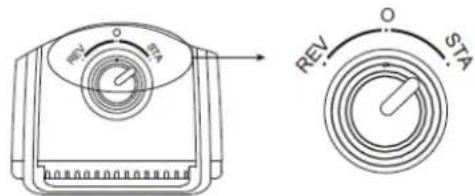
REV STA REV STATo switch the appliance on, slide the switch into „STA.
If ingredients get stuck in the tank, slide the switch into „REV“ for a few seconds. By doing so, you acti vate reverse rotati on. Aft er a while return to original model: slide the switch into „STA”.
To stop the squeezing process, slide the switch into „O”.
If pulp does not come out, stop the appliance and clean it with a brush supplied.
Once the operation is finished, unplug the appliance.
Tips:
- When extracting the leaf juice (e.g. spinach), the product may be louder, it is natural.
- The quality and looks of the juice depends on how fresh fruits and vegetables are.
- Some fruits and vegetables may leave more pulp in the juice than others. If necessary, filter such juice before you drink it.
- Carrot juice may contain less water and more deposits.
- If you put too many ingredients into the juicer, the tank may clog.
- If you can notice that the tank is clogged and juice does not come out – remove some ingredients.
- If you prepare juice of several different ingredients, change the order of ingredients added.
- If one of the ingredients are leaves, place them into the product along with other fruit to increase squeezing efficiency.
- Be careful when squeezing hard fruits and vegetables (e.g. carrots). The appliance is likely to overheat quicker.
Troubleshooting
| Problem Check | Solution | |
| The juicer does not work | Has the feeder cable been plugged in? | Check if the feeder cable is connected to the socket 220-240 V ~ 50-60 Hz. |
| Has the juicer been assembled properly? | Assemble the product in accordance with the manual. | |
| Has the ON switch been set properly? | To switch the appliance on, slide the switch into „STA”. | |
| Has the appliance been used for more than 20 minutes? | Switch the product off. Wait for a while and start it again. If you want to use the appliance for another period of 20 minutes, the product needs to cool down for one hour. | |
| Juice includes pulp or juice comes out of the pulp outlet | Has the rubber gasket been fixed properly? | Fix or adjust the rubber gasket as presented in the manual. |
| Have you used fresh fruits or vegetables? | Overripe fruits or vegetables contain less water and may clog the juicer mechanism. If you want to use overripe fruits, at first immerse them in mineral water for at least 10 minutes. | |
| Have you put too many products at a time into the juicer? | Slide the switch into reverse rotation mode (REV), after a few seconds stop the product and set the regular mode (STA). | |
| The juicer stops when working | Have you put fruits/ vegetables into the juicer „by force”? | Remove some fruits or vegetables. |
| Have you put fruits/ vegetables with hard stones into the juicer? | Switch into reverse rotation mode (REV), after a few seconds stop the appliance and set regular mode (STA). | |
| Pulp is too wet Is the sieve clogged? | Check the auger mechanism for excess of pulp. Clean it up. | |
| Motor is too loud or vibrates | Have all components of the set been assembled properly? | If the product has been assembled properly, the appliance may be louder when squeezing overripe fruits and vegetables. |
| The tank vibrates during operation | It is a regular operation of the product. The motor sets the tank in motion. | |
How to clean and maintain
Do not use such detergents as solvents, thinners, bleach or other chlorine- or benzene-rich agents. Do not use abrasives either.
Before you start cleaning, unplug the appliance.
Cleaning the base with motor:
Use a soft and wet cloth. Do not immerse the base of the juicer in water and do not clean it under running water. To clean the cable and plug, use a dry clo.
Cleaning the auger:
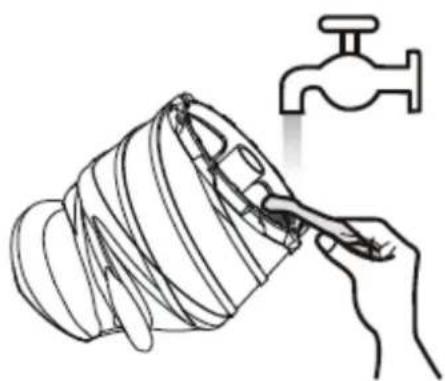
natural_image
Illustration of a hand holding a tool next to a coiled pipe with a faucet symbol (no text or labels)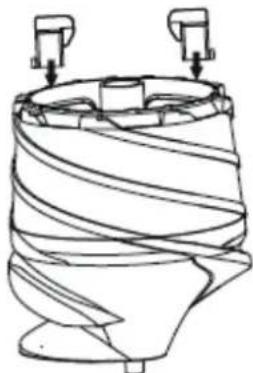
natural_image
Technical line drawing of a mechanical component with coiled spring and two protruding ports (no text or symbols)Use a brush or wet cloth to clean the pulp remains. You may clean the auger under running water. Clean the product every ti me you use it.
Cleaning other components:
Do not use the dishwasher. Do not dry components with a drier. Clean the product aft er every use. Remove the pulp from the appliance 5 minutes aft er squeezing at the latest.


The product complies with requirements of EU directi ves. Pursuant to the Directi ve 2012/19/EU, this product is subject to selecti ve collecti on. The product must not be disposed of along with domesti c waste as it may pose a threat to the environment and human health. The worn-out product must be handed over to the electrics and electronics recycling center.
The pictures are for reference only. The real design of the products may differ from the pictures presented.
Einleitung
natural_image
Line drawing of two hands holding a cylindrical device with a circular knob (no text or symbols)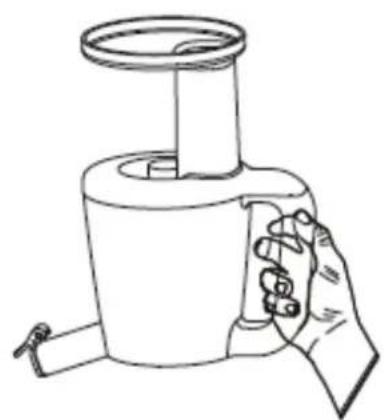
natural_image
Line drawing of a hand holding a cylindrical device with a lid, no text or symbols presentDE
Beschreibung
natural_image
Line drawing of a portable device with handle and spout, no text or symbols present
text_image
6 7natural_image
Line drawing of a blender with a lid and base, showing a drop from top to bottom (no text or symbols)natural_image
Technical line drawing of a mechanical component with an upward arrow indicating motion (no text or symbols)natural_image
Line drawing of a hand holding a mug with an upward arrow, no text or symbols presentnatural_image
Line drawing of a blender with three cups and a power outlet (no text or symbols)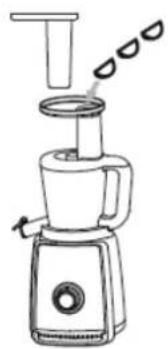
natural_image
Line drawing of a blender with liquid droplets (no text or symbols)natural_image
Line drawing of a hand holding a tool over a coiled pipe with a faucet symbol nearby (no text or labels)
natural_image
Technical line drawing of a coiled industrial component with two mounting fixtures (no text or symbols)natural_image
Line drawing of two hands holding a cylindrical device with a circular button, no text or symbols present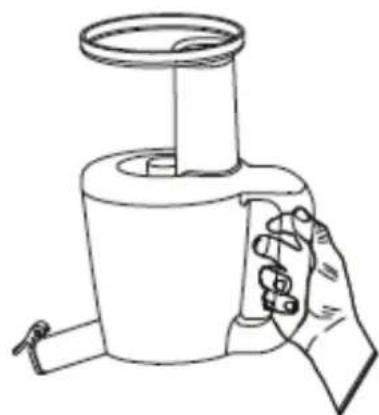
natural_image
Line drawing of a hand holding a cylindrical device with a lid and handle (no text or symbols)PL
Opis

natural_image
Line drawing of a portable kitchen fan with handle and side arm, no text or symbols present
text_image
6 7natural_image
Line drawing of a blender with a lid and base, showing a drop from top to bottom (no text or symbols)natural_image
Technical line drawing of a mechanical component with an upward arrow indicating motion (no text or symbols)Spód zbiornika

natural_image
Line drawing of a hand holding a container with an upward arrow indicating motion (no text or symbols)natural_image
Line drawing of a blender with three cups connected to a power outlet (no text or symbols)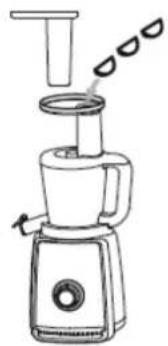
natural_image
Line drawing of a blender with a handle and spout (no text or symbols)natural_image
Line drawing of a hand holding a tool over a coiled pipe with a faucet symbol nearby (no text or labels)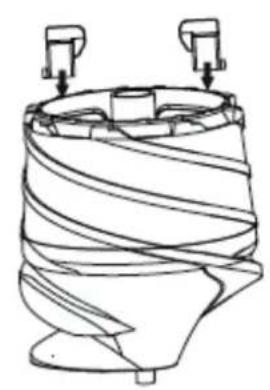
natural_image
Technical line drawing of a mechanical component with two protruding parts (no text or symbols)natural_image
Line drawing of a portable kitchen fan with handle and side arm, no text or symbols present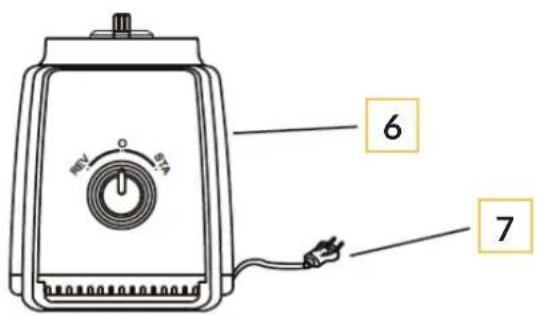
text_image
6 7natural_image
Line drawing of a blender with a lid and base, showing a drop from top to bottom (no text or symbols)natural_image
Technical line drawing of a mechanical component with an upward arrow indicating motion (no text or symbols)natural_image
Line drawing of a hand holding a container with an upward arrow indicating motion (no text or symbols)natural_image
Line drawing of a blender with three cups connected to a power outlet (no text or symbols)
natural_image
Line drawing of a blender with a handle and spout (no text or symbols)natural_image
Line drawing of a hand using a tool to clean a coiled pipe with a faucet symbol nearby (no text or labels)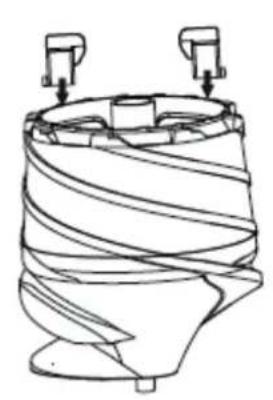
natural_image
Line drawing of a coiled industrial component with two protruding components (no text or symbols)natural_image
Line drawing of two hands holding a cylindrical device with a circular button on the cover (no text or symbols)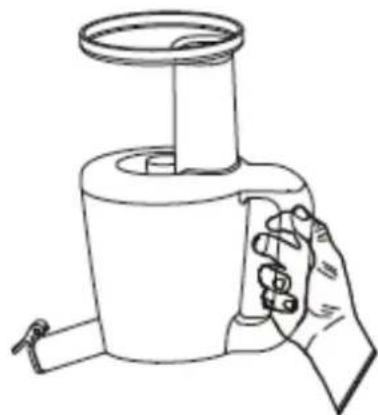
natural_image
Line drawing of a hand holding a cylindrical device with a side port (no text or symbols)Description :

natural_image
Line drawing of a blender with handle, spout, and base (no text or symbols)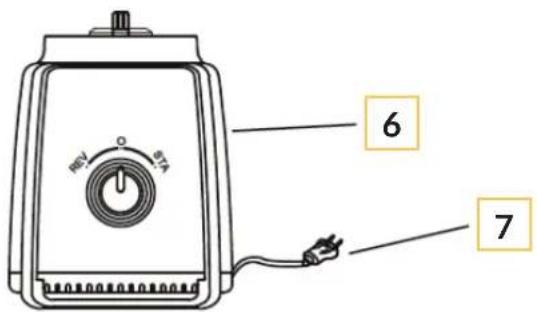
text_image
6 7natural_image
Line drawing of a kettle being placed on top, showing the drop from top to bottom (no text or symbols)natural_image
Technical line drawing of a mechanical component with an upward arrow indicating motion (no text or symbols)natural_image
Line drawing of a hand holding a mug with an upward arrow, no text or symbols presentnatural_image
Line drawing of a blender with three cups and a power outlet (no text or symbols)natural_image
Line drawing of a kitchen blender with steam rising from top (no text or symbols)natural_image
Hand holding a syringe with coiled tubing, next to a faucet diagram (no text or symbols)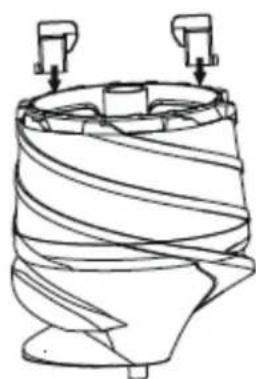
natural_image
Technical line drawing of a mechanical component with two mounting holes (no text or symbols)natural_image
Line drawing of two hands holding a device with a circular button on the cover (no text or symbols)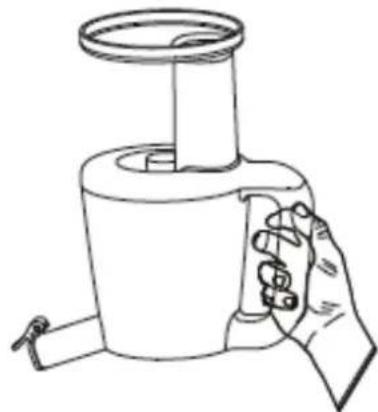
natural_image
Line drawing of a hand holding a small cylindrical device with a lid, no text or symbols presentDescripción:
natural_image
Line drawing of a mechanical device with handle and base components (no text or symbols)
text_image
6 7natural_image
Line drawing of a kettle being placed on top, showing the drop from top to bottom (no text or symbols)natural_image
Technical line drawing of a mechanical component with an upward arrow indicating motion (no text or symbols)Fondo del depósito
natural_image
Line drawing of a hand holding a mug with an upward arrow, no text or symbols presentnatural_image
Line drawing of a blender with three cups and a power outlet (no text or symbols)natural_image
Line drawing of a blender with liquid droplets (no text or symbols)text_image
REV O STA
text_image
RBJ O S2A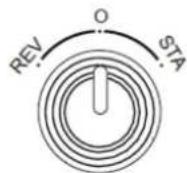
natural_image
Line drawing of a hand using a tool to clean or inspect the spiral-shaped object, with a faucet symbol nearby (no text or labels)
natural_image
Line drawing of a mechanical component with two protruding pins (no text or symbols)natural_image
Line drawing of two hands holding a cylindrical device with a circular button and handle (no text or symbols)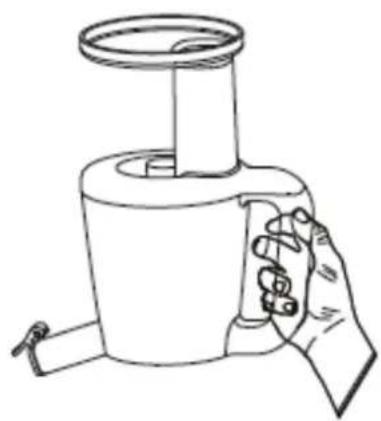
natural_image
Line drawing of a hand holding a cylindrical device with a lid, no text or symbols presentBeschrijving:
1

natural_image
Line drawing of a kitchen mixer with handle and side arm, no text or symbols present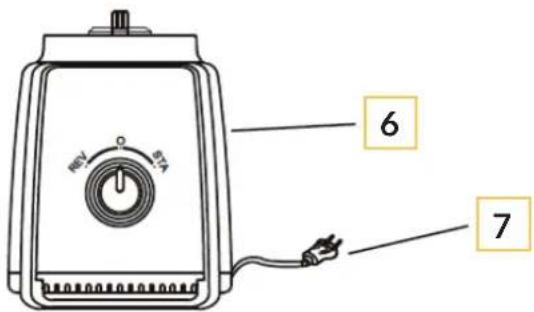
text_image
6 7natural_image
Line drawing of a kettle being placed on top, showing the lid and base (no text or symbols)natural_image
Technical line drawing of a mechanical device with an upward arrow indicating motion or force (no text or symbols present)natural_image
Line drawing of a hand holding a mug with an upward arrow, no text or symbols presentnatural_image
Line drawing of a blender with three cups and a power outlet (no text or symbols)natural_image
Line drawing of a blender with a side arm and handle (no text or symbols)natural_image
Line drawing of a hand holding a tool next to a water tap (no text or symbols)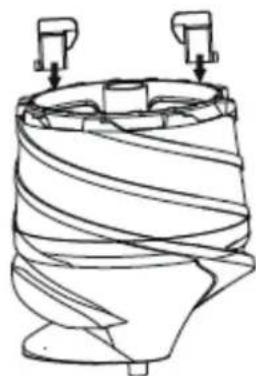
natural_image
Technical line drawing of a coiled industrial component with two mounting fixtures (no text or symbols)natural_image
Line drawing of two hands holding a cylindrical device with a central knob (no text or symbols)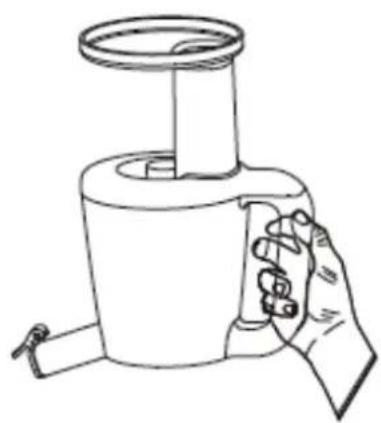
natural_image
Line drawing of a hand holding a cylindrical device with a lid, no text or symbols presentUK
Опис:
1
3
4

natural_image
Line drawing of a kitchen mixer with handle, side arm, and outlet (no text or symbols)5
text_image
6 7natural_image
Line drawing of a kettle being placed on top, showing the drop from top to bottom (no text or symbols)natural_image
Technical line drawing of a mechanical device with an upward arrow indicating motion (no text or symbols)дно ємності
natural_image
Line drawing of a hand holding a container with an upward arrow indicating motion (no text or symbols)natural_image
Line drawing of a blender with two cups and a power outlet (no text or symbols)natural_image
Line drawing of a blender with a handle and spout (no text or symbols)
text_image
REV STA REV STAnatural_image
Hand holding a tool interacting with a coiled pipe, next to a faucet diagram (no text or symbols)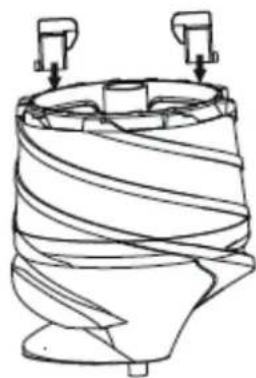
natural_image
Technical line drawing of a mechanical component with two mounting holes (no text or symbols)natural_image
Line drawing of two hands holding a cylindrical device with a circular knob (no text or symbols)
natural_image
Line drawing of a hand holding a cylindrical device with a lid, no text or symbols presentLT
Aprašymas
1
3
4
natural_image
Line drawing of a kitchen mixer with handle, side arm, and outlet (no text or symbols)5
text_image
6 711
natural_image
Line drawing of a kettle being placed on top, showing the drop from top to bottom (no text or symbols)natural_image
Technical line drawing of a mechanical device with an upward arrow indicating motion or force (no text or symbols present)Indo dugnas
natural_image
Line drawing of a hand holding a steamer with an upward arrow indicating motion (no text or symbols)natural_image
Line drawing of a blender with three cups and a power outlet (no text or symbols)natural_image
Line drawing of a kitchen blender with handle and side blades (no text or symbols)I sulčiaspaudę ingredientus dékite létai.
Jei reikia, naudokite stūmoklj.
text_image
REV O STA REV O STAnatural_image
Line drawing of a hand holding a tool next to a water tap (no text or symbols)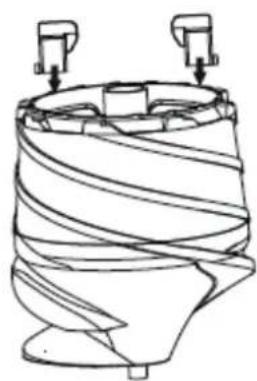
natural_image
Technical line drawing of a mechanical component with two protruding components (no text or symbols)natural_image
Line drawing of two hands holding a cylindrical device with a circular button on the top (no text or symbols)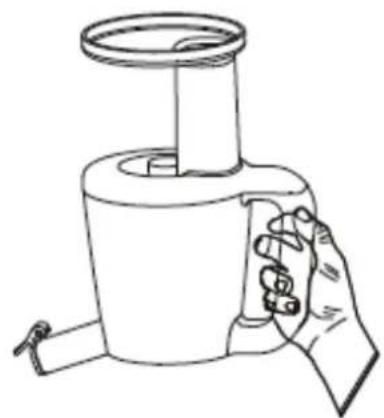
natural_image
Line drawing of a hand holding a cylindrical device with a lid, no text or symbols presentHR
Opis:
natural_image
Line drawing of a mechanical device with handle and base components, no text or symbols present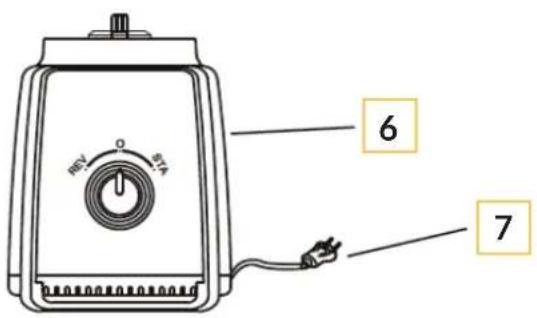
text_image
6 7- Potiskivač
- Ulazna posuda s poklopcem
- Spirala
- Sito x3
- Posuda za otpatke i sok
- Postolje s motorom
-
Kabel napajanja
-
Prekidač za rad motora unatrag
- Prekidač za normalan rad motora
- Prekidač
- Četka za čišćenje
- Posuda x2
- Čep protiv curenja
Montiranje uređaja
natural_image
Line drawing of a kettle being placed on top, showing the process from top to bottom (no text or symbols)natural_image
Technical line drawing of a mechanical device with an upward arrow indicating motion or force (no text or symbols present)Dno posude

natural_image
Line drawing of a hand holding a container with an upward arrow indicating motion (no text or symbols)- Ukloni posudu s postolja sokovnika.
- Ukloni poklopac.
- Gurni metalni štap spirale ispod.
Primjena
natural_image
Line drawing of a blender with three cups and a power outlet (no text or symbols)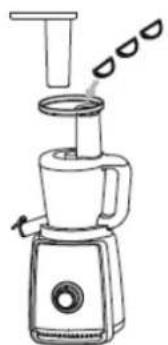
natural_image
Line drawing of a blender with a handle and spout (no text or symbols)natural_image
Illustration of a hand using a tool to clean or inspect the interior wall of a water tap (no text or symbols present)