BMS7120X - Microwaves BRANDT - Free user manual and instructions
Find the device manual for free BMS7120X BRANDT in PDF.
User questions about BMS7120X BRANDT
0 question about this device. Answer the ones you know or ask your own.
Ask a new question about this device
Download the instructions for your Microwaves in PDF format for free! Find your manual BMS7120X - BRANDT and take your electronic device back in hand. On this page are published all the documents necessary for the use of your device. BMS7120X by BRANDT.
USER MANUAL BMS7120X BRANDT
natural_image
Black-and-white photo of a bowl with decorative leaf garnish, blurred background objects (no visible text or symbols)MANUEL DE L'UTILISATEUR FR
Micro-ondes

natural_image
Simple line drawing of a microwave oven with control panel and buttons (no text or symbols)
text_image
ORIGINE FRANCE® GRANTIEChère Cliente, Cher Client,
text_image
QR code image containing encoded data, no visible human-readable text
Important :
text_image
(x 2) 3.5 x 9.5 mm (x 2) 4 x 13 mm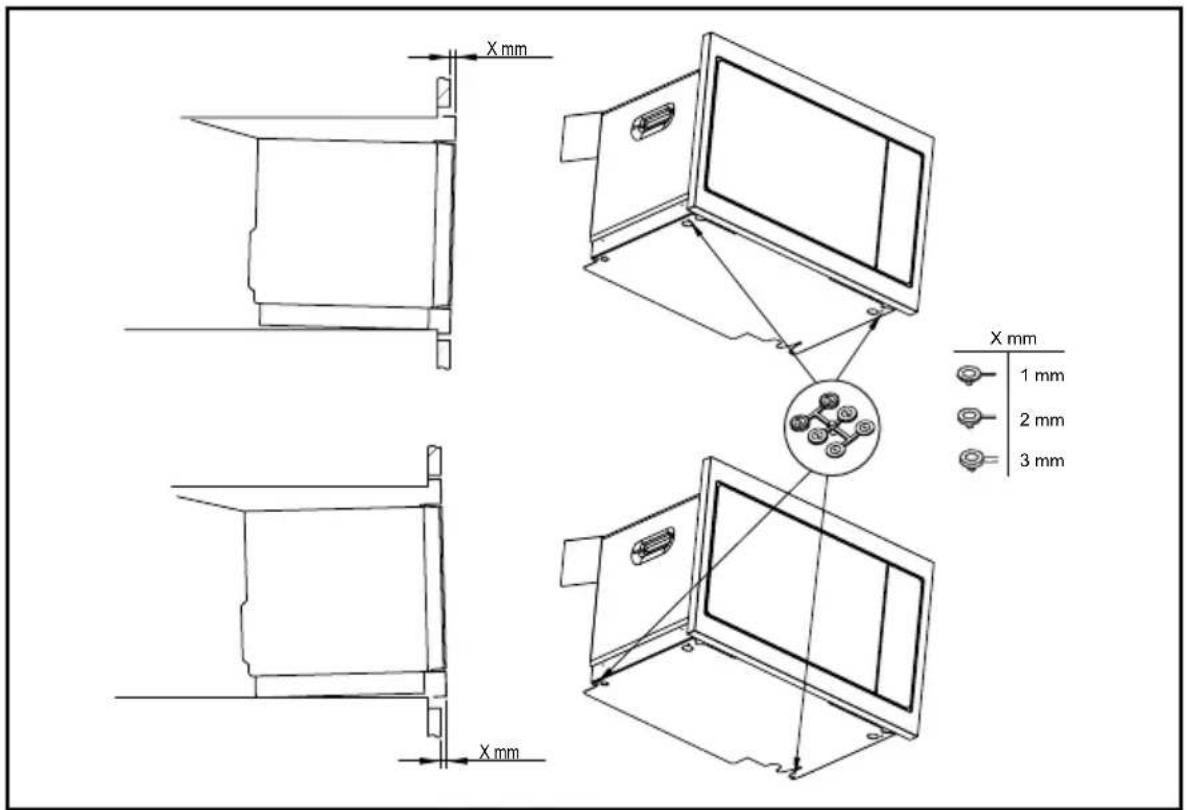
text_image
X mm X mm 1 mm 2 mm 3 mm
Conseil :
text_image
8888 g 900 W 350 W AUTO 150 W Made in France A B C D E F STOP G HACCESSOIRES
text_image
XXXXXXXXX XXXXXXXX N: XX-XX-XXXXXX C18 - Or.2 Made in FranceRELATIONS CONSOMMATEURS FRANCE
natural_image
Black-and-white photo of a bowl with mint leaf garnish, blurred background bowls (no text or symbols visible)NÁVOD K POUŽITÍ CS
Mikrovlnná trouba
natural_image
Simple line drawing of a microwave oven with control panel and buttons (no text or symbols)
text_image
ORIGINE FRANCE® GRANTIEVážený kliente,
text_image
QR code image containing encoded data, no visible human-readable text
Důležité:
text_image
(x 2) 3.5 x 9.5 mm (x 2) 4 x 13 mm
text_image
X mm X mm 1 mm 2 mm 3 mm
Rada :
text_image
88.88 g 900 W 350 W AUTO 150 W Made in France A B C D E F STOP G HPŘÍSLUŠENSTVÍ
• Točna
natural_image
Black-and-white photo of a bowl with mint leaf garnish, blurred background objects (no text or symbols visible)BRUGERVEJLEDNING DA
OVN

natural_image
Simple line drawing of a microwave oven with control panel and buttons (no text or symbols)
text_image
ORIGINE FRANCE® GRANTIEKære kunde,
text_image
QR code image containing encoded data, no visible human-readable text
Vigtigt:
INSTALLATION AF DIT APPARAT 8
VALG AF PLACERING OG INSTALLATION....8
ELEKTRISK TILSLUTNING ....10
BESKRIVELSE AF DIT APPARAT ....11
PRASENTATION AF OVNEN 11
DISPLAY- OG KONTROLTASTER 11
TILBEH∅R 12
BRUG AF DIN ENHED 13
INDSTILLINGER 13
INDSTILLINGSMENU 13
TILBEREDNINGSTILSTANDE 14
START AF MADLAVNING 15
VEDLIGEHOLDELSE AF DIN ENHED ....17
INTERI∅R - UDVENDIG RENG∅RING 17
ANOMALIER OG L∅SNINGER 17
EFTERSALGSSERVICE 18
INDGREB 18
TILBEREDNINGSST∅TTE 19
FUNKTIONELLE EGNETHEDSPR∅VER 19
VIGTIGE SIKKERHEDSREGLER, SOM SKAL LÆSES N∅JE OG GEMMES TIL FREMTIDIG BRUG.
text_image
000 MHz 000 GHz 000-000V - 00Hz Servative screen XXXXXXXXX XXXXXXXXX N: xx-xx-xxxxx C1.18 - C4.2 Music by FranceVALG AF PLACERING OG INDBYGNING
text_image
(x 2) 3.5 x 9.5 mm (x 2) 4 x 13 mm
text_image
X mm X mm 1 mm 2 mm 3 mm
Tip
text_image
88.88 g 900 W 350 W AUTO 150 W Made in France A B C D E F STOP G HTILBEH∅R
- Pladespilleren
Press the key until the symbol is displayed.
natural_image
Black-and-white photo of a bowl with mint leaf topping, surrounded by other bowls (no visible text or symbols)natural_image
Simple line drawing of a microwave oven with control panel and buttons (no text or symbols)
text_image
ORIGINE FRANCE® GRANTIEtext_image
QR code image containing encoded data, no visible human-readable texttext_image
(x 2) 3.5 x 9.5 mm (x 2) 4 x 13 mm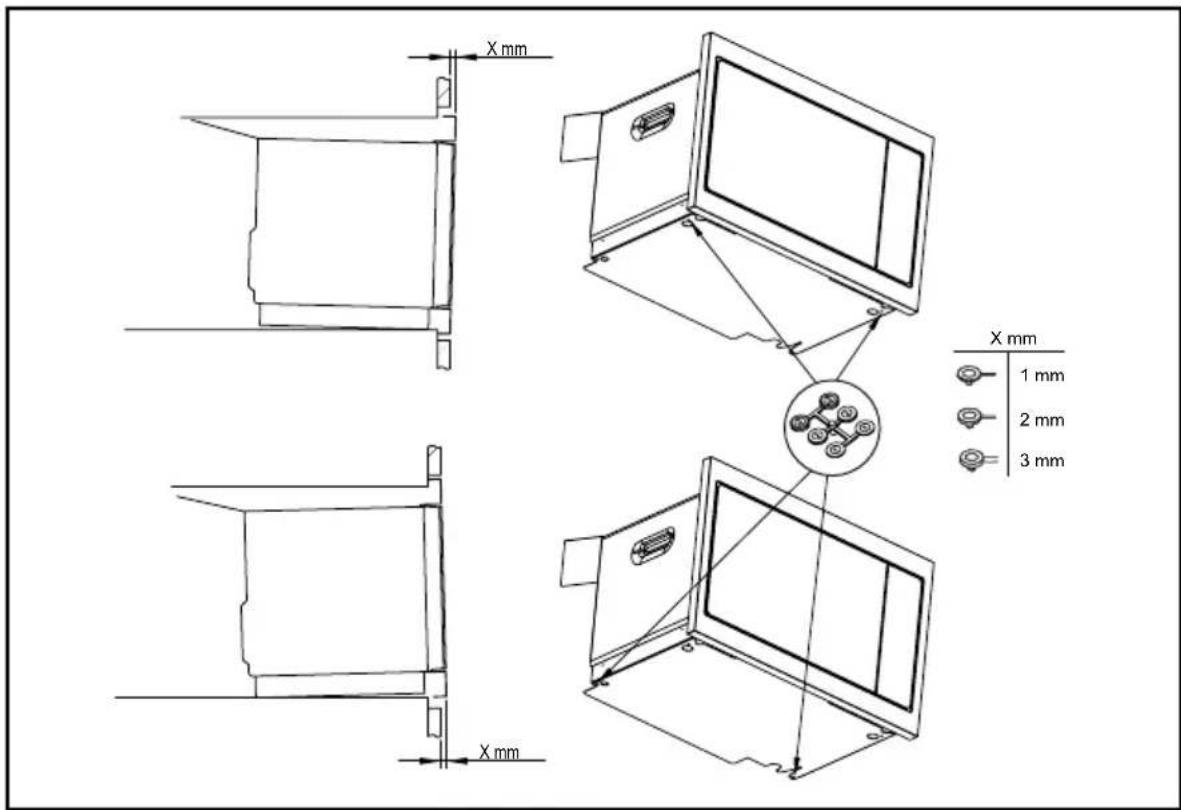
text_image
X mm X mm 1 mm 2 mm 3 mm
Tipp
text_image
8888 g 900 W 350 W AUTO 150 W Made in France A B C D E F STOP G HDIE ZUBEHÖRE
• Der Drehtisch
natural_image
Black-and-white photo of a bowl with mint leaf garnish, blurred background with indistinct objects (no visible text or symbols)ΟΔΗΓΙΕΣ ΧΡΗΣΗΣ EL
natural_image
Simple line drawing of a microwave oven with control panel and buttons (no text or symbols)
text_image
ORIGINE FRANCE® GRANTIEΑγαπητέ Πελάτη,
text_image
QR code image containing encoded data, no visible human-readable text
Σημαντικό:
text_image
88.88 g 900 W 350 W AUTO 150 W Made in France A B C D E F STOP G HΑΞΕΣΟΥΑΡ
• То пикал
text_image
secc MHz secc V secc 200V - xyl e Service control. XXXXXXXXX XXXXXXXXX N: xx-xx-xxxxx OLB - Gr.2 Made in Francenatural_image
Black-and-white photo of a bowl with mint leaf garnish, blurred background objects (no text or symbols visible)USER INSTRUCTIONS EN
MICROWAVE OVEN

natural_image
Simple line drawing of a microwave oven with control panel and buttons (no text or symbols)
text_image
ORIGINE FRANCE® GRANTIEDear Customer,
You have just acquired a BRANDT product and we would like to thank you.
We have designed and made this product with you, your lifestyle and your requirements in mind so that it meets your expectations. We have devoted our know-how, our innovative spirit and the passion that has been guiding us for over 60 years.
In an effort to ensure that our products meet your requirements in the best possible way, our Customer Relations department is at your disposal, to answer all your questions and to listen to all your suggestions.
Visit our website www.brandt.com where you will find our latest innovations, as well as useful and complementary information.
BRANDT is delighted to assist you every day and hopes you get the most out of your purchase.
The label «Origine France Garantie» assures the consumer the traceability of a product by giving a clear and objective indication of the source. The BRANDT brand is proud to affix this label on products from our French factories based in Orléans and Vendôme.
http://www.brandt.com/
Important : Before using your appliance, read this user guide carefully to familiarise yourself more quickly with its operation.
SAFETY INSTRUCTIONS .... 4
ENVIRONMENT AND ENERGY SAVING 7
Environment.... 7
Energy saving tip 7
INSTALLING YOUR APPLIANCE 8
Choice of location and installation ....8
Electrical connection 10
DESCRIPTION OF YOUR APPLIANCE 11
Presentation of the oven 11
Display and control keys.... 11
Accessories 12
USING YOUR DEVICE 13
Settings 13
Settings menu 13
Cooking modes 14
Starting a cooking 15
CARING FOR YOUR DEVICE 17
Interior - exterior cleaning 17
ANOMALIES AND SOLUTIONS 17
AFTER-SALES SERVICE 18
Interventions 18
COOKING AID 19
Functional aptitude tests 19
IMPORTANT SAFETY INSTRUCTIONS - READ CAREFULLY AND RETAIN FOR FUTURE USE.
This user guide is available for download on the brand's website.

Important:
Before switching your appliance on, please read this installation guide carefully to familiarise yourself quickly with its operation. Keep this manual with the appliance. If you sell or give the appliance to someone else, make sure that you also give them this manual.
Please read these instructions before installing and using your appliance. They have been written for your safety and the safety of others.
— This appliance is designed to be used for domestic and similar applications such as:
kitchen areas for the staff of shops, offices and other professional premises; farms; use by customers in hotels, motels and other residential environments; guest house type environments.
— This appliance may be used by children aged 8 years and older, and by persons with impaired physical sensory or mental capacities, or without experience or knowledge, if they are supervised or have received prior instructions on how to use the appliance safely and have understood the risks involved. Children must not be allowed to play with the appliance. The appliance should not be cleaned or maintained by children unless supervised.
— Children should be supervised to prevent them from playing with the appliance.

WARNING:
Accessible parts of the appliance become hot during use. Be careful not to touch the heating elements inside the oven. Children under 8 years of age should not be allowed near the appliance, unless they are constantly supervised.
It is dangerous for anyone other than a qualified person to perform maintenance or repairs that requires the removal of the cover providing protection against exposure to microwave power.
If the appliance is being used in combination mode, it is recommended that children only use the oven under adult su-
pervision, due to the temperatures involved.
— Metal food and beverage containers must not be used when microwave cooking.
— Take care not to move the turntable when removing the containers from the appliance.
— Use only microwave-safe utensils.
— When heating food items in plastic or paper containers, keep an eye on the microwave's contents, since there is a risk of spontaneous combustion.
— If smoke appears, stop or unplug the oven and leave the door closed to smother any flames that may appear.
— Liquids and other foods must not be heated in sealed containers, as they may explode.
Metal food and beverage containers cannot be used for microwave cooking.
— Heating beverages in a microwave oven can cause the sudden and/or delayed spitting of boiling liquid, so care should be taken when handling their containers.
— The contents of baby bottles and baby food jars must be stirred or shaken and the temperature must be checked before consumption, so as to prevent burns.
— Heating eggs in their shells or whole hard-boiled eggs in a microwave oven is not recommended, since they may explode even after cooking has ended.
— This appliance has been designed for closed door cooking.
— A microwave oven is intended for heating food and drinks.
Drying food products or linen or heating heat pads, slippers, sponges, damp clothes or similar could cause injury or fire.

WARNING:
If the door or door seal is damaged, the oven should not be used until it has been repaired by an authorised person.
It is recommended that the oven is cleaned regularly and that any food residue is removed.
— If the appliance is not cleaned regularly, its surface could become damaged, permanently affecting the appliance's service life and possibly causing a safety hazard.
Do not use abrasive cleaners or hard metal scrapers to clean the oven's glass door; they could scratch the surface and cause the glass to crack.
Do not use a steam cleaner.
The electrical plug must remain accessible after installation.
It must be possible to disconnect the appliance from the power supply, either using a plug or by fitting a switch on the fixed wiring system in accordance with installation rules.
If the power cable is damaged, it should be replaced by the manufacturer, its after-sales service department or by a similarly qualified person in order to avoid danger.
Centre the oven in the unit so as to ensure a minimum distance of 10 mm between the appliance and the surrounding unit. The unit supporting the appliance must be made of heat-resistant material (or covered with a heat-resistant material). For greater stability, attach the oven to the unit with 2 screws through the holes provided on the side panels.
WARNING:
Only allow children to use the oven without supervision if adequate instructions have been given so that the child is able to use the oven safely and understands the dangers of incorrect use.
This appliance is not designed to operate above an oven in pyrolysis mode.
This appliance must be installed at a height of 850mm or more above the ground the ground.
This appliance may be installed in a cabinet column, as shown in the installation diagram.
CARE FOR THE ENVIRONMENT
- This appliance's packing materials are recyclable. Please recycle them and help protect the environment by depositing them in municipal containers provided for this purpose.
- Your appliance also contains many recyclable materials. It is therefore marked with this logo to indicate that used appliances must not be mixed with other waste.
The appliance recycling organised by your manufacturer will therefore be conducted in optimum conditions, in accordance with European directive 2002/96/EC on electrical and electronic equipment waste.
Consult your local authority or your retailer to locate your nearest used appliance drop-off points.
- We thank you for your help in protecting the environment.
ENERGY SAVING ADVICE
- Avoid cooking too large portions in the microwave, prefer to cook twice.
- Avoid foods that require a lot of water for cooking.
UNPACKING
When you receive the appliance, unpack it or have it unpacked immediately. Check its general appearance. Make a note of any reservations on the delivery slip and keep a copy.

text_image
025 MHz 025 m³ 025 mm³ - 1000Ω Service operation N: XX-XX-XXXXX 01.8 - On 2 02.0000000000000000000000000000000000000000000000000000000000000000000000000000000000000CHOICE OF LOCATION AND BUILDING IN
This appliance must be installed in a cabinet column as shown in the installation diagram.
Centre the oven in the cabinet so as to ensure a minimum gap of 10mm between the appliance and the surrounding unit. The unit supporting the appliance must be made of heat-resistant material (or covered with a heat-resistant material).
For greater stability, attach the oven to the unit with 2 screws through the holes provided on the side panels.

text_image
x1 3.5 x 9.5 mm x2 x1 4 x 13 mm x2 550 600 ≥100 540.5 380 120 331 ≥850 23 390 592 ≥100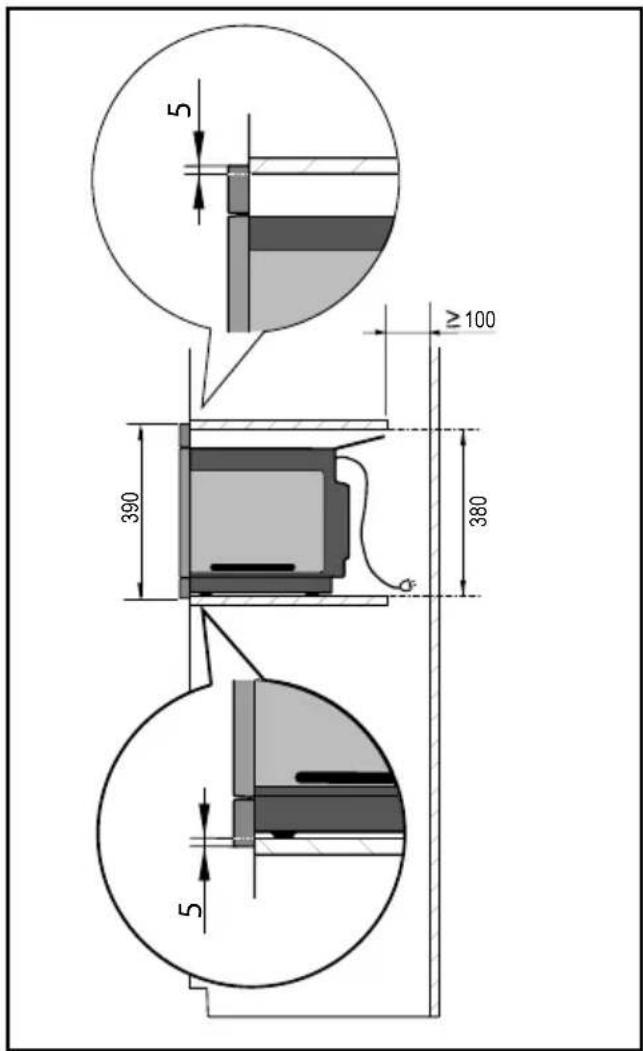
text_image
5 ≥100 390 380 5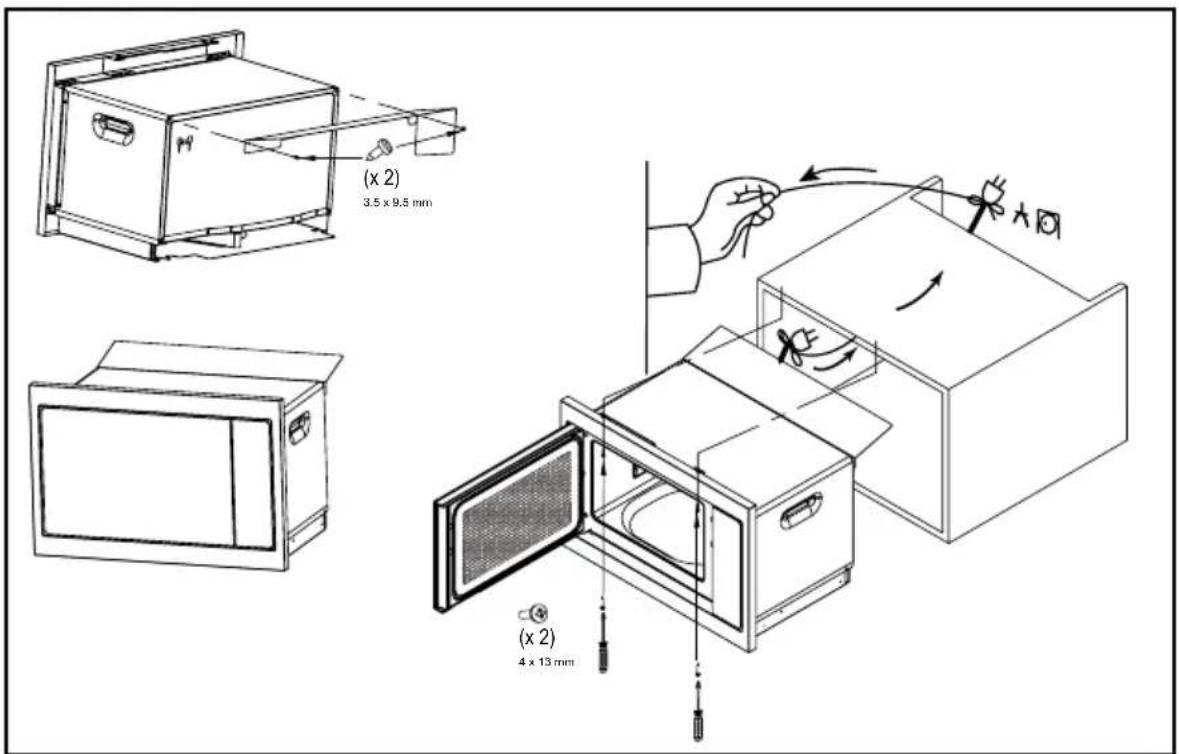
text_image
(x 2) 3.5 x 9.5 mm (x 2) 4 x 13 mm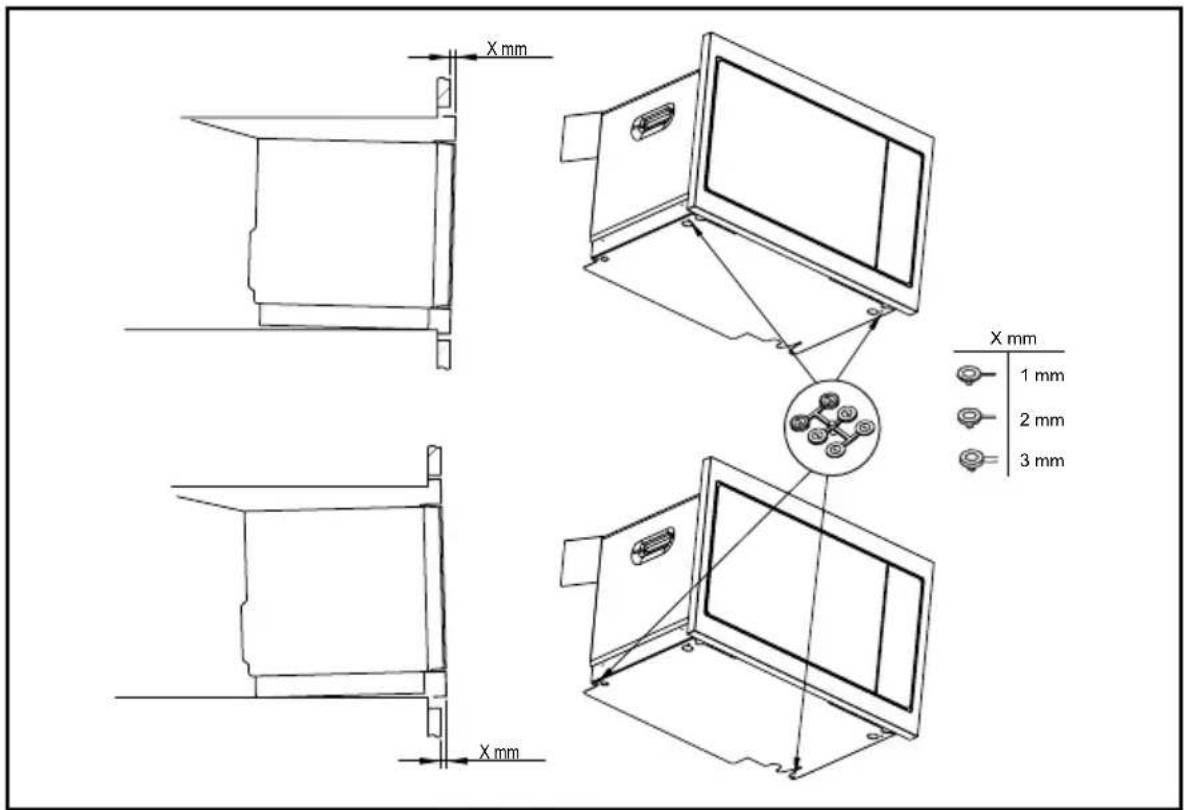
text_image
X mm X mm 1 mm 2 mm 3 mm
Tip
To be certain that you have properly installed your appliance, do not hesitate to call on a household appliance specialist.
ELECTRICAL CONNECTION
Your oven must be connected with a (standard) power cable with 3 conductors of 1.5mm^2 (1 live + 1 neutral + earth) which must be connected to a 220 - 240V_ single-phase grid by means of a 1 live + 1 neutral + earth CEI 60083 standard power socket or via an all-poles cut-off device in compliance with the installation rules.

Warning
The safety wire (green-yellow) is connected to the appliance's terminal and must be connected to the earth terminal of the electrical set-up.
The fuse in your set-up must be 16 amperes.
We cannot be held responsible for any accident resulting from inexistent, defective or incorrect earthing.

text_image
bleu Black,brown or red green yellow Neutral (N) Phase (L) Terminal
Tips
Do not use your appliance immediately (wait approximately 1 to 2 hours) after moving it from a cold location to a hot location, as the condensation may cause a malfunction.
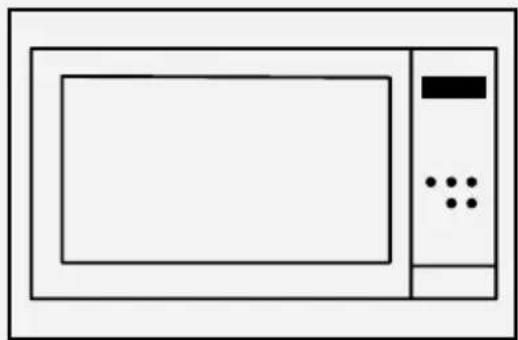
THE CONTROL PANEL

The display :
simplifies programming by displaying the function, cooking time, weight or clock time :
Micro-wave indicator
Programming time and clock indicator.
Timer indicator.
g Weight indicator.

The 4 program-selection's keys :
is used to set the clock time or access the timer.

The clock key :
is used to set the clock time or access the timer.

The + et - keys :
are used to set the weight, program cooking time and the timer.

The stop turntable key:
stops and re-starts the turntable.

The start key / +30 seconds :
starts any program.
Each press on this key adds an additional 30 seconds of cooking.

The cancel key :
a press on this key stops the cooking or programming in progress.

The door open key

text_image
8888 g 900 W 350 W AUTO 150 W Made in France A B C D E F STOP G HTHE ACCESSORIES
- The turntable
The turntable A ensures that food cooks evenly without further attention.
It rotates in both directions. If it does not turn, check that all components are properly positioned. It may be used as a cooking dish. For easy removal, recesses are provided on both sides.
Rotation is controlled by the drive hub C.
If you take out the support with the drive hub, make sure you do not let water get into the motor shaft or ice.
Remember to put back the support, the support wheels B and the turntable.
When the turntable is in the stopped position, large dishes can be used which cover the entire surface of the oven. In this case, it is necessary to turn the container or mix its content half-way through the program
Turntable management
If you feel there is insuf cient space to rotate freely in the oven, you can stop the turntable before or during the execution of a program.
You may stop or start the turntable by pressing
The symbol ashes in the display with the word OFF, telling you to stop the turntable.
Warning :
Do not try to turn it manually, since you could damage the drive system. If the turntable does not turn properly, check that there is nothing underneath it stopping it from turning.
OPERATING PRINCIPLE
Microwaves used for cooking are electromagnetic waves. They are commonly found in our environment in the form of radio waves, light and infra-red rays.
Their frequency is in the 2450MHz range.
Their behaviour:
• They are re-ected by metals.
- They pass through any other material.
- They are absorbed by water, fat and sugar molecules.
When food is exposed to microwaves, its molecules begin moving rapidly, causing it to heat up.
The depth of penetration of the waves into the food is about 2.5 cm. If the food is thicker, cooking at its centre occurs by conduction just like traditional cooking.
In essence, microwaves are simply causing a thermal change inside the food and are therefore not harmful to health.
SETTINGS
- setting the time
When you switch the oven on or after a power cut, 12:00 flashes.
Set the time using the +and keys and then press the key to confirm.
- changing the time
Hold the Ⓤ key pressed until the time flashes. Adjust the time with the ⊕ and ⊖ keys and then press the ⏱ key to confirm.
Your appliance will now show the right time.
- Using the timer
Press the ⏻ key and the timer indicator ⚠ is displayed; the time set flashes.
Adjust the time setting using the ⊕ and ⊖ keys and then press the ▶ key to confirm. At the end of the time, an audible signal sounds; press a key to stop it.
The timer function cannot be accessed during cooking.
LOCKING THE CONTROLS
Press the ∅ key until the symbol is displayed.
To unlock, hold the ☑ key pressed until the symbol disappears from the screen.
SETTINGS MENU
You can adjust a number of settings on your oven:
sounds and demonstration mode.
Hold the Ⓕ and keys pressed for a few seconds to access the settings menu.
 | Key sounds- beeps:ON position, so unds active.OFF position, no sounds |
 | DEMO modePosition ON, mode active.Position OFF, normal mode. |
When "MENU" is displayed, press ▶.
Then navigate between the different parameters by pressing ▶ again and change the selection of the parameter (ON or OFF) by pressing the key ⊕.
The validation is done automatically when you exit the settings menu by pressing STOP.
COOKING FUNCTIONS
Fonctions Manuelles

Manual cooking (or reheating):
900 W :
To cook fresh vegetables and soup. To heat up all liquids.
700 W :
To reheat all fresh or frozen pre-cooked dishes and frozen vegetables. To bring pre-cooked dishes and frozen vegetables up to temperature.
500 W :
To cook fish and poultry. To finish programs begun with the «FAST COOK» setting such as beans, lentils or milk-based dishes.
350 W :
To finish programs begun with the «FAST COOK» setting, which might otherwise overcook on the outside, for instance veal or pork roast.

Manual defrosting :
To defrost meat, fish, fruit, bread or delicate dishes.
Automatic cooking functions

Automatic cooking :
fresh vegetables fish

Automatic defrosting :
ready meals meat and poultry bread vegetables
MANUAL COOKING FUNCTIONS
"Quick" start
- Open the door. Place the food in the appliance, close the door.
You can start cooking for 30 seconds at full power (900W) just by long pressing, then each short press on will add an additional 30 seconds of cooking.
Cooking start (or reheating)
You have at your disposal several microwave powers:
350 W - 500 W - 700 W and 900 Watts.
- Select a power by successively pressing the microwave key until you obtain the desired one. A cooking time ashes in the display. You can change this cooking time with the and keys.
- Con rm with the key, cooking starts, the tray turns and the interior lighting comes on.
Defrosting start (at 150 W)
- Press the key, a cooking time flashes in the display. You can change this cooking time with the and keys.
- Con rm with the key, cooking starts, the tray turns and the interior lighting comes on.
Note : a beep sounds halfway through the program and "TURN" is displayed indicating that the food should be turned over for a better result.
After turning the food over, close the door and press the key to continue defrosting.
During the program
- You can change the power by pressing the microwave key (or the key).
The cooking time is then modified according to the power chosen. You can modify it with the and keys.
- If you open the door before the end of a program, close the door and press key to continue cooking.
- If the door is not closed properly, the appliance will not work.
At the end of a program
- A triple acoustic signal indicates the end of cooking. This signal is repeated every minute for ten minutes; to stop it, open the door.
- The ventilation can continue to operate to cool the oven. This is normal, it will stop automatically.
AUTOMATIC COOKING FUNCTIONS
Start cooking or defrosting.
The automatic functions select the appropriate cooking or defrosting parameters for you based on the food to be prepared and its weight.

Cooking

Defrosting
A01 - fresh vegetables
A02 - fish
d01 - ready meals
d02 - meat and poultry
d03 - bread
d04 - vegetables
- Press the cooking key or defrosting key depending on the food used.
The program "01" corresponding to your choice flashes.
- Press the cooking key (or defrosting key) again to switch from one program to another. A weight is proposed to you, it flashes in the display.
- Enter the actual weight of the food with the ④ and keys (in 50 g increments).
- Confirm with the start ▶key, cooking starts.

Note :
In the functions "A01, d02 et d03" a beep sounds at mid-program and "TURN" is displayed indicating that the food must be turned over for a better result.
After turning the food over, close the door and press the ▶key to continue defrosting.
CLEANING THE INNER AND OUTER SURFACES
The use of abrasive products, alcohol or thinners is not recommended as they are likely to damage the appliance. Use a damp sponge and a little soap.
If the oven smells bad or is dirty, boil a cup of water with lemon juice for 2 minutes and clean the walls with a small amount of washing up liquid.
The turntable can be removed for easy cleaning. To remove it, pick it up using the hand-holds provided for the purpose. If you remove the drive hub, take care not to allow water to enter the motor shaft hole.
Remember to put back the support, the support wheels and the turntable.
PROBLEMS AND SOLUTIONS
The appliance does not start.
Check that it is plugged in properly.
Check that the oven door is properly closed.
The appliance is noisy and the turntable does not rotate properly.
Clean the wheels and the rolling area under the turntable.
Ensure that the wheels are properly positioned.
You see steam on the window.
Wipe away the condensation with
a cloth.
Food is not heated during a microwave program.
Ensure that the utensils are suitable
for microwave ovens and that the power level
is suitable.
Check that the oven is not in
«DEMO» mode (see settings menu)).
There are sparks coming from the appliance.
Clean the appliance properly: remove any grease, food deposits, etc.
Remove any metal items from the walls of the oven.
SERVICE CALLS
Any repairs made to your appliance must be carried out by a qualified professional authorised to work on the brand. When calling, please provide the complete references of your appliance (commercial reference, service reference, serial number), so that we can handle your call better. This information appears on the manufacturer's nameplate attached to your equipment.

text_image
xxxxxx xxxxxxxxx N: xx-xx-xxxxx CLB - Gr.2 Made in FranceB: Product number
C: Service information
H: Serial number
GENUINE REPLACEMENT PARTS
During maintenance work, request that only certified genuine replacement parts are used.

PERFORMANCE IN USE
Function performance tests according to IEC/EN/NF EN 60705
The International Electrotechnical Commission, SC.59K, has established a standard for comparative performance tests conducted on various micro-wave ovens. We recommend the following for this appliance:
| Test Load | Approx. time | Power level selector | Cookware/Tips |
| Custard(12.3.1) | 1000 g 16-18 min 500 W | Pyrex 227On the turntable | |
| Savoie cake(12.3.2) | 475 g 7-8 min 700 W | Pyrex 827On the turntable | |
| Meatloaf(12.3.3) | 900 g 12-15 min 700 W | Pyrex 838Cover with plastic lm.On the turntable | |
| Defrosting meat(13.3) | 500 g 14-15 min 150 W | On a at plateOn the turntable | |
| Defrosting raspberries(B.2.1) | 250 g 7-8 min 150 W | On a at plateOn the turntable |
Brandt

natural_image
Black-and-white photo of a bowl with a mint leaf and a lid, surrounded by other bowls (no visible text or symbols)INSTRUCCIONES DE USO EN
HORNO MICROONDAS

natural_image
Simple line drawing of a microwave oven with control panel and buttons (no text or symbols)
text_image
ORIGINE FRANCE® GRANTIEDear Customer,
You have just acquired a BRANDT product and we would like to thank you.
We have designed and made this product with you, your lifestyle and your requirements in mind so that it meets your expectations. We have devoted our know-how, our innovative spirit and the passion that has been guiding us for over 60 years.
In an effort to ensure that our products meet your requirements in the best possible way, our Customer Relations department is at your disposal, to answer all your questions and to listen to all your suggestions.
Visit our website www.brandt.com where you will find our latest innovations, as well as useful and complementary information.
BRANDT is delighted to assist you every day and hopes you get the most out of your purchase.

text_image
ORIGINE FRANCE® GRANTIEThe label «Origine France Garantie» assures the consumer the traceability of a product by giving a clear and objective indication of the source. The BRANDT brand is proud to affix this label on products from our French factories based in Orléans and Vendôme.
http://www.brandt.com/

Important : Before using your appliance, read this user guide carefully to familiarise yourself more quickly with its operation.
text_image
(x 2) 3.5 x 9.5 mm (x 2) 4 x 13 mm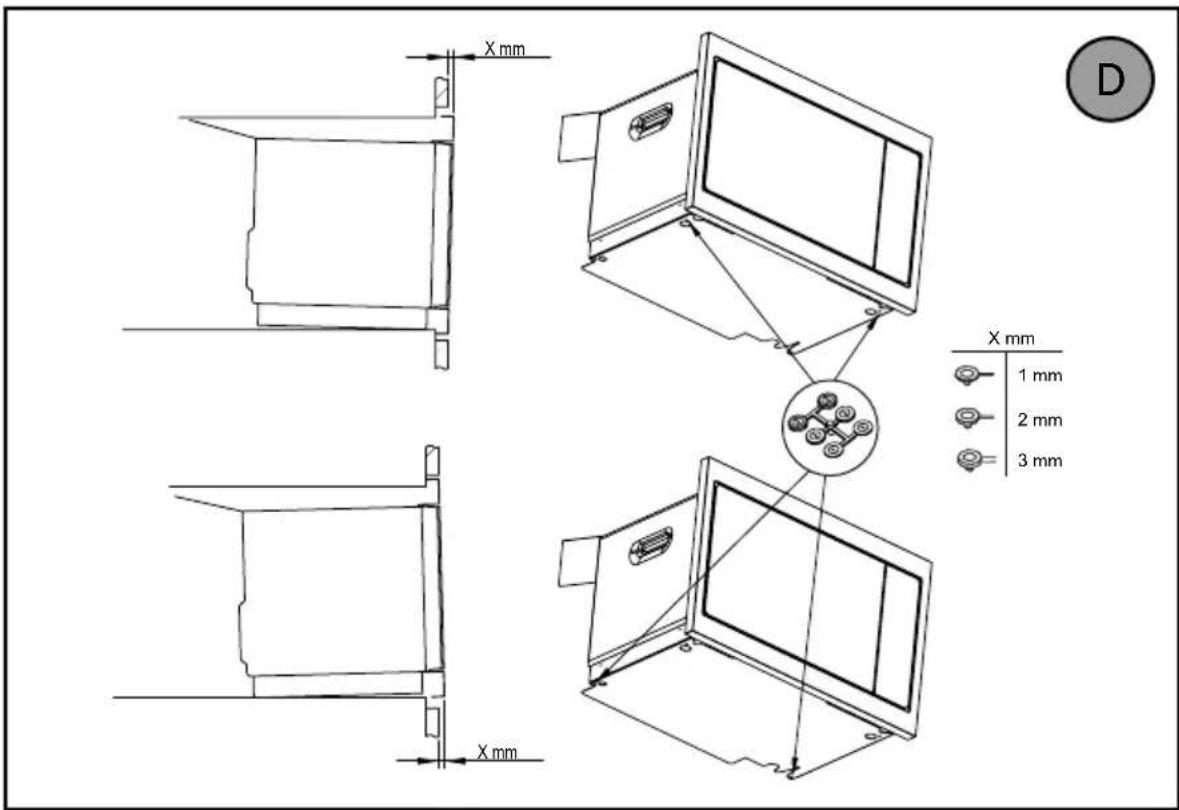
text_image
X mm X mm 1 mm 2 mm 3 mm
Consejo
text_image
88.88 g 900 W 350 W AUTO 150 W Made in France A B C D E F STOP G HLOS ACCESOS
- El plato giratorio
natural_image
Black-and-white photo of a bowl with mint leaf garnish, blurred bowls in background (no text or symbols visible)KÄYTTÖOPAS FI
Mikroaaltouuni

natural_image
Simple line drawing of a microwave oven with control panel and buttons (no text or symbols)
text_image
ORIGINE FRANCE® GARANTIEHyvä asiakas,
text_image
QR code image containing encoded data, no visible human-readable text
Tärkeä:
POIKKEUKSET JA RATKAISUT ....17
MYYNNIN JÄLKEINEN PALVELU 18
TOIMENPITEET 18
RUOANVALMISTUS ....19
TOIMINNALLISET SOVELTUVUUSTESTIT 19
text_image
class MHz class MHz type: 240-1 type: Service status XXXXXXXXX XXXXXXXXX N: XX-XX-XXXXX CLB - On 2 S.2.000 GB/100%SIJAINNIN JA TALOUDEN VALINTA
text_image
(x 2) 3.5 x 9.5 mm (x 2) 4 x 13 mm
text_image
X mm X mm 1 mm 2 mm 3 mm
Kärki
text_image
88.88 g 900 W 350 W AUTO 150 W Made in France A B C D E F STOP G HLISÄVARUSTEET
• Levysoitin
MANUAALISET KYPSENNYSTOIMINNOT
"Pika-aloitus
AUTOMAATTISET KYPSENNYSTOIMINNOT
• TOIMINNAN SOVELTUVUUSTESTIT
natural_image
Black-and-white photo of a bowl with mint leaf topping, surrounded by blurred bowls (no visible text or symbols)ISTRUZIONI PER L'USO IT
FORNO A MICROONDE

natural_image
Simple line drawing of a microwave oven with control panel and buttons (no text or symbols)
text_image
ORIGINE FRANCE® GARANTIEGentile Cliente,
text_image
QR code image containing encoded data, no visible human-readable text
Importante:
text_image
(x 2) 3.5 x 9.5 mm (x 2) 4 x 13 mm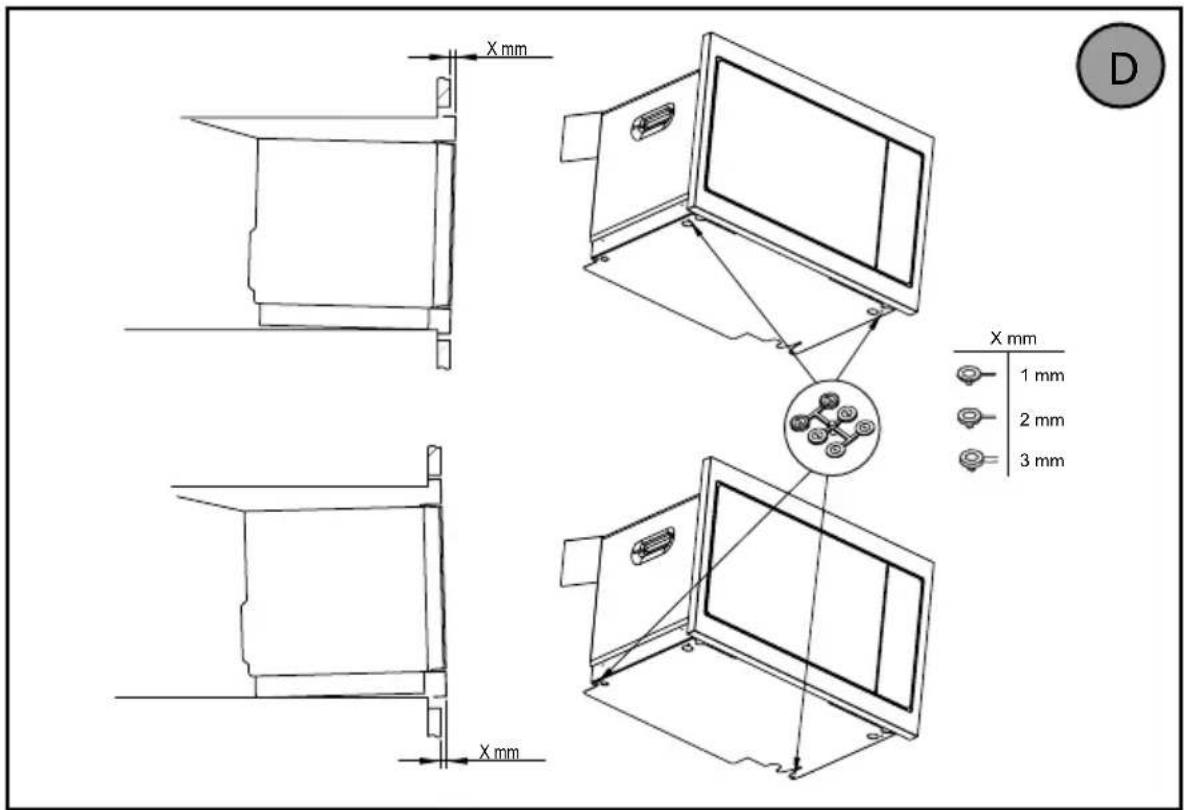
text_image
X mm X mm 1 mm 2 mm 3 mm
Suggerimento
text_image
8888 g 900 W 350 W AUTO 150 W Made in France A B C D E F STOP G HGLI ACCESSI
- Il giradischi
MANUAL COOKING FUNCTIONS
"Quick" start
- Open the door. Place the food in the appliance, close the door.
You can start cooking for 30 seconds at full power (900W) just by long pressing, then each short press on will add an additional 30 seconds of cooking.
natural_image
Black-and-white photo of a bowl with decorative elements, possibly a dessert or dessert, with blurred background bowls (no visible text or symbols)GEBRUIKERSINSTRUCTIES NL
MAGNETRON OVEN

natural_image
Simple line drawing of a microwave oven with control panel and buttons (no text or symbols)
text_image
ORIGINE FRANCE® GRANTIEGeachte klant,
text_image
QR code image containing encoded data, no visible human-readable text
Belangrijk:
text_image
(x 2) 3.5 x 9.5 mm (x 2) 4 x 13 mm
text_image
X mm X mm 1 mm 2 mm 3 mm
Tip
text_image
8888 g 900 W 350 W AUTO 150 W Made in France A B C D E F STOP G HDE TOEGANGSVOORZIENINGEN
- De draaitafe
A01 - fresh vegetables
A02 - fish
d01 - ready meals
d02 - meat and poultry
d03 - bread
d04 - vegetables
text_image
Service Mio Service W Service 200V - 30Hz Service contact: XXXXXXXXX XXXXXXXXX N: XX-XX-XXXXX OLB - Gr.2 Made in Francenatural_image
Black-and-white photo of a bowl with mint leaf garnish, blurred bowls in background (no text or symbols visible)ANVÄNDARMANUAL NO
Mikrovågsugn

natural_image
Simple line drawing of a microwave oven with control panel and buttons (no text or symbols)
text_image
ORIGINE FRANCE® GARANTIEKjære kunde
Du har nettopp kjøpt et produkt fra BRANDT og vi takker for tilliten til våre produkter.
INSTALLERE APPARATET 8
VALG AV PLASSERING OG INSTALLASJON 8
ELEKTRISK TILKOBLING ....10
BESKRIVELSE AV APPARATET ....11
PRESENTASJON AV OVNEN ....11
DISPLAY- OG KONTROLLTASTER ....11
TILBEH∅R 12
BRUKE ENHETEN DIN ....13
INNSTILLINGER 13
INNSTILLINGSMENY 13
MATLAGINGSMODUSER ....14
STARTE EN MATLAGING ....15
TA VARE PÅ ENHETEN DIN 17
INNVENDIG - UTVENDIG RENGJ∅RING 17
AVVIK OG L∅SNINGER 17
ETTERSALGSSERVICE ....18
INNGREP 18
TILBEREDNINGSHJELP ....19
FUNKSJONELLE EVNETESTER 19
VIKTIGE SIKKERHETSINSTRUKSJONER. MÅ LESES N∅YE OG OPPBEVARES FOR SENERE BRUK.
text_image
(x 2) 3.5 x 9.5 mm (x 2) 4 x 13 mm
text_image
X mm X mm 1 mm 2 mm 3 mm
Tips
For å være sikker på at du har installert apparatet riktig, ikke nøl med å kontakte en spesialist på husholdningsapparater.
ELEKTRISK FORBINDELSE
Ovnen din må kobles til med en (standard) strømkabel med 3 ledere på 1,5 mm2 (1 strømførende + 1 nøytral + jord) som må kobles til et 220-240V\~enfasenett ved hjelp av 1 strømførende + 1 nøytral + jord CEI 60083 standard strømuttak eller via en all-polet avskjæringsenhet i samsvar med installasjonsreglene.

Advarsel
text_image
88.88 g 900 W 350 W AUTO 150 W Made in France A B C D E F STOP G HTILBEH∅R
- Platespilleren
text_image
user MHz user W xxx-ECV - vol.: Service cons. XXXXXXXXX XXXXXXXXX N: xx-xx-xxxxxx CLB - Gr.2 Made in FranceB: Produktnummer
natural_image
Black-and-white photo of a bowl with decorative elements, possibly a dessert or dessert, with blurred background bowls (no visible text or symbols)INSTRUKCJA OBSŁUGI PL
MICROWAVE OVEN

natural_image
Simple line drawing of a microwave oven with control panel and buttons (no text or symbols)
text_image
ORIGINE FRANCE® GRANTIESzanowni Klienci,
text_image
QR code image containing encoded data, no visible human-readable text
Uwaga:
WYBÓR MIEJSCA I INSTALACJI 8
PRZYŁĄCZE ELEKTRYCZNE ....10
OPIS URZĄDZENIA ....11
PREZENTACJA PIECA 11
WYŚWIETLACZ I PRZYCISKI STERUJĄCE ......11
AKCESORIA 12
KORZYSTANIE Z URZĄDZENIA ....13
USTAWIENIA 13
MENU USTAWIEN .....13
TRYBY GOTOWANIA 14
ROZPOCZĘCIE GOTOWANIA ......15
DBAŁOŚĆ O URZĄDZENIE ....17
WYBÓR MIEJSCA INSTALACJI I WBUDOWANIA
text_image
(x 2) 3.5 x 9.5 mm (x 2) 4 x 13 mm
text_image
X mm X mm 1 mm 2 mm 3 mm
Wskazówka
text_image
88.88 g 900 W 350 W AUTO 150 W Made in France A B C D E F STOP G HAKCESORIA
- Gramofon
d02 - meat and poultry
d03 - bread
d04 - vegetables
PROBLEMY I ROZWIAZANIA
text_image
user MHz user 1% user eCOV - vol.: Service cono. XXXXXXXXX XXXXXXXXX N: XX-XX-XXXXX CLB - Gen2 Made in Francenatural_image
Black-and-white photo of a bowl with decorative leaf garnish, blurred background objects (no text or symbols visible)natural_image
Simple line drawing of a microwave oven with control panel and buttons (no text or symbols)
text_image
ORIGINE FRANCE® GRANTIECaro(a) cliente,
text_image
max MHz max V max power - power Service ports: XXXXXXXXX XXXXXXXXX N: XX-XX-XXXXX CLB - Gr.2 W/100 100x 350Hztext_image
(x 2) 3.5 x 9.5 mm (x 2) 4 x 13 mm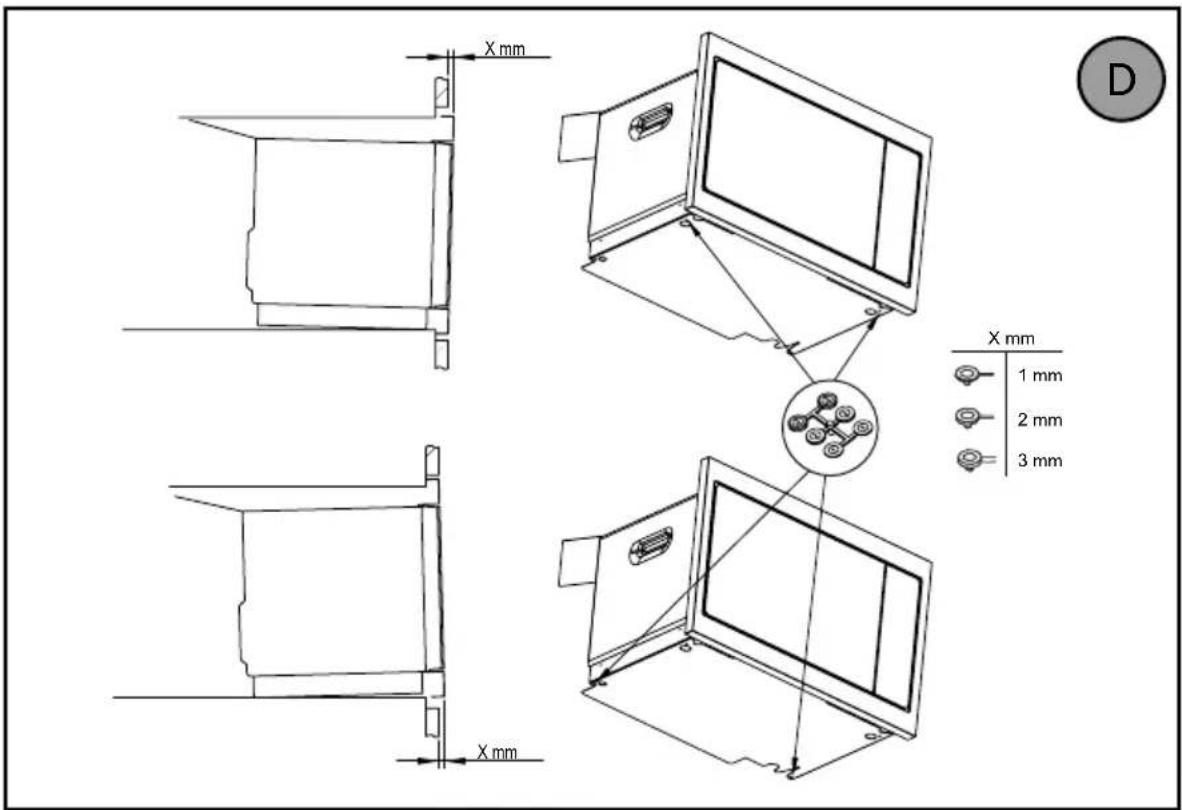
text_image
X mm X mm 1 mm 2 mm 3 mm D
Dica
text_image
8888 g 900 W 350 W AUTO 150 W Made in France A B C D E F STOP G HOS ACESSÓRIOS
- A mesa giratória
Defrosting start (at 150 W)
PROBLEMAS E SOLUÇÕES
text_image
xxx MHz xxx MHz xxx mode - select Service camera XXXXXXXXX XXXXXXXXX NE-xx-xx-xxxxx CLB - Oct.2 Node to Francenatural_image
Black-and-white photo of a bowl with decorative elements, possibly a dessert or dessert, with blurred background bowls (no visible text or symbols)NÁVOD NA POUŽITIE SK
MIKROVLNKA

natural_image
Simple line drawing of a microwave oven with control panel and buttons (no text or symbols)
text_image
ORIGINE FRANCE® GRANTIEBEZPEČNOSTNÉ POKYNY ....4
ŽIVOTNÉ PROSTREDIE A ÚSPORA ENERGIE ......7
ŽIVOTNÉ PROSTREDIE ....7
TIP NA ÚSPORU ENERGIE ....7
INŠTALÁCIA SPOTREBIČA 8
VOL'BA UMIESTNENIA A INŠTALÁCIE ....8
ELEKTRICKÉ PRIPOJENIE ....10
POPIS VÁŠHO SPOTREBIČA ......11
PREZENTÁCIA RÚRY NA PEČENIE ....11
DISPLEJ A OVLÁDACIE TLAČIDLÁ ....11
PRÍSLUŠENSTVO ....12
POUŽÍVANIE PRÍSTROJA ....13
NASTAVENIA ....13
text_image
(x 2) 3.5 x 9.5 mm (x 2) 4 x 13 mm
text_image
X mm X mm 1 mm 2 mm 3 mm
Tip
text_image
8888 g 900 W 350 W AUTO 150 W Made in France A B C D E F STOP G HPRÍSLUŠENSTVO
- Gramofón
ZAMYKANIE OVLÁDACÍCH PRVKOV (DETSKÁ POISTKA)
text_image
user MHz user N user acc/- cell Service core. XXXXXXXXX XXXXXXXXX XXXXXXXXX N: xx-xx-xxxxx CLB - 0x.2 Made in Francenatural_image
Black-and-white photo of a bowl with leaf garnish, blurred bowls in background (no text or symbols)BRUKSANVISNINGAR SV
MIKROVÅGSUGN

natural_image
Simple line drawing of a microwave oven with control panel and buttons (no text or symbols)
text_image
ORIGINE FRANCE® GRANTIEKära kund,
VAL AV PLACERING OCH INBYGGNAD
text_image
(x 2) 3.5 x 9.5 mm (x 2) 4 x 13 mm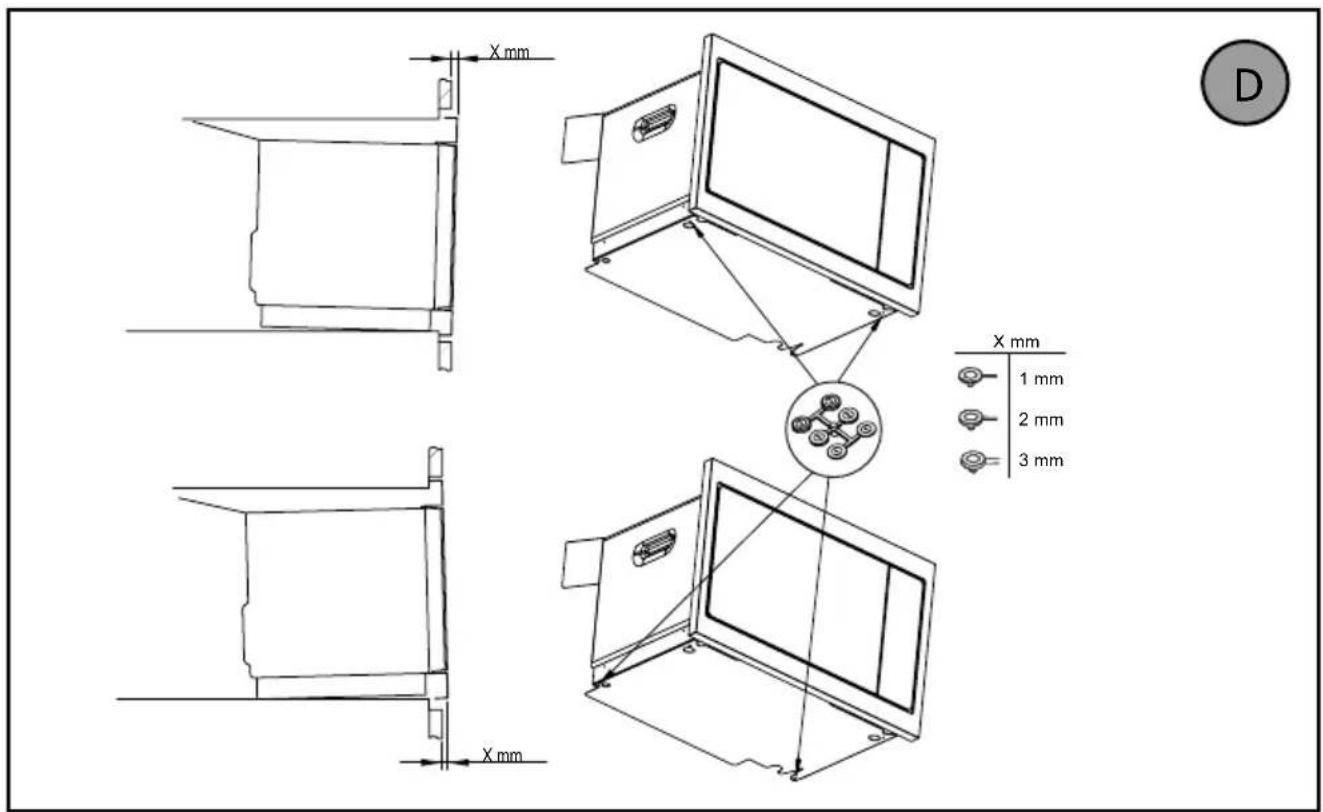
text_image
X mm X mm 1 mm 2 mm 3 mm D
Tips
text_image
88.88 g 900 W 350 W AUTO 150 W Made in France A B C D E F STOP G HTILLBEHÖR
- Plattentallriken
Press the ∅ key until the symbol is displayed.
To unlock, hold the ☑ key pressed until the symbol disappears from the screen.
MENU SETTINGS
To cook fish and poultry. To finish programs begun with the «FAST COOK» setting such as beans, lentils or milk-based dishes.