SS7141 - Croque monsieur clip Sogo - Free user manual and instructions
Find the device manual for free SS7141 Sogo in PDF.
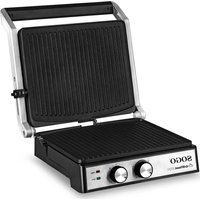
| Appliance type | Press for croque-monsieur / electric grill |
| Brand | Sogo |
| Model | SS7141 |
| Power supply | 220-240 V~, 50-60 Hz |
| Power | 1800-2200 W |
| Plate material | Non-stick coating |
| Opening | 180° |
| Display | Digital with temperature and time display |
| Automatic programs | Steak, grilled chicken, sausage, hamburger, fish |
| Manual mode | Adjustable temperature from 150 to 230 °C, adjustable time from 1 to 30 min |
| Cooking indicator | 3 levels: 50% (white), 70% (green), 100% (red) |
| Safety | Automatic shut-off after 60 min, NTC protection, overheat protection (>300 °C) |
| Error codes | ERR1 (NTC short circuit), ERR2 (abnormal temperature), ERR3 (overheating) |
| Plate cleaning | Wipe with a damp sponge; do not immerse |
| Drip tray | Removable, washable in warm soapy water |
| Dishwasher | Not suitable |
| Standby consumption | < 0.5 W |
| Cable length | Retractable under base (length not specified) |
| After-sales service | www.sogosat.com / 0034 902 222 161 |
| Origin | Made in P.R.C. |
Frequently Asked Questions - SS7141 Sogo
User questions about SS7141 Sogo
0 question about this device. Answer the ones you know or ask your own.
Ask a new question about this device
Download the instructions for your Croque monsieur clip in PDF format for free! Find your manual SS7141 - Sogo and take your electronic device back in hand. On this page are published all the documents necessary for the use of your device. SS7141 by Sogo.
USER MANUAL SS7141 Sogo
natural_image
Exterior view of a SOGO grater with digital display and control buttons (no text or symbols on main body)
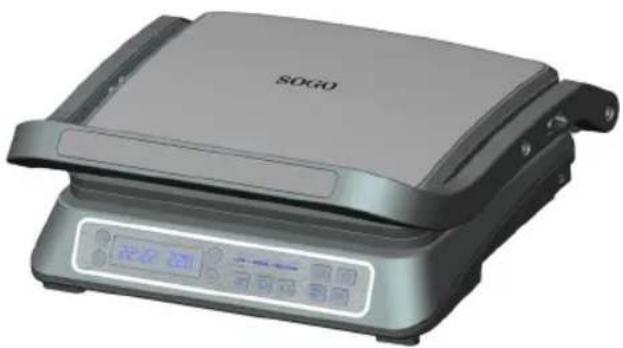
SANDWICHERA PRESS GRILL DIGITAL DIGITAL SANDWICH PRESS GRILL PRESSE-SANDWICH GRILL DIGITAL MÁQUINA DE SANDUICHE GRELHA DIGITAL GRILL SANDWICH PRESSE DIGITAL BISTECCHIERA ELETTRICA DIGITALE
natural_image
Exterior view of a modern SOGO grater with control panel (no visible text or symbols)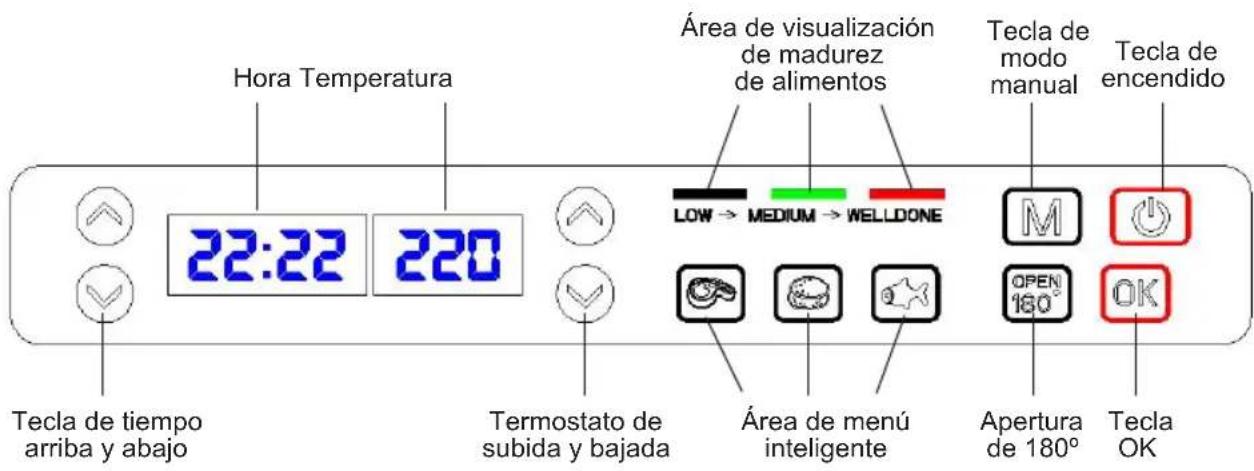
- This instruction manual can also be downloaded from our web page www.sogo.es
- READ ALL INSTRUCTIONS
- Use only on AC 220-240 Volt, 50-60 Hz. Use only for household.
- Do not touch hot surfaces. Use handles and knob.
- To protect against risk of electric shock, do not immerse the cord, plug or cooking unit in water or any other liquid.
- Close supervision is necessary when any appliance is used by or near children.
- Unplug from outlet when not in use and before cleaning. Allow to cool before putting on or taking off parts, and before cleaning appliance.
- Do not operate any appliance with a damaged has malfunctioned or has been damaged in any manner. In order to avoid the risk of an electric shock, never try to repair the Press Grill yourself. Take it to an authorized service station for examination and repair. An incorrect reassembly could present a risk of electric shock when the Press Grill is used.
- The use of accessory attachments not recommended by the manufacturer may result in fire, electrical shock, or risk of injury to persons.
- Do not use outdoors or for commercial purposes.
- Do not let power cord hang over the edge of the table or counter, or touch hot surfaces.
- Do not place on or near a hot gas or electric
burner or heated oven.
- Unplug the unit when finished using.
- Extreme caution must be exercised when moving an appliance.
FUNCTION INTRODUCE
natural_image
Exterior view of a modern SOGO grater with control panel (no visible text or symbols)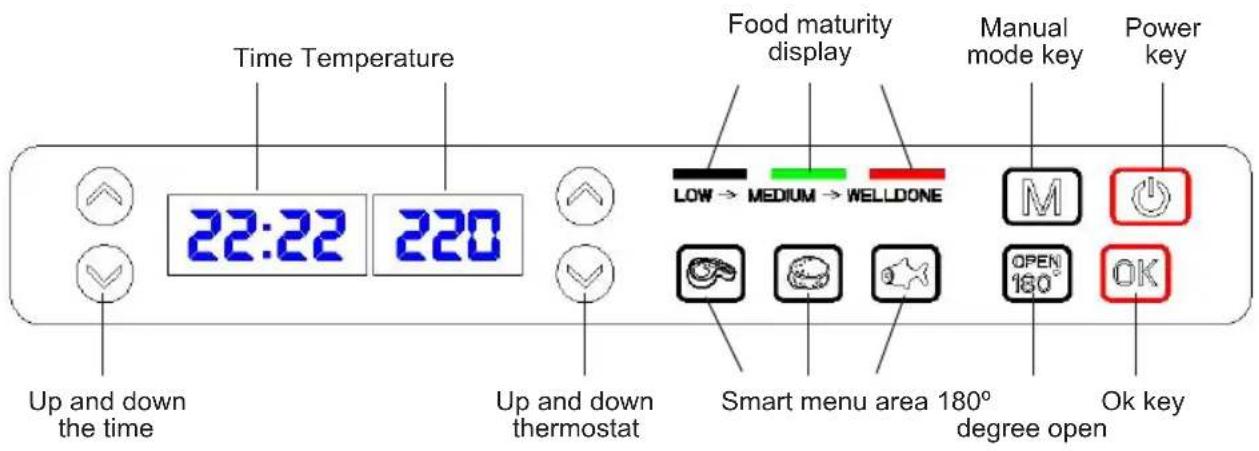
text_image
Time Temperature 22:22 220 Up and down the time Up and down thermostat Food maturity display LOW → MEDIUM → WELLDONE Smart menu area 180° degree open Manual mode key Power key OK keyBEFORE FIRST USE
- Read all instructions carefully and keep them for future reference.
- Remove all packaging
- Clean the Cooking Plates by wiping a sponge or cloth dampened in warm water. DO NOT IMMERSE THE UNIT AND DO NOT RUN WATER DIRECTLY ONT THE COOKING SURFACES.
• Dry with a cloth or paper towel. - For best results, lightly coat the cooking plates with a little cooking oil or cooking spray. Notice: When your Grill Toaster is heated for the first time, it may emit slight smoke or odor. This is normal with many heating appliances. This does not affect the safety of your appliance.
DETAILED FUNCTION DESCRIPTION OF EACH FUNCTION KEY
Power button -- it controls the on and off power of the whole machine. After the power is plugged in, the red light of the backlight flashes. After the button is pressed, the red light of the backlight will be on for a long time (the first impulse of the product in any menu should not exceed 260°).

Ok key -- the background red lights are flashing before confirmation and always on after confirmation.

Steak/grilled chicken/sausage process -- Range of temperature: The maximum temperature of the disk is 230+/-15 degrees, and the temperature range should be less than 35°C. Push down this button, the background white light flashing, press OK key, background white light flash, preheat machine into the state, when the end of the preheating, two sound alarm, the background light is always on, (prompt consumers to put the food), put in the food and bake, When heated to 4 minutes, two sound alarm, LOW → MEDIUM → WELLDONE
The first white light is always on (50 % cooked). When it is heated to 6 and a half minutes, three sound alarm, the second green light is always on (70% cooked); when it is heated to 9 minutes, four sound alarm, the third red light is always on (100% cooked), indicating that the frying is finished. At this time, the product does not carry on any operation, then continue to heat, when 60 minutes later into the automatic shutdown mode. If you want to continue to bake, you need to re-menu operation.
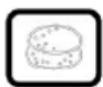
Roast hamburger meat -- Range of temperature: The maximum temperature of the disk is 210+/-15 degrees, and the temperature range should be less than 35°C. Push down this button, the background white light flashing, press OK key, background white light flash, preheat machine into the state, when the end of the preheating, two sound alarm, the background light is always on, (prompt consumers to put the food), put in the food and bake. When heated to 4 minutes, two sound alarm, LOW > MEDIUM > WELLDONE The first white light is always on (50 % cooked). When it is heated to 6 and a half minutes, three sound alarm, the second green light is always on (70% cooked); when it is heated to 9 minutes, four sound alarm , the third red light is always on (100% cooked), indicating that the frying is finished. At this time, the product does not carry on any operation, then continue to heat, when 60 minutes later into the automatic shutdown mode. If you want to continue to bake, you need to re-menu operation.
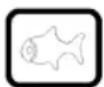
Grilled fish program--- Range of temperature: The maximum temperature of the disk is 220+/-15 degrees, and the temperature range should be less than 35°C. Push down this button, the background white light flashing, press OK key, background white light flash, preheat machine into the state, when the end of the preheating, two sound alarm, the background light is always on, (prompt consumers to put the food), put in the food and bake. When heated to 4 minutes, two sound alarm, LOW > MEDIUM > WELLDONE The first white light is always on (50 % cooked). When it is heated to 6 and a half minutes, three sound alarm, the second green light is always on (70% cooked); when it is heated to 9 minutes, four sound alarm , the third red light is always on (100% cooked), indicating that the frying is finished. At this time, the product does not carry on any operation, then continue to heat, when 60 minutes later into the automatic shutdown mode. If you want to continue to bake, you need to re-menu operation.

Manual key ---- Press this key and the display area of the digital tube (blue screen) lights up, consumers can choose according to different food and personal tast, press “” adjust different baking temperature and time. (adjustable temperature range: 150-160-170-180-190-200-210-220-230 degree, time adjustable range: 1-2-3-4----30minutes Interval cyclic selection, such as 2 minutes 28 seconds shown as , the ten digits are blank), baked function ia same as the normal paninig grill. Once you’ve adjusted it, blink for 5 seconds by default, stop flashing, two sound alarm, automatic confirmation start (at the same time the background light is always red). At this time, the clock is ticking, the time goes back to zero, three sound alarm, “00:00” blink. If there is no further operation and continue heating, it will enter automatic shutdown mode after 60 minutes. If you want to continue to bake, you need to re-menu operation.
Note:
- After ☐, menu, if enter the smart menu, temperature and digital display turned off, unable to operate. (Digital display area only can be used under ☐ menu).
- After adjustment you can press, two sound alarm and start, don't wait for five seconds. After start, the background light is always red.
- In this case, If the preheating temperature is not reached, press down, the time shows the flash, this does not alarm, preheating temperature to reach, stop flashing, alarm two sound, start the countdown.
- At the same time, the display of digital tube is slow flash display.
- When you switch to, the initial temperature and time is: , blinking display.
- When confirm and press OK, if you want to change the time and temperature again, You need to press it twice in quick succession or to change, then press OK again.
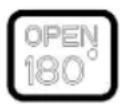
When the product is opened at 180 degrees for use, press the background white light is always on, the smart menu can't be used. the background white light is always on, the temperature adjustable range is modified to: 150-160-170-180-190-200°C cyclical selection, the highest temperature is 200°C, time is the same.
OTHER REQUIREMENTS
- Power consumption of EUP standby is required to be less than 0.5W when starting up
- Preheating time is not calculated. The machine must be disconnected for 50 seconds after 5 minutes of continuous power heating to prevent the internal temperature rising too high.
- All the above time definitions should be based on the actual product's frying and baking test results.
KEY DEFINITION
- Sound, alarm: The buzzer time is 0.25S
- Blew: Continuous buzzer.
- Blink time: 3 times/2 seconds, quick flashing: 2 times/second, Slow flashing: 1 time/second.
SAFETY PROTECTION FUNCTION
- Automatic power off after 60 minutes, such as after any pattern is complete, no more operations, after 60 minutes, the temperature digital tube on the right side flashes "OFF" for 60 seconds and alarms 4 times before turning OFF the power.
- When NTC shorts or breaks, disconnect the electric heat pipe and display the fault screen. On the right, the time digital tube displays the "ERR 1" symbol flash, the buzzer is ringing long, and there is no response to the button until the power is removed.
- In case of abnormal product failure, 150 ± 10 seconds after starting the gear setting (when the product works normally for 2.5 minutes), when the NTC temperature is below 50^ , disconnect the electric heat pipe and display the fault screen. On the right, the time digital tube displays the "ERR 2" symbol flash, the buzzer is ringing long, and there is no response to the button until the power is removed.
- High temperature protection function: When the temperature is higher than 300^ ± 15^ , disconnect the electric heat pipe and display the fault screen. On the right, the time digital tube displays the “ERR 3” symbol flash, the buzzer is ringing long, and there is no response to the button until the power is removed.
CLEANING AND CARE
• Always unplug the Grill Toaster and allow it to cool before cleaning. The unit is easier to clean when slightly warm. There is no need to disassemble Grill Toaster for cleaning. Never immerse the Grill Toaster in water or place in dishwasher.
- Wipe cooking plates with a soft to remove food residue. For baked on food residue squeeze some warm water mixed with detergent over the food residue then clean with a non abrasive plastic scouring pad or place wet kitchen paper over the grill to moisten the food residue.
- Do not use anything abrasive that can scratch or damage the non-stick coating.
- Do not use metal utensils to remove your foods, they can damage the non-stick surface.
- Wipe the outside of the grill toaster with a damp cloth only. Do not clean the outside with any abrasive scouring pad or steel wool, as this will damage the finish. Do not immerse in water or any other liquid.
- Do not place in the dishwasher.
- Remove and empty the drip tray after each use and wash the tray in warm, soapy water. Avoid the use of scouring pads or harsh detergents as they may damage the surface. Rinse and dry thoroughly with a clean, soft cloth and replace.
STORAGE
• Always unplug the Grill Toaster before storage.
• Always make sure the Grill Toaster is cool and dry before string.
- The power cord can be wrapped around the bottom of base for storing.
DATOS TÉCNICOS
Voltage: 220-240V\~
Frequency: 50-60Hz
Power: 1800-2200W
MESURES DE SÉCURITÉ IMPORTANTES
natural_image
Exterior view of a modern SOGO grating with control panel (no visible text or symbols)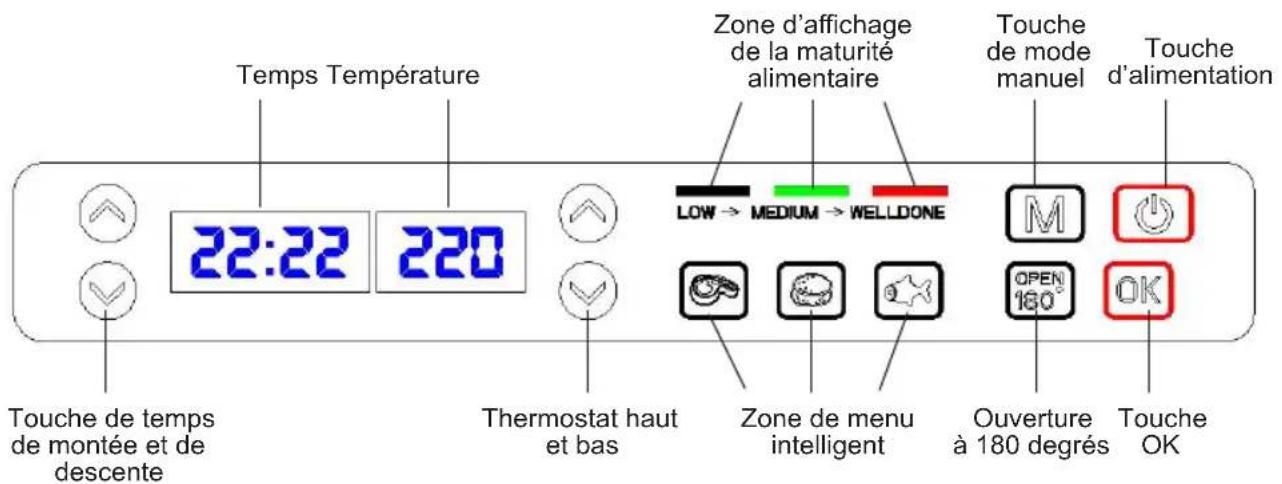
natural_image
Exterior view of a modern SOGO grater with control panel (no visible text or symbols)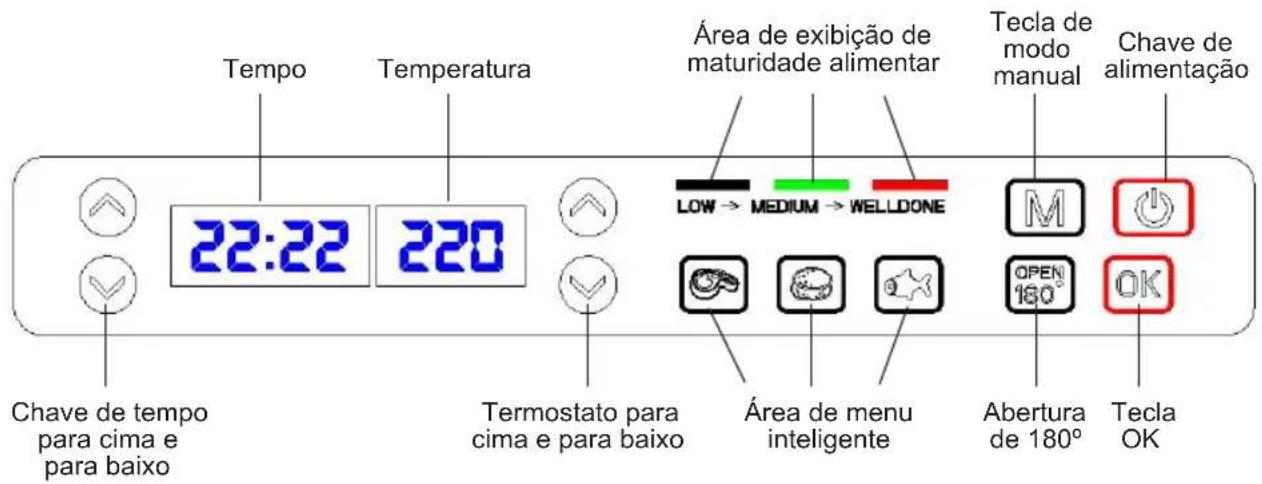
natural_image
3D rendering of a SOGO food grater with control panel (no visible text or symbols)
natural_image
3D rendering of a SOGO grater with control panel and display screen (no visible text or symbols)
DECLARATION OF CONFORMITY
This device complies with Low Voltage Directive 2014/35/EC, Electromagnetic Compatibility Directive 2014/30/EU, Directive 2015/863/EU on the restriction of the use of certain hazardous substances in electrical and electronic equipment and Directive 2009/125/EC on the eco-design requirements applicable to energy-related products.
DÉCLARATION DE CONFORMITÉ
This symbol means that in case you wish to dispose of the product once its working life has ended, take it to an authorised waste agent for the selective collection of waste electrical and electronic equipment (WEEE).

Imported by:
Sanysan Appliances S.L, NIF: B98753056, C/ Barcas 2, 2 46002 Valencia, Spain Product made in P.R.C. – Designed by SOGO based on the European Quality Standards Customer Service: www.sogosat.com / sogosat@sogosat.com / 0034 902 222 161