BRM 51172 A - Lawn mower Grizzly - Free user manual and instructions
Find the device manual for free BRM 51172 A Grizzly in PDF.
User questions about BRM 51172 A Grizzly
0 question about this device. Answer the ones you know or ask your own.
Ask a new question about this device
Download the instructions for your Lawn mower in PDF format for free! Find your manual BRM 51172 A - Grizzly and take your electronic device back in hand. On this page are published all the documents necessary for the use of your device. BRM 51172 A by Grizzly.
USER MANUAL BRM 51172 A Grizzly
natural_image
Black and red lawn mower with blue blades and red handle, labeled 'BRM' in top right corner (no other text or symbols)BRM 5117-2 A 4in1 Set

Originalbetriebsanleitung Traduction de la notice d’utilisation originale Vertaling van de originele gebruiksaanwijzing Traduzione delle istruzioni per l’uso in originale Tłumaczenie oryginalnej instrukcji obsługi Translation of the original instructions for use Překlad originálního návodu k obsluze Originalios eksploatavimo instrukcijos vertimas Traducción del manual de instrucciones original Preklad originálneho návodu na obsluhu

text_image
E 1 2 24 23
text_image
F 22 28 29
text_image
G 22a Grizzly Tools 21 22 30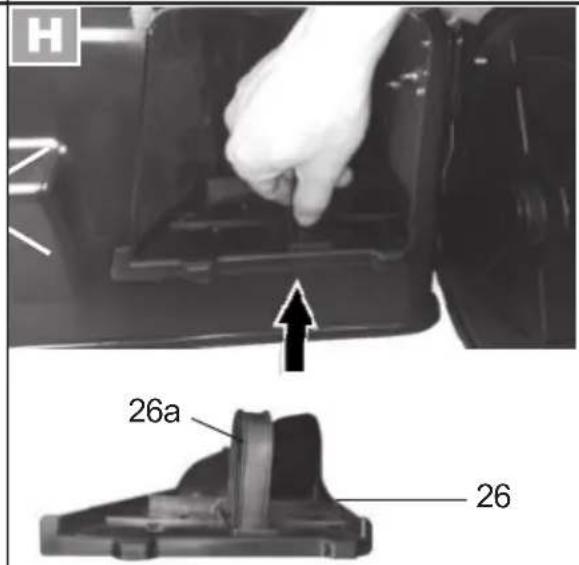
text_image
H 26a 26
text_image
16 16 a 27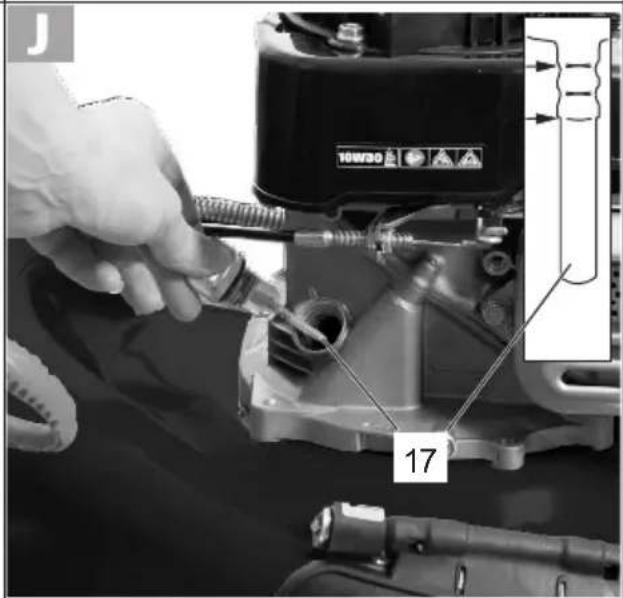
text_image
J 17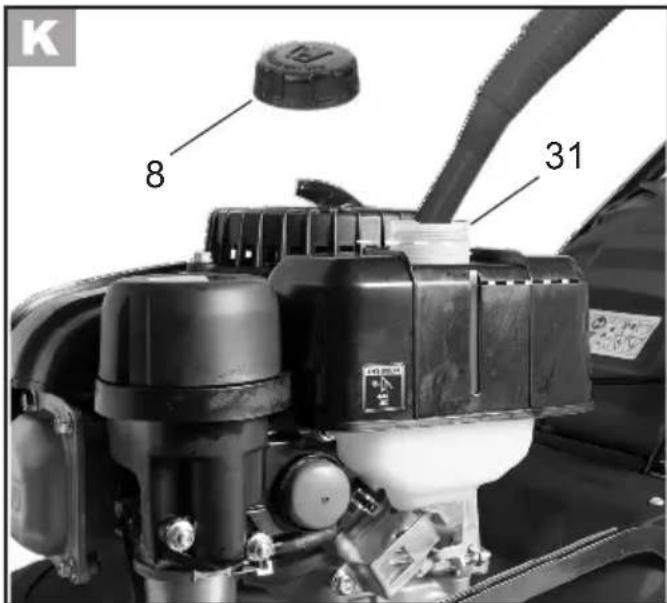
text_image
K 8 31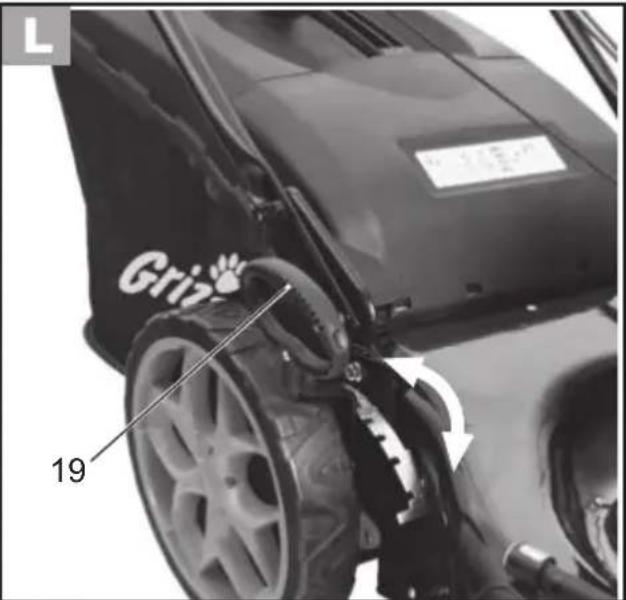
text_image
Griz 19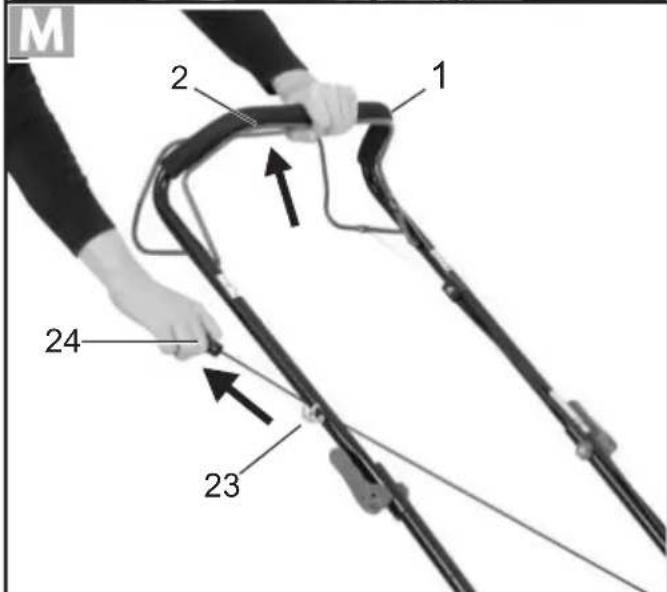
text_image
M 1 2 24 23
text_image
N 1 25 2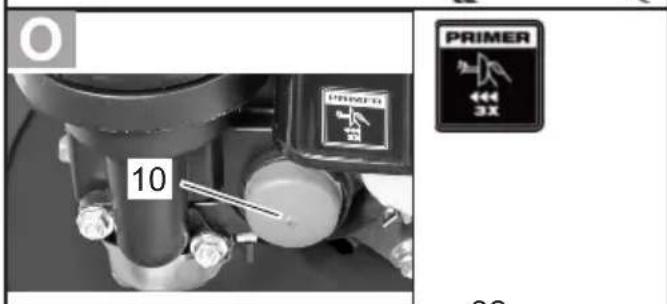
text_image
O 10 PRIMER 3X 22
natural_image
Black-and-white photo of a small wheeled motor with wheels and a curved arrow indicating motion (no text or symbols)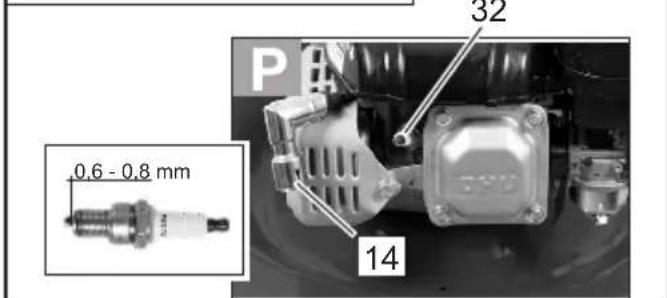
text_image
0.6 - 0.8 mm 32 14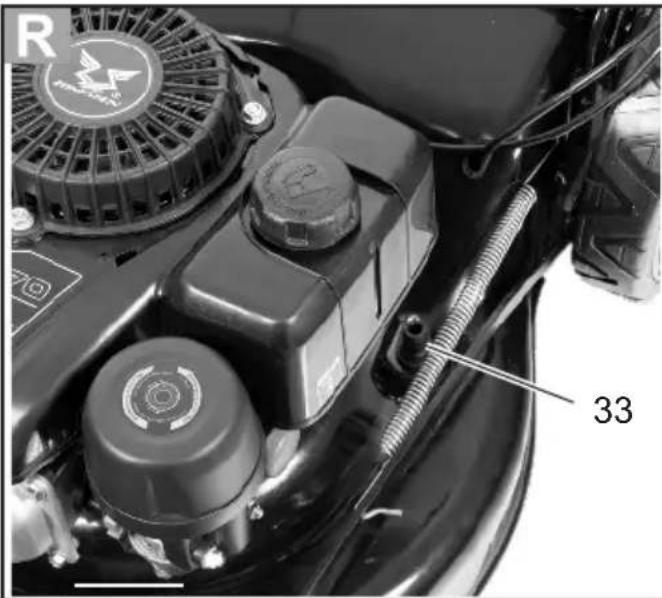
natural_image
Close-up of a car engine component with visible hoses and a numbered label (33), no readable text or symbols beyond the number.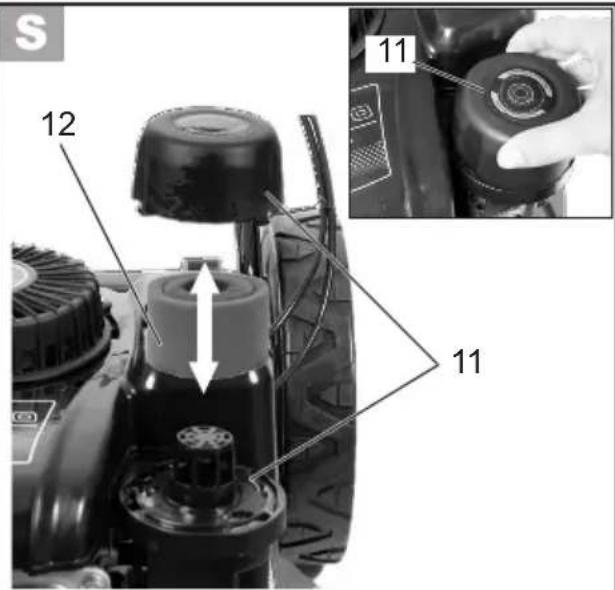
text_image
S 12 11 11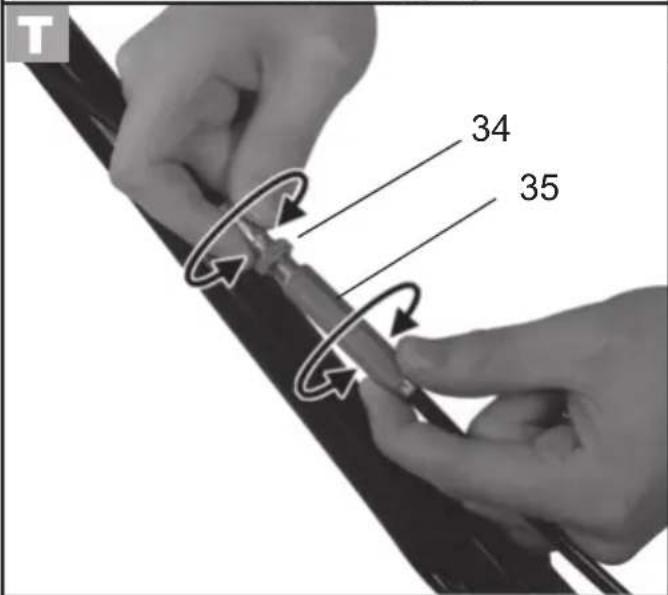
text_image
T 34 35
natural_image
Black-and-white photo of a lawn mower with visible blades and wheels, showing mechanical components and motion arrows (no text or symbols)
GB Insolation of the original instructions for use.... 110
text_image
Four black-and-white warning symbols: flame, exclamation mark, person silhouette, and smoke symbol.21 Protection anti-choc
Bougies.....Torch F5RTC
Before initial use, please read these operating instructions carefully in order to avoid incorrect handling. Keep the instructions in a safe place and pass them on to any subsequent user, so the information is available at all times.
Content
Intended use 110
General description....111
Delivery contents ......111
Functional description....111
Summary......111
Safety equipment 112
Technical data.... 112
Symbols and icons......112
Symbols on the devic....112
Symbols in the manual....114
Safety instructions 114
Initial operation....117
Mounting the lower bar 117
Mounting the handlebar 117
Fitting the starter cable 118
Removing/attaching the grass collection box 118
Filling level indicator....118
Mulchkit....118
Lateral grass ejection....119
Filling with engine oil 119
Checking the oil level 119
Filling with petrol 119
Setting the cutting height 120
Operation....120
Starting and stopping the engine .... 120
Mowing....121
Working instructions......121
General working instructions......121
Differencebetweenmovingand mulching lawns 121
Cleaning and maintenance....122
Cleaning and maintenance work on the underside of the appliance....122
Replacingtheairfilter 122
Change/adjust spark plug 123
Changing the engine oil 123
Adjusting the bowden cable....123
Checking the blade 124
Adjusting the carburettor....124
Storage 124
General storage instructions...... 124
Storage during longer breaks from operation....124
Disposal / environmental protection ..125
Guarantee....125
Repair service....126
Maintenance intervals....126
Replacement parts/accessories.....127
Troubleshooting ....127
Translation of the original EC declaration of conformity....213
Exploded Drawing 218
Service-Center 219
Intended use
The equipment is intended only for mowing lawns and grass in domestic use.
This equipment is not suitable for commercial use. Commercial use will invalidate the guarantee.
Any use other than specifically permitted in these instructions may result in damage to the equipment and represent a serious risk to the user.
The equipment is intended for use by adults. Children or other people who are unfamiliar with the operating instructions must not use the equipment.
The operator or user is responsible for accidents or damage to other persons or their property.
The manufacturer is not liable for damage caused by improper use or incorrect operation.
General description

The illustration of the principal functioning parts can be found on pages 2 - 5.
Delivery contents
Carefully unpack the appliance and check that it is complete:
- Petrol lawn mower
- Collapsed handle bar
- Grass collection box
- Mulching kit
- Lateral ejection canal
- Cable clamp
- Assembly accessories for fixing the bar
- Quick guide
- Operating instructions
Functional description
The equipment is driven by a powerful four-stroke engine (Zongshen NP170 Easy Start). The Easy Start system with temperature-controlled automatic choke, the rear wheel drive and the blade braking function make the equipment easier to operate.
The equipment is fitted with a high quality steel metal casing, a grass catchment basket and a foldable handlebar. Four modes of operation are available for the user: Mowing with or without the grass collector, mulch mowing or mowing with lateral grass ejector.
Summary

1 Handle bar
2 Safety catch
3 Quick release levers
3a Nut
4 Lower bar
5 Bowden cable
6 Cable clamp
7 Star grip screw
7a Carriage bolt
8 Filler cap
9 Engine cover
10 Petrol pump (primer)
11 Air filter box
12 Air filter (not visible)
13 2 front wheels
14 Spark plug connector
15 Exhaust guard
16 Lateral ejection with impact protection
17 Oil filler cap with
18 Sheet steel housing
19 Lever for cutting height adjustment
20 2 rear wheels
21 Impact protection
22 Grass collection box
22a Level gauge
23 Starter cord guide
24 Starter handle with starter cord
25 Drive catch
26 Mulching kit
27 Lateral ejection canal

28 Plastic straps
Grass collection box bar
30 Collection bag holder

31 Filler plugs

32 Spark plug

33 Hose connection

34 Lock nut Bowden cable
35 Adjusting nut Bowden cable
Safety equipment

2 Safety catch
The equipment stops when the safety catch is released.
21 Impact protection
protect the operator from parts that are flung out and from accidentally touching the blades when mowing with no grass collection box.
15 Exhaust guard
prevents hands or combustible materials from coming into contact with a hot exhaust
16+27 Lateral ejection with impact protection
prevents the lateral ejection of lawn cuttings and solid parts and strings up the lawn cuttings from the side.
Technical data
Petrol Lawn
Performance....2.7 kW
Engine ...... Zongshen NP170 Easy Start
Engine size 171 cm ^4
Blade rotation speed n_0 ..... 2900 min ^-1
Blade torq ue .... max. 45 Nm
Wheel drive....aprox. 3 km/h
Petrol tank volume....0.75 l
Octane rating....95-98
Engine oil tank volume ....400 ml
Motoroil....10W-30
Spark plug .... Torch F5RTC
Cutting width....510 mm
Cutting height ......6-steps, 25-75 mm
Grass collection box volume....70 l
Weight 26.9 kg
Sound pressure level
(L_pA) .....83.23 dB (A), K_pA=3 dB
Sound power level ( L_WA )
measured .....93.50 dB (A); K_WA=1.66 dB
guaranteed....98 dB(A)
Vibration ( a_h ) at the handle
left 9.890 m/s ^2 ; K=1.5 m/s ^2
Noise and vibration values were determined according to the standards and stipulations mentioned in the declaration of conformity.
The stated vibration emission value was measured in accordance with a standard testing procedure and may be used to compare one power tool to another.
The stated vibration emission value may also be used for a preliminary exposure assessment.

Warning: The vibration emission value may differ during actual use of the power tool from the stated value depending on the manner in which the power tool is used.
Try to keep the exposure to vibrations as low as possible. Examples of measures to reduce vibration exposure are the wearing of gloves when using the tool and limiting the working hours. For this purpose all parts of the operating cycle have to be considered (for example, times when the electric tool is switched off and times when it is switched on but running without any load).
Symbols and icons
Symbols on the devic

ntion!
Read the instruction manual

Risk of injury from parts being flung out.
bystanders away from the equipment.

Risk of injury from sharp blades. feet and hands away.

Caution – toxic fumes!
Do not operate the equipment in enclosed areas.
Caution – petrol is flammable!
Do not smoke and keep away from heat sources

Before maintenance work, switch off the engine and take out the spark plug connector.

Caution – hot surfaces!
Risk of burning.
Caution – risk of injury!
Wear eye and ear protection
Switch off the engine when you leave the device.
Never mow if there are people, particularly children or animals near by.

Do not expose the unit to rain. lawnmower blade continues to run after switching off.
There is a risk of injury!

Danger!
Keep hands and feet away.

Information of the acoustic power level L_WA in dB.


Cutting width
Symbols on the level gauge of the grass collection box
Symbol on handlebar:
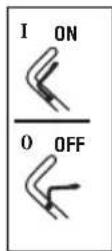
Switch device on (ON): Pull up safety bracket
Switch device off (OFF): Release safety bracket
Wheel drive on:
Pull up drive bracket
Wheel drive off:
Release drive bracket
Graphical symbol on the lateral ejection chute:

The side impact protection must be unlocked before it can be opened
Symbol on petrol pump:

Press petrol pump (primer) 3x before starting.
Tank cap symbols:

max. 10% ethanol
Symbol on the oil tank cap:
OIL Reference to the oil filler neck
Symbols on the motor:

Read the instruction manual

Warning against flammable sub- stances

Caution - Toxic vapours! Do not operate device in closed rooms
10W30

Caution! Check the oil level before starting. Use 10W30 motor oil

WARNING
HOT SURFACE
Caution - Hot surfaces!
Risk of burn injury

Reference to the air filter
Symbols in the manual

Warning symbols with information on damage and injury prevention.

Instruction symbols (the instruction is explained at the place of the exclamation mark) with information on preventing damage.

Help symbols with information on improving tool handling.

Highly flammable

Irritant

Hazardous to health

Environmentally hazardous

For your safety: Stand behind the device when starting it.
Safety instructions
This section deals with the basic safety procedures when working with the equipment.

WARNING! Read all of the safety instructions and directions. Failure to observe the safety instructions and directions may result in electric shock, fire and/or serious injury.
Instructions:
- Read the operating instructions carefully. Familiarise yourself with the controls and with the correct use of the equipment.
- In case of uncertainties, allow yourself to be given instruction concerning the use of the device and prohibited operations.
- Pay attention, be aware of what you are doing and take the utmost care when working. Do not use the device if you are tired or ill or you are under the influence of drugs, alcohol or other medication. A moment of inattention whilst using the device can result in serious injuries.
- This appliance is not intended for use by persons with reduced physical, sensory or mental capabilities, or lack of experience and knowledge, unless they have been given supervision or instruction concerning use of the appliance by a person responsible for their safety.
• Children should be supervised to ensure that they do not play with the appliance. - Do not allow children or other people who are unfamiliar with the operating
instructions to use the equipment.
Local regulations may set a minimum age for the user.
- Do not mow whilst people – especially children – or animals are nearby. If distracted, you may lose control of the equipment.
- The operator or user is responsible for accidents or damage to other persons or their property.
- Observe noise control and local regulations.
Preparatory measures:
- When mowing, always wear slip resistant shoes and long trousers. Do not mow barefoot or in light sandals. Loose clothing, jewellery or long hair can become caught in moving parts. Wearing suitable clothing reduces the risk of injury.
- Check the area on which the equipment is to be used and remove all objects (stones, sticks, wires, toy) that could be caught and flung out.
- Warning: Petrol is highly flammable. Fire or explosions can result in serious burns:
- Keep petrol only in containers intended for this purpose;
- Only refuel outdoors and do not smoke whilst refuelling;
- Fill with petrol before starting the engine. Do not open the filler cap or refill with petrol whilst the engine is running or the equipment is hot:
- If petrol is spilled, do not attempt to start the engine. Instead, remove the equipment from the surface on which the petrol has been spilled. Avoid any ignition attempt until the petrol fumes have evaporated;
-
For reasons of safety, replace petrol and other filler caps in the event of damage.
-
Replace defective silencers.
- Before use, always carry out a visual inspection to check whether the cutting tools, mounting bolts and entire cutting unit are worn or damaged. To avoid imbalance, only replace worn or damaged tools and bolts in sets.
• Take care with equipment that has several cutting tools, as the movement of one blade may result in rotation of other blades. - Use only replacement parts and accessories supplied and recommended by the manufacturer. The use of parts from other manufacturers may result in injuries and will result in immediate invalidation of the guarantee.
Handling:
- Do not run the combustion engine in enclosed spaces, in which dangerous carbon monoxide can collect.
- Mow only in daylight or with good artificial lighting. An unlit working area can result in accidents.
- If possible, avoid using the equipment on wet grass.
• Always ensure secure positioning, particularly on hillsides, landfills, ditches or dykes. This will give you better control of the equipment in unexpected situations. - Always work across the slope, never upwards or downwards.
- Take particular care when changing the direction of travel on the slope.
- Do not mow on excessively steep slopes (max. 10°).
- Run the equipment only at walking speed.
• Take particular care when turning the equipment around or pulling it towards you. - Stop the cutting tool if the equipment has to be tipped up for transportation
GB
over a surface other than grass and when moving the equipment from and to the surface to be mown.
- Do not use the equipment with damaged safety equipment or guards or with no safety equipment attached, e.g. impact protection and/or grass catchers. This ensures that the equipment remains safe.
- Do not change the engine regulator setting and do not over-rev it. This may damage the equipment.
- Before starting, the engine, disengage all cutting tools and drives.
- Start or operate the start switch with care and in accordance with the manufacturer's instructions. Ensure sufficient space between feet and the cutting tool. Risk of injury.
- When starting or activating the engine, do not tip the equipment unless the equipment has to be lifted for this procedure. In this case, tip the equipment only as far as is absolutely necessary and lift only the side that is away from the user.
- Do not start the engine when standing in front of the ejection channel.
- Switch on the engine in accordance with the instructions and only if your feet are a safe distance away from the cutting tools.
- Do not place hands or feet under rotating parts. Always keep away from the ejection opening. A moment of carelessness when using the equipment may result in serious injury.
- Do not leave or carry the equipment when the engine is running.
- Switch off the engine, take out the spark plug connector and ensure that all moving parts are still:
- Before releasing blockages or removing obstructions in the ejection channel;
- Before checking, cleaning or working on the equipment;
- If a foreign body is struck. Look for damage to the equipment and carry out the necessary repairs before re-starting and working with the equipment;
- If the equipment starts to vibrate unusually strongly, an immediate check is required.
- Switch off the engine
- When leaving the equipment; - Before refuelling;
- Close the throttle valve when stopping the engine.
- Do not leave the equipment unattended in the workplace.
- Do not work with equipment that is damaged or incomplete or has been converted without the approval of the manufacturer.
Using machines for applications other than those intended may result in dangerous situations.
- Do not work with the device if there is a risk of lightning strike. Danger of electric shock.
Maintenance and storage:
- Ensure that all nuts, bolts and screws are tightened firmly and the equipment is in safe working condition. Many accidents are caused by poorly maintained equipment.
- Do not keep the equipment with petrol in the tank inside a building in which petrol fumes could potentially come into contact with open fire or sparks.
- Allow the engine to cool before placing the equipment in enclosed spaces. Risk of fire.
• To avoid the risk of fire, keep the engine, exhaust and area around the
fuel tank free of grass, leaves or leaking grease (oil).
- Check the grass catcher regularly for wear or loss of function.
- For reasons of safety, replace worn or damaged parts. Replace defective silencers.
- If the fuel tank is to be drained, do this outdoors.
- Handle your equipment with care. Keep the tools sharp and clean to enable you to work better and more safely. Follow the maintenance directions.
- Do not attempt to repair the equipment yourself unless you are trained to do so. Any work not specified in these instructions is to be carried out only by customer service centres authorised by us.
- Keep the equipment in a dry place and out of reach of children. Machines are dangerous if used by inexperienced people.
Initial operation

Caution! Risk of injury from rotating blades. Carry out work on the equipment only when the blade is switched off and stationary.
Before starting the equipment, you must
- Remove the Protective Caps
- Mounting the lower bar
- Install the handle bar
- Mounting the tool tray
- Install the grass collection box
- Install the starter cord
- Fill with engine oil
- Fill with petrol
- adjust cutting height if required
Mounting the lower bar

-
Fold the lower bar (4) outwards, together with the handlebar (1).
-
Fasten the lower bar (4) to the lawnmower with the star grip screws (7) and carriage bolts (7a). You can determine the desired tilt for the bar by selecting one of the two possible screw positions.
Mounting the handlebar

Make sure that the Bowden cables (5) are not squeezed when the grip is installed.

-
Place the handlebar (1) onto the lower bar (4).
-
Push the thread of the quick-re-lease lever (3) through the drill holes from the outside.
- Screw a nut (3a) onto the thread of each of the quick-release levers (3).
- Lock the quick release levers (3) by pressing them towards the handlebar (1). The quick release levers (3) must rest against the bar in such a way that tigh-tening can be carried out with medium force. Otherwise, the quick release levers must be turned clockwise for tensioning them or anti-clockwise to loosen them.
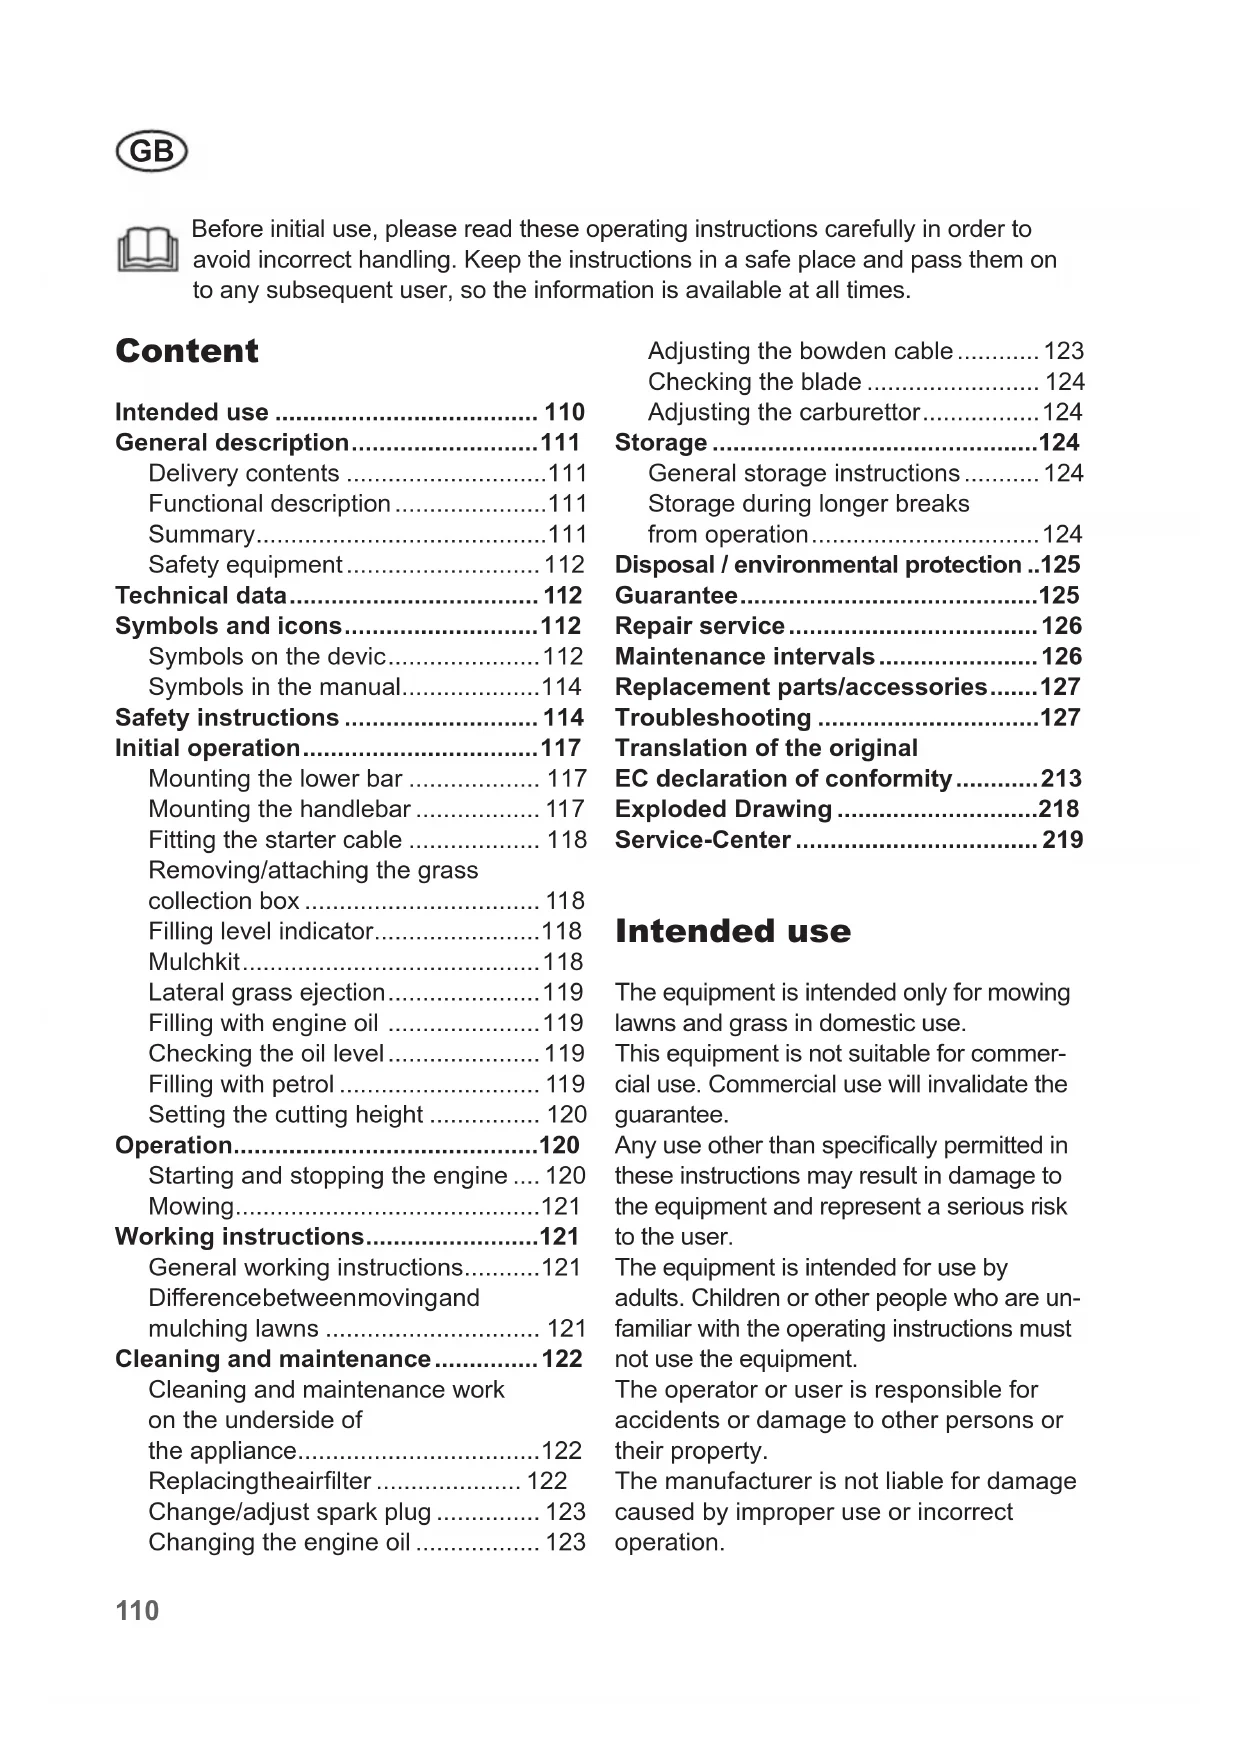
- Fasten the Bowden cable (5) using a cable clamp (6) to the lower bar (4) (see ).
Fitting the starter cable

-
Pull the safety bracket (2) towards the handlebar (1) and hold it in this position.
-
Slowly pull the starter cable by the starter handle (24) towards the bar.
- Guide the starter cable into the starter cable guide (23).
- Release the safety bracket (2).
Removing/attaching the grass collection box

Caution: Do not operate the equipment with the grass collection box (22) or impact protection (21) installed incompletely. Risk of injury
Assemble grass collection box

- Put the plastic straps (28) over the grass collection box rod (29).
Fixing the Grass Collection Box onto the Equipment:

Prior to using the grass collection box (22), the mulch kit (26) and lateral ejection chute (27) must be removed.(see H). I

-
Lift the rear impact protection (21).
-
Hold the grass collection box (22) by the carrying handle.
- Hang the grass collection box (22) into the grass collection box attachment (30) on the rear of the device.
- Remove the impact protection (21); it keeps the grass collection box in place.
Removing/emptying the grass collection box:
- Switch off the engine and wait for the blade to come to a stop.
- Lift the impact protection (21).
- Remove the grass collection box (22) by the carrying handle.
- Empty the grass collection box (See chapter "Disposal/environmental protection").
- Mount the grass collection box again.
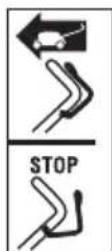
Filling level indicator
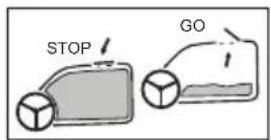
There is a filling level indicator (22) on the grass collection box (22a). The filling level indicator only works while the machine is in operation.
GO Flap open: grass catcher empty STOP Flap closed: grass catcher full The grass collection box must be emptied.
Mulchkit

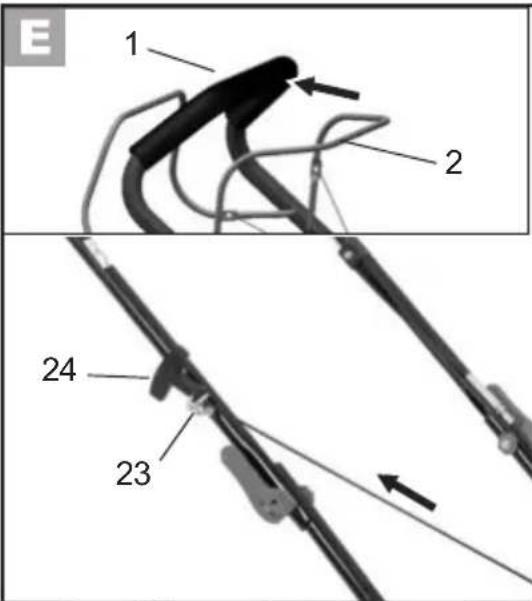
Prior to using the mulch kit (26), the lateral ejection canal (27) has to be removed (see “Lateral grass ejection”).

Attaching mulch kit
-
Remove the gras collection box (22), if used.
-
Lift the impact protection (21).
- Insert the mulch kit (26) into the holder and push in the bracket (26a) of the mulch kit (26).
You will hear the bracket (26a) click into place.
Remove mulch kit
- Lift the impact protection (21).
- Push in the bracket (26a)
- Remove the mulch kit (26).
Lateral grass ejection

Before using the lateral grass ejection, the mulch kit (26) has to be inserted and the grass collection box (22) has to be removed.
Install lateral ejection canal

-
Pull the locking element (16a) on the impact protection (16) to the left.
-
Lift the impact protection (16) on the lateral ejection.
- Hook in the lateral ejection chute (27).
- Place the impact protection (16) on the lateral ejection. The impact protection holds the lateral ejection chute (27) in position.
Filling with engine oil


Warning! Engine oil is harmful to health and the environment.

Check the oil level every time before mowing and add oil before the lower marking point is reached.

Place the device on a stable, level floor.

-
Screw off the oil tank cap with dipstick (17).
-
Fill the engine oil in the oil tank. The engine oil tank holds 0.4 l of oil. Use brand-name oil.
- Close the oil tank cap (17) again.
Checking the oil level

-
Screw off the oil tank cap with dipstick( 17).
-
Wipe the dipstick using a clean cloth.
- Return the oil tank cap with dipstick (17) back in the oil tank as far as it will go.
- After removing the dipstick (17), read the oil level.
The oil level must be in the marked field between the minimum and maximum mark (maximum: 0.4 l engine oil in the oil tank).

- Close the oil tank cap (17) again.
- Wipe away any spilt engine oil.
Filling with petrol


Warning! Petrol is flammable, an irritant and harmful to health and the environment.

Warning! Petrol is flammable and hazardous to health:
- Keep petrol in containers intended for this purpose;
- Only refuel outdoors and never with the engine running or when the machine is hot;
GB
- Open the filler cap carefully to allow excess pressure to escape;
- Do not smoke whilst refuelling;
- Avoid skin contact and inhalation of the fumes;
- Remove spilt petrol;
- Keep petrol away from sparks, open flames and other ignition sources;

- Do not use petrol/oil mixtures;
e normal or super unleaded petrol; If using organic fuel, do not mix more than 10% ethanol.
- Only use clean, fresh petrol;
- Do not store petrol for longer than one month, as its quality deteriorates

Do not fill the tank fully, so that the petrol has space to expand

-
Unscrew the filler cap (8).
-
Pour in the petrol to the lower edge of the filler (31).
-
Close the filler
-
Wipe away petrol residues around the filler cap.
Setting the cutting height
The equipment has 6 positions for setting the cutting heigh (25-75 mm):

-
Pull the lever (19) outwards and push it to the desired position.
-
Push the lever back in.
The correct cutting height is around 25 – 45 mm for an ornamental lawn and around 40 – 65 mm for a utility lawn.

Select a greater cutting height for the first cut of the season.
Operation

Some level of noise emission with this equipment is unavoidable. Postpone noisy work until designated periods when it is permitted. Take rest periods when needed and limit working time to the minimum necessary. For your personal protection and the protection of people working nearby a suitable form of hearing protection must be worn.

Warning! Petrol is flammable. Start the engine at least 3 m away from the filling location.

Start the equipment on a sturdy, level base, if possible not in long grass. Ensure that the cutting tool is touching neither objects nor the ground.

For your safety: Stand behind the device when starting it.

Regularly check petrol and oil level (see „Initial Operation“) and refill in due time.
Starting and stopping the engine

Cold start:
- Press the fuel pump (10) (Primer) 3 times.


-
Pull the safety catch (2) towards the handle bar (1) and hold it.
-
Pull the starter cord (24).
-
When the engine starts, allow the starter handle to slowly slide back into the starter cable guide (23).

For a warm start it is not necessary to press the primer (10).

If the primer is pressed too often, too much petrol will enter the carburettor and the motor is difficult to start.
Stopping the engine:
- Release the safety loop (2). The motor switches off and the knife is braked.

Regularly examine the knife stopping device:
Release the safety loop (2). The motor switches off and the knife is braked. The knife must stop within 7 seconds.
Mowing

- Start the engine (see „Starting and Stopping the Engine“).

- Wheel drive:
On: Pull the drive catch (25) towards the handle bar (1). The mower moves forwards.
Off: Release the drive catch (25). The equipment stops.
Working instructions
General working instructions
- As far as possible, mow the lawn when it is dry in order to protect the turf.
-
Set the cutting height such that the equipment is not overloaded.
-
Run the equipment at walking speed in lines that are as straight as possible. For uninterrupted mowing, the lines should always overlap by a few centimetres.
- Do not move backwards.
- On slopes, always work across the slope.
- If the blade comes into contact with a foreign body, switch off the engine immediately. Wait until the blade is stationary and check the equipment for damage. Restart work only if the equipment is undamaged.
- Switch off the equipment during longer breaks and for transportation and wait until the blade is stationary.
- Clean the equipment after each use, as described in the “cleaning and maintenance” chapter.
Difference between moving and mulching lawns
When using the mulch kit (26), the grass clippings are not captured in a collection box but are instead shredded and spread across the lawn. The nutrients contained in the clippings are thus left to be broken down by soil organisms and form a nutrient cycle. Mulched lawns therefore need to be fertilised much less frequently.
As a basic rule, the lawn has to be mowed relatively often so that only small amounts of mulch remain on the lawn.
It is therefore best to mulch the lawn at least once a week and to adjust the mower so that only about 40% of the total height of the lawn is left as mulch. If the mulch remains visible on the lawn (for example when cutting the lawn for the first time of the year or during strong growth), the grass collection box (22) should be used.
Cleaning and maintenance

Have any repair and maintenance work not described in these instructions carried out by a specialist workshop. Use only original replacement parts. Risk of accidents!
Carry out maintenance and cleaning work strictly with the engine switched off and spark plug connectors removed. Risk of injury!
Allow the equipment to cool before any maintenance and cleaning work. Elements of the engine are hot. Risk of burning!

Wear gloves when handling the blade.
Cleaning and maintenance work on the underside of the appliance:

Place an underlay under the petrol lawnmower.

Do not tilt the equipment sideways or forwards. Operating fluids could leak out and the engine could be damaged.

Make sure that a second person holds the device because there is a danger of tipping backwards.

-
Disconnect the spark plug connector (14).
-
Remove the grass collection box (22).
-
Unhook the starter handle and rope (24).
-
Release the quick-release levers (3) and fold up the handlebar (1).
When folding up, make sure that the Bowden cables (5) do not get caught and jammed.
- Tilt the device back.
• Always keep the equipment clean. To clean, use a toothbrush or cloth but no corrosive cleaning agents or solvents. Do not use water to clean the engine as it could contaminate the fuel system.
- To clean the blade housing, it is possible to connection a hose to the upper side of the housing (see 33).
- After mowing, remove plant remains that are stuck to the equipment by using a piece of wood or plastic. Clean the vent holes, ejection hole and blade area especially. Do not use hard or pointed objects, which could damage the equipment.
- Oil the wheels from time to time.
- Before each use, check the lawn-mower for obvious defects such as loose, worn or damaged parts. Check that all nuts bolts and screws are sitting firmly.
- Check covers and guards (2, 9, 15, 16, 21, 27) for damage and that they are sitting correctly. Replace if necessary.

Replacing the air filter

Do not operate the equipment without the air filter otherwise dust and dirt will get into the engine and result in damage to the machine
Removing the air filter
-
Disconnect the spark plug connector (14) (see "Spark plug maintenance").
-
Open the air filter box (11).
- Remove the air filter (12).
- Clean the air filter (12) in a soap solution.
- Allow the air filter (12) to dry. Put a few drops of fresh engine oil into the air filter.
- Replace the faulty air filter (12) with a new air filter (12) see „Spare parts/Accessories“).
Inserting the air filter
- Insert the air filter (12) into the air filter box (11).
- Close the air filter box (11) back up.
Change/adjust spark plug

A worn spark plug or a spark gap that is too large will result in a reduction of engine performance.

-
Disconnect the spark plug connector (14) from the spark plug (32) by simultaneously pulling and turning.
-
Unscrew spark plug (32) co-ter clockwise with a spark plug socket.
-
Check the spark gap using a feeler gauge (available from specialist shops). The spark gap must be at least 0.6 - 0.8 mm.
-
If necessary, adjust the gap by carefully bending the ground electrode on the spark plug.
-
Clean the spark plug with a wire brush.
-
Insert the cleaned and adjusted spark plug (32) or replace a damaged spark plug with a new one.
-
Tighten the spark plug (32) by turning in a clockwise direction with a spark plug wrench.(rec-
ommended torque 20 Nm, determined with a torque wrench).
Changing the engine oil


Warning! Engine oil is harmful to health and the environment.

Change the engine oil when the engine is warm.
To change the oil, you will need:
- Oil change kit
- Empty container for the waste oil.

- Change the engine oil for the first time after around 5 operating hours then every 50 operating hours or annually.
- Dispose of the used oil in an eco-friendly manner (see “disposal / environmental protection”).
-1. Disconnect the spark plug connector (14).
2. Open the oil tank cap (17).
3. Pump out the engine oil with an oil pump (not included in delivery).
4. Top up the engine oil (see "Filling the engine oil").
Adjusting the bowden cable
If the Bowden cable becomes misplaced for the drive and has too much play, it can be adjusted.

-
Loosen the small lock nut (34).
-
- Turn the adjusting nut (35) anticlockwise:
The Bowden cable shortens.
- Turn the adjusting nut (35) clockwise:
The Bowden cable lengthens.
- Tighten the locking nut (34) by hand.
Checking the blade

Always have a blade that is damaged or unbalanced replaced by a specialist workshop.
Improper installation can cause severe injury.

Never tilt the lawnmower to the side or forwards when the petrol or oil tank is filled! This could damage the engine, voiding the warranty.

Always have a specialist workshop sharpen a dull blade, as they can perform imbalance testing.

Wear gloves when handling the blade.
- Remove the spark plug connector (14) and check the blade for wear and damage.
Adjusting the carburettor
The carburettor has been preset in the factory for optimum performance. If re-adjustments are required (see “Troubleshooting”) have the adjustments made by a specialist workshop.
Storage
General storage instructions

Do not store the equipment with a full collection box. In hot weather, the grass begins to ferment when heat is generated.
Risk of fire.
- Clean and service the equipment before storage.
- Allow the engine to cool before storing the equipment in enclosed areas.
- Use suitable and authorised containers for storing fuel.
- Keep the equipment in a dry place that is protected from dust and out of reach of children.
- For space-saving storage, the handle bar can be folded down (see 1-4 „Cleaning and General Maintenance Work - Cleaning and maintenance work on the underside of the appliance", u)
- Do not enclose the device in nylon sacks as this may cause moisture or mould to form.
Storage during longer breaks from operation

Non-observance of the storage instructions may cause starting problems or permanent damage as a result of fuel residues in the carburettor.

There is no need to drain the petrol tank if a fuel stabiliser is added to the petrol.
- To empty the petrol tank, start the motor in a well-ventilated area and let it run until it runs out of petrol.
- Change the oil (see “changing the engine oil”).
-
Preserve the engine:
-
Unscrew the spark plug (32) (see "cleaning and maintenance" - Change/adjust spark plug;
- Pour a tablespoon of engine oil through the spark plug hole into the engine compartment;
- Pull the starter cord (24) slowly several times with the safety catch (2) pulled in order to distribute the oil inside the engine;
- Screw the spark plug (32) tight.
- Dispose of used oil and petrol residues in an ecofriendly manner (see "disposal / environmental protection").
Disposal / environmental protection
- Return the tool, accessories and packaging to a recycling centre when you have finished with them.
- Carefully drain the petrol and oil tanks and take your equipment to a recycling centre. The plastic and metal parts that are used can be separated by type and thus recycled.
- Take used oil and petrol residues to a disposal point and do not pour them into the sewer system or down the drain.
- Please contact your Service-Center.
- Defective units returned to us will be disposed of for free.
- Do not throw cut grass in the dustbin but rather compost it or spread it under bushes and trees as a mulch layer.
Guarantee
-
The guarantee period for this equipment is 2 years from the date of purchase and it is applicable only for the initial buyer. This equipment is not suitable for commercial use. Commercial use will invalidate the guarantee.
• The guarantee does not include: -
Damage caused by natural wear, overloading or improper use.
- Equipment employed for commercial use.
- Damages arising as the result of non-compliance with the operating instructions or if the cleaning intervals have not been observed.
- Equipment on which technical interventions have been undertaken.
- Other damages excluded from the warranty are motor damages caused by using the wrong fuel or a wrongly mixed fuel as well as all damage to the machine caused by insufficient lubrication.
- The following parts are subject to normal wear and therefore not covered by the guarantee: cutter, spark plugs, air filter, fuel filter, starter cord.
- Please do not send equipment to our service points without prior agreement by telephone, as you could otherwise incur costs for non-acceptance.
- Attention: Please do not hand in defective appliances with fuel or oil still in the tanks. Always empty the tanks beforehand. Material damage (oil/fuel escaping when the appliance is put on the side or held upside down!) or fire damage during transport will be at the sender's expense.
- The repair or replacement of the equipment will neither result in extension of the guarantee period nor the commencement of a new guarantee pe-
GB
riod for the equipment or any replacement parts installed as a result of this work. This also applies if on-site service is used.
- Defective units returned to us will be disposed of for free.
Repair service
- In case of a justified warranty claim, we ask you to call our service centre. You will receive more information on complaint processing here. Please do not send any devices to our service workshops before coordinating this on the telephone, as otherwise you may be charged costs for refusal.
- Caution: Never ship a defective device with a filled fuel or oil tank. It is essential that you empty the fuel tank. Any
property damage (oil/petrol might leak, if device is placed on the side or upside down!) or fire damage during transport shall be borne by the consignor.
- Device repairs or exchange do not extend the warranty time or begin a new warranty period for the device or any installed spare parts. This also applies for on-site services.
- Disposal of your sent in defective devices is carried out free of charge.
Maintenance intervals
Regularly carry out the maintenance work listed in the “maintenance intervals” table. Regular maintenance prolongs the life of the equipment. It also gives optimum cutting performance and avoids accidents.
Table maintenance intervals
| Maintenance Work(See “cleaning and maintenance“) | Before | After | After 1^st 5 Hrs. | After8 Hrs. | After50 Hrs. | Annual |
| Work | ||||||
| Check and tighten screws,nuts and bolts | √ | |||||
| Check the engine oil level /petrol level and refill with engine oil / petrol if required | √ | √ | ||||
| Clean operating elements /the area around the silencer | √ | √ | ||||
| Clean the finger protection | √ | |||||
| Change the engine oil | √√ | √ | ||||
| Replace the air filter^a | √ | |||||
| Clean/adjust the spark plugReplace the spark plug | √ | √ | ||||
| Check the silencer and spark catcher | √ | √ | ||||
| Clean the air cooling system^a | √ | |||||
^a Clean more often if there is a high level of dust or heavy dirt
Replacement parts/accessories
Spare parts and accessories can be obtained at www.grizzlytools.shop
If you have any other questions, contact the "Service-Center" (see „Service-Center“).
Troubleshooting
| Problem Possible Cause Fault Correction | ||
| Engine does not start | Too little petrol in the tank Fill with petrol | |
| Incorrect starting sequence | Follow the instructions for starting the engine (see "operation") | |
| Spark plug connector (14) not put on correctly Sooted spark plug (32) | Attach the spark plug connector Clean, adjust or replace the spark plug (see "cleaning and maintenance") | |
| Incorrectly adjusted carburettor mix | Have the carburettor adjusted by a specialist workshop | |
| Engine starts but equipment does not run at full power | Dirty air filter (14) | Replace the air filter (see "cleaning and maintenance") |
| Incorrectly adjusted carburettor mix | Have the carburettor adjusted by a specialist workshop | |
| Engine splutters, stops | Incorrectly adjusted carburettor mix | Have the carburettor adjusted by a specialist workshop |
| Sooted spark plug (32) | Clean, adjust or replace the spark plugs (see "cleaning and maintenance") | |
| Engine overheats | Ventilation holes blocked Clean the ventilation slot | |
| Incorrect spark plug (32) | Change the spark plug | |
| Too little engine oil in the engine | Fill with engine oil (see "initial operation") | |
| Drive does not switch on | Bowden cables (5) misadjusted | Adjust the Bowden cables or have them adjusted by a specialist work-shop |
| Output unsatisfactory or engine labouring | Grass too short or too long | Change the cutting height (see "setting the cutting height") |
| Blade blunt | Have the blade sharpened or replaced by a specialist workshop | |
| Blade blocked with grass, grass collection box full, ejection channel blocked | Remove the grass (see "cleaning and maintenance") | |
| Blade does not turn | Blade blocked with grass Remove the grass | |
| Blade not installed correctly | Have the blade installed by a special-ist workshop | |
| Abnormal noises, rattling or vibra-tions | Blade not installed correctly | Have the blade installed by a special-ist workshop |
| Blade damaged | ||

text_image
Four black-and-white warning symbols: flame, exclamation mark, heart-shaped hazard, and tree symbol.(L_pA) 83,23dB(A),K _pA =3 dB
text_image
Four black diamond-shaped warning symbols with flame, exclamation, heart, and plant icons| GB | Translation of the original EC declaration of conformity | |
| We confirm, that the Petrol Lawn Mower series BRM 5117-2 A 4in1 Set Batch number: B-52003 conforms with the following applicable relevant version of the EU guidelines: | ||
| 2006/42/EC • 2014/30/EU • 2000/14/EC • 2005/88/EC • 2011/65/EU* | ||
| In order to guarantee consistency, the following harmonised standards as well as national standards and stipulations have been applied: | ||
| EN ISO 5395-2:2013+A1:2016+A2:2017 EN ISO 5395-1:2013+A1:2018 • EN ISO 14982:2009 | ||
| We additionally confirm the following in accordance with the 2000/14/EC emissions guideline: Sound power level guaranteed: 98 dB(A) measured: 93.50 dB(A) Compliance evaluation process carried out in accordance with Appendix VI / 2000/14/EC + 2005/88/EC Registered Office: TÜV Rheinland LGA Products GmbH, No. 0197 | ||
| This declaration of conformity is issued under the sole responsibility of the manufacturer: | ||
 | Grizzly Tools GmbH & Co. KG Stockstädter Straße 20 63762 Großostheim Germany 02.02.2022 |  Christian Frank Documentation Representative Christian Frank Documentation Representative |
* The object of the declaration described above satisfies the provisions of Directive 2011/65/EU of the European Parliament and the Council of 8 June 2011 on limiting the use of certain harmful substances in electrical and electronic appliances.
| Překlad originálního prohlášení o shodě CE | |
| Potvrzujeme tímto, že konstrukceBenzinová sekačka na trávukonstrukční řady BRM 5117-2 A 4in1 SetČíslo šarže: B-52003odpovídá následujícím příslušným směrnicím EU v jejich toho času platném vydání | |
| 2006/42/EC • 2014/30/EU • 2000/14/EC • 2005/88/EC • 2011/65/EU* | |
| Aby byl zaručen shodnost, bylo použito následujících harmonizovaných- norem jakož i národních norem a předpisů: | |
| EN ISO 5395-2:2013+A1:2016+A2:2017EN ISO 5395-1:2013+A1:2018 • EN ISO 14982:2009 | |
| Navíc se na základě směrnice pro emise hluků 2000/14/EC potvrzuje:Úroveň akustického výkonuzaručená: 98 dB(A)měřená: 93,50 dB(A)Použitý způsob postupu pro ohodnocení konformity dle dodatku VI/ 2000/14/ECMísto hlášení: TÜV Rheinland LGA Products GmbH, No. 0197 | |
| Výhradní odpovědnost za vystavení tohoto prohlášení o shodě nese výrobce: | |
Grizzly Tools GmbH & Co. KG Stockstädter Straße 2063762 GroßostheimGermany02.02.2022 Stockstädter Straße 2063762 GroßostheimGermany02.02.2022 |  Christian FrankOsoba zplnomocněná k sestavení dokumentace Christian FrankOsoba zplnomocněná k sestavení dokumentace |
| LT Vertimas iš originaliųEB atitikties deklaracija | |
| Šiuo dokumentu mes patvirtiname, kadBenzininė vejapjovėserijos BRM 5117-2 A 4in1 SetPartijos numeris: B-52003atitinka toliau nurodytų numatytųjų ES direktyvų galiojantį leidimą: | |
| 2006/42/EC • 2014/30/EU • 2000/14/EC • 2005/88/EC • 2011/65/EU* | |
| Kad būtų galima užtikrinti atitiktį, taikyti šie darnieji standartai ir nacionaliniai standartai bei nuostatos: | |
| EN ISO 5395-2:2013+A1:2016+A2:2017EN ISO 5395-1:2013+A1:2018 • EN ISO 14982:2009 | |
| Remiantis 2000/14/EB dėl valstybių narių įstatymų, reglamentuojančių lauko sąlygomis naudojamos įrangos į aplinką skleidžiamą triukšmą, suderinimo, papildomai patvirtinama: Garso galingumo lygisNumatyta: 98 dB(A)Išmatuota: 93,50 dB(A)Taikyta atitikties vertinimo procedūra pagal 2000/14/EB VI priedą + 2005/88/EB,Paskelbtoji įtaisas: TÜV Rheinland LGA Products GmbH, No. 0197 | |
| Tiktai gamintojas yra atsakingas už šio atitikties pareiškimo parengimą: | |
| CE Grizzly Tools GmbH & Co. KGStockstädter Straße 2063762 GroßostheimGermany02.02.2022 | Christian FrankAsmuo, įgaliotas sudaryti dokumentaciją |
Unit 3, Beldray Park
Beldray Road, Mount Pleasant
Bilston, West Midlands WV14 7NH
Tel.: 0845 683 2672
e-mail: care@novoserv.co.uk