ERM 1500-33 LF - Lawn mower Grizzly - Free user manual and instructions
Find the device manual for free ERM 1500-33 LF Grizzly in PDF.

User questions about ERM 1500-33 LF Grizzly
0 question about this device. Answer the ones you know or ask your own.
Ask a new question about this device
Download the instructions for your Lawn mower in PDF format for free! Find your manual ERM 1500-33 LF - Grizzly and take your electronic device back in hand. On this page are published all the documents necessary for the use of your device. ERM 1500-33 LF by Grizzly.
USER MANUAL ERM 1500-33 LF Grizzly
natural_image
Red and black lawn mower with black handle and red clasp (no text or symbols visible)ERM 1500-33 LF

Originalbetriebsanleitung Traduction de la notice d'utilisation originale Vertaling van de originele gebruiksaanwijzing Traduzione delle istruzioni per l'uso in originale Translation of the original instructions for use Tłumaczenie oryginalnej instrukcji obsługi Překlad originálního návodu k obsluze Vertimas iš originalių eksploatavimo instrukcijoje Preklad originálneho návodu na obsluhu Traducción del manual de instrucciones original


text_image
D 6 5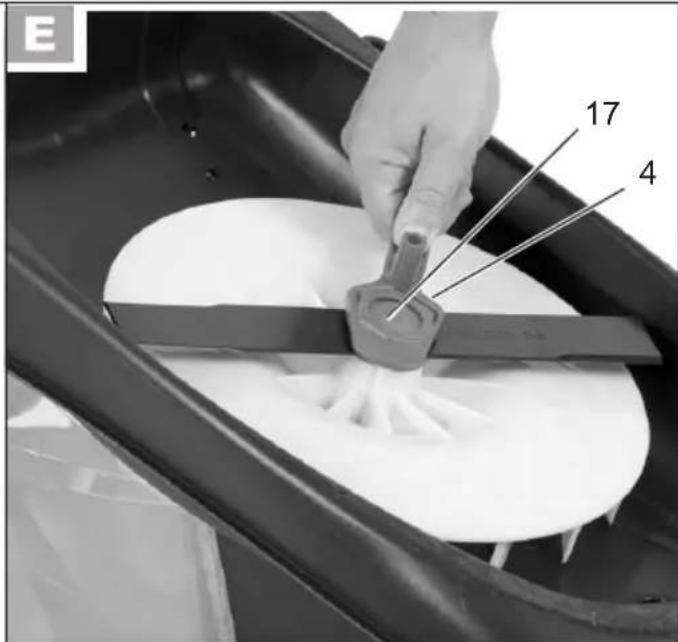
text_image
E 17 4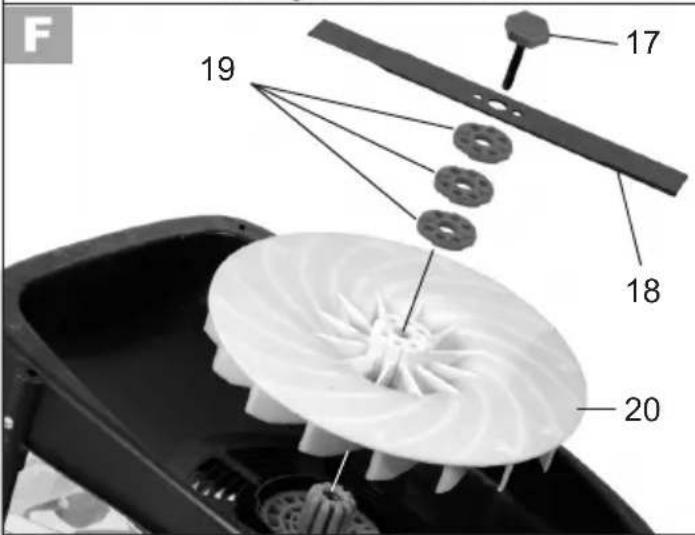
text_image
F 19 17 18 20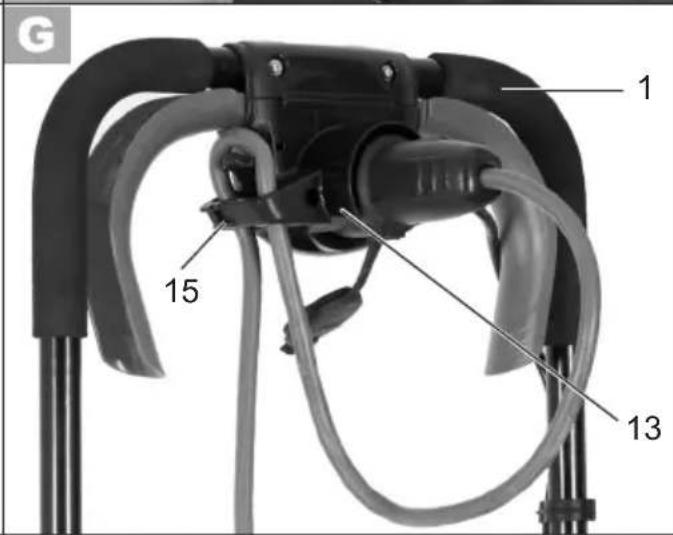
text_image
G 1 15 13
natural_image
Close-up of a black and white vacuum cleaner with a curved arm, no visible text or symbols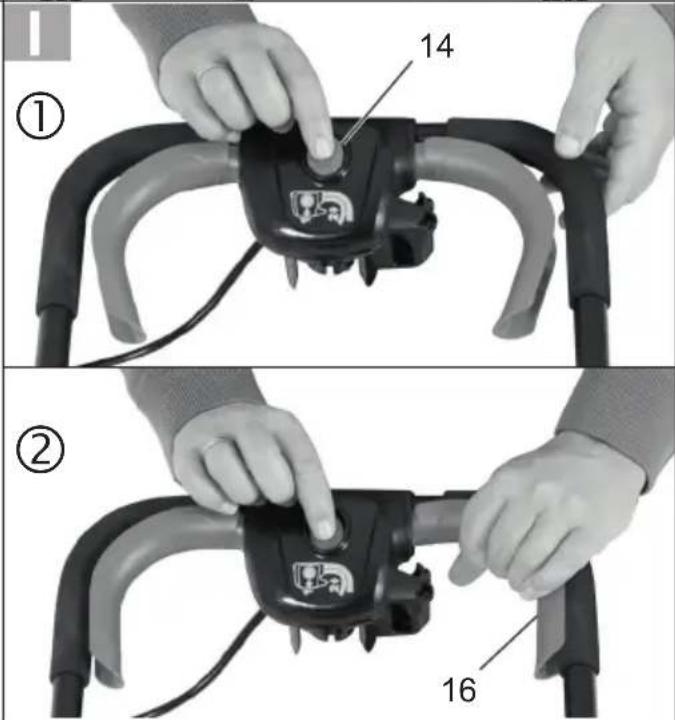
text_image
① 14 ② 16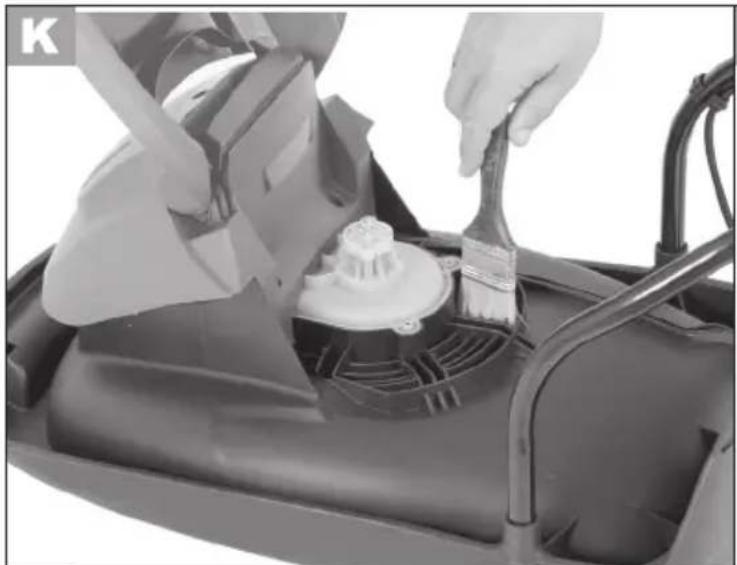
natural_image
Person cleaning a lawn mower with a brush and tool (no visible text or symbols)
natural_image
Exterior view of a snowmobile car seat with transparent cover and black frame (no text or symbols visible)
natural_image
LampDH cleaning machine with directional arrows in background (no text or symbols on the machine itself)
DE Originalbetriebsanleitung....6
FR Traduction de la notice d'utilisation originale.... 19
NL Vertaling van de originele gebruiksaanwijzing....32
IT Traduzione delle istruzioni per l'uso in originale 45
GB Translation of the original instructions for use .... 58
PL Tłumaczenie oryginalnej instrukcji obsługi 70
CZ Překlad originálního návodu k obsluze....84
LT Vertimas iš originalių eksploatavimo instrukcijoje 96
SK Preklad originálneho návodu na obsluhu....108
ES Traducción del manual de instrucciones original.... 120

Nettoyage/Maintenance/Stockage .... 28
Before initial use, please read the operating instructions carefully, in order to avoid incorrect handling. Keep the instructions in a safe place and pass them on to any subsequent user so the information is available at all times.
Contents
Scope of Delivery 58
Intended Use....58
General Description 59
Function Description 59
Summary....59
Technical Specifications....59
Safety Information....60
Pictorial Diagrams on the Equipment....60
Symbols used in the instructions...... 60
General Safety Information 61
Assembly.... 64
Mounting grip rod 64
Assembling the Curved Handle...... 64
Operation....65
Inserting / removing grassbox......65
Adjusting the Cut Height 65
Switching On and Off 65
Working with the Lawnmower 66
Cleaning, Maintenance and
Storage 66
General Cleaning and Maintenance Work....66
Changing the Blade.... 67
Storage.... 67
Disposal / Environmental Protection ... 67
Replacement parts/Accessories ..... 67
Guarantee....68
Repair Service.... 68
Trouble Shooting....69
Translation of the original EC
declaration of conformity 133
Service-Center 139
This appliance can be used by persons with reduced physical, sensory or mental capabilities or lack of experience and knowledge if they have been given supervision or instruction concerning use of the appliance in a safe way and understand the hazards involved. Children shall not play with the appliance. Cleaning and user maintenance shall not be made by children without supervision.
Scope of Delivery
Carefully remove the equipment from the packaging and check whether the following parts are complete:
- Lawnmower and curved handle with connection cable
- Bottom bar
- Grass box
- Mounting material bow-type handle
- 2 cable holders
- 3 Spacers für Cutting height adjustment
- Spanner for blade bolt
- Instruction Manual
Intended Use
The equipment is designed only for mowing domestic lawns and grass areas.
The equipment is intended for use in the field of DIY. It is not designed for commercial use.
Any other use that is not expressly per- mitted in these instructions may result in damage to the equipment and represent a serious risk to the user.
The equipment is intended for use by adults. It is not to be used by children
or people who are unfamiliar with these instructions. The use of the equipment is prohibited in the rain or a damp environment.
The manufacturer will not be liable for damages caused by use other than for the intended purpose or by incorrect operation.
General Description
Function Description
The hover mulching mower .has a cutting tool, which turns parallel to the cutting level. It is equipped with a high performance electric motor, robust plastic housing, safety switch, collision guard, and grass box. The machine is 4-step height adjustable and has smooth-running rollers. For the function of the operating parts, please refer to the descriptions below.

The illustration how to handle the appliance can be found on the pages 2-4.
Summary

1 Curved handle
2 Tightening lever
3 Lower bar
4 Spanner for blade bolt
5 Collision guard
6 Grass box
7 Cutting height adjustment (not visible)
8 Air cushion deck
9 Rollers
10 Lawnmower housing
11 Connection cable
12 2 Cable holder
13 Appliance socket
14 Release button
15 Cable strain relief
16 Start lever

17 Blade bolt
18 Blade
19 Spacers
20 Fan
Technical Specifications
Air Cushion
Mulching Mower .....ERM 1500-33 LF
Motor input power....1500 W
Mains voltage ...... 220-240 V\~, 50 Hz
Idling speed 4200 min ^-1
Blade width 330 mm
Cut height 4-tiered, 10-33 mm
Protection class □ II
Protection type.....IPX4
Weight 7,5 kg
Thermal insulation class 155
Lawn box volume....20 l
Sound pressure specification
(L_pA) 72 dB(A); K_pA = 3 dB
Noise level specification ( L_WA )
measured .....91,6 dB(A); K_WA=2,07 dB
guaranteed....94 dB(A)
Vibration
on the handle (a_h) .. 1,8m / s^2 ; K = 1,5m / s^2
The noise and vibration values have been determined in accordance with the standards and regulations specified in the declaration of conformity.
The stated vibration emission value was measured in accordance with a standard testing procedure and may be used to compare one power tool to another.
The stated vibration emission value may also be used for a preliminary exposure assessment.
GB

Warning: The vibration emission value may differ during actual use of the power tool from the stated value depending on the manner in which the power tool is used.
Safety precautions aimed at pro- tecting the user should be based on estimated exposure under actual usage conditions (all parts of the operating cycle are to be considered, including, for example, times during which the power tool is turned off and times when the tool is turned on but is running idle).
Safety Information
This section covers the basic safety regulations when working with the electric lawnmower.
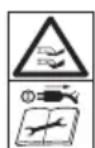
Pictorial Diagrams on the Equipment
ution!
Read the operating instructions carefully.

Wear eye and ear protection.

Do not expose the equipment to the damp. Do not work in the rain and do not cut wet grass.
Risk of injury from parts being thrown up.

o nearby people away from the mower.

Caution – sharp cutting blade! Keep feet and hands away. Risk of injury!
Switch off the motor and disconnect the plug before adjustment or repair work or if the power cable is caught or damaged.
Danger of damaged power cable.
Keep the power cable away from the cutting blade!

Caution!
he lawnmower blade continues to run after switching off.

Noise level specification L_WA in dB.

Protection class II
Do not dispose of electrical equipment in domestic waste.
Symbols used in the instructions

Hazard symbols with in- formation on prevention of personal injury and pro- erty damage.

Precaution symbol (explanation of precaution instead of exclamation mark) with information on prevention of harm / damage.

Notice symbol with information on how to handle the device properly.
General Safety Information

Important! Please read the operating instructions carefully and keep the manual for future reference

This equipment may cause serious injury in the case of improper use. In order to avoid injury to people and damage to property, the following safety information must be observed and users must familiarise themselves with all operating parts.

Warning! During operation, this electric tool generates an electromagnetic field which, under certain circumstances, may impair the functionality of active or passive medical implants. To reduce the risk of serious or lethal injuries, we recommend that persons with medical implants consult their doctor and the manufacturer of their medical implant before operating the machine.
Preparation:
- Do not allow the use of this equipment by children or others who are unfamiliar with these operating instructions. Local regulations may specify the minimum age of the operator.
-
Do not use the equipment when people and particularly children or pets are nearby.
-
The operator or user is responsible for accidents, injuries to other people or damage to the property of others.
- Check the terrain on which the equipment is to be used and remove stones, sticks, wires and other foreign objects that could become caught and thrown up.
- Wear suitable work clothing such as stable shoes with non-slip soles and robust, long trousers. Do not use the equipment when barefoot or when wearing open sandals.
Do not wear loose clothing or clothes that straps or belts suspend from. - Before each use, carry out a visual inspection of the equipment. Do not use the equipment if protective devices (e.g. collision guard or grass bag), parts of the cutting device or bolts are missing, worn or damaged. To avoid imbalance, damaged tools and bolts are to be replaced only in sets.
• Take care with equipment that has several cutting tools, as the movement of one blade may result in the rotation of the other blades. - Use only spare parts and accessories supplied and recommended by the manufacturer. The use of non-original parts will immediately invalidate the guarantee.
- Prior to use, always check the cord and extension cord for signs of damage or wear. Immediately disconnect the cord from the mains in case it is
GB
damaged in use. Do not touch the cord until it is unplugged. Do not operate the appliance if the cord is worn or damaged.
Working with the Equipment:

Do not place feet or hands near or under rotating parts when working. Risk of injury!

Observe the noise protection and local regulations.
- Switch on the motor according to the instructions and only when your feet are at a safe distance from the cutting tools.
- Do not use the equipment in the rain, in poor weather, in a damp environment, or on wet grass. Work only in daylight or with good lighting.
- Do not work with the equipment when tired, lacking concentration or under the influence of alcohol or drugs. Always take breaks in good time. Take a sensible approach to the work.
- When working, ensure a firm stance, particularly on slopes. Always work across the slope, never upwards or downwards. Take particular care when changing the direction of travel on the slope. Do not work on excessively steep slopes.
- Run the equipment only at a walking pace. Take particular care when turning the equipment around, pulling it towards you or going backwards.
- Switch on the equipment carefully and in accordance with
the directions in these instructions. Ensure sufficient distance between feet and the rotating blades.
- Do not tilt the equipment when starting other than if it is necessary to do so when starting up in long grass. In this case, tilt the equipment by pressing down the handle bar such that the front wheels of the equipment are raised. Always check that both hands are in the working position before returning the equipment to the ground.
- Do not work without the grass bag or collision guard. Keep away from the ejection hole at all times.
- Do not start the motor while standing in front of the discharge duct.

Caution! Danger! The blade continues to run after switching off. There is a risk of injury.
- The equipment is not to be lifted or transported while the motor is running. Switch off the equipment if it has to be tilted in transit, when crossing surfaces other than grass, and when the equipment is being transported to and from the surfaces to be mowed.
- Always keep the grass ejection hole clean and clear. Remove cut material only when the equipment is stopped.
-
Do not leave the equipment unattended in the workplace.
-
Do not work with equipment that is damaged, incomplete, or has been modified without the authorisation of the manufacturer. Do not use the equipment with damaged safety devices or screens or with missing safety equipment such as deflection and/or grass collection devices.
- Do not overload the equipment. Work only within the specified power range and do not change the regulator settings on the motor. Do not use low-powered machines for heavy work. Do not use your equipment for purposes other than those for which it is designed.
- Do not use the equipment near inflammable liquids or gases. Non-observance will result in a risk of fire or explosion.
- Do not lift or carry the equipment when the motor is running.
-
Turn off the appliance, unplug it from the mains and check that all moving parts are at rest:
-
Whenever you leave the machine,
- Before cleaning the ejection hole or removing blockages,
- When the equipment is out of use,
- Before checking, cleaning or working on the equipment,
- If the power cable is damaged or frayed,
- If the equipment has hit a foreign object or if strange vibrations occur during work. In this case, check the equipment for damage and have it repaired if applicable.
- Do not place feet or hands near or under rotating parts. Do not stand in front of the grass ejection hole during sickle mowing.
Maintenance and Storage:
- When servicing the blades, ensure that the blades can be moved, even if the power source is switched off.
- Ensure that all nuts, bolts and screws are tightened firmly and the equipment is in safe working condition.
- Check the mower for any damages.
- Repair damaged parts as appropriate.
- Do not attempt to repair the equipment yourself unless you have been trained to do so. Any work not specified in these instructions is to be carried out only by customer service centres that we have authorised.
- Keep the equipment in a dry location and out of reach of children.
- Handle the equipment with care. Keep tools sharp and clean, in order to facilitate better and safer work. Follow the maintenance instructions.
- Wear protective gloves when changing the cutting device.
- Regularly check the grass collection device for wear and strains. For safety reasons, replace worn or damaged parts. When adjusting the blades, take particular care to avoid fingers being trapped between the rotating blades and fixed parts of the machine.
GB
- Check that only replacement tools authorised by the manufacturer are used.
Electrical Safety:
- Ensure that the mains voltage matches the specifications on the rating plate.
- Connect the equipment to a socked with a residual current-operated protective device (RCD) with a release current of more than 30 mA.
- Avoid bodily contact with earthed parts (e.g. metal fences, metal posts).
- Use only authorised power cables of type H07RN-F, which are no more than 75 m long and suitable for outdoor use. The power cable wire cross section must be at least 2.5 mm ^2 . Always completely unroll cable drums before use. Check the cable for damage.
- To fix on the power cable, use the cable suspension intended for the purpose.
- Keep the power cable away from the cutting tool when working. The cutting blades may damage the power cable and result in contact with live parts. Always run the power cable behind the operator.
- Do not use the power cable to pull the plug from the socket. Protect the power cable from heat, oil and sharp edges.
- Switch off the equipment and disconnect the plug from the socket if the power cable is damaged. If the power cable is damaged, it must be replaced
by the manufacturer, the customer services of the same, or a qualified person, in order to avoid hazards.
- Do not connect a damaged power cable to the mains. Do not touch a damaged power cable when it is connected to the mains. A damaged power cable may result in contact with live parts.
Assembly

Disconnect the plug before any work on the equipment. There is a risk of injury.
Mounting grip rod
Assembling the Curved Handle

-
Insert the lower handle (3) into the slot in the air cushion deck (8).
-
Attach the lower bar (3) with the screws provided.

-
Fasten the bow-type handle (1) with the enclosed screws, washers and clamping levers (2) to both right and left sides of the lower bar (3). Two positions are possible. There are two possible positions.
-
Turn the tightening lever (2) in the clockwise direction.
-
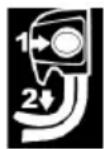
- Lock the clamping lever (1) by pressing it in the direction of the bow-type handle (2) ②. The tightening lever fit the bar so that a tensioning with medium force can be carried out. Otherwise, the tightening levers must
be turned clockwise for tensioning them or anti-clockwise to loosen them ①.
- Clip the cable holder (12) into the bar (3) and thus fix the cable. (11).
Operation
Inserting / removing grassbox

Switch off the equipment, disconnect the plug and wait for the blade to stop. There is a risk of injury..

-
To fit the grassbox (6), lift the impact protection (5) and insert the grassbox. Fold the collision guard (5) onto the grass box (6). It holds the grass box in the correct position.
-
To remove the grassbox (6), lift the impact protection (5) and remove the grassbox. Fold the collision guard (5) back onto the mower housing (10).
Adjusting the Cut Height

Switch off the equipment, disconnect the plug and wait for the blade to stop. There is a risk of injury.
The mower can be adjusted by the insertion of spacers (19) to the following cutting heights:
10 mm - Short cutting height
18 mm - Medium cutting height
25 mm - Medium cutting height
33 mm - Tall cutting height

- Tilt the machine over Using non-slip gloves, hold the blade (18) firmly. Loosen the blade bolt (17) with the supplied spanner (4).

-
Depending on the desired cutting height, click the spacers (19) together. The more spacers you use, the lower the cutting height.
-
Removing the blade (18). Press the required spacers into the recesses provided on the blade.
- Position the blade (18) on the fan (20) with the inserted spacers (19) upwards and connect everything with the blade bolt (17). Tighten with the spanner (4).

A higher cut height should be selected for the first cut of the season.
Switching On and Off

-
Plug the mains lead into the extension cable outlet (13) at the curved handle (1).
-
Turn the end of the mains lead into a loop and hook it into the cable strain relief (15).
-
Connect the equipment to the power supply.
- Before switching on, ensure that the equipment is not in contact with any objects.

- Before switching on, tilt the lawnmower slightly to one side. This facilitates the start-up and prevents an unintentionally deep cutting circle at the point of contact, as the air cushion only builds up after start-up.
GB

6 To switch on, press the . release button (14) while holding down the start lever (16).
Release the release button (14).
- To switch off, release the start lever (16).

After switching off the equipment, the blade continues to turn for several seconds. Do not touch the moving blade. There is a risk of injury.
Working with the Lawnmower

Observe noise control and local regulations.
Regular mowing encourages increased foliation of the grass and kills off weeds at the same time. Therefore, not only does each mowing increase the density of the lawn, it also produces an evenly resilient lawn.
The first cut is to be made in around April.. In the main vegetation period, the lawn is to be mowed at least once a week.

- Start mowing near the socket and work away from the socket.
• Always keep the extension cable behind you and when you turn, move it to the side that has already been mowed.
- Run the equipment at a walking pace, in tracks that are as even as possible. For gap-free mowing, the tracks should always overlap by a few centimetres.
- Adjust the cut height so the equipment is not overloaded. Otherwise, the motor may be damaged.
- On slopes, always work across the slope. Take particular care when going backwards and pulling the equipment.
- Clean the equipment after each use, as described in the chapter on “Cleaning, Maintenance and Storage”.

Switch off the equipment after work and in order to transport it, disconnect the plug and wait until the blade stops. There is a risk of injury.
Cleaning, Maintenance and Storage

Have work that is not described in these instructions carried out by a customer service centre that we have authorised. Use only original parts.

Wear gloves when handling the blade.

Switch off the equipment before all maintenance and cleaning work, disconnect the plug and wait until the blade stops.
General Cleaning and Maintenance Work

Do not hose down the lawnmower with water. This would result in the danger of an electric shock.

• Always keep the equipment clean. To clean, use a brush or cloth but no detergent or solvent.
• After mowing, use a piece of wood or plastic to remove adherent plant remains from the wheels, ventilation holes, ejec-
tion hole and blade area. Do not use hard or pointed objects, as these may damage the blade.
- Oil the rollers from time to time
- Before each use, check the lawnmower for obvious defects such as loose, worn or damaged parts. Check that all nuts, bolts and screws are sitting firmly.
- Check the covers and protective devices for damage and check that they are sitting correctly. Replace them if necessary.
Changing the Blade
If the blade is blunt, it can be sharpened by a specialist workshop. If the blade is damaged or showing signs of imbalance, it must be replaced (see chapter on "Spare Parts").

-
Turn the equipment over.
-
Use sturdy gloves and hold the blade (19) firmly. Loosen the blade bolt (17) with the supplied spanner (4).
-
Install the new blade (19) in the reverse order. Ensure that the blade is positioned correctly and the screw (20) tightened firmly.
Storage
Clean the equipment before putting it away (see “General Cleaning and Maintenance Work”).

In order to ensure that the device takes up less space, unlock the clamping lever (2) and fold down the bow-type handle (1). Make sure that the cable of the device (11) is not pinched.
- Keep the equipment dry and out of reach of children.
- Allow the motor to cool before storing the equipment in a confined space.
- Do not cover the equipment with nylon bags as moisture could build up.
We will not be liable for damages caused by our equipment where these are caused by improper repair or the use of non-original parts or by use other than for the intended purpose.
Disposal /Environmental Protection
Do not dispose of used oil in the sewage system or drains. Dispose of used oil in an environmentally correct manner - bring it to a waste disposal center. Be environmentally friendly. Return the tool, accessories and packaging to a recycling centre when you have finished with them.

Machines do not belong with domestic waste.
The plastic and metal parts employed can be separated out and thus recycled use can be implemented. Ask our Service-Center for details.
Defective units returned to us will be disposed of for free.
Replacement parts/Accessories
Spare parts and accessories can be obtained at www.grizzlytools-service.eu
If you have any other questions, contact the "Service-Center" (see "Service-Center").
Guarantee
- This appliance has a 24-month guarantee; This equipment is not suitable for commercial use. Commercial use will invalidate the guarantee.
- Damages, which can be attributed to natural wear, overloading or inappropriate use, are excluded from the guarantee. Certain component parts are subject to a normal wear and are excluded from the guarantee. In particular, these include: blade, grass box.
• Furthermore, the prerequisite for guarantee services is that the references indicated in the operating instructions regarding cleaning and maintenance have been adhered to.
- Damage, which has been caused from material or manufacturing faults, will be made good free of charge, by replacement delivery or repair. This requires that the appliance is returned to the merchant undismantled and with proof of purchase and guarantee.
Repair Service
- Repairs, which are not covered by the guarantee, can be carried out for charge by our service center. Our service center will be glad to provide you with a cost estimate. We can only process devices which have been packaged sufficiently and which have been dispatched with correct stamping.
- Note: In case of complaint or service, please deliver your device cleaned, and with an indication of the defect, to our service address.
Devices sent in freight collect - by bulk freight, express or with other special freight - are not accepted.
- Defective units returned to us will be disposed of for free.
Trouble Shooting
| Problem Possible Cause Fault Fixing | ||
| Equipment does not start | Power is off | Check the socket, cable, wire and plug and have any repairs carried out by an electrician |
| Defective on/off switch | Repair by customer services | |
| Worn carbon brushes | ||
| Defective motor | ||
| Grass too long | Set a greater cut height. Lift the front wheels slightly by pressing down on the handle bar | |
| Motor stops | Blockage by foreign object | Remove the foreign object |
| Result unsatisfactory or motor labours | Cut height too low Set a higher cut height | |
| Blade blunt | Have the blade sharpened or replace it | |
| Blade area blocked Clean the equipment | ||
| Blade assembled incorrectly | Install the blade correctly | |
| Blade fails to turn | Blade blocked by grass Remove the grass | |
| Blade screw loose Tighten the blade screw | ||
| Strange noises, rattling or vibrations | Blade screw loose Tighten the blade screw | |
| Blade damaged Replace the blade | ||
| Poor air cushion | Clogged air filter | Cleaning the air filter (see „General cleaning and maintenance“) |
| Severely clogged under-side of the machine | Cleaning the machine (see „General cleaning and maintenance“) | |
PL

* The object of the declaration described above satisfies the provisions of Directive 2011/65/EU of the European Parliament and the Council of 8 June 2011 on limiting the use of certain harmful substances in electrical and electronic appliances.
| Traduction de la déclaration de conformité CE originale | Traduction de la déclaration de conformité CE originale |
| Nous certifions par la présente que le modèleTondeuse hacheuse sur coussin d'air ERM 1500-33 LFNumero de lotB-46614, B-48769est conforme aux directives UE actuellement en vigueur | Con la presente dichiariamo che Tosaerba a cuscino d'aria serie di costruzioneERM 1500-33 LFNumero lottoB-46614, B-48769corrisponde alle seguenti direttive UE in materia nella rispettiva versione valida: |
| 2006/42/EC • 2000/14/EC • 2014/30/EU • 2011/65/EU • (EU)2015/863* | |
| En vue de garantir la conformité les normes harmonisées ainsi que les normes et décisions nationales suivantes ont été appliquées: | Per garantire la conformità sono state ap-plicate le seguenti norme armonizzate eanche le norme e disposizioni nazionali che seguono: |
| EN 55014-1:2017 • EN 55014-2:2015 • EN IEC 63000:2018EN 60335-1:2012/A2:2019 • EN 60335-2-77:2010EN 61000-3-2:2014 • EN 61000-3-3:2013 • EN 62233:2008 | |
| De plus, conformément à la directive sur les émissions de bruit 2000/14/EC, nous confirmons:Niveau de puissance sonoregaranti: 94 dB(A)mesuré: 91,6 dB(A)Procédé utilisé pour l'évaluation de la conformité en fonction de l'annexe VI / 2000/14/ECBureau declaré: TÜV SÜD, NB: 0036 | Si dichiara inoltre in conformità alla direttiva 2000/14/EC sull'emissione acustica ambi-entale:Livello di potenza sonoragarantita: 94 dB(A)misurata: 91,6 dB(A)Procedura della valutazione della conformità applicata come da allegato VI / 2000/14/ECAutorità registrata: TÜV SÜD, NB: 0036 |
| Le fabricant assume seul la responsabilité d'établir la présente déclaration de conformité: | Il produttore è il solo responsabile della stesura della presente dichiarazione di conformità: |
 Grizzly ToolsGmbH & Co. KGStockstädter Straße 2063762 GroßostheimGermany, 11.01.2021 Grizzly ToolsGmbH & Co. KGStockstädter Straße 2063762 GroßostheimGermany, 11.01.2021 | Christian FrankChargé de documentation, Direttore tecnico e respon-sabile documentazione tecnica |
Unit 3, Beldray Park
Beldray Road, Mount Pleasant
Bilston, West Midlands WV14 7NH
Tel.: 0845 683 2672
e-mail: care@novoserv.co.uk