P5732T - Doorbells Emos - Free user manual and instructions
Find the device manual for free P5732T Emos in PDF.
| Product Type | Wireless doorbell with push button and chime |
| Brand | Emos |
| Model | P5732T |
| Signal range | Up to 100 m outdoors (approx. 20 m indoors) |
| Transmission frequency | 433.92 MHz, 10 mW e.r.p. max. |
| Button protection rating | IP44 (waterproof) |
| Pairing | Self-learning |
| Chime power supply | 3 AAA alkaline batteries 1.5 V or micro USB input 5 V/500 mA |
| Button power supply | 1 CR2032 lithium battery 3 V |
| Melodies | Selectable via button on chime |
| Volume adjustment | Yes, via button on chime |
| Number of pairable buttons | Multiple (repeat procedure for each) |
| Pairing memory | Preserved even after battery change |
| Package contents | Chime, button, double-sided adhesive tape |
| Chime usage | Indoor, dry rooms only |
| Maintenance and cleaning | Soft damp cloth with mild soap; no harsh solvents |
| Safety | Do not expose to shocks, high temperatures, humidity; remove batteries if not used for a long time; do not use by unsupervised persons |
| Recycling | Do not dispose of with household waste; use collection points |
| Compliance | Directive 2014/53/EU (declaration on emos.eu) |
| Installation materials | Mounting with double-sided tape or screws (not supplied); avoid metal |
| Dimensions (button) | Not specified |
| Weight | Not specified |
Frequently Asked Questions - P5732T Emos
User questions about P5732T Emos
0 question about this device. Answer the ones you know or ask your own.
Ask a new question about this device
Download the instructions for your Doorbells in PDF format for free! Find your manual P5732T - Emos and take your electronic device back in hand. On this page are published all the documents necessary for the use of your device. P5732T by Emos.
USER MANUAL P5732T Emos
Designed for wireless doorchime P5732.
Specifications
Transmission range: up to 100 m in an open area (can drop down to up to one fifth in a busy area)
Transmission frequency: 433.92 MHz, 10 mW e.r.p. max.
Button: water resistant; enclosure rating IP44
Pairing the chime with buttons: self-learning function
Chime power supply: 3× 1.5 V (type AAA) batteries, 5 V/500 mA micro USB port
Button power supply: 1×3 V battery (type CR2032)
Includes: double-sided adhesive tape
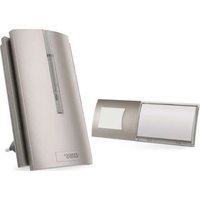
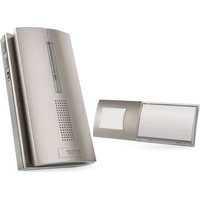
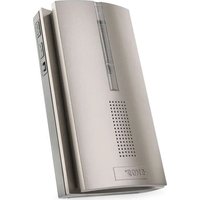
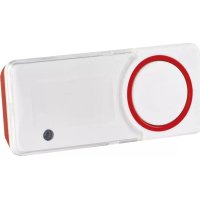
Chime Description
See fig. 1
1 - ringtone change button
2 - volume setting button
3 - micro USB port for powering with 5 V/500 mA
4 - bell LED
5 - hanging hole
6 - battery compartment
Button Description
See fig. 2
1 - ring button and LED
2 - battery compartment/mounting pad
3 – hole for opening the battery cover
4 - battery
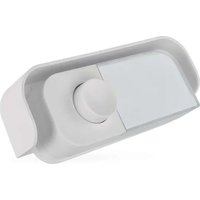
Installing the Button/Removing the Mounting Pad
See fig. 3
1 - mounting pad
2 - holes for screws
Pairing the Button with the Chime
- Remove the rear cover of the button by inserting a screwdriver into the hole on the bottom side. Insert a 3 V battery, type
CR2032, into the button. When inserting a battery, make sure to observe the correct polarity! Replace the battery cover.
-
Insert 3× 1.5 V AAA alkaline batteries into the chime (a red LED will flash). When inserting the batteries, make sure to observe the correct polarity. Do not use 1.2 V rechargeable batteries; the lower voltage may prevent the chime from working. Replace the battery cover. If you wish to power the chime via the micro USB port, connect the micro USB cable to a power adapter (not included) and the chime, then plug the adapter into a socket.
-
Long press the button (for ca. 5 seconds); the LED on the chime will light up red. The chime will switch to self-learning pairing mode which lasts for 30 seconds. During this time, press the ring button. The chime will ring, the LED on the chime will turn off, and the button is now paired with the chime. This automatically ends self-learning mode.
-
To pair multiple buttons, repeat the process for each button from step 1.
Note: The chime has an internal memory where it stores the codes of the currently paired buttons. Therefore, there is no need to pair buttons again after replacing batteries. Every time batteries are changed in a doorbell, the currently set ringtone will sound.
Wiping the Memory of Paired Buttons
-
Remove the batteries from the chime or disconnect the micro USB cable.
-
Press and hold the button.
-
Insert batteries back into the chime or reconnect the USB cable (while still holding the button).
-
A red LED will light up on the chime within approximately 5 seconds.
-
Release the button; the red LED will turn off.
-
This erases the memory of all paired buttons.
Installation of the Doorbell Button (Transmitter)
-
Begin by pairing the button with the chime.
-
Before installation, check that the pair works reliably in the chosen spot.
-
Remove the mounting pad from the battery cover, see figure 3.
-
Use the double-sided adhesive tape (included) or two screws to fix the back of the mounting pad to the wall. Although the button is weather resistant, choose a location where it is protected, e.g. in a wall recess.
-
Fit the mounting pad back onto the button.
-
Press the button to ring the chime. Pressing is accompanied by LED illumination indicating the button has sent a radio signal. The chime plays the selected ringtone.
Note: The doorbell button (transmitter) can be placed on wood or brick walls without issue. However, never place the button directly onto metal objects or materials containing metal, such as plastic windows or doors that have a metal frame. In such cases, the transmitter will not work properly.
Upkeep and Maintenance
The wireless digital doorchime is a sensitive electronic device. Therefore, it is necessary to observe the following precautions:
- The chime (receiver) is designed for indoor use in dry environments only.
- Periodically check the functioning of the doorbell button and replace the battery in a timely manner. Use only quality alkaline batteries with the prescribed parameters.
- When the doorchime is not used for a long time, remove the batteries from the chime and the button.
- Do not subject the button or chime to excessive vibrations and shocks.
- Do not subject the button or chime to excessive heat and direct sunlight or moisture.
- To clean the device, use a slightly moistened cloth with a small amount of detergent; do not use aggressive cleaning agents or solvents.
- This device is not intended for use by persons (including children) whose physical, sensory or mental disability or lack of experience and expertise prevents safe use, unless they are supervised or instructed in the use of the appliance by a person responsible for their safety. Children must always be supervised and must never play with the device.

Do not dispose with domestic waste. Use special collection points for sorted waste. Contact local authorities for information about collection points. If the electronic devices would be disposed in landfill, dangerous substances may reach groundwater and subsequently food chain, where it could affect human health.
Hereby, EMOS spol. s r.o. declares that the radio equipment type P5732T is in compliance with Directive 2014/53/EU. The full text of the EU declaration of conformity is available at the following internet address: http://www.emos.eu/download.