
P57000T - Doorbells Emos - Free user manual and instructions
Find the device manual for free P57000T Emos in PDF.

| Product Type | Wired doorbell |
| Brand | Emos |
| Model | P57000T |
| Power Supply | 4 AA 1.5 V batteries (not included) or 8/12/24 V AC/DC transformer (not included) |
| Protection Rating | IP44 (button only) |
| Usage | Indoor only (chime) |
| Connection Type | Wired (maximum cable length: 5 m) |
| Recommended Cable Section | 0.5 mm² to 2.5 mm² |
| Main Functions | Melodic chime, illuminated push button? (not specified) |
| Installation | Wall mounting with screws |
| Maintenance and Cleaning | Soft slightly damp cloth; do not use solvents |
| Safety | Do not immerse, do not expose to excessive moisture, do not open |
| Repairability | Repair by qualified specialist only; warranty void if unauthorized intervention |
| General Information | CE declaration available at www.emos.eu/download |
Frequently Asked Questions - P57000T Emos
User questions about P57000T Emos
0 question about this device. Answer the ones you know or ask your own.
Ask a new question about this device
Download the instructions for your Doorbells in PDF format for free! Find your manual P57000T - Emos and take your electronic device back in hand. On this page are published all the documents necessary for the use of your device. P57000T by Emos.
USER MANUAL P57000T Emos
natural_image
Technical line drawing of two electronic device modules with internal components and a tool inserted (no text or symbols)1.1
natural_image
Technical line drawing of an electrical switchgear assembly with internal components and mounting brackets (no text or symbols)1.2

3.1
3.2
3.2
GB | Replacement Button
Safety Instructions and Warnings

Read the user manual before using the device.

Follow the safety instructions in the manual.
- Do not tamper with the internal electrical circuits of the product – doing so may damage the product and will automatically void the warranty. The product should only be repaired by a qualified professional.
- To clean the product, use a soft, slightly damp cloth. Do not use solvents or detergents – they could scratch the plastic parts and cause corrosion of the electrical circuits.
- Do not use the device in the proximity of devices that generate electromagnetic fields.
- Do not expose the product to excessive force, impact, dust, high temperatures or humidity – these may cause the product to malfunction or may deform its plastic parts.
- Do not insert any objects into the openings on the device.
- Do not submerge the device in water.
- Protect the device from falls or impacts.
- Only use the device in accordance with the instructions provided in this manual.
- The manufacturer is not liable for damage caused by improper use of the device.
- The appliance is not intended for use by persons (including children) whose physical, sensory or mental disability, or lack of experience and expertise prevents safe use, unless they are supervised or instructed in the use of the appliance by a person responsible for their safety. Children must always be supervised to ensure they do not play with the appliance.
The full text of the EU Declaration of Conformity is available on this website http://www.emos.eu/download.
Technical Specifications
Enclosure: IP44
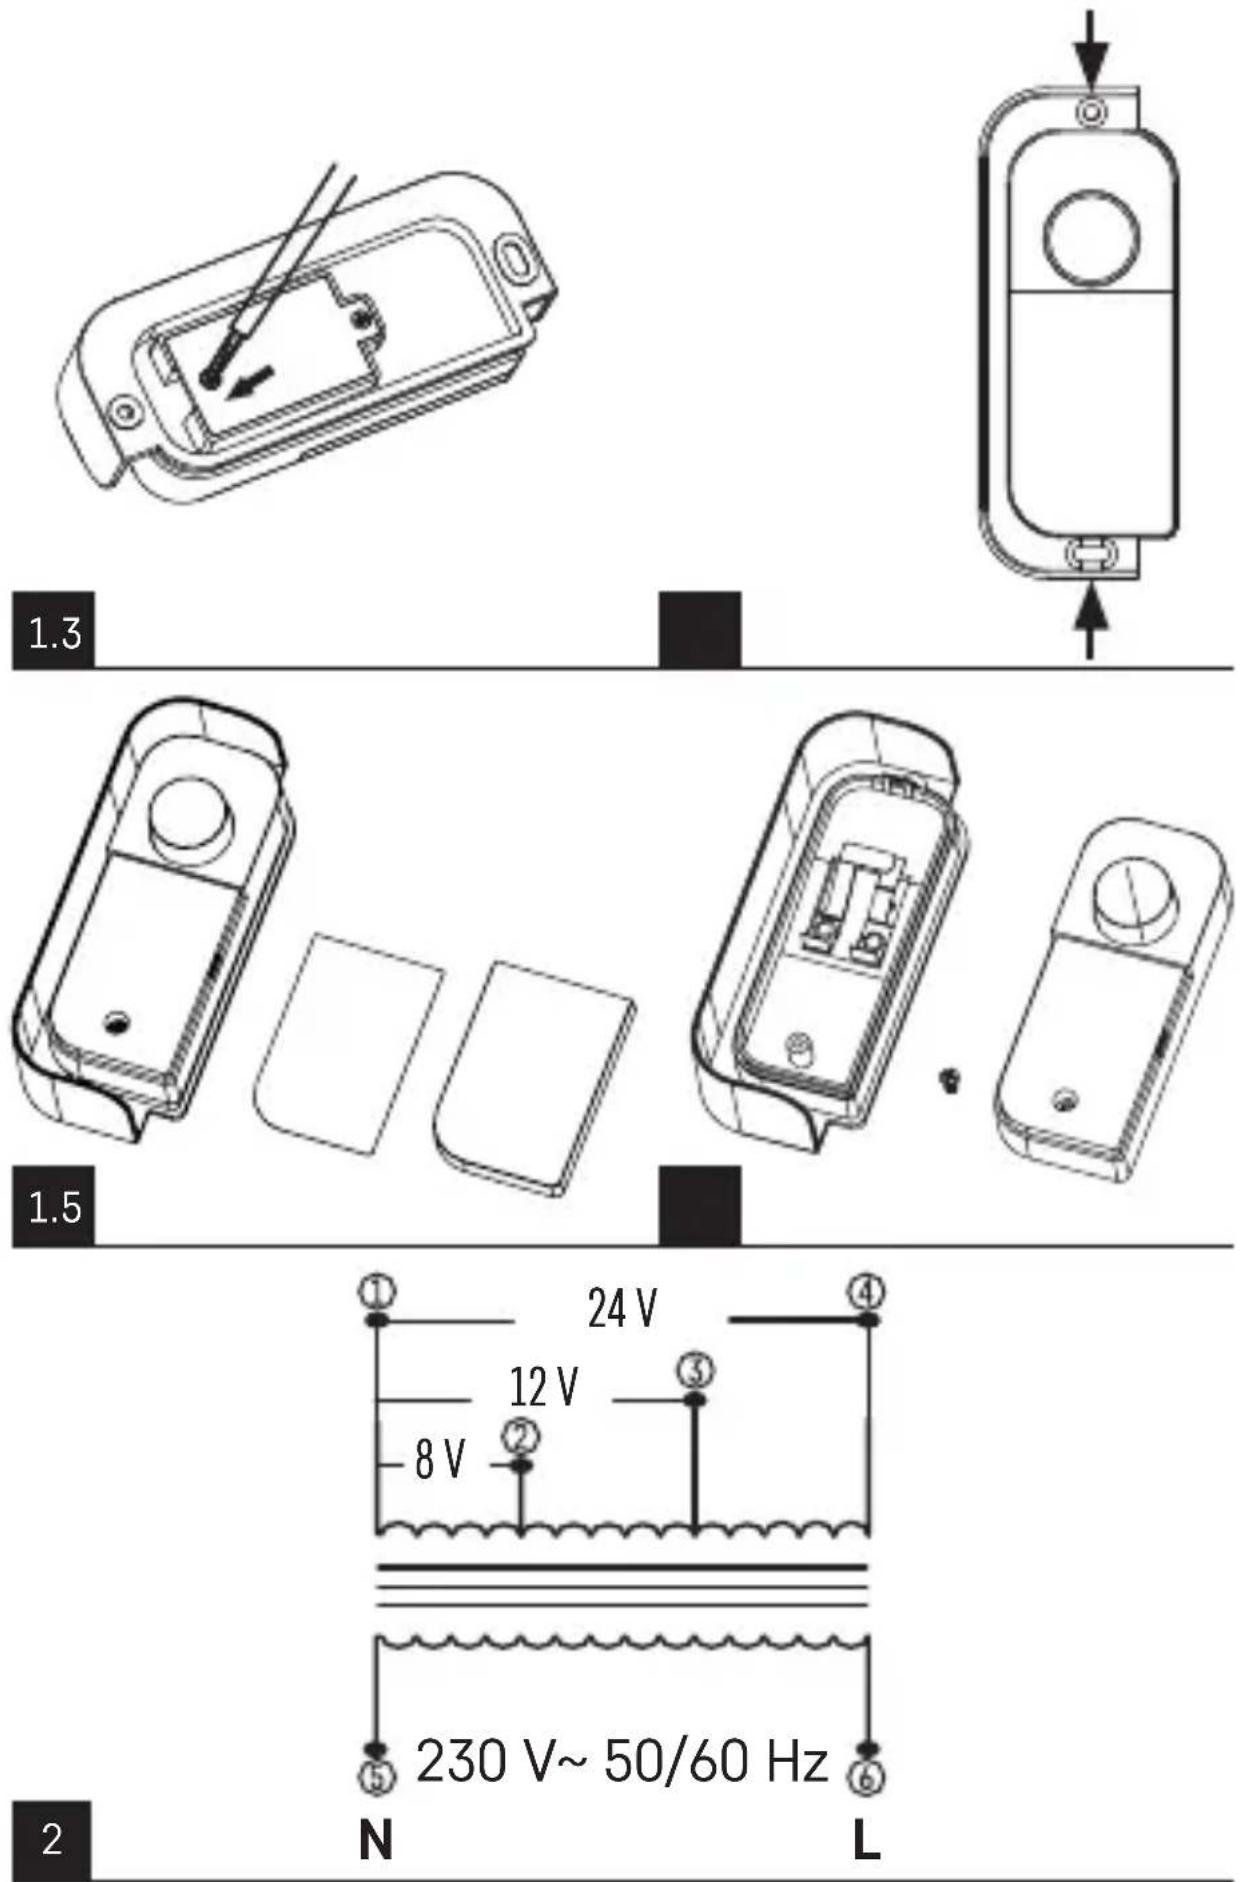
Power supply: 4× 1,5 V AA (not included) / 8, 12, 24 V AC/DC (not included)
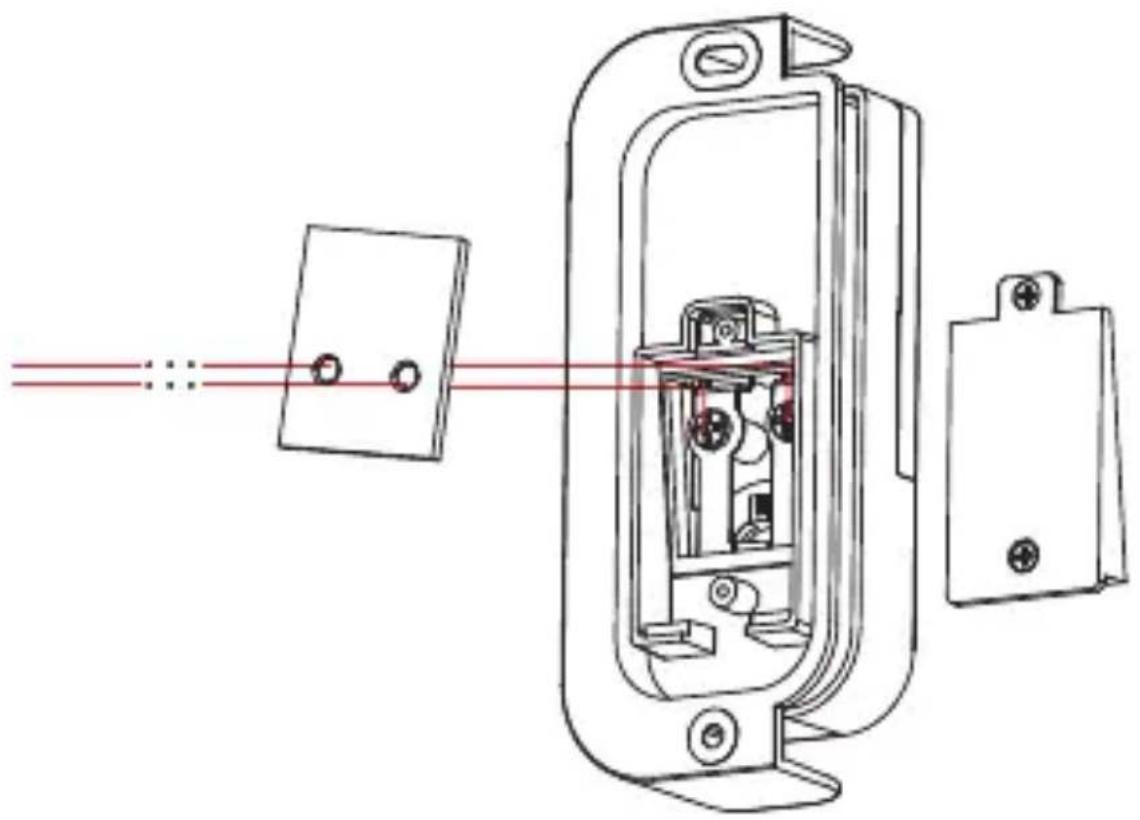
P57000T button description (not included) (see fig. 1)
1 – Unscrew the back cover
2 - Connect the wires
3 - Screw the back cover back on
4 - Mounting holes
5, 6 - Unscrew the front cover
Wiring diagram of transformer P57000TR (not included) (see fig. 2)
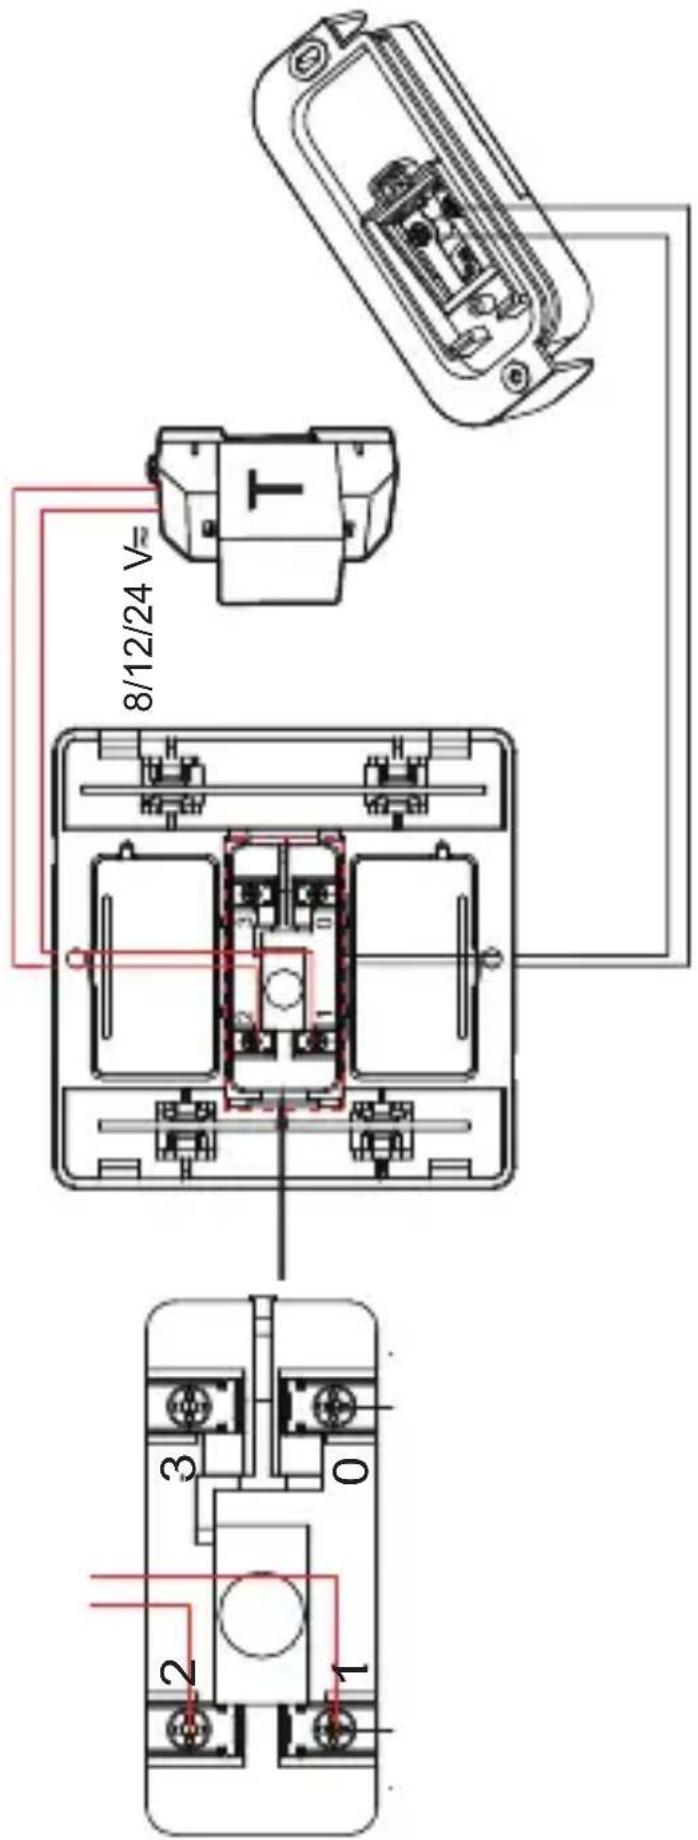
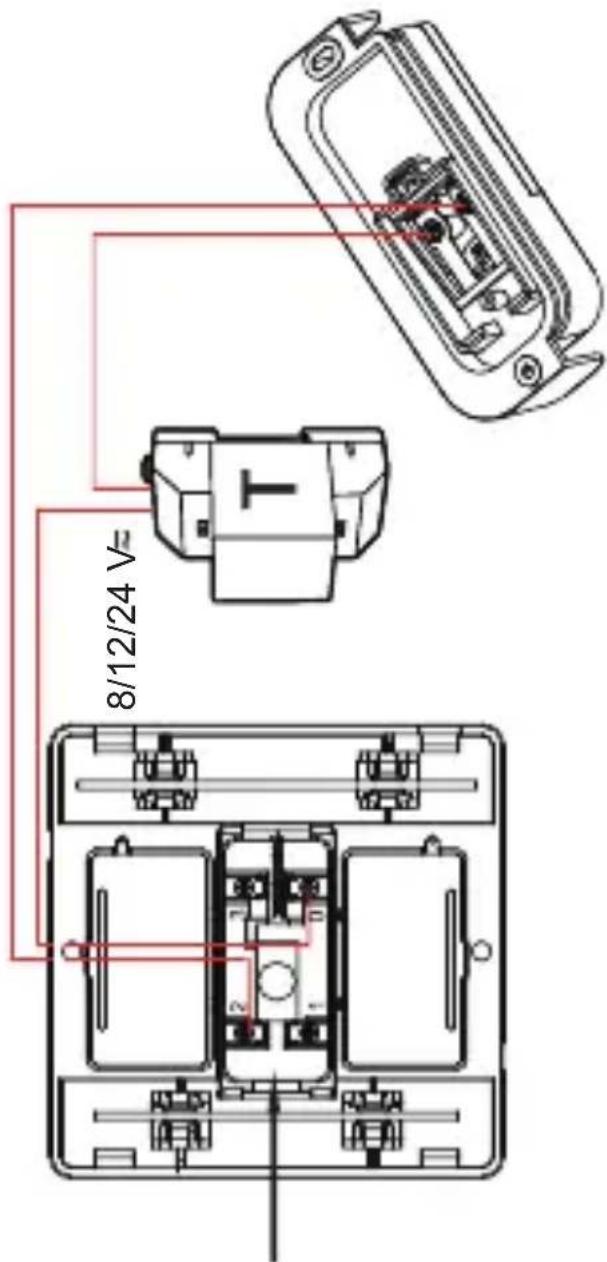
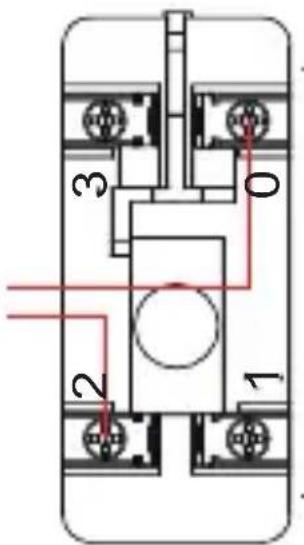
Connection diagram of the chime and button (see fig. 3)
1 – Powering the doorchime with batteries
2 – Powering the doorchime with the P57000TR transformer (not included)
Installing the Doorchime, Doorchime transformer, Doorchime button
The chime is designed for indoor use only.
The installation may only be performed by an appropriately qualified person.
During installation, follow applicable standards.
Note: Only one power mode can be used at a time – battery or transformer power. Connecting batteries while operating from another power source may result in an explosion hazard.
The total length of wires connecting the doorbell to the push button should not exceed 5 meters.
The electrical wiring should use a wire suitable for the specific installation conditions, with a cross-section of between 0.5 mm ^2 and 2.5 mm ^2 .
- Disconnect the source of 230 V AC power supply before installation. Use a measuring instrument to make sure the wiring is not live.
-
Remove the front of the chime cover, unscrew the rear button cover.
-
Choose a spot for the doorchime and button, drill 2 holes matching the spacing of the mounting holes on the doorbell and insert wall plugs into the wall.
- Insert cables into the doorchime's opening for wiring and mount the doorchime to the wall with screws.
- Remove an approximately 1 cm long stretch of insulation from the end of the cables.
- Place the wiring cables into the terminals of the doorchime/button/transformer and screw them in.
- Replace the front cover of the doorchime, screw back the rear cover of the push button and secure the push button with the screws.
- Hang the transformer in a vertical position by the top slot on the DIN rail and push the bottom part in with slight pressure until you hear the click of the locking latch. Check that the restraint is firmly gripping the DIN rail. Connect the 230 V AC supply wires to the L and N terminals via a suitable safety device (fuse, circuit breaker).
- Turn on the 230 V power supply and press the ring button to test the functionality of the doorchime.
Troubleshooting FAQ
The chime does not ring:
- Check the voltage of the batteries in the chime, replace them.
- Check the correct wire connection of the power supply from the transformer.
- Check the button wire connection for correctness.
- Check the transformer output/input for supply voltage, check that the output is not interrupted or shorted, or that the power supply is not overloaded.


- GB | Replacement Button
- Safety Instructions and Warnings
- Technical Specifications
- P57000T button description (not included) (see fig. 1)
- Wiring diagram of transformer P57000TR (not included) (see fig. 2)
- Connection diagram of the chime and button (see fig. 3)
- Installing the Doorchime, Doorchime transformer, Doorchime button
- Troubleshooting FAQ
- The chime does not ring:
Brand : Emos
Model : P57000T
Category : Doorbells