
Molen Chef - Chopper Zeegma - Free user manual and instructions
Find the device manual for free Molen Chef Zeegma in PDF.
| Product type | Meat grinder |
| Brand | Zeegma |
| Model | Molen Chef |
| Power supply | 220-240 V ~ 50 Hz |
| Body material | Plastic |
| Main functions | Grinding, sausage and kibbeh preparation |
| Included accessories | 3 cutting plates (fine, medium, large holes), cutting blade, screw shaft, feeding tray, pusher, sausage and kibbeh attachments, storage compartment |
| Max continuous use time | 10 minutes |
| Cleaning | Wash with warm soapy water except the body (wipe with a damp cloth) |
| Safety | Unplug before assembly/disassembly/cleaning; do not immerse the body |
| Prohibited | Grinding bones, nuts, ginger or hard/fibrous foods |
| Reverse function | REV button, use appliance when completely stopped |
| Repairability | Do not repair yourself; contact customer service support@zeegma.com |
| Usage | Household use only |
| Minimum user age | 8 years under supervision |
| Cutting plates | Fine, medium, large holes |
| Sausage attachment | Yes, specific fitting |
| Kibbeh attachment | Yes, without blade |
| Accessory storage | Integrated compartment |
| Compliance | CE, directive 2012/19/EU |
Frequently Asked Questions - Molen Chef Zeegma
User questions about Molen Chef Zeegma
0 question about this device. Answer the ones you know or ask your own.
Ask a new question about this device
Download the instructions for your Chopper in PDF format for free! Find your manual Molen Chef - Zeegma and take your electronic device back in hand. On this page are published all the documents necessary for the use of your device. Molen Chef by Zeegma.
USER MANUAL Molen Chef Zeegma
natural_image
Close-up of a ZEEGMA stainless steel robotic food processor (no visible text or symbols on the device body)ZEEGMA

natural_image
Line drawing of a hand inserting into a small motor or brush (no text or symbols)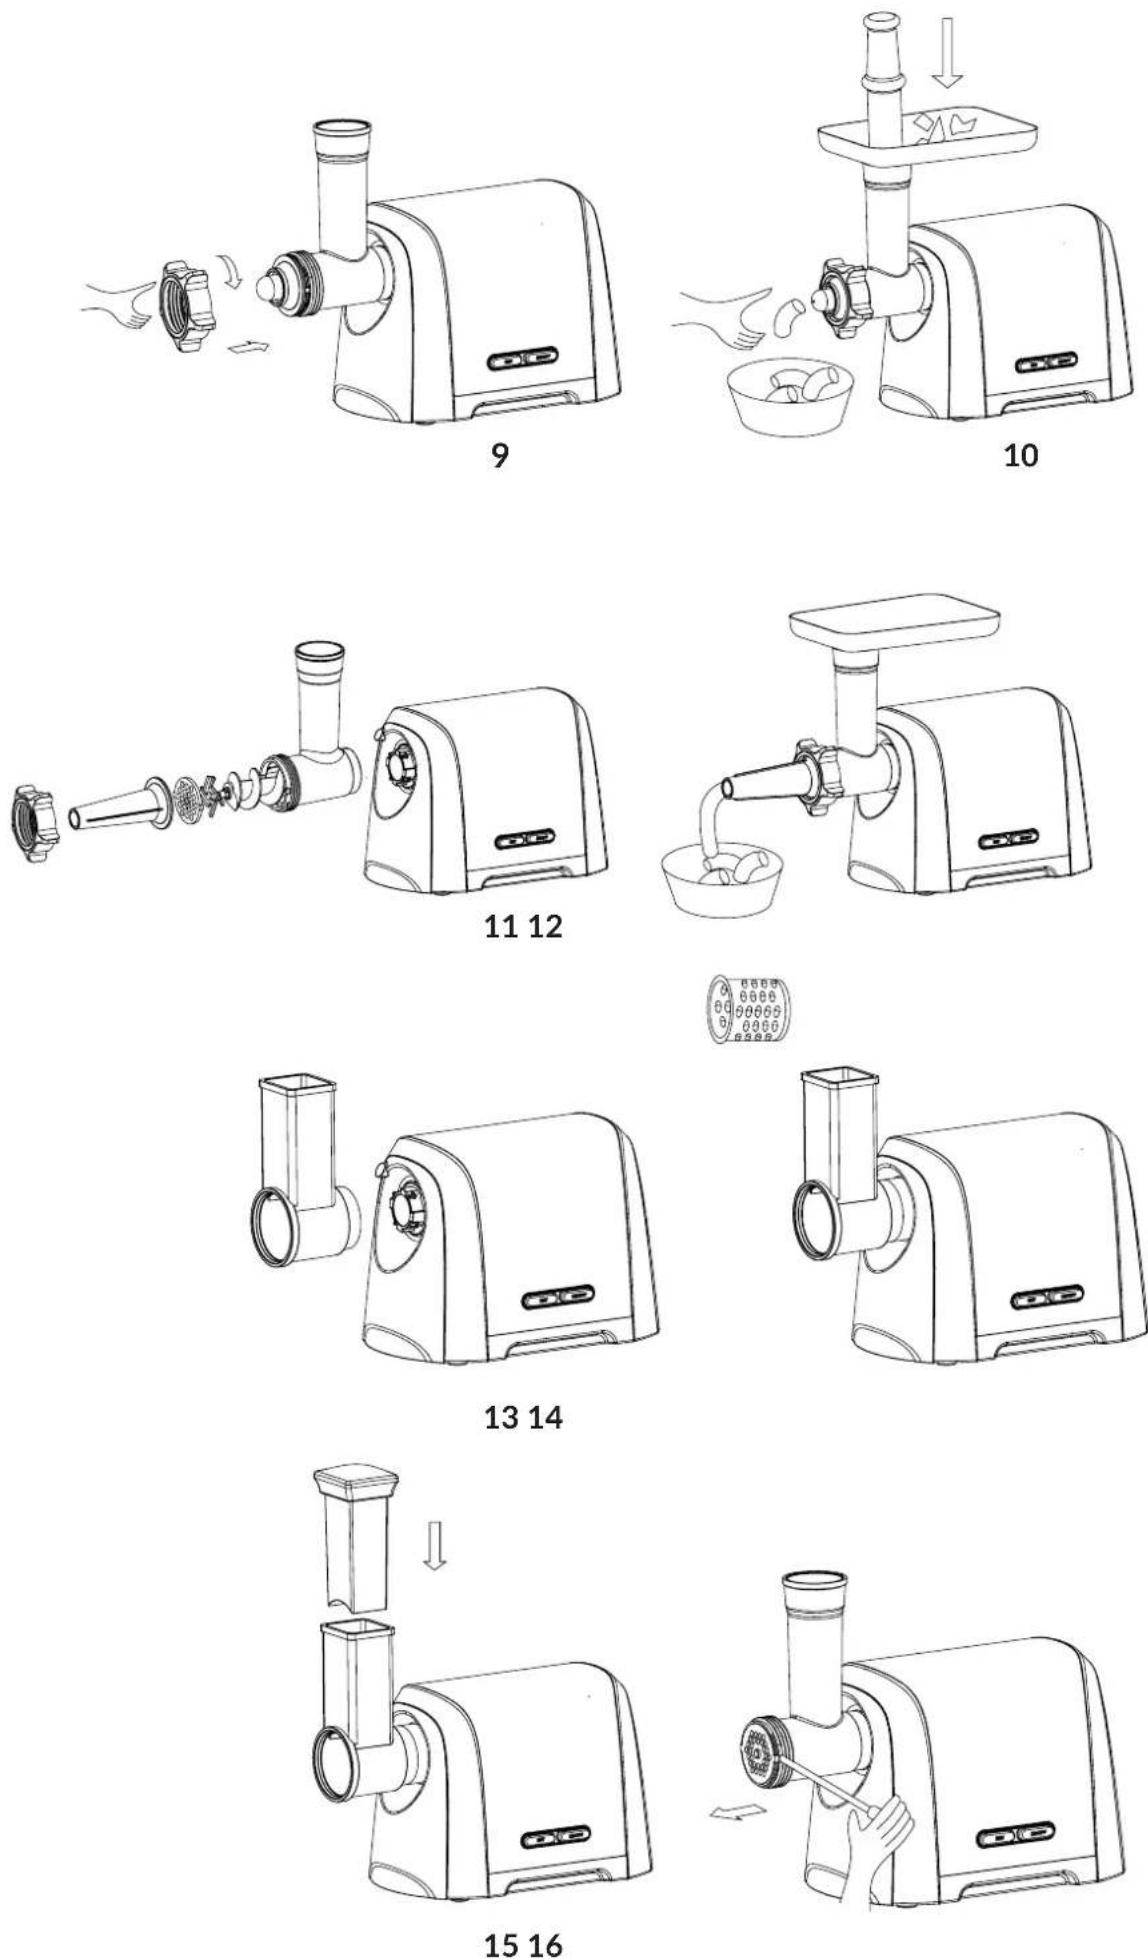
Introduction
Dear customer!
Thank you for placing trust in us and choosing Zeegma.
We provide you with a product perfect for everyday use thanks to the use of high-quality materials and modern solutions.
We are convinced that the product will satisfy your requirements as it has been designed with utmost care.
Before you use the product, please read this manual carefully.
Should you have any remarks or questions concerning the product, please do not hesitate to contact us:
support@zeegma.com
Please read this manual before you start using the product to see its functions and use them in accordance with intended use.
-
Before you start using the device, please read the manual and follow its tips. The manufacturer shall not be held responsible for damage arising from use at variance with intended use and damage arising from wrong use of the device. The manual must be kept for future reference.
-
The device is intended for home use only. Do not use it for other purposes, at variance with intended use.
-
The device may be used by children aged at least 8, by persons with limited physical abilities, sensory or mental abilities, as well as persons not familiar with and inexperienced in using the device, provided they are supervised or have been instructed on safe use of the device, so that resulting hazards are understandable. Children who are unattended should not clean and maintain the product.
-
Use the device with utmost care when there are children around. Do not let children play with the device.
-
Always disconnect the appliance from the supply if it is left unattended and before assembling, disassembling or cleaning.
-
When moving the device, grab the body and hold with both hands. Do not grab the feed tray or head to move the device.
-
Using the Kubbe attachment, do not fix blades and cutting plates on the device.
-
Never put the food into the grinder on your own. Use a pusher.
-
Do not grind hard products, such as bones, nuts, etc.
-
Do not grind ginger and other hard-fiber foods.
-
The device must not work continuously for more than 10 minutes.
- Never activate reverse rotation when the device operates (REV key).
- Wait for at least one minute until the grinder stops working completely. Otherwise it may lead to atypical sound, vibrations, or electric spark in the device. This may damage the product. After use, food remains may accumulate in the head. It is natural. The ground food may contain grains of black metal powder. Remove them.
- To make sure the product does not get blocked, do not put too much pressure.
- Do not switch the device on when the electrical fuse is active.
- Never replace or repair parts of the device or entire device on your own.
- If the feeder cable is damaged, it must be replaced by the manufacturer or authorized service centers. A wrong repair may result in serious danger to the user.
CE

The product complies with requirements of EU directives.
Pursuant to Directive 2012/19/EU, this product is subject to selective collection. The product must not be disposed of together with household waste as it may pose a threat to the environment and human health. Worn-out product must be handed over to electrics and electronics recycling point.
Before first use:
- Make sure the electric voltage specified on the device label complies with the electric voltage at your home.
- Carefully wash all parts (except for body) in warm water with soap.
List of parts (fig. A)
- PUSHER
- FEED TRAY
- LOCKING KNOB
- BODY
- ON/OFF SWITCH
- REVERSE GEAR (REV KEY)
- HEAD
-
WORMSHAFT
-
BLADE
- CUTTING PLATE (SMALL HOLES)
- CUTTING PLATE (MEDIUM HOLES)
- CUTTING PLATE (LARGE HOLES)
- FIXING RING
- SAUSAGE ATTACHMENT
- KEBBE ATTACHMENT
- EXTRAS LOCKER
This device has a special locker for additional accessories. To open it, just press the locker. Close the locker after every use.
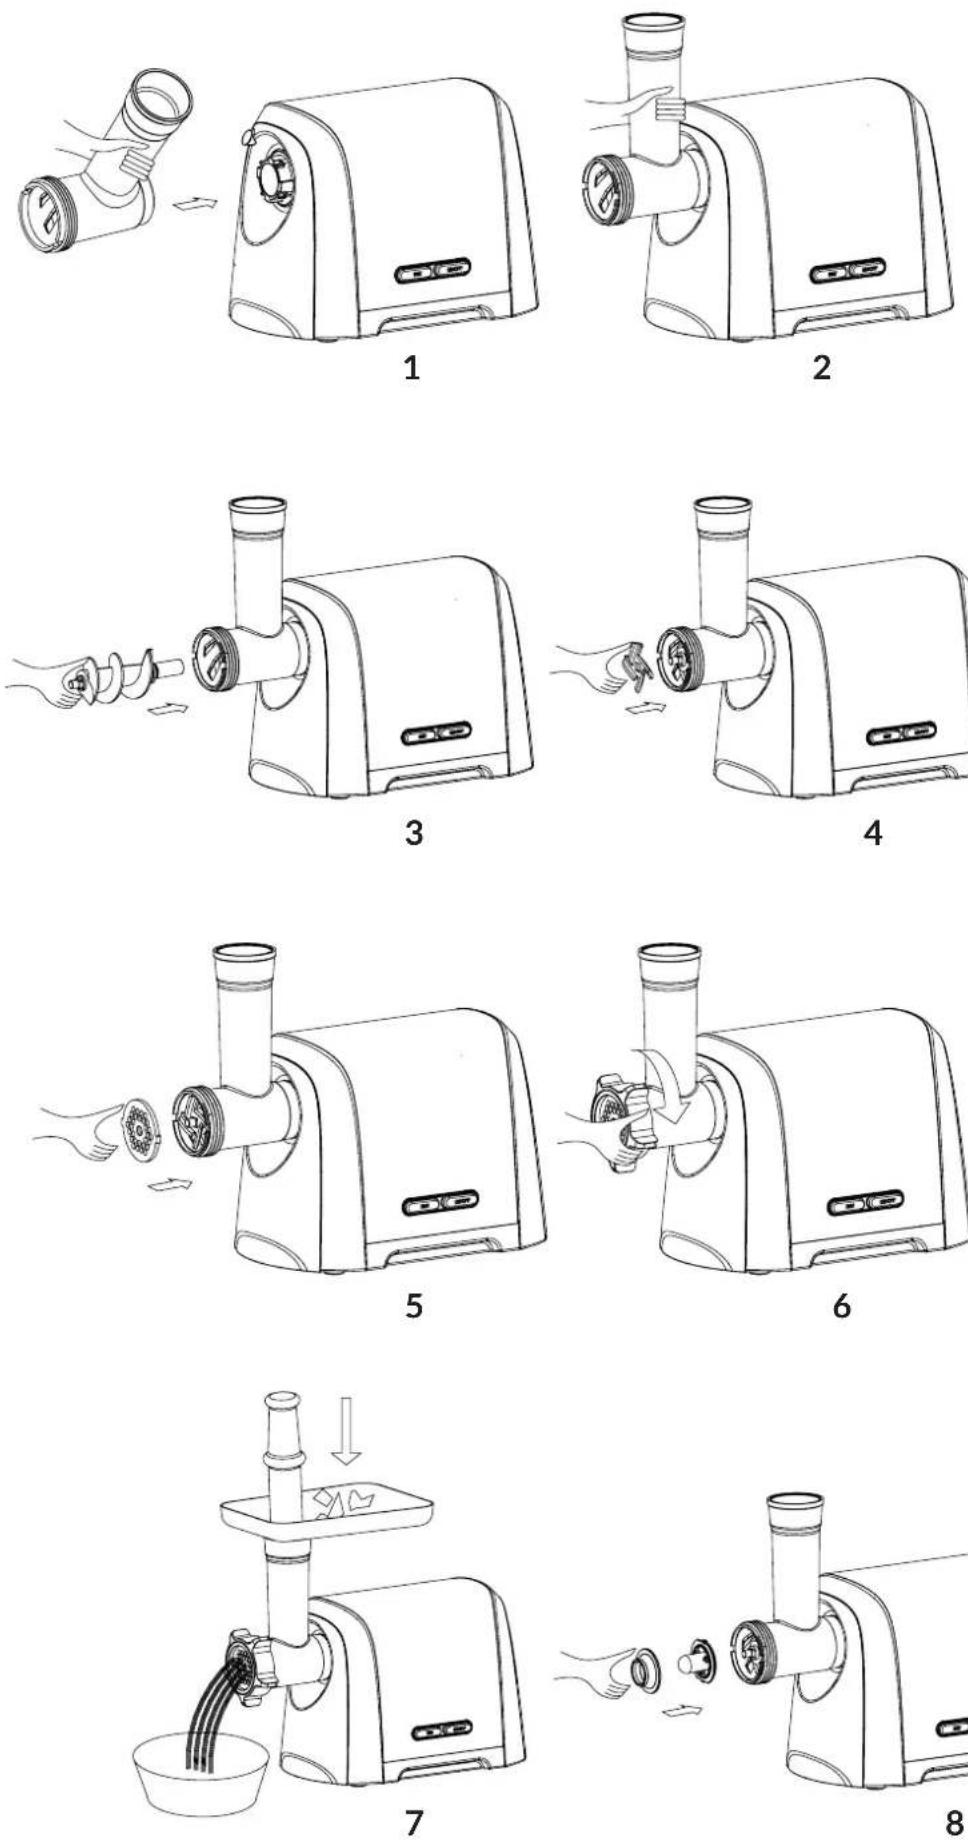
How to assemble
- Put the head on the device body so that it rotates left (fig. 2)
- Place the wormshaft inside the head with its short part at the front (fig. 3) by rotating the shaft gently until it is properly fixed in the body.
- Place the blade on the wormshaft handle, with a blade positioned at the front, as showed in fig. 4. Meat will not be ground if the blade is not properly fixed.
- Place the cutting blade you have chosen on the blade, remember to adjust protrusion to holes (fig. 5).
- Hold or press the center of cutting plate, next tighten up the fixing ring (fig. 6). Do not screw the ring too tight.
- Place and fix the feed tray on the head.
- Place the device on a hard surface.
- Airflow at the bottom and on sides of the body must be free and undisturbed.
How to grind meat
- Cut meat up into pieces (it is recommended to have meat devoid of tendons, bones and fat, approximate size: 2 cm x 2 cm x 6cm) so that it fits the hole on feed tray.
- Plug the device in and set ON/OFF switch in ON position.
- Put the meat on feed tray. When putting the meat into the grinder, use a pusher only (fig. 7).
- After use, switch the device off with ON/OFF switch and unplug it.
Reversed rotation
- At first make sure ON/OFF switch is in OFF position.
- REV key can be used when the device is blocked. It will make the wormshaft rotate in a reversed direction, and the head will go empty. If you release REV key, you will stop the product.
- When you finish, switch off and wash the device.
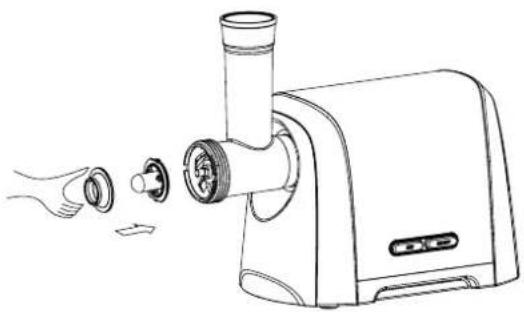
Kebbe attachment
- Remove the plate and blade.
- Place both Kebbe attachments on the wormshaft handle, remember to adjust protrusion to holes (fig. 8).
- Tighten up the fixing ring (fig. 9). Do not screw the ring too tight.
Butcher's overlay
- Place the sausage attachment on previously fixed blade and cutting plate with small holes (fig. 11).
- Tighten up the fixing ring (fig. 12). Do not screw the ring too tight.
Slicing/shredding
- Follow the assembly instructions presented in fig. 13.
- Choose a type of blade (fig. 14) – small, large, or grinding blade.
- Place food in plastic box.
- Switch the device on and place food in the grinder with the use of a pusher (fig. 15).
How to clean and maintain
-
Disassembly
-
Make sure the motor has stopped completely.
- Disconnect the plug from power source.
- Disassemble the device by reversing steps from subpoints 1-5 in „Assembly” section (fig. 6-1).
- If you cannot easily remove the fixing ring manually, use tools.
-
To remove the cutting plate easily, place the screwdriver between the cutting plate and head (fig. 16), and then lift the cutting plate.
-
Cleaning
-
Remove food remains from the device.
- Wash every part (except for body) in warm water with soap.
- Wash the body only with a wet cloth.
- If you do not use the device for a long time, please grease the sieve and knife with edible oil.
- Bleaches containing chlorine may cause aluminum surfaces to fade.
- Thinners may cause cracking or fading of the device.
The pictures are for reference only. The real design of the products may differ from the pictures presented.
Einführung
List of parts (fig. A)
BrandLine Group Service – Support
www.zeegma.com/en/service


- Introduction
- Dear customer!
- Please read this manual before you start using the product to see its functions and use them in accordance with intended use.
- CE
- Before first use:
- List of parts (fig. A)
- How to assemble
- How to grind meat
- Reversed rotation
- Kebbe attachment
- Butcher's overlay
- Slicing/shredding
- How to clean and maintain
- Einführung
- BrandLine Group Service – Support
- www.zeegma.com/en/service
Brand : Zeegma
Model : Molen Chef
Category : Chopper