Liquajuice Pro - Juicer TAURUS - Free user manual and instructions
Find the device manual for free Liquajuice Pro TAURUS in PDF.

| Product Type | Juice Extractor |
| Brand | Taurus |
| Model | Liquajuice Pro |
| Main Function | Juice extraction by auger |
| Reverse function (REV) | Allows to unblock the appliance in case of clogging |
| Anti-drip | Integrated juice outlet tap |
| Thermal protection | Automatic shut-off in case of overheating, restart after 15 minutes |
| Hopper capacity | Up to 5.5 cm diameter for whole fruits |
| Filtration system | Filter with integrated rotating brush |
| Safety | Stops if hopper is not properly closed; protective cover |
| Cleaning | Cleaning brush provided; parts washable with water (except base) |
| Juice flow | Separate outlet for juice and pulp |
| Included jugs | One jug for juice and one for pulp |
| Inner stopper | Ensures complete juice evacuation through the appropriate outlet |
| Continuous use | Maximum 20 minutes, 5-minute pause between cycles |
| Power supply | 220-240 V ~ 50/60 Hz |
| Main spare parts | Auger, filter, rotating brush, hopper, pusher, rubber stopper |
Frequently Asked Questions - Liquajuice Pro TAURUS
User questions about Liquajuice Pro TAURUS
0 question about this device. Answer the ones you know or ask your own.
Ask a new question about this device
Download the instructions for your Juicer in PDF format for free! Find your manual Liquajuice Pro - TAURUS and take your electronic device back in hand. On this page are published all the documents necessary for the use of your device. Liquajuice Pro by TAURUS.
USER MANUAL Liquajuice Pro TAURUS
natural_image
Line drawing of a kitchen grater with handle and control panel (no text or symbols)Fig.1
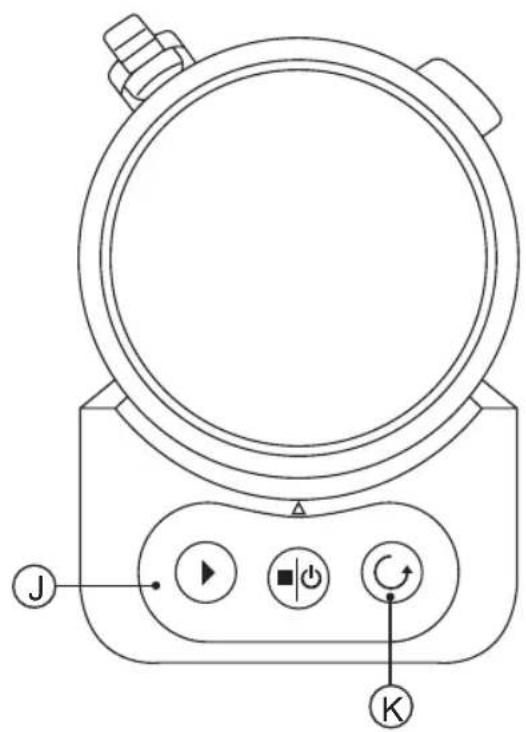
Fig.2

natural_image
Technical diagram of a mechanical component with concentric rings and directional arrows, no text or symbols present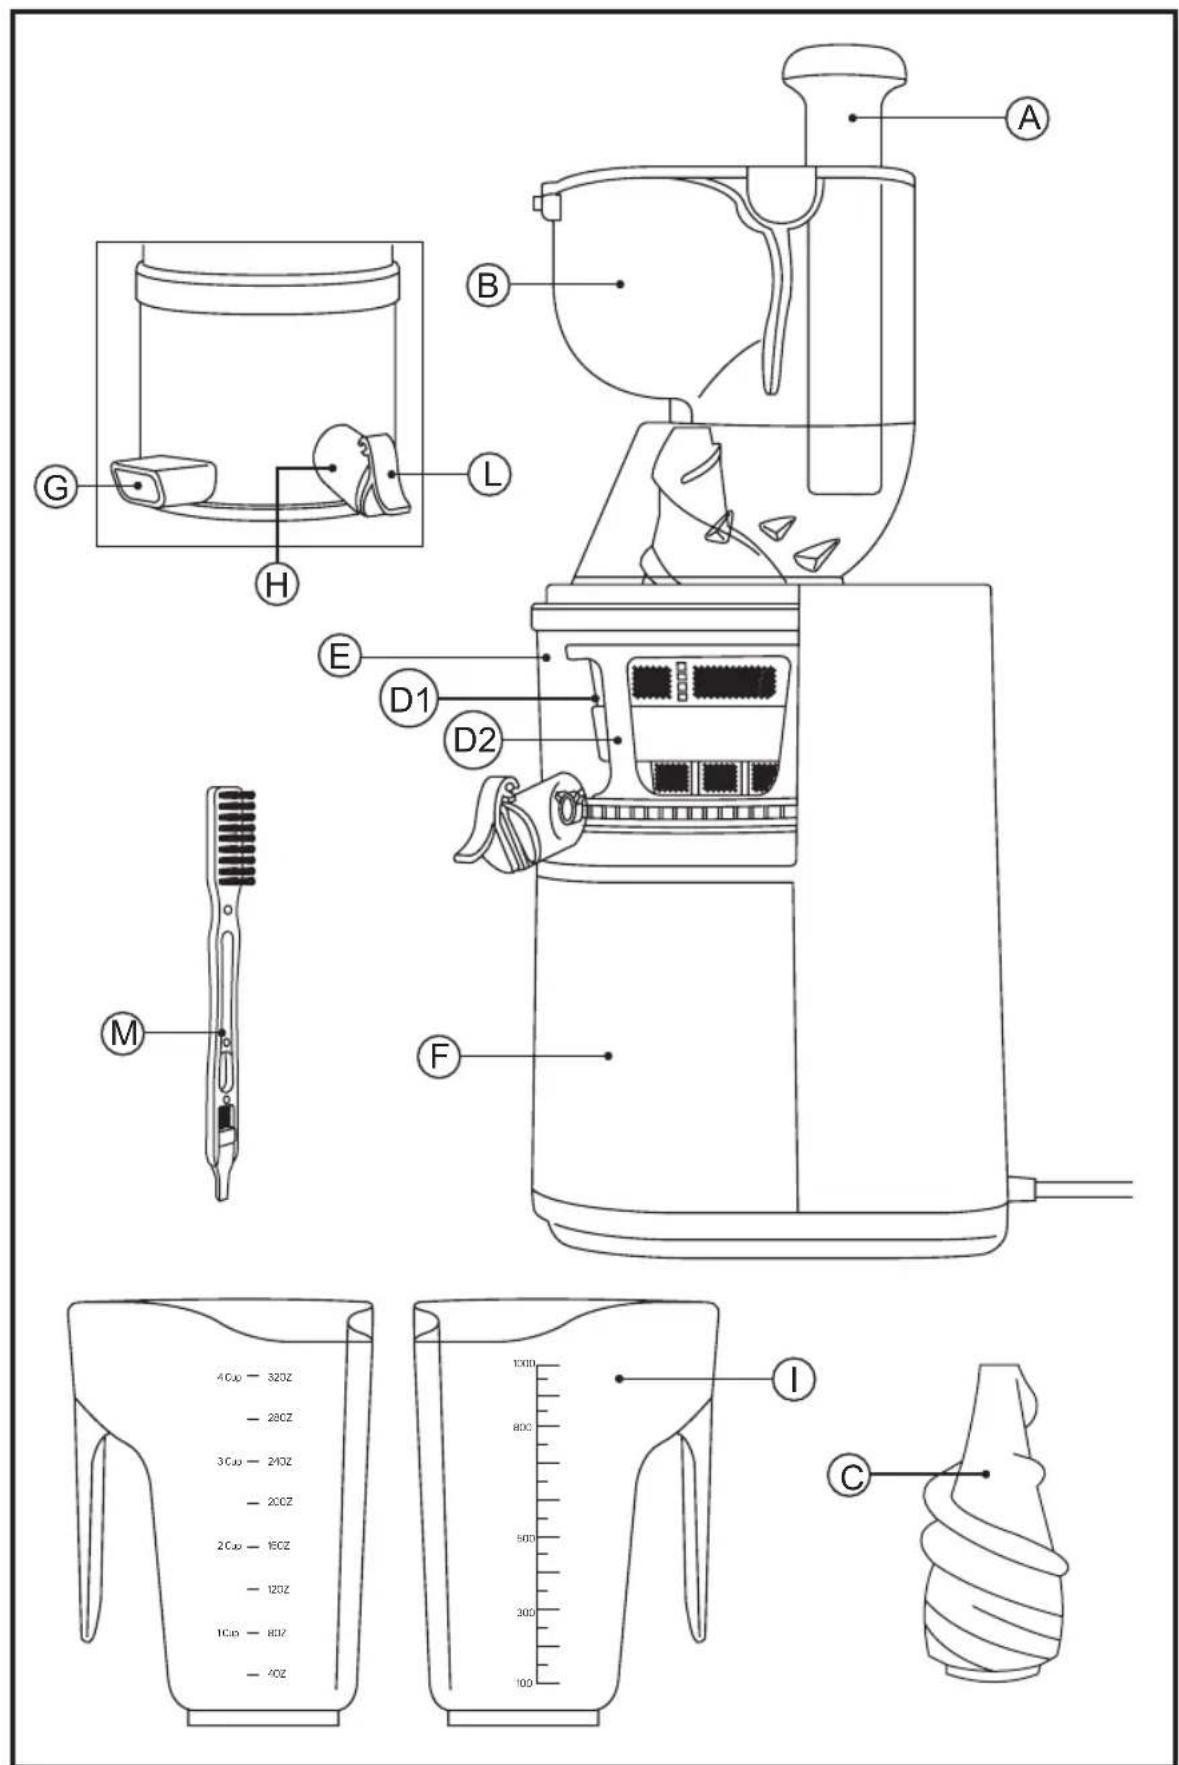
Español
Licuadora Liquajuice PRO
Many thanks for choosing to purchase a TAURUS brand product.
Thanks to its technology, design and operation and the fact that it exceeds the strictest quality standards, a fully satisfactory use and long product life can be assured.
Description
A Pusher
B Feeding tube
C Juice auger
D1 Filter
D2 Spinning Brush
E Juicer bowl
F Base
G Residue exit
H Juice exit
I Jugs (one to collect residue and one to collect juice)
J On/Off /Reverse button (3 positions)
K Reverse function
L Juice tap
M Cleaning Brush
N Rubber Stopper
Safety advice and warnings
- Read these instructions carefully before switching on the appliance and keep them for future reference. Failure to follow and observe these instructions could lead to an accident.
- Clean all the parts of the product that will be in contact with food, as indicated in the cleaning section, before use.
- This appliance shall not be used by children. Keep the
appliance and its cord out of reach of children.
- Always switch off the appliance and disconnect from supply if it is left unattended and before changing accessories or approaching parts that move in use, assembling, disassembling and cleaning.
- This appliance can be used by people with reduced physical, sensory or mental capabilities or lack of experience and knowledge if they have been given supervision or instruction concerning use of the appliance in a safe way and understand the hazards involved.
- This appliance is not a toy. Children should be supervised to ensure that they do not play with the appliance.
- If the connection to the mains has been damaged, it must be replaced, take the appliance to an authorized technical support service. Do not attempt to disassemble or repair the appliance by yourself in order to avoid a hazard.
- Do not use the appliance if the rotating sieve is damaged or the protecting cover is damaged or has visible cracks.
- Ensure that the voltage indicated on the rating label matches the mains voltage before plugging in the appliance.
- Connect the appliance to a base with an earth socket withstanding a minimum of 10 amperes.
- The appliance's plug must fit into the mains socket properly. Do not alter the plug. Do not use plug adaptors.
- Place the appliance on a horizontal, flat, stable surface.
- Do not use the appliance if the cable or plug is damaged.
- If any of the appliance casings breaks, immediately disconnect the appliance from the mains to prevent the possibility of an electric shock.
- Do not use the appliance if it has fallen on the floor, if there are visible signs of damage or if it has a leak.
- Keep the working area clean and well lit. Cluttered and dark areas invite accidents.
- Do not wrap the power cord around the appliance.
- Do not clip or crease the power cord.
- Check the state of the power cord. Damaged or tangled cables increase the risk of electric shock.
- The appliance is not suitable for outdoor use.
- Supply cord should be regularly examined for signs of damage, and if the cord is damaged, the appliance must not be used.
- Do not touch the plug with wet hands.
- Do not touch any of the appliance's moving parts while it is operating.
Use and care:
- Fully unroll the appliance's power cable before each use.
- Do not use the appliance if the parts are not properly fitted.
- Do not use the appliance if the switch does not work.
- Do not move the appliance while in use.
- This appliance is for household use only, not professional, industrial use.
- Store this appliance out of the reach of children and/or those with reduced physical, sensory or mental abilities or those unfamiliar with its use
- To push the food, always use the food pusher. Never use your fingers or other accessories.
- Never leave the appliance connected and unattended if is not in use. This saves energy and prolongs the life of the appliance.
- Do not use the appliance for more than 15 minutes at a time. In case of operate in cycles, allow the appliance a resting period of at least
10 minutes between each cycle. Under no circumstances should the appliance be operated for more time than necessary.
- Do not use the appliance with frozen goods, ice or those containing bones.
- Any misuse or failure to follow the instructions for use renders the guarantee and the manufacturer's liability null and void.
Instructions for use
Before use:
- Make sure that all the product's packaging has been removed.
- Before using the product for the first time, clean the parts that will come into contact with food in the manner described in the cleaning section.
Use:
Assembling
- Unroll the cable completely before plugging it in.
Juice Tap (L)
- it can be fixed onto the juice outlet, simply close the tap while juicing until the juicing bowl is approximately 1/2 full. Then open the juice tap allowing the juice flow into the juice pitcher/jug. The juice tap can also be effect on reducing froth and foaming in some juice & self clean
Important:
- Prior to assembling the juicer, please check this point: at the main Body of the juicing bowl there is a rubber stopper (N) (see fig 2). When in place, the Rubber stopper ensures all the juice only exits via the juice outlet. Before juicing always ensure that the rubber stopper (N) is firmly in place
- Put the juicer bowl (E) on the base (F) (Inserting the slots)
- Place the strainer (D1) into the spinning brush (D2), align the dot on the strainer keep in line with the arrow on the juicing bowl, then insert strainer together with the spinning brush into the juicing bowl. When the dots are correctly aligned the strainer and spinning brush will lock in place
- Put the juice auger (C) into the filter (D1) and turn until it drops into position
- Put the feeding tube (B) onto the juice bowl (E), making sure it is well fitted. To do it, align the arrow on the feeding tube (B) with the arrow on the juicing bowl (E) turning, toward the lock position
Attention:
If the auger (C) is not fully inserted, the cover will not close properly. Make sure the auger is well placed, turning and pressing down
- If feeding tube is not well closed, device won't operate properly.
Use
- Wash the fruit and /or vegetable and cut them into pieces that fit into the feeding tube.
- Please make sure that the switch is turned at "O" before to connect to the power.
- Connect the appliance to the mains.
- Put the juicer cup and residue cup under the juice and dregs spout
- The switch has 3 positions: (Fig 1)
ON- starts the machine and juicing process STOP- is the central position of the button. It stops the appliance
REV- is REVERSE. It is a function to be used when something is stuck in the juicer and it needs to be unclogged. Finger should keep pressing this button while it start working.
- Prepare the material you wish to juice. The slow juicer is designed to juice many different materials
-T he necessary preparation will be different depending on the used materials
- If you use small mouth juicing, ensure juice material is cut small portion for optimal juice extraction
- Each portion should easily fall down the hopper chute without the need for force
- If big mouth juicing, ensure the diameter of the fruit is less than 5.5 cm
- Turn the appliance on, by turning the control knob to setting "ON"
- Insert pre-cut pieces slowly in the feeding tube and allow juicer have time to work.
- Don't overstuff the hopper or force food in
- Only use the aid of the pusher when necessary
- Remark: If you process a large quantity of fruit, you must periodically clean the filter and remove the remains of the pulp.
Safety thermal protector:
- The appliance has a safety device, which protects the appliance from overheating.
- If the appliance turns itself off and does not switch itself on again, disconnect it from the mains supply, and wait for approximately 15 minutes before reconnecting. If the machine
does not start again seek authorised technical assistance.
NOTES:
- This product is only used for extract juice.
- Peel only the ingredients with thick skin such as citrus fruits, bananas, pineapples, melon and so on.)
-Remove the kernel from the fruits such as plums, peaches, cherries, apricots and so on) - Other fruit with soft peel should be washed before extracting such as apples, carrots, grapes, strawberry and so on.)
- Never put fruit kernel, excessively hard foods (ice cubes, sugar cubes), extremely fibrous food or meat into your juicer because they would damage the filter net and pusher.
-Switch "ON" stand for rotating clockwise, switch R stands for rotating reversely, switch "O" stands for stop. When there is some fruits be stuck between filter net and pusher, please turn the switch to speed "R" to make the fruit exit, then turn the switch to ON for extracting. - Slowly put the fruit into the feeding chute slowly, leaving the appliance to work
- Only use pusher assistance when necessary
NOTES:
- Please do not put your fingers or other objects to the feeding chute is blocked, please use the pusher or other fruit slice to push and remove the stuck fruit. If it still won't work, stop the machine and clean up the stuck fruit.
- Turn the switch to "O" if the juice cup or dregs is full, please also turn off the machine if there is no fruit. Empty the cup and clean the filter net and feeding chute for the next extracting.
Once you have finished using the appliance:
- Turn the appliance off, using the on/off switch.
- Unplug the appliance from the mains.
- Clean the appliance.
How to disassemble and clean the unit
- Switch off the unit
- Unplug the appliance from the mains.
- Twist the hopper anticlockwise then lift off. Lift the bowl straight up to remove from the base
- Disassemble the parts from the juicing bowl in the following order:
-
Auger (C), Filter (D1), Spinning brush (D2), Juice bowl (E)
-
Use the brush (M) to clean all these parts.
- Ensure pulp outlet is clear and unplug the rubber stopper(N) (Fig 2) for easier access to pulp outlet
- Use a damp cloth to wipe down the main body of unity
- Caution: Before juicing ensure the rubber stopper (N) is firmly placed
Cleaning
- Disconnect the appliance from the mains and allow it to cool before undertaking any cleaning task.
- Clean the equipment with a damp cloth with a few drops of washing-up liquid and then dry.
- Do not use solvents, or products with an acid or base pH such as bleach, or abrasive products, for cleaning the appliance.
- Never submerge the appliance in water or any other liquid or place it under running water.
- Put the filter net into the water and use a brus-her to clean it.
- Please use the soft damp cloth to wash the juice container, screw, pusher and feeding tray.
- It is advisable to clean the appliance regularly and remove any food remains.
- If the appliance is not in good condition of cleanliness, its surface may degrade and inexorably affect the duration of the appliance's useful life and could become unsafe to use.
- Then dry all parts before its assembly and storage.
Anomalies and repair
- Take the appliance to an authorized technical support service if product is damaged or other problems arise. Do not attempt to disassemble or repair the appliance yourself as this may be dangerous.
For EU product versions and/or in case that it is requested in your country:
Ecology and recyclability of the product
- The materials of which the packaging of this appliance consists are included in a collection, classification and recycling system. Should you wish to dispose of them, use the appropriate public recycling bins for each type of material.
- The product does not contain concentrations of substances that could be considered harmful to the environment.
This symbol means that in case you wish to dispose of the product once its working life has ended, take it to an authorized waste agent for the selective collection of Waste from Electric and Electronic
Equipment (WEEE).
This appliance complies with Directive 2014/35/EU on Low Voltage, Directive 2014/30/EU on Electromagnetic Compatibility, Directive 2011/65/EC on the restrictions of the use of certain hazardous substances in electrical and electronic equipment and Directive 2009/125/EC on the eco-design requirements for energy-related products.
Français
Extracteur de Jus
Liquajuice PRO LS-690