T 101 Adv HEPA - Vacuum Cleaner Kärcher - Free user manual and instructions
Find the device manual for free T 101 Adv HEPA Kärcher in PDF.
| Product type | Universal vacuum cleaner for floors and wall surfaces |
| Brand | Kärcher |
| Model | T 101 Adv HEPA |
| Usage | Professional (hotels, schools, hospitals, factories, offices) |
| Tank capacity | 10 L |
| Air flow (max.) | 38 l/s |
| Vacuum pressure (max.) | 18.5 kPa (185 mbar) |
| Nominal power consumption | 500 W |
| Mains voltage | 220-240 V |
| Mains frequency | 50-60 Hz |
| Protection class | II |
| Cable length | 12 m |
| Mains cable type | H05VV 2x1.0 GF |
| Dimensions (L × W × H) | 430 × 255 × 370 mm |
| Typical operating weight | 6.6 kg |
| Suction hose diameter | 35 mm |
| Sound pressure level LpA | 52 dB(A) |
| Sound power level LwA | 64 dB(A) |
| Hand-arm vibration value | < 2.5 m/s² |
| Filtration | HEPA filter (special accessory), exhaust air filter, motor protection filter, permanent filter basket |
| Operation | With or without vacuum bag |
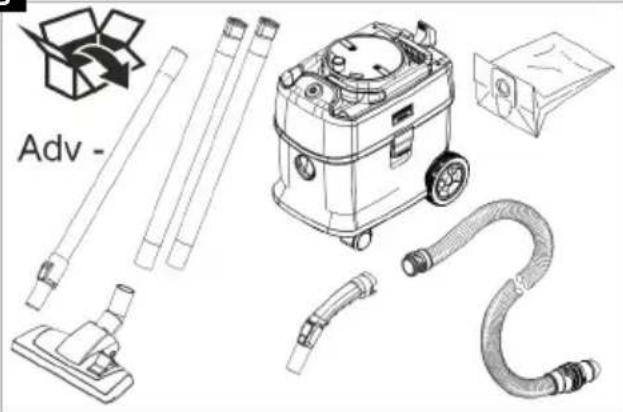
| Included accessories | Floor nozzle with hard floor/carpet switch, crevice nozzle, upholstery nozzle, telescopic tube, suction hose |
| Care and maintenance | Bag change, cleaning of permanent filter basket, filter replacement, emptying the tank |
| Warranty | According to country conditions (material or manufacturing defect) |
Frequently Asked Questions - T 101 Adv HEPA Kärcher
User questions about T 101 Adv HEPA Kärcher
0 question about this device. Answer the ones you know or ask your own.
Ask a new question about this device
Download the instructions for your Vacuum Cleaner in PDF format for free! Find your manual T 101 Adv HEPA - Kärcher and take your electronic device back in hand. On this page are published all the documents necessary for the use of your device. T 101 Adv HEPA by Kärcher.
USER MANUAL T 101 Adv HEPA Kärcher
T 10/1
T 10/1 Adv/HEPA
T 15/1
T 15/1 Adv/HEPA
Deutsch 5
English 9
Français 13
Italiano 17
Espanol 21
Portugues 25
Nederlands 29
Türkce 33
Svenska 37
Suomi 41
Norsk 45
Dansk 49
Eesti 53
Latviešu 57
Lietuviskai 61
Polski 65
Magyar 69
Cestina 73
Slovencina 77
Slovenscina 81
Romaneste 85
Hrvatski 89
Srpski 93
EAAyivka 97
Pycckn 101
ykpaiHcbka 105
Блгарский 109
Ka3akwa 113
中文 117
a 120
B
3
1
4
2
5
2

Inhalt

H.Jenner
Chairman of the Board of Management
S. Reiser
Director Regulatory Affairs & Certification
71364 Winnenden (Germany)
Tel.: +49 7195 14-0
Fax: +49 7195 14-2212
Winnenden, 2020/10/01
Technische Daten
Environmental protection. 9
Intended use 9
Description of the device 9
Preparation. 9
Initial startup 9
Operation. 10
Transport 10
Storage. 10
Care and service 10
Troubleshooting guide 11
Warranty 11
Accessories and spare parts 11
Declaration of Conformity 11
Technical data 12
General notes


Read these original instructions and the enclosed safety instructions before using the device for the first time. Act in ac
cordance with them.
Keep both books for future reference or for future owners.
- If the operating instructions and safety instructions are not observed, the device can be damaged and dangers could arise for users and other persons.
- Notify the dealer immediately in the case of shipping damage.
- Check the package contents when unpacking for missing accessories or for damage.
Environmental protection

The packing materials can be recycled. Please dispose of packaging in accordance with the environmental regulations.

Electrical and electronic devices contain valuable, recyclable materials and often components such as batteries, rechargeable batteries or oil, which - if handled or disposed of incorrectly - can
pose a potential danger to human health and the environment. However, these components are required for the correct operation of the device. Devices marked by this symbol are not allowed to be disposed of together with the household rubbish.
Notes on the content materials (REACH)
Current information on content materials can be found at: www.kaercher.de/REACH
Intended use
WARNING
Health risk
Inhalation of dusts that are harmful to health Do not use the device for vacuuming up dusts that are harmful to health.
ATTENTION
Damage to the device
Short-circuit due to high levels of humidity
Only use and store the device indoors.
- This universal vacuum cleaner for carpets is intended for dry cleaning floor and wall surfaces.
- This device is suitable for commercial use, e.g. in hotels, schools, hospitals, factories, shops, offices, and rental companies.
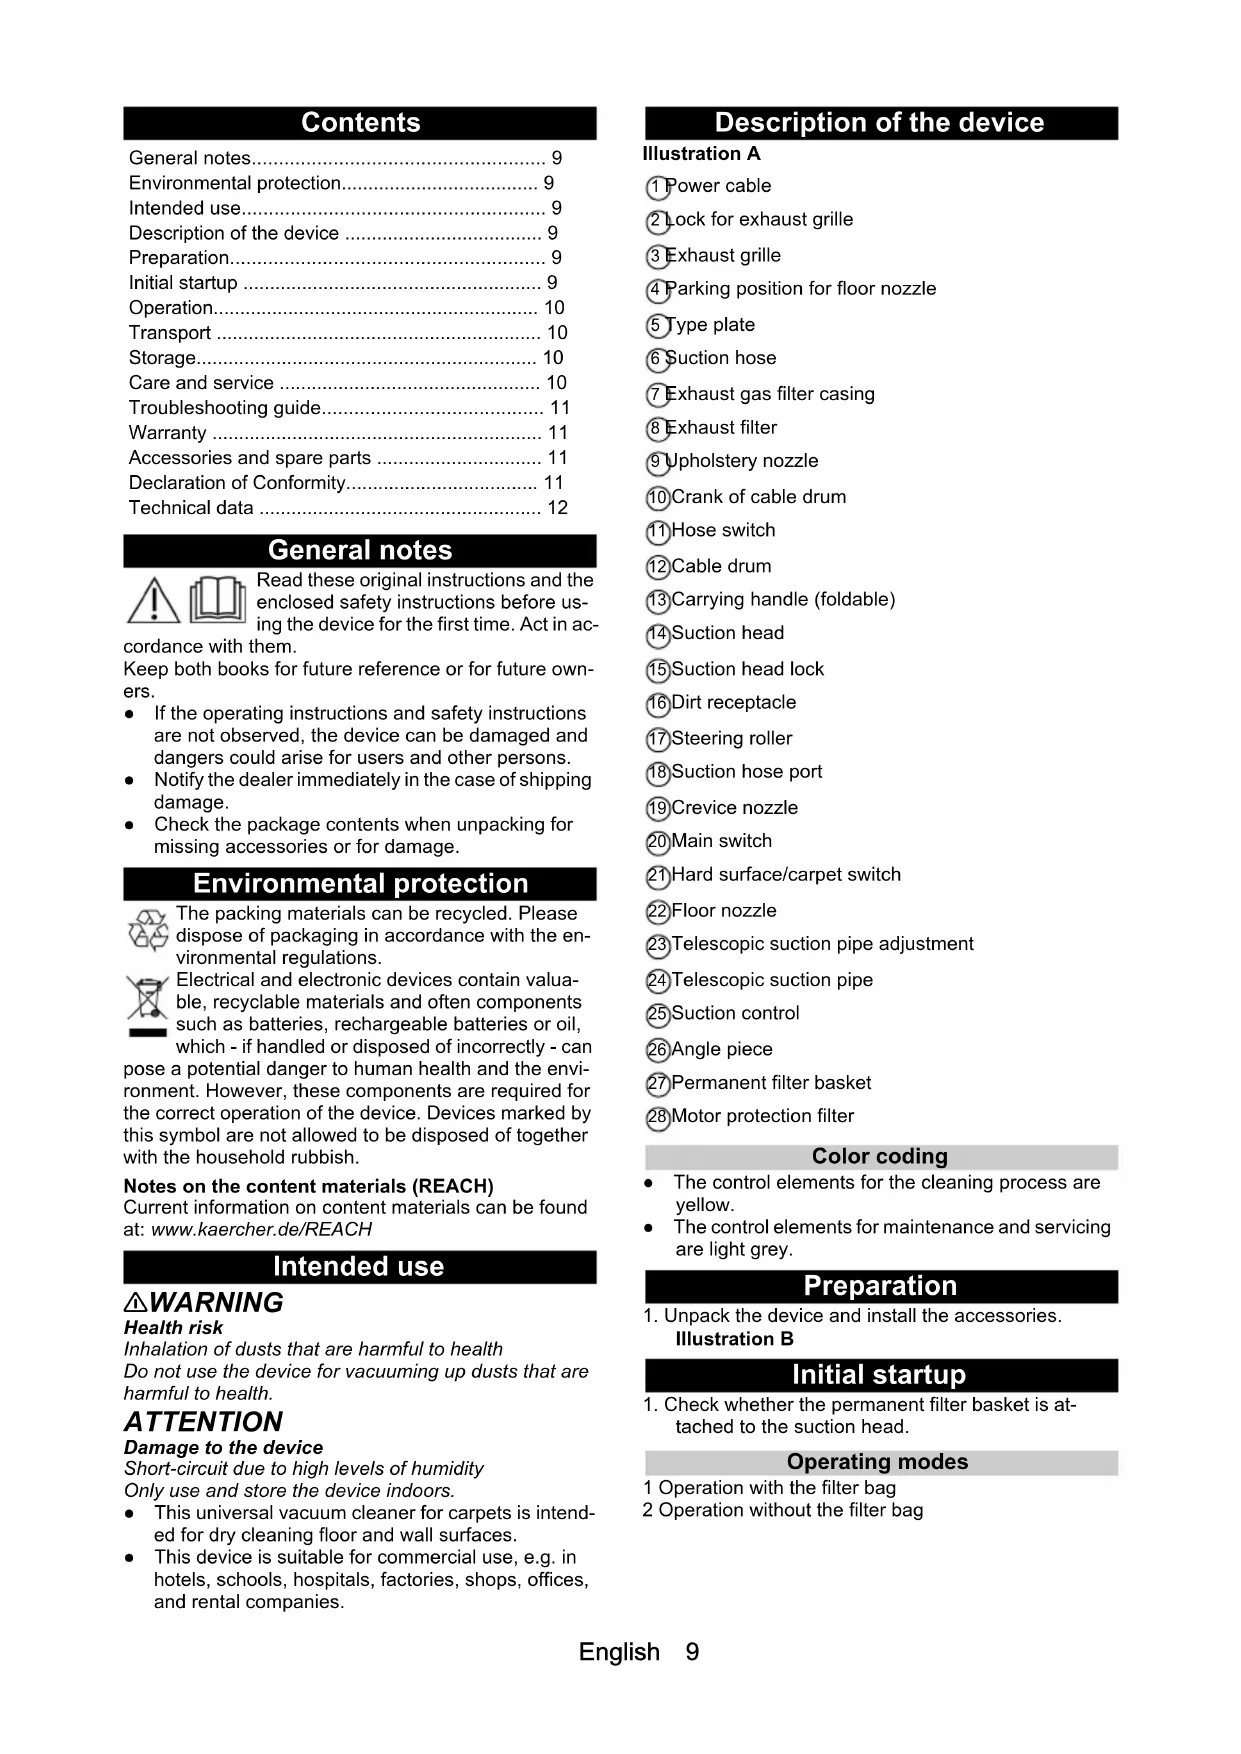
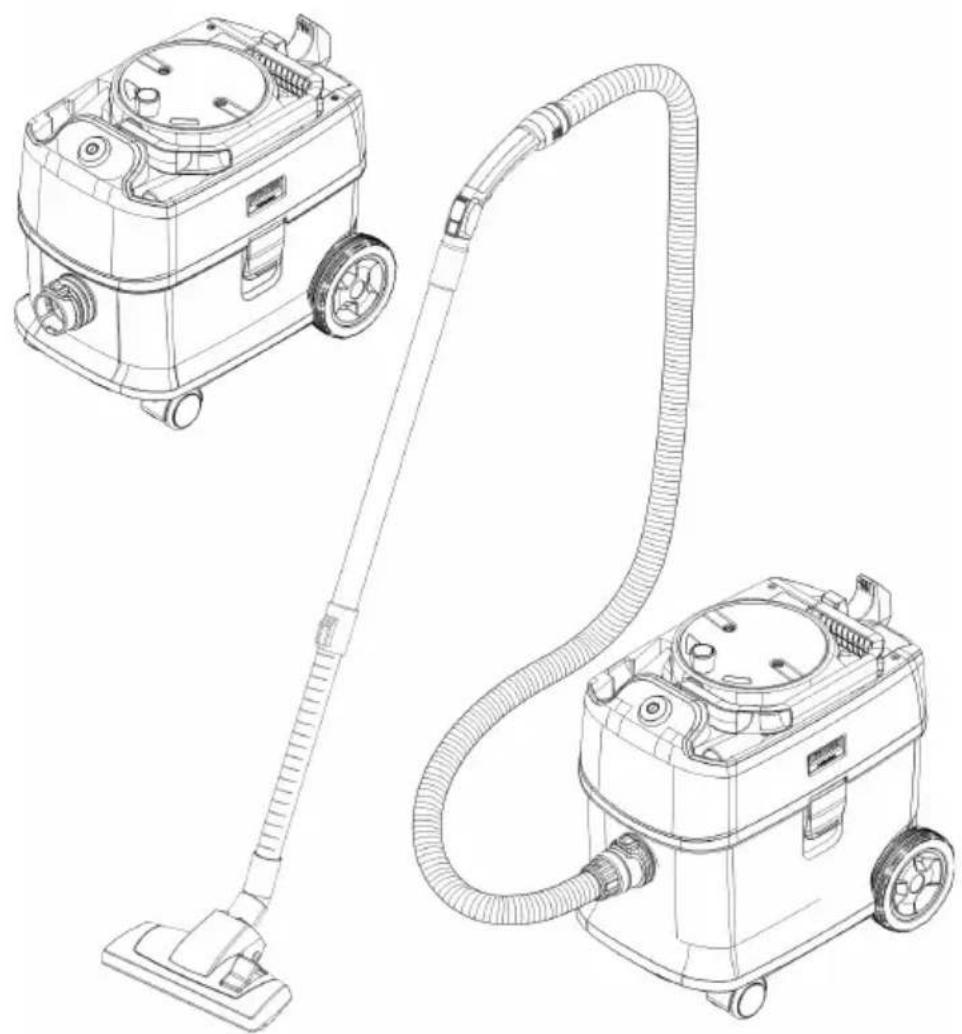
Description of the device
Illustration A
1 Power cable
2ock for exhaust grille
3 Exhaust grille
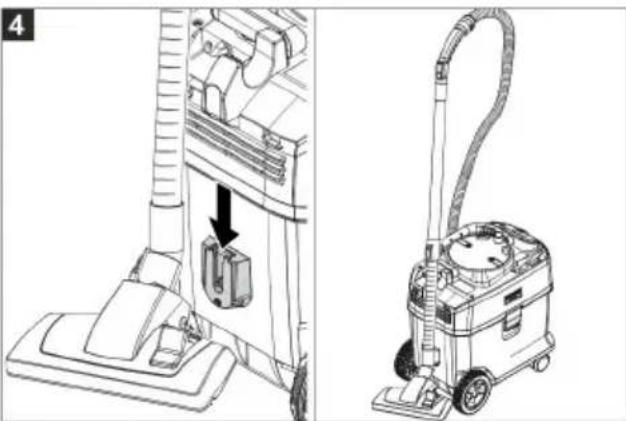
4 Parking position for floor nozzle
5Type plate
⑥ suction hose
7 Exhaust gas filter casing
Exhaust filter
9 Upholstery nozzle
10 Crank of cable drum
1) Hose switch
12Cable drum
13Carrying handle (foldable)
14Suction head
15Suction head lock
16Dirt receptacle
17 Steering roller
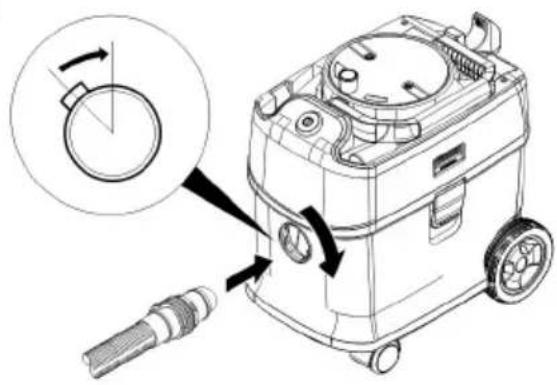
Suction hose port
19Crevicenozzle
20Main switch
1 Hard surface/carpet switch
② Floor nozzle
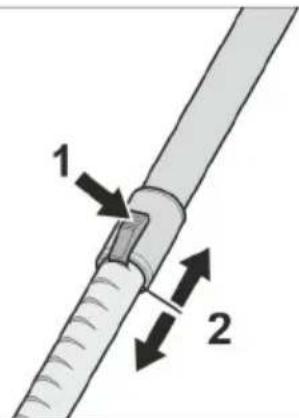
23)Telescopic suction pipe adjustment
24 Telescopic suction pipe
25Suction control
26Angle piece
27Permanent filter basket
28)Motor protection filter
Color coding
- The control elements for the cleaning process are yellow.
- The control elements for maintenance and servicing are light grey.
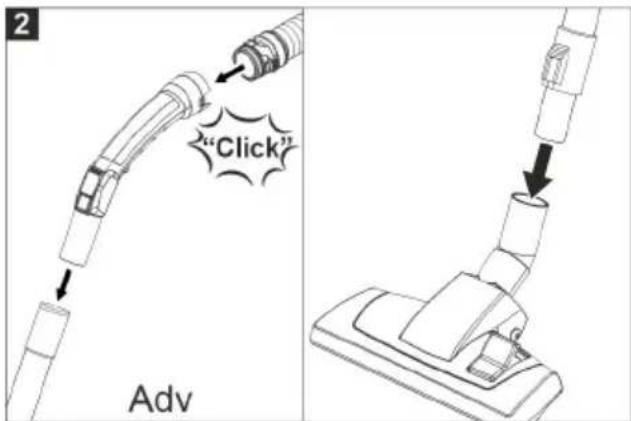
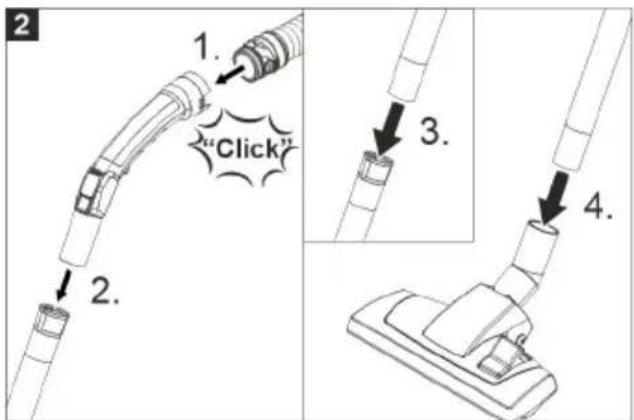
Preparation
- Unpack the device and install the accessories. Illustration B
Initial startup
- Check whether the permanent filter basket is attached to the suction head.
Operating modes
1 Operation with the filter bag
2 Operation without the filter bag
Installing HEPA filter (optional accessory)
- Unlock and remove the exhaust grille.
- Remove the exhaust gas filter casing.
- Insert the HEPA filter (special accessory).
- Attach and lock the exhaust grille.
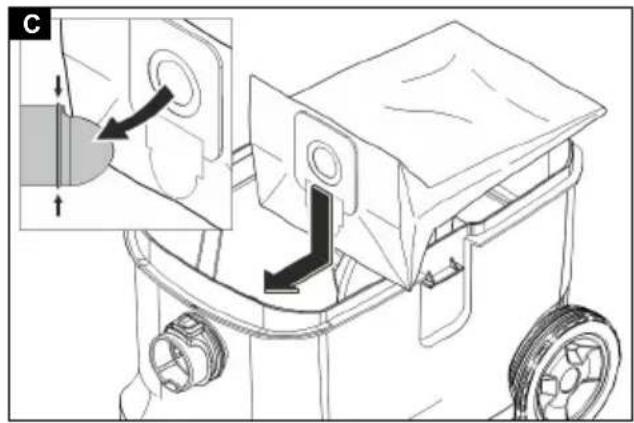
Installing the filter bag
- Unlock and remove the suction head.
- Fit the fleece filter bag. Pull the opening of the filter bag completely over the shoulder of the suction hose port.
Illustration C
- Fit the suction head and lock.
Operation
Switching on the device
- Connect the mains plug.
- Switch on the device at the main switch.
Adjusting the suction power
- Regulate the suction power on the suction control.
Cleaning mode
- Set the floor nozzle switch to hard surface or carpet.
- Perform cleaning.
Switching off the device
- Switch off the device at the main switch.
- Pull out the mains plug.
After each operation
- Empty the container.
- Vacuum the inside and outside of the device and clean with a moist cloth.
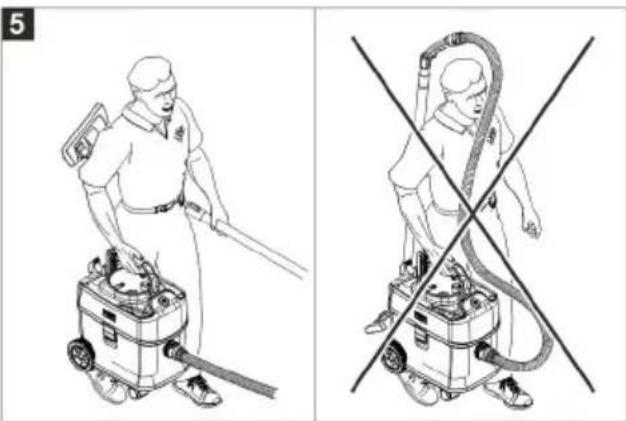
Transport
CAUTION
Failure to observe the weight
Risk of injury and damage
Be aware of the weight of the device during transportation.
- When transporting the device in vehicles, secure it to prevent it from slipping or overturning in accordance with the respectively applicable guidelines.
Storage
CAUTION
Failure to observe the weight
Risk of injury and damage
Be aware of the weight of the device during storage.
The device may only be operated indoors.
Care and service
△DANGER
Danger of electric shock
Injuries due to touching live parts
Switch off the device.
Remove the mains plug.
Cleaning the permanent filter basket
ATTENTION
Danger due to wet permanent filter basket
Risk of damage to the device
Never insert the permanent filter basket when wet.
- Unlock and remove the suction head.
- Turn the suction head by 180^ and set it down.
-
Unlock and remove the permanent filter basket.
-
If necessary, clean the permanent filter basket (washable) under running water and let it dry.
- Fit the permanent filter basket and snap it into place.
- Fit the suction head and lock.
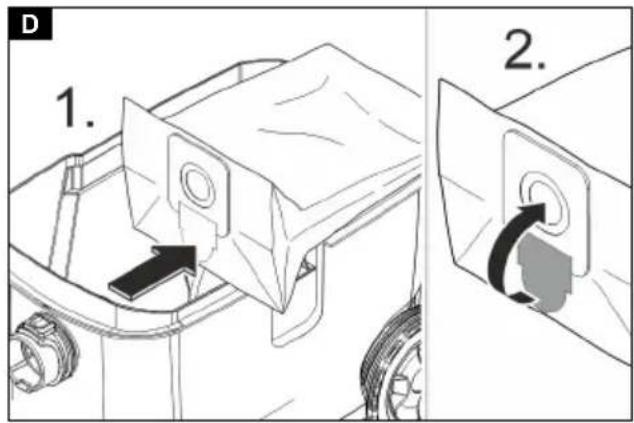
Changing the filter bag
- Unlock and remove the suction head.
- Remove the fleece filter bag from the suction hose port.
Illustration D
- Fold in the lock latch and seal the fleece filter bag tight.
-
Fit a new fleece filter bag. Pull the opening of the filter bag completely over the shoulder of the suction hose port.
-
Fit the suction head and lock.
Replacing the exhaust filter
Exhaust filter: replace as required, but at least once a year
- Unlock and remove the exhaust grille.
- Remove the exhaust gas filter casing.
- Remove the exhaust filter from the exhaust gas filter casing.
- Insert a new exhaust filter in the exhaust filter casing.
- Insert the exhaust gas filter casing.
- Attach and lock the exhaust grille.
Replacing HEPA filter (optional accessory)
HEPA filter: replace as required, but at least once a year
- Unlock and remove the exhaust grille.
- Remove the HEPA filter (special accessories).
- Insert a new HEPA filter (special accessory).
- Attach and lock the exhaust grille.
Replacing the motor protection filter
- Unlock and remove the suction head.
- Turn the suction head by 180^ and set it down.
- Unlock and remove the permanent filter basket.
- Remove the motor protection filter.
- Fit a new motor protection filter.
- Fit the permanent filter basket and snap it into place.
- Fit the suction head and lock.
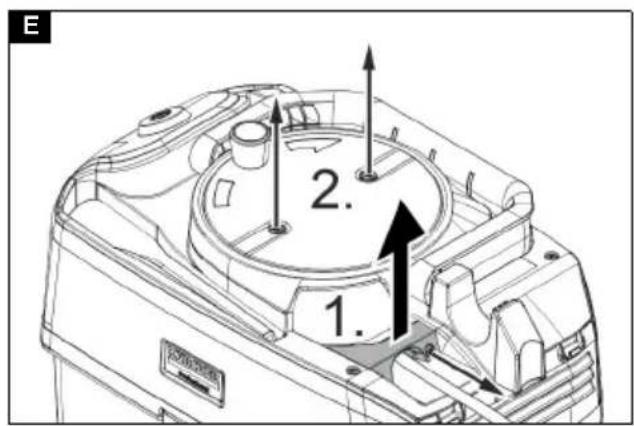
Replacing the mains cable
- Unscrew and remove the mains cable guide. Illustration E
- Unscrew and remove the cover of the cable drum.
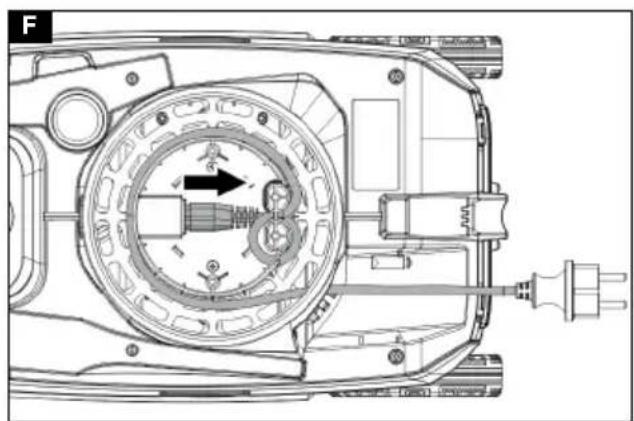
- Unwind the mains cable from the cable drum. Illustration F
- Unplug and remove the mains cable.
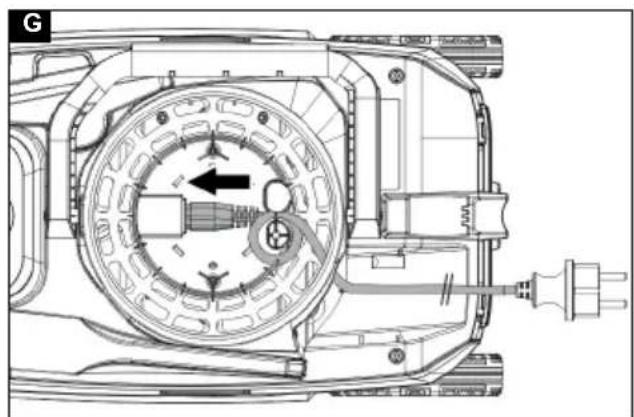
- Plug in the new mains cable and route it as shown in the illustration (strain relief). Illustration G
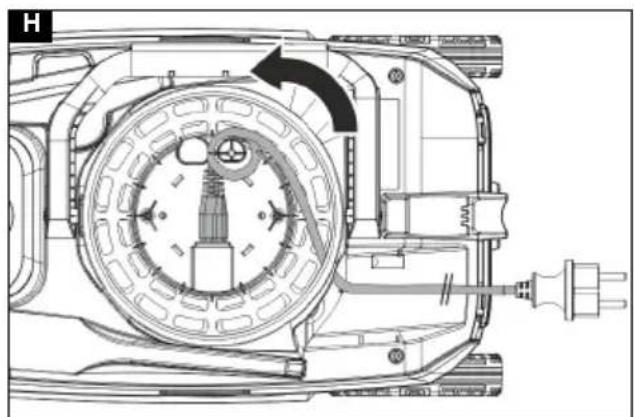
- Turn the cable drum 90^ anti-clockwise so that the mains cable is slightly pre-tensioned and thus lies tightly against the pin. Illustration H
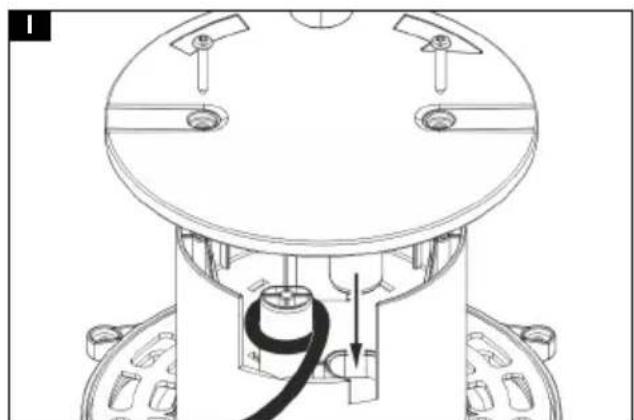
- Position the cover of the cable drum so that the mains cable is not crushed. Fasten the cover. Illustration I
- Wind up the mains cable in a clockwise direction.
- Attach and fasten the mains cable guide. Illustration J
Troubleshooting guide
△DANGER
Danger of electric shock
Injuries due to touching live parts
Switch off the device.
Remove the mains plug.
The device stops during operation
The motor thermo-protector has triggered
- Check all parts for clogging.
- Change the fleece filter bag.
- Replace the motor protection filter.
- Replace the exhaust filter or the HEPA filter (optional accessory).
- Allow the engine turbine to cool for approx. 30-40 minutes. Switch the device on again.
Suction turbine does not start up
- Check the socket and the power supply fuse.
- Check the mains cable and the mains plug of the device.
- Turn on the device again.
Suction force decreases
- Remove all blockages from the suction nozzle, the suction pipe or the suction hose.
- Change the fleece filter bag.
- Clean the permanent filter basket under running water and allow to dry.
- Position/lock the suction head correctly.
- Replace a defective suction hose.
- Replace the motor protection filter.
Escaping dust when vacuuming
- Check the fit of the fleece filter bag.
- Change the fleece filter bag
- Position/lock the suction head correctly.
- Clean the permanent filter basket under running water and allow to dry.
- Insert a new permanent filter basket.
- Correctly insert the motor protection filter or replace.
Customer Service department
If the malfunction cannot be corrected, the device must be checked by the Customer Service department.
Warranty
The warranty conditions issued by our relevant sales company apply in all countries. We shall remedy possible malfunctions on your appliance within the warranty period free of cost, provided that a material or manufacturing flaw is the cause. In a warranty case, please contact your dealer (with the purchase receipt) or the next authorised customer service site.
(See overleaf for the address)
Further warranty information (if available) can be found in the service area of your local Kärcher website under "Downloads".
Accessories and spare parts
Only use original accessories and original spare parts. They ensure that the appliance will run fault-free and safely.
Information on accessories and spare parts can be found at www.kaercher.com.
Declaration of Conformity
EU Declaration of Conformity
We hereby declare that the machine described below complies with the relevant basic safety and health requirements in the EU Directives, both in its basic design and construction as well as in the version placed in circulation by us. This declaration is invalidated by any changes made to the machine that are not approved by us.
Product: Dry vacuum cleaner
Type: 1.355-xxx
Type: 1.527-xxx
Currently applicable EU Directives
2006/42/EC (+2009/127/EC)
2009/125/EC
2011/65/EU
2014/30/EU
Harmonised standards used
EN IEC 63000:2018
EN 55014-1:2017 + A11:2020
EN 55014-2: 2015
EN 60312-1: 2017
EN 60335-1
EN 60335-2-69
EN 61000-3-2: 2014
EN 61000-3-3: 2013
EN 62233: 2008
National standards used
Commission Regulation(s)
666/2013
The signatories act on behalf of and with the authority of the company management.

H.Jenner
Chairman of the Board of Management

S. Reiser
Director Regulatory Affairs & Certification
Documentation supervisor:
S. Reiser
Alfred Kärcher SE & Co. KG
Alfred-Karcher-Str. 28 - 40
71364 Winnenden (Germany)
Ph.: +49 7195 14-0
Fax: +49 7195 14-2212
Winnenden, 2020/10/01
Declaration of Conformity (UK)
We hereby declare that the product described below complies with the relevant provisions of the following UK Regulations, both in its basic design and construction as well as in the version put into circulation by us. This declaration shall cease to be valid if the product is modified without our prior approval.
Product: Dry vacuum cleaner
Type: 1.355-xxx
Type: 1.527-xxx
Currently applicable UK Regulations
S.I. 2008/1597 (as amended)
S.I. 2010/2617 (as amended)
S.I. 2012/3032 (as amended)
S.I. 2016/1091 (as amended)
Designated standards used
ENIEC63000:2018
EN 55014-1:2017 + A11:2020
EN 55014-2: 2015
EN 60312-1: 2017
EN 60335-1
EN 60335-2-69
EN 61000-3-2: 2014
EN 61000-3-3: 2013
EN 62233: 2008
National standards used
Commission Regulation(s)
(EU) No 666/2013
The signatories act on behalf of and with the authority of the company management.

H.Jenner
Chairman of the Board of Management

S. Reiser
Director Regulatory Affairs & Certification
Documentation supervisor:
S. Reiser
Alfred Karcher SE & Co. KG
Alfred-Karcher-Str. 28 - 40
71364 Winnenden (Germany)
Ph.: +49 7195 14-0
Fax: +49 7195 14-2212
Winnenden, 2020/10/01
Technical data
| Kärcher T 10/1 (Adv/HEPA) | Kärcher T 15/1 (Adv/HEPA) | ||
| Electrical connection | |||
| Mains voltage V 220-240 220-240 | |||
| Phase ~ 1 1 | |||
| Power frequency Hz 50-60 50-60 | |||
| Protection class II II | |||
| Rated power input W 500 500 | |||
| Device performance data | |||
| Tank content | 1 | 10 | 15 |
| Air quantity (max.) l/s 38 | 38 | ||
| Vacuum (max.) | kPa (mbar) | 18,5 (185) | 18,5 (185) |
| Dimensions and weights | |||
| Length x width x height | mm | 430 x 255 x 370 | 430 x 255 x 420 |
| Typical operating weight | kg | 6,6 | 6,9 |
| Diameter of the suction hose | mm | 35 | 35 |
| Ambient conditions | |||
| Ambient temperature (max.) | °C | +40 +40 | |
| Determined values in acc. with EN 60335-2-69 | |||
| Sound pressure level LpA | dB(A) | 52 | 52 |
| Uncertainty KpA | dB(A) | 2 2 | |
| Sound power level LwA | dB(A) | 64 | 64 |
| Hand-arm vibration value | m/s2 | <2,5 | <2,5 |
| Uncertainty K | m/s2 | 0,2 | 0,2 |
| Mains cable | |||
| Power cord type | mm2 | H05VV 2x1,0 GF | H05VV 2x1,0 GF |
| Part number (EU) | 6.650-915.0 | 6.650-915.0 | |
| Part number (GB) | 6.652-282.0 | 6.652-282.0 | |
| Part number (CH) | 6.652-281.0 | 6.652-281.0 | |
| Cable length | m | 12 | 12 |
Subject to technical modifications.
Contenu
Remarques generales. 13
2006/42/CE (+2009/127/CE)
2009/125/CE
2011/65/UE
2014/30/UE
Ordonnance(s) appliquee(s)
666/2013

H.Jenner
Chairman of the Board of Management

S. Reiser
Director Regulatory Affairs & Certification
Responsible de la documentation :
S. Reiser
\section*{Caracteristiques techniques}

H.Jenner
Chairman of the Board of Management

S. Reiser
Director Regulatory Affairs & Certification
2006/42/CE (+2009/127/CE)
2009/125/CE
2011/65/UE
2014/30/UE

H.Jenner
Chairman of the Board of Management

S. Reiser
Director Regulatory Affairs & Certification
Responsible de documentacion:
S. Reiser
Datasétécnicos
2006/42/CE (+2009/127/CE)
2009/125/CE
2011/65/UE
2014/30/UE

H.Jenner
Chairman of the Board of Management

S. Reiser
Director Regulatory Affairs & Certification
Chairman of the Board of Management

S. Reiser
Director Regulatory Affairs & Certification
71364 Winnenden (Germany)
Tel.: +49 7195 14-0
Fax: +49 7195 14-2212
Winnenden, 2020/10/01
Technische gegevens
2006/42/AT (+2009/127/AT)
2009/125/EG
2011/65/AB
2014/30/AB
Chairman of the Board of Management

S. Reiser
Director Regulatory Affairs & Certification
Winnenden, 2020/10/01
Teknik bilgiler

Chairman of the Board of Management
S. Reiser
Director Regulatory Affairs & Certification
Dokumentationsbefullmaktigad:
S. Reiser
Alfred Kärcher SE & Co. KG
Alfred-Karcher-Str.28-40
D-71364 Winnenden (Germany)
Tfn: +49 7195 14-0
Fax: +49 7195 14-2212
Winnenden, 2020/10/01
Tekniska data

Chairman of the Board of Management
S. Reiser
Director Regulatory Affairs & Certification
71364 Winnenden (Germany)
Puh.: +49 7195 14-0
Winnenden, 2020/10/01
Tekniset tiedot
Stovutslipp under suging
2006/42/EF (+2009/127/EF)
2009/125/EF
2011/65/EU
2014/30/EU
Anvende harmoniserte standarder
ENIEC63000:2018
EN 55014-1:2017 + A11:2020
EN 55014-2: 2015
EN 60312-1: 2017
EN 60335-1
EN 60335-2-69
EN 61000-3-2: 2014
EN 61000-3-3: 2013
EN 62233: 2008
Chairman of the Board of Management

S. Reiser
Director Regulatory Affairs & Certification
71364 Winnenden (Germany)
TIf.: +49 7195 14-0
Winnenden, 2020/10/01
Relevant EU-directtiver
2006/42/EF (+2009/127/EF)
2009/125/EF
2011/65/EU
2014/30/EU
Chairman of the Board of Management

S. Reiser
Director Regulatory Affairs & Certification
71364 Winnenden (Germany)
TIf.: +49 7195 14-0
Fax: +49 7195 14-2212
Winnenden, 2020/10/01
Tekniske data
Toode: Kuivimur
Tüpp: 1.355-xxx
Tüpp: 1.527-xxx
Chairman of the Board of Management

S. Reiser
Director Regulatory Affairs & Certification
Dokumentatsoonivolinik:
S. Reiser
Alfred Kärcher SE & Co. KG
Alfred-Karcher-Str. 28 - 40
71364 Winnenden (Germany)
Tel: +49 7195 14-0
Winnenden, 2020/10/01
Tehnilised andmed
| Kärcher T 10/1 (Adv/HEPA) | Kärcher T 15/1 (Adv/HEPA) | ||
| Elektrühendus | |||
| Vörgupinge V 220-240 220-240 | |||
| Faas ~ 1 1 | |||
| Vörgusagedus Hz 50-60 50-60 | |||
| Kaitseklass II II | |||
| Nimivöimsustarve W 500 500 | |||
| Seadme vöimsusandmed | |||
| Paagi maht | I | 10 | 15 |
| Öhukogus (max) | I/s | 38 | 38 |
| Alaröhk (max) | kPa (mbar) | 18,5 (185) | 18,5 (185) |
| Mööttmed ja kaalud | |||
| Pikkus x laius x körgus | mm | 430 x 255 x 370 | 430 x 255 x 420 |
| Tüüpiline toökaal | kg | 6,6 | 6,9 |
| Imivooliku lübimõöt | mm | 35 | 35 |
| Ubrustingimused | |||
| Uembrustemperatuar (max) | °C | +40 +40 | |
| Kindlakstehtud värtused EN 60335-2-69 kohaselt | |||
| Heliröhutase LpA | dB(A) | 52 | 52 |
| Ebakindlus KpA | dB(A) | 2 2 | |
| Helivöimsustase LWA | dB(A) | 64 | 64 |
| Labakäsi-käsivars vibratsioonivärtus | m/s2 | <2,5 | <2,5 |
| Ebakindlus K | m/s2 | 0,2 | 0,2 |
| Vörgukaabel | |||
| Vörgukaabli tüüp | mm2 | H05VV 2x1,0 GF | H05VV 2x1,0 GF |
| Osa number (EU) | 6.650-915.0 | 6.650-915.0 | |
| Osa number (GB) | 6.652-282.0 | 6.652-282.0 | |
| Osa number (CH) | 6.652-281.0 | 6.652-281.0 | |
| Kaabli pikkus | m | 12 | 12 |
Tips: 1.355-xxx
Tips: 1.527-xxx

H.Jenner
Chairman of the Board of Management

S. Reiser
Director Regulatory Affairs & Certification
Pilvarotais sagatavot dokumentaciju:
S. Reizers (S. Reiser)
Alfred Kärcher SE & Co. KG
Alfred-Karcher-Str.28-40
71364 Winnenden (Vacija)
Talr.: +49 7195 14-0
Fakss: +49 7195 14-2212
Winnenden, 2020/10/01
Tehniskie datum
Chairman of the Board of Management
S. Reiser
Director Regulatory Affairs & Certification
Winnenden, 2020/10/01
Techninai duomenys
| Kärcher T 10/1 (Adv/HEPA) | Kärcher T 15/1 (Adv/HEPA) | ||
| Elektros jungtis | |||
| Tinklo jtampa V 220-240 220-240 | |||
| Fazé ~ 1 | 1 | ||
| Tinklo dažnis Hz 50-60 50-60 | |||
| Apsaugos klase II II | |||
| Vardiné naudojamoji galia | W | 500 | 500 |
| Irenginio galios duomenys | |||
| Talpyklos türis | I | 10 | 15 |
| Oro kiekis (maks.) | I/s | 38 | 38 |
| Neigiamasis slëgis (maks.) | kPa (mbar) | 18,5 (185) | 18,5 (185) |
| Matmenys ir svoriai | |||
| Ilgis x plotis x aukëstis | mm | 430 x 255 x 370 | 430 x 255 x 420 |
| Tipinis darbinis svoris | kg | 6,6 | 6,9 |
| Siurbiamosios Žarnos skersmuo | mm | 35 | 35 |
| Aplinkos salygos | |||
| Aplinkos temperatūra (maks.) | °C | +40 | +40 |
| Nustatyta vertë pagal EN 60335-2-69 | |||
| Garso lygis LpA | dB(A) | 52 | 52 |
| Neapibrežtis KpA | dB(A) | 2 2 | |
| Garso galios lygis LwA | dB(A) | 64 | 64 |
| Plašakos ir rankos vibracijos vertë | m/s² | <2,5 | <2,5 |
| Neapibrežtis K | m/s² | 0,2 | 0,2 |
| Tinklo kabelis | |||
| Tinklo kabelio tipas | mm² | H05VV 2x1,0 GF | H05VV 2x1,0 GF |
| Dalies numeris (EU) | 6.650-915.0 | 6.650-915.0 | |
| Dalies numeris (GB) | 6.652-282.0 | 6.652-282.0 | |
| Dalies numeris (CH) | 6.652-281.0 | 6.652-281.0 | |
| Kabelio ilgis | m | 12 | 12 |
Pasiliekame teise daryti techninius pakeitimus.
Spis tresci
Ogólne wskazówki 65
2006/42/WE (+2009/127/WE)
2009/125/WE
2011/65/UE
2014/30/UE

H.Jenner
Chairman of the Board of Management

S. Reiser
Director Regulatory Affairs & Certification
Administrator dokumentaci:
S. Reiser
Alfred Karcher SE & Co. KG
Alfred-Karcher-Str. 28 - 40
71364 Winnenden (Germany)
Tel.: +49 7195 14-0
Winnenden, 2020/10/01
Dane techniczne

H.Jenner
Chairman of the Board of Management

S. Reiser
Director Regulatory Affairs & Certification
Winnenden, 2020/10/01
Muszaki adatok
Chairman of the Board of Management

S. Reiser
Director Regulatory Affairs & Certification
Zmocnenec pro Dokumentaci:
S. Reiser
Alfred Kärcher SE & Co. KG
Alfred-Karcher-Str.28-40
Winnenden, 2020/10/01
Technické udaje
2006/42/ES (+2009/127/ES)
2009/125/ES
2011/65/EU
2014/30/EU
Chairman of the Board of Management

S. Reiser
Director Regulatory Affairs & Certification
71364 Winnenden (Germany)
Tel.: +49 7195 14-0
Fax: +49 7195 14-2212
Winnenden, 2020/10/01
Technické udaje
| Kärcher T 10/1 (Adv/HEPA) | Kärcher T 15/1 (Adv/HEPA) | ||
| Elektrická priwowka | |||
| Sietové napätie V 220-240 220-240 | |||
| Fáza ~ 1 1 | |||
| Sietová frekvencia Hz 50-60 50-60 | |||
| Trieda ochrany II II | |||
| Menovitý príkon W 500 500 | |||
| Výkonové udaje pristroja | |||
| Objem námody | I | 10 | 15 |
| Množstvo vzduchu (max.) | I/s | 38 | 38 |
| Podtlak (max.) | kPa (mbar) | 18,5 (185) | 18,5 (185) |
| Rozmery a hmotnosti | |||
| Dlžka x šírna x výška | mm | 430 x 255 x 370 | 430 x 255 x 420 |
| Typická prevádková hmotnost' | kg | 6,6 | 6,9 |
| Priemer nasévacej hadice | mm | 35 | 35 |
| Podmienky prostredia | |||
| Teplota okolia (max.) | °C | +40 +40 | |
| Zistené hodnoty podla EN 60335-2-69 | |||
| Hladina akustického tlaku LpA | dB(A) | 52 | 52 |
| Neistota KpA | dB(A) | 2 2 | |
| Hladina akustického výkonu LwA | dB(A) | 64 | 64 |
| Hodnota vibraciú ruka-rameno | m/s2 | <2,5 | <2,5 |
| Neistota K | m/s2 | 0,2 | 0,2 |
| Sietový kabel | |||
| Typ sietového kábla | mm2 | H05VV 2x1,0 GF | H05VV 2x1,0 GF |
| Číso sučiastky (EU) | 6.650-915.0 | 6.650-915.0 | |
| Číso sučiastky (GB) | 6.652-282.0 | 6.652-282.0 | |
| Číso sučiastky (CH) | 6.652-281.0 | 6.652-281.0 | |
| Dlžka kábla | m | 12 | 12 |
2006/42/ES (+2009/127/ES)
2009/125/ES
2011/65/EU
2014/30/EU
Chairman of the Board of Management

S. Reiser
Director Regulatory Affairs & Certification
Pooblascena oseba za dokumentacio:
S. Reiser
Alfred Kärcher SE & Co. KG
Alfred-Karcher-Str.28-40
Winnenden, 2020/10/01
Tehnični podatki
| Kärcher T 10/1 (Adv/HEPA) | Kärcher T 15/1 (Adv/HEPA) | ||
| Elektrichi ni priključek | |||
| Napetost omrežja V 220-240 220-240 | |||
| Število faz ~ 1 1 | |||
| Omrežna frekvenca Hz 50-60 50-60 | |||
| Razred zaščite II II | |||
| Poraba nazivne moči W 500 500 | |||
| Podatki ozmogljivosti naprave | |||
| Vsebina posode | I | 10 | 15 |
| Količina zraka (maks.) | I/s | 38 | 38 |
| Podtlak (maks.) | kPa (mbar) | 18,5 (185) | 18,5 (185) |
| Mere in masé | |||
| Dolžina x širina x višina | mm | 430 x 255 x 370 | 430 x 255 x 420 |
| Tipčna delovna masa | kg | 6,6 | 6,9 |
| Premer sesalne gibke cevi | mm | 35 | 35 |
| Okoljski pogoji | |||
| Okoljska temperatura (maks.) | °C | +40 +40 | |
| Ugotovljene vrednosti v skladu s standardom EN 60335-2-69 | |||
| Raven tlaka hrupa LpA | dB(A) | 52 | 52 |
| Negotovost KpA | dB(A) | 2 2 | |
| Raven zvokovne moči LwA | dB(A) | 64 | 64 |
| Vrednost tresljajev za dlani/roke | m/s2 | <2,5 | <2,5 |
| Negotovost K | m/s2 | 0,2 | 0,2 |
| Omrežni kabel | |||
| Tip omrežnega kabla mm | 2 | H05VV 2x1,0 GF | H05VV 2x1,0 GF |
| Številka sestavnega dela (EU) | 6.650-915.0 | 6.650-915.0 | |
| Številka sestavnega dela (GB) | 6.652-282.0 | 6.652-282.0 | |
| Številka sestavnega dela (CH) | 6.652-281.0 | 6.652-281.0 | |
| Dolžina kabla | m | 12 | 12 |
Directive UE relevante
2006/42/UE (+2009/127/UE)
2009/125/UE
2011/65/UE
2014/30/UE
Norme armonizate aplicate
EN IEC 63000:2018
EN 55014-1:2017 + A11:2020
EN 55014-2: 2015
EN 60312-1: 2017
EN 60335-1
EN 60335-2-69
EN 61000-3-2: 2014
EN 61000-3-3: 2013
EN 62233: 2008
Standardenationale aplicate
Regulament(e)utilizat(e)
666/2013

H.Jenner
Chairman of the Board of Management
S. Reiser
Director Regulatory Affairs & Certification
Insarcinat cu elaborarea documentatiei:
S. Reiser
Date tehnice
2006/42/EZ (+2009/127/EZ)
2009/125/EZ
2011/65/EU
2014/30/EU
Primijenjene uskladene norme
EN IEC 63000:2018
EN 55014-1:2017 + A11:2020
EN 55014-2: 2015
EN 60312-1: 2017
EN 60335-1
EN 60335-2-69
EN 61000-3-2: 2014
EN 61000-3-3: 2013
EN 62233: 2008
Primijenjene nacionalne norme
Primijenjene uredebe
666/2013

H.Jenner
Chairman of the Board of Management

S. Reiser
Director Regulatory Affairs & Certification
Winnenden, 2020/10/01
Tehnički podaci
| Kärcher T 10/1 (Adv/HEPA) | Kärcher T 15/1 (Adv/HEPA) | ||
| Elektrichi ni priključak | |||
| Napon elektrichi ne mreže V 220-240 220-240 | |||
| Faza ~ 1 1 | |||
| Frekvencija elektrichi ne mreže Hz 50-60 50-60 | |||
| Klasa zašite II II | |||
| Nazivna primljena snaga W 500 500 | |||
| Podaci o snazi urežaja | |||
| Zapremina spremnika | I | 10 | 15 |
| Protok zraka (maks.) | I/s | 38 | 38 |
| Podtlak (maks.) | kPa (mbar) | 18,5 (185) | 18,5 (185) |
| Dimenzije i težine | |||
| Duljina x širina x visina | mm | 430 x 255 x 370 | 430 x 255 x 420 |
| Tipična težina pri radu | kg | 6,6 | 6,9 |
| Promjer usisnog crijeva | mm | 35 | 35 |
| Okolni uvjeti | |||
| Okolna temperatura (maks.) | °C | +40 +40 | |
| Vrijednosti utvržene prema EN 60335-2-69 | |||
| Razina zvučnog tlaka LpA | dB(A) | 52 | 52 |
| Nesigurnost KpA | dB(A) | 2 2 | |
| Razina zvučne snage LwA | dB(A) | 64 | 64 |
| Vrijednost vibracije šaka-ruka | m/s2 | <2,5 | <2,5 |
| Nesigurnost K | m/s2 | 0,2 | 0,2 |
| Mrežni kabel | |||
| Tip mrežnog kabela | mm2 | H05VV 2x1,0 GF | H05VV 2x1,0 GF |
| Kataloški brojevi dijelova (EU) | 6.650-915.0 | 6.650-915.0 | |
| Kataloški brojevi dijelova (GB) | 6.652-282.0 | 6.652-282.0 | |
| Kataloški brojevi dijelova (CH) | 6.652-281.0 | 6.652-281.0 | |
| Duljina kabla | m | 12 | 12 |
2006/42/EZ (+2009/127/EZ)
2009/125/EZ
2011/65/EU
2014/30/EU
Primenjene harmonizovane norme
ENIEC63000:2018
EN 55014-1:2017 + A11:2020
EN 55014-2: 2015
EN 60312-1: 2017
EN 60335-1
EN 60335-2-69
EN 61000-3-2: 2014
EN 61000-3-3: 2013
EN 62233: 2008
Primenjene nacionalne norme
Primenjena(e) odredba(e)
666/2013
Potpisnici deluju po nalogu i uz punomoc upravnog odbora.

H.Jenner
Chairman of the Board of Management

S. Reiser
Director Regulatory Affairs & Certification
Lice ovlasceno za Dokumentaciju:
S. Reiser
Alfred Karcher SE & Co. KG
Alfred-Karcher-Str.28-40
71364 Winnenden (Germany)
Tel.: +49 7195 14-0
Winnenden, 2020/10/01
Tehnički podaci
| Kärcher T 10/1 (Adv/HEPA) | Kärcher T 15/1 (Adv/HEPA) | ||
| Elektrichi ni priključak | |||
| Napon elektrichi ne mreže V 220-240 220-240 | |||
| Faza ~ 1 1 | |||
| Mrežna frekvencija Hz 50-60 50-60 | |||
| Klasa zašite II II | |||
| Potrošnja nominalne energije W 500 500 | |||
| Podaci o snazi urežda | |||
| Zapremina posude | I | 10 | 15 |
| Protok vazduha (maks.) I/s | 38 | 38 | |
| Podpritsisak (maks.) | kPa (mbar) | 18,5 (185) | 18,5 (185) |
| Dimenzije i težine | |||
| Dužina x širina x visina | mm | 430 x 255 x 370 | 430 x 255 x 420 |
| Tipična radna težina | kg | 6,6 | 6,9 |
| Prečnik usis nog creva | mm | 35 | 35 |
| Uslovi okruženja | |||
| Temperatura okoline (maks.) | °C | +40 +40 | |
| Uvtvržene vrednosti prema EN 60335-2-69 | |||
| Nivo zvučnog pritiska LpA | dB(A) | 52 | 52 |
| Nepouzdanost KpA | dB(A) | 2 2 | |
| Nivo zvučne snage LwA | dB(A) | 64 | 64 |
| Vrednost vibracije na šaci i ruci | m/s2 | <2,5 | <2,5 |
| Nepouzdanost K | m/s2 | 0,2 | 0,2 |
| Mrežni kabl | |||
| Tip mrežnog kabla | mm2 | H05VV 2x1,0 GF | H05VV 2x1,0 GF |
| Broj dela (EU) | 6.650-915.0 | 6.650-915.0 | |
| Broj dela (GB) | 6.652-282.0 | 6.652-282.0 | |
| Broj dela (CH) | 6.652-281.0 | 6.652-281.0 | |
| Dužina kabla | m | 12 | 12 |
Duáxta doi biiaipakia yia metayevotepn xpno n yia tov eioevo idokntn.
H m npnT ov oyivx npans, kawkai twv utoedeewv aqaaiac, mtopei va exi wouvetieia otn ouakeun n Kivovouc yia tov xepiotn n aaatao.
- Σε περιπτωπ ζημίας από τη μεταφρά εἰδοτοίητε αμέσως το καταστημα αγορά.
Kata to aoivma tsoukeuaoiac, eEyEte To Tepiexóve yia tuxov eAeeiwic oE eapntmuata Kaohs kai yia znuiε.
PpOoTaOia Tou TepiβaAovToC

Ta uliká oukeuaiaç éivai avakukwoija. AvakukwveTIC oukeuaoic μe TEPiβaλovtikopóTo.

Oi nAektpikec kai oi nAektpovikec ouokuecs Tepieoxuv Tnulima avakukwoiua uikacai, ouxva, etianis ecaptnPata oTWC atLcKai ETTavaopopticoeves mTatapiec n Aodia, TIOUe
TepiTTwon Aavthetaevnc xphnns n atoppiu nC
tIopouv va teauov oe kivduo tvnv avpwtivn uyia
kai to TepiBaalov. Otoa ta ouotatika ivai
attapaitna yia tn owtn aeitoupyia tnC oukeunc. OI
ouakeues Tou fepuov auto to ouuBoAo EITITpeTETAI
va atoppittiovta uci me ta oikiaka atoppmuata.
Chairman of the Board of Management

S. Reiser
Director Regulatory Affairs & Certification
YTEUVOc TEXVIKOU pakeLou:
S. Reiser
Alfred Karcher SE & Co. KG
Alfred-Karcher-Str. 28 - 40
71364 Winnenden (Germany)
TnA::+49719514-0
Φαξ: +49 7195 14-2212
Winnenden, 2020/10/01
TexvikaXapaktnpiotiká
NopekdeHue ycmpoucma
Kopomkoe 3ambikaHue u3-3a ebicokou gnaxHQcmu Ncnonb3o6amb u xpaHumb ycmpoucmeo monbko e nomeeenuu.
- DaaHbI yHnBepcaJIbHbI nbJIneCoc npeHa3HaueH dIa cyXoI qCTKn IOBePxAHOCTe IOna H CTeH.
JaHHoe yctpoiCTBO NOxOHT DnI npOMbIJIeHHO NcONb3OBaHnI, HApPIMep, BTOCTINHuaX, SKoJax, 60JIbHuaX, a6pKax, Mara3nHax, oCncax n 6Ipo no apenHe HeBvIXMocTn.
OncanHe yctpoicTba
PucyHok A
①CeteboKa6eNb
②БлOKировka BbIyucHoi peIeTkn
3BbInyckHnpeIeTka
④ NapkoBOUHoe noNoKeHne hacaDNn noNa
⑤BaOДСКАТаБИЧKA
6BcacbBaIOuWJHaH
⑦ Kopnyc BbIXoHoro ΦnIbItpa
8BbIXoHoiΦnIbTp
9HacaKaDnMaRkoMBeenn
10 Kpmbuunnha pykota ka6enbHoro 6apa6aHa
1)DepkaTeNb 7nHaHra
12 YdnnHnTeNb Ha KaTuShke
3 Puyka nla nepeHockn (cknaHa)
(14)TOnOBKa nbIeNecoca
15ΦKcaTop roIOBkn nbIeOcCa
16Mycoporoc6opnK
17HappaBJIIOUpoNko
(18)BcabsbIaUoI nnatpy60K
19UeJeBaeHacaKa
20TnabHbBbIKNIOuateIb
21 NpeeknHouaTeB nTbepdbix noBepxHoCTeN/ KObPOBbIX NOKpbITn
22 HacaKa nn nona
23 MexaHn3M peryInpOBK TeNeckOOnueckoYdINHHTeJIbHO Tpy6Kn
24 TeneckonHueckaydHHHTenbHaTpy6ka
25 PerjTOp Cnbl BcacbBAHn
(26)KoJIeHo
27 NocToaHHbI qHbTpYIOUm 3JemEH
28ΦnIbTp 3aunTbIDBvraTeNa
UBeToBaMapKnpoBka
- ΘημeMentbI ynpaBnEHHaДЯ npoceCa oUcTkn
HMeHOT XENTbI UBeT.
3IeMeHTbI ynpabHeHn Ipn TeXnueckoro n cepBnCHoro 06cnyKuBaHn -CBETno-cepRoUcbeta.
IodrotOBka
- PacnaKOBaTb ycTpoIcTBO n yCTaHOBnTb npHaJNeJxHocTn. PucyHok B
BBoD B 3KcnpnyaTaunIO
BbIKIOUcMb ycmpoucM8O.
H38neB umencelbHyio 8unky.
YcTpoIcTBO OTKJIIOUaETcRA BO BpeMa pa60TbI
Cpa6oTaN TeNIOBO 3aUHTbI 3JEMENT DBNrAteTn
- PpOBepntb BCE qactn Ha npEmdet 3acopeHnra.
- 3aMeHnTb ΦnIbTp-MeUOK n3 HETKaHOro MaTePnAna.
- 3aMeHnTbФnJIbTp 3aUHTbI DnBraTeJrA.
- 3aMeHntb BbIXoHoiΦnIbTp nIINΦnIbTp HEPA (cneuaJIbHbIe npHaJdEeKHOCTN).
5.ДаыTypбин eBnIaTeJIЯ OCTbIb B TeeHne np6n. 30-40 MHyT. BKIOUHTe yCToPoiCTBO CHOba.
BcacbibaOuaTyp6nHa He pa6oTaet
Ecnn HeucnpaBHOCTb He ydaetcyaYCTpaHNTb, YcTpoiCTBO Heo6xOIMO OTnpaBHTb Ha npOBepky B cepBnCHyIO cnKy6y.
RapaHTn
B kaxdoi ctpahe DeicbTyO t COOTBeTcTByUoUne
ycnoBnra rapaHTn, yCTaHOBneHHbIe HaWeJ doOpHeN
c6bItoBOi KOMpaHNe. Bo3MOKhIe HeNCnPabHOCTn
yctpoiCTBa B TeueHne rapaHTnHO rO pOka Mbl
yctpaHem 6ecnPaTHO, ecn npuHaHa 3aknIOuaETcR B
deΦeKtax MaTePnaOB nnn npOn3BOJcTBeHHom 6pake.
B Cnyae BO3HKnHOBeHn npTeH3n B TeueHne
rapaHTnHO rOcoka npoc6Ba o6paAaTbc C yeKOM O
nOKynke B ToproByO opraHn3aunIO, npOdaBswyo
m3dJIne, nINB 6bnKaWyO ynonHOMOeHHyO cnyx6y
cepBnCHOrO 06cnykmbAHn.
(Adpec yka3aH ha o6oPoTe)
DOnonHnTeJIbHyIO HnΦopMauIIO O rapaHTNn (PnHaJIuYn) MoXHO HaITN B O6JIaCTN cepBnCHOrO 06ClyKuBaHnHa MeCTHom Be6-caTte Karcher Bpa3dene «3arpy3Kn».
ДаТа Выlnуcka OTo6paKaeTcЯ Ha 3aBoJcKo T a6nUcKe ЛибоВфОрмATE MM/YYYY,гдМ-Мecя пpon3BOJcTBa,YYYY - roД пpon3BOJcTBa,ЛибоВ ЗakOДирOBaHHOM BИd.
Pn3OM OTdJIbHbIe UINpbl IMeOT CJeNyUouee 3NaueHHe:
Приимер: 30290
3 rOa BbInycka
0 cToJTeNbeBbInycka
2 DecTInTeN BbInycka
9 BToPaa CnΦpa MeCya BbInycka
0 nepbary ufo pa Mecaa BbInycka TaKIM o6pa3OM, B daHHOM npImpe KoD 30290 O3Haayet DaTy BbInycka 09 /(2)023.
Принодлесхови и заразсье Част
IcnoIb3OBAbToIbKoOpuHHaJIbHbIe npHaIaIeXHocTn 3aIacHbIe YacTn.ToIbKO OHI rapaHTnpyIOT6eONachHyIO becnepe6oHyO pa60Ty yCTpOJCTBa.
Chairman of the Board of Management

S. Reiser
Director Regulatory Affairs & Certification
JIInO,OTBETCTBeHHoe3a BeEHeHne DOKyMeHTaun:
II. Pau3ep (S. Reiser)
Alfred Kärcher SE & Co. KG
Alfred-Karcher-Str.28-40
71364 Winnenden (Germany)
Ten.: +49 7195 14-0
Φaκc: +49 7195 14-2212
Winnenden, 2020/10/01
TexHnueckne XapaKTePncTnKn
Chairman of the Board of Management

S. Reiser
Director Regulatory Affairs & Certification
Ocoba, Biinobianda 3a BeedeHHa DOkymeHTaui:
II. Pau3ep (S. Reiser)
Alfred Kärcher SE & Co. KG
Alfred-Karcher-Str. 28 - 40
71364 Winnenden (Germany)
Ten.: +49 7195 14-0
_A ; + 49719514 - 2212
Winnenden, 2020/10/01
TexHiChi XapaKTepeNCTnKi
N3KJIIOUyBaHeHa ypeDa
- N3KJIIOUeTe ypeJa OT rnaBnI npEkbCBAu.
- 13BaTe wencena.
CneBcya ynoTpe6a
- N3npa3HeTepe3epBoapa.
2.Почирете урEDA OТБТпЕ И OТБВн ПОСРДСТВOM n3CMyKBAHe И n3TpNBaHe C BЛжна Кьрna.
TpaHcnpTupaHe
△PENEJNA3NJNBOCT
Hecb6JIOdaaHe Ha meJIMO
Onachocm om HapaHyaBua u nopedu
Ipu mpaHcnpmuhe cb6nOdaeaume meaIomo Ha
ypeda.
1. Пп Транслортуаре В превози Средства осигуравайу реша ИзпьзваимпpeобрьшаныВ сбOTБETСВЕ CBANДНITE Инскрукши.
CbXpaHeHne
△NPEДПА3ЛИВОCT
Hecb6nodaabaHa meJIMO
OnachocomnapaHbuau u noepdu
Ipu cbxpanHeHuem 63emaume nod bHumaHue meanomo Ha ypda.
YpeBbT Tp8Ba Da Ce CbXpaHraBa Camo BbB BbTpEHH NOMeueHn.
Pnka npoDpBxKa
ONACHOCT
Onachocm om mokoe ydap
HapaHaaHua nopadu donup do npoeekdau mu k yacmu
U3KIIIOyeme ypeda.
N3bpaune uencena.
IOnCTBaHe Ha NocToHHaTa 0JIbPHa KOUHnua
BHIMAHNE
Onachocm nopadu MOKpa nocmoHHa unmbpHa kouhuca
Onachocm om noepda ha ypeda
Hukozha He nocmaeJme nocmHa mOpmbpKaowHuca MOKpa.
1. De6nokpaIte n cBaIeTe BCMyKaTeJHaTa rJaBa.
2. 3aBbptete CmykatenHaTa rnaBa Ha 180^ nЯ NOCTaBeTe.
3. OTKJIHOyete n H3BaJeTe NOCTOaHHata fHNTbPHa KOUHNuA.
4. Пи Heo6xOIMOC T NOUHCTe T NoCToHHaTa
ФИNTbPHa K0UHnua (MneIa ce) NOD TeuAua BOna
Я OCTaBeTe Da N3CbxHe.
5. NocTabete noctoHHata funtbphKa KooHNuHa n 3actonopete.
6. NocTabeteN 6IOKpaIte BCMyKaTeJIHaT a TlaBa.
CmHa Ha qnTbphata Top6uKa
- De6nokpaIte n cBaIeTe BCMyKaTeJIHaTa rJaBa.
2.ИЗваде TeФиNTbPHaTAp06aOTTeKCTUneH MaTePnANot CMyKaTeHnHaHaKpaHnK. ΦIrypaD - CrbheTe 3aTbapraata nlaactnHa n 3aTbopete IITbTHO fNITbPhata Top6a ot TEKCTnneH MaTePnaJ.
- NocTabete HOBa nITbPna Top6a OT TeKCTnEnH MaTePnA.N 3ndbpNaIte OTbopa Ha nITbPHaT a Top6a n3zraIO Bbpxy KpaI HA BCMyKaTeJIHHa NaKpaIHNK.
- NocTaBete n 6nokupaTe BCMyKaTeJHaT a rnaBa.
CmHa HaΦnntbpa 3a n3XoJaU Bb3dUx
ФИТьр 3a OTпаьчен Вьздух: cmeнгte ro npn Heo6xOДиMоCT, Ho noHe 1 nbT roDmshO
- OTKIIOUeTe nCBaIeTe n3dYbXBaUaTa peWetKa.
2.ИЗВаДeTe KОрпуca Ha ФиNTьра 3a OТпадычЕн ВьзДух.
3.ИЗБАДЕТФИЛТБРа3aOTnAДьЧЕНВБ3ДУXOTЯЛTOHaФИNTbPа3aOTnAДьЧЕНВБ3ДУX. - NocTabete HOB qnntbp 3a OTnaDbueH Bb3dyx TBJIIOTo Ha qnntbpa.
- NocTaBeTe TAnOTo Ha 0nTbpa 3a OTnadBueH Bb3DyX.
- NocTabete n 3actonopete n3dyXbaaata peweTka.
CmHa Ha HEPA qntbpa (cneuaHa npHaJekHOCT)
HEPA nIbTp: cMeHnTe ro npn Heo6xOaMocT, Ho nohe 1 nbT rOuWoHO
- OtknIOyTe n cBaIeTe n3dYXBaIaTa peWetka.
2.ИЗвадеTe HEPaФиNTьра (cneцианha npинадпжноct). - NocTaBTe HOB HEPA nTbp (cneuaHa npnHaJIeKHOCT).
- NocTabete n 3actonopete n3dyxbaaata peweTka.
CmHa Ha 3aunTHnHΦnTbp Ha DnurTaTeJra
- De6nKpaTe n CbaIeTe BCMyKaTeHaTa rnaBa.
- 3aBbPTeCEcMyKaTeHHaTa rNaBa Ha 180^ nЯ NOCTaBeTe.
- OTKIIOUeTe n 13BaIeTe NOCToHHaTa fNITbPHa KOuHnua.
- ⅢBaTeTe3aunTHnHaHbPaTeJr.
- NocTaBeTe HOB 3aunTeH pHa DnBaTaeTna
- NocTabete NoctoHHaTaФnTbPHa KooHnua nЯ 3actonopeTe.
- NocTabete n 6nokupaTe BCMykaTeHaTa rnaBa.
CmHa Ha MpeKOBn3axpaHbau Ka6eJ
- OTBnTe n CbaneTe BodaHa Ha MpeXOBnKa6en. Φnrypa E
- OTBnTe n cBaIeTe KaNaKa Ha Ka6enHna 6apa6aHa.
- Pa3BnTeMpexKOBnKa6eIOT Ka6eHn8bapabH. FnrypaF
4.ИЗКЛЮЧЕиИЗВадеТМрЕХОВЯΚаБЕЛ. - BkIIOUeTe HOBnMpeKOB Ka6eN Iro npokapaiTe, KaKTo e NOKa3aHo Ha qHypaTa (HaMaJIyBaHe Ha onbHa).
Φnrypa G
- 3aBbptete Ka6eHnHa 6apa6aHa Ha 90^ B noCoka, o6paTHa Ha yacOBHnKOBaTa CTpeNka, Taka Ye mpeXOBnT Ka6e Da e JeKO npeDbapntenHO onbHaT N NO To3n Haun Da JExn PnTHO do uanΦata.
Φurypa H
- NocTabete Kanaka Ha Ka6eHnHa 6apaban Taka, Ye da He ce npTnCKa MpeXOBnT Ka6en. 3akpenete Kanaka.
Dnypa I
- Habnite MPeKOBna Ka6eI NO nocoka Ha YacobHnKOBaTa CTpeJIka.
- NocTabete n 3aKpeTete BODaHa Ha MpeKOBnKa6eJ.
Φnrypa J
Pomou npn noBpeN
ONACHOCT
Onachocm om mokoe ydap
HapaHaaHua npadu donup do npoeekdau mu k yacmu
U3KJIIOeMe ypeda.
H3bpaume uencena.
YpeBbTce n3KJIIOyBa no Bpeme Ha pa6oTa
3aunTHnT TepmonpoTeKTop Ha DBrTaTeN e cpa6oTN
- PpOBepeTe BCnUKN YaCTN 3a 3anyBaHnIy.
- CmHeTe pntbphata Top6a OT TEKCTnneH MaTePnaI.
- CmeHeTe 3aunTHnH PnTTbP Ha DnBnTaTeJr.
4.CmeHeteΦnntbpa3aOTNaIbueh Bb3dyxnnHEPAΦnntbpa(cneuaHa npHaadNekHOCT). - Octabete MOTOPHATA Typ6nHa da ce oxlaan 3a OK. 30-40 MNHyTN. BKNUOte ypeDa OTHOBO.
BcmykaTeJIHaTa Typ6nHa He pa6oTu
- Поберете Контака и пedingаителя на щелковурахаразовeto.
- Поверете Мрекова зхсанькели упенина на урEDA.
- BkJIIOHeTe ypeJa OTHOBO.
CnJaTa Ha BCMyKBaHe OTCna6Ba
- OTCpaHete BCnuk 3anyuBaHnO TcMykATEJIHaTa IIO3a, CMyKATEJIHaTa Tpb6a NIN CMykATEJIHn MapKyU.
- CmeHete NTbphata Top6a OT TEKCTnEn H mATEpnaJ.
3.Почисте Фпгьрна Кошниа по Туаць BOДАЯ OCTaBeTe ДИЗBXHE. - Правино постаBet/3aknOуTe cmykaTeJIHaTa rnaBa.
- CmeheTe depeKTHnA cmyKaTeJIeH MapkyU.
- CmeHete 3aunTHnФnITbP Ha DnBnTaTeJr.
N3n3aHe Ha npax npn 3acMykBaHe
- Поверете поожжени.To ha Фиntьрна Торба OT TEKTUNEN MaTePnaI.
- CmeHete nTbPhata Top6a OT TEKCTnEn H mATEpnaJ.
- Праилно постаBete/3aklnooye cmykaTeJIHaTa TnaBa.
4.Почистефштбпа КОшнца по Teчашьда вая и оctавete на ИЗсхHE. - NocTabete HOBa NOCToHHa QnTTbPha KOWHua.
- NocTabete npabuJHo uIcMeHete 3aunTHna HnTbp Ha DnurataTeI.
CepBn3
Ako nobpeaTa He MoKe Da 6bJe OTCpaHeHa, ypeBt Tp8Ba Da 6bJe npOBepenOT cepBu3a.
RapaHcH
BbB BcKaJa bpxKaBa ca BaIIaHn n3daJeHHeOT Haun oToPn3upan dNCTpn6yTop rapaHcNoHH yCNoBna.
EbeHTyaHn NOBpeHn Ha BaunypeI ueOTcpaHm B paMKInTe Ha rapaHcuOnHHn CpOK 6e3nnatHO, Ako ce Kacae 3a DeΦeKT B MaTePnaJIte NnnpoN3BOOCTBeH DeΦeKT. B clyaH na H npedraBaHe Ha npabo Ha rapaHua, ce o6bpHeTe KbMa Baun y nCtpr6yTop nn KbM Hau-6n3kn OToPn3upan cepBu3, KaTo npedctabNTe KacOBaTa 6eJexKa.
(Adpec, Bx. 3aHaTa cTpaHa)
DonbHnTeHa rapaHcNoHHa HOpMaun (ako nMa taKaBa) MoKTe Da HamePte B cTpaHnCata „CepBn3" Ha MeCTnHa ye6caNT Ha Karcher B pa3dEn „N3Ternnahe".
Akkcecoapn npe3epBHN qactn
I3noI3BaIte cAmO opuHaHnH akcecoapn OpunHnHn pe3epBn YacTn, NO To3n Hayn HocnpyraBe 6e3oNaChHaTa N 6e3npo6mHa EKcNlloataaHa ypeDa.
HOpmaun OTHOcH OAKCEcoApn pe3epBHN Yactn 1e HamepuTe Tk: www.kaercher.com.
Декларачnia 3a cьOTВЕТСТВЕ NaEC
C HacToaTO DeKJIapnPaMe, Ye NocOueHaTa NO-DoNy MaunHa No CBOrTa KOHcEPluN I KOHCTpyKUra, KaKTo I B NyCHaTOTOT Ha Na3apa N3bJIHeHne,
CbOTBeCTBa Ha npINIOXMMTE OCHOBHN3NCKBAHNA 3a6e3ONaCHOCn ONa3BaHe Ha 3dPaBeTo, ONpeJeTeHNBnIpeKTHBnTe Ha EC. Pn HeCbIgacyBaHa C HAc
IpOMHa Ha MaUHnHaTa Ta3u DeKnapaunr y6n CBOrTa BaNJnDHOCT.
PpOdyKT: PpaxocmykaUka 3a cyxo nouNCBaHe
Tn1: 1.355-xxx
Tun: 1.527-xxx
PnJIOXIMM DnpeKTHBn Ha EC
2006/42/EO (+2009/127/EO)
2009/125/EO
2011/65/EC
2014/30/EC
PpIIOXIMM XapMOHn3IpaHn CTaHdaptN
EN IEC 63000:2018
EN 55014-1:2017 + A11:2020
EN 55014-2: 2015
EN 60312-1: 2017
EN 60335-1
EN 60335-2-69
EN 61000-3-2: 2014
EN 61000-3-3: 2013
EN 62233: 2008
PpIIOXmMnHaCNOHaJIHnCTaHdApTn
PpIIOxKeH(n) perIaMeHT(n)
666/2013
IopnncBaunTe JInca DeNCTBAT OT NMeTo Kato
TbJHOMOuHnUHa ynpaBtJIHHoopraH.

H.Jenner
Chairman of the Board of Management

S. Reiser
Director Regulatory Affairs & Certification
Пьномошник по дokумэнтuaида:
S. Reiser
Alfred Kärcher SE & Co. KG
Alfred-Karcher-Str.28-40
71364 Winnenden (Germany)
Tei.: +49 7195 14-0
ΦaKc: +49 7195 14-2212
Winnenden, 2020/10/01
TexHHueckn DaHHN
| Kärcher T 10/1 (Adv/HEPA) | Kärcher T 15/1 (Adv/HEPA) | ||
| ЕlektriческоSBьрзванe | |||
| Мрекови наразожения | V | 220-240 | 220-240 |
| Фаза ~ 1 | 1 | ||
| Мрекова чECTOTA Hz 50-60 50-60 | |||
| Клас зашита II II | |||
| Номинална консуmpирана мошност | W | 500 | 500 |
| Данни за мошностпа на уреда | |||
| Сыдьржание на рezервоара | I | 10 | 15 |
| Колочень Вьздун (мак.) | I/s | 38 | 38 |
| Вakкум (мак.) | kPa (mbar) | 18,5 (185) | 18,5 (185) |
| Разmersи тетла | |||
| Дылжина xшиroduных височиа | mm | 430 x 255 x 370 | 430 x 255 x 420 |
| Тлично собъевно тетло | kg | 6,6 | 6,9 |
| Диамetedр на BCмукATEЛига марку | mm | 35 | 35 |
| Услови на заobikkаляцata сревa | |||
| Temпература на okолнatable срева (мак.) | °C | +40 | +40 |
| Установени стойости съласно EN 60335-2-69 | |||
| Нимо на звеково налаяге LpA | dB(A) | 52 | 52 |
| Heystоючвocst KpA | dB(A) | 2 2 | |
| Нимо на звекова мошност LWA | dB(A) | 64 | 64 |
| Стойост на вибрацьага рьka-pамо | m/s² | <2,5 | <2,5 |
| Heystоючвocst K | m/s² | 0,2 | 0,2 |
| Мреков зaxсанваши кабел | |||
| Тил мреков зхсанваши кабел | mm² | H05VV 2x1,0 GF | H05VV 2x1,0 GF |
| Homeр на чast (EU) | 6.650-915.0 | 6.650-915.0 | |
| Homeр на чast (GB) | 6.652-282.0 | 6.652-282.0 | |
| Homeр на чast (CH) | 6.652-281.0 | 6.652-281.0 | |
| Дылжина на кабел | m | 12 | 12 |
3ana3BaMe cn npaBTo HaTexHueckn IpomEnH.
Ma3MyHbI
Kannbl Hucaynap. 113
Kopwaeh opTaHbI Kopray 113
MaKcaTbHa caikec kondany 113
KpybIINfbHbIH CnNaTTaMaCbI 113
DaibIHbIK 114
Paiandahyra 6epy. 114
KoIdaHy 114
TacbImaIay. 114
CaKray 114
KyTim XeHe TexHnKaJIbIK KbI3MeT KepCeTy 114
Akaynap Ke3iHderi KEmek 115
Keninik 115
Kepek-kaapKHe KocanKbI 6eJWeKTeP 115
EO cTaNdapTTapbHa cKeCTiri Typanbl
deKnapaun. 115
TexHnKaIbIK CInaTtAmJapbl 116
XaJIbI HycKaynap


KypbInrBihb anraaw pet naDanahy anDbHda, ocb naDanahy BoBihwa TynHcyka HcckaynbIKtbj Xehe 6epinreH
Kayinci3ik HycaynapbIH OKbIHbI3. HyckaynbIKKa caikec epekeT erHj3.
ApkapanaHaHemecKeNecine6epy yuih,ekyaybIKDaCaTanKoBih3.
- PaiDanaHy XeHiHderi OcbI HyckaynbIKbI XaHe Kayinci3ik XeHiHderi HcYckaynbIKbI YcTaH6ay KypblfBhlBn 3aKbIMdaIybiHa XaHe KypblfBlnapMeH XaHe con optada Kymbc icTeuTIn TynFa napDbIH JapaKaTtAHybiHa eKenyi MymkIN.
TacbImaNayKe3IHNe3aKbIMdaIraHXaFdaIa depey dInepre xa6apnah3. - KanTaMaJaH WbIrFapraH Ke3e OHbIH KypaMbIHdaKepeK-KapaKaTapDbH 6ap-KorBbH Hemece3aKbIMDaHaRaHbH TeKcepHj3.
KopwaFAH opTaHbI KopFay

OpaybI MaTePnAaDapbH yTunl3aCuaJlayfa 6oJaIb. OpaBbIaTpDbI KOpwaHaN opTaRa kayinci Tpyde yTunl3aCuaJnaHbI3.

3NeKtpnIK XHe 3NeKtpoHbIK 6YnbIMapDbIH KypamblHa KaTe KOJdaHy Hemece
yTnIn3aunay HETnxKecHde aam DeHCayIbIFbHa XeHe KopwaraH opTaKayin
TeHdipyblkTmAn, KHybl KaetaeHdennMeI
MaTePnAnnapKHe 6aTapeanap, AkKymyTApTopnap
Hemece MaCnAaKbI 6eJWeKTeP KNI Ke3deCeI.
Anaada, ataMblw 6eJWeKTeP 6yibIMdb Tnicinwe
naDanahy ywiH kaxet bonaDb. Ocb TaHbAmen
BeJrineHReN KpyblnblapdbY KoKbICTapbImeH bipre
Tactayfa 6oImaDbI.
Kypamdaftb3aTap6oBbHwaHyckaynap (REACH)
BmybIMhbH KypambIHdaftb3aTAP TpyaIb coHbI mEmimetTepi MbHa MeKeHka BoBHua Tabyfa 6oJa: www.kaercher.de/REACH
MaKcaTbIHa cənkec KoJIdaHy
△ECKEPTY
AehcaynbikkaKayin
DeHcaybIKKa 3uH 6oJFaH waHdbI Kmy KypblrBdeHcaybIKKa 3uHaDbI waHdbI copyra apHaMaHaH.
HA3AP AYdAPbIHbI
KypbIFBihbIH 3aKbIMDaHybl
binrandaBH KOrapb6onybHa 6aunahbcmbkckawa myubkmany.
KypbifbHb mek yu iwiHde naudanhbn, caKaMaHb13.
BepinreH om6e6an wahcnpbIw eEN MeH Ka6bipraapdbkyprKaTa3aJayFa apHaIraH.
ByI KpybIfbl KOMMepuJbIK MaKcatta naIdaIaNHyfa apHaNFaH, MbCaJIbI, KOHaK yInep, MEKTenTep, emXaHaJnap, fa6pNkaJap, dyKeHdep, KeHceJIep MeH KaJIFa aJIbIHraH FIMapaTTap.
Kypblfblhblcnuattamacbl
CypT A
①Keni ka6eni
② CopfbiiuTOpdbiKyNbInTay
③ Copfblu Top
④ EdeH canTaMaHa apHaHaT ypaK Kyi
5BaybIT TaKraWacbi
⑥ Copy wlaHrcici
7 乌bifbcaya cyariciHHkopnycbi
⑧ Ubi bicaaya cyarici
⑨ Kantay
10 Ka6eBdk 6apa6aHbIHbIH ca6bl
1UHaHycTaftbllbl
12Ka6eBik 6apa6aHbI
⑬ TyTka (KHHaHMaJIbI)
14CopaTbH6acbl
15CopaBbH6acbHbHinMeri
16KoKbIC KOHTeHepi
17SafbTTaybiu WibfBipUwIK
18CopaTbIH KeTe Ky6bpbl
(19)CaHbIaynbI canTaMa
20Heri3ri kockbiu
21 KaTbI 6eTKei/KiemDi 6eTKei npaMeTpJIepiHe aybICTbIPbIN-KOCKblW
22EeH canTaMaCbI
23 Teneckon copbbl tytirih pettey
24 Teneckon copbwi Tytiri
(25) Copy kyyuin peTteriu
26 BybH
27 TypakTbI cy3riney 3neMeHti
28 Ko3raNTkbI W KOPraHbIcbi cy3rici
Tycti KoIdTay
- Ta3aJay npouecin 6ackapy 3neMeHTTepi capbI TycTI.
TexHnKajbIK KbI3MeT KepCeTyre XaHe KbI3MeT KepCeTyre apHaIraH 6ackapy 3neMeHTtepi aUbIK cyp TycTI.
Daibihdik
- KypbIJIbIHbI KaITaMaJaH ⅢbIFapBIn, KepeKxapaKTapDbI OPhaTbIHb3. Cypet B
PaindaJanaHyra 6epy
- TypakTbCy3rIney 3JIeMeHTiH copy 6acbHa 6ekitirreH IN TeKcepiH3.
Kymbic pexnmi
1 Cy3ri nakeTi 6ap peKIM
2 Cy3ri nakeTe kokpekm
HEPA cy3ricih (Aphahbi Kepek-kaapakTap) opHaTbIHbI3
- Copfbih TopbHbH KynnbH aBbHb3 kHe aBbHb3.
- 甲fbiC aya cy3ricih KopnycbiH Wbifapbn anBih3.
- HEPA cy3riciH (Aphai Kepek-kaPaTap) opHaTbIbI3.
- Copfbliu Topbl opHaTbIn, 6eKiTiH3.
Cy3ri naketih opHaTbIHbI3
- Copy 6acbiH KynbInTaH aubin, anbHb3.
2.Фиизелин cy3ri naketin6ekiriH3.Cy3ri naketinH caHbIaybIH copy KeNTeKb6bIpbIH 6enDemeciHn TOblfBImeH TapTbIHbI3.
Cyper C
- CopaBbH 6acBbH opHaTy XaHe 6ekiTy.
KoIdaHy
KypbInfbHbI Kocy
- TencenbdiH aibpbih KocbHb3.
- KypbIINfbIHb Heri3ri axbIpaTkblkEMerImeH Kocy.
Copy kywiH peTTeHi3
- Copy kyyiin peTteriu KEMerimeh copy kyyiin opHaTy.
Ta3anay pekmi
- EdeHre apHaIraH canTamaHbI aybIcTbIpbnKockbltbl KaTTbI Hemece KInem 6etKei KaJIbHaKOJIbHI3.
- Ta3aaydbOpbHday.
KypbInfbHbI eWipy
- KypbIJIbIHbI Heri3ri aXbIpaTkblbIme eUpiH3.
- AaahbI cybpIn anHbI3.
Op6ip Ta3aJaydAn KeiH
- KoHTeINHePdi 6OcaTbIbI3.
- Backa wahcopbih Hemece bInfai Wsybepek Kemerimeh wahcopfbiHTbIH iH xHe cbiptbH Ta3anay.
TacbImaJnay
△ABAHJIAHbI3
CanmaKmbiH caKmamaybi
Kapaam any kHe KypblfBhl 3aKbIMday Kayni TacbImday Ke3iHde KypblfBhlH CanMarbIH ecepiH3.
1. KypbIINfbHbKeNikTepeTacBImaJday Ke3iHKeONdaHbICTaFbHyCKaynapra CnKec OHb cbIpfbInKeTydeH XHe aydapblbN KeTyDeH CaKaTbI3.
CaKray
△ABAHJIAHbI3
CaMaKmbiH caKaMaMMaybI
KapaKaam any KHe KpybIrfiHbI 3aKbIMday Kayni TacbMaIday Ke3iHde KpybIrfiHbIH cAmAfbiH ecepehi3.
KypblfblHbI TEK yu iuiHne caKTayra 6oana.
Kytim XaHe TexHnKaJIbIK KbI3MeT Kepcety
KAYIN
Tokneh 3bIKbIMdany Kayni
Kephey kyuiHde myprah 6eWneKmepMeH 6aunhaic Ke3iHdezi 3akbImdap
KypbInrBihb EwipjH3.
Xeninik wmekepiozemkadau bifapbn anbHb3.
TypaKtbI cy3rIney 3JemeHTIH Ta3aHaHb13
HA3AP AYdAPbIHbI
blrann mypaKmbi cy32iney 3neMeHmHeh 6onambH kayin
KypbIINrBbIHbH 3aKbIMoHa hy Kayni
Typakmbczy32iney 3neMeHmih eukawah dbIMkbn caImHa6i3.
1. Copy 6acbH KynbInTaH aWbIn, aNbHb3.
2. Copy 6acb1n 180^ aHaanDbipbn, OHbTeMeHRe KObHb3.
3. Typaktb cy3riey 3neMeHTiH KyIbIH aWbIHb3 XHe aJIbHbI3.
4. TypaKtbl cy3riney 3nemeHTIH (kybIaTbH) afbH cy actbHa Ta3anay.
5. Typaktb cy3riney 3nemehin ophaib,6ekitiiz.
6. CopaTbIH 6acBHy Ophaty XeHe 6ekiTy.
Cy3ri naketih aybictbipbHb3
- Copy 6acbH KJbINTaH aBbIn, aBbHb3.
2.Фииэин cy3ri nakeTin copy KeNTeK6bipbHaH anblHbI3. Cypet D - KyjbnTay bicbipmacbi6ekitin, pni3enH cy3ri naKeTIH mbkTan Xa6bHbI3.
- KaHa 6eKtiH3. Cy3ri naKeTIiH caHbIaybH copy KeTKeYbipbIH 6eIeMecHeH ToJIbIMeH TapTbIHbI3.
- CopaTBH 6acBHy OphATy XeHe 6ekiTy.
Ibifbcaya cy3ricih aJMaCTbipy
Ubifapbcaya cy3rici: kaxket 60Jca kblbHa keimHe 1 pet aybictbipbHbI3
- Copfbibt TopbHbH KynnbH aWbHb3 KHe aTbHb3.
- 乌fbcaya cy3ricih KopnycbH uBifapbn anhbl3.
- Kopnyctan wibfbc aya cyricin wifapbin anbHbI3.
- KopnyctaftkaHa Wbifbc aya cy3ricH opHaTbHbI3.
- 乌fbcayacyricih KopnycbH opHaTbHbI3.
- CopfbtupbOpHaTbIn, 6ekitiH3.
HEPA cy3ricin (AphaHbi KepeK-kaPakTap) aybictbipbIHbI3
HEPA cy3rici: kaxket 6oJca KbIbHa KEMiHde 1 pet aybIcTbIpbIHbI3
- Copfbih TopbHbH KyIbH aIbHbI3 KHe aJIbHbI3.
- HEPAcy3riciH (AphaBkepeK-kaPakapTap) bifapbIn aIbIHbI3.
- KaHa HEPA cy3ricin (ApaHai bI KepeK-kaPaKaTap) opHaTbIHbI3.
- CopfbtupbOpHaTbIn,6ekitiH3.
Ko3fantkbii KopfaHbcbc cy3ricin aybictbipy
- Copy 6acbH KynbInTah aWbIn, anbHb3.
- Copy 6acb1n 180^ aHaanDbipbIn, OHbI TEmHRe KOblbl3.
- Typaktb cy3riJeey anemeHTiH KyIINbIH aUbIHb3 XHe anbIHb3.
- Ko3faTkblI KopraHbIcbl cy3ricH WbIrapbn any.
- KaHa K03FaNTKbIu KOpFaHbICbIH any.
- Typaktb cy3riJey 3JemeHTIH opHaTbI, 6eKITiH3.
- CopaTbIH 6acbIH opHaTy XeHe 6ekiTy.
XeJI ka6eJIH anMaCTbIpy
- KyaT cbIMbIHbIH 6aFBITayblbIH 6ypan, aIbIHbl3. Cyper E
- Ka6eBbik 6apa6aHbHbIH KaKnaFbIH 6ypan aIbHbI3.
- KyaTcbIMbIHbIH Ka6eJIbIK 6apa6aHHan 6ocatbIHbI3. Cypert F
- Kyat cbIMbiH axbipaTbIn, wbIFapbIn anbHb3.
- KaHa Kyat cbIMbIH po3eTKara KaIan, OHbl cpeTTe KepcTeINrReHdE 6aBbITTaHbI3 (Ka6eNbDik KipMe). Cypet G
- KyatcbimbOaH TaPbInbTpybXeHaCaHbIayf aMblkTnTin TpybYwH Ka6enbDik 6apa6aHdbI caFATtiniHeKapcb90°6ypaHbI3. Cypet H
- Ka6eBbDik 6apa6aHHbIH KaKaNarBH KyaT cbIMbl 6eniHIN KaImaHTbIHdai KOIBHbI3. KaKNaKTbI 6ekTIhi3. Cypet I
- KyaT cbIMbiH caFaT tiJimeH 6ypaHbI3.
- KyaT cbIMbIHbIH 6aftTaybIbIH opHaTbIN, 6eKITiH3. Cypet J
Akaynap Ke3iHderi KEmek
KAYIN
ToKneH 3bIKbIMdany Kayni
Kephey KyuiHde myprah 6eMekmepeHbic Ke3iHoezi 3aKbIMap
KypbInrBihb EwipjH3.
Keninik wmekepi0emkaaH wifapbin anbHb3.
WahcopfbiTekXyMbic npoueciHde axbipatbina
Ko3FaNTKbIuTbIH TepMNKaJIbIK KOpFaHbICbl IcKe Kocblnbl
1.卍HcopfbltBn6apnbK6eNikTepiH 6iteJin KaNMaFaHbIH TeKcepy.
2.ФинзелнсугпaketihaybICTbipHbI3.
3. Ko3FaTbIw KopFaHbIcBi cy3ricih aybIcIbpy.
4. 乌fbcaya cyricinH Hemece HEPA cyriciH (ApaHbI KepeK-kaapakTap) aybictbipbHbI3.
5. Ko3FaJIrkblI Typ6nHaCbH waMameH 30-40 MNHyT cyblTbHb1. KypblfBhlb KaTadaH Kocblb13.
CopaTbIH Typ6nHa Kymbic icTeMeiDi
- Kyat Ke3iHiH po3eTKacbIH XaHe caKaTaHdbIpfbIbH TeKcepiHi3.
- KypbIJIbIaIbI KeJI Ka6JI MeH KyaT aWacbIH Tekcepy.
- KypbIJIfBiHbI KaI Ta KocBHybI3.
Copy kywi a3aJbI
- BapIbIK copy KeITeKy6bIbIH, copaTbIH TypBnHaHbIH Hemece WnaHriH 6iTeynepin KOIO.
- Φπη3εηηcγ3ri naKetiaybicTbpbHbI3.
- TypaTb cy3rinye anemEnTH (kyblnabH) arbH cy actbHa Ta3aJay XHe KpyFaTy KepeK.
- Copy 6acbH dypbc opHaTy/cbIPT etKisin 6eKiTy.
- Akaynb copy wnaHricin anMaTbipy.
- Ko3fantKbll KopfaHbcI cy3rici aybIcIbpy.
Ta3anay Ke3iHne WaHHbIH WbIFybl
1.ФизэнсуглпянakетिनсэнкесггтEkcepei3.
2.ФинзелнсугпaketihaybICbIbHbI3.
3. Copy 6acbH dypbic opHaTy/cbipt etKisin 6ekity.
4. TypaKtbI cy3rIney 3nEMeHTIH (KybIaTbIH) aFbIH cy actbHda Ta3anay KHe Kypraty Kepek.
5. KaHa TpyakTbI cy3riney 3neMeHTIH caBHB13.
6. Ko3raTbI W KOpraHbIcbl cy3ricH dypbic calbin, aybICTbIPbIHbI3.
TyTbHybBnapFa Kbl3MeT KepceTy
Akay Konybimarhan 60nca,waHcopfblWtbl cepBnctIK KbI3MeTTE Tekcepy KepeK.
Kenindik
Op ennde Jepriikti dinctpn6bhotnap 6epren Keninik
waapTtapbl kondaHbIaNdbI. BybIMda MaTePnAnDbIK
Hemece eHdiipictik akaynap aHbIKtaIraH xaIaIa,
bIKTMaJ akaynapdbI keiNdk Mep3iMi iWInde aKbcIb3
KeHNDeMl3. KeiNdk Mep3imHe Hapa3bnbIKTapbHbI3
60JCa, bYbIMdbI catKaH cayda MeKemeciHe Hemece
XaKbIHDaftbl ekJIeTTI kbI3MeT Kepcety opHbHa
Ty6ipteKTI Kepcetin xa6apnaCbHbI3.
(MeKeHkaaBbIMbI3 apTbI 6eTTe)
Kenindik Typabk KocbIMwa aKnapataTb (6ap 6o1ca)
jepriikti Karcher Be6-caNTbHbH (KyKteynep)
6eiminderi KbImet KepcTe yemimHde Ta6yfa 6o1a.
IbIrApy KyHi fnpMaNbIK TaKaTawada MM/YYY
niimHde KepcTeJIeDi, MyHa MM -ehDipic aHb, YYYYY
- IbIrApbInraH Xbln HeMece KoDTanFaH Tpyde.
Keke caHapdbIH MaBihacbI KeNeciJe60naDbI: MbicnbI: 30290
3 EHHipinreH Kblbl
0 ΘHπipinre rfaebpi
2 ΘHdpinreH OHkbIbIK
9 Θιπίρητη ἀῦς ἡκεις καῦς
0 ΘHДIPiRrEh aHbIHbH 6ipHwi caHbI
CoHbIMeH 6yI MbicaJa 30290 KoIbI 09/(2)023 eHdpinre H KyHn 6iDipei.
KepeK-kaPak XaHe KocaJIkbl 6eJWeKTeP
TeK TynHcyKaIbI KepeK-kaPak Hemece KocaJIbI 6eJIweKTEpDi naiDanaHaHBiB3, c6e6i on KypaIdbIH Kayinc3 XHe anatcb13 Kymblc icTeyiHe KeniJdk 6oJaBl.
Kepek-kaapakap MeKocalkb6eIweKtepTypaBiaKnapaTwww.kaercher.com Be6-caTbHda KOnJXetimdi.
EO cTaHdapTTapbHa cÖnKeCTiri TypaNbI DeKnapaÇu
OcbimEn TeMeHne KepcTeIJreMaunHa Kayinci3ik
KHe DeHcaybIK Kopfay 6oynbHwa EO
DnpeKTHBnapbHbIH TaanTapbHa cKeKec KeJIeTHi
mAmimdeM3. Bi36e H KeIicyci3 MaunHaHbIH
KOHCTpyKUncbl e3repRe H KaFaJaOaOCbI DeKnapaunr
E3 KUsIH KOyAbI.
ΘHIM: KpKa Ta3aJayra apHanraH WaHcOpfbiW
Tuni: 1.355-xxx
Tuni: 1.527-xxx
KoJaHbIcTaBcEO DnpeKTHBaJapbl
2006/42/EG (+2009/127/EG)
2009/125/EG
2011/65/EU
2014/30/EU
KondaHbIaNbIH 6ipi3eHdiipinre HcTahdapTTap
ENIEC63000:2018
EN 55014-1:2017 + A11:2020
EN 55014-2: 2015
EN 60312-1: 2017
EN 60335-1
EN 60335-2-69
EN 61000-3-2: 2014
EN 61000-3-3: 2013
EN 62233: 2008
KondaHbinaTbIH yTTbIK CTaHapTTap
KoIaHbIJIaTbIHHyckama(Nap)
666/2013
KoN KOnFaHap 6aCkapMaHbIn TaNCbIPMaCbl MeH
yekindiiribonbHwaepekeTezi.

H.Jenner
Chairman of the Board of Management

S. Reiser
Director Regulatory Affairs & Certification
KyKaTtAmHbI Kypri3etIH yekijetTI Tynfa:
C. Pau3ep
Alfred Karcher SE & Co. KG
Alfred-Karcher-Str. 28 - 40
71364 Winnenden (Германь)
Ten.: +49 7195 14-0
TeledpaKc: +49 7195 14-2212
Winnenden, 2020/10/01
TexHnKaJIbIK cHnTaTmApIapbl
www.kacrchor.com/REACH
按规定使用
警告
健康危害
吸入有害粉尘
请勿使用本设备抽吸有害粉尘。
注意
设备损坏
高湿度会导致短路
仪在室内使用和存放设备。
JJI JJI JIJI IJI IJI IJI IJI IJI IJI IJI IJI IJI IJI IJI IJI IJI IJI IJI IJI IJI IJI IJI IJI IJI IJI IJI IJI IJI IJI IJI IJI IJI IJI IJI IJI IJI IJI IJI IJI IJI IJI IJI IJI IJI IJI IJI IJI IJI IJI IJI IJI IJI IJI
F a>la| o.
a|jg aall jks 4.
aagll gog o od g g djjll aal lks jg .5
.(wll c)
G a>la| o.
aclll ojaol ksc agj ygl jkll oj.6
jllg kss kss sds aal lks onk c
.
H a>la| o.
aill Jls qsw u Jkll oj sllac .7
.
I a>la| o.
aclll oja I g aall jks 8.
.
J a>la| o.
Jbcl Jbcl
Jbcl
Jbcl
Jbcl
Jbcl
Jbcl
Jbcl
Jbcl
Jbcl
Jbcl
Jbcl
Jbcl
Jbcl
Jbcl
Jbcl
Jbcl
Jbcl
Jbcl
Jbcl
Jbcl
Jbcl
Jbcl
Jbcl
Jbcl
Jbcl
Jbcl
JIbcl
JIbcl
JIbcl
JIbcl
JIbcl
JIbcl
JIbcl
JIbcl
JIbcl
JIbcl
JIbcl
JIbcl
JIbcl
JIbcl
JIbcl
JIbcl
JIbcl
JIbcl
JIbcl
JIbcl
JIbcl
JIbcl
JIbcl
JIbcl
JIbcl
Jbcl
JIbcl
JIbcl
JIbcl
JIbcl
JIbcl
JIbcl
JIbcl
JIbcl
JIbcl
JIbcl
JIbcl
JIbcl
JIbcl
JIbcl
JIbcl
JIbcl
JIbcl
JIbcl
JIbcl
JIbcl
JIbcl
JIbcl
JU
1. aJ
2. J
1. 1.
1. 1.
2..
1. 1.
1. 1.
2..
1. 1.
2..
1. 1.
2..
Jaiu 1. gUjU J
Register your product and benefit from many advantages.
www.kaercher.com/welcome


Rate your product and tell us your opinion.
www.kaercher.com/dealersearch