
IAN 383843 - Weather Station AURIOL - Free user manual and instructions
Find the device manual for free IAN 383843 AURIOL in PDF.

| Product type | Radio-controlled weather station |
| Brand | Auriol |
| Model | IAN 383843 |
| Dimensions (station) | Approx. 11.5 x 12 x 2.5 cm |
| Weight (station, without batteries) | Approx. 177 g |
| Power supply station | 3 batteries 1.5 V AAA LR03 |
| Number of outdoor sensors | 3 radio sensors |
| Dimensions (sensor) | Approx. 10.2 x 4.0 x 2.6 cm |
| Weight (sensor, without batteries) | Approx. 43 g |
| Power supply sensor | 2 batteries 1.5 V AAA LR03 per sensor |
| Radio range | Max. 100 m |
| Transmission frequency | 433 MHz - 434.8 MHz |
| Protection rating (sensor) | IPX4 (protection against water splashes) |
| Temperature range (station) | 0 °C to 50 °C |
| Temperature range (sensor) | -20 °C to 50 °C |
| Temperature accuracy (station) | ±2 °C (0–5 °C), ±1.5 °C (5–50 °C) |
| Humidity range (station/sensor) | 20% to 95% |
| Main functions | DCF77 radio time, alarm, snooze, indoor/outdoor temperature/humidity, trends, min/max values, backlight, custom room names |
| Cleaning | Soft, dry, lint-free cloth; do not immerse in water |
| Storage | Remove batteries, store in a dry, cool place |
| Warranty | 3 years |
| Customer service | Inter-Quartz GmbH, support@inter-quartz.de, phone +49 (0)6198 571825 |
Frequently Asked Questions - IAN 383843 AURIOL
User questions about IAN 383843 AURIOL
0 question about this device. Answer the ones you know or ask your own.
Ask a new question about this device
Download the instructions for your Weather Station in PDF format for free! Find your manual IAN 383843 - AURIOL and take your electronic device back in hand. On this page are published all the documents necessary for the use of your device. IAN 383843 by AURIOL.
USER MANUAL IAN 383843 AURIOL
safety instructions .... - 1 -
and safety instructions
Table of contents
Table of contents - 1 -
Introduction - 4 -
Intended use - 4 -
Scope of delivery ...... - 5 -
Technical specifications .... - 6 -
Device - 6 -
Wireless sensors ...... - 6 -
Symbol description ...... - 8 -
Important safety information Important safety information
Important safety information for users .... - 11 -
Important safety information for the batteries .... - 12 -
Hanging or positioning the device securely - 15 -
Hang or position the wireless sensors securely .... - 17 -
Display - 19 -
Control panels - 21 -
Wireless sensors .... - 22 -
Starting up the device ...... - 23 -
GB IE NI -1 - CY MT
Time zone adjustment ..... - 26 -
Interference with reception ...... - 27 -
Switching DCF77 radio reception off and on - 28 -
Quick set-up - 29 -
Default settings.... - 30 -
Light - 31 -
12/24-hour time format - 31 -
Alarm - 31 -
Activate or deactivate the alarm ... - 31 -
Setting alarms - 32 -
Snooze function (SNOOZE) ..... - 33 -
Temperature format - 33 -
Trends - 33 -
Maximum and minimum values.... - 34 -
Battery level indicator ...... - 35 -
Channel setting of
the wireless sensors 1-3 - 35 -
Retrieving wireless sensor data ..... - 36 -
Naming the wireless sensors .... - 37 -
Assigning preset names ...... - 37 -
Assigning your own names ..... - 38 -
Personal information ...... - 40 -
Reset(RESET) - 40 -
Cleaning instructions - 40 -
Storage.... - 40 -
GB IE NI -2- CY MT
Simplified EU declaration of
conformity - 41 -
Disposal - 41 -
Disposal of the electronic device .. - 42 -
Battery disposal - 45 -
Recycling ...... - 50 -
Waste disposal - 50 -
The digi-tech gmbh warranty ...... - 50 -
Warranty terms ...... - 50 -
Warranty period and
statutory claims for defects ..... - 51 -
Scope of Warranty ...... - 52 -
Processing in the event of
a warranty claim ...... - 53 -
Service - 54 -
Supplier - 56 -
GB IE NI -3- CY MT
RADIO-CONTROLLED WEATHER STATION
Introduction
Congratulations on purchasing your new radio-controlled weather station (hereinafter referred to simply as "device"). You have chosen a high-quality device. The quick-start guide is part of this device. It contains important information pertaining to safety, and to using and disposing of the device. Please familiarise yourself with all the operating and safety instructions before using this device. Use the device only as described and for the purposes indicated. All documents must be included if the device is passed on to third parties. Please keep the packaging and the quick-start guide for future queries.
Intended use
This device is suitable for displaying the time and for using the additional functions described. Any other use or modification of
GB IE NI -4- CY MT

the device is considered to be improper use. The manufacturer is not liable for damage caused by improper use or incorrect operation. The device is not intended for commercial use.
Scope of delivery
Note: Please check the package after purchase. Make sure that all parts are included and that none are defective. If the package is incomplete and/or parts are damaged, do not use the device. Contact the service department (see "Procedure in the event of a warranty claim").
• 1 x radio-controlled weather station
• 3 x batteries 1.5 V AAA LRO3
- 3 x wireless sensors suitable for indoor and outdoor use
- 6 x batteries 1.5 V AAA LR03 (2 batteries per wireless sensor)
• 4 x screw anchors
- 4 x screws
• 1 x operating instructions
GB IE NI -5-
CY MT
Technical specifications
Device
- DCF77 radio time signal
- Temperature measuring range: 0 °C – 50 °C
- Temperature display/tolerance:
+/- 2 °C (0 °C - 5 °C); +/- 1.5 °C
(5 °C - 50 °C)
• Humidity measuring range: 20% – 95% - Humidity display/tolerance: +/- 5% (35% - 70%); +/- 8% (20% - 35%, 70% - 95%)
- Dimensions: approx. 11.5 × 12 × 2.5 ~cm
• Weight: approx. 177 g (excl. battery)
• Batteries: 3 x 1.5 V AAA R03/LR03
Wireless sensors
- Temperature measuring range: -20°C - 50°C
- Temperature display/tolerance: +/- 2 °C (0 °C - 5 °C); +/- 1.5 °C (5 °C - 50 °C)
GB IE NI -6-
CY MT
• Humidity measuring range: 20% – 95%
- Humidity display/tolerance: +/- 5% (35% - 70%); +/- 8% (20% - 35%, 70% - 95%)
- Range: max. 100 m
• Transmission frequency: 433 MHz - 434.8 MHz
• Transmission power: 0.024 W
- Protective system provided by the housing (wireless sensor): IPX4 (splash guard in accordance with the IEC 60529 standard)
• Dimensions: approx. 10.2 x 4 x 2.6 cm
• Weight: approx. 43 g (excl. battery)
Batteries per wireless sensor: 2 x 1.5 V AAA R03/LR03
- DC voltage indicator
GB IE NI -7- CY MT
Symbol description
 WARNING! WARNING! | This signal symbol/word indicates a hazard with a medium risk level which, if not avoided, may result in death or serious injury. |
| Note: | This signal word indicates important information. |
 | Improper use of the batteries/ rechargeable batteries poses a risk of explosion and leakage of the battery fluid. |
 | Alcaline batteries included |
 | |
 | 9 x Batteries:1.5 V AAA R03/LR03 |

GB IE NI -8- CY MT
 | Mark for direct voltage | |
 | Instruction manual | |
 | Read the instruction manual! | |
 | With the CE marking, digi-tech gmbh declares conformity with the applicable EU directives. | |
 | Temperature indoor/outdoor | |
 | Humidity | |
 | Range outdoor sensor: max. 100 m Frequency: 433 MHz - 434,8 MHz Transmission power: 0.024 W | |
GB IE NI -9-
CY MT
 | Protection offered by the case (outdoor sensor): IPX4 (Water resistant according to IEC norm 60529) |
 | |
 | Time |
 | DCF77 radio time signal |
 | Radio wave symbol/Radio tower symbol |
 | Alarm |
GB IE NI -10- CY MT
Important safety information
Important safety information for users

WARNING!
RISK OF INJURY!
This device may be used by persons (including children over 8 years of age) with reduced physical, sensory or mental abilities or lack of experience and knowledge, if they are supervised or instructed regarding the safe use of the device and understand the dangers that may arise. Children may not play with the device.
Cleaning and user maintenance
GB IE NI -11-
CY MT
of the device may not be performed by children without supervision. Keep packaging films out of the hands of children. There is a danger of suffocation.
Important safety information for the batteries

WARNING!
HEALTH HAZARD! RISK OF EXPLOSION!
Keep new and old batteries/rechargeable batteries out of reach of small children. If a battery/rechargeable battery is swallowed, medical help must be obtained immediately.
The batteries/rechargeable batteries must always be inserted
GB IE NI -12- CY MT
with the correct polarity. Clean the battery and device contacts beforehand if necessary. Do not attempt to recharge, short-circuit, or open the batteries/rechargeable batteries. Never heat the batteries/rechargeable batteries to recharge them. Do not expose the batteries to excessive heat such as sunshine, fire or the like. There is an increased risk of leakage! Never throw batteries/rechargeable batteries into fire, as they can explode.
Improper use of the batteries/rechargeable batteries poses a risk of explosion and leakage of the battery fluid. If the
GB IE NI -13-

CY MT
batteries/rechargeable batteries should leak, avoid contact with skin, eyes and mucous membranes. Use gloves. In the event of contact with battery fluid, immediately rinse the affected areas with plenty of clean water and consult a doctor immediately. Remove exhausted batteries/rechargeable batteries from the device immediately, there is an increased risk of leakage.
Note:
• Non-rechargeable batteries must not be recharged.
- Different battery types or new and used batteries must not be used together!
GB IE NI -14-
CY MT
- Do not short-circuit the supply terminals.
- Empty batteries/rechargeable batteries must be removed from the device and safely disposed of (see Disposal of batteries)!
- If the device is stored unused for a longer period of time, the batteries/rechargeable batteries should be removed.
Hanging or positioning the device securely
The device is not designed to be used in rooms with a high humidity level (e.g. bathrooms).
You can use the screw plug and screw enclosed to attach the device to the wall. Before mounting to the wall, make sure that there are no gas, water or electricity lines
GB IE NI -15- CY MT
at the drilling location. Note the condition of the wall. The enclosed fastening material is not suitable for all types of wall. The manufacturer accepts no liability for damage caused by incorrect mounting.
- Set up the stand (28) in order to position the device securely.
- Be sure to protect sensitive surfaces before setting up the device, otherwise scratches may occur.
Make sure that:
- there is always sufficient ventilation (do not place the device on shelves or where curtains or furniture cover the ventilation slots (29) and leave at least 10 cm clearance from the side);
- the device is not placed on a thick carpet or bed during operation and that no direct heat sources (e.g. heaters) impact the device;
- the device is not exposed to direct sunlight;
- contact with splashing and dripping water is avoided;
GB IE NI
-16-
CY MT
- the device is not hanging or standing in the immediate vicinity of strong magnetic fields (e.g. loudspeakers);
- no impurities or dust can enter the device;
• candles and other naked flames must be kept away from the device at all times to prevent the spread of fire.
Hang or position the wireless sensors securely
Place the wireless sensors so that they are protected from direct weather influences, e.g. under a porch or carport. The wireless sensors feature class IPX4 protection and are thereby splash-proof.
You can use the screw anchors and screws provided to mount the device to the wall. Make sure that there are no gas, water or electricity pipes at the drilling site before mounting on the wall. Note the condition of the wall. The enclosed fastening material is not suitable for all types of wall. The manufacturer accepts no liability for damage caused by improper fastening.
GB IE NI -17-
CY MT
- Protect sensitive surfaces before setting up to avoid scratches.
Make sure that:
- the wireless sensors are either in an upright position or suspended;
- there is always sufficient ventilation (leave at least 10 cm clearance from the side);
- the wireless sensors are not exposed to direct sunlight;
- the wireless sensors are not suspended or positioned in the immediate vicinity of magnetic fields (e.g. loudspeakers);
- no foreign bodies or dust can enter the device;
- sensitive surfaces are protected before installation.
GB IE NI
-18-
CY MT
Display
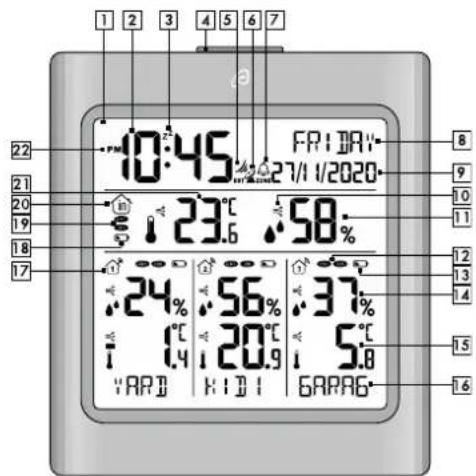
| 1 | Display | 2 | Time display |
| 3 | Snooze symbol | 4 | SNOOZE/LIGHT button |
| 5 | Radio waves | 6 | Radio symbol |
| 7 | Alarm symbol | 8 | Weekday |
GB IE NI -19- CY MT
| 9 | Date (day/month/year) | 10 | Trend symbol, humidity, indoors |
| 11 | Humidity display, indoors | 12 | MAX/MIN symbolWireless sensor 1, 2, 3 |
| 13 | Battery level displayWireless sensor 1, 2, 3 | 14 | Humidity displayWireless sensor 1, 2, 3 |
| 15 | Temperature displayWireless sensor 1, 2, 3 | 16 | Room nameWireless sensor 1, 2, 3 |
| 17 | Signal reception and channel wireless sensor 1, 2, 3 | 18 | Battery level indicator, device |
| 19 | MAX/MIN symbol device | 20 | Device symbol |
GB IE NI -20- CY MT
| 21 | Temperature display device | 22 | AM/PM display |
Control panels

| 23 | Hanging kit | 24 | Reset Button |
| 25 | ▲Up button | 26 | ▼Down button |
| 27 | Battery compartment | 28 | Collapsible stand |
GB IE NI -21-
CY MT
| 29 | Ventilation slots | 30 | ROOM/Room 1-3 buttons |
| 31 | ALM button, alarm | 32 | SET button |
| 33 | Loudspeaker/buzzer | ||
Wireless sensors
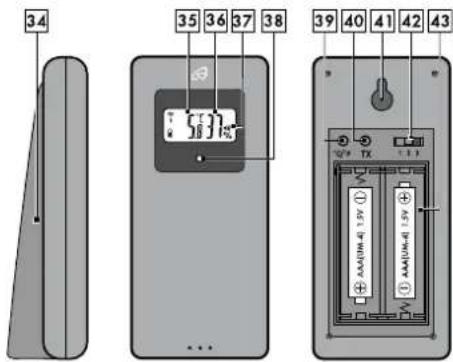
| 34 | Stand | 35 | Temperature display |
| 36 | Humidity display | 37 | Channel display, 1, 2, 3 |
| 38 | Control LED | 39 | °C/°F button |
GB IE NI -22- CY MT
| 40 | TX button | 41 | Mounting kit |
| 42 | Channel selection switch, 1.2.3 | 43 | Battery compartment |
Starting up the device
Note:
- Set a different channel for each wireless sensor by using the channel selector (42).
■ First insert the batteries into the battery compartment (43) of the wireless sensors. -
Then insert the batteries into the device's battery compartment (27).
-
Remove the protective film from the device and wireless sensors.
- Open the battery compartment (43) of the wireless sensors 1-3.
- Set a different channel 1-3 for each wireless sensor by using the channel selector switch (42).
- Insert 2 1.5 V AAA LRO3 batteries with their poles facing the
GB IE NI -23- CY MT
correct way for each wireless sensor.
The control LED (38) will light up temporarily and the temperature (35), humidity (36) and the selected channel (37) will be displayed.
-
Close the battery compartment (43) again.
-
Open the device's battery compartment (27) and insert 3 1.5 V AAA LR03 batteries with their poles facing the correct way.
-
Close the battery compartment (27). A short beep will sound and the temperature (21) and humidity (11) of the device's location will be displayed. The radio symbol (6) flashes and the device will receive the DCF77 radio signal. This process can take 3-10 minutes.
Note:
Do not move the device or the wireless sensors during the reception process!
GB IE NI
-24-
CY MT
None of the buttons except the
SNOOZE/LIGHT button (4) have any function during the reception process.
If the process of radio reception was successful, the time (2), the day of the week (8) and the date

(9) will be set automatically and the radio
symbol (6) will be permanently displayed. During daylight saving time, DST appears on the display under the radio symbol (6).
The device then receives the signals from the wireless sensors 1-3. This process can take a few minutes. If reception is successful, the signal reception (17) of the respective wireless sensor 1-3 as well as the current temperature (15) and the current humidity (14) will be displayed.
If the time signal is not received after 10 minutes, the radio symbol (6) will disappear.
Set the time manually (see default settings). The device receives the DCF77 radio signal at 01:00, 02:00 and 03:00. If no
GB IE NI -25-
CY MT
reception can be established, the device will make a new attempt at reception between 04:00 and 05:00 and automatically correct the time after successful signal reception.
Time zone adjustment
If you are in a country where the current time differs from that of the DCF77 radio signal, use the time zone adjustment to use your device in a time zone other than the standard setting (UTC + 1 = Central European Time).
Set the difference in hours (e.g. -01) to the desired time zone.
- Press the SET button (32) 1 x for a long time and 6 x briefly on the normal display. The time zone (00) will flash and can be set with the ▲p button (25) or the ▼down button (26).
- Press the SET button (32) to confirm the setting. The device will immediately display the adjusted time (e.g. 1 hour less).
GB IE NI
-26-
CY MT
- Press the SET button (32) until you return to the normal display.
Interference with reception
The DCF77 radio signal is sent from near Frankfurt am Main. It can be received within a radius of up to approx. 2000 km from Frankfurt am Main. However, there are some sources of interference that can significantly hinder reception. If your device does not receive the DCF77 radio signal as it should, hang or place the device in a different location. Note that there may be electromagnetic radiation in the vicinity of computers, telephones, radios and TVs, which can interfere with the reception of the DCF77 radio signal. Problems with radio signal reception can also be caused by strong building insulation (metal components), high mountains or atmospheric interference. Replace the batteries if necessary.
GB IE NI -27- CY MT
Switching DCF77 radio reception off and on

You can turn off the radio reception.
- Press and hold (RCC OFF) the ▲ up button (25) and the ▼ down button (26) together for approx. 3 seconds. The radio symbol's radio tower (6) △ disappears. The device will no longer receive a DCF77 radio signal.
You can reactivate the radio reception manually.
- Press and hold (RCC OFF) the ▲ up button (25) and the ▼ down button (26) together for approx. 3 seconds. The radio symbol (46) radio waves (5) will disappear. The device receives the DCF77 radio signal at 01:00, 02:00 and 03:00. If no reception can be established, the device will make a new attempt at reception between 04:00 and 05:00 and automatically correct the time after successful signal reception. If reception is successful, the
GB IE NI -28-
CY MT
radio symbol (6) will be displayed permanently. You can restart the DCF77 radio signal immediately.
- Press and hold the down button (26) for approx. 3 seconds. The radio symbol (6) will flash and the device will receive the DCF77 radio signal. This process can take 3-10 minutes. If the radio reception was successful, the time (2), the day of the week (8) and the date (9) are automatically set and the radio symbol (6) will be permanently displayed. Radio reception is restored.
Quick set-up
When setting numerical values, you can use the quick setting by pressing and holding the ▲up button (25) or the ▼down button (26).
GB IE NI -29-
CY MT
Default settings
You can configure the following settings: Time, time format, date, time zone and language of the weekday display.
- Press and hold the set button (32) on the normal display for approx. 3 seconds. The hours will flash and can be set with the ▲p button (25) or the ▼ down button (26).
- Press the SET button (32) to confirm the setting. - Set the minutes, 12/24-hour time format, year, month, day and the language of the day of the week display (ENGLISH, GERMAN, FRENCH, ITALIAN, SPANISH, DANISH or SWEDISH) in the same way.
Note:
If you do not press any buttons within 30 seconds, the device will automatically return to the normal display.
GB IE NI
-30-
CY MT
Light
Press the SNOOZE/LIGHT button (4) to temporarily activate the backlight.
12/24-hour time format
- Press the SET button (32) 1 x for a long time and 2 x briefly on the normal display. The 12/24-hour time format will flash and can be set with the ▲up button (25) or the ▼down button (26).
In 12-hour time format, the display shows AM (22) in the morning and PM (22) in the afternoon before the time (2).
- Press the SET button (32) repeatedly until you return to the normal display.
Alarm
The device has an alarm function.

Activate or deactivate the alarm
- Briefly press the ALM button (31) to switch to alarm mode. The message
GB IE NI -31-
CY MT
ALARM OFF or ALARM ON will appear.
- Press the ▲ up button (25) to turn on the alarm function.
- Press the ▼ down button (26) to turn off the alarm function. If the alarm function is switched on, the bell symbol (7) will appear on the display. If the alarm function is switched off, the bell symbol (7) will disappear from the display.
Setting alarms
The default alarm time is 06:00. To change the alarm time, proceed as follows:
- Briefly press the ALM button (31) to switch to alarm mode.
- Press and hold the ALM button (31) for approx. 3 seconds. The hours will flash on the display and can be set with the ▲ up button (25) or the ▼ down button (26).
- Confirm the setting by pressing the ALM button (31).
- Set the minutes in the same way.
GB IE NI -32-
CY MT
- Confirm the setting by pressing the ALM button (31). And you will automatically return to the normal display.
Snooze function (SNOOZE)
- When the alarm sounds, press the SNOOZE/LIGHT button (4) to temporarily deactivate the alarm. The bell symbol (7) and the SNOOZE symbol Z^2 (3) will flash on the display. The alarm will sound again after approx. 5 minutes.
- Press any button except the SNOOZE/LIGHT button (4) to stop the alarm. However, the alarm time will stay activated for the next day.
Temperature format
Press the down button (26) on the normal display to show the temperature in Celsius (°C) or Fahrenheit (°F).
Trends
Your device and the wireless sensors 1-3 can display the trend for the weather data
GB IE NI -33-
CY MT
temperature and humidity [e.g. Humidity device (10)].
→ Humidity/temperature increases
→ Humidity/temperature remains the same
Humidity/temperature decreases
Maximum and minimum values
The maximum and minimum temperature and humidity are stored from the time the batteries are inserted and can be displayed for you.
- Press the ▲ up button (25) briefly to read the maximum values 🐘 the temperature and humidity of the device (11) and the wireless sensors 1-3 (14) on the display.
- Briefly press the ▲ up button (25) repeatedly to read the minimum values 4 of the temperature and humidity of the device (1) and the wireless sensors 1-3 (14) on the display.
GB IE NI -34-
CY MT
- Press and hold the ▲ up button (25) for approx. 3 seconds to delete the maximum and minimum values. The values are deleted and will be recorded again from that moment on.
Battery level indicator
When the batteries become too low to support the device, the wireless sensors and the data transmission, the battery level indicator (13) or (18) will appear on the display.
- Replace the batteries in the device and the wireless sensors as soon as possible.
- Restart the device.
Channel setting of the wireless sensors 1-3
Your device can use 3 wireless sensors at the same time.
- Open the wireless sensors' battery compartment (43).
- Set the desired channel 1-3 by using the channel selector switch (42). The
GB IE NI -35-
CY MT
device receives the signal from the wireless sensors 1-3 and the signal reception (17) can be read on the device's display.
- Press the TX button (40) to manually transfer the captured data from the wireless sensor to the device.
- Use the °C/°F button (39) to select between °C-Celsius and °F-Fahrenheit.
- Close the battery compartment (43).
Note:
The wireless sensors must be positioned within a maximum radius of 100 m from the device and be free of obstacles.
The wireless sensors will flash briefly as they collect ambient data.
Retrieving wireless sensor data
The device regularly retrieves the data from the wireless sensors. If the data transfer fails, you can perform a data update directly.
GB IE NI
-36-

CY MT
- Press and hold the ROOM 1, 2 or 3 button (30) for approx. 3 seconds. The signal reception symbol (17) will flash on the display. If reception is successful, the signal reception symbol (17) will appear permanently on the display.
Naming the wireless sensors
You can place the wireless sensors in different rooms or even outside. It is possible to give the respective wireless sensor a corresponding name on the device by entering the room name (16).
For example, if you place a wireless sensor in the bathroom, you can call it BATH.
When assigning names, you can choose between the 5 preset names BATH, BED, CHILD1, CHILD2 and GARDEN.
Or you can assign your own names, these can contain a maximum of 5 characters.
Assigning preset names
| \ | Room 1 | Room 2 | Room 3 | Room 4 | Room 5 |
GB IE NI -37-
CY MT
| DE | BAD | BETT | KINDI | KINDO2 | GARTN | |
| GB | BATH | BEDRM | KIOI | KIO2 | YARD | |
| FR | BAIN | SOMML | ENFI | ENF2 | JARDN | |
| IT | BAGNO | SONMO | BAMBI | BAMB2 | GIARD | |
| ES | BANO | DORTMI | NI | NOI | NINO2 | JARDN |
| DK | BADEV | SOEVN | BARM1 | BARM2 | HAVE | |
| SE | BADRM | SOETM | BARM1 | BARM2 | TRADG | |
- Press the 1-ROOM button (30) to select a name for wireless sensor 1.
- Continue pressing the 1-ROOM button (30) to display the preset names.
- To select one of the names, wait approx. 5 seconds until the name is displayed permanently. The name has now been set.
- Select the names for wireless sensor 2 and 3 in the same way.
Assigning your own names
You can also create your own names for the wireless sensors. A maximum of 5 names can be saved. As soon as a 6th name is created, the first saved name is automatically overwritten. To create your own name, you can use the letters A-Z as
GB IE NI -38-
CY MT
well as the special characters—,+,--# and the numbers 0-9.
To create your own name for wireless sensor 1, proceed as follows:
- Press the 1-ROOM button (30) and then the ▲up button (25) immediately afterwards. You can now select a character by pressing the ▲up button (25) or the ▼down button (26).
- When you reach the desired character, press the 1-ROOM button (30) to confirm your entry and move to the next character out of a total of 5 characters. As soon as you have assigned 5 characters, you will be automatically returned to the normal display.
- If you have assigned less than 5 characters, press the 1-ROOM button (30) twice to return to the normal display.
- Set the names for wireless sensors 2 and 3 in the same way.
GB IE NI -39-
CY MT
Personal information
Delete your personal data from the device before giving it away or disposing of it (e.g. by resetting).
Reset(RESET)
- Press the RESET button (24), by using a narrow tool, if necessary, to reset the device and restart radio reception. All data and settings will be deleted.
Cleaning instructions
Incorrect cleaning can damage the device. Do not immerse the device in water or other liquids. Do not use aggressive cleaning agents, brushes with metal or nylon bristles or sharp or metallic cleaning objects such as knives, hard spatulas etc. These can damage the surface. Clean the device with a soft, dry, lint-free cloth like the ones used for cleaning spectacles.
Storage
If the device is not going to be used for a longer period of time, remove the batteries
GB IE NI -40-
CY MT
and store the device and the wireless sensors, cleaned and protected from sunlight, in a cool, dry place, preferably in the original packaging.
Simplified EU declaration of conformity
Hereby, digi-tech gmbh declares that the radio-controlled weather station 4-LD6032 is in compliance with the RED 2014/53/EU, article 10 (8) directive.
You can download your instruction manual and declaration of conformity here: www.digi-tech-gmbh.com/downloads
Then click on the magnifying glass and enter the IAN 383843_2110.

Disposal
This device and all the packaging materials are recyclable. Please dispose of them separately for better waste handling. You can find out about disposal options for your product by contacting your municipality.
GB IE NI -41-

Please take note of the marking of packaging material when separating waste materials. They are marked with abbreviations (a) and numbers (b) with the following meanings:
1-7: plastics
20-22: paper and cardboard
80-98: composite materials.

Disposal of the electronic device
The symbol with the crossed-out waste bin signifies that electrical and electronic equipment must not be
disposed of with household waste.
Consumers are legally obliged to collect electrical and electronic equipment separately from unsorted municipal waste at the end of their service life. In this way, an environmentally friendly and resource-saving usage is ensured.
Batteries and rechargeable batteries that are not firmly enclosed by the
GB IE NI -42-
CY MT
electrical or electronic device and that can be removed non-destructively must be separated from the device before it is handed over to a collection point and disposed of as intended. The same applies to light sources that can be removed from the device non-destructively.
Owners of electrical and electronic equipment from private households can hand them in at the collection points of the public waste disposal authorities or at the collection points set up by the manufacturers or distributors within the jurisdiction of the ElektroG/WEEE. The surrender of old devices is free of charge.
Please dispose of the device by returning it to your lidl store.
Dealers with a sales area of at least 400 m ^2 for electrical and electronic equipment are obliged to take them back. The same applies to food retailers with a total sales area of at least 800 m ^2 , provided that they offer electrical and electronic equipment
GB IE NI -43- CY MT
continuously or at least several times a year. Distance sellers with a storage area of at least 400 m² for electrical and electronic equipment or a total storage area of at least 800 m² are also obligated. In general, distributors are obliged to ensure that old devices can be returned free of charge by means of suitable return options at a reasonable distance.
Consumers have the option of handing over an old device free of charge to a distributor who is obliged to take them back if they purchase an equivalent new device with essentially the same function. This possibility also exists for deliveries to a private household. In distance selling, the option of free pick-up when purchasing a new device is limited to heat exchangers, display screen devices and large devices that have at least one outer edge with a length of more than 50 cm. When concluding the purchase contract, the distributor must question the consumer about their return intention. Apart from
GB IE NI -44- CY MT
that, consumers can hand in up to three old devices of one type at a collection point of a distributor free of charge, without this being tied to the purchase of a new device. However, the edge lengths of the respective devices must not exceed 25 cm.
Consumers are encouraged to take measures to avoid waste. With regard to electrical and electronic devices, this means extending their lifespan by repairing defective devices and selling used devices that are in good working order instead of disposing of them.
Remove the battery before disposal without causing damage and dispose of it separately (see "Disposing of the batteries").
Battery disposal
The accompanying symbol indicates that batteries and rechargeable batteries must not be disposed of with normal household waste. Defective or used batteries/rechargeable batteries must
GB IE NI -45- CY MT

be recycled in accordance with Directive 2006/66/EC and its amendments. Consumers are legally obliged to dispose of all batteries and rechargeable batteries, regardless of whether they contain harmful substances such as: Cd = cadmium, Hg = mercury, Pb = lead, Li = lithium or not, at a collection point in their municipality/district or at a retail outlet, for environmentally friendly disposal and for the recovery of valuable raw materials such as cobalt, nickel or copper.
The return of batteries and accumulators is free of charge.
GB IE NI -46- CY MT

WARNING!
Environmental damage through incorrect disposal of batteries/rechargeable batteries!
Some of the possible materials such as mercury, cadmium and lead are poisonous and, if not disposed of properly, endanger the environment. For example, heavy metals can have harmful effects on the health of humans, animals and plants and accumulate in the environment and in the food chain, and can then
GB IE NI -47-
CY MT
enter the body indirectly via food.

WARNING!
Danger of explosion!
With used batteries containing lithium (Li = lithium) there is a high risk of fire. Therefore, special attention must be paid to the proper disposal of used batteries and rechargeable batteries containing lithium. Incorrect disposal can also lead to internal and external short circuits due to thermal effects (heat) or mechanical damage. A short circuit can lead to a fire or an explosion and have serious
GB IE NI -48- CY MT
consequences for humans and the environment. For this reason, tape off the poles of lithium-based batteries and rechargeable batteries prior to disposal in order to avoid an external short circuit.
Batteries and rechargeable batteries that are not permanently installed in the device must be removed and disposed of separately before disposal of the device. Please return batteries and rechargeable batteries only when they have been discharged!
Use rechargeable batteries instead of disposable batteries whenever possible.
GB IE NI -49- CY MT
Recycling
The product packaging consists of recyclable materials.

Please dispose of them properly at the available collection sites.
Waste disposal
Dispose of the packaging in an environmentally responsible fashion.

Please note the marking of the different packaging materials and separate them if applicable.
The digi-tech gmbh warranty
This device has a 3 year warranty valid from the date of purchase. In the event of defects in this device, you have legal rights against the seller of the device. These statutory rights are not limited by our warranty set out below.
Warranty terms
The warranty period begins on the date of purchase. Please keep the receipt. This document is required as proof of purchase. If a material or
GB IE NI -50-
CY MT
manufacturing defect occurs within three years of the date of purchase of this device, the device will be repaired or replaced – at our discretion – by us free of charge. This warranty requires that the defective device and the purchase receipt are presented within the three-year period with a briefly written statement stating the nature of the defect and when it occurred. If the defect is covered by our warranty, you will receive the repaired or a new device back. No new warranty period begins with the repair or replacement of the device.
Warranty period and statutory claims for defects
Statutory warranty rights do not extend the warranty period. This also applies to replaced and repaired parts. Any damage or defects already present at the time of purchase must be reported immediately after unpacking. After the warranty has expired, any repairs are subject to a charge.
GB IE NI -51- CY MT
Scope of Warranty
The device was carefully manufactured according to strict quality guidelines and carefully checked before delivery. The warranty applies to material or manufacturing defects. This warranty does not cover parts of the product that are subject to normal wear and tear and can therefore be regarded as wear parts or for damage to fragile parts, e.g. switches, batteries or parts made of glass. This warranty is void if the unit has been damaged or improperly used or maintained. For proper use of the device, all instructions given in the manual must be strictly observed. Uses and actions that are advised against or warned against in the operating instructions must be avoided at all costs. The device is designed exclusively for private and not for commercial use. The warranty expires in the event of abusive or improper handling, the use of force or repairs that were not carried out by our authorised service branch.
GB IE NI -52- CY MT
Processing in the event of a warranty claim
To ensure that your request is processed quickly, please follow the instructions below:
- Please have the receipt and item number (383843_2110) ready as proof of purchase for all enquiries.
- Please refer to the type plate, engraving, title page of your manual (bottom left) or to the sticker on the back or underside for the item number.
- If functional errors or other defects occur, please contact the following service department by phone or email first.

You can download this manual and many other user manuals, product videos and software at www.lidl-service.com.
GB IE NI
-53-
CY MT
This QR code will take you directly to the Lidl service page (www.lidl-service.com), where you will be able to access your operating instructions by entering the article number (383843_2110).
Service
Inter-Quartz GmbH
Valterweg 27A
65817 Eppstein
GERMANY
Email: support@inter-quartz.de
Phone: +49 (0) 6198 571825

00800 5515 6616
GB IE NI
-54-
CY MT
BG 00800 1114916
CH 0800 563862
CY 8009 4403
CZ 800 142 315
DK 800 5515 6616
EE 80000 49116
GR 00800 44140855
HR 0800 222943
HU 0680 981220
LT 8800 33139
LV 8000 5884
MT 800 62851
PL 00800 44 11 493
RO 0800 896640
GB IE NI -55- CY MT
RS 0800 191026
SI 0800 80847
SK 0800 004449
IAN 383843_2110
Art.-Nr.: 4-LD6032

Year of manufacture: 2022

Supplier
Please note that the following address is not a service address. Please first contact the service address (see above).
digi-tech gmbh
Valterweg 27A
65817 Eppstein
GERMANY


-56-

www.digi-tech-gmbh.com/downloads
support@inter-quartz.de
Pooblaščeni serviser:


- and safety instructions
- Table of contents
- RADIO-CONTROLLED WEATHER STATION
- Introduction
- Intended use
- Scope of delivery
- Technical specifications
- Device
- Wireless sensors
- Important safety information
- WARNING!
- RISK OF INJURY!
- HEALTH HAZARD! RISK OF EXPLOSION!
- Note:
- Hanging or positioning the device securely
- Hang or position the wireless sensors securely
- Starting up the device
- Time zone adjustment
- Interference with reception
- Switching DCF77 radio reception off and on
- Quick set-up
- Default settings
- Light
- 12/24-hour time format
- Alarm
- Activate or deactivate the alarm
- Setting alarms
- Snooze function (SNOOZE)
- Temperature format
- Trends
- Maximum and minimum values
- Battery level indicator
- Channel setting of the wireless sensors 1-3
- Retrieving wireless sensor data
- Naming the wireless sensors
- Assigning your own names
- Personal information
- Reset(RESET)
- Cleaning instructions
- Storage
- Simplified EU declaration of conformity
- Disposal
- Disposal of the electronic device
- Please dispose of the device by returning it to your lidl store.
- Battery disposal
- Environmental damage through incorrect disposal of batteries/rechargeable batteries!
- Danger of explosion!
- Recycling
- Waste disposal
- The digi-tech gmbh warranty
- Warranty terms
- Warranty period and statutory claims for defects
- Scope of Warranty
- Processing in the event of a warranty claim
- Service
- Supplier
- Pooblaščeni serviser:
Brand : AURIOL
Model : IAN 383843
Category : Weather Station