
IAN 283582 - Weather Station AURIOL - Free user manual and instructions
Find the device manual for free IAN 283582 AURIOL in PDF.


| Product Type | Weather Station |
| Model | IAN 283582 |
| Brand | Auriol |
| Dimensions (Main Unit) | 120 x 80 x 25 mm |
| Weight (Main Unit) | 200 g |
| Power Supply | 2 x AAA batteries (not included) |
| Outdoor Sensor Power | 2 x AA batteries (not included) |
| Indoor Temperature Range | 0°C to 50°C |
| Outdoor Temperature Range | -20°C to 60°C |
| Humidity Range | 20% to 95% |
| Radio-Controlled Clock | DCF-77 (Europe) |
| Weather Forecast | Sunny, partly cloudy, cloudy, rainy, stormy |
| Barometric Pressure | Display in hPa or inHg |
| Alarm Function | Yes, with snooze |
| Backlight | Yes, auto or manual |
| Max Outdoor Sensors | Up to 3 |
| Transmission Frequency | 433 MHz |
| Range (Open Area) | Up to 100 m |
| Maintenance | Clean with a dry cloth; avoid liquids |
| Safety | Battery compartment keep dry; not for children under 3 |
| Spare Parts | Sensor available separately; batteries standard |
| Repair | Contact Auriol service for battery replacement or sensor issues |
Frequently Asked Questions - IAN 283582 AURIOL
User questions about IAN 283582 AURIOL
0 question about this device. Answer the ones you know or ask your own.
Ask a new question about this device
Download the instructions for your Weather Station in PDF format for free! Find your manual IAN 283582 - AURIOL and take your electronic device back in hand. On this page are published all the documents necessary for the use of your device. IAN 283582 by AURIOL.
USER MANUAL IAN 283582 AURIOL
Operation and Safety Notes
IAN 283582


B
List of pictograms used....Page 6
Introduction Page 6
Intended use......Page 6
Parts description......Page 7
Technical Data Page 8
Scope of delivery....Page 9
General safety instructions....Page 9
Safety instructions for batteries / rechargeable batteries......Page 10
Start-up Page 11
Setting up the products ......Page 11
Starting the outdoor sensor/changing batteries ......Page 12
Starting the main station/changing batteries ......Page 12
The DCF signal (time transmitter)......Page 13
Information in base mode......Page 14
The clock field Page 14
The barometric pressure field ...... Page 15
The indoor temperature field ......Page 16
The outdoor temperature field......Page 18
Settings Page 19
Basic settings......Page 19
Temperature alarm......Page 21
Activating the temperature alarm......Page 22
Alarm....Page 22
Accessing stored data......Page 24
Manually activating signal reception Page 24
Activating DCF signal reception......Page 24
Activating reception from the outdoor sensor......Page 25
Background lighting......Page 25
Reset function Page 25
Troubleshooting......Page 25
Cleaning and Care Page 26
Disposal Page 26
Simplified EU declaration of conformity......Page 27
Warranty Page 28
| List of pictograms used | |||
 | Direct current Radio |  lled lled | |
 | Alternating current |  | Splashproof |
 | Safety class II Fused |  | |
Radio-controlled weather station
- Introduction
We congratulate you on the purchase of your new product. You have chosen a high quality product. The instructions for use are part of the product. They contain important information concerning safety, use and disposal. Before using the product, please familiarise yourself with all of the safety information and instructions for use. Only use the product as described and for the specified applications. If you pass the product on to anyone else, please ensure that you also pass on all the documentation with it.
Intended use
This product displays the indoor and outdoor temperature, indoor and outdoor humidity, and barometric pressure. It features a radio-controlled clock and several alarm functions. The probable weather trend is calculated based on data collected. The product is not intended for commercial use.
Parts description
Main station
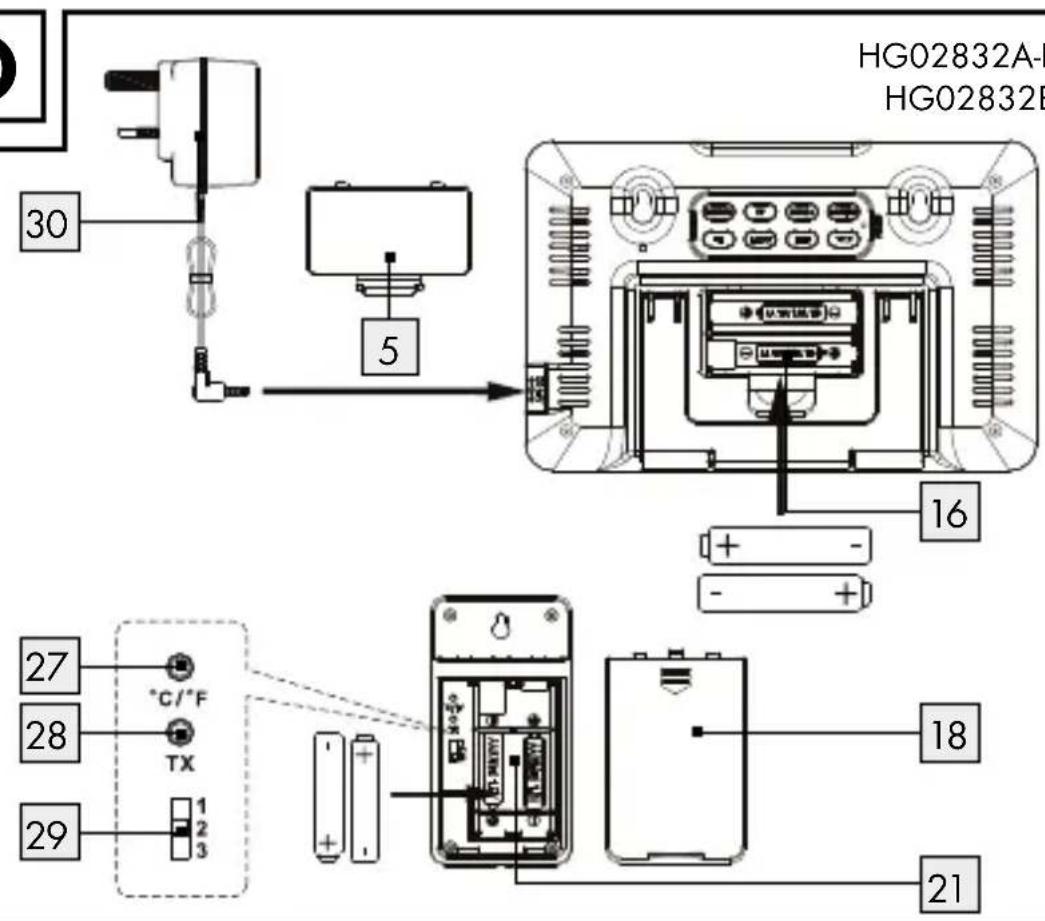
1 Display 2 SNOOZE-/LIGHT field 3 Keypad 4 Main station eyebolt 5 Battery compartment cover 6 Stand 7 SET-/HISTORY button 8 UP button 9 DOWN-/button 10 ALARM-/SET button 11 Reset button 12 °C/°F button 13 MEM button 14 ALERT button 15 CH button 16 Battery compartment
Display
22 Indoor temperature field 23 Outdoor temperature field 24 Clock field 25 Barometric pressure field 26 Outdoor sensor display
Outdoor sensor buttons next to battery compartment
27 °C / °F button 28 TX button (Channel reset button) 29 Channel selector switch
Optional power supply
30 Mains adapter 31 Mains adapter socket
Outdoor sensor
17 Signal LED 18 Battery compartment cover 19 Outdoor sensor eyebolt 20 Outdoor sensor stand 21 Outdoor sensor battery compartment
Technical Data
Main station:
Temperature measurement range: 0 °C to 50 °C
32 °F to 122 °F
Humidity measurement range: 20% to 95%
Radio-controlled clock: DCF77
Batteries: 2 x LRO6 (UM-3), 1.5 V
= = (size AA)
Barometric pressure
measurement range: 850 hPa to 1050 hPa
25.1 inHg to 31.1 inHg
Frequency band: 77.5kHz, 433.050 MHz to
434.790 MHz
Mains adapter:
Input: 230-240V
~ 50 Hz, 50 mA
Output: 5V
= 150 mA
Model: 6305-BS-A for HG02832B-BS,
HG02832D-BS
6305-BS-B for HG02832A-BS,
HG02832C-BS
Protection class:

Outdoor sensor:
Temperature measurement range: -20 °C to +50 °C
-4.0°F to +122 °F
Humidity measurement range: 20% to 95%
Wireless range: max. 100 m (open area)
Batteries: 2 x LR06 (UM-3), 1.5 V
(size AA)
Protection class: IPX4
Frequency band: 433.050 MHz to 434.790 MHz
Transmitted maximum
radio-frequency power: 433.92 MHz, -10.77 dBm
- Scope of delivery
1 Main station, 1 Outdoor sensor, 4 Batteries, type LR06, 1.5 V, 1 Mains adapter, 1 Set of operating instructions

General safety instructions
Before using the product, please familiarise yourself with all of the safety information and instructions for use! When passing this product on to others, please also include all the documents!
This product may be used by children age 8 years and up, and persons with reduced physical, sensory or mental capacity or lacking experience and knowledge, when supervised or instructed on the safe use of the product and the associated risks. Children should not be allowed to play with the product. Cleaning and user maintenance should not be performed by children without supervision.
- Do not use the product if it is damaged.
- Do not expose the main station to moisture or direct sunlight.
Before using the product, ensure that the available mains voltage corresponds with the operating voltage required for the mains supply (230-240V~, 50Hz).
Before using the product, verify the product and the mains supply and the cable connection aren't damaged! Never operate a damaged product!
The product must be plugged into an easily accessible socket so it can easily be unplugged in the event of an emergency.
This product does not contain any parts that can be serviced by the user. The LEDs cannot be exchanged. The product is only suited for use with the included mains adapter (model no. 6305-BS-A (HG02832B-BS, HG02832D-BS), 6305-BS-B (HG02832A-BS, HG02832C-BS)). ■ To switch the product off completely, unplug the mains adapter from the socket.

Safety instructions for batteries / rechargeable batteries
■ DANGER TO LIFE! Keep batteries / rechargeable batteries out of reach of children. If accidentally swallowed seek immediate medical attention.

DANGER OF EXPLOSION! Never recharge non-
rechargeable batteries. Do not short-circuit batteries / rechargeable batteries and / or open them. Overheating, fire or bursting can be the result.
Never throw batteries / rechargeable batteries into fire or water.
Do not exert mechanical loads to batteries / rechargeable batteries.
Risk of leakage of batteries / rechargeable batteries
Avoid extreme environmental conditions and temperatures, which could affect batteries / rechargeable batteries, e.g. radiators / direct sunlight. Avoid contact with the skin, eyes and mucous membranes. In the event of contact with battery acid, thoroughly flush the affected area with plenty of clean water and seek immediate medical attention. WEAR PROTECTIVE GLOVES! Leaked or damaged batteries / rechargeable batteries can cause burns on contact with the skin. Wear suitable protective gloves at all times if such an event occurs.
In the event of a leakage of batteries / rechargeable batteries, immediately remove them from the product to prevent damage. Only use the same type of batteries / rechargeable batteries. Do not mix used and new batteries / rechargeable batteries. ■ Remove batteries / rechargeable batteries if the product will not be used for a longer period.
Risk of damage of the product
■ Only use the specified type of battery / rechargeable battery! - Insert batteries / rechargeable batteries according to polarity marks (+) and (-) on the battery / rechargeable battery and the product. - Clean the contacts on the battery / rechargeable battery and in the battery compartment before inserting! ■ Remove exhausted batteries / rechargeable batteries from the product immediately.
Start-up
Note: First insert the batteries in the outdoor sensor, then the main station.
- Setting up the products
ATTENTION: First start the outdoor sensor, then the main station.
☐ If possible, do not expose the outdoor sensor or main station to direct sunlight. Place it on a horizontal, level surface or mount it on a vertical wall. ☐ The main station can be hung by the eyebolt 4 or flip out the stand 6 to place it on a horizontal, level surface.
- Starting the outdoor sensor / changing batteries
☐ Open the battery compartment 21 on the back of the outdoor sensor by sliding the battery cover 18 in the direction of the arrow. ☐ When changing batteries first remove the old batteries. ☐ Insert the new batteries, type LR06, in the battery compartment 21. Check the polarity of the battery during insertion. This is indicated in the battery compartment. ☐ Close the battery cover. The signal LED 17 at the front of the outdoor sensor will briefly light up. The signal LED will then flash about twice a minute, indicating wireless transmission.
Starting the main station / changing batteries
Open the battery cover 5 at the back of the main station by pulling up on the tab at the bottom of the battery compartment. ☐ When changing batteries, first remove the old batteries. ☐ Insert the new batteries, type LR06, in the battery compartment 16. Check the polarity of the battery during insertion. This is indicated in the battery compartment. ☐ Close the battery cover. The display 1 will briefly light up and run a brief check of all display elements. □ Alternatively, first remove the batteries from the battery compartment. ☐ Plug the low voltage plug of the mains adapter 30 into the mains adapter socket 31 in the main station and plug the mains adapter into an easily accessible outlet. The display will permanently light up and run a brief check of all display elements. ☐ The outdoor temperature field 23 will show an animation of the reception symbol, indicating the main station is searching for the signal from the outdoor sensor.
If no outdoor temperature is displayed after 3 minutes, the main station will stop searching. The animation of the reception symbol will turn off and the outdoor temperature field will show -._ °C and -._ %. Most likely, the signal cannot be received due to structural factors, reinforced concrete walls, the brickwork being too solid, or the distance between the units. After finding a better location for the outdoor sensor, reception will need to be restarted.
☐ Press and hold the CH button 15 at the back of the main station for 3 seconds until the reception signal becomes animated again. The product will automatically start receiving the outdoor sensor signal, regardless if signal from the outdoor sensor was received or not. The clock field 24 will show an animated radio tower symbol, indicating the receiver for the DCF signal is starting to receive the time.
The DCF signal (time transmitter)
The DCF signal (German time transmission station) consists of time impulses emitted by one of the most accurate clocks in the world, located near Frankfurt / Main, Germany.
In ideal conditions, your main station can pick up this signal over a distance of up to approx. 1500 km around Frankfurt / Main.
If the signal is detected the clock field 24 will show the current Central European Time, date and day of the week. A static radio tower symbol appears. For more details please refer to section Basic settings.
If the attempts to receive a signal fail the main station will stop attempting to receive a signal after 7 minutes and the radio tower symbol 📂 will disappear. For information on how to resolve this issue please refer to chapter Troubleshooting.
☐ You may reactivate reception by pressing and holding the DOWN-/button 9 for three seconds until an radio tower symbol 📋 in the clock field 24 becomes animated.
You also have the option to set the time manually. For more details please refer to section Basic settings.
Once the main station has received the signal from the outdoor sensor and the DCF signal, it enters base mode.
In base mode, the main station will display the following information:
Information in base mode
The clock field 24
Time:

The time will be displayed in 24-hour format according to the default settings. When selecting 12-hour mode in basic settings, the time from 12:00 o'clock in the afternoon until 11:59 o'clock at night will show PM (Latin for "post meridiem" = afternoon) in front of the time.
During Daylight Saving Time, DST will appear at the top between the hour and minute. This display is only functional when receiving the DCF signal.
Date and day:


To the left of the abbreviation D (Day) the date of the current day appears, and to the left of the abbreviation M (month) the date of the current month. On the right the abbreviation for the current day of the week appears. The default language for this abbreviation is German, but can be changed.
Please refer to section Basic settings.
The radio tower symbol:

The radio tower symbol indicates successful reception of the DCF signal. The main station synchronises its internal clock with the time station every night. During synchronisation this symbol will flash. If reception was successful the symbol will be static until the next reception cycle.
The lunar phase:
MOON PHASE
The current lunar phase is indicated as follows:
The portion of the moon not illuminated will be dark in the display.
● The barometric pressure field 25
Barometric pressure display:

At the top right is the barometric pressure at the time shown in the HIST field (history).
If LLL (or LL.LL when setting the unit inHg), the display range is below 850 hPa (25.1 inHg), if HHH (or HH.HH), it is above.
By default the current barometric pressure (HIST = 0) is shown in the unit mb (millibar) or hPa (hectopascal). However, the display can also be set to the uncommon unit inHg (inch of mercury). Please refer to section Basic settings.
The bar graph shows a graphic of the barometric pressure 0, 1, 2, 3, 6 and 12 hours ago.
The barometric pressure trend:
TREND
The trend will appear as rising (or dropping), when the barometric pressure changes by 2 hPa (= 0.06 inHg) or more within an hour and will maintain the direction for one hour even without any further change.
The weather forecast:
The main station calculates a weather forecast for about the next 12 hours based on the barometric pressure trend. Of course this forecast can't compare to that of professional weather services supported by satellites and high performance computers, but merely provides an approximate indication of current developments.
Available graphic forecasts are:

slightly cloudy sunny cloudy rainy snow
● The indoor temperature field 22
The indoor temperature:

The indoor temperature measured by the main station is displayed with indexing up to a tenth of a degree. The temperature unit °C (for degrees Celsius) appears at the top right. The temperature unit can also be set to the now uncommon unit °F (degrees Fahrenheit). To change to this unit press the °C / °F button. If LL.L appears, it is below the measurement range of 0 °C to 50 °C (or 32 °F to 122 °F), when HH.H appears it is above.
The relative humidity:
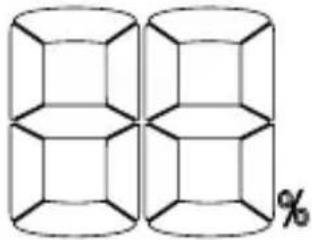
This displays the relative humidity to which the main station is exposed.
The temperature- or humidity trend:

The trend will appear as rising (or dropping), when the temperature changes by 2 °C (= 3.6 °F) or more within an hour and will maintain the direction for one hour even without any further change. The humidity trend will respond accordingly with a change of 2 % in humidity.
Indoor climate rating:
Based on the indoor humidity and temperature the main station will rate the indoor climate using the following key:

DRY
DRY humidity below 40 %

COM
COMFORT humidity between 40 and 70 %, and a temperature range between 20 °C-28 °C (68 °F-82.4 °F).

WET
WET humidity higher than 70 %
When the indoor temperature is outside the 20 °C–28 °C range no indoor climate rating will appear.
Low battery:
If the battery symbol appears, the batteries in the main station should be replaced as soon as possible. Please refer to the instructions in the section "Starting the main station / changing batteries."
● The outdoor temperature field 23
The outdoor temperature:

The outdoor temperature is displayed with indexing up to a tenth of a degree. The temperature unit °C (for degrees Celsius) appears at the top right. The temperature unit can also be set to the now uncommon unit °F (degrees Fahrenheit).
☐ To change to this unit, press the °C / °F button 12.
If LL.L appears, it is below the measurement range of -20 °C to 50 °C (or -4 °F to 122 °F); when HH.H appears, it is above.
The relative humidity:

This displays the relative humidity to which the outdoor sensor is exposed.
The temperature or humidity trend:

The trend will appear as rising (or dropping) when the temperature changes by 2 °C (= 3.6 °F) or more
within an hour and will maintain the direction for one hour even without any further change. The humidity trend will respond accordingly with a change of 2% in humidity.
Channel display:
Yad ch:123
The main station receives the outdoor signal automatically after you have made all the settings.
Note: In the event of interference from nearby equipment transmitting radio signals, please select a different channel for the outdoor sensor by pressing the CH button 15 on the main station or the channel selector switch 29 on the outdoor sensor. The relevant data is shown in the LC display.
- 1: Outdoor sensor on channel 1
- 2: Outdoor sensor on channel 2
- 3: Outdoor sensor on channel 3
- Ⓞ: automatic channel change
Low battery:

If the battery symbol appears, the batteries in the outdoor sensor should be replaced as soon as possible. Please refer to the instructions in the section 'Starting the outdoor sensor / changing batteries'.
- Settings
ATTENTION: Firmly touching the top of the housing will turn on the backlight (Fig. E). 10 seconds after releasing it, the display backlight will turn off again.
Please note, the main station does not respond to two buttons being pressed at once. Hence, if the unit does not respond to a button being pressed, you are probably also pressing the SNOOZE / LIGHT field. Release when this occurs!
Basic settings
☐ Press and hold the SET- / HISTORY button 7 for 3 seconds to change the basic settings. ☐ Pressing the UP button 8 or the DOWN-/button 9 allows you to now change the respective flashing value.
TIP: Pressing and holding the UP button or the DOWN-/button will quickly scan ahead or back through the numbers.
ATTENTION: When no buttons are pressed for approx. 20 seconds, the main station will return to base mode.
☐ Briefly pressing the SET/HISTORY button will confirm the setting and switch to the next option in the clock settings. This allows you to change the following settings in sequence:
Note: If the main station has received the DCF signal, the year, month, day, hour and minute settings will remain unchanged. If you are in a different time zone than Germany, you may set your local time under time zone.
Year
Month
Day
Language setting for displaying the weekday at the bottom right of the clock display.
The following codes will flash and can be changed in the following sequence by pressing the UP / DOWN button: GE (German), DA (Danish), ES (Spanish), NE (Dutch), FR (French), IT (Italian), EN (English)
Clock format: select from 24 Hr for 24-hour format (0:00 o'clock -23:59 o'clock). 12 Hr indicates the 12-hour format (1:00 o'clock -12:59 o'clock). In 12-hour mode the time from 12:00 o'clock in the afternoon until 11:59 o'clock at night will show PM (Latin for "post meridiem" = after noon) in the display.
Hour
Minute
Time zone: The time zone can be set ranging from +12 to -12 hours.
Note: Should you be in a country in which the DCF signal can be received but the time is different to your current local time, you can use the time zone setting to have the clock display your current local time. If you find yourself in a country in which, for example,
the local time is an hour ahead of Central European Time (CET), you set the time zone to +01. The clock is now still controlled by DCF but shows the time as one hour ahead of CET.
If you wish to know what the time is in the USA for example, then simply by setting the time zone value to e.g. -10 you will obtain the current local time in Los Angeles etc.
Weather forecast: The main station computes the weather forecast based on changes in the barometric pressure. Since no data related to barometric pressure changes is available when starting the unit, the weather forecast will be random at this time. The main station will only be able to compute the forecast after a few days.
However, when starting the unit you may use the UP- or DOWN-/button to set a forecast based on the forecast on the TV or the internet to slightly accelerate self-regulation of the weather forecast.
Setting the barometric pressure: The barometric pressure will indicate the absolute barometric pressure in mb or hPa according to the default setting. Here you may now set the display to the altitude-related barometric pressure of your location. Please obtain the correct current data from the internet or the local weather forecast. Please note, the data must be entered in the unit displayed at the time the setting is made.
Setting the barometric pressure: The default is the official European unit hPa. However, you may also select the unit inch of mercury (inHg). When changing the unit at this time the indicated value will automatically be converted to the new unit.
- Temperature alarm
You have the option to define a temperature range for the outdoor sensor. With the temperature alarm activated, the main station will sound an alarm if the outdoor sensor measures a temperature outside of this temperature range.
- Activating the temperature alarm
Press and hold the ALERT button 14 for three seconds until the temperature display flashes in the outdoor temperature field 23. A flashing up arrow will appear to the left of the temperature.
Now press the UP button 8 or the DOWN button 9 to set the maximum temperature for the desired temperature range.
TIP: Press and hold the UP button or the DOWN button to quickly scan ahead or back through the numbers.
Confirm the value by pressing the ALERT button. The temperature display will now flash again and a down arrow will start flashing.
Press the UP button or the DOWN button to now set the minimum temperature for the desired temperature range.
Confirm the value by pressing the ALERT button.
The temperature range is now set.
Briefly press the ALERT button to now activate or deactivate the temperature alarm.
With the temperature alarm activated a static double arrow will appear in the outdoor temperature field below OUT.
If the outdoor sensor measures a temperature outside this temperature range the main station will sound an alarm for one minute.
This alarm can be silenced by pressing any button on the keypad.
The temperature that triggered the alarm will flash as a visual alarm, along with the part of the double arrow indicating the direction of the temperature deviation. Press the ALERT button to switch off the alarm.
Alarm
The main station features two alarms, which can be set and activated separately.
Weekday alarm, Single alarm

Weekday alarm: Mo to Fr weekday alarm

Single Alarm: one time alarm
Once it finishes, it will be disabled automatically.
Setting the alarm
Press and hold the ALARM-/SET button 10 for 3 seconds to enter the alarm settings mode. The last alarm setting will appear in place of the clock, with the hour flashing. The mark 🎨 will appear to the right of the alarm time.
Set the hour for alarm W (weekday) or S (single) alarm using the UP button 8 or the DOWN-/button 9.
TIP: Press and hold the UP button or the DOWN button to quickly scan ahead or back.
Press the ALARM-/SET button again to confirm your entry, and the minutes will start flashing. These can be changed in the same manner.
Activating the alarm
In clock mode press the DOWN-/button 9. In addition to the time, a bell will appear with 1: 🎨. Alarm 1 is now activated. Press the DOWN-/🔊 button again and the alarm symbol 1 will disappear. Alarm symbol 2: 🎨 will appear. Pressing the DOWN-/🔊 button again will activate alarm 1 and alarm 2. Both alarm symbols will appear: 🎨. Pressing the DOWN-/🔊 button a fourth time will deactivate both alarm 1 and alarm 2.
Switching off the alarm
The alarm will sound at the set time and the backlight will switch on. When not switched off, the alarm will sound for 2 minutes before stopping automatically.
Press the SNOOZE-/LIGHT field 2 to interrupt the alarm. The clock display will flash W, indicating the snooze function has been activated: the alarm will sound again after 5 minutes.
Press any button on the keypad to actually shut off the alarm.
Accessing stored data
Maximum temperatures
Press the MEM button again and both temperature fields will show 22 and 23 next to the temperature, and MAX next to the humidity. The respective maximum indoor and outdoor value will be shown. Press the MEM button twice and MIN will appear next to the temperature, and the respective lowest indoor and outdoor value will be shown. After 5 seconds the current values will again be displayed.
TIP: Min / Max Temperature are measured by all time since start (after batteries inserted / power supply connected). To erase the stored Min / Max Temperature, hold the MEM button for approx. 3 seconds.
Barometric pressure history
Repeatedly briefly pressing the SET-/HISTORY button will display the barometric pressure for the past 12 hours. The barometric pressure field 25 next to the display of the barometric pressure the history indicates how many hours ago the barometric pressure being displayed was current.
Manually activating signal reception
Activating DCF signal reception
Every night the main station synchronises the internal clock with the DCF signal. However, you may also activate DCF reception manually. To do so, press and hold the DOWN-/button 9 for 3 seconds until the radio tower symbol flashes. Following successful reception the radio tower symbol will be static. If reception fails, the radio tower symbol will disappear.
Activating reception from the outdoor sensor
The outdoor sensor will transmit a signal about twice a minute, which is automatically received by the main station. However, you may also manually activate reception of the signal. To do so, press and hold the CH button 15 for three seconds until the channel symbol flashes.
Following successful reception the animation of the symbol will disappear and the transmitted temperature and humidity will appear in the display.
Background lighting
Touch the SNOOZE-/LIGHT field. The backlight illuminates for 10 seconds. While the adapter is plugged in, there are 3 steps of backlight level.
Reset function
Press the reset key to reset the entire product; you will need to set it up again.
Troubleshooting
The product contains delicate electronic components. Thus, radio transmitting equipment in the immediate vicinity may interfere with the product. If the display shows interference, move such objects away from the product.
Electrostatic discharges can lead to malfunctions.
In cases of the product failing to work, remove the batteries for a short while and then replace them.
Obstacles, e.g., concrete walls, may make the reception susceptible to interference. In this event, change the location. Please note, the outdoor
sensor should always be set up within a range of max. 100 metres (open area) of the main station. The specified range is the open area range, meaning there should be no obstructions between the outdoor sensor and the base. "Visual contact" between the outdoor sensor and the base will often improve transmission.
Cold (outdoor temperatures below 0 °C) may also negatively impact battery performance of the outdoor sensor, thus wireless transmission. Another factor which may interfere with reception is drained or weak batteries in the outdoor sensor. Replace these with fresh batteries.
If the product is not working properly, briefly remove and reinsert the batteries.
Cleaning and Care
Never immerse the product in water or other liquids. Otherwise the product can be damaged. Use a dry, soft cloth (e.g., eyeglasses cloth) for cleaning and care.
Disposal

The packaging is made entirely of recyclable materials, which you may dispose of at local recycling facilities. The Green Dot is not valid for Germany.

Observe the marking of the packaging materials for waste separation, which are marked with abbreviations (a) and numbers (b) with the following meaning: 1–7: plastics / 20–22: paper and fibreboard / 80–98: composite materials.

The product and packaging materials are recyclable; dispose of them separately for better waste treatment. The Triman logo is valid in France only.

Contact your local refuse disposal authority for more details on how to dispose of your worn-out product.

To help protect the environment, please dispose of the product properly when it has reached the end of its useful life and not in the household waste. Information on collection points and their opening hours can be obtained from your local authority.
Faulty or used batteries / rechargeable batteries must be recycled in accordance with Directive 2006/66/EC and its amendments. Please return the batteries / rechargeable batteries and / or the product to the available collection points.

Environmental damage through incorrect disposal of the batteries / rechargeable batteries!
Batteries / rechargeable batteries may not be disposed of with the usual domestic waste. They may contain toxic heavy metals and are subject to hazardous waste treatment rules and regulations. The chemical symbols for heavy metals are as follows: Cd = cadmium, Hg = mercury, Pb = lead. That is why you should dispose of used batteries / rechargeable batteries at a local collection point.
● Simplified EU declaration of conformity
Hereby, OWIM GmbH & Co. KG, Stiftsbergstraße 1, DE-74167 Neckarsulm, GERMANY declares that the product Radio-controlled weather station HG02832A-BS, HG02832B-BS, HG02832C-BS, HG02832D-BS is in compliance with Directives 2014/53/EU, 2011/65/EU and 2009/125/EC.
The full text of the EU declaration of conformity is available at the following internet address: www.owim.com
- Warranty
The product has been manufactured to strict quality guidelines and meticulously examined before delivery. In the event of product defects you have legal rights against the retailer of this product. Your legal rights are not limited in any way by our warranty detailed below.
The warranty for this product is 3 years from the date of purchase. Should this product show any fault in materials or manufacture within 3 years from the date of purchase, we will repair or replace it – at our choice – free of charge to you.
The warranty period begins on the date of purchase. Please keep the original sales receipt in a safe location. This document is required as your proof of purchase. This warranty becomes void if the product has been damaged, or used or maintained improperly.
The warranty applies to defects in material or manufacture. This warranty does not cover product parts subject to normal wear, thus possibly considered consumables (e.g. batteries) or for damage to fragile parts, e.g. switches, rechargeable batteries or glass parts.
CE
C HG02832A-BS/HG02832B-BS 25
25
HG02832C-BS/ HG02832D-BS


E
HG02832A-BS/
HG02832B-BS


HG02832C-BS/
HG02832D-BS


OWIM GmbH & Co. KG
Stiftsbergstraße 1
DE-74167 Neckarsulm
GERMANY
Model-No.: HG02832A-BS/HG02832B-BS/
HG02832C-BS/HG02832D-BS
Version: 06/2017
Last Information Update: 07/2017 · Ident.-No.:
HG02832A/B/C/D-BS072017-GB/IE/NI



- LIST OF PICTOGRAMS USED....PAGE
- INTRODUCTION PAGE
- GENERAL SAFETY INSTRUCTIONS....PAGE
- START-UP PAGE
- INFORMATION IN BASE MODE......PAGE
- SETTINGS PAGE
- MANUALLY ACTIVATING SIGNAL RECEPTION PAGE
- TROUBLESHOOTING......PAGE
- CLEANING AND CARE PAGE
- DISPOSAL PAGE
- SIMPLIFIED EU DECLARATION OF CONFORMITY......PAGE
- WARRANTY PAGE
- RADIO-CONTROLLED WEATHER STATION
- INTRODUCTION
- INTENDED USE
- PARTS DESCRIPTION
- MAIN STATION
- DISPLAY
- OUTDOOR SENSOR BUTTONS NEXT TO BATTERY COMPARTMENT
- OPTIONAL POWER SUPPLY
- OUTDOOR SENSOR
- TECHNICAL DATA
- MAINS ADAPTER
- SCOPE OF DELIVERY
- GENERAL SAFETY INSTRUCTIONS
- SAFETY INSTRUCTIONS FOR BATTERIES / RECHARGEABLE BATTERIES
- RISK OF LEAKAGE OF BATTERIES / RECHARGEABLE BATTERIES
- RISK OF DAMAGE OF THE PRODUCT
- START-UP
- SETTING UP THE PRODUCTS
- STARTING THE OUTDOOR SENSOR / CHANGING BATTERIES
- STARTING THE MAIN STATION / CHANGING BATTERIES
- THE DCF SIGNAL (TIME TRANSMITTER)
- INFORMATION IN BASE MODE
- THE CLOCK FIELD
- TIME
- DATE AND DAY
- THE RADIO TOWER SYMBOL
- THE LUNAR PHASE
- ● THE BAROMETRIC PRESSURE FIELD
- BAROMETRIC PRESSURE DISPLAY
- THE BAROMETRIC PRESSURE TREND
- THE WEATHER FORECAST
- ● THE INDOOR TEMPERATURE FIELD
- THE INDOOR TEMPERATURE
- THE RELATIVE HUMIDITY
- THE TEMPERATURE- OR HUMIDITY TREND
- INDOOR CLIMATE RATING
- LOW BATTERY
- ● THE OUTDOOR TEMPERATURE FIELD
- THE OUTDOOR TEMPERATURE
- THE TEMPERATURE OR HUMIDITY TREND
- CHANNEL DISPLAY
- SETTINGS
- BASIC SETTINGS
- ATTENTION: WHEN NO BUTTONS ARE PRESSED FOR APPROX. 20 SECONDS, THE MAIN STATION WILL RETURN TO BASE MODE
- YEAR
- MONTH
- DAY
- HOUR
- MINUTE
- TEMPERATURE ALARM
- ACTIVATING THE TEMPERATURE ALARM
- ALARM
- WEEKDAY ALARM, SINGLE ALARM
- SETTING THE ALARM
- ACTIVATING THE ALARM
- SWITCHING OFF THE ALARM
- ACCESSING STORED DATA
- MAXIMUM TEMPERATURES
- BAROMETRIC PRESSURE HISTORY
- MANUALLY ACTIVATING SIGNAL RECEPTION
- ACTIVATING DCF SIGNAL RECEPTION
- ACTIVATING RECEPTION FROM THE OUTDOOR SENSOR
- BACKGROUND LIGHTING
- RESET FUNCTION
- TROUBLESHOOTING
- CLEANING AND CARE
- DISPOSAL
- ENVIRONMENTAL DAMAGE THROUGH INCORRECT DISPOSAL OF THE BATTERIES / RECHARGEABLE BATTERIES
- ● SIMPLIFIED EU DECLARATION OF CONFORMITY
- WARRANTY
- CE
- OWIM GMBH & CO. KG
Brand : AURIOL
Model : IAN 283582
Category : Weather Station