Geovid R 10x42 - Binoculars LEICA - Free user manual and instructions
Find the device manual for free Geovid R 10x42 LEICA in PDF.
| Product type | Rangefinder binoculars |
| Brand | Leica |
| Model | Geovid R 10x42 |
| Magnification | 10x |
| Objective diameter | 42 mm |
| Exit pupil | 4.2 mm |
| Field of view at 1000 m | 113 m |
| Minimum focusing distance | 5 m |
| Diopter adjustment | ±4 dpt |
| Interpupillary distance | 56 - 74 mm |
| Power supply | 3V lithium round battery type CR2 |
| Battery life | Approximately 2000 measurements at 20°C |
| Measuring range | 10 m to 1825 m (2000 yds) |
| Measuring accuracy | ±1 m at 500 m, ±2 m at 1000 m, ±0.5% beyond |
| Dimensions (L x H x W) | 127 x 81 x 177 mm |
| Weight (with battery) | 950 g |
| Waterproofness | Up to 5 m depth |
| Housing material | Die-cast magnesium with rubber coating |
| Main functions | Laser rangefinder, distance measurement, ballistics compensation (EHR, HOLD, MOA), Scan mode, atmospheric conditions display |
| Care and cleaning | Clean lenses with a damp cloth then a chamois leather; do not use alcohol or chemicals |
| Safety | Class 1 laser (eye-safe); do not look directly at intense light sources |
| Spare parts and repairability | Contact Leica customer service for spare parts (eyecups, strap, etc.); the device must not be opened |
| General information | Instructions available in multiple languages; warranty included; compatibility with microSD memory card for custom ballistics curves |
Frequently Asked Questions - Geovid R 10x42 LEICA
User questions about Geovid R 10x42 LEICA
0 question about this device. Answer the ones you know or ask your own.
Ask a new question about this device
Download the instructions for your Binoculars in PDF format for free! Find your manual Geovid R 10x42 - LEICA and take your electronic device back in hand. On this page are published all the documents necessary for the use of your device. Geovid R 10x42 by LEICA.
USER MANUAL Geovid R 10x42 LEICA
natural_image
Black binoculars with dual lenses (no visible text or symbols)
flowchart
graph TD
    A["CCU"] --> B["US"]
    A --> C["EU"]
    D["LUL"] --> E["US/CEU"]
    D --> F["US/CEU"]
    D --> G["US/CEU"]
    H["UL"] --> I["GE"]
    H --> J["GE+1"]
    K["UL"] --> L["GE"]
    K --> M["GE+1"]
    N["UL"] --> O["GE"]
    N --> P["GE+1"]
    Q["UL"] --> R["GE"]
    Q --> S["GE+1"]
    T["UL"] --> U["GE"]
    T --> V["GE+1"]
    W["UL"] --> X["GE"]
    W --> Y["GE+1"]
    Z["UL"] --> AA["GE"]
    Z --> AB["GE+1"]
    AC["UL"] --> AD["GE"]
    AC --> AE["GE+1"]
    AF["UL"] --> AG["GE"]
    AF --> AH["GE+1"]
    AI["UL"] --> AJ["GE"]
    AI --> AK["GE+1"]
    AL["UL"] --> AM["GE"]
    AL --> AN["GE+1"]
    AO["UL"] --> AP["GE"]
    AO --> AQ["GE+1"]
    AR["UL"] --> AS["GE"]
    AR --> AT["GE+1"]
    AU["UL"] --> AV["GE"]
    AU --> AW["GE+1"]
    AX["UL"] --> AY["GE"]
    AX --> AZ["GE+1"]
    BA["UL"] --> BB["GE"]
    BA --> BC["GE+1"]
    BD["UL"] --> BE["GE"]
    BD --> BF["GE+1"]
    BG["UL"] --> BH["GE"]
    BG --> BI["GE+1"]
    BJ["UL"] --> BK["GE"]
    BJ --> BL["GE+1"]
    BM["UL"] --> BN["GE"]
    BM --> BO["GE+1"]
    BP["UL"] --> BQ["GE"]
    BP --> BR["GE+1"]
    BS["UL"] --> BT["GE"]
    BS --> BU["GE+1"]
    BV["UL"] --> BW["GE"]
    BV --> BX["GE+1"]
    BY["UL"] --> BZ["GE"]
    BY --> CA["GE+1"]
© Delivered with Infla et al.
- VOLUME SHEET INVESTURE
2017年1月1日
□ = large batch
无法识别
- 中国银行股份有限公司
无法识别
- Subject to
For example of the same group, they are an initiation at the beginning of
3.11 (posteq)
The following table is in English:
- 陈小平先生
This project is not stated under Section 1.5.
Deutsch 02
English 28
Françias 54
Nederlands 80
Italiano 106
Español 132
Norske 158
Русский 184
natural_image
Line drawing of a medical procedure with tubing and a balloon (no text or symbols)Hinweis:
natural_image
Pure mechanical diagram showing a circular component with red arrows indicating rotational motion, no text or symbols present.EINSETZEN UND AUSWECHSELN DER BATTERIE
natural_image
Mechanical assembly diagram showing a cylindrical component inserted into a housing, with a red arrow indicating direction (no text or symbols present)Hinweise:
natural_image
Technical line drawing of two identical mechanical device components labeled A, B, C, D (no text or symbols on the devices themselves)natural_image
Technical line drawings of two binoculars with no visible text or symbolsUS = Anzeige in yards EU = Anzeige in Meter

natural_image
Simple white square outline on black background, no text or symbols presentUS EU

EU
Hinweis:
natural_image
Two circular black-and-white photos of a deer standing on a snowy slope, no text or symbols visiblenatural_image
Black-and-white circular image of a dark, rounded animal in a forest setting (no text or symbols)
natural_image
Black-and-white circular portrait of a bear standing in a forest (no text or symbols visible)
natural_image
Black-and-white circular image of a bear standing in a forest, no visible text or symbolsnatural_image
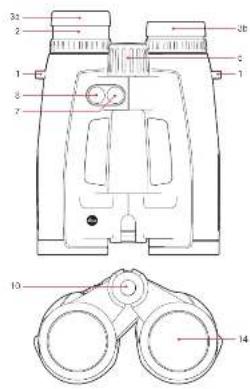
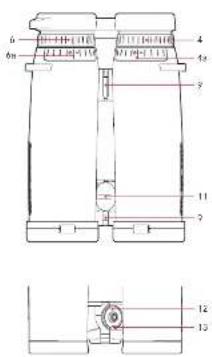
Cross-sectional diagram of a mechanical component with a red arrow indicating direction (no text or symbols)- Eyes for carrying strap
- Eyepiece
- Eyepiece cup with
a. Diopter scale
Position a: Extended for viewing without glasses (4 settings)
Position b: Screwed in for viewing with glasses
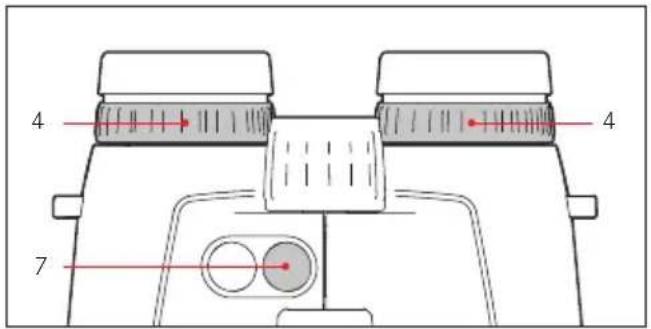
- Diopter compensation dial with
a. Scale - Central focusing dial
- Diopter compensation dial for displays with a. Scale
- Main/release button for range measurement
- Secondary/menu button
- Hinged axes for adjusting the eye spacing
- Laser transmission optics
- Cover for battery compartment / memory card slot (closed)
- Battery compartment
- Memory card slot
- Objective lens
pPACKAGE CONTENTS
- Binoculars
- 1 lithium button cell, 3V, type CR 2
- Carrying strap
- Ever ready case
- Eyepiece cover
- 2 lens covers
- 2GB microSD memory card
- microSD card adapter
- Warranty card
- Tweezers
- Test certificate
Warning notice
As with any binoculars, avoid looking directly at bright sources of light when using the Leica Geovid HD-B, to prevent eye injury.
FOREWORD
Dear Customer,
Throughout the world, the Leica name stands for premium quality, accurate precision mechanics, optimum reliability and long service life.
We wish you much enjoyment and every success with your new Leica Geovid HD-B binoculars.
These binoculars with integrated range finder transmit invisible infrared pulses that are harmless to the eyes and a built-in microprocessor calculates the distance to the object from the reflected signal. They also detect the ambient and usage conditions. Along with the measured distances, this data can be used to calculate and display the appropriate point of aim correction for various selectable and freely programmable ballistics curves, the appropriate click adjustments for the reticle on a telescopic sight or the equivalent horizontal range.
To enable you to make the best possible use of this high performance and versatile device's features, we recommend that you read these instructions before use.
DISpOSAL OF ELECTRICAL AND ELECTRONIC EQUIpMENT
(Applies within the EU, and for other European countries with segregated waste collection systems)
This device contains electrical and/or electronic components and should therefore not be disposed of in general household waste. Instead it should be disposed of at a recycling collection point provided by the local authority. This costs you nothing.
If the device itself contains removable batteries or rechargeable batteries, these should first be removed and, if necessary, properly disposed of (refer to the specifications in the manual for your device).
Further information on this issue is available from your local administration, your local waste collection company, or in the store where you purchased this device.
CONTENTS
Designation of parts....28
Package contents 28
Menu structure / operating scheme diagram .....U3
Foreword 29
Disposal of electrical and electronic equipment 29
Applications....31
Attaching the lens covers 31
Attaching the carrying strap and the eyepiece cover....31
Inserting and changing the battery 32
Battery charge level 33
Adjusting the eyepiece cups / using with and without glasses 34
Adjusting the eye spacing 34
Focusing / diopter compensation 35
Basic information on menu system 36
Setting the unit of measure 36
Range measurement 37
Scan mode 38
Measurement range and accuracy....39
Displaying the atmospheric conditions 40
Calculating the ballistics curve 41
Setting the zeroing distance 42
Displaying the set ballistics curve and zeroing distance....43
Ballistic output formats 43
Equivalent horizontal range 44
Point of aim 44
Windage correction using elevation adjustment (click / MOA adjustment) 45
Settings and selection of ballistic output formats 45
Displaying and checking the set ballistic parameters....46
Using alternative ballistics curves....46
Maintenance / cleaning......49
Spare parts 49
Troubleshooting 50
Technical data 51
Leica Academy 52
Leica Info Service.... 52
Leica Customer Service 53
Appendix / Ballistics tables....210
Applications
The Leica Geovid HD-B binoculars have a robust magnesium housing, allowing them to be used even under adverse conditions. There's no need to worry about moisture - they are absolutely waterproof to a depth of 5m and the internal optics do not become fogged thanks to a nitrogen filling.
ATTACHING THE LENS COVERS
To fit the two lens covers, the rubber rings on the covers are pushed over the binocular tubes from the lens side in such a way that the covers fold downwards.
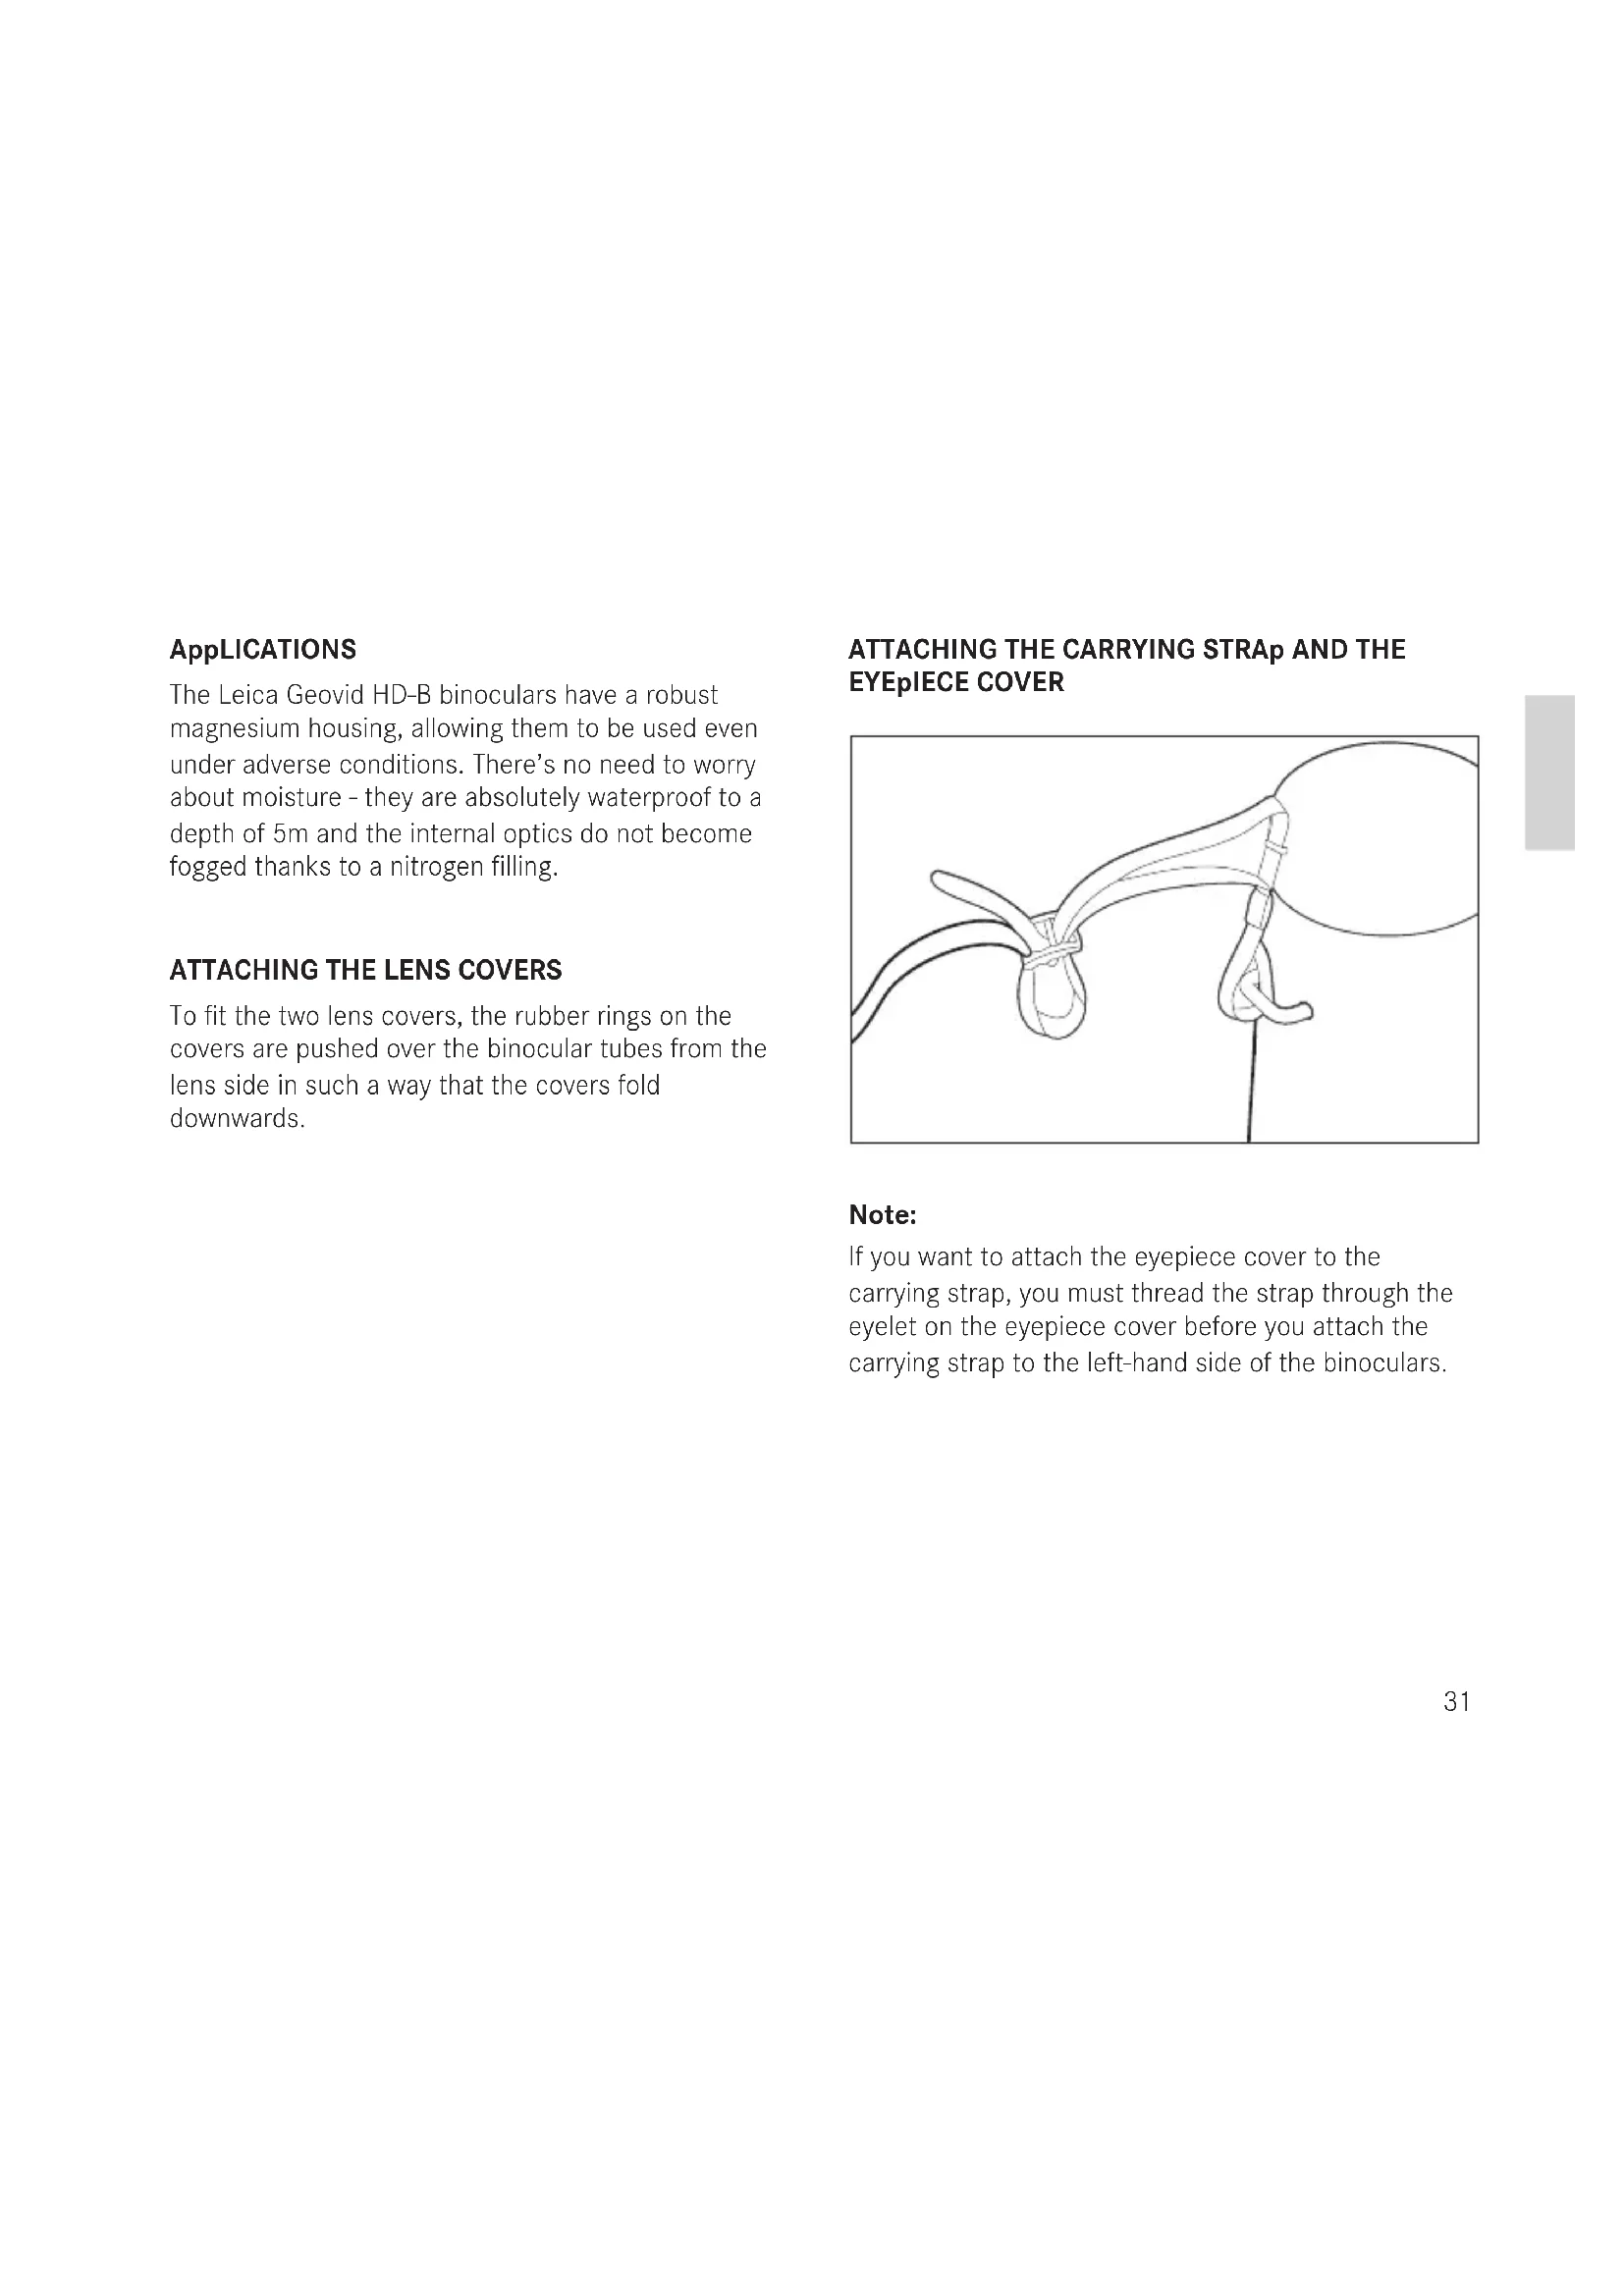
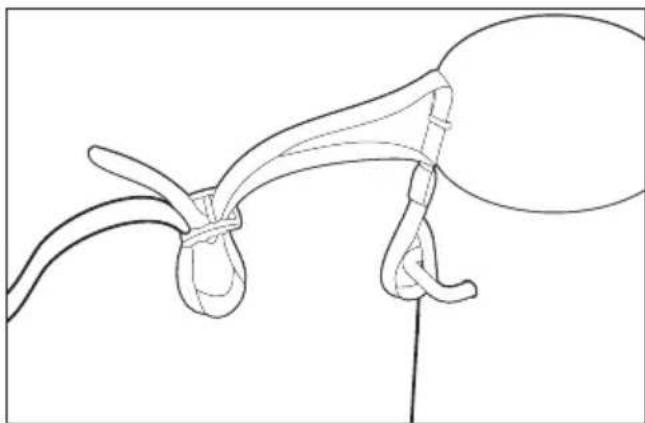
ATTACHING THE CARRYING STRAp AND THE EYEpIECE COVER
natural_image
Line drawing of a medical procedure with tubing and a balloon (no text or symbols)Note:
If you want to attach the eyepiece cover to thecarrying strap, you must thread the strap through theeyelet on the eyepiece cover before you attach thecarrying strap to the left-hand side of the binoculars.
natural_image
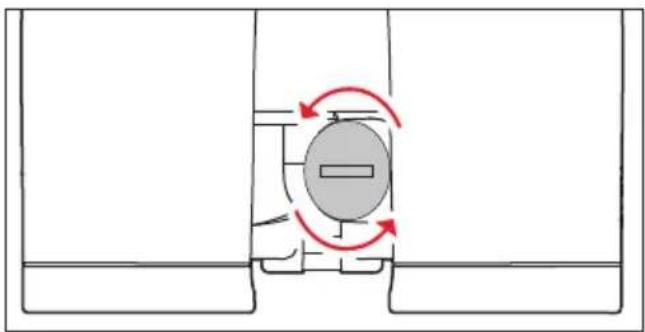
Pure mechanical diagram showing a circular component with red arrows indicating rotational motion (no text or symbols)INSERTING AND CHANGING THE BATTERY
The Leica Geovid HD-B draws its power supply from a 3 Volt lithium button cell (type CR2).
- Open the cover (11) over the battery compartment (12) by turning it anticlockwise, e.g. with a coin.
- Insert the battery so that the positive contact goes in first (as shown by the markings in the battery compartment).
- Close the cover again by turning it clockwise.
natural_image
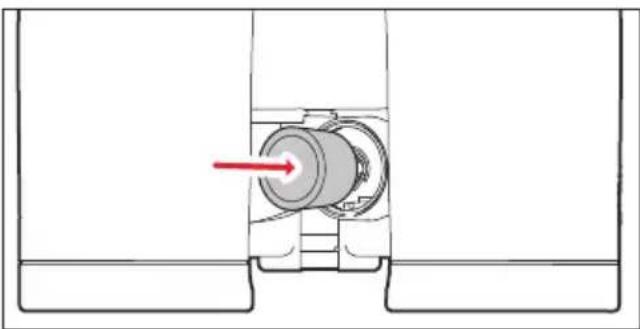
Mechanical assembly diagram showing a cylindrical component inserted into a housing, with a red arrow indicating direction (no text or symbols present)Notes:
• Cold conditions impair the battery performance.
Therefore, at low temperatures the binoculars should be kept as close to the body as possible and a new battery should be fitted.
- If the binoculars are not going to be used for a long time, the battery should be removed.
• Batteries should be stored in a cool dry place.
Attention:
- Batteries should never be put in a fire, heated, recharged, taken to pieces or broken apart.
• Used batteries may not be disposed of as normal, household waste as they contain toxic materials that are harmful to the environment. - To ensure that they are properly recycled, they should be returned to the dealer or disposed of as special waste (at a collection point).
BATTERY CHARGE LEVEL
A new battery lasts for more than 2000 measure ments at 20^ C/ 68^ F.
Depending on the conditions of use, the battery life can be significantly shorter or longer than this. Low temperatures and frequent use of scan mode (see p.35) shorten the battery life.
A used battery is indicated by a flashing measured value and reticule display. When flashing starts, around another 50 measurements are possible, but with a continuously reduced range.
Leica recommends the use of branded batteries.

natural_image
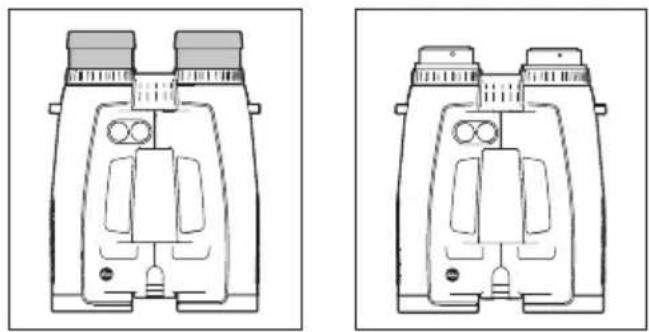
Technical line drawing of two identical mechanical device components labeled A, B, C, D (no text or symbols on the devices themselves)ADJUSTING THE EYEpIECE CUpS / USING WITH AND WITHOUT GLASSES
The eyepiece cups (1) can easily be adjusted by turning them, and lock securely in the selected positions. They can be removed completely for thorough cleaning.
For viewing with glasses (Figure A), they remain in the fully screwed in position. For viewing without glasses, they are extended by turning them anticlockwise. Four positions are available for optimum adjustment (Figure B).
If the eyepieces are heavily soiled, we recommend removing the cups for cleaning (Figure C). They are removed by gently pulling them in the fully extended position.
natural_image
Technical line drawings of two binoculars with no visible text or symbolsADJUSTING THE EYE SpACING
Bending the binoculars about the hinged axes (9) individually adjusts the eye spacing. The right and left field of vision should merge into a circular image.
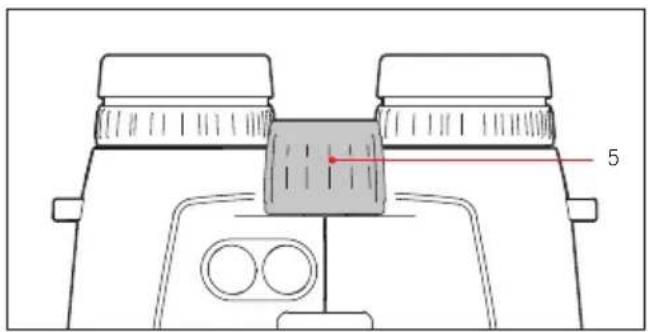
FOCUSING / DIOpTER COMpENSATION
On the Leica Geovid HD-B binoculars, the focus is set for objects different distances away using the central focusing dial (5).
The two diopter compensation dials (4) are used to compensate for individual eyesight problems when viewing without glasses and to focus the reticule.
Carefully run through the steps described below. Only then can you utilize the full capabilities of the optical system.
- Turn the two diopter compensation dials (4) to their zero positions.
- When viewing with both eyes, adjust them to a distant object using the central focusing dial.
- Press the main / release button (7) to activate the reticule.
- When the reticule appears, while continuing to view with both eyes, adjust the right diopter compensation dial (red index) so that the reticule can be seen in focus in the right optical system.
- Then, with the reticule still activated but only viewing with the right eye, use the central focusing dial to adjust the image in the right lens until it is exactly in focus.
- Then repeat this procedure for the left lens using the left diopter dial (4).
- The set values can be read off using the "+" or "-" values on the diopter scales (4a).
Note:
When looking through just the left or right side, the other eye should be squeezed shut or you can simply hold the corresponding half of the binoculars on the lens at the front.
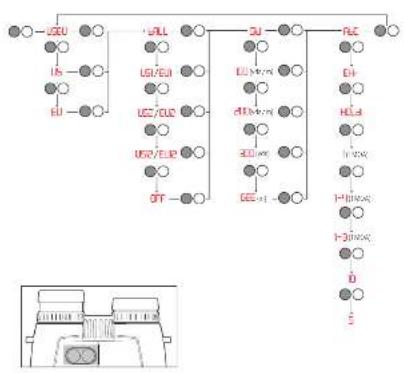
BASIC INFOMATION ABOUT THE MENU SYSTEM
For all settings:
- The main menu contains four options: Display in yards/meters (US, EU), ballistics curve (bøLL), zeroing distance (Sld) and ballistic output format (AaC). Details of these functions can be found in the relevant sections.
- Both the main menu and the relevant setting options scroll in a continuous loop, i.e. all options/settings can be accessed by repeatedly pressing the relevant button.
SETTING THE UNIT OF MEASURE
The Leica Geovid HD-B can be set to either the imperial unit system commonly used in the USA (US) or the metric system (EU) i.e. yards and inches / Fahrenheit / inHG (inches of mercury) or meters and centimeters / Celsius / millibars for distance, temperature and air pressure respectively.
This setting also determines the units used for the point of aim, the ballistics curves and the zeroing distances. The factory setting on the Leica Geovid HD-B is yards.
Setting
- Press and hold (≥3s) the secondary / menu button (2).
• US:EU appears in the display (flashing).
- Press the main / release button (7) to select the unit of measure you want to use.
US = Display in yards
EU = Display in meters

natural_image
Simple white square outline on black background (no text or symbols)US EU

EU
Note:
The current setting can always be seen in the display: If metric values are selected, a dot appears to the bottom right of the reticule.
- Save your setting by pressing the secondary / menu button.
- The saved setting lights up as confirmation and the display then switches to the next option (BALL = Ballistics curve) and then goes out if no more settings are made.
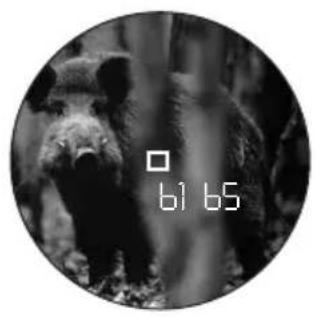
RANGE MEASUREMENT

natural_image
Two circular black-and-white photos of a goat standing in a snowy mountain landscape, with no visible text or symbols.To measure the range to an object, you must aim directly at it. To do this, proceed as follows:
- Press the main / release button (7). The range finder is activated.
• The reticule appears.
When you let go of the main / release button, the reticule is lit for a further six seconds. If you hold the button down, the reticule remains lit.
- Aim at the object while the reticule is lit.
- Press the main / release button (7).
a. The reticule disappears briefly during the measurement.
b. The measured value is displayed.
As long as the reticule is still lit, a new measurement can be started at any time by pressing the main / release button again.
The display shows: - - - if
- the object distance is less than 10 meters/yards, or
- the range is exceeded, or
- the object is not sufficiently reflective.
When the display disappears, the range meter is automatically deactivated.
SCAN MODE
natural_image
Black-and-white circular image of a bear in a forest setting, with no visible text or symbols.
natural_image
Black-and-white circular portrait of a bear standing in a forest (no text or symbols visible)
natural_image
Black-and-white circular image of a bear standing in a forest, no visible text or symbolsThe Leica Geovid HD-B binoculars can be used to measure continuously (scan mode).
Hold down the main / release button (7) on the 2nd press.
After around 2.5 seconds, the binoculars switch to scan mode and then carry out measurements continuously. This can be seen by a change in the display:
Around every 1s a new measured value is shown.
Scan mode is particularly practical for measuring small and moving targets.
Notes:
- In scan mode, the BC correction value is not displayed until after the last measurement.
- Because of the continuous measurements, power consumption is greater in scan mode than for single measurements.
MEASURING RANGE AND ACCURACY
The measuring range of the Leica Geovid HD-B is up to ±1825m/2000yds . The maximum range is achieved with high reflective target objects and a visual range of 10km/6.2 miles.
Note:
To reliably detect very distant objects, we recommend holding the binoculars very steadily and/or placing them on a stable surface.
The measuring range is influenced by the following factors:
| Range Higher Lower | ||
| Color | White Black | |
| Angle to lens | Perpendicular Acute | |
| Object size | Large Small | |
| Sunlight | Low (cloudy) | High (midday sun) |
| Atmospheric conditions | Clear Hazy | |
| Object structure conditions | Homogeneous (wall of building) | Inhomogeneous (bush, tree) |
In sunlight and with good vision, the following ranges and accuracies can be achieved:
| Range | Approx. 10m/yds to 1825m/2000yds |
| Accuracy | Approx. ±1m/yd up to 500m/yds Approx. ± 2m/yds up to 1000m/yds Approx. ± 0.5% above 1000m/1000yds |
DISpLAYING THE ATMOSpHERIC CONDITIONS
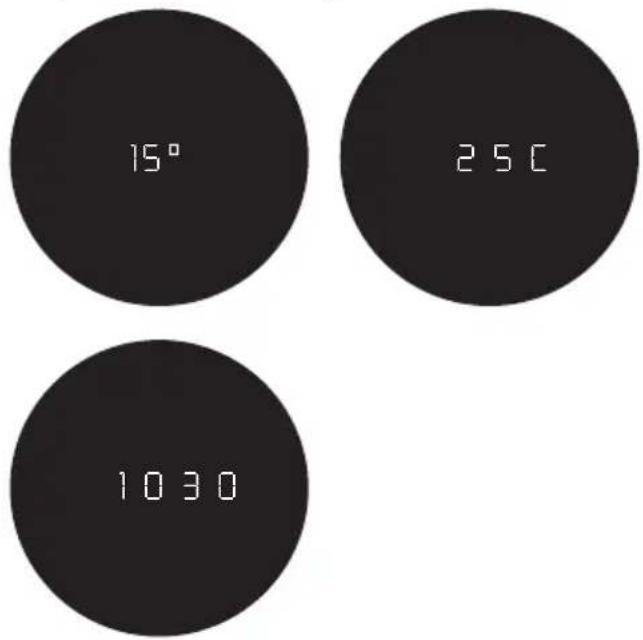
For precise calculation of the point of impact (see next section) the Leica Geovid HD-B determines three other important pieces of information during the range measurement: the inclination of the binoculars, the temperature and the atmospheric pressure. The relevant values can be displayed at any time.
Briefly press the secondary / menu button (8) once.
- The reticule appears briefly (if range measurement was not already active). The following are then displayed alternately instead of the range for around 2s:
- Angle of inclination
- Temperature
- Atmospheric pressure
Note:
If the housing of the Leica Geovid HD-B initially has a significantly different temperature than its surroundings, e.g. when taking it outside, it can take up to 30 minutes before the internal sensor can determine the correct ambient temperature.
DETERMINING THE BALLISTICS CURVE
To adjust the equivalent horizontal range calculation (EHR, see p. 44), the point of aim (HOLD, see p. 44) or the reticule adjustment (NOR, see p. 45) to different calibers, ammunition types and weights, you can choose from 12 different ballistics curve. The Appendix contains six tables, three different ones for zeroing distances in meters and in yards. In the table that corresponds to the set zeroing distance, find the ballistics curve that is closest to the point of impact specification provided by the ammunition manufacturer.
Example:
The weapon is zeroed to 100 meters with the associated telescopic sight, Table 1 is applicable. The ammunition manufacturer specifies 15.0cm at 200m as the point of impact for the ammunition used. In the corresponding column, this corresponds most closely to the value of 14.5cm in the EU7 line - this is therefore the appropriate ballistics curve.
Note:
When using the ballistics function on the Leica Geovid HD-B, particularly at ranges of >300m / 300 yards, we recommend determining the ballistic data for your ammunition by practical trials, so that you can select the appropriate curve.
SETTING THE BALLISTICS CURVE
Start with step 1 if you have not yet opened the menu system and with step 3 if you have already set the unit of measure and bAII is still flashing in the display.
- Press and hold (≥3s) the secondary / menu button (8).
• USEU appears. - Briefly (<2s) press the secondary / menu button once.
• The display changes to ALL (= Ballistics curves). - Press the main / release button (7).
• The display changes to - US1 or
-
EUI
-
Repeatedly press the main / release button to select the relevant ballistics curve, i.e.
-
US1 to US12 or
- EU1 to EU2, or
if you want the range to be displayed with no point of impact correction (RBC) -
OFF.
-
Save your setting by pressing the secondary / menu button.
- The saved setting appears continuously for 4s as confirmation and the display then changes to Sid and goes out if no more actions are performed.
If a ballistics curve is set, after each range measurement the range is displayed for 2s and then the calculated correction value for 6s.
Start with step 1 if you have not yet opened the menu system and with step 3 if you have already set the ballistics curve and SId is still flashing in the display.
- Press and hold (≥3s) the secondary / menu button (8).
• US:EU appears.
- Briefly (<2s) press the secondary / menu button twice.
• The display changes to ALL and then to SID.
-
Select the relevant zeroing distance by repeatedly pressing the main / release button (7).
-
100 [m],
- 200 [m], or
- GEE [m], or
- 100 [y], or
- 200 [y], or
-
300 [y].
-
Save your setting by pressing the secondary / menu button.
- The saved setting appears continuously for 4s as confirmation and the display then changes to A&C and goes out.
DISPLAYING THE SET BALLISTICS CURVE AND THE ZEROING DISTANCE
To check your settings, e.g. if the hunting situation has changed or you have not used the binoculars for some time, you can quickly display the three values at any time.
To do this, briefly press the secondary / menu button (8) twice.
- The following information briefly appears in turn below the reticule (instead of the range) for approx. 2s:
- The set ballistics curve
- The set zeroing distance
- The set ballistic output value
BALLISTIC OUTpUT FORMATS (ABC®)
Advanced Ballistic Compensation (ABC) on the Leica Geovid HD-B allows you to display one of the following three ballistic values after measuring the range:
- the equivalent horizontal range (Hr)
- the corresponding point of aim HOLD
- the number of clicks required for quick reticule adjustment
Both the point of aim and EHR value displayed take account of:
a. the measured distance to the target,
b. the angle of inclination of the weapon,
c. the set ballistics curve,
d. the measured temperature and atmospheric pressure values
e. the set zeroing distance.
Notes:
- The calculation of the specified values is based on the set ballistics curve, i.e. this must be selected first (see p. 41).
- Ballistic output values are only specified up to a range of 800m/875 yards on safety grounds. In addition, only the range actually measured is specified.
Important:
- Note that at longer ranges, the influence of all the factors relevant in ballistics increases significantly and considerable variations can occur. The ballistic values displayed should therefore be seen only as a reference.
- Regardless of whether or not you use this information, you are responsible for assessing the relevant hunting situation.
EQUIVALENT HORIZONTAL RANGE
Shots at higher or lower targets are subject to changed ballistic conditions. They therefore require the use of the equivalent horizontal range, which differs from the actual distance to the target (in some cases significantly).
Note:
Even horizontal EHR measurements can result in values that differ from the "normal" measured range, for example if the temperature and/or atmospheric pressure differ from the programmed mean values.
POINT OF AIM
The point of aim is the point the weapon is aimed at instead of the actual target to compensate for the variations caused by the flight of the bullet (e.g. when using conventional hunting reticules).
By displaying the point of aim, the Leica Geovid HD-B can provide valuable support when used in hunting, ensuring that shots are as accurate as possible. In addition to the range, the calculation is based on the general conditions outlined in the previous section and the ballistics curve you have selected.
Note:
The point of aim / attachment value displayed is always expressed relative to the distance to the target. Example: If 300m 30 is displayed, you would need to aim 30cm higher on the object than would be the case without correction.
pPOINT OF IMpACT CORRECTION USING ELEVATION ADJUSTMENT (CLICK / MOA ADJUSTMENT)
Variations in the point of impact can be compensated by a corresponding adjustment of the reticule on your telescopic sight.
Taking into account the measured range, the trajectory of the bullet and the set zeroing distance (see p. 42), the Leica Geovid HD-B can display the required adjustments, i.e. the relevant number of clicks.
For the different elevations, you can specify whether the clicks are to be specified
- based on the international standard MOA (minutes of angle) graduation, or
- in 5 or 10 centimeter graduations.
SETTINGS AND SELECTION OF BALLISTIC OUTpUT FORMATS
Start with step 1 if you have not yet opened the menu system and with step 3 if you have already set the unit of measure and ABC is still flashing in the display.
-
Press and hold (≥2s) the secondary / menu button (8).
• USEU appears. -
Briefly (<2s) press the secondary / menu button three times.
- The display changes to ALL and SID and then to ABC.
-
Select the relevant ballistic setting by repeatedly pressing the main / release button (7).
-
EH or
- HOLD or
- H(1MOA), or
- 1-3 (1/3MOA), or
- 1-4( ^1/_4 MOA), or
-
10
-5 -
Save your setting by pressing the secondary / menu button.
- The saved setting is displayed continuously for 4s as confirmation and the display then goes out.
DISPLAYING AND CHECKING THE SET BALLISTICS pARAMETERS
If you want to check your settings, you can display the values at any time.
To do this, briefly press the secondary / menu button (8) twice.
- The following information briefly appears in turn below the reticule (instead of the range) for approx. 2s:
- The set ballistics curve (see p. 41)
- The set zeroing distance (see p. 42)
- The set ballistic output value (see p. 45)
If all ballistics functions are deactivated (BALL = OFF), only the US or EU setting is displayed.
USING ALTERNATIVE BALLISTICS CURVES
If the intended weapon / ammunition combination is not covered by one of the 2 x 12 programmed ballistics curves on the Leica Geovid HD-B you can use your own custom ballistics curves. These are initially precisely calculated based on the load data your provide online - such as caliber, ammunition weight etc. - and then transferred to the microSD memory card supplied so that it can be retrieved on the binoculars once the card has been inserted.
This is done in three stages:
A. Calculation and transfer of requested ballistics curve to the memory card.
On the Leica Camera AG homepage at www.leica-camera.com, the Sport Optics area
- includes instructions for entering the required information/values for calculation of a ballistics curve
- the corresponding input screen
- a description of the download process, i.e. how to transfer the calculated ballistics curve to the memory card
natural_image
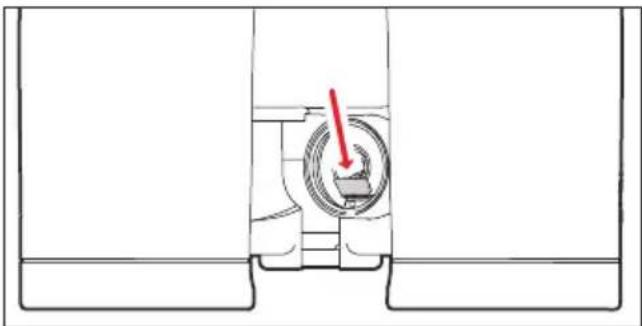
Cross-sectional diagram of a mechanical component with a red arrow indicating direction (no text or symbols)B. Inserting the memory card in the binoculars The memory card slot (13) is located in the battery compartment (12), where it is protected from soiling and the ingress of water.
-
Open the cover (11) over the battery compartment (12) by turning it anticlockwise, e.g. with a coin.
-
Remove the battery.
-
Slide the memory card into the slot with the contacts pointing forwards and downwards, until you feel it engage.
-
Insert the battery so that the positive contact goes in first (as shown by the markings in the battery compartment).
-
Close the cover again by turning it clockwise. To remove the memory card, follow these instructions in reverse. Use the tweezers supplied.
C. Retrieving the ballistics curve from the memory card
If a memory card containing a ballistics curve is inserted in the binoculars, this curve can be retrieved in exactly the same way as described under "Setting the ballistics curve" on p. 41.
- In this case, when you press the main / release button (7) Cord appears first.
The following warning messages can appear instead:
- Err1 if the SId menu is open but the memory card is then removed, or if the card is defective or cannot be read. In this case, Cord also disappears.
- Err2 if there is no ballistics curve on the memory card
- Err3 if the ballistics curve on the memory card does not contain correct data
The subsequent procedure is exactly the same as for the pre-programmed ballistics curves.
Note:
Even if a memory card is inserted, you can set one of the pre-programmed ballistics curves at any time. You should always check your settings.
Notes:
- For safety reasons, i.e. to prevent confusion, only one ballistics curve can ever be saved on the card.
- When using ballistics curves from the memory card, ranges up to 925m/1000yds are displayed.
- The range of microSD cards is too large for Leica Camera AG to be able to completely test all available types for compatibility and quality. Therefore, we recommend using a card such as the "microSDHC™" cards from the leading brand "SanDisk".
- Although using other card types is not likely to damage the binoculars or the card, some "no name" cards do not comply with the microSD standards, and Leica Camera AG is unable to provide any guarantee that they will function correctly.
MAINTENANCE / CLEANING
Your Leica Geovid HD-B binoculars do not require any special care. Coarse dirt particles, such as sand, should be removed with a fine hair brush or blown away. Marks such as fingerprints on the front lens and eyepiece lenses can be cleaned with a damp cloth and then wiped off with a soft, clean leather or dust-free cloth.
Important:
Do not exert heavy pressure when wiping highly soiled lens surfaces. Although the coating is highly abrasion resistant, it can be damaged by sand or salt crystals. The housing should only be cleaned with a moist leather cloth. Using dry cloths brings a risk of static charge. Alcohol and other chemical solutions must not be used to clean the optical system or the housing. All Leica Geovid HD-B binoculars have their “personal” serial number in addition to the type designation. Note this number in your documentation for security.
Attention:
The housing may not be opened.
SPARE PARTS
If you should require any spare parts for your Leica Geovid HD-B binoculars, e.g. eyepiece cups or covers, please contact our Customer Service department or the Leica office in your country (see warranty card for addresses).
TROUBLESHOOTING
| problem Cause Remedy | ||
| A circular image is not obtained when viewing. | a. The user's pupils are aligned with the eyepiece exit pupil.b. The position of the eyepiece cup does not match that for correct use with and without glasses. | a. Correct the eye position.b. Correct the adjustment: If wearing glasses, twist the eyepiece cups; if using without glasses they remain flipped up (see p. 34). |
| Display not focused Diopter compensation | not precise Repeat diopter compensation | (see p. 35) |
| The display "-" appears when measuring the range. | a. Above or below measuring rangeb. Object is not sufficiently reflectivec. Poor ambient conditions (visibility etc.) | Refer to the measuring range details (see p. 37) |
| Display flashing or no measurement possible | Battery used Replace battery (see p. 32) | |
| The display "Err" appears | Error involving the memory card Check whether- the memory card used is OK- the data saved on it is OKFor further details, refer to p. 46 | |
TECHNICAL DATA
| Magnification | 8x 10x | |
| Lens diameter | 42mm | |
| Exit pupil | 5.2mm / ^13/_64 " 4.2mm / | ^11/_64 " |
| Twilight number | 18.3 20.5 | |
| Geometric luminous intensity | 27.5 17.6 | |
| Field of vision (at 1,000m) / Objective field of view | Approx.128m /142yds / 7.3° Approx. 113m /125yds / 6.5° | |
| Exit pupil longitudinal distance | 18mm / 45/64" 16mm / 25/32" | |
| Close range limit | Approx. 5m/yds | |
| Prism type | Perger prism | |
| Coating on lenses and prisms | High Durable Coating (HDCTM) and hydrophobic Aqua-Dura coating on external lenses, P40 phase correction coating | |
| Diopter compensation | ±4dpt. | |
| Eyepiece cups | Adjustable by turning for use wearing glasses, 4 settings, removable for easy cleaning | |
| Eye spacing | Adjustable, 56 - 74mm/ 27/32" - 229/32" | |
| Operating temperature | Electrical system: -20°C/-4°F to 55°C/131°F, mechanical system: -30/-22°F to 55°C/131°F | |
| Storage temperature | -40 to 85°C / -40 to 185°F | |
| Water tightness | Impermeable to press water up to 5m/yds deep | |
| Housing / chassis material | Die cast magnesium, non-slip rubber reinforcement | |
| Range | Approx. 10m/yds - 1825m/2000yds | |
| Measuring accuracy | Approx. ±1m/y up to 500m/yds / Approx. ± 2m/yds up to 1000m/yds / Approx. ± 0.5% over 1000m/1000yds | |
| Display/Unit of measure | 4-digit LED/optionally in yards/inches or meters/centimeters | |
| Battery | 3V lithium button cell, CR2 type | |
| Battery life | Approx. 2,000 measurements at 20°C/68°F | |
| Laser | Invisible, safe for eyes in compliance with EN and FDA Class 1 | |
| Laser beam divergence | Approx. 0.5 x 2mrad | |
| Maximum measurement duration | Approx. 0.9s | |
| Dimensions (W x H x D) | Approx. 127 x 81 x 177mm / | |
| Weight (with battery) | Approx. 950g | |
LEICA ACADEMY
Our various seminars allow participants to discover the Leica values and the fascination of expert use of Leica products, all in a practical, contemporary form. The content of the courses are focused on use of the products and offer an array of practical ideas, information and advice.
More details, along with the current seminar program, are available from:
Leica Camera AG
Leica Academy
Oskar-Barnack-Str. 11
D-35606 Solms
The Leica information service can provide you with an answer to any technical application questions relating to the Leica range either in writing, on the telephone or by e-mail.
Leica Camera AG
Customer Care
Produkt Support
Gewerbepark 8
35606 Solms
Tel: +49 (0)6442-208 111
Fax: +49 (0)6442-208 339
info@leica-camera.com
LEICA CUSTOMER SERVICE
For servicing your Leica equipment or in the event of damage, the Leica Camera AG Customer Care department or the repair service provided by authorized Leica agents in your country are available (see the warranty card for a list of addresses).
Leica Camera AG
Customer Care
This is a Class B product based on the standard of the Voluntary Control Council for Interference from Information Technology Equipment (VCCI). If this is used near a radio or television receiver in a domestic environment, it may cause radio interference. Install and use the equipment according to the instruction manual.
FCC NOTE: (U.S. ONLY)
This equipment has been tested and found to comply with the limits for a Class B digital device, pursuant to Part 15 of the FCC Rules. These limits are designed to provide reasonable protection against harmful interference in a residential installation. This equipment generates, uses, and can radiate radio frequency energy and, if not installed and used in accordance with the instructions, may cause harmful interference to radio communications. However, there is no guarantee that interference will not occur in a particular installation. If this equipment does cause harmful interference to radio or television reception, which can be determined by turning the equipment off and on, the user is encouraged to try to correct the interference by one or more of the following measures:
• Reorient or relocate the receiving antenna.
- Increase the separation between the equipment and receiver.
- Connect the equipment into an outlet on a circuit different from that to which the receiver is connected.
- Consult the dealer or an experienced radio/TV technician for help.
FCC CAUTION:
To assure continued compliance, follow the attached installation instructions and use only shielded interface cables with ferrite core when connecting to computer or peripheral devices. Any changes or modifications not expressly ap proved by the party responsible for compliance could void the user's authority to operate this equipment.
Trade Name: LEICA
Model: Geovid HD-B
Responsible party/ Leica Camera Inc.
Support contact: 1 Pearl Court, Unit A
Allendale, New Jersey 07401
Tel.: +1 201 995 0051 232
Fax: +1 201 995 1684
technicalinfo@leicacamerausa.com
This device complies with Part 15 of the FCC Rules. Operation is subject to the following two conditions:
(1) This device may not cause harmful interference, and
(2) this device must accept any interference received, including interference that may cause undesired operation.
This Class B digital apparatus complies with Canadian ICES-003
Complies with 21 CRF 1040.1 and 1040.11 except for deviations pursuant to Laser No. 50, dated June 24, 2007
LEICA GEOVID HD-B

Tested To Comply
With FCC Standards
FOR HOME OR OFFICE USE
DESIGNATION DES COMpOSANTS
natural_image
Line drawing of a medical procedure with tubing and a balloon (no text or symbols)Remarque:
natural_image
Pure mechanical diagram showing a circular component with red curved arrows indicating rotational motion (no text or symbols)INSERTION ET REMpLACEMENT DE LA pILE
natural_image
Mechanical assembly diagram showing a cylindrical component inserted into a housing, with a red arrow indicating direction (no text or symbols present)Remarques:
natural_image
Technical line drawing of two identical mechanical device components labeled A, B, C, D (no text or symbols on the devices themselves)REGLAGE DES OÉILLETONS / UTILISATION AVEC ET SANS LUNETTES
natural_image
Technical line drawings of two binoculars with no visible text or symbolsREGLAGE DE LA DISTANCE INTEROCULAIRE
US = affichage en yards
natural_image
Two circular black-and-white photos of a mountainous animal, one with a marked square and the other with a number 98 (no text or symbols)natural_image
Black-and-white circular image of a bear in a forest setting, no text or symbols visible
natural_image
Black-and-white circular portrait of a bear standing on foliage (no text or symbols visible)
natural_image
Black-and-white circular image of a bear peeking through tree branches, with no visible text or symbols.natural_image
Cross-sectional diagram of a mechanical component with a red arrow indicating direction (no text or symbols)natural_image
Line drawing of a medical procedure with tubing and a balloon (no text or symbols)Opmerking:
natural_image
Pure mechanical diagram showing a circular component with red arrows indicating rotational motion (no text or symbols)PLAATSEN EN VERVANGEN VAN DE BATTERIJ
natural_image
Mechanical assembly diagram showing a cylindrical component inserted into a housing, with a red arrow indicating direction (no text or symbols present)Aanwijzingen:
natural_image
Technical line drawings of two mechanical device components labeled A, B, C, D (no text or symbols on the diagrams themselves)INSTELLEN VAN OOGSCHELpEN / GEBRUIK MET EN ZONDER BRIL
natural_image
Technical line drawings of two binoculars with no visible text or symbolsINSTELLEN VAN DE OOGAFSTAND
US = Weergave in Yards EU = Weergave in Meters

natural_image
Simple white square outline on black background, no text or symbols presentUS EU

EU
Opmerking:
natural_image
Two circular black-and-white photos of a mountain goat standing in snow, with no visible text or symbols.natural_image
Black-and-white circular image of a bear in a forest setting, no text or symbols visible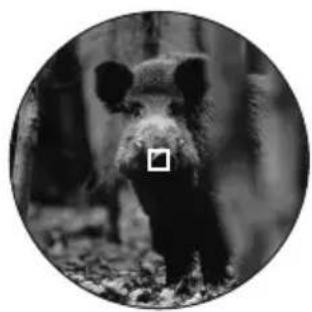
natural_image
Black-and-white circular portrait of a bear standing on foliage (no text or symbols visible)
natural_image
Black-and-white circular image of a bear peeking through dense forest foliage (no text or symbols)BALLISTISCHE WEERGAVEFORMATEN ((ABC®)
natural_image
Cross-sectional diagram of a mechanical component with a red arrow indicating direction (no text or symbols)natural_image
Line drawing of a medical procedure with tubing and a balloon (no text or symbols)Avvertenza:
natural_image
Pure mechanical diagram showing a circular component with red arrows indicating rotational motion (no text or symbols)natural_image
Mechanical assembly diagram showing a cylindrical component inserted into a housing, with a red arrow indicating direction (no text or symbols present)Note:
natural_image
Technical line drawings of two mechanical device components labeled A, B, C, D (no text or symbols on the diagrams themselves)REGOLAZIONE DELLE CONCHIGLIE OCULARI / UTILIZZO CON E SENZA OCCHIALI
natural_image
Technical line drawings of two binoculars with no visible text or symbolsnatural_image
Simple white square outline on black background, no text or symbolsUS EU

EU
Avvertenza:
natural_image
Two circular black-and-white photos of a goat standing in a snowy mountain landscape, no text or symbols visible.natural_image
Black-and-white circular image of a bear in a forest setting, no text or symbols visible
natural_image
Black-and-white circular portrait of a bear standing on foliage (no text or symbols visible)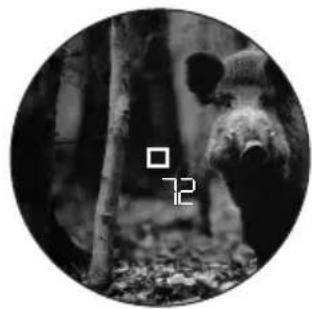
natural_image
Black-and-white circular image of a bear peeking through dense forest foliage (no text or symbols)natural_image
Cross-sectional diagram of a mechanical component with a red arrow indicating direction (no text or symbols)natural_image
Line drawing of a medical procedure with tubing and a balloon (no text or symbols)Nota:
natural_image
Pure mechanical diagram showing a circular component with red arrows indicating rotational motion (no text or symbols)natural_image
Mechanical assembly diagram showing a cylindrical component inserted into a housing, with a red arrow indicating direction (no text or symbols present)Notas:
natural_image
Technical line drawing of two identical mechanical device components labeled A, B, C, D (no text or symbols on the devices themselves)natural_image
Technical line drawings of two binoculars with no visible text or symbolsAJUSTE DE LA DISTANCIA INTEROCULAR
natural_image
Two circular black-and-white photos of a deer standing in a snowy mountain landscape, no text or symbols visible.natural_image
Black-and-white circular image of a bear in a forest setting, no text or symbols visible
natural_image
Black-and-white circular portrait of a bear standing on foliage (no text or symbols visible)
natural_image
Black-and-white circular image of a bear peeking through dense forest foliage (no text or symbols)natural_image
Cross-sectional diagram of a mechanical component with a red arrow indicating direction (no text or symbols)natural_image
Line drawing of a medical procedure with tubing and a balloon (no text or symbols)Merk:
natural_image
Pure mechanical diagram showing a circular component with red arrows indicating rotational motion, no text or symbols present.INNSETTING OG SKIFTE AV BATTERIET
Til energiforsyning settes det inn en 3 volt litium-knappelle (type CR2) i din Leica Geovid HD-B.
natural_image
Mechanical assembly diagram showing a cylindrical component inserted into a housing, with a red arrow indicating direction (no text or symbols present)Merk:
natural_image
Technical line drawings of two mechanical device components labeled A, B, C, D (no text or symbols on the diagrams themselves)INNSTILLING AV ∅YEMUSLINGENE / ANVENDELSE MED OG UTEN BRILLER
natural_image
Technical line drawings of two binoculars with no visible text or symbolsINNSTILLING AV ∅YEAVSTANDEN
US = visning i yards
natural_image
Two circular black-and-white photos of a goat standing in a snowy mountain landscape, with no visible text or symbols.natural_image
Black-and-white circular image of a bear in a forest setting, with no visible text or symbols.
natural_image
Black-and-white circular portrait of a bear standing in a forest (no text or symbols visible)
natural_image
Black-and-white circular image of a bear peeking through dense foliage, with no visible text or symbols.Med din Leica Geovid HD-B kan du også måle i kontinuerlig drift (skannemodus):
natural_image
Cross-sectional diagram of a mechanical component with a red arrow indicating direction (no text or symbols)natural_image
Line drawing of a medical procedure with tubing and a balloon (no text or symbols)Указание:
natural_image
Pure mechanical diagram showing a circular component with red rotational arrows, no text or symbols presentnatural_image
Mechanical assembly diagram showing a cylindrical component inserted into a housing, with a red arrow indicating direction (no text or symbols present)Указания:
natural_image
Technical line drawings of two mechanical device components labeled A, B, C, D (no text or symbols on the diagrams themselves)natural_image
Technical line drawings of two binoculars with no visible text or symbolsnatural_image
Black-and-white circular image of a mountain with snow-capped peaks and a small black square overlay (no text or symbols)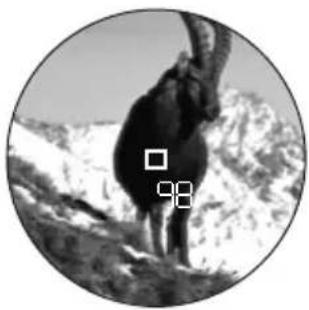
natural_image
Black-and-white circular image of a mountain with snow-capped peaks and a small pixelated square overlay (no text or symbols)natural_image
Black-and-white circular image of a bear in a forest setting, no text or symbols visible
natural_image
Black-and-white circular portrait of a bear standing on foliage (no text or symbols visible)
natural_image
Black-and-white circular image of a bear peeking through dense forest foliage (no text or symbols)natural_image
Cross-sectional diagram of a mechanical component with a red arrow indicating direction (no text or symbols)- Tables 1, 2 and 3 show the ranges in meters and the hold-over corrections in centimeters, while tables 4 and 5 use yards and inches.
-
All values are applicable for:
-
An atmospheric pressure of 1013mbar
- A temperature of 20°C/68°F
- Horizontal shots