
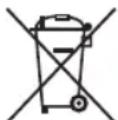
PCHWS 1145 - Kettle PROFICOOK - Free user manual and instructions
Find the device manual for free PCHWS 1145 PROFICOOK in PDF.
| Product Type | Electric Kettle with Hot Water Dispensing |
| Brand | ProfiCook |
| Model | PCHWS 1145 |
| Tank Capacity | 4 liters |
| Power | 2200 - 2600 W |
| Supply Voltage | 220-240 V ~, 50/60 Hz |
| Protection Class | I |
| Net Weight | Approximately 2.95 kg |
| Housing Material | Plastic and Stainless Steel |
| Functions | Water heating, volume dispensing, temperature setting, child lock, automatic shut-off |
| Temperature Settings | 55 °C, 65 °C, 75 °C, 85 °C, 100 °C |
| Volume Settings | 100 ml, 200 ml, 300 ml, 400 ml, 500 ml |
| Display | Digital display with temperature and volume |
| Control | Touch buttons |
| Drip Tray | Removable, stainless steel, height adjustable |
| Spout | Removable for cleaning |
| Descaling | Recommended with citric acid, rinse cycle at 100 °C |
| Cleaning | Wipe with a soft cloth, do not immerse |
| Storage | Drain via drainage opening, store in a dry place |
| Safety | Overheat protection, automatic shut-off, child lock, hot surface indicator |
| Included Accessories | Two drip trays, reset key |
Frequently Asked Questions - PCHWS 1145 PROFICOOK
User questions about PCHWS 1145 PROFICOOK
0 question about this device. Answer the ones you know or ask your own.
Ask a new question about this device
Download the instructions for your Kettle in PDF format for free! Find your manual PCHWS 1145 - PROFICOOK and take your electronic device back in hand. On this page are published all the documents necessary for the use of your device. PCHWS 1145 by PROFICOOK.
USER MANUAL PCHWS 1145 PROFICOOK
natural_image
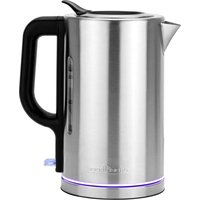
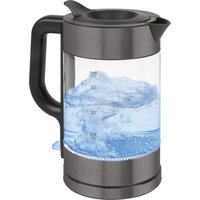
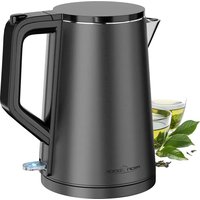
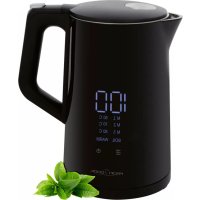
Modern water dispenser with digital display showing 100/200 units, featuring a glass mug filled with water and control buttons (Lock, Nuttles) visible (no text on main subject)Heißwasserspender PC-HWS 1145
Heet water dispenser • Distributeur d'eau chaude • Dispensador de agua caliente Distributore dell'acqua calda • Hot Water Dispenser • Dozownik gorącej wody Melegvíz-adagoló • Дозатор горячей воды • wireless للميابع الساخنة
CE
Bedienungsanleitung ...... Seite 4
Gebruiksaanwijzing....Pagina 11
Mode d'emploi....Page 17
Manual de instrucciones......Página 23
Istruzioni per l'uso....Pagina 29
Instruction Manual......Page 35
Instrukcja obsługi......Strona 41
Használati utasítás.... Oldal 48
Руководство по эксплуатации....стр. 54
64 صفحة ____ دليل التعليمات
Thank you for choosing our product. We hope you will enjoy using the appliance.
Symbols in these Instructions for Use
Important information for your safety is specially marked. It is essential to comply with these instructions in order to avoid accidents and prevent damage to the appliance:

WARNING:
This warns you of dangers to your health and indicates possible injury risks.

CAUTION:
This refers to possible hazards to the appliance or other objects.

NOTE: This highlights tips and information.
Contents
Overview of the Components....3
General Notes......35
Special Safety Instructions for this Appliance....35
Designated Use 37
Overview of the Components / Scope of Delivery......37
Unpacking the Appliance 37
Notes on Use 37
Placement....37
Insert Drip Tray Area for the Cups....37
Electric Connection....37
Connected Wattage 37
Standby (Standby Mode)....38
Control Panel 38
Button Functions 38
Functionality of the Appliance 38
First Use....38
Operation 38
De-scaling....38
Cleaning 39
Cleaning the Water Faucet....39
Storage....39
Troubleshooting....39
Technical Data 40
Disposal 40
Meaning of the "Wheelie Bin" Symbol....40
General Notes
Read the operating instructions carefully before putting the appliance into operation and keep the instructions including the warranty, the receipt and, if possible, the box with the internal packing. If you give this appliance to other people, please also pass on the operating instructions.
- The appliance is designed exclusively for private use and for the envisaged purpose. This appliance is not fit for commercial use.
- Do not use it outdoors. Keep it away from sources of heat, direct sunlight, humidity (never dip it into any liquid) and sharp edges. Do not use the appliance with wet hands. If the appliance is humid or wet, unplug it immediately.
- When cleaning or putting it away, switch off the appliance and always pull out the plug from the socket (pull the plug itself, not the lead) if the appliance is not being used and remove the attached accessories.
- Do not operate the appliance without supervision. If you leave the room you should always turn the appliance off. Remove the plug from the socket.
- The appliance and the mains lead have to be checked regularly for signs of damage. If damage is found the appliance must not be used.
- Use only original spare parts.
- In order to ensure your children's safety, please keep all packaging (plastic bags, boxes, polystyrene etc.) out of their reach.

WARNING:
Do not allow small children to play with the foil. There is a danger of suffocation!
Special Safety Instructions for this Appliance

WARNING:
Danger of scalding due to escaping steam!
- While preparing hot water keep your hands away from the faucet.

WARNING: Risk of burns!
- The water faucet's temperature will be high during operation. Do not touch it.
- Even after use the surface of the faucet still has residual heat.

CAUTION:
This appliance is not intended to be immersed in water during cleaning. Please observe the instructions that we have included in the chapter “Cleaning”.
- Use the appliance only on a level work surface.
- Only use the appliance when water is filled into the water container.
- Do not move the appliance when it is in operation.
- Pay attention that no water comes in contact with the appliance adapter.
- This appliance can be used by children aged from 8 years and above if they have been given supervision or instruction concerning the safe use of the appliance understand the hazards involved.
- Cleaning and maintenance by the user shall not be made by children unless they are older 8 years and supervised.
- Keep the appliance and its cord out of reach of children less than 8 years.
• Children shall not play with the appliance. - Appliances can be used by persons with reduced physical, sensory or mental capabilities or lack of experience and knowledge if they have been given supervision or instruction concerning use of the appliance in a safe way and if they understand the hazards involved.
- Do not repair the appliance by yourself. Please contact authorized personnel. If the supply cord is damaged, it must be replaced by the manufacturer, its service agent or similarly qualified persons in order to avoid a hazard.
Designated Use
- This appliance is used for heating and boiling water. Never use to heat up other fluids or foodstuffs.
- Only use the appliance in a dry, indoor area.
-
It is intended for domestic use and similar areas of use such as e.g.:
-
In staff kitchens in shops, offices and other commercial areas;
- By guests in hotels, motels and other accommodation facilities;
- in B&Bs.
It is not intended for applications in agricultural properties.
Overview of the Components / Scope of Delivery
1 Water tank lid
2 Tab to open the water tank lid
3 Water level indicator
4 Water tank
5 Tray / drip pan with stainless steel overlay
6 Housing
7 Key for resetting an error message
8 Water faucet
9 Control panel with display
10 Drain closure
11 Temperature indication in °C
12 Water volume indication in ml
13 Touch buttons
No illustration:
High drip pan with stainless steel overlay
Unpacking the Appliance
- Remove the appliance from its packaging.
- Remove all packaging material such as plastic films, filler material, cable ties and cardboard packaging.
- Check the content for any missing parts.
- In the event that the packaging content should be incomplete or if damages are noticeable, do not operate the appliance. Return it to the dealer immediately.
i NOTE:
There may be dust and production residue on the appliance. We recommend cleaning the appliance as described under "Cleaning".
Notes on Use
Placement
- Place the appliance on a stable and level surface.
- Due to rising heat and vapours do not operate the appliance under wall cabinets.
- Do not place the appliance in close proximity to a gas or electric stove or any other heat source.
Insert Drip Tray Area for the Cups
Two drip trays with stainless steel overlays are included in the scope of delivery. Choose which drip tray to use depending on your cup's or vessel's height.
- Mount one of the two drip trays into the housing.
- You may put the higher drip tray onto the flat one to use it as an attachment.
Electric Connection
Ensure that your mains power corresponds with the specifications of the appliance. The specifications are printed on the type label.
Connected Wattage
The total power consumption of this appliance can be up to 2600 W. With this connected load a separate supply line protected by a 16 A household circuit breaker is recommended.
CAUTION: Overload!
- If you use extension leads, these should have a cable cross-section of at least 1.5 ~mm^2 .
- Do not use any multiple sockets, as this appliance is too powerful.
Standby (Standby Mode)
Connect the mains cable to a properly installed and earthed wall outlet. The "Lock" button is illuminated. The notification "0" will appear in the display. The appliance is in standby mode.
Control Panel
The appliance features touch buttons. A slight touch of the control panel with the finger is enough. Use the fingertip, not the top of the finger.
Button Functions
Lock Lock / unlock the appliance:
To unlock the appliance touch the button for 3 seconds. The appliance will switch back into Standby if you did not touch a button for 10 seconds.
Temp. Setting the water temperature in °C:
000 / 55 / 65 / 75 / 85 / 100
Volume Setting the water volume in ml:
100 / 200 / 300 / 400 / 500
Start / Stop Start or premature stop of dispensing water
Functionality of the Appliance
- The appliance will save the temperature and quantity setting selected last as long the power plug has not been removed from the socket.
- Once the selected amount of water has been dispensed the appliance will stop dispensing automatically. You will hear signal tones.
• The appliance emits different signal tones: - 6 signal tones: Water discharge completed.
- 10 signal tones: Water discharge incomplete
- 20 signal tones: Water tank empty (error message "E7")
First Use

CAUTION:
Before first use cold water must run through the heating system to avoid activating the over temperature protection.
- Fill the water tank with clean, fresh water to the MAX marking. Close the lid again.
- Place an empty vessel with a minimum volume of 500 ml onto the drip tray cover.
- Touch the "Lock" button for 3 seconds to unlock the appliance. The "Temp." and "Volume" buttons are illuminated. The temperature and water volume is shown in the display.
- Check the temperature setting. It must be set to "000".
- Tap the "Volume" button until "500" is shown in the display.
- To start dispensing water tap the "Start / Stop" button.
-
Once the water discharge is completed you will hear 6 signal tones. Pour the dispensed water away. Place the vessel onto the drip tray again.
-
Select the temperature "100" °C.
- Start the water dispense once again. This procedure is necessary in order to enable the appliance to identify the boiling point.
The water dispenser is now ready to use.

NOTE:
If you accidentally heat up the water to 100 °C during first use the over temperature protection of the appliance may be activated. During the next use the appliance would dispense cold water only. In this case refer to "Troubleshooting".
Operation

WARNING:
Danger of scalding due to escaping steam!
While preparing hot water keep your hands away from the faucet.

NOTE:
Always use fresh, cold water.
- Ensure that a sufficient amount of water is left in the tank.
- Place a vessel with the desired volume onto the drip tray.
- Unlock the appliance with the "Lock" button.
- Tap the "Temp." button to set the desired temperature.
- Tap the "Volume" button to select the desired amount of water.
- Start dispensing water by tapping the "Start / Stop" button.

NOTE:
Tap the "Start / Stop" button to interrupt the water dispenser.
De-scaling
Decalcification is necessary if preparation time increases or if the amount of water issued varies. In any case, we recommend that you decalcify the appliance after filling the tank 2 - 4 times, depending on the degree of hardness of your tap water.
- Use only commercially available citrus acid-based descaler.
- Follow the recommended instructions for use.
- Dispense hot water with a temperature of 100 °C once. Do not pour that water away immediately. As long as it is hot you may still use it to de-scale the water faucet if needed. Please observe the instructions that we have included in the chapter “Cleaning”.

WARNING:
- Then dispense the biggest volume (500 ml) of hot water with a temperature of 100 °C for three times in order to rinse any residues of de-scaling agent.
- Do not use this water for consumption.
Cleaning

WARNING:
- Before cleaning, always remove the mains plug and wait until the appliance has cooled down.
- Do not immerse the appliance in water. Otherwise this might result in an electric shock or fire.

CAUTION:
- Do not use a wire brush or any abrasive items.
- Do not use any acidic or abrasive detergents.
• Empty the water tank completely. - Wipe out the water tank with a damp cloth (without additives). Then wipe it with a dry cloth.
- When using the appliance for the first time rinse the water tank with clean water. Use a cloth to wipe the water tank dry. Repeat this step several times.
• Empty the drip trays. Wipe them dry. - Use a microfiber cloth to remove water stains on the stainless steel covers.
- The exterior of the appliance should be cleaned as necessary with a slightly damp cloth - without any additives.
Cleaning the Water Faucet
The water faucet is removable.
- Slightly turn it clockwise and pull it off.
- Remove the silicone seal.
-
Remove possible scale residues with a nylon brush. In case you previously de-scaled the appliance and kept the hot water with the de-scaling agent put the water faucet in this water for approx. half an hour. Or prepare a hot de-scaling bath.
-
Then rinse the water faucet under running water several times.
- Mount the silicone seal to the water faucet.
- Put the water faucet back onto the appliance. Turn it anticlockwise until it clicks into place.
Storage
Clean the appliance as described and let it dry completely. Additionally drain the remaining water if you do not intend to use it for a longer period of time. For this purpose refer to figure B on page 3 and proceed as follows:
- Put the appliance on one side.
- Turn the drain closure anticlockwise e.g. with a small coin.
- Put the appliance upright. The drainage will be emptied.
- Use the closure to lock the drainage again. Tighten the closure by turning it clockwise.
• We recommend that you store the appliance in its original packaging when it is not to be used for a longer period.
• Always store the appliance at a well ventilated and dry place outside the reach of children.
Troubleshooting
| Problem Possible Cause Solution | ||
| The appliance does not work. | The appliance is not connected to mains power. | Check the wall outlet with a different appliance. |
| Insert the plug properly in the wall outlet. | ||
| Check the fuse. | ||
| The appliance is defective. | Contact our service or a repair centre. | |
| Problem Possible Cause Solution | ||
| “E7” will appear on the display. You will hear 20 signal tones. | The water tank is empty. | |
| The appliance is dispensing water without heating it up. | The over temper-ature protection is enabled. | |
Technical Data
Model: PC-HWS 1145
Power supply: 220 - 240 V\~, 50 / 60 Hz
Power consumption: 2200 - 2600 W
Protection class:....I
Filling quantity: max. 4 Litre
Net weight: .... approx. 2.95 kg
The right to make technical and design modifications in the course of continuous product development remains reserved.
This appliance complies with all current CE directives, such as electromagnetic compatibility and low voltage directive and is manufactured according to the latest safety regulations.
Disposal
Meaning of the "Wheelie Bin" Symbol
Take care of our environment, do not dispose of electrical appliances via the household waste.
Dispose of obsolete or defective electrical appliances via municipal collection points.
Please help to avoid potential environmental and health impacts through improper waste disposal.
You contribute to recycling and other forms of utilization of old electric and electronic appliances.
Your municipality provides you with information about collecting points.
Instrukcja obsługi
CTC Clatronic Sp. z o.o
Ul. Brzeska 1
45-960 Opole
Usuwanie
- Heißwasserspender PC-HWS 1145
- Symbols in these Instructions for Use
- WARNING:
- CAUTION:
- Contents
- General Notes
- Special Safety Instructions for this Appliance
- Danger of scalding due to escaping steam!
- WARNING: Risk of burns!
- Designated Use
- Overview of the Components / Scope of Delivery
- No illustration:
- Unpacking the Appliance
- i NOTE:
- Notes on Use
- Placement
- Insert Drip Tray Area for the Cups
- Electric Connection
- Connected Wattage
- CAUTION: Overload!
- Standby (Standby Mode)
- Control Panel
- Button Functions
- Functionality of the Appliance
- First Use
- NOTE:
- Operation
- De-scaling
- Cleaning
- Cleaning the Water Faucet
- Storage
- Technical Data
- Disposal
- Meaning of the "Wheelie Bin" Symbol
- Instrukcja obsługi
- Usuwanie
Brand : PROFICOOK
Model : PCHWS 1145
Category : Kettle