EWB 3785 - Kitchen appliance CLATRONIC - Free user manual and instructions
Find the device manual for free EWB 3785 CLATRONIC in PDF.
User questions about EWB 3785 CLATRONIC
0 question about this device. Answer the ones you know or ask your own.
Ask a new question about this device
Download the instructions for your Kitchen appliance in PDF format for free! Find your manual EWB 3785 - CLATRONIC and take your electronic device back in hand. On this page are published all the documents necessary for the use of your device. EWB 3785 by CLATRONIC.
USER MANUAL EWB 3785 CLATRONIC
natural_image
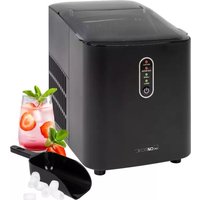
Exterior view of a silver and black CAFRONE water heater (no text or symbols visible on the device body)Bedienungsanleitung......Seite 4
Instruction Manual...... Page 9
Gebruiksaanwijzing......Pagina 13
Mode d'emploi.... Page 17
Manual de instrucciones ...... Página 22
Istruzioni per l'uso....Pagina 26
Instrukcja obsługi......Strona 31
Használati utasítás .... Oldal 36
Руководство по эксплуатации ...... стр. 40
48 دليل التعليماتصفحة
Be sure to read the separately enclosed safety instructions first.
Instruction Manual
Thank you for choosing our product. We hope you will enjoy using the appliance.
Read the instruction manual and the separately enclosed safety instructions very carefully before using this appliance. Keep these documents, including the warranty certificate, receipt and, if possible, the box with the inner packaging in a safe place. If you pass the appliance on to a third party, always include all the relevant documents.
Symbols in this Instruction Manual
Important information for your safety is specially marked. It is essential to comply with these instructions in order to avoid accidents and prevent damage to the appliance:

WARNING:
This warns you of dangers to your health and indicates possible injury risks.

CAUTION:
This refers to possible hazards to the appliance or other objects.
Content
Overview of the Components....3
Unpacking the Appliance....9
Scope of Delivery....9
Overview of the Components....9
Warnings for the Use of the Appliance ....10
If the Refrigerant Circuit is Damaged....10
Notes for Use....10
Location....10
Assembly....10
Electrical Connection 10
Standby (Standby Mode)....10
Ice Cube Size....10
Eco Save (Power Saving Mode).... 10
Operation 10
Making Ice Cubes 10
Stop Ice Cube Production....10
Control Lamp ICE FULL (Ice Cube Container Full)......11
Control Lamp ADD WATER (Water Refill)....11
Cleaning and Maintenance 11
Self-Cleaning....11
Ice Cube Container 11
Housing and Interior....11
Drain Residual Water....11
Storage....11
Troubleshooting....12
Technical Data....12
Disposal 12
Meaning of the "Dustbin" Symbol 12
Unpacking the Appliance

CAUTION:
When unpacking the appliance and removing packaging material, make sure not to tilt the appliance by more than 45^ , otherwise the cooling compressor could get damaged.
- Remove the appliance from its packaging.
- Remove all packaging material, such as foils, filling material, cable ties and cardboard packaging. Also remove the adhesive tape in the water tank, which is attached to fix moving parts.
- Check the scope of delivery for completeness.
- If the contents of the packaging are incomplete or if damage can be detected, do not operate the appliance. Return it to the dealer immediately.
- There may still be dust or production residues on the appliance. We recommend that you clean the appliance as described under "Cleaning and Maintenance".
Scope of Delivery
1 × Ice cube maker
1×Iceshovel
1 × Replacement closure for drainage opening
1×Carryinghandle
Overview of the Components
1 Cover
2 button (switch on / off)
3 Control lamp SMALL
4 Control lamp LARGE
5 Control lamp CLEAN
6 :Button (select ice cube size)
7 Control lamp ICE FULL
8 Control lamp ADD WATER
9 Control lamp POWER
10 Freezing unit
11 Air outlet
12 Housing
13 Water tank (inside the appliance)
14 Ice cube slider
15 Carrying handle
16 Air inlet
17 Residual water - drainage opening
18 Ice cube container
19 Ice shovel
Warnings for the Use of the Appliance

WARNING:
- The refrigerant circuit of the appliance uses the refrigerant isobutane (R600a), a flammable natural gas with high environmental sustainability. When transporting and installing the appliance, prevent the appliance from falling down. The refrigerant circuit must not get damaged.
- When carrying the appliance by the handle, always carry it straight and with both hands to avoid tilting the handle.

CAUTION:
Please observe a waiting period of 2 hours before initial operation and after moving the appliance for the refrigerant to settle. Otherwise the compressor can be damaged.
If the Refrigerant Circuit is Damaged
- Open flames and ignition sources must be avoided.
- Disconnect the mains plug.
- Ventilate the room in which the appliance is installed.
Notes for Use
Location
- Place the appliance on a stable, horizontal, water-resistant and level surface. Maintain a gap of at least 15 cm to walls or objects.
- Do not place the appliance on or directly next to heat sources such as ovens, radiators, etc.
Assembly
Assemble the carrying handle by inserting the ends into the holes in the housing. Make sure that it is firmly seated.
- Note: Once the carrying handle has been fitted, it cannot be removed!
Electrical Connection
- Before inserting the plug into the socket. Make sure that the mains voltage to be used matches that of the appliance. You can find this information on the nameplate.
- Connect the appliance to a properly installed wall outlet.
Standby (Standby Mode)
• The POWER control lamp flashes.
- The last set ice cube size lights up.
Ice Cube Size
You may choose between 2 sizes:
- small (SMALL)
- large (LARGE)
Eco Save (Power Saving Mode)
Once the ice cube container is full the appliance switches into standby mode.
You benefit from better safety and lower energy consumption.
Operation
When using the appliance for the first time or if you have not used it for a long time, clean the appliance as described in the chapter "Cleaning and Maintenance".
Making Ice Cubes
- Make sure that the water tank cap on the bottom of the appliance is tightly closed.
- Open the lid and take out the ice cube container.
-
There is a filter at the bottom of the water tank. Make sure that it is firmly inserted.
-
Fill the container with water to no more than the MAX mark. Only use drinking water to make ice cubes.
-
For best results, aim for a water temperature of between 7 °C and 20 °C as well as an ambient temperature of between 16 °C and 25 °C.
-
If you want clear ice cubes, use chilled drinking water which has firstly been boiled.
-
Now put the ice cube container back in and close the lid.
-
Select the desired ice cube size with the button. The corresponding control lamp lights up.
-
Press the button to start ice cube production.
-
For hygienic reasons do not use the ice cubes from the first cycle.
- The first few ice cubes will be small depending on the water temperature and ambient temperature. The ice cubes will only grow larger in the following cycle.
-
Due to fast freezing the ice cubes can look "milky". This is the air trapped in the water and does not influence the quality of the ice cubes.
-
Keep the lid closed during ice cube production. An ice cube making cycle lasts between 8 and 10 minutes.
Stop Ice Cube Production
Press the ⏻ button to stop ice cube production.
- If operation is manually interrupted, water which is no longer needed is fed back to the water tank. Only then will the appliance stop. Half-finished ice cubes remain suspended on the cooling rods. As soon as it is sufficiently thawed, it will fall off and drop into the ice cube container.
Control Lamp ICE FULL (Ice Cube Container Full)
The temperature sensor stops the ice cube production as soon as the ice cube container is full.
The ICE FULL control lamp flashes. The appliance switches into standby mode.
- Remove the ice cubes with the supplied ice cube scoop. When removing the ice cube container, some water will drip through the holes onto the floor.
- The control lamp ICE FULL turns off and a few moments later ice cube production starts again.
Control Lamp ADD WATER (Water Refill)
The control lamp displays when there is too little water in the water tank. Ice cube production is automatically interrupted.
- Open the lid.
- Empty the ice cube container.
- Refill with potable water as described in chapter "Make ice cubes". Since there may still be water in the appliance, check the MAX mark in the water tank.
- Now put the ice cube container back in and close the lid.
- Press the ⏻ button to resume ice cube production. The control lamp ADD WATER turns off.
Cleaning and Maintenance

WARNING:
- Switch off the appliance before cleaning and disconnect the mains plug.
- Never immerse the appliance in water to clean it. Doing so may lead to electric shock or fire.

CAUTION:
- Do not use wire brushes or other abrasive implements.
- Do not use harsh or abrasive cleaning agents.
- Do not use chemicals, acids, petrol or oil products.
- For hygienic reasons exchange the water in the tank after 24 hours.
- Remove the ice cube container after use. If the water tank remains open no mould or bacteria can form.
Self-Cleaning
- Fill the water tank with water up to the MAX mark.
- Press and hold the ⏻ button for approx. 5 seconds in standby mode. The appliance switches to self-cleaning mode and the CLEAN control lamp lights up.
- After 15 minutes, the appliance switches back to standby mode and the POWER control lamp flashes.
Ice Cube Container
Remove the ice cube container. Clean it in warm rinse water with a little hand dishwashing liquid. Rinse with clean water.
Housing and Interior
- Clean housing and interior with a damp cloth.
- Use a diluted solution of vinegar and water.
Drain Residual Water
Drain the residual water if the appliance is not in use for a longer period of time. Rest the appliance on a table edge. Take a bowl and hold it under the drainage opening for the residual water.
- Pull out the cap at the bottom.
• After the remaining water has drained off, put the cap back into the opening.
Storage
• We recommend that you keep the appliance in the original packaging if you do not intend using it for long periods.
- Always keep the appliance out of the reach of children in a dry, well-ventilated place.
Troubleshooting
| Problem Possible Cause Solution | ||
| No function. No power supply. | Test the socket with another appliance. | |
| Plug in the mains plug correctly. | ||
| Check the main circuit breaker. | ||
| The appliance is faulty. Contact our service centre or a specialist. | ||
| Compressor noisy. | Mains power supply too low. | Turn the appliance off and check the mains power supply. |
| Control lamp ADD WATER flashes. | Water refill. Add water as described in the chapter “Operation” ⇒ “Making Ice Cubes”. | |
| Control lamp ICE FULL flashes. | The ice cube container is full. Empty the ice cube container. | |
| The ice cubes are too small. | Surrounding temperature is too high. Place the appliance in a cooler location. Make sure there is adequate air circulation around the appliance. | |
| The water temperature is too high. | Stop the ice production. Drain some water and refill cold water (max. 20°C). | |
| Ice cube size has been wrongly selected. | Select the LARGE ice cube size with the:≡ button. | |
| Smaller ice cubes are normal during the first production cycles. | ||
| Ice cubes are too large and stick together. | Water temperature or ambient temperature too low. | Stop ice cube production. Drain off some water and refill with lukewarm water (max. 35°C). |
| The appliance is in operation but does not produce ice cubes. | Blockage of the refrigerant line. | Contact our service centre or a specialist. |
| Refrigerant leak. | ||
Technical Data
Model: EWB 3785
Voltage supply: 220–240 V\~, 50 Hz
Power input: 0.8 A
Ice cube production: 6.5–10 kg / 24 hours
Water tank volume:....approx. 1.5 litres
Refrigerant: R600a/28 g
Insulation blowing gas: C5H10 (cyclopentane)
Protection class: I
Climate class: SN/N/ST/T
Net weight: .... approx. 7.1 kg
The right to make technical and design modifications in the course of continuous product development remains reserved.
This appliance has been tested according to all applicable, current CE directives and built according to the latest safety regulations.
Disposal
Meaning of the "Dustbin" Symbol
Protect our environment: do not dispose of electrical equipment in the domestic waste.
Please return any electrical equipment that you will no longer use to the collection points provided for their disposal.
This helps avoid the potential effects of incorrect disposal on the environment and human health.
This will contribute to the recycling and other forms of re-utilisation of electrical and electronic equipment.
Information concerning where the equipment can be disposed of can be obtained from your local authority. Your dealer and contractual partner is also obliged to take back the old appliance free of charge.
BELANGRIJK:
- Note: Once the carrying handle has been fitted, it cannot be removed!
CTC Clatronic Sp. z o.o
Ul. Brzeska 1
45-960 Opole