Tycam 2100 - Surveillance Camera DELTA DORE - Free user manual and instructions
Find the device manual for free Tycam 2100 DELTA DORE in PDF.

| Product type | Outdoor surveillance camera (Outdoor) |
| Brand | Delta Dore |
| Model | Tycam 2100 |
| Dimensions | ∅ 70 mm x 165 mm (with mount) |
| Weight | 410 g |
| Power supply | 12 V DC 1 A or PoE (802.3af Class3) via 100-240 V~ AC adapter |
| Power consumption | 5 W |
| Video resolution | Full HD 1920 x 1080 pixels at 25 frames per second |
| Night vision | EXIR 2.0 automatic, range up to 30 m |
| Viewing angle | Horizontal 107°, Vertical 56°, Diagonal 127° |
| Two-way audio | No (only listening via speaker, no intercom) |
| Motion detection | Detection by video analysis (grid zones), line crossing, zone crossing (SMART DETECT) |
| Local storage | Micro SD / SDHC / SDXC card (class 10) up to 128 GB, encrypted |
| Network connectivity | Wi-Fi 2.4 GHz (802.11 b/g/n), Ethernet RJ45 10/100 Mbps, PoE |
| Protection rating | IP67 (water jet resistant) |
| Operating temperature | -30 °C to +60 °C |
| Built-in siren | Yes, up to 85 dB |
| Mobile app | Tydom (iOS and Android) |
| Main functions | Remote surveillance, detection notifications, continuous or event-based recording, digital zoom x4, image flip, backlight compensation, privacy mode, up to 8 cameras per account |
| Maintenance and cleaning | Clean the lens with a slightly damp soft cloth; regularly check for insects or cobwebs |
| Data security | Videos encrypted on SD card, access via personal account, no cloud storage |
| Spare parts and repairability | Memory card (Micro SD), RJ45 cable, power adapter, mounting bracket, weatherproof casing, Wi-Fi antenna, disassembly key; memory card included |
| General information | Complies with local video surveillance legislation; requires Tydom app; Wi-Fi 2.4 GHz compatibility only |
Frequently Asked Questions - Tycam 2100 DELTA DORE
User questions about Tycam 2100 DELTA DORE
0 question about this device. Answer the ones you know or ask your own.
Ask a new question about this device
Download the instructions for your Surveillance Camera in PDF format for free! Find your manual Tycam 2100 - DELTA DORE and take your electronic device back in hand. On this page are published all the documents necessary for the use of your device. Tycam 2100 by DELTA DORE.
USER MANUAL Tycam 2100 DELTA DORE
Tycam 1100 - Tycam 2100
FR Guide d'installation
EN Installation guide
DE Installationsanleitung
IT Guida di installazione
ES Manual de instalación
PL Instrukcja instalacji
NL Installatiegids
NO Bruksanvisning
FI Asennusopas
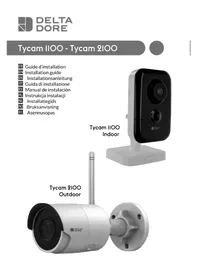
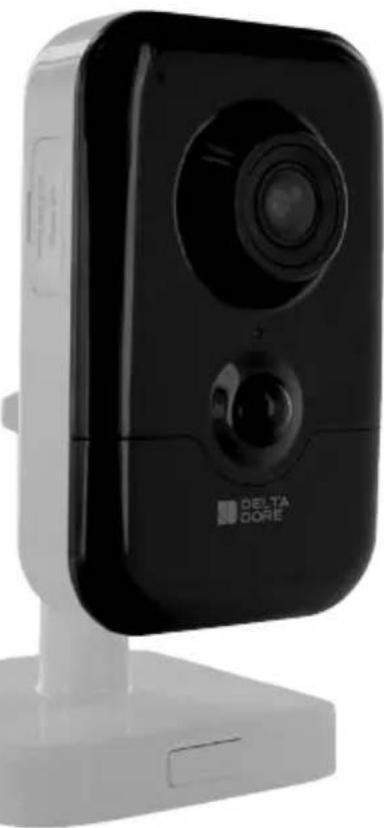
Tycam I100
Indoor
natural_image
Black Delta Core device with a circular lens and stand (no visible text or symbols on the device body)Tycam 2100
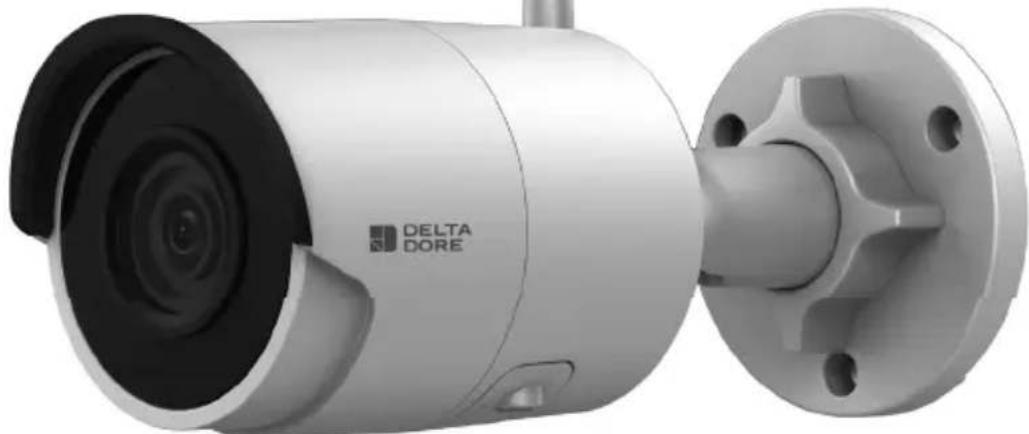
Outdoor
natural_image
Exterior view of a modern security camera with mounted lens and mounting flange (no visible text or symbols)Mentions juridiques
natural_image
Technical line drawing of a mechanical valve or fitting (no text or symbols)5 - Tycam 1100 Indoor 8
5.1 Contenu 8
5.2 Description 8
6 - Tycam 2100 Outdoor 10
6.1 Contenu 10
6.2 Description 10
6.3 Fixation 11
6.4 Réglage 11
6.5 Carte Mémoire 11
natural_image
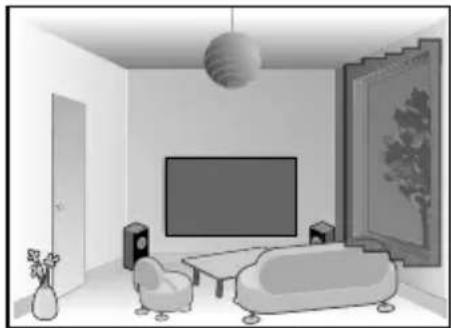
Interior view of a modern living room with a TV, sofa, lamp, and wall art (no text or symbols)Tycam 2100 Outdoor - h : 4m minimum
text_image
hnatural_image
Two abstract diagrams: one showing a cross over human silhouettes, the other showing a checkmark with a checkmark (no text or symbols)natural_image
Top-down view of a car parked on a paved lot with trees and a person walking nearby (no visible text or symbols)
natural_image
Illustration of a car parked in a parking lot with trees and a person standing nearby (no text or symbols)
5 - Tycam 1100 Indoor
5.1 Contenu
text_image
Diagram showing seven types of electronic devices and connectors with numbered labels5.2 Description
text_image
Technical diagram of a device with numbered parts for identification and assembly reference.natural_image
Diagram showing two mechanical components with screws and holes, no text or symbols present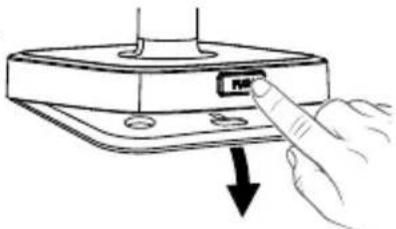
natural_image
Hand inserting a small component into a device panel (no text or symbols visible)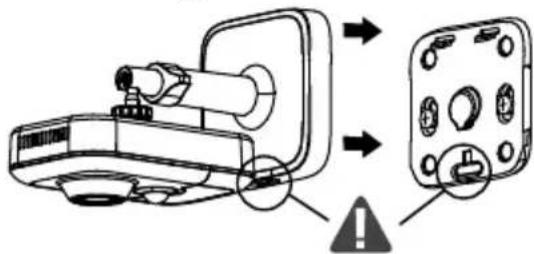
text_image
Diagram showing a device with labeled components and warning symbol, likely illustrating a safety or hazard detection mechanism.5.5 Réglage
natural_image
Diagram showing a camera module being inserted into a device, with no visible text or symbols6 - Tycam 2100 Outdoor
6.1 Contenu
text_image
Technical diagram of an electric drill system with labeled components including motor, drill template, and cable6.2 Description
text_image
Technical diagram of a device with numbered components, including a control panel and labeled parts.
text_image
Technical diagram of a mechanical or electrical component with numbered parts labeled 8, 9, 10, and 11.text_image
Exploded view diagram of a multi-core cable showing numbered components from inner to outer connectorstext_image
Technical diagram showing exploded and assembled views of a plug-in connector with numbered parts and directional arrows indicating assembly.6.8 Antenne
natural_image
Technical illustration of a mechanical assembly with a magnified inset showing a hand holding a tool (no text or symbols present)natural_image
WiFi icon with Wi-Fi signal symbol and 'WiFi' text below (no additional symbols or text)8 - Application Tydom
The connection quality of your product may be affected due to changes on the IP architecture on which it operates. These changes may involve (the list is not exhaustive) a change in hardware, software update or configuration operations, work on your operator's equipment or any other multimedia devices such as tablets, smartphones, etc.'
IOS is a Cisco trademark or registered trademark in the United States and in other countries, and is used under licence.
Android ^TM and Google Play are Google LLC registered trademarks.
Wi-Fi ^™ is a trademark registered by Wi-Fi Alliance.
WPS (Wi-Fi Protected Setup) is a standard created by the Wi-Fi Alliance.
The camera must be used and installed in accordance with local regulations.
You must respect the privacy of others. It is prohibited to film the public highway or adjoining properties.
You must also inform any persons working in your home (nurse, baby-sitter, etc.), in writing, that they are likely to be filmed temporarily while working.
Data processing
The acquisition of your connected camera implies acceptance of any data processing being carried out. DELTA DORE uses a cloud platform to provide the data processing service. The sequences recorded by your camera will not be stored at any time by the platform providing this service. The videos are only stored and encrypted on the SD card of your camera and can only be accessed using your personal account through the Tydom application.

The use of your camera requires the Tydom application available on Google Play and App Store.
Because of changes in standards and equipment, the characteristics given in the text and the illustrations in this document are not binding unless confirmed.
1 - Installation recommendations 19
2 - Camera operation 19
3 - Operation of motion detection in one or several zoness 20
4 - Operation of image analysis (SMART DETECT) 20
4.1 Selecting the detection mode 21
5 - Tycam 1100 Indoor 22
5.1 Contents 22
5.2 Description 22
5.3 Support assembly 22
5.4 Mounting 23
5.5 Setting 23
5.6 Memory card 23
5.7 Replacing the memory card 23
6 - Tycam 2100 Outdoor 24
6.1 Contents 24
6.2 Description 24
6.3 Mounting 25
6.4 Setting 25
6.5 Memory card 25
6.6 Replacing the memory card 25
6.7 Impervious sheath for RJ 45 cable 26
6.8 Antenna 26
7 - Camera connection 27
8 - Tydom application 28
9 - Delete the camera 28
10 - Technical characteristics 29
The Tycam 1100 Indoor and Tycam 2100 Outdoor cameras feature a new generation of high resolution sensors providing a great quality image whatever the lighting conditions.
Connected to your wireless router, the camera enables you to view your home on your smartphone and record videos and photos vial the Tydom application.
Remotely, you can:
- Observe and listen (*).
- Start a recording instantly.
- Speak with your family and relatives (*).
- View the recorded videos.
- Receive notifications in case of detection.
Image analysis functions
- Motion detection
The camera detects any movement in one or several predefined grid zones.
• Crossing line detection.
The camera detects any person that crosses a predefined detection line.
- Intrusion zone detection
The camera detects any person entering or leaving a predefined detection zone.
The 2 crossing detection modes require specific installation conditions: see §4
Other functions
- Remote surveillance
• Surveillance mode setting - Automatic recording on detection
- Continuous recording
- Recording management (backup, deletion, etc.)
- Notification of events
• Viewing of detection alerts - Intercom (*)
- Digital Zoom x4
- Night vision
- Reversal of captured image
- Backlight compensation
- Photo capture
- Privacy mode
• 8 cameras max per TYDOM - Embedded siren (*)
• Possible association by QR Code
(*) TYCAM 1100
1 - Installation recommendations
To achieve optimum operation:
- Avoid installing the camera in an area with strong changes in brightness (backlighting) or one that is too dark.
- Ensure that there is no reflecting surface too near the camera lens.
- Do not install the camera on an unstable support that creates vibrations.
- Avoid proximity to a heat source.
- Do not touch the lens with your finger.
- Do not expose the camera to direct sunlight.
-
Do not subject the camera to impacts.
• Install the Tycam 1100 Indoor camera in dry, well ventilated place. -
Electromagnetic radiation can affect video data transmission and image quality. Do not install the camera near a source of electromagnetic radiation.
- The installation must conducted using the best practice of video surveillance.
- Ensure that all the associated devices are switched off during the installation.
- For equipment connected to the power grid, the socket outlet must be installed close to the equipment and readily accessible.
The 2 crossing detection modes require specific installation conditions: see §4
2 - Camera operation
Maintenance of Tycam 2100 Outdoor cameras:
- Regularly check that there are no insects or spider webs that could trigger false alarms. Use a soft, slightly damp cloth to clean the lens of the outdoor camera.
- Periodically check the wiring and connections of your camera.
Video recording
- The videos are automatically deleted after 30 days.
-
When the storage limit of the card is reached, the oldest videos are deleted automatically.
-
The recording time can vary according to the movement in the image. These values are given for information only and cannot be guaranteed.
- The lifetime of the memory card will depend on the SD card used. Only the SD card supplied with the camera ensures an operational life of 2 years.
Videos are recorded in "medium" resolution quality.
Each video recorded upon detection starts 5 seconds before the event for a total duration of 35 seconds
3 - Operation of motion detection in one or several zoness
Tycam 1100/2100 cameras monitor the zone or zones via video analysis to detect any motion.
Tycam 1100 also features heat detection by a passive infrared sensor (PIR).
Materialize the zone or zones to be excluded according to a grid in the Tydom application.
This detection mode requires no specific installation conditions.
natural_image
Interior view of a modern living room with TV, sofa, lamp, and vase (no text or symbols)4 - Operation of image analysis (SMART DETECT)
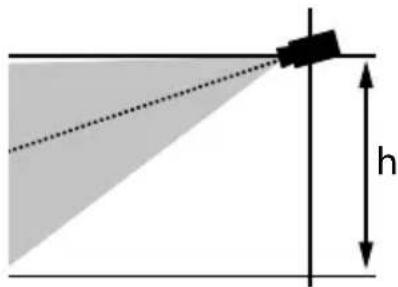
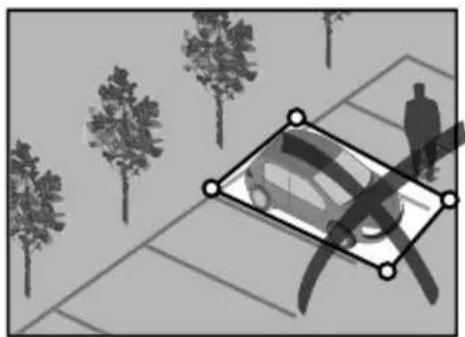
To obtain an optimum analysis of motion in its field of vision, position the camera at a sufficient height and distance from the zone to monitor.
Camera height
Tycam 1100 Indoor - h: 2 m minimum
Tycam 2100 Outdoor - h: 4 m minimum
Distance from the zone to monitor
Recommended fields of vision :
Minimum: 2.5 m/Maximum: 10m (TYCAM
Minimum angle of camera axis: 15^ .
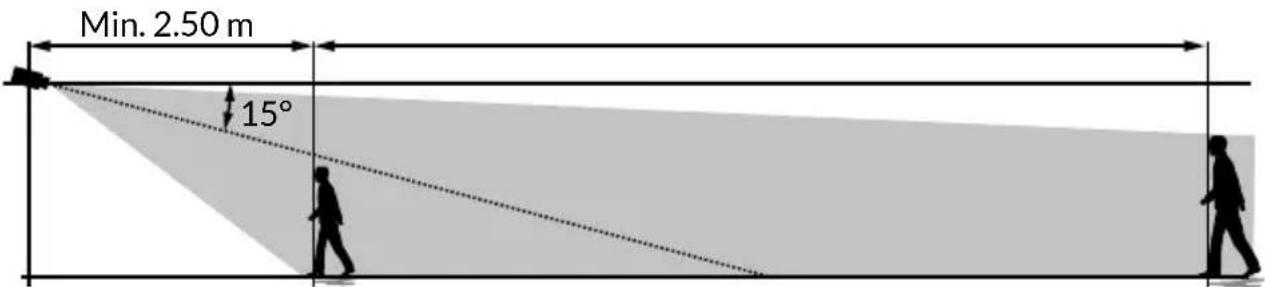
text_image
Min. 2.50 m 15°Ensure that a person detected does not appear too small nor too large in the image.

natural_image
Two abstract diagrams: one showing a cross over a human figure, the other showing a checkmark with a checkmark (no text or symbols)4.1 Selecting the detection mode
Using the Tydom application, select the detection mode suited to the monitored zone.
EN
4.1.1 Crossing zone detection
This mode is recommended for external cameras.
Direct and position the camera at the recommended height to ensure reliable crossing detection.
Define a crossing line in the Tydom application, any person crossing this line is detected.
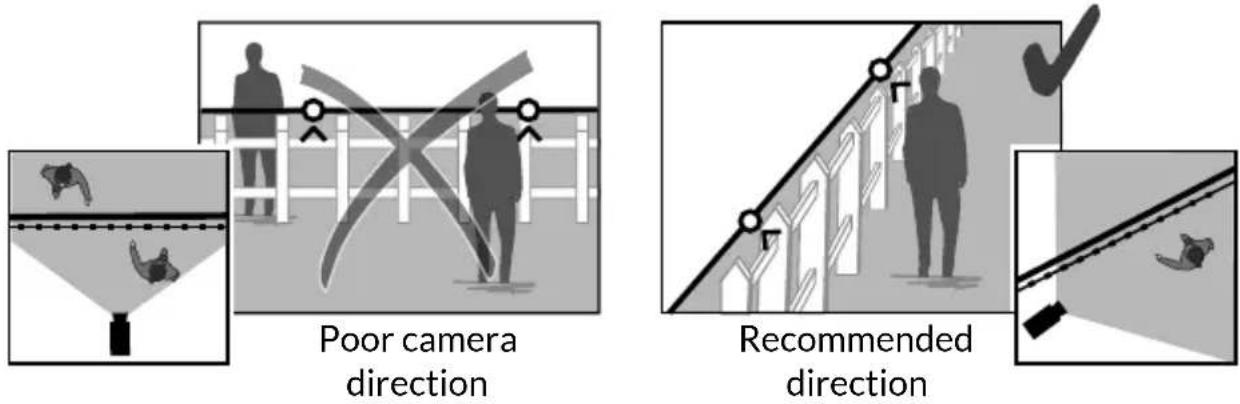
4.2.2 Intrusion zone detection
Move the corners of the rectangle in the Tydom application to define an intrusion zone. Any person entering the zone is detected.
To ensure reliable detection, ensure that the zone to monitor is not at the edge of the image.
natural_image
Black-and-white illustration of a car parked on a paved path with trees and a person walking nearby (no text or symbols)
natural_image
Illustration of a car parked on a paved lot with trees and a person standing nearby (no text or symbols)
- Follow the installation guidelines to get the best use out of the camera: Height/Distance/Camera position angle.
- Whatever the operating mode chosen, you can adjust the detection sensitivity using the Tydom application.
- When you finish configuring the camera, it is vital to run a detection test to ensure that camera correctly analyses the scene to monitor and effectively detects movements.
5 - Tycam 1100 Indoor
5.1 Contents
1- Camera
2- Support
3- EU plug
4- UK plug
5- Mains adaptor (1m50)
6- Installation guide
Regulatory documents
7- RJ 45 cable (1m50)

text_image
Diagram showing seven types of household appliances and accessories with numbered labels5.2 Description
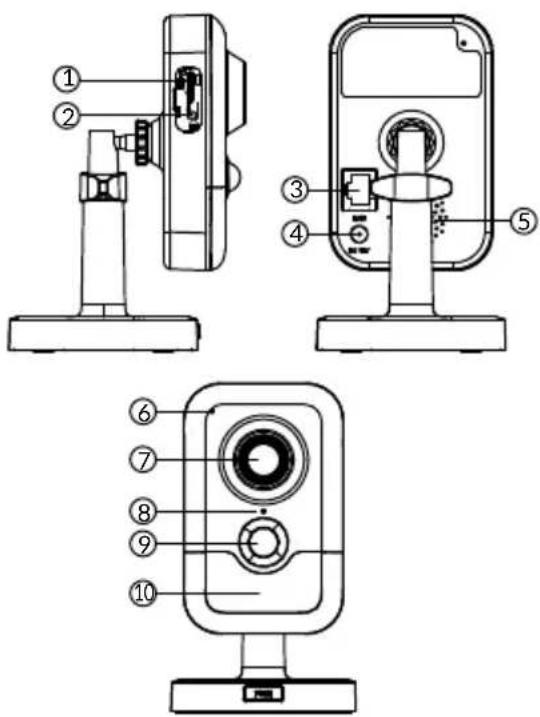
text_image
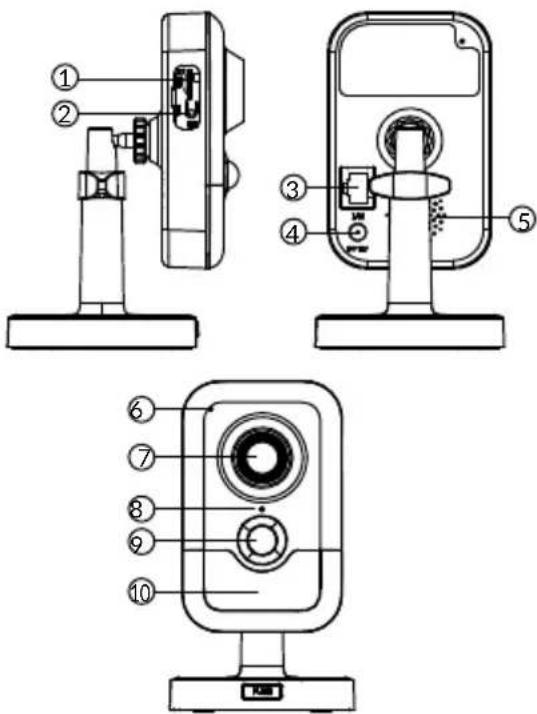
Technical diagram of a device with numbered parts for identification and assembly reference.1- Memory card location
2- RESET/WPS button (Open the protective cover).
3- RJ45 Network Connector
4- Power supply socket
5- Loudspeaker
6- Microphone
7- Lens
8- Status LED
Red and steady: Camera start.
Blue and steady: The camera is connected to the network.
Slow flashing red: No connection to the server (check the firewall and parental controls).
Slow flashing blue: Camera is communicating on network.
Fast flashing red: Safety installation.
Fast flashing blue: Camera updating.
Red/Blue alternative Waiting to read QR Code flashing:
flashing: or no assigned IP address. (check that the DHCP function is activated on your router and that the Wi-Fi network is in range).
9- PIR (passive infrared sensor)
10- Infrared LED (night vision)
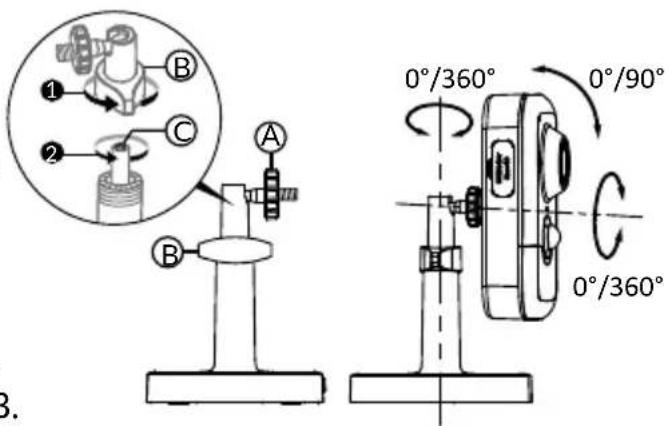
5.3 Support assembly
- Screw the support to the back of the camera.
- Place the camera on a flat surface.
- Loosen nut B,
- Point the camera correctly then tighten nuts A and B.
- If the camera is not held correctly, loosen screw C to tighten the nut B.
text_image
1 B 2 C A B 0°/360° 0°/90° 0°/360° 3.5.4 Mounting
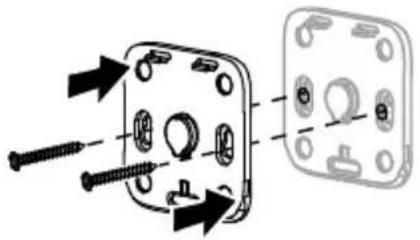
You can mount the camera on a wall or ceiling.
- Press the 'PUSH' button to separate the support from the base.
- Drill the base mounting holes.
- Mount the base with suitable screws for the support.
- Clip the support onto the base by aligning the 3 stops.
natural_image
Diagram showing two mechanical components with screws and fasteners, no text or symbols present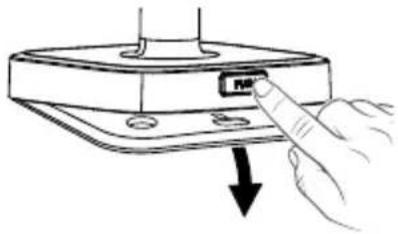
natural_image
Hand inserting a USB into a device component (no text or symbols visible)
text_image
Diagram showing a device with labeled components and warning symbol, likely illustrating a safety or hazard detection mechanism.5.5 Setting
- Loosen nuts A and B,
- Point the camera correctly then tighten nuts A and B.
text_image
B A 0°/360° 0°/360° 0°/90°5.6 Memory card
The Tycam 1100 Indoor camera is already fitted with a memory card.
This card records encrypted videos that can only be read by the Tydom application. You can increase the recording capacity by installing a card with a greater capacity (Micro SD/ SD HC/ SD HX class 10 required).
Note: Videos recorded on another card model will not be encrypted.
| Memory card | Continuous recording time |
| 8 GB 12h | |
| 16 GB 24h | |
| 32 GB 2,5 days | |
| 64 GB 5 days | |
| 128 GB 10 days |
5.7 Replacing the memory card
- Turn off the camera power supply.
- Open the protective cover.
- Insert the new memory card in the direction indicated.
- Format the card using the Tydom application.
natural_image
Diagram showing a camera module being inserted into a device, with no visible text or symbols6 - Tycam 2100 Outdoor
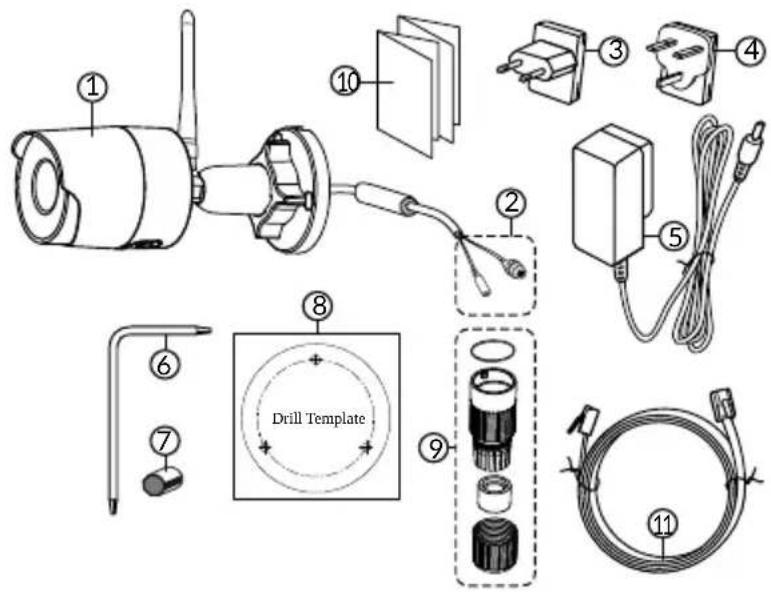
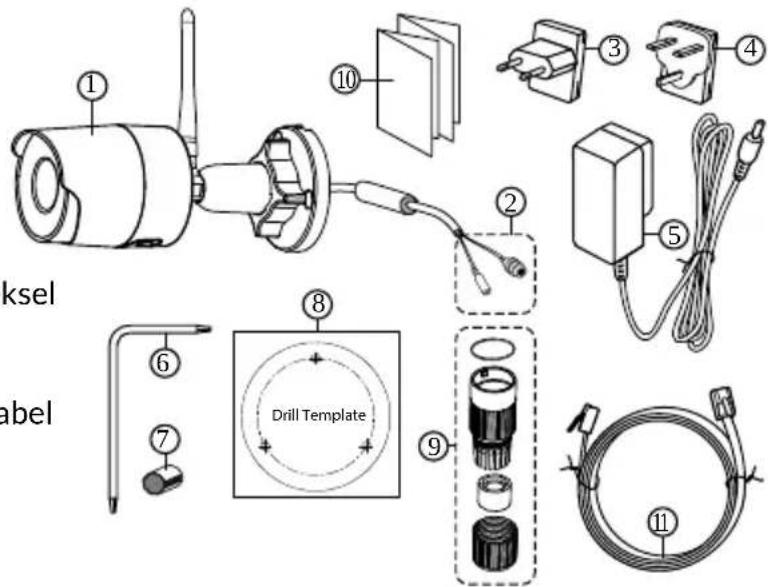
6.1 Contents
1- Camera
2-Connectors
3- EU plug
4- UK plug
5- Mains adaptor (1m50)
6- Memory card cover key
7- Antenna socket plug
8- Drill template
9- Impervious sheath for RJ 45 cable
10- Installation guide
Regulatory documents
11- RJ 45 cable (1m50)
text_image
Exploded diagram of a drill device with numbered components including motor, socket, and cable assembly6.2 Description
text_image
Technical diagram of a mechanical device with numbered components and an inset view of the internal component.
text_image
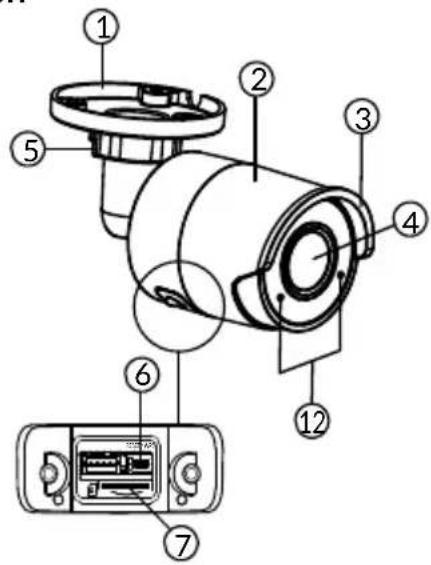
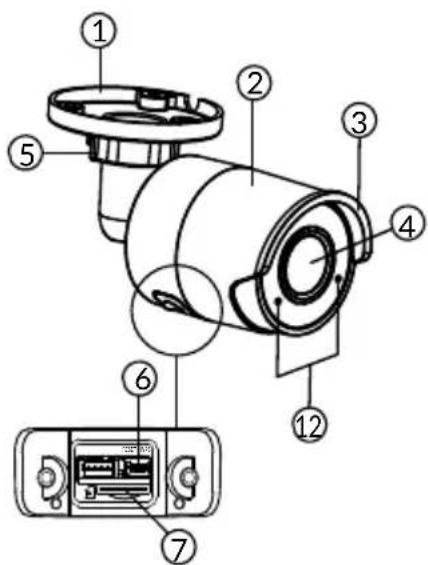
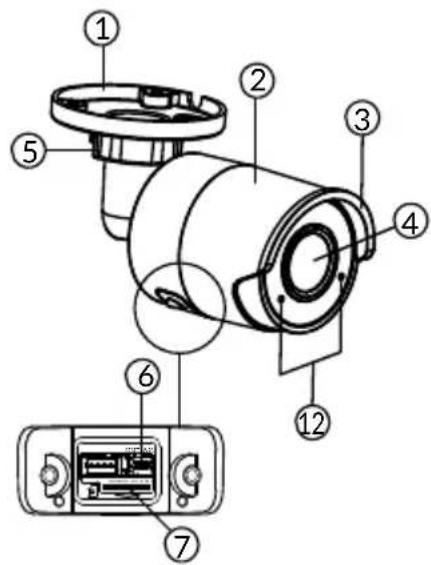
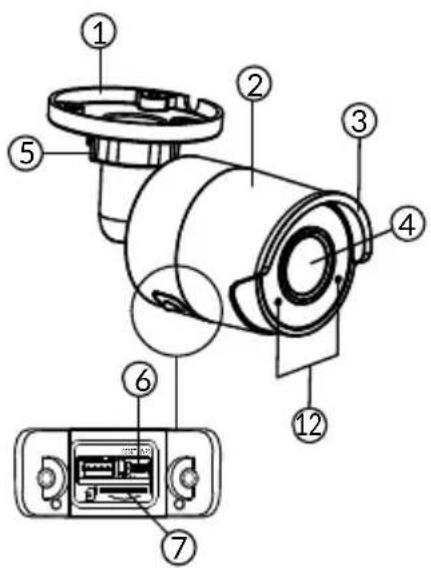
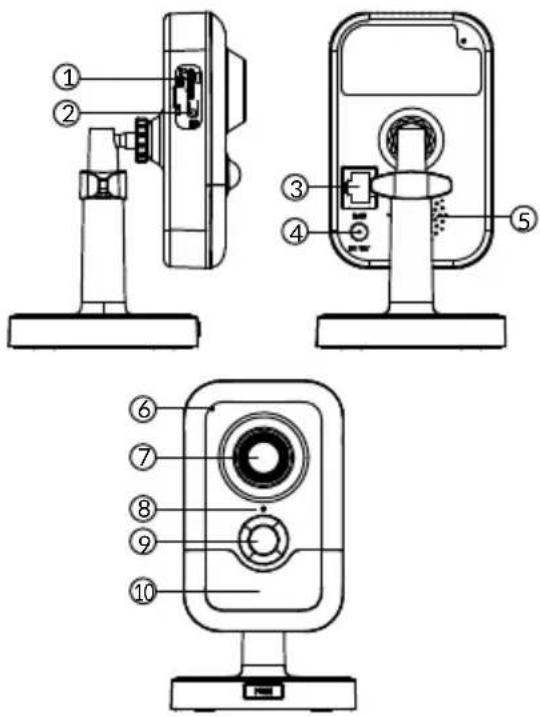
Technical diagram of a mechanical or electrical component with numbered parts labeled 8, 9, 10, and 11.1- Base
2- Camera
3- Sun visor
4- Lens
5- Clamping screw
6- RESET/WPS button
(Remove the 2 screws from
the cover using the key supplied).
7- Memory card location
8- Earth connection (Optional connection)
9- PoE cable
10- Power supply socket
11- RJ45 Network Connector
12- Infrared LED (night vision)
Slow flashing: QR Code reading confirmation/
Security set up
Fast flashing: Pending QR Code reading for Wi-Fi association / Updating the camera.
6.3 Mounting
- Drill the mounting holes using the drill template.
- Mount the base with suitable screws for the support.
text_image
Drill Template6.4 Setting
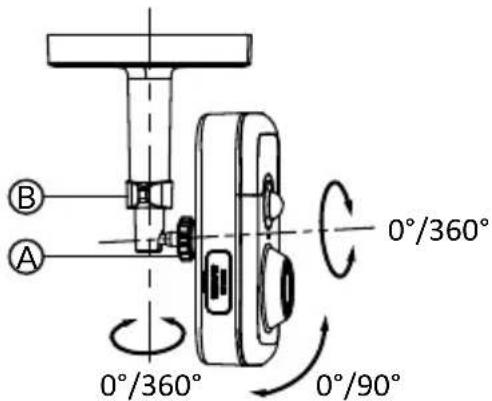
- Loosen nut A,
- Point the camera correctly then tighten nut.
text_image
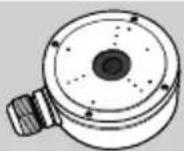
0°/360° A 0°/90° 0°/360°For installations that require wiring for outdoor sockets, a external connection box is available as an option.
BRE Tycam 2100 Outdoor - Ref: 6417008

6.5 Memory card
The Tycam 2100 Outdoor camera is already fitted with a memory card.
This card records encrypted videos that can only be read by the Tydom application. You can increase the recording capacity by installing a card with a greater capacity (Micro SD/ SD HC/ SD HX classe 10 obligatoire).
Note: Videos recorded on another card model will not be encrypted.
| Memory card | Continuous recording time |
| 8 GB 12h | |
| 16 GB 24h | |
| 32 GB 2,5 days | |
| 64 GB 5 days | |
| 128 GB 10 days |
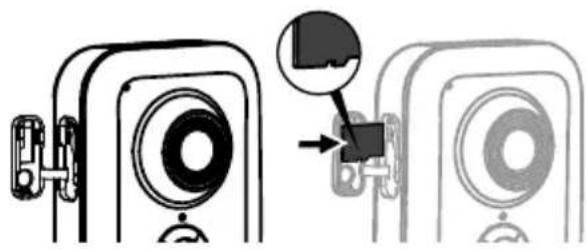
6.6 Replacing the memory card
- Turn off the camera power supply.
- Remove the 2 screws from the cover using the key supplied.
- Insert the new memory card in the direction indicated.
- Format the card using the Tydom application.

text_image
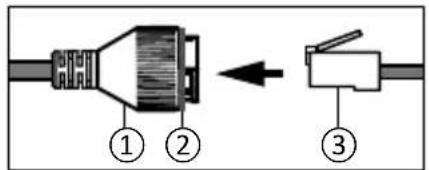
Memory card location6.7 Impervious sheath for RJ 45 cable
If necessary, you can fit the sealing accessory for the RJ 45 cable.
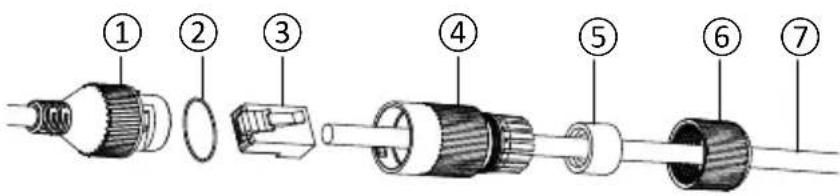
text_image
Exploded view diagram of a multi-core cable showing numbered components from pin 1 to pin 71- Camera network interface socket
2- Seal
3- Network plug
4- Seal plug
5- Rubber seal
6- Clamping nut
7- Network cable from the wireless router
- Pass the network cable (7) (without plug) through the clamping nut (6), the rubber seal (5) (inner edge of the rubber seal must be opposite the seal plug), then through the seal plug (4), in this order.
- Crimp an RJ-45 network plug (3) onto the end of the cable, taking care to insert the twisted pairs of wires in the right order.
- Place the seal (2) on the tip of the camera network interface socket (1).
- Insert the network plug (3) into the camera network interface socket (1).
- Insert the rubber seal (5) into the seal plug (4), then screw the clamping nut (6) onto the seal plug (4) without tightening it completely.
- Align the seal plug snap-fit system (4) with the notch on the camera network interface socket (1), then screw the seal plug (4) a quarter turn on the camera network interface socket (1).
- Tighten nut 6, the sealed connection of the RJ45 plug is complete.
text_image
Diagram showing three labeled components of a cable or connector, with arrows indicating direction of movement.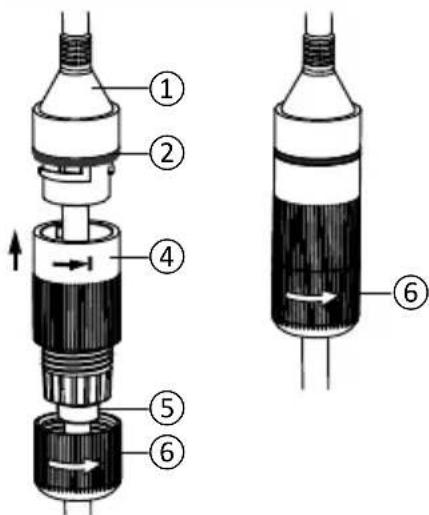
text_image
Technical diagram of a mechanical device with numbered components and directional arrows indicating flow or movement.6.8 Antenna
If you are using the Wi-Fi mode to connect the camera to your local network (see § 4), screw the antenna manually onto the camera.
If you are using another connection mode, fit the antenna socket plug to ensure the antenna socket is sealed.

natural_image
Technical illustration of a mechanical assembly with a magnified inset showing a hand holding a tool (no text or symbols present)7 - Camera connection
Select your connection mode:

natural_image
WiFi icon with Wi-Fi signal symbol and 'WiFi' text below (no additional symbols or text)• The RJ45 cable is briefly required for this mode.

text_image
WPS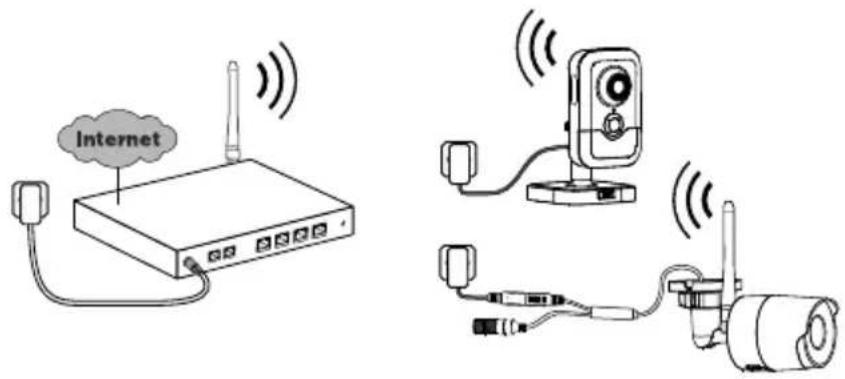
text_image
InternetConnection modes by Wi-Fi link (2.4 Ghz).
The local Wi-Fi network must be secure.
WPS connection: Check the compatibility of your Wireless router.
text_image
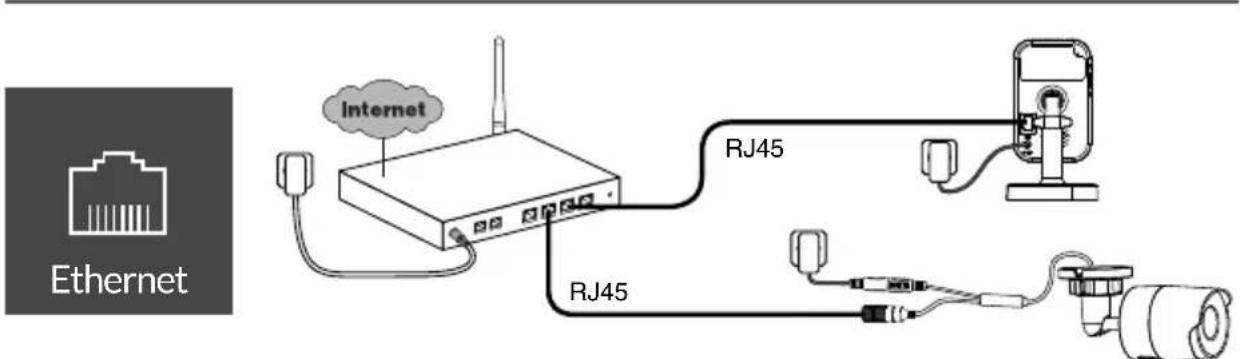
Internet Ethernet RJ45 RJ45Connection mode by Ethernet RJ45 link (Cat. 5E, max. 100m).
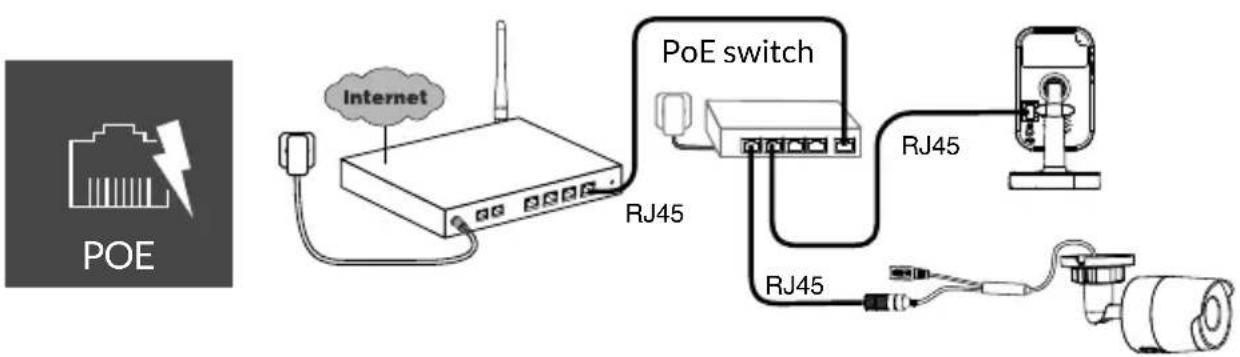
flowchart
graph TD
    A["POE"] --> B["Internet"]
    B --> C["RJ45"]
    C --> D["RJ45 switch"]
    D --> E["RJ45"]
    E --> F["Camera"]
The PoE connection mode is used to power the camera by the Ethernet RJ45 link. It requires a Switch or PoE Injector to be installed as well as a category 6 Ethernet cable (not supplied).
Type and max. length according to the switch used (Poe SW4: 250m max)
PoE switch option: Poe SW4 Ref: 6417010
Bitrate
The resolution of the camera is automatically adjusted according to the available bit rate.
If you have difficulty connecting remotely, you can change the resolution of your camera in the app. This setting can only be accessed remotely.
The router requires 100 kbit/s for its own operation.
| Setting the resolution | Upstream rate used by camera |
| High 900 | kbit/s |
| Average 450 | kbit/s |
| Low 300 | kbit/s |
8 - Tydom application
Switching on for the first time
- When switching the camera on for the first time or after deleting the camera, the time needed to set up the connection with the secure server is around 2 minutes. It can take up to 7 minutes if a software update is required.

Associate your camera with the Tydom application, making sure that your smartphone or tablet is connected to the local network.
Run the Tydom application and follow the instructions.
You can associate up to 8 cameras.
9 - Delete the camera
To remove the camera from the system, launch the Tydom application.
Menu> My devices> Camera> Delete
10 - Technical characteristics
| Tycam 1100 Indoor Tycam | 2100 Outdoor | |
| Power supply | INPUT: 100-240V~50-60 Hz 0,3A OUTPUT: 12V --- 1A Or PoE (802.3af Class3) | |
| Consumption 7 W 5 W | ||
| RJ45 Network Ethernet 10/100 Mbps | ||
| Wi-Fi network Wi-Fi IEEE 802.11 b/g/n 2.4 Ghz (5Ghz not compatible) | ||
| Optical sensor/Focal distance | 1/2.8" 2 Megapixels HD CMOS/f 2.8mm | 1/2.5" 2 Megapixels HD CMOS/f 2.8mm |
| Viewing angle H | 108°/V 59°/Diag: 129° H 107° / V 5 | 6° /Diag : 127° |
| Minimum light intensity | 0 Lux (with infrared LED) | |
| Night vision EXIR 2.0 Automatic - Range: 10 m | EXIR 2.0 Automatic - Range: 30 m | |
| Resolution | → Full HD -1920x1080 pixels @25 ips (image per second) depending on connection quality | |
| Video compression | H.265 | |
| Micro SD card/SD HC/ SD XC | Can be extended up to 128 GB - (Class 10 obligatory) | |
| Customised detection | ● | ● |
| Bidirectional audio | ● | - |
| Embedded siren | Max 85 db - | |
| Operating temperature and humidity | -10°C/+40°C 10% ~ 95% without condensation | -30°C/+60°C 10% ~ 95% without condensation |
| Storage temperature and humidity | -20°C/+60°C - 0% ~ 90% without condensation | |
| Degree of protection | - | Water spray resistant IP 67 |
| Dimensions 103 mm x 66 mm x 33 mm ∅ 70 mm x 165 mm | ||
| Weight | 128 gr | 410 gr |
EN
Rechtliche Hinweise
natural_image
Technical line drawing of a mechanical component with flanged ends and a cylindrical body (no text or symbols)1 - Installationshinweis 33
6 - Tycam 2100 Outdoor 38
6.1 Inhalt 38
6.2 Beschreibung 38
6.3 Montage 39
6.4 Einstellung 39
8 - Tydom application 42
natural_image
Aerial view of a parking lot with trees and a car, overlaid with a geometric overlay (no text or symbols)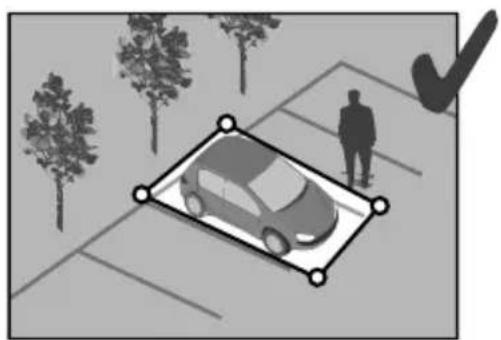
natural_image
Illustration of a car parked in a parking lot with trees and a checkmark (no text or symbols)
5 - Tycam 1100 Indoor
5.1 Inhalt
text_image
Diagram showing seven types of electronic devices with numbered labels, including a camera, switch, and cable.5.2 Beschreibung

text_image
Technical diagram of a device with numbered parts for identification and assembly reference.natural_image
Diagram showing two mechanical components with screws and fasteners, no text or symbols present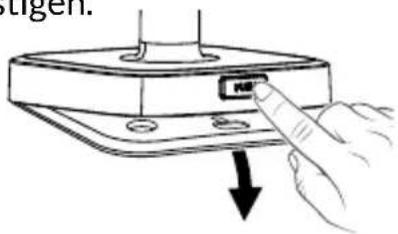
text_image
H ↓
text_image
Diagram showing a device with labeled components and warning symbol, likely illustrating a safety or hazard detection mechanism.5.5 Einstellung
natural_image
Diagram showing a camera module being inserted into a device, with no visible text or symbols6 - Tycam 2100 Outdoor
6.1 Inhalt
text_image
Exploded diagram of a drill device with numbered components including motor, socket, and cable assembly6.2 Beschreibung

text_image
Technical diagram of a mechanical device with numbered components and labeled partstext_image
Technical diagram of a mechanical or electrical component with numbered parts labeled 8, 9, 10, and 11.text_image
Exploded view diagram of a multi-core cable showing numbered components from inner to outer casingtext_image
Technical diagram showing exploded and assembled views of a mechanical connector with numbered parts and directional arrows indicating assembly.6.8 Antenne
natural_image
Technical illustration of a mechanical assembly with a magnified inset showing a hand holding a tool (no text or symbols present)natural_image
WiFi icon with Wi-Fi signal symbol and 'WiFi' text below (no additional symbols or text)8 - Tydom application
natural_image
Technical line drawing of a mechanical component with flanged ends and a cylindrical body (no text or symbols)5 - Tycam 1100 Indoor 50
6 - Tycam 2100 Outdoor 52
natural_image
Interior view of a modern living room with TV, sofa, lamp, and wall art (no text or symbols)natural_image
Two abstract diagrams: one showing a cross over a person silhouette, the other showing a checkmark with a checkmark (no text or symbols)natural_image
Top-down view of a car parked on a paved lot with trees and a person walking nearby (no visible text or symbols)
natural_image
Illustration of a car parked in a parking lot with trees and a person standing nearby (no text or symbols)
5 - Tycam 1100 Indoor
5.1 Contenuto
text_image
Technical diagram of a device with numbered components, showing front and side views of a device with labeled parts.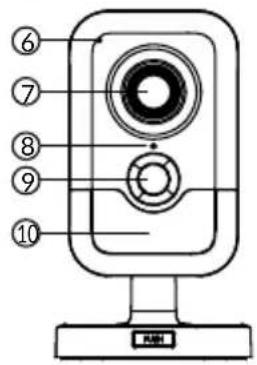
text_image
⑥ ⑦ ⑧ ⑨ ⑩ A#H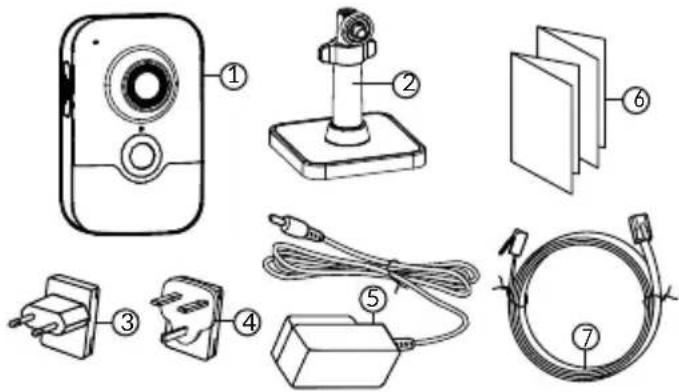
text_image
Diagram showing seven types of electronic devices with numbered labels, including a camera, display, plug, cable, and connector.natural_image
Hand pointing at a small electronic component with a button labeled 'USB', showing a downward arrow (no text or symbols on the device itself)
natural_image
Diagram showing two mechanical components with screws and fasteners, no text or symbols present5.5 Regolazione
text_image
Diagram showing a device with labeled components and warning symbol, likely illustrating a safety or hazard detection mechanism.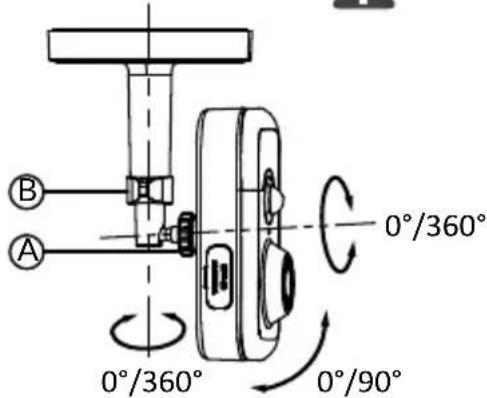
text_image
B A 0°/360° 0°/360° 0°/90°natural_image
Diagram showing a device with a magnified inset view of a component, no text or symbols present6 - Tycam 2100 Outdoor
6.1 Contenuto
text_image
Exploded diagram of a portable electric drill system with labeled components including motor, socket, and cable assembly6.2 Descrizione
text_image
Technical diagram of a device with numbered components and an inset view of the internal component.text_image
Technical diagram of a mechanical or electrical component with numbered parts labeled 8, 9, 10, and 11.text_image
Diagram of a multi-section mechanical component with numbered parts for identificationtext_image
Technical diagram showing exploded and assembled views of a mechanical connector with numbered parts and directional arrows indicating assembly.6.8 Antenna
natural_image
Technical illustration of a mechanical assembly with a magnified inset showing a hand holding a tool (no text or symbols present)natural_image
WiFi icon with Wi-Fi signal symbol and 'WiFi' text below (no additional symbols or text)natural_image
Technical line drawing of a mechanical component with flanged ends and a cylindrical body (no text or symbols)6 - Tycam 2100 Outdoor 66
natural_image
Interior view of a modern living room with TV, sofa, lamp, and vase (no text or symbols)natural_image
Black-and-white architectural sketch of a car parked on a paved path with trees and a person walking nearby (no text or symbols)
natural_image
Illustration of a car parked in a parking lot with trees and a person standing nearby (no text or symbols)
5 - Tycam 1100 Indoor
5.1 Contenido
text_image
Diagram showing seven types of electronic devices and connectors with numbered labels5.2 Descripción

text_image
Technical diagram of a device with numbered parts, including a camera module and a digital camera.natural_image
Diagram showing two mechanical components with screws and mounting holes, no text or symbols present5.5 Ajuste
natural_image
Hand inserting a USB into a device component (no text or symbols visible)
text_image
Diagram showing a device with labeled components and warning symbol, likely illustrating a safety or hazard detection mechanism.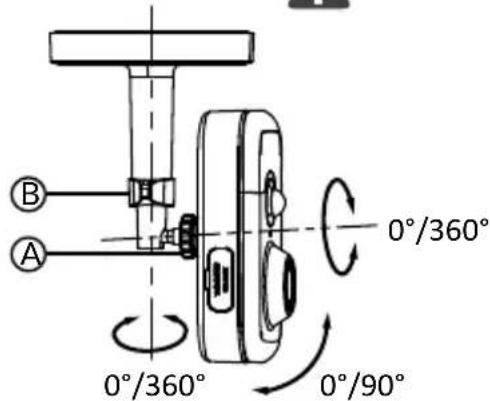
text_image
B A 0°/360° 0°/360° 0°/90°natural_image
Diagram showing a camera module being inserted into a device, with no visible text or symbols6 - Tycam 2100 Outdoor
6.1 Contenido
text_image
Exploded diagram of a drill device with numbered components including motor, socket, and cable assembly6.2 Descripción
text_image
Technical diagram of a mechanical device with numbered components for identificationtext_image
Technical diagram of a mechanical or electrical component with numbered parts labeled 8, 9, 10, and 11.9 - Cable PoE
text_image
Exploded view diagram of a multi-core cable showing numbered components from inner to outer connectorstext_image
Technical diagram showing exploded and assembled views of a plug-in connector with numbered parts and directional arrows indicating assembly.
natural_image
Technical illustration of a mechanical assembly with a magnified inset showing a hand holding a tool (no text or symbols present)natural_image
WiFi icon with Wi-Fi signal symbol and 'WiFi' text below (no additional symbols or text)natural_image
Technical line drawing of a mechanical component with flanged ends and a cylindrical body (no text or symbols)5 - Tycam 1100 Indoor 78
5.1 Zawartość 78
5.2 Opis 78
6 - Tycam 2100 Outdoor 80
6.1 Zawartość 80
6.2 Opis 80
6.3 Mocowanie 81
6.4 Regulacja 81
6.5 Karta pamięci 81
natural_image
Interior view of a modern living room with TV, sofa, lamp, and wall art (no text or symbols)natural_image
Two abstract diagrams: one showing a cross over a person silhouette, the other showing a checkmark with a checkmark (no text or symbols)natural_image
Illustration showing a person jumping over a barrier with a close-up of the person falling into a pool below (no text or symbols)natural_image
Abstract grayscale illustration of a person walking on a staircase with checkmark and bird silhouettes (no text or symbols)Zalecane ustawienie
natural_image
Top-down view of a car parked on a paved lot with trees and a person walking nearby (no visible text or symbols)
natural_image
Illustration of a car parked on a paved lot with trees and a person standing nearby (no text or symbols)
5 - Tycam 1100 Indoor
5.1 Zawartość
text_image
Diagram showing exploded view of a device with labeled parts including a camera, switch, socket, and cable assembly.5.2 Opis
text_image
Technical diagram of a device with numbered parts for identification and assembly reference.natural_image
Diagram showing two mechanical components with screws and holes, no text or symbols present
natural_image
Hand inserting a USB into a device component (no text or symbols visible)PL
5.5 Regulacja
text_image
Diagram showing a device with labeled components and warning symbol, likely illustrating a safety or hazard detection mechanism.
text_image
B A 0°/360° 0°/360° 0°/90°5.6 Karta pamięci
natural_image
Diagram showing two camera modules with a magnified inset highlighting a component (no text or symbols present)6 - Tycam 2100 Outdoor
6.1 Zawartość
text_image
Exploded diagram of a drill device with numbered components including motor, socket, and cable assembly6.2 Opis

text_image
Technical diagram of a mechanical device with numbered components and labeled partstext_image
Technical diagram of a mechanical or electrical component with numbered parts labeled 8, 9, 10, and 11.text_image
Exploded view diagram of a multi-core cable showing numbered components from inner to outer connectorstext_image
Technical diagram showing exploded and assembled views of a plug-in connector with numbered parts and directional arrows indicating assembly.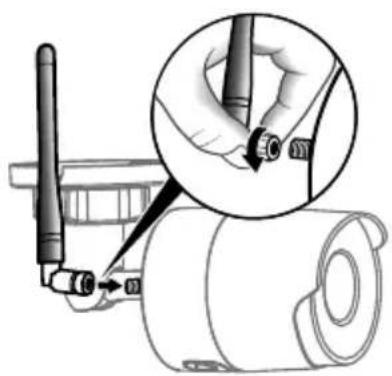
natural_image
Technical illustration of a mechanical assembly with a magnified inset showing a hand holding a tool (no text or symbols present)natural_image
WiFi icon with Wi-Fi signal symbol and 'WiFi' text below (no additional symbols or text)5 - Tycam 1100 Indoor 92
5.1 Inhoud 92
5.2 Beschrijving 92
5.3 Montage van steun 92
5.4 Bevestiging 93
5.5 Instelling 93
6 - Tycam 2100 Outdoor 94
6.1 Inhoud 94
6.2 Beschrijving 94
6.3 Bevestiging 95
6.4 Instelling 95
6.5 Geheugenkaart 95
natural_image
Interior view of a modern living room with TV, sofa, lamp, and vase (no text or symbols)Tycam 2100 Outdoor - h: Min. 4m
natural_image
Silhouette of a person standing with a large X-shaped cross symbol, accompanied by a small human figure below (no text or symbols present)
natural_image
Silhouette of a person standing on the ground next to a checkmark symbol (no text or labels)natural_image
Top-down view of a car parked on a paved lot with trees and a person standing nearby (no visible text or symbols)
natural_image
Illustration of a car parked in a parking lot with trees and a checkmark symbol (no text or labels)
5 - Tycam 1100 Indoor
5.1 Inhoud
1- Camera
2- Steun
3- EU-stekker
4- UK-stekker
5- Voedingsadapter (1m50)
6- Handleiding Wettelijke documentatie
7- RJ45-kabel (1m50)
text_image
Diagram showing seven labeled components of a device, including a camera, sensor, and cable with numbered parts.5.2 Beschrijving
text_image
Technical diagram of a device with numbered parts for identification and assembly reference.natural_image
Diagram showing two mechanical components with screws and a housing, no text or symbols present
text_image
Diagram showing a hand pressing a button labeled '按钮' (button) with an arrow indicating downward motion.5.5 Instelling
- Draai de moeren A en B los,
- Richt de camera correct en draai de moeren A en B vast.
5.6 Geheugenkaart
text_image
Diagram showing a device with labeled components and warning symbol, likely illustrating a safety or hazard detection mechanism.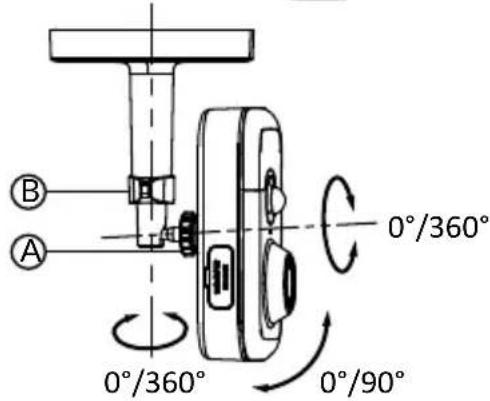
text_image
B A 0°/360° 0°/360° 0°/90°natural_image
Diagram showing two camera modules with a magnified inset highlighting a component (no text or symbols present)6 - Tycam 2100 Outdoor
6.1 Inhoud
text_image
Exploded diagram of a drill device with numbered components including motor, socket, and cable assembly6.2 Beschrijving
text_image
Technical diagram of a mechanical device with numbered components for identificationtext_image
Technical diagram of a mechanical or electrical component with numbered parts labeled 8, 9, 10, and 11.BRE Tycam 2100 Outdoor - Ref: 6417008
6.5 Geheugenkaart
text_image
Exploded view diagram of a multi-core cable showing numbered components from inner to outer connectorstext_image
Technical diagram showing exploded and assembled views of a mechanical connector with numbered parts6.8 Antenne
natural_image
Technical illustration of a mechanical assembly with a magnified inset showing a hand holding a tool (no text or symbols present)natural_image
WiFi icon with Wi-Fi signal symbol and 'WiFi' text below (no additional symbols or text)natural_image
Technical line drawing of a mechanical component with flanged ends and a cylindrical body (no text or symbols)5 - Tycam 1100 Indoor 106
5.1 Innhold 106
5.2 Beskrivelse 106
6 - Tycam 2100 Outdoor 108
6.1 Innhold 108
6.2 Beskrivelse 108
6.3 Festing 109
6.4 Innstilling 109
6.5 Minnekort 109
natural_image
Interior view of a modern living room with TV, sofa, lamp, and wall art (no text or symbols)Denne detekteringsmodusen krever ingen spesielle monteringsbetingelser.
Tycam 2100 Outdoor- h: 4 m minimum

text_image
hnatural_image
Two abstract diagrams: one showing a cross over a human figure, the other showing a checkmark with a checkmark (no text or symbols)natural_image
Top-down view of a parking lot with trees and a car silhouette overlay (no text or symbols)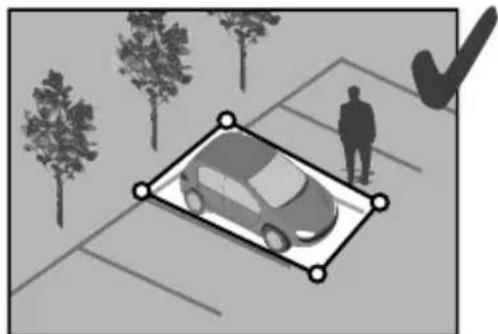
natural_image
Illustration of a car parked in a parking lot with trees and a checkmark (no text or symbols)
5 - Tycam 1100 Indoor
5.1 Innhold
text_image
Diagram showing seven types of household appliances and accessories with numbered labels5.2 Beskrivelse
text_image
Technical diagram of a device with numbered parts for identification and assembly reference.1 - Minnekortets plass
2 - RESET- / WPS-knapp (Åpne beskyttelsesdekselet).
3 - RJ45 nettverkskonnektor
4 - Strømkontakt
5 - Høyttaler
6 - Mikrofon
7 - Linse
8 - Statuslampe
natural_image
Diagram showing two views of a mechanical component with screws and holes, no text or symbols present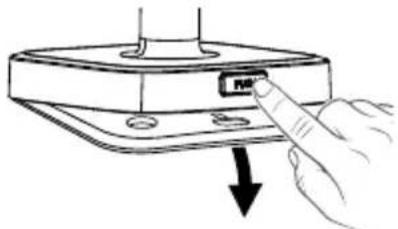
natural_image
Hand inserting a USB into a device component (no text or symbols visible)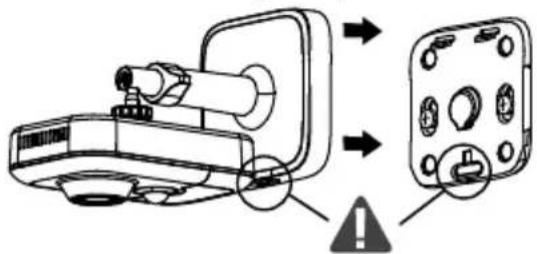
text_image
Diagram showing a device with labeled components and warning symbol, likely illustrating a safety or hazard detection mechanism.5.5 Innstilling
natural_image
Diagram showing a camera module being inserted into a device, with no visible text or symbols6 - Tycam 2100 Outdoor
6.1 Innhold
1 - Kamera
2 - Kontakter
3 - EU-kontakt
4 - UK-kontakt
5 - Adapter for strømnettet (1m50)
6 - Nøkkel til minnekortets deksel
7 - Deksel til antennekontakt
8 - Boremal
9 - Vanntett kappe til RJ 45-kabel
10 - Installasjonsveiledning
Regelverksdokumentasjon
11 - RJ45-kabel (1m50)
text_image
1 2 3 4 5 6 7 8 Drill Template 9 10 ksel abel6.2 Beskrivelse

text_image
Technical diagram of a device with numbered components and labeled parts, including a control panel and internal components.text_image
Technical diagram of a mechanical or electrical component with numbered parts labeled 8, 9, 10, and 11.9 - PoE-kabel
10 - Strømkontakt
11 - RJ45 nettverkskonnektor
12 - Infrarød LED (nattsyn)
Blinker sakte:
natural_image
Technical line drawing of a mechanical assembly with a Boremal component, showing internal components and wiring (no text or symbols beyond label)6.4 Innstilling
text_image
Diagram of a multi-section cable assembly with numbered parts for identification1 - Kameraets
nettverksgrensesnittkontakt
2 - Vanntett pakning
3 - Nettverkskontakt
4 - Vanntett deksel
5 - Vanntett gummipakning
6 - Strammemutter
7 - Nettverkskabel fra trådlås router
- Før nettverkskabelen (7) (uten kontakt) gjennom strammemutteren (6), den vanntette gummipakningen (5) (gummipakningens innvendige kant skal vende mot det vanntette dekselet), deretter tres den igjennom det vanntette dekselet (4). Denne rekkefølgen må følges.
- Monter en nettverkskontakt RJ 45 (3) på kabelenden. Sørg for at de tvinnede ledningsparene blir ført inn i riktig rekkefølge.
- Sett den vanntette pakningen (2) på enden av kameraets nettverkskontakt (1).
- Sett nettverkskontakten (3) inn i kameraets (1) nettverksgrensesnittkontakt.
- Sett den vanntette gummipakningen (5) inn i det vanntette dekselet (4), og skru strammemutteren (6) på dekselet (4) uten å stramme helt til.
- Sett dekselets (4) lukkesystem på linje med hakket på kameraets nettverksgrensesnittkontakt (1), og skru deretter det vanntette dekselet (4) en 1/4 gang på grensesnittkontakten (1).
- Stram mutteren 6, og den vanntette tilkoblingen av RJ45-kontakten er utført.
text_image
Technical diagram showing exploded and assembled views of a plug-in connector with numbered parts and directional arrows indicating assembly.6.8 Antenne
natural_image
Technical illustration of a mechanical assembly with a magnified inset showing a hand holding a tool (no text or symbols present)natural_image
WiFi icon with Wi-Fi signal symbol and 'WiFi' text below (no additional symbols or text)natural_image
Technical line drawing of a mechanical valve or fitting (no text or symbols)6 - Tycam 2100 Outdoor 122
natural_image
Interior view of a modern living room with a TV, sofa, lamp, and vase (no text or symbols)natural_image
Silhouette of a person with a large X-shaped cross symbol, accompanied by two smaller human figures below (no text or symbols)
natural_image
Silhouette of a person standing on the ground next to a checkmark symbol (no text or labels)4.1 Ilmaisutilan valinta
natural_image
Two identical grayscale images showing a car on a paved path with trees and a checkmark overlay (no text or symbols)
5 - Tycam 1100 Indoor
5.1 Sisältö
1 - Kamera
2 - Tuki
3 - EU-pistoke
4 - UK-pistoke
text_image
Diagram showing seven types of household appliances and accessories with numbered labels5.2 Kuvaus
text_image
Technical diagram of a device with numbered parts for identification and assembly reference.natural_image
Hand inserting a USB into a device component (no text or symbols visible)
natural_image
Diagram showing two mechanical components with screws and holes, no text or symbols present5.5 Säätö
text_image
Diagram showing a device with labeled components and warning symbol, likely illustrating a safety or hazard detection mechanism.
text_image
B A 0°/360° 0°/360° 0°/90°5.6 Muistikortti
natural_image
Diagram showing a device with a magnified inset view of its internal components (no text or symbols present)6 - Tycam 2100 Outdoor
6.1 Sisältö
text_image
Exploded diagram of a portable electric drill system with labeled components including motor, socket, and cable assembly6.2 Kuvaus