Capsule 3 Laser - Projector NEBULA - Free user manual and instructions
Find the device manual for free Capsule 3 Laser NEBULA in PDF.
User questions about Capsule 3 Laser NEBULA
0 question about this device. Answer the ones you know or ask your own.
Ask a new question about this device
Download the instructions for your Projector in PDF format for free! Find your manual Capsule 3 Laser - NEBULA and take your electronic device back in hand. On this page are published all the documents necessary for the use of your device. Capsule 3 Laser by NEBULA.
USER MANUAL Capsule 3 Laser NEBULA
Important Safety Instructions 02
What's Included 06
At a Glance 07
- Projector 07
- Remote Control 11
- LED Light Guide 12
Getting Started 13
1.Prepare the Remote 13
2. Position Your Projector 13
3. Charge Your Projector 15
4.PowerOn/Off 15
5. Auto Focus and Keystone 16
6. Setup 16
Nebula Connect App 17
Settings 17
- Network 17
- Projector 18
- Apps 21
- Device Preferences 21
- Others 22
Using Your Projector 23
- Select an App 23
- Voice Assistant 23
- Wireless Screen Mirroring 23
- Play from HDMI Playback Devices 24
- Play from a USB Drive 25
- Play Through External Sound Devices 26
- Bluetooth Speaker Mode 27
System Update 27
Specifications 28
Troubleshooting 30
Notice 32
Trademarks 35
Warranty 36
Important Safety Instructions
Read all instructions before you use this product. Do not make any changes or create settings that are not described in this manual. If physical injury, loss of data, or damage is caused by failure to follow instructions, the warranty does not apply.
Setup
- Do not use the product in any way other than described herein in order to avoid personal injury or property damage.
- To reduce the risk of fire and/or electric shock, do not expose the product to rain or moisture. Objects filled with liquids, such as vases, should not be placed on this product.
- Do not place this product on soft surfaces such as tablecloths or carpets, otherwise the product could be a fire hazard.
- Do not place this product in areas susceptible to excessive dust and dirt or near any appliance generating a strong magnetic field.
- To prevent overheating, do not block or clog the ventilation openings.
- Never place this product in a confined space. Always leave enough space around this product for ventilation.
- Do not use the product in an environment where the temperature is too high or too low. Never expose the product to strong sunshine or wet environments.
- When this product is running for a long period of time, the surface may become hot. If this occurs, shut it down immediately and unplug the charger. Resume operation after the product has cooled down.
Always handle this product with care. Avoid touching the lens. - Do not allow children to handle the product without supervision.
- Do not place heavy or sharp objects on this product.
- To avoid electric shock, do not disassemble the product.
- Avoid extreme vibrations as they may damage the internal components.
- Please ensure you use only the adapter offered by the manufacturer.
Using an unauthorized adapter may be dangerous and violate the Terms of Use and product warranty.
- User should comply with the laws and regulations of the corresponding countries and regions where the equipment is located (used), abide by professional ethics, pay attention to safety obligations, and strictly prohibit the use of our products or equipment for any illegal purposes. Our company will not be responsible for any violators' legal liability under any circumstances.
Power Supply
- It is recommended to supply the product in an environment with a temperature that ranges from 5^ 25^ / 41^ 77^ .
- When supplying power, place the device in an environment that has a normal room temperature and good ventilation.
Hearing Safety
- To prevent hearing damage, do not listen for extended periods at high volume. Set the volume to a safe level.
Charging
- The adapter is for indoor use only.
- The adapter should be installed near the product and should be easily accessible.
- Due to the enclosure material, the product must only be connected to a USB 2.0 or higher.
- When charging, place this device in an environment that has a normal room temperature (5°C~25°C / 41°F~77°F) and good ventilation.
Battery
- The remote control contains batteries, which are a choking hazard. Keep the remote control out of the reach of children.
-
Remove the batteries when the remote control has not been used for a long period of time.
-
Replace the remote control batteries only with the same or an equivalent type.
- Batteries contain chemical substances and they should be disposed of properly.
- Charge this device regularly. Do not store this device with a completely discharged battery.
Warning
- Replacing a battery with an incorrect type may defeat safeguards and create danger;
- Disposal of the battery / device in a fire or a hot oven or other source of significant heat, or mechanically crushing, or cutting of the battery / device, may result in an explosion;
- Leaving the battery / device in an extremely hot environment may result in an explosion or leakage of flammable liquids or gases;
- The battery / device subjected to extremely low air pressure may result in an explosion or leakage of flammable liquids or gases.
Cleaning
- Use a soft, lint-free cloth. Never use liquid, gaseous, or easily flammable cleansers to clean.
- Do not use any liquid cleaning agents to clean the lens to avoid damaging the film coating on the lens.
- Wipe surfaces gently. Be careful that you do not scratch the surface.
- Use lens cleaning paper to clean the lens.
Repairs
- Do not make any repairs to this product yourself.
- Improper maintenance can result in injuries or product damage.
Refer all servicing to qualified service personnel.
Caution
- Possibly hazardous optical radiation emitted from this product may be harmful to eyes.
- Do not stare at the operating beam.
Laser Safety

RG1 IEC 62471-5:2015
- Complies with IEC 60825-1:2014 Class 1 and IEC 62471-5:2015 Risk Group 1.
- Potential hazards may exist during lamp or product servicing.
- Service shall be performed only by authorized, trained servicing personnel.
- Do not open the enclosure of the product.
- When the enclosure of the product is damaged, don't use it anymore.
- Do not open the enclosure of laser module inside the product.
- When the enclosure of laser module inside the product is damaged, don't use it anymore.
- Laser inside. Be aware of the risk of skin or corneal burns.
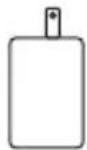
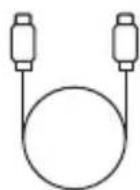
What's Included
12
45
1 Nebula Capsule 3 Laser
2 Adapter
3 Charging Cable
4 Remote Control
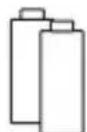
5 AAA Battery × 2
Quick Start Guide
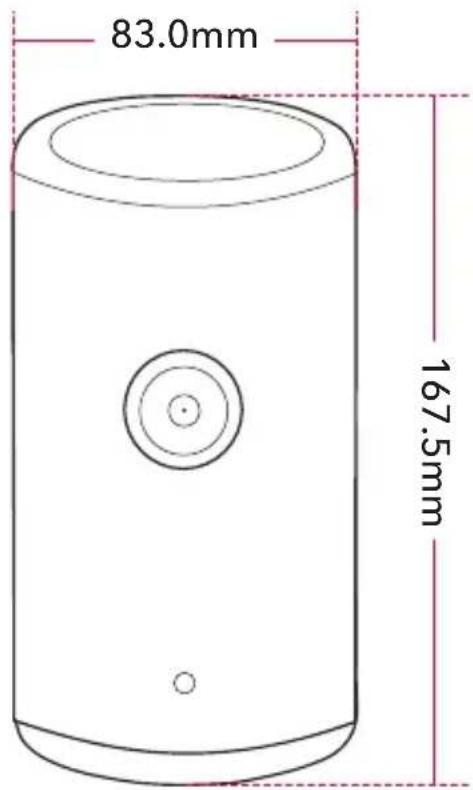
At a Glance
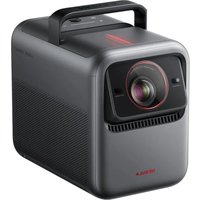
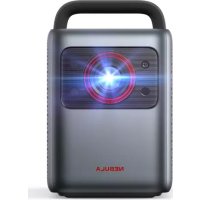
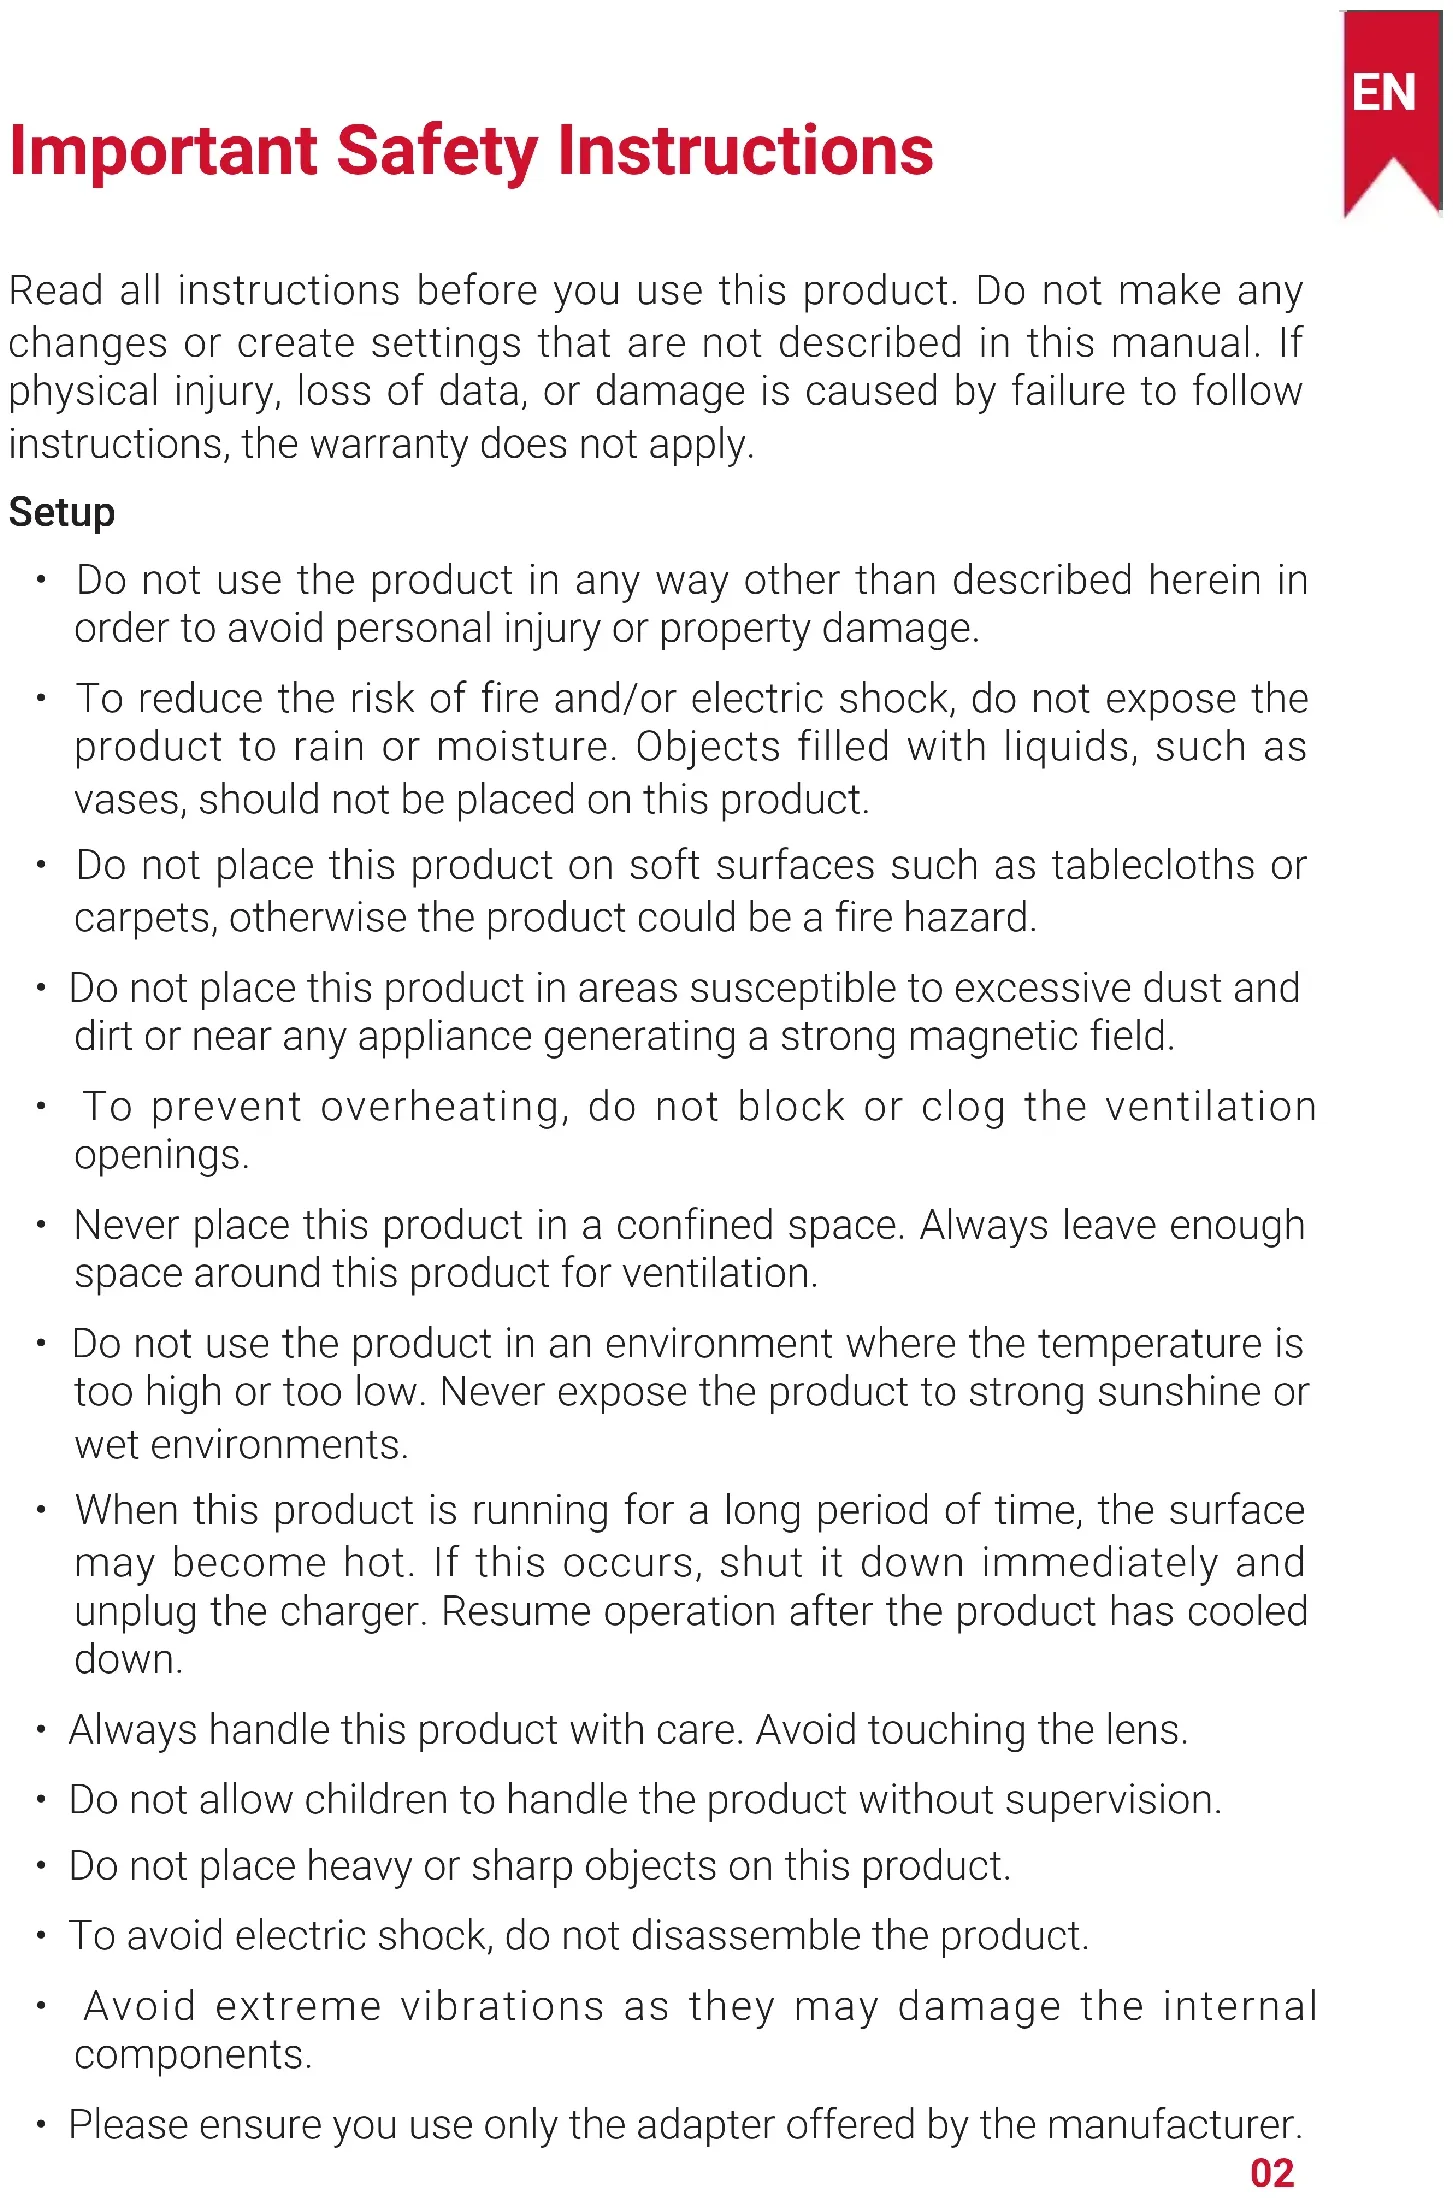
1. Projector
Front View
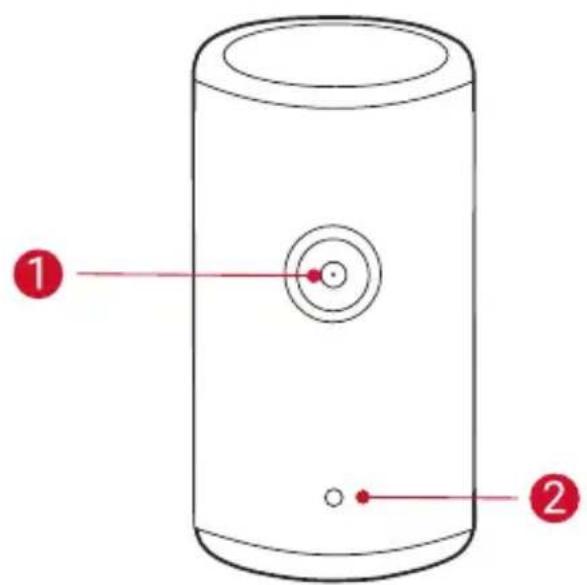
1 Lens
2 Camera (for autofocus and auto keystone correction)
Rear View
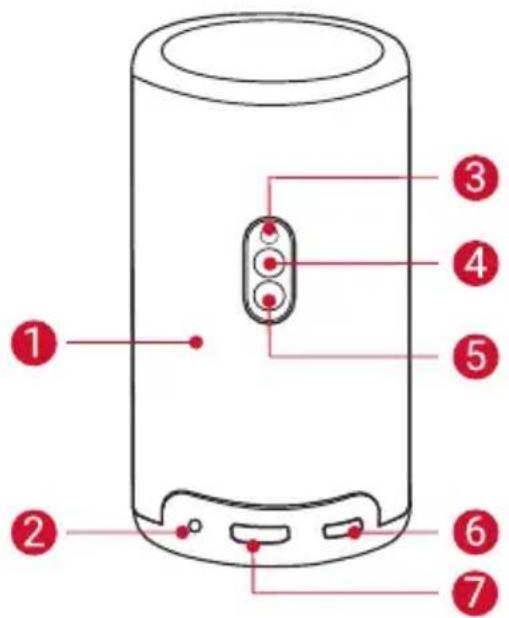
1 Speaker
2 AUX-OUT Socket
- Connect to an external sound output device.
3 Infrared Receiver
Mode Button
- Press to switch between Bluetooth speaker mode and projector mode.
5 Power Button
- Press and hold for 3 seconds to power on / off.
- Press to wake up the projector / enter standby mode in projector mode.
USB-C Port
- Connect to the power supply with the provided adapter and charging cable.
- Connect to a USB drive.
7 HDMI port
- Connect to a playback device via HDMI output.
Top View
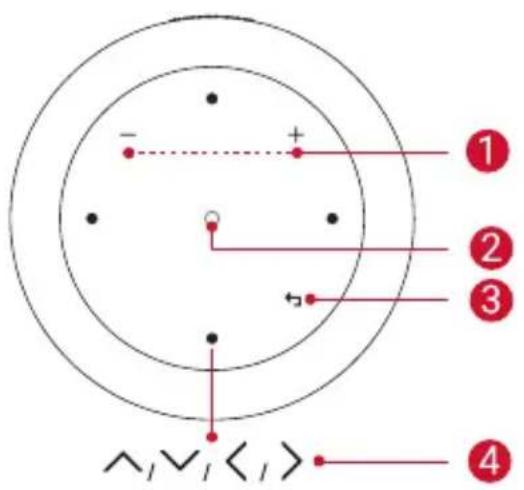
Volume Up / Down Buttons
2 Confirmation Button
3 Return Button
4 Navigation Buttons
Bottom View
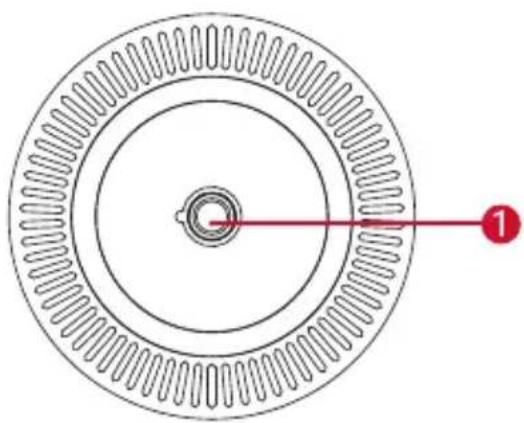
1 1/4" Tripod Socket
Dimensions
167.5 (H) x 83.0 (D) mm / 6.6 (H) x 3.3 (D) in

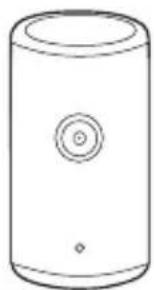
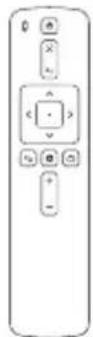
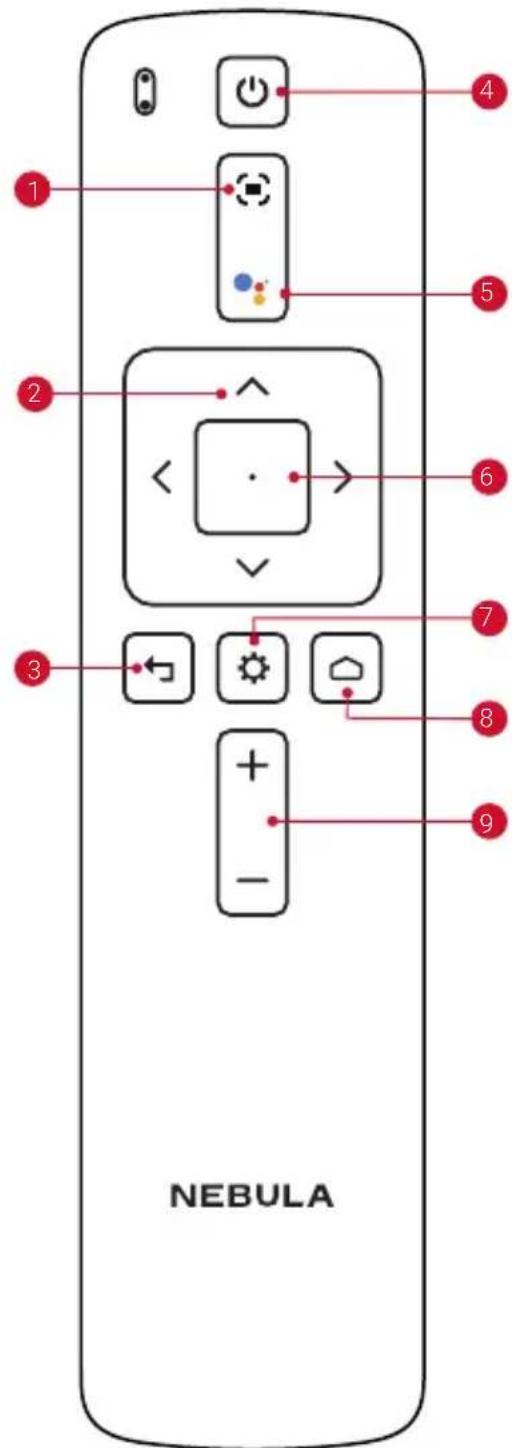
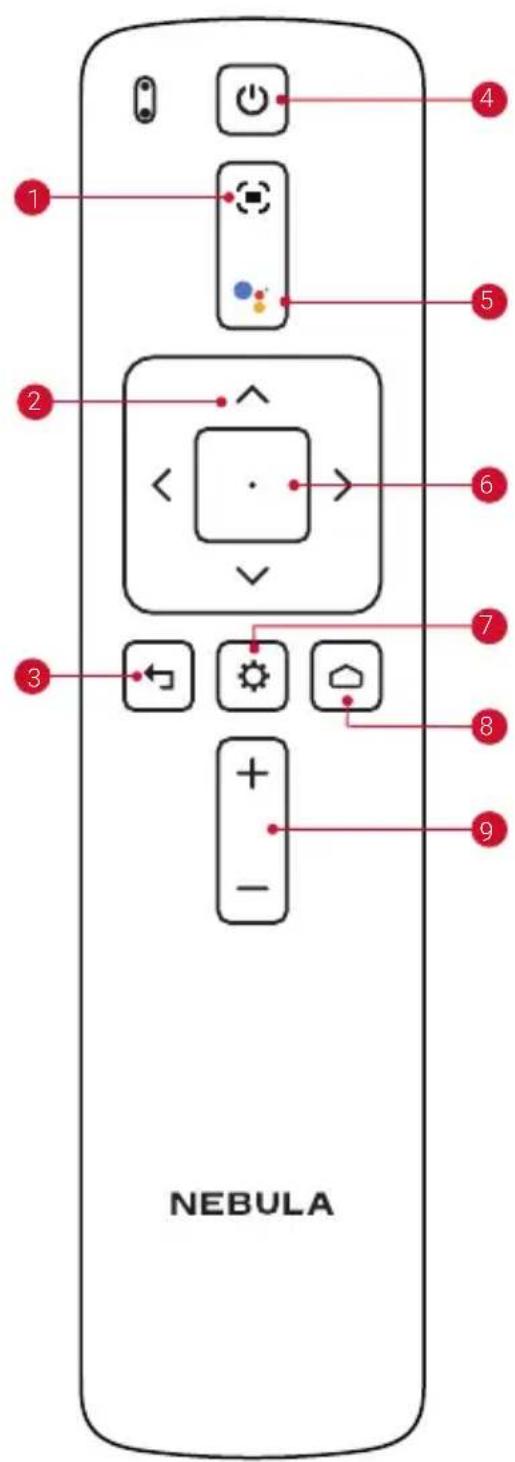
2. Remote Control
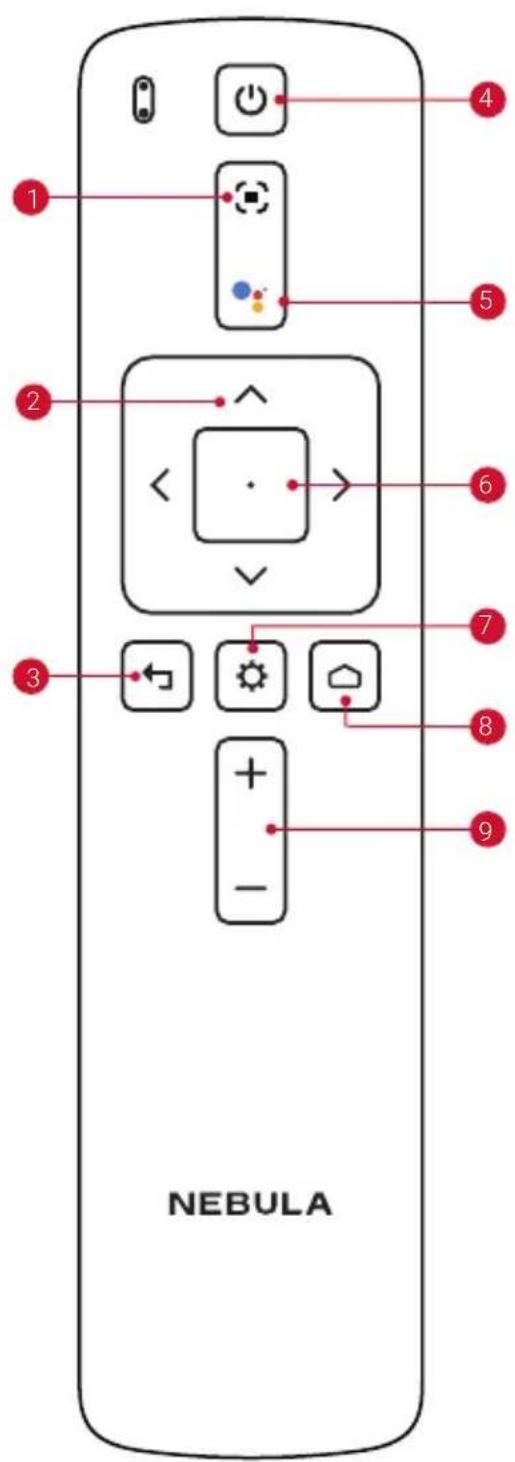
1 Adjust focus
2 Navigation
3 Return to the previous menu
4 Power on / off or switch to standby mode
5 Activate the Google Assistant
6 Confirm a selection / Pause / Resume
7 Access more options
8 Access the home menu
9 Volume up / down
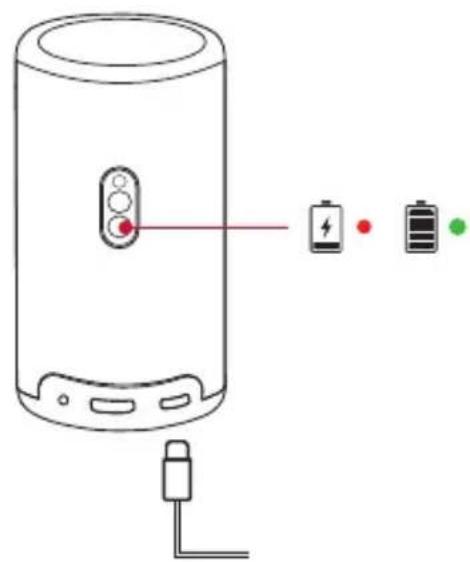
3. LED Light Guide
| Button LED Status Description | ||
| Steady blue Powered on | ||
| Light off Powered off | ||
| Steady orange Standby mode / Charging | ||
| Steady green Fully charged | ||
| Flashing red Low battery | ||
| Flashing blue | Ready to pair / Bluetooth pairing / Bluetooth disconnected (Bluetooth speaker mode) | |
| Steady blue | Bluetooth connected (Bluetooth speaker mode) | |
Getting Started
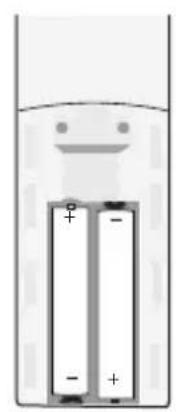
1. Prepare the Remote
① Slide to open the battery compartment.
② Insert new batteries matching the polarity (+/-) and close the battery compartment.
③ For first-time use, follow the on-screen instructions to pair the remote with your projector.
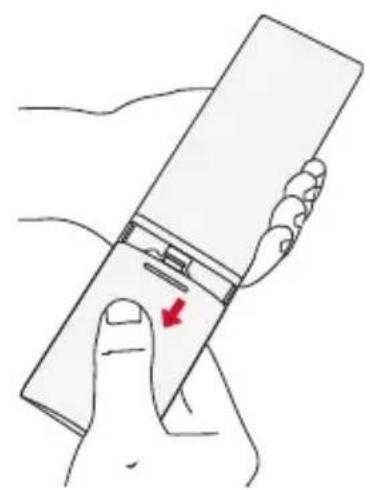
0
2

The distance between the remote and the projector should not exceed 10m / 33 ft.
2. Position Your Projector
Place the projector on a stable, flat surface in front of the projection surface. For the best results, the projection surface should be white and flat.
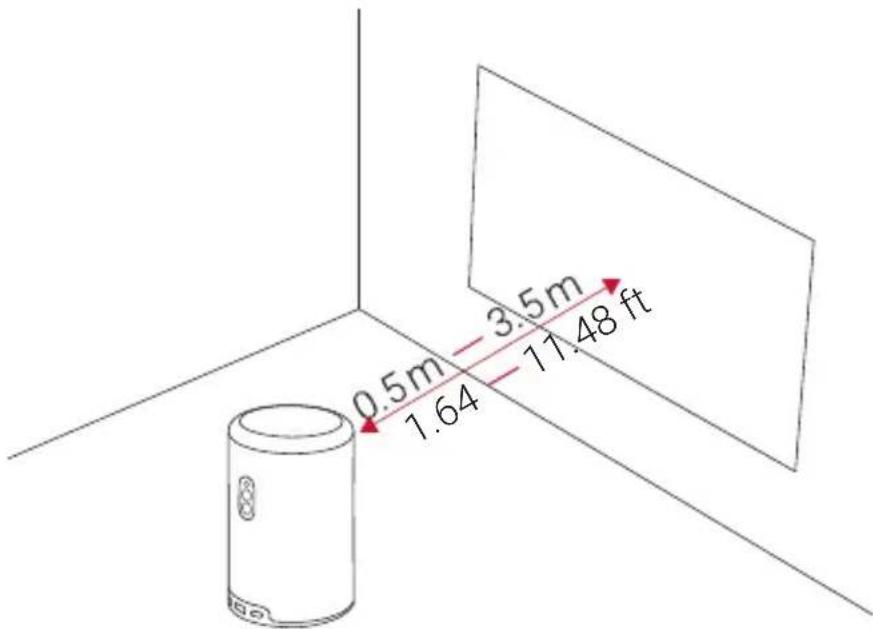

- It is unnecessary to tilt the projector towards the projection surface. You can correct the projection image with the built-in autofocus and auto-keystone correction.
- You may also install the projector onto a tripod (sold separately).
- The distance between the projector and the projection surface determines the projection image size. For the best result, position the projector 1.06 3.18 ~m / 3.37 10.43 ft away from the projection surface to get a screen size of 40 120 inches.
| Screen Size Distance Between Projector Lens and Screen | |
| 40 inches 1.06 | m / 3.47 ft |
| 50 inches 1.33 | m / 4.36 ft |
| 60 inches 1.60 | m / 5.24 ft |
| 70 inches 1.86 | m / 6.10 ft |
| 80 inches 2.13 | m / 6.98 ft |
| 90 inches 2.39 | m / 7.84 ft |
| 100 inches 2.65 | m / 8.69 ft |
| 110 inches 2.92 | m / 9.58 ft |
| 120 inches 3.18 | m / 10.43 ft |
3. Charge Your Projector
For first-time use, fully charge your projector using the provided adapter and charging cable.
4. Power On / Off
Press and hold the projector power button for 3 seconds to power on / off.

-
You can also press and hold the power button on the remote for 3 seconds to power off.
-
When powered on, press the power button on the projector or remote to switch to standby mode.
-
In HMDI Source Mode, the projector will switch to standby mode after 10 minutes of button inactivity or when no signal is detected.
-
When standby mode lasts for 30 minutes, the projector will automatically power off.
5. Autofocus and Auto Keystone Correction
To enable autofocus and auto keystone correction, slightly move the projector or press the on the remote.
6. Setup
When using the projector for the first time, follow the on-screen display (OSD) instructions to complete the basic setup.
- Pair the remote with your projector
- Select your language
- Set up your TV with your Android phone (optional)
- Connect to Wi-Fi
- Sign in with your Google account
Nebula Connect App
To easily control the projector, we recommend you download the Nebula Connect app.


① Download the Nebula Connect app from the App Store (iOS devices) or Google Play (Android devices).
② Enable Bluetooth on your smartphone.
③ Open the Nebula Connect app and select [Capsule 3 Laser] > [XXXXXX] as the device to be connected.
④ Follow the on-screen instructions to complete connection setup.
Settings
Go through the setup process when you power on the projector for the first time.
1. Network
This projector can be connected to the Internet via a wireless (Wi-Fi) connection.
(1) On the home page, select l > [Network & Internet] and press.
② Follow the on-screen instructions to complete the network connection.
2. Projector
On the home page, select Projector Settings] and press.
| [Brightness] | Adjust brightness based on your environment. |
| [Picture] | [Picture mode]: The projector is preset with several predefined picture modes so that you can choose one to suit your environment and input source. ·[Standard]: Keeps natural looking colors with a balance of warm and cool tones. ·[Movie]: Provides the best colors for watching movies. ·[Game]: Increases the brightness and response time level for playing video games. ·[Picture Custom]: Manually set the contrast, saturation, sharpness, color temperature, and gamma, or reset the values. |
| [Expert Settings]: Customize advanced settings to enhance image quality. ·[DNR]: Reduces digital noise on screen. ·[MPEG NR]: Eliminates image noise when playing an MPEG-compressed video. ·[DI Film Mode]: Creates high-definition images encoded at 24 frames/second. ·[MEMC]: Inserts additional frame between original frames for smooth motions. | |
| [Image Correction] | [Auto Keystone Correction at Startup]: Automatically perform keystone correction when the projector powers on. [Auto Keystone Correction After Movement]: Automatically perform keystone correction when you move the projector. [Manual Keystone Correction]: Enable manual keystone correction. It is only available when auto Keystone correction is off. |
| [Manual Keystone Correction Access]: Manually perform keystone correction. [Zoom]: Zoom in or out of the projection image from 50% to 100%. | |
| [Focus Settings] | [Auto Focus at Startup]: Automatically adjust the focus when the projector powers on. [Auto Focus After Movement]: Automatically adjust the focus when you move the projector. [Manual Focus Correction]: Enable manual focus correction. |
| [Sound] | [Sound Mode]: The projector is preset with several predefined sound modes so that you can choose one to suit your environment and input source. ·[Music]: Enhances the treble for listening to music. ·[Movie]: Creates a surround-sound listening experience for watching movies. ·[Outdoors]: Increases volume for playing audio / video outdoors. ·[Custom]: Manually set audio settings such as balance, bass, and treble. |
| [System sound]: Turn on / off system sound notifications. | |
| [Expert Settings]: Customize advanced settings to enhance audio quality. ·[Digital Output]: Select an output audio format. ·[eARC]: Allows TV to send audio backward to its source device via a single HDMI cable. ·[Downmix Mode]: Mixes down multi-channel audio signals. ·[Auto Volume Control]: Controls volume automatically. | |
| [Bluetooth Speaker Mode] | Enable Bluetooth speaker mode. |
| [Advanced Settings] | [Projector Mode]: Select a way of placing the projector. ·[Auto]: Automatically detects whether the projector is inverted. Automatically switch between these options. ·[Front]: The device is located in front of the projection surface. ·[Front Ceiling]: The device is hanging from the ceiling in an upside-down position. The image is rotated by 180 degrees. ·[Rear]: The device is located behind the projection surface. ·[Rear Ceiling]: The device is hanging from the ceiling in an upside-down position behind the projection surface. The image is rotated by 180 degrees and horizontally mirrored. |
| [Motion Settings]: Set a sensitivity level for the G-sensor to trigger autofocus and auto keystone correction. | |
| [Keystone Calibration]: Recalibrate the projector if keystone correction doesn’t work properly. | |
| [Smart Solutions]: Turn on / off auto-alerts when the projector detects an issue. ·[Projection Angle Alert]: Shows an alert when the maximum projection angle is reached. ·[Slow Charging Alert]: Shows an alert when the power supply is insufficient. ·[Fine Tuning Alert]: Shows a prompt to access fine-tuning after auto keystone correction. |
3. Apps
① On the home page, select > [Apps], and press.
② Select an app and check the current version, open or force stop the app, check the storage used, clear data or cache, uninstall the app, or enable or disable notifications and permissions.
4. Device Preferences
On the home page, select Device Preferences] and press.
| [About] | Check the product information, update the system, reset the device, or rename the device. |
| [Date & Time] | Enable or disable automatic date and time. Manually set date and time, select time zone, or set time format. |
| [Timer] | Change settings for auto power-off. |
| [Language] | Select an on-screen display language. |
| [Keyboard] | Check and manage keyboards. |
| [Input] | Select HDMI as the input source, or change Consumer Electronic Control (CEC) settings. CEC allows your HDMI device and Android TV to control each other. |
| [Power] | Change the auto-sleep settings, turn off the current display, or set auto power-off time when no signal is available. |
| [Storage] | Check the device storage. |
| [Home screen] | Set the channels and apps on the home screen or check open-source licenses. |
| [Google Assistant] | Change settings for the Google Assistant. |
| [Chromecast built-in] | Choose to show notifications on all Android devices connected to your Wi-Fi and let them control media casting to this device. |
| [Screen Saver] | Change the screen saver settings. |
| [Location] | Permit apps to estimate locations. |
| [Usage & Diagnostics] | Automatically send diagnostic information to Google, like crash reports and usage data from your device, apps, and Chromecast built-in. |
| [Accessibility] | Change the caption settings or enable accessibility service. |
| [Restart] Restart the | system or cancel. |
5. Others
On the home page, select to find more setting options.
| [Accounts & Sign-in] | Sign in to make the most of the Android TV. |
| [Remotes & Accessories] | Search for accessories for pairing. |
Using Your Projector
1. Select an App
Once connected to a wireless network, you can access online services, enjoy movies, music and pictures, and browse online. You can download more apps from Google Play.
① Press to access the home page.
② Select [Apps] > [Get more apps].
2. Voice Assistant
After setup, press the Google Assistant button on the remote, you can speak to the Google Assistant and request your commands.
3. Wireless Casting
You can wirelessly cast movies, games, music, and entire screen from your iOS, macOS, Android, or Windows device to Nebula Capsule 3 Laser.

Make sure Nebula Capsule 3 Laser and your device are connected to the same wireless network. The network can be a WiFi network or your phone's hotspot.
3.1 Cast In-App Content
You can cast content from apps that support Chromecast, such as YouTube and Prime Video.
① Connect your device and projector to the same wireless network.
② Open the streaming app on your device.
③ Play a video clip and tap the cast icon on the video screen.
(4) Select D2426 to connect. The projector will mirror the video screen on your device.

Certain content cannot be cast on Nebula Capsule 3 Laser due to copyright restrictions. You can stream the content via the same app installed on your projector.
3.2 Cast Device Screen
You can cast the entire screen from your device to the projector.
① Connect your device and projector to the same wireless network.
② Install the AirScreen app on your projector.
③ Open AirScreen and follow the on-screen instructions to complete the process.
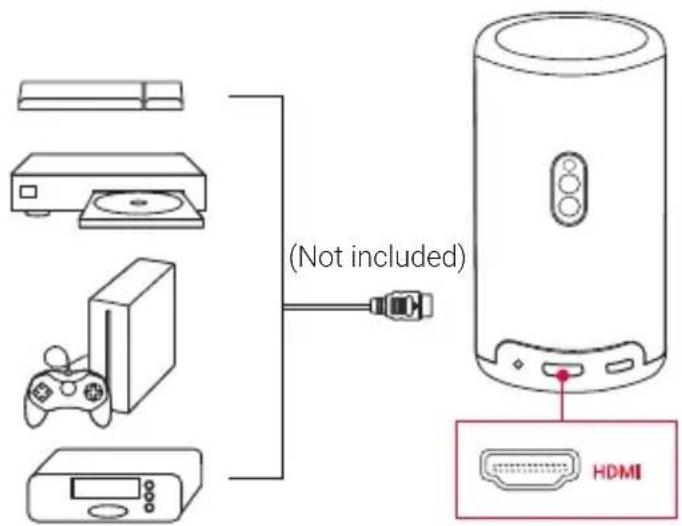
4. Play from HDMI Playback Devices
The projector can be connected to various HDMI playback devices such as a TV box, TV stick, DVD player, set-top box (STB), gaming console, or other devices.
① Connect the projector to an HDMI playback device with an HDMI cable (not provided).
② Press to access the settings menu, then select [Device Preferences] > [Input] > [HDMI].
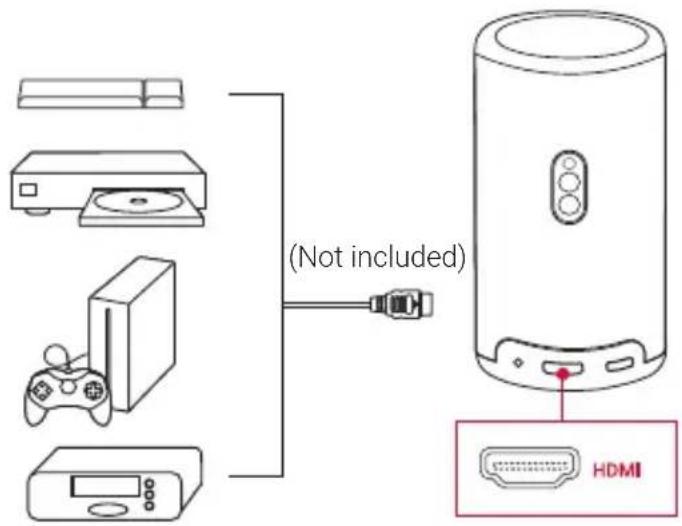

The projector will automatically start HDMI playback once connected to an HDMI playback device for the first time.
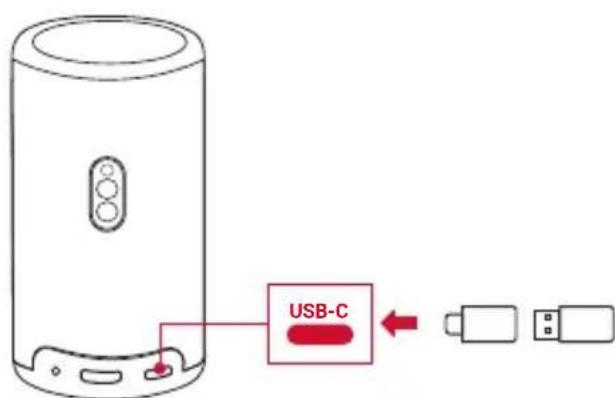
5. Play from a USB Drive
With this projector, you can enjoy music, video, and pictures, or install apps that are stored on a USB 2.0 drive.
① Download the File Explorer app from Google Play.
② Insert a USB-A drive (with the USB converter) or USB-C drive into the USB port.
(3) Select music, videos, or photos from the USB drive that you want to play and press.
(4) Press to stop playback.
6. Play Through External Sound Devices
This projector can also be connected to external sound output devices, including headphones and speakers; when connected to external speakers, the built-in speaker system is disabled.
① Use a 3.5 mm audio cable or an adapter (not provided) to connect your headphones or external speakers.
② Connect the other end of the cable to the AUX port on this projector.
- You will hear audio from your headphones or external speakers.
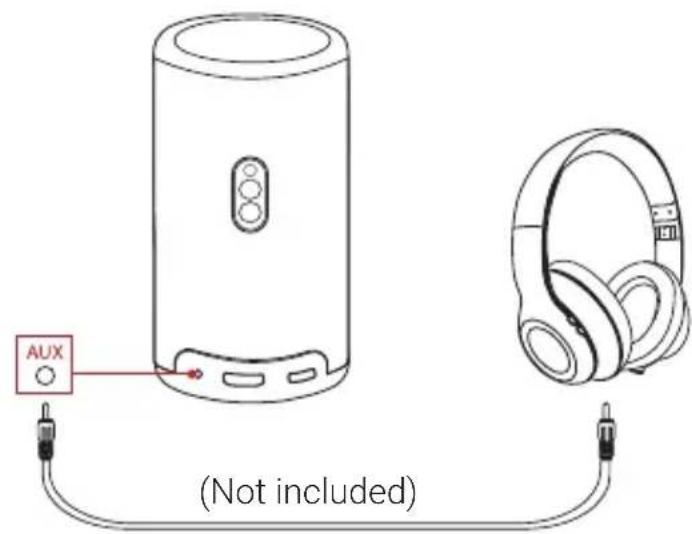

Before connecting headphones and putting them on, turn down the volume to avoid hurting your ears.
7. Bluetooth Speaker Mode
You can use this projector as a standalone Bluetooth speaker.
① To switch to Bluetooth speaker mode, you have two options:
A: Press on the projector.
B: On the home page, select > [Bluetooth Speaker Mode] and press.
② Enable Bluetooth on your smartphone and select Nebula Capsule 3 Laser to connect.
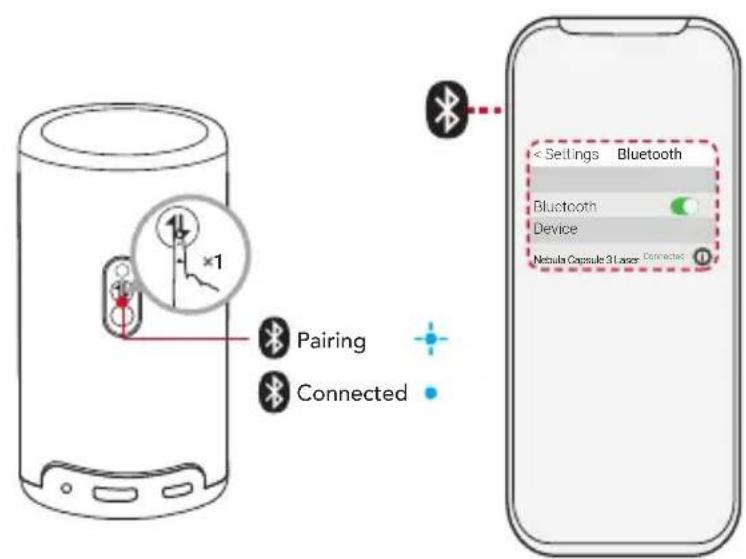

To exit Bluetooth speaker mode, press on the projector or press and hold on the remote for two seconds.
System Update
To fully enhance your experience with this product with the latest features, you are recommended to update the system from time to time.
To update the system, go to [Settings] > [Device Preferences] > [About] > [System update].
Specifications
Specifications are subject to change without notice.
| Input | 5V =3A or 9V 3A or 12V 3A or 15V 3A or 20V =2.25A |
| Power Consumption | < 45W |
| Standby Power Consumption | < 0.5W |
| Resolution | 1920 × 1080 |
| Compatible Resolutions | 480p (60 Hz), 576p (50 Hz), 720p (30 Hz), 720p (50 Hz), 720p (60 Hz), 1080p (24 Hz), 1080p (30 Hz), 1080p (50 Hz), 1080p (60 Hz), 4K2K (23.976 Hz), 4K2K (25 Hz), 4K2K (30 Hz), 4K2K (50 Hz), 4K2K (60 Hz), 4096 (23.976 Hz), 4096 (25 Hz), 4096 (30 Hz), 4096 (50 Hz), 4096 (60 Hz) |
| Contrast Ratio | 500:1 |
| Aspect Ratio | 16:9 |
| Screen Size | 40" to 120" |
| Throw Ratio | 1.2:1 |
| Throw Distance | 1.06~3.18 m / 3.48~10.43 ft |
| Light Source | Laser |
| Focus | Auto |
| Keystone Correction | Auto |
| Speaker Output Power | 8W |
| Noise | 28 dB |
| Wi-Fi | Wi-Fi 2.4 GHz/5.0 GHz 802.11 a/b/g/n/ac |
| Bluetooth Version | 5.1 |
| Bluetooth Range | 25 m / 82 ft |
| USB Format | FAT, FAT32 |
| Operating Temperature | For Europe and UK, 0°C to 25°C For other countries and regions, 0°C to 35°C / 32°F to 95°F |
| Remote Control Batteries | AAA x 2 |
Troubleshooting
① Fails to Power On
- The projector may be out of power. Charge the projector for 15-30 minutes and see if the power button light turns on.
(2) Cannot Charge
- Use the included adapter and charging cable to charge the projector.
- Try a different adapter (at least 30W) and USB-C charging cable.
(3) Cannot Connect to a Wi-Fi Network
- Place your projector within 16 ft / 5 m of the router and reconnect.
- Set your router to 2.4 GHz or 5 GHz and retry.
- Restart your projector and router and retry.
- Try a different Wi-Fi network or your phone's hotspot.
④ Blurry Image
- Slightly move the projector or press on the remote to start autofocus.
- To manually adjust the focus, go to [Settings] > [Projector Settings] > [Focus Settings] > [Manual Focus Correction], and use < and > on the remote.
- Adjust the projection angle and direction as well as the height of the projector if necessary.
(5) Distorted Image
- Update the firmware to the latest version via [Settings] > [Device Preferences] > [About] > [System update] > [Check for update].
- Go to [Settings] > [Projector Settings] > [Image Correction], turn on [Manual Keystone Correction], and select [Manual Keystone Correction Access].
- Move the projector left or right, or alter the tilt if necessary.
⑥ No HDMI Signal
-
Use a different HDMI cable.
-
Connect your projector with another HDMI playback device.
- Connect the HDMI playback device to your TV via HDMI cable to check if the device or cable malfunctions.
- Adjust the HDMI playback device's output resolution / frequency to be the same as the projector's.
⑦ How to Install Netflix
- On your projector, download and install the Nebula Play app from Google Play. Open Nebula Play and select [Tips] > [Netflix Installation]. Then follow the on-screen instructions to install Netflix.
(8) How to Control Netflix with Mouse Mode
- Install Nebula Connect on your phone and connect with Capsule 3 Laser. Select Mouse mode. Use one finger to move and click, or two fingers to scroll.
9 How to Play Videos without Wi-Fi
- Download videos to a USB drive in FAT32 format. For the following steps, see Play from a USB Drive.
CE This product complies with the radio interference requirements of the European Community.
Declaration of Conformity
Hereby, Anker Innovations Limited. declares that this device is in compliance with the essential requirements and other relevant provisions of Directive 2014/53/EU. For the Declaration of Conformity, visit the Web site https://uk.seenebula.com/.

This product complies with the radio interference requirements of the United Kingdom.
Declaration of Conformity
Hereby, Anker Innovations Limited declares that this device is in compliance with Radio Equipment Regulations 2017(SI 2017/1206). The full text of the UK declaration of conformity is available at the following internet address: https://uk.seenebula.com/.
The suitable temperature range for the projector and its accessories is 0^ - 25^ .
The adapter type is PN453I (with rated output voltage / current of 5VDC/3A or 9VDC/3A or 12VDC/3A or 15VDC/3A or 20VDC/2.25A) or A2713 (with rated output voltage / current of 5VDC/3A or 9VDC/3A or 15VDC/3A or 20VDC/3.25A).
RF exposure information
The Maximum Permissible Exposure (MPE) level has been calculated based on a distance of d = 20 cm between the device and the human body. To maintain compliance with RF exposure requirement, use product that maintain a 20 cm distance between the device and human body.
Frequency bands and power as below:
| Function | Bands | Operation Frequency | Max.Power |
| Bluetooth (Projection) | 2.4 GHz | 2402-2480 MHz EIRP 13.58 dBm | |
| WIFI (Projection) | 2.4 GHz | 2412-2472 MHz EIRP 19.8 dBm | |
| 5 GHz | 5150-5250 MHz EIRP 22.32 dBm | ||
| 5250-5350 MHz EIRP 19.7 dBm | |||
| 5470-5725 MHz EIRP 19.96 dBm | |||
| 5725-5850 MHz EIRP 13.93 dBm | |||
| Bluetooth (Remote Control) | 2.4 GHz 2 | 402-2480 MHz EIRP 3.62 dBm |
5150~5350 MHz can be used indoors only.
| AT | BE | BG | HR | CY | CZ | DK |
| EE | FI | FR | DE | EL | HU | IE |
| IT | LV | LT | LU | MT | NL | PL |
| PT | RO | SK | SI | ES | SE | UK |
The following importer is the responsible party (contract for EU matters): Anker Innovations Deutschland GmbH I Georg-Muche-Strasse 3, 80807 Munich, Germany
The following importer is the responsible party (contract for UK matters): Anker Technology (UK) Limited I GNR8, 49 Clarendon Road, Watford, Hertfordshire, WD17 1HP, United Kingdom

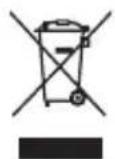
Your product is designed and manufactured with high-quality materials and components, which can be recycled and reused.
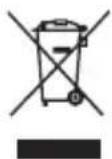
This symbol means the product must not be discarded as household waste, and should be delivered to an appropriate collection facility for recycling. Proper disposal and recycling helps protect natural resources, human health and the environment. For more information on disposal and recycling of this product, contact your local municipality, disposal service, or the shop where you bought this product.
FCC Statement
This device complies with Part 15 of the FCC Rules. Operation is subject to the following two conditions: (1) this device may not cause harmful interference, and (2) this device must accept any interference received, including interference that may cause undesired operation.
Warning: Changes or modifications not expressly approved by the party responsible for compliance could void the user's authority to operate the equipment.
Note: This equipment has been tested and found to comply with the limits for a Class B digital device, pursuant to Part 15 of the FCC Rules. These limits are designed to provide reasonable protection against harmful interference in a residential installation.
This equipment generates uses and can radiate radio frequency energy and, if not installed and used in accordance with the instructions, may cause harmful interference to radio communications. However, there is no guarantee that interference will not occur in a particular installation. If this equipment does cause harmful interference to radio or television reception, which can be determined by turning the equipment off and on, the user is encouraged to try to correct the interference by one or more of the following measures: (1) Reorient or relocate the receiving antenna. (2) Increase the separation between the equipment and receiver. (3) Connect the equipment into an outlet on a circuit different from that to which the receiver is connected. (4) Consult the dealer or an experienced radio/TV technician for help.
FCC Radio Frequency Exposure Statement
The device has been evaluated to meet general RF exposure requirements. The device can be used in fixed/mobile exposure condition. The min separation distance is 20cm .
Notice: Shielded cables
All connections to other computing devices must be made using
shielded cables to maintain compliance with FCC regulations.
The following importer is the responsible party.
Company Name: Fantasia Trading LLC
Address: 5350 Ontario Mills Pkwy, Suite 100, Ontario, CA 91764
Telephone: 1-800-988-7973
5150~5350 MHz can be used indoors only.

CAUTION: RISK OF EXPLOSION IF BATTERY IS REPLACED BY AN INCORRECT TYPE. DISPOSE OF USED BATTERIES ACCORDING TO THE INSTRUCTIONS.
RG1 IEC 62471-5:2015
Complies with IEC 60825-1:2014 Class 1 and IEC 62471-5:2015 Risk
Group 1
Remote Control: Nebula RC Model: D0413X
Anker Innovations Limited
Room 1318-19, Hollywood Plaza, 610 Nathan Road, Mongkok, Kowloon,
Hong Kong
Trademarks
Bluetooth
The Bluetooth® word mark and logos are registered trademarks owned by the Bluetooth SIG, Inc. and any use of such marks by Anker Innovations Limited is under license. Other trademarks and tradenames are those of their respective owners.
HDMI
HIG-DEPINITION MULTIMEDIA INTERPACE
HDMI, and HDMI logo and High-Definition Multimedia Interface are trademarks or registered trademarks of HDMI licensing LLC in the United States and other countries.
Manufactured under license from Dolby Laboratories. Dolby, Dolby Audio and the double-D symbol are trademarks of Dolby Laboratories Licensing Corporation.
Warranty
30-Day Money-Back Guarantee for Any Reason
You may return your undamaged product and packaging within 30 days of purchase to receive a FULL REFUND for any reason. If the reason for the return isn't quality-related, the customer must pay for the return shipping.
12-Month Warranty for Quality-Related Issues
Nebula's products are warranted to be free from material and workmanship defects for 12 months from the date of purchase. Within this period, Nebula will provide a replacement and cover any return shipping costs for products that fail in normal use.
Please note: Any provided shipping labels must be used within 20 days from the date they're issued by Nebula Support.
Inhaltsverzeichnis
Nebula Connect App 54
Einstellungen 54
167,5 (H) x 83,0 (D) mm

2. Fernbedienung
Anker Technology (UK) Limited | GNR8, 49 Clarendon Road, Watford, Hertfordshire, WD17 1HP, United Kingdom

Anker Innovations Limited
Room 1318-19, Hollywood Plaza, 610 Nathan Road, Mongkok, Kowloon, Hongkong
Marken
Bluetooth
Hereby, Anker Innovations Limited. declares that this device is in compliance with the essential requirements and other relevant provisions of Directive 2014/53/EU. Para consultar la declaración de conformidad, visite el sitio web https://uk.seenebula.com/.
Anker Technology (UK) Limited I GNR8, 49 Clarendon Road, Watford, Hertfordshire, WD17 1HP, United Kingdom

Anker Innovations Limited
Room 1318-19, Hollywood Plaza, 610 Nathan Road, Mongkok, Kowloon, Hong Kong
Marcas commerciales
Bluetooth
Application Nebula Connect 123
Paramètres 124
Application Nebula Connect
Hereby, Anker Innovations Limited. declares that this device is in compliance with the essential requirements and other relevant provisions of Directive 2014/53/EU. Pour consulter la Déclaration de conformité, consultez le site web suivant: https://uk.seenebula.com/.
Anker Technology (UK) Limited I GNR8, 49 Clarendon Road, Watford, Hertfordshire, WD17 1HP, United Kingdom
This device complies with Industry Canada licence-exempt RSS standard(s). Operation is subject to the following two conditions:
1) this device may not cause interference, and
2) this device must accept any interference, including interference that may cause undesired operation of the device.
When using the product, maintain a distance of 20cm from the body to ensure compliance with RF exposure requirements.
5150~5250 MHz can be used indoors only.
Anker Innovations Limited
Room 1318-19, Hollywood Plaza, 610 Nathan Road, Mongkok, Kowloon, Hong Kong
Marques commerciales
Bluetooth
167,5 (A) x 83,0 (P) mm
2. Telekomando
3. Transmissione wireless
Hereby, Anker Innovations Limited. declares that this device is in compliance with the essential requirements and other relevant provisions of Directive 2014/53/EU. Per la Dichiarazione di conformità, visitare il site Web https://uk.seenebula.com/.
Anker Technology (UK) Limited I GNR8, 49 Clarendon Road, Watford, Hertfordshire, WD17 1HP, United Kingdom

Anker Innovations Limited
Room 1318-19, Hollywood Plaza, 610 Nathan Road, Mongkok, Kowloon, Hong Kong
Marchi registrati
Bluetooth
Hereby, Anker Innovations Limited. declares that this device is in compliance with the essential requirements and other relevant provisions of Directive 2014/53/EU. De verklaring van conformiteit vindt u op de website https://uk.seenebula.com/.
Anker Innovations Limited
Room 1318-19, Hollywood Plaza, 610 Nathan Road, Mongkok, Kowloon, Hong Kong
Handelsmerken
Bluetooth
167,5 (A) x 83,0 (P) mm

2. Controlo remoto

Hereby, Anker Innovations Limited. declares that this device is in compliance with the essential requirements and other relevant provisions of Directive 2014/53/EU. Para consulutar a Declariação de conformidade, visite o site https://uk.seenebula.com/.
O intervalo de temperatura adequado para o projector e respetivos accesarios é de 0^ a 25^ .
Anker Technology (UK) Limited | GNR8, 49 Clarendon Road, Watford, Hertfordshire, WD17 1HP, United Kingdom

O produit foci concebido e fabricado com materiais e componentes de alta qualidade, que podem ser reciclados e reutilizados.
Anker Innovations Limited
Room 1318-19, Hollywood Plaza, 610 Nathan Road, Mongkok, Kowloon, Hong Kong
Marcas commerciais
Bluetooth
FlorokteTnTVb,TVStk,DVDpReIe,STB(Tabk),KeiMgKo 1HDMIJxHJtEJXJxJxJxJxJxJxJxJxJxJxJxJxJxJxJxJxJxJxJxJxJxJxJxJxJxJxJxJxJxJxJxJxJxJxJxJxJxJxJxJxJxJxJxJxJxJxJxJxJx
尅戸発発発発発発発発発発発発発発発発発発発発発発発発発発発発発発発発発発発発発発発発発発発発発発発発発発癨発癨癨癨癨癨癨癨癨癨癨癨癨癨癨癨癨癨癨癨癨癨癨癨癨癨癨癨癨癨癨癨癨癨癨癨癨癨癨癨癨癨癨癨癨癨癨癨癨癨癨癢癢癢癢癢癢癢癢癢癢癢癢癢癢癢癢癢癢癢癢癢癢癢癢癢癢癢癢癢癢癢癢癢癢癢癢癢癢癢癢癢癢癢癢癢癢癢癢癢癢癬

Anker Innovations Limited
Room 1318-19, Hollywood Plaza, 610 Nathan Road, Mongkok,
Kowloon, Hong Kong
Bluetooth
Declaration of the Presence Condition of the Restricted Substances Marking
證書號碼/受理編號:(No.)
Certificate No/Application No.
商品標籤及商品檢驗標識:(Picture)
Product Label and Commodity Inspection Mark.
樣張及其標示位置:(Description and Picture)
Sample and its location
| 設備名稱: Nebula膠囊雷射投影儀,型號(型式): D2426 Equipment name Type designation (Type) | ||||||
| 單元Unit | 限用物質及其化學符號 Restricted substances and its chemical symbols | |||||
| 鉛 Lead(Pb) | 汞 Mercury (Hg) | 鎘 Cadmium (Cd) | 六價鉻 Hexavalent chromium (Cr+6) | 多溴聯苯 Polybrominated biphenyls (PBB) | 多溴二苯醚 Polybrominated diphenyl ethers (PBDE) | |
| 電路板 | ○ | ○ | ○ | ○ | ○ | ○ |
| 外殼 | ○ | ○ | ○ | ○ | ○ | ○ |
| Nebula藍牙 遙控器 | ○ | ○ | ○ | ○ | ○ | ○ |
Note 1: "Exceeding 0.1 wt %" and "exceeding 0.01 wt %" indicate that the percentage content of the restricted substance exceeds the reference percentage value of presence condition.
Note 2: "O" indicates that the percentage content of the restricted substance does not exceed the percentage of reference value of presence.
Note 3: The “—” indicates that the restricted substance corresponds to the exemption.
電源供應器
使用前請參閱以下安全資訊。
Anker Innovations Limited
Room 1318-19, Hollywood Plaza, 610 Nathan Road, Mongkok,
Kowloon, Hong Kong
商標
Bluetooth
J 1 J 1 J 1 J 1 J 1 J 1 J 1 J 1 J 1 J 1 J 1 J 1 J 1 J 1
3.18 1.06 nJn Jn Jn Jn Jn Jn Jn Jn Jn Jn Jn Jn Jn Jn Jn Jn Jn Jn Jn Jn Jn Jn Jn Jn Jn Jn Jn Jn Jn Jn Jn Jn Jn Jn Jn Jn Jn Jn Jn Jn Jn Jn Jn Jn Jn Jn Jn Jn Jn Jn Jn
120 40
(iOS pblj jy) App Store Nebula Connect 1
.(Android pJ) Google Play
Bluetooth ②
[Capsule 3 Laser] < [XXXXXX] Nebula Connect ③
1
Jg JI HDMI Jz Jz Jz Jz Jz Jz Jz Jz Jz Jz Jz Jz Jz Jz Jz Jz Jz Jz Jz Jz Jz Jz Jz Jz Jz Jz Jz Jz Jz Jz Jz Jz Jz Jz Jz Jz Jz Jz Jz Jz Jz Jz Jz Jz Jz Jz Jz
HDMI HDMI
< [j_i] <[j]
HDMI jj j j j j j j j j j j j j j j j j j j j j j j j j j j j j j j j j j j j j j j j j j j j j j j j j j j j j j

5.US
iill jj g jllg jllg jllg jll
.USB2.0
Google Play File Explorer
USB-C (USBJU) USB-A ②
.USB
3
$$ . \text {j} _ {\text {i}} \text {i} _ {\text {i}} \text {i} _ {\text {i}} \text {i} _ {\text {i}} \text {i} _ {\text {i}} \text {i} _ {\text {i}} \text {i} _ {\text {i}} \text {i} _ {\text {i}} \text {i} _ {\text {i}} \text {i} _ {\text {i}} \text {i}. $$
$$ \text {W i - F i} \quad a < b, \text {b o l d s y m b o l {d i f f}} \text {a l p h a} \text {a l p h a} \text {a l p h a} \text {a l p h a} \text {a l p h a} \text {a l p h a} \text {a l p h a} \tag {9} $$
$$ F A T 3 2 \text {f a r g e} \cup \text {F A T 3 2} \cup \text {F A T 3 2} \cup \text {F A T 3 2} \cup \text {F A T 3 2} \cup \text {F A T 3 2} \cup \text {F A T 3 2} \cup \text {F A T 3 2} \cup \text {F A T 3 2} \cup \text {F A} $$
$$ . U S B \quad \text {d} \quad \text {d} \quad \text {d} \quad \text {d} \quad \text {d} \quad \text {d} \quad \text {d} \quad \text {d} \quad \text {d} \quad \text {d} \quad \text {d} \quad \text {d} \quad \text {d} \quad \text {d} \quad \text {d} \dots $$
J
Hereby, Anker Innovations Limited. declares that this device is in compliance with the essential requirements and other relevant provisions of Directive 2014/53/EU
$$ \mathrm {e} ^ {\mathrm {i} \omega_ {0}} \mathrm {e} ^ {\mathrm {j} \omega_ {1}} \mathrm {e} ^ {\mathrm {k} \omega_ {2}} \mathrm {e} ^ {\mathrm {l} \omega_ {3}} $$
$$ . \mathrm {t h} \mathrm {t} s: / / \mathrm {u k . s e e n e b u l a . c o m} / $$
$$ . \text {a g i n} 2 5 \text {d} 0 \text {n} \text {a l o} \text {g} \text {s} \text {r} \text {e l l j} \text {j} \text {l} \text {a l l} \text {s} \text {r} \text {a l l} \text {a} \text {j} \text {j} \text {l} \text {j} $$
$$ \left. \right.\left. \right.\left. \right.\left. \right.\left. \right.\left. \right.\left. \right.\left. \right.\left. \right.\left. \right.\left. \right.\left. \right.\left. \right.\left. \right.\left. \right.\left. \right.\left. \right.\left. \right.\left. \right.\left. \right.\left. \right.\left. \right.\left. \right.\left. \right.\left. \right.\left. \right.\left. \right.\left. \right.\left. \right.\left. \right.\left. \right.\left. \right.\left. \right.\left. \right. \text {d} _ {\text {d} _ {\text {d} _ {\text {d} _ {\text {d} _ {\text {d} _ {\text {d} _ {\text {d} _ {\text {d} _ {\text {d} _ {\text {d} _ {\text {d} _ {\text {d} _ {\text {d} _ {\text {d} _ {\text {d} _ {\text {d} _ {\text {d}}}}}}}}}}}}}}}}}} $$
$$ 2 0 \mathrm {V D C} \text {a l p h a} 1 5 \mathrm {V D C} / 3 \text {a l p h a} 1 2 \mathrm {V D C} / 3 \text {a l p h a} 9 \mathrm {V D C} / 3 $$
$$ \text {a l p h a} 5 \mathrm {V D C} / 3 \text {a l p h a} \text {d i s t r i b u t i o n} \text {d i s t r i b u t i o n} \text {d i s t r i b u t i o n} \text {d i s t r i b u t i o n} \text {d i s t r i b u t i o n} \text {d i s t r i b u t i o n} \text {d i s t r i b u t i o n} \text {(a l p h a)} A 2 7 1 3 \text {a l p h a} / 2. 2 5 $$
$$ . (1 2 0 V D C / 3. 2 5 \text {a l p h a} 1 5 V D C / 3 \text {a l p h a} 9 V D C / 3 $$
:
Anker Technology (UK) Limited I GNR8, 49 Clarendon Road, Watford, Hertfordshire, WD17 1HP, United Kingdom

i 1
e 1

RG1 IEC 62471-5:2015
1 IEC 62471-5:2015, 1 IEC 60825-1:2014
Nebula RC: D0413X
Anker Innovations Limited
610 1318-19
Bluetooth
Bluetooth SIG, 4k k k k k k k k k k k k k k k k k k k k k k k k k k k k k k k k k k k k k k k k k k k k k k k k k k k k k k k k k k k k k k k k k k k k k k k k k k k k k k k k k k k k k k k k k k k k k k k K
HOMI
High-Definition Multimedia Interface & HDMI & HDMI & HDMI & HDMI & HDMI & HDMI & HDMI & HDMI & HDMI & HDMI & HDMI & HDMI & HDMI & HDMI & HDMI & HDMI & HDMI & HDMI & HDMI & HDMI & HDMI & HDMI & HDMI & HDMI & HDMI & HDMI & HDMI & HDMI & HDMI & HDMI & HDMI & HDMI & HDMI & HDMI & HDMI & HDMI & HDMI & HDMI & HDMI & HDMI & HDMI & HDMI & HDMI & HDMI & HDMI & HDMI & HDMI & HDMI & HDMI & HDMI &
t Dolby AUDIO
double-D, Dolby Audio, Dolby. Dolby Jalea mnnn nn nnnn nn nnnn nn nnnn nn nnnn nn nnnn nn nnnn nn nnnn nn nnnn nn nnnn nn nnnn nn nnnn nn nnnn nn nnnn nn nnnn nn nnnn nn nnnn nn nnnn nn nnnn nn nnnn nn nnnn nn nnnn nn nnnn nn nnnn nn nnnn nn nnnn nn
30 15
Jlll 30 30
J
12 12
12 12 12 12 Nebula
y jll llll lnnn nnnn nn nnnn nn nnnnnnnnnnnnnnnnnnnnnnnnnnnnnnnnnnnnnnnnnnnnnnnnnnnnnnnnnnnnnnnnnnnnnnnnnnnnnnnnnnnnnnnnnnnnnnnnnnnnnnnnnnnnnnnnnnn
sde Jgol
20 20
. Nebula Support