
CS 4030 - Saw AL-KO - Free user manual and instructions
Find the device manual for free CS 4030 AL-KO in PDF.



| Product type | Cordless chainsaw (battery-powered) |
| Brand | AL-KO |
| Model | CS 4030 |
| Reference | 113616 |
| Guide bar length | Approx. 350 mm |
| Usable cutting length | 265 mm |
| Cutting chain | 91P045X (pitch 3/8", gauge 1.27 mm) |
| No-load speed | 17 m/s |
| Chain brake | Yes, electric (manual) |
| Chain oil tank capacity | 180 ml |
| Weight (with guide bar and chain) | 4.45 kg |
| Weight (without guide bar and chain) | 3.9 kg |
| Sound power level LwA | 101 dB(A) |
| Nominal battery voltage | 36 V (40 V max.) |
| Battery capacity | 4 Ah (B150 Li) or 5 Ah (B200 Li) |
| Compatible charger | C130 Li |
| Charger mains voltage | 100-240 V AC, 50/60 Hz |
| Charging time | Approx. 90 min (4 Ah) / 120 min (5 Ah) |
| Operating temperature range | +5 °C to +40 °C |
| Intended use | Light wood cutting work (wood cutting, hedge trimming, firewood) |
| Safety devices | Chain brake, start protection, hand guard |
| Lubrication | Automatic, biodegradable oil recommended |
| Assembly | Guide bar and chain to be mounted, adjustable tension |
Frequently Asked Questions - CS 4030 AL-KO
User questions about CS 4030 AL-KO
0 question about this device. Answer the ones you know or ask your own.
Ask a new question about this device
Download the instructions for your Saw in PDF format for free! Find your manual CS 4030 - AL-KO and take your electronic device back in hand. On this page are published all the documents necessary for the use of your device. CS 4030 by AL-KO.
USER MANUAL CS 4030 AL-KO
natural_image
Line drawing of a mechanical chainings device with no text or symbols| DE |
| GB |
| NL |
| FR |
| IT |
| PL |
| CZ |
| HU |
| DK |
| SE |
| UA |






Inhaltsverzeichnis
Deutsch 6
English....27
Nederlands 47
Français....68
Italiano 90
Polski....110
Česky 132
Magyarul....151
Dansk 171
Svensk....190
Україна....209
© 2020
AL-KO KOBER GROUP Kötz, Germany
This documentation or excerpts therefrom may not be reproduced or disclosed to third parties without the express permission of the AL-KO KOBER GROUP.
natural_image
Illustration of a battery connected to an electrical outlet with a power plug, showing battery symbols and color-coded indicators (no text or labels)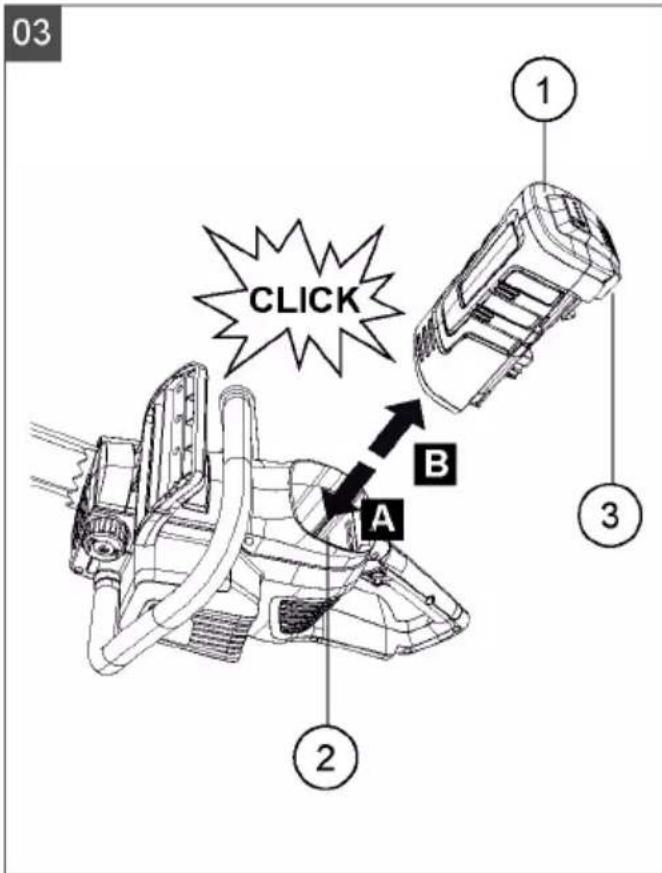

natural_image
Diagram of a tree stump with arrows indicating movement or force direction, no text or symbols present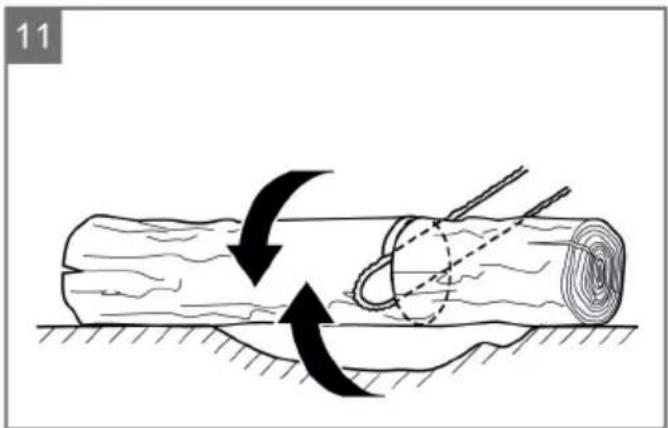
natural_image
Diagram showing two circular processes with arrows indicating direction of movement, no text or symbols present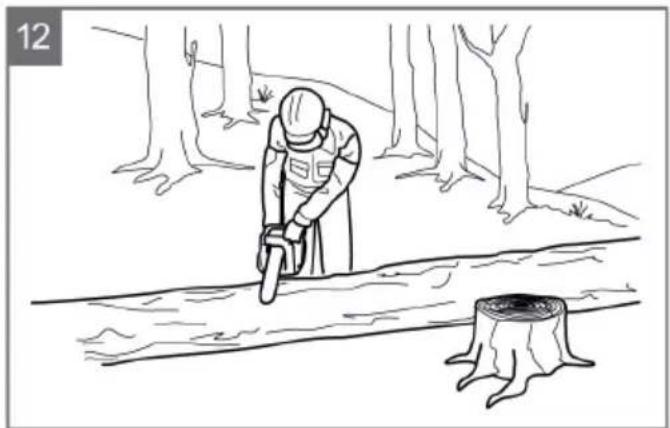
natural_image
Line drawing of a person using a power saw to cut tree bark in a forest (no text or symbols)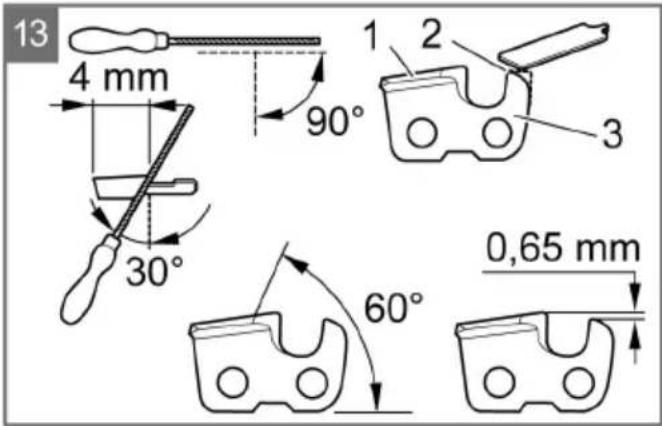
natural_image
Diagram of a wooden log being cut with a black arrow indicating force or direction, no text or symbols presentNr. Bauteil
www.al-ko.com/service-contacts
22 GARANTIE
1 About these operating instructions ..... 28
1.1 Legends and signal words ...... 28
2 Product description 28
2.1 Designated use 28
2.2 Residual risks...... 28
2.3 Safety and protective devices ..... 28
2.3.1 Switch-on protection 29
2.3.2 Chain brake/chain brake bracket. 29
2.4 Symbols on the appliance 29
2.5 Scope of supply.... 29
2.6 Product overview (01) 30
3 General Power Tool Safety Warnings ..... 30
3.1 Work area safety 30
3.2 Electrical safety 30
3.3 Personal safety 30
3.4 Power tool use and care 31
3.5 Battery tool use and care 31
3.6 Service 31
4 Chain saw safety warnings 31
5 Causes and operator prevention of kick-back 32
6 Vibration load.... 32
7 Noise pollution 33
8 Safety information regarding the rechargeable battery 33
9 Safety information regarding the charging unit 34
10 Safety information when working...... 34
10.1 Operator 35
10.2 Operating times.... 35
10.3 Working with the chain saw.... 35
11 Installation.... 36
11.1 Installing the guide rail (05, 06) ...... 36
11.2 Installing the saw chain (05, 06)...... 36
11.3 Tightening the saw chain (05, 07) ..... 36
12 Start-up.... 36
12.1 Charging the rechargeable battery (02) 36
12.2 Inserting the rechargeable battery (03) 36
12.3 Pulling out the rechargeable battery (03) 36
12.4 Checking the chain tension 37
12.5 Testing the function of the chain brake.... 37
12.6 Function test of the chain brake with the engine switched off (08) 37
12.7 Function test of the chain brake with the motor switched on (08) 37
12.8 Filling saw chain oil (09) 38
13 Operation.... 38
13.1 Determining the charge status of the rechargeable battery (04) 38
13.2 Check the saw chain oil.... 38
13.3 Testing the chain brake 39
13.4 Switching the engine on and off ..... 39
14 Working behaviour and working technique.... 39
14.1 Felling trees 39
14.2 Branch lopping.... 40
14.3 Cross-cutting 40
14.4 Cutting converted timber (12) ..... 41
15 Maintenance and care.... 41
15.1 Sharpening the saw chain (13).... 41
15.2 Cleaning the chain sprocket interior ... 42
15.3 Changing over the quick-tension chain wheel (16) 42
15.4 Checking, turning and greasing the guide rail (14, 15).... 42
16 Help in case of malfunction 42
17 Transport.... 43
18 Storage.... 43
19 Disposal.... 43
20 Technical data 44
21 After-Sales / Service 45
22 Guarantee.... 46
1 ABOUT THESE OPERATING INSTRUCTIONS
The German version is the original operating instructions. All additional language versions are translations of the original operating instructions.
It is essential to read through these operating instructions carefully before start-up. This is essential for safe working and trouble-free handling.
■ Always safeguard these operating instructions so that they can be consulted if you need any information about the appliance.
■ Only pass on the appliance to other persons together with these operating instructions.
■ Comply with the safety and warning information in these operating instructions.
1.1 Legends and signal words
⚠️ DANGER! Denotes an imminently dangerous situation which will result in fatal or serious injury if not avoided.
WARNING! Denotes a potentially dangerous situation which can result in fatal or serious injury if not avoided.
CAUTION! Denotes a potentially dangerous situation which can result in minor or moderate injury if not avoided.
IMPORTANT! Denotes a situation which can result in material damage if not avoided.
NOTE Special instructions for ease of understanding and handling.
2 PRODUCT DESCRIPTION
These operating instructions describe a hand-operated electric chain saw that is operated with a rechargeable battery.
2.1 Designated use
The chain saw is exclusively designed for domestic, DIY and gardening applications. In this sector, the chain saw can be used for light wood sawing work, e.g. for:
- Cutting up timber
■ Pruning hedgerows
■ Sawing firewood
Because of the electrical drive, the rechargeable battery-chain saw can be used not only on open ground but also in closed rooms for sawing wood. Any application not in accordance with the application described here shall be regarded as misuse.
The chain saw must not be used in the commercial sector.
CAUTION! Danger of injury due to non-designated use! If wood or other substances embedded with foreign bodies are sawn with the chain saw, injury can result.
■ Only use the chain saw for light wood sawing work.
■ Before sawing wood, check for foreign bodies, e.g. nails, screws, fittings.
2.2 Residual risks
Even when using the appliance as intended, there is always a certain residual risk that cannot be excluded. The following hazards cannot be ruled out due to the nature and design of the appliance.
■ Contact with the exposed teeth of the chain (risk of cutting)
■ Access to the moving chain (risk of cutting)
■ Sudden and unexpected movement of the bar (risk of cutting)
■ Detachment of parts of the chain (risk of cutting/injury)
■ Detachment of parts of the wood being worked on
■ Impairment of hearing during work if ear defenders are not used
2.3 Safety and protective devices
WARNING! Danger of serious injury from manipulated safety and protective devices. As a result of manipulated safety and protective devices, serious injury can occur when working with the chain saw.
■ Never deactivate safety and protective devices.
■ Only work with the chain saw if all safety and protective devices function correctly.
2.3.1 Switch-on protection
If the operator applies the throttle quickly several times in succession, the chain saw switches off for a few seconds to protect the electronics and the saw chain. In this case, wait until the chain saw can be switched on again.
2.3.2 Chain brake/chain brake bracket
The chain saw has a manual chain brake that is triggered by the chain brake bracket, for example if kickback occurs. If the chain brake is tripped, saw chain and motor are stopped immediately.
2.4 Symbols on the appliance
Symbol Meaning

Pay special attention when handling this product.

Danger of kickback!
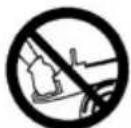
Do not operate the chain saw with one hand!

Do not use in the rain! Protect against moisture!

Wear a protective helmet, ear defenders and eye protection!

Wear protective gloves!

Wear sturdy shoes!

Read the operating instructions before starting operation.
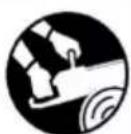
Always operate the chain saw with both hands!
2.5 Scope of supply
The battery-powered chain saw is intended for operation with rechargeable battery B150 Li (B05-3640, Art. No. 113280) or B200 Li (B05-3650, Art. No. 113524).
IMPORTANT! Danger of damage to the appliance and battery. If the appliance is operated with an unsuitable battery, both the device and the battery may be damaged.
■ Only operate the appliance with the specified rechargeable battery.
Charger C130 Li (Art. No. 113281) is required for charging the battery.
NOTE You will find further information in the following operating instructions:
■ Li-Ion rechargeable battery B150 Li / B200 Li (Doc. No. 441630_b)
- Charger C130 Li (Doc. No. 441633)
After unpacking check that all the parts have been delivered.
NOTE The rechargeable battery and the charging unit are not included.
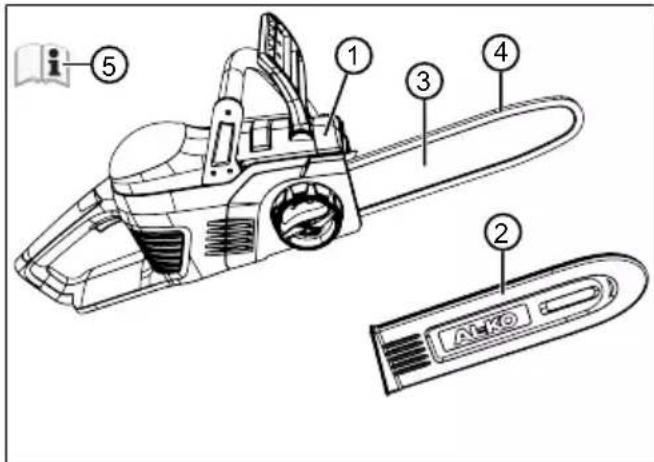
No. Component
| 1 CS 4030 battery-powered chain saw |
| 2 Protective cover for the cutting blade |
| 3 Chain bar |
| 4 Saw chain |
| 5 Operating instructions |
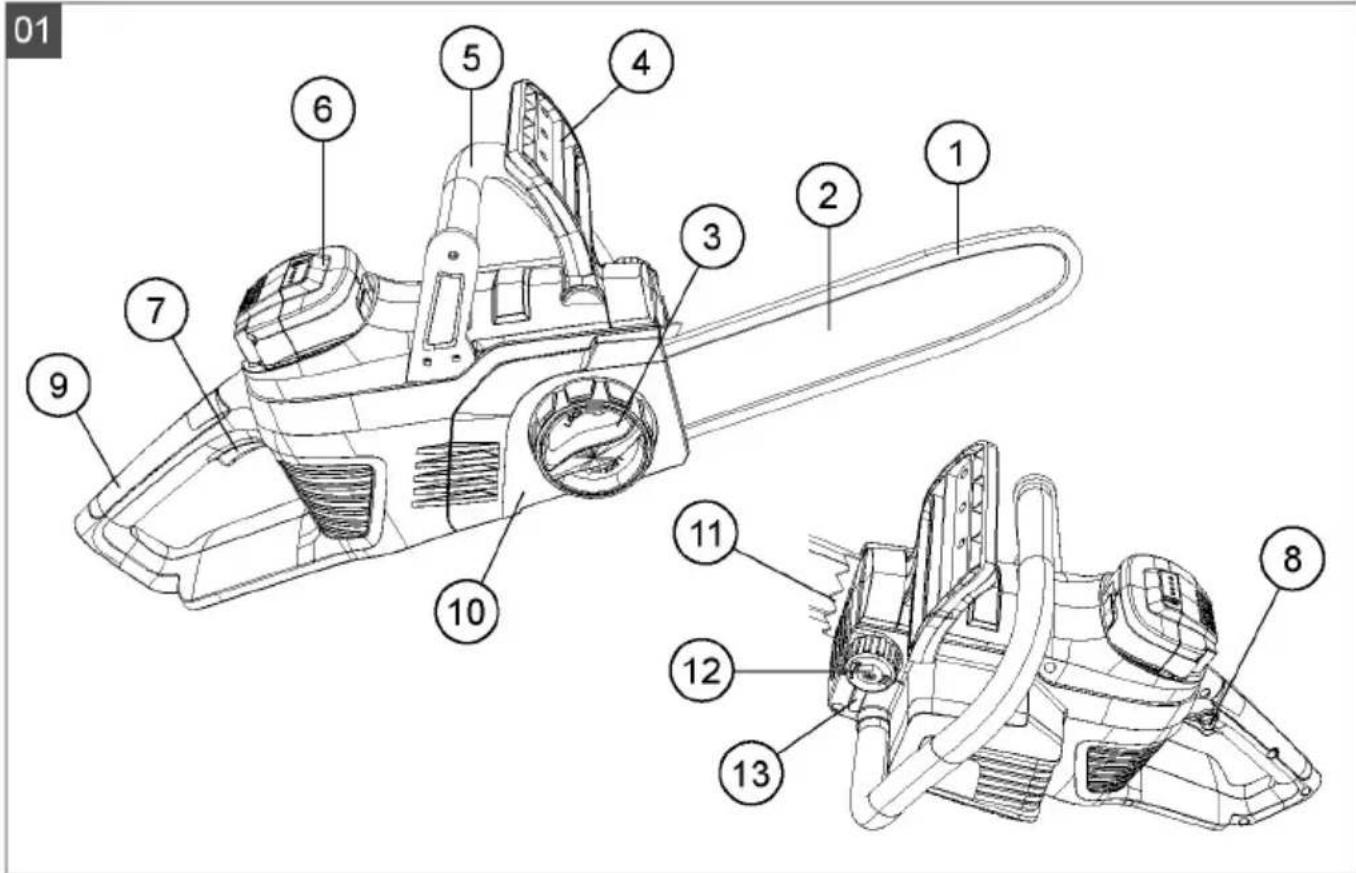
2.6 Product overview (01)
| No. Component |
| 1 Saw chain |
| 2 Chain bar |
| 3 Quick-tension chain wheel with central lock and rotating ring |
| 4 Hand guard |
| 5 Handle |
| 6 Battery |
| 7 Throttle lever |
| 8 Locking button |
| 9 Rear handle |
| 10 Cover for chain sprocket |
| 11 Bumper spike |
| 12 Cap of the chain oil tank |
| 13 Viewing aperture of the chain oil tank |
3 GENERAL POWER TOOL SAFETY WARNINGS
WARNING! Read all safety warnings and all instructions. Failure to follow the warnings and instructions may result in electric shock, fire and/or serious injury.
■ Save all warnings and instructions for future reference.
The term "power tool" in the warnings refers to your mains-operated (corded) power tool or battery-operated (cordless) power tool.
3.1 Work area safety
- Keep work area clean and well lit. Cluttered and dark areas invite accidents.
- Do not operate power tools in explosive atmospheres, such as in the presence of flammable liquids, gases or dust. Power tools create sparks which may ignite the dust or fumes.
- Keep children and bystanders away while operating a power tool. Distractions can cause you to lose control.
3.2 Electrical safety
■ Power tool plugs must match the outlet. Never modify the plug in any way. Do not use any adapter plugs with earthed
(grounded) power tools. Unmodified plugs and matching outlets will reduce risk of electric shock.
- Avoid body contact with earthed or grounded surfaces such as pipes, radiators, ranges and refrigerators. There is an increased risk of electric shock if your body is earthed or grounded.
- Do not expose power tools to rain or wet conditions. Water entering a power tool will increase the risk of electric shock.
- Do not abuse the cord. Never use the cord for carrying, pulling or unplugging the power tool. Keep cord away from heat, oil, sharp edges or moving parts. Damaged or entangled cords increase the risk of electric shock.
- When operating a power tool outdoors, use an extension cord suitable for outdoor use. Use of a cord suitable for outdoor use reduces the risk of electric shock.
If operating a power tools in a damp location is unavoidable, use a residual current device (RCD) protected supply. Use of an RCD reduces the risk of electric shock.
3.3 Personal safety
■ Stay alert, watch what you are doing and use common sense when operating a power tool. Do not use a power tool while you are tired or under the influence of drugs, alcohol or medication. A moment of inattention while operating power tools may result in serious personal injury.
Use personal protective equipment. Always wear eye protection. Protective equipment such as a dust mask, non-skid safety shoes, hard hat, or hearing protection used for appropriate conditions will reduce personal injuries.
■ Prevent unintentional starting. Ensure the switch is in the off-position before connecting to power source and/or battery pack, picking up or carrying the tool. Carrying power tools with your finger on the switch or energizing power tools that have the switch on invites accidents.
■ Remove any adjusting key or wrench before turning the power tool on. A wrench or a key left attached to a rotating part of the power tool may result in personal injury.
- Do not overreach. Keep proper footing and balance at all times. This enables bet-
ter control of the power tool in unexpected situations.
■ Dress properly. Do not wear loose clothing or jewellery. Keep your hair, clothing and gloves away from moving parts. Loose clothes, jewellery or long hair can be caught in moving parts.
If devices are provided for the connection of dust extraction and collection facilities, ensure these are connected and properly used. Use of these devices can reduce dust-related hazards.
3.4 Power tool use and care
- Do not force the power tool. Use the correct power tool for your application. The correct power tool will do the job better and safer at the rate for which it was designed.
- Do not use the power tool if the switch does not turn it on and off. Any power tool that cannot be controlled with the switch is dangerous and must be repaired.
■ Disconnect the plug from the power source and/or the battery pack from the power tool before making any adjustments, changing accessories, or storing power tools. Such preventive safety measures reduce the risk of starting the power tool accidentally.
■ Store idle power tools out of the reach of children and do not allow persons unfamiliar with the power tool or these instructions to operate the power tool. Power tools are dangerous in the hands of untrained users.
- Maintain power tools. Check for misalignment or binding of moving parts, breakage of parts and any other condition that may affect the power tool's operation. If damaged, have the power tool repaired before use. Many accidents are caused by poorly maintained power tools.
- Keep cutting tools sharp and clean. Properly maintained cutting tools with sharp cutting edges are less likely to bind and are easier to control.
Use the power tool, accessories and tool bits etc. in accordance with these instructions, taking into account the working conditions and the work to be performed. Use of the power tool for operations different from those intended could result in a hazardous situation.
3.5 Battery tool use and care
■ Recharge only with the charger specified by the manufacturer. A charter that is suitable for one type of battery pack may create a risk of fire when used with another battery pack.
■ Use power tools only with specifically designated battery packs. Use of any other battery packs may create a risk of injury and fire.
- When battery pack is not in use, keep it away from other metal objects, lie paper-clips, coins, keys, nails, screws or other small metal objects, that can make a connection from one terminal to another. Shorting the battery terminals together may cause burns or a fire.
■ Under abusive conditions, liquid may be ejected from the battery; avoid contact. If contact accidentally occurs, flush with water. If liquid contacts eyes, additionally seek medical help. Liquid ejected form the battery may cause irritation or burns.
3.6 Service
■ Have your power tool serviced by a qualified repair person using only identical replacement parts. This will ensure that the safety of the power tool is maintained.
4 CHAIN SAW SAFETY WARNINGS
- Keep all parts of the body away from the saw chain when the chain saw is operating. Before you start the chain saw, make sure the saw chain is not contacting anything. A moment of inattention while operating chain saws may cause entanglement of your clothing or body with the saw chain.
■ Always hold the chain saw with your right hand on the rear handle and your left hand on the front handle. Holding the chain saw with a reversed hand configuration increases the risk of personal injury and should never be done. - Hold the power tool by insulated gripping surfaces only, because the saw chain may contact hidden wiring. Saw chains contacting a "live" wire may make exposed metal parts of the power tool "live" and could give the operator an electric shock.
■ Wear safety glasses and hearing protection. Further protective equipment for head, hands, legs and feet is recommend-
ed. Adequate protective clothing will reduce personal injury by flying debris or accidental contact with the saw chain.
- Do not operate a chain saw in a tree. Operation of a chain saw while up in a tree may result in personal injury.
■ Always keep proper footing and operate the chain saw only when standing on fixed, secure and level surface. Slippery or unstable surfaces such as ladders may cause a loss of balance or control of the chain saw. - When cutting a limb that is under tension be alert for spring back. When the tension in the wood fibres is released the spring loaded limb may strike the operator and/or throw the chain saw out of control.
■ Use extreme caution when cutting brush and saplings. The slender material may catch the saw chain and be whipped toward you or pull you off balance. - Carry the chain saw by the front handle with the chain saw switched off and away from your body. When transporting or storing the chain saw always fit the guide bar cover. Proper handling of the chain saw will reduce the likelihood of accidental contact with the moving saw chain.
■ Follow instructions for lubricating, chain tensioning and changing accessories. Improperly tensioned or lubricated chain may either break or increase the chance for kick-back. - Keep handles dry, clean, and free from oil and grease. Greasy, oily handles are slippery causing loss of control.
- Cut wood only. Do not use chain saw for purposes not intended. For example: do not use chain saw for cutting plastic, masonry or non-wood building materials Use of the chain saw for operations different than intended could result in a hazardous situation.
5 CAUSES AND OPERATOR PREVENTION OF KICKBACK
Kickback may occur when the nose or tip of the guide bar touches an object, or when the wood closes in and pinches the saw chain in the cut.
Tip contact in some cases may cause a sudden reverse reaction, kicking the guide bar up and back towards the operator.
Pinching the saw chain along the top of the guide bar may push the guide bar rapidly back towards the operator.
Either of these reactions may cause you to lose control of the saw which could result in serious personal injury. Do not rely exclusively upon the safety devices built into your saw. As a chain saw user, you should take several steps to keep your cutting jobs free from accident or injury.
Kickback is the result of tool misuse and/or incorrect operating procedures or conditions and can be avoided by taking proper precautions as given below:
- Maintain a firm grip, with thumbs and fingers encircling the chain saw handles, with both hands on the saw and position your body and arm to allow you to resist kickback forces. Kickback forces can be controlled by the operator, if proper precautions are taken. Do not let go of the chain saw.
- Do not overreach and do not cut above shoulder height. This helps prevent unintended tip contact and enables better control of the chain saw in unexpected situations.
■ Only use replacement bars and chains specified by the manufacturer. Incorrect replacement bars and chains may cause chain breakage and/or kickback. - Follow the manufacturer's sharpening and maintenance instructions for the saw chain. Decreasing the depth gauge height can lead to increased kickback.
6 VIBRATION LOAD
■ Danger due to vibration
The actual magnitude of the vibration emissions during the use of the appliance may deviate from that stated by the manufacturer. Observe the following influencing factors before or during use:
Is the appliance being used as intended?
Is the material being cut or processed in the proper manner?
Is the appliance in a proper condition of use?
Is the cutting tool properly sharpened or is the correct cutting tool installed?
Are the handle grips and any optional vibration grips mounted, and are they firmly attached to the appliance?
■ Only operate the tool at the motor speed required for the respective work. Avoid using the maximum speed in order to reduce noise and vibrations.
The noise and vibrations of the tool may increase due to improper use and maintenance. This leads to health damage. In this case, immediately switch off the tool and have it repaired by an authorised service workshop.
The degree of stress due to vibration depends on the work to be performed or on the use of the tool. Estimate the stress and plan appropriate work breaks. This considerably reduces stress due to vibration over the entire working time.
■ Extensive use of the tool exposes the operator to vibrations, which can lead to circulatory issues ("white fingers"). To avoid this risk, wear gloves and keep your hands warm. If any symptoms of "white fingers" occur, immediately consult a physician. These symptoms include: Numbness, loss of feeling, tingling, itching, pain, reduced muscular strength, changes in the colour or condition of the skin. Normally these conditions affect the fingers, hands or pulse. The risk increases at low temperatures.
Take long breaks during your working day so you can recover from the noise and the vibrations. Plan your work in such a way that the use of appliances that generate strong vibrations is spread over several days.
If you notice an unpleasant sensation or discoloration of the skin on your hands when using the tool, stop work immediately. Take sufficient work breaks. Without sufficient breaks, a hand/arm vibration syndrome can occur.
- Minimise your risk of being exposed to vibrations. Maintain the tool according to the instructions in the operating instructions.
If the tool is used frequently, contact your dealer to purchase anti-vibration accessories (e.g. handles).
- Avoid working with the tool at temperatures below 10 °C. Define how the vibration load can be limited in a work plan.
7 NOISE POLLUTION
A certain level of noise exposure from this appliance is inevitable. Carry out noisy work at approved and specified time periods. Observe rest periods as necessary and restrict the duration of the work to a minimum. For your personal protection and protection of persons in the vicinity, appropriate hearing protection must be worn.
8 SAFETY INFORMATION REGARDING THE RECHARGEABLE BATTERY
This section mentions all the basic safety information to be heeded when using the rechargeable battery. Read these instructions.
■ Only use the rechargeable battery as designated, i.e. for AL-KO rechargeable battery-driven appliances. Only charge the rechargeable battery with the AL-KO charging unit
■ Only unpack the new rechargeable battery from the original packaging when it is to be used.
■ Fully charge the rechargeable battery before using it for the first time and always use the specified charger. Comply with the details given in these instructions for use for charging the rechargeable battery.
- Do not use the rechargeable battery in environments where there is a potential risk of explosion and/or fire.
- Do not expose the rechargeable battery to moisture and humidity when in use with the appliance.
■ Protect the rechargeable battery from heat, oil and fire to prevent it being damaged so no vapours and electrolyte liquids can escape. There is a danger of explosion!
- Do not subject the rechargeable battery to impacts or throw it.
- Do not use the rechargeable battery when soiled or wet. Before use, clean and dry the rechargeable battery with a dry, clean cloth.
When the battery pack is not in use, keep it away from other metal objects to prevent bridging the contacts (e.g. paper clips, coins, keys, nails, screws). Do not use sharp objects (e.g. a screwdriver) to work on the battery. This can cause an internal short circuit which can lead to overheating, fire or explosion of the battery.
- Do not open, dismantle or crush the rechargeable battery. There is a danger of electric shock and short-circuit.
An improperly used and damaged rechargeable battery can cause vapours and electrolyte liquid to escape. Vent the room adequately and in the case of any disorders, con-
sult a doctor.
If accidental contact with electrolyte liquid occurs, flush with water and thoroughly rinse the eyes immediately. Then consult a doctor.
This rechargeable battery must not be used by unauthorised persons unless they are supervised by a person responsible for their safety or have been instructed on how to use the rechargeable battery. Unauthorised persons include, for example:
■ Persons (including children) with limited physical, sensory or mental aptitude.
■ Persons who have no experience and/or knowledge of the rechargeable battery.
Children must be supervised and instructed so they do not play with the rechargeable battery.
- Do not leave the rechargeable battery permanently in the charger. For prolonged storage, remove the rechargeable battery from the charger.
- When not in use, remove the rechargeable batteries from the operated appliances.
Dry the unused rechargeable battery and store in a closed place. Protect from heat and direct sunlight. Unauthorised persons and children must not have access to the rechargeable battery.
9 SAFETY INFORMATION REGARDING THE CHARGING UNIT
This section mentions all the basic safety and warning information to be heeded when using the charging unit. Read these instructions.
■ Only use the charging unit as designated, i.e. for charging the intended rechargeable batteries. Only charge original rechargeable batteries from AL-KO in the charging unit.
Before each use, inspect the charging unit – and especially the mains cable and the rechargeable battery compartment – for damage. Only use the charging unit when it is in proper working order.
- Do not use the charging unit in environments where there is a potential risk of explosion and/or fire.
■ Only operate the charging unit indoors and do not expose it to moisture and humidity.
■ Always place the charging unit on a well ventilated and non-inflammable surface because it heats up during the charging process. Keep
the ventilation slots clear and do not cover the charging unit.
Before connecting the charging unit, make sure that the mains voltage matches the voltage stated in the "Technical data".
■ Only use the mains cable for connecting the charging unit, not for any other purpose. Do not carry the charging unit by the mains cable and do not remove the power plug from the power outlet by pulling on the mains cable.
■ Protect the mains cable from heat, oil and sharp edges to prevent it being damaged.
- Do not use the charging unit and rechargeable battery when soiled or wet. Before using the charging unit, clean and dry the rechargeable battery.
- Do not open the charging unit or rechargeable battery. There is a danger of electric shock and short-circuit.
For your own safety, only have the charging unit repaired by qualified specialist personnel using genuine spare parts.
This appliance can be used by children of 8 years and older and by persons with reduced physical, sensory or mental capabilities, or those lacking experience and knowledge, if they are supervised or have been instructed with regard to the safe use of the appliance and the ensuing risks. Children must not be allowed to play with the appliance. Cleaning and maintenance must not be carried out by children without supervision.
■ People with very strong and complex restrictions may have needs that exceed the instructions described here.
Dry the unused charging unit and store in a closed place. Unauthorised persons and children must not have access to the charging unit.
10 SAFETY INFORMATION WHEN WORKING
■ Heed the country-specific safety regulations, e.g. from the relevant trade associations, social security systems, authorities for industrial safety.
■ Only work in sufficient daylight or artificial lighting.
- Keep the working area free from objects (e.g. off-cuts) – danger of stumbling.
■ The user is responsible for accidents involving other people and their property.
If you are working with a chain saw for the first time:
- Have the salesperson or another expert explain the operation of the chain saw, or attend a course.
Prior to the first use, at the very least practice cutting round wood on a saw frame or stand.
10.1 Operator
■ Young people under 16 years of age and people who do not know the operating instructions are not allowed to use the tool.
To operate the chain saw, you must be rest-ed and in good physical and mental health. If you must not exert yourself for health reasons, ask your doctor whether it is possible to work with a chain saw.
10.2 Operating times
Heed the country-specific regulations for the operating times of chain saws. The operating times of chain saws can be limited by national and local regulations.
10.3 Working with the chain saw
WARNING! Danger of serious injury. If an incompletely mounted chain saw is used, serious injury can be caused.
■ Only use the chain saw when it has been fully mounted.
Before each use, perform a visual inspection in order to check that the chain saw is complete and does not contain damaged or worn components. Safety and protective devices must be intact.
WARNING! Risk of injury due to chain saw being started inadvertently. A chain saw that is started inadvertently can lead to serious injury. Therefore, remove the rechargeable battery during:
■ Testing, adjustment work and cleaning work
■ Work on the cutting equipment
■ Leaving the chain saw
Transport
Storage
■ Maintenance and repair work
Danger
■ Never work alone.
■ Always keep a first-aid kit to hand in case of accidents.
- Avoid touching metal objects in the ground or which are conductively connected to the ground.
■ The personal protective equipment comprises:
- Protective helmet
■ Hearing protection (e.g. ear defenders, especially when working for than 2.5 hours a day)
■ Protective glasses or face visor incorporated in the protective helmet
■ Protective trousers with cut protection in-lay
Sturdy working gloves
Safety boots with high-grip sole and steel toe caps
- Do not use the chain saw above shoulder height, since safe handling is no longer possible in this way.
■ When changing position, switch off the engine and put on the chain guard. - When chain saws are not in use, always put on the chain guard and remove the rechargeable battery.
■ Switch the chain saw off before putting it down. - Do not use the chain saw for levering or moving wood.
■ Only specialist personnel are allowed to saw trunks that are thicker than the length of the chain bar.
■ Only start the cut once the saw chain is running, never switch on the chain saw already in the kerf.
■ Make sure that no saw chain oil gets onto the ground. - Do not undertake sawing work in the rain, snow or stormy weather.
■ Never disable safety and protective devices.
11 INSTALLATION
WARNING! Danger of serious injury. If an incompletely mounted chain saw is used, serious injury can be caused.
■ Only use the chain saw when it has been fully mounted.
Before each use, perform a visual inspection in order to check that the chain saw is complete and does not contain damaged or worn components. Safety and protective devices must be intact.
CAUTION! Danger of laceration injuries.
The sharp edges of the saw chain can cause laceration injuries when assembling.
■ Before installation, remove the rechargeable battery.
■ Wear safety gloves when installing the saw chain and the guide rail.
11.1 Installing the guide rail (05, 06)
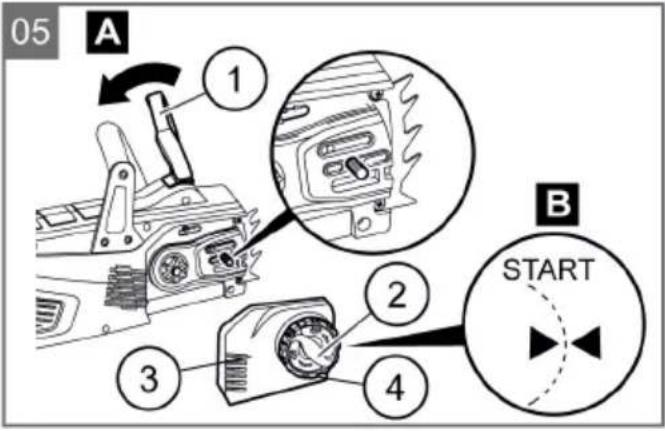
- Pull hand guard (05/1) in the direction of the handle (05/A) in order to release the chain brake.
- Turn the central lock (05/2) anti clockwise and remove together with the cover (05/3).
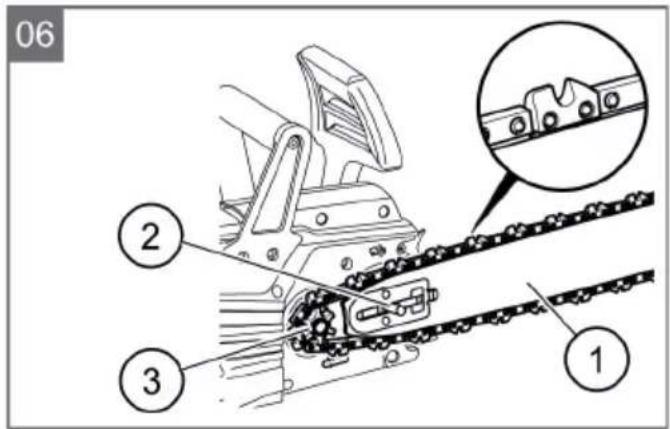
- Set the guide rail (06/1) on the guide pin (06/2) and push so far back that the saw chain can be mounted.
11.2 Installing the saw chain (05, 06)
- Place the saw chain on the chain sprocket (06/3) and in the groove of the chain bar (06/1).
- Guide the saw chain around the reversing sprocket of the chain bar. The saw chain must hang down slightly on the underside of the chain bar.
- Put the cover (05/3) and tighten the central lock (05/2) slightly.
11.3 Tightening the saw chain (05, 07)
NOTE The saw chain has been tensioned correctly when:
It is in contact with the underside of the guide rail and can be pulled through by hand
It can be lifted by 3 – 4 mm in the middle of the guide rail
-
Check the seat of the saw chain so that it sits correctly on the chain sprocket and in the chain bar.
-
Turn the rotating ring (05/4) towards the cover (05/3) so that the two triangles face each other (05/B).
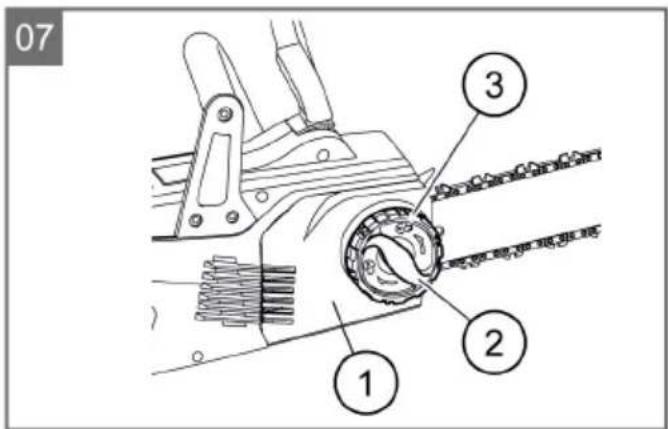
- Put on the cover (07/1) and turn the central lock (07/2) clockwise. Do not tighten the central lock fully or turn back by one turn.
- Turn the rotating ring (07/3) clockwise until the saw chain has been tensioned correctly as described above.
- Turn the central lock (07/2) clockwise until it is fixed in place.
12 START-UP
⚠️ DANGER! Danger of fatal injury and danger of extremely severe injury. Lack of knowledge of the safety instructions and operating instructions can lead to extremely serious and even fatal injury.
Read and follow all safety instructions and instructions for use in these operating instructions as well the operating instructions which are referred to before you start using the chain saw.
WARNING! Danger of serious injury. Serious injury can be caused if there are damaged components on the chain saw.
Before each use, perform a visual inspection in order to check that the chain saw is complete and does not contain damaged or worn components. Safety and protective devices must be intact.
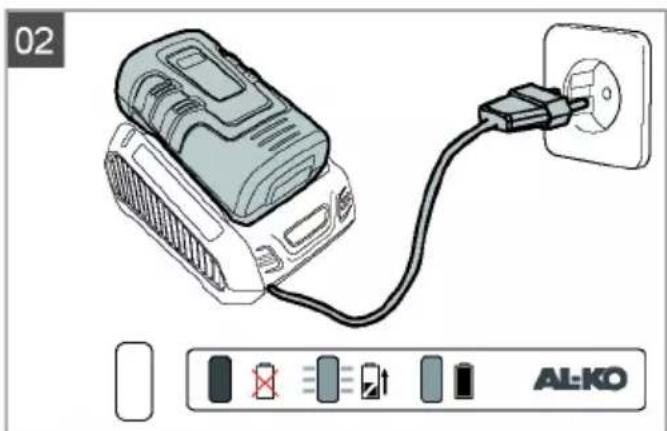
12.1 Charging the rechargeable battery (02)
The rechargeable battery is partially charged. Fully charge the rechargeable battery before using it for the first time. The rechargeable battery can be charged in any charge status. Interrupting charging does not damage the rechargeable battery.
NOTE For detailed information, heed the separate operating instructions for the rechargeable battery and for the charging unit.
12.2 Inserting the rechargeable battery (03)
- Push (03/A) the rechargeable battery (03/1) into the rechargeable battery slot (03/2) from above until it engages.
12.3 Pulling out the rechargeable battery (03)
-
Press and hold the unlock button (03/3) on the rechargeable battery (03/1).
-
Pull out (03/B) the rechargeable battery (03/1).
12.4 Checking the chain tension
Frequently check the chain tension, because new saw chains stretch.
At operating temperature, the saw chain stretches and hangs down.
NOTE The saw chain has been tensioned correctly when:
It is in contact with the underside of the guide rail and can be pulled through by hand.
It can be lifted by 3 – 4 mm in the middle of the guide rail.
CAUTION! Danger of injury due to the saw chain jumping off! An insufficiently tensioned saw chain can jump off during operation and lead to injury.
■ Frequently check the chain tension. The chain tension is too low if the drive links come out of the groove on the underside of the chain bar.
■ Re-tension the saw chain properly if the chain tension is too low.
12.5 Testing the function of the chain brake
The chain saw has a manual chain brake that is triggered by the hand guard, for example if kick-back occurs.
When the chain brake is triggered, the saw chain is abruptly stopped and the engine switched off.
⚠️ DANGER! Danger of fatal injury as a result of negligent handling! Extremely serious injury and even fatal injury can be caused as a result of careless and unexpected movements of the chain saw.
■ Pay attention to safety and work with a high level of concentration when using the chain saw.
- Do not press any switch when releasing the chain brake.
WARNING! Danger of fatal injury and danger of extremely severe injury due to a defective chain brake. Extremely serious injury and even fatal injury of the operator can be caused if the chain brake does not function, e.g. due to kickback by the running saw chain.
- Check the chain brake each time before starting work.
- Do not switch the chain saw on if the chain brake is defective. in this case, have the chain saw checked in a customer service workshop.
12.6 Function test of the chain brake with the engine switched off (08)
- Pull the rechargeable battery out of the appliance, see chapter see chapter 12.3 "Pulling out the rechargeable battery (03)", page 36.
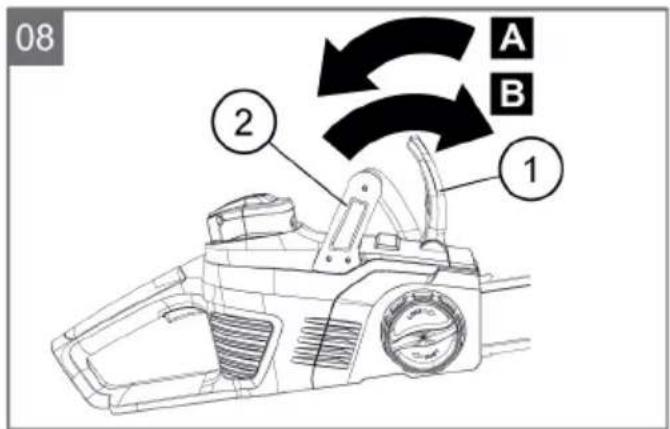
- To release the chain brake, pull (08/A) the hand guard (08/1) in the direction of the handle (08/2). The saw chain can be pulled through by hand.
- Push the hand guard (08/1) forwards (08/B) to switch on the chain brake. It must not be possible to pull the saw chain through.
12.7 Function test of the chain brake with the motor switched on (08)
i NOTE Release the chain brake each time before switching on the chain saw.
- Hold the chain saw securely and firmly by the handle and hand grip.
- Release the chain brake.
- Switch on the engine.
- Push the hand guard (08/1) forwards (08/B). The saw chain and engine must stop immediately.
12.8 Filling saw chain oil (09)
IMPORTANT! Danger of damaging the
chain saw. The chain saw will be severely damaged if there is too little or even no saw chain oil in the tank or if it has dried/is sticky. Dried/sticky saw chain oil can lead to damage to oil-channeling components and the oil pump. Damage also occurs if used oil is used. The use of used oil leads to environmental damage!
■ For start-up work, fill saw chain oil into the tank.
■ Do not use any used oil!
■ Each time before changing the rechargeable battery at the latest, fill the tank with saw chain oil again.
The saw chain and the chain bar are continuously supplied with oil during operation by means of an automatic oiler system. The saw chain oil protects against corrosion and premature wear.
There must always be sufficient saw chain oil in the tank to lubricate the saw chain sufficiently.
To lubricate the saw chain and the chain bar, only use environmentally friendly, biodegradable, high-quality saw chain oil. This oil must be transported and stored in approved and appropriately labelled containers.
Each time before starting work or changing the rechargeable battery, check the oil level and replenish the saw chain oil if necessary:
-
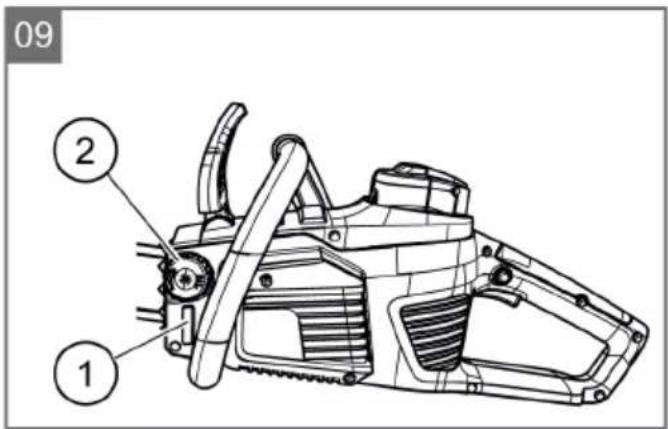
Check the oil level in the viewing aperture of the tank (09/1). It must always be possible to see oil. The minimum and the maximum oil level must not be exceeded.
-
Refill saw chain oil via the filler neck (09/2) if necessary.
13 OPERATION
⚠️ DANGER! Danger of fatal injury and danger of extremely severe injury. Lack of knowledge of the safety instructions and operating instructions can lead to extremely serious and even fatal injury.
Read and follow all safety instructions and instructions for use in these operating instructions as well the operating instructions which are referred to before you start using the chain saw.
■ Comply with working time regulations in force in your country.
Grip the rear handle firmly with your right hand and the bow handle with your left hand, and hold them tightly.
- Do not release the handles as long as the motor is running.
■ Do not use the chain saw if you are:
Tired
Unwell
■ Under the influence of alcohol, medicines and drugs
13.1 Determining the charge status of the rechargeable battery (04)
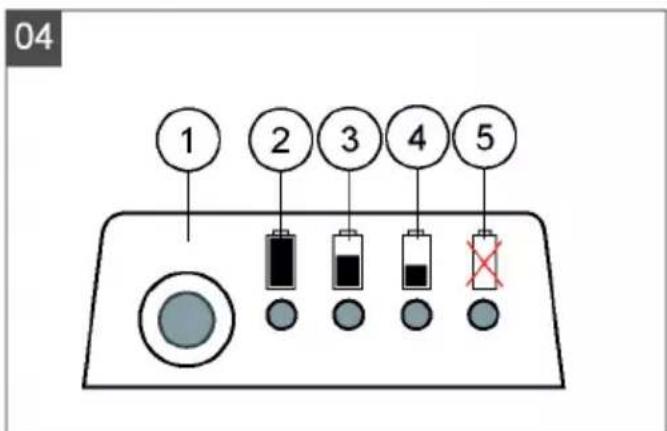
There is a control panel with a push-button (04/1) and LED charge status displays (04/2 to 04/5) on the front of the rechargeable battery.
- Press the push-button (04/1).
The charge status displays light according to the charge status of the rechargeable battery.
- Read off the charge status.
| Lighting LEDs | Charge status of the rechargeable battery |
| Green (04/2) | The rechargeable battery is fully charged. |
| Green (04/3) and (04/4) | Rechargeable battery is charged to over 50 %. |
| Green (04/4) | Rechargeable battery is charged to less than 50 %. |
| Red (04/5) | The rechargeable battery is fully discharged or the rechargeable battery has been overheated/undercooled. |
13.2 Check the saw chain oil
Procedure see chapter 12.8 "Filling saw chain oil (09)", page 38.
IMPORTANT! Danger of damaging the chain saw. The chain saw will be severely damaged if there is too little or even no saw chain oil in the tank or if it has dried/is sticky. Dried/sticky saw chain oil can lead to damage to oil-channeling components and the oil pump. Damage also occurs if used oil is used. The use of used oil leads to environmental damage!
■ Each time before starting work, check that enough saw chain oil is present in the tank.
If the oil level is low, refill saw chain oil.
■ Do not use any used oil!
13.3 Testing the chain brake
Procedure see chapter 12.5 "Testing the function of the chain brake", page 37.
WARNING! Danger of fatal injury and danger of extremely severe injury due to a defective chain brake. Extremely serious injury and even fatal injury of the operator can be caused if the chain brake does not function, e.g. due to kickback by the running saw chain.
- Check the chain brake each time before starting work.
- Do not switch the chain saw on if the chain brake is defective. in this case, have the chain saw checked in a customer service workshop.
13.4 Switching the engine on and off
CAUTION! Danger of hearing impairment! The operation of the chain saw causes intense noise that can cause hearing impairment.
■ During work with the chain saw, wear ear defenders.
i NOTE Release the chain brake each time before switching on the chain saw.
Switching on the engine:
- Release the chain brake.
- Press and hold locking button (01/8) with your thumb.
- Press and hold the throttle lever (01/7).
- Release the locking button (01/8). It is not necessary to keep the locking button pressed once the chain saw has started. The locking button is intended to prevent inadvertent starting of the chain saw.
Switching off the engine:
- Release the throttle lever (01/7).
14 WORKING BEHAVIOUR AND WORKING TECHNIQUE
i NOTE Courses in the use of chain saws and techniques for felling trees are regularly held by various forestry organisations.
⚠️ DANGER! Danger of fatal injury due to inadequate technical knowledge! Inadequate technical knowledge can result in extremely serious up to fatal injury!
■ Only trained and experienced people are allowed to fell trees and lop branches.
⚠️ DANGER! Danger of fatal injury from splintered wood! Wood chips caught up in the chain can cause extremely serious and even fatal injury!
■ Remove loose chips and wood splinters from the part to be sawn.
14.1 Felling trees
Take the following measures before starting felling work.
■ Make sure that no other people, animals or objects are in the danger area.
■ The safe distance from other workplaces or objects should be at least 212 tree lengths.
- Watch out for power lines and other people's property. If necessary, notify the power supply company or the property owner.
■ Judge the falling direction of the tree. Factors influencing the falling direction of the tree:
Natural lean of the tree
Height of the tree
■ Branches growing on one side
■ Level ground or slope
■ Asymmetrical growth, wood damage
■ Wind direction and wind speed
Snow load
■ When working on a slope, always work uphill of the tree to be felled.
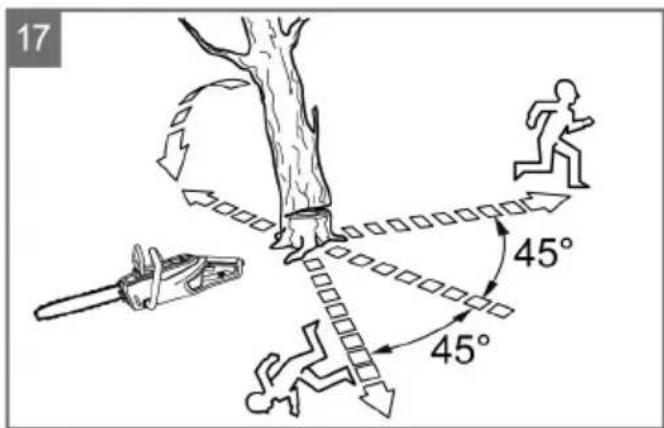
- Establish your escape route in advance, and make sure that there are no obstacles in the way. The escape route should be at an angle of approx. 45° backwards from the falling direction (17).
The trunk must be free from growth, branches and foreign bodies (e.g. dirt, stones, loose bark, nails, staples, wire, etc.).
Make two undercuts and one back cut in order to fell a tree.
- During back cuts and cross-cuts, place the bumper spike firmly against the wood to be cut.
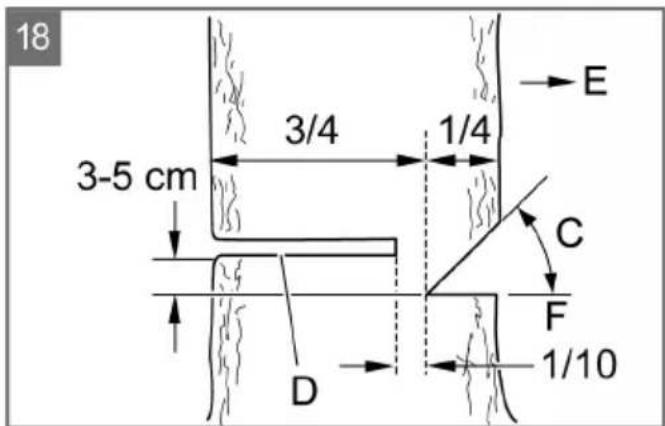
- Saw the first undercut (18/C) horizontally, then the second undercut at an angle of at least 45^ from above. This prevents the chain saw becoming trapped when you make the second undercut. The undercut must be as close as possible to the ground and in the required felling direction (18/E). The depth of
the undercut should be about 1/4 of the diameter of the trunk.
- Cut the back cut (18/D) exactly horizontally opposite to the undercut. The back cut must be made 3-5 cm above the horizontal undercut.
- Saw in the back cut (18/D) sufficiently deep so that a bridge (18/F) of at least 1/10 the trunk diameter remains between the undercut (18/C) and the back cut (18/D). This bridge prevents the tree from twisting and falling in the wrong direction. The tree should start to fall when the back cut (18/D) approaches the bridge (18/F).
If the tree falls whilst you are sawing:
- Interrupt the back cut if the tree does fall in the wrong direction or leans back and traps the chain saw. To open the cut and fell the tree, drive in wedges in the direction of the required felling line.
-
Immediately pull the chain saw from the cut, switch it off and put it down.
■ Walk away in the direction of the escape route.
■ Watch out for falling branches and twigs. -
If the tree remains standing, drive wedges into the back cut in order to cause it to fall in a controlled way.
- At the end of sawing work, immediately remove your ear defenders and listen out for signals or warning calls.
NOTE Only use wedges made from wood, plastic or aluminium.
⚠️ DANGER! Danger of fatal injury from a falling tree! Having no escape route when felling a tree represents a danger of serious and even fatal injury!
- Do not start the felling work until you are sure there is an unobstructed escape route away from the tree to be felled.
⚠️ DANGER! Danger of fatal injury from an uncontrollably falling tree! Uncontrolled falling trees can lead to extremely serious and even fatal injury!
In order to guarantee controlled felling of a tree, leave a bridge between the undercut and the back cut. The length of this bridge should be approx. 1/10 of the trunk diameter.
- Do not carry out any felling work in windy conditions.
14.2 Branch lopping
Heed the following points during this work:
■ Support the chain saw against the tree trunk during the work.
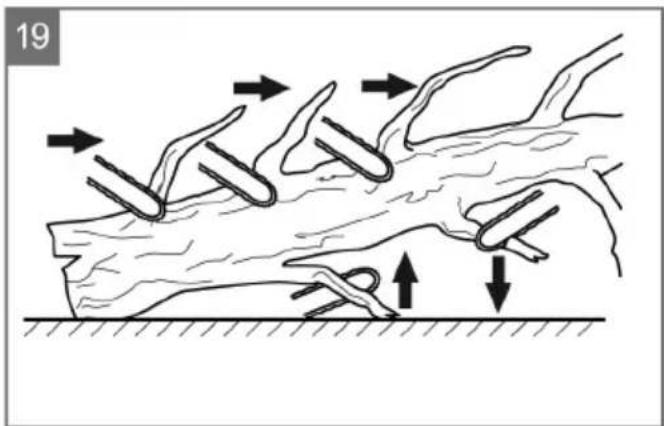
In the preliminary phase, leave larger, downward-pointing branches that are supporting the tree (19).
- Cut off smaller branches with one cut.
■ Pay attention to branches under tension, and saw through these from underneath upwards in order to avoid the chain saw becoming trapped (19).
- Do not saw off free-hanging branches from underneath.
■ Only experienced or trained people should make plunge cuts, longitudinal cuts and boring cuts (18).
14.3 Cross-cutting
Heed the following points during this work:
■ When working on a slope, always stand uphill from the tree trunk, because it could roll away (19).
■ Guide the chain saw so that there is no part of your body in the extended sweep arc of the saw chain.
■ Position the bumper spike directly adjacent to the cut edge and allow the chain saw to pivot about this point. Do not exert any pressure at the end of the cut.
■ Make sure that the saw chain does not touch the ground.
At the end of the cut, wait for the saw chain to come to a halt before you remove the chain saw.
■ Always switch off the engine of the chain saw before you go to the next tree.
The entire length of the tree trunk is in contact with the ground:
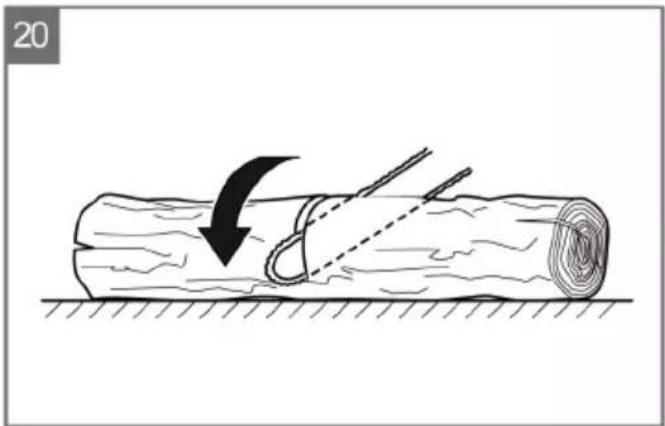
■ Saw through the tree trunk from above, without cutting into the ground (20).
Tree trunk is lying raised at one end:
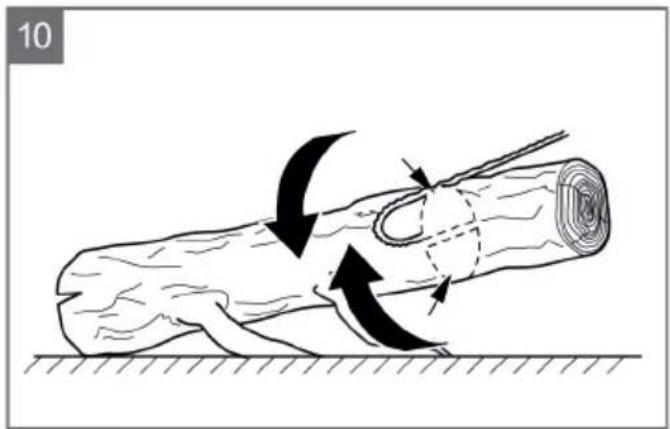
To prevent the chain saw becoming trapped and the wood splintering, first saw through 1/3 of the trunk diameter from below, then saw through the remainder from above, down as far as the cut made from underneath (10).
Tree trunk is lying raised at both ends:
To prevent the chain saw becoming trapped and the wood splintering, first saw through 1/3 of the trunk diameter from above, then saw through the
remainder from underneath, up as far as the cut made from above (11).
⚠️ DANGER! Danger of fatal injury due to kickback! The operator can be fatally injured by kickback of the appliance.
It is essential to comply with the measures in order to avoid any kickback.
14.4 Cutting converted timber (12)
Heed the following points during this work:
■ Use a secure cutting surface (sawing trestle, wedges, beams).
■ Make sure you are standing securely and that your bodyweight is evenly distributed.
- Secure logs to prevent them twisting.
■ Only start the cut once the saw chain is running. Never switch on the chain saw already in the kerf.
- Do not secure the wood with your foot and do not get another person to hold it.
15 MAINTENANCE AND CARE
WARNING! Danger of lacerations. Danger of cutting injuries when reaching into sharpedged, moving appliance parts and into cutting tools.
■ Before maintenance, care and cleaning work, always switch off the appliance. Remove the rechargeable battery.
■ Always wear protective gloves during maintenance, care and cleaning work.
The chain saw complies with all relevant safety standards. Repairs are only allowed to be performed by qualified specialists, and with the exclusive use of genuine spare parts.
■ After each use, check the chain saw for wear and renew any damaged components.
- Do not get the machine wet or expose it to moisture. Clean plastic parts with a cloth and do not use any cleaning agents or solvents.
■ Clean the cooling air slots if they are blocked.
- Do not spray the chain saw not with water and do not use a high-pressure cleaner.
■ Only use spare parts specified by the manufacturer.
15.1 Sharpening the saw chain (13)
⚠️ DANGER! Danger of fatal injury due to kickback! Improperly sharpened saw chain increases the danger of kickback and thus the danger of fatal injury.
■ Sharpen the saw chain properly to reduce the risk of kickback.
CAUTION! Danger of injury from the saw chain! The sharp edges of the saw chain can cause serious laceration injuries.
■ Wear protective gloves when resharpening the saw chain.
IMPORTANT! Damage to the machine due to incorrect sharpening! Uneven cutting teeth mean that the chain runs roughly and may even break. All cutting teeth must have the same length and width after sharpening.
■ Sharpen the saw chain properly.
NOTE Inexperienced chain saw operators are recommended to have the saw chain sharpened by a specialist at the customer service.
Do not work with a blunt or damaged saw chain. The consequences include physical strain, a poor cutting result and high levels of chain wear.
To achieve an optimum cutting result, it is necessary for the saw chain to be resharpened at regular intervals.
A correctly sharpened saw chain reduces the danger of kickback and prevents high levels of wear.
Sharpening is required if:
■ The saw chips are like sawdust.
■ Greater force is necessary for cutting.
■ The cut is not straight.
■ Vibration increases.
■ Fuel consumption increases.
To sharpen the chain:
- Switch off the chain saw and remove the rechargeable battery.
- Check the chain tension and adjust it if necessary.
-
Only use a suitable tool for sharpening: Round chain file = 4.0 mm, file guide, chain gauge. These tools are available from specialist retailers.
-
The individual chain links consist of a saw link (13/3), saw tooth (13/1) and a depth limiter (13/2).
- Guide the file from the inside to the outside of the cutting tooth, exerting slight pressure and holding it perpendicular (13). A file guide is helpful for handling the file correctly. 2 – 3 file strokes are sufficient.
- When sharpening, maintain the angles (13) on the cutting tooth and the height of the depth limiter (13/2) in relation to the cutter. Make sure that all cutting teeth on the chain have equally length and width after sharpening.
- If using the prescribed tools and the correct handling, the specified angle values will be obtained automatically. The values can be checked with a chain gauge.
- At the end, slightly round off the front part of the depth limiter (13/2).
Sharpen the saw chain frequently, without removing much material while doing so. After sharpening 3 to 4 times yourself, have the saw chain re-sharpened by a specialist workshop. This also involves resharpening the depth limiter.
Renew the saw chain as soon as the minimum cutting tooth length of 4 mm (13) is reached.
15.2 Cleaning the chain sprocket interior
Thoroughly clean the chain saw after each use.
- Remove the rechargeable battery and place the chain saw on a stable base.
- Unscrew the sprocket cover.
- Clean the inside with a suitable brush.
- Remove the saw chain and take out the chain bar.
- Clean the groove in the bar and the oil inlet hole.
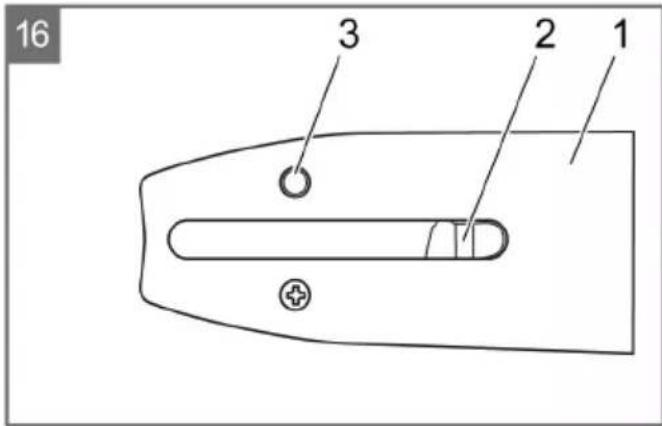
15.3 Changing over the quick-tension chain wheel (16)
- Remove the guide rail (16/1).
-
Unscrew the Phillips screw (16/3) and release the adapter sheet metal from the guide rail with the tensioning hook (16/2).
-
Turn the guide rail around the longitudinal axis.
- Attach the adapter sheet metal to the chain bar with the tensioning hook again and fix in place with the Phillips screw again.
- Mount the chain bar again, see chapter 11.1 "Installing the guide rail (05, 06)", page 36.
15.4 Checking, turning and greasing the guide rail (14, 15)
Checking the guide rail
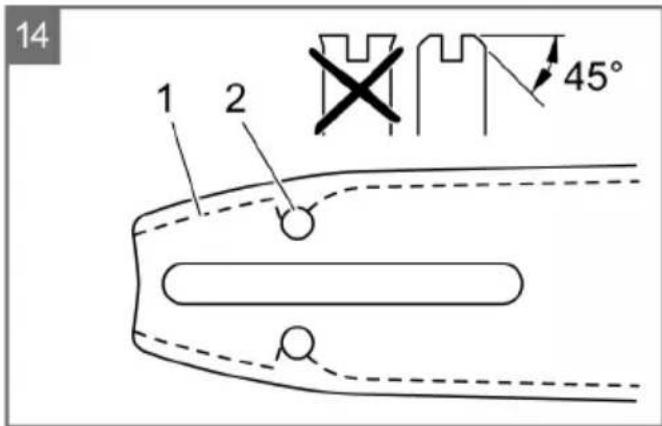
Regularly check the guide rail for damage. Remove any projecting burrs (14).
Turning the guide rail
The chain bar must be turned over after each chain sharpening and chain change in order to avoid one-sided wear.
- Change over the quick-tension chain wheel on the guide rail, see chapter 15.3 "Changing over the quick-tension chain wheel (16)", page 42.
- Turn the guide rail.
Greasing the guide rail
- Carefully clean groove in bar (14/1) and oil inlet hole (14/2).
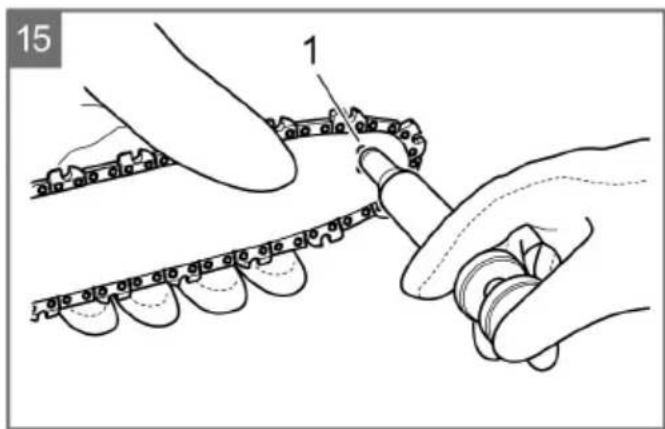
- Carefully clean lubricating hole (15/1) from both sides.
- Use a suitable grease gun to pump in sufficient grease from both sides in succession until the grease emerges evenly at the tips of the sprocket. Keep turning the sprocket when doing this.
16 HELP IN CASE OF MALFUNCTION
CAUTION! Risk of injury. Sharp-edged and moving appliance parts can lead to injury.
■ Always wear protective gloves during maintenance, care and cleaning work.
■ Switch off the appliance and remove the rechargeable battery.
NOTE For malfunctions that are not listed in this table or that you cannot resolve yourself, please contact our customer service.
| Malfunction Cause Remedy | ||
| Motor does not run. No battery voltage present. Have the power supply checked by a qualified electrician. | ||
| Chain brake engaged. Release the chain brake. | ||
| The guide rail and saw chain become hot when running. Generation of smoke. | The saw chain is tensioned too tightly. | Reduce chain tension. |
| Oil tank is empty. Replenish the saw chain oil. Inspect the oil tank for damage. | ||
| The oil entry hole and/or groove of the guide rail are dirty. | Clean the oil entry hole and groove of the guide rail. | |
| Engine running, but the saw chain does not move. | The saw chain is tensioned too tightly. | Reduce chain tension. |
| Device errors Contact an AL-KO service centre. | ||
| Only sawdust is thrown out, rather than wood chips. The chain saw has to be pushed through the wood. | The saw chain is blunt. Sharpen the saw chain or contact an AL-KO service centre. | |
| Device vibrates unusually. Device errors Contact an AL-KO service centre. | ||
17 TRANSPORT
WARNING! Danger of fatal injury and danger of extremely severe injury. During transport, a running saw chain can lead to extremely serious and even fatal injury.
■ Never carry and transport the chain saw with the saw chain running.
■ Before transporting, carry out the measures mentioned above.
Before transporting, carry out the following measures:
- Switch off the chain saw and remove the rechargeable battery.
- Fit the chain guard.
- Carry the chain saw only at the bow handle. Guide rail and saw chain should be facing to the rear.
- In vehicles: Secure the chain saw against tipping over, damage and leakage of chain oil.
18 STORAGE
Thoroughly clean the chain saw after each use. Store it in a dry, lockable place out of the reach of children.
Carry out the following jobs before intervals in work lasting for longer than 30 days:
■ Switch off the chain saw and remove the rechargeable battery.
■ Empty the oil tank for the saw chain oil.
■ Remove the saw chain and guide rail, clean it and spray it with rust-proofing oil.
■ Thoroughly clean the chain saw and store it in a dry place.
IMPORTANT! Danger of damage to the appliance. Dried/sticky saw chain oil can lead to damage to oil-channelling components or the oil pump after lengthy storage.
■ Remove the saw chain oil from the chain saw before each extended period of storage.
19 DISPOSAL
Information on the German Electrical and Electronic Equipment Act (ElectroG)

Electrical and electronic appliances do not belong in household waste, but should be collected and disposed of separately.
■ Used batteries or rechargeable batteries that are not installed permanently in the old appliance must be removed before disposal. Their disposal is regulated by the battery law.
- Owners or users of electrical and electronic appliances are obliged by law to return them after use.
The end user bears personal responsibility for deleting his personal data from the old appliance to be disposed of.
The symbol of the crossed-through rubbish bin means that electrical and electronic appliances may not be disposed of in the household rubbish.
Electrical and electronic appliances can be handed in at the following places at no charge:
■ Public service disposal or collection points (e.g. municipal building yards)
■ Points of sale of electrical appliances (stationary and online) provided traders are obliged to take them back or offer this voluntarily.
These statements only apply to appliances that are installed and sold in the countries of the European Union and are subject to European Directive 2012/19/EU. Different provisions may apply to the disposal of electrical and electronic appliances in countries outside the European Union.
Information on the German Battery Act (BattG)

■ Used batteries and rechargeable batteries do not belong in household waste, but should be collected and disposed of separately.
For safe removal of batteries or rechargeable batteries from the electrical appliance and for information on their type or chemical system, follow the further information within the operating or installation instructions.
- Owners or users of batteries and rechargeable batteries are obliged by law to return them after use. Return is limited to the handover of customary household quantities.
Used batteries can contain harmful substances or heavy metals that can cause damage to the environment and human health. Reuse of the used batteries and use of the resources contained therein contributes to the protection of these two essential commodities.
The symbol of the crossed-through rubbish bin means that batteries and rechargeable batteries may not be disposed of in household rubbish.
In addition, if the symbol Hg, Cd or Pb appears under the rubbish bin, this stands for the following:
■ Hg: Battery contains more than 0.0005 % mercury
Cd: Battery contains more than 0.002 % cadmium
■ Pb: Battery contains more than 0.004 % lead Rechargeable batteries and batteries can be handed in at the following places at no charge:
■ Public service disposal or collection points (e.g. municipal building yards)
■ Points of sale of batteries and rechargeable batteries
■ Disposal points of the common take-back system for the used batteries of appliances
■ Disposal point of the manufacturer (if not a member of the common take-back system)
These statements apply only to rechargeable batteries and batteries that are sold in the countries of the European Union and that are subject to European Directive 2006/66/EU. Different provisions can apply to the disposal of rechargeable batteries and batteries in countries outside the European Union.
20 TECHNICAL DATA
| Type CS 4030 | |
| Item no. 113616 | |
| Idling speed 17 m/s | |
| Operating speed 16 m/s ± 0.7 m/s | |
| Length of the guide rail approx. 350 mm | |
| Usable saw length 265 mm | |
| Saw chain 91P045X | |
| Drive link thickness 1.27 mm | |
| Chain sprocket pitch 3/8” | |
| Chain brake Yes (electrical, PCB and | brake rod) |
| Chain run-on time (DIN EN 60745-2-13 – 19.107.1) Max. 0.15 s | |
| Chain run-on time (DIN EN 60745-2-13 – 19.113) Max. 2 s | |
| Activation of the chain Twofold | |
| Chain oil tank volume 180 ml | |
| Weight with guide rail and saw chain 4.45 kg | |
| Weight without guide rail and saw chain 3.9 kg | |
| Overload protection No | |
| Sound power level LwA (DIN EN ISO 3744) 101 dB(A) | |
| Sound pressure level LpA (DIN EN ISO 3744) 91.5 dB(A), K = ± 3 dB(A) | |
| Vibration value (DIN EN 28662-1) | 3.159 m/s2 – 3.193 m/s2 K= ± 1.5 m/s2 |
| Battery | B150 Li / B200 Li |
| Rated voltage | 36 V (40 V max.) |
| Rated capacity | 4 Ah / 5 Ah |
| Charging duration | approx. 90 min / approx. 120 min |
| Charging unit | C130 Li |
| Mains voltage | 100 V – 240 V (AC) |
| Mains frequency | 50/60 Hz |
| Output voltage | 42 V (DC) |
| Operating temperature range | +5°C – +40°C |
21 AFTER-SALES / SERVICE
In the event of questions of warranty, repair or spare parts, please contact your nearest AL-
KO Service Centre. These can be found on the Internet at:
www.al-ko.com/service-contacts
22 GUARANTEE
We will resolve any material or manufacturing faults on the appliance during the legal warranty period for claims relating to faults, in accordance with our choice either to repair or replace. The legal warranty period is determined by the legislation of the country in which the appliance was purchased.
Our warranty promise applies only if:
■ These operating instructions are heeded
■ The appliance is handled correctly
■ Original spare parts have been used
The warranty becomes void in the case of:
■ Unauthorised repair attempts
■ Unauthorised technical modifications
Non-intended use
The guarantee excludes:
■ Paint damage that can be attributed to normal wear and tear
■ Wear parts that are marked with a frame (x) on the spare parts card
The guarantee period commences with purchase by the first end user. The date on the proof of purchase is decisive. In the event of a guarantee claim, please take this guarantee declaration and the original proof of purchase, and contact your dealer or the nearest authorised customer service centre. This statement does not affect the purchaser's statutory claims for defects against the vendor.
VERTALING VAN DE ORIGINELE GEBRUIKERSHANDLEIDING
Inhoudsopgave
21 Klantenservice/service centre 67
22 Garantie.... 67
2 PRODUCTOMSCHRIJVING
Nr. Component
WAARSCHUWING! Lees alle veiligheids-
www.al-ko.com/service-contacts
22 GARANTIE
N° Pièce
www.al-ko.com/service-contacts
22 GARANTIE
N. Componente
www.al-ko.com/service-contacts
22 GARANZIA
Nr elementu
www.al-ko.com/service-contacts
22 GWARANCJA
Č. Součást
www.al-ko.com/service-contacts
22 ZÁRUKA
Sz. Alkatrész
www.al-ko.com/service-contacts
22 GARANCIA
21 Kundeservice/service 189
22 Garanti....189
1 OM DENNE BRUGSANVISNING
Nr. Komponent
www.al-ko.com/service-contacts
22 GARANTI
Nr. Komponent
www.al-ko.com/service-contacts
22 GARANTI
Номер компонента



- Inhaltsverzeichnis
- GARANTIE
- ABOUT THESE OPERATING INSTRUCTIONS
- Legends and signal words
- PRODUCT DESCRIPTION
- Designated use
- Residual risks
- Safety and protective devices
- Switch-on protection
- Chain brake/chain brake bracket
- Symbols on the appliance
- Scope of supply
- Product overview (01)
- GENERAL POWER TOOL SAFETY WARNINGS
- Work area safety
- Electrical safety
- Personal safety
- Power tool use and care
- Battery tool use and care
- Service
- CHAIN SAW SAFETY WARNINGS
- CAUSES AND OPERATOR PREVENTION OF KICKBACK
- VIBRATION LOAD
- ■ Danger due to vibration
- NOISE POLLUTION
- SAFETY INFORMATION REGARDING THE RECHARGEABLE BATTERY
- SAFETY INFORMATION REGARDING THE CHARGING UNIT
- SAFETY INFORMATION WHEN WORKING
- Operator
- Operating times
- Working with the chain saw
- INSTALLATION
- CAUTION! Danger of laceration injuries.
- Installing the guide rail (05, 06)
- Installing the saw chain (05, 06)
- Tightening the saw chain (05, 07)
- START-UP
- Charging the rechargeable battery (02)
- Inserting the rechargeable battery (03)
- Pulling out the rechargeable battery (03)
- Checking the chain tension
- Testing the function of the chain brake
- Function test of the chain brake with the engine switched off (08)
- Function test of the chain brake with the motor switched on (08)
- Filling saw chain oil (09)
- IMPORTANT! Danger of damaging the
- OPERATION
- Determining the charge status of the rechargeable battery (04)
- Check the saw chain oil
- Testing the chain brake
- Switching the engine on and off
- WORKING BEHAVIOUR AND WORKING TECHNIQUE
- Felling trees
- Branch lopping
- Cross-cutting
- Cutting converted timber (12)
- MAINTENANCE AND CARE
- Sharpening the saw chain (13)
- Cleaning the chain sprocket interior
- Changing over the quick-tension chain wheel (16)
- Checking, turning and greasing the guide rail (14, 15)
- Checking the guide rail
- Turning the guide rail
- Greasing the guide rail
- HELP IN CASE OF MALFUNCTION
- TRANSPORT
- STORAGE
- DISPOSAL
- Information on the German Battery Act (BattG)
- AFTER-SALES / SERVICE
- GUARANTEE
- VERTALING VAN DE ORIGINELE GEBRUIKERSHANDLEIDING
- Inhoudsopgave
- PRODUCTOMSCHRIJVING
- GARANZIA
- GWARANCJA
- ZÁRUKA
- GARANCIA
- OM DENNE BRUGSANVISNING
- GARANTI
Brand : AL-KO
Model : CS 4030
Category : Saw