SatinSkin HL 76 - Epilator BEURER - Free user manual and instructions
Find the device manual for free SatinSkin HL 76 BEURER in PDF.

| Product Type | Electric Epilator Dry & Wet |
| Brand | Beurer |
| Model | SatinSkin HL 76 |
| Dimensions (L x W x H) | 15.4 x 6.2 x 4.3 cm |
| Weight | 144 g |
| Power supply | Rechargeable Li-ion battery 3.7 V / 800 mAh, charging via USB-C (5 V, 1 A) |
| Charging time | Approximately 2 hours |
| Battery life | Approximately 40 minutes |
| Main functions | Epilation, shaving, trimming (with 4 mm comb) |
| Heads and attachments included | Epilation head, glide attachment, precision attachment, shaving head, comb (4 mm), module holder, protective cap |
| Usage | Dry and wet (in the shower or bath) |
| Speeds | 2 speeds (low/high) |
| Travel lock | Yes (3-second lock) |
| Cleaning | Washable under running water (head and body); cleaning brush included |
| Additional accessories | Charging and storage station, storage pouch, USB-C cable |
| Replacement parts | Shaving heads (ref. 576.26), epilation heads (ref. 576.27) |
| Warranty | See included warranty card |
| Protection rating | Waterproof, suitable for use in bathtub or shower |
Frequently Asked Questions - SatinSkin HL 76 BEURER
User questions about SatinSkin HL 76 BEURER
0 question about this device. Answer the ones you know or ask your own.
Ask a new question about this device
Download the instructions for your Epilator in PDF format for free! Find your manual SatinSkin HL 76 - BEURER and take your electronic device back in hand. On this page are published all the documents necessary for the use of your device. SatinSkin HL 76 by BEURER.
USER MANUAL SatinSkin HL 76 BEURER
natural_image
White and black beige device with textured grip and circular base, labeled 'beuwer' (no additional text or symbols visible)EN Epilator Wet & Dry Instructions for use....11
natural_image
Illustration of an open book with a geometric window and horizontal lines, no text or symbols presentEN Unfold page 3 before reading the instructions for use.
natural_image
Simple line drawing of a medical or anatomical procedure with labeled point A (no text or symbols beyond label)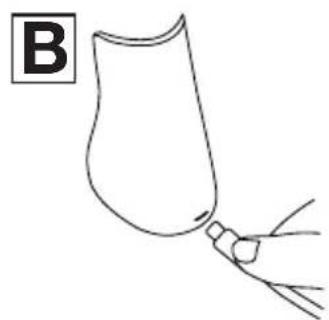
natural_image
Simple line drawing of a container with a handle and a small object attached to it, labeled 'B' in the top-left corner (no text or symbols on the diagram itself)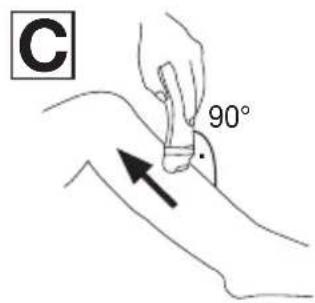
natural_image
Line drawing of hands holding a mechanical component (no text or symbols)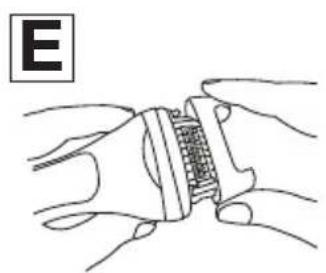
natural_image
Illustration of hands holding a mechanical component with a grid-like structure (no text or symbols)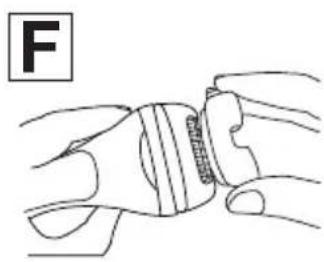
natural_image
Illustration of a hand holding a wristband with a finger, no text or symbols present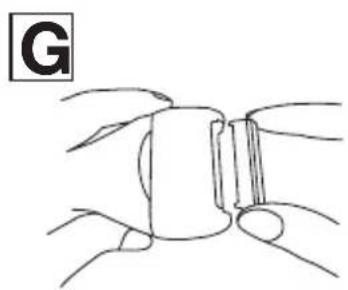
natural_image
Simple line drawing of a stylized insect head with no text or symbols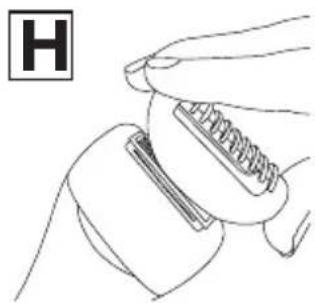
natural_image
Line drawing of a hand holding a tool with a spring-like object, no text or symbols presentDEUTSCH

Read these instructions for use carefully. Observe the warnings and safety notes. Keep these instructions for use for future reference. Make the instructions for use accessible to other users. If the device is passed on, provide the instructions for use to the next user as well.
Table of contents
- INCLUDED IN DELIVERY 11
- IMPORTANT SAFETY NOTES....12
- SIGNS AND SYMBOLS....14
- DEVICE DESCRIPTION .... 14
- USAGE 15
- CLEANING AND MAINTENANCE.... 16
- ACCESSORIES AND REPLACEMENT PARTS......16
- DISPOSAL....17
- TECHNICAL SPECIFICATIONS....17
- WARRANTY....17
1. INCLUDED IN DELIVERY
Check that the exterior of the cardboard delivery packaging is intact and make sure that all contents are present. Before use, ensure that the device and accessories have no visible damage and all packaging material is removed. If you have any doubts, do not use the device and contact your retailer or the specified Customer Services address.
1 Epilator Wet & Dry
1 Epilator attachment
1 Glide attachment (for epilator attachment)
1 Precision attachment (for epilator attachment)
1 Attachment holder (for shaver attachment)
1 Shaver attachment
1 Trimming attachment (4 mm)
1 Protective cap
1 Storage bag
1 Cleaning brush
1 USB-C charging cable
1 Charging and storage station
2. IMPORTANT SAFETY NOTES

WARNING
- The device must only be used for the purpose for which it was designed and in the manner specified in the instructions for use.
- The device is only intended for domestic/private use, not for commercial use.
- This device may be used by children over the age of 8 and by people with reduced physical, sensory or mental skills or a lack of experience or knowledge, provided that they are supervised or have been instructed on how to use the device safely, and are fully aware of the consequent risks of use.
• Children must not play with the device. - The hand-held part must be disconnected from the connection cable before it is cleaned in water.
- When using the device in the bathroom, unplug the plug after charging as water in the vicinity constitutes a danger, even when the device is switched off.
- If the device should fall into water despite following all safety precautions, immediately pull the mains plug from the socket! Do not reach into the water! Risk of electric shock!
- Cleaning and user maintenance must not be performed by children unless supervised.
- As an additional safety measure, we recommend the installation of a residual-current-operated protective device (RCD) with a rated operational current not exceeding 30 mA in the bathroom circuit.
-
Under no circumstances should you open or repair the device yourself, as correct functioning of the device can no longer be guaranteed should you do so. Failure to observe this will invalidate the warranty.
-
Cleaning and user maintenance must not be performed by children unless supervised.
- The device may only be supplied with protective extra-low voltage.
- Danger of suffocation! Keep packaging materials away from children.
- Do not use the device if you have sunburn, open wounds, eczema or cuts.
- In the event of a fault or damage, have the device repaired by a certified specialist workshop.
- Protect the device and its accessories from impacts, humidity, dirt, marked temperature fluctuations and direct sunlight.
Intended use
The Epilator Wet & Dry (hereinafter referred to as the device) is intended exclusively for removing human body hair. Do not use the device on animals or objects!

Notes on handling batteries
- If your skin or eyes come into contact with fluid from a battery cell, wash the affected areas with water and seek medical assistance.
- Protect batteries from excessive heat.
- Risk of explosion! Never throw batteries into a fire.
- Do not disassemble, split or crush the batteries.
- Batteries must be charged correctly prior to use. The instructions from the manufacturer and the specifications regarding correct charging in these instructions for use must be observed at all times.
- Fully charge the battery prior to initial use. In order to achieve as long a battery service life as possible, fully charge the battery at least 2 times a year.
- The device contains batteries that are not replaceable.
3. SIGNS AND SYMBOLS
The following symbols are used on the device, in these instructions for use, on the packaging and on the type plate for the device:
 | WARNINGWarning notice indicating a risk of injury or damage to health. |  | IMPORTANTSafety note indicating possible damage to the device/accessory. |
 | Product informationNote on important information |  | The products demonstrably meet the requirements of the Technical Regulations of the EAEU |
 | Separate the packaging elements and dispose of them in accordance with local regulations. |  | Read the instructions |
 A A | Marking to identify the packaging material.A = Material code, B = Material number: 1-7 = Plastics, 20-22 = Paper and cardboard |  | Disposal in accordance with the Waste Electrical and Electronic Equipment EC Directive – WEEE |
 | CE labellingThis product satisfies the requirements of the applicable European and national directives. | — — — — | Direct currentThe device is suitable for use with direct current only |
 | Suitable for use in a bath or shower. |  | Separate the product and packaging elements and dispose of them in accordance with local regulations. |
 | United Kingdom Conformity Assessed Mark | ||
4. DEVICE DESCRIPTION
The corresponding drawings are shown on page 3.
1 Base device
7 Glide attachment (for epilator attachment)
② ON/OFF button
8 Precision attachment (for epilator attachment)
3 Battery level indicator
9 Attachment holder (for shaver attachment)
4 Charger
10 Shaver attachment
5 Protective cap
11 Trimming attachment (4 mm) (for shaver attachment)
⑥ Epilator attachment
12 Release button
5. USAGE
Commissioning/charging the battery

The device should only be charged with a mains adapter with an output of min. 1 A.
- Charge the device for approx. 2 hours before initial use. You can either charge the device directly (Figure A) or connect it to the charging station (Figure B). Connect the charging station or the device to a suitable mains adapter (mains adapter not included in delivery scope) or via a device with a suitable interface.
- The battery level indicator 3 flashes during charging. Once the battery is fully charged, the battery level indicator 3 stays on continuously. The device is now ready for use. One charge is sufficient for approx. 40 minutes of operation.
Epilating
- Press the ON/OFF button 2 to switch on the device.
- To increase the speed setting, press the ON/OFF button 2 again.
- Cleanse skin before epilation to avoid redness. Ideally, epilate after or during the shower to make it easier to pull out your hair. The device can be used both on dry skin and in the shower or in the bathtub.
- Place the device vertically on your skin. Guide the device slowly, steadily and without pressure over the skin against the direction of hair growth (Figure C). As hair doesn't always grow in one direction, guide the device over the skin in various directions. For best results, use your free hand to tighten the skin to make the hair stand up. For thorough epilation, the hair should be about 2 to 5 millimetres long.

Be aware that the underarm and bikini areas may be particularly sensitive to pain at first. We therefore recommend that you use the lowest speed setting upon initial use. The pain will lessen with repeated use. As skin in this area is particularly sensitive after epilation, do not use any substances that might irritate the skin such as alcohol-based deodorant.
-
To switch off the device, press the ON/OFF button 2 again. If the battery level indicator 3 flashes red during battery operation, the battery is almost empty.
-
You can also attach the following two attachments to the epilator attachment ⑥ :
Glide attachment 7: For gentle gliding over skin during epilation.
To do this, attach the glide attachment 7 to the epilator attachment 6 (Figure E).
Precision attachment 8: For epilation of very sensitive areas.
To do this, attach the precision attachment 8 to the glide attachment 7 (Figure F).
Shaving/trimming
- You can also use the device for shaving or trimming:
Shaver attachment 10: For a gentle shave of the skin.
Trimming attachment 11: For shortening hair to 4 mm. To do this, place the trimming attachment onto the shaver attachment 10 (Figure H).
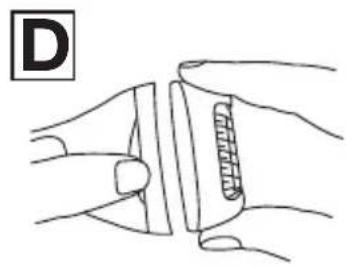
- Press the release button 12 and remove the epilator attachment 6 from the base unit 1 (Figure D).
- Place the attachment holder (for shaver attachment) 9 onto the base unit 1.
- Insert the shaver attachment 10 into the attachment holder (for shaver attachment) 9 (Figure G).
Travel lock
The device has a travel lock. If the travel lock is activated, it is not possible to switch on the device. The travel lock prevents the device from switching on unintentionally (e.g. when being carried in a suitcase).
- To activate the travel lock, press and hold the ON/OFF button 2 for 3 seconds. The battery level indicator 3 flashes. The device is now locked. If you press the ON/OFF button 2 while the travel lock is activated, the battery level indicator 3 flashes briefly.
- To deactivate the travel lock, press and hold the ON/OFF button ② again for 3 seconds. The battery level indicator ③ flashes. The device is now unlocked.
6. CLEANING AND MAINTENANCE

Risk of electric shock!
Unplug the device each time before cleaning. Clean the device using only the methods specified.
- Do not use any abrasive cleaning products or hard brushes.
- For better cleaning, the glide attachment 7 can be removed from the epilator attachment 6 after epilation (Figure E). After shaving, remove the shaver attachment 10 from the attachment holder 9 (Figure G).
- Then remove the epilator attachment 6 / the attachment holder (for shaver attachment) 9 from the base unit 1 (Figure D).
- Use the cleaning brush to remove coarse hair from the epilator attachment 6 / attachment holder (for shaver attachment) 9 / the shaver attachment 10.
- The product is waterproof. Thoroughly clean the epilator attachment 6 / the attachment holder (for shaver attachment) 9 / the shaver attachment 10 and the base unit 1 under running water.
- Do not use the device again until it is completely dry.
7. ACCESSORIES AND REPLACEMENT PARTS
To purchase accessories and replacement parts, please visit www.beurer.com or contact the service address for your country (see the service address list). Accessories and replacement parts are also available from retailers. Replacement recommended every 12 months.
| Designation Item number and/or | order number |
| 2 x shaver attachments 576.26 | |
| 2 x epilator attachments 576.27 |
8. DISPOSAL
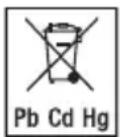
For environmental reasons, do not dispose of the device in household waste at the end of its service life. Dispose of the device at a suitable collection point in your country. Dispose of the device in accordance with the EC Directive on Waste Electrical and Electronic Equipment (WEEE). If you have any questions, please contact the local authorities responsible for waste disposal.
Batteries must not be disposed of in the household waste. They may contain poisonous heavy metals and are subject to special refuse treatment.
The codes below are printed on batteries containing harmful substances:
Pb = battery contains lead
Cd = battery contains cadmium
Hg = battery contains mercury
9. TECHNICAL SPECIFICATIONS
| Model HL 76 Battery: | |
| Weight 144 g | |
| Device dimensions 15.4 | x 6.2 x 4.3 cm |
| Device input 5.0 V | 1.0 A |
| CapacityNominal voltageType designation | 800 mAh3.7 VLithium-ion |
Subject to technical changes.
The Declaration of Conformity for this product can be found at the following address: https://www.beurer.com/web/we-landingpages/de/cedeclarationofconformity.php
10. WARRANTY
Further information on the warranty and warranty conditions can be found in the warranty leaflet supplied.
FRANÇAIS

Remarques relatives aux batteries
7. ACCESSORI E RICAMBI
https://www.beurer.com/web/we-landingpages/de/cedeclarationofconformity.php
10. GARANTI
https://www.beurer.com/web/we-landingpages/de/cedeclarationofconformity.php.
10. ГАРАНТИЯ
https://www.beurer.com/web/we-landingpages/de/cedeclarationofconformity.php
10. GWARANCJA
4. BESCHRIJVING VAN HET APPARAAT
https://www.beurer.com/web/we-landingpages/de/cedeclarationofconformity.php
10. GARANTIE
Barbering / trimming
Pb = batteriet indeholder bly.
Cd = batteriet indeholder cadmium.
https://www.beurer.com/web/we-landingpages/de/cedeclarationofconformity.php
10. GARANTI
https://www.beurer.com/web/we-landingpages/de/cedeclarationofconformity.php
10. GARANTI
https://www.beurer.com/web/we-landingpages/de/cedeclarationofconformity.php