
NV7B5645TAS - Cooker SAMSUNG - Free user manual and instructions
Find the device manual for free NV7B5645TAS SAMSUNG in PDF.

| Product type | Built-in oven (range) |
| Brand | Samsung |
| Model | NV7B5645TAS |
| Main unit dimensions (W x H x D) | 585 x 596 x 570 mm |
| Built-in dimensions (W x H x D) | 560 x 579 x 549 mm |
| Capacity | 76 liters |
| Weight (approx.) | 33.4 kg |
| Voltage | 230-240 V ~ 50 Hz |
| Maximum connected power | 3650-3950 W |
| Number of cavities | 1 |
| Heat source | Electricity |
| Energy efficiency class | A- |
| Energy consumption conventional mode | 1.05 kWh/cycle |
| Energy consumption fan-forced mode | 0.71 kWh/cycle |
| Standby consumption (Wi-Fi on) | 1.9 W |
| Off-mode consumption | 0.5 W |
| Main functions | Single cooking, double cooking, air fry, sous vide, natural steam, temperature probe, auto cooking, Wi-Fi, SmartThings |
| Cleaning | Pyrolysis, manual cleaning, catalytic surface |
| Door | Flexible door (double hinge) |
| Number of door panes | 3-4 stacked panes |
| Interior lighting | Halogen bulb 25-40 W/220-240 V |
| Included accessories | Metal grid, universal tray, baking sheet, deep tray, temperature probe, steam container, steam tray, air fry tray |
| Safety | Child lock, safety shut-off, door lock, overheat protection |
| Connectivity | Wi-Fi 2.4 GHz, Bluetooth, SmartThings |
| Warranty | Consult Samsung customer service |
Frequently Asked Questions - NV7B5645TAS SAMSUNG
User questions about NV7B5645TAS SAMSUNG
0 question about this device. Answer the ones you know or ask your own.
Ask a new question about this device
Download the instructions for your Cooker in PDF format for free! Find your manual NV7B5645TAS - SAMSUNG and take your electronic device back in hand. On this page are published all the documents necessary for the use of your device. NV7B5645TAS by SAMSUNG.
USER MANUAL NV7B5645TAS SAMSUNG
NV7B564**** / NV7B565**** / NV7B566**** / NV7B567**** /
NV7B568**** / NV7B564**C* / NV7B566**C* / NV7B568**C* /
NV7B574**** / NV7B575**** / NV7B576**** / NV7B577**** / NV7B578****

[Unreadable]
text_image
Mobile phone screenshot showing a QR code payment interface with app icons and a mobile payment terminaltext_image
Mobile phone screenshot showing a QR code with Chinese text '扫码关注' (Scan to follow) and a logo on the left.text_image
C B A D E G K L F H J 1Horno (mm)
| A 590 G 503 | ||
| B 166 H 481 | ||
| C 383 I 21 | ||
| D 45 J 549 | ||
| E 596 K 579 | ||
| F 595 L 559 |
text_image
A B C D EArmario empotrado (mm)
| A Min. 550 |
| B Min. 560 |
| C Min. 50 |
| D Min. 590 / Max. 600 |
| E Min. 450 x Min. 50 |
text_image
A B C DNOTA
natural_image
Pure technical line drawing of a rectangular frame with a circular arrow and star symbol, no text or labels presentnatural_image
Diagram showing a circular object with an arrow labeled 'A' and diagonal lines, no readable text or symbols present.text_image
Technical diagram showing a mechanical assembly with labeled component B and directional arrow indicating motion or movement.natural_image
Technical line drawing of a structural assembly with an inset showing a cross-section detail (no text or symbols)natural_image
Diagram showing a hand holding a chair inside a vehicle cabin, with an inset circular view highlighting the seat area (no text or symbols present)natural_image
Diagram of a kitchen appliance with a door and scroll, showing airflow direction (no text or symbols)natural_image
Illustration of a car seatbelt with a magnified inset showing the seatbelt detail (no text or symbols)natural_image
Diagram of a folded paper or sheet with an inset showing a hand holding a small object (no text or symbols present)natural_image
Diagram of a device with a ruler and a flat panel, no visible text or symbolsnatural_image
Diagram of a rectangular frame with a labeled section '02' and an arrow, no readable text or symbols present.natural_image
Pure diagram of a rectangular frame with a central gray square and an arrow, no text or symbols present.natural_image
Technical line drawing of a mechanical assembly with a magnified circular detail (no text or symbols)
ADVERTENCIA
natural_image
Diagram showing a cylindrical object above a device with a handle, and a close-up of its internal components (no text or symbols)Colector de agua
natural_image
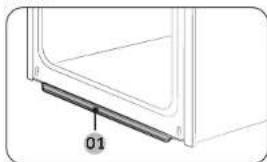
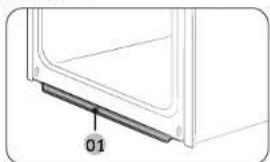
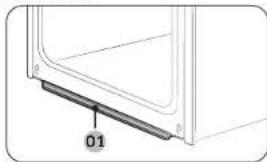
Diagram of a door frame with a labeled component '01' (no text or symbols beyond label)01 Colector de agua
natural_image
Diagram of a mechanical component with an inset showing a downward force or compression mechanism (no text or symbols present)
natural_image
Diagram of a ladder inside a rectangular frame with an arrow indicating motion (no text or symbols)natural_image
Simple line drawing of a hand holding a small object inside a circular frame (no text or symbols)natural_image
Illustration of a hand holding a tool inside a circular frame (no text or symbols)natural_image
Line drawing of a hand inserting a small object into a device (no text or symbols)natural_image
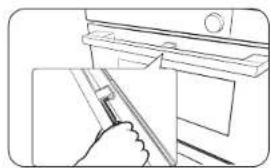
Line drawing of a hand using a tool to clean or adjust a door panel (no text or symbols)natural_image
Diagram of a double bass structure with horizontal plates and vertical supports (no text or labels)natural_image
Illustration of a loaf of bread inside a bag (no text or symbols)
natural_image
Simple line drawing of a cabinet or storage unit with no text, numbers, or symbolsnatural_image
Illustration of a hand pouring liquid into a tray inside an oven (no text or symbols)text_image
QR code image containing encoded data, no visible human-readable textEspañol 19
NV7B564**** / NV7B565**** / NV7B566**** / NV7B567**** / NV7B568**** / NV7B564**C* / NV7B566**C* / NV7B568**C* / NV7B574**** / NV7B575**** / NV7B576**** / NV7B577**** / NV7B578****

text_image
Mobile phone screenshot showing a QR code payment interface with app icons and a mobile payment terminal.text_image
Mobile phone screenshot showing a QR code with Chinese text '扫码关注' (Scan to follow) and a logo on the left.www.samsung.com/uk/aboutsamsung/sustainability/environment/our-commitment/data/
text_image
C B A D E G K L F H J 1Forno (mm)
| A 590 G 503 | ||
| B 166 H 481 | ||
| C 383 I 21 | ||
| D 45 J 549 | ||
| E 596 K 579 | ||
| F 595 L 559 |

text_image
A B C D Enatural_image
Pure technical line drawing of a rectangular frame with a circular arrow and star symbol, no text or labels presentnatural_image
Diagram showing a circular object with an arrow labeled 'A' and diagonal lines, no readable text or symbols present.text_image
Technical diagram showing a mechanical assembly with labeled component B and directional arrow indicating motion or movement.natural_image
Technical line drawing of a structural assembly with an inset showing a component detail (no text or symbols)natural_image
Diagram showing a hand operating a device with a circular inset highlighting the mechanism (no text or symbols present)natural_image
Diagram of a kitchen appliance with a door and scroll, showing directional arrows indicating movement (no text or symbols)natural_image
Illustration of a car seatbelt with a magnified inset showing the seatbelt detail (no text or symbols)natural_image
Technical line drawing of a mechanical component with an inset close-up showing a detail (no text or symbols)natural_image
Diagram of a mechanical assembly with layered components and a ruler, no visible text or symbolsnatural_image
Diagram of a rectangular frame with a labeled section '02' and an arrow, no readable text or symbols present.natural_image
Pure diagram of a rectangular frame with a central gray rectangle and an arrow, no text or symbols present.natural_image
Technical line drawing of a mechanical assembly with a magnified circular detail (no text or symbols)
AVISO
natural_image
Diagram showing a cylindrical object being inserted into a device with a handle, and a separate view of the device's internal structure (no text or symbols)Coletor de água

natural_image
Diagram of a door frame with a labeled component '01' (no text or symbols beyond label)01 Coletor de água
natural_image
Diagram of a mechanical component with an inset showing a downward force or compression mechanism (no text or symbols present)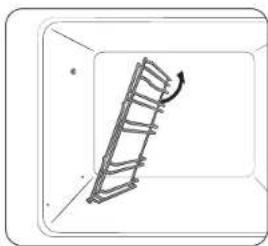
natural_image
Diagram of a ladder leaning against a wall, with an arrow indicating motion direction (no text or symbols)natural_image
Simple line drawing of a hand holding a small object inside a circular frame (no text or symbols)natural_image
Illustration of a hand holding a tool inside a circular frame (no text or symbols)natural_image
Line drawing of a hand holding a tool near a window (no text or symbols)natural_image
Line drawing of a hand using a tool to clean or install a door panel (no text or symbols)natural_image
Diagram of a two-tiered storage unit with horizontal shelves and support legs (no text or labels)natural_image
Simple line drawing of a rectangular room with a central table and two side shelves (no text or symbols)
NOTA
natural_image
Illustration of a hand pouring liquid into a tray inside an oven (no text or symbols)text_image
QR code image containing encoded data, no visible human-readable textPortuguês 19
DÚVIDAS OU COMENTÁRIOS?
| PAÍS CONTACTE-NOS OU VISITE-NOS ONLINE EM | ||
| AUSTRIA 0800 | 72 67 864 (0800-SAMSUNG) www.samsung.com/ai/support | |
| BELGIUM 02 201 | 24 18 | www.samsung.com/be/support (Dutch)www.samsung.com/be_fr/support (French) |
| DENMARK 707 | 70 70 www.samsung.com/dk/support | |
| FINLAND 030-6227 | 515 www.samsung.com/fi/support | |
| FRANCE 01 48 | 63 00 00 www.samsung.com/fr/support | |
| GERMANY 06156 | 77 555 77 www.samsung.com/de/support | |
| ITALIA 600-SAMSUNG (800.7267864) www.samsung.com/it/support | ||
| CYPRUS | 8009 4000 only from landline, toll free | www.samsung.com/qr/support |
| GREECE | 80111-SAMSUNG (80111 726 7864)only from land line(+30; 210 6897691 from mobile andland line | www.samsung.com/gr/support |
| LUXCMOURG | 261 03 710 | www.samsung.com/be_fr/support |
| NET-IERLANDS | 388 90 90 100 | www.samsung.com/nl/support |
| NORWAY | 21629099 | www.samsung.com/no/support |
| PORTUGAL | 210 608 098Chamada para a rede fixa nacionalDias Otels des 9h às 20h | www.samsung.com/pt/support |
| SPAIN | 91 175 00 15 www.samsung.com/es/support | |
| SWEDEN 0771 | 400 300 www.samsung.com/sc/support | |
| SWITZERLAND | 0800 726 786 | www.samsung.com/ch/support (German)www.samsung.com/ch_fr/support (French) |
| UK | 0333 000 0333 | www.samsung.com/uk/support |
| IRELAND (EIRE) | 0818 717100 | www.samsung.com/ie/support |
NV7B564**** / NV7B565**** / NV7B566**** / NV7B567**** / NV7B568**** / NV7B564**C* / NV7B566**C* / NV7B568**C* NV7B574**** / NV7B575**** / NV7B576**** / NV7B577**** / NV7B578****

natural_image
Close-up of sliced meat on a plate, showing texture and surface (no text or symbols)SAMSUNG
Pripremsadržaj
Povezivanje aplikacije SmartThings
text_image
Mobile phone screenshot showing a QR code payment interface with app icons and a mobile payment terminal.- Pokrenite aplikaciju za očitavanje QR koda i skenirajte sliku QR koda na proizvodu.
- Pokušajte povezati aplikaciju SmartThings s proizvodom.
Registriranje proizvoda / Čitanje priručnika / Povezivanje s uslugama
text_image
Mobile phone screenshot showing a QR code with Chinese text '扫码关注' (Scan to follow) and a logo on the left.- Pokrenite aplikaciju za očitavanje QR koda i skenirajte sliku QR koda na proizvodu.
- Odaberite željeni izbornik u cjelini Registriranje proizvoda, Priručnik, Korisnička podrška. Ako odaberete »Priručnik«, moći čete pročitati priručnik kupljenog proizvoda.

NAPOMENA
- Na raspolaganju su vam i mrežni priručnici kojima možete pristupiti putem svog pametnog telefona ili našeg web-mjesta i tako doprinijeti smanjenoj upotrebi tiskanih priručnika i naporima za spas Zemlje.
Sigurnosne upute 3
text_image
C B A D E G K L F H J 1Pečnica (mm)
| A 590 G 503 | ||
| B 166 H 481 | ||
| C 383 I 21 | ||
| D 45 J 549 | ||
| E 596 K 579 | ||
| F 595 L 559 |

text_image
A B C D Enatural_image
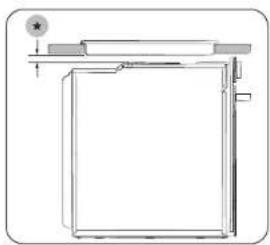
Pure technical line drawing of a rectangular frame with a circular arrow and star symbol, no text or labels presentPostavljanje pećnice s pločom za kuhanje Prije postavljanja ploče za kuhanje na pećnicu pogledajte vodič za postavljanje za informacije o potrebnom prostoru ( ).
Montiranje pečnice

natural_image
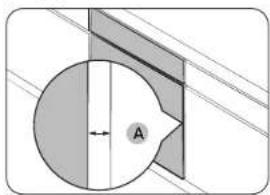
Diagram showing a circular object with an arrow labeled 'A' and diagonal lines, no readable text or symbols present.Pazite da ostavite razmak (A) od minimalno 5 mm između pećnice i strana ormarića.

text_image
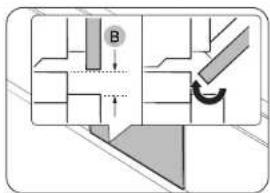
Technical diagram showing a mechanical assembly with labeled component B and directional arrowPobrinite se da razmak bude najmanje 3 mm (B) kako bi se vrata otvarala i zatvarala bez poteškoća.

natural_image
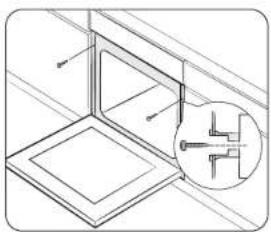
Technical line drawing of a structural assembly with an inset showing a component detail (no text or symbols)Postavite pečnicu u ormarić i pričvrstite je s obje strane pomoću 2 vijka.
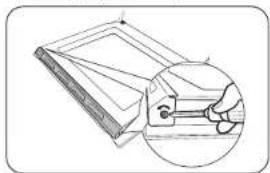
Nakon montaže uklonite zašitnu foliju, traku i ostalu ambalažu te izvadite isporučeni pribor iz pećnice. Kako biste pećnicu izvadili iz ormarića, najprije isključite napajanje pećnice i zatim uklonite 2 vijka s obje strane pećnice.
UPOZORENJE
natural_image
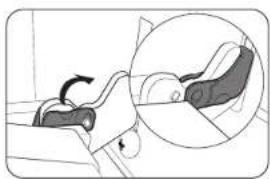
Diagram showing a hand holding a device inside a vehicle cabin, with an inset circular view highlighting the mechanism (no text or symbols present)- Otvorite vrata i prebacite spojnice na obje šarke.
natural_image
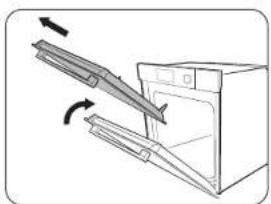
Diagram of a kitchen appliance with an open door and a diagonal handle, showing directional arrows (no text or symbols)- Zatvorite vrata na približno 70°. Držite vrata pečnice za bočne strane objema rukama te in podignite i izvucite prema gore tako da se uklone šarke.
- Operite vrata čistom krpom namočenom u sapunicu.
Hrvatski 9
Održavanje

natural_image
Illustration of a person lying down with a magnified inset showing the foot area (no text or symbols)- Nakon čiščenja slijodite navedene korake 1 i 2 obrnutim redoslijedom kako biste ponovno postavili vrata na poćnicu. Pobrinite se da spojnice dosjednu na šarke na obje strane.
Staklo u vratima
Ovisno o modelu, vrata pečnice opremljena su s 3-4 ploče stakla, prislonjene jedna uz drugu. Nemojte uklanjati staklo u vratima, osim u svrhu čišćenja. Kako biste uklorili staklo u vratima zbog čišćenja, slijedite ove upute.
natural_image
Technical line drawing of a mechanical component with an inset magnified view showing internal components (no text or symbols)- Pomoću odvijača uklonite vijke na lijevoj i desnoj strani.
natural_image
Diagram of a mechanical assembly with layered components and a ruler, no visible text or symbolsnatural_image
Diagram of a square frame with a labeled section '02' and an arrow, no readable text or symbols present.natural_image
Diagram of a mechanical assembly with a gray rectangular component and a black arrow indicating direction (no text or symbols)natural_image
Technical line drawing of a mechanical assembly with a magnified circular detail (no text or symbols)
UPOZORENJE
natural_image
Diagram showing a cylindrical object above a device with a handle and internal components, and a separate view of a device with a tool inside (no text or symbols)Kolektor za vodu

natural_image
Diagram of a door frame with a labeled component '01' (no text or symbols beyond label)01 Kolektor za vodu
natural_image
Diagram of a mechanical component with an inset showing a downward force or compression mechanism (no text or symbols present)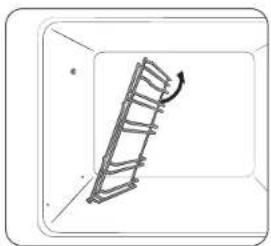
natural_image
Simple line drawing of a ladder inside a rectangular frame, with an arrow indicating motion direction (no text or symbols)natural_image
Simple line drawing of a hand holding a small object inside a circular frame (no text or symbols)natural_image
Illustration of a hand holding a tool inside a circular frame (no text or symbols)natural_image
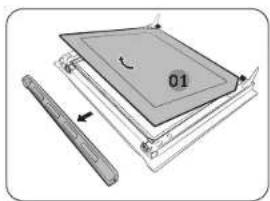
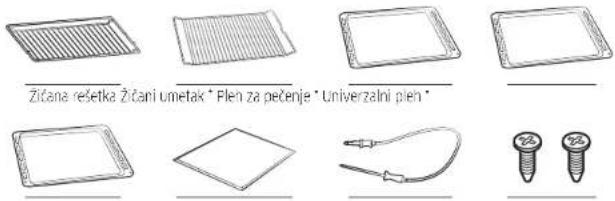
Illustration of five different electronic components: a square plate, a diamond-shaped package, a cable with plug, and two screws (no text or symbols)Vrlo duboka posuda * Pregrada Sonda za meso * 2 vijka (M4 L25)
Spremnik za kuhanje na pari
natural_image
Line drawing of a hand inserting a component into a door (no text or symbols)natural_image
Line drawing of a hand holding a tool near a window (no text or symbols)natural_image
Diagram of a two-tiered storage unit with horizontal shelves and side-mounted units (no text or labels)- Umetnite pregradu i stavite posudu sa žičanom rešetkom na položaj rešetke 4.
- Odaberite Prženje vrućim zrakom pomoću Birača.
- Upotrijebite Blrač kako bisle promijenili zadanu temperaturu. Unesite predloženu temperaturu za svoju hranu prema preporuci u vodiću za kuhanje. Zadana temperatura je 220 °C.
- Odaborite Vrijeme kuhanja i zatim pritisnite Birač kako biste postavili željeno vrijeme kuhanja.
- Odaberite Početak i pritisnite Birač.
- Kada kuhanje završi, dodirnite ISKLJUČI i izvadite hranu iz pečnice.
NAPOMENA
natural_image
Illustration of a baked loaf or saucer package (no text or symbols visible)
natural_image
Simple line drawing of a cabinet or storage unit with no text, numbers, or symbols- Stavite hranu u čistu vakoumsku vrečicu i hermetički je zatvorite. Zatim namirnice stavite u pećnicu na rešetku u položaj 3.
- Odaberite nacin rada Air Sous Vide
- Ucotrijebite Blrač kako biste promijenili zadanu temperaturu. Unesite predloženu temperaturu za svoju hranu prema preporuci u vodiču za kuhanje. Zadana temperatura je 60 °C. (Temperaturu možete mijenjati po 1 °C.)
- Okrenite Birač i postavite vrijeme kuhanja.
- Dodirnite ▷II ili pritisnite Blrač.
NAPOMENA
- Koristite samo svježe i kvaitetne sastojke. Očistite i operite namirnice te ih stavite u hladnjak.
- Za premještanje i pohranjivanje sastojaka koristite vakuumsku vrečicu otpornu na visoke temperature.
- Vakuumsku vrečicu otpornu na visoke temperature nemojte nikada upotrebjavati više puta.
- Vrijeme kuhanja ovisi o debljini namirnica. Dodavanje soli ili šečera može skratiti vrijeme kuhanja.
Savjeti
- Kako bi hrana zadržala svoj okus, preporučujemo da koristite manje začinskog bilja i začina nego kako kod uobičajene pripreme jela.
natural_image
Illustration of a hand pouring liquid into a tray inside an oven (no text or symbols)text_image
QR code image containing encoded data, no visible human-readable textHrvatski 19
IMATE UPIT ILI KOMENTAR?
| DRŽAVA NAZOVITE ILI NAS POSJETITE NA INTERNETU | ||
| AUSTRIA 0800 | 72 67 864 (0800-SAMSUNG) www.samsung.com/et/support | |
| BELGIUM 02 201 | 24 18 | www.samsung.com/be/support (Dutch)www.samsung.com/be_fr/support (French) |
| DENMARK 707 | 019 70 www.samsung.com/dk/support | |
| FINLAND 030-6227 | 515 www.samsung.com/fi/support | |
| FRANCE 01 48 | 63 00 00 www.samsung.com/fr/support | |
| GERMANY 06196 | 77 555 77 www.samsung.com/de/support | |
| ITALIA 800 SAMSUNG (800.7267864) www.samsung.com/it/support | ||
| CYPRUS | 8009 4000 only from landline, toll free | www.samsung.com/gr/support |
| GREECE | 80111-SAMSUNG (80111 726 7864)only from land line(+30) 210 6897691 from mobile andland line | www.samsung.com/gr/support |
| LUXEMOURG | 261 03 710 | www.samsung.com/be_fr/support |
| NETHERLANDS | 088 90 90 100 | www.samsung.com/nl/support |
| NORWAY | 21629099 | www.samsung.com/nc/support |
| PORTUGAL | 210 608 098Chamada para a rede fixa nacionalDies üters das 9h às 20h | www.samsung.com/pt/support |
| SPAIN | 91 175 00 15 | www.samsung.com/es/support |
| SWEDEN 0771 | 400 300 | www.samsung.com/sc/support |
| SWITZERLAND | 0800 726 786 | www.samsung.com/ch/support (German)www.samsung.com/ch_fr/support (French) |
| UK | 0333 000 0333 | www.samsung.com/uk/support |
| IRELAND (EIRE) | 0818 717100 www.samsung.com/ie/support | |

SAMSUNG
Skenirajte QR kod* ili posjetite
www.samsung.com kako biste
saznali korisne informacije.
* Morate imati citat instaliran na pometnom telefonu.
NV7B564**** / NV7B565**** / NV7B566**** / NV7B567**** / NV7B568**** / NV7B564**C* / NV7B566**C* / NV7B568**C* NV7B574**** / NV7B575**** / NV7B576**** / NV7B577**** / NV7B578****

- Za uputstva o korišćenju proizvoda, pogledajte korisničke priručnike sporučene u v du QR koda ili na veb-sajtu kompanije Samsung Electronics (https://www.samsung.com).

natural_image
Close-up of sliced meat on a plate, showing texture and surface (no text or symbols)SAMSUNG
Pripremsadržaj
text_image
Mobile phone screenshot showing a QR code payment interface with app icons and a mobile payment terminal.- Pokrenite aplikaciju čitača QR koda i skenirajte sliku QR koda na proizvodu.
- Pokušajte da povežete SmartThings aplikaciju sa proizvodom.
text_image
Mobile phone screenshot showing a QR code with Chinese text '扫码关注' (Scan to follow) and a logo on the left.- Pokrenite aplikaciju čitača QR koda i skenirajte sliku QR koda na proizvodu.
- Odaberite željeni meni iz opcija Registracija proizvoda, Priručnik, Korisnička podrška. Ako odaberete „Priručnik“, možete da pročitate uputstvo za kupljeni proizvod.

NAPOMENA
- Obezbeđujemo prirućnike na mreži kojima možete pristupiti putem pametnog telefona ili našeg veb-sajta kako bismo doprineli smanjenju korišćenja priručnika u papirnom formatu, kao deo napora da zaštitimo planetu.
www.samsung.com/uk/aboutsamsung/sustainability/environment/our-commitment/data/
text_image
C B A D E G K L F H J 1Pecnica (mm)
| A 590 G 503 | ||
| B 166 H 481 | ||
| C 383 I 21 | ||
| D 45 J 549 | ||
| E 596 K 579 | ||
| F 595 L 559 |

text_image
A B C D EUgradni element (mm)
| A Min. 550 |
| B Min. 560 |
| C Min. 50 |
| D Min. 590 - Maks. 600 |
| E Min. 450 x Min. 50 |

text_image
A B C DNAPOMENA
Element u koji se pečnica ugrađuje mora imati ventilacione otvore (E) kroz koje će izlaziti toplota strujati vazdun.
Kuhinjski element ispod sudopere (mm)
| A Min. 550 |
| B Min. 560 |
| C Min. 600 |
| D Min. 450 x Min. 50 |
B NAPOMENA
natural_image
Pure technical line drawing of a rectangular frame with a circular arrow and star symbol, no text or labels presentUgradnja sa grejnom pločom Da biste ugradili grejnu ploču iznad pečnice, pogledajte zahtcve u pogledu prostora za ugradnju u vodiću za ugradnju grejne ploče (*).
Ugradnja pećnice
natural_image
Pure geometric diagram showing a circle intersected by two lines, with a shaded region and labeled point A (no text or symbols beyond basic geometry)Obavezno ostavite razmak (A) od bar 5 mm između pečnice i svih susednih strana kuhinjskog elementa.
text_image
Technical diagram showing a mechanical assembly with labeled component B and directional arrow indicating motion or movement.Oslavite razmak od bar 3 mm (B) tako da se vrata neometano otvaraju i zatvaraju.

natural_image
Technical line drawing of a structural assembly with an inset showing a component detail (no text or symbols)natural_image
Diagram showing a hand holding a device inside a vehicle cabin, with an inset circular view highlighting the mechanism (no text or symbols present)natural_image
Diagram of a kitchen appliance with an open door and a diagonal handle, showing directional arrows (no text or symbols)- Zatvorite vrata na približno 70°. Sa obe ruke držite vrata pecnice za strane i podignite i povucite nagore sve dok se ne uklone šarke.
- Očistite vrata vodom sa sapunicom i čistom krpom.
Održavanje

natural_image
Illustration of a person lying down with a magnified inset showing the foot area (no text or symbols)- Kada završite, ponovite navedene korake 1 i 2 obrnutim redosledom da biste vratili vrata. Uvcrite se da su držači postavljeni na šarke sa obe strane.
Staklo na vratima
U zavisnosti od modela, na vratima pećnice se nalaze 3-4 sloja stakla postavljena jedno na drugo. Nemojte da skidato staklo na vratima osim u svrhe čišćenja. Da biste skinuli staklo na vratima radi čišćenja, pratite ova uputstva.

natural_image
Technical line drawing of a mechanical component with an inset magnified view showing internal components (no text or symbols)natural_image
Diagram of a mechanical assembly with layered components and a ruler, no visible text or symbols- Skinite poklopac u smerovima strelica
- Skinite prvi sloj sa vrata.
natural_image
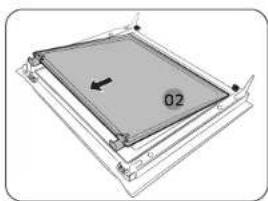
Pure diagram of a rectangular frame with a central label '02' and an arrow, no readable text or symbols beyond the label.- Skinite drugi sloj sa vrata u smeru strelice.
natural_image
Pure diagram of a rectangular frame with a central gray area and an arrow, no text or symbols present.- Skinite treći sloj sa vrata u smeru strelice.
- Očistite staklo vodom sa sapunicom i čistom krpom.
text_image
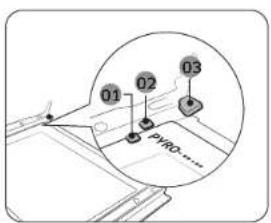
01 02 03 PYRO....natural_image
Technical line drawing of a mechanical assembly with a circular inset showing a hand holding a component (no text or symbols)
UPOZORENJE
Da biste sprečili gubitak toplote, obavezno se uverite da li ste pravilno postavili slojeve stakla.
natural_image
Diagram showing a cylindrical object above a tray with a handle, and a separate view of a container with a handle and a tool inside (no text or symbols)Sakupljač vode

natural_image
Diagram of a door panel with a labeled component '01' (no text or symbols beyond label)01 Sakupljač vode
- Nakon umetanja 2. sloja pritisnute staklene kopče i proverite da li pravilno učvršćuju stakloni sloj.
-
Ponovite navedene korake 1-2 obrnutim redosledom da biste vratili vrata.
-
Stavite peškir ispod vrata.
- Očistite vrata.
- Nancsite octerdžent na ubrus i očistite penovo.
- Prebrište suvim ubrusom vlagu i mehuriće.
OPREZ
natural_image
Diagram of a mechanical component with an inset showing a downward force or compression mechanism (no text or symbols present)
natural_image
Diagram of a ladder inside a rectangular frame with an arrow indicating rotation (no text or symbols)- Pritisnite gornju liniju leve bočne vodice i spustite za oko 45°.
- Povucite i izvadite donju liniju leve bočne vodice.
- Na isti način izvadite desnu bočnu vodicu.
- Očistite obe bočne vodice.
- Kada završite, ponovite navedene korake od 1 do 2 obrnutim redosledom da biste vratili bočne vodice.

NAPOMENA
natural_image
Simple line drawing of a hand holding a small object inside a circular frame (no text or symbols)- Skinite stakleni poklopac okretanjem suprotno od kazaljki na satu.
- Zamenite sijalicu u pećnici.
- Dčistite stakleni poklopac.
- Kada završite, ponovite navedeni 1. korak obrnutim redosledom da biste vratili stakleni poklopac.
UPOZORENJE
natural_image
Illustration of a hand holding a tool inside a circular frame (no text or symbols)- Držite donji kraj poklopca bočnog svetla u pećnici jednom rukom i koristite ravan oštar alat poput storog noža kako biste skinuli poklopac kao što je prikozano.
- Zamenite bočno svetlo u pečnici.
- Ponovo postavite poklopac svetla.
Funkcije pećnice
Pećnica

text_image
01 02 03 0401 Kontrolna tabla
02 Drška na vratima
03 Rezervoar za vodu (°)
04 Vrata
NAPOMENA
U zavisnosti od modela, postoje dva tipa pećnice: sa jednim vratima i sa dvoje vrata.
12 Srpski
Kontrolna tabla
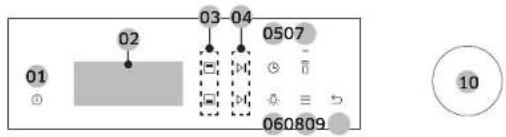
text_image
01 02 03 - 04 0507 060809 1001 Napajanje 02 Ekran 03 Birac gornje/
04 Start / Stop 05 Trajanje
pripreme hrane
06 Svetlo 07 Pametra
donje zone
08 Opcije 09 Nazad 10 Dugme za
biranje
Dodatni elementi
natural_image
Three line drawings of plastic containers: one open with lids, one closed with a lid, and one closed with a lid (no text or symbols)natural_image
Line drawing of a hand inserting a small object into a device (no text or symbols)- Potpuno pritisnite ručku.
- Povucite ručku.
- Na taj način ćte otvoriti samo gornja vrata kao što je prikazano.
Kako da koristite cela vrata
natural_image
Line drawing of a hand holding a tool near a window (no text or symbols)natural_image
Diagram of a two-tiered storage unit with horizontal shelves and ventilation slots (no text or labels)- Umetnite pregradu i postavite posudu sa žičanom rešetkom na položaj 4.
- Izaberite režim Prženje na vazduhu koristeći Dugme za biranje.
- Okrenite Dugme za blranje da biste promenili podrazumevanu temperaturu. Unesite predloženu temperaturu za vašu hranu u skladu sa preporukama iz vodiča za kuvanje. Podrazumevana temperatura je 220°C.
- Izaborite Trajanje pripreme hrane, a zatim pritisnite Dugme za bliranje da biste podesili željeno trajanje pripreme hrane.
- Izaberite Pokreni, a zatim pritisnite Dugme za biranje.
- Kada je kuvanje završeno, dodirnite ISKLJUČI i izvadite hranu.

NAPOMENA
- Postavite pagir za pečenje ili posudu na rešetku ispod posude za prženje na vazduhu, za skupljanje masnoća, ako kapije. To će pomoći u smanjenju prskanja i dima.
- Pre upotrebe pleha, proverite maksimalnu dozvoljenu temperaturu plaha.
- Prženje na vazduhu je dizajnirano za duplu gornju pećricu. Umetnite pregradu i postavite hranu na položaj 4 za najbolje rezultate.
- Za kuvanje svežih ili domaćih namirnica, ravnomernije rasporedite ulje po većoj površini čime ćete efikasnije ispeči hranu.

UPOZORENJE
natural_image
Illustration of a small rectangular object with a label inside, resembling a food item or container (no text or symbols present)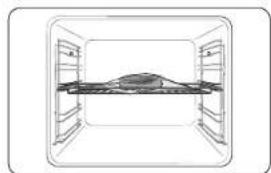
natural_image
Simple line drawing of a cabinet or storage unit with no text, numbers, or symbols- Stavite hranu u čistu vakuumiranu kesu i zatvorite je. Zatim stavite hranu na rešetku u 3. položaju u pečnici.
- Izaberite Air Sous Vide 📄 režim.
- Okrenite Dugme za biranje da biste promenili podrazumevanu temperaturu. Unesite predloženu temperaturu za vašu hranu u skladu sa preporukama iz vodiča za kuvanje. Podrazumevana temperatura je 60° C. (Možete da promenite temperaturu za po 1° C)
- Pritisite Dugme za blranje i podesite trajanje pripreme hrane.
- Dodirnite ▷II ili pritisnite Dugme za biranje.

NAPOMENA
- Koristite samo sveže i kvalitetne sastojke Isecite ih u čistom stanju i čuvajte u frižideru.
- Koristite vakuum kese otporne na toplotu za premešanje i skladistenje sastojaka.
- Nikad nemojte ponovo da koristite vakuum kese otporne na toplotu.
- Trajanje pripreme hrane zavisi od debljne hrane. Dodavanje soli ili šećera može da skrati trajanje pripreme hrane.
Saveti
- Da biste zadržali originalni ukus, preporučujemo da koristite manje začinskog bilja i začina nego u originalnim receptima.
- Meso i ribli proizvodi često imaju bolji ukus kada su pečeni i servirani.
- Ako nisu servirani odmah nakon kuvanja, stavite hranu u ledenu vodu i potpuno ohladite. Zatim skladištite na temperaturi ispod 5 °C da biste zadržali miris i teksturu hrane.
- Izuzetno, preporučeno je da piletinu pojedete odmah nakon kuvanja.
14 Srpski
natural_image
Illustration of a hand pouring liquid into a tray inside an oven (no text or symbols)- Postavile pleh za paru pri dnu odeljka.
- Napunite pleh sa 250 ml vode samo kada je pećnica hladna.
- Postavite režim Kruženje vazduha + izaberite Prilodna para 🚙️
- Okrenite Dugme za biranje kako biste podesili temperaturu i trajanje pripreme hranc.
- Pritisnite Dugme za biranje da biste započeli zagrevanje.
- Stavite hranu u pećnicu na bilo koju rešetku i počnite sa kuvanjem.

NAPOMENA
- Nemojte da dopunjujete vodu tokom kuvanja ili kada je pećnica vrela.
- Kada se pečnice potpuno ohladi nakon korišćenja funkcije Prirodna para, pomoću vlažne krpe prebrišite donji deo zone.
- Da biste uklonili vodeni kamenac koji se formira nakon korišćenja poćnice duže vremena, koristite meku krpu sa namenskim deterdžentom.
Upotreba pećnice Rešavanje problema i informativni kôd
Korišćenje funkcija automatske pripreme hrane
Standardna priprema hrane
| Br. | Hrana | Br. | Hrana |
| 1 | Pekarski krompir | 2 | Gratinirano povrće |
| 3 | Zapečena testenina | 4 | Lazanje |
| 5 | Ratatull | 6 | Pila od jabuka |
| 7 | Kroasani | 8 | Lisnato testo sa jabukama |
| 9 | Osnovni vočni kolač | 10 | Kiš loren |
| 11 | Vekna belog hieba | 12 | Vekna hieba od mešanin žitarica |
| 13 | Kiflice | 14 | Lomljoni vočni kolač |
| 15 | Pogačice | 16 | Patšpanj |
| 17 | Mramorni kolač | 18 | Holandski kolač |
| 19 | Brauniji | 20 | Počena goveda slabina |
| 21 | Sporo kuvana pečena govedina | 22 | Pečeni jagnjeći kotleti sa začinskim biljem |
| 23 | Jagrjeci but sa koskom | 24 | Počena prasetina sa kožicom |
| 25 | Svinjska robra | 26 | Celp pilo |
| 27 | Pileče grudi | 28 | Pileći batak |
| 29 | Pačje grudi | 30 | Počeni fileti pasırmke |
| 31 | Pastrmka | 32 | Riba list |
| 33 | Odrezak/fhlet od lososa | 34 | Peceno povrće |
| 35 | Pečene polovine krompira | 36 | Zaleđeni pomfrit za pećnicu |
| 37 | Zamrznut krompir isećen na kriške | 38 | Zamrznute pica |
| 39 | Domaća pica | 40 | Narastanje testa |
Dvostruka priprema hrane
- Gornja
| Br. | Hrana | Br. | Hrana |
| 1 | Pekarski krompir | 2 | Lazanč |
| 3 | Pileći batak | 4 | Pečene po ovine krompira |
| 5 | Zalećeni pomfrit za pečnicu | ||
- Donja
| Br. | Hrana | Br. | Hrana |
| 1 | Pita od jabuka | 2 | Lisnato testo sa jabukama |
| 3 | Kiš loren | 4 | Zamrznuta pica |
| 5 | Domeća pica | ||
16 Srpski
Rešavanje problema
Ako se javi problem sa pecnicom, najre pogledajte sledeću tabelu i pokusajte da rešite problem na osnovu datih predloga. Ako ne uspete da otklonite problem, kontaktirajte lokalni servisni centar kompanije Samsung.
| Problem Uzrok Radnja | ||
| Nije moguce pravilno pritisnuti dugmad. | Ako je neki predmet zaqlav jen između dugmadi | Uklonite predmet i pokuša te ponovo. |
| Model sa okranom osel jivim na dodir, ako je na površin uredlaja prisulna v laga | Očisila vlegu i pokušajio ponovo. | |
| Ako je aktivna funkcija zaključavanja | Proverite da li je aktivna funkcija zaključavanja. | |
| Vreme nije prikazano. Ako nema napajanja Proverite da li je pečnica | oniključena na napajanje. | |
| Pečnica ne radi. Ako nema napajanja Proverite da li je pečnica | oniključena na napajanje. | |
| Pečnica je prestala da radi tokom pripreme hrane. | Ako je isključena iz utičnice Ponovo priključite napajanje. | |
| Napajanje se isključilo tokom rada. | Ako je neprekidna priprema hrane traje predugo | Nakon duže pripreme hrane sačekajte ca se pečnica ohadi. |
| Ako ventlator ne radi Posuša te da li | raci ventilator. | |
| Ako je pečnica posavljena na meslo bez odgovarajuće ventilacije | Pridržavaje se smernice o razmacima navedenim u vodiću za ugradnju pečnice. | |
| Kada koristite nekoliko različnih utikača za napajanje na istol utičnici | Koristte utičnicu za jedan ut kač. | |
| Pečnica nema napajanja. Ako nema napajanja Proverite da li je pečnica | oniključena na napajanje. | |
| Spoljašnjost pečnice se previše zagreva tokom rada. | Ako je pečnica posavljena na meslo bez odgovarajuće ventilacije | Pridržavaje se smernice o razmacima navedenim u vodiću za ugradnju pečnice. |
| Vrata ne mogu pravilno da se otvore. | Ako su ostaci hrane zapali između vrata i unutrašnjosti uredalja | Dobro očistite pečniku, a zatim pokuša te da otvorite vrata. |
| Unutrašnje svetlo je slabo ili se nije uključilo. | Ako se lampa uključi, a zatim isključi | Lampa se automatski isključje nakon određenog vremena kako bi se uštedela elektrčno energija. Možele da je uključite ponovo kada pritisrete dugme za svetlo u pečnici. |
| Ako je lampa prekrivena orijavštinom tokom pripreme hrane | Očistite unutrašnjost pečnice, a zatim proverite svetlo. | |
| Došlo je do strujnog udara u pečnici. | Ako napajanje nije pravilno uzemljenoAko koristite utičnu bez uzemljenja | Proverite da li je napajanje pravilno uzemljeno. |
text_image
QR code image containing encoded data, no visible human-readable textIMATE PITANJA ILI KOMENTARE?
| ZEMLJA POZOVITE NAS ILI NAS POSETITE NA INTERNETU NA | ||
| AUSTRIA 0800 | 72 67 864 (080C-SAMSUNG) www.samsung.com/ai/support | |
| BELGIUM 02-201 | 24-18 | www.samsung.com/be/support (Dutch)www.samsung.com/be_fr/support (French) |
| DENMARK 707 | 019 70 www.samsung.com/dk/support | |
| FINLAND 030-6227 | 515 www.samsung.com/fi/support | |
| FRANCE 01 48 | 63 00 00 www.samsung.com/fr/support | |
| GERMANY 06196 | 77 555 77 www.samsung.com/de/support | |
| ITALIA 800 SAMSUNG (800.725/7864) www.samsung.com/it/support | ||
| CYPRUS | 8009 4000 only from landline, toll free | www.samsung.com/qr/support |
| GREECE | 80111-SAMSUNG (80111 726 7864)only from land line(+30; 210 6897691 from mobile andland line | www.samsung.com/gr/support |
| LUXCMOURG | 261 03 710 | www.samsung.com/be_fr/support |
| NET-IERLANDS | 388 90 90 100 | www.samsung.com/nl/support |
| NORWAY | 21629099 | www.samsung.com/no/support |
| PORTUGAL | 210 608 098Chamada pera a rede fixa nacionalDas Otés des 9h às 20h | www.samsung.com/pt/support |
| SPAIN | 91 175 00 15 | www.samsung.com/es/support |
| SWEDEN 0771 | 400 300 www.samsung.com/se/support | |
| SWITZERLAND | 0800 726 786 | www.samsung.com/ch/support (German)www.samsung.com/ch_fr/support (French) |
| UK | 0333 000 0333 | www.samsung.com/uk/support |
| IRELAND (EIRE) | 0818 717100 | www.samsung.com/ie/support |
NV7B564**** / NV7B565**** / NV7B566**** / NV7B567**** / NV7B568**** / NV7B564**C* / NV7B566**C* / NV7B568**C* / NV7B574**** / NV7B575**** / NV7B576**** / NV7B577**** / NV7B578****

natural_image
Close-up of sliced meat on a plate, showing texture and surface (no text or symbols)SAMSUNG
PripravaVsebina
Povezovanje SmartThings
text_image
Mobile phone screenshot showing a QR code payment interface with app icons and a mobile payment terminaltext_image
Mobile phone screenshot showing a QR code with Chinese text '扫码关注' (Scan to follow) and a logo on the left.text_image
C B A D E G K L F H J 1Pecica (mm)
| A 590 G 503 | ||
| B 166 H 481 | ||
| C 383 I 21 | ||
| D 45 J 549 | ||
| E 596 K 579 | ||
| F 595 L 559 |

text_image
A B C D EVgradna omara (mm)
natural_image
Pure technical line drawing of a rectangular frame with a circular arrow and star symbol, no text or labels presentnatural_image
Diagram showing a circular object with an arrow labeled 'A' and a shaded region, no readable text or symbols present.Med pedico in vsako stranjo omarice mora biti najmanj 5 mm prostora (A).

text_image
Technical diagram showing a mechanical assembly with labeled component B and directional arrow indicating motion or movement.Zagotovite najmanj 3 mm veliko režo (B) tako, da se bodo vrata gladko odirala in zapirala.
natural_image
Technical line drawing of a structural assembly with an inset showing a component detail (no text or symbols)natural_image
Diagram showing a hand holding a chair inside a vehicle cabin, with an inset circular view highlighting the seat area (no text or symbols present)natural_image
Diagram of a kitchen appliance with an open door and a lever mechanism (no text or symbols)- Zaprite vrata za približno 70°. Z obema rokama držite vrata pečice ob straneh ter dvignite in povlecite navzgor, dokler se tećaji ne odklopijo.
- Vrata očistite z milnico in čisto krpo.
Slovenščina 9
Vzdrževanje
natural_image
Illustration of a person lying down with a magnified inset showing the anatomical view (no text or symbols)natural_image
Technical line drawing of a mechanical component with an inset magnified view showing internal components (no text or symbols)- Z izvijačem odstranite vijake na levi in desni strani.

natural_image
Diagram of a mechanical assembly with layered components and a ruler, no visible text or symbols- Odstranite obloge v smeri puščice
- Odstranite prvo stekleno ploskev z vrat.
natural_image
Pure diagram of a rectangular frame with a central label '02' and an arrow, no readable text or symbols beyond the label.- Odstranite drugo stekleno ploskev z vrat v smeri puščice.

natural_image
Diagram of a mechanical assembly with a gray rectangular component and a black arrow indicating direction (no text or symbols)- Odstranite tretjo stekleno ploskev z vrat v smeri puščice.
- Stcklo očistite z milnico in čisto krpo.

text_image
01 02 03 PYRO......natural_image
Diagram of a hand holding a small object on a mechanical component, with no visible text or symbols.
OPOZORILO
Da preprečite uhajanje toplote, se prepričajte, da ste steklene ploskve vstavili na pravilen način.
Vrata z dvojnim steklom (samo na nekaterih modelih)

natural_image
Diagram showing a cylindrical object above a tray with a handle, and a separate view of a mechanical device inside (no text or symbols)Zbiralnik vode

natural_image
Diagram of a door panel with a labeled component '01' (no text or symbols beyond label)01 Zbiralnik vode
natural_image
Diagram of a mechanical component with an inset showing a downward force or compression mechanism (no text or symbols present)natural_image
Diagram of a ladder inside a rectangular frame with an arrow indicating motion (no text or symbols)natural_image
Simple line drawing of a hand holding a small object inside a circular frame (no text or symbols)natural_image
Illustration of a hand holding a tool inside a circular frame, no text or symbols presentnatural_image
Line drawing of a hand inserting a component into a door panel (no text or symbols)natural_image
Line drawing of a hand holding a tool near a window or door (no text or symbols)natural_image
Diagram of a two-tiered storage unit with horizontal shelves and vertical supports (no text or labels)natural_image
Illustration of a small boat inside a transparent bag (no text or symbols)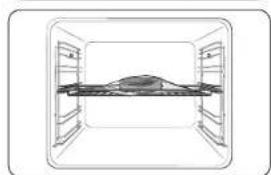
natural_image
Simple line drawing of a rectangular room with a central horizontal beam and surrounding shelves (no text or symbols)OPOMBA
natural_image
Illustration of a hand pouring liquid into a tray inside an oven (no text or symbols)text_image
QR code image containing encoded data, no visible human-readable textSlovenščina 19
VPRAŠANJA ALI KOMENTARJI
| DRŽAVA POKLIČITE ALI OBIŠČITE NAŠE SPLETNO MESTO | ||
| AUSTRIA 0800 | 72 67 864 (0800-SAMSUNG) www.samsung.com/ai/support | |
| BELGIUM 02 201 | 24-18 | www.samsung.com/be/support (Dutch)www.samsung.com/be_fr/support (French) |
| DENMARK 707 | 019 70 www.samsung.com/dk/support | |
| FINLAND 030-6 | 227 515 www.samsung.com/fi/support | |
| FRANCE 01 48 | 63 00 00 www.samsung.com/fr/support | |
| GERMANY 06196 | 77 555 77 www.samsung.com/de/support | |
| ITALIA 800 SAMSUNG (800.725/7864) www.samsung.com/it/support | ||
| CYPRUS | 8009 4000 only from landline, toll free | www.samsung.com/qr/support |
| GREECE | 80111-SAMSUNG (80111 726 7864)only from land line(+30; 210 6897691 from mobile andland line | www.samsung.com/gr/support |
| LUXCMOURG | 261 03 710 | www.samsung.com/be_fr/support |
| NET-IERLANDS | 388 90 90 100 | www.samsung.com/nl/support |
| NORWAY | 21629099 | www.samsung.com/no/support |
| PORTUGAL | 210 608 098Chamada pera a rede fixa nacionalDas Otés des 9h às 20h | www.samsung.com/pt/support |
| SPAIN | 91 175 00 15 | www.samsung.com/es/support |
| SWEDEN 0771 | 400 300 www.samsung.com/sc/support | |
| SWITZERLAND | 0800 726 786 | www.samsung.com/ch/support (German)www.samsung.com/ch_fr/support (French) |
| UK | 0333 000 0333 | www.samsung.com/uk/support |
| IRELAND (EIRE) | 0818 717100 | www.samsung.com/ie/support |

Skenirajte to s pametnim telefonom.
SAMSUNG
NV7B564**** / NV7B565**** / NV7B566**** / NV7B567**** / NV7B568**** / NV7B564**C* / NV7B566**C* / NV7B568**C* / NV7B574**** / NV7B575**** / NV7B576**** / NV7B577**** / NV7B578****

natural_image
Close-up of sliced meat on a plate, showing texture and surface (no text or symbols)SAMSUNG
Přípravabsah
text_image
Mobile phone screenshot showing a QR code payment interface with app icons and a mobile payment terminaltext_image
Mobile phone screenshot showing a QR code with Chinese text '扫码关注' (Scan to follow) and a logo on the left.text_image
C B A D E G K L F H J ITrouba (mm)
| A 560 G 503 | ||
| B 166 H 481 | ||
| C 383 I 21 | ||
| D 45 J 549 | ||
| E 596 K 579 | ||
| F 595 L 559 |

text_image
A B C D Enatural_image
Pure technical line drawing of a rectangular frame with a circular arrow and star symbol, no text or labels presentnatural_image
Diagram showing a circular object with an arrow labeled 'A' and diagonal lines, no readable text or symbols present.text_image
Technical diagram showing a mechanical assembly with labeled component B and directional arrownatural_image
Technical line drawing of a structural assembly with an inset showing a component detail (no text or symbols)natural_image
Diagram showing a hand holding a device inside a vehicle cabin, with an inset circular view highlighting the mechanism (no text or symbols present)natural_image
Diagram of a kitchen appliance with an open door and a diagonal handle, showing directional arrows (no text or symbols)natural_image
Illustration of a car seatbelt with a magnified inset showing the seatbelt detail (no text or symbols)natural_image
Diagram of a mechanical component with an inset showing a hand using a tool (no text or symbols present)natural_image
Diagram of a mechanical assembly with a ruler and a flat plate, no visible text or symbolsnatural_image
Diagram of a rectangular frame with a central square and an arrow, no text or symbols presentnatural_image
Pure diagram of a rectangular frame with a central gray square and an arrow, no text or symbols present.natural_image
Technical line drawing of a mechanical assembly with a hand holding a tool, no visible text or symbols
VAROVÁNÍ
natural_image
Diagram showing a cylindrical object being inserted into a device with a handle, and a separate view of the device's internal structure (no text or symbols)Sběrač vody

natural_image
Diagram of a door panel with a labeled component '01' (no text or symbols beyond label)01 Sběrač vody
natural_image
Technical line drawing of a mechanical assembly with an inset showing a bracket detail (no text or symbols)
natural_image
Diagram of a ladder leaning against a wall, with an arrow indicating motion direction (no text or symbols)natural_image
Simple line drawing of a hand holding a small object inside a circular frame (no text or symbols)natural_image
Illustration of a hand holding a tool inside a circular frame (no text or symbols)natural_image
Line drawing of a hand holding a tool near a window (no text or symbols)natural_image
Line drawing of a hand holding a tool near a window or door (no text or symbols)natural_image
Diagram of a two-tiered storage unit with horizontal shelves and control panels (no text or labels)natural_image
Illustration of a bag with a small object inside, no text or symbols present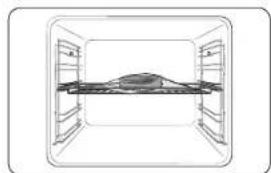
natural_image
Simple line drawing of a cabinet or storage unit with no text, numbers, or symbolsnatural_image
Illustration of a hand pouring liquid into a tray inside an oven (no text or symbols)text_image
QR code image containing encoded data, no visible human-readable textČeština 19
MÁTE DOTAZY NEBO POZNÁMKY?
| ZEME ZAVOLEJTE NAM | NEBO NAS NAVISTIVTE NA WEBOVYCH STRANKACH | |
| AUSTRIA 0800 | 72 67 864 (0800-SAMSUNG) www.samsung.com/ai/support | |
| BELGIUM 02 201 | 24-18 | www.samsung.com/be/support (Dutch)www.samsung.com/be_fr/support (French) |
| DENMARK 707 | 70 70 www.samsung.com/dk/support | |
| FINLAND 030 | 6227 515 www.samsung.com/fi/support | |
| FRANCE 01 48 | 63 00 00 www.samsung.com/fr/support | |
| GERMANY 06196 | 77 555 77 www.samsung.com/de/support | |
| ITALIA 800 SAMSUNG (800 725/7854) www.samsung.com/it/support | ||
| CYPRUS | 8009 4000 only from landline, toll free | www.samsung.com/gr/support |
| GREECE | 80111-SAMSUNG (80111 726 7864)only from land line(+30) 210 6897691 from mobile andland line | www.samsung.com/gr/support |
| LUXCMOURG | 261 03 710 | www.samsung.com/be_fr/support |
| NETHERLANDS | 288 90 90 100 | www.samsung.com/nl/support |
| NORWAY | 21623089 | www.samsung.com/no/support |
| PORTUGAL | 210 608 098Chamada para a rede fixa nacionalDas utels das 9h as 20h | www.samsung.com/pt/support |
| SPAIN | 91 175 00 15 | www.samsung.com/es/support |
| SWEDEN 0771 | 400 300 www.samsung.com/sc/support | |
| SWITZERLAND | 0800 726 786 | www.samsung.com/ch/support (German)www.samsung.com/ch fr/support (French) |
| UK | 0333 000 0333 | www.samsung.com/uk/support |
| IRELAND (IRE) | 0818 717100 | www.samsung.com/ie/support |
NV7B564**** / NV7B565**** / NV7B566**** / NV7B567**** / NV7B568**** / NV7B564**C* / NV7B566**C* / NV7B568**C* / NV7B574**** / NV7B575**** / NV7B576**** / NV7B577**** / NV7B578****

text_image
Mobile phone screen displaying a QR code with app icons and text '扫码关注' (Scan to follow)text_image
Mobile phone screenshot showing a QR code with Chinese text '扫码关注' (Scan to follow) and a logo on the left.www.samsung.com/uk/aboutsamsung/sustainability/environment/our-commitment/data/
text_image
C B A D E G K L F H J 1Rúra (mm)
| A 560 G 503 | ||
| B 166 H 481 | ||
| C 383 I 21 | ||
| D 45 J 549 | ||
| E 596 K 579 | ||
| F 585 L 559 |

text_image
A B C D EVstavaná skrinka (mm)
| A Min. 550 |
| B Min. 560 |
| C Min. 50 |
| D Min. 590 - Max. 600 |
| E Min. 480 x Min. 50 |
POZNÁMKA
natural_image
Pure technical line drawing of a rectangular frame with a circular arrow and star symbol, no text or labels presentnatural_image
Diagram showing a circular object with an arrow labeled 'A' and diagonal lines, no readable text or symbols present.Medzi rúrou a každou stranou skrinky nechajte medzeru (A) s velkostou minimalne 5 mm.

text_image
Technical diagram showing a mechanical assembly with labeled component B and directional arrowZaistite medzeru s velkostou minimalne 3 mm (B), aby sa dvierka jednoducho otvárali a zatvárali.
natural_image
Technical line drawing of a structural component with an inset magnified detail (no text or symbols)natural_image
Diagram showing a hand operating a device inside a vehicle cabin (no text or symbols present)natural_image
Diagram of a kitchen appliance with an open door and a lever mechanism (no text or symbols)- Zatvorte dvierka o približne 70°. Uchopte dvierka rúry obidvomi rukami, zdvihnite a potiahnite ich; až kým nevytiahnete závesy.
- vyčistite dvierka mydlovou vodou a čistou handrou.
Slovenčina 9
Údržba

natural_image
Illustration of a person lying down with a magnified inset showing the foot area (no text or symbols)natural_image
Technical line drawing of a mechanical component with an inset magnified view showing internal components (no text or symbols)natural_image
Diagram of a mechanical assembly with layered components and a ruler, no visible text or symbolsnatural_image
Pure diagram of a rectangular frame with a central label '02' and an arrow, no readable text or symbols beyond the label.- Potom odmonujte druhu tabulu z dvierok v smere sipky.
natural_image
Diagram of a mechanical assembly with a gray rectangular component and a black arrow indicating direction (no text or symbols)- Pocom odmoncujte tretiu tabulu z dvierok v smere šipky.
- vyčistite sklo mydlovou vodou a čistou handrou.
text_image
01 02 03 PYRO......natural_image
Technical line drawing of a mechanical assembly with a magnified circular detail (no text or symbols)
VAROVANIE
natural_image
Diagram showing a cylindrical object being inserted into a device with a handle and base, no text or symbols present.Kolektor vody
natural_image
Diagram of a door frame with a labeled component '01' (no text or symbols beyond label)01 Kolektor vody
natural_image
Diagram of a mechanical component with an inset showing a downward force or compression mechanism (no text or symbols present)
natural_image
Diagram of a ladder leaning against a wall, with an arrow indicating motion direction (no text or symbols)natural_image
Simple line drawing of a hand holding a small object inside a circular frame (no text or symbols)natural_image
Illustration of a hand holding a tool inside a circular frame (no text or symbols)natural_image
Line drawing of a hand inserting a card into a door (no text or symbols)- Úplne zatlačte páku rukováte.
- Potiahnite rukovat.
- Tým důjde k otvoreniu len horných dvierok - vid porázok.
natural_image
Line drawing of a hand using a tool to clean or store items (no text or symbols)natural_image
Diagram of a two-tiered storage unit with horizontal shelves and ventilation slots (no text or labels)natural_image
Illustration of a raw steak inside a bag (no text or symbols)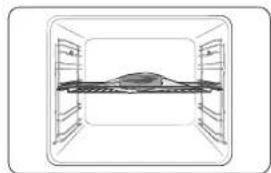
natural_image
Diagram of a horizontal structure with vertical supports and a central horizontal beam, enclosed in a rectangular frame (no text or symbols)natural_image
Illustration of a hand pouring liquid into a tray inside a storage unit (no text or symbols)text_image
QR code image containing encoded data, no visible human-readable textSlovenčina 19
MÁTE OTÁZKY ALEBO KOMENTÁRE?
| KRAJINA ZAVÓLAJTE NAM | ALEBO NÁS NAVŠTÍVTE ONLINE NA STRÁNKE | |
| AUSTRIA 0800 72 67 884 (0800-SAMSUNG) www.samsung.com/at/support | ||
| BELGIUM 02-201-24-18 | www.samsung.com/bc/support (Dutch)www.samsung.com/be_fr/support (French) | |
| DENMARK 707 019 70 www.samsung.com/dk/support | ||
| FINLAND 030-6227 515 www.samsung.com/lt/support | ||
| FRANCE 01 48 63 00 00 www.samsung.com/fr/support | ||
| GERMANY 06196 77 555 77 www.samsung.com/dz/support | ||
| ITALIA 800-SAMSUNG (800.7257864) www.samsung.com/lt/support | ||
| CYPRUS | 8009 4000 only from landline, toll free | www.samsung.com/gr/support |
| GREECE | 80111-SAMSUNG (80111 728 7864)only from land line(+30; 210 6897691 from mobile andland line | www.samsung.com/gr/support |
| LUXEMEURG 251 03 710 www.samsung.com/oe_fr/support | ||
| NET-ERLANDS | 388 90 90 100 | www.samsung.com/nl/support |
| NORWAY | 21629093 | www.samsung.com/no/support |
| PORTUGAL | 210 608 098Chamada para a rede fixa nacionalDias ótós das 9h às 20h | www.samsung.com/pt/support |
| SPAIN | 91 175 00 15 | www.samsung.com/cs/support |
| SWEDEN 0771 400 300 www.samsung.com/se/support | ||
| SWITZERLAND | 0800 726 786 | www.samsung.com/ch/support (German)www.samsung.com/ch_fr/support (French) |
| UK | 0333 000 0333 | www.samsung.com/uk/support |
| IRELAND (EIRE) | 0818 717100 | www.samsung.com/e/support |
Naskenujle terlo köc smartlonom.
SAMSUNG
NV7B564**** / NV7B565**** / NV7B566**** / NV7B567**** / NV7B568**** / NV7B564**C* / NV7B566**C* / NV7B568**C* /
NV7B574**** / NV7B575**** / NV7B576**** / NV7B577**** / NV7B578****

natural_image
Close-up of sliced meat on a plate, showing texture and surface (no text or symbols)SAMSUNG
text_image
Mobile phone screen displaying a QR code with app icons and text '扫码关注' (Scan to follow)text_image
Mobile phone screenshot showing a QR code with Chinese text '扫码关注' (Scan to follow) and a logo on the left.www.samsung.com/uk/aboutsamsung/sustainability/environment/our-commitment/data/
text_image
C B A D E G K L F H J 1Sùtǒ (mm)
| A 590 G 503 | ||
| B 166 H 481 | ||
| C 383 I 21 | ||
| D 45 J 549 | ||
| E 596 K 579 | ||
| F 595 L 559 |

text_image
A B C D Enatural_image
Pure technical line drawing of a door frame with no text, numbers, or symbolsnatural_image
Pure diagram of a circular object with a labeled point A, no text or symbols presenttext_image
Diagram showing a mechanical or architectural component with labeled section B and directional arrow, likely illustrating a process or assembly.natural_image
Technical line drawing of a structural component with an inset magnified view (no text or symbols)natural_image
Diagram showing a hand holding a chair inside a vehicle cabin, with an inset circular view highlighting the seat area (no text or symbols present)natural_image
Diagram of a kitchen appliance with an open door and a lever mechanism (no text or symbols)natural_image
Illustration of a person lying down with a magnified inset showing the anatomical view (no text or symbols)natural_image
Diagram of a mechanical component with an inset close-up showing a hand holding a tool (no text or symbols present)natural_image
Diagram of a mechanical assembly with layered components and a ruler, no visible text or symbolsnatural_image
Diagram of a mechanical assembly with a labeled component '02' and an arrow indicating direction (no text or symbols beyond the label)natural_image
Diagram of a mechanical or architectural component with labeled section '03' and directional arrow (no readable text or symbols beyond label)natural_image
Technical line drawing of a mechanical assembly with a magnified circular detail (no text or symbols)
FIGYELEM!
natural_image
Diagram of a mechanical device with a cylindrical component above it and a base with a handle (no text or symbols)Vízgyűjtő
natural_image
Diagram of a door frame with a labeled component '01' (no text or symbols beyond label)01 Vizgyújtó
natural_image
Diagram of a mechanical component with an inset showing a downward force or compression mechanism (no text or symbols present)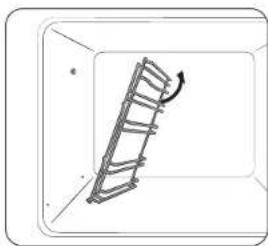
natural_image
Diagram of a ladder inside a rectangular frame with an arrow indicating direction (no text or symbols)natural_image
Simple line drawing of a hand holding a small object inside a circular frame (no text or symbols)natural_image
Illustration of a hand holding a tool inside a circular frame, no text or symbols presentnatural_image
Line drawing of a hand inserting a component into a door panel (no text or symbols)natural_image
Line drawing of a hand holding a tool near a window or cabinet (no text or symbols)natural_image
Diagram of a two-tiered storage unit with horizontal shelves and vertical supports (no text or labels)natural_image
Illustration of a bag with a rectangular object inside, no text or symbols present
natural_image
Simple line drawing of a rectangular room with a central horizontal beam and surrounding shelves (no text or symbols)MEGJEGYZÉS
natural_image
Illustration of a hand pouring liquid into a tray inside a storage unit (no text or symbols)text_image
QR code image containing encoded data, no visible human-readable textKÉRDÉSE VAGY ÉSZREVÉTELE VAN?
| ORSZÁG HÍVJA A KÖVETKEZŐ SZÁMOT: VACY LÁTOGASSON EL HONLAPUNKRA: | ||
| AUSTRIA 0800 | 72 67 864 (0800-SAMSUNG) www.samsung.com/et/support | |
| BELGIUM 02 201 | 24-18 | www.samsung.com/be/support (Dutch)www.samsung.com/be_fr/support (French) |
| DENMARK 707 | 019 70 www.samsung.com/dk/support | |
| FINLAND 030 | 6227 515 www.samsung.com/fi/support | |
| FRANCE 01 48 | 63 00 00 www.samsung.com/fr/support | |
| GERMANY 06196 | 77 555 77 www.samsung.com/de/support | |
| ITALIA 800 SAMSUNG (800 725/7854) www.samsung.com/it/support | ||
| CYPRUS | 8009 4000 only from land line. toll free | www.samsung.com/gr/support |
| GREECE | 80111-SAMSUNG (80111 726 7864)only from land line(+30) 210 6897691 from mobile andland line | www.samsung.com/gr/support |
| LUXCMOURG | 261 03 710 | www.samsung.com/be_fr/support |
| NETHERLANDS | 088 90 90 100 | www.samsung.com/nl/support |
| NORWAY | 21623089 | www.samsung.com/no/support |
| PORTUGAL | 210 608 098Chamada para a rede fixa nacionalDas utels das 9h às 20h | www.samsung.com/pt/support |
| SPAIN | 91 175 00 15 | www.samsung.com/es/support |
| SWEDEN 0771 | 400 300 | www.samsung.com/sc/support |
| SWITZERLAND | 0900 726 786 | www.samsung.com/ch/support (German)www.samsung.com/ch fr/support (French) |
| UK | 0333 000 0333 | www.samsung.com/uk/support |
| IRELAND (EIRE) | 0818 717100 | www.samsung.com/e/support |
NV7B564**** / NV7B565**** / NV7B566**** / NV7B567**** /
NV7B568**** / NV7B564**C* / NV7B566**C* / NV7B568**C* /
NV7B574**** / NV7B575**** / NV7B576**** / NV7B577**** / NV7B578****

10.20.12.13.14.15.16.17.
text_image
Mobile phone screen displaying a QR code with app icons and text '扫码关注' (Scan to follow)text_image
Mobile phone screenshot showing a QR code payment interface with Chinese text and a logotext_image
C B A D E G K L F H J IΦούρνος (mm)
| A560 G503 | ||
| B166 H481 | ||
| C383 I21 | ||
| D45 J549 | ||
| E596 K579 | ||
| F595 L559 |

text_image
A B C D Enatural_image
Pure technical line drawing of a door frame with no text, numbers, or symbolsnatural_image
Pure geometric diagram showing a circle intersected by two lines, with a labeled point A inside (no text or symbols beyond label)text_image
Diagram showing a mechanical or architectural component with labeled point B and directional arrow, likely illustrating a motion or assembly process.natural_image
Technical line drawing of a structural component with an inset magnified detail (no text or symbols)natural_image
Illustration of a person sitting on a bench with a magnified inset showing the hand holding a device (no text or symbols present)natural_image
Diagram of a kitchen appliance with a door and drawer, showing directional arrows indicating movement (no text or symbols)natural_image
Illustration of a person lying on the back with a magnified inset showing the side view (no text or symbols)natural_image
Diagram of a folded paper or sheet with an inset showing a hand holding a tool, no text or symbols present.natural_image
Diagram of a mechanical assembly with a ruler and a flat plate, no visible text or symbolsnatural_image
Diagram of a rectangular frame with a labeled section '02' and an arrow, no readable text or symbols present.natural_image
Diagram of a rectangular frame with a central gray square and an arrow, no text or symbols presentnatural_image
Technical line drawing of a mechanical assembly with a magnified circular detail (no text or symbols)
ΠΡΟΕΙΔΟΠΟΙΗΣΗ
natural_image
Diagram showing a cylindrical object being inserted into a device with a handle and base, no text or symbols present.Συλλέκτης νερού
natural_image
Diagram of a door panel with a labeled component '01' (no text or symbols beyond label)01 Συλλέκτης νερού
natural_image
Diagram of a mechanical component with an inset showing a downward force or compression mechanism (no text or symbols present)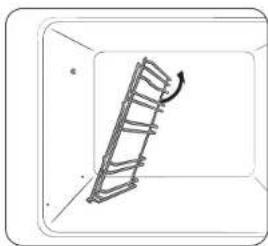
natural_image
Diagram of a ladder inside a rectangular frame, showing rotational motion (no text or symbols)natural_image
Simple line drawing of a hand holding a small object inside a circular frame (no text or symbols)natural_image
Illustration of a hand holding a tool inside a container with a magnified inset showing the handle (no text or symbols)natural_image
Line drawing of a hand inserting a small object into a device (no text or symbols)natural_image
Line drawing of a hand using a tool to clean or install a door panel (no text or symbols visible)natural_image
Diagram of a two-tiered storage unit with horizontal shelves and control panels (no text or labels)natural_image
Illustration of a single loaf of bread inside a bag (no text or symbols)
natural_image
Diagram of a mechanical assembly inside a transparent enclosure, showing internal components and no text or symbols.
ΣΗΜΕΙΩΣΗ
natural_image
Illustration of a hand pouring liquid into a tray inside an oven (no text or symbols)text_image
QR code image containing encoded data, no visible human-readable textΕλληνικά 19
NV7B564**** / NV7B565**** / NV7B566**** / NV7B567**** /
NV7B568**** / NV7B564**C* / NV7B566**C* / NV7B568**C* /
NV7B574**** / NV7B575**** / NV7B576**** / NV7B577**** / NV7B578****

natural_image
Close-up of sliced meat on a plate, showing texture and surface (no text or symbols)SAMSUNG
Vorberleitung
text_image
Mobile phone screenshot showing a QR code payment interface with app icons and a mobile payment terminal.text_image
Mobile phone screenshot showing a QR code with Chinese text '扫码关注' (Scan to follow) and a logo on the left.text_image
C B A D E G K L F H J IGerät (mm)
| A 560 G 503 | ||
| B 166 H 481 | ||
| C 383 I 21 | ||
| D 45 J 549 | ||
| E 596 K 579 | ||
| F 595 L 559 |

text_image
A B C D EEinbauschrank (mm)
natural_image
Pure technical line drawing of a rectangular frame with a circular arrow and star symbol, no text or labels presentnatural_image
Diagram showing a circular object with an arrow labeled 'A' and diagonal lines, no readable text or symbols present.text_image
Technical diagram showing a mechanical assembly with labeled component B and directional arrownatural_image
Technical line drawing of a structural assembly with an inset showing a component detail (no text or symbols)natural_image
Diagram showing a hand pressing down on a device inside a circular frame (no text or symbols)natural_image
Diagram of a kitchen appliance with an oven and hanging blade, showing motion arrows (no text or symbols)natural_image
Illustration of a car seatbelt with a magnified inset showing the seatbelt detail (no text or symbols)natural_image
Diagram of a mechanical component with an inset showing a hand using a tool (no text or symbols present)natural_image
Diagram of a mechanical assembly with a ruler and a flat plate, no visible text or symbolsnatural_image
Diagram of a rectangular frame with a labeled section '02' and an arrow, no readable text or symbols present.natural_image
Pure diagram of a rectangular frame with a central gray square and an arrow, no text or symbols present.natural_image
Technical line drawing of a mechanical assembly with a magnified circular detail (no text or symbols)
WARNUNG
natural_image
Diagram of a cylindrical object being placed above an open drawer with a handle, showing internal components (no text or symbols)Wasserkollektor
natural_image
Diagram of a door frame with a labeled component '01' (no other text or symbols)01 Wasserkolicktor
natural_image
Diagram of a mechanical component with an inset showing a downward force or compression mechanism (no text or symbols present)
natural_image
Diagram of a ladder inside a rectangular frame with an arrow indicating motion (no text or symbols)natural_image
Simple line drawing of a hand holding a small object inside a circular frame (no text or symbols)natural_image
Illustration of a hand holding a tool inside a circular frame, with no text or symbols present.natural_image
Line drawing of a hand inserting a small object into a device (no text or symbols)natural_image
Line drawing of a hand holding a tool inside a kitchen appliance (no text or symbols)natural_image
Diagram of a double bass structure with horizontal plates and vertical supports (no text or labels)natural_image
Illustration of a baked flatbread inside a bag (no text or symbols)natural_image
Illustration of a hand pouring liquid into a tray inside an oven (no text or symbols)text_image
QR code image containing encoded data, no visible human-readable textDeutsch 19
NV7B564**** / NV7B565**** / NV7B566**** / NV7B567**** / NV7B568**** / NV7B564**C* / NV7B566**C* / NV7B568**C* / NV7B574**** / NV7B575**** / NV7B576**** / NV7B577**** / NV7B578****
text_image
Mobile phone screen displaying a QR code with Wi-Fi signal and app iconstext_image
Mobile phone screenshot showing a QR code with Chinese text '扫码关注' (Scan to follow) and a logo on the left.www.samsung.com/uk/aboutsamsung/sustainability/environment/our-commitment/data/
text_image
C B A D E G K L F H J 1Forno (mm)
| A 590 G 503 | ||
| B 166 H 481 | ||
| C 383 I 21 | ||
| D 45 J 549 | ||
| E 596 K 579 | ||
| F 595 L 559 |

text_image
A B C D Enatural_image
Pure technical line drawing of a rectangular frame with mounting brackets and a small circular symbol at the top (no text or labels)natural_image
Diagram showing a circular object with an arrow labeled 'A' and diagonal lines, no readable text or symbols present.text_image
Technical diagram showing a mechanical assembly with labeled component B and directional arrownatural_image
Technical line drawing of a structural assembly with an inset showing a cross-section detail (no text or symbols)natural_image
Diagram showing a hand holding a chair inside a vehicle cabin, with an inset circular view highlighting the seat area (no text or symbols present)natural_image
Diagram of a kitchen appliance with a door and scroll, showing airflow direction (no text or symbols)natural_image
Illustration of a car seatbelt with a magnified inset showing the seatbelt detail (no text or symbols)natural_image
Diagram of a folded paper or sheet with an inset showing a hand holding a small object (no text or symbols present)natural_image
Diagram of a mechanical assembly with a ruler and a flat plate, no visible text or symbolsnatural_image
Diagram of a rectangular frame with a central square and an arrow, no text or symbols presentnatural_image
Pure diagram of a rectangular frame with a central gray square and an arrow, no text or symbols present.natural_image
Technical line drawing of a mechanical assembly with a magnified circular detail (no text or symbols)
AVVERTENZA
natural_image
Diagram showing a cylindrical object above a device with a handle and internal components, and a separate view of a device with a tool inside (no text or symbols)natural_image
Diagram of a door or panel with a labeled component '01' (no text or symbols beyond label)natural_image
Diagram of a mechanical component with an inset showing a downward force or compression mechanism (no text or symbols present)
natural_image
Diagram of a ladder leaning against a wall, with an arrow indicating motion direction (no text or symbols)natural_image
Simple line drawing of a hand holding a small object inside a circular frame (no text or symbols)natural_image
Illustration of a hand holding a tool inside a circular frame, no text or symbols presentnatural_image
Line drawing of a hand inserting a small object into a device (no text or symbols)natural_image
Line drawing of a hand holding a tool near a window (no text or symbols)natural_image
Simple line drawing of a two-tiered storage unit or rack (no text or symbols)natural_image
Illustration of a flat plate with a small piece inside, wrapped in a plastic bag (no text or symbols)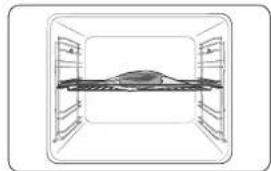
natural_image
Top-down schematic of a mechanical or architectural component with no visible text, numbers, or symbols.NOTA
natural_image
Illustration of a hand pouring liquid into a tray inside an oven (no text or symbols)text_image
QR code image containing encoded data, no visible human-readable textItaliano 19
DOMANDE O COMMENTI?
| NAZIONE CHIAMARE IL NUMERO O VISITARE IL SITO WEB | ||
| AUSTRIA 0800 | 72 67 864 (0800-SAMSUNG) www.samsung.com/ai/support | |
| BELGIUM 02 201 | 24 18 | www.samsung.com/be/support (Dutch)www.samsung.com/be_fr/support (French) |
| DENMARK 707 | 70 70 www.samsung.com/dk/support | |
| FINLAND 030-6227 | 515 www.samsung.com/fi/support | |
| FRANCE 01 48 | 63 00 00 www.samsung.com/fr/support | |
| GERMANY 06156 | 77 555 77 www.samsung.com/de/support | |
| ITALIA 600-SAMSUNG (800.7267864) www.samsung.com/it/support | ||
| CYPRUS | 8009 4000 only from landline, toll free | www.samsung.com/gr/support |
| GREECE | 80111-SAMSUNG (80111 726 7864)only from land line(+30; 210 6897691 from mobile andland line | www.samsung.com/gr/support |
| LUXCMOURG | 261 03 710 | www.samsung.com/be_fr/support |
| NET-IERLANDS | 388 90 90 100 | www.samsung.com/nl/support |
| NORWAY | 21623089 | www.samsung.com/no/support |
| PORTUGAL | 210 608 098Chamada para a rede fixa nacionalDas Otés des 9h às 20h | www.samsung.com/pt/support |
| SPAIN | 91 175 00 15 | www.samsung.com/es/support |
| SWEDEN 0771 | 400 300 www.samsung.com/sc/support | |
| SWITZERLAND | 0800 726 786 | www.samsung.com/ch/support (German)www.samsung.com/ch_fr/support (French) |
| UK | 0333 000 0333 | www.samsung.com/uk/support |
| IRELAND (EIRE) | 0818 717100 | www.samsung.com/ie/support |

SAMSUNG
NV7B564**** / NV7B565**** / NV7B566**** / NV7B567**** / NV7B568**** / NV7B564**C* / NV7B566**C* / NV7B568**C* / NV7B574**** / NV7B575**** / NV7B576**** / NV7B577**** / NV7B578****

text_image
Mobile phone screen displaying a QR code with app icons and text '扫码关注' (Scan to follow)text_image
Mobile phone screenshot showing a QR code with Chinese text '扫码关注' (Scan to follow) and a logo on the left.| Courant nominal (A) Section minimale | |
| 10 < A ≤ 16.5 mm | 2 |
| 16 < A ≤ 25.25 mm | 2 |
text_image
C B A D E G K L F H J IFour (mm)
| A 560 G 503 | ||
| B 166 H 481 | ||
| C 383 I 21 | ||
| D 45 J 549 | ||
| E 596 K 579 | ||
| F 595 L 559 |

text_image
A B C D EMeuble encastré (mm)
| A 550 min mum |
| B 590 minimum |
| C 50 minimum |
| D 590 minimum / 600 maximum |
| E 460 minimum x 50 minimum |

text_image
A B C DREMARQUE
Installation Installation Installation
natural_image
Pure technical line drawing of a rectangular frame with a circular arrow and star symbol, no text or labels presentnatural_image
Diagram showing a circular object with an arrow labeled 'A' and diagonal lines, no readable text or symbols present.text_image
Technical diagram showing a mechanical assembly with labeled component B and directional arrownatural_image
Technical line drawing of a structural assembly with an inset showing a component detail (no text or symbols)natural_image
Diagram showing a hand holding a device inside a vehicle cabin, with an inset circular view highlighting the mechanism (no text or symbols present)natural_image
Diagram of a kitchen appliance with a door and drawer, showing directional arrows indicating movement (no text or symbols)natural_image
Illustration of a person lying on the back with a magnified inset showing the side view (no text or symbols)natural_image
Diagram of a folded paper or sheet with a magnified inset showing a hand holding a small object (no text or symbols present)natural_image
Diagram of a device with a ruler and a slide, no visible text or symbolsnatural_image
Diagram of a rectangular frame with a labeled section '02' and an arrow, no readable text or symbols present.natural_image
Diagram of a 3D rectangular frame with a central gray square and an arrow, no text or symbols presentnatural_image
Technical line drawing of a mechanical assembly with a magnified circular detail (no text or symbols)
AVERTISSEMENT
natural_image
Diagram showing a cylindrical object being inserted into a device with a handle and base, no text or symbols present.Collecteur d'eau

natural_image
Diagram of a door frame with a labeled component '01' (no text or symbols beyond label)01 Collecteur d'eau
natural_image
Diagram of a mechanical component with an inset showing a downward force or compression mechanism (no text or symbols present)
natural_image
Diagram of a ladder leaning against a wall, with an arrow indicating motion direction (no text or symbols)natural_image
Simple line drawing of a hand holding a small object inside a circular frame (no text or symbols)AVERTISSEMENT
natural_image
Illustration of a hand holding a tool inside a circular frame, no text or symbols presentnatural_image
Line drawing of a hand inserting a small object into a device (no text or symbols)natural_image
Line drawing of a hand using a tool to clean or adjust a window (no text or symbols)natural_image
Diagram of a two-tiered storage unit with horizontal shelves and support structures (no text or labels)natural_image
Illustration of a hand pouring liquid into a tray inside a storage unit (no text or symbols)text_image
QR code image containing encoded data, no visible human-readable textFrançais 19
UNE QUESTION ? DES COMMENTAIRES ?
| PAYS APPELEZ LE OU CONTACTEZ-NOUS EN LIGNE SUR | ||
| AUSTRIA 0800 72 67 864 (0800-SAMSUNG) www.samsung.com/ai/support | ||
| BELGIUM 02-201-24-18 | www.samsung.com/be/support (Dutch)www.samsung.com/ie_fri/support (French) | |
| DENMARK 707 019 70 www.samsung.com/dk/support | ||
| FINLAND 030-6227 515 www.samsung.com/ support | ||
| FRANCE 01 48 63 00 00 www.samsung.com/fr/support | ||
| GERMANY 06196 77 355 77 www.samsung.com/de/support | ||
| ITALIA 800-SAMSUNG (800.7267864) www.samsung.com/it/support | ||
| CYPRUS | 8009-4000 only from landline, toll free | www.samsung.com/ge/support |
| GREECE | 00111-SAMSUNG (80111 726 7864)only from land line(+30) 210 6897601 from mobile andland line | www.samsung.com/ge/support |
| LUXEMBURG | 261 03 710 | www.samsung.com/be_fri/support |
| NETTIERLANDS | 088 80 90 100 | www.samsung.com/ir/support |
| NORWAY | 21629099 | www.samsung.com/no/support |
| PORTUGAI. | 210 608 089Chamada para a redexx nacionalDias diris das 5h as 20h | www.samsung.com/pt/support |
| SPAIN | 91 175 00 15 | www.samsung.com/ies/support |
| SWEDEN 0771-400 300 www.samsung.com/so/support | ||
| SWITZERLAND | 0800 726 786 | www.samsung.com/ch/support (German)www.samsung.com/ch_fri/support (French) |
| UK | 0333 000 0333 | www.samsung.com/uk/support |
| TRF AND (FIRF) | 0818 717100 | www.samsung.com/ies/support |
NV7B564**** / NV7B565**** / NV7B566**** / NV7B567**** /
NV7B568**** / NV7B564**C* / NV7B566**C* / NV7B568**C* /
NV7B574**** / NV7B575**** / NV7B576**** / NV7B577**** / NV7B578****

- For the instructions of how to use the product, please refer to the user manuals
provided as QR code or the Samsung Electronics' website (https://www.samsung.com).

natural_image
Close-up of sliced meat on a plate, showing texture and surface (no text or symbols)SAMSUNG
Poepanasi Contents
Connecting SmartThings
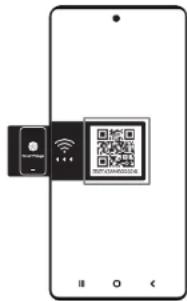
text_image
Mobile phone screen displaying a QR code with Wi-Fi and payment interface icons- Launch a QR code reader app and scan the QR code image on the product.
- Try connecting the SmartThings app to the product.
Registering the product / Reading the manual / Connecting to Services
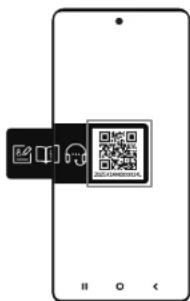
text_image
Mobile phone screenshot showing a QR code with Chinese text '扫码关注' (Scan to follow) and a logo on the left.- Launch a QR code reader app and scan the QR code image on the product.
- Choose the desired menu from the Product Registration, Manual, Customer Support. If you choose 'Manual' you can read the manual of the product you purchased.

NOTE
• We provide online manuals that can be accessed via your smartphone or our website to contribute in reducing the usage of manuals in paper format, as part of efforts to save the Earth.
Safety instructions 3
Important safety precautions 3
Correct Disposal of This Product (Waste Electrical & Electronic Equipment) 6
Auto energy saving function 6
Installation 6
Prepare to install the oven 6
Power connection 6
Cabinet mount 7
Maintenance 9
Cleaning 9 Replacement 12
Oven features 12
Oven 12
Control panel 13
Accessories 13
Oven use 13
Flexible Door 13 Wi-Fi / My Patterns 13 Air Fry 14 Air Sous Vide 14 Cooking with the meat probe 15 Natural Steam 15 Using the auto cook features 16
Troubleshooting and information code 16
Troubleshooting 16 Information codes 17
Technical specifications 18
Appendix 18 Product data sheet 18 Open Source Announcement 19
2 English
Safety instructions
Installation of this oven must be performed only by a licensed electrician. The installer is responsible for connecting the appliance to the mains power supply in observance of the relevant safety recommendations.
IMPORTANT SAFETY PRECAUTIONS
WARNING
This appliance is not intended for use by persons (including children) with reduced physical, sensory or mental capabilities, or lack of experience and knowledge, unless they have been given supervision or instruction concerning use of the appliance by a person responsible for their safety.
Children should be supervised to ensure that they do not play with the appliance.
The means for disconnection must be incorporated in the fixed wiring in accordance with the wiring rules.
This Appliance should be allowed to disconnection from the supply after installation. The disconnection may be achieved by having the plug accessible or by incorporating a switch in the fixed wiring in accordance with the wiring rules.
If the supply cord is damaged, it must be replaced by the manufacturer, its service agent or similarly qualified persons in order to avoid a hazard.
The method of fixing stated is not to depend on the use of adhesives since they are not considered to be a reliable fixing means.
This appliance can be used by children aged from 8 years and above and persons with reduced physical, sensory or mental capabilities or lack of experience and knowledge if they have been given supervision or instruction concerning use of the appliance in a safe way and understand the hazards involved. Children shall not play with the appliance. Cleaning and user maintenance shall not be made by children without supervision. Keep the appliance and its cord out of reach of children less than 8 years.
During use the appliance becomes hot. Care should be taken to avoid touching heating elements inside the oven.
WARNING: Accessible parts may become hot during use. Young children should be kept away.
Do not use harsh abrasive cleaners or sharp metal scrapers to clean the oven door glass since they can scratch the surface, which may result in shattering of the glass.
English 3
Safety instructions Safety instructions
If this appliance has cleaning function, excess spillage must be removed before cleaning and all utensils should not be left in the oven during steam cleaning or self cleaning. The cleaning function depends on the model.
If this appliance has cleaning function, during cleaning conditions the surfaces may get hotter than usual and children should be kept away. For appliances with pyrolytic cleaning process, Some animals, particularly birds, can be sensitive to the fumes and local temperature fluctuations during the pyrolytic cleaning process and should be moved to an appropriate well ventilated area during this process.
Ventilate the room during and after the pyro cleaning process.
The cleaning function depends on the model.
Only use the temperature probe recommended for this oven. (Meat probe model only)
A steam cleaner is not to be used.
WARNING: Ensure that the appliance is switched off before replacing the lamp to avoid the possibility of electric shock.
The appliance must not be installed behind a decorative door in order to avoid overheating.
WARNING: The appliance and its accessible parts become hot during use. Care should be taken to avoid touching heating elements. Children less than 8 years of age shall be kept away unless continuously supervised.
CAUTION: The cooking process has to be supervised. A short term cooking process has to be supervised continuously.
The door or the outer surface may get hot when the appliance is operating.
The temperature of accessible surfaces may be high when the appliance is operating. The surfaces are liable to get hot during use.

Insert the wire rack into position with the protruding parts (stoppers on both sides) towards the front so that the wire rack supports the rest position for large loads.

CAUTION
If the oven has been damaged in transport, do not connect it.
This appliance must be connected to the mains power supply only by a specially licensed electrician.
In the event of a fault or damage to the appliance, do not attempt to operate it. Repairs should be performed by a licensed technician only. Improper repair may result in considerable danger to you and others. If your oven needs repair, contact a SAMSUNG Service center or your dealer.
Electrical leads and cables should not be allowed to touch the oven.
4 English
The oven should be connected to the mains power supply by means of an approved circuit breaker or fuse. Never use multiple plug adapters or extension leads.
The power supply of the appliance should be turned off when it is being repaired or cleaned.
Take care when connecting electrical appliances to sockets near the oven. If this appliance has a vapour or steam cooking function, do not operate this appliance when the water supply cartridge is damaged. (Vapour or steam function model only)
When the cartridge is cracked or broken, do not use it and contact your nearest service center. (Vapour or steam function model only)
This oven has been designed only for the cooking of household foods.
During use, the oven interior surfaces become hot enough to cause burns. Do not touch heating elements or interior surfaces of the oven until they have had time to cool.
Never store flammable materials in the oven.
The oven surfaces become hot when the appliance is operated at a high temperature for an extended period of time.
When cooking, take care when opening the oven door as hot air and steam can escape rapidly.
When cooking dishes that contain alcohol, the alcohol may evaporate due to the high temperatures and the Vapour can catch fire if it comes into contact with a hot part of the oven.
For your safety, do not use high-pressure water cleaners or steam jet cleaners.
Children should be kept at a safe distance when the oven is in use.
Frozen foods such as pizzas should be cooked on the big grid. If the baking tray is used, it may become deformed due to the great variation in temperatures.
Do not pour water into the bottom of the oven when it is hot. This could cause damage to the enamel surface.
The oven door must be closed during cooking.
Do not line the bottom of the oven with aluminum foil and do not place any baking trays or tins on it. The aluminum foil blocks the heat, which may result in damage to the enamel surfaces and cause poor cooking results.
Fruit juices will leave stains, which can become permanent on the enamel surfaces of the oven.
When cooking very moist cakes, use the deep pan.
Do not rest bakeware on the open oven door.
Keep children away from the door when opening or closing it as they may bump themselves on the door or catch their fingers in the door.
Do not step, lean, sit or place heavy items on the door.
Do not open the door with unnecessarily strong force.
WARNING: Do not disconnect the appliance from the main power supply even after the cooking process is completed.
WARNING: Do not leave the door open while oven is cooking.
English 5
Safety instructions
Correct Disposal of This Product (Waste Electrical & Electronic Equipment)
(Applicable in countries with separate collection systems)
This marking on the product, accessories or literature indicates that the product and its electronic accessories (e.g. charger, headset, USB cable) should not be disposed of with other household waste at the end of their working life. To prevent possible harm to the environment or human health from uncontrolled waste disposal, please separate these items from other types of waste and recycle them responsibly to promote the sustainable reuse of material resources.
Household users should contact either the retailer where they purchased this product, or their local government office, for details of where and how they can take these items for environmentally safe recycling.
Business users should contact their supplier and check the terms and conditions of the purchase contract. This product and its electronic accessories should not be mixed with other commercial wastes for disposal.
For information on Samsung's environmental commitments and product-specific regulatory obligations, e.g. REACH, WEEE, Batteries, visit :
www.samsung.com/uk/aboutsamsung/sustainability/environment/our-commitment/data/
Auto energy saving function
Light : During cooking process, you can switch off Oven lamp by pressing 'Oven light' button. For energy saving, the oven lighting is switched off a few minutes after cooking program has started.
Installation
Prepare to install the oven

Phillips Screwdriver Drill

Power connection
010203
01 BROWN or BLACK
02 BLUE or WHITE
03 YELLOW and GREEN
Plug the oven into an electrical socket. If a plug-type socket is not available due to allowable current limitations, use a multi-pole isolator switch (with at least 3 mm spacing in-between) to meet safety regulations. Use a power cord of sufficient length that supports the specification H05 RR-F or H05 VV-F, min. 1.5 \~ 2.5 mm ^2 .
| Rated current (A) Minimum cross-sectional area | |
| 10 < A ≤ 16 1.5 mm | 2 |
| 16 < A ≤ 25 2.5 mm | 2 |
Check the output specifications on the label attached to the oven. Open the rear cover of the oven using a screwdriver, and remove the screws on the cord clamp. Then, connect the power lines to the relevant connection terminals. The Terminal is designed for earth grounding. First connect the yellow and green lines (earth grounding), which must be longer than the others. If you use a plug-type socket, the plug must remain accessible after the oven is installed. Samsung is not responsible for accidents caused by missing or faulty earth grounding.
WARNING
Do not step on or twist the wires during installation, and keep them away from heat-emitting parts of the oven.
6 English
Cabinet mount
If installing the oven in a built-in cabinet, the cabinet must have its plastic surfaces and adhesive parts resistant up to 90 °C. Samsung is not responsible for damage to furniture from the oven's heat emission.
The oven must be properly ventilated. For ventilation, leave a gap of about 50 mm between the lower shelf of the cabinet and the supporting wall. If you install the oven under a cooktop, follow the cooktop's installation instructions.
Required dimensions for installation
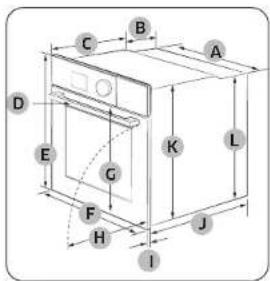
text_image
C B A D E G K L F H J 1Oven (mm)
| A 560 G 503 | ||
| B 166 H 481 | ||
| C 383 I 21 | ||
| D 45 J 549 | ||
| E 596 K 579 | ||
| F 595 L 559 |

text_image
A B C D EBuilt in cabinet (mm)
| A Min. 550 |
| B Min. 560 |
| C Min. 50 |
| D Min. 590 - Max. 600 |
| E Min. 460 x Min. 50 |
NOTE
The built-in cabinet must have vents (E) to ventilate heat and circulate the air.
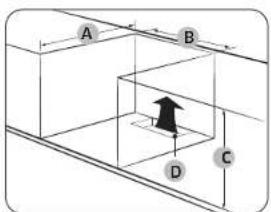
text_image
A B C DUnder-sink cabinet (mm)
| A Min. 550 | |
| B Min. 560 | |
| C | Min. 600 |
| D | Min. 460 x Min. 50 |
NOTE
- The built-in cabinet must have vents (D) to ventilate heat and circulate the air.
• Minimum height requirement (C) is for oven installation alone.
Installation Installation Installation
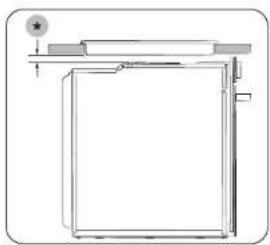
natural_image
Pure technical line drawing of a rectangular frame with mounting bracket and circular detail (no text or symbols)Installing with a hob
To install a hob on top of the oven, check the installation guide of the hob for the installation space requirement (4).
Mounting the oven
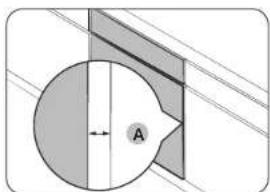
natural_image
Pure mechanical cross-section diagram without any text, numbers, or symbolsMake sure to leave a gap (A) of at least 5 mm between the oven and each side of the cabinet.

text_image
Diagram showing a mechanical or architectural component with labeled parts and directional arrows, including a curved arrow indicating rotation.Secure at least 3 mm of gap (B) so that the door opens and closes smoothly.

natural_image
Technical line drawing of a structural frame with an inset magnified detail (no text or symbols)Fit the oven into the cabinet and fix the oven firmly on both sides using 2 screws.
After installation is complete, remove the protective film, tape, and other packing material, and take out the provided accessories from inside the oven. To remove the oven from the cabinet, disconnect power to the oven first, and then remove 2 screws on both sides of the oven.
WARNING
The oven requires ventilation for normal operation. Do not block the vents under any circumstance.
NOTE
The actual appearance of the oven may differ with the model.
8 English
Maintenance
Cleaning
For easier cleaning, regularly clean the oven.
WARNING
- Make sure the oven and accessories are cool before cleaning.
- Do not use abrasive cleaning agents, hard brushes, scouring pads or cloths, steel wool, knives or any other abrasive materials.
Oven interior
- For cleaning the interior of the oven, use a clean cloth and a mild cleaning agent or warm soapy water.
- Do not hand-clean the door seal.
- To avoid damaging the enamelled oven surfaces, only use standard oven cleaners.
- To remove stubborn soils, use a special oven cleaner.
- As the temperature of the cooking room increases at an initial period, you may find some spots on the inner glass of the door. If this is the case, turn off the oven and wait until it cools down. Then, use kitchen paper or neutral detergent with a clean cloth to wipe up the inner glass.
Oven exterior
For cleaning the exterior of the oven such as the oven door, handle, and display, use a clean cloth and a mild cleaning detergent or warm soapy water, and dry with a kitchen roll or dry towel.
Grease and dirt can remain, especially around the handle because of the hot air coming from inside. It is recommended to clean the handle after each use.
Accessories
Wash the accessories after every use, and dry it with a tea towel. To remove stubborn impurities, soak the used accessories in warm soapy water for about 30 minutes before washing.
Catalytic enamel surface (applicable models only)
The removable parts are coated with dark grey catalytic enamel. They can be soiled with oil and fat spattered by the circulating air during convection heating. However, these impurities burn off at oven temperatures of 200 °C or above.
- Remove all accessories from the oven.
- Clean the interior of the oven.
- Select Convection mode with max temperature, and run the cycle for an hour.
Door
Do not remove the oven door unless for cleaning purposes. To remove the door for cleaning, follow these instructions.
WARNING
The oven door is heavy.
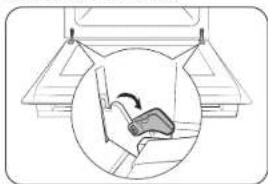
natural_image
Diagram showing a mechanical device inside a vehicle cabin, with an inset circular view highlighting the mechanism (no text or symbols present)- Open the door and flip open the clips at both hinges.
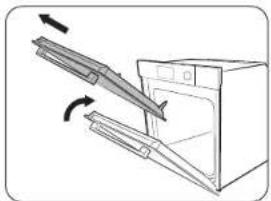
natural_image
Diagram of a kitchen appliance with an open door and a diagonal scroll, showing airflow direction (no text or symbols)- Close the door approximately 70°. Hold the oven door by the sides using both hands, and lift and pull upwards until the hinges are removed.
- Clean the door with soapy water and a clean cloth.
English 9
Maintenance

natural_image
Illustration of a car seatbelt with a magnified inset showing the seatbelt detail (no text or symbols)- When done, follow steps 1 to 2 above in the reverse order to reinstall the door. Make sure the clips are hinged on both sides.
Door glass
Depending on the model, the oven door is equipped with 3-4 sheets of glass placed against each other. Do not remove the door glass unless for cleaning purposes. To remove the door glass for cleaning, follow these instructions.
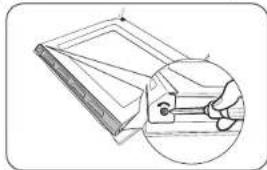
natural_image
Diagram of a folded paper or sheet with an inset showing a hand holding a small object (no text or symbols present)- Use a screwdriver to remove the screws on the left and right sides.
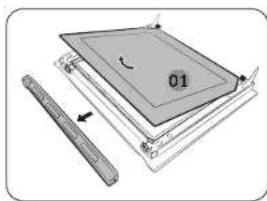
natural_image
Diagram of a mechanical assembly with layered components and a ruler, no visible text or symbols- Detach the coverings in the arrow directions
- Remove the first sheet from the door.

natural_image
Diagram of a rectangular frame with a labeled section '02' and an arrow, no readable text or symbols present.- Remove the second sheet from the door in the arrow direction.

natural_image
Pure diagram of a rectangular frame with a central gray square and an arrow, no text or symbols present.- Remove the third sheet from the door in the arrow direction.
- Clean the glass with soapy water and a clean cloth.

text_image
01 02 03 PYRO......- When done, reinsert the sheets as follows: • See the picture and locate the hinges. Insert sheet 3 below support clip 1, sheet 2 between support clip 1 and 2, and sheet 1 into support clip 3 in this order. Make sure the printed side of sheets is inserted inward.
01 Support clip 1
02 Support clip 2
03 Support clip 3
CAUTION
To identify the correct side of the sheet, locate the "PYRO" mark on the corner of every sheet.
Correct direction: PYRO---- Wrong direction: ----ORY9
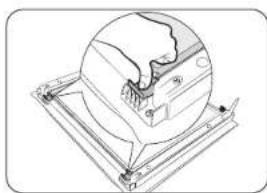
natural_image
Technical line drawing of a mechanical assembly with a magnified circular detail (no text or symbols)
WARNING
To prevent heat leaks, make sure you properly reinsert the glass sheets.
Dual door glass (applicable models only)

natural_image
Diagram showing a cylindrical object being inserted into a device with a handle and base, no text or symbols present.Water collector

natural_image
Diagram of a door frame with a labeled component '01' (no text or symbols beyond label)01 Water collector
- After inserting the sheet 2, press down the glass clips and check if they secure the glass sheet properly.
-
Follow steps 1-2 above in the reverse order to reinstall the coverings.
-
Tie the wet tissue to stick.
-
Put on the towel below door.
- Clean the door
- Apply detergent to tissue and clean again.
- Wipe the dry tissue to the moisture and bubble.
CAUTION
Do not detach the door for cleaning.
The water collector collects not only excess moisture from cooking but also food residue. The water collector cannot be detached. Wipe water on the water collector when the oven cools down after a cooking process.
WARNING
If you encounter a water leak from the water collector, contact us at a local Samsung service centre.
Side runners (applicable models only)

natural_image
Diagram of a mechanical component with an inset showing a downward force or compression mechanism (no text or symbols present)
natural_image
Diagram of a ladder leaning against a wall, with an arrow indicating motion direction (no text or symbols)-
Press the top line of the left side runner, and lower by approximately 45°.
-
Pull and remove the bottom line of the left side runner.
- Remove the right side runner in the same way.
- Clean both side runners.
- When done, follow steps 1 to 2 above in the reverse order to reinsert the side runners.
NOTE
The oven operates without the side runners and racks in position.
Diaméteatures Oven features
Replacement
Bulbs
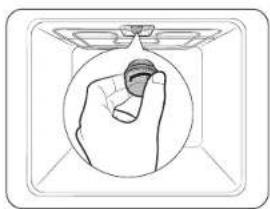
natural_image
Simple line drawing of a hand holding a small object inside a circular frame (no text or symbols)- Remove the glass cap by turning anti-clockwise.
- Replace the oven light.
- Clean the glass cap.
- When done, follow step 1 above in the reverse order to reinsert the glass cap.
WARNING
- Before replacing a bulb, turn off the oven and unplug the power cord.
- Use only 25-40 W/220-240 V, 300 °C heat-resistant bulbs. You can purchase approved bulbs at a local Samsung service centre.
- Always use a dry cloth when handling a halogen bulb. This is to prevent the bulb from being tampered with fingerprints or sweat, resulting in a shortened lifecycle.
Side oven light
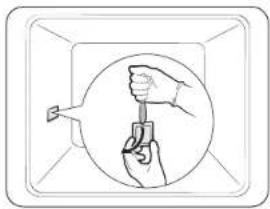
natural_image
Illustration of a hand holding a tool inside a circular frame, no text or symbols present- Hold the lower end of the cover of the side oven light with one hand, and use a flat-sharp tool such as a table knife to remove the cover as shown.
- Replace the side oven light.
- Reinsert the light cover.
Oven
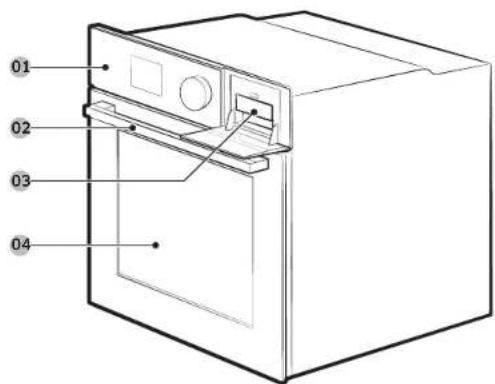
text_image
01 02 03 0401 Control panel 02 Door handle
03 Water reservoir (*)
04 Door
NOTE
Depending on the model, this oven comes in two types: single door and dual door.
12 English
Control panel
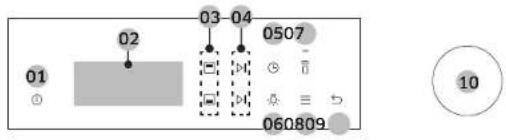
text_image
02 03-04 0507 01 - 060809 1001 Power
02 Screen
03 Upper / Lower
04 Start / Stop
05 Cooking
06 Light 07 Smart
08 Options 09 Back 10 Dial
Knob
Accessories

natural_image
Four different rectangular plastic or plastic sheet designs, each with a distinct line style and shading (no text or symbols)Wire rack Wire rack insert * Baking tray * Universal tray *

natural_image
Illustration of four different types of electrical connectors: a square plate, a diamond, a wire with cable, and two screws (no text or symbols)Extra deep tray * Divider Meat probe *
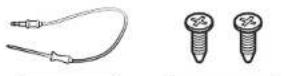

Steam container * Steam tray * Air fry tray *
NOTE
- Availability of accessories with an asterisk (*) depends on the oven model.
- Do not use the divider for any other purpose than dividing the compartment into two cooking zones. Do not use the divider as a shelf.
Oven use
Flexible Door (applicable models only)
This oven has a unique Flexible Door that is hinged in the middle, so you only need to open the top half to access the upper zone. When you're using the Dual Cook capability, you can access the top oven space much more easily and with greater energy efficiency.
How to use the upper door

natural_image
Line drawing of a hand inserting a component into a door (no text or symbols)How to use the full door
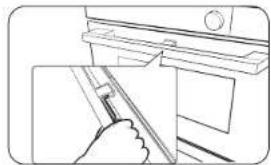
natural_image
Line drawing of a hand holding a tool near a window (no text or symbols)- Completely press the handle lever.
- Pull the handle.
-
This will open only the upper door as shown.
-
Hold the lever less area of the handle, and then pull.
- This will open the whole door as shown.
CAUTION
When opening the whole door, make sure to grasp the handle by the lever-less portion. If the lever is pressed halfway through opening the door, the upper door may open, causing physical injury.
NOTE
- Do not put heavy objects on, or apply excessive force, to the upper door.
- Do not let children play with or on the upper door.
Wi-Fi / My Patterns
- Tap and hold ≡ for 3 seconds to enter the System Settings menu.
- Select the desired menu using the Dial Knob, and then press Dial Knob.
- Turn the Dial Knob to select On or Off.
- Press Dial Knob to save the changes.
English 13
Oven use
Air Fry (applicable models only)
Preheating is not necessary for this mode. We recommended place a baking sheet or tray on the divider for getting any drippings. For better cooking results, flip food over during the process.
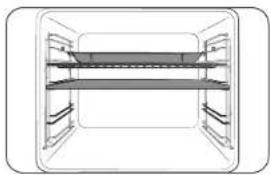
natural_image
Diagram of a two-tiered storage unit with horizontal shelves and control panels (no text or labels)- Insert divider and place the tray with wire rack on rack position 4.
- Select Air fry mode using the Dial Knob.
- Use the Dial Knob to change the default temperature. Enter the suggested temperature for your food as recommended cooking guide. The default temperature is 220 °C.
- Select Cook Time, and then press the Dial Knob to set the desired cooking time.
- Select Start and press the Dial Knob.
- When cooking is complete, tap OFF and take out the food.

NOTE
- Place a baking sheet or tray on the rack below the Air fry tray for getting any drippings. This will help to reduce splatter and smoke.
- Before using a baking sheet, check the maximum allowable temperature of baking sheet.
• Air fry is designed for a dual upper oven rack. Insert divider and place food on rack position 4 for best results. - For cooking fresh or homemade foods, spread the oil over a larger area more evenly, crisping up the food more effectively.

WARNING
• If anything is in progress in lower zone, Air fry is not available in the upper zone.
- When Air fry is in progress in the upper zone, the lower zone is not available at all.
Air Sous Vide (applicable models only)
Air Sous Vide mode uses low-temperature hot air to implement Sous Vide mode without steam or the water tank. In this mode, the oven keeps constant low temperatures inside the cooking chamber, cooking food that can keep its original fragrance and nutrients while offering enriched flavor and soft texture.
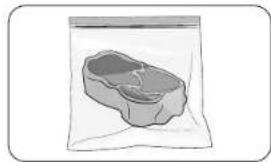
natural_image
Illustration of a small rectangular object inside a transparent bag, resembling a food item or container (no text or symbols visible)
natural_image
Simple line drawing of a rectangular room with shelves and a central table (no text or symbols)- Put food in a clean vacuum bag and seal it up. Then, load the food in rack position 3 of the oven.
- Select Air Sous Vide 📄 mode.
- Use the Dial Knob to change the default temperature. Enter the suggested temperature for your food as recommended cooking guide. The default temperature is 60 °C. (You can change the temperature by 1 °C)
- Press the Dial Knob and set the cooking time.
- Tap ▷ or press the Dial Knob

NOTE
- Use fresh and quality ingredients only. Trim them in a clean condition and store under refrigeration.
- Use heat-resistant vacuum bags for moving and storing ingredients.
- Do never reuse the heat resistant vacuum bags.
- The cooking time depends on the thickness of food. Addition of salt or sugar may shorten the cooking time.
Tips
- To keep the original taste, we recommend you use less herbs and spices than in ordinary recipes.
- Meat and fishery offer better flavors when seared and served.
- If not served immediately after cooked, put the food in ice water and cool down completely. Then, store them under 5 °C to keep the fragrance and texture of food.
- Exceptionally, chicken is recommended to eat immediately after cooked.
14 English
Cooking with the meat probe (applicable models only)
The meat probe measures the internal temperature of meat while it's cooking. When the temperature reaches the target temperature, the oven stops and finishes cooking.
- Use only the meat probe that comes with your oven.
- You cannot set the cooking time if the meat probe is plugged in.
- On the feature panel, tap to choose a cooking mode and temperature.
- Insert the tip of the meat probe into the centre of the meat to cook. Make sure the rubber handle is not inserted.
- Plug the probe connector into the socket on the left-sided wall. Make sure you see the Meat Probe inserted indicator when the probe connector is connected.
- Turn the Dial Knob to set the internal temperature of the meat.
- Tap ▷II to start cooking. The oven completes cooking with a melody when the internal temperature of the meat reaches the set temperature.

WARNING
• To prevent damage, do not use the meat probe with the spit accessory.
- When cooking is complete, the meat probe becomes very hot. To prevent burns, use oven gloves to take out the food.

NOTE
Not all modes support using the meat probe. If you use the meat probe with inapplicable modes, the current mode indicator blinks. When this happens, remove the meat probe instantly.
Natural Steam (applicable models only)
With Natural Steam, you can bake bread that is crispy on the outside and moist inside. We recommended preheat the oven for the best results.
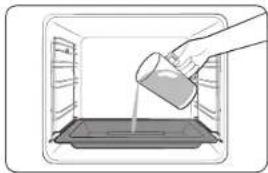
natural_image
Illustration of a hand pouring liquid into a tray inside an oven (no text or symbols)- Insert steam tray on the bottom of compartment.
- Fill the tray with water 250 mL only when the oven is cold.
- Set Convection Mode and select Natural Steam
- Turn the Dial Knob to set the temperature and cooking time.
- Press Dial Knob to start preheating.
- Put the food in the oven on any rack and start cooking.

NOTE
- Do not refill the water during cooking or when the oven is hot.
- When the oven cools down completely after using the Natural Steam function, use a wet cloth to wipe the bottom of the zone.
- To remove water scale that forms after using the oven for an extended time, use a soft cloth with dedicated detergent.
Oven use Troubleshooting and information code
Using the auto cook features
Single cook
| No. Food No. Food | |||
| 1 Potato gratin 2 Vegetable gratin | |||
| 3 Pasta bake 4 Lasagne | |||
| 5 Ratatouille | 6 Apple pie | ||
| 7 | Croissants | 8 | Apple puff pastry |
| 9 | Fruit flan base | 10 | Quiche Lorraine |
| 11 | White bread loaf | 12 | Mixed grain bread loaf |
| 13 | Bread roll | 14 | Fruit crumbles |
| 15 | Scones | 16 | Sponge cake |
| 17 | Marble cake | 18 | Dutch loaf cake |
| 19 | Brownies | 20 | Roast sirloin of beef |
| 21 | Slow Cooked Roast Beef | 22 | Herb Roasted Lamb Chops |
| 23 | Leg of Lamb on the bone | 24 | Roast Pork with Crackling |
| 25 | Rack of Pork Ribs | 26 | Chicken, Whole |
| 27 | Chicken, Breast | 28 | Chicken Drumstick |
| 29 | Duck, Breast | 30 | Trout fillet, baked |
| 31 | Trout | 32 | Sole |
| 33 | Salmon steak/fillet | 34 | Roast vegetables |
| 35 | Baked potato halves | 36 | Frozen Oven Chips |
| 37 | Frozen potato wedges | 38 | Frozen Pizza |
| 39 | Homemade Pizza | 40 | Dough Proofing |
Dual cook
- Upper
| No. Food No. Food | |||
| 1 Potato gratin 2 Lasagne | |||
| 3 | Chicken Drumstick | 4 | Baked potato halves |
| 5 Frozen oven chips | |||
- Lower
| No. Food No. Food | ||
| 1 Apple pie | 2 Apple pull pastry | |
| 3 Quiche Lorraine | 4 Frozen Pizza | |
| 5 Home made Pizza | ||
16 English
Troubleshooting
If you encounter a problem with the oven, first check the table below and try the suggestions. If the problem continues, contact a local Samsung service centre.
| Problem Cause Action | ||
| The buttons cannot be pressed properly. | If there is foreign matter caught between the buttons | Remove the foreign matter and try again. |
| Touch model if there is moisture on the exterior | Remove the moisture and try again. | |
| If the lock function is set Check whether the lock function is set. | ||
| The time is not displayed. | If there is no power supplied Check whether there is power supplied. | |
| The oven does not work. | If there is no power supplied Check whether there is power supplied. | |
| The oven stops while in operation. | If it is unplugged from the power socket | Reconnect the power. |
| The power turns off during operation. | If continuous cooking takes a long time | After cooking for a long time, let the oven cool. |
| If the cooling fan does not work Listen for the sound of the cooling fan. | ||
| If the oven is installed in a place without good ventilation | Keep the gaps specified in the product installation guide. | |
| When using several power plugs in the same socket | Use a single plug. | |
| There is no power to the oven. | If there is no power supplied Check whether there is power supplied. | |
| The oven exterior is too hot during operation. | If the oven is installed in a place without good ventilation | Keep the gaps specified in the product installation guide. |
| The door cannot be opened properly. | If there is food residue stuck between the door and product interior | Clean the oven well and then open the door again. |
| The interior light is dim or does not turn on. | If the lamp turns on and then off The lamp automatically turns off after a certain amount of time to save power. You can turn it on again by pressing the oven light button. | |
| If the lamp is covered by foreign matter during cooking | Clean the inside of the oven and then check. | |
| Electric shock occurs on the oven. | If the power is not properly groundedIf you are using a socket without grounding | Check whether the power supply is properly grounded. |
| There is water dripping. | There may be water or steam in some cases depending on the food. This is not a product malfunction. | Let the oven cool and then wipe with a dry dish towel. |
| There is steam through a crack in the door. | ||
| There is water remaining in the oven. | ||
| The brightness inside the oven varies. | The brightness changes depending on power output changes. | Power output changes during cooking are not malfunctions, so there is no need to worry. |
| Cooking is finished, but the cooling fan is still running. | The fan automatically runs for a certain amount of time to ventilate inside the oven. | This is not a product malfunction, so there is no need to worry. |
| The oven does not heat. | If the door is open Close the door and restart. | |
| If oven controls are not correctly set | Refer to the chapter on oven operation and reset the oven. | |
| If the household fuse has been blown or the circuit breaker has been tripped. | Replace the fuse or reset the circuit. If it happens repeatedly, call an electrician. | |
| Smoke comes out during operation. | During initial operation Smoke may come from the heater when you first use the oven. This is not a malfunction, and if you run the oven 2-3 times, it should stop happening. | |
| If there is food on the healer Let the oven cool sufficiently and remove the food from the heater. | ||
| There is a burning or plastic smell when using the oven. | If using plastic or other containers that are not heat resistant. | Use glass containers suitable for hot temperatures. |
| The oven does not cook properly. | If the door is often opened during cooking. | Do not frequently open the door unless you are cooking things that need to be turned. If you frequently open the door, the interior temperature will be lower and this may affect the results of your cooking. |
| The oven is warm during pyro cleaning. | This is because pyro cleaning uses high temperatures. | This is not a product malfunction, so there is no need to worry. |
| There is a burning smell during pyro cleaning. | Pyro cleaning uses high temperatures, so you may smell food residue burning. | This is not a product malfunction, so there is no need to worry. |
| Steam cleaning does not work. | This is because the temperature is too high. | Let the oven cool and then use. |
| Dual cook mode does not work. | If the divider is not properly assembled | Insert the divider correctly and use. |
| Single cook mode does not work. | If the divider is inserted in the oven. | Take out the divider and use. |
Information codes
If the oven fails to operate, you may see an information code on the display. Check the table below and try the suggestions.
| Code Meaning Action | ||
| C-d1 | Door lock malfunctions | Turn off the oven and then restart.If the problem continues, turn off all power for 30 seconds or more and then reconnect. If the problem is not fixed, please contact a service centre. |
| C-20 | Sensor malfunctions | |
| C-21 | ||
| C-22 | ||
| C-23 | ||
| C-F1 | Only occurs during EEPROM Read/Write | |
| C-70 | Steam-related problems | |
| C-72 | ||
| C-F0 | If there is no communication between the main PCB and sub PCB | |
| C-F2 | Occurs when a communication problem is maintained between the Touch IC <-> Main or Sub micom | Turn off the oven and then restart.If the problem continues, turn off all power for 30 seconds or more and then reconnect. If the problem is not fixed, please contact a service centre. |
| C-d0 | Button problemOccurs when a button is pressed and held for a period of time. | Clean the buttons and make sure there is no water on/around them.Turn off the oven and try again. If the problem continues, contact a local Samsung service centre. |
| -dC- | If the divider is removed during cooking in Dual cook mode.If the divider is inserted during cooking in Single cook mode. | The divider must not be removed during cooking in Dual cook mode.Turn off the oven and then restart.If the problem continues, turn off all power for 30 seconds or more and then reconnect.If the problem is not fixed, please contact a service centre. |
| S-01 | Safety shutoffOven has continued operating at a set temperature for an extended time.Under 100 °C - 16 hoursFrom 105 °C to 240 °C - 8 hoursFrom 245 °C to Max - 4 hours | This is not system failure. Turn off the oven and remove food. Then try again normally. |
Technical specifications
SAMSUNG strives to improve its products at all times. Both the design specifications and these user instructions are thus subject to change without notice.
| Connection voltage 230-240 V | -50 Hz | |
| Maximum connected load power 3650-3950 W | ||
| Dimensions(W x H x D) | Main unit 595 x 596 x 570 mm | |
| Built-in 560 x 579 x 549 mm | ||
| Volume 76 liter | ||
* This product contains a light source of energy efficiency class
Appendix
Product data sheet
| SAMSUNG SAMSUNG | |||
| Model identification | NV7B564***, NV7B565***, NV7B566***, NV7B567***, NV7B568***, NV7B564°C, NV7B566°C, NV7B568°C, NV7B574***, NV7B575***, NV7B576***, NV7B577***, NV7B578*** | ||
| Energy Efficiency Index per cavity (EEI cavity) | 81.6 | ||
| Energy Efficiency Class per cavity | A+ | ||
| Energy consumption (electricity) required to heat a standardised load in a cavity of an electric heated oven during a cycle in conventional mode per cavity (electric final energy) (EC electric cavity) | 1.05 kWh/cycle | ||
| Energy consumption required to heat a standardised load in a cavity of an electric heated oven during a cycle in fan-forced mode per cavity (electric final energy) (EC electric cavity) | 0.71 kWh/cycle | ||
| Number of cavities 1 | |||
| Heat source per cavity (electricity or gas) | electricity | ||
| Volume per cavity (V) 76 L | |||
| Type of oven Built-in | |||
| Mass of the appliance (M) | NV7B564***:33.4kgNV7B565***:38.4kgNV7B566***:35.6kgNV7B567***:40.6kgNV7B568***:35.6kg | NV7B564°C:35.4kgNV7B566°C:37.6kgNV7B568°C:37.6kg | NV7B574***:36.9kgNV7B575***:40.9kgNV7B576***:39.1kgNV7B577***:43.1kgNV7B578***:39.1kg |
Data determined according to standard EN 60350-1, EN 50564. Commission Regulations (EU) No 65/2014 and (EU) No 66/2014, and Regulation (EC) NO 1275/2008.
| Overall Standby Power consumption (W)(All network ports is "on" condition) | 1.9 W | |
| Period of time for the power management (min) | 20 min. | |
| WIFI Standby | mode Power Consumption (W) 1.9 W | |
| Period of time for the power management (min.) 20 min. | ||
| Off Mode Power consumption 0.5 W | ||
Energy saving tips
- During cooking, the oven door should remain closed except for turning food over. Do not open the door frequently during cooking to maintain the oven temperature and to save energy.
- Plan oven use to avoid turning the oven off between cooking one item and the next to save energy and reduce the time for re-heating the oven.
- If cooking time is more than 30 minutes, the oven may be switched off 5-10 minutes before the end of the cooking time to save energy. The residual heat will complete the cooking process.
- Wherever possible cook more than one item at a time.
NOTE
Hereby, Samsung declares that this radio equipment is in compliance with Directive 2014/53/EU and with the relevant statutory requirements in the UK. The full text of the EU declaration of conformity and the UK declaration of conformity is available at the following internet address: The official Declaration of conformity may be found at http://www.samsung.com. go to Support > Search Product Support and enter the model name.
| Frequency range Transmitter power (Max) | ||
| Wi-Fi 24 | 12-2472 MHz 20 dBm | |
| Bluetooth | 2402-2480 MHz 10 dBm | |
Open Source Announcement
The software included in this product contains open source software. The following URL http://opensource.samsung.com/opensource/SMART_TP1_0/ seq/0 leads to open source license information as related to this product.

text_image
QR code image containing encoded data, no visible human-readable textEnglish 19
QUESTIONS OR COMMENTS?
| COUNTRY CALL OR VISIT US ONLINE AT | ||
| AUSTRIA | 0800 72 67 864 (0800 SAMSUNG) www.samsung.com/at/support | |
| BELGIUM | 02-201-24-18 | www.samsung.com/be/support (Dutch)www.samsung.com/be_fr/support (French) |
| DENMARK | 707 019 70 www.samsung.com/dk/support | |
| FINLAND | 030-6227 515 www.samsung.com//fr/support | |
| FRANCE | 01 48 63 00 00 www.samsung.com/fr/support | |
| GERMANY | 06196 77 555 77 www.samsung.com/dc/support | |
| ITALIA | 800 SAMSUNG (800 726 7864) www.samsung.com/it/support | |
| CYPRUS | 8009 4000 only from landline, toll free www.samsung.com/gr/support | |
| GREECE | 80111-SAMSUNG (80111 726 7864)only from land line(+30) 210 6897691 from mobile andland line | www.samsung.com/gr/support |
| LUXEMBURG | 261 03 710 www.samsung.com/be_fr/support | |
| NETHERLANDS | 088 90 90 100 www.samsung.com/n/support | |
| NORWAY | 21629099 www.samsung.com/nc/support | |
| PORTUGAL | 210 608 098Chamada para a redo fixa nacionalDias óteis das 9h às 20h | www.samsung.com/pt/support |
| SPAIN | 91 175 00 15 www.samsung.com/es/support | |
| SWEDEN | 0771-400 300 www.samsung.com/se/support | |
| SWITZERLAND | 0800 726 786 | www.samsung.com/ch/support (German)www.samsung.com/ch_fr/support (French) |
| UK | 0333 000 0333 www.samsung.com/uk/support | |
| IRELAND (EIRE) | 0818 717100 | www.samsung.com/ie/support |

Scan this with your smartphone.
SAMSUNG
Scan the QR code* or visit www.samsung.com to check helpful information.
* Requires reader to be installed on your smartphone.
| COUNTRY CALL OR VISIT US ONLINE AT | ||
| ALBANIA | 045 620 202 | www.samsung.com/al/support |
| BOSNIA | 055 233 999 | www.samsung.com/ba/support |
| NORTH MACEDONIA | 023 207 777 www.samsung.com/mk/support | |
| BULGARIA | 0800 111 31 - Безплатен за всички оператори *3000 - Цена на один градски разговор или според тарифата на мобилижат оператор 09-00 до 18-00 - Понеделиник до Петък | www.samsung.com/bq/support |
| CROATIA | 072 726 786 | www.samsung.com/hr/support |
| CZECH | 800 - SAMSUNG (800-726786) | www.samsung.com/cz/support |
| HUNGARY | 0680SAMSUNG (0680-726-7864) | www.samsung.com/hu/support |
| MONTENECRO | 020 405 888 | www.samsung.com/support |
| POLAND | 801-172-678* lub +48 22 607-93-33* *(oplata wedlug taryfy operatora) | http://www.samsung.com/pl/support/ |
| ROMANIA | 0800872678 Apel gratuit *8000 - Apel tarifat in retea | www.samsung.com/ro/support |
| SERBIA | 011 321 6899 | www.samsung.com/rs/support |
| SLOVAKIA | 0600 - SAMSUNG (0600-726 786) | www.samsung.com/sk/support |
| LITHUANIA | 8-800-77777 | www.samsung.com/lt/support |
| LATVIA | 8000-7267 | www.samsung.com/lv/support |
| ESTONIA | 800-7267 | www.samsung.com/ee/support |
| SLOVENIA | 080 697 267 (brezplačna številka) | www.samsung.com/si/support |
| KOSOVO | 038 40 30 90 www.samsung.com/support | |

DG68-01412C-00