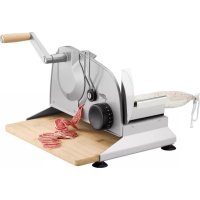
Piatto 5 - Slicer Ritter - Free user manual and instructions
Find the device manual for free Piatto 5 Ritter in PDF.


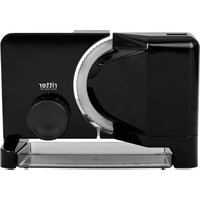
| Product type | Manual universal slicer |
| Brand | Ritter |
| Model | Piatto 5 |
| Intended use | Domestic use, cutting food products |
| Cutting thickness | 0 to 20 mm (graduated adjustment, position 0 protects the blade) |
| Blade material | Stainless steel |
| Power source | Manual (crank rotation) |
| Feet | Suction cups for fixing on smooth work surface |
| Safety | Very sharp blade; use carriage and food pusher; return thickness to 0 after use; do not cut frozen, hot foods, or foods with bones or pits |
| Assembly | Crank, cutting board (amano/piatto models), carriage, food pusher |
| Cleaning | Wipe with damp cloth; blade and removable parts washable in hot water (not dishwasher); wooden board (oil regularly) |
| Maintenance | Occasional lubrication of the guide with grease or vaseline |
| Optional accessories | Smooth blade for meat and cold cuts; Ritter maintenance grease |
| Warranty | 2 years, manufacturer (subject to conditions on ritterwerk.de) |
| Repairability and parts | Contact local after-sales service; www.ritterwerk.de |
| Disposal | Do not dispose of with household waste; follow WEEE scheme |
Frequently Asked Questions - Piatto 5 Ritter
User questions about Piatto 5 Ritter
0 question about this device. Answer the ones you know or ask your own.
Ask a new question about this device
Download the instructions for your Slicer in PDF format for free! Find your manual Piatto 5 - Ritter and take your electronic device back in hand. On this page are published all the documents necessary for the use of your device. Piatto 5 by Ritter.
USER MANUAL Piatto 5 Ritter
natural_image
Technical line drawings of a mechanical device with two views: top shows a slide and side view, bottom shows a base with a handle (no text or symbols present)| deen | ||
| 1 Handkurbel Hand crank | ||
| 2 Messerverschluss Blade catch | ||
| 2a Verschlussscheibe Sealing washer | ||
| 2b Verschlussschraube Locking screw | ||
| 3 Anschlagplatte Stop plate | ||
| 4 Saugfüße Suction foot | ||
| 5 Schneidgutschlitten Slice carriage | ||
| 6 Schlittenführungselement Carriage guidance element | ||
| 6a Vorderer Haltestift Front locking pin | ||
| 6b Hinterer Haltestift Rear locking pin | ||
| 7 Restehalter Left-over holder | ||
| 8 Rundmesser Rotary blade | ||
| 9 Kurbelgehäuse Crankcase | ||
| 9a Kunststoffbuchse Plastic bushing | ||
| 9b Welle | Shaft | |
| 10 Befestigungsschraube | Fastening screw | |
| 11 Schneidgut-Führungsbügel | Food guide bracket | |
| 12 Schneidbrett a) | Slicing board a) | |
| 13 Typenschild | Type label | |
| 14 Schnittstärke-Verstellknopf | Slice thickness adjustment knob | |
| a) Bei Modell amano 3 / piatto 3 aus SicherheitsglasBei Modell amano 5 / piatto 5 aus Bambusholz | a) On the amano 3 /piatto 3 model, this is made of safety glass.On the amano 5 /piatto 5 model, this is made of bamboo. | |
natural_image
Technical line drawing of a mechanical assembly with two views (top and side), no text or symbols present
natural_image
Line drawing of a hand using a tool to adjust or install a cylindrical component (no text or symbols present)

natural_image
Technical line drawing of a mechanical device with no visible text or symbols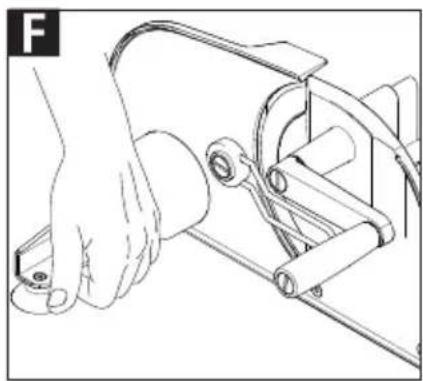
natural_image
Line drawing of a hand operating a mechanical device with rollers and tubing (no text or symbols)
natural_image
Line drawing of a hand operating a mechanical device with a curved blade and lever (no text or symbols)
natural_image
Technical line drawing of a mechanical device with no visible text or symbols
natural_image
Illustration of a hand operating a cutting machine with a blade and rotating wheel (no text or symbols)
natural_image
Illustration of a hand operating a rotating mechanical device with a circular component, no text or symbols present
natural_image
Technical line drawing of a mechanical cutting machine with no visible text or symbols

natural_image
Illustration of a hand using a tool to adjust or install a mechanical component, no text or symbols present
natural_image
Technical line drawing of mechanical components with concentric ovals and central hub (no text or symbols)
GENERAL SAFETY INSTRUCTIONS
To avoid personal injury or damage to the appliance, please observe the following safety instructions:
–The food slicer is to be used for domestic purposes only and must not be used commercially.
—Never set the appliance down on hot surfaces or close to a naked flame.
-Use the accessories included in the delivery specification only.
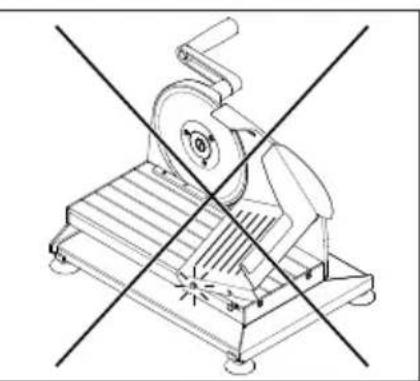
-Only start to use the appliance after it has been securely set up.
-Persons with reduced physical, sensory or intellectual capabilities or lacking in relevant experience and/or knowledge may only use this appliance if they do so under supervision or have been instructed in the safe use of the appliance and understand the potential risks associated with its use.
-Do not allow children to play with the appliance.
-This appliance must not be used by children. Keep the appliance out of reach of children.
-Do not use it to cut frozen foods, hot foods, bones, food containing large stones, roast meats encased in netting or packaged foods!
-Stop using the appliance immediately if any parts are damaged and contact the ritter after-sales service.
Risk of injury
-This appliance must not be used without a slice carriage or a left-over holder, unless the size and shape of the food to be sliced means that these parts cannot be used.
–The rotary blade is extremely sharp.
–Never touch the rotary blade when operating the appliance.
- After each use and before cleaning, turn the slice thickness adjustment knob to the "0" position.
Unfold the illustrations at the front and back of this manual.
Please read these instructions thoroughly before you start to use the appliance. Keep these operating instructions in a safe place and ensure that they are included with the appliance if passing it on to a third party.
Alternatively, the current operating instructions are available at www.ritterwerk.de.
INTENDED USE
The manual food slicer is used for the slicing of household foods.

The food slicer is suitable for contact with foodstuffs.
If the appliance is used for a purpose other than this, or if it is operated incorrectly, severe injuries may occur or the appliance may be damaged. All warranty and liability claims will be rendered null and void in this case.
BEFORE USING THE APPLIANCE FOR THE FIRST TIME
Preparation
Remove the appliance carefully from the packaging. Remove all packaging components and keep them in a safe place along with the packaging itself. Clean the appliance before allowing it to come into contact with any food (see CLEANING).
Setting up the appliance
- Place the appliance on a flat, even surface.
- Press down on the appliance so that the suction feet (4) attach themselves to the surface.
Assembling the appliance
Assembling the hand crank (1):
A Loosen the fastening screw (10) and remove it.
- If the plastic bushing (9a) is not fully inside the crankcase (9), push the bushing backwards. When doing so, ensure that the lip on the plastic bushing fits exactly into the slot provided on the crankcase.
- Place the hand crank on the shaft (9b).
B Replace the fastening screw and tighten it using a suitably sized coin.
C Insert the slicing board (12) from the right (on the amano 3/5 /piatto 3/5 model).
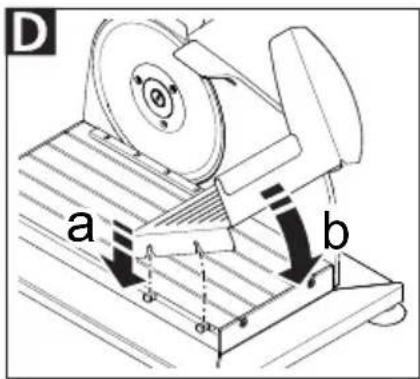
D Mount the slice carriage (5):
- Insert the slice carriage into the front locking pin (6a) of the carriage guidance element (6).
- Then swivel the slice carriage downwards to insert it into the rear locking pin (6b) of the carriage guidance element.
E Slide the left-over holder (7) onto the handle of the slice carriage.
Moving the appliance
C Do not use the slicing board (12) to lift the appliance. Before moving the appliance, you should slide the slicing board to the right out of the appliance (on the amano 3/5 /piatto 3/5 model). The board can only be pulled out to the right.
F Take hold of the bottom of the appliance next to the right suction foot and lift it up carefully. The suction feet will detach themselves from the surface one by one.
SLICING
G Use the slice thickness adjustment knob (14) to set the required thickness.
Info:
Slice thickness: 0 mm to approx. 20 mm. The slice thickness adjustment scale is not a millimetre scale. For safety reasons, the "0" position is designed to cover the blade.
C Pull the slicing board (12) out slightly to the right to collect the cut slices (on the amano 3/5 / piatto 3/5 model). The board can only be pulled out to the right.
- Place a plate or similar underneath to catch the cut slices if necessary (on the manus 3 /podio 3 model).
H Place the food guide bracket (11) in a horizontal position until it locks into place.
Info:
The food guide bracket ensures that long, hard foods (e.g. a large loaf of bread) are passed on to the crank without hindering movement.
For short, thin, soft slices, we recommend that you turn the guide upwards (e.g. for sausages).
1 Place the food to be sliced onto the slice carriage (5). Use the left-over holder (7) to lightly press the food up against the stop plate (3).
Protect your hands by always using the slice carriage and, where applicable, the left-over holder.
K Exception: Excessively large foods for slicing.
- Use your right hand to turn the hand crank (1) in a clockwise direction with even pressure.
- As soon as the rotary blade (8) starts moving, gently place the food to be sliced next to the rotary blade.
• After each use, turn the slice thickness adjustment knob to the "0" position to cover up the sharp rotary blade and to avoid any injuries.
CLEANING
CAUTION
The rotary blade is extremely sharp. Before cleaning, turn the slice thickness adjustment (14) knob to the "0" position.
Clean the food slicer regularly to prevent the accumulation of food residue. The rotary blade must also be cleaned regularly as described below to prevent its surface from rusting.
Info:
Over time, an accumulation of food residue may damage the surface of the rotary blade, causing it to rust.
Preparation
C Slide the slicing board (12) to the right out of the appliance (on the amano 3/5 /piatto 3/5 model). The board can only be pulled out to the right.
- Remove the left-over holder (7).
Remove the slice carriage (5):
- Pull the slice carriage fully towards you.
- Use the finger protection on the slice carriage to pull it upwards. The slice carriage detaches from each locking pin (6a and 6b) of the carriage guidance element (6) in turn. Ensure that the slice carriage does not tilt to the left.
M Remove the rotary blade (8):
- Keep a tight grip on the rotary blade from above during the entire removal process.
- Open the blade catch (2) by turning the locking screw (2b) in an anti-clockwise direction using a suitably sized coin.
- Remove the sealing washer (2a).
N Press the blade out from the opposite side and take hold of it at its rotational centre.
Cleaning after each use
- Wipe down the housing and all removed parts, including the rotary blade, with a damp cloth.
Occasional cleaning
- Wash the slicing board in water and detergent (amano 3/5 /piatto 3/5 model). Do not use aggressive abrasive cleaners.
- Rub food-safe oil into the slicing board to keep it in the best condition (amano 5 /piatto 5 model).
- Give all removed parts, including the rotary blade, a thorough wash in warm soapy water (not in the dishwasher!).
- Clean the housing behind the blade using a dry cloth/brush. Info:
Do not use any abrasive cleaners, sponges with rough surfaces or hard brushes.
- The suction feet must be free of grease and crumbs to ensure a firm grip. We therefore recommend that you clean the suction feet regularly.
- Dry all parts that you have washed.
- Grease the rotary blade's gear wheel with a little ritter maintenance grease (or alternatively with a little Vaseline).
Repeat the steps above in reverse order to replace the rotary blade (8). When doing so, ensure that the sealing washer (2a) fits exactly into the slot provided.
MAINTENANCE
Your food slicer is maintenance-free. However, we recommend that you occasionally apply a little extra ritter maintenance grease or Vaseline to the rails of the slice carriage to keep them lubricated and ensure that the carriage continues to move easily.
STORAGE
Keep the appliance out of the reach of children.
DISPOSAL OF WASTE ELECTRICAL AND ELECTRONICEQUIPMENT

This symbol indicates that this product must not be disposed of with unsorted municipal
waste. There is a separate (free) system for the collection and return of waste electrical and electronic equipment. For more information, please contact your local authority or the shop where you purchased the product. By ensuring that this product is disposed of correctly, you will help prevent potential negative consequences for the environment and human health and contribute to the conservation of natural resources.
REACH DIRECTIVE
A special, non-toothed rotary blade is also available for use with sliced meat, sausage and ham.
The original ritter maintenance grease is available for delivery for maintaining (regreasing) the food slicer.
SERVICE, REPAIRS AND SPARE PARTS
Please contact your local after-sales service for service, repairs and spare parts.
This manual food slicer comes with a 2-year manufacturer's warranty, calculated from the date of purchase and in accordance with EU warranty directives. Your legal warranty claims according to § 437 ff. BGB (German Civil Code) remain unaffected by this regulation. The manufacturer warranty applies to all devices sold within the European Union. For details of the warranty conditions, see www.ritterwerk.de/warranty. For any warranty claims or for customer service, the food slicer must always be sent to the customer service centre in your country.
INSTRUCTIONS DE SÉCURITÉ GÉNÉRALES
SERVICE, REPARATIONER OCH RESERVDELAR


- GENERAL SAFETY INSTRUCTIONS
- Risk of injury
- INTENDED USE
- BEFORE USING THE APPLIANCE FOR THE FIRST TIME
- Preparation
- Setting up the appliance
- Assembling the appliance
- Moving the appliance
- SLICING
- CLEANING
- CAUTION
- Cleaning after each use
- Occasional cleaning
- MAINTENANCE
- STORAGE
- DISPOSAL OF WASTE ELECTRICAL AND ELECTRONICEQUIPMENT
- REACH DIRECTIVE
- SERVICE, REPAIRS AND SPARE PARTS
- INSTRUCTIONS DE SÉCURITÉ GÉNÉRALES
- SERVICE, REPARATIONER OCH RESERVDELAR
Brand : Ritter
Model : Piatto 5
Category : Slicer