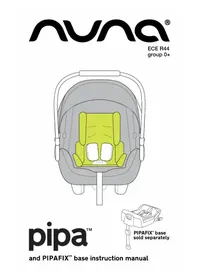
Aace LX - Car seat Nuna - Free user manual and instructions
Find the device manual for free Aace LX Nuna in PDF.
User questions about Aace LX Nuna
0 question about this device. Answer the ones you know or ask your own.
Ask a new question about this device
Download the instructions for your Car seat in PDF format for free! Find your manual Aace LX - Nuna and take your electronic device back in hand. On this page are published all the documents necessary for the use of your device. Aace LX by Nuna.
USER MANUAL Aace LX Nuna
natural_image
Illustration of a dark blue car seat with white outline and blue accent lines (no text or symbols)IMPORTANT! KEEP THESE INSTRUCTIONS FOR FUTURE REFERENCE:
READ CAREFULLY

text_image
1 × 1 2
text_image
4 1 2 3 4 5 6 7 1 2 3 4 5 6 7
text_image
7 click
natural_image
Line drawing of a car seat assembly with a belt buckle (no text or symbols)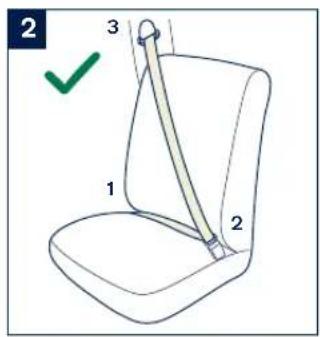
text_image
2 3 1 2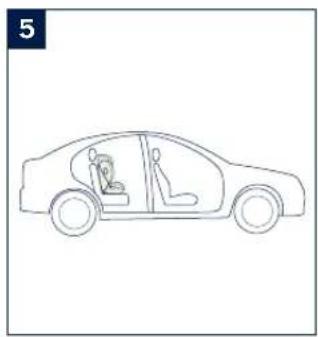
natural_image
Line drawing of a car interior view showing driver and passenger (no text or symbols)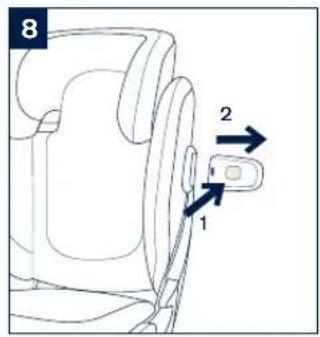
text_image
8 1 2
text_image
11 2 1
natural_image
Simple line drawing of a chair with a green checkmark indicating selection (no text or symbols)
natural_image
Line drawing of a car seat assembly with a highlighted belt (no text or symbols)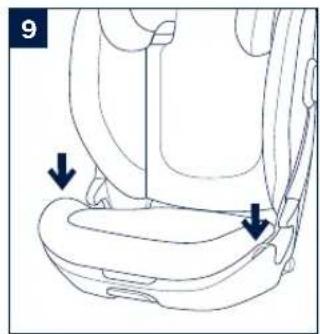
natural_image
Line drawing of a car seat assembly with arrows indicating movement or positioning (no text or symbols)
text_image
12 2 1 3 3
natural_image
Diagram showing two directional arrows pointing to a vehicle interior panel (no text or symbols)
text_image
16 click
natural_image
Line drawing of a hand pressing down on a car seatbelt, with a black arrow indicating the motion direction (no text or symbols)
text_image
17 1 → 2
text_image
15 2 1
natural_image
Line drawing of a car seat with hands adjusting seatbelt (no text or symbols)
natural_image
Illustration of a car seatbelt with a red X mark indicating absence or failure (no text or symbols present)
text_image
Diagram showing mechanical assembly with labeled parts 2, 3 and directional arrows indicating motion or force
text_image
21 1 2 3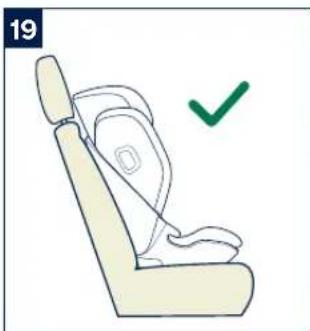
natural_image
Illustration of a car seat with a green checkmark indicating selection (no text or symbols present)
text_image
22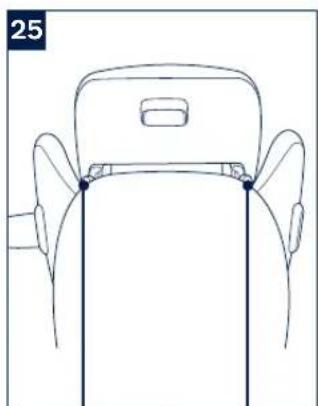
natural_image
Line drawing of a car seat with front and rear seats, no text or symbols present
natural_image
Line drawing of a person sitting in a car seat with a belt buckle (no text or symbols)
natural_image
Line drawing of a mechanical component with an arrow indicating direction (no text or symbols)
natural_image
Illustration of a car seat with a curved arrow indicating direction (no text or symbols)
natural_image
Illustration of a hand pressing down on a mechanical device with a curved arrow indicating motion (no text or symbols)
natural_image
Illustration of a person sitting in a seat with a hand adjusting the seat area, showing a curved arrow indicating motion (no text or symbols present)
text_image
31
text_image
24 1 2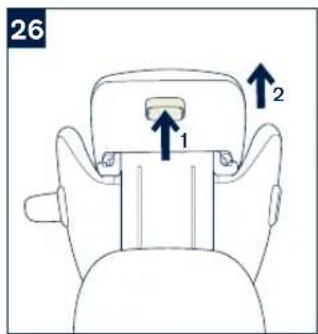
text_image
26 1 2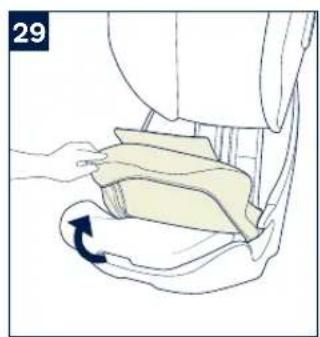
natural_image
Illustration of a hand pressing down a seatbelt with a blue arrow indicating rotation (no text or symbols)
natural_image
Illustration of a person's seatbelt device with arrows indicating rotation (no text or symbols)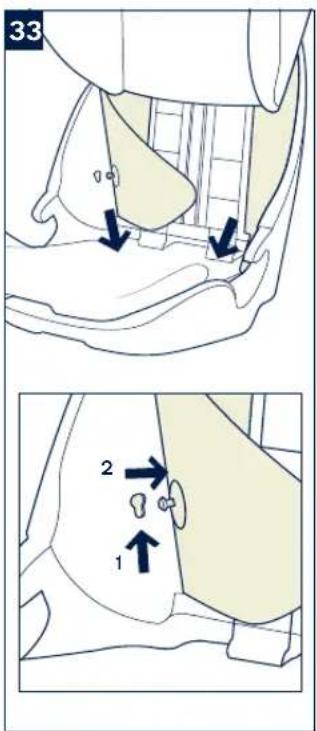
text_image
33 2 1Designed around your life

Contents
Product Information 3
Product Registration
Warranty
Contact
Child Usage Requirements 4
Warning 5
Parts List 7
Product Set Up 8
Product Use 8
Cleaning and Maintenance 11
Français (FR) 13
Deutsch (DE) 25
Nederlands (NL) 37
Italiano (IT) 49
Español (ES) 61
Português (PT) 73
Polski (PL) 85
Čeština (CZ) 97
Slovenčina (SK) 109
Hrvatski (HR) 121
Manufactured in (date):
Product Registration
Please fill in the above information. The model number and the manufactured date are located at the bottom of the AACE Ix.
To register your product please visit:
www.nunababy.com
Click the "Register Gear" link on the homepage.
Warranty
We have purposely designed our high-quality products so that they can grow with both your child and your family. Because we stand by our product, our gear is covered by a custom warranty per product, starting from the day it was purchased. Please have the proof of purchase, model number and manufactured date available when you contact us.
For warranty information please visit:
www.nunababy.com
Click the "Warranty" link on the homepage.
Contact
For replacement parts, service, or additional warranty questions, please contact our customer service department.
info@nunababy.com
www.nunababy.com
In the United Kingdom:
infouk@nunababy.com
www.nunababy.com
NUNA International B.V.
This product is suitable for use with children who meet the following requirements:
1 - This is an Enhanced Child Restraint System, intended to use as a Non-integral Universal Enhanced Child Restraint System (i-Size booster seat) from 100-150cm.
2 - It is approved to the latest UN Regulation R129/03.
3 - If in doubt, consult either the Enhanced Child Restraint System manufacturer or the retailer.
WARNING
NO booster can guarantee full protection from injury in an accident. However, proper use of this booster will reduce the risk of serious injury or death to your child.
Always take care to follow the installation instructions correctly, this will ensure the booster performs at an optimum safety level.
DO BE cautious that the rigid items and plastic parts of an enhanced child restraint system shall be located and installed so that they are not liable to become trapped by a moveable seat or in a door of the vehicle.
To use this booster seat according to the UN Regulation R129, your child must meet the following requirements.
Child height 100cm-150cm (reference age: 3.5-12 years). Forward facing only (in vehicle travel direction)
The booster may not fit to all vehicles for the usage from 135cm-150cm.
Any straps holding the booster to the vehicle should be tight and the straps should not be twisted.
The booster seat should be replaced if it has been subjected to heavy loads in the event of an accident or if it has been dropped.
This booster seat is only intended to be used in the car.
DO NOT make any alterations or additions to the booster seat without approval from the type approval authority. DO NOT remove any of the white EPP/EPS foams. Failure to do so may result in serious safety issues.
DO NOT use the seat if the surfaces are too hot from sunlight.
NEVER leave the child unattended in the booster seat or vehicle, not even for a few minutes.
Any luggage or other objects liable to cause injuries in the event of a collision shall be properly secured.
The booster shall not be used without the soft goods.
The booster soft goods should not be replaced with any other than the one recommended by the manufacturer, because the soft goods constitutes an integral part of the restraint performance.
Always secure child in booster, even on short trips, as this is when most accidents occur.
DO NOT leave this booster, or other items unbelted or unsecured in your vehicle. Remove the booster seat from the car if not regular used and store in a dry, sun-protected surrounding.
It's recommended not to use a second-hand booster seat whose history is not known. It may have invisible structural damages or defects due to incorrect usage/storage.
DO NOT use any load bearing contact points other than those described in the instructions and marked on the booster.
Consult the retailer for issues concerning maintenance, repair and part replacement.
DO NOT install this booster under the following conditions:
1 - Vehicle seats facing sideways or rearward with respect to the vehicle's direction of travel.
2 - Vehicle seats movable during installation.
Parts List
Make sure all parts are available before assembly. If any part is missing, please contact local retailer. No tools are required for assembly.
1 Head Support
7 Cupholder
2 Lower Back Support
8 ISOFIX Guides
3 Armrest
9 HeadSupportAdjustment Lever
4 SeatDepthAdjustment button
10 ISOFIX Adjuster Button
5 Base
11 Instruction Manual Storage Compartment
6 Side Impact Protection Pod
12 ISOFIX Connector

text_image
Technical diagram of a car seat assembly with numbered parts for identificationProduct Set Up
Installation concerns
! DO NOT install this enhanced child restraint on vehicle seats with Lap Belts only. (1)
This enhanced child restraint is suitable for vehicle seats with a 3-point Retractor Safety Belt. (2) If your vehicle has ISOFIX Anchor Bars, we strongly recommend that you connect the ISOFIX connector to the ISOFIX Anchor Bars together. (3)
! DO NOT install this enhanced child restraint on vehicle seats that face sideways or rearward with respect to the moving direction of the vehicle.
! Please refer to your vehicle owner's manual for recommended or suggested installation positions. (4)-1
! This enhanced child restraint must be installed in the rear vehicle seat. (5)
! DO NOT install this on movable vehicle seats during installation.
Product Use
Use Side Impact Protection
1 - The enhanced child restraint is delivered with removable side impact protection. This side impact protection pod MUST be used on the door side of the vehicle. Installation shown in (6)(7).
2 - Press the release button to remove side impact protection. (8)
Cupholder Assembly
Insert the Cupholder clip into the opening on either side of seat. (9) Make sure the Cupholder clip is fully inserted into the plastic slot on booster. (10)
Seat Adjustment for Seat Bottom
The seat bottom depth can be adjusted for added comfort for the child. Three position are provided for best fit.
1 - Reach under the front of the seat bottom.
2 - Pull and hold the seat depth adjustment button to adjust the seating surface in or out as needed for additional thigh support. (11)
Height Adjustment
1 - Squeeze the head support adjustment lever, then pull up or push down the head support until it locks into one of the 17 positions. (12)
2 - As the head support is adjusted up, the side wings of the seat automatically move outward to provide more shoulder room.
Installation using ISOFIX System and 3-point belt or using 3-point belt only
Use of ISOFIX connectors
1 - If required, attach the ISOFIX guides onto the vehicle ISOFIX anchor bars. (13)
2 - Pull and hold the ISOFIX adjusting button to pull out the ISOFIX connectors. (14)
3 - Rotate the ISOFIX connectors 180 degrees until they are pointing toward the ISOFIX guides. (15)
4 - Line up the ISOFIX connectors with the ISOFIX guide, and then click both ISOFIX connectors into the ISOFIX anchor bars. (16)
! Make sure that both ISOFIX connectors are securely attached to the vehicle's ISOFIX anchor bars. There should be two audible clicks and the colors of the indicators on both ISOFIX connectors should be completely green.
! Check to make sure the booster is securely installed by pulling on both ISOFIX connectors.
Removing the enhanced child restraint
1 - Press the secondary lock button (17)-1 first follow by the button (17)-2 on the ISOFIX connectors before removing the booster from the vehicle seat.
2 - Rotate the ISOFIX connectors by 180 degrees, then pull and hold the ISOFIX adjusting button to store the ISOFIX connectors. (18)
Securing your Child
1 - The back of the child restraint MUST fit tightly against the vehicle seat back as shown (19).
! The front of child restraint MUST NOT hang over the front of vehicle seat.
! DO NOT use a child restraint when vehicle seat back is reclined beyond the recline position (20).
2 - Pull the vehicle safety belt and route it through the belt path, and then buckle it up. (21)
! Could also be installed by using 3-point belt only.
! Position vehicle's shoulder belt through the shoulder belt guide shown in (21)-1.
! DO NOT position vehicle lap belt over the armrests. It must pass under the armrests.
! Make sure the vehicle shoulder belt is routed completely through the shoulder belt guide as shown in (21)-2.
! The child restraint cannot be used if the vehicle safety belt buckle (female buckle end) is too long to secure the booster properly. (21)-3
! After your child is placed in this child restraint, the vehicle safety belt must be used correctly, and ensure that any lap strap is worn low down, so that the pelvis is firmly engaged.
! The correct head support height is obtained when the bottom of the head support is even with the top of your child's shoulders as shown in (22) and the vehicle belt must be positioned in the green zone as shown in (23).
! Place the child restraint firmly against the back of a forward-facing vehicle seat equipped with a lap/shoulder belt.
! Tighten the vehicle belt by pulling the shoulder strap until all belt slack is removed.
! Readjust the head support height if the vehicle safely belt lays across the child's neck, head or face.
! Any straps are holding the child restraint to the vehicle should be tight and not to be twisted.
Detach Soft Goods
1 - Follow steps (24) - (33) to detach soft goods.
2 - To re-attach the soft goods please repeat the above steps in the reverse step.
Cleaning and Maintenance
Wash the soft goods with cold water under 30^ C.
DO NOT iron the soft goods.
DO NOT bleach or dry clean the soft goods.
DO NOT use undiluted detergents, gasoline or other organic solvents to wash the enhanced child restraint. It may cause damage to the product.
DO NOT twist the soft goods and inner padding to dry with great force. It may leave the soft goods and inner padding with wrinkles.
Please hang dry the soft goods and inner padding in the shade.
Please remove the enhanced child restraint from the vehicle seat if not in use for a long period of time. Put the enhanced child restraint in a cool, dry place and somewhere your child can not access it.
NUNA International B.V. Nuna and all associated logos are trademarks.
11 AACE lx instruction AACE lx instruction
IMPORTANT! CONSERVEZ CES INSTRUCTIONS POUR RÉFÉRENCE ULTÉRIEURE :
LIRE ATTENTIVEMENT
Sommaire
text_image
Technical diagram of a car seat assembly with numbered parts for identificationtext_image
Technical diagram of a car seat assembly with numbered parts for identificationProdukt aufbauen
text_image
Technical diagram of a car seat assembly with numbered parts for identificationInstalleren product
text_image
Technical diagram of a car seat assembly with numbered parts for identificationtext_image
Technical diagram of a car seat assembly with numbered parts for identificationtext_image
Technical diagram of a car seat assembly with numbered parts for identificationMontagem do produto
text_image
Technical diagram of a car seat assembly with numbered parts for identificationIMPORTANT! KEEP THESE INSTRUCTIONS FOR FUTURE REFERENCE:
READ CAREFULLY

text_image
1 1 2 X
text_image
4 1 2 3 4 5 6 7 1 2 3 4 5 6 7
text_image
7 click
natural_image
Line drawing of a car seat assembly with a belt buckle (no text or symbols)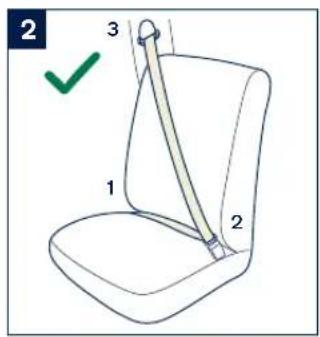
text_image
2 3 1 2
natural_image
Line drawing of a car interior view showing driver and passenger (no text or symbols)
text_image
8 1 2
text_image
11 2 1
natural_image
Simple line drawing of a chair with a green checkmark indicating selection (no text or symbols)
natural_image
Line drawing of a seatbelt device with a blue arrow pointing to the right side (no text or symbols)
natural_image
Line drawing of a car seat assembly with arrows indicating parts of the seat (no text or symbols present)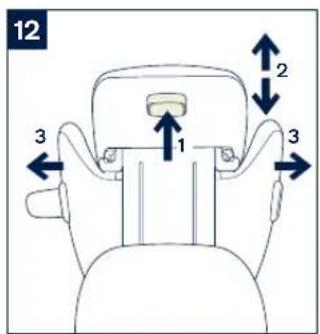
text_image
12 2 1 3 3
natural_image
Diagram showing two directional arrows pointing to a device component on a curved surface (no text or symbols)
text_image
16 click ✓ X
natural_image
Line drawing of a hand holding a seatbelt, with a black arrow pointing to the seat area (no text or symbols)
text_image
17 1 → 2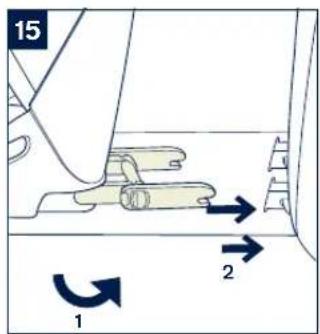
text_image
15 2 1
natural_image
Line drawing of a car seat with hands holding a belt, no text or symbols present
text_image
20 ×
text_image
Diagram showing mechanical assembly with labeled parts 2 and 3, indicating directional movement or motion.
natural_image
Line drawing of a person seated in a car seatbelt, no text or symbols present
natural_image
Illustration of a car seat with a green checkmark indicating selection (no text or symbols present)
text_image
1 2 3
text_image
22
natural_image
Line drawing of a car seat with front and rear seats, no text or symbols present
natural_image
Line drawing of a person sitting in a car seat with a belt buckle (no text or symbols)
natural_image
Line drawing of a mechanical component with an arrow indicating direction (no text or symbols)
natural_image
Illustration of a car seat assembly with a curved arrow indicating direction (no text or symbols)
natural_image
Illustration of a hand pressing down on a mechanical device with a curved arrow indicating motion (no text or symbols)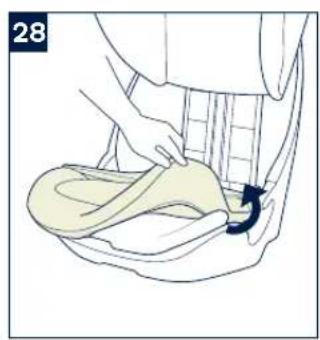
natural_image
Illustration of a person sitting in a seat with a hand adjusting the seat area, showing a curved arrow indicating motion (no text or symbols present)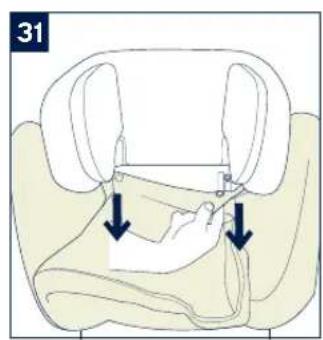
text_image
31
text_image
24 1 2
text_image
26 1 2
natural_image
Illustration of a hand pressing down a car seatbelt with a blue arrow indicating rotation (no text or symbols)
natural_image
Illustration of a person's seatbelt with arrows indicating rotation (no text or symbols)
text_image
33 2 1Designed around your life

Contents
Product Information 3
Product Registration
Warranty
Contact
Child Usage Requirements 4
Warning 5
Parts List 7
Product Set Up 8
Product Use 8
Cleaning and Maintenance 11
Français (FR) 13
Deutsch (DE) 25
Nederlands (NL) 37
Italiano (IT) 49
Español (ES) 61
Português (PT) 73
Polski (PL) 85
Čeština (CZ) 97
Slovenčina (SK) 109
Hrvatski (HR) 121
text_image
Technical diagram of a car seat assembly with numbered parts for identificationtext_image
Technical diagram of a car seat assembly with numbered parts for identificationPokyny k výrobku AACE lx Pokyny k výrobku AACE lx
Zostavenie výrobku
text_image
Technical diagram of a car seat assembly with numbered parts for identification
text_image
10 11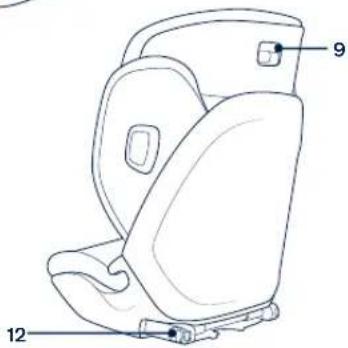
text_image
Technical diagram of a car seat with numbered labels pointing to different seat positionsUpute za AACE lx Upute za AACE lx
Postavljanje proizvoda
O čemu voditi računa prilikom postavljanja
text_image
Technical diagram of a car seat assembly with numbered parts for identificationNavodila za izdelek AACE lx Navodila za izdelek AACE lx
Priprava izdelka
text_image
Diagram of car seat assembly with numbered labels pointing to different components
text_image
10 11
text_image
Technical diagram of a car seat with labeled parts 9 and 12IKKE bruk beltestolen med:
text_image
Technical diagram of a car seat assembly with numbered labels for identificationtext_image
Technical diagram of a car seat assembly with numbered parts for identificationAACE lx-instruktion AACE lx-instruktion
Produktinställning
text_image
Technical diagram of a car seat assembly with numbered parts for identificationTuotteen asetus
IMPORTANT! KEEP THESE INSTRUCTIONS FOR FUTURE REFERENCE:
READ CAREFULLY

text_image
1 × 1 2
text_image
4 1 2 3 4 5 6 7 1 2 3 4 5 6 7
text_image
7 click
natural_image
Line drawing of a car seat assembly with a belt buckle (no text or symbols)
text_image
2 3 1 2
natural_image
Line drawing of a car interior view showing driver and passenger (no text or symbols)
text_image
8 1 2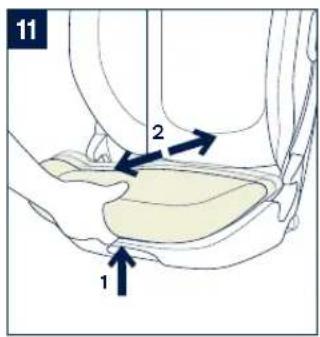
text_image
11 2 1
natural_image
Simple line drawing of a chair with a green checkmark indicating selection (no text or symbols)
natural_image
Line drawing of a car seat assembly with a highlighted belt (no text or symbols)
natural_image
Line drawing of a car seat assembly with arrows indicating movement or positioning (no text or symbols)
text_image
12 2 1 3 3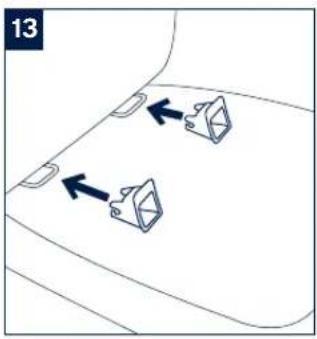
natural_image
Diagram showing two directional arrows pointing to a device component on a curved surface (no text or symbols)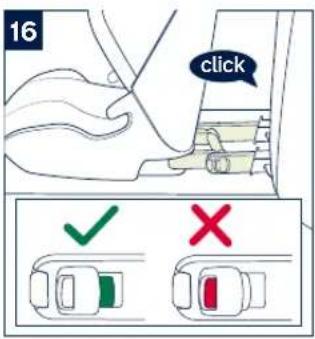
text_image
16 click ✓ X
natural_image
Line drawing of a hand holding a seatbelt, with a black arrow pointing to the seat area (no text or symbols)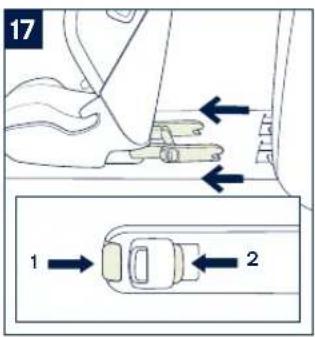
text_image
17 1 → 2
text_image
15 2 1
natural_image
Line drawing of a car seat with hands holding a belt, no text or symbols present
text_image
20 ×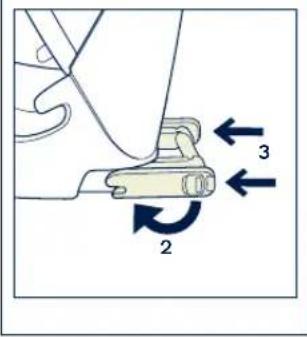
text_image
Diagram showing mechanical assembly with labeled parts 2 and 3, indicating directional movement or motion.
natural_image
Line drawing of a person seated in a car seatbelt, with a car partially visible on the side (no text or symbols)
natural_image
Illustration of a car seat with a green checkmark indicating selection (no text or symbols present)
text_image
1 2 3
text_image
22
natural_image
Line drawing of a car seat with front and rear seats, no text or symbols present
natural_image
Line drawing of a person seated in a car seat with a belt buckle (no text or symbols)
natural_image
Line drawing of a mechanical component with an arrow indicating direction (no text or symbols)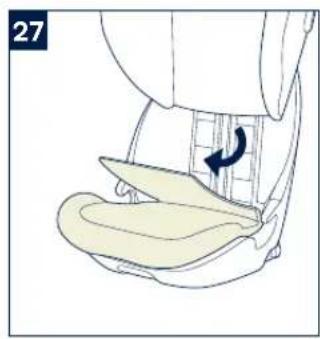
natural_image
Illustration of a car seat assembly with a curved arrow indicating direction (no text or symbols)
natural_image
Illustration of a hand pressing down on a mechanical device with a curved arrow indicating motion (no text or symbols)
natural_image
Illustration of a person sitting in a chair holding a cushion, with a curved arrow indicating motion (no text or symbols)
text_image
31
text_image
24 1 2
text_image
26 1 2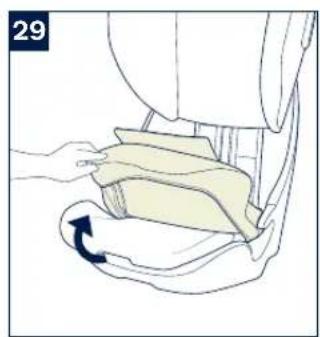
natural_image
Illustration of a hand pressing down a seatbelt with a blue arrow indicating rotation (no text or symbols)
natural_image
Illustration of a person's seatbelt with arrows indicating rotation (no text or symbols)
text_image
33 2 1Designed around your life
nuna®
Contents
Product Information 3
Product Registration
Warranty
Contact
Child Usage Requirements 4
Warning 5
Parts List 7
Product Set Up 8
Product Use 8
Cleaning and Maintenance 11
Français (FR) 13
Deutsch (DE) 25
Nederlands (NL) 37
Italiano (IT) 49
Español (ES) 61
Português (PT) 73
Polski (PL) 85
Čeština (CZ) 97
Slovenčina (SK) 109
Hrvatski (HR) 121