43819 - Drill MAX - Free user manual and instructions
Find the device manual for free 43819 MAX in PDF.

| Product Type | Cordless Drill |
| Brand | MAX |
| Model | 43819 |
| Power Source | Li-ion 20 V, 1.3 Ah battery |
| Charging time | 1 hour |
| Speeds | 2 (0-400 / 0-1400 rpm) |
| Max torque | 35 Nm |
| Torque settings | 18 + 1 (drilling) |
| Chuck | 10 mm, self-tightening |
| Work light | LED |
| Sound pressure | 87.6 dB(A) (K=3 dB(A)) |
| Sound power | 98.6 dB(A) |
| Vibrations (drilling) | 1.298 m/s² (K=1.5 m/s²) |
| Double insulation | Yes, protection class II |
| Weight (approx.) | ~1.5 kg |
| Maintenance and cleaning | Clean with a damp cloth or compressed air; do not use corrosive products. |
| Safety | Use hearing protection, eye protection, and dust mask. |
| Spare parts and repairability | Contact after-sales service via www.schou.com |
| General information | Compliant with CE standards (EN 62841, EN 61558, etc.) |
Frequently Asked Questions - 43819 MAX
User questions about 43819 MAX
0 question about this device. Answer the ones you know or ask your own.
Ask a new question about this device
Download the instructions for your Drill in PDF format for free! Find your manual 43819 - MAX and take your electronic device back in hand. On this page are published all the documents necessary for the use of your device. 43819 by MAX.
USER MANUAL 43819 MAX
GB: Read the instructions before use!
Product Safety Manager

27.01.2020 - Schou Company A/S, DK-6000 Kolding
Miljooplysninger

Product Safety Manager

27.01.2020 - Schou Company A/S, DK-6000 Kolding
Miljoinformasjon
27.01.2020 - Schou Company A/S, DK-6000 Kolding
Miljöinformation
Product Safety Manager

27.01.2020 - Schou Company A/S, DK-6000 Kolding
To get the most out of your new cordless drill, please read through these instructions before use. Please also save the instructions in case you need to refer to them at a later date.
Technical data
Battery: 20 V 1.3 AH Li-ion
Charging time: 1 hour
Gears: 2
Speed: 0-400/0-1400 rpm
Torque: Max. 35 Nm
Torque settings: 18+1
Chuck: 10 mm
With LED work light and 1-hour charger
Sound pressure, L_pF : 87.6 dB(A), K_pA : 3 dB(A)
Sound level, L_WA : 98.6 dB(A), K K_WA : 3 dB(A)
Vibration,drilling: 1.298m / s^2 K:1.5 m/s
The table below shows how long you may be exposed to vibration every day, if the vibration load of 2.5m / s^2 is not to be exceeded
| Vibration | Max. exposure |
| 2.5 m/s2 | 8 hours |
| 3.5 m/s2 | 4 hours |
| 5 m/s2 | 2 hours |
| 7 m/s2 | 1 hour |
| 10 m/s2 | 30 minutes |
Special safety instructions
Use the charger at room temperature only (max. 40^ ).
Never use the charger if the battery, charger or cord is damaged.
Check that the air vents on the cordless drill are not blocked.
Do not use damaged or worn drill and screw bits and always select the correct type of bit for the job.
Secure small items in a vice or similar. Never hold the item in your hand!
Check for concealed power cables, pipes, etc. in the items or surfaces you are going to drill.
Place a piece of scrap wood under the item if possible. Make sure that the drill does not damage any objects under or behind the item, e.g. when drilling into walls.
The drill must not be in contact with anything when it is started.
Drilling certain materials can produce harmful dust. Always wear a mask.
Ensure the drill has completely stopped before changing direction.
Never put the drill down if the bit is still rotating. Wait until it has stopped completely before putting it down if you are not going to use it again.
Avoid touching the drill bit immediately after use. It may be very hot.
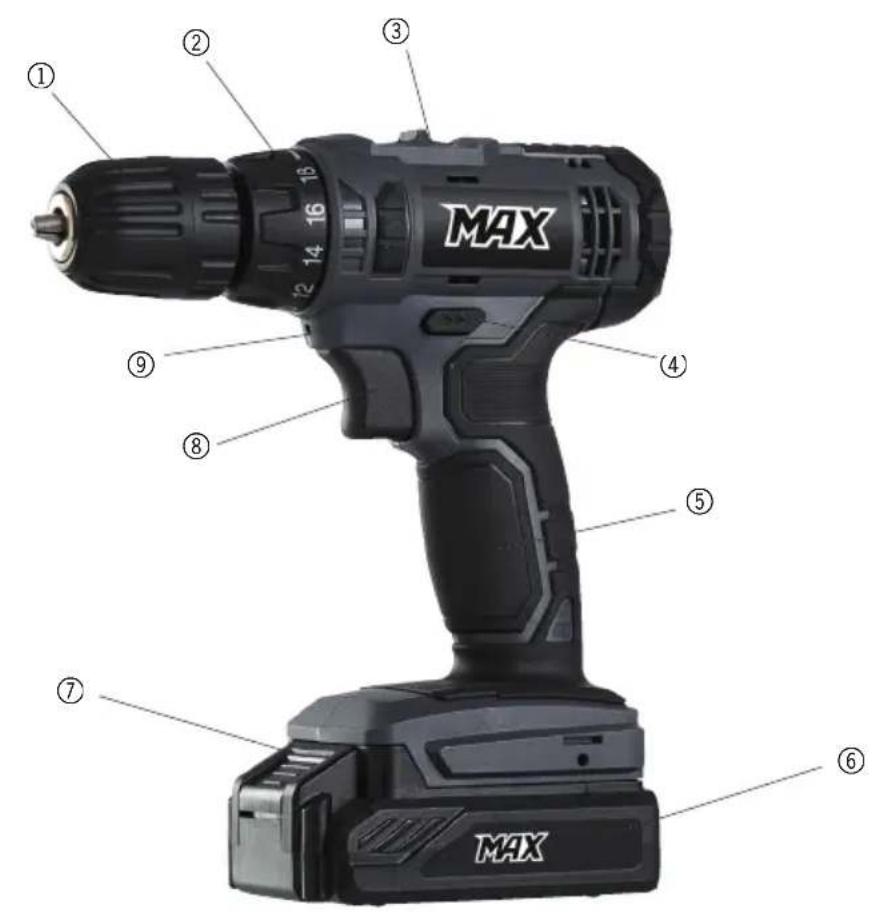
Main components
- Self-tightening drill chuck
- Torque selector (18 settings+drilling)
- Gear selector
- Direction selector
- Handle
- Battery
- Release button
- On/off button (variable)
- LED work light
Charging and fitting the battery
Charge the battery fully before using the drill for the first time
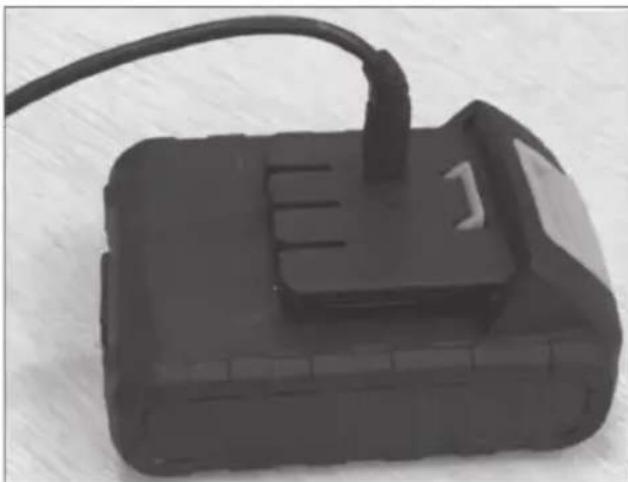
Press the release button (7) on the battery (6) and take the battery out.
Insert the plug from the charger into the charging socket on the battery. Plug the charger in. The LED on the charger will light up red while the battery is charging. Once the LED turns green, the battery is fully charged. Charging takes approx. 1 hour
Disconnect the charger from the mains once the battery is charged and insert it into the drill.
Make sure the release button engages so that the battery is firmly in place
NB! The battery is not fully charged or delivery. It must be charged for about 3 hours prior to use. After that, charging takes 1 hour. The battery cannot reach full capacity until it has been charged and discharged around 5 times.
Preparation
Changing bits
Switch the direction selector (4) to its centre position
Turn the chuck (1) by hand to open the jaws of the chuck. Insert the required drill bit into the chuck and retighten.
Check that the bit is in the centre of the chuck and is secure
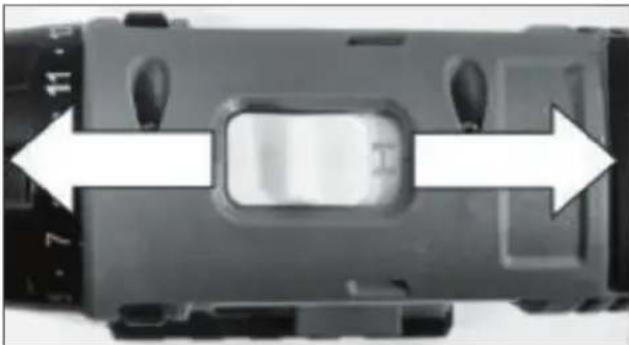
Selecting direction
Select direction (left or right) using the switch (4).
If the switch is placed in the centre position, the on/off button cannot be pressed in and the drill cannot be started.
Selecting speed
Push the gear selector (3) to position 1 to select low speed and high torque, or position 2 for high speed and lower torque
NB! The gear selector must not be moved while the chuck is rotating!
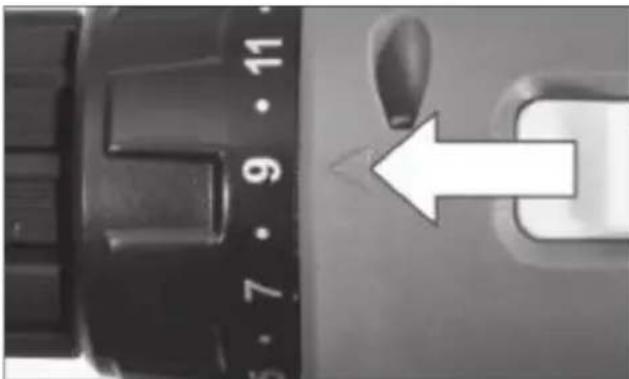
Selecting torque
Select the torque by turning the torque selector (2) to the required position. The higher the setting, the higher the torque applied. To drill, turn the torque selector to the position with the drill symbol.
Use
Fit a suitable drill or bit for the task. Select gear, direction and torque
Start the drill by pressing the on/off button (8). The more the button is depressed, the faster the chuck will revolve. The LED work light (9) comes on and lights up the working area when you press the on/off button
Allow the drill to reach full speed before starting to drill.
Do not press the drill too hard. Select a low speed for screwing, large drill bits or hard materials and a higher speed for small drill bits or softer materials.
Switch off by releasing the on/off button
Useful tips for drilling
When drilling in smooth surfaces, e.g. tiles, stick a piece of strong tape on the drilling point before drilling to prevent the bit slipping.
Always centre-punch the drilling point first when drilling steel.
Place a piece of scrap wood under the item when drilling thin sheet metal to avoid deforming the sheet
Lubricate the drilling point with oil when drilling into metal. Use machine oil for steel and paraffin oil for aluminium
To avoid splinters when drilling wood or plastic, place a piece of scrap wood under the item or drill from both sides.
Use a high speed drill bit when drilling plastic.
For large holes, start with a small diameter drill and then move up to the desired diameter
Cleaning and maintenance
Clean the drill with a slightly damp cloth or compressed air after use and always keep all surfaces and ventilation slots free from dust. Never use corrosive or abrasive cleaning agents, as they may attack the plastic parts of the drill.
Service centre
Note: Please quote the product model number in connection with all inquiries.
The model number is shown on the front of this manual and on the product rating plate.
For:
- Complaints
- Replacements parts
- Returns
- Guarantee issues
- www.schou.com
EC Declaration of Conformity
Manufacturer: Schou Company A/S, Nordager 31, 6000 Kolding, Denmark, hereby declares that
MAX
CORDLESS DRILL
43819
20 V 1.3 Ah
has been manufactured in accordance with the following standards:
EN 62841-1:2015
EN 62841-2-1: 2018
EN 61558-1:2005/A1:2009
EN 61558-2-16:2009/A1:2013
EN 60335-1:2012/A11:2014
EN 60335-2-29:2004/A2:201C
EN 62233:2008
EN 55014-1:2017
EN 55014-2:2015
in accordance with the provisions of the following directives:
2006/42/EC The Machinery Directive
2014/30/EU The EMC Directive
1907/2006/EC The REACH Regulation
2011/65/EU The RoHS Directive
2014/35/EU The Low Voltage Directive
CE
Kirsten Vibeke Jenser Product Safety Manager

27.01.2020 - Schou Company A/S, DK-6000 Kolding, Denmark
Environmental information
Electrical and electronic equipment (EEE) contains materials, components and substances that may be hazardous and harmful to human health and the environment
if waste electrical and electronic equipment (WEEE) is not disposed of correctly. Products marked with a crossed-out wheeled bin are electrical and electronic equipment. The crossed-out wheeled bin indicates that waste electrical and electronic equipment must not be disposed of with unsorted household waste, but must be collected separately.
Manufactured in P.R.C
All rights reserved. The content of this manual may not be reproduced, either in full or in part, in any way by electronic or mechanical means, e.g. photocopying or publication, translated or saved in an information storage and retrieval system without written permission from Schou Company A/S
AKKU-BOHRMASCHINE
Einleitung
Product Safety Manager

27.01.2020 - Schou Company A/S, DK-6000 Kolding
27.01.2020 - Schou Company A/S, DK-6000 Kolding, Danie
Product Safety Manager

27.01.2020 - Schou Company A/S, DK-6000 Kolding
Taani
27.01.2020 - Schou Company A/S, DK-6000 Kolding, Danimarca
Product Safety Manager

27-01-2020 - Schou Company A/S, DK-6000 Kolding, Denemarker
Milieu-informatie
$$ K _ {W A}: 3 \mathrm {d B} (A $$
2006/42/CE Directive machines
2014/30/UE Directive CEM
1907/2006/CE Reglement REACH
2011/65/UE Directive RoHS
Product Safety Manager

27.01.2020 - Schou Company A/S, DK-6000 Kolding,
Danemark