
GigKit Junior - Musical instrument MAX - Free user manual and instructions
Find the device manual for free GigKit Junior MAX in PDF.


User questions about GigKit Junior MAX
0 question about this device. Answer the ones you know or ask your own.
Ask a new question about this device
Download the instructions for your Musical instrument in PDF format for free! Find your manual GigKit Junior - MAX and take your electronic device back in hand. On this page are published all the documents necessary for the use of your device. GigKit Junior by MAX.
USER MANUAL GigKit Junior MAX
GigKit Junior Electr.Guit 3/4
Ref. nr.: 173.272; 173.273, 173.274, 173.275

natural_image
Black and white photo of an electric guitar setup including a band, guitar case, amplifier, and earphones (no text or symbols visible)INSTRUCTION MANUAL GEBRUIKSAANWIJZING BEDIENUNGSANLEITUNG MANUAL DE INSTRUCCIONES MANUEL D'INSTRUCTIONS INSTRUKCJA OBSŁUGI NÁVOD K POUŽITÍ
ENGLISH
Congratulations to the purchase of this Max product. Please read this manual thoroughly prior to using the product in order to benefit fully from all features.
Read the manual prior to using the product. Follow the instructions in order not to invalidate the warranty. Take all precautions to avoid fire and/or electrical shock. Repairs must only be carried out by a qualified technician in order to avoid electrical shock. Keep the manual for future reference.
- When using a shoulder strap, make sure the shoulder strap is securely attached to the guitar.
- Do not place your face close to the instrument when changing or adjusting the strings.
- After changing the strings, cut off the leftover string ends.
- The guitar has been properly adjusted before being shipped from the factory. In For those adjustments that can be performed by the owner, please closely follow the instructions given in the Owner's Manual for the procedure.
- When playing the instrument, pay attention to the volume level. Especially late at night, take neighbors and those who are close by into consideration.
- Broken guitar necks are mostly the result of accidents such as dropping the guitar, the guitar falling over, or from shocks occurred during transport. When the guitar is not being used, make sure it is kept on a sturdy stand where it won't fall over, or place it in its case.
- Do not treat the instrument in a rough manner like swinging it around, throwing objects at the instrument, dropping the instrument, etc. And do not put excessive force on the switches or control knobs, etc.
- When cleaning the instrument, use a soft, dry cloth. Also, do not spray insecticides close to the instrument. And when cleaning the headstock, be careful not to injure yourself on the sharp string ends.
- Connect the product to an earthed mains outlet (220-240Vac/50Hz) protected by a 10-16A fuse.
- During a thunderstorm or if the product will not be used for a longer period of time, unplug it from the mains. The rule is: Unplug it from the mains when not in use.
- If the product has not been used for a longer period of time, condensation may occur. Let the unit reach room temperature before you switch it on. Never use the product in humid rooms or outdoors.

This mark attracts the attention of the user to high voltages that are present inside the housing and that are of sufficient magnitude to cause a shock hazard.

This mark attracts the attention of the user to important instructions that are contained in the manual and that he should read and adhere to.

The product has been certified CE. It is prohibited to make any changes to the product. They would invalidate the CE certificate and their guarantee!
NOTE: To make sure that the unit will function normally, it must be used in rooms with a temperature between 5^ C/41°F and 35^ C/95°F.

Electric products must not be put into household waste. Please bring them to a recycling centre. Ask your local authorities or your dealer about the way to proceed. The specifications are typical. The actual values can slightly change from one unit to the other. Specifications can be changed without prior notice.
Do not attempt to make any repairs yourself. This would invalid your warranty. Do not make any changes to the product. This would also invalid your warranty. The warranty is not applicable in case of accidents or damages caused by inappropriate use or disrespect of the warnings contained in this manual. Max cannot be held responsible for personal injuries caused by a disrespect of the safety recommendations and warnings. This is also applicable to all damages in whatever form.
UNPACKING INSTRUCTION
CAUTION! Carefully unpack the box upon receipt. Check the contents to ensure that all parts are present and have been received in good condition. Notify the shipper immediately and retain packaging material if any parts appear damaged from shipping or the package itself shows signs of mishandling. Save the package and all packaging materials. If the product must be returned, it is important that the product is returned in the original factory box and packaging.
If the device has been exposed to drastic temperature fluctuation (e.g. after transportation), do not switch it on immediately. The arising condensation water might damage your device. Leave the device switched off until it has reached room temperature.
POWERSUPPLY
The label on the back/under side of the product indicates the mains voltage to which it must be connected. Check that the mains voltage corresponds to this. Any other voltage than the one indicated may cause irreparable damage to the unit. The unit must also be connected directly to the mains voltage and no dimmer or adjustable power supply may be used.

Always connect the device to a protected circuit (circuit breaker or fuse). Make sure the device has an appropriate electrical ground to avoid the risk of electrocution or fire.
STORE THE GUITAR
- Do not keep the instrument close to a fire or flame, and keep it on a low, stable surface.
- Do not leave the instrument leaning against the wall, etc., in the vicinity of children.
- Long-term storage in the hard case may have an adverse effect on the guitar. Open the case occasionally to let air circulate within the case.
- If the instrument is not going to be used for an extended period of time, keep the instrument in a place other than those listed below.
■ Locations subject to direct sunlight.
- Locations subject to extremely high or low temperatures.
- Locations subject to high humidity, dust, or vibration.
- During the summer season, temperatures inside of a car can become extremely hot. Do not leave the instrument inside of a car.
AMPLIFIER
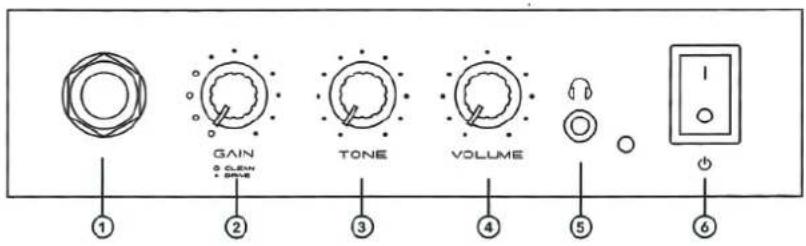
- Guitar input – Plug in your guitar here.
- Gain - Adjust the amount of pre-amp gain. High gain setting will supply more distortion and sustain.
- Tone - Rotate to adjust the tonal quality of the amplifier.
- Volume – Rotate to adjust the overall volume.
- Phones – For connecting stereo headphones.
- Power - Switch the amplifier on/off.
text_image
GAIN 5 CLEW • GAIN TONE VOLUME ① ② ③ ④ ⑤ ⑥STRING SETUP
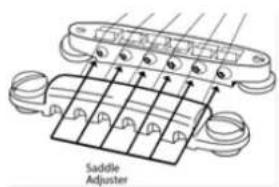
String height refers to the space between the strings and frets, and has an affect on playability. String height is adjusted with the bridge and/or the saddle on the bridge. Adjust height by alternately turning the screws little by little on the left and right sides. Set too high and the instrument is hard to play. Too low results in fret noise. Adjust so that the space between the string and the last fret measures as follows:
| String | Tuning | Height |
| 1 | E | 1.9mm |
| 2 | B | 2.0mm |
| 3 | G | 2.1mm |
| 4 | D | 2.2mm |
| 5 | A | 2.3mm |
| 6 | E | 2.4mm |
Height adjustment screw (for each string)

text_image
Height AdjusterIntonation adjustment screw (for each string)
text_image
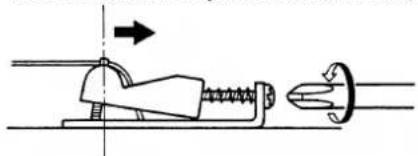
Saddle AdjusterTo check intonation, compare the harmonic tone (12th fret) to the fretted tone (12th fret).
- If fretted pitch is higher than harmonic, saddle must be moved backward to lengthen string.
natural_image
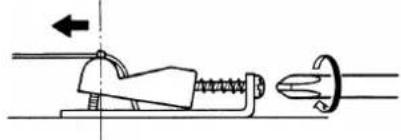
Technical diagram of a mechanical assembly with no visible text or symbols- If fretted pitch is lower than harmonic, saddle must be moved forward to shorten string.
natural_image
Mechanical diagram showing a spring-loaded tool interacting with a nut and connecting rod (no text or symbols)TUNING MACHINE TENSION ADJUSTMENT
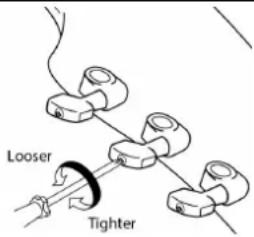
The tuning machines have spring-loaded mechanisms which automatically take up wear, preventing backlash. However, it is possible to adjust the amount of pressure required to turn the machines. Each machine has a tension adjustment screw, as illustrated.
Clockwise screw rotation tightens the machine. The tuning machines should be adjusted to the extent that they are firm, but can turn smoothly. This adjustment is normally unnecessary, and excessive tightening can lead to premature tuning machine wear.
text_image
Looser TighterCHANGE THE STRINGS
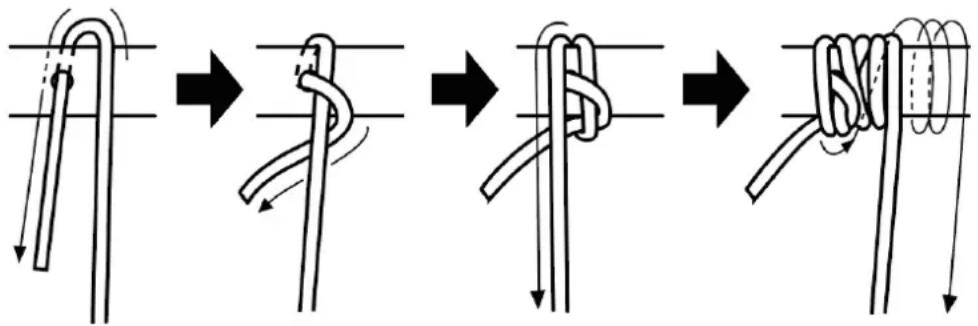
- Unwind the old string at the tuning machine at the top of the neck (it is recommended to change 1 string at a time).
- Push the old string through the body of the guitar through the hole in the bridge.
- Insert a new string through the corresponding hole (compare the thickness of the new string to the old string to make sure it is the correct string).
- Run the string over the nut in the bridge and along the neck.
- Feed the string through the hole in the tuning machine post.
- Bend the string around the post and wind the string using a tuning peg.
flowchart
graph TD
    A["Step 1: Rip rope knot"] --> B["Step 2: Rolling knot"]
    B --> C["Step 3: Retraction"]
    C --> D["Step 4: Rolling knot with loop"]
CLIP-ON DIGITAL TUNER
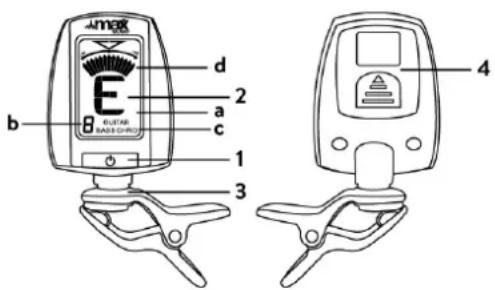
- Power / mode
-
Display
a. Note name
b. String number
c. Chromatic / Guitar / Bass
d. Measuring range -
Clip
-
Battery compartment
text_image
AM/HEA E d 2 a c b 8 ELTAR BAS GROUND 1 3 4Inserting the battery
Press on the battery compartment cover as marked on the back of the device. Open the compartment and insert a fresh CR2032 battery, paying close attention to the polarity. The life of the battery depends on the conditions of use.
Note: If the device does not work as described in this manual, and you do not solve the problem by switching it off and on again, remove the battery and reinstall it to possibly solve the problem.
Operating
- Attach the device to your instrument via the clip.
- Press and hold the button for 2 seconds to turn the unit on.
- Select the tuning. Press the button repeatedly to select 'Chromatic', 'Guitar' or 'Bass' as the tuning.
- If you select 'Chromatic', the display will show the note name.
- If you select 'Guitar' or 'Bass', the display will show the string number and the note name.
- Play a single note on your instrument, the note name or string number is displayed. The backlight changes and the measuring range is displayed.
- If the backlight turns green and the gauge is centered, the note is in tune correctly.
- If the backlight turns blue and the indicator is pointing to the left, the tuning is too low.
- If the backlight turns blue and the display is pointing to the right, the tuning is too high.
- If the unit does not detect any signal for 3 minutes after switching it on, it will switch off automatically.
NEDERLANDS
text_image
GAIN TONE VOLUME ① ② ③ ④ ⑤ ⑥SNAARAFSTELLING
text_image
Height Adjustertext_image
Saddle Adjusternatural_image
Mechanical assembly diagram showing a spring-loaded tool interacting with a flanged component (no text or symbols)natural_image
Mechanical assembly diagram showing a spring-loaded component inserted into a housing with a valve (no text or labels)AFSTELLING VAN DE SPANNING STELKNOPPEN
text_image
Looser TighterSNAREN VERWISSELEN
flowchart
graph TD
    A["Step 1: Rippled rope knot"] --> B["Step 2: Rolling knot"]
    B --> C["Step 3: Retraction of loop"]
    C --> D["Step 4: Rolling knot with loop"]
CLIP-ON DIGITALE TUNER
text_image
GAIN 0. CLEAN • CLEAN TONE VOLUME ① ② ③ ④ ⑤ ⑥text_image
Height Adjustertext_image
Saddle Adjusternatural_image
Technical diagram of a mechanical assembly with no visible text or symbolstext_image
GAIN 0. CLEAR 1 TONE VOLUME ① ② ③ ④ ⑤ ⑥AJUSTE DE LA CUERDA
text_image
Height Adjustertext_image
Saddle Adjusternatural_image
Mechanical diagram showing a tool interacting with a spring and nut (no text or symbols)natural_image
Pure mechanical diagram showing a screw fastening tool inserted into a housing, with no text or symbols present.text_image
Looser TighterCAMBIAR LAS CUERDAS
text_image
GAIN S CLEW • SWE TONE VOLUME ① ② ③ ④ ⑤ ⑥REGLAGE DE LA CORDE
text_image
Height Adjustertext_image
Saddle Adjusternatural_image
Mechanical diagram showing a spring-loaded tool interacting with a fastener (no text or symbols present)natural_image
Pure mechanical diagram showing a tool interacting with a spring and nut (no text or symbols)REGLAGE DE LA TENSION
text_image
Looser TighterREPLACEMENT DES CORDES
text_image
GAIN TONE VOLUME ① ② ③ ④ ⑤ ⑥KONFIGURACJA CI GU
text_image
Height Adjustertext_image
Saddle Adjusternatural_image
Pure mechanical diagram showing a tool interacting with a spring and nut (no text or symbols)REGULACJA NAPI CIA MASZYNKI DO STROJENIA
text_image
Looser TighterZMIENI CI GI ZNAKÓW
text_image
GAIN 0 CLEAN 0 SWE TONE VOLUME ① ② ③ ④ ⑤ ⑥NASTAVENÍ STRINGU
text_image
Height Adjustertext_image
Saddle Adjusternatural_image
Mechanical assembly diagram showing a spring-loaded tool interacting with a connector (no text or symbols)natural_image
Technical line drawing of a mechanical clamp or connector assembly (no text or symbols)NASTAVENÍ NAP TÍ LADI KY
text_image
Looser TighterZM NIT ET ZCE
The products referred to in this manual is conforming European and UK legislation directives to which they are subject:
European Union
Tronios B.V.,
7602KR Almelo, The Netherlands
2014/35/EU
2014/30/EU
2011/65/EC

United Kingdom
Tronios Ltd.,
130 Harley Street,
London W1G 7JU, United Kingdom
S.I. 2016:1101
S.I. 2016:1091
S.I. 2012:3032

Specifications and design are subject to change without prior notice.
www.tronios.com
Copyright © 2025 by Tronios The Netherlands