
La Specialista Prestigio EC9355.BM - Coffee machine DELONGHI - Free user manual and instructions
Find the device manual for free La Specialista Prestigio EC9355.BM DELONGHI in PDF.
| Product type | Espresso machine with integrated bean grinder |
| Brand | DeLonghi |
| Model | La Specialista Prestigio EC9355.BM |
| Power supply | 220-240 V ~ 50/60 Hz, 1450 W |
| Pump pressure | 15 bar |
| Water tank | 1.8 L removable |
| Bean hopper | 250 g |
| Heating system | Thermoblock |
| Steam wand | Adjustable, with frother |
| Functions | Espresso, Americano, Coffee, Hot water, Steam |
| Customization | My button for beverage programming |
| Display and controls | Control panel with pressure gauge and indicator lights |
| Body material | Stainless steel |
| Dimensions (W x D x H) | 38 x 39 x 44 cm (estimation) |
| Weight | 12 kg (estimation) |
| Included accessories | Portafilter, single and double shot filters, milk jug, cleaning tool, needle, water hardness test strip, descaler, Softballs |
| Maintenance | Automatic cleaning, scheduled descaling, coffee spout cleaning with tablets |
| Safety | Adjustable auto-off, main switch, overheating protection |
| Repairability | Replaceable burrs, technical support |
Frequently Asked Questions - La Specialista Prestigio EC9355.BM DELONGHI
User questions about La Specialista Prestigio EC9355.BM DELONGHI
0 question about this device. Answer the ones you know or ask your own.
Ask a new question about this device
Download the instructions for your Coffee machine in PDF format for free! Find your manual La Specialista Prestigio EC9355.BM - DELONGHI and take your electronic device back in hand. On this page are published all the documents necessary for the use of your device. La Specialista Prestigio EC9355.BM by DELONGHI.
USER MANUAL La Specialista Prestigio EC9355.BM DELONGHI
| DISHWASHER SAFE MycHClean | Eco MycHClean | |||
| × | √ | √ | × | × |
| √ | × | × | √ | √ |
| × | × | × | √ | √ |
| × | × | × | √ | √ |
| × | × | √ | √ | × |
| × | × | × | √ | √ |
Before using the appliance, always read the safety warnings.
1.DESCRIPTION
1.1 Description of appliance - A
A1. Beans container lid
A2. Beans container
A3. Cup tray
A4. Steam dial
A5. Hot water spout
A6. Steam wand
A7. Cup grille for espresso
A8. Cup grille for glasses or mugs
A9. Drip tray grille
A10. Drip tray
A11. Drip tray water level indicator
A12. Water tank lid
A13. Water tank extraction handle
A14. Water tank
A15. Water softener filter housing
A16. Power cord connector socket
A17. Main switch (ON/OFF)
A18. Coffee spout
A19. Coffee mill outlet (tamping station)
A20. Presser lever
A21. Cover giving access to coffee mill funnel
1.2 Description of control panel - B
B1. ON/Standby button
B2. Ground coffee quantity dial
B3. "2x" button: selection of 2-coffee filter
B4. Coffee temperature button
B5. "OK" button: delivery of beverage/confirm
B6. Hot water button
B7. "My" button: customization of beverage quantity
B8. Function selector dial
- Espresso
- Americano
Coffee - Descale
B9. "Descale" light
B10. "Steam ready" light
B11. "No beans container" light
B12. "Energy saving" light
B13. "Clean" light (see "8.1 Cleaning of the coffee outlet")
B14. "Beans container empty" light
B15. "No water" light
B16. "Press" light
B17. Pressure gauge
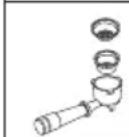
1.3 Description of accessories - C
C1. Filter holder
C2. 1 cup filter
C3. 2 cup filter
C4. "Total Hardness Test" paper
C5. Descaler
C6. Removable power cord
C7. Tube brush
C8. Coffee outlet cleaning accessory
C9. Softballs
C10. Milk jug
C11. Steam wand cleaning needle
1.4 Optional cleaning accessories recommended by the manufacturer
For more information, visit www.delonghi.com.
Cleaning tabs
(see "8.1 Cleaning the coffee outlet")

Cleaner
EAN:8004399333307
2. PREPARING THE APPLIANCE
Wash all accessories with warm water and washing-up liquid, then proceed as follows:
- Locate the beans container in the (A2) coffee mill (fig. 1). The container is correctly in place when the arrow aligns with the symbol and a "click" is heard (fig. 2).
- Locate the drip tray (A10) together with the cup grille (A8) and drip tray grille (A9) (fig. 3);
- Take out the water tank (A14) (fig. 4) and fill with fresh clean water, taking care not to exceed the MAX level (fig. 5).
- Put the tank back in the appliance.
Important: Never operate the appliance without water in the tank or without the tank.
Please note: You should customise water hardness as soon as possible following the instructions in section "7. Settings menu".
3. SETTING UP THE APPLIANCE
- Plug the power cord connector (C6) into the socket (A16) at the back of the appliance (fig. 6), then plug into the mains socket. Make sure the main switch (A17) at the back of the appliance is pressed and in the I position (fig. 7);
- Place a container of at least 100ml capacity under the hot water spout (next to the coffee spout (A18)) as illustrated (fig. 8).
- Press the button (B6) next to the indicator light (fig. 9): delivery will start and then stop automatically. Empty the container.
Before using the coffee maker, the internal circuits of the machine must be rinsed. Proceed as follows:
- Attach the filter holder (C1) complete with filter to the appliance. To attach correctly, align the filter holder handle with
"INSERT" (fig. 10), then turn the handle to the right until it is aligned in the "CLOSE" position;
- Place a container under the filter holder and the steam wand (A6);
- Press the OK button (B5): delivery will start (fig. 11);
- When delivery has finished, turn the steam dial (A4) (fig. 12) and release the jet for a few seconds so as to rinse the steam circuit: to ensure best possible results, repeat the operation 3 or 4 times. The purpose of this procedure is to purge any water from the circuit before using steam to prepare a beverage.
The appliance is ready for use.
Please note: We also recommend rinsing the internal circuits if the appliance is not used for a long period.
The first time you use the appliance, you need to make 4-5 cups of coffee before the appliance starts to give satisfactory results. Pay particular attention to the quantity of pre-ground coffee in the filter ((C2) or (C3)) (see instructions in section "4.1 Step 1 - Grinding").
Proceed as described in section "The "perfect dose""
4. PREPARATION OF COFFEE
4.1 Step 1 - Grinding
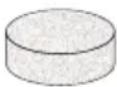
- Put coffee beans in the container (A2) (fig. 13). It is best to grind only a quantity of beans sufficient for immediate use, so that the coffee will always be fresh.
- Select the grinding level (fig. 14). The factory setting is 5 (medium ground). If this is too fine or too coarse, adjust the level according to personal taste and to the type of coffee being used (the adjustment must be made only when the coffee mill is in operation).
Please note: A grinding level between 3 and 6 is recommended for most coffees. A grinding level of 1 or 2 is very fine and should be used with special coffees only (light roasted)
- Place the ground coffee filter (C2) or (C3) in the filter holder (C1) (fig. 15); If the 2-cup filter is in use, press the 2x button (B3): this will also double the quantity of espresso coffee delivered from the spout.
- Set the quantity by adjusting the dial (B2), starting from the minimum position (fig. 16).
Refer to the section on "Adjusting the quantity of ground coffee in the filter" for further indications.
- Attach the filter holder to the outlet of the coffee mill (A19), aligning it with "INSERT", then turning it to the right. Grinding begins when the filter holder reaches the CLOSE position, then stops automatically.
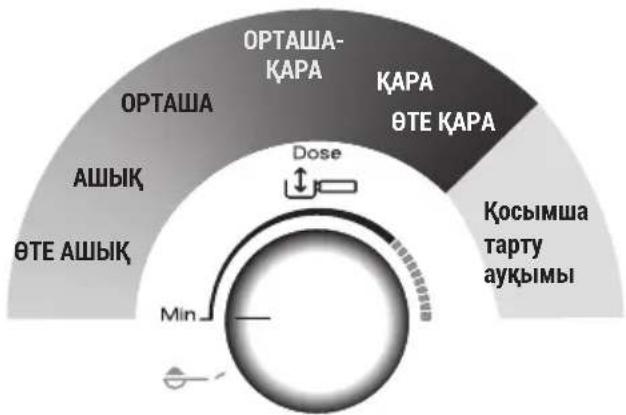
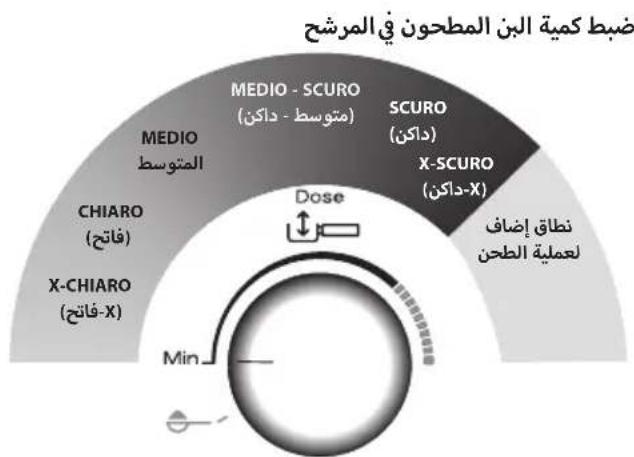
Adjusting the quantity of ground coffee in the filter
Different varieties of coffee bean give different results when ground: consequently, the initial adjustment of the dosage requires special care.
This illustration shows how to regulate the dosage, based on the roast colour: this should be taken as a general guide, given that in practice, the final adjustment can vary according to the composition of the beans.
- Set the dosage starting from the minimum position.
- Looking at the roast colour of your particular beans, turn the dial slowly to find the right adjustment.
4.2 Step 2 - Tamping
- Following the grinding step, bring the tamping lever (A20) down completely (keeping the filter in place under the outlet) (fig. 17). For a perfect result, repeat the step twice.
- Keep the tamping lever fully down when removing the filter holder (fig 18) and then return the lever to its initial position.
- Having checked that the dosage is as required (see "The "perfect dose""), attach the filter holder to the brewer outlet (A18) (fig. 19).
Please note: Coffee left on the edges of the filter after pressing does not in any way compromise the quality of the brewing and therefore the end result.
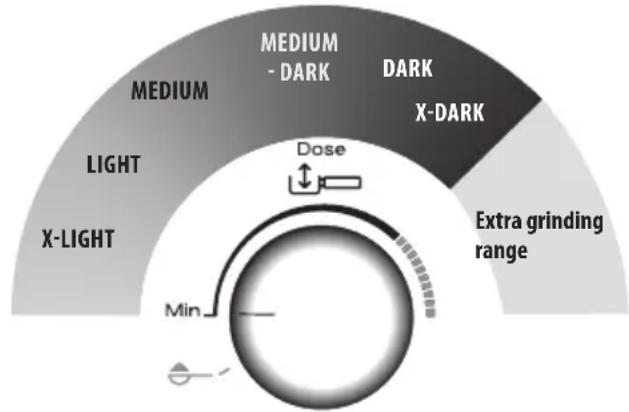
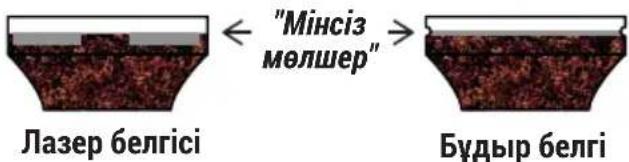
The "perfect dose"
- A reference mark inside the coffee filters identifies the perfect quantity.
- Laser marked filters: the perfect quantity corresponds to the top line of the mark.
-
Filters with relief mark: the perfect quantity corresponds to the line in relief.
-
Make sure the coffee is at the right level after tamping. It might be necessary to adjust the level a few times using the dial (B2) before the ideal dosage is achieved.
-
If the coffee is extracted too strongly or too weakly even at the ideal dosage, this can be corrected by grinding the beans more finely or more coarsely (see "4.1 Step 1 - Grinding"). To correct over-extraction (coffee released too slowly), select a coarser setting. To correct under-extraction (coffee released too quickly), select a finer setting.
- Barista tips: Draw the filter holder away from the tamper with the lever (A20) still down, so that the dose of coffee has a perfectly smooth finish.
- When using pre-ground coffee:
- spoon the pre-ground coffee into the filter;
- turn the dial to ;
- attach the filter holder to the grinder outlet;
- lower the tamping lever.
4.3 Step 3 - Brewing
- Select the temperature (fig. 20) (see "Coffee preparation temperature").
- Select the desired beverage (fig. 21).
- Press OK (B5) to start brewing (fig. 11) (pre-infusion and infusion). Delivery of the coffee will stop automatically.
Coffee preparation temperature
The water temperature is controlled during the entire preparation process to ensure its stability during the extraction step. The Specialista Prestigio offers 3 infusion temperatures* set in a range between 92 and 96^ .
The temperature effectively utilized will depend typically on the variety of been and the roast: Robusta beans require a lower temperature, and Arabica beans a higher temperature. The same applies for dark roasted beans or for light roasted beans, respectively.
| Temperature level | Corresponding indicator light | Roast colour |
| MIN Dark | ||
| MED Medium | m-dark | |
| MAX Light |
- This is the temperature of the water in the thermoblock. It is therefore not the temperature of the beverage in the cup or the temperature of the beverage at the moment of release from the outlets of the filter holder.
5. MAKING MILK BEVERAGES
5.1 Frothing the milk
- Fill the jug (C10) with the amount of milk to be warmed/ frothed, bearing in mind that the volume of the milk will increase 2- or 3-fold (fig. 22). For a denser and more evenly distributed froth, best results will be achieved using whole cow's milk at refrigerator temperature (about 5^ ).

- To froth the milk, offer the nozzle of the steam wand (A6) to the surface of the liquid: this will allow air to mix with the milk and steam.
- Keep the steam nozzle just in contact with the surface, taking care not to let in too much air and create unsuitably large bubbles.
- Immerse the nozzle just beneath the surface of the milk: this will create a vortex in the liquid. Once the milk is heated to the desired temperature, turn off the steam and wait for the flow to stop completely before removing the milk jug from the machine.
Barista tips:
- Fresh milk is best. Always use fresh milk straight from the fridge.
- For best results, always replace the milk jug in the fridge when not in use.
Whole milk ensures optimum results. The appearance and texture of froth depending on the nature of the dairy milk or vegetable beverages utilized.
After frothing the milk, eliminate unwanted bubbles by swirling the jug gently.
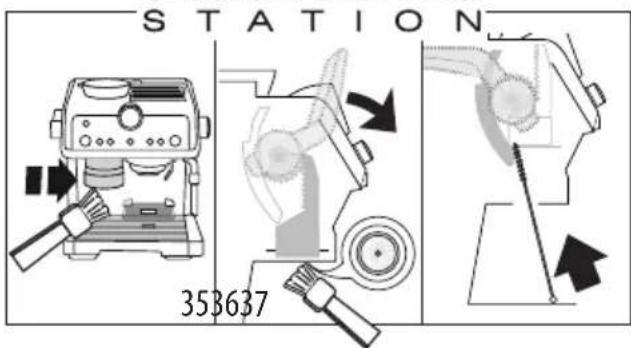
Cleaning the steam wand:
- Following use, always wipe the steam wand (fig. 23) with a cloth to remove residual deposits of milk. The recommended procedure for in-depth cleaning is to use Eco MultiClean: this product ensures maximum hygiene by removing milk proteins and fats, and can be used for cleaning the entire machine.
- Release steam for a few seconds to clean the wand (fig. 12).
- Wait until the steam wand has cooled down: to ensure the wand works efficiently over time, use the special cleaning tool (C11) to free the 3 holes (fig. 24) of any obstruction.
6. CUSTOMISING THE QUANTITY OF COFFEE BEVERAGES WITH THE BUTTON (B7)
- Prepare the appliance to deliver 1 or 2 cups of the coffee beverage you want to make, as far as attaching the filter holder (C1) complete with the (C2) or (C3) filter and ground coffee.
- Turn the dial (B8) to select the beverage being programmed.
- Press the button: the light associated with the my button blinks.
- Press the OK button to start delivery. The lights associated with the Ok and buttons blink.
- When the required quantity is reached, press OK. If the beverage includes another ingredient, the machine will start delivering this one as well: once the required quantity has been reached, press OK.
- Press the button to save. The appliance is now ready again for further use and the light remains on.
If there is no wish to save the new setting, simply press any other button.
Please note:
- Coffee beverages can be programmed, but the delivery of steam and hot water can not.
- Programming changes the quantity of beverage delivered, but not the quantity of ground coffee
- "2x" beverages can be programmed separately.
To restore the default factory settings, press and hold the button until the light goes off. The selected beverage reverts to the default quantity.
| Coffee recipe | Default quantity | Programmable quantity |
| Expresso | 35 ml from 25 | to 90 ml |
| 2x | 70 ml from 50 | to 180 ml |
| Coffee | 80 ml from 50 | to 120 ml |
| 2x | 160 ml from | 20 to 240 ml |
| Americano | 120 ml | · espresso: from 25 to 60 ml · water: from 25 to 120 ml |
| 2x | 240 ml · espresso: from 50 to 120 ml · water: from 50 to 240 ml | |
7. SETTINGS MENU
| 1. Enter the menu: |
| → |
| Press together and hold for 5 seconds | 2x | my | |
| 2. Settings selected with dial (B8) | |||
| Americano Espresso Coffee - | |||
| Corresponding setting | Turn to Adjustments | ||
| Extra grinding adjustment | Espresso | ×2 → Range 1 | |
| ∃v → Range 2 | |||
| Water hardness | Americano | ×2 → soft | |
| ∃v → medium | |||
| OK → hard/very hard | |||
| Auto-off | Coffee | ×2 → 9 minutes | |
| ∃v → 1.5 hours | |||
| OK → 3 hours | |||
| 3. Settings selected with buttons | |||
| Energy saving | Active | ||
| Off | |||
| Default values | Press the button and hold for at least 5 seconds until the light remains permanently on | ||
| 4. Save the new settings by pressing ON/Standby (B1) | |||
8. CLEANING THE APPLIANCE
Important!
- Do not use solvents, abrasive detergents or alcohol to clean the coffee machine.
- Do not use metal objects to remove encrustations or coffee deposits as they could scratch metal or plastic surfaces.
- Should the machine remain idle for more than a week, it is advisable to carry out a rinse cycle before preparing any beverages.
Danger!
- Never immerse the coffee maker in water when cleaning: it is an electrical appliance.
- Before commencing any cleaning operation on the outside of the machine, turn it off, unplug it from the mains socket and wait for it to cool down.
| × | √ | √ | × | × | |
| √ | × | × | √ | √ | |
| × | × | × | √ | √ | |
| × | × | × | √ | √ | |
| × | × | √ | √ | × | |
| × | × | × | √ | √ |
8.1 Cleaning the coffee outlet
When light comes on (orange) (B13), it means that the coffee circuit needs to be cleaned. This requires special cleaning tabs for coffee makers, which must be purchased separately. For more information, visit www.Delonghi.com.
- Insert the 1-cup filter (C2) in the holder (C1) (fig. 25).
- Position the cleaning accessory in the filter (C8) (fig. 25) and press home.
- Place the cleaning tab on the accessory (fig. 26).
- Attach the filter holder to the coffee outlet (A18).
-
Fill the tank(A14) with water. Make sure the drip tray (A10) is empty.
-
Press and hold the button (B6) until the light (B13) comes on. After a few minutes, the cleaning cycle stops automatically.
-
Remove the filter holder and the cleaning accessory.
- Wash the filter holder and the filter under running water.
- Attach the filter holder again and run a rinse cycle by pressing the button: it is advisable to place a container under the filter holder.
- Remove and empty the drip tray.
Please note:
This cleaning cycle can be initiated at any time by pressing the button and holding for a few seconds. To cancel, press and hold the button for at least 10 seconds.
8.2 Cleaning the beans container housing
- Make sure the beans container (A2) is empty. If in doubt, operate the mill briefly to make certain.
- Release the container by turning it anticlockwise and detach it from the machine (fig. 27).
- Remove coffee residues using a vacuum cleaner (fig. 28).
- Clean the beans container housing with a moist cloth, and wipe dry (fig. 29);
- Reposition the beans container in the coffee mill. The container is correctly in place when the arrow is aligned with the symbol and a "click" is heard (fig.30).
8.3 Cleaning the burrs
When cleaning the beans container (A2), clean the container housing and the top burr with a moist cloth. If the burrs need to be removed and replaced, contact a service centre.
The burr can be removed in the event of the coffee mill being jammed by the presence of foreign matter. Should this occur, remove the beans container and proceed as follows:
- Attach the filter holder (C1) and operate the mill briefly without beans to free the internal duct.
- Turn the appliance off.
- Turn the grinding adjustment dial anticlockwise as far as it will go, which is the "REMOVE" position (fig. 31).
- Gripping the top burr by the handle, pull it up and out of the housing (fig.32).
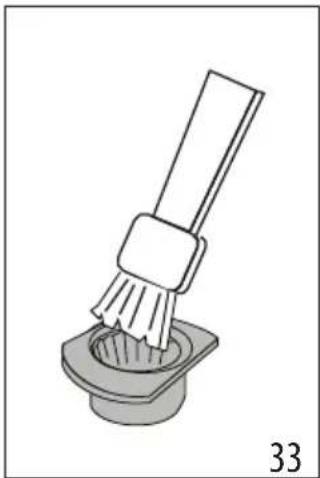
- Clean the burr with a brush (fig. 33) and remove coffee residues using a vacuum cleaner (fig. 28).

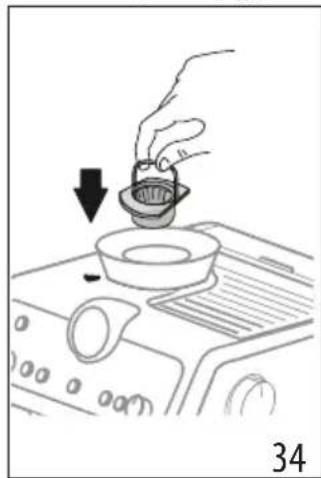
- Replace the burr in the housing (fig. 34);
- Turn the adjustment dial to select the desired grinding level (fig. 14);
Check that the burr is properly seated by pulling on the handle: if it is correctly in place, it will not move.
8.4 Replacing the burrs
When the quantity of ground coffee becomes less than expected, contact a service centre to have the burrs replaced: with the new burrs fitted, adjust the coffee mill by accessing the settings menu ("7. Settings menu") and selecting the first range of the "extra grinding adjustment" setting. Next, turn the ground coffee quantity adjustment dial (B2) to the MIN position and set the dose as for first-time use (see "The "perfect dose"").
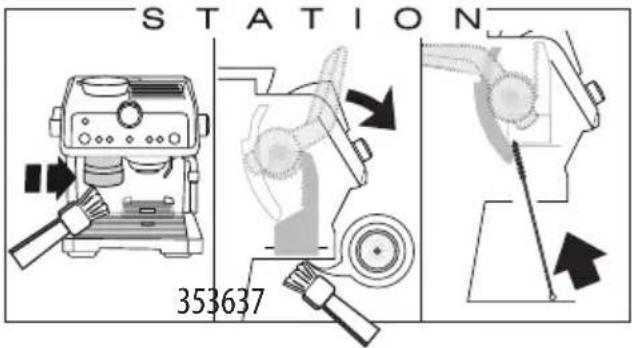
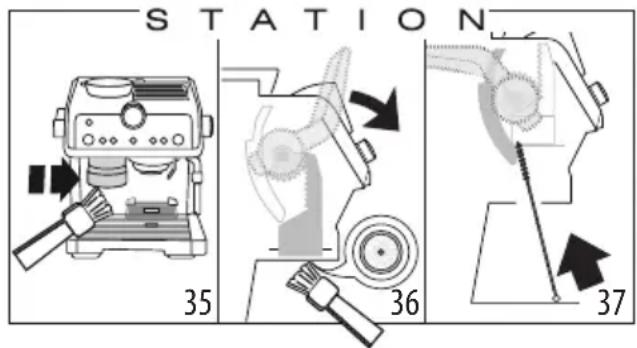
8.5 Cleaning the "Smart tamping station"
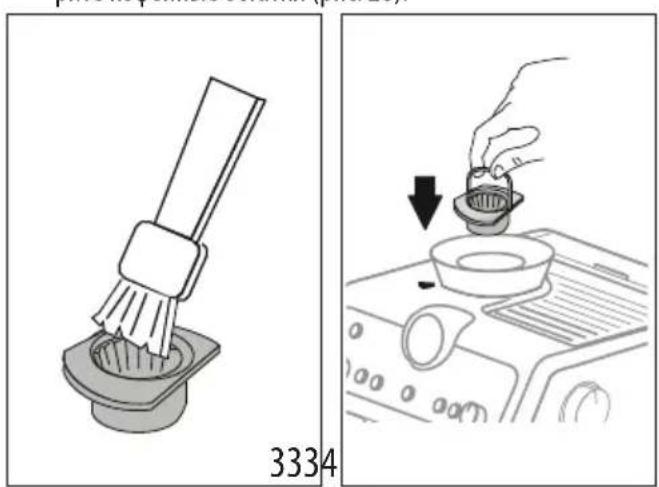
- Clean the attachment area with a brush (fig. 35).
- Pull the lever (A20) down completely and clean the tamper with a brush (fig. 36), then release the lever.
- Use the tube brush (C7) to clean the coffee funnel (fig. 37).
SmartTAMPING
9. WATER HARDNESS
The descale light (B9) comes on following a predetermined period of operation that depends on a water hardness setting. The machine can also be programmed according to the actual hardness of the local water supply, in which case descaling may be required less frequently.
- Remove the "TOTAL HARDNESS TEST" indicator paper (C4) from its pack.
- Immerse the paper completely in a glass of water for one second.
- Remove the paper from the water and shake lightly. Set the machine accordingly, as indicated in the section "7. Settings menu".
| Water Hardness Test Result Button Level | ||
| ×2 | 1 soft water | |
| = & | 2 medium water | |
| OK | 3 hard or very hard water | |
- Set the machine accordingly, as indicated in the section "7. Settings menu".
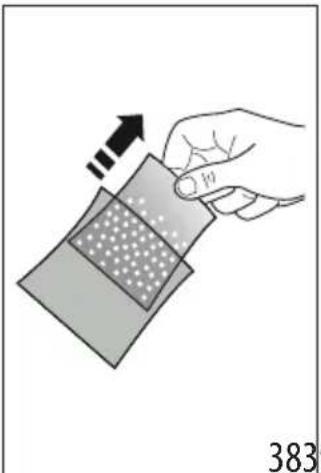
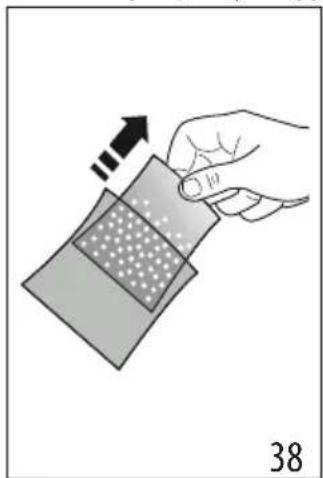
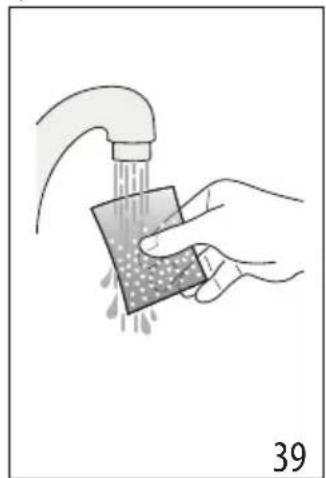
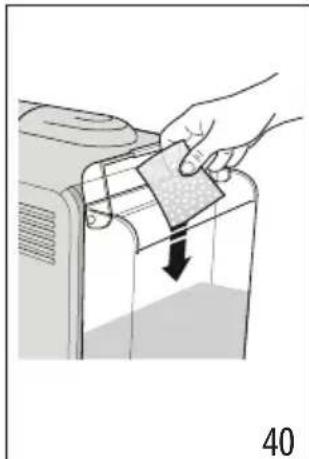
10. HOW TO USE SOFTBALLS
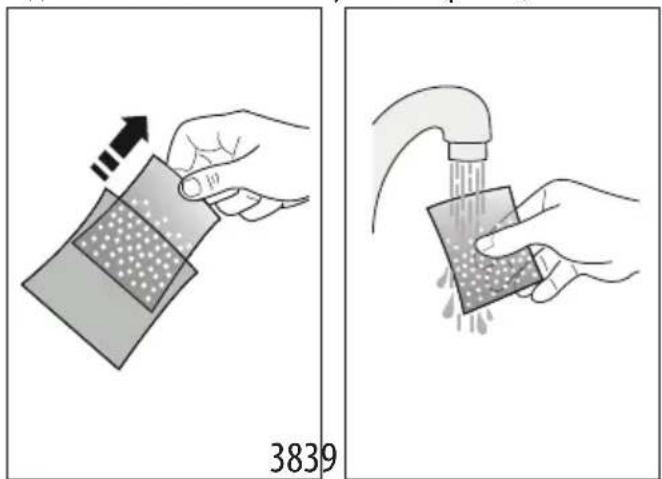
Softballs (C9) are an innovative treatment system that prolongs the life of the machine, without altering the properties of the water, while ensuring consistently creamy and aromatic coffee. To optimize the effectiveness of the treatment, leave Softballs in the water overnight before use.
- Take the sachet of Softballs from the wrapper (fig. 38).
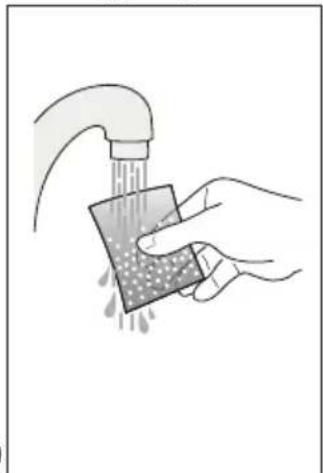
- Rinse the sachet of Softballs under running water (fig. 39).
- Immerse the sachet in the water tank (A14) (fig. 40).
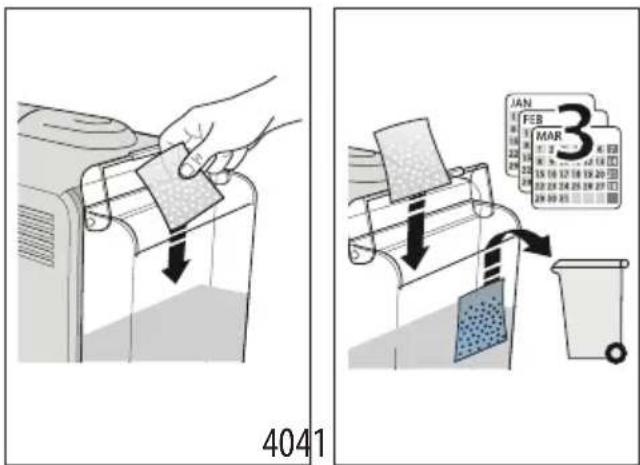
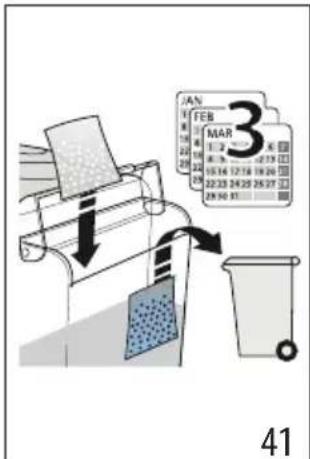
- Change the sachet of Softballs every 3 months (fig. 41).
11. DESCALING
Important!
- Before using the descaler, (C5)read the instructions and the labelling on the pack.
- Use De'Longhi descaler only. Using unsuitable descaler products and/or performing the descale procedure incorrectly could give rise to faults not covered by the manufacturer's guarantee.
- Descaler can cause damage to delicate surfaces. If the product is accidentally spilt, dry immediately.
| To descale | |
| Descaler De'Longhi descaler | |
| Container Capacity 2 litres | |
| Time ~40min | |
- (REMOVE WATER SOFTENER AND SOFTBALLS, IF PRESENT). Pour the descaler into the water tank (A14) up to the first level marked on the inside of the tank (which corresponds to the contents of one 100ml pack) (fig. 42).
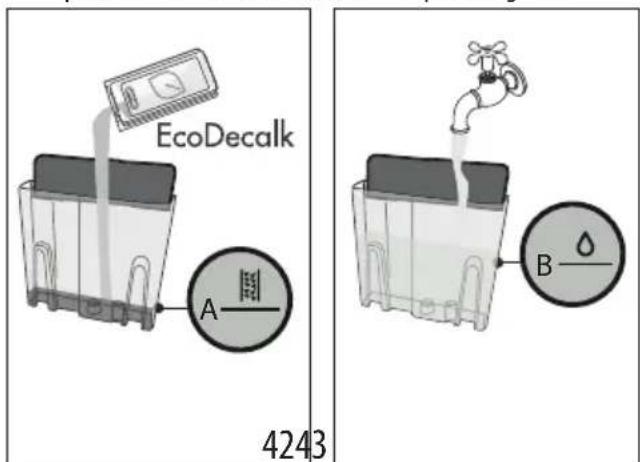
- Add water up to level B (fig. 43). Now reposition the water tank in the machine.
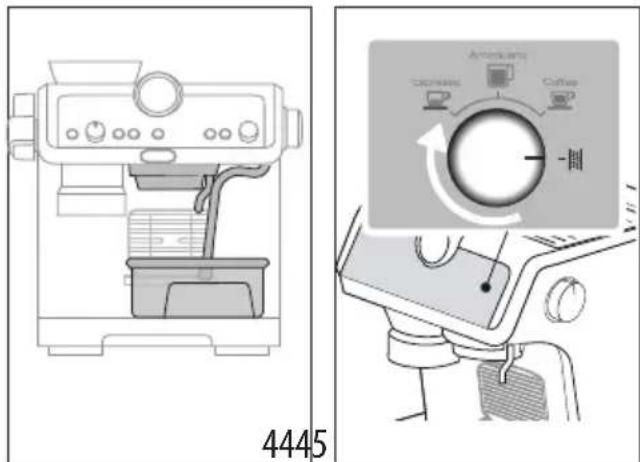
- Make sure that the filter holder (C1) is not attached. Position a container under the coffee outlet and the hot water spout, and another under the steam wand (A6) (fig. 44).
- Turn the knob (B8) to fig. 45): the OK light comes on, orange in colour and the light blinks.
- Press the OK button: the OK light blinks.
- The descending programme starts and the descaler liquid comes out of the spouts. The descale programme removes limescale deposits from inside the appliance by automatically performing a series of rinses and pauses until the tank is empty.
Descending ceases and the colour of the OK light turns to white. This means that a rinse cycle must be carried out:
- Empty the containers used to collect the descaler solution and reposition them under the spouts.
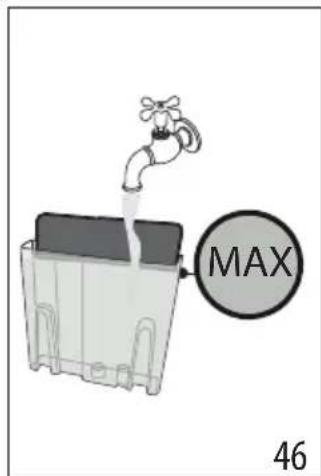
- Remove the water tank, empty out any residual descaler solution, rinse under running water and fill with fresh water up to the MAX level (fig. 46). Put the tank back in its housing.
-
Press the OK button; the rinse cycle will start.
-
Once the rinse cycle has been completed, water will stop draining out and the machine is ready for use.
- Empty the containers used to collect the rinse water.
-
Remove and empty the drip tray, then reposition it in the machine.
-
Remove the tank, fill with fresh water, and reposition in the machine.
The machine is now ready for use.
Please note:
- The descending cycle can be started up at any time (even if the relative light has not yet come on).
-
Should descending be started up by mistake, it can be stopped by pressing the OK button and holding for 10 seconds; the rinse cycle cannot be stopped.
-
EXPLANATION OF INDICATOR LIGHTS
| LIGHTS EXPLANATION OF LIGHTS OPERATION | ||
| All lights blink briefly Turning the machine on Self-diagnosis | ||
| permanently on | The machine has been turned on for the first time and the water circuit must be filled | Proceed as indicated in section “3. Setting up the appliance” |
| OK permanently on (white) ·light indicates the selected coffee temperature ·light indicates the machine is ready to deliver hot water | The machine is ready to deliver fluids | Set up the machine and proceed with preparation of the beverage |
| permanently on | Energy saving is enabled Refer to section “7. Settings menu” for instructions on disabling the function | |
| permanently on | The beans container (A2) is empty Fill the beans container | |
| blinking | The grinding function has been selected, but the beans container (A2) is empty | Fill the beans container |
| blinking momentarily at regular intervals | The dial (B2) has been set to the MAX adjustment | When the freshly ground coffee in the filter is not sufficient, select a new grinding range as indicated in section “6. Menu settings”. |
| permanently on | There is not enough water in the tank (A14) or the tank is not correctly in place | Fill the tank with water, or remove the tank and reposition it correctly |
| → | ||
| blinking | An attempt is being made to prepare a beverage, but with water tank (A14) empty | Fill the tank with water |
| Because the beans are too finely ground, the coffee is delivered too slowly or not at all | Remove the filter holder (C1) and repeat the coffee-making steps, bearing in the mind the indications given in sections "4.1 Step 1 - Grinding" and "4.2 Step 2 - Tamping" | |
| The coffee filter (C2) or (C3) is obstructed | Rinse the filters under running water | |
| The tank (A14) is not properly in place and the relative valves are not open | Press down lightly on the tank to open the valves | |
| Limescale in the water circuit Descale as described in section "11. Descaling" | ||
| permanently on | The machine is ready to deliver steam | The machine is at the right temperature to deliver steam. To deliver steam from the wand, turn the steam dial (A4) |
| blinking | The machine is switched on and energy saving is enabled. The steam dial (A4) is in the steam delivery position | The indicator light blinks to indicate that the machine is preparing to deliver steam. Delivery begins as soon as the steam circuit is up to temperature |
| The machine is ready to deliver steam The machine is at the right temperature to provide steam when the light remains permanently on | ||
| The machine is delivering steam | ||
| permanently on | The beans container is not in place Position on the beans container (A2) correctly, or check that it is correctly in place The container is correctly in place when the arrow▲ is aligned with the symbol and a "click" is heard | |
| blinking | The setting of the grinding level adjust-ment selector is incorrect, or beyond the maximum adjustment possible | Return the selector to one of the regular set-tings (between 1 and 8), remembering that:· The grinding adjustment must be made with the mill in operation· The mill should be adjusted one level at a time, and used at least 5 times be-tween one adjustment and the next |
| correct range | Correct range OUT OF | |
| permanently on | The machine calls for tamping The coffee | has just been ground and the filter holder is attached to the coffee mill |
| The filter holder has been detached from the coffee mill without tamping | Release the filter holder and proceed, tamp-ing the coffee as described in section “The “perfect dose”” “When using pre-ground coffee:” | |
| The filter holder has been released with grinding incomplete, or the tamping step has occurred too quickly | Repeat the grinding step | |
| The coffee mill funnel is clogged | Clean as described in section “8.5 Cleaning the “Smart tamping station”. If the problem persists, access the funnel by opening the relative cover and clear the blockage using the tube brush | |
| The burrs are jammed by foreign matter | Remove the foreign matter and clean the burrs as indicated in section “8.3 Cleaning the burrs”. | |
| permanently on (red) | Descaling is required Carry out descaling | as described in section "11. Descaling" |
| blinks (red) + blinks (orange) | Descaling is in progress Complete the operation | operation as described in sec-tion "11. Descaling" |
| blinks (red) + permanently on (white) | Rinsing is required | |
| → | ||
| blinks (red) + OK blinks (white) | Rinsing is in progress following completion of the descale cycle | |
| permanently on (orange) | The coffee outlet requires cleaning See section “8.1 Cleaning the coffee outlet” | |
| blinking (orange) | Cleaning of the coffee outlet is in progress | |
| All indicator lights blink General alarm Contact Customer Services | ||
13. TROUBLESHOOTING
| PROBLEM CAUSE SOLUTION | ||
| There is water in the drip tray (A10) | This water comes from the internal circuits of the machine and is a normal consequence of their operation | Empty and clean the drip tray on a reg- ular basis |
| The machine fails to produce espresso coffee | No water in the tank (A14) Fill the tank | |
| The (B6) light is on, meaning that the coffee circuit or the steam circuit is empty | Press the button associated with the (B) light to fill the circuit | |
| Blockage in the coffee filter (C2) or (C3) Rinse the filters under running water | ||
| The tank (A14)is not properly in place and the valves at the bottom are not open | Press down lightly on the tank to open the valves at the bottom | |
| Limescale in the water circuit Descale as | described in section "11. Descaling" | |
| Coffee ground too finely Remove the filter | holder (C1) and repeat the coffee-making steps, bearing in the mind the indications given in sections "4.1 Step 1 - Grinding" and "4.2 Step 2 - Tamping" | |
| The filter holder cannot be attached to the coffee outlet | The ground coffee has not been tamped or the quantity is excessive | Repeat the grinding step with different settings. Reduce the dosage quantity: check that the filter (C2) or (C3) (1 or 2 cups) and the grinding dosage are cor- rectly matched (2x button (B3) selected or otherwise) |
| The espresso coffee drips from the edges of the filter holder (C1) instead of from the holes | The filter holder is not properly attached | Attach the filter holder correctly and ro- tate firmly as far as it will go |
| The seal of the coffee outlet (A18) has lost flexibility or is dirty | Have the coffee outlet seal replaced by a Service Centre | |
| Blockage in the coffee filter (C2) or (C3) | Rinse the filters under running water | |
| → | ||
| The espresso cream is too white (delivered from the spout too fast) | The machine settings need to be reappraised | Remove the filter holder and repeat the coffee-making steps, bearing in the mind the indications given in sections “4.1 Step 1 - Grinding” and “4.2 Step 2 - Tamping” |
| The espresso cream is too dark (delivered from the spout too slowly) | The machine settings need to be reappraised | Remove the filter holder (C1) and repeat the coffee-making steps, bearing in the mind the indications given in sections “4.1 Step 1 - Grinding” and “4.2 Step 2 - Tamping” |
| On completion of the descale cycle, the machine calls for a further rinse | During the rinse cycle, the water tank has not been filled to the MAX level | Repeat the rinse cycle (see section “11. Descaling”) |
| The machine does not grind the coffee Foreign | ign matter has found its way into the coffee mill | Clean the burrs as described in section “8.3 Cleaning the burrs”, making sure you remove all the beans from the beans container (A2) before extracting it. Before putting the burr back, vacuum all residues from the housing |
| The beans container (A2) is not correctly positioned | The container is correctly in place when the arrow ▲ is aligned with the □symbol and a “click” is heard | |
| Changing to a different type of coffee All beans currently in the machine must first be removed | • Empty the beans container (A2) (operating the coffee mill without beans or removing any beans still present with a vacuum cleaner) • Attach the filter holder (C1) and operate the mill a few times without beans to free the internal duct: now attach the filter holder to the coffee mill outlet (A19) aligning it with the INSERT mark, and turn it to the right. Grinding begins when the filter holder reaches the CLOSE position, then stops automatically. Repeat until the filter is empty • Fill the container (A2) with the new variety of coffee beans • If the amount of ground coffee does not give the perfect dose, proceed to set up the machine as for first-time use | |
| After grinding, the coffee filter (C2) or (C3) is empty | The funnel of the coffee mill is clogged | Clean as described in section “8.5 Cleaning the “Smart tamping station”。If the problem persists, access the funnel by opening the relative cover (A21) and clear the blockage using the tube brush |
| After grinding, there is too much coffee in the filter | ||
| After grinding, the amount of coffee in the filter (C2) or (C3) does not give the "perfect dose" | The "Smart Tamping Station" needs cleaning | Clean as described in section “8.5 Cleaning the “Smart tamping station”, then repeat the grinding step |
| The quantity of ground coffee needs adjusting | Adjust the quantity of coffee with the dial (B2), following the instructions in section “The “perfect dose””. If the dial is already in the max. position, proceed as described in section “7. Settings menu” - “Extra grinding adjustment” | |
| Over time the burrs wear down | Have the burrs replaced as indicated in section “8.4 Replacing the burrs”. | |
4.3 Phase 3 - Distribution (brewing)
| CHISHWASHER SAFE MUNICHEAN | GEco MUNICHEAN | |||
| × | √ | √ | × | × |
| √ | × | × | √ | √ |
| × | × | × | √ | √ |
| × | × | × | √ | √ |
| → | ||||
| DISHWASHER SAFE MUNICLEAN | DEco MultiClean | ||||
| × | × | √ | √ | × | |
| × | × | × | √ | √ |
| × | √ | √ | × | × | |
| √ | × | × | √ | √ | |
| × | × | × | √ | √ | |
| × | × | × | √ | √ | |
| × | × | √ | √ | × | |
| × | × | × | √ | √ |
De barista advisert:
| × | √ | √ | × | × | |
| √ | × | × | √ | √ | |
| × | × | × | √ | √ | |
| × | × | × | √ | √ | |
| × | × | √ | √ | × | |
| × | × | × | √ | √ |
- Espresso
- Americano
- Coffee
- Descalcification
| GEco MothClean | |||||
| × | √ | √ | × | × | |
| √ | × | × | √ | √ | |
| × | × × | √ | √ | ||
| × | × × | √ | √ | ||
| → | |||||
| × | × | √ | √ | × | |
| × | × | × | √ | √ |
- Espresso
- Americano
Coffee - Descalcification
| DISH-WANSHED SAFE SALE | @Eco MultiClean | |||
| × | √ | √ | × | × |
| √ | × | × | √ | √ |
| × | × | × | √ | √ |
| × | × | × | √ | √ |
| × | × | √ | √ | × |
| × | × | × | √ | √ |
4.3 Táðio 3 - Napoxh (brewing)
- Eπλεξτη θερμοκρασia (εικ. 20) (δείτε «H θερμοκρασia για την προετοιμασia tou καφέ').
- Eméxto eimθuŋntó pôqημa (εικ. 21).
- PatnoTE OK (B5) yia va Eekivnoe i npoxn (EIK. 11) (npo-eyxuon kai eyxuon). H npoxn Tou Kape diakontetau autouata.
H 3eppuokpaia yia thy npoetoupaia tou kape
H taou vepou ElambdaeYxetai KaO' oAn Tn diapkeia tncdeltaikaia c npoetoiiaic npokieivou va eaaopaiaizetai n Ota-0epooinon tnc oTo otadio tnC ekxuianc. H Specialista Prestigio ppoapepe 3 eepoikpaiec eyxuaoc* nou avtiotoixov uEupoc 92^ kai 96^
Avaloya TnV Nklaia KAI TO TOWKOKKW, Ouviotatai
diawopetikn 0epkoopa: oI KOKoi Robusta anaitouv xaunn
0eepokpaia, evw oI KOKoi Arabica anaitouv uynn n 0eepokpa-
oia.To iio toxuei yia touc kOKKouc ME oKoUPO 0no Iyia Touc
eaepoc 0neevouc Kokouc.
| DISH-WANSHED SAFE SALE | @Eco MuhClanm | |||
| × | √ | √ | × | × |
| √ | × | × | √ | √ |
| × | × | × | √ | √ |
| × | × | × | √ | √ |
| × | × | √ | √ | × |
| × | × | × | √ | √ |
4.1 Fase 1 - Maling (grinding)
4.3 Fase 3 - Brygging (brewing)
- Velg temperatur (fig. 20) (se "Temperatur for tilberedelse av kaffe").
- Velg onsket drikk (fig. 21).
- Trykk pa OK (B5) for a starte tilberedelsen (fig. 11) (for händsbrygging og brygging). Tilberedelsen starter opp og avbrytes automatisk.
| × | √ | √ | × | × | |
| √ | × | × | √ | √ | |
| × | × | × | √ | √ | |
| × | × | × | √ | √ | |
| × | × | √ | √ | × | |
| × | × | × | √ | √ |
4.3 Fas 3 - Dispensing (brewing)
| × | √ | √ | × | × | |
| √ | × | × | √ | √ | |
| × | × | × | √ | √ | |
| × | × | × | √ | √ | |
| × | × | √ | √ | × | |
| × | × | × | √ | √ |
8.1 Rengöring av kaffedispensern
| × | √ | √ | × | × | |
| √ | × | × | √ | √ | |
| × | × × | √ | √ | ||
| × | × × | √ | √ | ||
| × | × | √ | √ | × | |
| × | × × | √ | √ |
8.5 Rengoring af "Smart tamping station"
| × | √ | √ | × | × | |
| √ | × | × | √ | √ | |
| × | × × | √ | √ | ||
| × | × × | √ | √ | ||
| × | × | √ | √ | × | |
| × | × × | √ | √ |
1.4 He BkIIOUeHHbIe npucno6beHnna IJIa OuNCTK, peKOMeHDoBaHHbIe npOn3BODHTeMe
DonoIe CBE DeHn CM. Ha caTte Delonghi.com.
Ta6netKn n ooucTkn
TemnepaTypa nnpuroToBHeHn KoFe
KoHTpoIb 3a TemnepaTyPoB BoIbIO OcyuEcTBJIeTcHa npOTJXeHIN BCero npOceCa npuROTOBNeHn, YTO6bl oBeCneHTb erO CTaBnBHOCTb Ha 3Tane kCTpaKun. La Specialista Prestigio npednaer 3 yOBnraTeMnpaTypbl 3abapKn, KOtOpBie COOTBETCTBYOT dmaNa3OHy OT 92°do 96°C.
B 3aBnCmOCTN OT Tnna N CTeNEH O6XapKn 3epe H peKOMeH dyETc NcNoIb3OBaHne pa3NIuHbIX yPOBHe TEmpePaTpybl: 3epHa pO6yctbl Tpe6yEt 60Jee Hn3Ko TEmpePaTybl, a 3epHa apa6nKn - 60Jee BbICOKo. Te Jx e Tpe6oBaHnJa DeiCTBNTbHbl n dIg 3epeh TEMHO 6XapKn IIN TOIbKO qTO 6XapEnHbIX 3epeH.
8.2 OuHCTHTe MeTo pa3MeUeHnKoHTeHepa Ira 3epeH
- Y6eHITecb, yTo KOHTeHep nIa 3epeH (A2) npT. Ipn Heo6-XOIMOCTN BblIOJIHnTe HeCKoJIbKO nCyTBIX NOMONOB nIeraero nolHOOnopoxHeHH.
- OToeHNHTe KOHTeHep nyTem ero NOBOpTa npotNB acoBOI CTpeKNu CHMnTE erO cMaunHbI (pnc.27)
- Octatkn Kofoe y6epnte nbinecocom (pnc. 28).
- BnaXho TpAnKoO uNCTte MeCTo paCNoIoxHeN KoHTeHepa DnA 3epeH N BbICyUHTe (Pc.29).
- YctaHOBnTe KOHTeHep B KoFemOnKy. KOHTeHep yCTaHOBHeN npaBnIbHo, eCNI CTpeNka ▲ BbIPOBHeHa C CmMBOJOM N CblHNTcR qEnyOK (pnc. 30).
8.3 OuInCTKa XepHOBOB
Korda BbInonHareTc Ouyntka KOtheHepa DnE 3epeh (A2),OuCTnte MeTO paCnoNooKeHna KOtheHepa N BepxHn JepHOB cNOMoUb BOIaxHoT TpIKN.ObpaauTeCb B cepBnChb n eHTP dJI CHrTHN I ZAmHebl JepHOBOB.
Moxho ChrTb KepHOB, eCNI KoFemOnka 3a6nokupoBaHa noCTOpOHnIM PpeDMToM. EcN ITO pON30uNo, CHmnte KOHeHep dIepeH N BbINONHtte CNeDuOuSe:
- 3akpenite fnoIbTpoepkataeIb (C1) n BblnoHnTe npcto nOMJ DnO CBO60KdHnKaHAp Koe.
- Bbiklounte npu6op.
- ПовернITE потив уасови стpenк ретуларпомona do уpopа в поожене «REMOVE» (pnc. 31).
4.ДocTaHbTe BepXHIOU qAcTb JekpHOBa 3a CneuaJIbHyO pyuKy (pnc.32). - OuCTHe JepHOB KnCTOouKoI (pnc. 33) n PbInecocom y6ePNTe KoFeHbIe OCTaTKn (pnc.28).
-
YCTaHOBnte JekpHOB B CBOe rHe3do (pnc. 34).
-
ПовернITE рergyларови Вьберпге Ла EMу O SteneHb nomona (pnc.14).
y6eNTecb, yTO xepHOB xopoIO nocaxHe, noTAYB erO 3a pVvky: OH XopoIO YCTAHOBnEh. eCNI He JBUNrAeTcJ.
8.4 3aMeHa XepHOBOB
ECIN KOINueCTBO MONOTORO KOFe CHOBa yMeHbShaetc, 6oPaTHTeCb B cepBnCHbI ueHTp IAn 3aMeHbI XeepHOBo. 3aTeM CHOBAOTperyInpUte KOfemOnKy Upez MeHIO HAcTpoEK (7.MeHOHACTpoEK) NytEM Bbl6opa nepBoro dmana30Ha DononHITebHoN peryInpOBKn NOMOA. 3aTeM NOBepHnTe pyKoRTky peryInpOBKn KOINueCTBa (B2) B noLoXeHne MIN n OTperyInpuyTeKOINueCTBO KAK Pn nepBOM nCNOJb30BaHN (cm. «NeaeJIbHoeKOINueCTBO).
8.5 OuNTka Smart tamping station
- OuICTnte 3OHy KpeJIeHnK KCTOcKoI (pnc. 35).
- Notaryte pbiar (A20) do ynopa n Knctoukoi oucntte npndaBnaBateJIb (pnc. 36), 3aTe OTnyCTte pbiar.
- C nomou bjo epwnka (C7) ounctnte xenno6 kope (pnc. 37).
SmartTAMPING
9. JECTKOCTb BOДbl
HnDkaTOp (B9) ydaenHa Kaunn 3aIopae Tcepe 0npdeHHbI nepoD pa60bl, npdoJXeJIbHocTb KOTopo3aBncIT OT XeCTKoCTu BObl. MoXHO 3anporpaMMIpOBA Tb np60p Ha OCHOBAHn PhAKTuYeCKo JXeCTKoCTu BObl B pa3HbIX pernohax. TaKIM o6pa3OM YBeJInuHbaeTcN HHTepBaI npOBeHnONepaunn no ydaenHIO HauNII.
- DocTaHbTe n3 ynaKOBKn HnDnKaTOpHyu NOnocKy n3 KOMnneKta noctabKn TOTAL HARDNESS TEST (C4).
2.ПОИнOCtБIO NOrpy3nTe NOIocKy B cTaKaH BoJbI Ha OdHy CEKvHv.
3.ДocTaHbTe NOnOcKy u3 BObIu OtpaXHnTe ee.HacTpoTe npi6Op,KaK yKa3aHO B rNaBe 以 7 .MeHIO HaCTpoeK
Softballs (C9) RAJIeTc HHHOBAUHHOI CNCTeMOJ, KOtOpa I npoJIeBaET cPOK CnyK6bl MaUNHbI, He BnIeT Ha KaYeCTBO BOI bIOBcNEuHbAe TPOdApy apOMaTHOrO KoFe C nbIHOH neHKo. JIy HAn6oJIbSeH 30EeKtUBHOCTN OCTaBBTe Softballs B BOJe HA BcH OCH Nepei NcNoJIb3OBAHMeM.
1.ДocTaHbTe naker Softballs u3 ynaKOBKN (pnc. 38).
- Onolochne npotochno Bdoon naket Softballs (pnc. 39).
3.Погуztte napketВбаokДлЯ Вовы(A14)(pnc.40)

- 3amehnTe naker Softballs kaxdble 3 Mecaa (pnc. 41).
11. YDAJIENHE HAKINI
BhumaHue!
- Ipeed npimehnem npouHTaTe NHCTpyKuIN n 3TNKeTky cpeCDtBa dnydaneHnaKmN (C5)Ha ynaKOBke cpeCDtBa.
- PeKOMeHdyETcA NcNoB3OBAb TOnbKO CpeCTBO Dn ydaJIeHnHaKINN KOMNaHm De'Longhi. NcNoB3ObaHne HeIIOxOJaIcx CpeCTB, a TaKxe HeperyIaRHOe ydaJeHne HaKINM MOryT Bbl3BaTb HEnCnpaBHOCTn, Ha KOToPbIe HpaCnpocTpaHraETcRApaHTn IpnON3BOdnten.
CpeCTBOIydaJIeHnHaKnnMOxET NOBpeNTb yBCTBnteIbHbIe NOBepXHOCTN.EcIN npOdyKT CnyauHo ONpOKHyT,HEMeJeHHO BbICyUHTe.
- 3cnpecco
- AmepnKaHo
Kofoe - KaKaTaH Ta3aJay
B9. "KaKaTa3aJay" WAmbl
B10. "By daibin" wambl
B11. "Дэн bɪdɪcbl XOK" WʌMbɪ
B12. "KyaT yHemdey" WAmbl
B13. "Tazanay" wambl ("8.1 Kofoe wymerin ta3anay" 6enimin kapahtb3)
B14. "Дан bIbICbl 60c" WAmbl
B15. "Cy xok" wambl
B16. "Bacy" wambl
B17. KbICbIM MaHOMeTpi
1.3 KocankbI KypaIapDbIH cHnataMaCbi -C
C1. Cy3ri yctaTkbiiu
C2. 1 Kece cy3rici
C3. 2 Kece cy3rici
C4. "KaJIbI KaTTbIbIKTbI TeKcepy" KaFa3bl
C5. KaTa3apTKbIi
C6.AbH6aIbI KyaT cbIMbl
C7. Tytik ueTkacbl
C8. KoΦe wμyMerɪn Ta3aŋay KepeK-kaPapBfI
C9. JyMcaK TyipwikTep
C10.CyTKyTbICbl
C11.By TYTirin Ta3aJay nHeci
1.4 Θндірші усынган тазалayra apHaHFaH KocbIMwa KocaIIKbI KypaIДap
KocbIMsa aknapaT any ywiH www.delonghi.com caiTbHa KipiHi3.
Ta3anay Ta6netkacbl
(8.1 Kofo wmyerin Ta3anay" 6eimn KapaHbI3)

Ta3anaFbiu
EAN KoDbI:8004399333307
2. KYPbIJIfblHbl DAHyDAY
BapnbK KocbIMwa KypaIJaapdbI XblbI cyMeH XaHe bIDbc XyfbIcYbIKTbIKNeH XybIN, MblHa apeKeTTepdi opbIHdaHbI3:
1.Дан bIDbcIH (A2) Kofoe TapTKbIwka (1-cypet) caIbIHbI3. KOpceTkici 6enriciH Typa KeIreHde XHe "cbIPT" etKeH dbl6bIC ectinreHde bIDbc OPHbHa Dypbc TyckeHi (2-cypet).
2. Tamshi Hayacbi (A10) Kece Topbi (A8) XaHe TaMshi HayacbiHbIH TopbIMeH (A9) 6ipre oPhbHa caJIbHbI3 (3-cypET);
3. Cy bIDbcIH (A14) (4-cypeT) WbIFapbIHbI3 XaHe Ta3a Cymen MAX DeHReiHeH (5-cypeT) acbIPMaTTOJTbIPbIHbI3.
4. bIbIcTbI KypblIbfIdaftbI opHbHa caIbIHbl3.
MaHb13a: KypbIFbHbI bIDbcIHda cy 60MaFaHa H bIdbcTbIH 03i 60MaFaHa eKaawah naiJaHa6aHb13.
Ecihi3e 6oIcbiH: CydbH KaTbIbIFbIH "7. NapaMeTpnep M3iPi" 6oImiHderi HycKaynapFa KyriHe OtbipIn, Te3 peTTehi3.
3. KYPbIJIfbl IAPAMETPJIePIH OPHATY
- Kyat cbIMbIHbIH JxJAFbIbIH (C6) KypblfblHbIH apTKbl JxafblHaIyJWBIKKa (A16) eHri3iHi3 (6-cypet), codah Kein H po3eTKaFa KocblbI3. KypblfblHbIH apTbIHdaFBI Heri3r I KockblITbIH (A17) 6acblfAHbIHa JxHe I KyiHe opHaTbINFaHbIH Ka3 JeTKi3H3 (7-cypet);
- bIcTBiK cy wYmeriHHa actbHa cbIbIMdblbIfbl 100 Ml 6oc bIdbcTbl (KoFe wYmeriHn (A18) XaHbHa) cypETte KepceTIirreHdeN KObIHb3 (8-cyper).
- HdNkAToP 7aMbIHbIH (9-cypeT) KaHbIHdaIbI (B6) TYmeciH 6acbIHbI3: KyIO 6actaIbI Da, aBTOMaTTbI TypDe TOKtaIDblDlcTbI 60caTbIHbI3.
KoFe XacaFbIuTbI NaIaIaN6ac 6ypbIH, KypblfblHbIH iWKi aHaJIbIM KOJaapbl WaiBInybi Kepek. MbiHa apeKeTTi opbIHdAhl3:
- Cy3rici caIbIHFaH cy3ri yCTaTKblTbI (C1) KypblfBifa 6ekiriH. Dypbc 6ekity ywiH, cy3ri YCTaTKblTbIH TYTKacBH INSERT 6eJricHe (10-cpeT) TypanaHbI3 da, TYTKaHbI OHfa Kapai CLOSE 6eJricim Hen TypanaHFaHwa 6ypaHbI3;
- Cy3ri yCTaTKbIHTbIH XaHe 6y TyTirH (A6) actbHa bIDbc KObIHb13;
- OK TsyMecin (B5) 6acbHb3: KyIO 6aCTaIaNbI (11-cypTe);
- KIO aKtaFah Ke3e, 6y Tetirin (A4) (12-cypet) 6ypan, 6y aHaIbIMbIH wao yiwH 6ipHeWe ckyHd 6y bITkbITbIN WbIFapbIHb3: eH XaKcbI HtNKe 60nybl ywH Ocbl apeketti 3 Hemece 4 pet KaTalaHb3. Byn npoueDypaHbIH MaKcaTbl - 6ydbI CYcbIH daNbIHday MaKCaTbIHda NaJaIaNHy aJDbIHda cy aHaJIbIMbIHda KaIFaH cydbI WbIFapy.
KypbIbI naIaIaNyFa daIbIH 60JaBb.
EciH3e 6oNcBbH: Kypblfbl y3ak yaKbIT 60bI naIaHaBImarH Ke3de de iWki JyHepePi WaiRan H.
KypblfblbI 6ipHwi pet naIaHaRaH KaHaFATTaHApNbIK HAtnKeHi 4-5 Kece KoFe XacaraHHaH KeiH 6epei.Cy3rideri ((C2) Hemece (C3)) TaPTbIrfaH KofeHIn MOnIsepihe epeKwe Ha3ap aydapbIHb3 ("4.1 1-Kaam - YHTaKTay" 6OJIIMHderi HycKaynapDbI KepiH3).
HemMiHci3 MOnIeep" 60nIMiHde CnnaTaNFaHdaJ XaNFactbIpblHbI3.
4. KOFE DAHyHdA
4.1 1-kaam -yHTaKTay
1.Дан bIDbcHa (A2) Kofoe dHepin caIbIHb3 (13-cypet).ДанdepiH Tek Ka3ip KOndaHbIIaTbIH MOnIsepiH fHa TaPTKaH XeH, coHda Kofoe apkaaah JAc 6oJaNbl.
2. KoΦeHi TapTy DeHrein TaHdaHbI3 (14-cypet). 3aybITbIK napaMeTp - 5 (opTawa tapTy). Erep on TbIM MaJa Hemece TbIM ipi 6oIca, DeHreNdi JKe Ke TAnFamFa XHe KOJIaHaBbIyDaFbI KoΦe TyPiHe cai petTeHi3 (peTteYdi TeK KoΦe TapTKbIw Kymblc icTei KaTKaH Ke3De fAHa opbIHdayra 6oJaNBJ).
Ecihi3e 60ncbH: Kntteren Koepenep ywiin 3
Kane 6 apabfbihdaftapTy deHreinycbihiaa.
1 Hemece 2 tapTy deHreInepi Koehi tbim ycakei, coHbIKtaH onapdbI TK 6enrini bip Koepe typnpie (a3 fHa KybipfaH) rHa naJaHaHraH
KoH
- (C2) Hemece (C3) TapTbIrfan Kohe cy3ricin cy3ri yctaftbikka (C1) (15-cypet) caIbIHbI3; erep 2 kecenik cy3ri kondaHbInbIN kAtca, 2x TyImecih (B3) 6acblbI3: 6yI coHdaiak WymekTeH aFaTbIH 3cnpecco KofeciHH Mnlweipin eki eceneHipei.
- Mønlwep DeHreinOpHaTy ywiH DeHreNkTI (B2) eH a3 KynDen 6actan Kofapbl Kapai petteHi3 (16-cypet).
Kocbimwa Hycaynapdbi "Cy3rideri TapTbIrfan Kofoe mOJIsepiH petTey" 6oImiHeN KapaHbI3.
- Cy3ri yCTaTKbIITbI KOfe TapTKbIITbIH 1bIFbc Tecirine (A19) 6ekitin, OHbl "INSERT" kazybiHa TypaHaBla3 da, OHf a Kapa 6ypaHbI3. KofoHi tapTy cy3ri yCTaTKbIIS CLOSE deHreInie XeTKeH Ke3de 6actaIbIN, ABTomATTbI TypDe TOKtaNDbI.
Cy3rideri TaptbIraH Kofoe MOnuepin petTey
Kofohi tapTKaH Ke3e, aPTyPNI Kofoe cypbInTapbi aPTyPNI HATNXeHI 6epei: coHdbIKTaH, moIwepi 6actankbida petTereHne oTe Mkynrt 60nybHb13 kepek.
ByI CypETe KybIPy TyciHe 6aIIaHbICTbl MoIwePdi peTey aDici KOpCetIirReH: Myhbl XaIIbI HycKay petIHne Ka6blIaHaH XoH, c6e6i ic Xy3iHde COHfbl petTey dAnHepePiH KypamblaHa 6aIIaHbICTbl aPTpyPi 6Olybl MymKIn.
- Mennepi eH TMeHri KyIeH 6actan petTeHi3.
- Beirini 6ip dHepin Kybipy Tycine Kapan, Dypbc DeHreNi Ta6y yuH dHreNekti akbpBn 6ypaHbI3.
4.2 2-KaJaAM-TbIFbI3day
- Kofo tapTy KaadMbIH OpbIHdA OtbipBIn, TbIFbI3day TeTirih (A20) ToJIbIFbIMeH TEmeH TycipiHi3 (Cy3rHi IyMek acTbIHdaFbI OphbIHDa KaIbIpa OtbipBIn) (17-cypet). MInc3 HATNXe any yuIN OcbI KaadMbI eki pet KaITanaHbI3.
- Cy3ri yctarbltbi (18-cypet) sbfapy ke3iHde TbIFbI3day TeTirIH TOJIbIK ToMeH 6acbln, OdaH KeIN 6actankbl KyiHe KaITapblbI3.
- Mønweepin KaXeTTi DeHreIe eKehine K03 XeTKi3e OTbIPbIn ("MmHci3 MoIwep"" 6oNIMiH KapaHbI3), cy3ri yCTaRbIUtB1 (A18) (19-cypet) KaHaTKbl WMyerIHe 6ekITiHi3.
EciH3e 60ncbH: BacydAn Kein cy3riHIN 3
KneKeTepiHde KaIHaN KoFe eW6ip KaFdaJa
KaHaTy CanacbHa HyKcH KeNTIpMeiDi, rHH,
COHfbl HAtNXKere De acep etnei.
"Mimci3 MJIwep"
Kofe cy3rinepiHH iwiHderi aHbIKtama 6eRici MInci MoIwepei 6iDipei.
Ja3ep 6enrici 6ap cy3riinep yuiH: 6enriin HXOFAPfbl Cbl3bIfbl Mihci3 MoIwepdi 6iIndipei.
Bydbip 6enrici 6ap cy3riep: 6ydbipnbI cb3bIK MHCi3 MoIepei 6iDipei.
TbIfbI3dayaH coH, KOfeHH dypbic DeHreJe eKeHHe K03 XeTKi3iH3. MInci 3 MoIwepre KOn XeTKi3y ywiH deHreNi peTTey dOHreIerIme (B2) 6ipHeWe pet pettey KaKet 6onybl MymKiH.
Erep Kofoe tinti minci3 0o3ada TbIM KOIO Hemece TbIM aWbIK 6Obln WbIKca, OHbl dHepdi MaIdanaHy Hemece ipiney etin TapTy apKbIbI peTteyre 6oJaB1 ("4.1 1-Kaam - YHTaKTay" 6oImiH KapaHbI3). ApTBIN WbIFybl TY3eTy ywiH (Kofoe TbIM 6aY WbIKca), ipiney napaMeTpdi TaHaHaI3. Kemin WbIFybl TY3eTy ywiH (Kofoe TbIM Te3 WbIKca), MaIdaJAY npaMeTpdi TaHaHaI3.
Bapncta Kehectepi: Cy3ri yCTaFbIWBH Tetik (A20) ani TEmHeT tyPfAn Ke3de TbIFbI3DaFbIHTah WbIFapbIHbI3, COHa KoFe MOnIwepi MInci 36ipKeJI K6ObnI WbIFaDbI.
TaptbinraH Kofeni naJdaJaanrHaR Ke3e:
TapTbIiFaH KofoHi cy3ri iWHe KacbIKneH Tblfbl3daHb13;
- Tetikti - KyiHe 6ypaHbI3;
cy3ri yCTarbltbl TapTKbltblH WymeriHe 6ekitihi3;
TbIfb3day TeTirih TEmHe Tyciphi3.
4.3 3-KaJaM - KaHHaTy
- TemnepaTypaHbI TaHaHbI3 (20-cypeT) ("KoFe daBbIHday TemnepaTypacbl" 6eJIIMiH KapaHbI3).
- KaIaFaH cycbIHdbI TaHaDbI3 (21-cypet).
- KaHaTyDbI 6acTay ywiH OK (B5) TyMeciH 6acbIHbI3 (11-cypet) (dEmdey XaHe aIbIH ana dEmdey). KoFe KByblNybl aBTOMaTTbl TypDe TOKtaIbI.
Kofo daibinday TemnepaTypacbi
Kofohi afb3y 6apbIcbIHda 6ykIN daHbHday npouecHH TypaKtbIbIFbH KaMTaMaCbI3 eTy ywiH cydbH Tempeatypacbi 6akblHaDbI. Specialista Prestigio KypblfbcIHda 3 demey
TeMnepaTypacbI* 6ap, onap 92 XaHe 96^ apacbIHda peTTenei.
TemnepaTpaHbIH TImDi DeHRei dH cypb6bl MeH KybIPbIy DeHReiHe 6aIIaHbICTb peTTenei: Po6ycta dAndepi ywiH TeMeHipeK, an apa6nka dAndepi ywiH Xorapbipak TemnepaTpa KaXeT. A3 KybIPbIFaH KHe KaTTbI KybIPbIFaH dHdep ywiH de TemnepaTpa OcbIaN peTTenei.
| × | √ | √ | × | × | |
| √ | × | × | √ | √ | |
| × | × | × | √ | √ | |
| × | × | × | √ | √ | |
| → | |||||
| × | × | √ | √ | × | |
| × | × | × | √ | √ |
8.5 "AkbilnbI TbIfbI3day CTaHcncbIH" Ta3anay
- Bekity aMafbIH ΜeTkamEn Ta3aHaHbI3 (35-cyper).
- TetikTi (A20) toIbIbIMeH toMeHre 6acbl, TbIFbl3daFbIWTbl 9eTKaMeH (36-cypet) Ta3aJahbI3 da, TetikTi xi6epiHj3.
- KoΦe KIyIbICbIH (37-cypeT) Ta3aJay ywiH TYtIK ⅢeTKaHbI (C7) naJaHaHbIHbI3.
SmartTAMPING
9. CY KATTblIbIfbl
KaKa Ta3aay WAMBI (B9) cy KaTTbIbIFblnapaMeTpIe 6aIIaHbICTbl anDbIH anaahbIKTaIraH KymbIC Ke3eHHeH KeiH KaHaDbI. ByI KypblrHbI ci3 TypaTBH Jepderi HaKTbI cy KaTbIbIfbHa caI 6aFapnAmalayFa da 60JaBl, coHda Kni KaKa Ta3aay KaKeT 6oMaNbbl.
-
TOTAL HARDNESS TEST KερceTkιw KaFA3bIH (C4) opamblHaH WbIfapblHbI3.
-
Kara3dbl cTaKaHdafl cyfa 6ip ceKyHka TOIbIFbIMeH 6aTbIPbIN aJIbIHbI3.
- Karaa3dbI cydAn WbIFapbIn, XaIIan cinkhi3. KypblfbiHbI "7. Napametpnep M3ipi" 6oJIIMHe KepcetirreHnei Tnicihwe opHaTbHbI3.
| Су КатТыIlbIfbl СыИнФыHbIH,НэТиЖeçi | ТуМeДeнгeǐ | |
| x2 | 1 ЖУМСаК сy | |
| = 5 | 2 opТашa сy | |
| OK | 3 КатТыI Немеce эTe КатТыI cy | |
- KypbIrfbIhbl "7. NapaMeTpnep Mə3ipi" 6eJIIMHe KepcetIJreHdE TniciHwe OPhaTbIHbI3.
10. JYMCAK TYIIPUIKTEPII IAIJALAHY OICI
KymcaK TyipwikTep (C9) dereHimi3 cydbin KacneTTepiH 03repTnei, KypblfblHbH JapaMdbIbIK Mep3IMH y3apTaTbIH XHe KOphiHi 6ipKaIbIITbI KOHO XoH NiCTi eteTIH INHOBAaIIbIK Kyue. OHeyDIn TImdInirH KaKcapTy YsiH KymcaK TyipwikTepdi KOnDaH6ac 6ypbH 6ip TyHre cyfa calbn KoBih3.
- KymcaK TyiipikTep KaTaNbIFbH opAMHaH sbIfapbHb3 (38-cpeT).
- KymcaK TyipikTep KaIraWbIFbIH aFBH cy (39-cpeT) actbHa WaaBHB13.
- KaTaNbIKTbI cy bIDbcIHHa 6aTbIPbIHbl3 (A14) (40-cyper).
- KymcaK TynipikTepe KaTaaBbIFbIH 3 aN caBH aybICtbIpbIHbI3 (41-cypet).
11. KAK TA3AJIAY
MaHbI3AbI!
Ka Ka Ta3aJafbl (C5) KOnJaH6ac 6ypbIH, Hycaynapdb JxHe KaNTama XancbipMacbIHdafl Hycaynapdb Okbin 1bIfbIHbI3.
Tek De'Longhi KaKa Ta3aJafblbH naJaHaHbIbI3. BacKa KaKa Ta3aJafblw eHIMdepNi naJaHaHy XaHe/Hemece KaKa Ta3aJay npoceDypacbH dypbc OpbHdAmay OHIM XacaywbicbHbIH KeniDiirHde KapaImaHaH akaybIKTapfa ce6n 60nybl MymKiH.
KaKaTa3aJaFbIiH3iK 6eTTepDi 3aKbIMdaybl MyMKIn. Erep 6yI eHIM 6aIKaycbI3da TOrjin KeTce, OHbl Depey KypFaTbIHbI3.
| × | √ | √ | × | × | |
| √ | × | × | √ | √ | |
| × | × × | √ | √ | ||
| × | × × | √ | √ | ||
| × | × | √ | √ | × | |
| × | × × | √ | √ |
| DISHwasher SAFE | GEco MWhClean | |||
| × | √ | √ | × | × |
| √ | × | × | √ | √ |
| × | × × | √ | √ | |
| × | × × | √ | √ | |
| × | × | √ | √ | × |
| × | × × | √ | √ |
8.1 Cisteni davykovačé kavy
| × | √ | √ | × | × | |
| √ | × | × | √ | √ | |
| × | × | × | √ | √ | |
| × | × | × | √ | √ | |
| × | × | √ | √ | × | |
| × | × | × | √ | √ |
| DISHWASHER SAFE MCHClean | ∅Eoo MoHClean |
X | ✓ | ✓ | X | X
√ |× |× |√ |√
X |X X |√ |√
X |X |√ |√
X | X | ✓ | ✓ | X
X |X |√ |√
| × | √ | √ | × | × | |
| √ | × | × | √ | √ | |
| × | × × | √ | √ | ||
| × | × × | √ | √ | ||
| × | × | √ | √ | × | |
| × | × × | √ | √ |
J 1
. TOTAL HARDNESS TEST (C4) "JAL J
2
3
4
guljol jalil 11
!
.(31JW) ''(dI|j) REMOVE"gog,Jw
4
.(32J)UJJaaasll
jll lai baleg .(33 JkW) oaiy adiaboll 5
.28Jkl) 1
:34 J5uill) 6
:14JKJJI) aagcall jabll aasjL bai all Jd
13:aaal no laa a o 10
J 1
jolal jolai JllwA
aJg dIyall jy Jd gag boll oogell aos jolssil sic
jll aabdo jno bawl :jbl lll ydaalall
(《bail cslid .7)bwll cdlael adi Jg 11
c
aae alld yds y.
8.1 ogeal
aSally
C (B13) (Jlgljllnll) 0g jgall gog ylooc
aaglll aLac cJy.oggall dJzra 0g yrrgrll no
Jcloglall no Jzal .oggal lclslslo 0g jrl .
. www.Delonghi.com ngjly gogall 0juy
(C2)1 1 1.25
g( C8) ( a,b,c) ( ab,| b| x) 2. dalc
Jolj
J 3 (26 J
.(A18)gagall Ssw Ejogai Jol>Jogii .4
- 1
.已(A10)
gall (B6) 2011 all jie baiy 3 yaiw 6
aill aac ggs, gds day. (B13)
.
.
Jglo jglj cui jwajl g wajl Jolj 8
Je baxally abw adac 3 Jui w jyoll Jol Jld Jd .9
S_ OBC = 12 · CO · BC = 12 × CD × 5
.1ybalgaaagfo> gaggallj1q
a1^2 = a2^2 + a_3^2
10 10
| 1الطام←x2 | Espresso | الصبادف الطام |
| 2الطام←== | ||
| العربية←x2 | Americano | العربية |
| العربية←== | ||
| العربية/العربية←OK | ||
| العربية9←x2 | Coffee | العربية العربية العربية |
| العربية1,5←== | ||
| العربية3←OK | ||
| :الصبادف合影視 | ||
| العربية←== | العربية العربية العربية | العربية العربية العربية |
| العربية←== | ||
| العربية↓↓↓↓↓↓↓↓↓↓↓↓↓↓↓↓↓↓↓↓↓↓↓↓↓↓↓↓↓↓↓↓↓↓↓↓↓↓↓↓↓↓↓↓↓↓↓↓↓↓↓↓↓↓↓↓↓↓↓↓↓↓↓↓↓↓↓↓↓↓↓↓↓↓↓↓↓↓↓↓↓↓↓↓↓↓↓↓↓↓↓↓↓↓↓↓↓↓↓↓↑↑↑↑↑↑↑↑↑↑↑↑↑↑↑↑↑↑↑↑↑↑↑↑↑↑↑↑↑↑↑↑↑↑↑↑↑↑↑↑↑↑↑↑↑↑↑↑↑↑↑↑↑↑↑↑↑↑↑↑↑↑↑↑↑↑↑↑↑↑↑↑↑↑↑↑↑↑↑↑↑↑↑↑↑↑↑↑↑↑↑↑↑↑↑↑↑↑↑↑ | ||
| ON/Standby ↓↓↓↓↓↓↓↓↓↓↓↓↓↓↓↓↓↓↓↓↓↓↓↓↓↓↓↓↓↓↓↓↓↓↓↓↓↓↓↓↓↓↓↓↓↓↓↓↓↓↓↓↓↓↓↓↓↓↓↓↓↓↓↓↓↓↓↓↓↓↓↓↓↓↓↓↓↓↓↓↓↓↓↓↓↓↓↓↓↓↓↓↓↓↓↓↓↓↓↓ | ||
| (B1) | ||
jglj1 1
!
o'clabio gl lbuio Jaaaiu y aiSlll aibiu
10 > 5 > 1
jll jall j 1 aal lal y
a.sll 3 a.sss
3EgwiJcUjji gll pluWwIy oic jxl aW
abw alosololl di sllolus
10 : 12 = 1 : 2
jgl:cll 1y aI aI y aI bI I JgJ gJgJgJgJgJgJgJgJgJgJgJgJgJgJgJgJgJgJgJgJgJgJgJgJgJgJgJgJgJgJgJgJgJgJgJgJgJgJgJgJgJgJgJgJgJgJgJgJgJgJgJ
S_ OBC = 12 · OB · BC = 12 × 5
JU 5
y:gsall lio sww waw wai jj gso wu
OK bdojdiyblol aoll lglgll
jol jol jol jol bce 6 . no
my
j j jcb bcdgolglb> ooc a clll
| - | = | + |
f( x) = - ( 2x + 1) ( ax + 5) x + 3x + 6-4x
BAC = A^ C = 12
. gaball o gfall
J (A6) Jl lIg U g o uu u u u u u u u u u u u u u u u u u u u u u u u u u u u u u u u u u u u u u u u u u u u u u u u u u u u u uu uuuuuuuuuuuuuuuuuuuuuuuuuuuuuuuuuuuuuuuuuuuuuuuuuuuuuuuuuuuuuuuuuuuuuuuuuuuuuuuuuuuuuuuuuuuuuuuuuuuuuuuuuuuuuuuuuuuuuuuuuuuuuuuuuuuuuuuuuuuuuuuuuuuuuuuuuuuuuuUUUUUUUUUUUUUUUUUUUUUUUUUUUUUUUUUUUUUUUUUUUUUUUUUUUUUUUUUUUUUUUUUUUUUUUUUUUUUUUUUUUUUUUUUUUUUUUUUUUUUUUUUUUUUUUUUUUUUUUUUUUUUUUUUUUUUUUUUUUUUUUUUUUUUUUUUUUUUUUUUUUUUUUUUUUUUUUUUUUUUUUUUUUUUUUUUUUUUUUU
.
:Jy Juy Jdy Joc
jibl lal ola JassaiJia jilbl
IaJcua, aJUaJI JgauuU
Jk. a 10000000000000000000000000000000000000000000000000000
.
:JgJgEggo
JlIbIgJyJyJyJyJyJyJyJyJyJyJyJyJyJyJyJyJyJyJyJyJyJyJyJyJyJyJyJyJyJyJyJyJyJyJyJyJyJyJyJyJyJyJyJyJyJyJyJyJyJyJ y J.1
aac aabaaac aac aag .23 Jkll) jao aolauo aolauo
aigblall aolblll jao ail :Eco MultiClean olauauo uus
aabai aolauuoi jao gdl lgl 00000000000000000000000000000000000000000000000000000000
.(12Jkll)Igjgsjg jgjg jg jg jg jg jg jg jg jg jg jg jg jg jg jg jg jg jg jg jg jg jg jg jg jg jg jg jg jg jg jg jg jg jg jg jg jg jg jg jg jg jg jg jg jg jg jg jg jg jg jg
(B7) my jjIy oogai I aygus Jgb aaa .6
| ( (: ) Scuro | ( (: ) MIN | |
| Medio-scuro ( (: ) | ( bpw ) MED | |
| Chiaro - scuro ( (: ) | ( (: ) MAX |
aJrJrJrJrJrJrJrJrJrJrJrJrJrJrJrJrJrJrJrJrJrJrJrJrJrJrJrJrJrJrJrJrJrJrJrJrJrJrJrJrJrJrJrJrJrJrJrJrJrJrJ
Uul Ugua 5
5.1
(C10)gjglgj/laalalaaa 1
aalac ael alia aaggall gge jy 1
.aaas agolal ydlalwbln baoaalac ccllgl
aalsbnaas sJg> tslalwrjy Js asygsogll lss
aalablaaas:aaanll nglleasdaalrll oag
.oggall gge gale gai 1
.2
.
(tamping) 2
(A20)bIJIJ1
oJrS.(17KJ)Jol
. 2
.(18JC)Jol
3
(19JCJl)(A18)gJgJgJgJgJgJgJgJgJgJgJgJgJgJgJgJgJgJgJgJgJgJgJgJgJgJgJgJgJgJgJgJgJgJgJgJgJgJgJgJgJgJgJgJgJgJgJgJgJgJg
"aaalaaa
aillll acjglg: juUy oiaolal aolll cldl cai yall 100
00 aull acjglg: ojjll aolll cldl cai yall 100
00 jll bcll
Joo yduo cdole pblj gogall cdoyo s00
00 aouu uul dol gogil yduo ayauu uu duu yduo
aouu uul dol gogil yduo ayauu uuu duu yduo
00 gogail auu uuu duo yduo ayauu uuu duu
00. bduu aLac uugboll gogall n no oo
00 Lgogll jno jB (B2) ouall buo sgrall no zu
aull aasll
5 1(A6).62.jg11.7 .0g(
JgJusll:JjIy 3 aJ100000000000000000000000000000000000000000000000000000000000000000000000000000000000000000000000000
4.
4.1 (grindin
. (13 JsJ) (A2) 1cgl 1y> ysw .b0s ysw;
.
: jb.
- ( a + b) ( a^2 - ab + b^2) = a^3 + b^3 .
aag a uuul uus no bll aas nss al 1. (bug
all jy y) oag all gig agg jn bll sg
bail lac e jy) oogall egig gag g jn bll sg
.(jll abo Jac
aag jll abd 6 g3 jy jn bll ag y dgi:1
Jal dt jt olw duaj jy
(202 1 1 202 10
.((Aull)
g(C3)gl(C2)ogall cawo Jd .C1)
jll bcbl jnil jol wol al lI .15 kJl)
gswll aaclw jls JkLs no ogai :X2 (B3
.aykwall
jdl dlal ayog no f B2) ayssll dydd tao bup 4 .Jkwall
.16
Jgall yall jn gaball jll ayksbwl Ojgy
.aylaill cloglall no do jle
Jll aia bgsj yol Jol Ctsi y .5yjb nc (A
11. ta. () INSERT aLsl
oo gng CLOSE "glc" gogll ll yogll Jy laic nba bll lac
C- aL
jolb w5 C1.2
1
jia 2 2x3
(olJg)《Total Hardness Test》jLJIJIbC
C5.
xuiyjia jiu jie C6.
C7
ogaiygaiaibii 20 C8.
Softbad
C10.
jglj
jlaaabuJy aolJI aauuJU 1.4
aaii 45
.Delonghi.com 0jy jg JgJogssall no yjoc
#
(goll 8.1)jbl)
abio
8004399333307:
EcoMultiClean
aill
:dlwlglgbslg jai gblb lbiog jil elay clllglg
Jssj.1 (1 JkA) jI aAa 3 (A2) wAeI eeg Jdsj .1
gag JyJ 10
.(J)
Jolal Jao aSoo go adols (A10) 1yball gao jss 2
:(3JwA1) (A9) wA1 AwA (A8)
go aig ay lq ao 4 (4 Jwll) (A14) oll jj jj.3
.5Jswj)MAXaIuSJIgJooJeol
4
1
cll 111 111 111 111 111 111
a aallll lalss s 7n 8 jg g d aayy haoog ao
yJ>J Jss
(A16) d yaaal gagall (C6) aJzJL8 Jogo JdJ .1
(8Kw1)J0100jc daw Jaa
ogai 1:9j(8)
aaglglgaly aalabi g
aasll aall jgall abw yjdl asll alaaol g dll
:dlwlglbllgj
Jol: aJSLa (C1) 2jog Jg jol Jolo g Cw .4
Jb 85 010 0100
jai jai jai jai (10 Jai) "INSERT" jai go
:"CLOSE" golgolol
Jlalil 1j
1.
1.1 A -jle=j
A1
A2.
jolol A3.ogell
A4. x,y
s A5
A6. 1,2,3 , 4,5,6
A7. g
A^2B^2 + AB^2 = - 4AB^2
A9.
A10.
CjIboll gaozi jogdall sgunu JuaA11.
A12.
cllll jj cjjwA
GdA14.
cll aai zjw0 2A150.
JSSU JSSU JSSU A16.
("ON/OFF" glaJlJg) gablaA17
gai 15w gA18.
(Tamping statjohio A19.