ATART1000 - Turntable AUDIO TECHNICA - Free user manual and instructions
Find the device manual for free ATART1000 AUDIO TECHNICA in PDF.
User questions about ATART1000 AUDIO TECHNICA
0 question about this device. Answer the ones you know or ask your own.
Ask a new question about this device
Download the instructions for your Turntable in PDF format for free! Find your manual ATART1000 - AUDIO TECHNICA and take your electronic device back in hand. On this page are published all the documents necessary for the use of your device. ATART1000 by AUDIO TECHNICA.
USER MANUAL ATART1000 AUDIO TECHNICA
ToJIOBka cTepeo-3ByKocHMaTeJIa MC-TnIa c npraMoI nepeJaee KoJe6aHH HrJIbHa KaTuHKn
DaiIeRtPAsWuSTeReoMCKaTREi
直驱动力式立体声动圈唱头
直接動力式MC型立體聲唱頭
取拔説明書
User Manual
Thank you for purchasing this Audio-Technicals product.
Before using the product, read through this user manual to ensure that you will use the product correctly. Please keep this manual, along with the warranty, for future reference.
Features
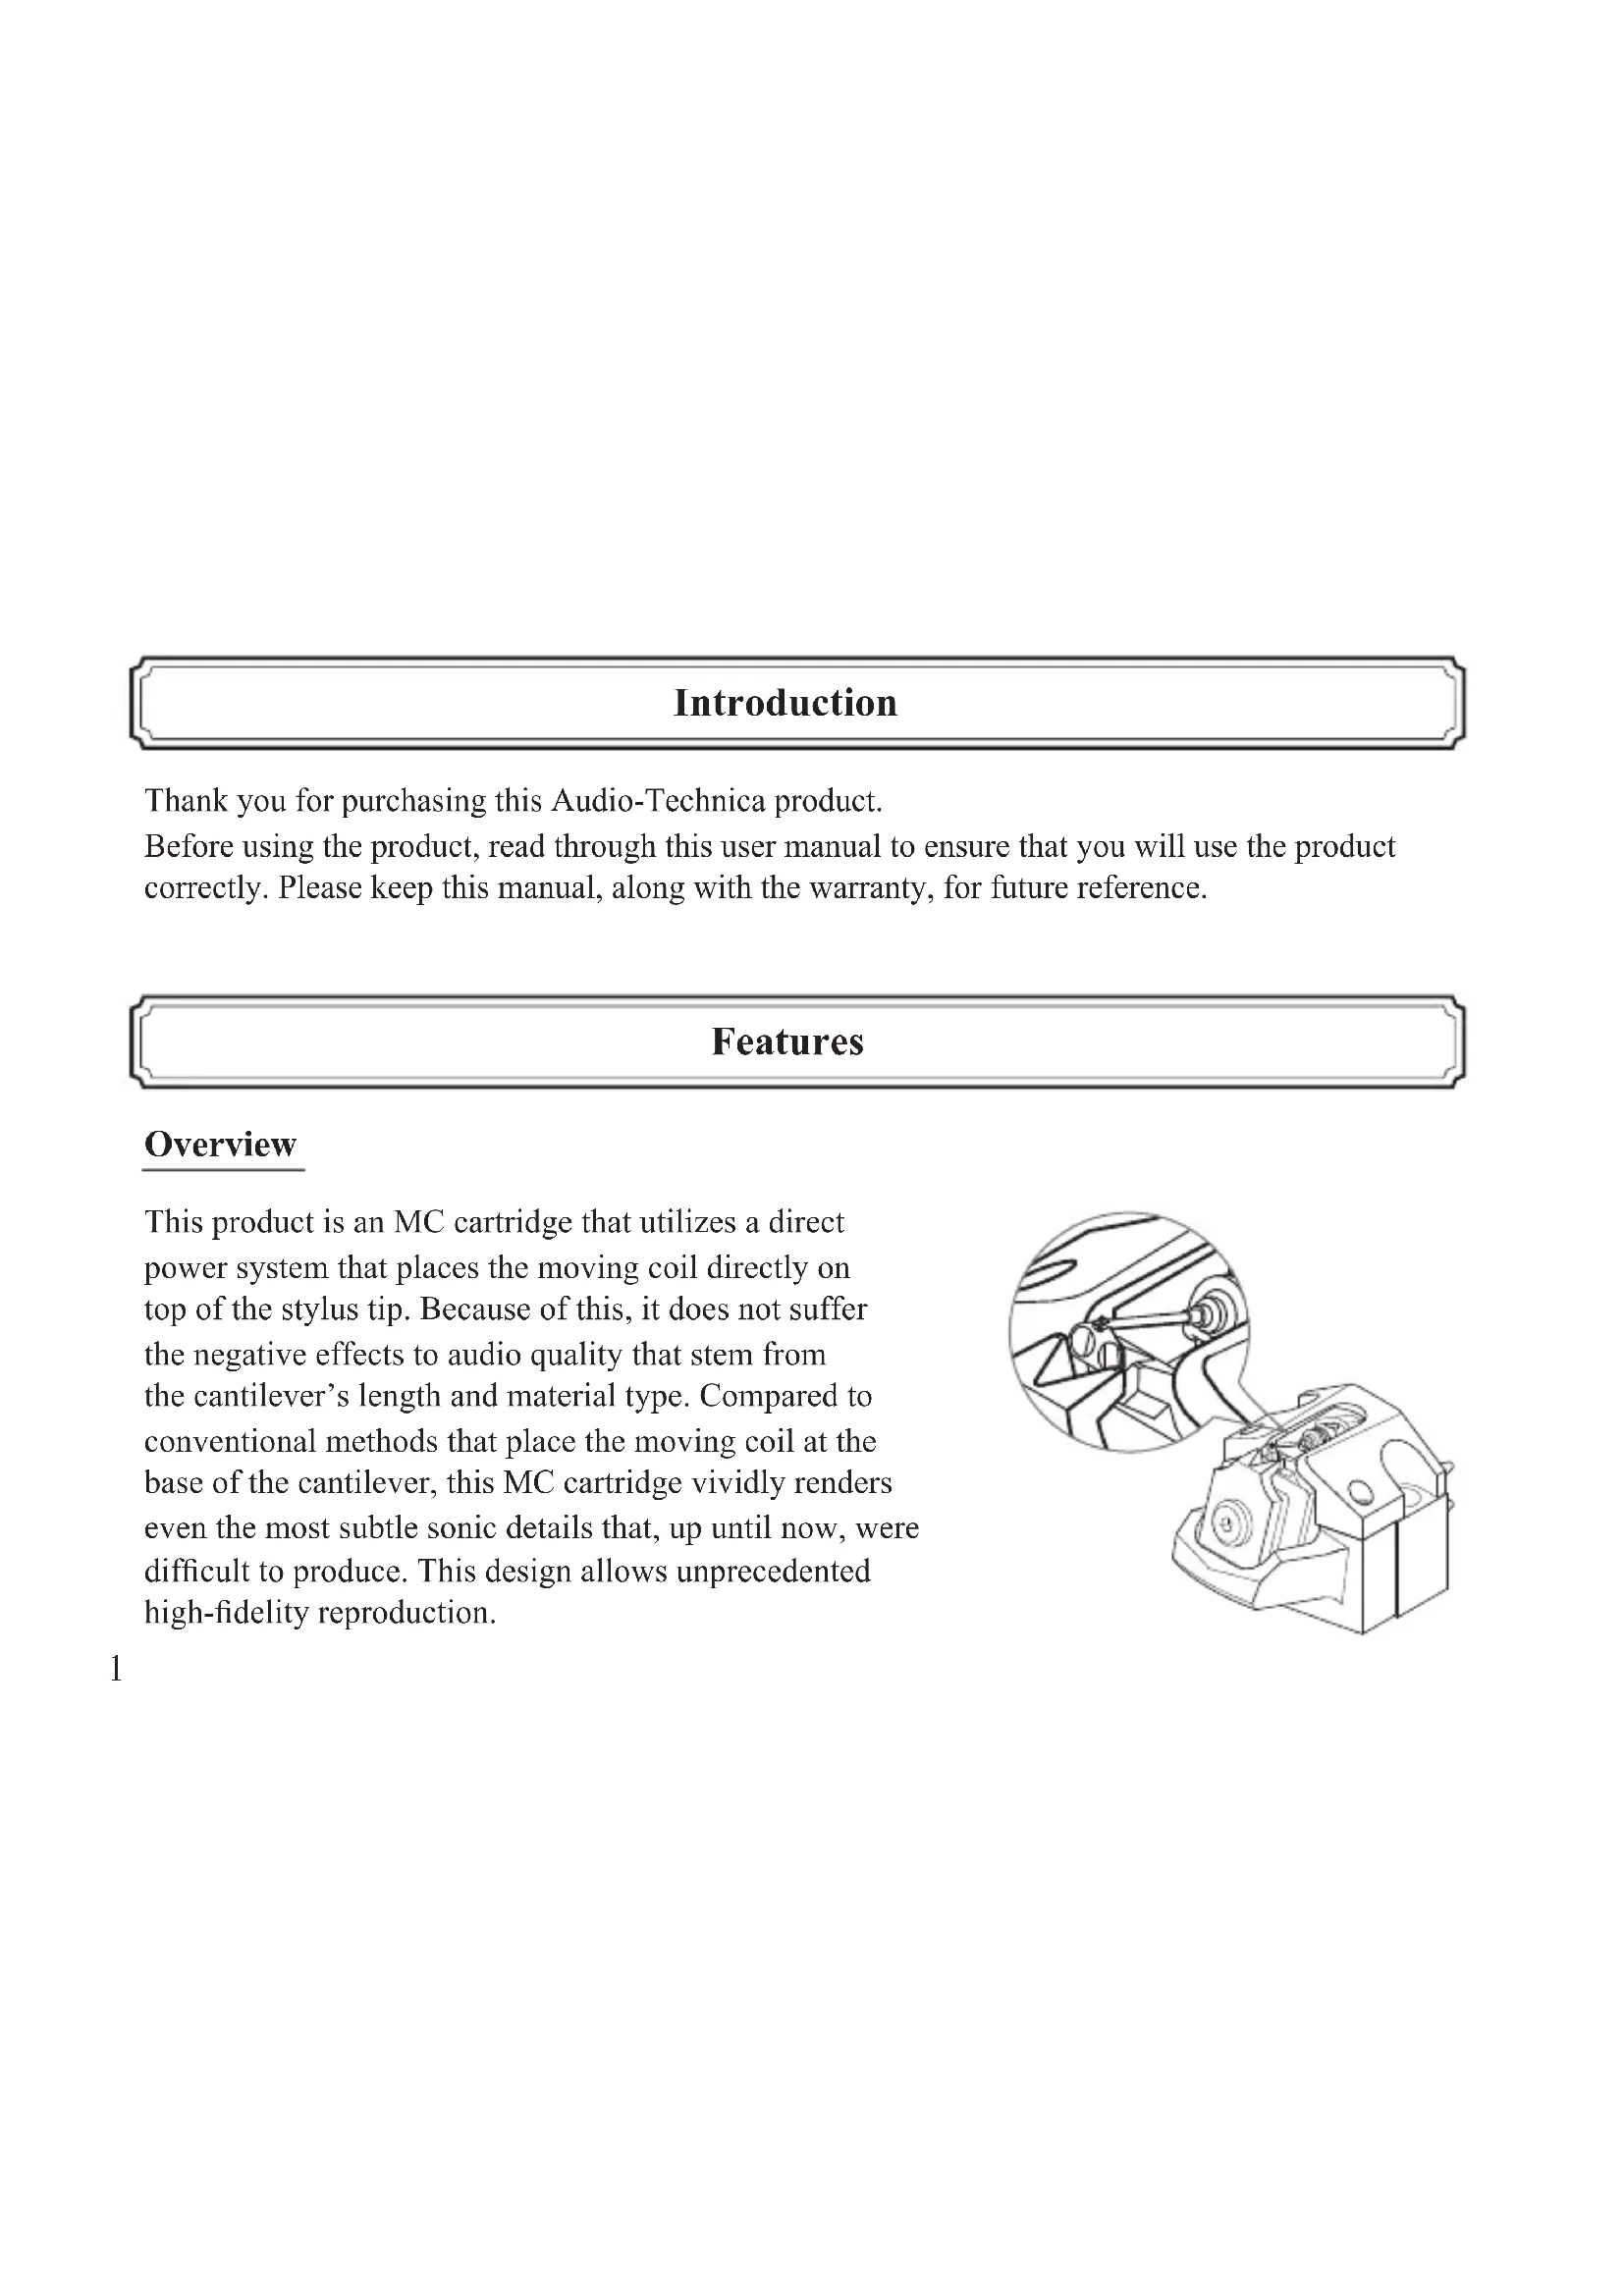
Overview
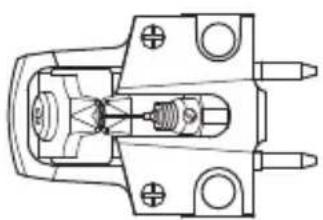
This product is an MC cartridge that utilizes a direct power system that places the moving coil directly on top of the stylus tip. Because of this, it does not suffer the negative effects to audio quality that stem from the cantilever's length and material type. Compared to conventional methods that place the moving coil at the base of the cantilever, this MC cartridge vividly renders even the most subtle sonic details that, up until now, were difficult to produce. This design allows unprecedented high-fidelity reproduction.
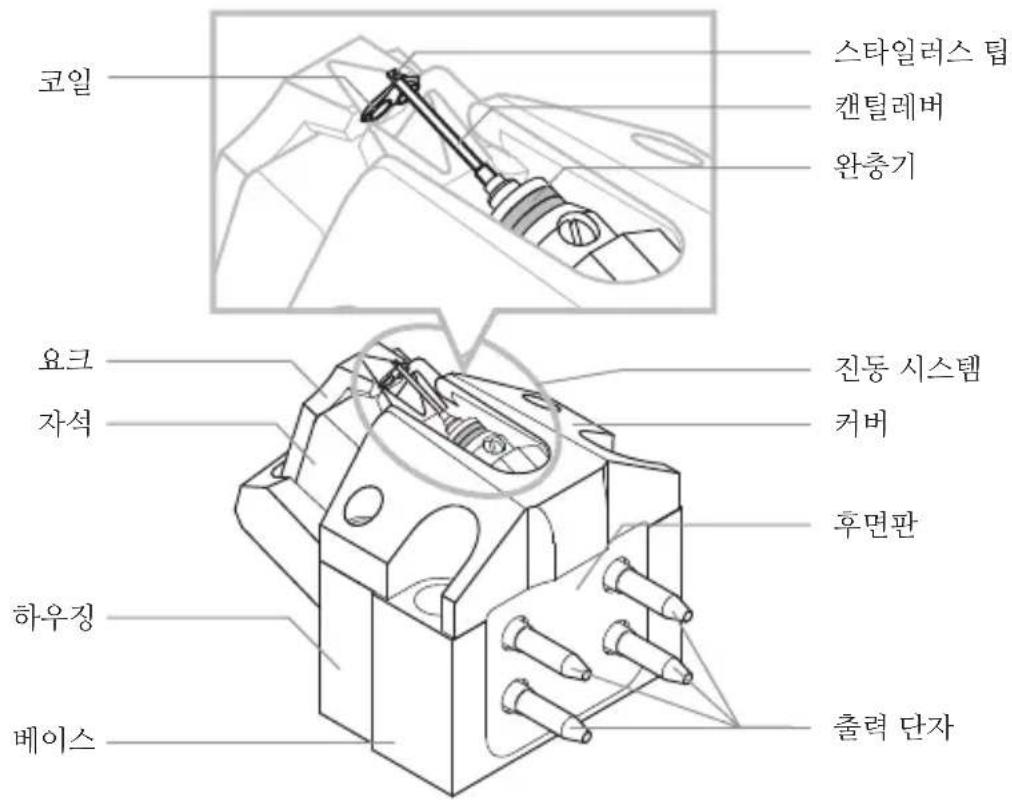
Design details Body
The coil material used is a 20 m diameter PCOCC wire, wound eight turns to a diameter of 0.9mm to create a non-magnetic core coil. This is layered with an ultrathin, 25~ special film. Despite being a nonmagnetic core type, an output voltage of 0.2mV with a coil impedance of 3 ohms is obtained by placing the coil in the minute 0.6mm gap of a powerful magnetic circuit. Integrating specifications that leverage the unique features of non-magnetic core type coils and specially designed magnetic circuits creates a three-dimensional sound field with dynamic audio quality and natural clarity.
The base that supports the specialized magnetic circuit and vibration system is made from titanium. The sturdy base is instrumental in providing consistently even playback.
It also works in combination with the cartridge's hard plastic cover and aluminum housing to disperse resonance that negatively affects the sound quality.
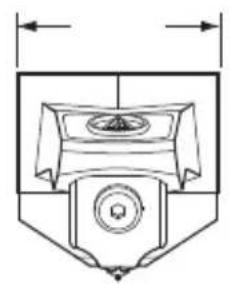
Special line contact stylus and 0.26mm diameter solid boron cantilever
The stylus tip is a 1.6 × 0.3 mil special line contact stylus type embedded in a 0.26 ~mm diameter solid boron cantilever, which allows music signals read by the stylus tip to be accurately transmitted to the moving coil.
Package contents
Before using the product, please make sure that you have all the included items. If some items are missing or damaged, contact your local Audio-Technica dealer.
- Cartridge
Brush
-
Case (wooden box) - PCOCC lead wire set
-
Non-magnetic screwdriver - User manual (this manual)
-
Washer × 2 - Important notification
-
Protector
Warranty
-
Nut × 2 -Tracking force information
-
Cartridge installation screws (12mm× 2,18mm× 2)

- Accessories for the product are packaged together in the box. Open them as indicated by the arrows in the box.
Safety precautions
- Keep the plastic bag provided with the product out of the reach of small children and away from open flames to avoid accidents or fire.
- Keep the product out of the reach of small children to avoid accidents or malfunction.
- Do not put the product in a location where it is exposed to direct sunlight, near heating devices, or in places with high temperatures, high humidity, or high concentrations of dust to avoid malfunction.
- Do not touch the product's vibration system to avoid malfunction.
- Do not attempt to disassemble or modify the product to avoid malfunction.
- Do not subject the product to strong impacts to avoid malfunction.
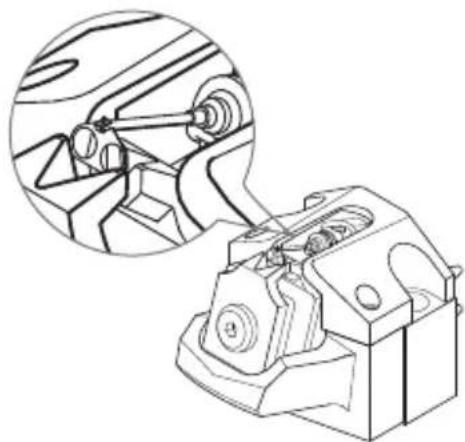
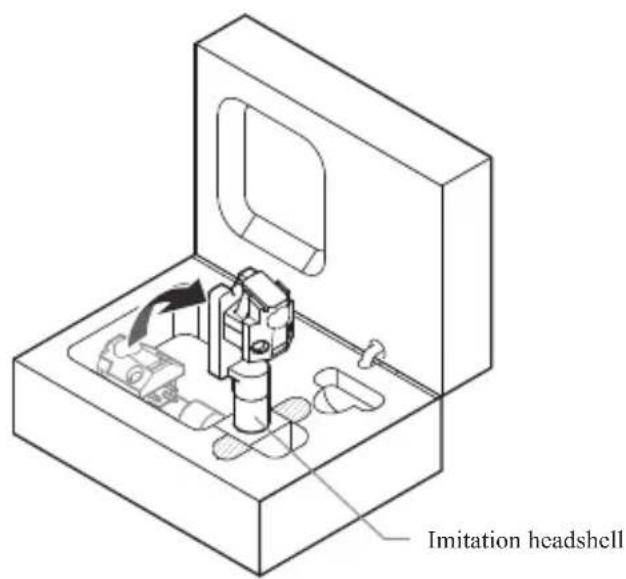
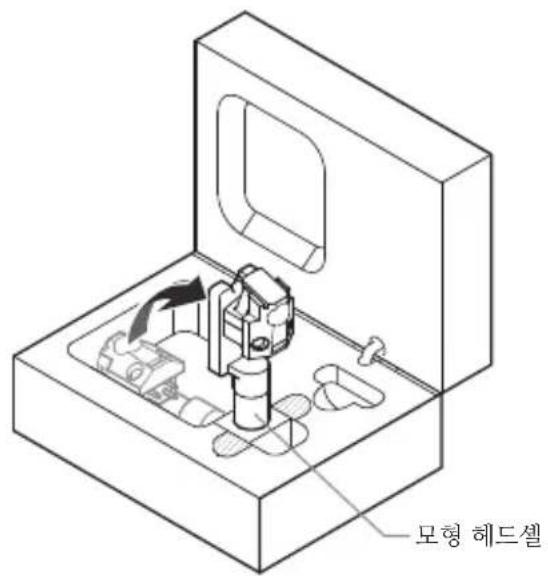
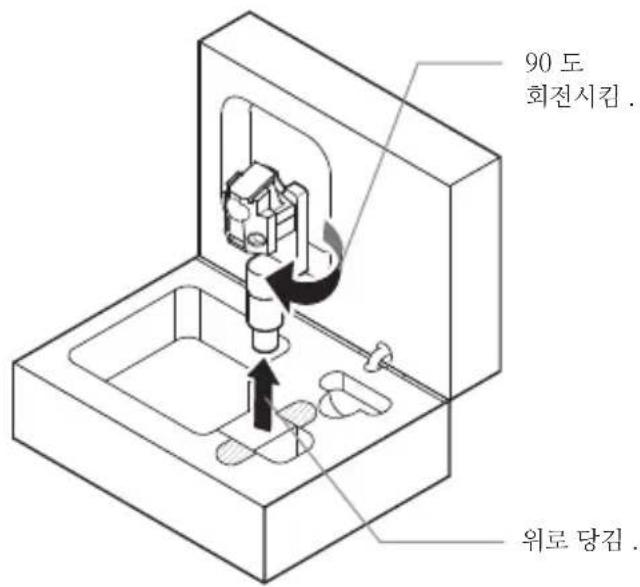
How to remove the product from the case

Raise the product and imitation headshell so that the product is pointed upward.

Rotate the imitation headshell 90 degrees and pull it upward.

3 Using the non-magnetic screwdriver provided, remove the product from the imitation headshell.
- When doing this, be extremely careful not to damage the vibration system of the product.

- The product can be stored in the case with an Audio-Technica headshell mounted.

- The case for the product is made of wood, so be careful not to store it in the following environments to avoid deformation, discoloration, or other damages: -Hot and humid -Exposed to UV rays (sunlight and fluorescent lights)
Name of each part
Become familiar with each part before using the product.

How to remove/mount the protector
The protector is mounted at the time of purchase.
How to remove
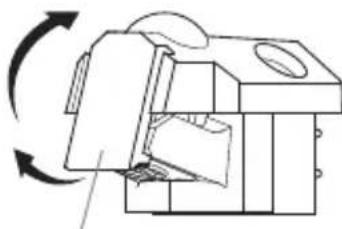
Tip of the protector

Place your finger on the tip of the protector and push upward.
How to mount

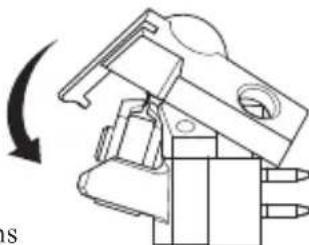
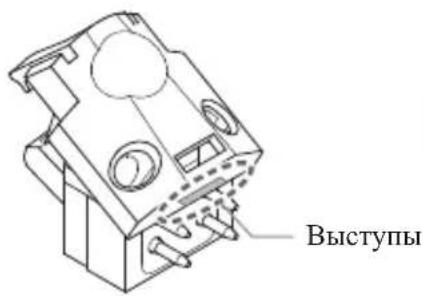
Protrusions

Align the protrusion on the product with the protrusion on the back of the protector.

Press the tip of the protector until it clicks.

- Make sure to mount the protector when storing the product in the case.
How to use
The product is extremely delicate. Handle it with sufficient care.

Mount the product onto your headshell.
- Mount the cartridge with the protector on to avoid damaging the vibration system.
- Temporarily tighten the screws.
- A headshell is unnecessary when attaching the product to an integrated tone arm. Attach it directly to the tone arm.

Connect the lead tips, noting output polarity.
- Connect headshell lead tips to the product output terminals of the same color. If a lead tip is loose, flatten it out slightly and reconnect it to the output terminal.
- Never apply heat (from solder, etc.) to the output terminals.


Remove the protector from the product.
- For details, refer to "How to remove/ mount the protector" on p. 8.

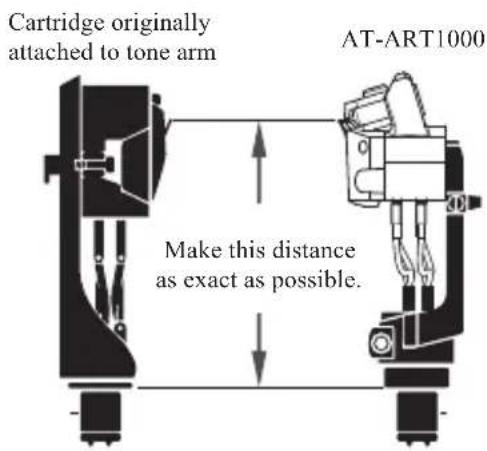
Determine the correct position for installing the product (adjust overhang).
- Adjust overhang following the instructions in the tone arm's or phonograph's user manual. If you are unsure, align the stylus tip to the cartridge originally attached to the tone arm (as shown in the figure).
- An excessively large gap will impair audio quality, so align within 1mm , if possible.

Finish tightening screws, making sure there is a balance between left and right.
6 Adjust tracking force.
- Due to the construction of the product, each unit varies in standard tracking force. If the proper tracking force is not used, the coil will not properly position itself with the magnetic circuit, and thereby degrade output voltage and channel separation. Always make sure to adjust to the proper tracking force before using.
- Confirm the tracking force for the product in the separate form "Tracking force information."
7 Adjust arm height.
- Adjust the height so that the bottom surface of the headshell and the record surface are parallel, as seen from the side. An improper arm height may cause the body of the product to make contact with the record and could impair audio quality or damage the record.
- Depending on the tone arm/turntable being used, you may not be able to adjust arm height.
Adjust anti-skating.
- If the anti-skating of the tone arm is not properly adjusted, the channel balance will be degraded. Follow the instructions in the arm's or phonograph's user manual and be sure to make the proper adjustments for the product.

- You need a transformer, head amplifier, or standalone phono equalizer to connect to a preamplifier/amplifier. If the preamplifier/amplifier has a phono input (MC position), it may be used as it is. However to fully take advantage of this product's audio quality, using a step-up transformer (sold separately), head amplifier (sold separately), or phono equalizer (sold separately) is recommended. For connection instructions, refer to the user manual of the equipment you are connecting.
Care
To properly care for the product, observe the following precautions.
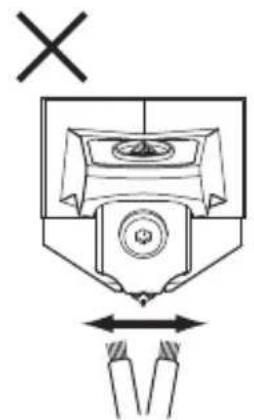
- Keep the stylus tip clean at all times.
- Use the brush provided to remove dirt and dust on the stylus tip. Do not use anything except the brush provided. If you use a commercially available brush with long bristles, you may scratch the coil or leader line, causing damage.
- A stylus cleaner (sold separately) is recommended to remove stubborn dirt.
- Before using the product, cleaning the record with a record cleaner (sold separately) is recommended.
- When the product is removed from the arm, do not forget to attach the protector and store the product away from the amplifier and other heat sources and magnetic materials.
- Store the product in a cool and dry area to avoid high temperature and high humidity.
- A brush is included in the case. When not in use, store the brush in the case.
Cleaning the stylus tip
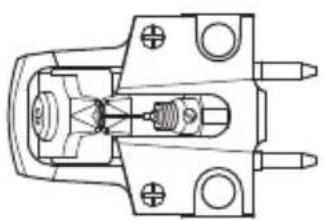
Cross section of the product
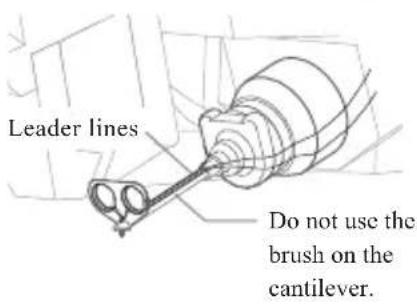

Make sure not to use the brush on the cantilever. The leader lines to the coils run along the surface of the cantilever and may be severed by the brush.
Always move the brush in the direction in which the record rotates.

When using a cleaning solution (sold separately) that contains alcohol compounds, apply a small amount of the solution to the brush and clean only the stylus tip.
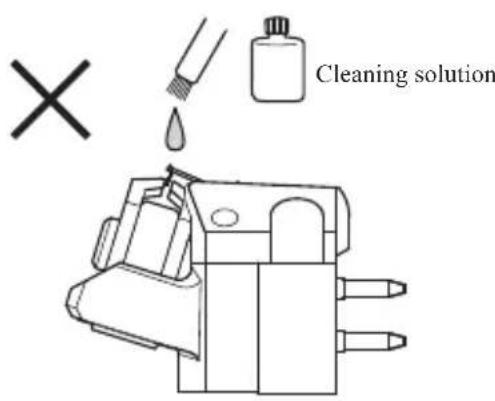
Do not clean with the stylus tip turned upward. If the cleaning solution accidentally drips and comes into contact with the coils, it may cause damage.
Cartridge rebuild program
To protect against damage to the cantilever and wear to the stylus tip of this product, we offer a paid service for Cartridge Rebuild Program.
This program provides the replacement of the whole assembly including stylus tip, cantilever, coils, and rubber dampers. For complete details about this program, please visit the program's website at http://www.audio-technica.com/art1000/
or contact your local Audio-Technica Service Center.
Please be aware that this program may be discontinued without prior notice, depending on the availability of spare parts or the amount of time that has passed since the product has been discontinued.
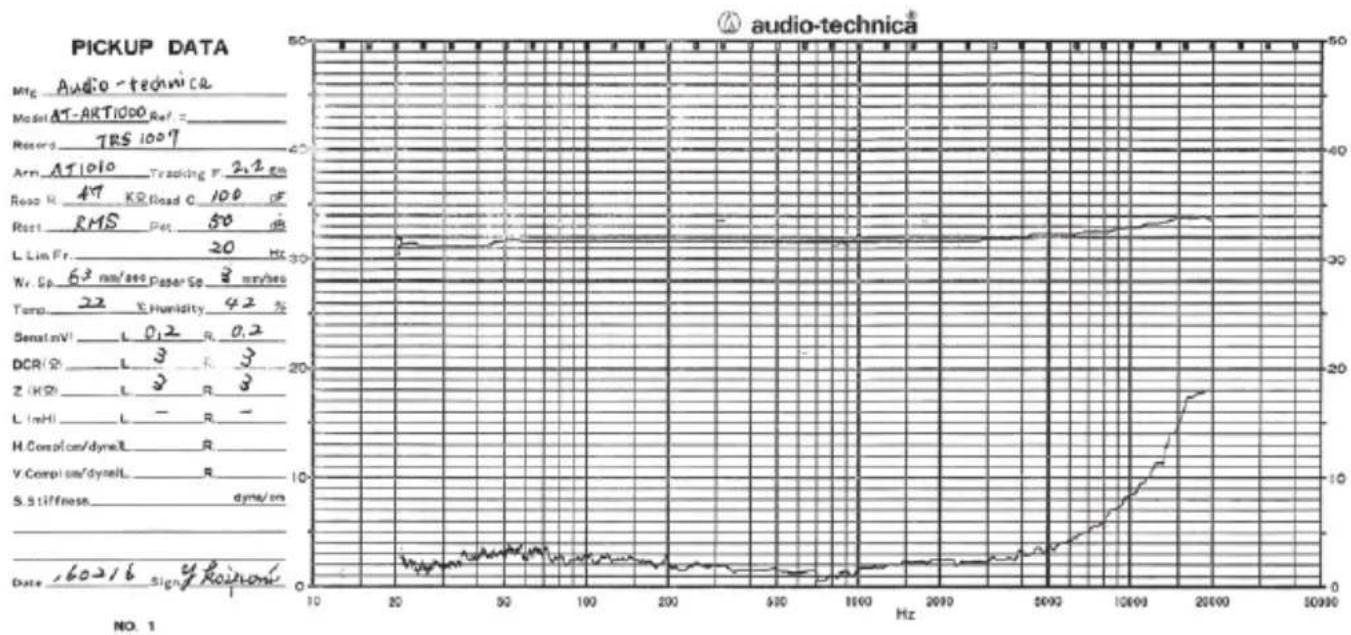
Frequency and separation characteristics
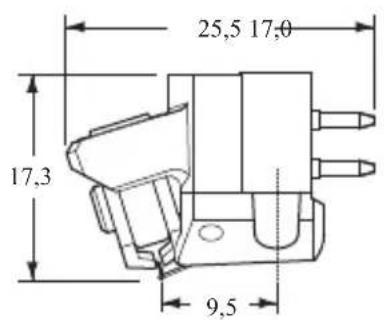
Dimensions


(Unit: mm)
Specifications
| Type | Direct power system, non-magnetic core coil (MC) type |
| Frequency response 15 to 30,000 Hz | |
| Output voltage 0.2 mV (1 kHz, 5 cm/sec.) | |
| Channel separation 30 dB (1 kHz) | |
| Output balance 0.5 dB (1 kHz) | |
| Tracking force Refer to “Tracking force information.” | |
| Coil impedance 3 ohms (1 kHz) | |
| DC resistance 3 ohms | |
| Load impedance ≥ 30 ohms (when head amplifier connected) | |
| Coil inductance ≤ 1 μH (1 kHz) | |
| Static compliance 30×10 | -6cm/dyne |
| Dynamic compliance 12×10 | -6cm/dyne (100 Hz) |
| Stylus Special line contact stylus | |
Cantilever 0.26mm (0.01^ ) diameter solid boron
| Vertical tracking angle 21° | |
| Dimensions | 17.3 mm (0.68") × 17.0 mm (0.67") × 25.5 mm (1.00") (H × W × D) |
| Weight 11 g (0.4 oz) | |
| Accessories | · Case (wooden box) |
| · Non-magnetic screwdriver | |
| · Washer × 2 | |
| · Protector | |
| · Nut × 2 | |
| · Cartridge installation screws (12 mm × 2, 18 mm × 2) | |
| · Brush | |
| · PCOCC lead wire set | |
Specifications are subject to change without notice due to improvements.
Introduction
Kak ydaJIHTb/yCTaHOBHTb 3aIHTbI K0JIpaOK
3aunTHbI KOJIInaOK ycTaHaBJIINBaETcR BO BpeMIOKyIKN.
KaK cHrTb

HaKoHeuHHK 3aIHTHO KojIIaYka
KaK yCTaHOBnTb
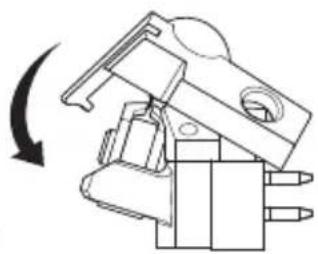
1 IomeCTHTe NaJIeH Na HAKOHeHHK 3aIHTHO KOJIaYKa H IOTAHTE BBePx.
1 BbipOBHnTe BbICTyIbHa H3JeJINC BbICTyIaMn Ha BHyTpEHHe IIOBcpxHOCTN 3aIHTHO KoJIiAka.
HaKMHTe Ha KaKHeHHK 3aIHTHO KOJIInaKa JIO IIeJKA.

- IpeTem, KaK y6HpaTb H3JeJIHe B cyTJAp, He 3a6yIbTe yCTaHOBHTb 3aIIHTbI KJIInaOH.
IcnoJb3OBaHne
I3JeJIne IeBJIeTcYpe3BbIaHIO XpyIKNM. ByIbTe OCTOpOJKbI IIpn ObpaIeHHN C Hm.

YcTaHOBHTe H3JeJIHe Ha JepKaTeIb TOrIOBKn CBOcTO ToHApMa.
BoBpemy yctAHOBKN,BO H36eKaHHe IOBpeKdHnKoJIe6aTeJbHOH cHCTeMbI,Ha IIOJBKE JOJIKeH HAXOHTbcr 3aIIITHbIKOJIiAOK.
CJerka 3aTaNHTe BNHTbI.
- IepkaTeJIb TIOBKn HHe HnyKeH, ecJIH Bby yctaHaBJIbAte HeIeJIHe Ha TOHaPc C HHTerpnpoBAHHbIM IepkaTeJIeM TIOBKn. 3aKpeIInTe TIOBky HcIIocpcIcTBcHHO Ha ToHaPMe.

IIOJIIOHTe IPOBOa TOHApMa K BbIBOJaAM ROJIOBKN, COJIHOaIIIOJpHOCTb.
IIOJKJIOOHTE KOHTAKTbI IPOBOIOB TOHApMa KBbIBOaM H3JeJIHa OJHO BOBaTa. EcJIN KOTAKT IIPOBOJa OCJIa6, HEMHO IOJOKMHTe cTO IN IOBOTOPHOIOKJIOOHTE K BbIBOy FOIOBKn.
BbIOIgIOBKn He IOJIKNbI IOIBepraTbcB O3JeCTBnIO BlicOKo TEmpeaTypb (OT IIaJIbHNka H.T.I.).


CHHMMTe 3aHTHBIO KOJIHaQOK C H3JeJIIN.
- IopraIOK IeIcTBn cm. B pa3JeIe "KaK ydaJIHTb/YcTaHOBHTb 3aIIHTbI KOIJaOK" Ha cTp.8.

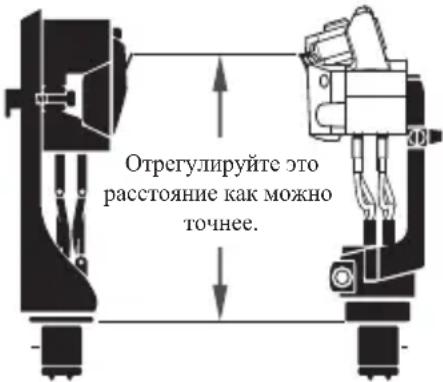
OIIpeJIInTe IpaBnIbHoe IOIOJKeHne IJIy yCTaHOBKn H3JeINr (OTperyJInpyIte BbHoc).
- OTPeryJInpye TBe BbHoc, cJIeIy yKa3aHnM B pyKOBOCTBe IIOJIb3ObaTeJI ToHapMa HIN IIPOINrPBbATEJI. EcII HcYBepEHb, BbIPOBHraTE IIO IIOJOKeHHIO HrJIbI Ha rOJIobKe 3ByKoCHnMaTeJI, KOtOpa paHBIIe CToJla Ha TOHaPMe (KaK IOKa3aHO B pncyHke).
- Upe3MepHa8 OIIIN6Ka B IIOJIOKeHHI rOJIOBKN yXyIHINT KaueCTBO 3ByKOBOcIIPOH3BeJeHHa, IIO3TOMy, IIO BO3MOxKHOCTH, BbIPOBHnTe ee c ToUHOCTbIO He xyKe 1 MM.
TIOIBKa 3ByKoCHHMaTeJI, IIepBOHaJaJIbHO yCTaHOBJIeHHa Ha ToHApMe AT-ART1000

IpoBcpe 6aJIaHc MeKJy JIEBBIM I npaBbIM KaHaJIaMn, H ecJIH BCE HopMaJIbHO, OKOHHaTeJIbHO 3aTAHTE BINTBI.
6 OtperyIpyTe npHKMHyO cnJIy.
-
H3-3a ocObeHHocTeKoHcTpyKuHn OINTMaJIbHaJ npJHKHMHa cNJa N3MeHReTcR O T OHOrO N3JeJIHa K JpyrOy. EcJn PpJHKMHa cNJa He oTpErYJHpOBaHa IpaBnJIbHo, TO KaTyIHKn He 6yUyt HaxOHTbcR B Tpe6yemOM MecTe MaHHTHOJ eIIH, n TaKHe IapamETpbI, KaK BbIXoJHoe HaIprJKeHHe n pa3JeJIeHHe KaHaIOB, yxUHaTcR. IpeE nCNoJb3OBaHNem Bcerda yCTaHaBJIbBaIte Tpe6yeMyIO pINJKMHyIO cNJy.
-
p_HK HmHa cHJa IJIa H3JeIHa yKa3aHa B OTJeJIbHOJ ope "HhOpMaIIra O npHKMHoH cHJIe".
7
OtperyJnpyeThe BBICOTy ToHapMa.
OtperyHpyte BbICOTy TaK, TTO6bI ecJIN cMOptB c0ky, HxHnA IOBepxHOCTb IepKaTeJI rIOOBKn H IOBepxHOCTb rpaMIIaCTHHKN 6bln IIapaJIeJIbHbI. HeipabHbHa Bcota ToHApMa MoKeT IIpNBecTH K TOMy, YTO KOpNyc H3JeJIIM RAoKet TepeTbcra O rpaMIIaCTHHKy, YTO 3HaHTeJIbHO yxyIHINT KaueCTBO 3ByKOBOcIpON3BeJeHHN HJIN IOBpeITr pAMIIaCTHHKy.
He BO Bcex TOHaPMax/IIpOHTpbIbATEJIAX MOxHO pcreyJInpoBaTb BBICOTY TOHaPMa.
8
OtperyIInpyteMexaHH3M IpoTHBOCKaTbIBaHH.
- EcJIM MExaHH3M IPOTNBOCKaTBiBaHHn He 6yJeT OTPeRyJIINPOBAn IpaBnJIbHO, 3TO IIpNBeJEET K yxyIiEHHIO 6aJIaHCA KaHaJIOB. IIpnpeRyJINPObKe CJeIyIte HHCTpyKIIHNM, IIpNBeJEHHbIM B pyKOBoJCTBe IIOJIb3OBaTeJIa K TOHaPMy HIN IIPOHrPBtBATeJIHO.

-Дя IOДКЛIOHEnIO K IpeIyCSJIHTeJIHO/ycJIHTeJIHO MOrTy IOTpe6OBaTbcr TpaHCΦopMaTOp, yCNJIITeJIb JIA HayIIHHKOB, HIN OTJeIbHbI 3KBaJIaJ3ep. EcIn y IpeIyCSJIHTeJIry/YcJIHTeJIa cTB BXoI JIA 3BYKOCHMaTeJI (IOIOXeHHe CEJIeKTopa BXoIOB "MC-3ByKocHMaTeJIb"), OH MOKeT HCIOJIb3OBAtbcr 6e3 HIX. OINako JIA IOJIHO rACJaXJDeHn KaYeCTBOM 3BYKOBOcIIpOH3BeDEHn 3TOrO H3DeJIHn, peKOMeHJyETcR HCIOJIb3OBAt b IOBbIIaIOHn TpaHCΦopMaTOp, yCNJIITeJIb JIA HayIIHHKOB HIN 3KBaJIaJ3ep (IpOJaIOTcR OTJeJIbHO). YKa3AHNЯ IO IOIKJIIOUeHHIO CMOTpHrE B pyKOBoJCTBe IOJIb3OBATeJI R HCIOJIb3YEmOMy BAMn O6OpyIOBaHHIO.
yXoI
IIpaBnIbHOrO yXoJa 3a H3JeJIHeM, co6JIIOaIte cJeIyIOUHe MepbI IpeIOCTOpOJHOCTH.
BcerdaIepKHTe HrIy B uHcToTe.
-Дя ydaJIeHЯ cKoIIbIeHЯ ha HJIe rpa3n HblJIn HCIOJIb3yIte KHCToQy H3 KOMJIeKta. He nCIOJIb3yIte JIAr 3TOrO HnYeRo HHO, KpOME KHCToQyH3 KOMJIeKta. EcIN Bb6yJeTe HcNOJIb3OBaTb POKUHHYIO KHCToQy C DJIHHOH IeTHHO, Bbl MoKeTe NOBpeIHTb KaTyIKN HJN BBIOBbI KaTuIeK.
-
yuaenra TpyuHOyauemn rpa3n peKOMeHnyeTc HcIOJB3OBaTb cpeCTBO IJIaHCTKN HJI (Ipoaaetc OTdeJbHo).
-
IpeI HcIOJIb3OBaHHem H3JeJIH, peKOMeHJyETc8 OYHCTHTb rpaIIJaCTIHKy cpeICTBOM JIJI YHCTKN rpaIIJaCTIHOK (IPOdaetc8 OTJeJIbHO).
-
IIpn IeMOHTaKe H3IJIINc TOHaPMa He 3a6bIBaIte HaIeBaTb 3aIIHTbIK KOJIInaOH. XpaHITe H3IJIne BdAJN OT YcHJNTeJIr HpyTHX NCTOCHNKOB TEJIJa H MaHHTHBIX MATEpHaJIOB.
XpaHnTe H3eJIHe B IPOXJIaIHOM H cyXOM MecTe, Ie OTCyTCTBYOT BbICOKa TeMIIepaTyPA N BBICOKa BJJaKHOCTb.
Knctouka noctabJareTcB fytIpe. XpaHnte Knctouky B fytJIpe, ecJIH bI eHO He IIOJIb3yITecb.
OuHCTKa HJbI
PonoepuHoeceueHHe H3JeJIHa
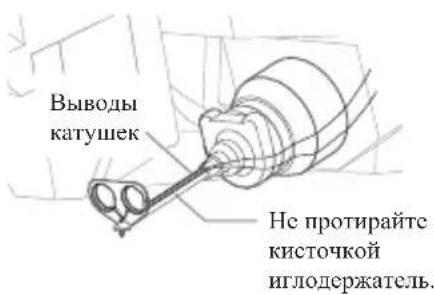


CTapaNTecb He KacaTbcra
KnCTOuKOHrIOePkaTeJIa.
BbIObl OT KaTyIeK
NDyTBIOJIb IOBepXHOCTH
HIODePkaTeJIa, HIO3TOMyHX
MOJHO IOBpeINtB KNCTOuKOH.
BcerIa IepemeIaIe KnCTOuy B HApPaBJIeHHN, B KOtOpOM BpaIaETCr rpaMIIaCTHHa.

HaheCNTe Ha KInCTOuKy He6oJIbIIOe KOJIINcTBO uNCTaIeRo pactBopa (npOJaETc8 OTJeJIbHO),KOTOpbI coJepKHT cIIHPT, H NcTHTe TOJIbKO HJy.
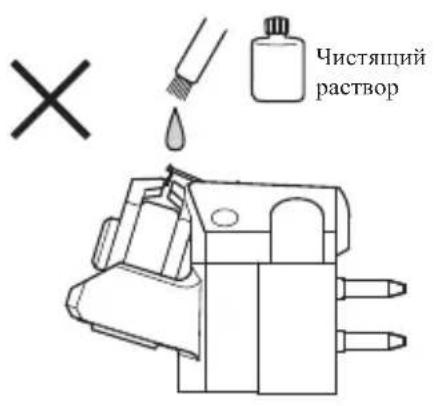
He nCTte HJy B noJIOKeHHI ROIBKN HJIOB BBepx. EcJHn HCTaIIHN paTbOp cJyauHNO CTeHT N IOnaTe Ha KaTyIKN, OH MOKeT IOBpeINb KaTyIKN.
IporpaMMbI BocctaHOBJIeHnI rOIOBKn 3ByKOCHMaTeJIa
YTO6bI 3aunHTb Bac OT IOBpeJdeHn HJIIOepKaTeJI n H3HOca HJIbI 3BYKOCHMaTeJI, Mbl IIpeJaAem Bam IIaTHyU ycJIyry B paMKax IporpaMMbI BOCCTaHOBJeHHra TOLOBKn 3ByKOCHMaTeJI.
B paMKkax 3ToI IIpoRpaMMbI ocUIIeCTBJIeTc8aMeHa BceRo y3Ja, BKIOUOaH INJy, HIOJIepKataJIb, KaTyIHKn H pe3INHObBi IeMIIΦepBi. YTO6bI IOJIyUHTb IOJIHyO INHΦOpMaIIH O6 3ToI IIpoRpaMMe, IIOcETIte Be6-CTpaHHu IIO aIpecy http://www.audio-technica.com/ art1000/ HIn CBJXHTecb C MeCTHbIM cepBnCHbIM IeHTpOM Audio-Technica.
UyHTTE, YTO IeIcTBnE DaHHOI pOgpaMMbI MoKet 6bITb IIpeKpaIeHo 6e3 IIpeBapHTeJIbHoro yBeIOJMeHHa, B 3aBHCMOCTN OT IOCTUYIOCTH 3aIIaChbIX HaCTe NJIH BpeMeHH, IIpoIIeIIIErO C MOMeHTa IIpeKpaIeHHI IOIePJKN H3JeHH.
YacToTHbI dHaapanH n rJy6nHa pa3JeHnKaHaIOB

Fa6apuTHbIe pa3MepeI

(EI. H3MepeHHa: MM)
Texnueckne xapaKtepncnKn
- 基本類譜的複専音譜是音音上音音中音音中音音中音中音中音中音中音中音中音中音中音中音中音中音中音中音中音中音中音中音中音中音中音中音中音中音中音中音中音中音中音中音中音中音中音中音中音中音中音中音中音中音中音中音中音中音中音中音中音中音中音中音
Anext주의상ographic
- 産和合期,造同的普拉斯邦勃托阿尼的的全要当时自,海亚贝将用
·社上
·高進在安時,有道,有道,有道,有道,有道,有道,有道,有道,有道,有道,有道,有道,有道,有道,有道,有道,有道,有道,有道,有道,有道,有道,有道,有道,有道,有道,有道,有道,有道,有道,有道,有道,有道,有道
·高首在安普哈尼用到本的同动士斯的门时
·高進在呼國哈尼用他,
·高進在國國時,爲國國國國國國國國國國國國國國國國國國國國國國國國國國國國國國國國國國國國國國國國國國國國國國國國國國國國國國國國國國國國國國國國國國國國國國國國國國國國國國國國國國國國國國國國國國國國國國國國國國國國国
賊吾也
1 译音i默巴罗从多歌译音和歌
2 彼他德也90日会
3 3
賊藥藻藻藻藻藻藻藻藻藻藻藻藻藻藻藻藻藻藻藻藻藻藻藻藻藻藻藻藻藻藻藻藻藻藻藻藻藻藻藻藻藻藻藻藻藻藻藻藻藻藻藻藻藻藻藻藻藻藻藻藻藻藻藻藻
北高知贝贝贝贝贝贝贝贝贝贝贝贝贝贝贝贝贝贝贝贝贝贝贝贝贝贝贝贝贝贝贝贝贝贝贝贝贝贝贝贝贝贝贝贝贝贝贝贝贝贝
巴 王国
部R

部
中


1 1
1 1
This explanation is a guidance concerned with the environmental laws and regulations of the People's Republic of China. This period information as well as the list of contained materials conform with the standard values established by the relaxed laws and regulations of the People's Republic of China, and does not apply to other Restrictions of Hazardous Substances including Europe's REHS Directive.
Deutsch
Disposal of Old Electrical & Electronic Equipment (Applicable in European countries with separate collection systems)
This symbol on the product or on its packaging indicates that this product shall not be treated as household waste. Instead it shall be handed over to the applicable collection point for the recycling of electrical and electronic equipment. By ensuring this product is disposed of correctly, you will help prevent potential negative consequences for the environment and human health, which could otherwise be caused by inappropriate waste handling of this product. The recycling of materials will help to conserve natural resources. For more detailed information about recycling of this product, please contact your local city office, your household waste disposal service or the shop where you purchased the product.

Deutsch
Audio-Technica Limited
Technica House, Unit 5, Millennium Way, Leeds LS11 8AL, United Kingdom
Manufactured by fabrique par / hergestelld durch / Produzione pa / fabricato por / fabricato por / vearardig door / Ipowneseo or / Proviozdav / Fremstillet af / valmistatud / Valmistaja / Katokeutetra amr / Gyarto / mnharaligh / Raizotajs / Gamintojas / manifuratirn min / wyproducnaeane / Produz / Vvrobae / Provjvajale / tilverkadav
Audio-Technica Corp.
2-46-1 Nishi-narusc, Machida, Tokyo 194-8666, Japan
MEMO
audio-technica.
Audio-Technicals Corp.
2-46-1 Nishi-naruse, Machida, Tokyo 194-8666, Japan
© 2016 Audio-Technica Corp.
中国大陆客户联系资料
代理商:广州市德讯贸易有限公司