ATLP60BT - Turntable AUDIO TECHNICA - Free user manual and instructions
Find the device manual for free ATLP60BT AUDIO TECHNICA in PDF.
| Product Type | Fully automatic belt-drive turntable |
| Brand | Audio-Technica |
| Model | AT-LP60BT |
| Rotation Speeds | 33 1/3 RPM and 45 RPM |
| Platter | Aluminum |
| Motor | DC servo-controlled |
| Speed Fluctuations | Less than 0.25% (WTD) @ 3 kHz (JIS) |
| Signal-to-Noise Ratio | Greater than 50 dB (DIN-B) |
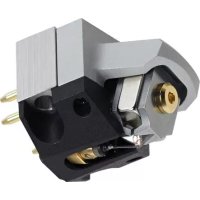
| Cartridge | Integral Dual Moving Magnet with diamond stylus |
| Output Level (PHONO) | 2.5 mV nominal at 1 kHz, 5 cm/sec |
| Output Level (LINE) | 150 mV nominal at 1 kHz, 5 cm/sec |
| Preamp Gain | 36 dB nominal, RIAA equalized |
| Bluetooth | Version 3.0, Power Class 2, max range 10 m (line of sight), A2DP profile, SBC codec |
| Power Supply | 120 V AC, 60 Hz, 3 W (US/Canada model) |
| Dimensions | 360 x 97.5 x 356 mm |
| Net Weight | 2.98 kg |
| Supplied Accessories | 3.5 mm mini-jack to RCA output cable, 45 RPM adapter, removable dust cover |
| Replacement Stylus | ATN3600L (approx. 400 hours life) |
| Maintenance | Clean stylus with a soft brush from back to front; clean cover and case with a soft cloth and mild detergent; do not use harsh chemicals |
| Safety | Do not expose to moisture, do not open the case, do not use within 22 cm of a pacemaker, do not use near medical equipment |
| Warranty | 1 year limited (US) |
Frequently Asked Questions - ATLP60BT AUDIO TECHNICA
User questions about ATLP60BT AUDIO TECHNICA
0 question about this device. Answer the ones you know or ask your own.
Ask a new question about this device
Download the instructions for your Turntable in PDF format for free! Find your manual ATLP60BT - AUDIO TECHNICA and take your electronic device back in hand. On this page are published all the documents necessary for the use of your device. ATLP60BT by AUDIO TECHNICA.
USER MANUAL ATLP60BT AUDIO TECHNICA
natural_image
Line drawing of a vintage rotary dial with a triangular warning symbol on the cover (no text or labels)Installation and Operation Pages 2-9
AT-LP60-BT
Tourne-disque sans fil
Turntable belt needs to be attached or turntable will not operate. See page 5 for instructions.
For assistance, contact our Audio Solutions Department at 330-686-2600 x5000 or audio-solutions@atus.com.
Wireless Turntable
Introduction
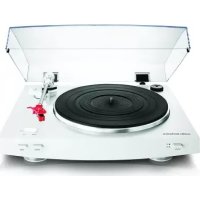
Thank you for purchasing the AT-LP60-BT wireless turntable. Audio-Technica has been a leading manufacturer of innovative stereo phonograph products for more than 50 years. We are pleased to provide this turntable, with its excellent performance and many convenient features, for your enjoyment.
The AT-LP60-BT wireless turntable features:
• Fully automatic operation
- Two speeds: 33 13 RPM and 45 RPM
• Professional aluminum turntable platter
- Integral Audio-Technica Dual Moving Magnet phono cartridge with replaceable diamond stylus
- Built-in Bluetooth transmitter function. Permits use of turntable with wireless speakers, headphones and other devices with Bluetooth® wireless technology.
- Built-in switchable stereo phono/line level pre-amplifier. Permits use of turntable with stereo systems having either magnetic-phono inputs or "AUX" (line-level) inputs; also allows convenient use of turntable with most powered speakers
- Damped lift/cueing mechanism with front-panel control
- Removable dust cover
To assure maximum satisfaction from this product, please read the information and follow the instructions presented in this manual. Please keep the manual in an accessible location for future reference.
We suggest that you save all packaging materials for possible future storage, moving or shipping.
CAUTION: To avoid stylus damage, make certain the included stylus guard is in place whenever the turntable is being installed, moved or cleaned.

text_image
Stylus assembly Stylus guard Stylus ("Needle")Reference:
- Disconnect this product from the computer if you encounter any malfunction like noise, smoke, smell, heat or damage with the product. In such case, contact your local Audio-Technica dealer.
- Do not use the turntable within 22 cm of where a cardiac pacemaker is installed. Pacemakers may be affected by radio waves of the turntable.
- Do not use the turntable near medical equipment. Radio waves may affect cardiac pacemakers and medical electronic equipment. Do not use the product inside medical facilities.
- Do not use the turntable near automatic control devices such as automatic doors and fire alarms. Radio waves may affect electronic equipment and cause accidents due to malfunction.
Simultaneous use with other devices
Failure, such as the interruption of sound, may be caused by radio wave interference from devices that use the same frequency band (2.4GHz) as the turntable, including devices with Bluetooth wireless technology, devices using wireless LAN, digital cordless phones and microwaves. Similarly, because radio waves of the turntable may affect these devices, take the following precautions:
- Install the devices using the same frequency band (2.4GHz) away from the turntable.
Instructions for Use
Any device which is connected to the turntable needs to meet the Bluetooth standards established by Bluetooth SIG and be certified. Even if the device meets the Bluetooth standards, it might not connect to the turntable or the operation method and behavior may differ depending on the device's characteristics and specification.
Important information
Warning:
- To prevent fire or shock hazard, do not expose this apparatus to rain or moisture.
Caution:
- Do not expose this apparatus to drips or splashes.
• To avoid electric shock, do not open the cabinet.
• Refer servicing to qualified personnel only. - Do not expose this apparatus to excessive heat such as sunshine, fire or the like.
- Do not subject this apparatus to strong impact.
- This apparatus should be located close enough to the AC outlet so that you can easily grasp the power cord plug at any time.
- In case of emergency, disconnect the power cord plug of this apparatus quickly.
- Do not place any objects filled with liquids, such as vases, on this apparatus.
- To prevent fire, do not place any naked flame sources (such as lighted candles) on this apparatus.
- Do not install this apparatus in a confined space such as a bookcase or similar unit.
- To install this apparatus only in the place where ventilation is good.
- To prevent fire, do not cover the ventilation of this apparatus with newspapers, table-clothes, curtains, etc.
For customers in the USA/Canada

CAUTION
RISK OF ELECTRIC SHOCK
DO NOT OPEN

Caution: To prevent electric shock, do not remove the cover. There are no user-serviceable parts inside. Internal adjustments are for qualified professionals only. Refer all servicing to qualified service personnel.

The lightning Flash Symbol, with "The Lightning Flash with arrowhead symbol within an equilateral triangle, is intended to alert the user to the presence of uninsulated "dangerous voltage" within the product enclosure that may be of sufficient magnitude to constitute a risk of shock to persons"

The exclamation Point Symbol, with “The exclamation point within an equilateral triangle is intended to alert the user to the presence of important operating and maintenance (servicing) instructions in the literature accompanying the product”.
Caution: To prevent electric shock, do not use this polarized plug with an extension cord, receptacle or other outlet unless the blades can be fully inserted to prevent blade exposure.
Safety instructions
- Read these instructions.
- Keep these instructions.
- Heed all warnings.
- Follow all instructions.
- Do not use this apparatus near water.
- Clean only with dry cloth.
- Do not block any ventilation openings. Install in accordance with the manufacturer's instructions.
- Do not install near any heat sources such as radiators, heat registers, stoves, or other apparatus (including amplifiers) that produce heat.
- Do not defeat the safety purpose of the polarized or grounding-type plug. A polarized plug has two blades with one wider than the other. A grounding type plug has two blades and a third grounding prong. The wide blade or the third prong are provided for your safety. If the provided plug does not fit into your outlet, consult an electrician for replacement of the obsolete outlet.
-
Protect the power cord from being walked on or pinched particularly at plugs, convenience receptacles, and the point where they exit from the apparatus.
-
Only use attachments/accessories specified by the manufacturer.
-
Use only with the cart, stand, tripod, bracket or table specified by the manufacturer, or sold with the apparatus. When a cart is used, use caution when moving the cart/ apparatus combination to avoid injury from tip-over.
-
Unplug this apparatus during lightning storms or when unused for long periods of time.
-
Refer all servicing to qualified service personnel. Servicing is required when the apparatus has been damaged in any way, such as power-supply cord or plug is damaged, liquid has been spilled or objects have fallen into the apparatus, the apparatus has been exposed to rain or moisture, does not operate normally, or has been dropped.
FCC Notice
Warning:
This device complies with Part 15 of the FCC Rules. Operation is subject to the following two conditions: (1) This device may not cause harmful interference, and (2) this device must accept any interference received, including interference that may cause undesired operation.
Caution:
You are cautioned that any changes or modifications not expressly approved in this manual could void your authority to operate this equipment.
Note: This equipment has been tested and found to comply with the limits for a Class B digital device, pursuant to part 15 of the FCC Rules. These limits are designed to provide reasonable protection against harmful interference in a residential installation. This equipment generates, uses and can radiate radio frequency energy and, if not installed and used in accordance with the instructions, may cause harmful interference to radio communications. However, there is no guarantee that interference will not occur in a particular installation. If this equipment does cause harmful interference to radio or television reception, which can be determined by turning the equipment off and on, the user is encouraged to try to correct the interference by one or more of the following measures:
- Reorient or relocate the receiving antenna.
- Increase the separation between the equipment and receiver.
- Connect the equipment into an outlet on a circuit different from that to which the receiver is connected.
- Consult the dealer or an experienced radio/TV technician for help.
This transmitter must not be co-located or operated in conjunction with any other antenna or transmitter used in other systems.
This device comply with FCC radiation exposure limits set forth for an uncontrolled environment and meets the FCC radio frequency (RF) Exposure Guidelines. This equipment has very low levels of RF energy that it deemed to comply without maximum permissive exposure evaluation. (MPE). But it is desirable that it should be installed and operated keeping the radiator at least 20cm or more away from person's body.
IC statement:
CAN ICES-3 (B)/NMB-3(B)
This device complies with INDUSTRY CANADA R.S.S. 247. Operation is subject to the following conditions:
(1) This device may not cause harmful interference and (2) this device must accept any interference received, including interference which may cause undesired operation.
Under Industry Canada regulations, this radio transmitter may only operate using an antenna of a type and maximum (or lesser) gain approved for the transmitter by Industry Canada. To reduce potential radio interference to other users, the antenna type and its gain should be so chosen that the equivalent isotropically radiated power (e.i.r.p.) is not more than that necessary for successful communication.
This device complies with RSS-102 radiation exposure limits set forth for an uncontrolled environment.
This device should be installed and operated with minimum distance 20 cm between the radiator & your body.

Main Features
Figure 1

text_image
Front Back 11 audio-technica START STOP 4 1 2 3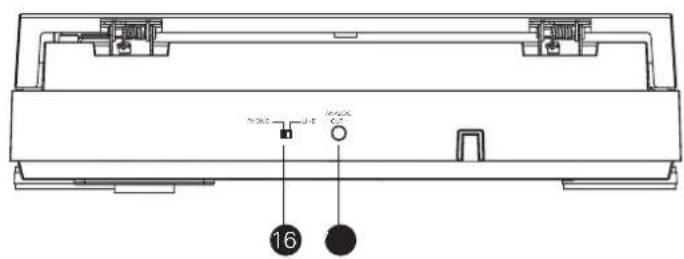
text_image
16
text_image
Technical diagram of a mechanical device with numbered components and a central triangular symbol1 START BUTTON
Engages the motor/platter and begins automatic operation.
② STOP BUTTON
Disengages the motor/platter and returns tone arm to rest.
3 TONE ARM LIFT BUTTON
Lifts and lowers tone arm for manual selection.
4 PLATTER SPEED BUTTON
Select 33 RPM (button in high position) or 45 RPM
(button in low position) platter speed.
5 WIRELESS FUNCTION BUTTON (with Indicator LED)
Use to perform initial pairing with a Bluetooth receiver device (speakers, headphones, receiver, sound bar, et al.) and to start/stop wireless signal transmission.
6 SIZE SELECTOR
Select the size of the record: 12° or 7°.
7 PLATTER
Aluminum platter mounts directly to center spindle/motor shaft.
* Illustration shows platter with turntable mat placed on top of it.
8 CENTER SPINDLE
Centering pin for record positioning.
9 45-RPM ADAPTER (shown in receptacle)
Adapts 7" records with large center holes to fit center spindle.
10 DUST COVER HINGE HOLDERS
Attachment points for removable hinged dust cover.
11 DUST COVER
12 TONE ARM/HEADSHELL ASSEMBLY
Tone arm is permanently attached to the headshell assembly.
13 STYLUS ASSEMBLY
14 STYLUS ("NEEDLE")
15 STYLUS GUARD
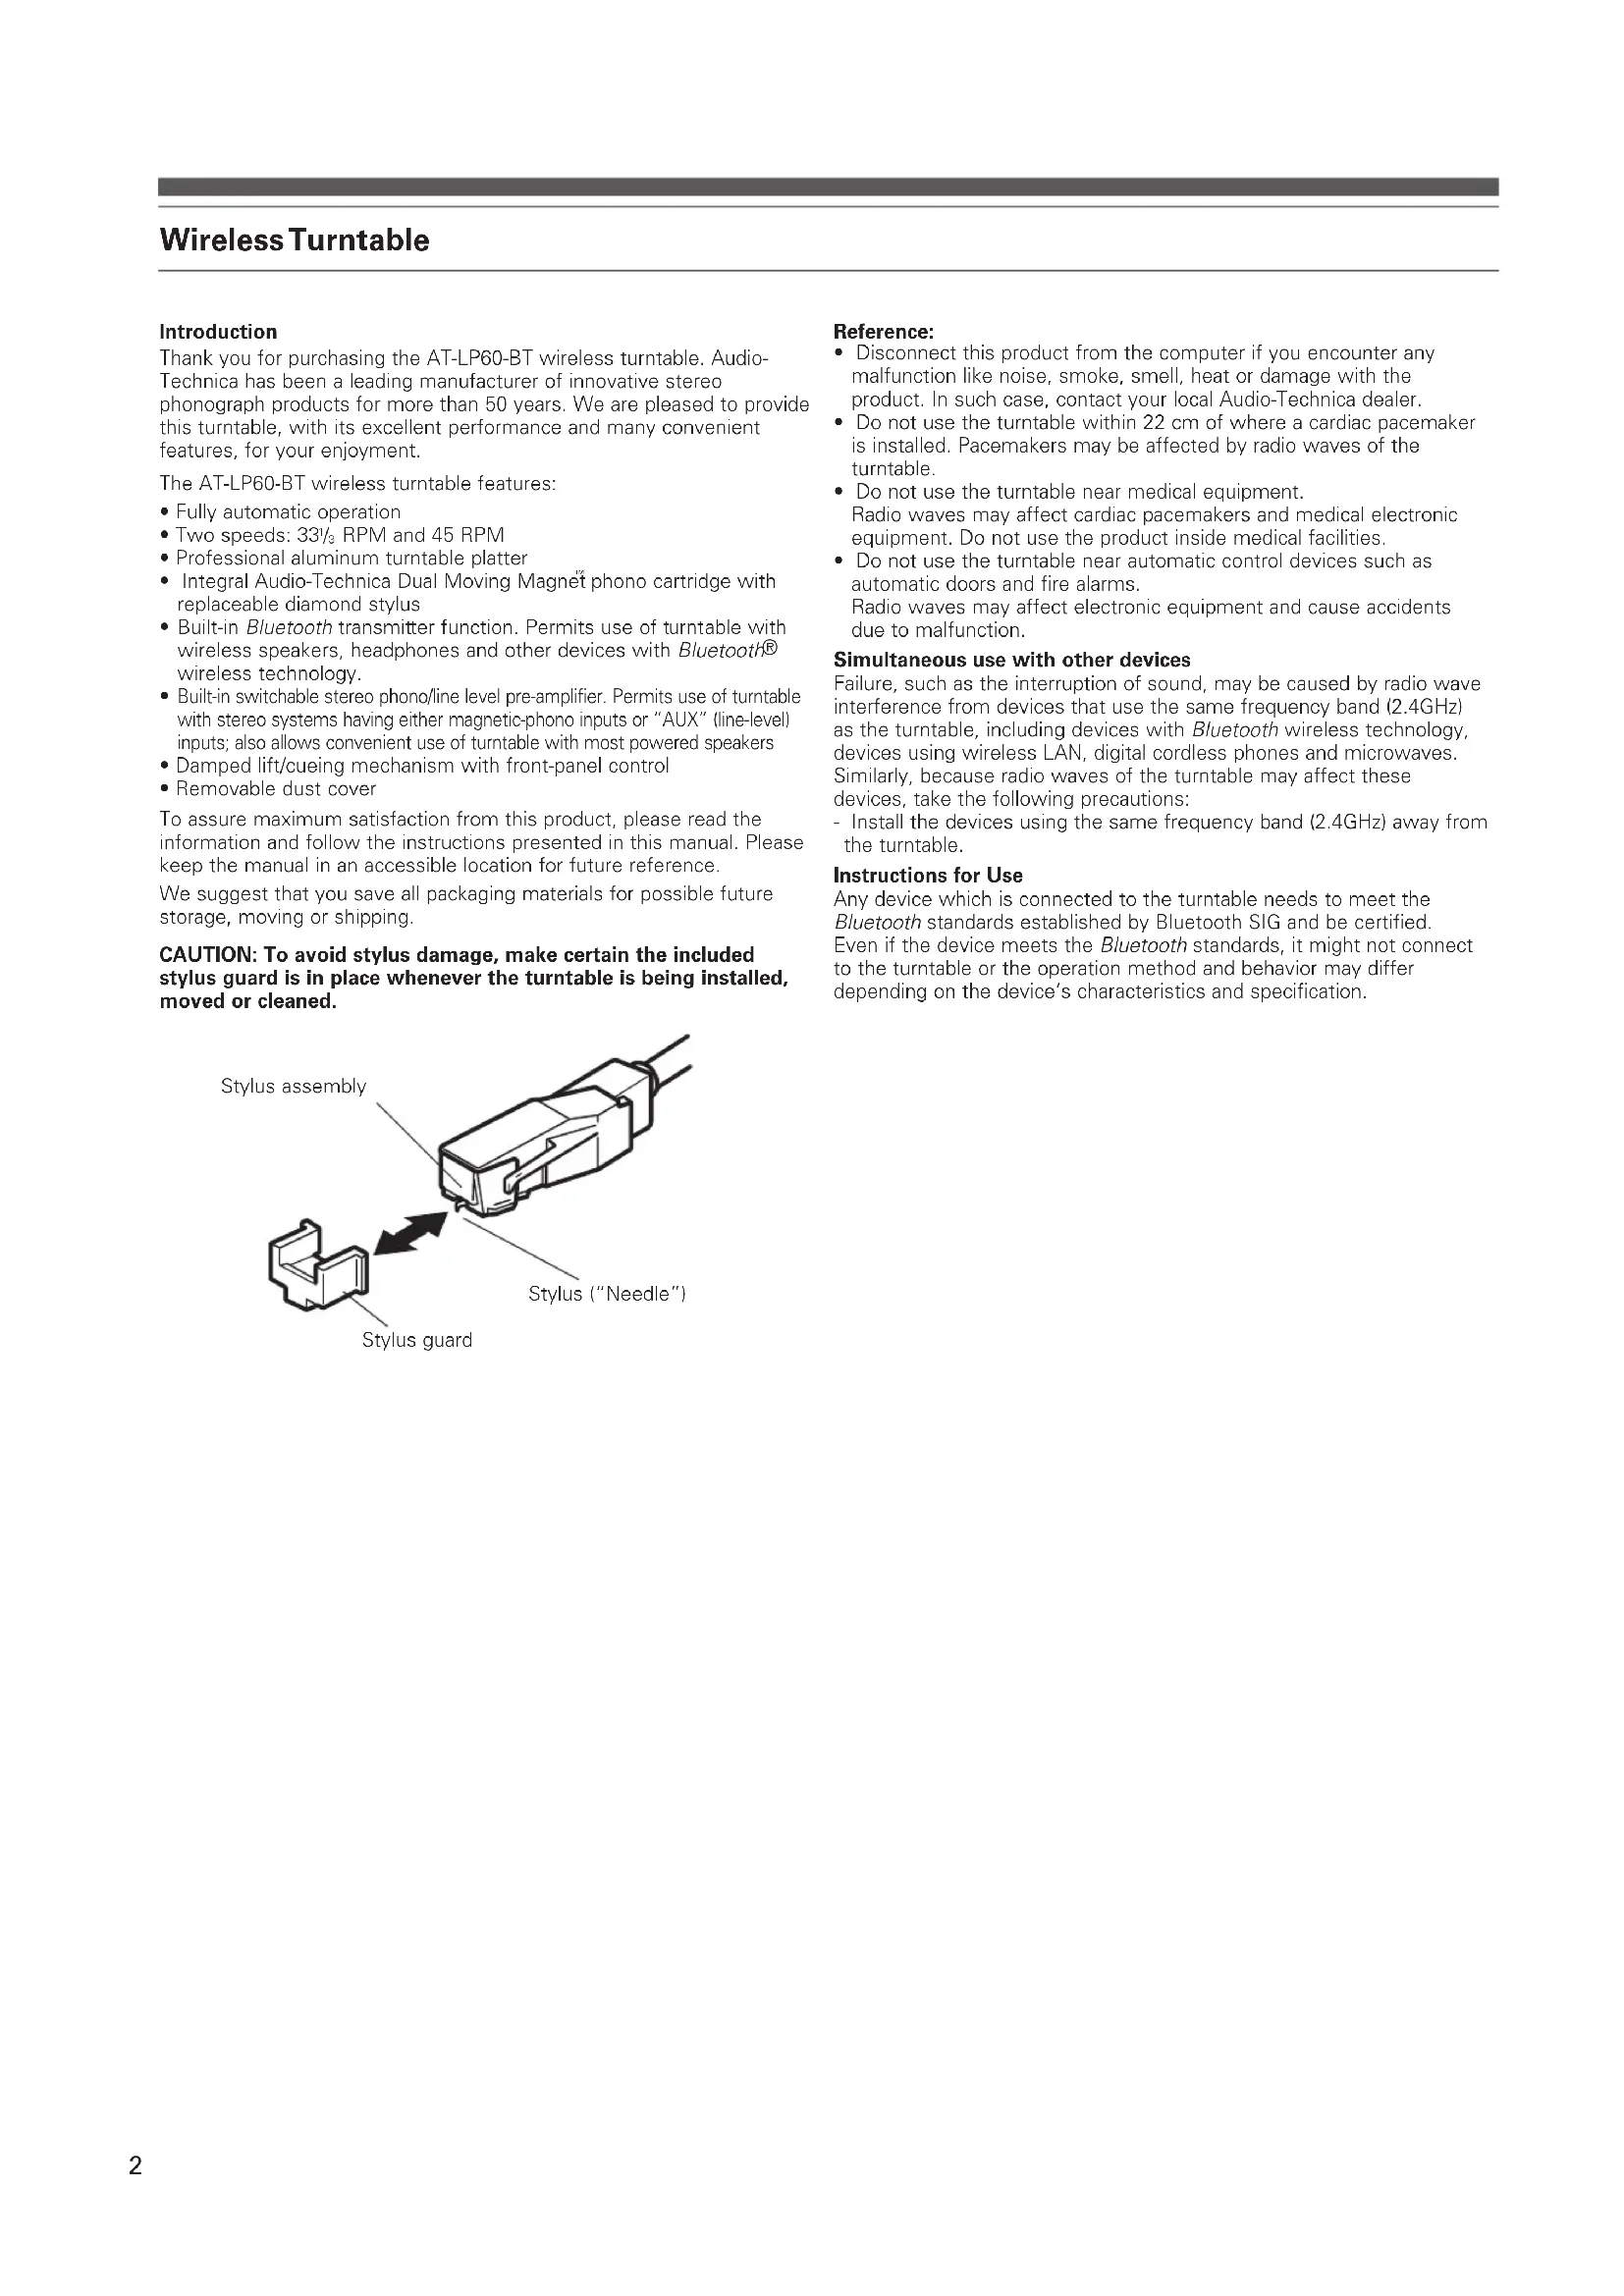
16 PRE-AMPLIFIER SELECTOR SWITCH (PHONO/LINE)
(On back of turntable) Use PHONO setting when you connect to the phono input on your home stereo via output cable. Use the LINE level when you connect to CD/TAPE/AUX inputs of your home stereo via output cable.
17 ANALOG OUT
Use this output to connect to your home stereo or powered speakers via the included 3.5 mm stereo mini-plug to dual RCA output cable.

text_image
Diagram of a connector with numbered parts, showing a connector being inserted into a housing.Assembling the Turntable
The AT-LP60-BT requires some assembly before first use. IMPORTANT: Do not connect the AC power cable until assembly is complete.
- Carefully place the turntable platter on the center spindle, making certain the platter is fully seated on the spindle.
- While holding both ends of the red tape ribbon on the turntable belt, carefully pull the belt over the brass motor pulley (Fig. 2a). (If the belt drops off, remove the turntable platter and put the belt back on it, as described on page 8.)
- Once the belt is seated in the pulley's groove, carefully remove the ribbon. Make certain the belt is not twisted.
(NOTE: If the belt is not correctly positioned around the motor pulley, the turntable will not operate. Please double-check to make sure that the belt is positioned correctly.)
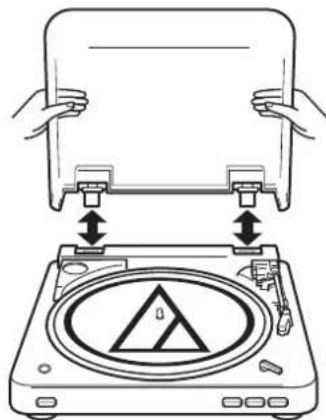
4 Place the turntable mat on top of the turntable platter (Fig. 2b). - If desired, the hinged dust cover may be removed. Hold both sides of the dust cover and pull upward gently and evenly to detach the cover from the turntable (Fig. 2c). Keep the cover in a safe, clean place.
- To re-install the dust cover, guide the dust cover hinges into the two hinge receptacles located at the back of the turntable housing.
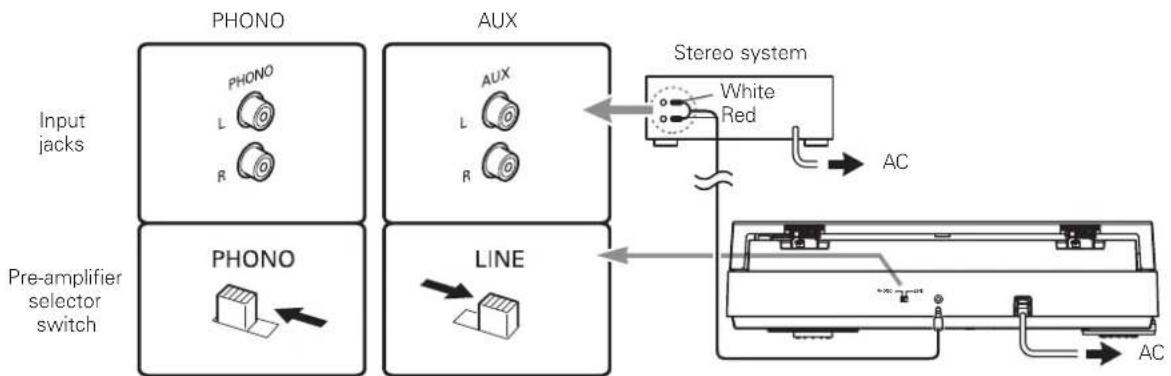
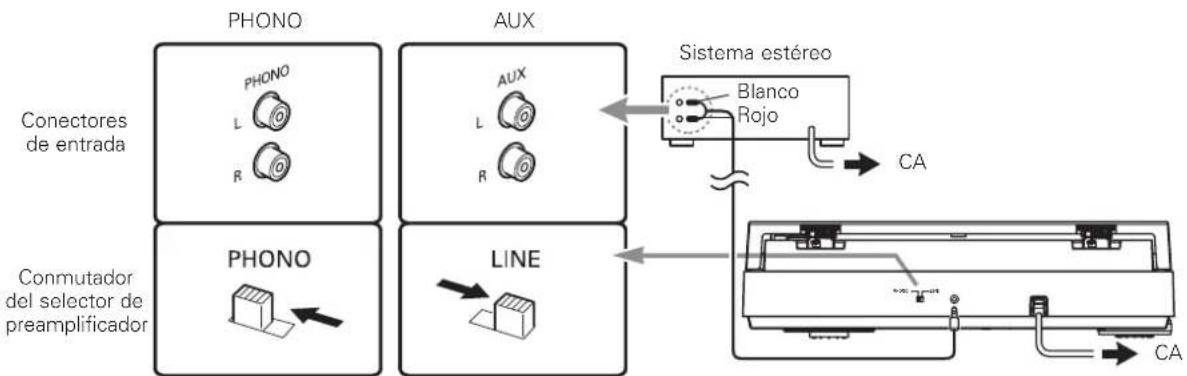
Setting the Pre-amplifier Selector Switch (PHONO/LINE)
For increased flexibility of use, this turntable has an internal stereo phono pre-amplifier. The pre-amplifier selector switch (PHONO/LINE) switch is located on the back of the turntable. If the stereo system you are using has a PHONO input, set the pre-amplifier selector switch to the "PHONO" position. If your stereo system does not have a PHONO input, set the pre-amplifier selector switch to the "LINE" position and connect the turntable's output cables to the AUX or other high-level input on your stereo system (described later) (Fig. 3).
The pre-amplifier selector switch does not affect wireless connection. You can leave the switch in either position when connecting the turntable to a Bluetooth receiver device.
Figure 2 – Assembling the turntable
2a - Drive belt
text_image
Red ribbon Brass motor pulley Drive belt2b - Record mat

text_image
2b - Record mat 45-RPM adapter Brass motor pulley2c - Dust cover removal
text_image
Diagram showing hands installing a panel on a CD/DVD machine with warning symbol and warning labelsFigure 3
flowchart
graph TD
    A["Input jacks"] --> B["PHONO L R"]
    C["Pre-amplifier selector switch"] --> D["PHONO L R"]
    E["AUX"] --> F["AUX L R"]
    G["Stereo system"] --> H["White Red AC"]
    I["Line"] --> J["Line AC"]
Connecting to Stereo System (Wireless Connection)
About Pairing
To connect the turntable to a Bluetooth receiver device, the turntable needs to pair (register) with the device. Once it is paired, you will not need to pair it again with that device, except in the following cases:
- If the turntable is deleted from the Bluetooth receiver device connection history,
- If the turntable is sent out for repair,
- If the turntable is paired with 9 devices or more.
(The turntable can be paired with up to 8 devices. When you pair with a new device after pairing with 8 devices, pairing information for the device with the oldest connection date will be overwritten by information for the new device.)
How to Perform Pairing
* Read the user manual for the Bluetooth receiver device.
* Place the Bluetooth receiver device within 1 meter of the turntable to perform pairing correctly.
- Set the Bluetooth receiver device into "pairing mode".
- After connecting the turntable's power cable plug to an AC outlet, press and hold the wireless function button for about 4 seconds. The button's Indicator LED will begin flashing red/blue.
- When the pairing is successfully performed, the Indicator will turn blue.
Listening to Music
- Once pairing has been performed, press and hold the wireless function button for about 2 seconds to turn on the Bluetooth function. Turn on the Bluetooth receiver device. Indicator will turn blue when the signal is transmitted correctly.
- Play and enjoy music according to the Automatic Operation (See below) or Manual Operation (See Page 7) instructions.
- Press and hold the wireless function button for 2 seconds to cut the connection to the Bluetooth receiver device. Indicator will turn off.
About Indicator Display
The wireless function button's Indicator LED displays the following wireless operating status by flashing or turning on:
| Operating status | LED display patterns ● BlueRed | ||
| Pairing | Searching for device | Flashing | |
| Connect | Waiting to be connected | ||
| LtConnecting | |||
Operation
Automatic Operation
- Remove the stylus guard from the stylus assembly (Fig. 4).
- Put a record on the turntable. If needed, use the 45 RPM adapter (Fig. 5).
- Select the size of record: 12" or 7" (Fig. 6).
- Select the speed: 33 13 RPM or 45 RPM (Fig. 7).
- Start: Gently push the START button (Fig. 8a). The turntable will start and the tone arm automatically will move to the lead-in groove. When the record has finished playing, the tone arm automatically will return to the tone arm rest and the turntable will shut off.
- Stop: To stop playing the record before it reaches the end, press the STOP button (Fig. 8b). The tone arm will lift and return to the tone arm rest, and the turntable will shut off.
- Pause: To pause the record before it has completed playing, press the tone arm Lift button (Fig. 8c). Press the Lift button again to continue playing the record.
Connecting to Stereo System (Wired Connection)
- Connect the output cable's mini-plug to the ANALOG OUT on the rear panel.
- Connect the output cable's red RCA-type pin-plug to the right channel input and the white RCA-type pin-plug to the left channel input of your stereo system (Fig. 3, page 5).
- With the tone arm still fastened to the tone arm rest, slowly turn the turntable platter clockwise ten times, to make certain the automatic mechanism is fully cycled.
- Remove the vinyl tie that holds the tone arm on its rest.
- Connect the power cable plug to an AC outlet. Make sure the AC outlet supplies the proper voltage for the AT-LP60-BT you are using.
Figure 4

text_image
Stylus assembly Stylus ("Needle") Stylus guardFigure 5
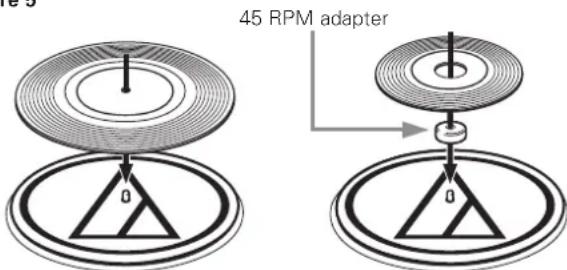
text_image
45 RPM adapter 0 0Caution: When the tone arm reaches the end of the record, it will lift and return to the tone arm rest automatically. When this happens, do not interfere with the tone arm's motion, or damage to the mechanism may occur.
If the tone arm does not return automatically to the tone arm rest after the record has finished playing, simply press the STOP button to complete operation.
Manual Operation
- Remove the stylus guard from the stylus assembly (Fig. 4).
- Put a record on the turntable. If needed, use the 45 RPM adapter (Fig. 5).
- Select the size of record: 12" or 7" (Fig. 6).
- Select the speed: 33 13 RPM or 45 RPM (Fig. 7).
- Press the Lift button in to raise the tone arm (Fig. 8c).
- Gently move the tone arm so the stylus is over the point on the record where play is desired to begin.
- Press the Lift button again to gently lower the tone arm and play record.
Figure 6
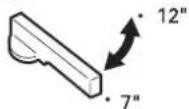
Figure 7
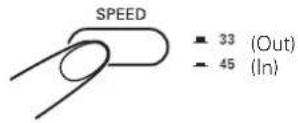
Figure 8
8a 8b 8c

text_image
START STOP Button Position: Tone Arm Action: Out | In Lower | RaiseReplacing the Stylus
While holding the head of the tone arm, rotate the front of the stylus assembly in a forward and down motion to remove it (Fig. 9). (As you remove the old assembly, note its position and "feel," to aid in properly installing the new one.)
Install the new stylus assembly as shown in Figures 10a/10b, being careful not to touch the actual stylus. Make certain that the projection at the back of the assembly is fully seated in the cartridge body first (Fig. 10a), and that the assembly "clicks" up into place, with no gap between its top edge and the front of the black plastic tone arm head (Fig. 10b). Replace the stylus after 400 hours of use.
To maintain original performance, insist upon a genuine Audio-Technica brand replacement stylus. Look for the Audio-Technica trademark ( Ⓜ on the front of the stylus assembly and on the packaging.
Figure 9 – Removing the stylus

natural_image
Illustration of a hand holding a pliers or tool with a downward arrow indicating motion (no text or symbols)Figure 10 – Installing a new stylus
10a

text_image
Engage in body first10b

text_image
No gap hereTroubleshooting
Turntable does not operate
- Make certain the turntable's AC cable is plugged into an AC outlet, and that the AC outlet is "live."
- Check the drive belt to make certain it is on correctly. (See Fig. 11.)
A) Remove the record mat from the turntable platter (Fig. 11a). Place the mat in the cardboard packaging sleeve for safekeeping. Through an opening in the turntable platter, visually inspect to see if the drive belt is around the brass motor pulley (Fig. 11b).
(NOTE: If the belt is not correctly positioned around the brass motor pulley, the turntable will not operate. Please double-check to make sure that the belt is positioned correctly.)
B) If the drive belt is not around the brass motor pulley: Lift and remove the turntable platter. Place a thumb into each of the left and right openings on the turntable platter; and, using the fingers to press down on the turntable housing's surface, pull the platter straight up (Fig. 11c). Avoid pressing on the tone arm.
C) With the turntable platter bottom side up, place the belt along the outside wall of the turntable platter's drive rim, making certain that the belt is smooth and flat all the way around (Fig. 11d).
D) Put the turntable platter back on the center spindle, make certain it is fully seated, and align one of its openings over the brass motor pulley position.
E) Through the opening, carefully hook the turntable belt with a finger or with the original red ribbon (never use a sharp object) and pull the belt over the brass motor pulley (Fig. 11e). Make certain the belt is not twisted between the pulley and the platter's drive rim.
F) Put the record mat back on the platter.
G) While holding the tone arm in its rest position, slowly turn the platter by hand clockwise at least 10 rotations to clear the mechanism's automatic cycle.
Turntable operates, but no sound at all
- The stylus guard is still in place.
- The tone arm Lift button is pressed in.
- Amplifier controls set incorrectly: wrong input selected, tape monitor on, speakers switched off, etc.
- Check the stylus on phono cartridge for correct placement. Refer to the instructions for replacing the stylus on page 7.
- If connected to a Bluetooth device, make sure the wireless connection has been performed correctly. (See page 6.)
Turntable operates, but no sound, or sound not loud enough
- If the turntable is connected to an AUX (high-level) input: The pre-amplifier selector switch may be set to the "PHONO" position (phono-input level). Move switch to the "LINE" position.
- The input gain of the amplified speaker or similar device may be too low.
- The stylus assembly may not be fully seated in the cartridge body. (See Fig. 10 on page 7.)
Sound is very distorted
- Turntable connected to an amplifier's PHONO input: If the pre-amplifier selector switch is set to the "LINE" position (AUX high-level output), a phono input will be overloaded.
Record/Tone Arm moves slightly up and down
- Usually this is a normal condition and not a problem. If this causes the turntable to be unable to track the record, please contact your dealer or our service department. Ensure the surface upon which the turntable is resting is not picking up vibrations from the floor or walls, or from direct speaker sound.
Figure 11 - Checking the drive belt

text_image
11a 11b Brass motor pulley 11c 11d live belt 11e Brass motor pulleyTips For Better Performance
- When opening or closing the turntable cover, handle it gently, moving it either at the center or equally from both sides.
- Do not touch the stylus tip with your fingers; avoid bumping the stylus on the turntable mat or a record's edge.
- Clean the stylus tip frequently, using a soft brush with a back-to-front motion only.
• If you use a stylus cleaning fluid, use it very sparingly. - Wipe the dust cover and turntable housing gently with a soft cloth. Use only a small amount of mild detergent solution to clean the turntable and dust cover.
- Never apply harsh chemicals or solvents to any part of the turntable system.
- Prior to moving the turntable, always unplug it from the AC outlet and fasten the tone arm on the tone arm rest with the vinyl twist-tie.
Specifications
| Communication system | Bluetooth Ver. 3.0 |
| Output | Bluetooth Specification Power Class 2 |
| Maximum communication range Line of sight - approx. 10m | |
| Compatible Bluetooth profile A2DP | |
| Support codec SBC | |
| Type Belt drive turntable, fully automatic | |
| Platter Aluminum | |
| Motor DC servo-controlled | |
| Speeds 33 | 13 RPM, 45 RPM |
| Wow and flutter Less than 0.25% (WTD) @ 3 kHz (JIS) | |
| Signal-to-noise ratio >50 dB (DIN-B) | |
| Cartridge Integral Dual Moving Magnet | * stereo cartridge with diamond stylus |
| Output level | |
| Pre-amplifier "PHONO" 2.5 mV nominal at 1 kHz, 5 cm/sec | |
| Pre-amplifier "LINE" 150 mV nominal at 1 kHz, 5 cm/sec | |
| Phono pre-amp gain | 36 dB nominal, RIAA equalized |
| Power 120V AC, 60 Hz, 3W (U.S. and Canada) | |
| Dimensions | 360.0mm (14.17") W x 97.5 mm (3.84") H x 356.0mm (14.2") D |
| Net weight | 2.98 kg (6.6lbs.) |
| Accessories | 3.5 mm (1/8") mini-plug (male) to dual RCA (male) stereo output cable, 45 RPM adapter, removable hinged dust cover |
| Replacement stylus ATN3600L | |
- The Bluetooth word mark and logos are owned by the Bluetooth SIG, Inc. and any use of such marks by Audio-Technica Corporation is under license. All other trademarks are property of their respective owners.
• For product improvement, the product is subject to modification without notice.
Tourne-disque sans fil
Introduction
MISE EN GARDE
RISQUES DE CHOC
ÉLECTRIQUE, NE PAS OUVRIR

text_image
Technical diagram of a radio receiver with numbered components and a triangular symbol inside the casing.1 BOUTON DE DÉMARRAGE
text_image
Diagram of an Ethernet connector with numbered parts and directional arrow indicating connection pointnatural_image
Diagram of hands installing or adjusting a CD-ROM on a machine, showing front panel and base plates (no text or symbols)Figure 3

flowchart
graph TD
    A["Jacks d'entrée"] --> B["PHONO"]
    B --> C["AUX"]
    C --> D["Chaine stéréo"]
    D --> E["CA"]
    F["Sélecteur de préamplification"] --> G["PHONO"]
    G --> H["L"]
    H --> I["AUX"]
    I --> J["Line"]
    J --> K["CA"]
    L["Chaine stéréo"] --> M["Blanc"]
    L --> N["Rouge"]
text_image
START STOPnatural_image
Illustration of a hand holding a tool with a downward arrow indicating motion (no text or symbols)text_image
Technical diagram of a radio receiver with numbered components and a triangular warning symbolnatural_image
Diagram of hands installing a CD into a CD on a CD-ROM (no text or symbols present)Figura 3
flowchart
graph TD
    A["PHONO"] --> B["AUX"]
    B --> C["Sistema estéreo"]
    C --> D["CA"]
    E["PHONO"] --> F["L"]
    F --> G["R"]
    H["CONUTador del selector de preamplificador"] --> I["LINE"]
    I --> J["CA"]
    K["Conectores de entrada"] --> L["PHONO L R"]
    M["Blanco Rojo"] --> N["CA"]
natural_image
Illustration of a hand holding a tool with a curved arrow indicating motion (no text or symbols)One-Year Limited Warranty
Audio-Technica brand products purchased in the U.S.A. are warranted for one year from date of purchase by Audio-Technica U.S., Inc. (A.T.U.S.) to be free of defects in materials and workmanship. In event of such defect, product will be repaired promptly without charge or, at our option, replaced with a new product of equal or superior value if delivered to A.T.U.S. or an Authorized Service Center, prepaid, together with the sales slip or other proof of purchase date. Prior approval from A.T.U.S. is required for return. This warranty excludes defects due to normal wear, abuse, shipping damage, or failure to use product in accordance with instructions. This warranty is void in the event of unauthorized repair or modification, or removal or defacing of the product labeling.
For return approval and shipping information, contact the Service Dept., Audio-Technica U.S., Inc., 1221 Commerce Drive, Stow, Ohio 44224.
Except to the extent precluded by applicable state law, A.T.U.S. will have no liability for any consequential, incidental, or special damages; any warranty of merchantability or tness for particular purpose expires when this warranty expires. This warranty gives you specific legal rights, and you may have other rights which vary from state to state.
Outside the U.S.A., please contact your local dealer for warranty details.
©2016 Audio-Technica Corp.