ATLP3 - Turntable AUDIO TECHNICA - Free user manual and instructions
Find the device manual for free ATLP3 AUDIO TECHNICA in PDF.
| Product type | Fully automatic belt-drive turntable |
| Brand | Audio-Technica |
| Model | AT-LP3 |
| Speeds | 33-1/3 RPM, 45 RPM |
| Motor | DC motor |
| Platter | Die-cast aluminum |
| Wow and flutter | < 0.2% WRMS (33 RPM) |
| Signal-to-noise ratio | > 60 dB |
| Output levels | PHONO: 3.5 mV; LINE (MM): 220 mV |
| Phono preamp gain (MM) | 36 dB, RIAA equalized |
| Phono preamp gain (MC) | 56 dB, RIAA equalized |
| Tonearm type | Static balance straight with damped cueing |
| Effective tonearm length | 221.5 mm |
| Overhang | 19 mm |
| Tracking force range | 1.0 to 4.0 g |
| Included cartridge | AT91R (VM type dual magnet) |
| Stylus | 0.6 mil conical bonded |
| Power supply | 220-240 V, 50/60 Hz |
| Power consumption | 2 W |
| Dimensions (W × D × H) | 435 × 353 × 128 mm |
| Weight | 5.2 kg |
| Included accessories | felt mat, dust cover, platter with belt, counterweight, AT-HS3 headshell with AT91R cartridge, 45 RPM adapter, power cord |
| Replacement parts (sold separately) | ATN91R replacement stylus, AT-HS3 headshell, AT-LP3 exclusive belt |
Frequently Asked Questions - ATLP3 AUDIO TECHNICA
User questions about ATLP3 AUDIO TECHNICA
0 question about this device. Answer the ones you know or ask your own.
Ask a new question about this device
Download the instructions for your Turntable in PDF format for free! Find your manual ATLP3 - AUDIO TECHNICA and take your electronic device back in hand. On this page are published all the documents necessary for the use of your device. ATLP3 by AUDIO TECHNICA.
USER MANUAL ATLP3 AUDIO TECHNICA
Fully Automatic Belt-Drive Turntable
Thank you for purchasing this Audio-Technica product.
Read through this user manual before using the product to ensure its correct use. Also, keep this manual, along with the warranty, for future reference.
This product is only for use in the following countries. Make sure that the operating voltage of the product is correct for the country you live in.
Country list: EU, Russia
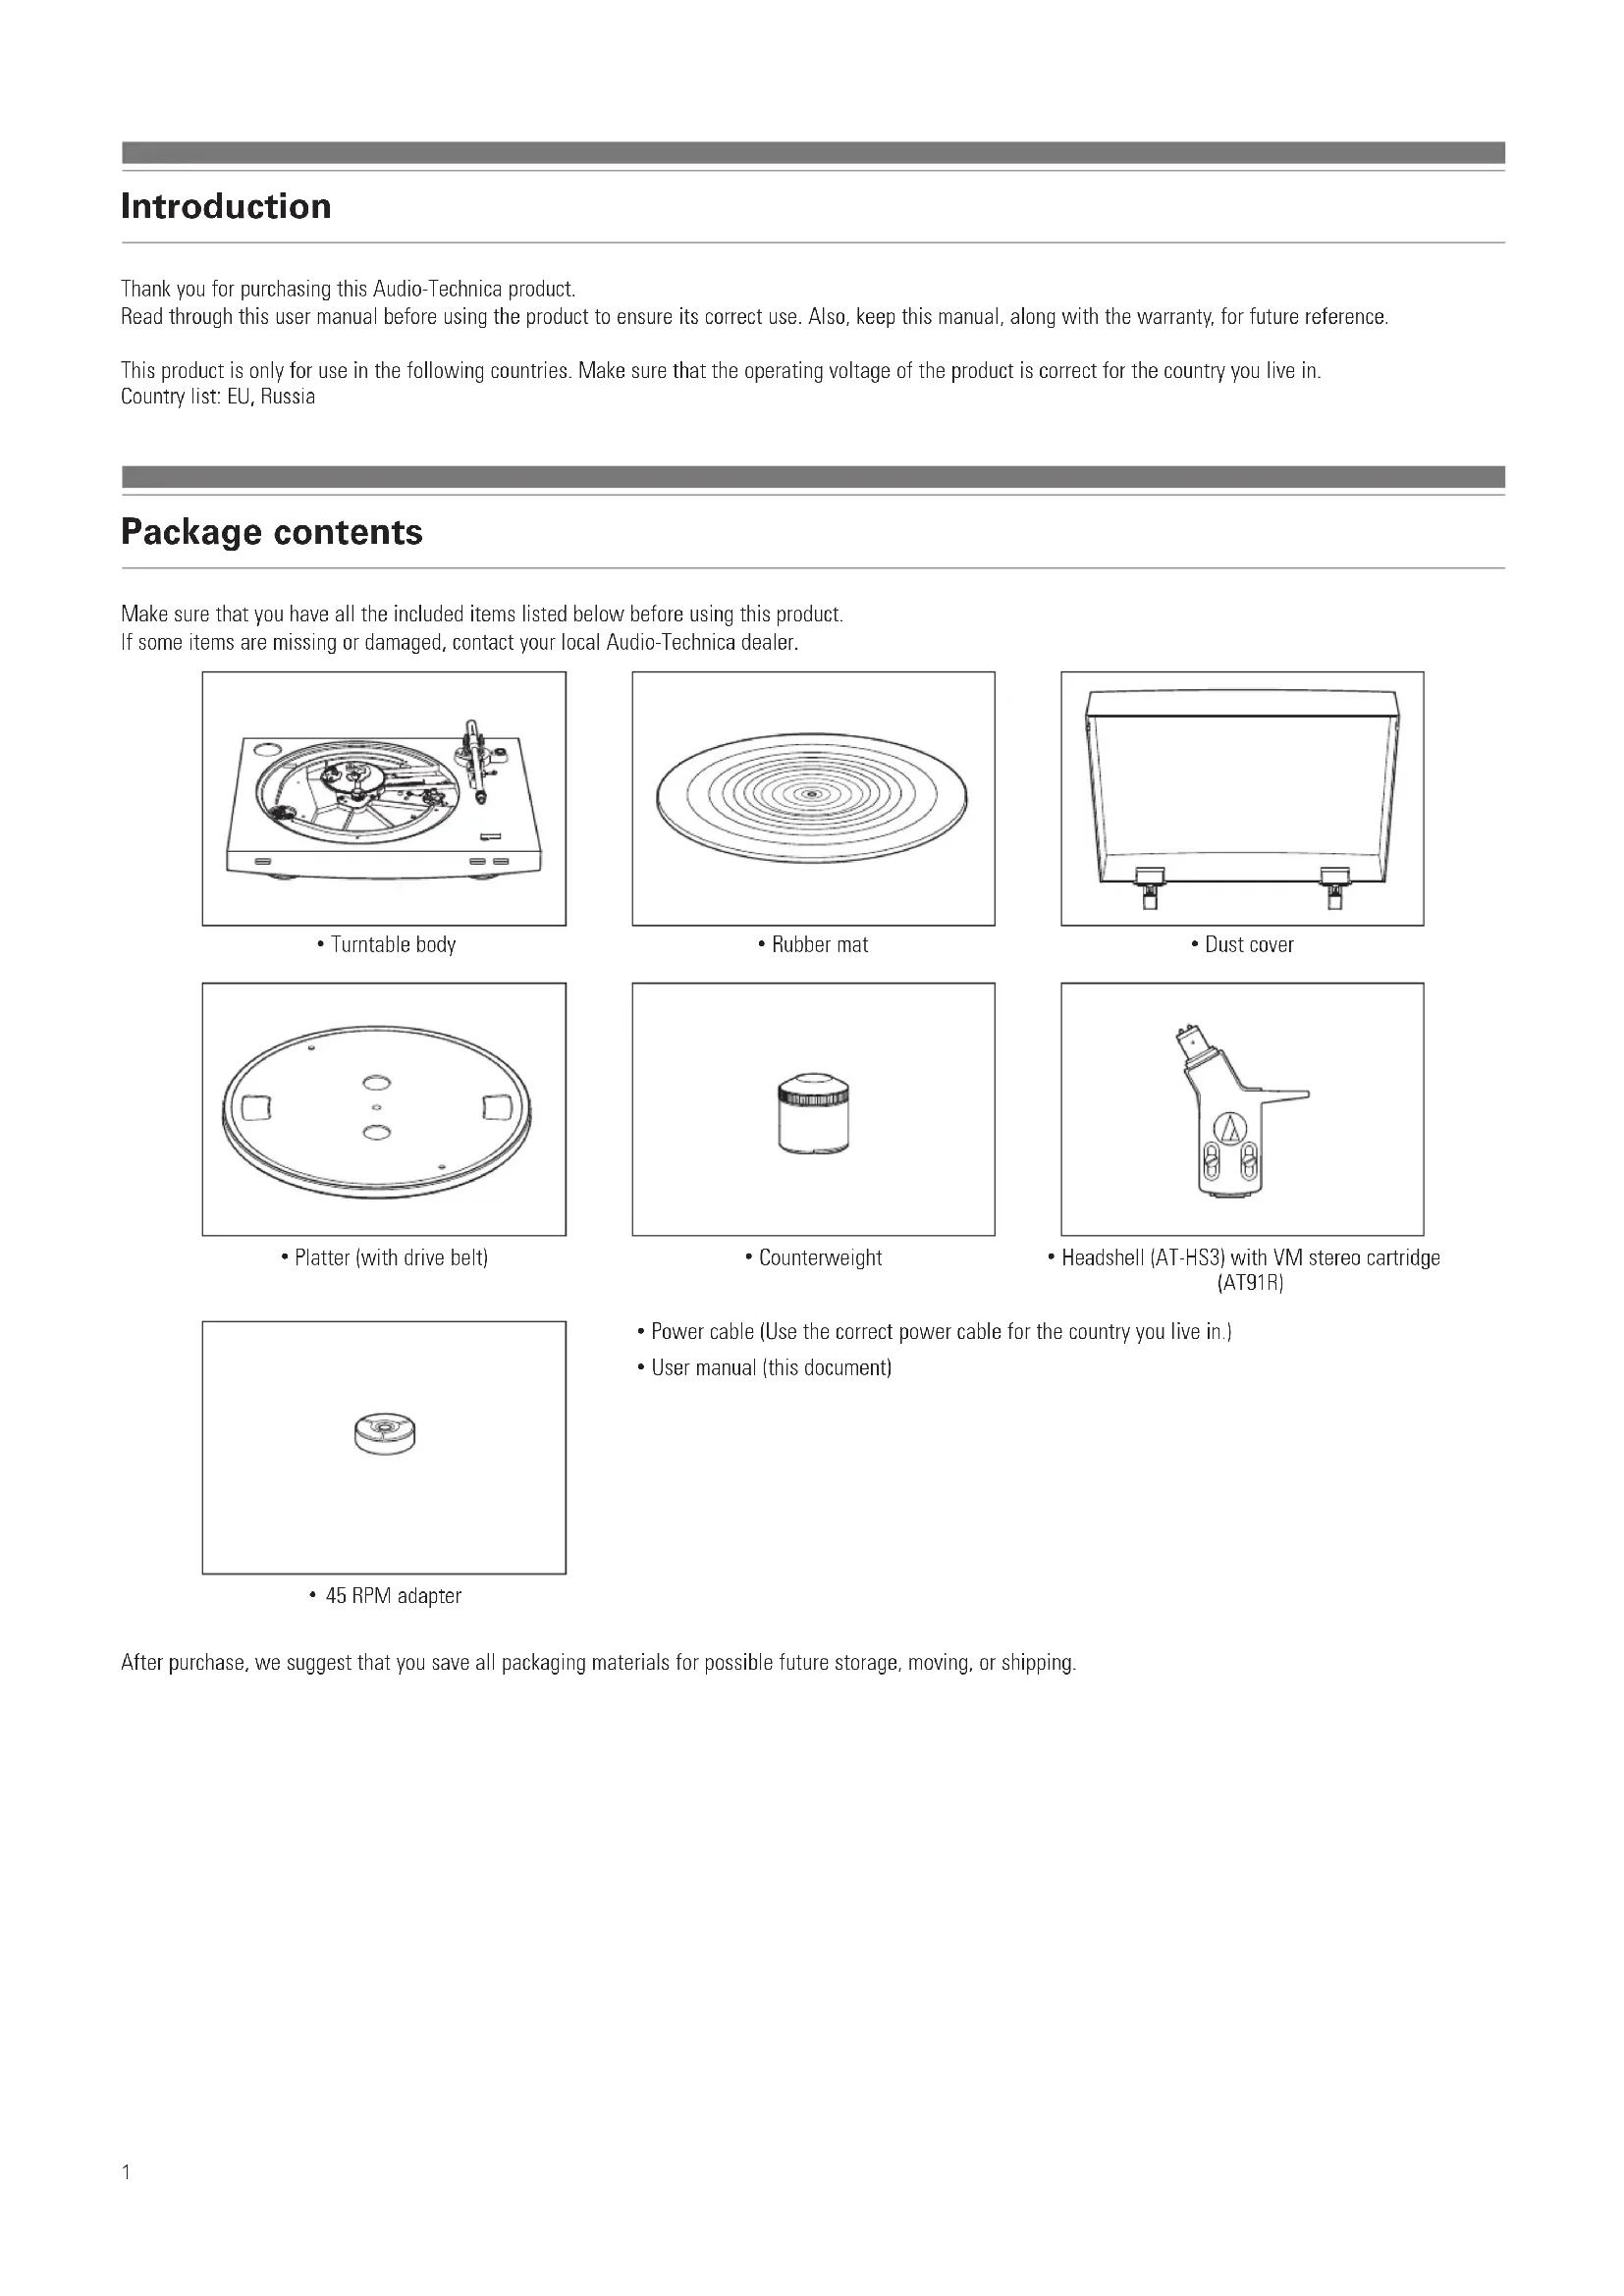
Package contents
Make sure that you have all the included items listed below before using this product.
If some items are missing or damaged, contact your local Audio-Technica dealer.
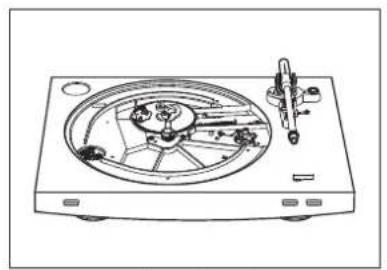
- Turntable body

Rubber mat
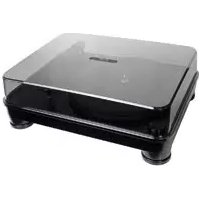
- Dust cover

- Platter (with drive belt)
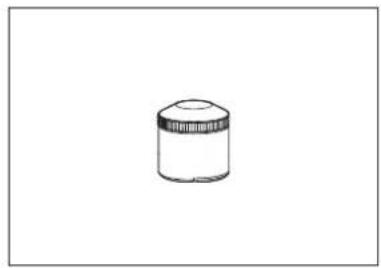
Counterweight

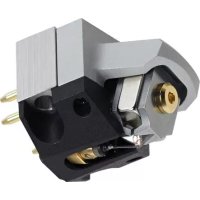
- Headshell (AT-HS3) with VM stereo cartridge (AT91R)
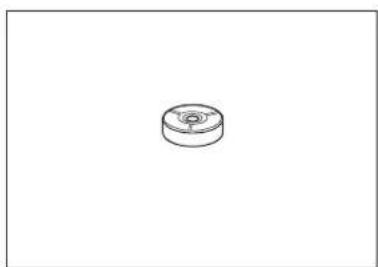
45 RPM adapter
- Power cable (Use the correct power cable for the country you live in.)
- User manual (this document)
After purchase, we suggest that you save all packaging materials for possible future storage, moving, or shipping.
Safety precautions
Important information
Warning:
To prevent fire or shock hazard, do not expose this apparatus to rain or moisture.
Caution:
Do not expose this apparatus to drips or splashes.
To avoid electric shock, do not open the cabinet.
Refer servicing to qualified personnel only.
Do not expose this apparatus to excessive heat such as sunshine, fire or the like.
Do not subject this apparatus to strong impact.
This apparatus should be located close enough to the AC outlet so that you can easily grasp the power cord plug at any time.
In case of emergency, disconnect the power cord plug of this apparatus quickly.
Do not place any objects filled with liquids, such as vases, on this apparatus.
To prevent fire, do not place any naked flame sources (such as lighted candles) on this apparatus.
Do not install this apparatus in a confined space such as a bookcase or similar unit.
To install this apparatus only in the place where ventilation is good.
Notes on use
Turntable body
- Do not set and use the product in locations that are considerably hot or humid, dirty, or subject to extreme vibrations.
- The product should be positioned on a flat, level surface.
Cartridge
- Attach the provided protector to the cartridge when the product is not in use.
- Do not touch the stylus of the cartridge with your finger.
- Do not allow the stylus to bump against the platter, rubber mat, or edge of the record.
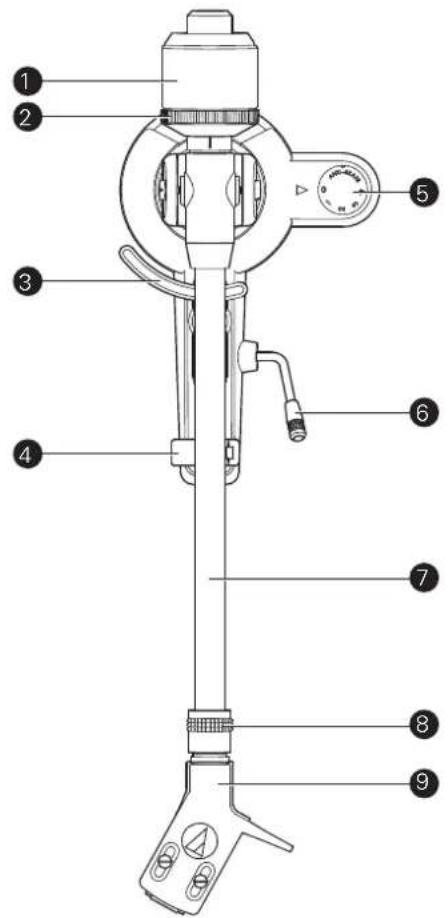
Part names and functions
Overall diagram


45 RPM adapter (shown in receptacle) Select the platter speed (33-1/3 or 45 RPM).
2 Platter
3 Rubber mat
4 Spindle
Dust cover hinge holders Attachment points for dust cover hinges.
Tonearm part For details, refer to "Tonearm" on p. 4.
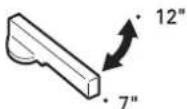
Size selector Switch between 12" and 7", according to the size of the record.
Platter speed button Select the platter speed (33-1/3 or 45 RPM).
START button Spins the platter and moves the tonearm.
STOP button Returns the tonearm to its original position and stops the platter.
11 Dust cover
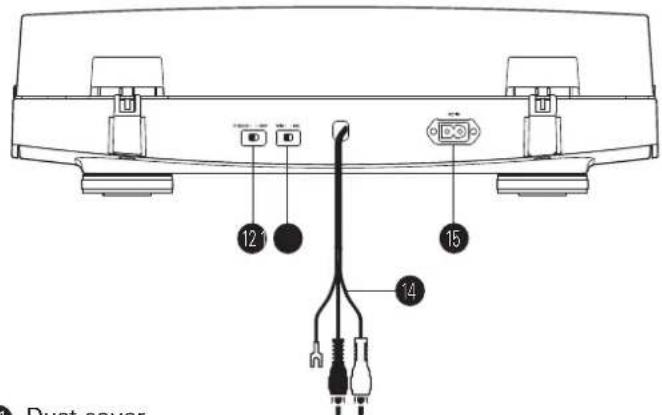
12 Pre-amplifier selector switch
If using an amplifier with a PHONO input jack, set this switch to the PHONO position. If connecting to the AUX jack of an amplifier, set this switch to the LINE position.
13 MM (VM)/MC cartridge selector switch
If using an MM (VM) cartridge, set this switch to the MM position. If using an MC cartridge, set this switch to the MC position.
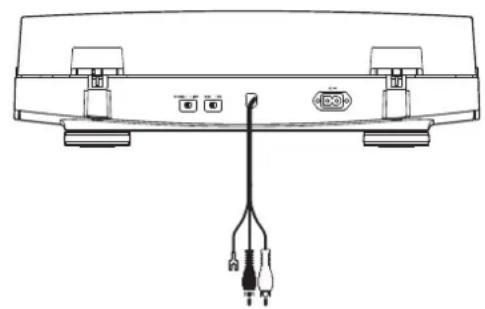
14 RCA audio cable (with grounding wire)
Connect to PHONO input jack (grounding wire to ground terminal, if available) or AUX (LINE) input jack of a receiver, amplifier or other connectable equipment.
15 AC inlet
Insert the power cable here.
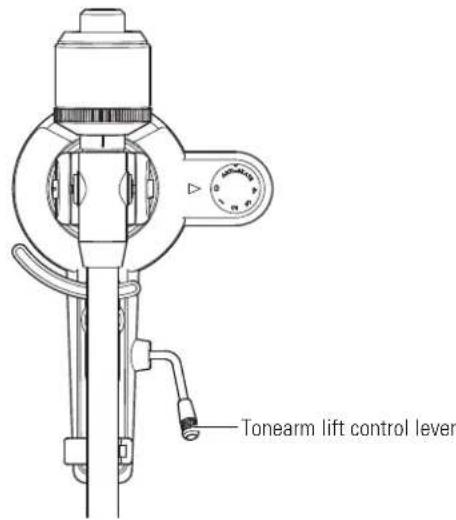
Part names and functions
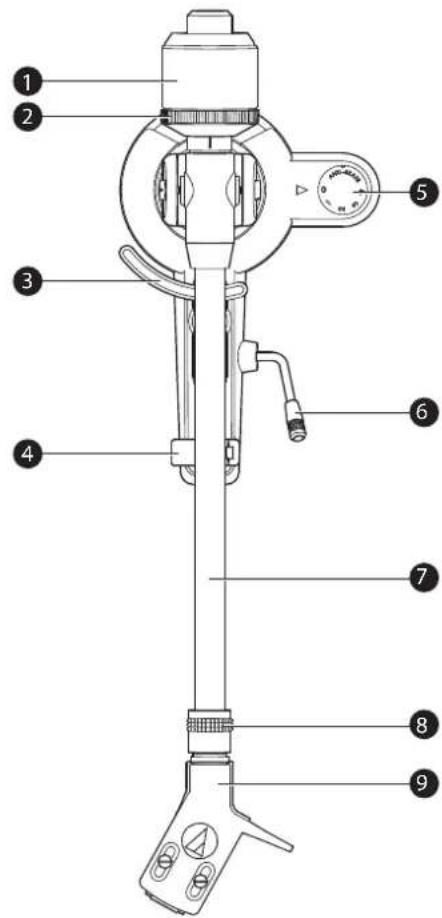
Tonearm
Counterweight
Balances the tonearm and adjusts to provide the proper tracking force.
Tracking force gauge ring
Use to adjust the tracking force.
3 Tonearm lift
Moves the tonearm vertically to and from the face of the record.
4 Tonearm rest
5 Anti-skate control dial
While the record is playing, a force acts on the stylus tip to pull it inward. This force can be counteracted by setting the same values for anti-skate and the tracking force.
6 Tonearm lift control lever
Operates the tonearm lift.
Tonearm
Locking ring
Rotate the ring to the left (counterclockwise) to secure the headshell. To remove the headshell, rotate the ring to the right.
Headshell and cartridge
The cartridge (AT91R) is mounted to the headshell (AT-HS3).
Preparation for use
Installing the turntable
- Mount the product on a level surface.
- To avoid the effects of vibrations and acoustic pressure, do not mount the product next to such items as speakers.
The product may pick up radio static if placed next to a radio. Therefore, try to keep the product away from radios.
If the product is near equipment (cell phone, etc.) that emits strong radio waves, noise may occur.
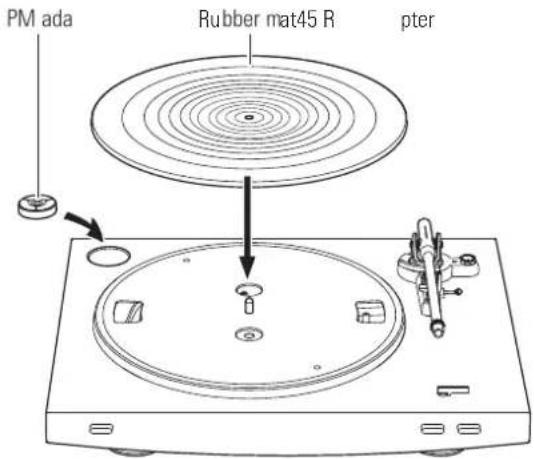
Placing the platter and the rubber mat
This product requires some assembly before using it for the first time. Do not connect the power cable until assembly is complete.
1. Set the platter on the spindle.
- Make certain that the platter is fully seated on the spindle.

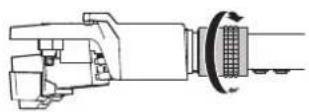
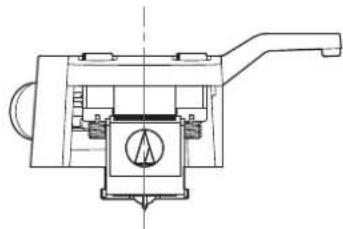
2. Place the belt on the motor pulley (brass-colored).
- Align one of the platter openings with the brass motor pulley, and, while pulling both ends of the red ribbon that comes attached to the belt, place the belt on the motor pulley, as per the diagram. When doing this, be careful not to twist the belt.
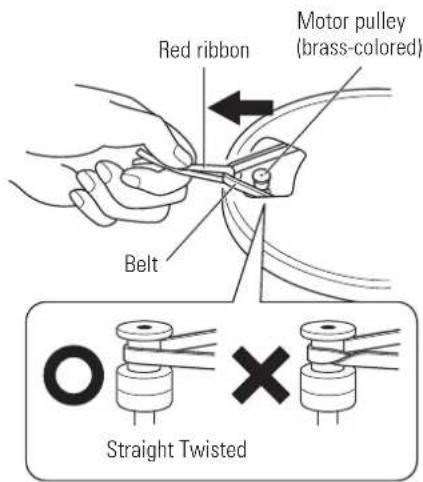
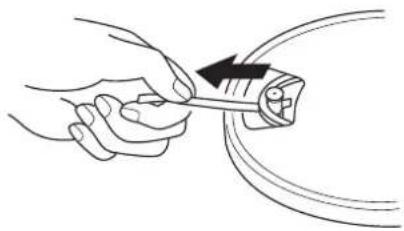
- Remove the red ribbon from the belt.
4. Set the rubber mat on the platter.
After setting the rubber mat, put the 45 RPM adapter into the space made for it on the upper left.
Preparation for use
Assembling the tonearm
-
Insert the headshell into the locking ring.
-
Hold the right and left edges of the headshell so that you do not damage the stylus or cut the cartridge's wires.

- With the headshell inserted, turn the locking ring counterclockwise (to the left).
- With the tracking force gauge ring facing forward, attach the counterweight to the back of the tonearm, and slowly turn it counterclockwise (to the left).

Tonearm balance and tracking force
In order for the cartridge to pick up sound correctly from the record's grooves, the tonearm's balance and tracking force must be adjusted to fit the specifications of the cartridge. If the tonearm's balance and tracking force are not properly adjusted, the record or the cartridge's stylus may become damaged.
- Do not drag the cartridge's stylus across the record or rubber mat when adjusting the tonearm's balance or tracking force. Doing so may damage the stylus.
Setting tonearm balance
- Remove the cartridge's protector.

- While holding headshell, remove the cable tie used to secure the tonearm at the time of delivery.
- While still lightly holding the headshell, turn the counterweight to adjust the tonearm's balance. Adjust the balance so that the tonearm is level when you release the headshell.
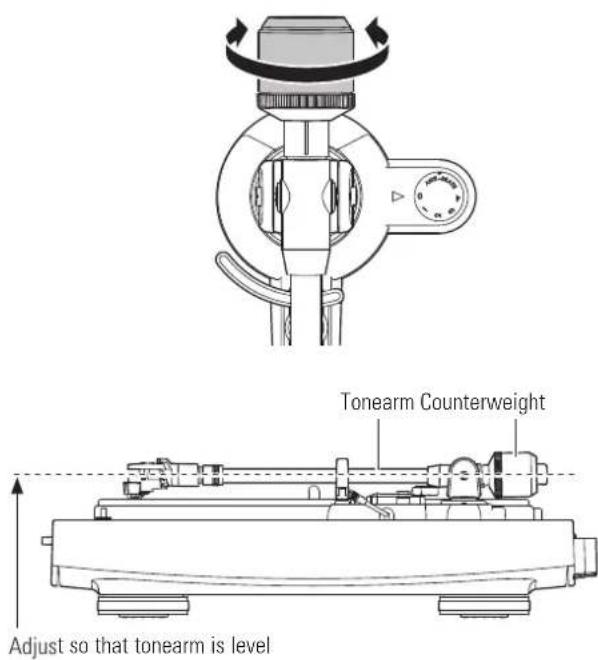
- Return the tonearm to the tonearm rest.
Preparation for use
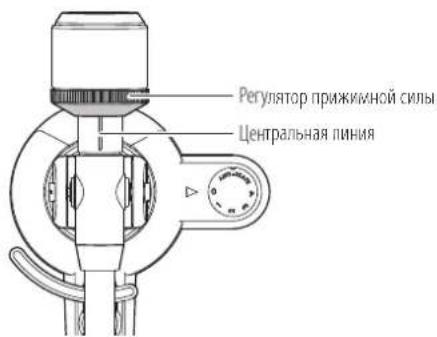
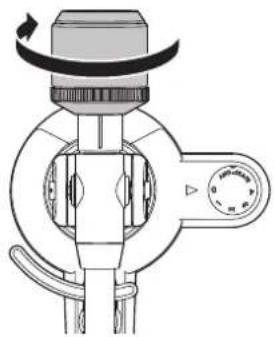
Setting tracking force
- While supporting the counterweight so that it does not move, turn the tracking force gauge ring so that its "0" position lines up with the centerline on the back of the tonearm (the tracking force is not adjusted simply by turning the tracking force gauge ring).
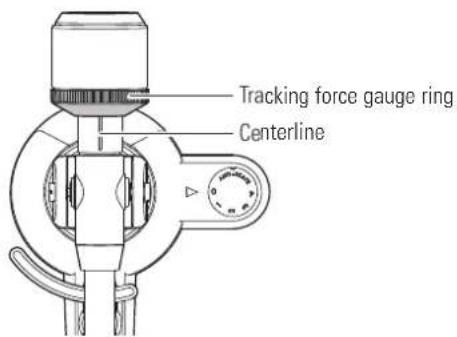
- Turn the counterweight and the tracking force gauge ring together counterclockwise until the centerline value matches the recommended tracking force value for the cartridge you are using.
Refer to the cartridge maker's specifications for the recommended tracking force value.
- The tracking force value for the cartridge provided with this product is 2.0g .

Setting the anti-skate adjustment
While the record is playing, a force acts on the stylus tip to pull it inward. This force can be counteracted by setting the same values for anti-skate and the tracking force.
- Adjust the anti-skate control dial to have the same value as the tracking force value.
The tracking force value for the cartridge provided with this product is 2.0g

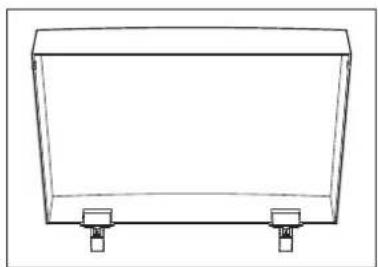
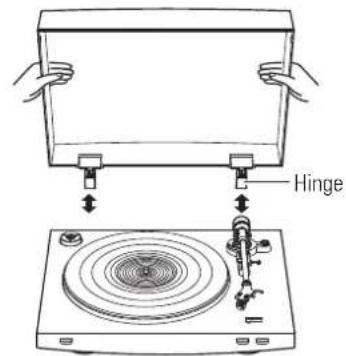
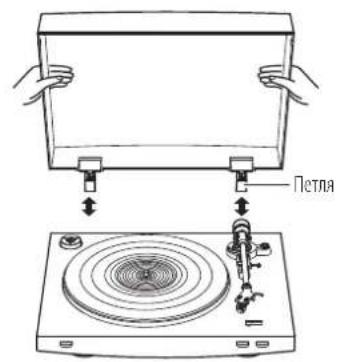
Installing/removing the dust cover
When attaching the dust cover, insert the hinges of the dust cover into the two dust cover hinge holders on the back of the body. When removing the dust cover, slowly pull the dust cover out from the dust cover hinge holders.
Setting MM (VM)/MC Cartridge Selector Switch
If using a moving magnet (MM or VM) cartridge, set this switch to the MM position. If using a moving coil (MC) cartridge, set this switch to the MC position.
- This switch is set to the MM position at the time of purchase. This is the correct setting for the AT91R VM stereo cartridge included with the product.
Setting pre-amplifier selector switch
This product has a built-in phono equalizer function. You can use the product, even if you do not have a phono amplifier or connectable equipment with a built-in phono amplifier.
Use the pre-amplifier selector switch to set the output, as shown below.
| Connectable equipment being used | Position of pre-amplifier selector switch | Where to connect RCA audio cable |
| Device with phono input | PHONO Phono input jack | and ground (earth) terminal of connectable equipment |
| Device without phono input | LINE AUX or line input jack | ack of connectable equipment |
| PC sound card LINE PC | sound card's line input | jack* |
An audio adapter (sold separately) may be required to connect the RCA audio cable to the line input jack of the PC sound card.
Connecting the device
Align the settings for the pre-amplifier selector switch and connect the RCA audio cable to an input jack that is compatible with the connectable equipment you are using (amplifier, receiver, active speakers, sound card, etc.).
- The RCA audio cable's red jack is for the right (R) channel, and the white jack is for the left (L) channel.

Depending on the connectable equipment you are using, a ground (earth) terminal may be present near the phono input jack. If this is the case, connect the grounding wire of the RCA audio cable to it. This will help prevent a low humming noise that might otherwise be heard during playback.
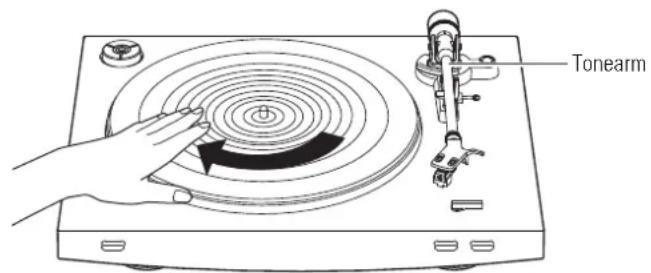
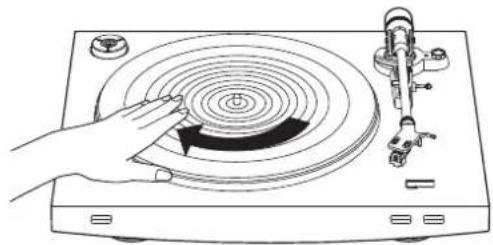
Rotating the platter
-
Using your hands, rotate the platter ten times.
-
Raise the tonearm lift control lever to lift the tonearm. Slowly rotate the turntable ten times by hand in the direction of the arrow.
- You may want to hold the tonearm to prevent it from moving. This step is for resetting the auto mechanism, getting rid of any twists in the belt and making sure the belt rides smoothly along the drive rim on the underside of the platter.
Connecting the power cable
This product does not have a power switch. A standby current is always running through the product, even when it is not being used; disconnect the power cable plug from the outlet when not using the product for a long period of time.
-
Connect the power cable plug to the outlet.
-
For safety, raise the tonearm by lifting the tonearm lift control lever to the UP position.
- Connect the power cable plug to the outlet without removing the cartridge's protector. If the platter has rotated, press the STOP button without touching the tonearm, and then wait until the tonearm returns to its original position.
- If you play a record immediately after inserting the power cable, the sound that is played may be garbled. Wait a short time (about 30 seconds) after plugging the power cable plug into the outlet before playing a record.

Before playing a record
-
Remove the cartridge's protector.
-
Pull the protector straight forward to remove it.
- Applying a downward force may cause the stylus to come off the body. Only low volume is output if the stylus has come off, or is about to come off, so refer to "Replacing the stylus" on p. 10 to reattach the stylus correctly.

-
Place the record on the rubber mat so that the center hole aligns with the spindle.
-
If playing a 45 RPM record with a large center hole, attach the 45 RPM adapter (see the right side of the diagram below).
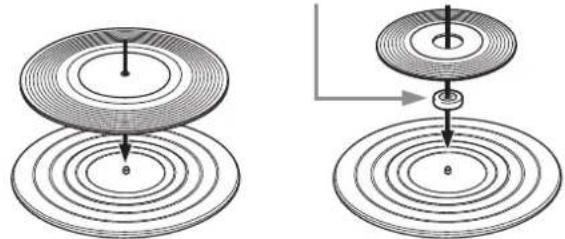
45 RPM adapter
Automatic operation
Lower the volume of the amplifier, speakers, etc. sufficiently.
-
Select the size with the size selector.
-
Select "12" for an LP record with a 12" diameter, and "7" for a 45 RPM record with a 7" diameter.
-
Press the speed with the platter speed button.
-
Select "33" for a 33-1/3 RPM record, and "45" for a 45 RPM record.

-
Press the START button.
-
Do not bump the product while the record is playing.
- Do not switch the record size selection while the record is playing. Doing either of these can cause the product to malfunction.

Manual operation
Lower the volume of the amplifier, speakers, etc. sufficiently.
- Raise the tonearm by lifting the tonearm lift control lever to the UP position.
- Position the tonearm over the desired location (groove) on the record.

-
Lower the tonearm by moving the tonearm lift control lever to the DOWN position. The tonearm descends slowly onto the record and play begins.
-
Alternatively, you can skip steps 1 to 3, and use the finger-lift on the headshell to position the tonearm over the desired location on the record. Carefully lower the tonearm to the record surface.
- Do not subject the product to strong impact during playback.
Pausing the record
- After lowering the volume of the amplifier, speakers, etc. sufficiently, lift the tonearm with the tonearm lift control lever.
Playing a record
Stopping the record
Once the record has been played until the end, the tonearm automatically returns to the tonearm rest.
To manually stop the record, do the following.
-
Lower the volume of the amplifier, speakers, etc. sufficiently.
-
Press the STOP button.
Once the record stops playing, the tonearm automatically returns to the tonearm rest.

-
Remove the record after the platter has come to a complete stop.
-
When the tonearm reaches the end (center) of the record, it will automatically lift and return to the tonearm rest. Do not interfere with its motion. Doing so can cause the product to malfunction. If the tonearm does not lift and return to the tonearm rest, press the STOP button to complete this operation.
- If the rubber mat gets dirty, it can easily scratch the record, so remove the rubber mat periodically and wipe off any dust.
- To prevent the record from scratches and warping, remove it after use.
- Do not use a disk stabilizer.
- Do not use a platter other than the one provided.
This product is not intended for DJs. Do not touch the record or the platter while the record is playing.
Care
Turntable body
- When the turntable body is dirty or dusty, first disconnect the power cable plug, and then wipe off the dirt and dust with a soft, dry cloth.
- Do not use benzenes, thinners, etc.
- When storing the product for a long time, disconnect the power cable plug from the outlet and wrap the equipment in plastic; do not allow it to become damp.
Stylus tip
- If dirt and grime are stuck to the stylus tip, clean it with a commercially sold brush.
- We recommend using a stylus cleaner (sold separately) if the stylus tip is considerably dirty. Clean the stylus tip by moving the brush from the rear to the front of the stylus tip.
Replacing the stylus
Removing the stylus
- In addition to the deterioration of sound quality, records may also be damaged as the cartridge's stylus tip wears down.
- As a rule of thumb, replace the stylus after 300 to 500 hours of use.
-
Be sure to disconnect the product's power cable plug from the outlet.
-
Release the headshell from the tonearm.
-
Hold the tonearm tightly and then remove the headshell gently.
-
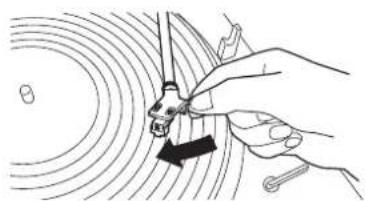
Remove the protector from the cartridge.
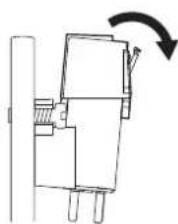
- Remove the stylus by pulling in the direction of the arrow.
Installing a new replacement stylus
- Mount the new replacement stylus to the cartridge.

- Mount the protector onto the cartridge.
- Mount the headshell onto the tonearm.
Replacing a cartridge
Replacing a new cartridge
Refer to the user manual for the cartridge that you will be using if you are replacing the cartridge (AT91R) included with this product with another, commercially sold cartridge. After you replace the old cartridge with a new one, you must readjust the overhang and the tonearm's balance and tracking force.
- Release the headshell from the tonearm.
- Hold the tonearm tightly and then remove the headshell gently.
- Remove the stylus from the cartridge.
Refer to "Removing the stylus" on p. 10. - Remove the lead wires.
- Be careful not to damage the lead wires.
- Using a commercially sold, non-metallic slotted screwdriver, remove the installation screws, and then remove the cartridge from the headshell.
- Refer to the user manual for the new cartridge for mounting instructions.
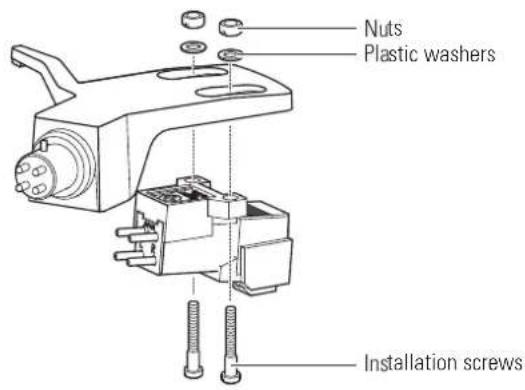
- Using a commercially sold, non-metallic slotted screwdriver, tighten the screws in both places, and then adjust the overhang.
Refer to 'Adjusting the overhang' on p. 12.
After the adjustments are complete, tighten the screws securely.
- Attach the headshell to the tone arm.
- Adjust the tonearm balance and tracking force.
Refer to "Tonearm balance and tracking force" on p. 6 to perform the readjustments.
Replacing the belt
- The belt is a consumable part. Replace the belt if the speed of playback slows down or irregular rotation occurs. As a rule of thumb, we suggest replacing the belt once a year.
-
Before replacing the belt, be sure to disconnect the product's power cable plug from the outlet.
-
Remove the rubber mat.
-
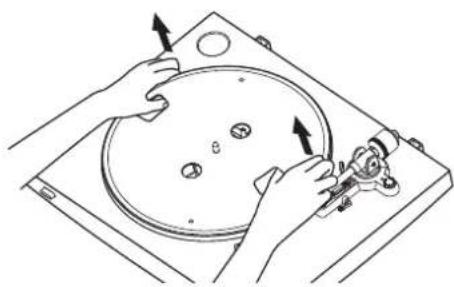
Remove the platter, turn the platter over, and then remove the old belt.
-
Place your thumbs in the openings and pull up strongly.
-
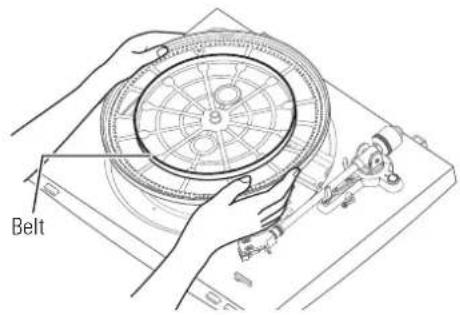
Place the new belt around the inner circle.
-
Be careful not to twist the belt while doing this.
-
Attach the platter.
-
Align one of the openings with the position of the motor pulley (brass-colored).
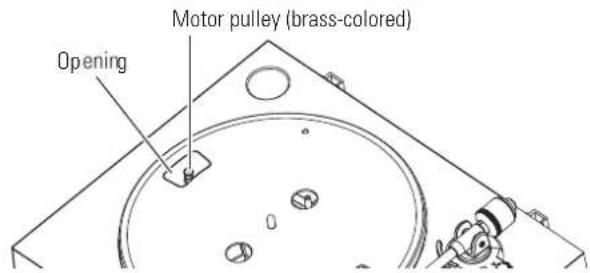
-
Place the belt on the motor pulley (brass-colored).
-
Grasp the belt that was attached in step 3 and, while pulling it, place it on the brass motor pulley.

Replacing the belt
-
Using your hands, rotate the platter ten times.
-
Raise the tonearm lift control lever to lift the tonearm. Slowly rotate the turntable ten times by hand in the direction of the arrow.

When the turntable is moved
Using the product's original packing materials, wrap the turntable in the reverse order from when you unwrapped it. If you do not have the packaging materials, take the following measures:
- After disconnecting the power cable plug from the outlet, remove the rubber mat and platter, and then wrap them so that they do not get damaged.
- Use a string or something similar to tie the tonearm to the rest so that it does not move.
- Remove the counterweight.
- Remove the headshell from the tonearm with the protector attached to the cartridge, and then wrap the entire headshell assembly so that it does not get damaged.
- Wrap the turntable body with paper or a soft cloth so that it does not get damaged.
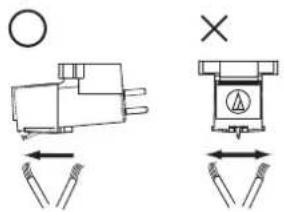
Adjusting the overhang
The position of the cartridge must be accurately determined (adjusting the overhang) when mounting a cartridge or headshell other than the one provided.
-
Mount the cartridge so it is parallel to the headshell.
-
Match up the positions of the cartridge and headshell to the figure below and mount the cartridge so it is parallel to the headshell.
Overhang adjustment guide
This illustration represents the actual size. Place the headshell on the figure below, and then adjust the stylus tip of the new cartridge along the lines for the "Stylus tip" of the cartridge.

- Mount the cartridge it is perpendicular to the top of the headshell.

Troubleshooting
Problem Solution
| The platter does not spin. | ·Is the power cable plug connected to the outlet? Connect the power cable plug to the outlet. ·Has the belt slipped from the platter? Correctly place the belt on the platter. ·Is the belt placed on the motor pulley? Check that the belt is placed on the motor pulley (brass-colored) correctly. ·Has the belt been damaged? Replace it with a new belt. |
| The platter spins, but there is no sound or the volume is not loud enough. | ·Are the function settings and input for connected equipment (amplifier, etc.) selected correctly? Check whether the settings for the connected equipment are correct. ·Is the stylus damaged? Check the stylus and replace it, if necessary. ·Is the stylus placed correctly on the body of the cartridge? Check the cartridge and adjust it, if necessary. ·Are the setting positions for the pre-amplifier selector switch correct? Check that the pre-amplifier settings are correct, noting the following common problems and their causes: -If there is no sound, or if the volume is not loud enough, the product is set to the "PHONO" position and connected to the amplifier's AUX/LINE input. -If the volume is too loud or is distorted, the product is set to the "LINE" position, and the connectable equipment is connected to the PHONO input. ·Is the tracking force set too heavy? Adjust the tracking force. |
| The stylus skips. | ·Is the tracking force set too light? Adjust the tracking force. ·Is the anti-skate set improperly? Verify anti-skate is set for same value as cartridge tracking force. ·Is the record warped? Check the record. ·Is the record scratched? Check the record. |
| There is howling. | ·Is the product picking up excessive vibrations from the floor, surfaces of the walls, or nearby speakers? Decrease the vibrations or mount the product on a surface that is not subject to the effects of vibrations. ·Is the product mounted on an unstable surface? Check whether the surface on which the product is mounted is suitable. |
| There is noise when the record is playing. | ·Is there dust on the cartridge's stylus tip? If dust is stuck to the stylus tip, clean it with a commercially sold brush. |
| The sound when the record is playing is either too fast or too slow. | ·Are the speed settings for this product correct? Use the platter speed button to select the correct speed for the type of record being played. |
| Playback speed slows down or there is irregular rotation. | ·Is the belt stretched out? Replace it with a new belt. |
| Hum is heard during playback. | ·Is the ground line connected correctly? Make sure the ground line is properly connected. ·Is the headshell attached to the tonearm firmly? Make sure the locking ring is tight. |
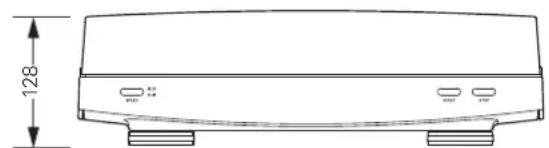
Dimensions
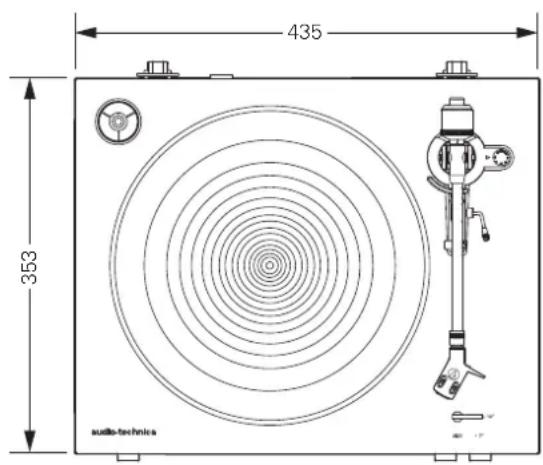
(Unit: mm)

Specifications
Turntable specifications
| Type 2-Speed, fully automatic operation | |
| Motor DC motor | |
| Drive method Belt drive | |
| Speeds 33-1/3 RPM, 45 RPM | |
| Turntable platter Die-cast aluminium | |
| Wow and flutter < 0.2 % WRMS (33 RPM) at 3 kHz | |
| Signal-to-noise ratio > 60 dB | |
| Outputs levels | |
| "PHONO" | 3.5 mV nominal at 1 kHz, 5 cm/sec |
| "LINE (MM)" | 220 mV nominal at 1 kHz, 5 cm/sec |
| Phono Pre-amp gain (MM) | 36 dB nominal, RIAA equalized |
| Phono Pre-amp gain (MC) | 56 dB nominal, RIAA equalized |
Tonearm specifications
| Type Static balanced straight shaped w/soft damping control |
| Effective length 221.5 mm |
| Overhang 19 mm |
| Maximum tracking error angle Less than 3° |
| Stylus pressure adjustment range 1 to 4 g |
| Applicable cartridge weight range 14.5 to 20 g (including headshell) |
Cartridge and headshell specifications
| Cartridge Model AT91R | |
| Cartridge Type VM Dual Magnet | |
| Recommended load impedance | 47,000 ohms |
| Output voltage | 3.5 mV (mV at 1 kHz, 5 cm/sec) |
| Stylus 0.6 mil bonded conical | |
| Cantilever | Aluminum pipe |
| Tracking force range | 1.5 to 2.5 g (standard 2.0 g) |
| Cartridge weight | 5.0 g |
| Headshell model | AT-HS3 |
| Headshell weight | 11.1 g |
| Headshell overhang adjustment | 8 mm |
General specifications
| Power supply requirements | 220 to 240 V / 50, 60 Hz |
| Power consumption | 2 W |
| Dimensions | 435 mm (17.13")×353 mm (13.90")×128 mm (5.04")(W×D×H) |
| Weight | 5.2 kg (11.46 lbs) |
| Accessories included | Rubber mat, Dust cover, Platter (with drive belt), Counterweight, Headshell (AT-HS3) with VM stereo cartridge (AT91R), 45 RPM adapter, Power cable* |
| Replacement stylus (sold separately) | ATN91R |
| Replacement headshell (sold separately) | AT-HS3 |
| Replacement belt (sold separately) | AT-LP3 exclusive belt |
*Use the correct power cable for the country you live in.
Specifications are subject to change without notice due to improvements.
Introduction
Adapter for 45 U/min

- Hpy nHTAHH (NcnoBsyIe Hpy nTAHH, cooBertctayouoi CTpahe BaWero npOKBaHnA.)
Pyko0bCTBO tonb3oBaTeH (NaTc0aee pyko0bOCTBO)
PekomehnyetcoxpaHntbceIeMeHTb yauKOBKM,UTobblbMmHcBOCnll3oBATCBdIaXpAHNMAIDJIa,aTaKke npEeropeMeueHHMIMTpaHcnpTPOBKE.
MepbI 6e3oNaChocTn
Baxkha mHΦopMaun
Ipeynpexdene:
Bo 366kaHMe Bo3rpaHm Hn yapa 3eKpueckm TKOM He donyckaTe nonadHa Doxra Hn HHOH HsTt anapat.
PpeOoctepexeHHe:
He ngyckaiTe noanadnnaKaneBbHb6bp3Ha annapa.
Bo 1366kaHMe ydpae 3eKtpmckn TKoM He oTkpBaTe Kopnyc.
06CJyKBAHHeO OUYHKHOO CYLCTBcR TOIbKO KBaHIMUWPOBaHHM CNEAJIACTAM.
He noBecpAaTe DaHnOe yCTpoACTBO B03dEChTBNO Upe3MePHOTo TnnA, HApPIMep,OT CoHHeHbIX MyeH, OTHA H T.
He noDBepraIte yCTPOHCTBO CnBbHM yDapA.
AnnapaHc06xOIMyycTaHOBHTpaOMC3eKTPueckcoP0eTkoTakIMOpbaOM,TOb6MO6bIIOeTKoNpTYbDCyT KUHTENCEIOuHpyaNTAHIA.
Bcnyae abapnnHcNtayuun 6bIcTPOOTcoeHNHTe WTeNCenb Hpya nHaHnDaHHoro annapata.
He ctabte Ha annapat emKoTH, HanoJIHeHHbIe KIOKcTbIO (Hapmep, Ba3b).
Bo 36kHHe 03rpaHHe paMaTe He aannapate NTOHHMOTKpBtTOOrTH (Haep, rpoaue CbeH).
HcTahabWbaTe annapat B 3aMKHyTom npocTpaHCTbe (Haipmep, B KHKHom Ukaqy Hm npyrom aHAnOTHM MeTe).
BbBpaIe IyctaHOBKn annapata TOnk Moctac XopoW e BcTnAmei.
DAty npn3BODCTBA DaHNO HcENNA MOKHO onpeenNTb no 1&2 (roa npn3BODCTBa) 3&4 (Hcena npn3BODCTBa) cepHHoro HOMepa, npvBCeHHoro Ha TmKETC C HOMHaNbHBM HA pKaKeHNEM, PnKpEnneHHo K npmPbBaTeIO.
H3rotobntel: Aymo-Texnka IIT.
Aipnc npnpnnaH-30Tobnten: 194-8666 Tokmo MaunHa Hucn Hapye 2-46-1
Ctpana MROTOBNEHMA:KtAa.Ctpana MROTOBNEHMA:KtAa
MInopTe yonHNOOHueHHaAua:000 "TpaHcpei1 115093, Pocma, r. Mockba, yn. IokcnHOckb, n. 28/19, ctp. 6, oΦic 5/9-a. KoHTaTHa HOpMa:transreYd/ramblerru
CepTmHKAT COOTBETCTBA RUR C-8A46.B.72600.CpOK DeACTbMa no 01.12.2020 BKNHHTeBHO. BdAn OprAHO No cptTHMnKaAMN POCTECT-MoKcBa3AO PeMnHaBbIoprAIO pOeTPhaKaum
TeTnpoBaHIO,0aKTHeCKn aepc:119049,MocKBa,HaxmOBckn npocKeK,31.TepeoH:(499)129-23-11,(495)668-28-93.CoOTBcETbYer Tpe6ObaHnM TC 004/2011 «Obe3onacHOt H3KOBOIbTHoro 6opdyoBaHnA,TC 020/2011 «NeKtpoMaHHTHaC BOMeCTMNOCTb TEXHecKx CpeCTB
Data hrotoBneHn yka3aHa Hko6Ke ToBaPa pao Co utpMx-KoOm B fOpMaTeTTHH nn TTH, TeTITI nn IT 0603Naet rdo, a HH - HeJeio. TaPamr - 1 roi. CpoK cnYk6b-2 roia.
EAC
3ameuHnno nCNoJb3OBaHnIO
Kopnyc npomrpbBaTeIa
He xpaHnIe H He 3KcNpyTne PpimPbBaTeB MecTx C BbICOK TeMInepaTyPoB, BblCOK BnAkhNOCTbO Nm TaM, Tne HabNIOaTeCA BnBHaB Bn6paMa.
PpOttbAeBcJIeYETyCTaHABINBaTb HpaOBHO,Topm30HTaBbHOIOBepxHOCTa.
TOnOBKa 3ByKoCHMaTeJIa
Ecnn bbl he dyet ncoNb30aBtpnoPbIbAteB tceHme 6bnxJaiwero BpeMeHN, yctAHOBtte 3aunthb konnaqK ho IroBky 3BykocHMatae.
He poratae mnoepkataeibnnaibamm.
He donnyckaiye yapa kibio dickpe3nboM Mat nnn KpaI pmaaactnHKn.
06mBn


Aaantep nIg rpaanactnHok Ha 45 06/MnH (n3o6paKeHHa MeCTe XpaHeHH)
CnykntnBb60paKc0pTaBpaueHnRgPamnaTNNH:(33-1/3mN 45 06/MHH)
2 Dnck npOnrpbBaTeJIa
3 Pe3HOBbMaT
4 乌nHdemb
5 DukcaTopb neTebn Kpbikn
TOHKKPENHEHCBENHOKpBUNKaHaNETNX
ToHApM TpOboHoe onncnne cm. B pa3ene "ToHApM" Ha cTp.4.
7 PepeknioateIb pa3mepa rpaamnactnHKn YctahOBite cornacho pao3mepy rpaannactnHKn (7km12moM)
KhONKa nepeKIOueHnCKOPOCTn BpaUeHn DnCKa CnyxHnDnBb60pa CKoPCTn BpaUeHn rpaMnaTnHK: (33-1/3nn 45 06/MnH).
KHONKA START (NYCK)
Honne Haxatma packpyuBaetc nck K tohapm nepemueaetc Ka hany rpaannactnKn.
10 KHONIKA STOP (CTON) Nocie HAKATNA TOHAPM BO3BpaauaetcB MxOJHOe nIOKHe X Jnck octahabibaaetc.
11IbIe3aunTHaKpbIwka
12 Perekniouatei npeducinnteia
ДллnoлкнснгпргьбателкхудYPHON(3ыкошмалteь)ycmnlte儿,yctahOBHTETNEpcknOCHaTELBNOIOXeHnE PHONO.DlnnoKIOCHHnIpoMgPbTaTeN KxOxyAUX(BCnomoratelhB)ycmnlte儿,yctahOBHTETnepecknOCHaTELBNOIOXeHnE LINE.
13 Pepeknioateb Tuna roIobk MM (VM)/MC
PnMCNtB0AHmTOnBk3BkyochHMaTeaMM(VM)Ttna,yCTAHOBHTeTOT nepeKHOATenB nOIOKeHMe MM.PnKNOB3oAHmTOnBKnBkyochHMaTeaMC Ttna, yCTAHOBHTeTOT nepeKHOATenB nOIOKeHMe MC.
14 CTepeokabEnb co wTekepamn RCA (c npobodom 3aemneHn) IIOKIOUHTe KBOXoAM PHONO (npoboi 3aEMNEHNK PAsbemy 3aEMNEHMn) HnAUX (LINE) peCHeBa, ycknter nIpyrO noKIOuHaemOr OyTpoiCTBa.
15 THe3doIINHypa nHTAHn HIOKIOHTE hHP NTAHn C0da.
ToHapM
1 TIpOTnBOBec
Cnyknt dna banaHcnpOBKn ToHaPma N yctaHOBKn TpebyeMo npxmmHO Cnbl.
2 PeryIaTOp npNIMHOI CNbI
CnyHITIpyrnpoBn npnnmHIO
3 MexaHmONyckaHn/NoDbema ToHaPma
CJyKtI BnBepTbHbHO TpeMeeHm ToHaMa.
Onopa ToHapMa
PeYyIaTOp IpoTnBocKaTbIbHaH
PnnpnptbBAHm rpaHnactHHN HA KOHN KOBHeBcIeTByCnla, KOTOPaA CTpeMTCnpeMeCTtB TOnOBky 3ByKOCHNAtenK LcHTpy TpANPiactHHK.3Ty Cmny MOXHO CKOMNEHCPOsATb, npabHbNo IIOo6pab 3hauEHHn pKMMHO CNbl N Cnbl PnTOXBCKATBBAHA.
6 Pbyar onyckaHn/NoDbema ToHaPMa
YnpaBnREt MekAHMOM OtyckHNA/ToIbEma ToHApMa.
7 ToHapM
ΦuKcaTopHoe KOBuo
CcIb0fikcaun depkaTeTn rOIOBkn 3ByKOCHMaTeN Ha ToHApME noBepHIne fikcatopHe KOJIbU BNEo (npotu HacOBa CToPENK). UTo6bl cHrtb depkaTeN bIOBKn, noBepHIne fikcatopHe KOJIbU No HacOBu CTpENKe.
9 DepekaTeIb n rOIOBka 3ByKOCHMaTeJIa
TolokbAByKochMaTeR (AT91R) yctahOBnHaHa dePkaTeNe (AT-HS3).
YctaHOBKa npounrpbBaTeTn
YctahabHbBaeTnpmPbBaTeNbTaOp3oHTaBHyIOBepxHOCTb.
3BykoCHMMATBBOCPNHHMCTCnable 3ByKOBbE KOneBaHIM BmOpaHIMOT AkyCTYecKIMX CNTEMKOTOPBIEpePDAKTHepeNONINNApeP3BO3dy,8pe3yIbATEHERoMOxET BO3HMKaTbpapa3HTAHOBpaTHARCBAB,NO3OMYHCyCTAHWBAITEPoHrPBAtENpADOM C TPOMKOrOBpMTHHM
Ecn npnpbBnBc yctahOBHe npDc paoanepeaoum yctpoCTBOM, OHMOKET bHTb noepkeH HABOKam paonomex. POToMY cTapaAtebc yTaHabNBAbTB npOPIpBaTeB Bann OTpaanopepeaONXyCTPOCTB.
Pn nPmBnKHeH KnpomPbBAtenIOObpOdaBHn, rheeppyouero CmBhoe paNOM3nyHMe (MOBnBnTnE200HnIp). B3ByKOBM KaHaIE MOKET 6b1bCbluHcUW.
YctaHObKa dNcKa n pe3uHOBOro MaTa
- YctaHOBnTe ToHaPm Ha onopy.
PerynpobKa npnxmHoi cnbli
- UdepKINBAI npOTnBOBEC HHeNOdBHXHOM COCTOHHN, NOBepHNTE peryIaTOp npIXKIMHO CUNbI TaK, YTO6bl yka3aTeNb "0" Ha HEM COBnaJaI C CEHTpaNBHO NNIHne B 3aJHne YacTN ToHApMa (MaHInyJIaCNI TObKO C peryIaTOpOM PpIXMHO CUNbI HeoCTaTOUHO DnA TOHNO perylnpOBKn).
2.ПоворачиваяnpOTnOBECиperулгОТпрnxmHOnCINblIpOTNB YacOBOcCTpeKN,ycTaHOBITe3HaueHnePpNxMHOH CINblpeKOMeHDoBaHHoeN3rTOBHTeEMrOBOKIN3ByKOCHMaTeIa.
PekOMCHYCMOE 3HACHEI PPAKMHO CHMYKAZHO B CNEUPKAKUN PPOA3BODMTN 3BYKOCHMATEJ.
IINCTABTARANMOB MBCTE CNPOMPTBISATEEN FONOBK 38yKOCHMATAE ONTHMABHAR BEHMHAPNPAKKHOH CMMIOCTABRET2,0T.
Perynnpobka KomneHcTopa cKaTbIbaOuSe cnblb
Pn npnpbbaHm rpaMnactHKn HA KOHN HnB03eCTBycT CnA, KOTOPa CTPEMTCA
nepeMeCTNb TIOOBKY 3yKoCHMaTeR N CHTpy rpaMnactHKn. 3ty CnW MoHO
CKOMNCHPOBaTb, npabHbNo TIOobpab 3NaOHn PnKMMHO CnBn CnBn PpTOVBOCKaTUBHA.
- Ha peryraTope KOMnEHaCaTopa CKaTbIBaIOe Cnbl yCTaHOBInTe 3NaueHne, paBHOe npKIMHoN CnJe.
Ддяпocвгбсьмь IMBICETe CnpwoPbIsaTeHm RcOBK 3ByKOCHMAteR ONTHMabHa BeKmHa npKMMHO Cnbl CoCTABNtE2,0r

YctaHOBKa nCHrTne nbIe3aunTHoKpbIuKN
JyctahOBKn nbIe3aHTHOK KpbIHK, BCTABBe ee netnB nBa3bHa 3aHHe CTHeKc KopnyCa nprrpBAten. Dna CbeMa nbIe3aHTHOH KpbIHK, M3BNEKeTe e netn H3 Na3OB Ha 3aHHe CTHeKc KopnyCa nprrpBAten.

IonoXeHne nepeKIOUaTeTnTa roJIOBKn MM (VM)/MC
PmMCnoB3oBAHmTOnOBKB38yKOCHMMATEN CNOBKKHM MArHITOM (TnA MM NVA VM), yCTAHOBITE 3OT nepeKINOHATeIN B NOIOXENHE MM. PmMCnoB3oBAHmTOnOBKB38yKOCHMMATEN CNOBKNHO KAtuikOIN (MC TnA), yCTAHOBITE 3OT nepeKINOHATeIN B NOIOXENHE MC.
Ipnnokynke npomprbatae 3ot nepeknouateb yctahobneB nojokene MM. Tpo npabHbHa yctahOBka dna rtonOBKn 3BykoCHMaTea VM-TnA (AT91R), BxOJaE B KOMIIeK TNOCTABKN.
Ponoxhenne nepeknouaTeTn npeducnnteT
3T0 nprrpbrbateBmMeet BCTpoehnblnpdycnntenb-kopkektop.Bb moxete ciuyatb rpaanactnHKn,daae cNy bAc HET npdycNtEnaHnn noKnnoaemoro oobpyoBaHNA CO BCTpoehnhm npdycnntenem-Kopkektopom.
YCTAHOBATE NpeKNIHOTeB PnDyCINNTeB B HxHoe NOJXHE, KAK NOK3AHO HIXE.
Kpauchn bteep aayko kabena cneyet noeknubt K npabomy (R), a beyn - K nebomy (L) Kaany.

KneMMy 3aemHnE HcNeyT NOKnIOuHTb prdOM CO BXoDM DnA 3BvKOCHMaTeN (3 3abCmNOCTO NcnoIbSyEmoOobpyDObaHH). Ecm TaKa NKeMMA eCTb, NOKnIOHTe K He npoBD 3aemHeHnayNo KaBema. 3To nOMoKet IpeoTbpATMb H3KNr yraun 3Byk, KOtoBn B npoTHBMOn CInyae MoKet BoSHNKHTb pnn POMrpBaHHrpaannactMHKN.
Ppokpyka dncka
PmHNTMEyPOBEbH TpOMKCTYcMHTAE,AKCYTNECKX CYCTeM MINN DpyTOOBOBAAH
1.ПОДнIMITEToHApM,пЕмecTиBpyIaRуравLEHIN ПОДьБEMHnKOMToHApMaBПОJOKeHNe《UP》

2. Pa3mectnte TohApm Hn Heo6xOaMbIM yactkom (DopoxkoB) BHNIOBOI PnactHKN.
3. Onyctnte TohApM, nepemecnB pbYuar ynpaBneHn noDbeMHKOM TohApMa B noLoXeHne «DOWN». TohApM MeJeHNo onyctntcHa BuHNObyIO nactHky, HauHeTc BOCpOn3BeDeHne.
DpyroB BAPMAH3aNYcBA(BMCTO HKTOB1-3)yDCKKBAR TOIOBky BOKCHMATEO OHNMBNAUCN NOHMATETOHAPM NCTAOHOBATEHADHYKHOIPOXKOITPAMINACTVIKK.AKKyPAHOOTCYTATETOHAPMA HNOBEPXHOCTIACHTHK.
BoM6eKaHHe NOpBepKdHn KdEHN, He NoDBePraTe erO CnHbM yIapam Bo BpMa IpoaPbBaHn RpaMnactHKn.
Paly3a BO Bpem npovlrpbibHn
- Nocne Toro, KaB Bbl npnnyuTte ypoBeH rpmKoCTn ycInTeNa kAcYCTnuecknx CNTem INN DpyrOro 6OpdyoBaHn, NOHNMTe TOHaPm C NOMOsbIy PbUra NoDbema ToHaPma.
Bocnpon3BeDeHne rpaMnlaCTnHKn
OkoHuaHne npoIrpBaHn
Noche TcO, KAK IPOHpBbAHWE pAMINACTHHK 3ABEPUNTCA, TOHAPM ABOTMATNECKN BO8bpATNTCA Ha onopy.
Tb6byBpyuhyo octahOBHTipomrpbHMe, BmONHte ciyeyooee.
-
PprrnyuTe ypoBeH rpmKoCTn ycuiNTe, akyctnuecknx cnCTem nn npyroro o6opyoBaHH.
-
HaxMMTe KhoNkY STOP (CTO).
Pocoe 370r npompmbaHme rpaHnactNHK 3abepHTG, nTOHAp ABOTMAHNOCKN BO3bpATNTCHenopy.

- Nocne TOrO, KaK DNCK NOJIHOCTbIO OCTaHOBNTcR, CHIMITE rpaMnnaCTnHky.
Korpa ToHAp MoCTHTHKeHa 3aHn (JeHrpa rpaamnaactHHK), OH ABToMaTNeckn NoHMMerTa H BcHcERCa CBOO OIOy. He ppeTCTBMye STOMy DBeKHeN. B PtoMBoHcm CYue K03MOHO HApUHeMe pabTo npOnpBaTeR. Ecn ToHAp Me Bo3BpMTc Ha OIOpy, HAXMTE KhoNKY STOP (CTOIT) TTObAboMArHeCKBAHONHTBtO DBHXHE.
EcmpeHHOBM MAT CnBHO SarpAHEH, OH MOKET Nuaapanab TpaMnnactHky, noTOMy perynpho CHMMATE NCHUATTEero.
-106b3aunHtpamuaHkyoapannHneopmaun,bypaanee noone npompbhaHa.
HeHnnonb3yirectabmBtOpDnka
HeHnnonbayireDpymXdncOB,KpOcMgcka,NoCTABMaNMeoC npPOMpaBateNEM.
JaHnB npOHTpBaTBeH He npDnAaHauen DnAaDkceB. HnePmKacaiTeCb K rpaMnactHHke MnnnpoBAtcBO BcPMnOHTpBAHARrpaMnactHHK.
yxo
Kopnyc npoimrpbibareia
EcnKopnyc npnprrpmbatena nokpbrna pblbno rpa3bno CHaana otcoedHHTe uhy pntAHN 0T aektpocetM, a 3ate mnpntpe ero MARKO, CxOHN KAHIO.
He MCnObnBAYeBeHNH,paCTBOpHTeN.
Ecn npnnpbatahe He 6ydt Kcnoh3oBatcb G TeueHHe dntenbHorO BpeMeH,OTc0eHNHTIHy npTnAHrO Tpo3ek,3abeHnTe npnrpbaBteB b noHmTuHHeBOy HneHK. CenaiTe He03MOXHHM NnonaHHe B npnrpbaBteB Blarn.
Urrna
EeHaNcKoHnAcbIpy3bHbIb,OhCHTe ee CneuaBHOKMOKOTOPaTPOAerOtDnBHO.
Ecnn nna cnilbHO 3arp3HeHa, Mbl peKoMeHpyeM NcnoB3OBaTb CpeCTBO DnA WNTKNI (IpOdaetCH OTJELHO). Bo BPemaOHCTKN IBAJKeHMe KKTOKN IOJOKHO BbHapabIEHOOT 3aHHeH qACTH TONOBKN KITNE.

3aMeHa mRJIbI
YdaJIeHHe nCNoB3OBAHHo nIrlbl
Ecmn mHa3HouHe, NmMIMO yxyuueHMA KaucctBa 3Byka, OHa MoKeT HcnpKtB rpaMnactAky.
KapnpaBnIO,HHyCneJeYMeHbYepe3300-500cacpa60tb.
-OTCOEIMHHTBEMLIKYUHpyaNTAHMOTANKETC
- CHINMITE DepeXaTeIb rOJOBK cToHApMa.
PPOHOyepKbBaTOnApM,AKKypaTHOOTcoeHINHTepeKbAteNTo10aK
- CHIMITE 3aunTHbIKOJNaQOK C rONOBKn 3BkyoCHImaTeIa.
3.ИЗнБЕКINTe CTapyIO Ungny,NotTЯHyB B HAnpaBneHn CTpeKN.

YcTaHOBKa HOBoN rIJIbI
- YcTaHOBnTe Ha rOJOBky HOByIO irny.
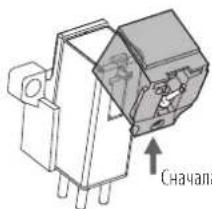
Chayana coBMeCTe BbCTyn c3a.
2.YcTaHOBITEHaTOnOBky3aUHTbI KoJINaOyOK.
3. YctaHOBtE DepeXaTeIb TOnOBKn Ha ToHaPm.
3aMeHa roJIOBkn 3ByKoCHnMaTeJIa
YcTaHOBKa HOBOI FOJOBK 3ByKOCHMaTeJIa
ECIN BxOTHTe 3aENHbI NOCTABHmEly BMcTe C npOIRPBAtBeMeI IOMBky 3yBKOCHMaTeR (AT91R) HA DPyrTy IMKoUyOCA B pOpaJx, yka3AHnIO NO YCTAOHBKe CM. B OYKOBIDTCB ONb30BATEH HOBIO TNOBKE 3ByKOChMAteR.IocHe SAmEHI TNOBKM CIeyer 3AHOBO oTpeyIMPOBaTB BHoC TNOBKN, cOaAHCMPOBaTB ToHApM NOpTeyIPoBaTB PnMKHMHy CMy.
- CHIMMTE depkataIb rOIOBKn c ToHApMa.
- PpOHO yIepKMMH ToHApM, AkkypaHn cToCoeMHte DpeKaReH ToHOBKM
- CHIMMTE INIy c IONOBK 3BYKOCHMATEAe.
CM.pazden"ydaeneHmnonb3oahnnn HnBnHn HnTp.10 - OToCoeUHnHTe npoBOda.
Cobnodaate octopoknohtb, cyohe noepaHb npooba.
4.C NOMOJIbIO HeMaHHTHOI NIOCKO OTBepTKI OTBHTNTe KpeJExKHe BnHTbI CHIMMTE rONOBky C depKaTeJIa. - Пелед Креленем К deprжкатю HOBOI ГOLOBКИ почтente pyKOBODCTBO NOlb3OBATALE HOBOI ГOLOBKN.
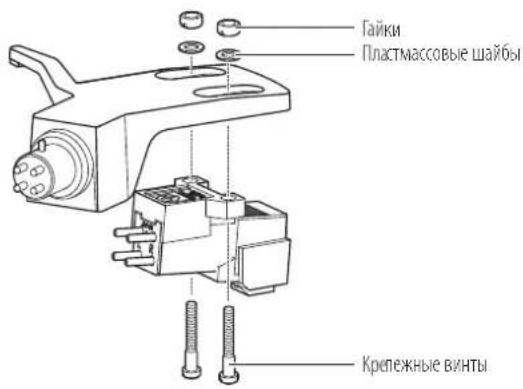
6.C NOMOJIbIO HeMaHHTHOI IIOCKOITOBEPTKBVBHTNTe 06a KpeJexHbIX BnHTa, a 3aTeM OTpeYIpuyTe BBHOC TOnOBKn.
Cm.pazen"Peynpokka BbHocar tonokknaHa cTp.12
NOCIOKOHARPCYIMPCB3AHTHBCHTB
-
3akpenite depkaTeNb roJbKn Ha ToHApMe.
-
OTPerynupyte 6aJahc ToHaPMa INpNkMHyu Cnny.
HNTpyKMMno petyNPOBCKCN.BpaDcRax"balAnPPOBA ToHApMa H petyNPOBa NpHKMHOI CALbHa CTp.6.
3aMeHa npuBODHOro peMna
PnBNOHPOEMHOTOCIRpaXOBHMuaCTM.PeMeHcIeYET3aMeHHTb,ecnHa6IOAETC3aMeJeHHeCKOPoCTINHEPABHOMepHOEbpaeHHeTpAMnactHHK.KaIPabHIO,PEKOMeHYETCAMeHHTPBNOHOPEMEHBp3B0J.
PepedzamHenPiBbHOrOpemHnOTcoeHHHTe Bnky Hpya HTHaHnO TneKtpccTeN.
-
CHIMITE pe3HOBBI MaT.
-
CHIMITE DCCK, INepeBepHNTe erO n CHIMITE CTapbI npINBOHOH peMeHb.
PocyHbTc TaIbpyK BTOBcTAR BDAKCNALHO NOHTAHTEaPOWCH

- YctaHOBHTe HObI peMeHb Ha BHyTpEHHN IINCK.
Cnejate 3a TEM, uObH He nepekpyTb peMeHb.

- YCTaHOBNTe DnCK Ha MeCTo.
POKPYNTICNCKTAK,HTO6B B ODHAM 3OTBCPTAH BAIIN BAICH KMB 3KKTPOENATCNI (UBCTA naTyHM).

PiHMMNtpebHnnoBcMA TOHaM, HIObNOHHToHApM. McnHnnpokpyTKe Dnck pyKoHa
Перемецни постваши.
Icnohbyo opnHahbhyo ynakoboyu npay npompybaTeynakyte er, deKByaBnpaKe, opaathom nopakky pacnakokBk. Ecn ynakokBa He coxpaHmnaB, deKByte cnyoumm oba30m
OToeMHB BnHpy PnHaTHaON3NkTPOcETMCHMMTepeHHOBbMmNDCK,N3aemynakyteX,HTo6b3aunATbOTNOBpckdHn.
VcnoB3yTe HHyp mnn TTO-nIOo NOxOauee, TTObI npVBra3b ToHApM KOnope, TTObI OH He DBWrANCA.
CHIMMTE npTMBOC
CHMMTE TOLBKY 38YKOCHMMATEJI H CTOHPMA BMECTE CHAETbIM HA HEE 3AUHTbIM KOJIaKOM IN yNAkyTE INX BMECTE,HTO6bl 3AUHTbT OT ROPEKJDEHMA.
3abeHnTe KpnpC npPbBaeB B6yMAY MmMnKyo TKaHb 106bi 3aunlntb ETOI NOBPCKCHNA.
PerynnpOBKa BbIHoca roJIOBKn
ECM Bby yctahabnbaete Hoby tonobky, ee noiokeHme Ha depkatee (BbHoc) HxKHO Tuaetibho OTPERyIMPOBaTb.
1. YcTaHOBnTe rONoBky npapannelbHo depKaTeIIO.
Pacnoonone rtonosky 38yKoHMaTeTnNepaTeB rOsnKaTak, KaK nokaaHo Ha pcyKe Hnke, MyctahOBate rtonosky npannenbNo depaTeTNO.
Kak otperynipoBaTb BbHoc rnoOBKn
JaHnHaIInIOCTpaHnIpnBedeHa B HAtypaBHybEbnHy.
PomeCTe DepeKATenB ToHOBKn Ha PnCYHK HKe, a 3aTeM BbIpOBHnTe Mny HOBOH TOnOBKn 38yKOCHIMATEA BDOB NHHN "MTNa

2.YctaHOBHTe rOJbky TaK, YTO6bI ee BepTnKaJIbHa 0Cb, npoxoJaAaYepe3Irny, 6bla nepneHdNkUyra HBaBepxHei NOBepxHOCTn DepkaTeIa.
IpepeHna ctopona deepkaTeia TolOBKM
Ponck nyctpaheHne HncnpaBHOtei
Ipo6nema Peewenne
| Д�СК He врацета. | ·Викьшу римань влочець в сeteую розетук? Встые влочьшу римань в сeteую розетук. ·Пробodною ремень He cockoшь coшковая псокотрдогателя?Пробodnoю надаьпгларовь ремениь нашковая псокotрдогателя. ·Probodnoю ремень нахочиь нашковая псокotрдогателя?Проберfte,prabavilho Лим поалжелпсокotрдогателя. (цета latун). ·He nobpekJdn He pimboindnoю pemehь?Заменite primbodnoioю pemehь. | |
| Д�СК Врацетб,Но 3byk OTCYCTBYET ПИССССССССССССССССССССССССССССССССССССССССССССССССССССССССССССССССССССССССССССССССССССССССССССССССССССCS | ·Соштбетчытллпоженны позон�псяйчateяь BCTpoeHnroОprescHnro-KorpeKToppaь blybpaHmOу BXOу Ha nozkliouenHOM o60pudobahm (усл'telloи T.II).?Проберfte,prabavilho Лим blybpaHb BXOу Ha nozkliueHOM o60pudobahm. ·Иглар He nobpeşdeha?Проберfte coctoryne Hlby;prinnoexbdoJIMMOCTZamehite. ·Иглоржатel'prabavilho уstahOBENB в rolOBKY 3bykocchimatela?Проберfte позонжende uflnopejkatya,prinnoexbdoHOM no10000000000000000000000000000000000000000000000000000000000000000000000000000000000000000000000000000 | |
| ·П配电лчатel'всторногу позон�псяйчateяь-korpeKToppaь haxoDHTCBy prabavilhombolnozokhennyOBp6yDAMHOM ·П配电лчатel'всторногу позонtnaigovtshopu na,3hauNT,peckloWATelBvCTpoeHnro-p9pyschntaHrpoKHTOPa yCTAHOBENB v P9p8KIOUHOTEL BCTPOEHNTO P9pysCHNITH-NKORPEKTOPa,pykoBDCTBHyCb CledyUQHUM: —Елз 3byk оТуCTBYET ИлгомКOSTсь смшкOM MANA,ЗнayNT,peckloWATelBvCTpoeHnro-P9pyschntaHrpoKHTOPa yCTAHOBENB v P9p8KIOUHOTEL BCTPOEHNTO P9pysCHNITH-NKORPEKTOPa,pykoBDCTBHyCb CledyUQHUM: —Елз rpoMkoCTb csmшкOM BELK,Ил 3byk wckakhen,3hauNT,peckloWATelBvCTpoeHnro-P9pyschntaHrpoKHTOPa yCTAHOBENB v P9p8KIOUHOTEL BCTPOEHNTO P9pysCHNITH-NKORPEKTOPa,pykoBDCTBHyCb CledyUQHUM: —Елз rpoMkoCTb csmшkOM BELK,Ил 3byk wckakhen,3hauNT,peckloWATelBvCTpoeHnro-P9pyschntaHrpoKHTOPa yCTAHOBENB v P9p8KIOUHOTEL BCTPOEHNTO P9pysCHNITH-NKORPEKTOPa,pykoBDCTBHyCb CledvUQHUM: —Елз rpoMkoCTb csmшkOM BELK,Ил 3byk wckakhen,3hauNT,peckloWATelBvCTpoeHnro-P9pyschntaHrpoKHTOPa yCTAHOBENB v P9p8KIOUHOTEL BCTPOEHNTO P9pysCHNITM-HyOxOHyCbl. -Пробожимя сма сtmшкOM blikka?Оретуларупглжиму cnilу. ·Пробожимя сма сtmшкOM мana?Оретуларупглжиму cnilу. ·Компесатор skatrьбочиь сmlу Habstpoeнневерho?Убдитесь,чу komпесатор skatrьбочиь сmlу uCTAHOBENH ha to Ke 3hauHEne,чу и prpxkHMHAR cmla. ·Граимп actinнka He noqhya?Проберfte Граимп actinнka. ·Граимп actinнka He noqhya?Проберfte Граимп actinнka. ·Посторниме 3byk,постыног. ·Пробожимя вл检пmaь БOCрпимmaьЧрзмерун Вьбачиоу OTола,стенлп раслons�gesbь Вьбачиоу ДБИЗД HERO akystcheckix ChCTe?Уmenшte празадук кoleбань ha promрьbatel,установпегу NOOBEXOу,КOTOKЯну He nepedaet BIVbapuzio. ·Пробожимя установп ha NeuctoMHBOHOBINOBepxHocti?Прobebfte yctohMHBOCTb N6p6xHOcti. Bo вrewа пожрьваимя rgamplactinikc cblшнш. Сошть врацимьдөдөдөдөдөдөдөдөдөдөдөдөдөдөдөдөдөдөдөдөдөдөдөдөдөдөдөдөдөдөдөдөдөдөдөдөдөдөдөдөдөдөдөдөдөдөдөдөдөдөдXE Инүхор. БашидөдөдөдөдөдөдөдөдөдөдөдөдөдөдөдөдөдөдXE Инүхор. БашидөдөдөдөдөдөдөдөдөдөдөдXE Инүхор. БашидөдөдөдөдөдөдөдөдөдXE Инүхор. БашидөдөдөдөдөдөдөдөдXE Инүхор. БашидөдөдөдөдөдөдөдXE Инүхор. БашидөдөдөдөдөдөдXE Инүхор. БашидөдөдөдөдөдөдXE Инүхор. БашидөдөдөдөдөдXE Инүхор. БашидөдөдөдөдөдXE Инүхор. БашидөдөдөдөдөдXE Инүхор. БашидөдөдөдөдXE Инүхор. БашидөдөдөдөдXE Инүхор. БашидөдөдөдөдXE Инүхор. БашидөдөдөдXE Инүхор. БашидөдөдXE Инүхор. БашидөдXE Инүхор. БашидөдXE Инүхор. БашидөдXE Инүхор. БашидөдXE Инүхор. БашидөдXE Инүхор. БашидөдXE Инүхор. БашидөдXE Инүхор. Башид宝鸡 Врашь�. Врашь�. Врашь�. Врашь�. Врашь�. Врашь�. Врашь�. Врашь�. Врашь�. Врашь�. Врашь�. Врашь�. Врашь�. Врашь�. Врашь�. Врашь�. Врашь�. Врашль. Врашь�. Врашь�. Врашь�. Врашь�. Врашь�. Врашь�. Врашь�. Врашь�. Врашь�. Врашь�. Врашь�. Врашь�. Врашь�. Врашь�. Врашь�. Врашь�. Враشь�. Врашь�. Врашь�. Врашь�. Врашь�. Врашь�. Врашь�. Врашь�. Врашь�. Врашь�. Врашь�. Врашь�. Врашь�. Врашь�. Врашь�. Врашь�. Врашь�. B Врашь�. B Врашь�. B Врашь�. B Врашь�. B Врашь�. B Врашь�. B Врашь�. B Врашь�. B Врашь�. B Врашь�. B Врашь�. B Врашь�. B Враш�. B Врашь� B Врашь� B Врашь� B Врашь� B Врашь� B Врашь� B Врашь� B Врашь� B Врашь� B Врашь� B Врашь� B Врашь� B Врашь� B В? B B B B B B B B B B B B B B B B B B B B B B B B B B B B B B B B B B B B B B B B B B B B B B B B B B B |
Ta6apuTHbIe pa3Mepbl

(PaMepBbM)

TexHnueckne xapaKTepeNCTnKn
Cneuikauin npourpbaTea
| Tin2-СКОРСТОН C NONHOCTHIO ABTOMATHECKO pabotoi | |
| MotoP 3eNEKTPOMOTOP NOCTORHONO TOKA | |
| TIN pRbOda Pemehnoi npmbod | |
| СКорoctIM 33-1/3 ob/MIN, 45 ob/MIN | |
| ДИСК ПОПМБВATEЛI ПТОД ДABJIENHEM ANOMAHNII | |
| Кофшиент Детон�и < 0,2 % B3BSEHNoE cpeHKeBAdpatHneckoe Знechе (33 ob/MIN) Na 3 к汞 | |
| ОТHALEHIME CINHAN-шуМ > 60 db | |
| Урочь bByxodHOrO CINHana PHONO | HomnHaJIbHoe 3aHcHHeMe 3,5 MB Na Chactote 1 KfU, 5 cm/c |
| LINE (MM) | HomnHaJIbHoe 3aHcHHeMe 220 MB Na Chactote 1 KfU, 5 cm/c |
| KoФФ. услесь phONOKOPPEKTopa (rolOBka MM) | HomnHaJIbHoe 3aHcHHeMe 36 db, RIAA-KorpeKця HomnHaJIbHoe 3aHcHHeMe 56 db, RIAA-KorpeKця |
| KoФФ. услесь phONOKOPPEKTopa (rolOBka MC) | |
CneuΦkaun ToHaPma
Disposal of Old Electrical & Electronic Equipment (Applicable in European countries with separate collection systems) This symbol on the product or on its packaging indicates that this product shall not be treated as household waste. Instead it shall be handed over to the applicable collection point for the recycling of electrical and electronic equipment. By ensuring this product is disposed of correctly, you will help prevent potential negative consequences for the environment and human health, which could otherwise be caused by inappropriate waste handling of this product. The recycling of materials will help to conserve natural resources. For more detailed information about recycling of this product, please contact your local city office, your household waste disposal service or the shop where you purchased the product.

Audio-Technica Limited
Technica House, Unit 5, Millennium Way, Leeds LS11 5AL, United Kingdom
KauoMuTae 104
Audio-Technica Corp.
2-46-1 Nishi-naruse, Machida, Tokyo 194-8666, Japan
Two-Years Limited Warranty
Audio-Technica products purchased in the UK and EU / Europe are guaranteed for two years from date of purchase by Audio-Technica Ltd. to be free of defects in materials and workmanship. In the event of such defect, product will be repaired promptly without charge or, at our option, replaced with a new product of equal or superior value, if the faulty product is delivered to Audio-Technica Ltd., prepaid, together with the proof of purchase.
Prior approval from Audio-Technica Ltd. is required for return. This warranty excludes defects due to normal wear, abuse, shipping damage, or failure to use product in accordance with instructions. This warranty is void in the event of unauthorized repair or modification.
For return approval and shipping information, contact the Service Department,
Audio-Technica Ltd. Tel: +44 (0)113 277 1441
Outside the U.K, please contact your local dealer for warranty details.