ATLP7 - Turntable AUDIO TECHNICA - Free user manual and instructions
Find the device manual for free ATLP7 AUDIO TECHNICA in PDF.
| Product type | Manual belt-drive turntable |
| Dimensions | 450 mm × 352 mm × 157 mm (L × W × D) |
| Weight | 8.3 kg (without dust cover) |
| Power supply | 100-240 V, 50/60 Hz, 0.6 A max; AC adapter 12 V, 2 A |
| Power consumption | 5.5 W |
| Playback speeds | 33-1/3 rpm, 45 rpm |
| Motor | DC motor |
| Platter | POM (polyoxymethylene) |
| Speed fluctuations | < 0.08% WRMS (33 rpm) at 3 kHz |
| Signal-to-noise ratio | > 60 dB |
| PHONO output level | 4.5 mV nominal at 1 kHz, 5 cm/sec |
| LINE output level (MM) | 280 mV nominal at 1 kHz, 5 cm/sec |
| Tone arm | Static-balanced J-shaped |
| Arm length | 247 mm |
| Overhang | 17 mm |
| Adjustable tracking force | 0 to 2.5 g |
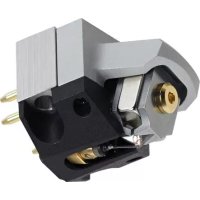
| Included cartridge | VM520EB (dual VM magnet) |
| Stylus | 0.3 × 0.7 mm elliptical bonded |
| Standard tracking force | 2.0 g |
| Included accessories | Dust cover, platter, belt, counterweight, AT-HS10 headshell with VM520EB cartridge, 45 rpm adapter, RCA audio cable (1.4 m), AC adapter (AD-SE1220KZ) |
| Maintenance | Clean the body with a soft dry cloth; clean the stylus with a brush; replace the stylus after 300 hours of use |
| Replacement parts (sold separately) | VMN20EB stylus, AT-HS10 headshell, exclusive AT-LP7 belt |
| Safety | Do not expose to rain or moisture; do not open the housing; refer all servicing to qualified personnel |
| Warranty | 2 years (subject to conditions) |
Frequently Asked Questions - ATLP7 AUDIO TECHNICA
User questions about ATLP7 AUDIO TECHNICA
0 question about this device. Answer the ones you know or ask your own.
Ask a new question about this device
Download the instructions for your Turntable in PDF format for free! Find your manual ATLP7 - AUDIO TECHNICA and take your electronic device back in hand. On this page are published all the documents necessary for the use of your device. ATLP7 by AUDIO TECHNICA.
USER MANUAL ATLP7 AUDIO TECHNICA
Belt-Drive Turntable
PykoBODTO NOIb3OBaTeTn
PpOINrpbIbATEnb cpeMeHHbIM npuBOdom
Introduction
Thank you for purchasing this Audio-Technica product.
Before using the product, read through this user manual to ensure that you will use the product correctly. Please keep this manual for future reference.
This product can be used only in the countries where the product is sold. Make sure that the operating voltage and the plug of AC adapter of the product are correct for the country you live in.
Package contents
Make sure that you have all the included items listed below before using this product. If some items are missing or damaged, contact your local Audio-Technica dealer.

- Turntable body - Dust cover - Platter

- Drive belt • Counterweight • Headshell (AT-HS10) with VM stereo

cartridge (VM520EB)

- 45 RPM adapter - RCA audio cable (Approx. 1.4 m (4.6'))

- AC adapter (Approx. 1.3 m (4.3'))
The AC adapter's plug can be removed. - User manual (this document)
After purchase, we suggest that you save all packaging materials for possible future storage, moving, or shipping.
Safety precautions
Important information
Warning:
To prevent fire or shock hazard, do not expose this apparatus to rain or moisture.
Caution:
Do not expose this apparatus to drips or splashes.
To avoid electric shock, do not open the cabinet.
Refer servicing to qualified personnel only.
Do not expose this apparatus to excessive heat such as sunshine, fire or the like.
Do not subject this apparatus to strong impact.
This apparatus should be located close enough to the AC outlet so that you can easily grasp AC adapter at any time.
In case of emergency, disconnect the AC adapter quickly.
Do not place any objects filled with liquids, such as vases, on this apparatus.
To prevent fire, do not place any naked flame sources (such as lighted candles) on this apparatus.
Do not install this apparatus in a confined space such as a bookcase or similar unit.
To install this apparatus only in the place where ventilation is good.
Notes on use
Turntable body
- Do not set and use the product in locations that are considerably hot or humid, dirty, or subject to extreme vibrations.
The product should be positioned on a flat, level surface.
Cartridge
- Lower the protector to protect the stylus when the product is not in use.
- Do not touch the stylus of the cartridge with your finger.
- Do not allow the cartridge's stylus to bump against the platter or the edge of the record.
Part names and functions
Overall diagram
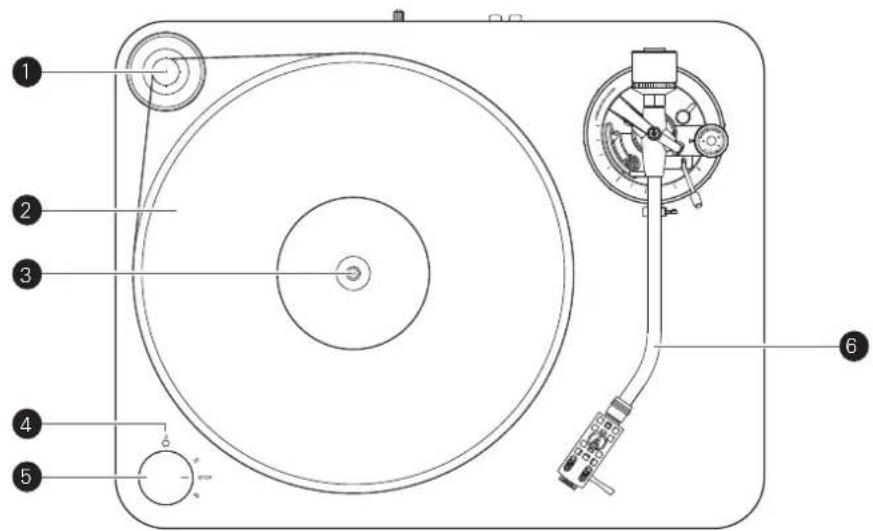
Motor pulley
2 Platter
3 Spindle
4 Power indicator
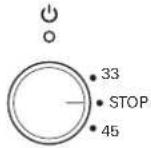
Control knob
Use to start and stop, as well as select the platter's speed.
6 Tonearm
For details, refer to "Tonearm" on p. 4.
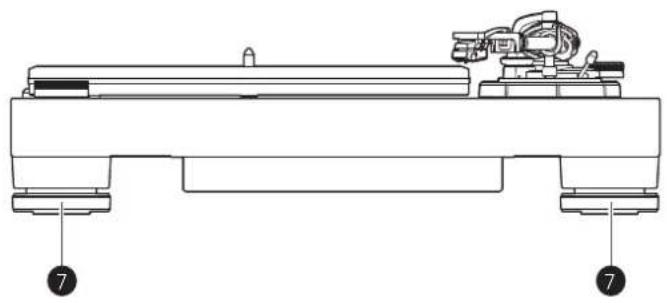
7 Feet
Adjust the level of the product.
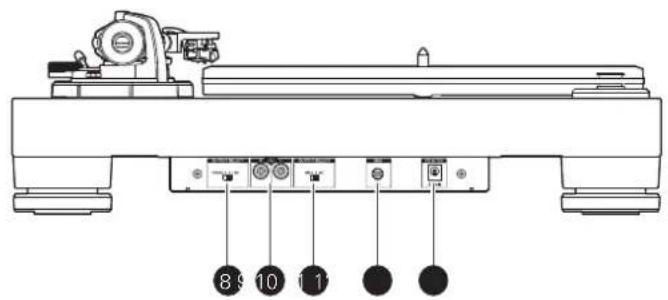
8 Pre-amplifier selector switch
If connecting to an amplifier's PHONO input jack, set this switch to the PHONO position. If connecting to the AUX jack of an amplifier, set this switch to the LINE position.
Stereo output terminals
Connect the RCA audio cable. Connect it to either the amplifier's PHONO input jack or its line input jack. The red terminal is the right channel and the white terminal is the left channel.
10 MM (VM)/MC cartridge selector switch
If using an MM (VM) cartridge, set this switch to the MM position. If using an MC cartridge, set this switch to the MC position.
Ground (earth) terminal
Connect the amplifier's ground (earth) terminal to this terminal using the RCA audio cable's ground line.
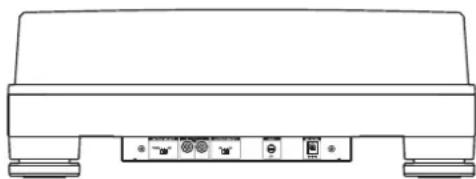
12 Power input jack
Connect the AC adapter.
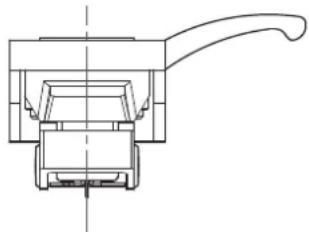
Tonearm
Counterweight
Balances the tonearm and adjusts to provide the proper tracking force.
Tracking force gauge ring
Use to adjust the tracking force.
3 Tonearm lift
Moves the tonearm vertically to and from the face of the record.
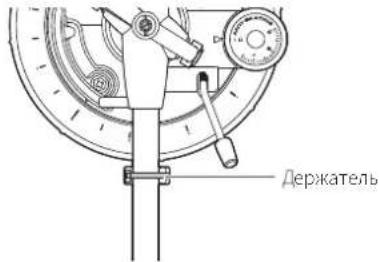
4 Tonearm rest with clamp
Use the clamp to secure the tonearm so that it does not move.
5 Tonearm height setting lever
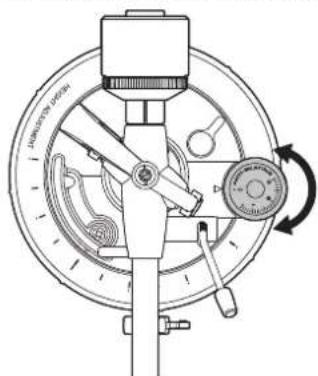
6 Anti-skate control dial
While the record is playing, a force acts on the stylus tip to pull it inward. This force can be counteracted by setting the same values for anti-skate and the tracking force.
Tonearm height adjustment dial
Use the adjustment dial to adjust the height of the tonearm.
8 Tonearm lift control lever
Operates the tonearm lift.
9 Tonearm
10 Locking ring
Rotate the ring to the left (counterclockwise) to secure the headshell. To remove the headshell, rotate the ring to the right.
11 Headshell and cartridge
The cartridge (VM520EB) is attached to the headshell (AT-HS10).

Placing the platter
This product requires some assembly before using it for the first time. Do not connect the AC adapter until assembly is complete.
-
Set the platter on the spindle.
-
To avoid damaging the spindle when seating the platter, align the positions of the spindle and the platter's hole, and then slowly seat the platter.
Make certain that the platter is fully seated on the spindle.

- Attach the belt to the platter first, and then attach it to the motor pulley.
Make sure that the belt does not get twisted.

Setting up the turntable
- Position the product on a level surface.
- To avoid the effects of vibrations and acoustic pressure, do not mount the product next to such items as speakers.
The product may pick up radio static if placed next to a radio. Therefore, try to keep the product away from radios. - If the product is near equipment (cell phone, etc.) that emits strong radio waves, noise may occur.
Leveling the turntable
-
After positioning the product where you want to use it, adjust the feet so that the product is level.
-
Use a level (sold separately) as needed to ensure that the product is level.

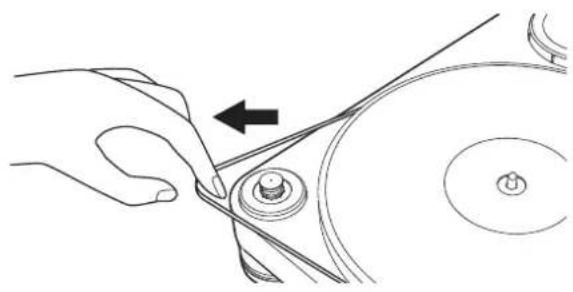
Assembling the tonearm
- Remove the cable tie used to secure the tonearm at the time of delivery.
-
Use the clamp to temporarily secure the tonearm to the tonearm rest.
-
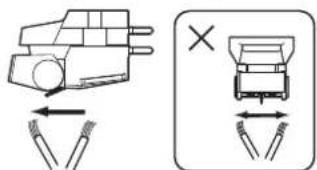
Insert the headshell into the tonearm.
-
Hold the right and left edges of the headshell so that you do not damage the stylus or cut the cartridge's wires.

- With the headshell inserted, turn the locking ring counterclockwise (to the left).

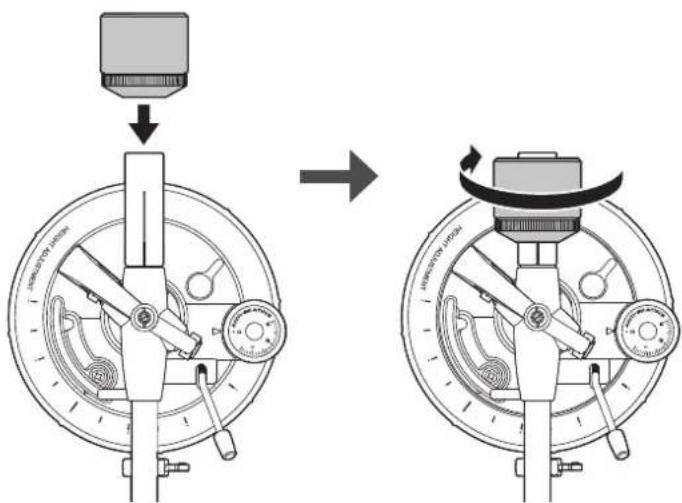
- With the tracking force gauge ring facing forward, attach the counterweight to the back of the tonearm, and slowly turn it counterclockwise (to the left).

Preparation for use
Tonearm balance and tracking force
In order for the cartridge to pick up sound correctly from the record's grooves, the lonearm's balance and tracking force must be adjusted to fit the specifications of the cartridge. If the tonearm's balance and tracking force are not properly adjusted, the record or the cartridge's stylus may become damaged.
- Do not drag the cartridge's stylus across the record or platter when adjusting the tonearm's balance or tracking force. Doing so may damage the stylus.
Setting tonearm balance
-
While lightly holding the headshell so as not to move the tonearm, remove the clamp.
-
The tonearm is tilted because the balance has yet to be adjusted.
-
While still lightly holding the headshell, turn the counterweight to adjust the tonearm's balance.
-
Adjust the balance so that the tonearm is level when you release the headshell.

Adjust so that tonearm is level
- Return the tonearm to the tonearm rest.
Setting tracking force
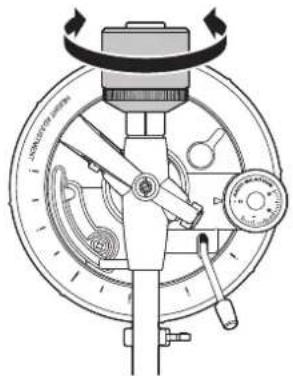
-
While supporting the counterweight so that it does not move, turn the tracking force gauge ring so that its "0" position lines up with the centerline on the back of the tonearm.
-
The tracking force is not adjusted simply by turning the tracking force gauge ring.

- Turn the counterweight and the tracking force gauge ring together counterclockwise (to the left) until the centerline value matches the recommended tracking force value for the cartridge you are using.
Refer to the cartridge maker's specifications for the recommended tracking force value.
The tracking force value for the cartridge provided with this product is 2.0g

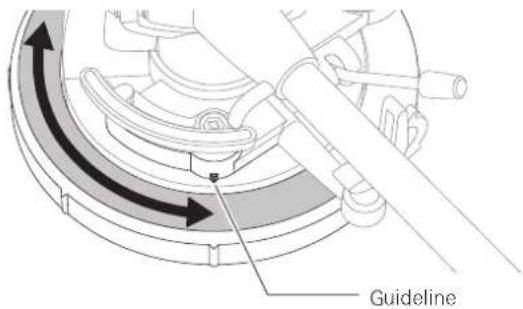
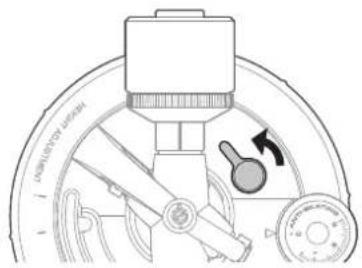
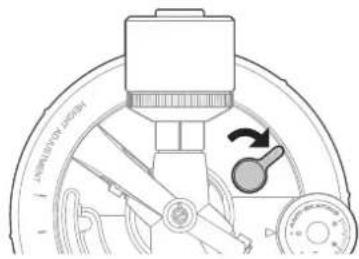
Setting the anti-skate adjustment
While the record is playing, a force acts on the stylus tip to pull it inward. This force can be counteracted by setting the same values for anti-skate and the tracking force.
- Adjust the anti-skate control dial to have the same value as the tracking force value.
The tracking force value for the cartridge provided with this product is 2.0g

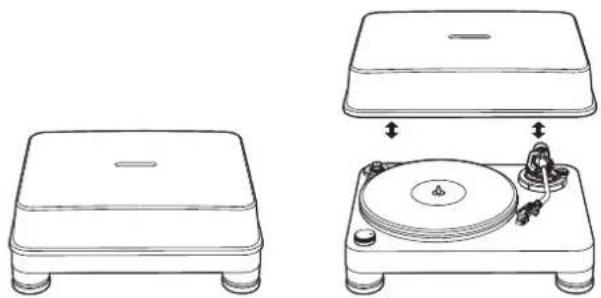
Installing/removing the dust cover
The dust cover is designed to protect the product's sensitive components when the product is not in use. It should remain off while records are playing.
- Using the dust cover during play may result in record damage or sound degradation.
- Whenever putting on or taking off the dust cover, put it onto or take it off of the body slowly.

Setting MM (VM)/MC Cartridge Selector Switch
If using a moving magnet (MM or VM) cartridge, set this switch to the MM position. If using a moving coil (MC) cartridge, set this switch to the MC position.
- This switch is set to the MM position at the time of purchase. Because the cartridge (VM520EB) included with the product is a VM stereo cartridge, keep the switch in the MM position as long as you continue to use the cartridge.
Setting pre-amplifier selector switch
This product has a built-in phono equalizer function. You can use the product, even if you do not have a phono amplifier or connectable equipment with a built-in phono amplifier, by connecting an active speaker, etc.
Use the pre-amplifier selector switch to set the output, as shown below.
| Connectable equipment being used | Position of pre-amplifier selector switch | Where to connect the RCA audio cable |
| Device with phono input | PHONO Phono input | jack and ground (earth) terminal of connectable equipment |
| Device without phono input | LINE AUX or line input | jack of connectable equipment |
| PC sound card LINE | Sound card's line input | jack* |
- An audio adapter (sold separately) may be required to connect the RCA audio cable to the PC sound card's line input jack.
Connecting to connectable equipment (active speakers, amplifiers, etc.)
Align the settings for the pre-amplifier selector switch and connect the RCA audio cable to an input jack that is compatible with the connectable equipment you are using (amplifier, receiver, active speakers, sound card, etc.).
- The RCA audio cable's red jack is for the right (R) channel, and the white jack is for the left (L) channel.
- Depending on the equipment you are connecting, a ground (earth) terminal may exist near the phono input jack. If this is the case, connect to it using the ground line from the RCA audio cable. This will help prevent a low humming noise that might otherwise be heard during playback.
Connecting the AC adapter
This product does not have a power switch. A standby current is always running through the product, even when it is not being used; disconnect the AC adapter from the outlet when not using the product for a long period of time.
-
Connect the AC adapter's cord to power input jack.
-
Plug the AC adapter into an outlet.
Make sure that the control knob is in the "STOP" position.
- If you play a record immediately after plugging the AC adapter into an outlet, the sound that is played may be garbled. Wait a short time (about 30 seconds) after plugging the AC adapter into the outlet before playing a record.
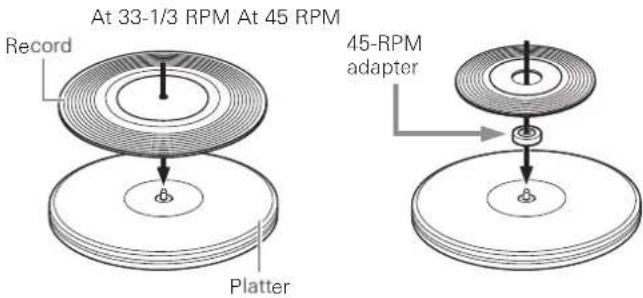
Before playing a record
-
Return the cartridge's protector to its original up position.
-
If the tonearm is fixed to the tonearm rest, remove the clamp.

-
Place the record on the platter so that the center hole aligns with the spindle.
-
If playing a 45 RPM record, attach the 45 RPM adapter (see the diagram to the right below).
Playing a record
Lower the volume of the amplifier, speakers, etc., sufficiently.
-
Use the control knob to select the speed.
-
Select "33" for a 33-1/2 RPM record, or "45" for a 45 RPM record.
The platter begins spinning. -
Raise the tonearm by lifting the tonearm lift control lever to the UP position.

- Position the tonearm over the desired location (groove) on the record.
-
Lower the tonearm by moving the tonearm lift control lever to the DOWN position. The tonearm descends slowly onto the record and play begins.
-
Alternatively, you can skip stops 2 to 4, and use your fingers to lift the headshell, move the tonearm over the desired location on the record, and then place the headshell down to begin playing the record.
- Do not subject the product to strong impact during playback.
Pausing the record
- After lowering the volume of the amplifier, speakers, etc., sufficiently, lift the tonearm with the tonearm lift control lever.
Stopping the record
- Lower the volume of the amplifier, speakers, etc., sufficiently.
- Lift the tonearm lift control lever, return the tonearm to the tonearm rest, and fix it with the clamp.
- Turn the control knob to the "STOP" position.
The platter slows down and rotation stops.
- Remove the record after the platter has come to a complete stop.
To prevent the record from becoming scratched or warped, remove it after use.
Do not use a platter other than the one provided.
This product is not intended for DJs. Do not touch the record or the platter while the record is playing.
Care
Turntable body
- When the turntable body is dirty or dusty, first disconnect the power cable plug, and then wipe off the dirt and dust with a soft, dry cloth.
- Do not use benzenes, thinners, etc.
- When storing the product for a long time, disconnect the power cable plug from the outlet and wrap the equipment in plastic; do not allow it to become damp.
Stylus tip
- If dirt and grime are stuck to the stylus tip, clean it with a commercially sold brush.
- We recommend using a stylus cleaner (sold separately) if the stylus tip is considerably dirty. Clean the stylus tip by moving the brush from the rear to the front of the stylus tip.

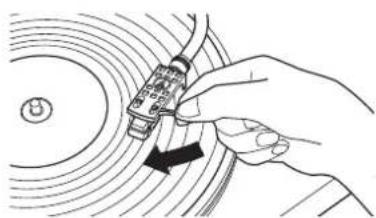
Replacing the stylus
Removing the stylus
- In addition to the deterioration of sound quality, records may also be damaged as the cartridge's stylus tip wears down.
- As a rule of thumb, replace the stylus after 300 hours of use.
-
Be sure to disconnect the product's power cable plug from the outlet.
-
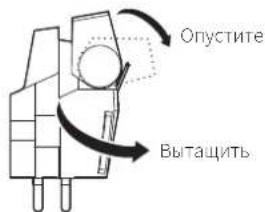
Release the headshell from the tonearm.
Fix the tonearm with the clamp and then remove the headshell gently.
- After lowering the cartridge's protector, remove the stylus by pulling in the direction of the arrow.

Installing a new replacement stylus
- Mount the new replacement stylus to the cartridge.

Align the position of the inner protrusion.
- Mount the headshell onto the tonearm.
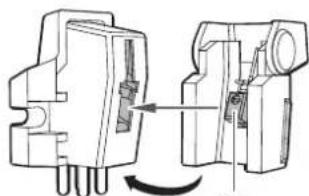
Replacing a cartridge
Refer to the user manual for the cartridge that you will be using if you are replacing the cartridge (VM520EB) included with this product with another, commercially available cartridge. After you replace the old cartridge with a new one, you must readjust the overhang and the tonearm's balance and tracking force.
- Release the headshell from the tonearm.
- Use the clamp to secure the tonearm and then remove the headshell gently.
- Remove the stylus from the cartridge.
Refer to "Removing the stylus" on p. 9. - Remove the lead tips.
- Be careful not to damage the lead tips.
- Using a commercially sold, non-metallic slotted screwdriver, remove the installation screws, and then remove the cartridge from the headshell.
- Refer to the user manual for the new cartridge for mounting instructions and connecting to the lead tips.

- Using a commercially sold, non-metallic slotted screwdriver, tighten the screws in both places, and then adjust the overhang.
Refer to "Adjusting the overhang" on p. 11.
After the adjustments are complete, tighten the screws securely.
- Attach the headshell to the tonearm.
- Adjust the tonearm's height.
Refer to "Adjusting the tonearm's height" on p. 10 while doing the adjustments.
- Adjust the tonearm balance and tracking force.
Refer to "Tonearm balance and tracking force" from p. 6.
Replacing the belt
The belt is a consumable part. Replace the belt if the speed of playback slows down or irregular rotation occurs. As a rule of thumb, we suggest replacing the belt once a year.
- Before replacing the belt, be sure to disconnect the product's power cable plug from the outlet.
-
Remove the old belt.
-
Attach the new belt to the platter first, and then attach it to the motor pulley.
-
When attaching the belt to the motor pulley, make sure that the belt does not get twisted.
Adjusting the tonearm's height
When installing a cartridge other than the one provided, you must maintain a suitable distance between the cartridge and the surface of the record. Place the stylus on the record and confirm that the tonearm is parallel to the record's surface. If it is not parallel, adjust the height of the tonearm.
- Rotate the tonearm's height setting lever to loosen the tonearm's anchor.

- Rotate the tonearm's height adjustment dial and adjust the tonearm's height.
- After the adjustments are complete, rotate the tonearm's height setting lever to set the tonearm.

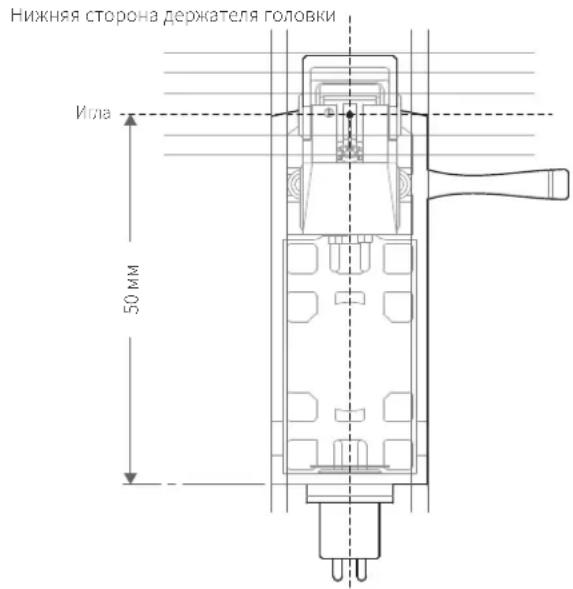
Adjusting the overhang
The position of the cartridge must be accurately determined (adjusting the overhang) when mounting a cartridge or headshell other than the one provided.
-
Mount the cartridge so it is parallel to the headshell.
-
Match up the positions of the cartridge and headshell to the figure below and mount the cartridge so it is parallel to the headshell.
Overhang adjustment guide
This illustration represents the actual size.
Place the headshell on the figure below, and then adjust the stylus tip of the new cartridge along the lines for the "Stylus tip" of the cartridge.
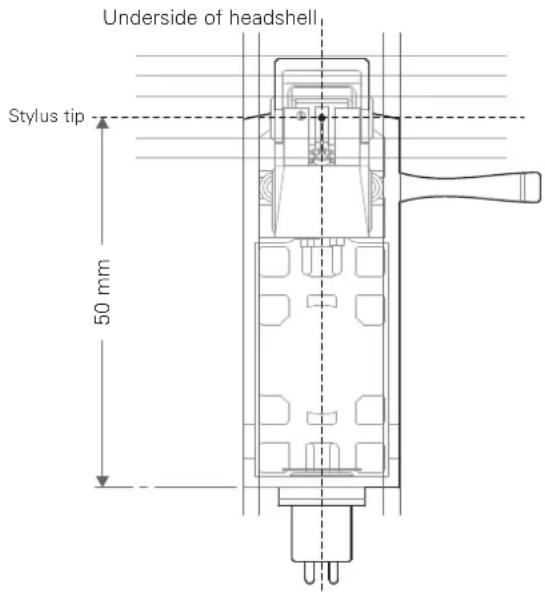
- Mount the cartridge so it is perpendicular to the top of the headshell.

When the turntable is moved
Using the product's original packing materials, wrap the turntable in the reverse order from when you unwrapped it. If you do not have the packaging materials, take the following measures:
- After unplugging the power cable plug from the outlet, remove the platter, and then wrap it so that it does not get damaged. If the product is moved while the platter is still seated, it may damage the spindle.
Fix the tonearm with the clamp. - Remove the counterweight.
- Remove the headshell from the tonearm with the cartridge's protector lowered, and then wrap the entire headshell assembly so that it does not get damaged.
- Wrap the turntable body with paper or a soft cloth so that it does not get damaged.
Troubleshooting
Problem Solution
| The platter does not spin. | - Is the AC adapter connected to the outlet? Connect AC adapter to the outlet. - Has the AC adapter's plug come off? Check whether or not the plug is properly attached to the AC adapter. - Has the belt slipped from the platter? Correctly place the belt on the platter. - Is the belt placed on the motor pulley? Check that the belt is placed on the motor pulley correctly. - Has the belt been damaged? Replace it with a new belt. |
| The platter spins, but there is no sound or the volume is not loud enough. | - Are the function settings and input for connected equipment (amplifier, etc.) selected correctly? Check whether the settings for the connected equipment are correct. - Is the stylus damaged? Check the stylus and replace it, if necessary. - Is the stylus placed correctly on the body of the cartridge? Check the cartridge and adjust it, if necessary. - Are the setting positions for the pre-amplifier selector switch correct? Check that the pre-amplifier settings are correct, noting the following common problems and their causes: - If there is no sound, or if the volume is not loud enough, the product is set to the "PHONO" position and connected to the amplifier's AUX/LINE input. - If the volume is too loud or is distorted, the product is set to the "LINE" position and connected to the amplifier's PHONO input. - Is the tracking force set too heavy? Adjust the tracking force. |
| The stylus skips. \( \bullet \) Is the tracking force set too light? Adjust the tracking force. - Is the anti-skate set improperly? Verify anti-skate is set for same value as cartridge tracking force. - Is the record warped? Check the record. - Is the record scratched? Check the record. | |
| There is howling. | - Is the product picking up excessive vibrations from the floor, surfaces of the walls, or nearby speakers? Decrease the vibrations or mount the product on a surface that is not subject to the effects of vibrations. - Is the product mounted on an unstable surface? Check whether the surface on which the product is mounted is suitable. |
| There is noise when the record is playing. | - Is there dust on the cartridge's stylus tip? If dust is stuck to the stylus tip, clean it with a commercially sold brush. |
| The sound when the record is playing is either too fast or too slow. | - Are the speed settings for the product correct? Use the control knob to select the correct speed for the type of record being played. |
| Playing speed slows down or there is irregular rotation. | - Is the belt stretched out? Replace it with a new belt. |
| Humming is heard during playback. | - Is the ground line connected correctly? Make sure the ground line is properly connected. - Is the headshell attached to the tonearm firmly? Make sure the locking ring is tight. |
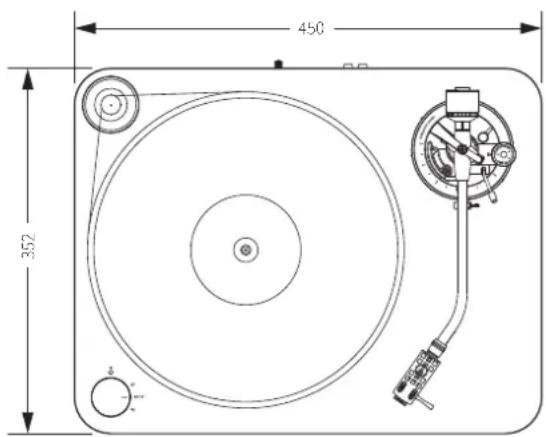
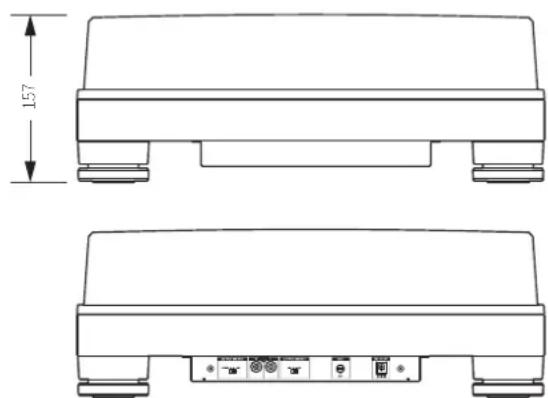
Dimensions

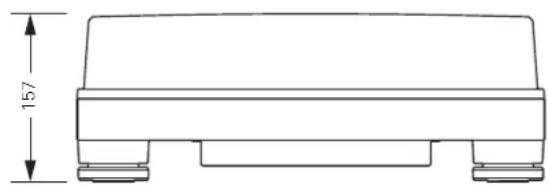
(Unit: mm)
Specifications
Turntable specifications
| Type | Belt-drive manual turntable |
| Motor DC motor | |
| Drive method Belt drive | |
| Speeds 33-1/3 RPM, 45 RPM | |
| Turntable platter POM (polyoxymethylene) | |
| Wow and flutter < 0.08 % WRMS (33 RPM) at 3 kHz | |
| Signal-to-noise ratio > 60 dB | |
| Output levels | |
| "PHONO" | 4.5 mV nominal at 1 kHz, 5 cm/sec |
| "LINE (MM)" | 280 mV nominal at 1 kHz, 5 cm/sec |
| Phono Pre-amp gain (MM) | 36 dB nominal, RIAA equalized |
| Phono Pre-amp gain (MC) | 56 dB nominal, RIAA equalized |
Tonearm specifications
| Type | Static balanced J-shaped tonearm |
| Effective length 247 mm | |
| Overhang 17 mm | |
| Maximum tracking error angle Less than 2.5° | |
| Stylus pressure adjustment range | 0 to 2.5 g |
| Applicable cartridge weight range (including headshell) | 15 to 20 g |
Cartridge and headshell specifications
| Cartridge Model VM520EB | |
| Cartridge Type VM Dual Magnet | |
| Recommended loadimpedance | 47,000 ohms |
| Output voltage 4.5 mV (mV at 1 kHz, 5 cm/sec) | |
| Stylus 0.3 × 0.7 mil bonded elliptical stylus | |
| Cantilever Aluminum pipe | |
| Tracking force range 1.8 to 2.2 g (standard 2.0 g) | |
| Cartridge weight 6.4 g | |
| Headshell model | AT-HS10 |
| Headshell weight | 10 g (excluding lead wires) |
| Headshell overhangadjustment | ± 5 mm |
General specifications
| Power supply requirements | 100 to 240 V, 50/60 Hz, 0.6 A Max. |
| Power consumption | 5.5 W |
| AC Adapter | 12 V, 2 A |
| Dimensions | 450 mm (17.72") × 352 mm (13.86") × 157 mm (6.18") (W × D × H) |
| Weight | 8.3 kg (18.30 lbs) (without dust cover) |
| Accessories included | Dust cover, Platter, Drive belt, Counterweight, Headshell (AT-HS10) with VM stereo cartridge (VM520EB), 45-RPM adapter, RCA audio cable (Approx. 1.4 m (4.6')), AC adapter (Approx. 1.3 m (4.3')) (AD-SE1220KZ) |
| Replacement stylus (sold separately) | VMN20EB |
| Replacement headshell (sold separately) | AT-HS10 |
| Replacement belt (sold separately) | AT-LP7 exclusive belt |
Specifications are subject to change without notice due to improvements.
Memo

Introduction
He donyckai neonadnna kanei bnn 6pb3r Ha annapa
Bo n36ekhaHne ydaepa 3eKtpueckm TOKOM He oTKpbBaIte KOpnyc.
OcJyKBaHHe DJIHXHO OcyIeCTBnTbCra TOnbKO KBAHmPpOBaHHbIMN CneuaHnCTaMn.
He noDBepraIte daHoe yCPTPOB03eCTBIO Hpe3MepHOTo Tnla, Hapmep,OT COINCHHbIX Lyuei,OrHaN T.Ⅱ
He noDBepraIte yCTPOINCTBO CnHbM yDapam.
AnnapaHTHo6xOJHMOyCTaHOBnTb pIOMC 3NCKTPuHccko PO3eKo TAKM O6pa30MTO6bMoKHO6bIOJIeKo BbIepHyTB WTeICeJIb BBpIMNTeJIa.
B cnhyac HncnpaHocn BbnpaNTen b npemcHHO Toka cnayet HemedieHHO OTKNHHTb.
He cTAbbTe Ha annapaT eMKoCTH, HAnOJIeHHbIe XIKIOCTbIO (HaPIMcP, Ba3b).
BoN36eKaHHe BOSrOpAHn He pa3MeaIte Ha annapate VCTOHNK OTKpIITOrO OTHR (HaNPmOp, TopAIInc CBeH).
He yctahabnbaIte annapaT B 3AMKHyTom npoctpaHCTBe (Hanpnmep, B KHHHOM ukaqy nn nprom aHaONHM MecTe).
BbIpaIeIyCTaHOBkAnnapataToIbKOMeTcXopoWeBeHTmIaIeN.
I3ROBtEnb:AyDIO-TexHnKaT
Ampes npdpnptna n3rotoaTeIa: 194-8666 ToKIO MaHJa Hncn Hapye 2-46-1
IcToHnK nTuHa: 100-240 B nep. ToKa 50/60 Fu, 5,5 BT

Cepa-oc Kpnae
3ameuHnno nCNoB3OBAHnIO
Kopnyc npoIrpBbataeJia
He xpaHnTe H He 3KcNpyAtnpyTe npOnrpbBaTeB MecTax C BicOKo TeMnepaTypoi, BicOKo BnaXHoCTbIO Nm TaM, Ie Ha6IIOdaETcCnBHa Bn6paun.
- PpOINrpBbATEb CJIeDyeyCTaHABnBaTb Ha pOBHO, rOpN3oHTaIbHO NOBePxHOCTN.
TolOBka 3ByKoCHMaTeIa
Ecnn H3dene BpeMeHHHO He HcnoNb3yETc, yCTaHOHTe 3auTHB KOJINaOK Ha rIOBky 3ByKOCHMATEJ.
- HetpotaTeIrrnoepKateBnnaBcAaM.
HeDoryckaTe ydaP a 3bYkoCHMaTeI O dNc Knn Kpa rpaMnlaTnHKn.
06mB


MoToPnBuiuKINB
2 Dnck npourpbibaTeJIa
3 WnHdJIb
4 INHdkatop nntaHn
5 Puyka ynpaBneHnna
IcnoIb3yeTeTgIaIyckA,OCTaHOBKn,aTaKHe,IaIpeYnnpoAKNCKOPOCTINBpaueHnIINCKA.
6 ToHapM
Pnp6Hoe onncaHne cm. Bpaane "ToHapM" Ha cTp.4.
Hokk
Cnykata perynpaik npn3oHbHoro nooxen npnrpbatna
3 PpeeknIOuateIb npedycnIInTeIa
Iy noiknoeHn npoRpbBaTea BxOHOmy pa3bemy PHONO ycnntela,yctahOBITE 3OT npeKIOHcATEB NOIOHcHNE PHONO. Iy noiknoeHn npoRpbBaTeA K BXOy AUX (acnomoraTcHbH) ycniTEA,yctahOBITE 3OT npeKIOHcATEB NIOHOHcHE LINE.
9 KneMmblcTepeo-BbIXOda
PoiKIOHHTe ayio-Ka6eB RCA. PoiKIOHHTe ero IIO60 Ko BxOHOmy pa3bemy PHONO ycnnten mI Kero NnneHOMy Bxody LINE. KpaHAR KIEMMA COOTBETCTByet IIpaBOMy KAHAly, a 6enar KIeMMa - JEBOMY KAHAly.
10 PepeknioateIb Tua IroBKn MM (VM)/MC
PnncnoBaoHHrnoBkBbkyKoHMaTeaMM(VM)Tnna, yctahOBHTeTOTpeekHOHaTeBNOIOKeHHeMM.PnncnoB3OBAHH rnoOBKnBbYKOCHMaTeaMCttna,yctahOBHTeTOTpeekHOHaTeB NIOIOKeHHe MC.
11 Klemma3aemJeHnna (o6ua)
IIOKIOUHTe KEMMY 3a3emHnna (O6yio) ycHnTeNk 3ToN KEmMe nocpeCTBOM HINb3a3emHeNaydno-Kabena RCA.
12 Bxodnoi wntencnb nntanu
PoiKIOHOUHTb BbIPaMxTeB NpeMeHHOro ToKa.
TohapM
I IpoTINBOBec
CnyHITIaBalaHcnpOBKTOHaPMaNyCTaHOBKNTPc6yeMoI npXMMHOHNbI.
2 PerylaTOp npnxKMMHcunbl
CnykntIaIpepyIpO8K npKMMHO cnbl.
3 MexaHn3M onyckaHn/NoDbema ToHaPma
CJyKHTIJIIBePTNKAJIbHOrTOIepeMeueEHHToHaPMa.
4 ΦикcaциToHapMaHaДерхаTeNe
JepKaTeBnCnoB3yETcTnIgKCaunToHApMa Bo n36eKaHne eronepeMeueHn.
5 Pyhar yCTAHOBKN BbICOTbTOHApMa
6 PerylaTOp npotmbockaTbBaHn
Ipn npnnpbAHnnrpaHnactHHHaKOHnHbO3eCTByET Cnna, KOTOPaC TpeMTCNpCMeCTNb TNOBky 3BYKOCHMaTcNk CEHTpy rpaHnactHHn.3Ty CNy MOHO CKOMNEHCPOBaTB, pPaBNbHO nOobpaB 3AueHApnKHMnO Cnbl Ncbl npoTBOCKaTbAHn.
DnckperynilnpBKN BbICOTbTOHaPMa
DcckpepynpoBKn cnkynt dnyctaHOBKn BbcotbTOHaPMa.
8 Pybuar onyckanra/ noDbema ToHapma
YIpaBnT MEXAHN3MOM ONyckHn/INJIbemaTOHaPma.
TOHAPM
1.YcTaHOBnTe DnCK Ha WnHdEnb.
Bo 36eHnne nopeKHeHHnnnne npy yTaHOBKe ncka,COBmectVe Hnnnepb cOTBepCTMeN pOCA,ncne yero MeIeHIO yTaONBVte NCK
-86eHITECb,HTOINCK3aHJNHyHXHOeNOIOXHeHc.

2. HanehhepeMeHb ChauHa Ha Nsck, a 3aTeMa Hb BnraTeTna
-66yTecb,HTppeMeHbHnepckpyHbAeTc.

HactpoKa npOnrpbBaTeTn
- yctahOBHT nponrPbIbATEbHa rOpH3OHaIbHyIO NOBepxHOCTb.
3BykocnHMaTeBocpHnHMaETcnaBe 3ByKOBBeKoIeBaHHN B6paunn OAtakcyTneCCHTEM, KOTopeI nepeaHTcyeep3 noI IIN ueep3 Bo3dy, BpeyIbTaTe HrO MoKeT Bo3HKnAtpaAnTHaO6paTHa C3Bb, NO30my He yCTaHaBnBaIte TpOnrPbBaTeN pApOM C rPoMkoROrOBoPnteAMN.
Ecn npoRpbBATEb yCTaHOBnEH paoDM c paHNOpepaOUM yCTPOINCTBOM, OHMOKeT 6bIb NOBepKeH HABoAM paHONOMEX. PO3OTMY CTapaHTecb yCTaHaBnBaTb npoRpbBATEb 3dann OT paHIOpepaOx yCTPOINCTB.
Pnpn6nHexHnK npounpbaTeNo 6oppyoBaHn, TepepnyoJero CnIbHoepaHOn3NueHHe (Mo6nBbH TepeOH np), B 3BykoBOM KaHaJe MOKeT 6BtCblWeH yM.
BbipabHnBaHne npOurpbIbaTeTn
- Nocye yctahOBKn 3dEINB HHyKHom dIra erO uCNOb3OBAHnMecTe Heo6xoJIMO OtperyNIOPOBaTb erO rOpN3OHTaNbHOCTb C NOMoub HOKeK.
IpiHHe6OAnMoCTn DnnpOBepKrOpMaHTaBHO rpaonnoeHIN HIOJIbayeyCCHyPOBEH (Piocdaetc OTeBHo).

C6opKa ToHapMa
1.YaJInte npoBOJOnOHyIO CTJHKy, KOToPAJ KcNpyET ToHApM Ha BpeMa TpaHCnOpTnpOBKn.
CnnyetncnoeBbatoepahterbpemehoHfKcunmToHaMaHaCroEonope.
2.YctaHOBNTe depKtaTeIb rOIOBKn Ha ToHApM.
YUeepKBAHcpeepKaBbTcOaKa3aHeayIO npaByIO KpOMKa TaK,HTo6uH No3peNtBuHy npoBaTaNoBn.
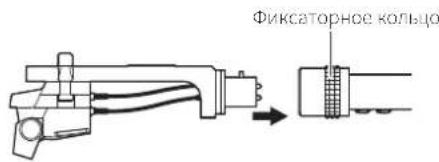
3.ПовернITE ФнкаTophoe кльculo npotNB acoboi CTpeIKN (BneBO).

- HanebTe npOTnBOBc Ha 3aHIOU qAcTb TOHaPMA CO CTOpOBpeYIaTOpa npXmHoi Cnbl N Cnerka NOBepHNTe npOTuBaOBoCTpeKn (BLeBO).
Ioprotobka ka pa6ote
BaJHcnpOBKa ToHapMa n peryInpOBKa npXmHOn cJIbI
IraHbOeToHOroBocpon3BedeHnroOBKn 3aNcaHoroHa
Dopokke rpaMnactHNK3Byka,HyKHO npabuHbHO c6alaHcnpoBaTb ToHAPM
IOpterynpoBaTB npXMMHyIO CnHy cornaCHO xapaKTepnCTHKAM roLOBKn.
B npotINHOM cnhye B03MOKe YckopeHHn H3Hoc rpaMnactHNk n daKe
nonomKa nRbl.
BoBpempeynpobkToHapMacoIIOaJTeOctopoKHOCTbBOI36eKaHHe DnHexHnIgNIIpoepckdoPooKcPamPiacTnHKnIKoHTAKTaCmckOM. 3TOMOKETPnBeCTKNOBpeKeDeHNIOITBL.
BaalancipobKa ToHaMa
- CnErkay yDepKHBa rOIOBky, YTO6bI ToHApM He DBrIaIcR, ydaJInte depXkATEJb.
ToHApMaHaKnOHeTcR, nockoNbky OH noka HecBanaHcapobAH.
2.AkkypaTHO yIepKINBaI depKaTeIb IOLOBN,IOBpaUBAIte npOTnBOBeC 176baIahcnpOBKn ToHApMa.
DobeneTcBTOO,HTo6bTOHApMOCCTABACBCIOPAHOHTABHOMIOHOHNHPN OTNYCAHNNNEPepKaTeNA TOBOHN.

Otperynpyntnojokhen npotnbogeca TaK,HTo6b ToHApM Haxodnca B Tropn30nTaBHom noJokhen
3.YctaHOBITE TOHApM Ha onOpy.
PerynipoBka npxmmHcui b
- YdepKINBIAI pOITNBOEC B HENODBHXHOM COCTOHHN, NOBepHNPeYJrTOp npnKHMn Cnbl TaK, YTO6bI yKa3aTeNb "0" Ha HEM COBnadaIc CEHTpaJIbHOJ LInHMe B 3aDHe YAcTH ToHApMa.
MaHnynyauTolbocceyIaTepmnpnnKMMNCHCMBHepeoCTaTOHOITOHOIeYTHCOIN

- NOBOPaHbA pOToHBoBc npeyIaTOp npxNmHOn Cnbl npotNB acBOB CTpeKn, yCTaHOBTe 3HaueHne npxNmHOn Cnbl, peKOMeHDoBaHHoe DnI NCNoIb3yeMoR TOrOBKn 3ByKOCHMaTeJ.
PexomeIyemoe3aHene npKMMnOH cNblykaaHO aCneHpKaHIN npON3OIOTEE 3ayKOCHMATEJ.
JINTOCTABISEMOBEMCteCnpPORbATEMENOLIOB38yKOCHIMATENOTNMAJIbHARBEINPHAHNPKIMHCOCNBUOCCTAHR2.0

PerynnpOBkAKOMneHcTopa cKaTbIbAoue cnJIbI
Pn npnnpbrBaHn rpaTnactnHKn Ha KOHN Mbl Bo3eNCTBye Cnna, KOTopar CTpcmTc npcmeCTaTB rOLOBky 3ByKCHMaTeN K LcHTpy rpaTnactnHKn.3Ty CNly MOKN CKOMHeCNPOBaTb, ppaBnIbHO NOo6paB 3HaChnnpKHMnCnbl nCnbl nPoTnBOckTaIBAHn.
- HapepyIaTopeKOMnHeCaTopaCKaTBaIOeCnblyUcTaHOBInTe 3NaHHe,paBHoe npxKmHOn Cnne.
-ⅡIIOCTABIAEMOAMcTeCnPOMOBaTeMENTOIOB38yKOCHMATeN ONTAJIHAR BENNUHAPINKIMHCOCNbcoCTAET2,9r.
YctaHOBKa n CHaTne nbIe3aunTHoKpbIuKn
-Пьлесаштая Кршka СлжкДгдя StaHTbIуHCTBxTeNbHbIX KOMTOHETOB
ИЗЕЛЯHA TO BPEM, NOKA OH He NcNoJIbayetC.ДИВOCPON3BEdENH
rpaMnactHOK OHa CHMaETC.
IcnoB3oBaHne bIe3aHTHO KpbuHK BO Bpem BoCnpnBedeHMOKET npueCTN K NOpeKdEHNTO rpaMnTACTHNK MN CHNKHNO KAeCTBA 3Byka.
- YCTaHaBnBaTb Hn CHMaTb PbIeBaAHTHyK (pbluKy Ha KOpNpy CneJeT MepeHNO.
IonoXeHne nepeKIOuOaTeN TnA rOJbKn MM (VM)/MC
PnHcnoB3oBAHNrTOBKN3ByKCHMATEENCNOBHHBMMaHHTOM (TnnaMMVIMV),ycTaHOBnTe3OTnepeKnOHaTeNbBNoXKeHMeMM.IpN IcNoB3oBAHm rO1OBKN 3ByKCHMATEEN C NOBKnHONKaTyKoN(MC Tnna), yCTaHOBnTe3OTnepeKnOHaTeN B NoJoxKeHMe MC.
- Pnnoynke npnpbbaTeMa 30r nepeknHnatB ycaHaonEn B noJokHee MM. Nockny Noctabnaem BAe C npnpbTaTeem rnoBka 3ByKochmater VM520CB) AInerTcVM creepo roIOBko, BCE pEmra, noka IncNolb3yecTcA tAoAka, ocTabnTc nepeKnOHaTeen B noJokChmMM.
Ponoxhenne nepeknloaTeI npeducnnteI
TOT npnnpbBateIb IMeET BCTpoEHHBI ppeDcNITeJI-BKOPeKTOp.UsdJIeM MoKHO NcNoJIb3OaBt DaKe BOTcyTCTBNI ppeDcNITeJI IIN NOKIOHaEMoTO 060pOyOBaHnco BCTpoEHHBM ppeDcNITeMe-KopkeKTOpOM,NOKIOuH K npnnpbBATEIKAHTNBHI rPOMKOrOBoPHTeJI H np.
Iy cTaHOAKn BixOda NcNoJIb3yETC CeneKToPbHBI nepeKIOuHaTeJI ppeDcNITeJI, KaK nOKa3Ho HIXe.
Pn331/306/MnH Pn4506/MnH


Bocpon3BepeHne rpaanlaactvnHKn
PnHpyntyypoBcHpomKCTHyCNHTENA,akCyTHueckxHCTeMnnDpyrO OobpyoBaIa
- BbIbepeTe cKOpocTc cHMOoBIOpyuN ynpaBHeHHa.
Bb6epnte"33"nnn45"pn33-1/nnn4506/mnH,cooTBeCTBENHO.
-AMCKHAAHAAETBpaalatbCR
2.ПОДИМЛТToHApM,пЕРЕМecTиBpyIaRунpaBJIeHЯ ПОДБeMHIKOM ToHApMa B NOLOXKeHHe«UP»

3.Pa3mecTeToHApHaHHeo6xOuMbIMyUactKOM(Dopokko)BHHIOBOIPIACTINKN

- Onyctte ToHapm, nepemecnB pblar ynpabneHn noJbemHKOM ToHapMa B noJooKHeNc «DOWN», ToHApM MeJneHo onyctntcra H BuHHIOByIO IIaCTNHky, n HaHcyTeBCOpn3BeHeHne.
MokHO TaKcE npOyCTb OePAaUM CO 2 No 4, noHHTb TOnOBKy BByKoCHMaTeNnAaAM, npeHeCTn ToHAp M HyXHoe NOnOKeHKe Ha rpaMnlaCTNHKe ONyCTb CC pHa HHaTa BOCPpONBcDpHmBaHNC.
BoBbEkanie noBpeyiennae,He noBepraTe erocnblm ydpam Bo BpemnpntpuBaHn rpaMnCTnKn
CnKpTc npoPbBtBnE noPbncnBnBnBnBnBnBnBnBnBnBnBnBnBnBnBnBnBnBnBnBnBnBnBnBnBnBnBnBnBnBnBnBnBnBnBnBnBnBnBnBnBnBnBnBnBnBnBnBnBnBn
He nCnoB3yIte 6eH3nH, pactBoPnten.
EpnnprrpbaTeB HeSyed HcnoBbOaBcB TteHHe DnTEnbHoro epemH, OTOeHNHTe Hpy nHApHnOT po3ETKn, 3aepHnTe npnrpbaTeB BToMAtneHOyIO HJENKy.CenaiNe HeBOaKoKNbHM NOnaJaHMe BnpnrpBaTeB BlaH.
Mrna
EcnHaIrrneckonnnaBcnp3bNbIb,OnCTteccneunabHKnctoHkoKOTopaaipodaetcrOeJbHO.
Ecnn nna cnilbno 3arpnHHe, MpeKOMeHnyem HcnonbOaTb cpocCTBO Jnnctkn nIb (npoJaerCOndJIbHO).BoBpemaOnCTKn DInBeKeHne KcTOckDOnIKHO 6bItb HapPabNCHOOT3aHHe NACTH TOLOBKNrIc
3aMeHa nIgbli
YdaHHe NcNoB3OBAHHoN rIbI
EcnMnIaN3HOeHa,NNMOyXuHHeHHKaueCTBa 3Byka,OHa MoKeT MCNOPTNTFpAMnlaCTNYK.
Kap npabno, nny cnedyet MeHrtb Hepe3 300 hacob pa6oTb.
OToeHNHTBNNKHyHypa HnTaHnTOr3neKtpocetn.
- CHIMMTE DepeKaTeB rOJIOBKn C ToHaPMa.
3aepnncpobab tonappekataen, aikypatIO oTcoeHNTe rONOBY 3BKOCHAMATEI.
2. Onyctnb 3aunThbI KOJINaOH KOrOBKn 3ByKoCHMaTeIe, ydaIInTe CMeHHyIO rny, BblTaUNB ee B HApPaBHeH N CTpeKN.
YcTaHOBka HOBOI rJIbI
1.YctaHOBNTHa rONOBky HObYIOIry.
Otperynpyte nonoKeHne BHyTpeHHero BbIcTyna.
2.YctaHOBtTeepKaTeIbTOnOBKnHa ToHApM.
3aMeHa rOJOBKn 3ByKoCHMaTeJIa
EcnBbXOTn3aMeHHTb NOCTABNcMyIO BMCCTe C pOnpRbBAeTcEM rOBOky 3ByKoCHMaTeJI (VM520EB) HA dpYrIO NmEOUyOCB B IpOdaKe, yKa3AHJHO YcTaHOBKe CM. BpyKOBoCtAE NOIb3oBaTeN HOBo rONOBKc 3ByKoCHMaTeJI. Iocne 3aMeHbI rONoAKn CnEyET 3aHOBO OTpeRyInpoBaTB bBiHOC rONOBKn, c6aHaHCPOBaTb ToHApM n OTpcryInpoBaTb npKIMHyIO CnHy.
- CHMnTe depKnatb rOIOBKn c ToHaPMa.
3a#nKcnpo8arTOHApMJeepKaTeMe,AKkypaTHOOTCOeHHVTeJeepKaTeBToLOBK.
-
CHIMMTE INIy C rOJIOBKN 3ByKOCHIMMaTeJIa.
Cm.pa3en"ydaeneHHe uonb3oBaHNO Hn Ta CTP.9 -
OToeHNHTe npoBOda.
Cobnoaieocpoknocb,htoHHeIOBpcnipnpoBa.
4.CnMOUbIO HeMaHHTHOI NIOCKO ITBepTKN OTBnHTNTe KpeNEXHBie BnHTbI CHIMNTe ROLOBKY CdePkaTeJI. - Ппесд кретлелнem К држателю HOвог roLOВки n Podknolyehne KMOTAKTOB npOBODа npOHTNe pyKOBOdCTBO noIb3OBaTeNЯ HOвОу ROLOBК.

6.C NOMOUBIO HEMARHTHOI NIOCKOITOBEPKINBBNHTNTe 06a Kpeenekhbx BNHTa,a 3aTeMOTperyIpnyTe BbHOCrIONBKN.
PnnpsoHoe onncannme cm. n pasdene "PeyunpOBAa bHIOca roNobKn" Ha cTp. 11.
-NoceOKOHuaHnpeynpoBk3aTHTHe BHTb.
-
3akpenTe depkaTeIb roJOBKn Ha ToHApMe.
-
OTPeynnpyTe BbICOTy ToHApMa.
PnBbHHeHMperynipOBckcm.paedPerynipOBKaBbCtoTcHapMaHaCTp.10. - OTPeynpyte 6aIanh ToHapMa n npxKmHyu cnly.
Cm.paaBnBaHcPoeBKaToHepMaPe yinPoeBKa pnnHHMOe CnBHa cTb.6
3aMeHa npBODHOro pemHra
PpBbHOH pcmHb OTHCnTcK paXOHNHM nactm. PemHc neyct 3aMeHtB,ecHn HabIOaTeC3aMeIeHHeCKopoCTnnHepaBHomeHoe BpaueHc rpaMnlaCTHHKn. KaK npabIno, pckOMHdyeTc 3aMeHrTb. npBbHOH pemeHb pa3BroD.
- Pecq 3amcHn npBnHoro pemHr oTcoeHNrC Bnky Hpya NtAHHo OT 3eKTPocETN.
-
CHIMMTE CTAPBI PEMEHb
-
Hadehbe HOBbI pemeHb ChauHa Ha dNcK, a 3aTeMa hIKMB dBnraTeJIa.
PvYCTAHOEC PCMHA WIKMB DAMATCAI H CIOOyET PPOBCPITb,HTo pcmHb H nepeKpyMaeta.

PerynnpOBka BbICOTbl ToHapMa
PnU yCTaHOKc TOLOKn,OTINHNOIOT INMOIOEICNA, HCOOxOymoCoBIOaTb Heo6xoIMOEpaccToHHeMeKdyTOLOAOKoNIOBepXHOCTbIOIpaMInactHHK, YCTaHOBHTeHnyHaNnACTHNKyNy6DNTCCBBTOM,HTOToHApMnpapllene ee NOBEPXHOCTN.ECN OH He npalneEN HOBepXHOCTN IaCTNHKN, oTPcYrnpuyTe Blicoty ToHApMa.
- Повернite рыаг Настpoи BBICOTы TOHapma,чTo6bl Ocna6ntb onopy TOHapma.
- OTPerynpyte ero Blicoty nobopoTOM dNcKa perynpOBKn BlicOTb TOHaMa.

- No 3aBepWeHn perynpoBKn nobepHnTe pbuarg yctaHOBKn BbICToI dny yCTaHOBKn ToHaPma.
PerynnpOBKa BbIHoca roIobKn
EeN Bly ycTaHABINBAcTe HOyIO rONOBky, cC nOioKChHe Ha dcpKaTeOE (BuHoc) HxHo TuaTeIbHO OTopepyIuPoBaTb.
1.YcTaHOBtE rONOBky npaPAnneBHo depKaTeIIO.
PacnoJoknTe TOnBky 3ByKoCHMaTeI N depKaTeNb TOnBkTak KaK noka3HO HpaCyHKe HVKe, I yCTaHOgTe TOnBky npaJIeNbHO depKaTeIO.
Kak oTperynipoBaTb BbIHoc roJIOBKn
HaHHa HIOCTpaH npBedeHa B HatypalbHyIO BENHHy.
IomeCTte depKaTe b rolOBKn Ha pncyHOK HNOke, a 3aTe M BipOBHnTe IyNHOBOI rOLOBKn 3ayKOCHMaTe IBDJIIN "IRNA".
2.YctahOBHTe roLOBky 3ByKoCHMaTeIaTak, YTO6bI ee BepTnKaIbHa aOcb, npoxoJaaYepe3 nIy, 6blIa nepneHdkyIpa HBaBepXHe NOBepxHocTn depKaTeIraIOBKn.
IpeDnA cTPOHa depKaTeIra rOIOBKn
PepemeHne npOnrpbBaTeIa
IcnoIb3yopunHnHbHyu ynaKOBouHyio Tapny npOnrpBbTea, ynaKyIte erO,deIctByB nopAke,obpaTHOM npRky paCnakOBKn. Ecn ynaKOBKa He coxpaHnNaBc,JeNCTByTne CNeDyOuMm ObaPOM:
OTcoeHNH BnIKy Hpya NtAHN O TNeKTPocETn, CHMNTE nck IN ynaKyIe erO, YTOb3aunTNTb OT NopeXdHNI. Pnp NepeMeueHIN N3dEHH CycTAHOBNEHHM DnCKOM MO(ET NOpeDITbcS WnHdJIb.
3aФИKcpyTeToHapMДepKAteIeM.
CHIMMTE NPOTUBOBCC.
CHIMITE depkaTeIbTOIOBKnCToHaMpA BMeCTe CHaTeBm Ha Hee 3aUNTHBM KOJINaYKOM UyNakyIte INBMeCTc, YTO6bl 3aUNITbOT NOBpckdCHIN.
3aBepHnTe KOpNc PpOuRpbATEIN B6yMAYIIMMRAKkyIO TKAHBTO6bl 3aunITb croOT NOBpeKdChn.
Ponck nyctpaheHne HencnpabHocte
| Пироблима Peшениe | |
| Диск. He bраается.· | ВыпrimпеловпоременогTo kAnIe- B cetebyu po3etky? BkInHHTb bypimntelbpemenenhoTo kCtebyu po3etky. |
| · He hapushen li konhtaft utencela shhura tvahnna? Пирobetyн hadeknocb nodknohenia utencela K bypimntelno nepemennhoTo kTo | |
| · He cockohn li npivbohdor peme-b co shkBaBolcktpodmbatcnel? Prabnilho nadoHbTe piroanodho pemeHb Na shkBaBolcktpodmbatcnel. | |
| · Ppvbohd-oy peMeHb HaxoHITcRaHa ShKBe 3AekTPOBDAHATe? PpOBeBte, npabilho nI noacJen npmbodNoPemehb Ha shkB | |
| 3AekTPOBDAHATe (UbeTa latyni). | |
| · He nobpeken li npivzdoHoi pemeHb? 3AmHNTe npivdoHoi pemeHb. | |
| Диск. bpaasactcR, Ho 3BykOTCYCTBvET IIN CIIshkom TIXH.N. | · CootBCTBvET ly noLoXHeHcncpeKlnOCHaTeB VcTpoCnHOrO pndyCmIeTcNkoKoppEeKTopa Bv6paHOMBy Ha noDkiLooCHHom o6opudOBAHM (ycnmlteB n.T.I.)? PpOBeBte, npabilho nI Bv6paHn BxOdHa noDkiLooHcHOM o6opudOBAHN. |
| · Yrta He nobpejdeHa? PpOBeBte ccoTOnHe NJIb; pri Ne6bXODMMocTn ZamHNTe. | |
| · ImodepHAtetb noavlbHo yctahOzReB n BTOsOy 3aYocchIMATE? PpOBeBte rOtokeHne VIOdePaxTeR, pri Ne6bXODMMocTn nonpabte ETO. | |
| · PpeKlouHateB BCToeHoro predyCmIeTc-KoppeKTopa HaxoHITcB n Pabilho nOLOHcHn OLOHcHn? PpOBeBte npabilho cTo | |
| PpOToHnpeKlouHateB BCToeHoro BCToeHoro pOToHnOTo pOToHnOTo pOToHnOTo pOToHnOTo pOToHnOTo pOToHnOTo pOToHnOTo pOToHnOTo pOToHnOTo pOToHnOTo pOToHnOTo pOToHnOTo pOToHnOTo pOToHnOTo pOToHnOTo pОToHnOTo pOToHnOTo pOToHnOTo pOToHnOTo pOToHnOTo pOToHnOTo pOToHnOTo pOToHnOTo pOToHnOTo pOToHnOTo pOToHnOTo pOToHnOTo pOToHnOTo pOToHnOTo pOTo HNtBuHnBnBnBnBnBnBnBnBnBnBnBnBnBnBnBnBnBnBnBnBnBnBnBnBnBnBnBnBnBnBnBnBnBnBnBnBnBnBnBnBnBnBnBnBnBnBnBnBnBnBn Bc | |
| · - Ecln 3Byk OTcYCTBvET IIN rpoMocBt CIIshKom Mana, 3aHnIT, np6kIouHaeB acTPOCnHOrO pOToCnHOrO pOToCnHOrO pOToCnHOrO pOToCnHOrO pOToCnHOrO pOToCnHOrO pOToCnHOrO pOToCnHOrO pOToCnHOrO pOToCnHOrO pOToCnHOrO pOToCnHOrO pOToCnHOR pOToCnHOrO pOToCnHOrO pOToCnHOrO pOToCnHOrO pOToCnHOrO pOToCnHOrO pOToCnHOrO pOToCnHOrO pOToCnHOrO pOToCnHOrO pOToCnHOrO pOToCnHOrO pOToClNOMBnBnBnBnBnBnBnBnBnBnBnBnBnBnBnBnBnBnBnBnBnBnBnBnBnBnBnBnBnBnBnBnBnBnBnBnBnBnBnBnBnBnBnBnBnBnBnBnBnBb | |
| · - Ecln rpoMocBt CIIshKom B6cokai IIN 3Byk NcKakJe, 3aHnIT np6kIouHaeB acTPOCnHOrO pOToCnHOrO pOToCnHOrO pOToCnHOrO pOToCnHOrO pOToCnHOrO pOToCnHOrO pOToCnHOrO pOToCnHOrO pOToCnHOrO pOToCnHOrO pOToClNOMBnBnBnBnBA | |
| Иларпдддддддддддддддддддддддддддддддддддддддддддддддддддддддддддддддддддддддддддддддддддддддддддддддддддд徳? | · Пржимнан снla сншКOM mala? OTrpympuyte Pp9KmHHy-cSny. |
| · KompenCatop sckTbBaOoSe csnIb HAcTpoEH HebeHOb? U6bDteCb, YTO kompenCatop cKaTbBaOoSe csnIb | |
| · YcTahOaHelen Ha To Ke 3NauchHe, YTO np6kIouHaeK no BxOdu AUX/LINE yCnVIteA. | |
| · Гамлл actinka He noqhyta? ПрОвьпгутгрamллactinHy. | |
| · Гамлл actinka He noqapanaHa? ПрОвьпгутгрamллactinHy. | |
| Пocstороннne 3Byk, noDblBaHnne.· | Почрьбатеьь ВocpinHIMaET Ype3MepHyBo 3b6paZHiO To nola, CTEN IIN paCnoIooMeHbX 6bLsin Hero akystueckix cStEm? |
| YmehbHitepepeHcyKoIe6aHnHa np6rplbAteBv, yctahOtsTe erO ha nobexHocTh, kToTogarHe nepedaet Bv6paZHiQ. | |
| · ПрОвьпгутьгь устанЗнHa HeucToChVbN ToNeToChVbN ChToHb. | |
| Во врма пошгьваня rpaamллactinнк cblshen shum. | ·Сколлась grp3b Ha nIe? Сcln Ha nIe skonllassb grp3b II pBl, ouHCTITE ee cIeuaIaIbHoi KICSTOchKoi, noDakouSeя ot DeIbNo. |
| Сокорstь bocspon3BaDeHnne 3aMeIeHa nII yckopena. | · Правиньо лу bly6bra Na CxOpocTb BpaauHern? C noMoIuBo puChk ynpaHEny u7p8oHbNte cKoTahOBtse cKoPocTb BpaauHern |
| ДИSCA COOTBETCTBEHNO ПрОвьгьBaEMO rPamllactinHke. | |
| Наблддддддддддддддддддддддддддддддддддддддддддддддддддддддддддддддддддддддддддддддддддддддддддддддддддд�? | · He np6ckalb3bBaet/pacTaNycIa NpivbodHoi p6meHb? 3aMeHNTe npivbodHoi p6meHb. |
| Во врма bocspon3BaDeHnne cblshin rydce. | · Правиньо лу podklouchen npovod z3aemlenH? ПрОвьпгуть поklouchenne npovodba z3aemlenH. |
| · Habekho IIN np6krpenIe depaTeB rOToBKn K ToHapMy? ПрОвьпгуть заTajkKуФИФКТOPHRoKollua. | |
Ta6apHTbIe pa3Mepbl
(EHUNHUBM)
TexHnueckne xapaKTepeNCTnKn
Cneunfkaun nponrpblbatae
Disposal of Old Electrical & Electronic Equipment (Applicable in European countries with separate collection systems) This symbol on the product or on its packaging indicates that this product shall not be treated as household waste. Instead it shall be handed over to the applicable collection point for the recycling of electrical and electronic equipment. By ensuring this product is disposed of correctly, you will help prevent potential negative consequences for the environment and human health, which could otherwise be caused by inappropriate waste handling of this product. The recycling of materials will help to conserve natural resources. For more detailed information about recycling of this product, please contact your local city office, your household waste disposal service or the shop where you purchased the product.
Audio-Technica Dutch Branch
Two-Years Limited Warranty
Audio-Technica products purchased in the UK and EU / Europe are guaranteed for two years from date of purchase by Audio-Technica Ltd. to be free of defects in materials and workmanship. In the event of such defect, product will be repaired promptly without charge or, at our option, replaced with a new product of equal or superior value, if the faulty product is delivered to Audio-Technica Ltd., prepaid, together with the proof of purchase.
Prior approval from Audio-Technica Ltd. is required for return. This warranty excludes defects due to normal wear, abuse, shipping damage, or failure to use product in accordance with instructions. This warranty is void in the event of unauthorized repair or modification.
For return approval and shipping information, contact the Service Department.
Audio-Technica Ltd. Tel: +44 (0)113 277 1441.
Outside the U.K, please contact your local dealer for warranty details.