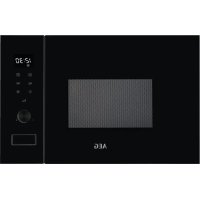
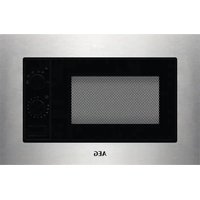
MSB2057DB - Microwave Oven AEG - Free user manual and instructions
Find the device manual for free MSB2057DB AEG in PDF.



| Brand | AEG |
| Model | MSB2057DB |
| Product type | Microwave oven |
| Dimensions (W × H × D) | 600 mm × 365 mm × 568 mm (approximately) |
| Capacity | Approximately 25 liters (not specified precisely) |
| Microwave power | 900 W (estimate, multiple power levels) |
| Grill power | Not specified, but grill and combi function |
| Power supply | 230 V, 50 Hz, earthed plug |
| Main functions | Microwave, grill, combined cooking, weight/time defrost, auto cooking (8 programs), quick start, timer, clock |
| Included accessories | Turntable set (roller support + glass tray), metal rack |
| Display | Digital, backlit |
| Care and cleaning | Clean with a soft damp cloth and mild soap; do not use abrasive products or steam cleaner |
| Safety | Child lock, door interlock, automatic stop when door opened |
| Spare parts and repairability | Original parts available via approved service center; class G lamps |
| General information | User manual available in several languages; support at www.aeg.com |
Frequently Asked Questions - MSB2057DB AEG
User questions about MSB2057DB AEG
0 question about this device. Answer the ones you know or ask your own.
Ask a new question about this device
Download the instructions for your Microwave Oven in PDF format for free! Find your manual MSB2057DB - AEG and take your electronic device back in hand. On this page are published all the documents necessary for the use of your device. MSB2057DB by AEG.
USER MANUAL MSB2057DB AEG
natural_image
Simple line drawing of a microwave oven (no text or symbols)MSB2057D-B
PËR REZULTATE PERFEKTE
- Futeni mikrovalën brenda mobiljes.
natural_image
Diagram of a microwave oven with a close-up inset showing internal components (no text or symbols)4. PËRSHKRIM I PRODUKTIT
natural_image
Technical line drawing of two circular components with a handle, no text or symbols presentnatural_image
Line drawing of a simple outdoor table with slatted top and legs (no text or symbols)Përdoret për:
natural_image
Diagram of a circular mechanical component with a base and top view, showing internal structure and assembly (no text or symbols)natural_image
Line drawing of a circular heating element with a grating and wheels (no text or symbols)9. FUNKSIONET SHTESË
natural_image
Diagram of a microwave oven with a close-up view showing internal components and a magnified inset (no text or symbols)natural_image
Technical line drawing of a circular component with a flanged base and top view (no text or symbols)Safata de vidre i guia de rodets.
Reixa per al grill
natural_image
Line drawing of a simple outdoor table with slatted top and legs (no text or symbols)Ús per:
- rostir menjar
- cuina combi
5. ABANS DEL PRIMER ÚS
! AVÍS!
natural_image
Diagram showing a circular component with a central hub and a small circular base, no text or symbols present.natural_image
Technical line drawing of a circular mechanical component with internal grating and wheels (no text or symbols)Slijedite korake u nastavku, počevši od broja 1.
Da biste postavili mikrovalnu u ormar s dimenzijama navedenim u nastavku, nisu potrebne nikakve preinake.
3.3 Postavljanje
- Mikrovalnu pećnicu umetnite u kuhinjski ormarić.
natural_image
Diagram of a microwave oven with an open door and internal compartments, showing a close-up of the interior (no text or symbols)natural_image
Technical line drawing of two circular components with a handle, no text or symbols presentStaklena plitica za kuhanje i okretna vodilica.
natural_image
Line drawing of a simple outdoor table with slatted top and legs (no text or symbols)Koristite za:
- roštiljanje hrane
- kombinirano kuhanje
5. PRIJE PRVE UPOTREBE

UPOZORENJE!
6. SVAKODNEVNA UPORABA

UPOZORENJE!
natural_image
Technical diagram showing a circular component with internal structure and a base component (no text or symbols)8.2 Umetanje stalka roštilja
Postavite stalak za roštiljanje na komplet s okretnim tanjurom.
natural_image
Technical line drawing of a circular mechanical component with internal hatched structure and wheels (no text or symbols)9. DODATNE FUNKCIJE
natural_image
Diagram of a microwave oven with an open door and internal panel, showing a close-up of the lid (no text or symbols present)natural_image
Line drawing of a circular fan with a small handle and a separate ring (no text or symbols)natural_image
Line drawing of a simple oval-shaped metal grate with three legs and a central slatted top (no text or symbols)Používá se pro:
natural_image
Diagram of a circular fan assembly with a central hub and base, showing no text or symbolsnatural_image
Line drawing of a circular heating element with heat sink and cooling fins (no text or symbols)9. DOPLŇKOVÉ FUNKCE
natural_image
Diagram of a microwave oven with an open door and a close-up inset showing the internal structure (no text or symbols)natural_image
Technical line drawing of two circular components with rings and a knob (no text or symbols)natural_image
Line drawing of a simple oval-shaped metal grate with three legs and a central slatted top (no text or symbols)Gebruiken voor:
natural_image
Technical diagram showing a circular component with internal structure and a base component (no text or symbols)natural_image
Line drawing of a circular heating element with a grating and wheels (no text or symbols)9. EXTRA FUNCTIONS
9.1 Kinderslot
12. PROBLEEMOPLOSSING

WAARSCHUWING!
Thank you for choosing this AEG product. We have created it to give you impeccable performance for many years, with innovative technologies that help make life simpler – features you might not find on ordinary appliances. Please spend a few minutes reading to get the very best from it.
Visit our website to:

Get usage advice, brochures, trouble shooter, service and repair information: www.aeg.com/support

Register your product for better service: www.registeraeg.com

Buy Accessories, Consumables and Original spare parts for your appliance: www.aeg.com/shop
CUSTOMER CARE AND SERVICE
Always use original spare parts.
When contacting our Authorised Service Centre, ensure that you have the following data available: Model, PNC, Serial Number.
The information can be found on the rating plate.
⚠ Warning / Caution-Safety information
i General information and tips
Environmental information
Subject to change without notice.
CONTENTS
- SAFETY INFORMATION......88
- SAFETY INSTRUCTIONS....92
- INSTALLATION....93
- PRODUCT DESCRIPTION....95
- BEFORE FIRST USE....96
- DAILY USE....97
- AUTOMATIC PROGRAMMES....100
- USING THE ACCESSORIES....101
- ADDITIONAL FUNCTIONS....101
- HINTS AND TIPS.... 102
- CARE AND CLEANING.... 103
- TROUBLESHOOTING.... 103
- ENVIRONMENTAL CONCERNS....104
1. ⚠SAFETY INFORMATION
Before the installation and use of the appliance, carefully read the supplied instructions. The manufacturer is not responsible
for any injuries or damage that are the result of incorrect installation or usage. Always keep the instructions in a safe and accessible location for future reference.
1.1 Children and vulnerable people safety

WARNING!
Risk of suffocation, injury or permanent disability.
- This appliance can be used by children aged from 8 years and above and persons with reduced physical, sensory or mental capabilities or lack of experience and knowledge if they have been given supervision or instruction concerning the use of the appliance in a safe way and understand the hazards involved. Children of less than 8 years of age and persons with very extensive and complex disabilities shall be kept away from the appliance unless continuously supervised.
- Children should be supervised to ensure that they do not play with the appliance.
- Keep all packaging away from children and dispose of it appropriately.
- WARNING: The appliance and its accessible parts become hot during use. Keep children and pets away from the appliance when in use and when cooling down.
- If the appliance has a child safety device, it should be activated.
- Children shall not carry out cleaning and user maintenance of the appliance without supervision.
1.2 General Safety
- This appliance is for cooking purposes only.
- This appliance is designed for single household domestic use in an indoor environment.
- This appliance may be used in, offices, hotel guest rooms, bed & breakfast guest rooms, farm guest houses and other
similar accommodation where such use does not exceed (average) domestic usage levels.
- WARNING: The appliance and its accessible parts become hot during use. Care should be taken to avoid touching heating elements.
• Always use oven gloves to remove or insert accessories or ovenware. - Do not use a steam cleaner to clean the appliance.
- Before any maintenance operation, deactivate the appliance and disconnect the mains plug from the socket.
- If the mains power supply cable is damaged, it must be replaced by the manufacturer, its Authorised Service Centre or similarly qualified persons to avoid an electrical hazard.
- Do not operate the appliance by means of an external timer or separate remote-control system.
- WARNING: Only a qualified person can carry out any service or repair operation that involves the removal of a cover which gives protection against exposure to microwave energy.
- WARNING: Do not heat liquids and other foods in sealed containers. They are liable to explode.
- WARNING: If the door or door seals are damaged, the appliance must not be operated until it has been repaired by a qualified person.
- Metallic containers for food and beverages are not allowed during microwave cooking. This requirement is not applicable if the manufacturer specifies size and shape of metallic containers suitable for microwave cooking.
- Only use utensils that are suitable for use in microwave ovens.
- When heating food in plastic or paper containers, keep an eye on the appliance due to the possibility of ignition.
- The appliance is intended for heating food and beverages. Drying of food or clothing and heating of warming pads, slippers, sponges, damp cloth and similar may lead to risk of injury, ignition or fire.
- If smoke is emitted, switch off or unplug the appliance and keep the door closed in order to stifle any flames.
- Microwave heating of beverages can result in delayed eruptive boiling. Care must be taken when handling the container.
- The contents of feeding bottles and baby food jars shall be stirred or shaken and the temperature checked before consumption, in order to avoid burns.
- Eggs in their shell and whole hard-boiled eggs should not be heated in the appliance since they may explode, even after microwave heating has ended.
- The appliance should be cleaned regularly and any food deposits removed.
- Failure to maintain the appliance in a clean condition could lead to deterioration of the surface that could adversely affect the life of the appliance and possibly result in a hazardous situation.
- The temperature of accessible surfaces may be high when the appliance is operating.
- The microwave oven shall not be placed in a cabinet unless it has been tested in a cabinet.
- The rear surface of appliances shall be placed against a wall.
- Do not use harsh abrasive cleaners or sharp metal scrapers to clean the glass door since they can scratch the surface, which may result in shattering of the glass.
- Do not activate the appliance when it is empty. Metal parts inside the cavity can create electric arcing.
- Pay attention to the minimum dimensions of the cabinet (if applicable). Refer to the installation chapter.
- The appliance must be operated with the decorative door open (if applicable).
2. SAFETY INSTRUCTIONS
2.1 Installation

WARNING!
Only a qualified person must install this appliance.
- Remove all the packaging.
- Do not install or use a damaged appliance.
- Follow the installation instructions supplied with the appliance.
• Always take care when moving the appliance as it is heavy. Always use safety gloves and enclosed footwear. - Do not pull the appliance by the handle.
- Keep the minimum distance from other appliances and units.
• Install the appliance in a safe and suitable place that meets installation requirements. - The sides of the appliance must stay next to appliances or units with the same height.
2.2 Electrical Connection

WARNING!
Risk of fire and electric shock.
- All electrical connections should be made by a qualified electrician.
• The appliance must be earthed. - Make sure that the parameters on the rating plate are compatible with the electrical ratings of the mains power supply.
- If the appliance is connected to the socket via an extension cord, make sure the cord is earthed.
- Make sure not to cause damage to the mains plug and to the mains cable. Contact the Service or an electrician to change a damaged mains cable.
- Do not pull the mains cable to disconnect the appliance. Always pull the mains plug.
2.3 Use

WARNING!
Risk of injury, burns and electric shock or explosion.
- Do not change the specification of this appliance.
- Do not let the appliance stay unattended during operation.
- Do not apply pressure on the open door.
- Make sure that the ventilation openings are not blocked.
- Do not use the appliance as a work surface and do not use the cavity for storage purposes.
2.4 Care and Cleaning

WARNING!
Risk of injury, fire, or damage to the appliance.
- Before maintenance, deactivate the appliance and disconnect the mains plug from the mains socket.
- Clean regularly the appliance to prevent the deterioration of the surface material.
- Do not allow food spills or cleaner residue to accumulate on door sealing surfaces.
- Fat and food remaining in the appliance can cause fire and electric arcing when the microwave function operates.
- Clean the appliance with a moist soft cloth. Use only neutral detergents. Do not use abrasive products, abrasive cleaning pads, solvents or metal objects.
- If you use an oven spray, obey the safety instructions on the packaging.
2.5 Service
• To repair the appliance contact the Authorised Service Centre. Use original spare parts only.
- This product contains a light source of energy efficiency class G.
- Concerning the lamp(s) inside this product and spare part lamps sold separately: These lamps are intended to withstand
extreme physical conditions in household appliances, such as temperature, vibration, humidity, or are intended to signal information about the operational status of the appliance. They are not intended to be used in other applications and are not suitable for household room illumination.
2.6 Disposal

WARNING!
Risk of injury or suffocation.
- Disconnect the appliance from the mains supply.
- Cut off the mains electrical cable close to the appliance and dispose of it.
3. INSTALLATION

WARNING!
Refer to Safety chapters.
3.1 Electrical installation

WARNING!
Only a qualified person must do the electrical installation.

The manufacturer is not responsible if you do not follow the safety precautions from the chapter "Safety Information".
This microwave is supplied with a main cable and main plug.
The cable has an earth wire with an earthing plug. The plug must be plugged into an outlet that is properly installed and earthed. In the event of an electrical short circuit, earthing reduces the risk of electric shock.
3.2 Installation - preliminary preparation
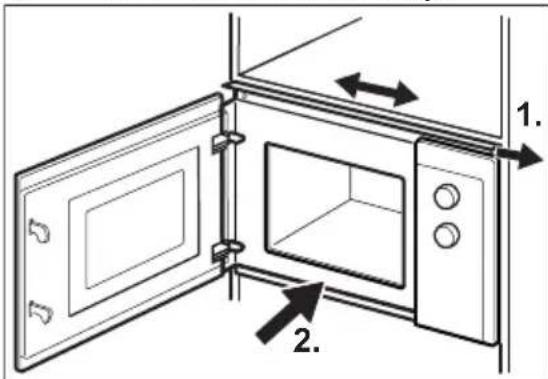
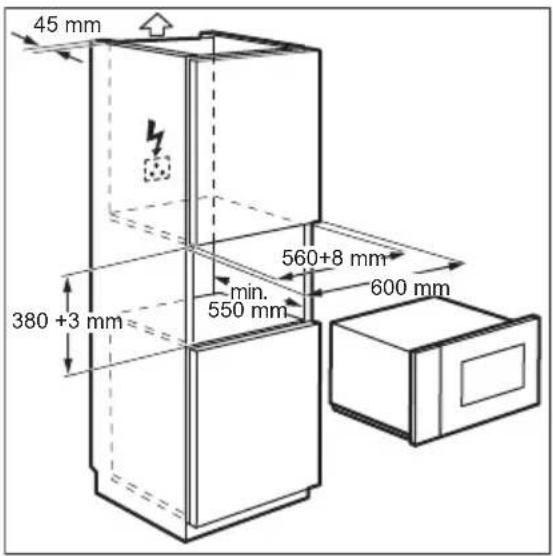
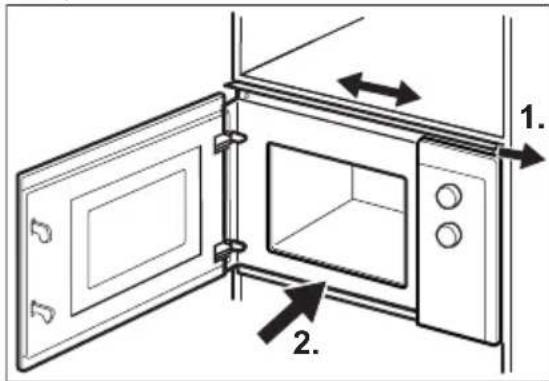
To install the microwave in a cupboard with dimensions as specified below, remove the 4 screws and the bracket from the bottom of the appliance.
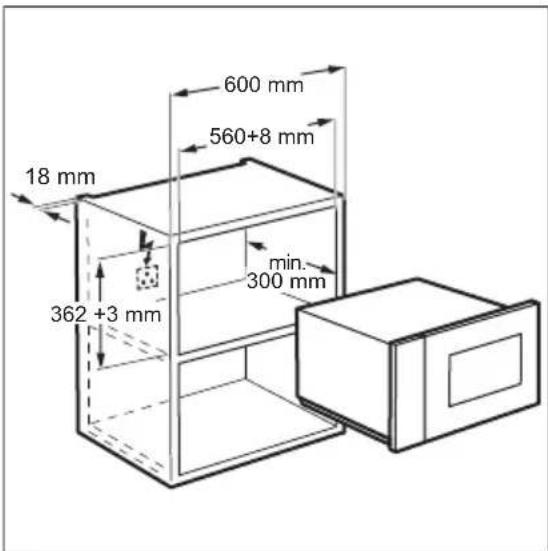
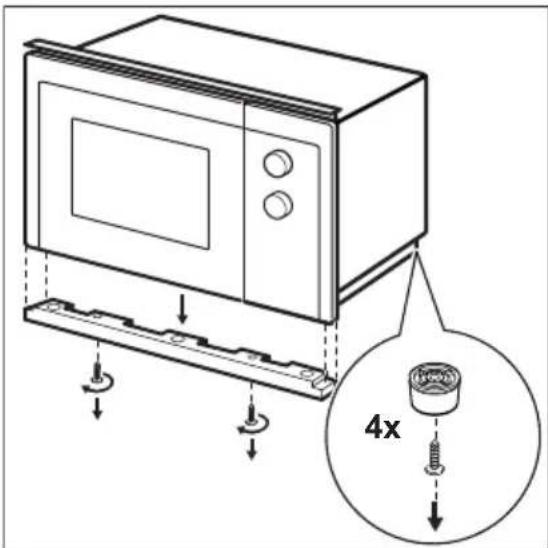
Follow the steps below, starting from number 1.
To install the microwave in a cupboard with dimensions as specified below, no modification is needed.
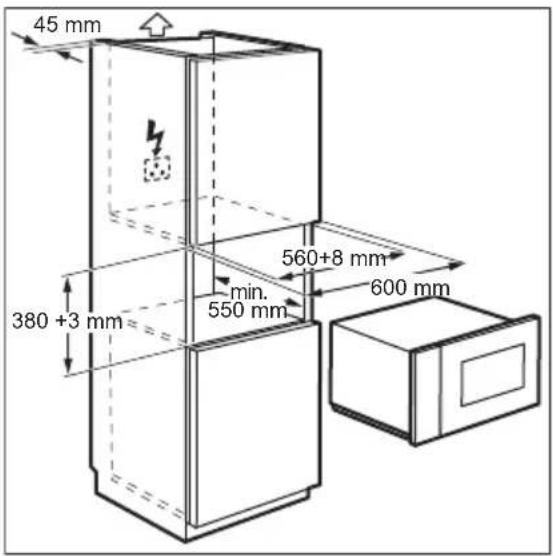
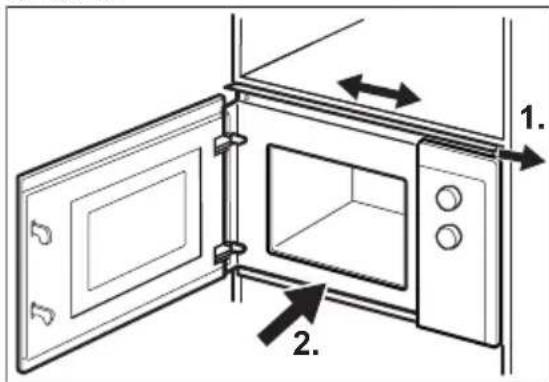
3.3 Installation
- The electrical cable must not be trapped in any way.
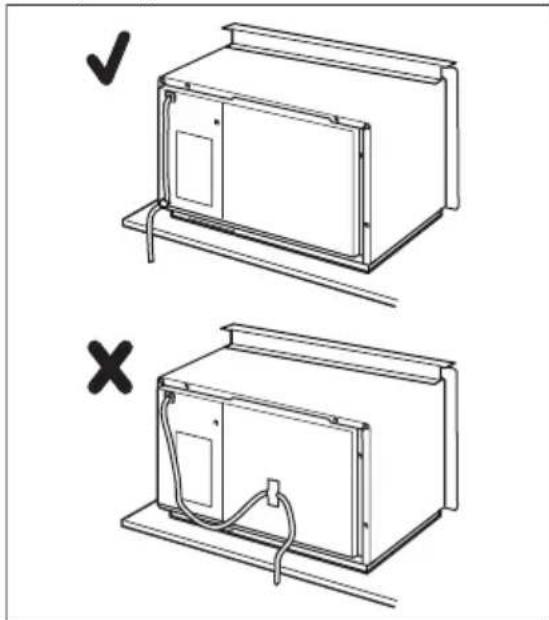
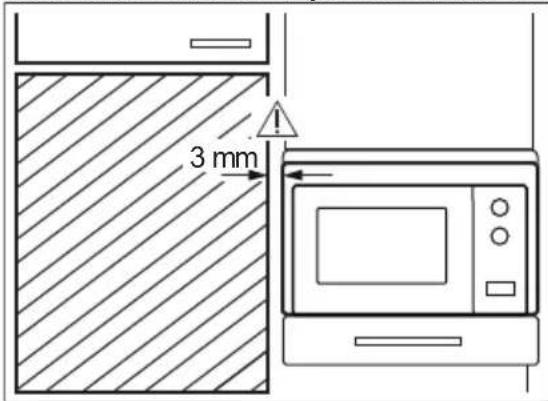
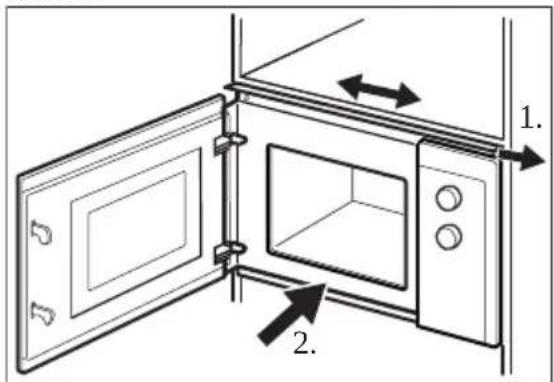
- Insert the microwave inside the cupboard.
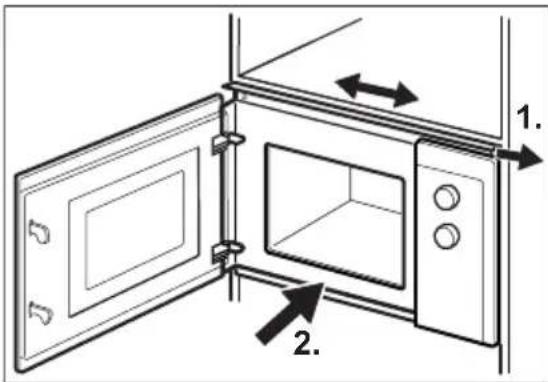
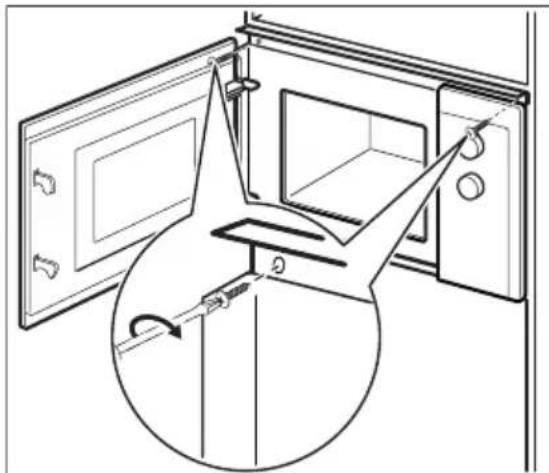
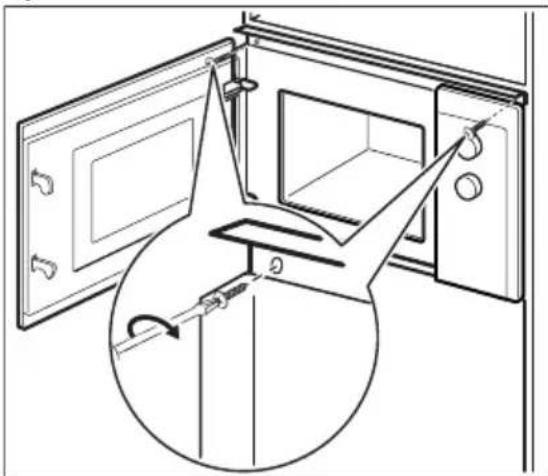
- Fix the upper bracket with 2 screws.
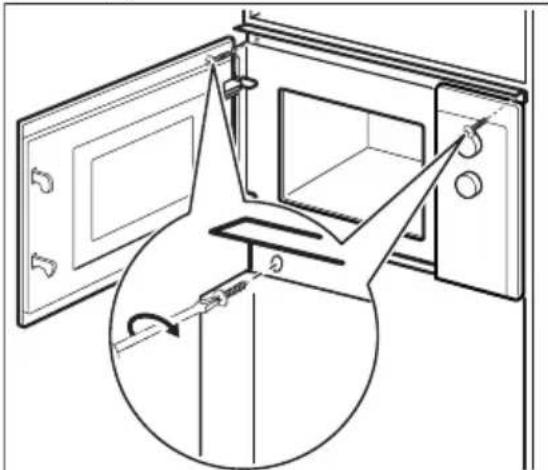
natural_image
Diagram of a microwave oven with an open door and a close-up inset showing internal components (no text or symbols)- Keep the minimum distance between the microwave and the adjacent furniture.
4. PRODUCT DESCRIPTION
4.1 General overview
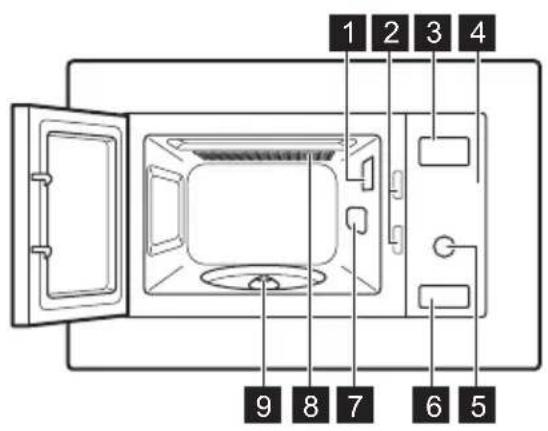
1 Lamp
2 Safety interlock system
3 Display
4 Control panel
5 Knob
6 Door opener
7 Waveguide cover
8 Grill
9 Turntable shaft
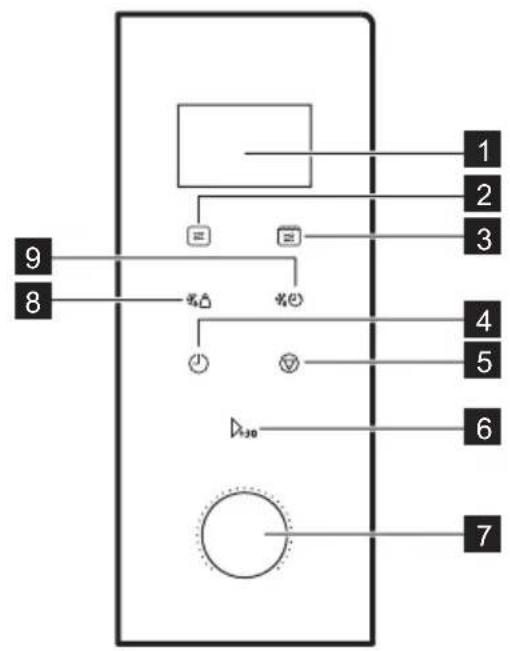
4.2 Control Panel
flowchart
graph TD
    A["1"] --> B["2"]
    B --> C["3"]
    C --> D["4"]
    D --> E["5"]
    E --> F["6"]
    F --> G["7"]
    H["8"] --> I["9"]
    I --> J["10"]
    J --> K["11"]
    K --> L["12"]
    L --> M["13"]
    M --> N["14"]
    N --> O["15"]
    O --> P["16"]
    P --> Q["17"]
    Q --> R["18"]
    R --> S["19"]
    S --> T["20"]
Display element Function description
1 Display Shows the settings and current time.
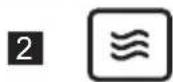
To set the microwave function.
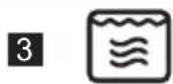
To set the grilling or combination cooking function.
| Display element Function description | ||
| 4 |  | To set the clock and timer. |
| 5 |  | To deactivate the microwave or to delete the cooking settings. |
| 6 | 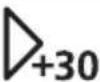 | To start the appliance or increase the cooking time for 30 seconds at full power. |
| 7 | Setting knob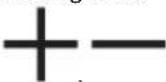 | To set the cooking time or weight or function. |
| 8 | 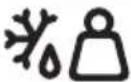 | To defrost food by weight. |
| 9 | 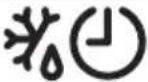 | To defrost food by time. |
4.3 Accessories
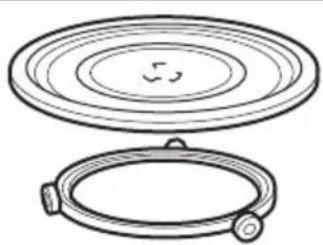
Turntable set
i
Always use the turntable set to prepare food in the microwave.
natural_image
Technical line drawing of a circular component with a flanged base and top view (no text or symbols)Glass cooking tray and roller guide.
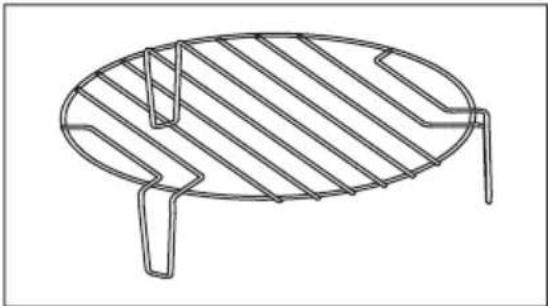
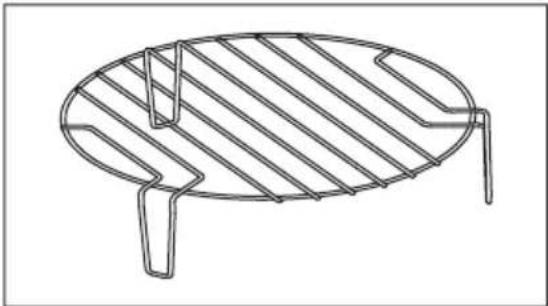
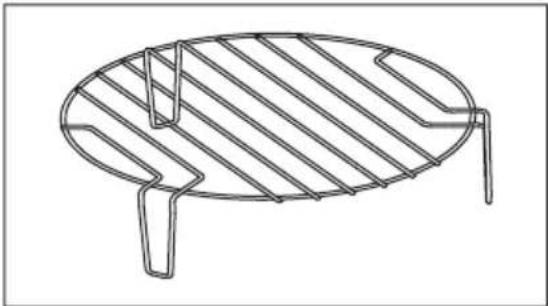
Grill Rack
natural_image
Line drawing of a simple outdoor table with slatted top and legs (no text or symbols)Use for:
- grilling food
- combi cooking
5. BEFORE FIRST USE

WARNING!
Refer to Safety chapters.
5.1 Initial Cleaning

CAUTION!
Refer to chapter "Care and Cleaning".
- Remove all the parts and additional packaging from the microwave.
- Clean the appliance before first use.
5.2 Setting the time
Set the time to operate the microwave.
When you connect the appliance to the electrical supply or after a power cut, the
display shows 0:00 and an acoustic signal sounds.

You can set the time in a 24 hour clock system.
- Press twice.
- Turn the Setting knob to set the hours.
- Press to confirm.
- Turn the Setting knob to set the minutes.
- Press ⏻ to confirm.
6. DAILY USE

WARNING!
Refer to Safety chapters.
6.1 General information about using the appliance
• After you deactivate the appliance, let the food stand for some minutes.
- Remove the aluminium foil packaging, metal containers, etc. before you prepare the food.
Cooking
- If possible, cook food covered with material suitable for use in the microwave. Only cook food without a cover if you want to keep it crusty
- Do not overcook the dishes by setting the power and time too high. The food can dry out, burn or catch fire in some places.
- Do not use the appliance to cook eggs or snails in their shells, because they can explode. With fried eggs, pierce the yolks first.
- Pierce skin or peel of potatoes, tomatoes, sausages and similar types of food with a fork several times before cooking so that the food does not burst.
- For chilled or frozen food, set a longer cooking time.
- Dishes which contain sauce must be stirred from time to time.
• Vegetables that have a firm structure, such as carrots, peas or cauliflower, must be cooked in water. - Turn larger pieces of food after half of the cooking time.
- If possible, cut vegetables into similar-sized pieces.
-
Use flat, wide dishes.
-
Do not use cookware made of porcelain, ceramic or earthenware with unglazed bottoms or small holes for example on handles. Moisture going into the holes can cause the cookware to crack when it is heated.
- The glass cooking tray is necessary for the operation of the microwave. Place the food or liquids on it.
Defrosting meat, poultry, fish
- Put the frozen, unwrapped food on a small upturned plate with a container below it so that the defrosting liquid collects in the container.
- Turn the food after half of the defrosting time. If possible, divide and then remove the pieces that started to defrost.
Defrosting butter, portions of gateau, quark
- Do not fully defrost the food in the appliance, but let it defrost at room temperature. It gives a more even result. Remove all metal or aluminium packaging before defrosting.
Defrosting fruit, vegetables
- If fruit and vegetables should remain raw, do not defrost them fully in the appliance. Let them defrost at room temperature.
• To cook fruit and vegetables without defrosting them first use a higher microwave power.
Ready meals
- You can prepare ready meals in the appliance only if their packaging is suitable for microwave use.
- You must follow the manufacturer's instructions printed on the packaging (e.g. remove the metal cover and pierce the plastic film).
Suitable cookware and materials
| Cookware / Material Microwave Grilling | ||||
| Defrosting | Heating | Cooking | ||
| Ovenproof glass and porcelain with no metal com-ponents, e. g. Pyrex, heat-proof glass | √ | √ | √ | √ |
| Non-ovenproof glass and porcelain 1) | √ | X X X | ||
| Glass and glass ceramic made of ovenproof/frost-proof material (e. g. Arcoflam), grill shelf | √ | √ | √ | √ |
| Ceramic 2), earthenware 2) | √ | √ | √ | X |
| Heat-resistant plastic up to 200 °C 3) | √ | √ | √ | X |
| Cardboard, paper X X X | √ | |||
| Clingfilm X X X | √ | |||
| Roasting film with microwave safe closure 3) | √ | √ | √ | X |
| Roasting dishes made of metal, e. g. enamel, cast iron | X X X | √ | ||
| Baking tins, black lacquer or silicon-coated 3) | X X X | √ | ||
| Baking tray X X X | √ | |||
| Browning cookware, e. g. crisp pan or crunch plate | X | √ | √ | X |
| Ready meals in packaging 3) | √ | √ | √ | √ |
1) With no silver, gold, platinum or metal plating / decorations
2) Without quartz or metal components, or glazes which contain metals
3) You must follow the manufacturer's instructions about the maximum temperatures.
√ suitable
X not suitable
6.2 Activating and deactivating the microwave

CAUTION!
Do not let the microwave operate if there is no food in it.
- Press once.
-
Repeatedly press 📋 or turn the Setting knob to set the desired function.
-
Press to confirm.
- Turn the Setting knob to set the time.
- Press to confirm and activate the microwave.
- The microwave deactivates automatically when the set time comes to an end. An acoustic signal sounds.
To deactivate the microwave earlier:
- press ◯.
- open the door. The microwave stops automatically. Close the door and press D_+30 to continue cooking. Use this option to inspect food.
6.3 Power setting table
| Press | Power setting Approximate Percentage of Power |
| 1 time P100 100 % | |
| 2 times P 80 80 % | |
| 3 times P 50 50 % | |
| 4 times P 30 30 % | |
| 5 times P 10 10 % |
Grilling and Combi cooking
| Press Power setting Function mode | |
| Grill | |
| 1 time G Full Grill | |
| Combi Cooking | |
| 2 times C – 1 55 % Microwaves, 45 % Grill | |
| 3 times C – 2 36 % Microwaves, 64 % Grill |
6.4 Quick Start

The maximum cooking time is 95 minutes.
To activate the microwave for 30 seconds at full power press _+30 .
The cooking time increases by 30 seconds with each additional press of the button.
To set the cooking time in standby mode turn the Setting knob counterclockwise then press
_+30 to activate the microwave at full power.
6.5 Defrosting
You can choose between 2 defrosting modes:
- Weight defrosting

- Time defrosting


Do not use weight defrosting on food that is left out of the freezer for more than 20 minutes, or for frozen ready-made food.

To activate weight defrosting you must use more than 100 g of food and less than 2000 g.

To defrost less than 200 g of food place it on the edge of the turntable.
- Press
for time defrosting. - Turn the Setting knob to set the weight or time.
For weight defrosting the time is set automatically. - Press
microwave.


6.6 Multistage cooking

If one stage is defrosting, set it as the first stage.
You can cook food in maximum 2stages.
-
Press for weight defrosting or for time defrosting.
-
Turn the Setting knob to set the defrosting time or weight.
-
Press to confirm.
-
Press repeatedly to choose a power level.
-
Turn the Setting knob to set the time.
-
Press to confirm and activate the microwave.
After each step an acoustic signal sounds.

7. AUTOMATIC PROGRAMMES

WARNING!
Refer to Safety chapters.
7.1 Auto cooking
Use this function to easily cook favourite food. The microwave automatically sets the optimum settings.
6.7 Grilling and Combi Cooking
-
Press to set the desired function.
-
Turn the Setting knob to set the time.
-
Press to confirm and activate the microwave.
You can change the power setting or time, while the Grilling or Combi cooking mode is active.
-
Turn the Setting knob clockwise to choose the desired menu.
-
Press to confirm.
-
Turn the Setting knob to set the weight of the menu.
-
Press to confirm and activate the microwave.
| Menu Amount | |
| A - 1 | 200 g |
| Pizza | 400 g |
| A - 2 | 250 g |
| Meat | 350 g |
| 450 g | |
| A - 3 | 200 g |
| Vegetables | 300 g |
| 400 g | |
| A - 4 | 50 g (add 450 ml of water) |
| Pasta | 100 g (add 800 ml of water) |
| A - 5 | 200 g |
| Potato | 400 g |
| 600 g | |
| A - 6 | 250 g |
| Fish | 350 g |
| 450 g | |
| A - 7 | 1 cup (120 ml) |
| Beverage | 2 cups (240 ml) |
| 3 cups (360 ml) | |
| A - 8 | 50 g |
| Popcorn | 100 g |
8. USING THE ACCESSORIES

WARNING!
Refer to Safety chapters.
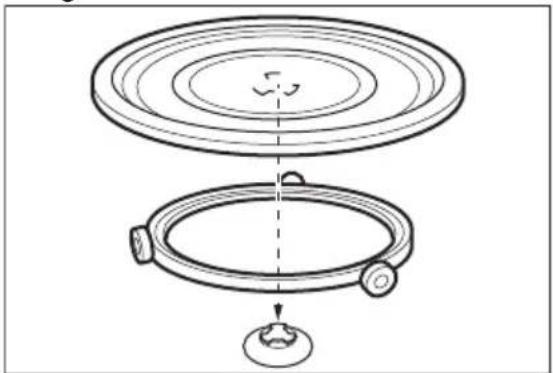
8.1 Inserting the turntable set

CAUTION!
Do not cook food without the turntable set. Use only the turntable set provided with the microwave.

Never cook food directly on the glass cooking tray.
- Place the roller guide around the turntable shaft.
- Place the glass cooking tray on the roller guide
natural_image
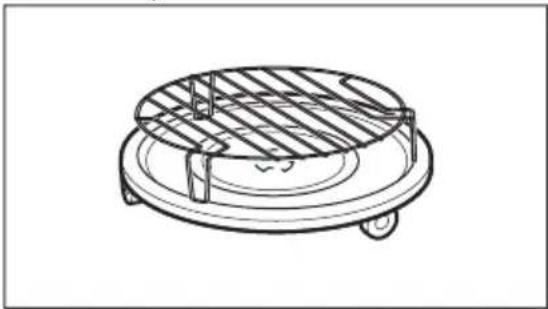
Diagram of a circular mechanical component with a base and top view, showing internal structure and assembly (no text or symbols)8.2 Inserting the grill rack
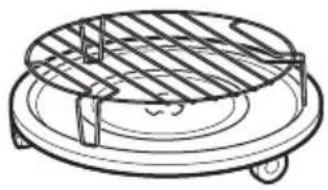
Place the grill rack on the turntable set.
natural_image
Line drawing of a circular heating element with a gridded top and side-mounted wheels (no text or symbols)9. ADDITIONAL FUNCTIONS
9.1 Child Safety Lock
The Child Safety Lock prevents an accidental operation of the microwave.
Press and hold Ⓥ for 3 seconds.
An acoustic signal sounds.
When the Child Safety Lock is active the display shows [二]
To deactivate the Child Safety Lock Press and hold for 3 seconds.
9.2 Kitchen Timer
You can set a maximum 95 minutes.
- Press .
- Turn the Setting knob to set the time.
- Press to confirm.
The Timer still works when you open the door or pause the microwave. Press to cancel.
When the set time is reached, an acoustic signal sounds.
10. HINTS AND TIPS

WARNING!
Refer to Safety chapters.
10.1 Tips for the microwave
Problem Remedy
| You cannot find details for the amount of food prepared. | Look for a similar food. Increase or shorten the length of the cooking times according to the following rule: Double the amount = almost double the time, Half the amount = half the time |
| The food got too dry. Set shorter cooking time or select lower microwave power. | |
| The food is not defrosted, hot or cooked after the time came to an end. | Set longer cooking time or set higher power. Note that large dishes need longer time. |
| After the cooking time comes to an end, the food is overheated at the edge but is still not ready in the middle. | Next time set a lower power and a longer time. Stir liquids half-way through, e.g. soup. |
To get better results for rice use a flat, wide dish.
10.2 Defrosting
Always defrost roast with the fat side down.
Do not defrost covered meat because this may cause cooking instead of defrosting.
Always defrost whole poultry breast side down.
10.3 Cooking
Always remove chilled meat and poultry from the refrigerator at least 30 minutes before cooking.
Let the meat, poultry, fish and vegetables stay covered after cooking.
Brush a little oil or melted butter over the fish.
All vegetables should be cooked at full microwave power.
Add 30 - 45 ml of cold water for every 250 g of vegetables.
Cut the fresh vegetables into even size pieces before cooking. Cook all vegetables with a cover on the container.
10.4 Reheating
When you reheat packed ready meals always follow the instruction written on the packaging.
10.5 Grilling
Grill flat food items in the middle of the grill rack.
Turn the food over halfway through the set time and continue grilling.
10.6 Combi Cooking
Use the Combi Cooking to keep the crispness of certain foods.
At the half of the cooking time, turn over the foods then continue.
Each mode combines the microwave and the grill functions at different time periods and power levels.
11. CARE AND CLEANING

WARNING!
Refer to Safety chapters.
11.1 Notes and tips on cleaning
- Clean the front of the appliance with a soft cloth with warm water and a cleaning agent.
- To clean metal surfaces, use a usual cleaning agent.
-
Clean the appliance interior after each use. The dirt does not burn on and can be removed easily.
-
Clean stubborn dirt with a special cleaner.
- Clean all accessories regularly and let them dry. Use a soft cloth with warm water and a cleaning agent.
- To soften the hard to remove remains, boil a glass of water at full microwave power for 2 to 3 minutes.
- To remove odours, mix a glass of water with 2 tsp of lemon juice and boil at full microwave power for 5 minutes.
12. TROUBLESHOOTING

WARNING!
Refer to Safety chapters.
12.1 What to do if...
| Problem Possible cause Remedy | ||
| The appliance does not operate. | The appliance is deactivated. Activate the appliance. | |
| The appliance does not operate. | The appliance is not plugged in. Plug in the appliance. | |
| The appliance does not operate. | The fuse in the fuse box is blown. Check the fuse. If the fuse blows more than one time, contact a qualified electrician. | |
| The appliance does not operate. | The door is not closed properly. Make sure that nothing blocks the door. | |
| The lamp does not operate. | The lamp is defective. The lamp has to be replaced. | |
| The display shows [ ] | The Child Safety Lock is active. Deactivate the Child Safety Lock. Hold for 3 seconds. | |
| There is sparking in the cavity. | There are metal dishes or dishes with metal trim. | Remove the dish from the appliance. |
| There is sparking in the cavity. | There are metal skewers or aluminium foil that touches the interior walls. | Make sure that the skewers or foil do not touch the interior walls. |
| The turntable set makes scratching or grinding noise. | There is an object or dirt below the glass cooking tray. | Clean the area below the glass cooking tray. |
Problem Possible cause Remedy
The appliance stops operating without a clear reason.
There is a malfunction. If this situation repeats call the Authorised Service Center.
12.2 Service data
If you cannot find a solution to the problem yourself, contact your dealer or an Authorised Service Centre.
The necessary data for the service centre is on the rating plate. The rating plate is on the appliance. Do not remove the rating plate from the appliance.
We recommend that you write the data here:
Model (MOD.) ......
Product number (PNC) ....
Serial number (S.N.) ....
13. ENVIRONMENTAL CONCERNS
Recycle materials with the symbol Put the packaging in relevant containers to recycle it. Help protect the environment and human health by recycling waste of electrical and electronic appliances. Do not dispose of
appliances marked with the symbol with the household waste. Return the product to your local recycling facility or contact your municipal office.
PARIMATE TULEMUSTE SAAVUTAMISEKS
- Mikrolaineahju paigaldamine köögimööblisse.
natural_image
Diagram of a cabinet with an open door and internal compartments, showing a close-up of the cabinet's handle (no text or symbols present)natural_image
Technical line drawing of a circular component with a coiled spring and a small protrusion (no text or symbols)natural_image
Line drawing of a simple outdoor table with slatted top and legs (no text or symbols)Kasutage:
natural_image
Diagram of a circular mechanical component with a central hub and a base, showing no text or symbols.8.2 Grillresti paigaldamine
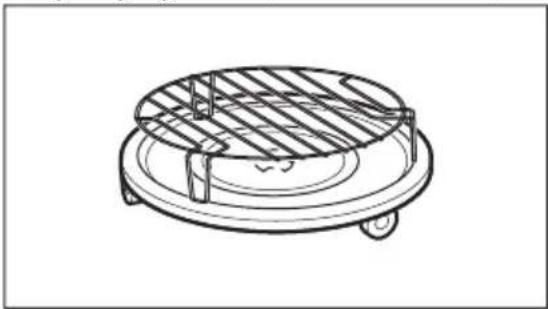
Paigutage grillrest pöördaluse komplektile.
natural_image
Line drawing of a circular heating element with a gridded top and side-mounted wheels (no text or symbols)9. LISAFUNKTSIOONID
9.1 Lapselukk
natural_image
Diagram of a kitchen appliance interior showing a door, cabinet, and window with a magnified inset showing a handle mechanism (no text or symbols)natural_image
Technical line drawing of a circular component with a coiled cable underneath (no text or symbols)natural_image
Line drawing of a simple oval-shaped metal grate with three legs and a central slot (no text or symbols)Utilisez-la pour :
natural_image
Technical line drawing of a mechanical component with concentric rings and a base mount (no text or symbols)8.2 Installation de la grille
natural_image
Line drawing of a circular mechanical component with a grating and wheels (no text or symbols)9. FONCTIONS SUPPLÉMENTAIRES
natural_image
Diagram of a microwave oven with a close-up inset showing internal components (no text or symbols)natural_image
Line drawing of two circular objects with rings and connectors, no text or symbols presentnatural_image
Line drawing of a simple oval-shaped object with horizontal slats and two legs, no text or symbols present.Verwendung:
- Grillen
- Kombi-Garen
natural_image
Technical diagram of a mechanical component with concentric rings and a star-shaped base (no text or symbols)natural_image
Line drawing of a circular mechanical component with a gridded top and wheels (no text or symbols)9. ZUSATZFUNKTIONEN
9.1 Kindersicherung
natural_image
Symbol of a trash bin crossed with a diagonal line, representing no waste or discharge (no text or labels)natural_image
Recycling symbol with three arrows forming a triangle (no text or labels)natural_image
Diagram of a microwave oven with an open door and a close-up inset showing internal components (no text or symbols)natural_image
Two types of circular objects: a top with concentric rings and a bottom with coiled ends (no text or symbols)natural_image
Line drawing of a simple oval-shaped object with horizontal slats and two legs, no text or symbols present.Χρήση για:
natural_image
Technical line drawing of a circular mechanical component with a central hub and base, showing assembly steps (no text or symbols)natural_image
Line drawing of a circular heating element with heat sink and wheels (no text or symbols)natural_image
Diagram of a cabinet interior with an open door and a close-up inset showing a hand holding a tool (no text or symbols present)natural_image
Line drawing of a circular fan with a small knob and handle, no text or symbols presentStikla gatavošanas plātne un rullīša vadotne.
Grila restes
natural_image
Line drawing of a simple outdoor table with slatted top and legs (no text or symbols)Izmantojiet:
natural_image
Diagram of a circular fan assembly with a central hub and base, showing no text or symbolsnatural_image
Line drawing of a circular heating element with a gridded top and side-mounted base (no text or symbols)9. PAPILDFUNKCIJAS
natural_image
Diagram of a microwave oven with an open door and internal compartments, showing a close-up of the interior (no text or symbols)natural_image
Technical line drawing of two circular components with a handle, no text or symbols presentnatural_image
Line drawing of a simple oval-shaped object with diagonal lines and two legs, resembling a pan or vent (no text or symbols)Naudokite:
• maisto kepimui ant grotelių;
• kombinuotajam gaminimui;
5. PRIEŠ NAUDOJANTIS PIRMAKART

ISPÈJIMAS!
Žr. saugos skyrius.
5.1 Pradinis valymas

DÈMESIO
natural_image
Technical line drawing of a circular component with a base and top view, showing internal structure and assembly (no text or symbols)natural_image
Technical line drawing of a circular mechanical component with internal hatched structure and wheels (no text or symbols)9. PAPILDOMOS FUNKCIJOS
natural_image
Diagram of a cabinet interior with an open door and a mounted cabinet, showing a close-up of the cabinet handle (no text or symbols present)natural_image
Technical line drawing of a circular component with a coiled cable underneath (no text or symbols)natural_image
Line drawing of a circular metal grate with three legs and a central slatted top (no text or symbols)Користете ја за:
natural_image
Diagram of a circular mechanical component with a central hub and a base, showing internal structure without any text or symbols.natural_image
Line drawing of a circular heating element with a grating and wheels (no text or symbols)natural_image
Diagram of a microwave oven with an open door and a close-up inset showing internal components (no text or symbols)natural_image
Line drawing of a circular fan with a small handle and a small leaf, shown above and below (no text or symbols)natural_image
Line drawing of a simple oval-shaped object with diagonal lines and two legs, resembling a pan or vent (no text or symbols)Zastosowanie:
natural_image
Technical diagram showing a circular component with internal structure and a small base component (no text or symbols)natural_image
Line drawing of a circular heating element with a gridded top and wheels (no text or symbols)9. DODATKOWE FUNKCJE
9.1 Blokada uruchomienia
- Fixe o suporte superior com 2 parafusos.

natural_image
Diagram of a microwave oven with an open door and a close-up inset showing the internal structure (no text or symbols)natural_image
Technical line drawing of a circular component with a coiled cable underneath (no text or symbols)natural_image
Line drawing of a simple outdoor table with slatted top and legs (no text or symbols)Utilize para:
- grelhar alimentos
- cozedura combinada
natural_image
Diagram of a circular mechanical component with a star-shaped top and a base, showing internal structure and alignment (no text or symbols)natural_image
Line drawing of a circular heating element with a gridded top and side-mounted base (no text or symbols)9. FUNÇÕES ADICIONAIS
natural_image
Diagram of a microwave oven with an open door and a close-up inset showing internal components (no text or symbols)natural_image
Technical line drawing of a circular component with a coiled cable underneath (no text or symbols)natural_image
Line drawing of a simple outdoor table with slatted top and legs (no text or symbols)A se utiliza pentru:
natural_image
Technical line drawing of a circular mechanical component with a base and top view, showing internal structure and mounting point (no text or symbols)natural_image
Technical line drawing of a circular mechanical component with internal grating and mounting base (no text or symbols)9. FUNCTII SUPLIMENTARE
natural_image
Diagram of a microwave oven with an open door and a close-up inset showing internal components (no text or symbols)natural_image
Technical line drawing of a circular component with a coiled cable underneath (no text or symbols)natural_image
Line drawing of a simple oval-shaped metal grate with three legs and a central slatted top (no text or symbols)Користи се за:
natural_image
Diagram showing a circular component being lifted by a ring, with a small base and a star-shaped connector at the bottom (no text or symbols)natural_image
Technical line drawing of a circular mechanical component with internal grating and mounting feet (no text or symbols)9. ДОДАТНЕ ФУНКЦИЈЕ
- Upevnite hornú konzolu 2 skrutkami.
natural_image
Diagram of a microwave oven with a close-up view showing internal components and a magnified inset (no text or symbols)natural_image
Technical line drawing of two circular components with internal rings and a handle (no text or symbols)natural_image
Line drawing of a simple oval-shaped metal grate with three legs and a central slot (no text or symbols)Používa sa na:
natural_image
Diagram of a circular mechanical component with internal structure and a base mount (no text or symbols)natural_image
Technical line drawing of a circular mechanical component with internal hatched structure and mounting feet (no text or symbols)9. DOPLNKOVÉ FUNKCIE
9.1 Detská poistka
- Mikrovalovno pečico postavite v kuhinjsko omaro.
- Zgornji nosilec pritrdite z dvema vijakoma.
natural_image
Diagram of a cabinet interior with an open door and a close-up inset showing a hand holding a tool (no text or symbols present)natural_image
Technical line drawing of a circular component with a flanged base and a small protrusion (no text or symbols)natural_image
Line drawing of a simple oval-shaped metal grate with three legs and a central slatted top (no text or symbols)Uporabite za:
- peko hrane na žaru
• kombinirano pripravo hrane
5. PRED PRVO UPORABO

OPOZORILO!
natural_image
Diagram of a mechanical assembly showing a top and bottom views of a circular component with a central hub and a small base (no text or symbols)natural_image
Line drawing of a circular heating element with a gridded top and side-mounted base (no text or symbols)9. DODATNE FUNKCIJE
natural_image
Diagram of a microwave oven with an open door and a close-up inset showing the internal structure (no text or symbols)natural_image
Technical line drawing of two circular components with internal rings and a knob (no text or symbols)natural_image
Line drawing of a circular metal grate with three legs and a central slatted top (no text or symbols)Se usa para:
natural_image
Diagram showing a circular component with internal structure and a small circular base, no text or symbols present.natural_image
Line drawing of a circular heating element with a grating and wheels (no text or symbols)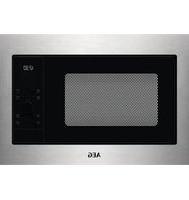


- PËR REZULTATE PERFEKTE
- PËRSHKRIM I PRODUKTIT
- FUNKSIONET SHTESË
- ABANS DEL PRIMER ÚS
- Postavljanje
- PRIJE PRVE UPOTREBE
- UPOZORENJE!
- SVAKODNEVNA UPORABA
- Umetanje stalka roštilja
- DODATNE FUNKCIJE
- DOPLŇKOVÉ FUNKCE
- EXTRA FUNCTIONS
- Kinderslot
- PROBLEEMOPLOSSING
- WAARSCHUWING!
- Visit our website to:
- CUSTOMER CARE AND SERVICE
- CONTENTS
- ⚠SAFETY INFORMATION
- Children and vulnerable people safety
- WARNING!
- General Safety
- SAFETY INSTRUCTIONS
- Installation
- Electrical Connection
- Use
- Care and Cleaning
- Service
- Disposal
- INSTALLATION
- Electrical installation
- Installation - preliminary preparation
- Installation
- PRODUCT DESCRIPTION
- General overview
- Control Panel
- Display element Function description
- Accessories
- BEFORE FIRST USE
- Initial Cleaning
- Setting the time
- DAILY USE
- General information about using the appliance
- Cooking
- Defrosting meat, poultry, fish
- Defrosting butter, portions of gateau, quark
- Defrosting fruit, vegetables
- Ready meals
- √ suitable
- X not suitable
- Activating and deactivating the microwave
- CAUTION!
- Power setting table
- Quick Start
- Defrosting
- Multistage cooking
- AUTOMATIC PROGRAMMES
- Auto cooking
- Grilling and Combi Cooking
- USING THE ACCESSORIES
- Inserting the turntable set
- Inserting the grill rack
- ADDITIONAL FUNCTIONS
- Child Safety Lock
- Kitchen Timer
- HINTS AND TIPS
- Tips for the microwave
- Defrosting
- Cooking
- Reheating
- Grilling
- Combi Cooking
- CARE AND CLEANING
- Notes and tips on cleaning
- TROUBLESHOOTING
- What to do if...
- Problem Possible cause Remedy
- Service data
- We recommend that you write the data here:
- ENVIRONMENTAL CONCERNS
- PARIMATE TULEMUSTE SAAVUTAMISEKS
- Grillresti paigaldamine
- LISAFUNKTSIOONID
- Lapselukk
- Installation de la grille
- FONCTIONS SUPPLÉMENTAIRES
- ZUSATZFUNKTIONEN
- Kindersicherung
- PAPILDFUNKCIJAS
- PRIEŠ NAUDOJANTIS PIRMAKART
- Pradinis valymas
- PAPILDOMOS FUNKCIJOS
- DODATKOWE FUNKCJE
- Blokada uruchomienia
- FUNÇÕES ADICIONAIS
- FUNCTII SUPLIMENTARE
- ДОДАТНЕ ФУНКЦИЈЕ
- DOPLNKOVÉ FUNKCIE
- Detská poistka
- PRED PRVO UPORABO
Brand : AEG
Model : MSB2057DB
Category : Microwave Oven