
iSENSYS MF754Cdw - Printer CANON - Free user manual and instructions
Find the device manual for free iSENSYS MF754Cdw CANON in PDF.
| Product type | Color laser multifunction printer (print, copy, scan, fax) |
| Brand | Canon |
| Model | iSENSYS MF754Cdw |
| Print speed | Approximately 28 pages per minute (A4, black and color) |
| Print resolution | 600 x 600 dpi (enhanced to 1200 x 1200 dpi) |
| Standard paper capacity | 250 sheets (main paper tray) |
| Optional paper capacity | Optional paper feeder (up to 550 additional sheets) |
| Connectivity | Wired LAN (Ethernet), wireless LAN (Wi-Fi), USB 2.0 |
| Power supply | 220-240 V AC, 50/60 Hz |
| Power consumption | In operation: approximately 800 W; standby: approximately 15 W |
| Dimensions (W x D x H) | Approximately 470 x 485 x 400 mm (without accessories) |
| Weight | Approximately 26 kg (without consumables) |
| Main functions | Automatic duplex printing, copying, color scanning, fax, remote UI |
| Security | Setting a PIN code for remote UI access |
| Maintenance | Color correction recommended for quality prints |
| Included software | MF Scan Utility, print and scan drivers |
| Optional accessories | Paper feeder, telephone handset |
| Scanning | Color scanning to PC, email, or network folder |
| Fax | Automatic, manual, answering machine mode; compatible with telephone line |
| Installation guide | Interactive setup guide on the control panel |
Frequently Asked Questions - iSENSYS MF754Cdw CANON
User questions about iSENSYS MF754Cdw CANON
0 question about this device. Answer the ones you know or ask your own.
Ask a new question about this device
Download the instructions for your Printer in PDF format for free! Find your manual iSENSYS MF754Cdw - CANON and take your electronic device back in hand. On this page are published all the documents necessary for the use of your device. iSENSYS MF754Cdw by CANON.
USER MANUAL iSENSYS MF754Cdw CANON
• After you finish reading this guide, store it in a safe place for future reference.
- The information in this guide is subject to change without notice.
1 Important Safety Instructions
Be sure to read these instructions before using the machine.
2 Setup Guide (this document)
3 User's Guide
This section explains all the ways this machine can be used.
FAQ
This section describes problems that may arise and how to resolve these problems.

https://oip.manual.canon/
See p. 8 "Accessing the Online Manual" for details.
Unless otherwise stated, illustrations used in this document are for the MF754Cdw.
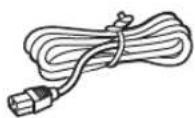
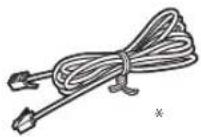
1 Checking the Items Included
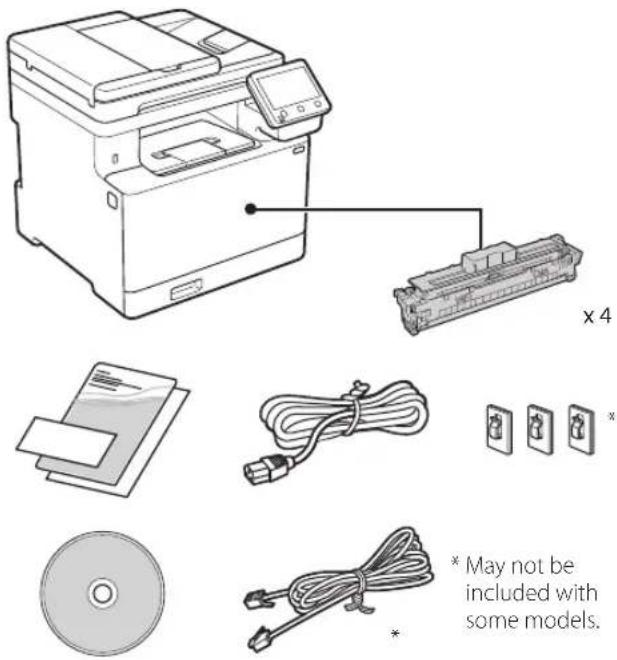
text_image
x 4 * May not be included with some models. *2 Removing the Packing Material
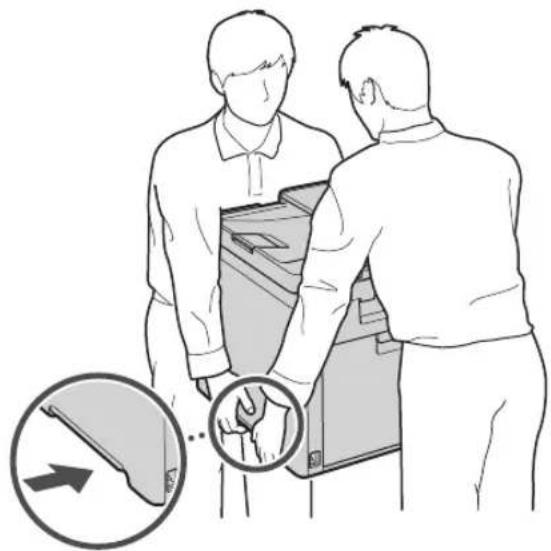
- Install the machine in the location where it will be used.
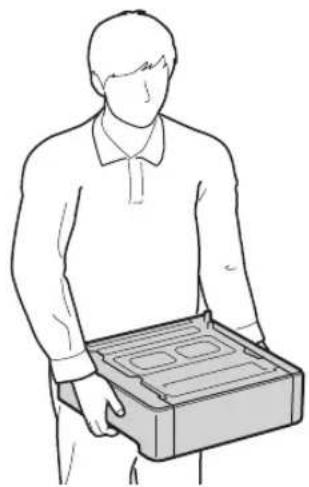
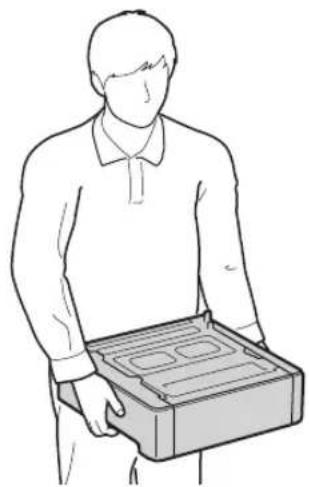
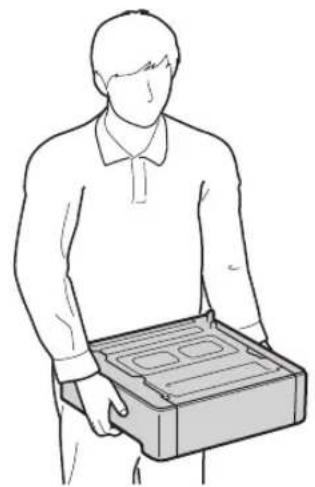
The machine should be carried by at least two people.
natural_image
Illustration of two people interacting with a device, showing hand placement and directional arrows (no text or symbols)2. Remove all packing material.
Remove all of the tape.

Do not remove the sticker that covers the USB port until you actually use the USB port.
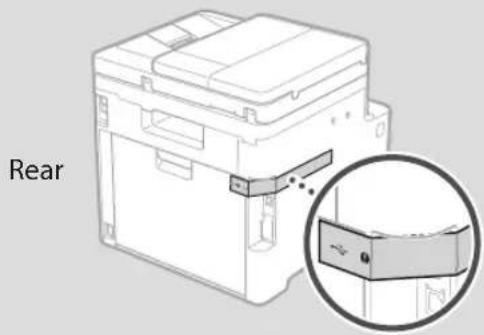
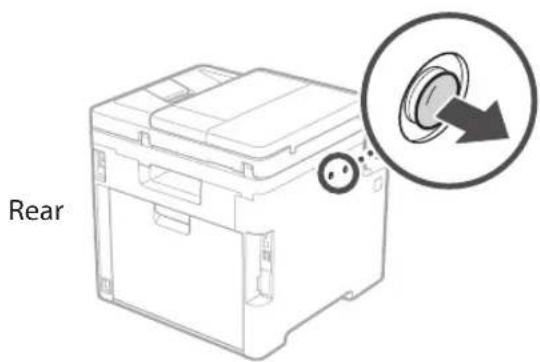
text_image
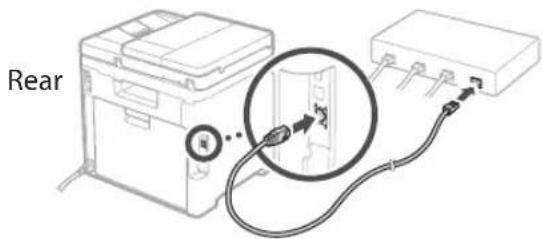
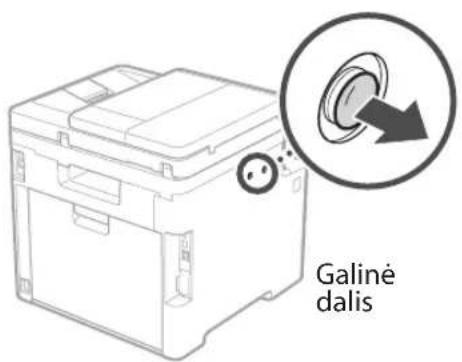
Rear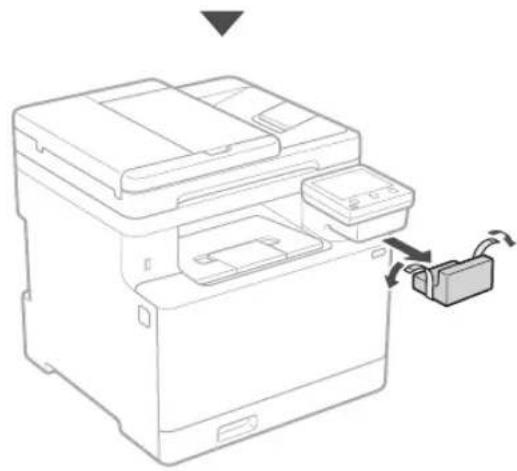
natural_image
Line drawing of a printer with a cable being inserted (no text or symbols)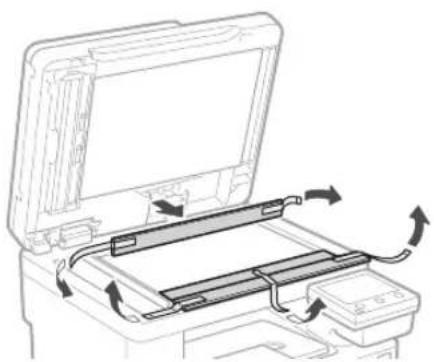
natural_image
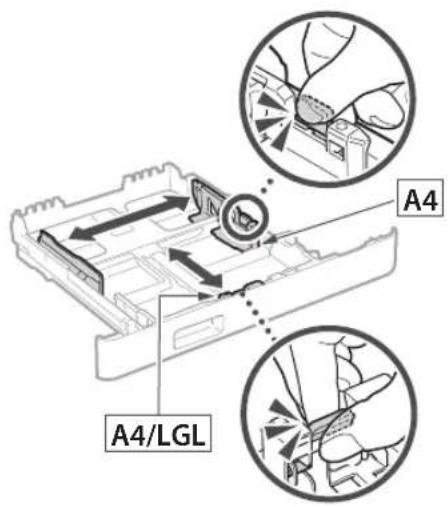
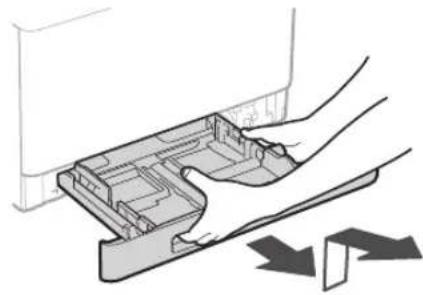
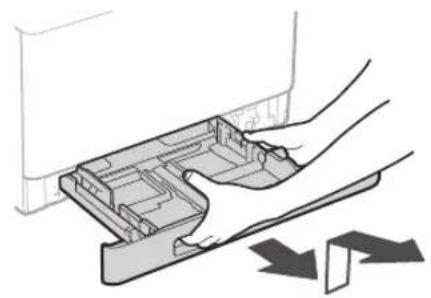
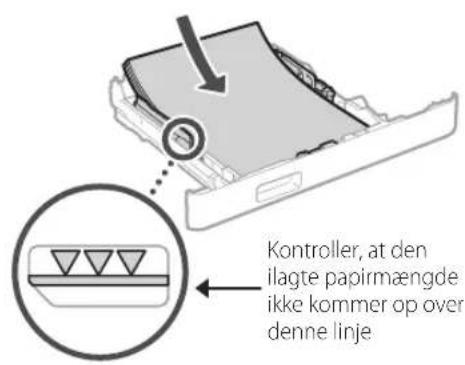
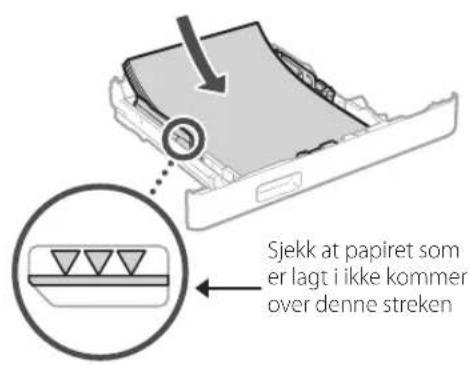
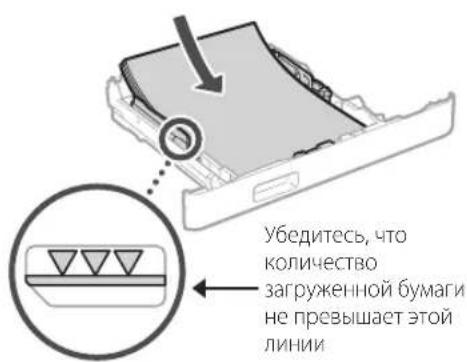
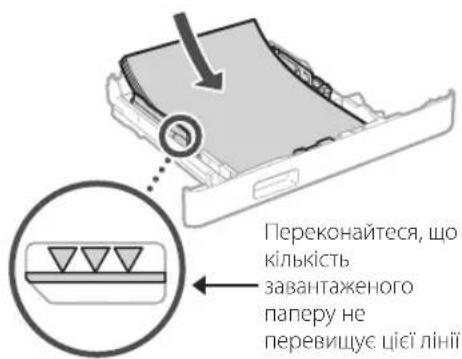
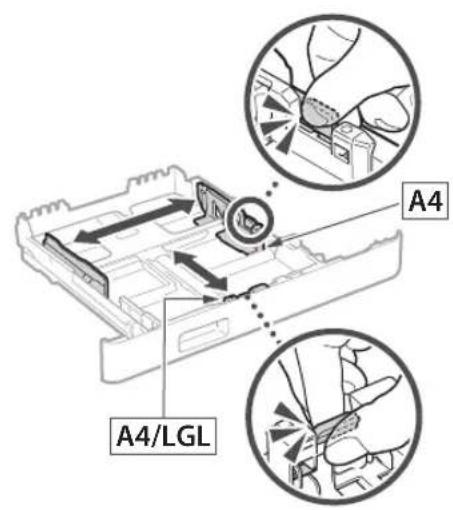
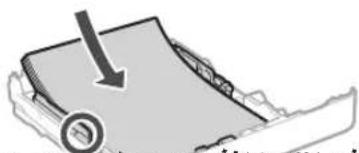
Diagram of a printer's internal structure showing paper feed, paper tray, and scroll wheel (no text or labels)3 Loading Paper
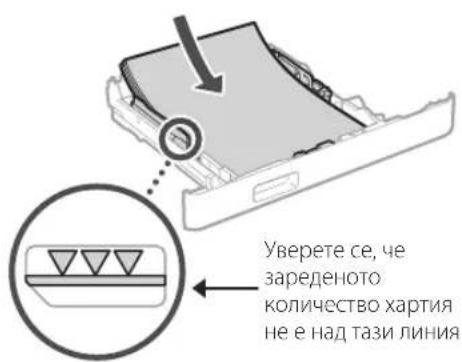
1.

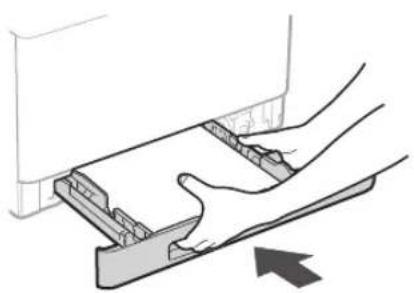
natural_image
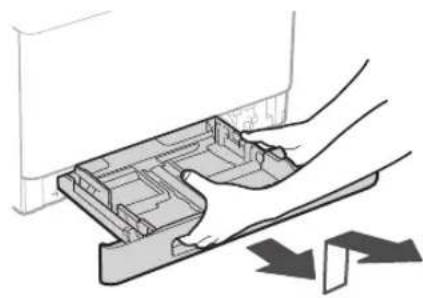
Diagram of a hand pressing a plastic tray with arrows indicating motion (no text or symbols)2.

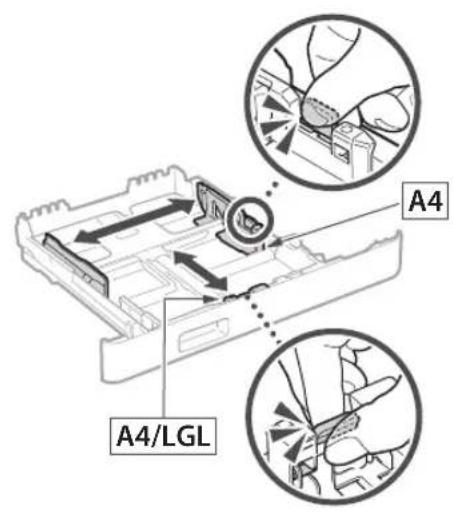
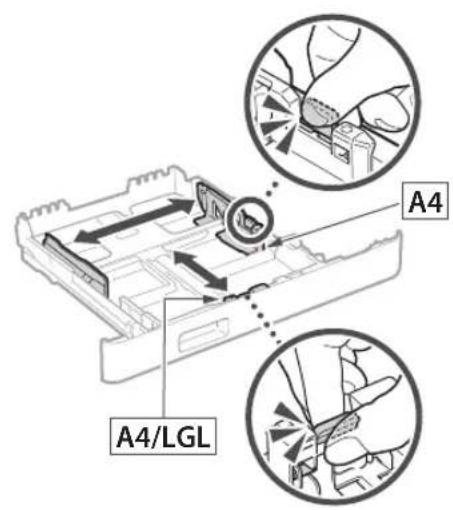
text_image
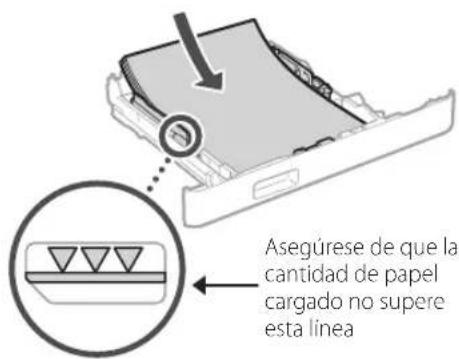
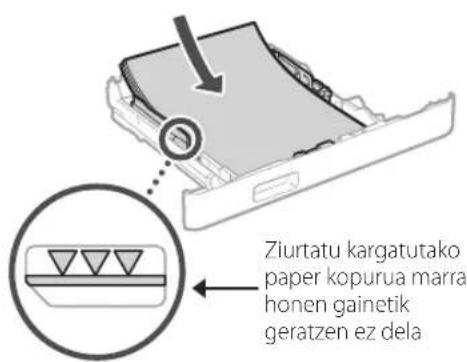
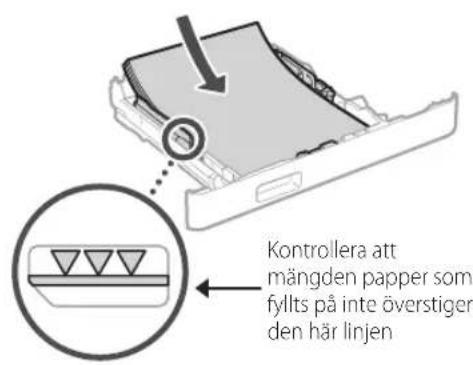
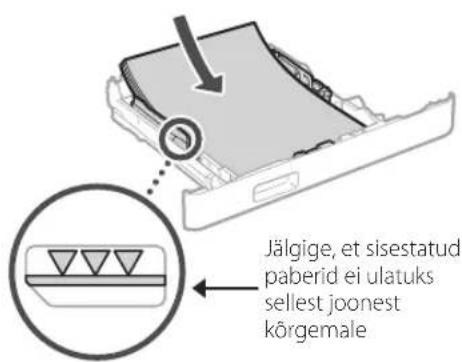
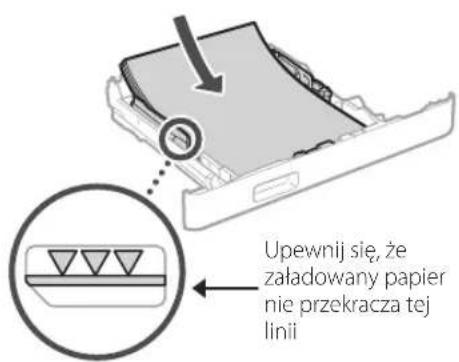
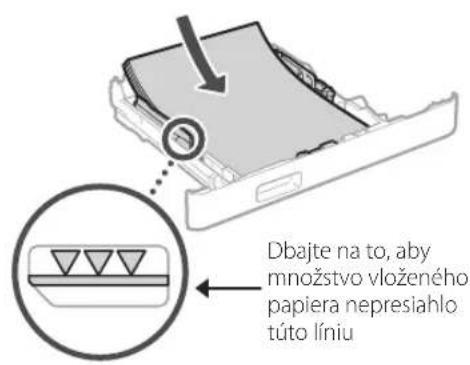
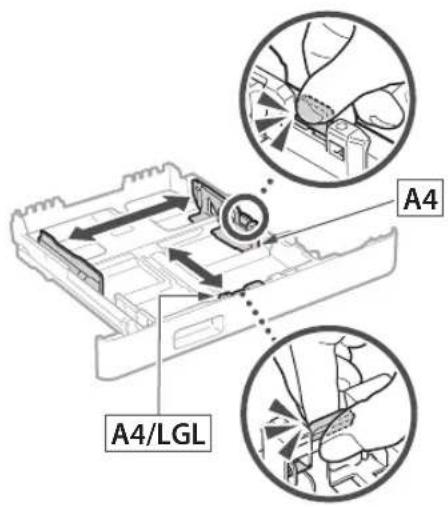
A4 A4/LGL3.
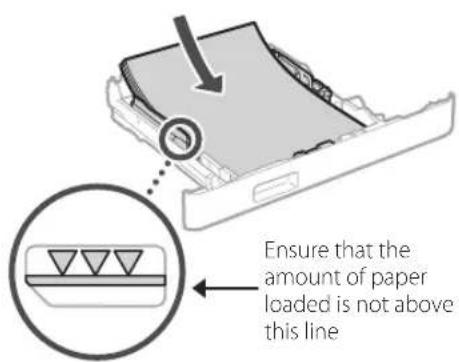
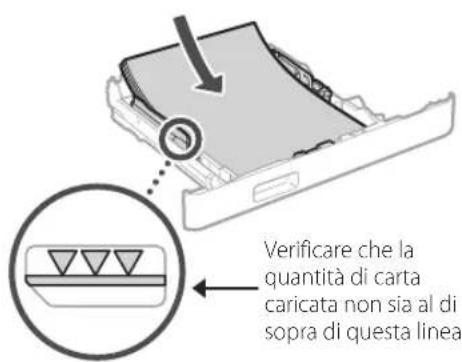
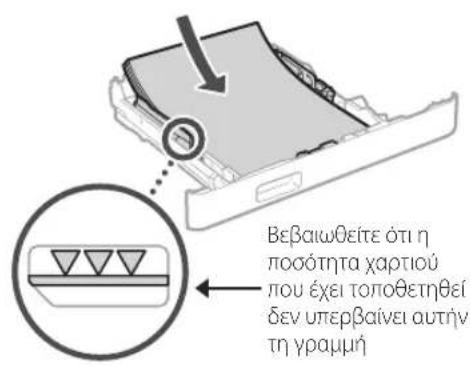
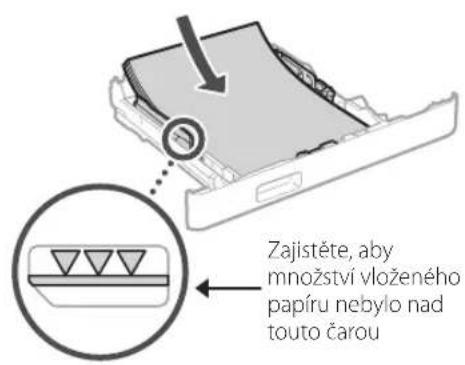
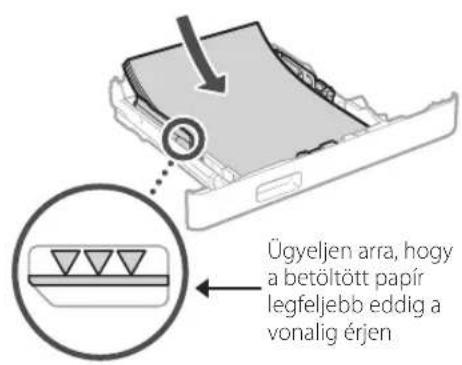
text_image
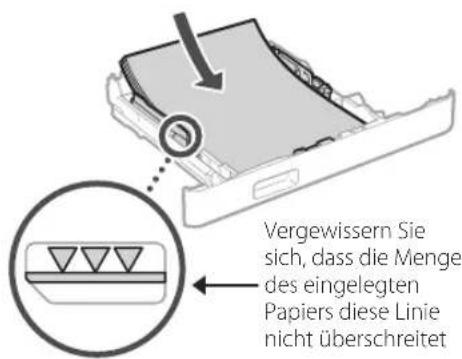
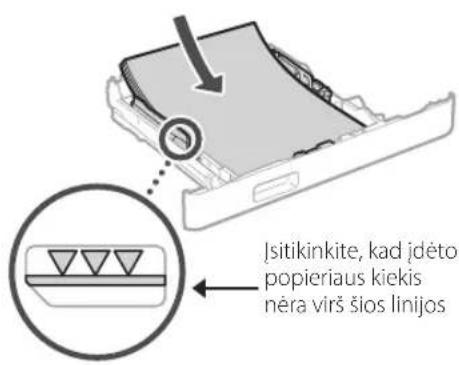
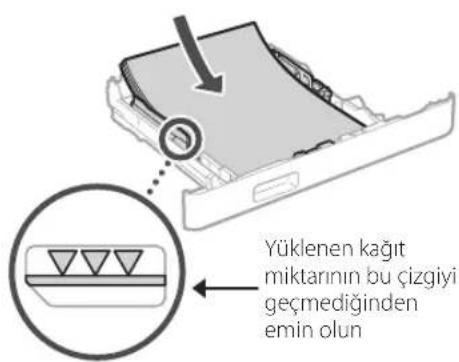
Ensure that the amount of paper loaded is not above this line4.
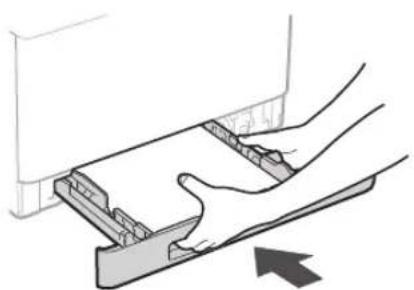
natural_image
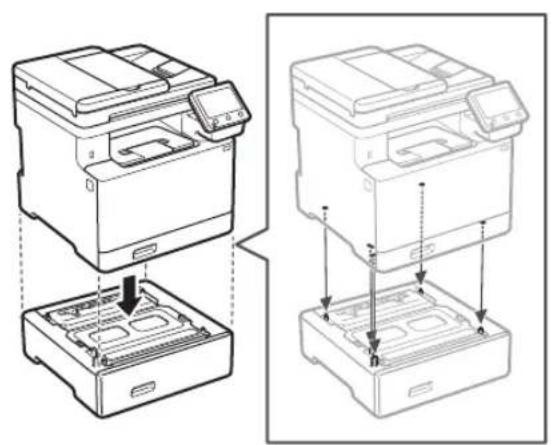
Illustration of hands installing or adjusting a mechanical component with an arrow indicating motion (no text or symbols present)4 Installing the Optional Part

If you are not using optional part, proceed to step 5
Before Installing the Optional Part
After the machine has been installed, perform the following before installing the optional part:
- Turn OFF the machine and your computer.
- Unplug the machine from the mains power outlet.
- Disconnect all cords and cables from the machine.
Paper Feeder
- Remove all packing material.

natural_image
Diagram of a device interior showing internal components and directional arrows, no text or symbols present- Install the paper feeder in the location where it will be used.
natural_image
Line drawing of a person holding an open box (no text or symbols)
natural_image
Technical line drawing showing two views of a printer's internal structure with no text or symbols
text_image
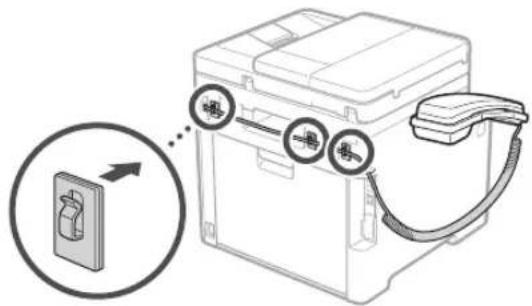
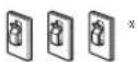
Diagram of a printer with two labeled buttons (1 and 2) pointing to the printer's screen, showing connection points.Handset
* The handset cannot be used with some models.
text_image
Rear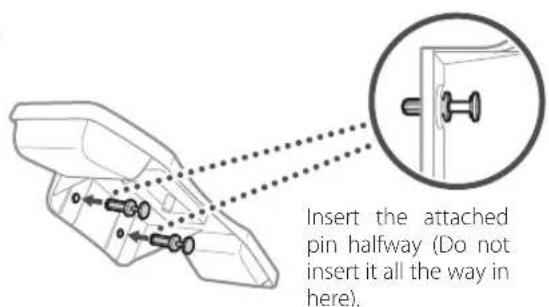
text_image
Insert the attached pin halfway (Do not insert it all the way in here).
text_image
Insert the pin all the way in.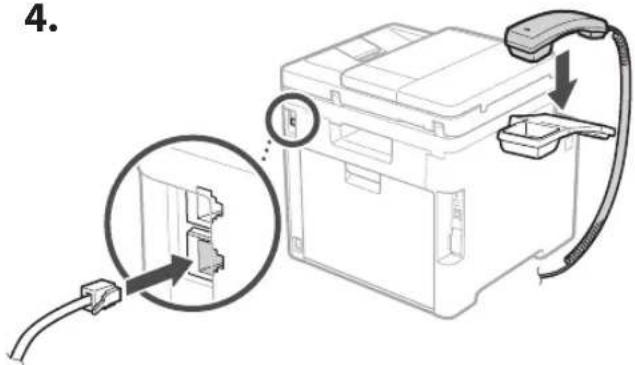
text_image
4.5.
text_image
Diagram showing a device with three labeled buttons (鸡, 烘, 鸢) connected to a battery pack, with an arrow pointing to a device component.5
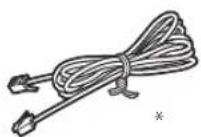
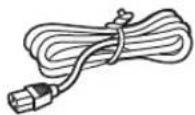
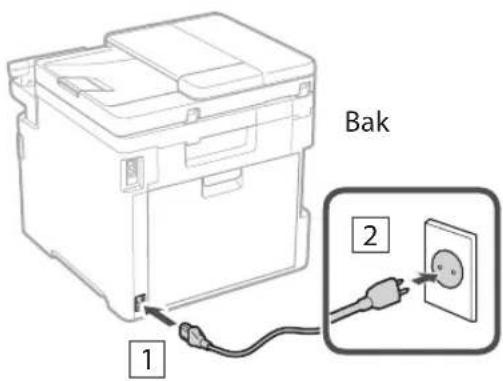
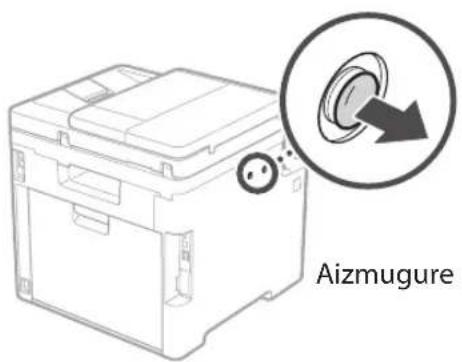
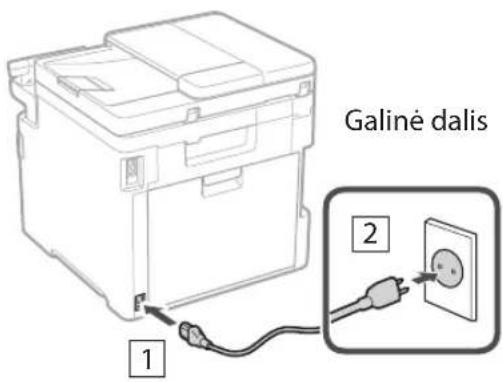
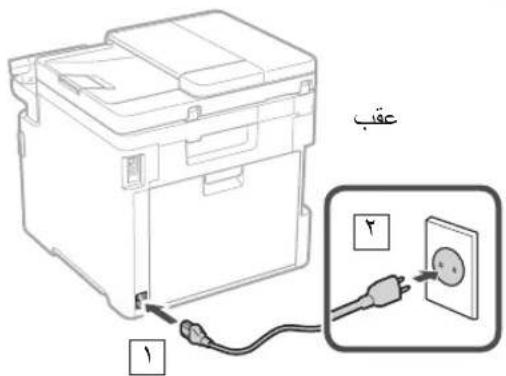
Connecting the Power Cord
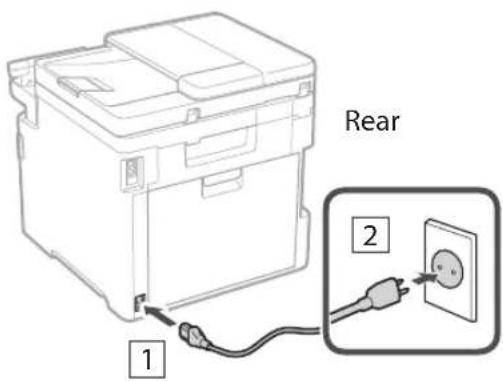
text_image
Rear 1 26 Specifying the Basic Settings
When you turn on the machine for the first time, the Setup Guide appears on the operation panel. Perform the initial machine setup by following the on-screen instructions.
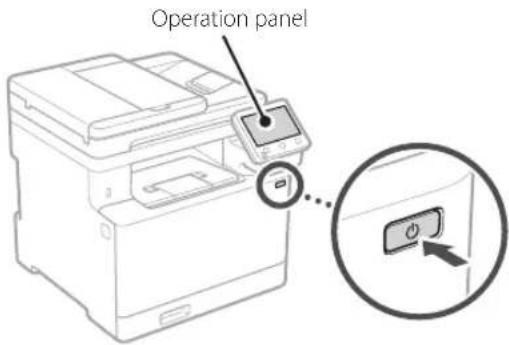
text_image
Operation panel- Select the language, the country or region, and then the time zone.
- Set the current date/time.
7 Specifying the Security Settings
To prevent unauthorized access to the machine, set access restrictions for Remote UI.

What is Remote UI?
Remote UI allows you to use your computer's Web browser to check the machine's operating status, change settings, and save items to the Address Book.
1. To use the Remote UI, select .
To continue without using the Remote UI, select
2. To use General User mode, select .
- Set the PIN to be used by general users to access the Remote UI.
- To continue without using General User mode, select
and proceed to step 8.
3. Set the Remote UI Access PIN.
- Enter any number and then select
- Re-enter the same PIN on the next screen as confirmation and select
8 Using Color Correction
For better print results, the use of color correction is recommended.
- Choose whether to use color correction.
- Check that the paper displayed on screen is actually loaded and then select
. - Select
and correct the colors by following the on-screen instructions.
9 Specifying the Network Settings
Specify the settings for connecting the machine to a network. Before proceeding, check that the computer and router are correctly connected to the network.
- You cannot use a wired LAN and a wireless LAN at the same time.
Wireless LAN
- Check the router's "SSID" and "Network key."
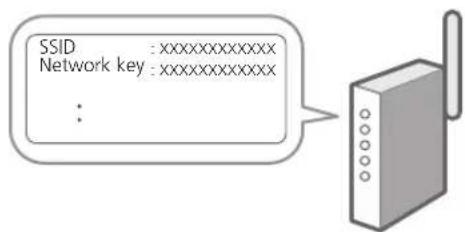
text_image
SSID :xxxxxxxxxxxx Network key :xxxxxxxxxxxx :- To configure the settings, select
on the operation panel. - Select the network with a matching SSID.
- Enter the password (network key) and select
.
Wired LAN
Connect the router to the machine with a LAN cable and then select
text_image
Rear10 Ending the Setup Guide
Check the description in the Application Library and then select
11 Installing the Software/Drivers
To use the print, fax, and scan functions of the machine, you must install the respective drivers.
Downloading from the Canon website
- Search for "(model name) download."
XXXXXXXX download

Example: MF754Cdw download
If you cannot find the download site, go to https://global.canon/en/support/
- Download the software and drivers, and install them on your computer.
To use the scan function, install the "MF Scan Utility" scanning application and the scan driver.
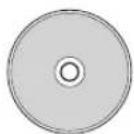
Installing from the Bundled CD/DVD-ROM
- Load the CD/DVD-ROM into your computer, and install the software and drivers.
For normal installation, select "Easy Installation." Selecting "Easy Installation" installs the drivers along with the standard software and manuals.

If a problem arises during the installation, see "See Troubleshooting (FAQ) for drivers" in "FAQ."
Accessing the FAQ
p. 8 "Accessing the Online Manual"
On models with a fax function, configure the fax settings next.
12 Fax Setup
* These settings do not appear on models without a fax function.
The first time you select
Setup Procedure
- Select
on the Home screen. - Select
. - Select
. - Enter the Unit Telephone Number and select
. - Select
. - Enter the Unit Name (name and company name, etc.) and select
. - Select the receive mode that best suits your telephone connection and the way you receive calls.
Refer to the illustration below and select
- Connect the machine to a telephone line.
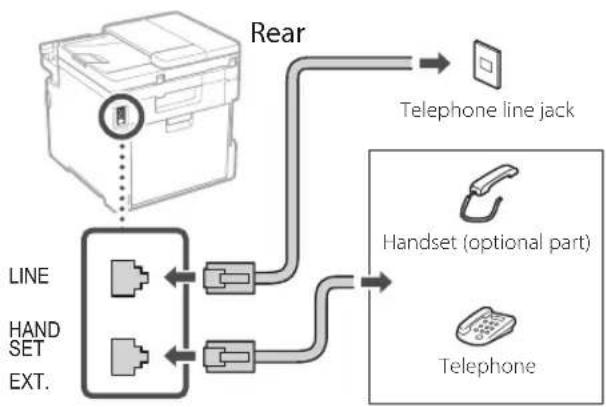
flowchart
graph TD
    A["Line"] --> B["Handset"]
    B --> C["EXT."]
    C --> D["Line"]
    D --> E["Rear"]
    E --> F["Telephone line jack"]
    E --> G["Handset (optional part)"]
    G --> H["Telephone"]
-
When you have completed the connection, select
. -
Select
.

flowchart
graph TD
    A["Start\nDo you want to connect a telephone?"] --> B["Selecting the Receive Mode"]
    B --> C["Auto\nFor fax use only. Receives faxes automatically."]
    B --> D["Answering Machine\nCan be used for both fax and phone. Uses an answering machine function to record phone messages while you are away. Receives faxes automatically."]
    B --> E["Fax/Tel (Auto Switch)\nCan be used for both fax and phone. Receives faxes automatically."]
    B --> F["Manual\nCan be used for both fax and phone. Allows you to check for incoming faxes and receive them manually."]
    G["Yes"] --> H["No"]
    H --> I["Selecting the Receive Mode"]
    I --> J["Do you want to use an answering machine?"]
    J --> K["Selecting the Receive Mode"]
    K --> L["Do you want to receive faxes automatically?"]
    L --> M["Selecting the Receive Mode"]
Useful Functions and Helpful Information
Accessing the Online Manual
- Scan the QR code to open the website to the Canon online manual.

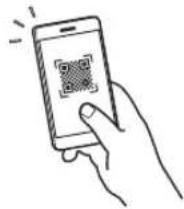
If the not open, go to site does
https://oip.manual.canon/
- Select the manual.
User's Guide
This section lists the functions of the machine, including machine operations, settings, and operating procedures.
FAQ
This section lists frequently asked questions and their answers.

If a problem arises during driver installation, see "See Troubleshooting (FAQ) for drivers."
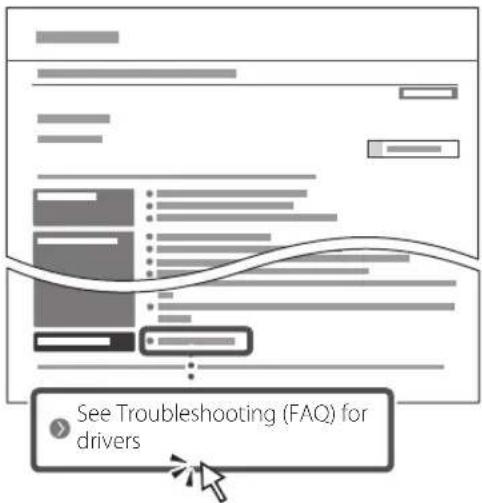
text_image
See Troubleshooting (FAQ) for driversUsing this Machine from a Mobile Device (Linking with Mobile Devices)
This machine can be used from mobile devices such as smartphones. This makes it easy to print documents or photos from a mobile device and to save data scanned on this machine on a mobile device.

User's Guide
See "Linking with Mobile Devices."
Managing the Machine from a Computer (Remote UI)
flowchart
graph TD
    A["User Input"] --> B["Process Data"]
    B --> C["Output Print"]
    style A fill:#f9f,stroke:#333
    style C fill:#ccf,stroke:#333
Remote UI allows this machine to be managed using the Web browser on a computer. You can use it to check the machine's operating status, change settings, and save items to the Address Book.

User's Guide
See "Managing the Machine from a Computer (Remote UI)."
Canon
MF754Cdw
MF752Cdw
Guide de
configuration
natural_image
Line drawing of a printer with a separate physical component labeled 'x 4' (no text or symbols on the device itself)


natural_image
Illustration of two people interacting with a device, showing hand placement and a magnified inset of the device (no text or symbols)natural_image
Line drawing of a printer with a close-up of its internal components and a cable being inserted (no text or symbols)
natural_image
Diagram of a printer's internal structure showing page loading and scroll movement (no text or symbols)natural_image
Diagram of a hand pressing a component into a device, showing internal structure and directional arrows (no text or symbols)2.

text_image
A4 A4/LGL3.

natural_image
Diagram of hands operating a mechanical device with an arrow indicating motion (no text or symbols present)natural_image
Diagram of a device interior showing internal components and directional arrows, no text or symbols presentnatural_image
Line drawing of a person holding an open box (no text or symbols)
natural_image
Technical line drawing showing two views of a printer with internal compartments and mounting holes (no text or symbols)
text_image
Diagram of a printer with labeled parts and connection points, showing two numbered callouts.text_image
Diagram showing a device with three labeled buttons (吸, 吸, 按) connected to a box, with an arrow pointing to a device component.5
natural_image
Hand holding a smartphone displaying a QR code (no text or symbols on the device)natural_image
Illustration of two people interacting with a device, showing hand positioning and directional arrows (no text or symbols)natural_image
Line drawing of a printer with a close-up of its internal components and a separate device attached (no text or symbols)
natural_image
Diagram of a printer's internal structure showing paper feed, paper tray, and scroll wheel (no text or labels)natural_image
Diagram of a hand pressing a plastic tray with arrows indicating motion (no text or symbols)2.

text_image
A4 A4/LGL3.
natural_image
Diagram of hands pressing down on a mechanical component with an arrow indicating motion (no text or symbols)natural_image
Diagram of a device interior showing internal components and airflow direction (no text or symbols)natural_image
Line drawing of a person holding an open box (no text or symbols)
natural_image
Technical line drawing showing two views of a printer with internal compartments and mounting points (no text or symbols)
text_image
Diagram of a printer with two labeled buttons (1 and 2) pointing to the print area, showing connection points.Hörer
text_image
Diagram showing a battery pack connected to three labeled buttons with an arrow pointing to a device panel, indicating a process or connection.natural_image
Line drawing of a printer with a separate printer attached, showing no text or symbols.


natural_image
Illustration of two people interacting with a device, showing hand placement and a magnified inset of the device (no text or symbols)natural_image
Line drawing of a printer with a close-up of its internal components and a cable being inserted (no text or symbols)
natural_image
Diagram of a printer's internal structure showing paper feed, scroll, and paper tray with arrows indicating rotation (no text or symbols)3 Caricamento carta
1.

natural_image
Diagram of a hand pressing a plastic tray with arrows indicating motion (no text or symbols)2.
text_image
A4 A4/LGL3.
natural_image
Illustration of hands using a mechanical device to press or install a component, with an arrow indicating motion (no text or symbols present)natural_image
Diagram of a device interior showing internal components and directional arrows, no text or symbols presentnatural_image
Line drawing of a person holding an open box (no text or symbols)
natural_image
Technical line drawing showing two views of a printer with internal compartments and mounting points (no text or symbols)
text_image
Diagram of a printer with two labeled buttons (1 and 2) pointing to the print area, showing connection points.Ricevitore
text_image
Diagram showing a battery pack connected to three labeled switches with an arrow pointing to the switch panel.5
natural_image
Hand holding a smartphone displaying a QR code (no text or symbols on the device screen)natural_image
Illustration of two people interacting with a device, showing hand placement and directional arrows (no text or symbols)natural_image
Line drawing of a printer with a close-up of its internal components and a cable being inserted (no text or symbols)
natural_image
Diagram of a printer's internal structure showing paper feed, paper tray, and scroll wheel (no text or labels)3 Cargar papel
1.
natural_image
Diagram of a hand pressing a plastic tray with arrows indicating motion (no text or symbols)2.

text_image
A4 A4/LGL3.
natural_image
Illustration of hands pressing down on a mechanical component with an arrow indicating motion (no text or symbols)natural_image
Diagram of a device interior showing internal components and airflow direction (no text or symbols)natural_image
Line drawing of a person holding an open box (no text or symbols)
natural_image
Technical line drawing showing two views of a printer with internal components and mounting base (no text or symbols)
text_image
Diagram of a printer with two labeled buttons (1 and 2) pointing to the print area, showing connection points.Teléfono
text_image
Diagram showing a battery pack connected to three labeled buttons with arrows indicating action, including a magnified inset of the battery.5
natural_image
Line drawing of a printer with a separate printer attached, showing no text or symbols.


natural_image
Illustration of two people interacting with a device, showing hand placement and a magnified inset of the device (no text or symbols)natural_image
Line drawing of a printer with a close-up of its internal components and a cable being inserted (no text or symbols)
natural_image
Diagram of a printer's internal structure showing page loading and scroll movement (no text or symbols)3 Càrrega de paper
1.
natural_image
Diagram of a hand pressing a component into a plastic housing with directional arrows indicating movement (no text or symbols)2.
text_image
A4 A4/LGL3.

natural_image
Diagram of hands operating a mechanical device with an arrow indicating motion (no text or symbols present)natural_image
Diagram of a device interior showing internal components and directional arrows, no text or symbols present- Instal-leu l'alimentador de paper allà on es farà servir.

natural_image
Line drawing of a person holding an open box (no text or symbols)
natural_image
Technical line drawing showing two views of a printer with internal components and mounting base (no text or symbols)
text_image
Diagram of a printer with two labeled buttons (1 and 2) pointing to the print area, showing connection points.Telèfon
text_image
Diagram showing a device with three labeled buttons (唱, 音, 罗) connected to a battery pack, with an arrow pointing to a device component.5
natural_image
Illustration of two people handling a refrigerator with hand gestures, showing a close-up of the interior (no text or symbols)natural_image
Line drawing of a printer with a close-up of its internal components and a cable being inserted (no text or symbols)
natural_image
Diagram of a printer's internal structure showing page loading and scroll movement (no text or symbols)3 Papera kargatzea
1.
natural_image
Diagram of a hand pressing a plastic tray with arrows indicating motion (no text or symbols)2.

text_image
A4 A4/LGL3.
natural_image
Illustration of hands pressing down on a mechanical component with an arrow indicating motion (no text or symbols)4 Aukerako elementua instalatzea

natural_image
Diagram of a device interior showing internal components and directional arrows, no text or symbols present- Instalatu paper-elikagailua erabiliko den tokian.

natural_image
Line drawing of a person holding an open box (no text or symbols)
natural_image
Technical line drawing showing two views of a printer with internal components and mounting holes (no text or symbols)
text_image
Diagram of a printer with two labeled buttons (1 and 2) pointing to the print area, showing connection points.Telefonoa
text_image
Diagram showing a device with three labeled buttons (鸡, 爹, 鸡) connected to a box, with an arrow pointing to a device component.5
text_image
Operazio panelanatural_image
Illustration of two people interacting with a device, showing a close-up of the device (no text or symbols present)natural_image
Line drawing of a printer with a close-up of its internal components and a cable being inserted (no text or symbols)
natural_image
Diagram of a printer's internal structure showing page loading and scroll movement (no text or symbols)3 Colocar papel
1.

natural_image
Diagram of a hand pressing a plastic tray with arrows indicating downward motion (no text or symbols)2.

text_image
A4 A4/LGL3.

natural_image
Diagram of hands pressing down on a mechanical component with an arrow indicating motion (no text or symbols)natural_image
Diagram of a device interior showing internal components and directional arrows, no text or symbols present- Instale o alimentador de papel no local onde será utilizado.
natural_image
Line drawing of a person holding an open box (no text or symbols)
natural_image
Technical line drawing showing two views of a printer or printer stack with internal compartments and mounting points (no text or symbols)
text_image
Diagram of a printer with two labeled buttons (1 and 2) pointing to the main device, showing connection points.Auscultador
text_image
Diagram showing a device with three labeled buttons (鸡, 烘, 鸢) pointing to a device panel, with an arrow indicating direction.5
natural_image
Hand holding smartphone displaying a QR code (no text or symbols on device)natural_image
Illustration of two people interacting with a device, showing hand placement and directional arrows (no text or symbols)natural_image
Line drawing of a printer with a close-up of its internal components and a separate device attached (no text or symbols)
natural_image
Diagram of a printer's internal structure showing paper feed, paper tray, and scroll wheel (no text or labels)natural_image
Diagram of a hand pressing a component into a plastic housing with directional arrows indicating movement (no text or symbols)2.

text_image
A4 A4/LGL3.
natural_image
Diagram of hands operating a mechanical device with an arrow indicating motion (no text or symbols present)natural_image
Diagram of a device's internal structure showing airflow or movement between components (no text or symbols)natural_image
Line drawing of a person holding an open box (no text or symbols)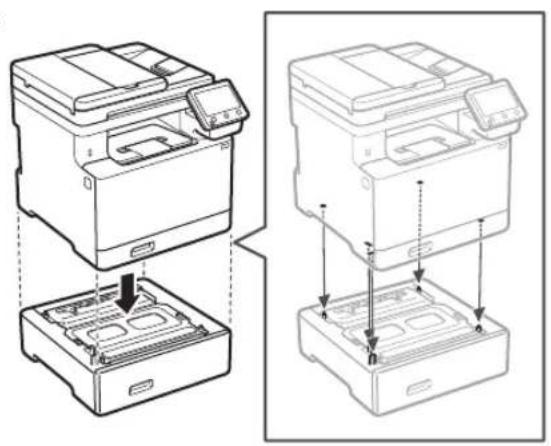
natural_image
Technical line drawing showing two views of a printer with internal compartments and mounting points (no text or symbols)
text_image
Diagram of a printer with two labeled buttons (1 and 2) pointing to the print area, showing connection points.Ακουστικό
text_image
Diagram showing a battery pack connected to three labeled buttons with an arrow pointing to a device panel, indicating a process or connection.5
text_image
SSID :XXXXXXXXXXXX Kλειδί δικτύου:XXXXXXXXXXXX ⋮natural_image
Line drawing of a printer with a separate printer attached, showing no text or symbols.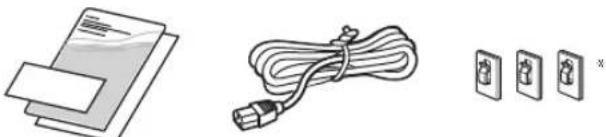
natural_image
Illustration of a medical device with a coiled cable, alongside three electrical outlets (no text or symbols)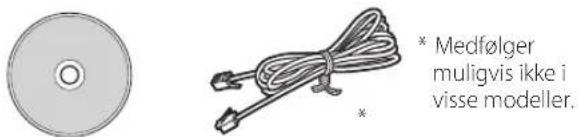
natural_image
Illustration of two people interacting with a device, showing hand placement and directional arrow (no text or symbols)2. Fjern alle emballagematerialer.
Fjern al tape.

natural_image
Line drawing of a printer with a close-up of its internal components and a cable being inserted (no text or symbols)
natural_image
Diagram of a printer's internal structure showing page loading and scroll movement (no text or symbols)3 Ilægning af papir
1.

natural_image
Diagram of a hand pressing a component into a plastic housing with directional arrows indicating movement (no text or symbols)2.

text_image
A4 A4/LGL3.
natural_image
Diagram of hands operating a mechanical device with an arrow indicating motion (no text or symbols present)natural_image
Diagram of a device interior showing internal components and directional arrows, no text or symbols presentnatural_image
Line drawing of a person holding an open box (no text or symbols)
natural_image
Technical line drawing showing two views of a printer with internal components and mounting base (no text or symbols)
text_image
Diagram of a printer with two labeled buttons (1 and 2) pointing to the print area, showing connection points.Telefon
text_image
Diagram showing a battery pack connected to a socket, with three labeled buttons and an arrow indicating direction of connection.5
text_image
Bagside 1 211 Installation af software/ drivere
natural_image
Hand holding smartphone displaying a QR code (no text or symbols on device)natural_image
Line drawing of a printer with a separate printer attached, showing no text or symbols.


natural_image
Illustration of two people interacting with a device, showing hand placement and directional arrow (no text or symbols)natural_image
Line drawing of a printer with a close-up of its internal components and a separate paper clip (no text or symbols)
natural_image
Diagram of a printer's internal structure showing paper feed, paper tray, and paper holder with rotation arrows (no text or symbols)3 Papier laden
1.

natural_image
Diagram of a hand pressing a component into a plastic housing with directional arrows indicating movement (no text or symbols)2.

text_image
A4 A4/LGL3.
natural_image
Diagram of hands operating a mechanical device with an arrow indicating motion (no text or symbols present)natural_image
Diagram of a device interior showing internal components and directional arrows, no text or symbols presentnatural_image
Line drawing of a person holding an open box (no text or symbols)
natural_image
Technical line drawing showing two views of a printer with internal compartments and mounting base (no text or symbols)
text_image
Diagram of a printer with two labeled buttons (1 and 2) pointing to the print area, showing connection points.Handset
text_image
Diagram showing a battery pack connected to a socket with three labeled buttons and an arrow indicating direction of connection.text_image
SSID :XXXXXXXXXXXX Netwerksleutel:XXXXXXXXXXXX :natural_image
Hand holding smartphone displaying a QR code (no text or symbols on device)natural_image
Line drawing of a printer with a separate connector (no text or symbols present)


natural_image
Illustration of two people interacting with a refrigerator, showing hand placement and a magnified inset of the device (no text or symbols)natural_image
Technical line drawing of a mechanical housing with an inset close-up showing a detail (no text or symbols)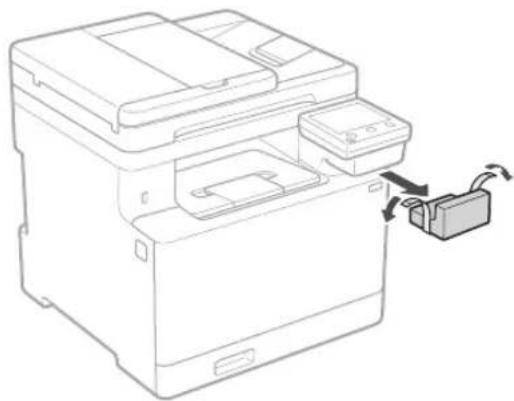
natural_image
Line drawing of a printer with a close-up of its internal components and a separate box, showing no text or symbols.
natural_image
Diagram of a printer's internal structure showing paper feed, paper tray, and scroll (no text or labels)3 Legge i papir
1.

natural_image
Diagram of a hand pressing a component into a plastic housing with directional arrows indicating movement (no text or symbols)2.

text_image
A4 A4/LGL3.
natural_image
Diagram of hands operating a mechanical device with an arrow indicating motion (no text or symbols present)natural_image
Diagram of a device interior showing internal components and directional arrows, no text or symbols present- Monter papirmateren der den skal brukes.
natural_image
Line drawing of a person holding an open box (no text or symbols)
natural_image
Technical line drawing showing two views of a printer with internal compartments and mounting holes (no text or symbols)
text_image
Diagram of a printer with two labeled buttons (1 and 2) pointing to the print area, showing connection points.Telefonrør
text_image
Diagram showing a battery pack connected to three labeled buttons with an arrow pointing to a device panel, indicating a process or connection.text_image
Se feilsøking (FAQ) for driverenatural_image
Illustration of two people interacting with a device, showing hand placement and directional arrows (no text or symbols)natural_image
Technical line drawing of a mechanical device labeled 'Bak', showing internal components and a magnified inset view (no text or symbols on the device itself)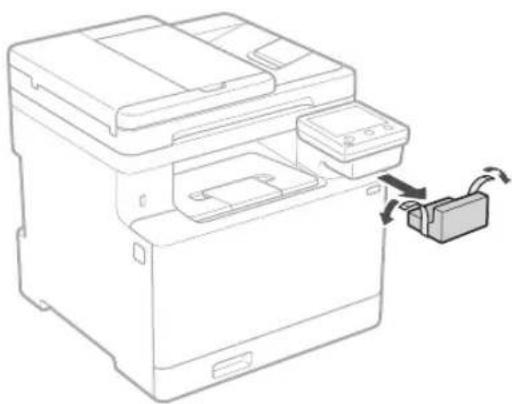
natural_image
Line drawing of a printer with a close-up of its internal components and a separate device connected to it (no text or symbols present)
natural_image
Diagram of a printer's internal structure showing paper feed, paper tray, and scroll wheel (no text or labels)3 Fylla på papper
1.

natural_image
Diagram of a hand pressing a component into a plastic housing with directional arrows indicating movement (no text or symbols)2.

text_image
A4 A4/LGL3.
natural_image
Diagram of hands pressing down on a mechanical component with an arrow indicating motion (no text or symbols present)4 Installera tillvalskomponent

natural_image
Diagram of a device interior showing internal components and directional arrows, no text or symbols presentnatural_image
Line drawing of a person holding an open box (no text or symbols)
natural_image
Technical line drawing showing two views of a printer with internal compartments and mounting points (no text or symbols)
text_image
Diagram of a printer with two labeled buttons (1 and 2) pointing to the print area, showing connection points.Telefonlur
text_image
Diagram showing a battery pack connected to three labeled buttons with arrows indicating direction, including a magnified inset of the battery cover.5
Ansluta nätkabeln
text_image
Bak 1 211 Installera program/ drivrutiner
natural_image
Illustration of two people interacting with a refrigerator, showing hand placement and directional arrow (no text or symbols)natural_image
Line drawing of a printer with a close-up of its internal components and a separate device attached (no text or symbols)
natural_image
Diagram of a printer's internal structure showing paper feed, paper tray, and scroll wheel (no text or labels)natural_image
Diagram of a hand pressing a plastic tray with arrows indicating motion (no text or symbols)2.

text_image
A4 A4/LGL3.

natural_image
Diagram of hands pressing down on a mechanical component with an arrow indicating motion (no text or symbols)natural_image
Diagram of a device interior showing internal components and airflow direction (no text or symbols)natural_image
Line drawing of a person holding an open box (no text or symbols)
natural_image
Technical line drawing showing two views of a printer with internal compartments and mounting base (no text or symbols)
text_image
Diagram of a printer with two labeled buttons (1 and 2) pointing to the print area, showing connection points.Luuri
text_image
Diagram showing a battery pack connected to a switch, with an arrow indicating the switch's direction and a magnified inset highlighting the battery compartment.text_image
Hand holding smartphone displaying a QR code with a speech bubble, indicating mobile payment or scanning interfacenatural_image
Line drawing of a printer with a separate connector (no text or symbols present)


natural_image
Illustration of two people interacting with a device, showing a hand gesture inside (no text or symbols)natural_image
Line drawing of a printer with a close-up of its internal components and a separate paper clip (no text or symbols)
natural_image
Diagram of a printer's internal structure showing paper feed, paper tray, and scroll wheel (no text or labels)3 Загрузка бумаги
1.

natural_image
Diagram of a hand pressing a component into a plastic housing with directional arrows indicating movement (no text or symbols)2.

text_image
A4 A4/LGL3.
natural_image
Diagram of hands pressing down on a mechanical component with an arrow indicating motion (no text or symbols)4
natural_image
Diagram of a device interior showing internal components and airflow direction (no text or symbols)natural_image
Line drawing of a person holding an open box (no text or symbols)
natural_image
Technical line drawing showing two views of a printer with internal compartments and mounting points (no text or symbols)
text_image
Diagram of a printer with two labeled buttons (1 and 2) pointing to the print area, showing connection points.Телефонная трубка
text_image
Diagram showing a battery pack connected to three labeled buttons with an arrow pointing to a device panel, indicating a process or connection.5
natural_image
Line drawing of a printer with a separate connector (no text or symbols present)


natural_image
Illustration of two people interacting with a refrigerator, showing hand placement and a magnified inset of the device (no text or symbols)natural_image
Line drawing of a printer with a close-up of its internal components and a separate paper clip (no text or symbols)
natural_image
Diagram of a printer's internal structure showing paper feed, paper tray, and scroll wheel (no text or labels)natural_image
Diagram of a hand pressing a plastic tray with arrows indicating downward motion (no text or symbols)2.

text_image
A4 A4/LGL3.
natural_image
Illustration of hands pressing down on a mechanical component with an arrow indicating motion (no text or symbols)natural_image
Diagram of a device's internal structure showing battery casing, internal compartments, and directional arrows indicating flow or movement (no text or symbols)natural_image
Line drawing of a person holding an open box (no text or symbols)
natural_image
Technical line drawing showing two views of a printer with internal compartments and mounting base (no text or symbols)
text_image
Diagram of a printer with two labeled buttons (1 and 2) pointing to the print area, showing connection points.Слухавка
text_image
Diagram showing a battery pack connected to three labeled switches with an arrow pointing to the switch panel.5
text_image
Hand holding smartphone displaying a QR code with a speech bubble, indicating mobile payment or scanning interfacenatural_image
Illustration of two people interacting with a device, showing hand positioning and directional arrows (no text or symbols)natural_image
Line drawing of a printer with a close-up of its internal components and a cable being inserted (no text or symbols)
natural_image
Diagram of a printer's internal structure showing paper feed, paper tray, and scroll wheel (no text or labels)natural_image
Diagram of a hand pressing a plastic tray with arrows indicating motion (no text or symbols)2.

text_image
A4 A4/LGL3.

natural_image
Illustration of hands pressing down on a mechanical component with an arrow indicating motion (no text or symbols)natural_image
Diagram of a device interior showing internal components and directional arrows, no text or symbols presentnatural_image
Line drawing of a person holding an open box (no text or symbols)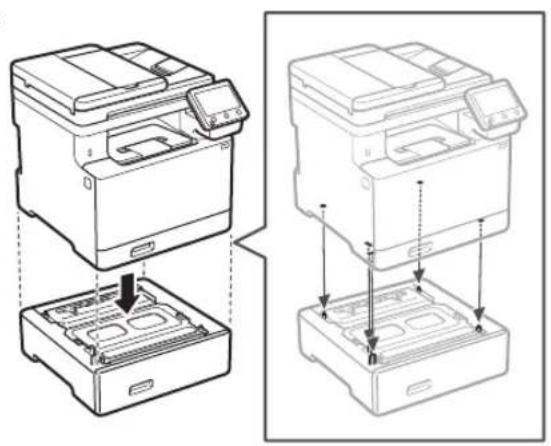
natural_image
Technical line drawing showing two views of a printer with internal components and mounting base (no text or symbols)
text_image
Diagram of a printer with two labeled buttons (1 and 2) pointing to the print area, showing connection points.Klausule
* Ar dažiem modeliem klausuli nevar izmantot.
text_image
Aizmugure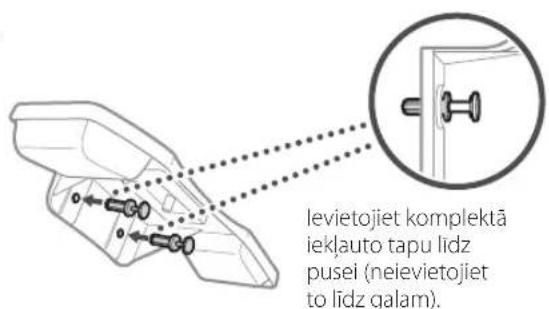
text_image
Diagram showing a battery pack with three labeled buttons and an arrow pointing to a device panel, likely illustrating a process or installation.5
text_image
QR code and smartphone payment interface with Chinese text labelshttps://oip.manual.canon/
natural_image
Illustration of two people interacting with a device, showing a hand gesture inside (no text or symbols present)natural_image
Line drawing of a printer with a close-up of its internal components and a separate paper clip (no text or symbols)
natural_image
Diagram of a printer's internal structure showing page loading and scroll movement (no text or symbols)natural_image
Diagram of a hand pressing a component into a plastic housing with directional arrows indicating movement (no text or symbols)2.

text_image
A4 A4/LGL3.
natural_image
Diagram of hands operating a mechanical device with an arrow indicating motion (no text or symbols present)4 Papildomos dalies jrengimas

natural_image
Diagram of a device interior showing internal components and airflow direction (no text or symbols)natural_image
Line drawing of a person holding an open box (no text or symbols)
natural_image
Technical line drawing showing two views of a printer with internal components and mounting holes (no text or symbols)
text_image
Diagram of a printer with two labeled buttons (1 and 2) pointing to the print area, showing connection points.Telefono aparatas
* Telefono aparato negalima naudoti su kai kuriais modeliais.
text_image
Galiné dalis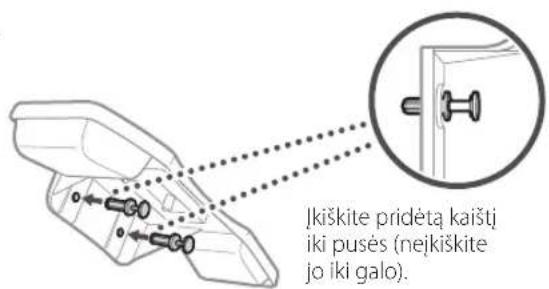
text_image
Diagram showing a device with three labeled buttons (鸡, 烘, 猪) connected to a battery pack, with an arrow pointing to a component.5
Maitinimo laido
prijungimas
text_image
Galiné dalis 1 2text_image
Hand holding smartphone displaying a QR code with a glowing effectnatural_image
Line drawing of a printer with a separate output box, no text or symbols present


natural_image
Illustration of two people interacting with a refrigerator, showing hand placement and a magnified inset of the device (no text or symbols)natural_image
Line drawing of a printer with a close-up of its internal components and a cable outlet (no text or symbols)
natural_image
Diagram of a printer's internal structure showing paper feed, paper tray, and scroll wheel (no text or labels)3 Paberi asetamine
1.

natural_image
Diagram of a hand pressing a component into a plastic housing with directional arrows indicating movement (no text or symbols)2.

text_image
A4 A4/LGL3.
natural_image
Diagram of hands pressing down on a mechanical component with an arrow indicating motion (no text or symbols present)4 Lisavarustuse paigaldamine

natural_image
Diagram of a device interior showing internal components and directional arrows (no text or symbols)natural_image
Line drawing of a person holding an open box (no text or symbols)
natural_image
Technical line drawing showing two views of a printer with internal compartments and mounting base (no text or symbols)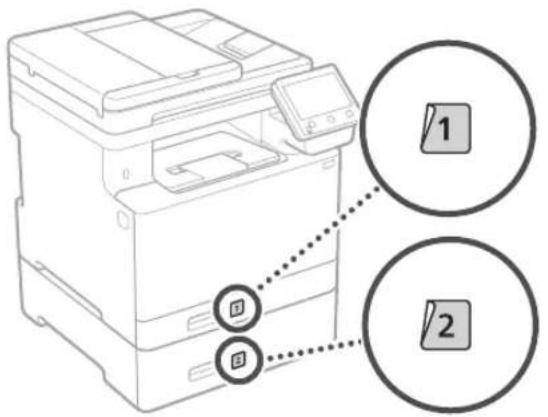
text_image
Diagram of a printer with two labeled buttons (1 and 2) pointing to the print area, showing connection points.Telefonitoru
text_image
Diagram showing a device with three labeled buttons (鸡, 爹, 鸡) connected to a battery pack, with an arrow pointing to a device component.natural_image
Illustration of two people interacting with a refrigerator, showing hand placement and directional arrow (no text or symbols)natural_image
Technical line drawing of a mechanical device with a magnified inset showing a detail (no text or symbols)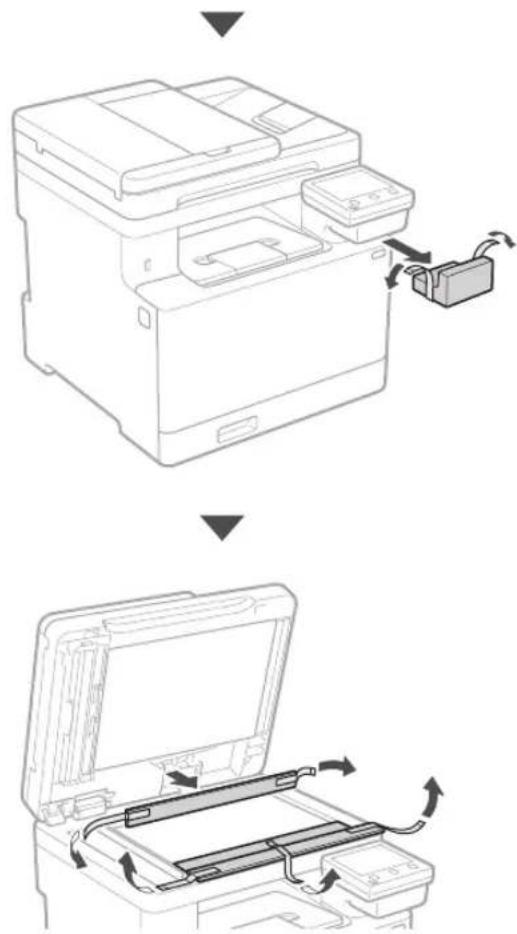
text_image
Technical diagram showing two steps of printer operation: adding a cable to a printer and inserting a cable into a closed holder.3 Ładowanie papieru
1.

natural_image
Diagram of a hand pressing a plastic tray with arrows indicating downward motion (no text or symbols)2.

text_image
A4 A4/LGL3.
natural_image
Illustration of hands pressing down on a mechanical component with an arrow indicating motion (no text or symbols)natural_image
Diagram of a device interior showing internal components and directional arrows (no text or symbols)natural_image
Line drawing of a person holding an open box (no text or symbols)
natural_image
Technical line drawing showing two views of a printer with internal compartments and mounting points (no text or symbols)
text_image
Diagram of a printer with two labeled buttons (1 and 2) pointing to the print area, showing connection points.Słuchawka
natural_image
Line drawing of a mechanical device with a magnified inset showing a circular button or dial (no text or symbols)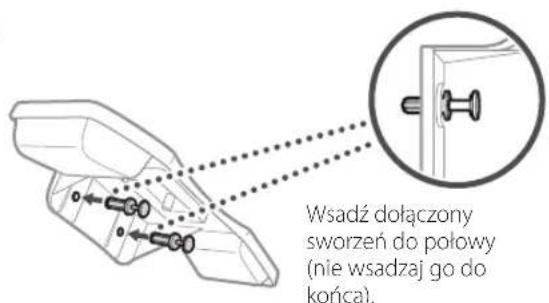
text_image
Diagram showing a battery pack connected to three labeled buttons with an arrow pointing to the battery cover, indicating a process or operation.5
natural_image
Hand holding smartphone displaying a QR code (no text or symbols on device)flowchart
graph TD
    A["User Input Data"] --> B["Processing Step"]
    B --> C["Printer Output"]
natural_image
Illustration of two people interacting with a refrigerator, showing hand positioning and a magnified inset of the device (no text or symbols)natural_image
Diagram of a hand pressing a component into a plastic housing with directional arrows indicating movement (no text or symbols)2.
text_image
A4 A4/LGL3.
natural_image
Diagram of hands operating a mechanical device with an arrow indicating motion (no text or symbols present)natural_image
Diagram of a device interior showing internal components and directional arrows, no text or symbols presentnatural_image
Line drawing of a person holding an open electronic device (no text or symbols)
natural_image
Technical line drawing showing two views of a printer with internal compartments and mounting points (no text or symbols)
text_image
Diagram of a printer with two labeled buttons (1 and 2) pointing to the print area, showing connection points.Dálkové ovládání
text_image
Diagram showing a battery pack with three labeled buttons and an arrow pointing to a device panel, likely illustrating a power or circuit connection.5
natural_image
Line drawing of a printer with a separate printer attached, showing no text or symbols.


natural_image
Illustration of two people interacting with a device, showing a hand gesture inside (no text or symbols present)natural_image
Line drawing of a printer with a cable being inserted (no text or symbols)
natural_image
Diagram of a printer's internal structure showing paper feed, paper tray, and scroll wheel (no text or labels)3 Vkladanie papiera
1.

natural_image
Diagram of a hand inserting a plastic component into a housing, with arrows indicating direction (no text or symbols)2.

text_image
A4 A4/LGL3.
natural_image
Diagram of hands operating a mechanical device with an arrow indicating motion (no text or symbols present)natural_image
Diagram of a device interior showing internal components and directional arrows, no text or symbols presentnatural_image
Line drawing of a person holding an open box (no text or symbols)
natural_image
Technical line drawing showing two views of a printer with internal components and mounting base (no text or symbols)
text_image
Diagram of a printer with two labeled buttons (1 and 2) pointing to the print area, showing connection points.Telefón
text_image
Diagram showing a battery pack with three labeled buttons and an arrow pointing to a device panel, likely illustrating a process or installation.5
natural_image
Hand holding smartphone displaying a QR code (no text or symbols on device)text_image
QR code and smartphone payment interface with Chinese text labelshttps://oip.manual.canon/
natural_image
Line drawing of a printer with a separate connector (no text or symbols present)


* Samo pri nekaterih modelih.
natural_image
Illustration of two people interacting with a refrigerator, showing hand gestures (no text or symbols)2. Odstranite ves embalažni material.
Odstranite vse trakove.

natural_image
Line drawing of a printer with a close-up view showing internal components and a separate device (no text or symbols)
natural_image
Line drawing of a printer's internal structure showing paper feed, paper tray, and scroll (no text or symbols)natural_image
Diagram of a hand pressing a component into a plastic housing with directional arrows indicating movement (no text or symbols)2.

text_image
A4 A4/LGL3.

natural_image
Diagram of hands operating a mechanical device with an arrow indicating motion (no text or symbols present)natural_image
Diagram of a device interior showing internal components and directional arrows, no text or symbols presentnatural_image
Line drawing of a person holding an open box (no text or symbols)
natural_image
Technical line drawing showing two views of a printer with internal compartments and mounting holes (no text or symbols)
text_image
Diagram of a printer with two labeled buttons (1 and 2) pointing to the print area, showing connection points.Slušalka
text_image
Diagram showing a battery pack connected to three labeled buttons with an arrow pointing to a device panel, indicating a process or connection.natural_image
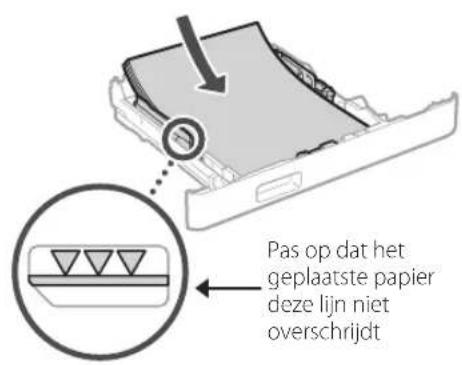
Illustration of two people interacting with a device, showing hand placement and a magnified inset of the device (no text or symbols)2. Uklonite svu ambalažu.
Uklonite svu traku.

natural_image
Diagram of a hand pressing a plastic tray with arrows indicating downward motion (no text or symbols)2.

text_image
A4 A4/LGL3.

text_image
Pazite da količina umetnutog papira ne prelazi ovu liniju4.
natural_image
Diagram of hands operating a mechanical device with an arrow indicating motion (no text or symbols present)4 Postavljanje izbornog dijela

Ako ne upotrebljavate izborni dio, idite na korak 5
natural_image
Diagram of a device interior showing internal components and directional arrows, no text or symbols presentnatural_image
Line drawing of a person holding an open box (no text or symbols)
natural_image
Technical line drawing showing two views of a printer with internal components and mounting base (no text or symbols)
text_image
Diagram of a printer with two labeled buttons (1 and 2) pointing to the print area, showing connection points.Slušalica
text_image
Diagram showing a battery pack with three labeled buttons and an arrow pointing to a device panel, likely illustrating a process or installation.5
natural_image
Hand holding smartphone displaying a QR code (no text or symbols on device)Ako se stranice ne otvara, idite na
https://oip.manual.canon/
- Odaberite korisnički priručnik.
Korisnički vodič
U ovom se dijelu navode funkcije uređaja, uključujući operacije, postavke i radne procedure uređaja.
FAQ
natural_image
Illustration of two people handling a device with a magnified inset showing hand placement (no text or symbols)natural_image
Diagram of a hand pressing down on a mechanical component with directional arrows indicating movement (no text or symbols)2.
text_image
A4 A4/LGL3.
natural_image
Diagram of hands operating a mechanical device with an arrow indicating motion (no text or symbols present)natural_image
Diagram of a device interior showing internal components and directional arrows, no text or symbols presentnatural_image
Line drawing of a person holding an open electronic device (no text or symbols)
natural_image
Technical line drawing showing two views of a printer with internal components and mounting base (no text or symbols)
text_image
Diagram of a printer with two labeled buttons (1 and 2) pointing to the print area, showing connection points.Kézibeszélő
text_image
Diagram showing a battery pack with three labeled buttons and an arrow pointing to a device panel, likely illustrating a process or installation.5
natural_image
Illustration of two people interacting with a device, showing hand positioning and directional arrows (no text or symbols)natural_image
Line drawing of a printer with a close-up of its internal components and a separate paper clip (no text or symbols)
natural_image
Diagram of a printer's internal structure showing paper feed, paper holder, and scroll wheel (no text or labels)natural_image
Diagram of a hand pressing a plastic tray with arrows indicating downward motion (no text or symbols)2.

text_image
A4 A4/LGL3.
natural_image
Illustration of hands using a mechanical device to lift a component (no text or symbols visible)natural_image
Diagram of a device interior showing internal components and airflow direction (no text or symbols)natural_image
Line drawing of a person holding an open box (no text or symbols)
natural_image
Technical line drawing showing two views of a printer with internal components and mounting base (no text or symbols)
text_image
Diagram of a printer with two labeled buttons (1 and 2) pointing to the print area, showing connection points.Receptor
text_image
Diagram showing a device with three labeled buttons (鸭, 燕, 电) connected to a battery pack, with an arrow pointing to a component.5
text_image
Spate 1 2natural_image
Hand holding smartphone displaying a QR code (no text or symbols on device)natural_image
Illustration of two people interacting with a device, showing a hand gesture inside (no text or symbols present)natural_image
Line drawing of a printer with a close-up of its internal components and a separate device attached (no text or symbols)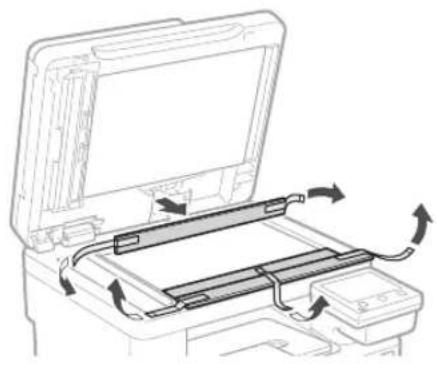
natural_image
Diagram of a printer's internal structure showing paper feed, cable routing, and scroll wheel (no text or labels)natural_image
Diagram of a hand pressing a plastic tray with arrows indicating motion (no text or symbols)2.

text_image
A4 A4/LGL3.
natural_image
Illustration of hands pressing down on a mechanical component with an arrow indicating motion (no text or symbols)4
natural_image
Diagram of a device interior showing internal components and airflow direction (no text or symbols)natural_image
Line drawing of a person holding an open box (no text or symbols)
natural_image
Technical line drawing showing two views of a printer with internal components and mounting base (no text or symbols)
text_image
Diagram of a printer with two labeled buttons (1 and 2) pointing to the print area, showing connection points.Слушалка
text_image
Diagram showing a device with three labeled buttons (鸭, 燕, 电) connected to a battery pack, with an arrow pointing to a component.5
natural_image
Hand holding a smartphone displaying a QR code (no text or symbols on the device)natural_image
Illustration of two people interacting with a device, showing a hand gesture inside (no text or symbols)natural_image
Line drawing of a printer with a close-up view showing internal components and a separate device (no text or symbols)
natural_image
Diagram of a printer's internal structure showing paper feed, paper tray, and scroll wheel (no text or labels)3 Kağıt Yükleme
1.

natural_image
Diagram of a hand pressing a plastic tray with arrows indicating downward motion (no text or symbols)2.
text_image
A4 A4/LGL3.
natural_image
Illustration of hands pressing down on a mechanical component with an arrow indicating motion (no text or symbols)natural_image
Diagram of a device interior showing internal components and directional arrows, no text or symbols presentnatural_image
Line drawing of a person holding an open box (no text or symbols)
natural_image
Technical line drawing showing two views of a printer with internal compartments and mounting holes (no text or symbols)
text_image
Diagram of a printer with two labeled buttons (1 and 2) pointing to the print area, showing connection points.Ahize
text_image
Diagram showing a device with three labeled buttons (鸡, 爹, 鸡) connected to a battery pack, with an arrow pointing to a device component.text_image
SSID :XXXXXXXXXXXX Ağ anahtarı :XXXXXXXXXXXX :natural_image
Sequence of gray square blocks with left-pointing and right-pointing arrows, ending in a black rectangle with a curved arrow (no text or symbols)natural_image
Illustration of two people interacting with a device, showing hand positioning and a magnified inset of the device (no text or symbols)natural_image
Diagram of a hand pressing a mechanical component with arrows indicating force or movement (no text or symbols)natural_image
Diagram of a device's internal structure showing a box, drawer, and cable connections (no text or symbols)استخدامها فيه.
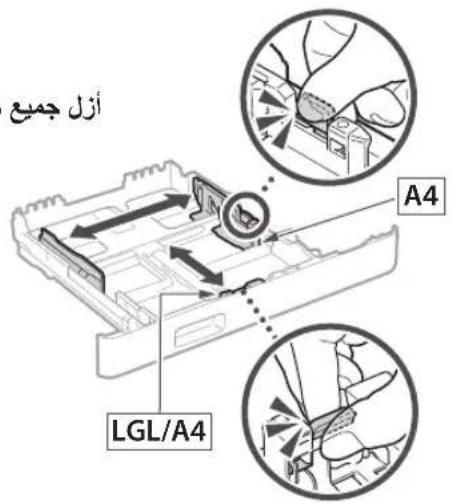
text_image
أزل جمع A4 LGL/A4natural_image
Line drawing of a person holding an open box (no text or symbols)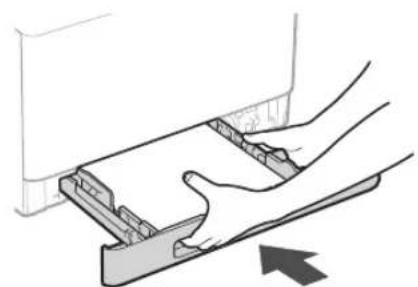
natural_image
Illustration of hands pressing down on a mechanical component with an arrow indicating motion (no text or symbols)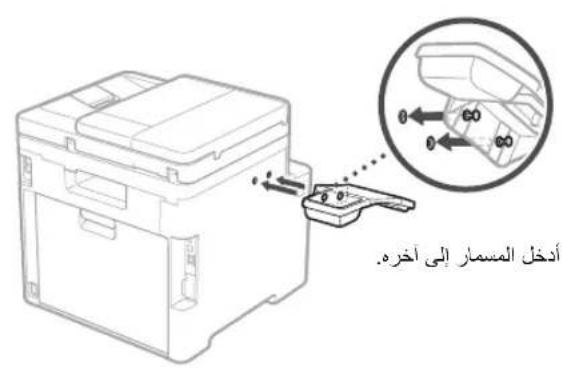
natural_image
Diagram of a portable electronic device with cable and connector, showing internal components and a magnified view of the cable (no text or symbols present)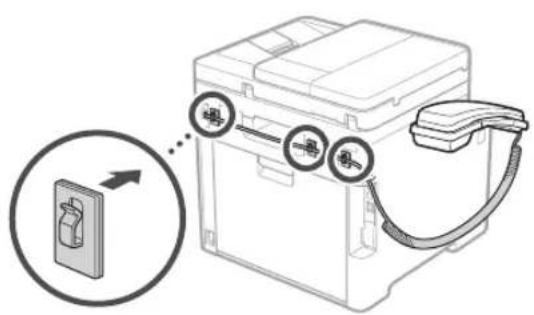
text_image
Diagram showing a device with three circular buttons labeled '吸' (wash) connected to a box, with an arrow pointing to it and a magnified inset highlighting the process.توصيل سلك الطاقة
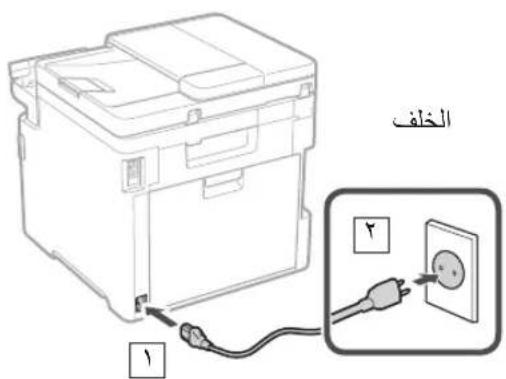
text_image
الخلف 14

natural_image
Technical line drawing showing two views of a printer with internal components and a downward arrow indicating a process (no text or symbols present)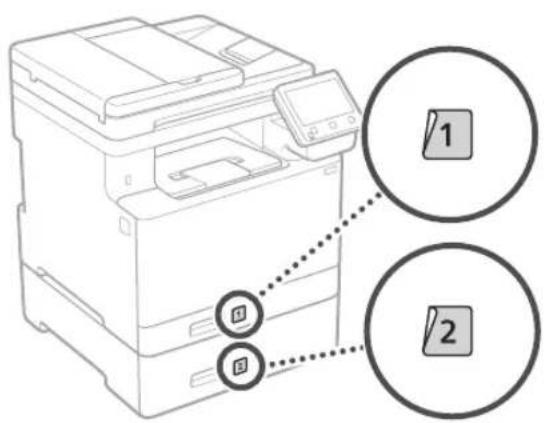
text_image
Diagram of a printer with two labeled buttons (1 and 2) connected to a paperclip, showing mechanical components and connection points.text_image
Diagram showing a printer with a close-up of its internal power button, labeled in Chinese.نقطة الزمنية...
الوقت الحالي. ٢ Sv
Y
natural_image
Sequence of gray rectangular blocks with white arrow symbols, no text or labels presentnatural_image
Illustration of two people interacting with a device, showing hand positioning and directional arrows (no text or symbols)نصب قطعه جانبی

natural_image
Diagram of a hand pressing a mechanical component with directional arrows indicating movement (no text or symbols)natural_image
Diagram of a device's internal structure showing a box, drawer, and internal components with arrows indicating flow or movement (no text or symbols present)گرفت نصب کنید.
natural_image
Illustration of a document being inserted into a paper with a downward arrow (no text or symbols)natural_image
Line drawing of a person holding an open box (no text or symbols)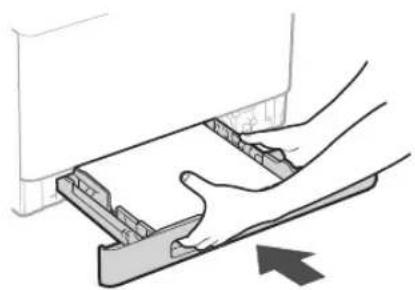
natural_image
Diagram of hands pressing a component on a tray, with an arrow indicating motion (no text or symbols present)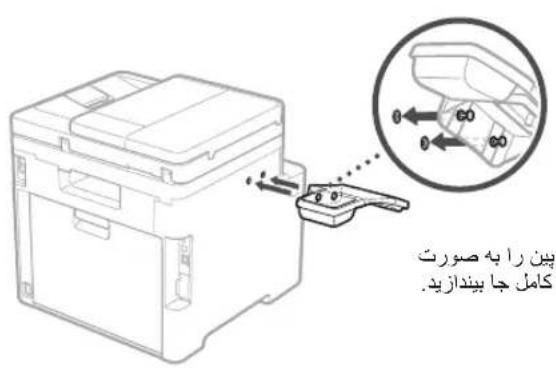
natural_image
Diagram of a device with cable and connector, showing internal components and a magnified view of the cable connection (no text or symbols present)
text_image
Diagram showing a device with three labeled buttons and an arrow pointing to a device panel, likely illustrating a process or installation.وصل کردن سیم برق
text_image
Diagram showing installation of an electrical socket with labeled components and a magnified view of the socket plug.4
natural_image
Technical line drawing showing two views of a printer or printer stack with internal components and mounting holes (no text or symbols)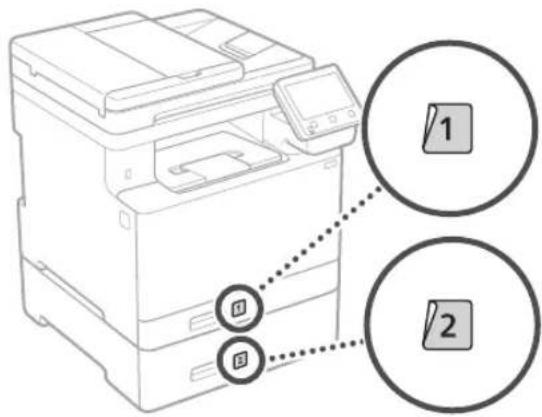
text_image
Diagram of a printer with labeled parts and connection points, showing two circular annotations labeled 1 and 2.- 4
natural_image
Sequence of gray rectangular blocks with white arrow symbols, no text or labels present30-2, Shimomaruko 3-chome, Ohta-ku, Tokyo 146-8501, Japan
One Canon Park, Melville, NY 11747, U.S.A.
CANON EUROPA N.V.
Bovenkerkerweg 59, 1185 XB Amstelveen, The Netherlands
CANON SINGAPORE PTE LTD
1 Fusionopolis Place, #14-10, Galaxis, Singapore 138522
CANON AUSTRALIA PTY LTD
Building A, The Park Estate, 5 Talavera Road, Macquarie Park, NSW 2113, Australia
CANON GLOBAL WORLDWIDE SITES
https://global.canon/