GFGT 433 B1 - Digital cooking thermometer Grillmeister - Free user manual and instructions
Find the device manual for free GFGT 433 B1 Grillmeister in PDF.

| Product type | Wireless electronic cooking thermometer |
| Brand | Grillmeister |
| Model | GFGT 433 B1 |
| Intended use | Measuring core temperature of food (meat, fish) during cooking |
| Power supply (receiver) | 2 AAA 1.5 V batteries (LR3) |
| Power supply (transmitter) | 2 AAA 1.5 V batteries (LR3) |
| Measuring range | 0 °C to 300 °C (32 °F to 572 °F) |
| Wireless range | Approx. 50 meters |
| Frequency band | 433.050 – 434.790 MHz |
| Max. transmission power | 10 mW ERP |
| Number of probes included | 2 temperature probes with cable |
| Preset meat types | Beef, lamb, veal, pork, turkey, chicken, minced steak, fish |
| Cooking levels | Well done, medium, medium-rare, rare (depending on meat type) |
| Timer function | Yes, adjustable countdown |
| Display | LCD with blue/red backlight |
| Alarm | Audible and visual (flashing) when target temperature is reached |
| Mounting | Built-in magnets and belt clip for receiver; magnets and hanging ring for transmitter |
| Package contents | 1 receiver, 1 transmitter, 2 probes, 1 belt clip, 1 metal clip, 4 AAA batteries, manual |
| Cleaning | Damp cloth for the housing; soapy water for the probes; do not immerse |
| Safety | Risk of burns: use gloves; do not expose to water; keep out of reach of children |
| Warranty | 3 years |
| Manufacturer | TARGA GmbH, Coesterweg 45, 59494 Soest, Germany |
| Certifications | CE, RED 2014/53/EU, RoHS 2011/65/EU |
Frequently Asked Questions - GFGT 433 B1 Grillmeister
User questions about GFGT 433 B1 Grillmeister
0 question about this device. Answer the ones you know or ask your own.
Ask a new question about this device
Download the instructions for your Digital cooking thermometer in PDF format for free! Find your manual GFGT 433 B1 - Grillmeister and take your electronic device back in hand. On this page are published all the documents necessary for the use of your device. GFGT 433 B1 by Grillmeister.
USER MANUAL GFGT 433 B1 Grillmeister
Last Information Update
Eutopieu wse
WIRELESS SMART COOKING THERMOMETER
THERMOMETRE DE CUISSON ELECTRONIQUE
DE AT Bedienungsanleitung und Sicherheitswerte
08 0E Operating instructions and safety instructions
FR BE Mode d'emploi et consignes de securite
NL DE Handleding en veilghedsaanwijzigen
PL Instruktura monta zu wakzowki bejepticza
Cz Nvod k obauze a bezpechcnn polky
SK Nevod hpozivane a bezpechone pckyf
P
DE BE NL
PL CZ 5K
Deutsch 2
English 34
Francais 64
Nederlands 102
Polski 133
Čežtina 167
Slovensky 197
Espanol 227
Dansk 259
Inhaltsverzeichnis
https://www.targa.gmbh/downloads/conformity/360220_2007.pdf
- Intended use 36
- Package contents 37
3.Description of controls. 37 - Technical specifications 39
- Safety instructions 39
- Copyright 46
7.Before you start 47
7.1 Inserting / replacing the batteries 47
7.2 Connecting the temperature sensors (30; 31) 48
7.3 Selecting the temperature unit 48
- Getting started 49
8.1 Position when in use 50
8.1.1 Receiver (1) 50
8.1.2 Transmitter (14) 50
8.2 Selecting the type of meat (32) / Adjusting the level of cooking. 51
8.3 Measuring the core temperature 53
8.4 Cooking chart 55
8.5 Timer function 57
- Cleaning 58
9.1 Storage when not in use 58 -
Troubleshooting 59
-
Environmental regulations and disposal information 60
- Conformity notes 61
- Warranty and service information 62
Congratulations!
By purchasing the GFGT 433 B1 wireless barbecue thermometer, hereinafter referred to as the barbecue thermometer, you have opted for a quality product.
The User Manual forms part of this product. It contains important information on safety, usage and disposal. Before using the product, please familiarise yourself with all operating and safety instructions. Only use the product as described and for the applications given. If you pass the product on to someone else, make sure to give them all the relevant documents with it.
1. Intended use
This barbecue thermometer serves to measure and monitor the core temperature of food such as fish, beef, pork, poultry, burgers and other meats. The barbecue thermometer has not been designed for corporate or commercial applications. Use the barbecue thermometer for private purposes only. Any use other than that mentioned above does not correspond to the intended use. This barbecue thermometer fulfils all relevant norms and standards associated with CE Conformity. In the event of any modification to the barbecue thermometer that was not approved by the manufacturer, compliance with these standards is no longer guaranteed. The manufacturer shall not be liable for any damage or malfunctions resulting from such modifications. Only use accessories supplied with the device by the manufacturer.
Observe the regulations and laws in the country of use.
2. Package contents
1 receiver
1 transmitter
2 temperature sensors
- 1 belt clip
1 metal clip
- 4 batteries of type AAA, 1.5V
These operating instructions
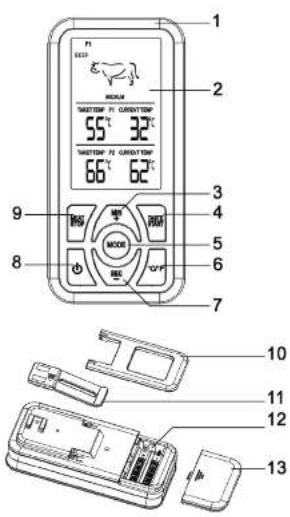
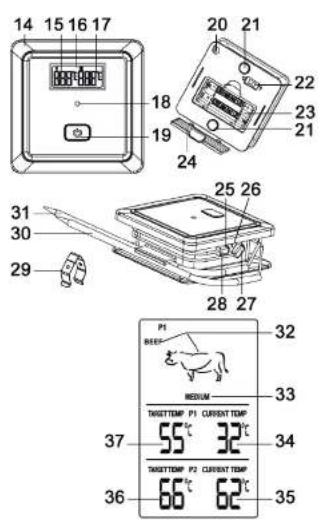
3. Description of controls
Receiver (1)
| 1 | Receiver |
| 2 | LCD display |
| 3 | “MIN/+” button |
| 4 | “TASTE/START” button |
| 5 | “MODE” button |
| 6 | Selector switch (for °C or °F) |
| 7 | “SEC/-” button |
| 8 | ON/OFF button |
| 9 | “MEAT/STOP” button |
| 10 | Retractile clip |
| 11 | Belt clip (with built-in magnets) |
| 12 | Battery compartment |
| 13 | Battery compartment cover |
Transmitter (14)
| 14 | Transmitter (with built-in magnets) |
| 15 | Temperature display 1 (current core temperature) |
| 16 | LCD display |
| 17 | Temperature display 2 (current core temperature) |
| 18 | Red LED |
| 19 | ON/OFF button |
| 20 | Hanging hole (to hang the transmitter) |
| 21 | Magnets |
| 22 | Selector switch (for °C or °F) |
| 23 | Battery compartment |
| 24 | Battery compartment cover |
| 25 | Socket 1 (for temperature sensor connector 1) |
| 26 | Socket 2 (for temperature sensor connector 2) |
| 27 | Connector (temperature sensor 2) |
| 28 | Connector (temperature sensor 1) |
| 29 | Metal clip (to fix the temperature sensor on the grill bars) |
| 30 | Temperature sensor 2 (with cable) |
| 31 | Temperature sensor 1 (with cable) |
LCD display (2) on the receiver (1)
| 32 | Type of meat |
| 33 | Cooking progress |
| 34 | “CURRENT TEMP” display 1 (current core temperature) |
| 35 | “CURRENT TEMP” display 2 (current core temperature) |
| 36 | “TARGET TEMP” display 2 (target temperature) |
| 37 | “TARGET TEMP” display 1 (target temperature) |
4. Technical specifications
| Receiver (1): Power supply | 2 batteries: 1.5 V AAA -Micro LR3 - 3V |
| Transmitter (14): Power supply | 2 batteries: 1.5 V AAA -Micro LR3 - 3V |
| Temperature measuring range | 0 °C - 300 °C 32 °F - 572 °F |
| Transmitting range approx. 50 m | |
| Frequency range 433.050 - 434.790 MHz | |
| Max. transmission power 10 mW ERP | |
5. Safety instructions
Before you use this barbecue thermometer for the first time, please read the following instructions and heed all warnings, even if you are familiar with handling electric devices. Keep this user manual in a safe place for future reference. If you sell the barbecue thermometer or give it away, pass on the User Manual at the same time.

This symbol denotes important instructions for the safe operation of the barbecue thermometer and the safety of the user.

Warning, hot surface!

This symbol denotes danger for human health from burning.
This symbol denotes further information on the topic.

DC voltage
Standby
This symbol designates products whose physical and chemical composition has been tested and found to be non-hazardous to health when used in contact with
food in accordance with the requirements of Regulation EU 1935/2004.

Wear protective gloves!

DANGER! Personal safety
-
Small parts can represent choking hazards. Keep the packaging out of the reach of these people. There is a risk of suffocation.
-
This product may be used by children of 8 years and older and by persons with physical, sensory or mental impairments or persons without sufficient knowledge or experience, providing they are supervised or they have received instructions regarding the proper use of
the device and they understand the associated risks. Children must not play with the product. The product must not be cleaned or maintained by unsupervised children.

General safety instructions
- Never use the product if it is damaged in any way. There is a danger of injury.
- Please note that the consumption of food of animal origin which is not completely cooked through can be damaging to the health. This is a particular risk for small children, pregnant women and people with a weakened immune system.
-
No foreign bodies must penetrate the interior of the device.
-
The product may not be exposed to strong vibrations or mechanical strain. This prevents it getting damaged.
- The product does not contain any parts that require maintenance.
- Contact the manufacturer's customer service department if the product becomes damaged, is faulty or you have other problems with it.

Risk of burns
- Always make sure no other persons, children or animals could burn themselves on the product.
-
Use protection or oven gloves if you touch the temperature sensors (30; 31) during or after use.
-
Improper use of the product can cause injuries.

Risk of damage to property
- Keep the product and its accessories away from open fires.
- Never use the product in a microwave or oven.
- Do not kink the temperature sensors (30; 31) cables.
- The product is not waterproof. Do not use it in the rain and keep the transmitter (14) and receiver (1) away from moist conditions.
- Switch the transmitter (14) and receiver (1) off when not in use.

Hazard from batteries
- Risk of death! Store batteries out of the reach of children. If a battery is swallowed, seek medical attention immediately!
- Batteries must be inserted respecting the correct polarity. Refer to the diagram inside the battery compartment (12, 23). Non-rechargeable batteries must not be recharged.
- Different types of batteries or new and old batteries must not be used together.
- Batteries must never be opened or deformed, as this could result in chemicals leaking out which could cause injuries. If the battery fluid comes into contact with the skin or eyes, rinse
immediately with plenty of water and seek medical aid.
- Remove any batteries which have leaked immediately. Use suitable safety gloves to prevent injuries.
- Remove the batteries when the product is not to be used for an extended period.
- Do not short-circuit any battery contacts.
- Empty batteries must be removed from the device and must be disposed of properly.
6. Copyright
All the contents of this user manual are protected by copyright and provided to the reader for information only. Copying data and information without the prior explicit written consent of the author is strictly forbidden. This also applies to any commercial use of the contents and information. All texts and diagrams are up-to-date as of the date of printing. Subject to change without notice.
7. Before you start
Remove the barbecue thermometer and all accessories from the packaging and check that the package contents are complete. Remove all protective films. If you notice any damage, do not use the barbecue thermometer and contact the manufacturer's customer service department. We recommend cleaning the temperature sensors (30; 31) before first use.
7.1 Inserting / replacing the batteries
When the batteries are weak, the display indication normally dims. In this case, replace the batteries as soon as practical.
Transmitter (14):
- Switch the transmitter (14) off using the ON/OFF button (19).
- Unlock the battery compartment cover (24) and remove it.
- Insert two AAA 1.5V (Micro LR3) batteries, making sure the polarity is correct. Refer to the diagram inside the battery compartment (23).
- Close the battery compartment (23) by replacing the cover (24). You should hear it click into place.
Receiver (1):
- Switch the receiver (1) off using the ON/OFF button (8).
-
Now unfold the retractile clip (10) so you can open the battery compartment cover (13) into the direction of the arrow.
-
Insert two AAA 1.5V (Micro LR3) batteries, making sure the polarity is correct. Refer to the diagram inside the battery compartment (12).
- Close the battery compartment (12) by replacing the cover (13) and pushing it in the opposite direction to the arrow.
7.2 Connecting the temperature sensors (30; 31)
Before using it for the first time, remove the transport protection (black rubber cover) from the temperature sensors (30; 31) ends.
Insert the connectors (27; 28) into the sockets (25; 26) on the side of the transmitter (14).
When not using it, you can wind the temperatures sensors (30; 31) cables around the transmitter and fix the temperatures sensors (30; 31) on the transmitter (14) top. There is an additional plastic nose for this purpose.
7.3 Selecting the temperature unit
You can choose between two temperature units (°C and °F). On the receiver (1) you can do this using the selection button (6). On the transmitter (14), slide the selector switch (22) on the back panel to the desired position.
8. Getting started

The barbecue thermometer has 2 temperature sensors (30; 31) and can perform 2 measurements
simultaneously. The settings for the 2 temperatures sensors (30; 31) can be adjusted individually. The displays on the receiver (1) and transmitter (14) keep you up-to-date on the temperature status in real time.
There is a separate display for each temperature sensor (30; 31) on both the receiver (1) and transmitter (14).
- Switch the transmitter (14) on by keeping the ON/OFF button (19) pressed. When in use, the red LED (18) flashes every few seconds.
- Now also switch the receiver (1) on by keeping the ON/OFF button (8) pressed. The LCD display (2) lights up once briefly with blue back-lighting, then red and then blue again, and a signal sounds.

If the temperature sensors (30; 31) are not connected to the transmitter (14) or there is a fault with the wireless connection between the transmitter (14) and the receiver (1), "---" is displayed as the current core temperature on the LCD display (2; 16).
In this case, make sure the connectors (27; 28) are properly inserted into the sockets (25; 26). The distance between transmitter (14) and receiver (1) must not be too large. If necessary, switch the transmitter (14) and receiver (1) off for about 3 seconds by long-pressing the
button and then switch them back on again. This should resolve the problem.
8.1 Position when in use

The range of the transmitter (14) is about 50 metres.
Make sure the distance between the transmitter (14) and the receiver (1) is not too great. This would mean accurate temperature measurement would not be possible.
8.1.1 Receiver (1)
- You can use the belt clip (11) to affix the receiver (1) to your belt or bag, for example.
- The belt clip (11) has two built-in magnets. This means you can also stick the receiver (1) to a magnetic surface.
8.1.2 Transmitter (14)
- There are two magnets (21) on the back of the transmitter (14). This means you can also stick the transmitter (14) to a magnetic surface.

When positioning the transmitter (14), make sure that you can easily reach the food whose core temperature you wish to measure with the temperature sensors (30; 31) cable. The transmitter (14) is made of plastic. Therefore, do not affix it to parts of the handle which get very hot, e.g. on the barbecue cover or the charcoal dish. This could damage the transmitter (14).
8.2 Selecting the type of meat (32) / Adjusting the level of cooking
- Press the "MEAT / STOP" button (9) to select the type of meat (32). The LCD display (2) shows the selection. Every time the button is pressed, the selection changes, moving through the table below:
| EVE | BEEF |
| LAMB | |
| VEAL | |
| PORK | |
| TURKEY | |
| CHICKEN | |
| BURGER | |
| FISH |
- Once you have selected the type of meat (32), press the "TASTE / START" button (4). Every time the button is pressed, the selection changes, moving through the table below. The current target temperature set is shown on the LCD display (2) under "TARGET TEMP" (36; 37).
| Display | Meaning |
| WELL | Cooked |
| MED WELL Nearly cooked through | |
| MEDIUM Half cooked through | |
| MED RARE Pink | |
| RARE | Bleeding |

Please note:
For health and other reasons, not all options are available for all types of meat.
For example, poultry should always be cooked through. For this reason, only this cooking level is available.
You also have the option of setting the target temperature "TARGET TEMP" (36; 37) manually. To do so, proceed as follows:
- First select the temperature sensor (30; 31) which target temperature you want to set. To do this, use the "MODE"
button (5). On the top of the LCD display (2), P1 appears for temperature sensor 1 (31) or P2 appears for temperature sensor 2 (30).
- Press and hold the "MODE" button (5) for approx. 3 seconds. A beep sounds and "TARGET TEMP" (36; 37) flashes on the LCD display (2). Use the "MIN / +" (3) and "SEC / -" (7) buttons to change the figure. Press the "MODE" (5) button to apply the target temperature shown in "TARGET TEMP" (36; 37).
- To cancel the manual selection or select another type of meat, press and hold the "TASTE / START" button (4) for about 3 seconds. Alternatively, you can switch the receiver (1) off and on again using the ON/OFF button (8).

For low core temperatures, only use meat which is fresh and in excellent condition. Generally, low core temperatures are not suitable for frozen or vacuum-packed meat.
8.3 Measuring the core temperature

The temperature is only measured correctly if no other devices of the same type are nearby and switched on. Otherwise, the current temperature is not shown correctly and uniquely on the LCD display (2).
- With the transmitter (14) and receiver (1) switched on, guide the point of the desired temperature sensor (30; 31) into the thickest part of the meat. It makes sense to feed the temperature sensor (30; 31) into the meat from the side, as you can then still turn it. If you also use the second temperature sensor (30; 31) for another piece of meat, proceed the same way.

Avoid contact between the temperature sensor (30; 31) and bones. This can result in an inaccurate temperature measurement. The temperature sensor (30; 31) should also not be inserted into pure fat for the same reason.
- After a short time, the core temperature of the meat is displayed under "CURRENT TEMP" (34; 35) on the transmitter (14) LCD display (16) and on the receiver (1). As the food cooks, the temperature rises until it reaches the target temperature "TARGET TEMP" (36; 37) set. The LCD display (2) then begins to flash red and a beep sounds with each flash.
- Press the "MEAT / STOP" button (9) to stop the beeping and the temperature measurement.

If you added multiple pieces of the same meat of similar shape and size to the pan or the barbecue at the same time, you can assume that the correct level of cooking has also been achieved for the other pieces as well.
8.4 Cooking chart
The following cooking chart can be used as a guide. The values quoted can differ slightly as a function of the quality of the meat used.

WELL

Cooked through
MED WELL

Nearly cooked through
MEDIUM

Half cooked through
MED RARE

Pink
RARE

Bleeding
*: Please note that the core temperature quoted for beef applies to steak.
| Type of food / Cooking level | WELL | MED WELL | MEDIUM | MED RARE | RARE |
| BEEF* | 66 °C / 150 °F | 58 °C / 136 °F | 55 °C / 131 °F | 53 °C / 127 °F | 49 °C / 120 °F |
| LAMB | 75 °C / 167 °F | 70 °C / 158 °F | 62 °C / 144 °F | 58 °C / 136 °F | |
| VEAL | 75 °C / 167 °F | 70 °C / 158 °F | 65 °C / 149 °F | 60 °C / 140 °F | |
| PORK | 75 °C / 167 °F | 70 °C / 158 °F | 65 °C / 149 °F | ||
| TURKEY | 85 °C / 185 °F | ||||
| CHICKEN | 85 °C / 185 °F | ||||
| BURGER | 75 °C / 167 °F | ||||
| FISH | 63 °C / 145 °F |
8.5 Timer function
If you are not happy with the level of cooking achieved, you can use the timer function to continue cooking the food for a little longer. You do not have to leave the temperature sensor (30; 31) in the meat for this. The procedure is as follows:
- Press the "MODE" button (5) until "TIMER" is shown on top of the LCD display (2).
00m
00s
- Select the time you want by pressing the "MIN / + (3) and "SEC / -" (7) buttons. You can also hold the buttons down to make the numbers move faster.
- Press the "TASTE / START" button (4) to start the countdown. The time on the LCD display (2) now counts backwards and you can see the time remaining at any time.
- You can use the "MEAT / STOP" button (9) to pause the countdown, for example to check or turn the food. You can then resume the countdown by pressing the "TASTE / START" button (4).
- When the time is up, the LCD display (2) begins to flash red and a beep sounds with each flash.
- Press the "MEAT / STOP" button (9) to stop the beeping. Otherwise, the beeping stops automatically after about 2 minutes.
9. Cleaning

Always allow the barbecue thermometer to cool completely before cleaning. There is a risk of getting burnt.
- Clean the barbecue thermometer, especially the temperature sensors (30; 31) after every use.
- Do not use solvents or aggressive detergents, brushes with metallic bristles or metallic objects such as knives, spatulas or similar.
- The barbecue thermometer and accessories cannot be washed in the dishwasher.
- Never immerse the barbecue thermometer or accessories in water or other liquids.
- Clean the transmitter (14) and receiver (1) with a slightly moistened, soft cloth. If necessary, use a mild detergent.
- Clean the temperature sensors (30; 31) with a damp cloth and a little washing-up liquid.
- Allow all parts to dry thoroughly after cleaning.
9.1 Storage when not in use
- If you do not intend to use the barbecue thermometer for an extended period, clean it as described in the previous chapter.
- Remove the batteries from the transmitter (14) and receiver (1) to prevent leaks.
- Store the barbecue thermometer in a dry, cool, dust-free place.
10. Troubleshooting
Not working
- Are the batteries in the transmitter (14) and/or receiver (1) empty? Insert new batteries where applicable.
The light on the LCD display (2; 16) is dim.
- Are the batteries in the receiver (1) or transmitter (14) empty?
- Insert new batteries where applicable.
The red LED (18) on the transmitter does not come on.
- Are the batteries in the transmitter (14) empty? Insert new batteries where applicable.
The current core temperature is shown as '' - - '' on the LCD display (2; 16).
- Check that the connectors (27; 28) for the temperature sensors (30; 31) are correctly inserted into the sockets (25; 26). Insert the connector (27; 28) properly if not.
- The transmitter (14) and receiver (1) are too far apart. Move them closer together.
- If necessary, switch the transmitter (14) and receiver (1) off for about 3 seconds and then switch them back on again. This should resolve the problem.
The LCD display (2) flashes with red back-lighting, shows "HI" and a warning beep sounds.
- The maximum temperature for the temperature sensor (30; 31) has been exceeded. Press the "MEAT / STOP" button (9) to stop the beeping and the measurement.
11. Environmental regulations and disposal information

Devices marked with this symbol are subject to the European Directive 2012/19/EU. All electrical and electronic devices must be disposed of separately from household waste at official disposal centres. Avoid damage to the environment and risks to your personal health by disposing of the device properly. For further information about proper disposal, contact your local council, disposal bodies or the shop where you bought the device.

Respect the environment. Old batteries must not be disposed of with domestic waste. They must be handed in at a collection point for waste batteries. Please note that batteries must be disposed of fully discharged at appropriate collection points for old batteries. If disposing of batteries which are not fully discharged, take precautions to prevent short circuits.


Dispose of all packaging in an environmentally friendly manner. Cardboard packaging can be taken to paper recycling centres or public collection points for recycling. Any film or plastic contained in the packaging should be taken to your public collection points for disposal.
Please note the markings on the packaging material when disposing of it, it is labelled with abbreviations (a) and numbers (b), the meanings of which are as follows:
1-7: plastic / 20-22: paper and cardboard / 80-98: composite materials.

The product can be recycled, is subject to an extended producer responsibility and is collected separately.
12. Conformity notes

This device has been tested for compliance with the relevant requirements of RED 2014/53/EU. Furthermore, the product fulfills the RoHS Directive 2011/65/EU.
The complete EU Declaration of Conformity is available for download from this link:
https://www.targa.gmbh/downloads/conformity/360220_2007.pdf
13. Warranty and service information
Warranty of TARGA GmbH
This device is sold with three years warranty from the date of purchase. Please keep the original receipt in a safe place as proof of purchase. Before using your product for the first time, please read the enclosed documentation. Should any problems arise which cannot be solved in this way, please call our hotline. Please have the article number and, if available, the serial number to hand for all enquiries. If it is not possible to solve the problem on the phone, our hotline support staff will initiate further servicing procedures depending on the fault. Within the warranty period the product will be repaired or replaced free of charge as we deem appropriate. No new warranty period commences if the product is repaired or replaced. Consumables such as batteries, rechargeable batteries and lamps are not covered by the warranty.
Your statutory rights towards the seller are not affected or restricted by this warranty.

Service

Phone: 0800 404 7657
E-Mail: targa@lidl.co.uk

Phone: 1890 930 034
E-Mail: targa@lidl.ie

Phone: 800 62230
E-Mail: targa@lidl.com.mt

Phone: 8009 4409
E-Mail: targa@lidl.com.cy
IAN: 360220_2007

Manufacturer
TARGA GmbH
Coesterweg 45
59494 Soest
GERMANY
Table des matieres
4. Specifications techniques
Attention, surface chaude!

| Écran | Signification |
| WELL | Bien cui |
| MED WELL Cuit | |
| MEDIUM | À point |
| MED RARE Saignant | |
| RARE | Bleu |

Remarque :
| WELL | → | Bien cuit |
| MED WELL | → | Cuit |
| MEDIUM | → | À point |
| MED RARE | → | Saignant |
| RARE | → | Bleu |
https://www.targa.gmbh/downloads/conformity/360220_2007.pdf
https://www.targa.gmbh/downloads/conformity/360220_2007.pdf
https://www.targa.gmbh/downloads/conformity/360220_2007.pdf
https://www.targa.gmbh/downloads/conformity/360220_2007.pdf
https://www.targa.gmbh/downloads/conformity/360220_2007.pdf
https://www.targa.gmbh/downloads/conformity/360220_2007.pdf
8.1 Position under drug

https://www.targa.gmbh/downloads/conformity/360220_2007.pdf