
272428 - Heating Hendi - Free user manual and instructions
Find the device manual for free 272428 Hendi in PDF.
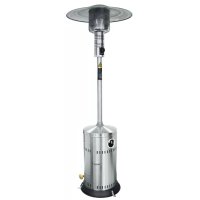
| Product type | Carbon infrared heater |
| Brand | Hendi |
| Model | 272428 |
| Voltage | 220-240 V ~ 50/60 Hz |
| Power | 2500 W |
| Protection class | Class I |
| Protection rating | IP55 |
| Dimensions (L × W × H) | 900 × 100 × 174 mm |
| Net weight | Approx. 3 kg |
| Intended use | Outdoor only |
| Heating type | Infrared heater |
| Heat levels | 4 levels (L1 to L4) |
| Timer | 0 to 24 hours |
| Remote control | Yes (AAA batteries not included) |
| Operation | Power button, power adjustment with remote control |
| Installation | Wall mounting bracket supplied, adjustable angle 30°-45° |
| Minimum mounting height | 2.4 m from floor |
| Side safety distance | 0.5 m from adjacent walls |
| Front safety distance | 1 m from combustible materials |
| Accessories included | L-brackets, screws, nuts, sealing washers |
| Maintenance | Clean with a soft damp cloth |
| Warranty | 12 months |
| Replaceable parts | Bulb from dealer |
| Materials | Metal, glass (heating tube) |
Frequently Asked Questions - 272428 Hendi
User questions about 272428 Hendi
0 question about this device. Answer the ones you know or ask your own.
Ask a new question about this device
Download the instructions for your Heating in PDF format for free! Find your manual 272428 - Hendi and take your electronic device back in hand. On this page are published all the documents necessary for the use of your device. 272428 by Hendi.
USER MANUAL 272428 Hendi
INFRARED PATIO HEATER BOLA
272428

You should read this user manual carefully before using the appliance.
Keep these instructions with the appliance.
Thank you for purchasing this Hendi appliance. Read this manual carefully, paying particular attention to the safety regulations outlined below, before installing and using this appliance for the first time.
Safety regulations
- This appliance is intended for commercial use only.
- Only use the appliance for the intended purpose it was designed for as described in this manual.
- The manufacturer is not liable for any damage caused by incorrect operation and improper use.
- Keep the appliance and electrical plug away from water and other liquids. In the event the appliance falls into water, immediately remove the power plug from the socket. Do not use the appliance until it has been checked by a certified technician. Failure to follow these instructions will cause life threatening risks.
- Never attempt to open the housing of the appliance by yourself.
- Do not insert objects into the housing of the appliance.
- Do not touch the plug with wet or damp hands.
DANGER OF ELECTRIC SHOCK! Do not attempt to repair the appliance by yourself, repairs are only to be conducted by qualified personnel. - Never use a damaged appliance! When it's damaged, disconnect the appliance from the socket and contact the retailer.
- WARNING! Do not immerse the electrical parts of the appliance in water or other liquids.
- Never hold the appliance under running water.
- Regularly check the power plug and cord for any damage. When damaged it must be replaced by a service agent or similarly qualified person in order to avoid danger or injury.
- Make sure the cord does not come in contact with sharp or hot objects and keep it away from open fire. Never pull the power cord to unplug it from the socket, always pull the plug instead.
- Make sure that the power cord and/or extension cord do not cause a trip hazard.
- Never leave the appliance unattended during use.
- WARNING!As long as the plug is in the socket the appliance is connected to the power source.
- Turn off the appliance before unplugging it from the socket.
- Connect the power plug to an easily accessible electrical socket so that in case of emergency the appliance can be unplugged immediately.
- Never carry the appliance by the cord.
- Do not use any extra devices that are not supplied together with the appliance.
- Only connect the appliance to an electrical outlet with the voltage and frequency mentioned on the appliance label.
-
Never use accessories other than those recommended by the manufacturer. Failure to do so could pose a safety risk to the user and could damage the appliance. Only use original parts and accessories.
-
This appliance should not be operated by persons with reduced physical, sensory or mental capabilities, or persons that have a lack of experience and knowledge.
- This appliance should, under any circumstances, not be used by children.
- Keep the appliance and its power cord out of reach of children.
- WARNING: ALWAYS switch off the appliance and unplug from power socket before cleaning, maintenance or storage.
Special Safety Regulations
- CAUTION: FOR OUTDOOR USE ONLY.
- READ CAREFULLY-The infrared heater is designed for safe operation. Nevertheless, in stallation, maintenance and operation of the heater can be dangerous. Observing the following procedures will reduce the risk of fire, electric shock, injury to persons and keep installation time to a minimum. Save these instructions for future use.
- Remove the unit from its packaging and check to make sure it is in good condition before using.
- Do not let children play with parts of package (such as plastic bags).
- This heater is hot when in use. To avoid burns, do not let bare skin touch hot surfaces. If provided, use handles when moving this heater. Keep combustible materials, such as furniture, pillows, bedding, papers, clothes, and curtains at least 3 feet (0.9m) from the front of the heater and keep them away from the sides and rear.
- Extreme caution is necessary when the heater is used near children or invalids.
- Do not use near or in the immediate vicinity of a bath or swimming pool or any source of liquid.
- Do not insert or allow foreign objects to enter any ventilation or exhaust opening, as this may cause an electric shock, fire or damage to the heater.
- Always unplug the heater when not in use.
- Connect to properly grounded outlets only.
- Always plug heaters directly into a wall outlet/receptacle. Never use with an extension cord or relocatable power tap (outlet/power strip).
- Do not allow cord to overhang the counter top where it can be easily pulled by children.
- Do not put fingers or foreign objects into the grill while in operation.
- Do not leave the appliance unattended when in use.
- This heater is not intended for use in bathrooms, laundry and similar indoor locations, never put heater where it may fall into a bathtub or other water container.
- Do not operate any heater with a damaged cord or plug or after the heater malfunctions, has been dropped or damaged in any manner. Disconnect power at service panel and have heater inspected by a reputable electrician before reusing. If the supply cord is damaged in any way, it must be replaced by the manufacturer or its service agent or a similarly qualified person in order to avoid a hazard.
-
Do not run cord under carpeting. Do not cover cord with throw rugs, runners, or similar coverings. Do not route cord under furniture or appliances. Arrange cord away from traffic area and where it will not be tripped over.
-
To prevent overheating of this appliance, keep the air inlets and outlets clean and free of anything that may cause blockage. Check all inlets and outlets from time to time to ensure it is clear of any dirt or dust accumulation. DO NOT COVER.
- A heater has hot and arcing or sparking parts inside. Do not use it in areas where gas line, paint, or flammable liquids are used or stored.
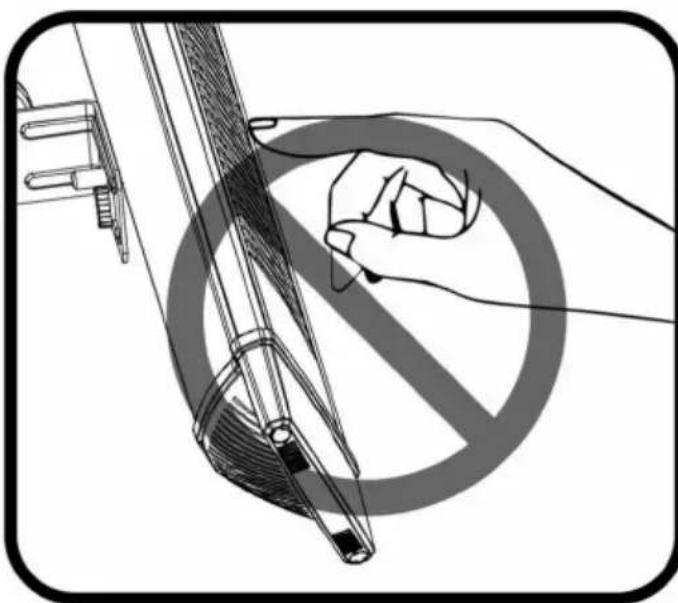
- Parts of the heater may exceed 200^ , contact with the heating tube, reflector, or metal parts near the heating tube, may cause severe BURNS. To avoid burns, do not let bare skin touch hot surface.
- NEVER place hands under the heating elements. ALWAYS allow heating element to cool at least 10 minutes before touching the heating tube or adjacent parts.
- This product contains recyclable materials. Do not dispose this product as unsorted municipal waste. Please contact your local municipality for the nearest collection point.
Intended use
- The appliance is intended for professional use.
-
The appliance is designed for heating outside only. Any other use may lead to damage of the appliance or personal injury.
-
Operating the appliance for any other purpose shall be deemed a misuse of the device. The user shall be solely liable for improper use of the device.
Grounding installation
This appliance is classified as protection class I and must be connected to a protective ground. Grounding reduces the risk of electric shock by providing an escape wire for the electric current.
This appliance is fitted with a power cord that has a grounding wire and grounded plug. The plug must be plugged into an outlet that is properly installed and grounded.
Introduction
The HENDI BOLA carbon infrared heaters produce instant and comfortable heat like the sun. These robust and weatherproof heaters are designed for
domestic and commercial heating applications at outdoor well-protected areas.
Installation
Tools Needed: Pencil, Hammer, Level, Screw Driver, Power Drill and drill bits.
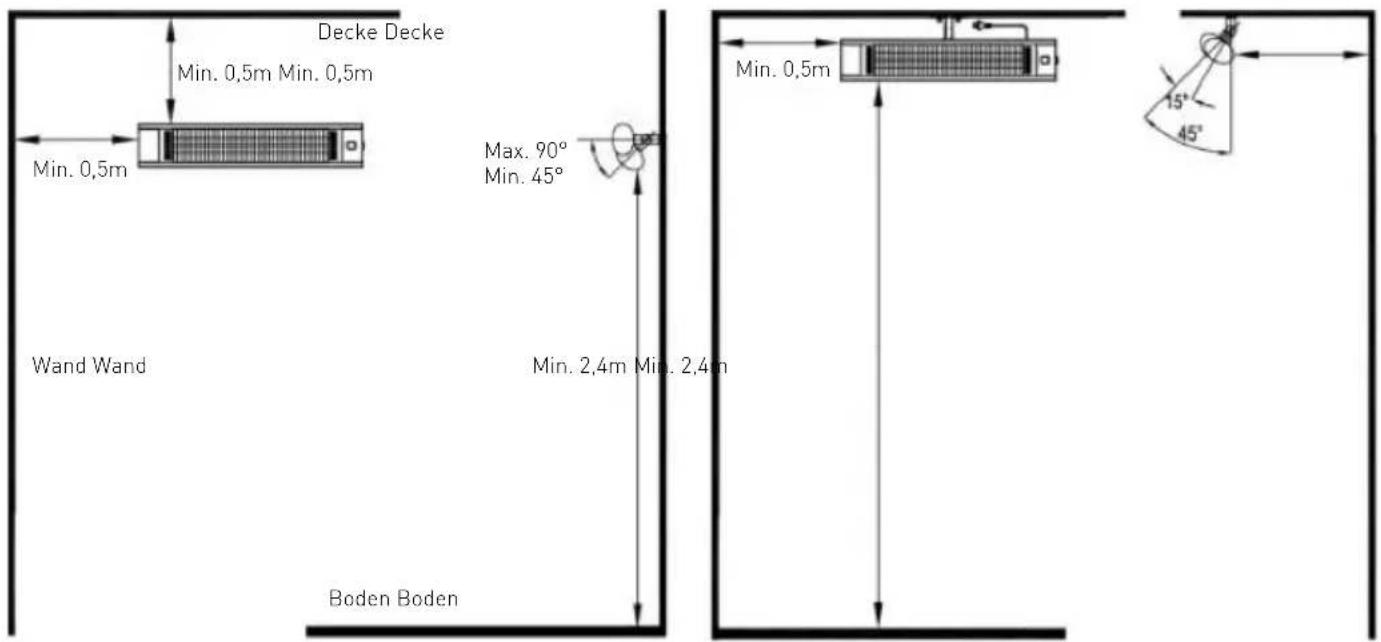
A wall mounting bracket is provide with the heater which has been specifically designed to allow this product to be fitted to a ceiling before drilling the holders for the ceiling is solid and that there are no hidden water pipes or electric wires. A wall mounting bracket is provide with the heater which has been specifically designed to allow this product to be fitted to a wall. Before mounting the bracket check that the wall is solid and that there are no hidden water pipes or electric wires. The heater must be installed no less than 19.7" from side walls and no less than 2.4m off the floor.
ATTENTION! The appliance must be installed on the solid surfaces like concrete, wood or metal etc. Important: Ensure that the supply cables is well mounted and that it does not come into contact with reflector of the heater or that does not trail into heated area, the supply cable can be fixed to the metal mounting bracket behind heater with plastic zip ties.
- This heater should be installed by a competent person, i.e. a qualified electrician.
- Always disconnected the heater from the electricity supply and allow it to cool before installation.
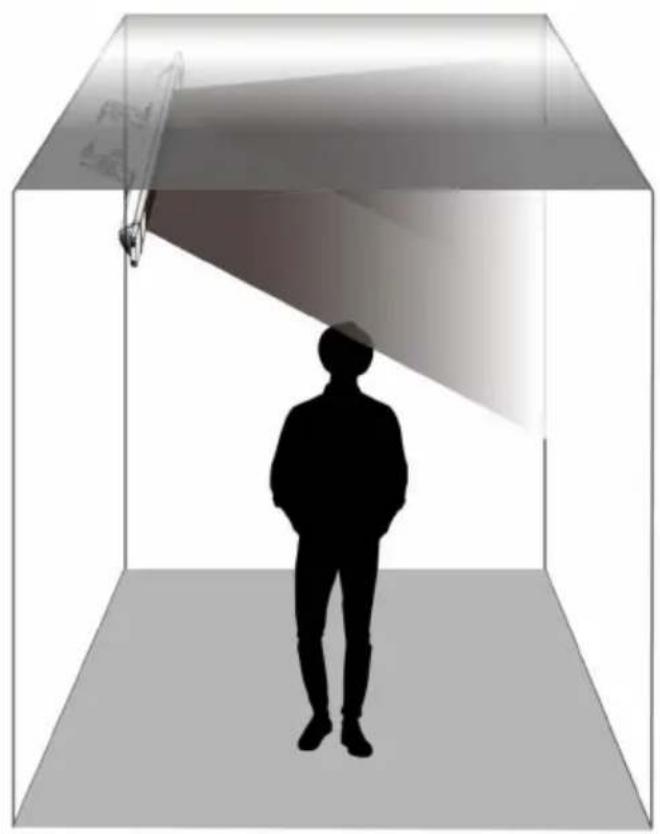
- For ceiling mounting, the lowest part of the heater must be located at or above a minimum height of 2.4m from ground level, so that the heater cannot be touched when in operation.
- For ceiling mounting, there must be a 2.4m distance from your appliance to the ground.
-
When installed to the ceiling, there must be a distance of 0.5m between corners and the appliance.
-
The distance of your appliance from the living beings is to be min 1m.
- The distance from the front side of the heater to materials such as wood, carton, cloth etc., must be min 1m.
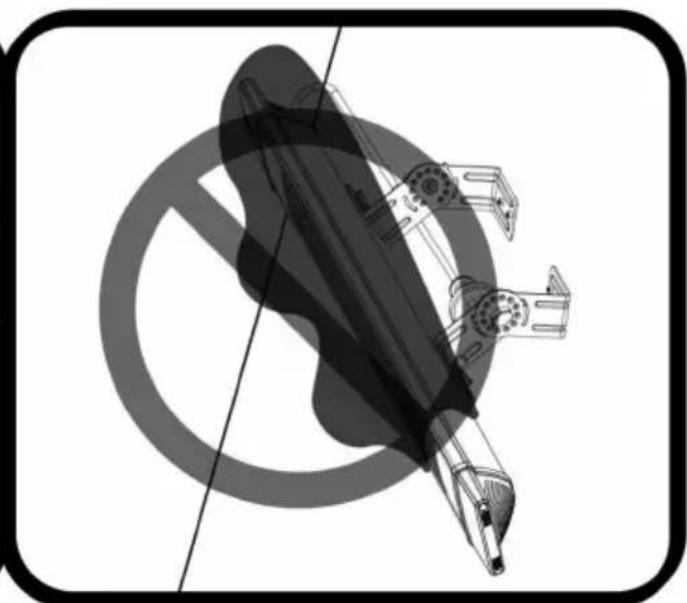
- When mounting to a ceiling, do not position the heater at an angle more than 90^ and less than 45^ .
- The supply cable must be at the lower end of the heater if the heater is installed at an angle or vertically.
- Keep the supply cord away from the body of the heater which will get hot during use.
- Do not install the heater on an inflammable surface.
- Observe the minimum safe distance between the heater body and the inflammable surfaces when mounted.
- The heater should always have a minimum clearance of 0.5m from a ceiling and adjacent walls.
- If the heater is to be used outside, a weatherproof outlet is recommended.
- Before drilling ensure that there are no wires or water pipes in the area where the heater is to be installed.
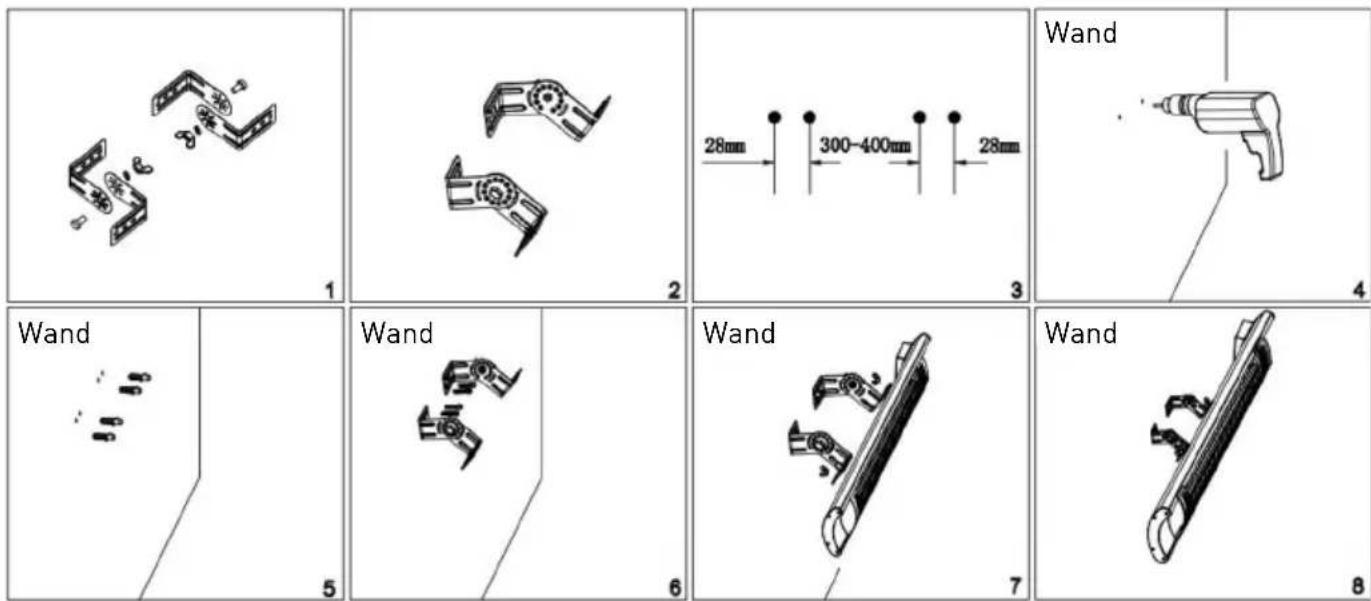
- The heater must be installed on the mounting brackets provided.
- Fasten the brackets securely to the mounting surface and the backside of the heater using the nuts and screws supplied.
- Fasten the heater securely on the brackets using the nuts and bolts supplied.
- The brackets can be used to adjust the direction of the heater, adjust the heater angle by loosening the two bolts on the wall mounting bracket, tighten the bolts again when the desired angle is reached.
Correct installation position
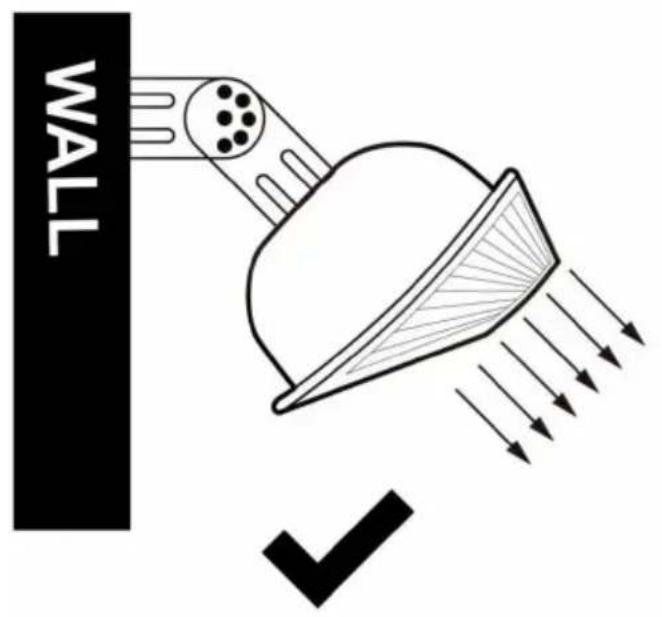
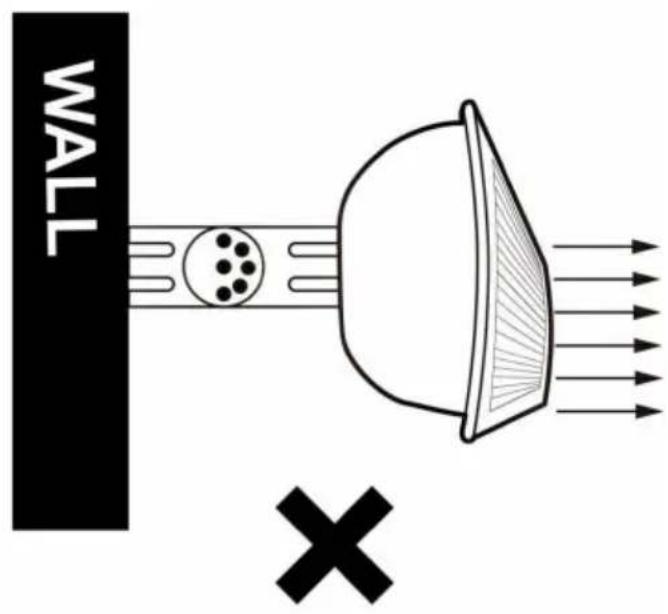


NOTE: Mounted angle with 30^ - 45^ .
Warning
To reduce the risk of fire
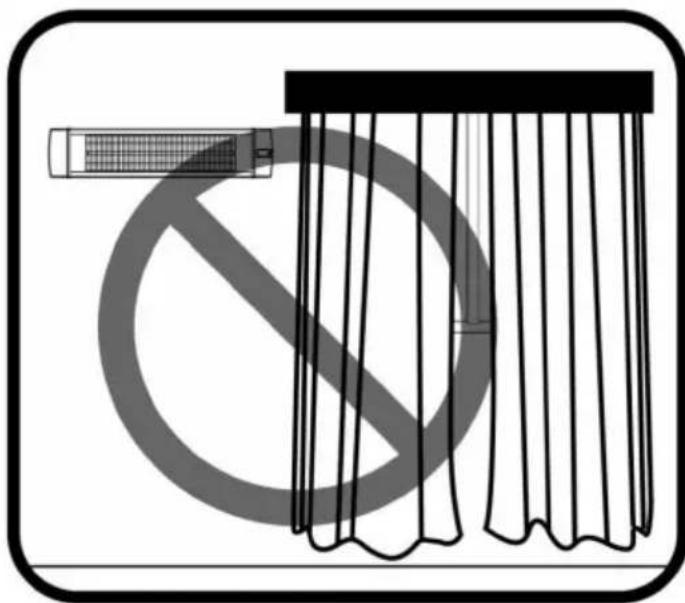
CAUTION: Keep combustible materials, such as furniture, pillows, curtains at least 3 feet (0.9m) from the front of the heater and keep them away from the sides and rear.
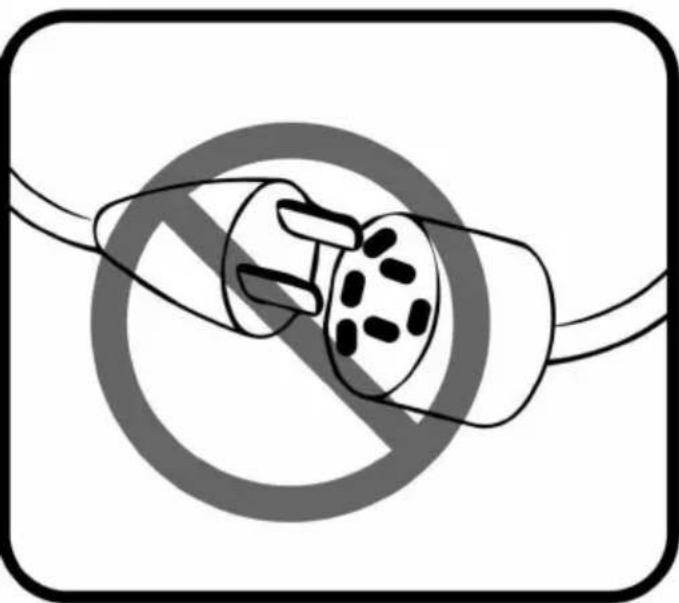
CAUTION: Do NOT use with an extension cord or relocatable power tap (outlet/power strip).
EN
CAUTION: Hot surface, do NOT touch.
CAUTION: Do NOT cover with any objects such as blanket on the heater.
Assembly instructions
- The heater must be properly installed before it is used.
- The heater can be using at indoor or well protected outdoor area.
- User-operated devices intended to reduce the
risk of fire, electric shock, or injury to persons; must be follow instruction
- Do not change the heater structure without registered electrician advice
Installation accessories
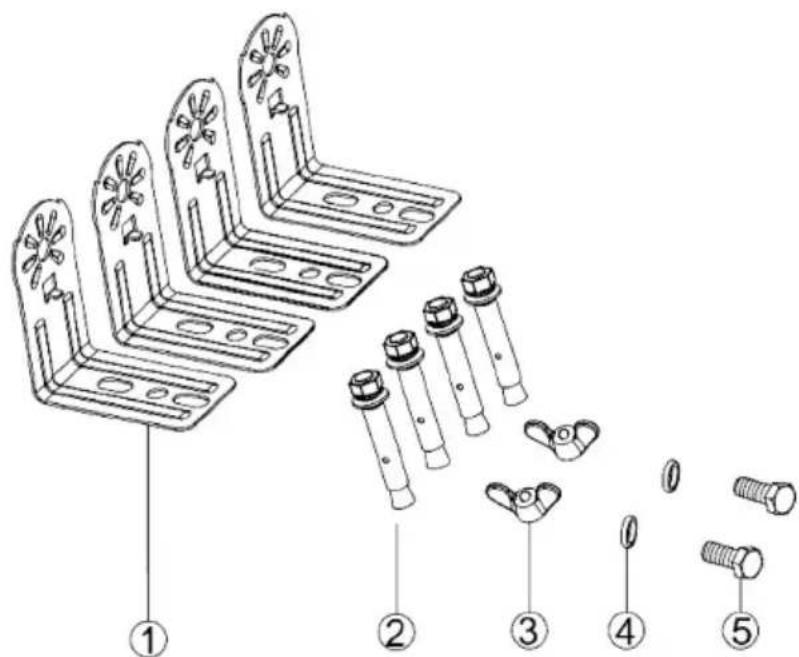
| 1 Bracket L shape 4PCS | ||
| 2 Screw M6mm*60mm 4PCS | ||
| 3 Nut M6mm 2PCS | ||
| 4 Gasket ø6mm*1 mm 2PCS | ||
| 5 Screw M6mm*12mm 2PCS |
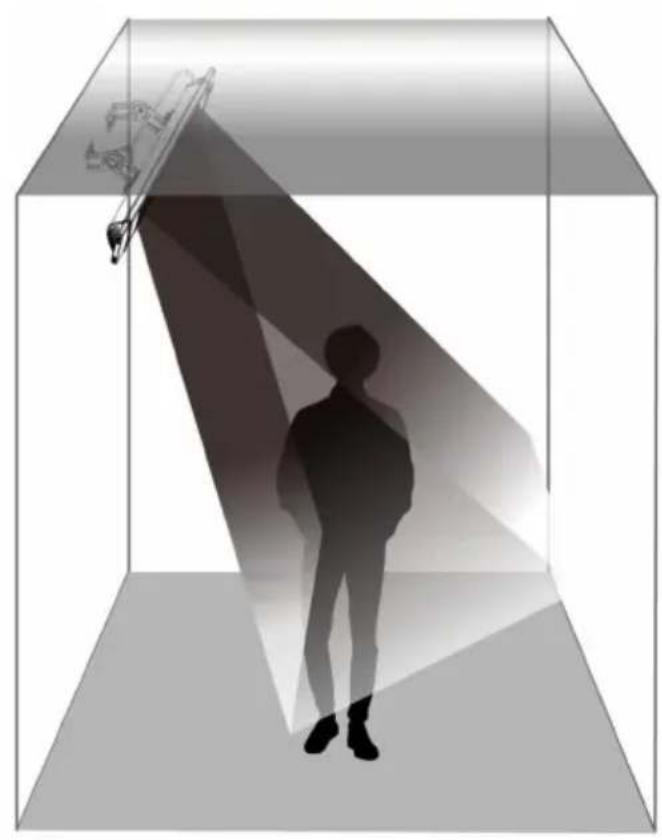
Wall mounted installation

Ceiling mounted installation

The heater must be installed at least 2.4M above the floor grade.
ATTENTION: cable should not passing thought the heater.
Operating
Product Key Function:
-
Turn on the power, the product is standby mode display - -
-
Press key function: press the button, then press the heat levels (L1-L2-L3-L4- standby-off).
EN
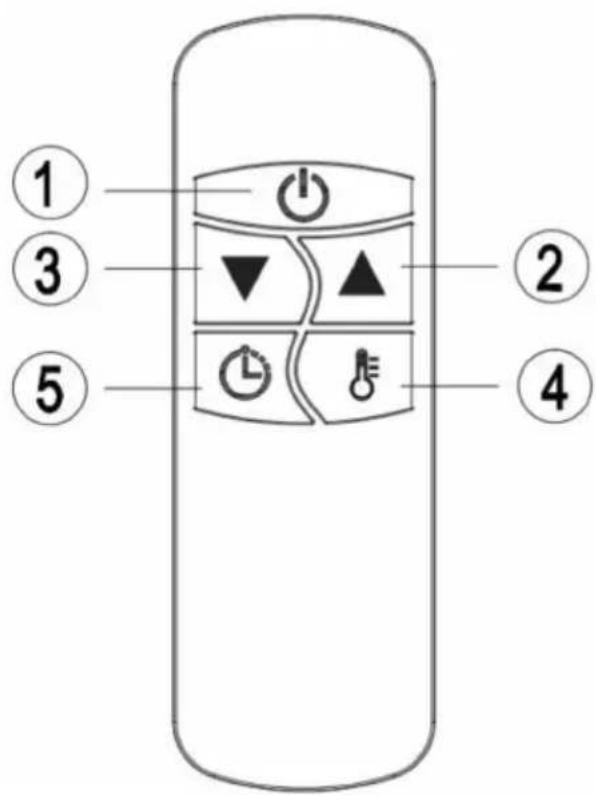
Remote Control Instructions
- POWER BUTTON: Turn the heater off.
- UP BUTTON: Increase timer or power level.
- DOWN BUTTON: Decrease timer or power level.
- LEVEL BUTTON: Use to adjust the heat levels(L1-L4). Press the Level button then use the up and down buttons(bu1ons 2 and 3) to increase or decrease the heating level.
- TIMER BUTTON: To set the timer from 0H-24H, which is the number of hours it will run. 0H will display and then adjust to the number of hours you would like to set, using the up and down buttons(2 and 3).
Noted: All heaters and their remote controls have the same frequency, so it is possible to control several heaters with just one remote.
Inserting Batteries (not included)
- Insert 2 AAA/ Alkaline type batteries into your remote control.
- Flip the backside of your remote control and pull out battery cover. Insert the batteries in accordance with the instructions and polarity the batteries.
- Change the batteries in the same way depicted above.
NOTICE:
- Replace the old batteries with the same type batteries. Otherwise, your heater may not function well.
- Pull out the batteries in case of long terms of disuse to prevent leakage which may impair your remote control.
- Do not allow water or liquid to get into the remote control.
CAUTION
When the appliance is not operated for a long period of time, cleaning or maintenance is conducted or when the location of the heater is changed, the heater should be turned to OFF and unplugged from the electrical connection.
Periodic inspection and removal of dirt and contaminants will ensure that equipment can be operated safely.
Troubleshooting
If the appliance does not function properly, please check the below table for the solution. If you are still unable to solve the problem, please contact the supplier/service provider.
-
Check if the power cord is plugged into an electrical outlet, if not, plug in.
-
Check if electricity to the main fuse is working
-
Error code shows on display
| Problem Possible cause Solution | ||
| E1 Error on display Control unit overheat. | Cooling down the heater after 1 hours and restart heater. | |
| L1,2,3,4 shows in display, but no heat Bulb is damaged. | Arrange for replacement bulb with local Dealer. | |
In case of any doubt, always contact your supplier!
Cleaning and maintenance
Maintenance
ATTENTION! Careful and regular maintenance of your heater considering our instructions assume great importance so as to attain a long efficient operation of your appliance.
- Check the filthiness of the Reflector and IR-Filament at least once a month. If necessary, apply cleaning and maintenance instructions.
- The number of checks may be increased considering the amount of the dust in the environment.
Cleaning
- Regular and careful cleaning helps your infrared heater operate efficiently for many trouble free years. To clean your heater follow steps below:
- Unplug the power cord for your safety before cleaning your appliance.
- Make sure the heater is cool before continuing.
-
To keep the heater clean, the outer shell maybe cleaned with a soft, damp cloth. You may use a mild detergent if necessary. After cleaning, dry the unit with a soft cloth. (CAUTION: DO NOT let liquids enter the heater).
-
Check the deformation of the Reflector, Wire and Frame visually while cleaning the appliance. In case of deformation, consult to your technical service.
-
Check the Power Cord and Plug visually while cleaning the appliance. In case of deformation, consult to your technical service.
-
DO NOT use alcohol, gasoline, abrasive powders, furniture polish or rough brushes to clean the heater. This may cause damage or deterioration to the surface of the heater.
- DO NOT immerse the heater in water
- Wait until the heater is completely dry before use.
Storage: Store the heater in a cool, dry location when not in use to prevent dust and dirt build up. Use packaging carton to store.
ATTENTION
- Always disconnect the heater from the electricity supply and allow it to cool before attempting to work on it.
- If the heater has collected dust or dirt inside the unit or around the heating element, have to unit cleaned by a qualified service agent. Do not operate the heater in this condition.
- The only maintenance required is cleaning of the external surfaces of the heater.
- Do not touch the heating element with bare fingers, as residue from your hand could affect the life of the lamp. If it is accidentally touched,
remove the finger marks with a soft cloth moistened with mentholated spirit or alcohol.
- Do not attempt to repair or adjust any electrical or mechanical functions on this heater.
- The heater contains no user serviceable parts. Should the product suffer damage or breakdown, it must be returned to the manufacturer or its service agent.
- Damaged supply cords to be replaced by the manufacturer, service agent or similarly qualified person in order to avoid hazard.
Technical specification
Item no.: 272428
Operating voltage & frequency: 220-240V~50/60Hz
Rated power: 2500 W
Protection class: Class I
Waterproof protection class: IP55
Dimension: 900× 100× (H)174mm
Net weight: approx. 3 kg
REMARK: Technical specification is subjected to change without prior notification.
Warranty
Any defect affecting the functionality of the appliance which becomes apparent within one year after purchase will be repaired by free repair or replacement provided the appliance has been used and maintained in accordance with the instructions and has not been abused or misused in any way. Your statutory rights are not affected. If the appliance is claimed under warranty, state where and
when it was purchased and include proof of purchase (e.g. receipt).
In line with our policy of continuous product development we reserve the right to change the product, packaging and documentation specifications without notice.
Discarding & Environment
When decommissioning the appliance, the product must not be disposed of with other household waste. Instead, it is your responsibility to dispose to your waste equipment by handing it over to a designated collection point. Failure to follow this rule may be penalized in accordance with applicable regulations on waste disposal. The separate collection and recycling of your waste equipment at the time of disposal will help conserve natural re
sources and ensure that it is recycled in a manner that protects human health and the environment.
For more information about where you can drop off your waste for recycling, please contact your local waste collection company. The manufacturers and importers do not take responsibility for recycling, treatment and ecological disposal, either directly or through a public system.
Installation and Wand
Installation and Decke
Aarding installation
Dimensioni: 900x100x(H)174 mm
Ecn yctpoiCTBO He pa6oTaETdoJXHbIM o6pa30M, 6paTnTeCb K npuBeHHO Hxke Ta6nue, TTo6bl HaHTn npaBnIbHoe peweHne. Ecn Bbl He moxepe PeWntb npo6nemy, 6paTnTeCb K nocTabuNky.
Iotppe6JIeMaMoUHocTb:2500BT
CTeeneH 3aunTbI: I KnaCC
KlaccBlaar03aunTbI:IP55
Pa3Mepb1: 900x100x(Bbc.)174 MM
Bec HeTTO: npM.3 K
Texnuecka cneunfkaun MOKeT 6bIb n3MeHeHa 6e3 npdynpeKdHn.
Tapaantna
JIIO6a HeoJekKa nn noomka, KOtopa BJeueT 3a c06o HnnpabInbHyu pa6Oty yctpoiCTBa, KOtopa 6ydet BblBHeHa B TeueHne nepBOro rOda OT DaTbI NOKynK, 6yDet ycTaPHeHa 6ecnPaTHo, nn JKe BCE yctpoiCTBO 6ydet 3aMeHEno HOBbIM, eCNI OHO 3KcNpyATnpOBaNoCb n 06cnyXnbALocb coNacHo INCTpyKnnn NO bcnyXnbAHnIO n He NCnoB3OBANoCb HnnpaBnBHo, nn B pa3pe3 C Ha3NaueHem. DAnHoe noLoxHne Hn Koen Mepe He HapUshaet INbIX npAB Notpe6nteJI, n3loXeHHbIX B 3aKOHO
dATENBCTBe.Bcnyae3aBHeHn yCTpoiCTBa BpeMOHTnHa 3aMeHy BpaMKax rapaHTn, cneNyETyKa3aTb MeTo n DaTy NOKynKuCTpoiCTBa n npNIO-JXNTb Cuet, nn YeKOByIO KBNTaHciHIO.
CorgaCHO haWei noIITnke COBepHcTBoBaHNHaunx npOyKTOB ocTaNlEe 3a co6oN npaBO HaBBOD N3MeHEN B KOHCTpyKcUIO, yNaKOBky N B TexHHueckne napametpbI, yKa3bIBaEMble B TexHHueCKoJ DOKymentauu 6e3 npedynpejXdeHn.
Ytlln3aunna 3aunTa OkpykaUoien cpebl
B clyuae BbIbOa o6OpyIOBaHnI 3KcNlyatauIN, npOyKT HeJIb3a yTInIIN3nPOBaTb BMeCT C dpYIMN 6bITOBIMn OTxOdAMn. POnb3oBaTeJb HecET OTBeTCTBeHHocTb 3a NpepaUy o6OpyIOBaHnB CcoOTBETCTByUOuN PyHK TpIeMa TexHnKn 6bIBweB BynoTpe6bIeHN. HecobIouHeNe BblweyKa3aHnHO rnoXeHnM MoKeT npVBecTN K HaIoXeHnU WTPaΦOB B COOTBeTCTBnC DeIcTBvUOuMn PpaBnAmn B OTHoWeHnN yTInIIN3aUIN OTxOoB. CeJeKtNBhI CBop n yTInIIN3aUIN IcNoJIb3OBAHHoro o6OpyIOBaHnI CNOC6CTByIOT COxPaHEHnIO npPpOdNbIX pecypcoB n o6ecneuBaHT peuRkyJauuTo KaIM
6pa30m, KOToPbI He BpeDeH IJIa 3OpOBbI N OKpyKaIOUeN cpebl.
Дя поуеня дононтьнoiифорmaци O TOM, rde можho OTdaTb nCnoьзOBaHHoe obopydoBaHne ДЯ уTNIN3aun, obpaTNTecb B MeCTHyO KOMnaHIO no c6opy otXoIDOB. ПрOn3BODInTeIb I MMnopTeP He Hecyt OTBeTcTBeHHocTn 3a peuRpyJIЯцIOи nepepa60TKy otXoDob ekOJorUmueckn 6e3-OpachbIM cNoCobOM, KaK HeNocpeIcTBeHHo, TaK INВ paMKax rocydapCTBeHHo cnCTembl.
Zac exapotoue yia tvn ayop autnc tncauokunc Hendi. AiaBaoTe npoektikau to exyepidio, divovtac iaiepn npooox n otouc kavovioouc aoaaieac nou nepiypapovtal napakatw, npiv eykataaonote KAI xpnoionoiote autn tn oukeun ia npwnf opa.
Kavovioi aαφαλεια
△aσταεις: 900x100x(Y)174 mm
Kaapó Bapoc: nepinou 3 kg
Oi TeXviKec npoaiypaqec mnpouv va tpononoinBoov xwpic nponyouuevn eldonoinon.
Eyyunon
Onoiobnone eatawma ennpaezntn aeoupyokotnta tnc ouakeunc nou yivetai npopavec duo xpovla meta tnv ayopa tnc, Ta biopowetai mewpeav EIOKEUN n avikataotaon, apkei n ouakeun va exu xpnoponoine i kal ovtnpntheta i uqwova m tic onnyiec kai va nuv exei yivei kataxpnon n lavthetaevn xpnon tnc m eo onioovdonote trpono. dE thiyovtal ta voima diikawataac.Eav n ouakeun unoootnpizetai
anéyyunon, dnλωote nou kal note exel ayopaotek kalouunepiaBete nvy anodetnyopac (n.x. anodεiE nn aviknc nwnonc).
tnv no t u t n a c ia tn ou x n t n T_W npoiovtwv mac, diatnpoue to dikaiwma va aAaa- o u e to npoiov, tn ouokuaoia kal tic npodaypa- pec teknpiowcn tou xwic npoeilonoinan.
Anoppyn&PiBaaov
H ouokun, ta to nepac tnc diapkeiac zwnc tnc, npenla va anoppintetai woc uikako anoppuma. Pnpenla va anoppintetai, dikn oac euohvn, oKaOpioevo onueio oulloync. H pn thpnon autou evextalva tupewitaloupwva touc loxovtec kavoviaouc yia tn dbaThean twv anoppmuatow. H xwiotn oulloyn kal avakukwanautnc tncc oukunc katn otiyun tn c anoppwnc Bonta otndiatnpnon tow quokov npowkai Eaopaalizetnv avakukwann tc tpono nou npoataeivtnv av- pwnivn uyia kal to nepiBaalov.
Tia nepioootepe c npopopiec oxetka e to nou mnpoeite va anoppiye tn ouokean yia avakukawon, enikovwovte e nTv tonik etaipciaouloync anoppmuatw. Okataaekuaotc kal oieayweic avalaabavouv tv uBuvn avakukwcon,ene- epyaia c kai okooyknc diaeonc, iTe aea eite onoiou ouotnatoC.
ΣEPBIZ EANAAOΣ:
Hendi Food Service Equipment GmbH
Ehring 15
Hendi Food Service Equipment Romania S.R.L.
Str. 13 decembris 94A, Hala 14
Braşov, 500164, Romania
Tel: +40 268 320330
Email: office@hendi.ro
PKS Hendi South East Europe SA
5 Metsovou Str.
18346 Moschato, Athens, Greece
Tel: +30 210 4839700
Email: info@pks-hendi.com
Hendi Italia S.R.L.
Via Leonardo da Vinci 4
39100 Bolzano [BZ], Italy
Tel: +39 800 727 438
Email: office.italy@hendi.eu
Hendi HK Ltd.
1208, 12/F Exchange Tower
33 Wang Chiu Road, Kowloon Bay, Hong Kong
Tel: +852 2154 2618
Email: info-hk@hendi.eu
FindHendi on internet:
www.hendi.eu
www.facebook.com/HendiToolsforChefs
www.linkedin.com/company/hendi-food-service-equipment-b.v.
www.youtube.com/HendiEquipment
- Changes, printing and typesetting errors reserved.
- Änderungen, Druck- und Satzfehler vorbehallen.
-Wijzigingen,druk-en zelfouten voorbehouden.
-Zastrzega sie moziwośczmian, btów w druku i skladzie. -
Sous réserve d'erreurs de modification, d'impression et de composition.
-
Con riserva di modifiche, errori di stampa e composizione.
- Rezervale modificarile, liparirea si erorile de liparire.
- Mby octabJnem 3a co60I npabo BHocntb n3MeHeHn, Own6Kn neatn Ha6opa.
- Entpuλaoovraaλayεc, ekτιων καοτοχειθεοία.

- INFRARED PATIO HEATER BOLA
- Safety regulations
- Special Safety Regulations
- Intended use
- Grounding installation
- Introduction
- Installation
- Correct installation position
- Warning
- To reduce the risk of fire
- EN
- Assembly instructions
- Installation accessories
- Wall mounted installation
- Ceiling mounted installation
- Operating
- Product Key Function:
- Remote Control Instructions
- Inserting Batteries (not included)
- NOTICE:
- CAUTION
- Troubleshooting
- Cleaning and maintenance
- Maintenance
- Cleaning
- ATTENTION
- Technical specification
- Warranty
- Discarding & Environment
- Installation and Wand
- Installation and Decke
- Aarding installation
- Tapaantna
- Ytlln3aunna 3aunTa OkpykaUoien cpebl
- Kavovioi aαφαλεια
- Oi TeXviKec npoaiypaqec mnpouv va tpononoinBoov xwpic nponyouuevn eldonoinon.
- Eyyunon
- Anoppyn&PiBaaov
Brand : Hendi
Model : 272428
Category : Heating