Planar 6 - Turntable REGA - Free user manual and instructions
Find the device manual for free Planar 6 REGA in PDF.
| Product Type | Belt-driven turntable |
| Brand | Rega |
| Model | Planar 6 |
| Power Supply | PS1 power adapter (24 V AC + 20 V DC) |
| Speeds | 33 1/3 and 45 rpm, electronically adjustable |
| Speed Control | Neo module with fine adjustment via encoder (0.01 rpm increment) |
| Tone arm | RB330 with tracking force and anti-skate adjustment |
| Cartridge | User installation with supplied alignment protractor |
| Platter | Glass platter, sub-platter with drive belt |
| Maintenance | Soft microfiber cloth slightly damp; replace belt every 5 years |
| Safety | Do not use near liquids, heat; ensure 10 cm ventilation, temperature 5-35 °C |
| Warranty | Lifetime against manufacturing defects; normal wear excluded |
| Optional Accessories | Rega strobe kit, RPM app for iPhone |
Frequently Asked Questions - Planar 6 REGA
User questions about Planar 6 REGA
0 question about this device. Answer the ones you know or ask your own.
Ask a new question about this device
Download the instructions for your Turntable in PDF format for free! Find your manual Planar 6 - REGA and take your electronic device back in hand. On this page are published all the documents necessary for the use of your device. Planar 6 by REGA.
USER MANUAL Planar 6 REGA
text_image
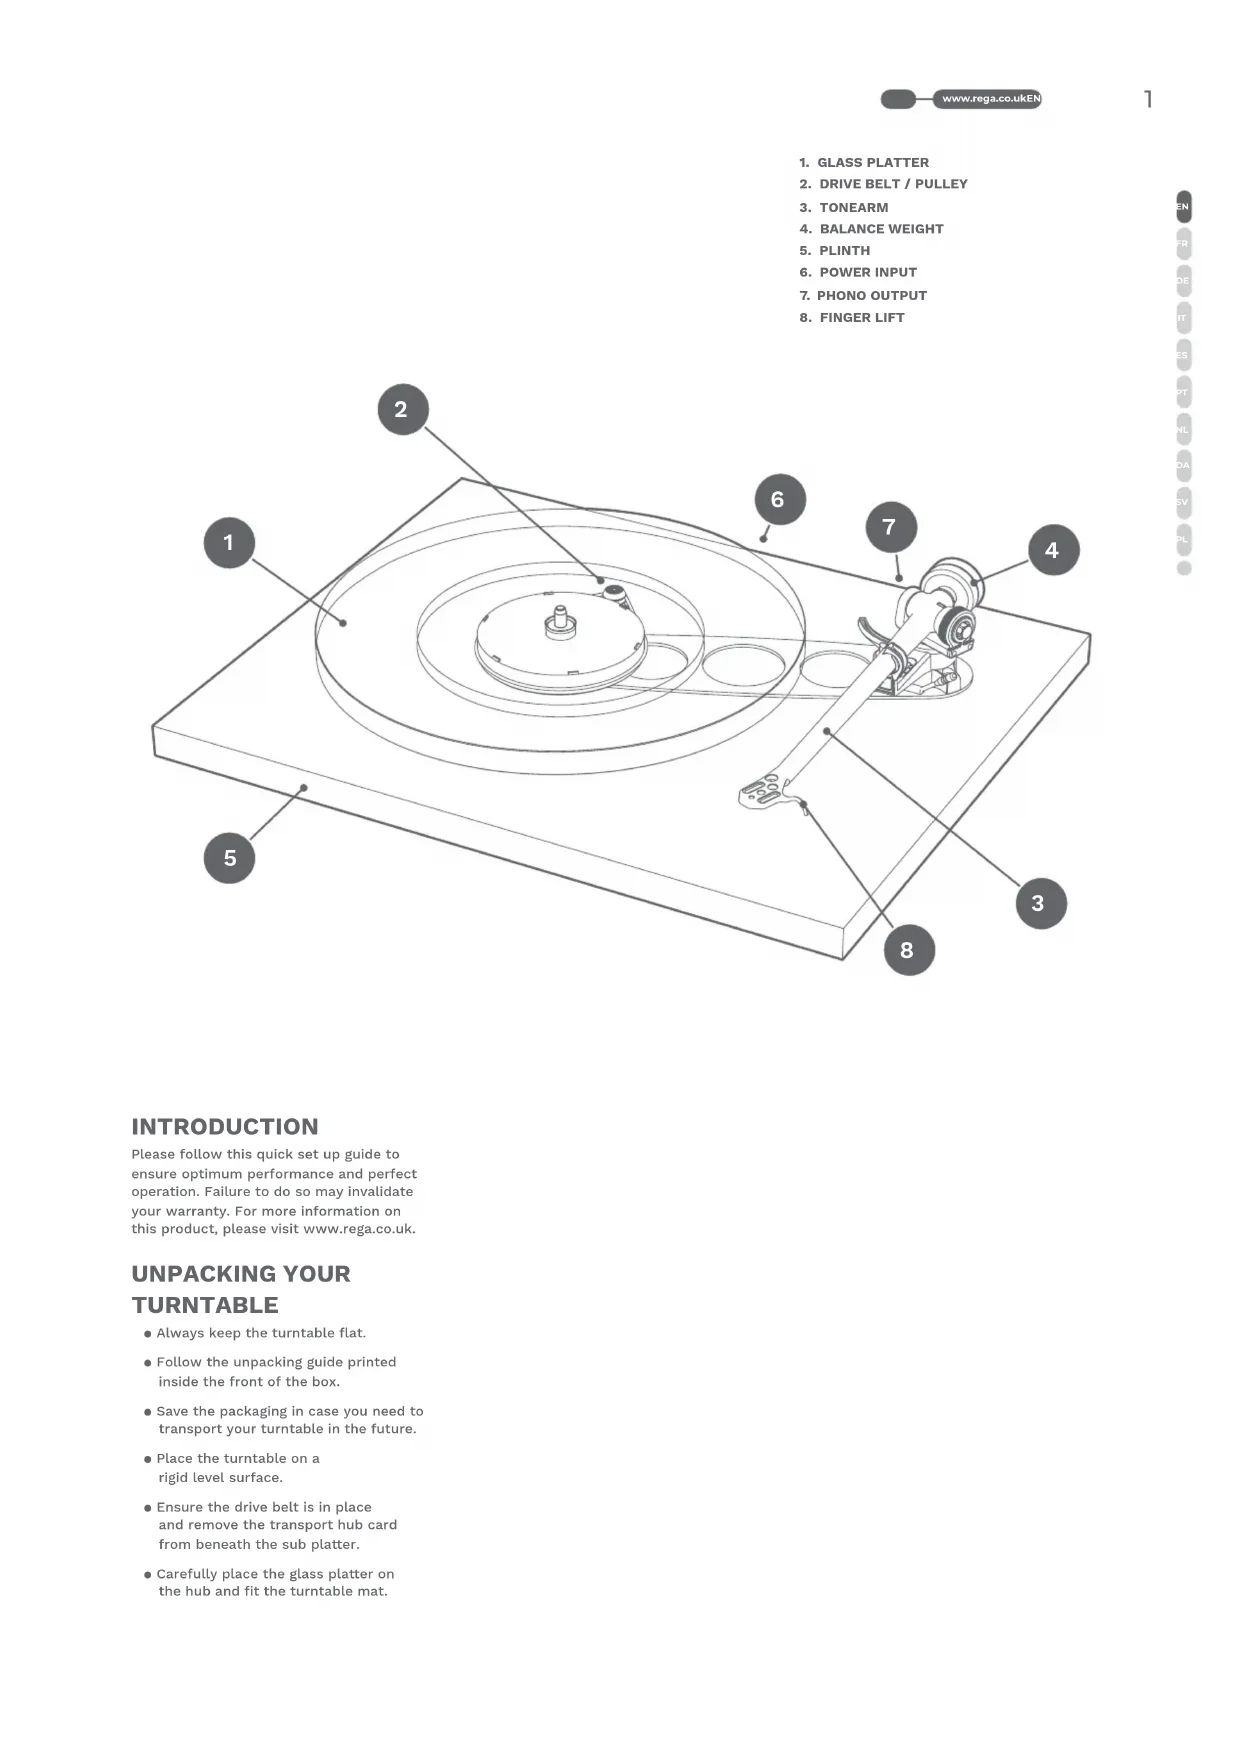
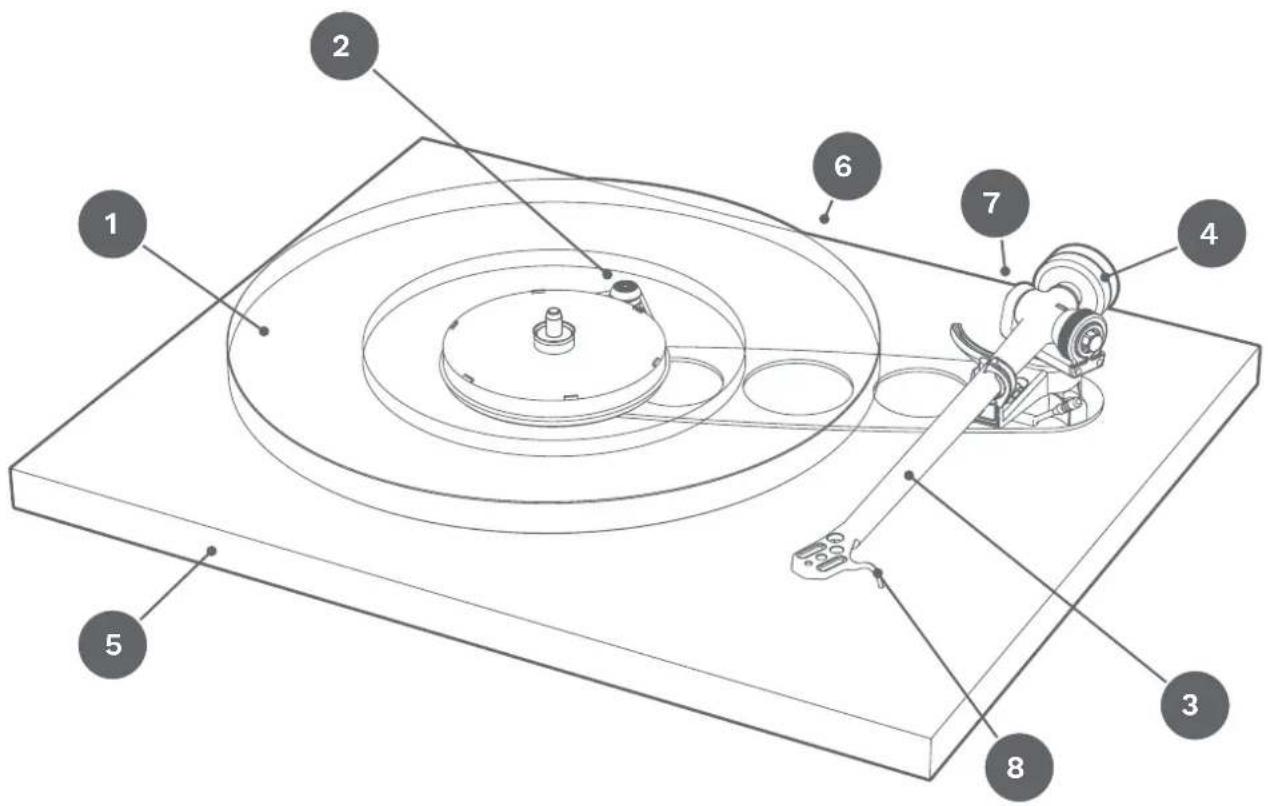
Technical diagram of a mechanical assembly with numbered components for identificationINTRODUCTION
Please follow this quick set up guide to ensure optimum performance and perfect operation. Failure to do so may invalidate your warranty. For more information on this product, please visit www.rega.co.uk.
UNPACKING YOUR
TURNTABLE
● Always keep the turntable flat.
- Follow the unpacking guide printed inside the front of the box.
- Save the packaging in case you need to transport your turntable in the future.
- Place the turntable on a rigid level surface.
- Ensure the drive belt is in place and remove the transport hub card from beneath the sub platter.
- Carefully place the glass platter on the hub and fit the turntable mat.
- GLASS PLATTER
- DRIVE BELT / PULLEY
- TONEARM
- BALANCE WEIGHT
- PLINTH
- POWER INPUT
- PHONO OUTPUT
- FINGER LIFT
SETUP AND CONNECTIONS
- Only use the Rega supplied PS1 AC adaptor.
- Connect the power DIN lead (supplied) between the rear of the Planar 6 and the 24 V AC input socket on the rear panel of the Neo.
- Plug in the Rega PS1 and switch the mains power on.
- To turn the Neo on, push the button marked 'power' located on the front panel and the turntable platter will rotate at the selected speed.
- When the power supply is switched on, if the Rega logo illuminates red, 33½ rpm is selected.
- If the Rega logo is illuminated green, 45 rpm is selected.
- To change between speeds, press the button marked '33/45' on the front panel as required.
Note: To minimise the risk of hum picked up by the cartridge, the Neo should be situated as far from the turntable as the interconnect cable will allow.
CONNECTING TO THE AMPLIFIER
The tonearm external phono leads must be connected to a suitable phono stage.
Connect as follows: Red = right channel / Black = left channel
Depending on the type of cartridge you have chosen, you will require the appropriate moving magnet (MM) or moving coil (MC) stage. If your amplifier does not have an integrated phone stage, you will require an external stage (sold separately).
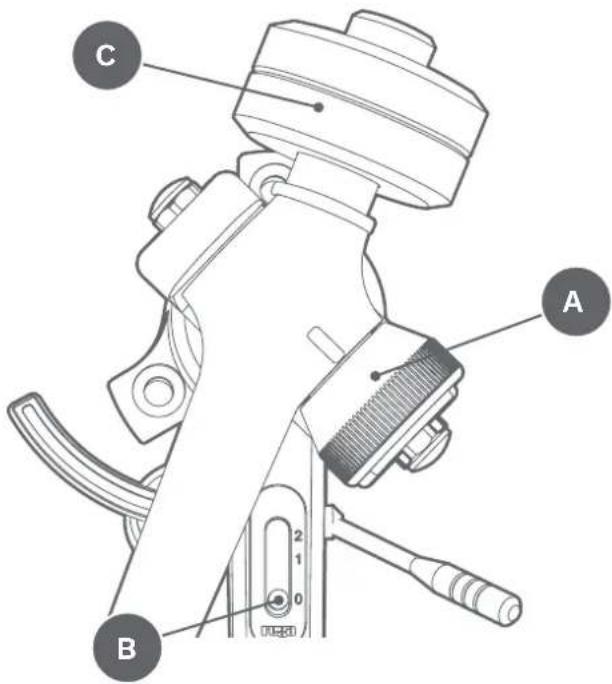
CARTRIDGE MOUNTING AND SETTING UP THE RB330 TONEARM
Firstly, ensure the cartridge fixings are orientated correctly according to the cartridge makers specification. Use the cartridge alignment protractor (supplied) to accurately set the position of the cartridge. Ensure that the tracking force dial (A) and bias adjustment slider (B) are both set to zero. Place the balance weight (C) on to the balance weight shaft. With the stylus guard removed, position the cartridge above the lead-in groove of an LP. Whilst supporting the headshell, carefully push the weight further up the shaft until the stylus is floating just 1 mm clear of the record.
The recommended tracking force can now be applied using the tracking force dial. Always use a force which corresponds to the upper limit of the cartridge makers recommended range. Finally, push the bias adjustment slider to the same number as the tracking force control.
text_image
A B CSPEED ADJUSTMENT (FACTORY SET - ONLY ADJUST IF NECESSARY)
The speed control functions are sited on the back panel of the Neo:
Speed program switch: This enables the set speed mode.
Program mode LED: This indicates the two modes of operation: Factory default mode and speed adjustment mode.
Speed adjustment: This encoder is used to adjust the speed. The step size of the speed control is 0.01 rpm.
ADJUSTING THE SPEED
Note: We recommend the Rega Strobe kit to accurately measure the speed during adjustment (sold separately).
Note: The speed is adjusted whilst running at 33½ rpm and any adjustments made at 33½ rpm will be automatically be applied to 45 rpm.
- Select 33½ rpm.
- Press the 'speed program' switch on the rear panel once to put the unit into setup mode - The 'program mode' LED will now be permanently illuminated red.
- Adjust the speed via the 'speed adjustment' control using a 1.7 mm allen key. Turning clockwise will increase the speed and turning counter clockwise will decrease the speed. The step size is 0.01 rpm. Only make small adjustments of up to five 'steps' at a time to ensure accurate adjustment. Check the speed after each adjustment to achieve the best accuracy.
- When the speed has been correctly set, press the 'speed program switch' once to put the unit back into 'run mode'. The 'program mode' LED will now go out and flash approximately every ten seconds indicating the speed has been changed from the factory setting. Your turntable is now set and ready to use.
RETURNING THE NEO TO FACTORY SETTINGS
This process is recommended when fitting a new drive belt to your turntable or after a service, to help optimise the range of adjustment available to you.
- Select 33 ^1/3 rpm.
- Press and hold down the 'speed program' switch until the 'program mode' LED flashes every few seconds. Keep the button pressed until a solid LED is illuminated.
- Whilst illuminated, press the 'speed program' switch button once again to fully factory reset and return to 'run mode'.
Note: We recommend changing Rega drive belts every five years to guarantee optimum performance. Using the Neo with old worn belts may result in lower performance and variation in speed stability.
USE OF MOBILE PHONE APPS TO CHECK AND ADJUST THE SPEED
Rega, along with a London mastering studio, have used the iPhone 'RPM' app (available on the App Store) developed by Philip Broder to check and adjust the speed of a turntable using the Neo, with positive results. We have verified the basic accuracy of the 'RPM' app using Rega's in-house speed measuring equipment, but as this is a third-party app we cannot guarantee the readings because of uncertainties, which could be caused by the age, condition, and operating system of the phone the app is installed on. If you are in any doubt, you should check the calibration of the 'RPM' app using a suitable reference.
REGA STROBE AND STROBOSCOPIC DISC (SOLD SEPARATELY)
The best way to adjust the speed of your Planar 6 is to use the Rega Stobe kit. A stroboscopic disc is an optical instrument used to measure the speed of the turntable by freezing the bars on the disc. The bars are illuminated by an accurate quartz locked LED pulsing at 100 Hz.
USING THE STROBE KIT
Simply place the strobe disc on the turntable platter. Switch on the 100 Hz LED and hold it approximately 2 cm above the rotating strobe. If the bars do not appear to move and are stationary, the speed is 33½ rpm. If they move clockwise, the turntable is running fast, and conversely, if they move anti-clockwise, the turntable is running slow.
If over one minute the bars appear to move by one bar to the left or one bar to the right, the speed is 0.016% fast or slow respectively. Using the speed control on the Neo, it is possible to achieve ±0.05% or ±1.3 rpm.
Note: If over one minute the bars appear to move by two bars to the left or by two bars to the right, the speed is 0.01 rpm fast or slow respectively. Using the speed control on the Neo, it is possible to achieve ±0.01 rpm, which is one step of the speed adjustment.
Warning: Because of the nature of the stroboscopic effect of the disc and the LED light, we strongly recommend anyone with photo-induced epilepsy not to use this device. Although this condition is very rare, we must make the user aware of this condition. Ask your dealer for assistance if required.
WARNINGS
Do not unplug the power supply from the turntable whilst the unit is on - turn off the power supply before unplugging. Do not operate the power supply without the turntable connected. A 24 V AC plus a 20 V DC signal present on the pins of the plug - if these are shorted it will cause damage to the power unit. Use only with the Rega PS1 power supply or Neo. Never expose the unit to rain or moisture. Do not open the case covers. There are no user serviceable parts inside.
The Neo incorporates resettable fuses in the driver amplifier to protect it from overcurrent faults, which will cause the turntable to run erratically or not at all. If in the rare circumstance these are activated, they are reset by turning off the Neo via the front panel for approximately 10 seconds. If the fault should persist, consult your dealer.
text_image
Technical diagram of a mechanical assembly with numbered components for identificationINTRODUCTION
text_image
Technical diagram of a mechanical assembly with numbered components for identificationINTRODUZIONE
text_image
Technical diagram of a mechanical assembly with numbered components for identificationINTRODUCCIÓN
text_image
Technical diagram of a mechanical assembly with numbered components for identificationINTRODUÇÃO
text_image
Technical diagram of a mechanical assembly with numbered components for identificationINTRODUKTION
text_image
Technical diagram of a mechanical assembly with numbered components for identificationINLEDNING
With the unit disconnected from the mains, only clean with a micro fibre cloth, (lightly damp if necessary). Do not remove any coverings; there are no user serviceable parts inside. If the unit performs erratically or emits smoke or colour, disconnect from the power supply and take it to a qualified service technician.
WARRANTY
All Rega products are covered by a lifetime warranty against manufacture defects. This warranty does not cover wear and tear. Any unauthorised modifications or failure to follow the Rega recommended guidelines may invalidate the warranty, if returning goods for inspection to your retailer, the original packaging must be used to preserve the warranty. Damage caused during transport due to incorrect packaging may invalidate your warranty. Replacement packaging is available from any Rega retailer. Your statutory rights are not affected.
SAFETY INSTRUCTIONS
Do not use this unit near liquids or expose to moisture. Do not use near sources of heat such as radiators, vents, stoves, or candies. Ensure adequate ventilation around the product, at least 10 cm in all directions, and avoid placing the unit on soft surfaces such as long carpet and fabric. Do not open the product enclosure or force objects into openings in the unit. Place the unit on a fixed level surface where it will not fall or tip. The unit should only be used in moderate climates between 5 °C (41°F) and 35 °C (95°F). Keep packaging material and small pieces out of reach of children. Unplug the power supply if the unit is unused for extended periods of time.
SERVICE
This symbol indicates that the electronic equipment bearing it should not be disposed of as general household waste at the end of its life. The equipment should be disposed of at a collection point for waste electrical and electronic equipment in accordance with national legislation and Directive 2012/19/EU. For more information about how to dispose of your waste electronic equipment, please contact your local authority or retailer where you purchased the product. In the UK, please return your product to the retailer.

FR
SPECIFICATIONS (EN/FR/DE/IT/ES/PT/NL/DA/SV/PL)
| Output to motor bi-phase24 V AC protected by resettable fuse. | Power consumption7,2 W | Voltage24 V AC. Rega PSU1 only. | Stroboscopic disc100 Hz, 180 marks 3312 rpm | The basic one bar per minute drift resolution0,016% |
| Sortie vers le moteur biphasé24 V AC protégée par un fusibleréarmable. | Consommation électrique7,2 W | Voltage24 V AC. Rega PSU1 uniquement. | Disque stroboscopique100 Hz, 180 marques 33,33 tours/min. | Résolution de dérive de base pour une barre par minute0,016% |
| Ausgang24 V Wechselspannung in zwei Phasenmit rückstellbarer Sicherung. | Leistungsaufnahme7,2 W | Netzspannung24 V AC. Wechselspannung für PSU1. | Stroboskopscheibe100 Hz, 180 Markierungen für 33,3/min. | Abweichung von einer Stelle pro Minute entspricht0,016% |
| Uscita al motore bifase24 V CA con protezione fornita dafusible resettabile. | Consumo elettrico7,2 W | Tensione24 V CA. Solo Rega PSU1. | Disco stroboscopico100 Hz, 180 contrassegna 33,33 giri/min. | Risoluzione di deriva di base al minuto per una barra0,016% |
| Salida al motor bifase24 V CA, con protección de fusiblereactivable. | Consumo eléctrico7,2 W | Voltaje24 V CA. Solamente PSU1 de Rega. | Disco estroboscópico100 Hz, 180 marcas 33,33 rpm. | Resolución básica de una barra por minuto0,016% |
| Bi-fase de saída para o motor24 V AC protegido por fusivel. | Consumo de energía7,2 W | Tensão24 V AC. PSU1 da Rega. | Disco estroboscópico100 Hz, 180 marks 3312 rpm | Resolução básica de um bar por minuto0,016% |
| Uitgangsspanning naar motor tweefase24 V AC beschermd door automatischeszekering. | Stroomverbruik7,2 W | Voltage24 V AC. Alleen Rega PSU1. | Stroboscoopschijf100 Hz, 180 geeft 33,33 rpm aan. | De basis-afwijkingsresolutie bij één streepje per minuut0,016% |
| Udgang til dobbeltfaset motor24 V vekselström beskyttet af sikringder kan nulstilles. | Stromforbrug7,2 W | Spænding24 V vekselström, Kun PSU1 fra Rega. | Stroboskopisk skive100 Hz, 180 betyder 33,33 omdrejninger pr. minut. | Grundläggende afvigelse ved én bjælke pr. minut0,016% |
| Uteffekt till motorns 2-fas24 V AC skyddad av återställningsbarsäkring. | Effektförbrukning7,2 W | Spänning24 V AC. Endast Rega PSU1. | Stroboskopskiva100 Hz, 180 märken 33,33 varv/min. | Grundläggande driftupplösning för ett streck per minut0,016% |
| Wyjście do silnika — prąd dwufazowy24 V AC, zabezpieczenie przezresetowany bezpiecznik. | Zużycie energii7,2 W | Napięcie24 V AC. Wyłącznie zasiłacz Rega PSU1. | Płyta stroboskopowa100 Hz, 180 oznaczeń 33,33 obr./min. | Podstawowa rozdzielczość odchytki o jeden pasek na minutę0,016% |

www.rega.co.uk
Rega Research Ltd.
6 Coopers Way
Temple Farm Industrial Estate
Southend-on-Sea, Essex
SS2 5TE
PLANAR 6
User Manual v7
MADE IN ENGLAND
SINCE 1973