KCA1330 MK2 - Camera DENVER - Free user manual and instructions
Find the device manual for free KCA1330 MK2 DENVER in PDF.
| Product type | Digital camera |
| Brand | Denver |
| Model | KCA1330 MK2 |
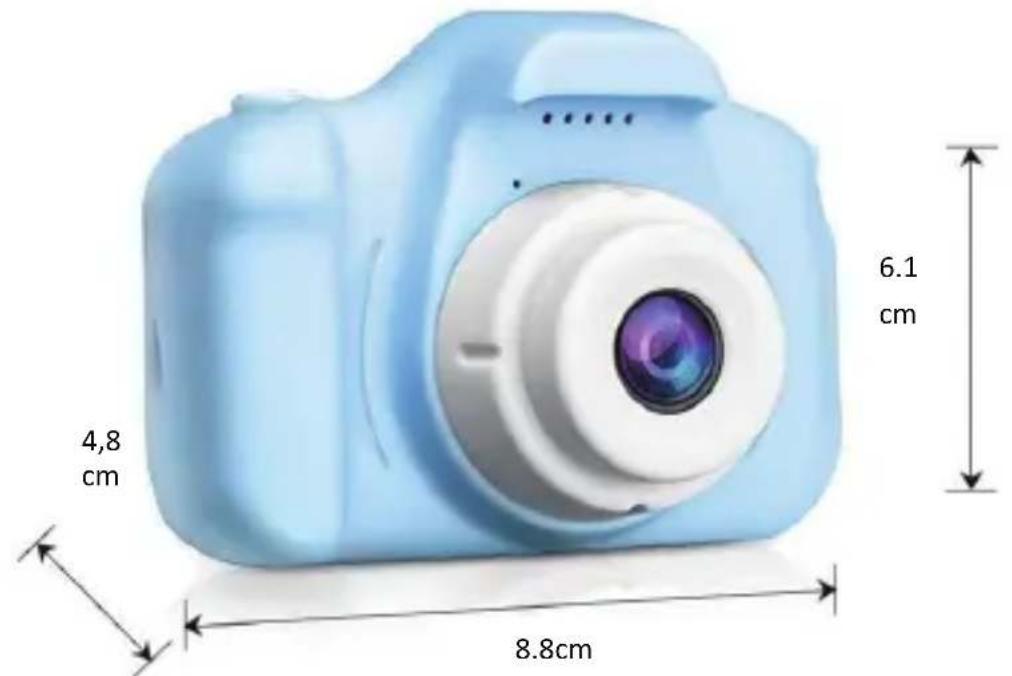
| Dimensions | 8.8 x 6.1 x 4.8 cm |
| Weight | 176 g (with packaging) |
| Power supply | Rechargeable lithium-polymer battery 600 mAh, charging via micro-USB cable |
| Charging time | 1 to 2 hours |
| Operating time | 1.5 to 2.5 hours |
| Screen | 2-inch IPS screen |
| Photo resolution (real) | 640 × 480 pixels |
| Photo resolution (interpolated) | Up to 40 M (3000 × 4000 pixels) |
| Video resolution | 1080P, 720P, VGA (640 × 480) |
| Internal storage | Built-in memory for about 50 photos (no video without card) |
| External storage | microSD card up to 32 GB |
| Main functions | Photo, video, playback, games (Puzzle, Push Box, Snake), 28 cartoon frames, 5 vibrato effects, 6 color filters, 8x digital zoom, self-timer (2/5/10s), slow motion/fast motion, voice recording, date stamp |
| Connectivity | Micro USB for charging and file transfer (Plug and Play) |
| Menu languages | 13 languages including French, English, German, Italian, etc. |
| Operating temperature | 0 °C to 40 °C |
| Material | ABS with rubber oil paint |
| Maintenance and cleaning | Clean with a soft dry cloth. Do not use chemicals. Protect from moisture and heat. |
| Safety | Do not open, keep out of reach of children, do not expose to water or direct sunlight, use only the supplied cable. |
| Spare parts and repairability | Repairs must be carried out by qualified personnel. No spare parts provided. Recycle at a waste disposal facility. |
| General information | Compact camera for children and beginners. Fun features (frames, games). Battery life of about 2 hours. Comes with USB cable. |
Frequently Asked Questions - KCA1330 MK2 DENVER
User questions about KCA1330 MK2 DENVER
0 question about this device. Answer the ones you know or ask your own.
Ask a new question about this device
Download the instructions for your Camera in PDF format for free! Find your manual KCA1330 MK2 - DENVER and take your electronic device back in hand. On this page are published all the documents necessary for the use of your device. KCA1330 MK2 by DENVER.
USER MANUAL KCA1330 MK2 DENVER
Please read the safety instructions carefully before using the product for the first time and keep the instructions for future reference.
- Warning: This product includes lithium polymer batteries.
- Keep product out of the reach of children and pets to avoid chewing and swallowing.
- Product operating and storage temperature is from 0 degree Celsius to 40 degree Celsius. Under and over this temperature might affect the function.
- Never open the product. Touching the inside electrics can cause electric shock. Repairs or service should only be performed by qualified personnel.
- Do not expose to heat, water, moisture, direct sunlight!
- The unit is not waterproof. If water or foreign objects enter the unit, it may result in fire or electric shock. If water or a foreign object enters the unit, stop use immediately.
- Only charge with supplied USB cable.
- Do not use non original accessories together with the product as this can make the product functionality abnormal.
Appearance
ENG2
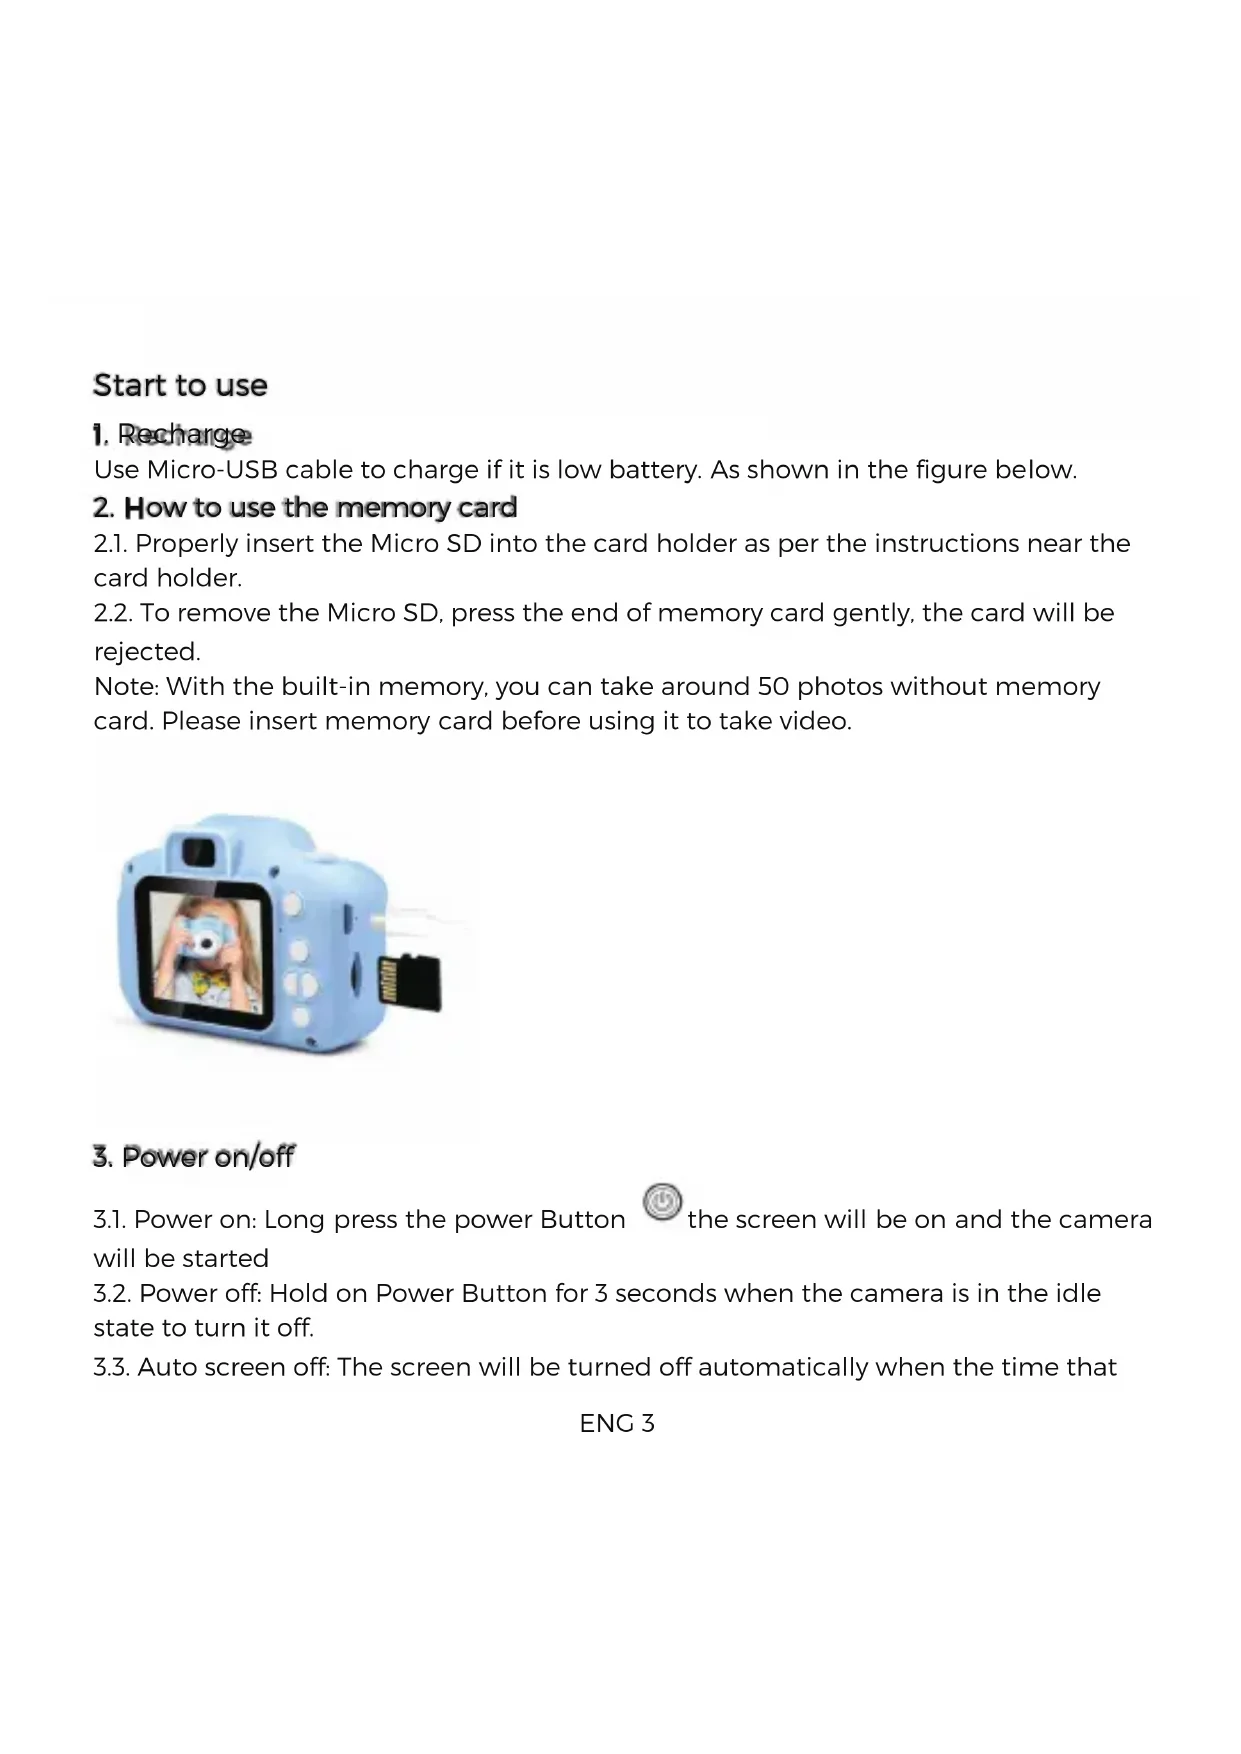
Start to use
1. Recharge
Use Micro-USB cable to charge if it is low battery. As shown in the figure below.
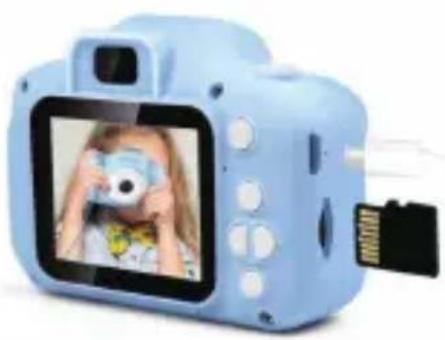
2. How to use the memory card
2.1. Properly insert the Micro SD into the card holder as per the instructions near the card holder.
2.2. To remove the Micro SD, press the end of memory card gently, the card will be rejected.
Note: With the built-in memory, you can take around 50 photos without memory card. Please insert memory card before using it to take video.
3. Power on/off
3.1. Power on: Long press the power Button will be started

the screen will be on and the camera
3.2. Power off: Hold on Power Button for 3 seconds when the camera is in the idle state to turn it off.
3.3. Auto screen off: The screen will be turned off automatically when the time that
ENG3
the camera is in the idle state for automatic-screen off to save power.
3.4. Power off when the camera is lacking-power. When battery power is very low, an icon will be displayed on the LCD screen, prompting you to charge it in time. When the icon flickers the camera will be turned off automatically.
- Recording mode, photo mode, playback mode, game, music and system settings
4.1. Recording Mode
When you turn on your camera, you are in main menu, find icon , short press
will enter video recording mode, short press to start video recording; short press it again to stop shooting.
Tip: If you want return menu, kindly short press power button
4.1.1. Short press page up button to choose color effect of images, there are seven kinds of color effects, such as normal, black and white, retro, negative, red, green and blue.
4.1.2. Short press page down button to enter the mode of Automatic breath screen.
4.1.3 Short press left button to choose fast or slow motion.
4.2. Photo Mode
4.2.1. When you turn on your camera, you are in main menu, find icon , short press
ENG4
the take photos button to enter photo mode, short press power button to capture your photo. Then short press page up button to choose color effect of images. You can long press it to enlarge focal length (2-3-4-8 times)
Tip: If you want to return to menu or exit, kindly short press power button
4.2.2. Short press page down button to enter different frames or vibrato effects mode. (28 cartoon frames and 5 vibrato effects) You can long press it to minify focal length. (2-3-4-8 times)
4.2.3. Short press to turn on/off timed photo function.
Tip: You can set timed photo function at setting menu, there are three kinds of modes:2 sec, 5 sec,10 sec.
4.3.Playback mode
4.3.1. Enter main menu, find icon, short press into playback mode, you can short press left or right button to see the photos and videos you took.
4.3.2. Short press up button to delete one photo or video. (you can see Execute and Cancel, short press right or left button to choose, short press to confirm)
4.3.3. Short press down button to delete ALL photos or videos. (you can see
Execute and Cancel, short press right or left button to choose, short press to confirm)
ENG5
Tip: If you want to return to menu or exit, kindly short press power button
4.4 Game mode:
Enter main menu,find icon , short press into game mode, you can short press
or right button to choose, then short press to confirm. (3 games: Square game, Push Box, Snake)
Tip: If you want return to menu or exit, kindly short press power button
4.5.Setting mode:
Enter main menu, find icon , short press into setting mode. More functions as below:
Photo size: 2M~3M~5M~8M~12M~16M~18M~20M ~40M
Timed photo: Off, 2 sec, 5 sec,10 sec
Video format: 1080P, 720P, VGA
Date stamp: on, off
Language: English, German, Italian, Portuguese, Espanol, Dutch, Danish, Swedish, Finnish, Polish, Norwegian, French,Croatian
Auto screen: off, 1min, 2 min, 3 min (to save power when you do not use)
Auto off: off, 3 min, 5min (To conserve battery power, the camera will shut off if no keys are pressed within the selected time)
Format: execute, cancel (Erase all data on the SD Card)
Date: Year/Month/ Day (setting the date and time of the camera)
System reset: execute, cancel (Reset settings of the camera to factory default)

5. Connect to PC
The camera has a plug-and-play function. Connect the powered device to the computer with the USB cable, and the mode will automatically switch to the removable hard disk. Removable disk icon will appear in the "My Computer" window. The pictures and video files you shot are stored in the removable disk H: \DCIM folder (H is this equipment removable disk).

Note: During file downloading, it is prohibited to disconnect USB connection,
and plugging out the memory card when USB connected is also prohibited to avoid loss of data.
Technical parameters
| Speaker 1W | |
| Battery | 600mah (full capacity +with protective board) |
| Resolution 1080P/720P/VGA | |
| Video Resolution | Real: 640*480 (VGA) Interpolation: 1920 * 1080 (with filters, slow, fast) |
| Photo Resolution Rea: 640*480 Interpolation: 3000 * 4000 | |
| Charging Time 1~2hours | |
| Working Time 1.5~2.5 hours | |
| Screen Size | 2 Inch IPS screen |
| Material ABS with rubber oil painting | |
| Storage Media: | Max support 32GB |
| Features | Photography, take videos, 3 Puzzle games, 28 Cartoon Stickers, 6 Filters, auto on/off, 8 x Digital Zoom, 12 Languages, 5 Vibrato Effects, Automatic Breath Screen, Timed Photo Function, Date Input, Time Stamp, Voice Record, Delete, Format, Reset System, Photo Size, Slow Motion |
| Product Size | 8.8 x 6.1 x 4.8cm |
| Product Weight | 176g (includes package) |
| Memory | Built-in memory (can take 50+ photos) but cannot record video without memory card |
| Operation Requirements | Windows XP/Vista/7/8, Mac 10.8 |
Note: The product design specification is made based on updated information when ENG 8
compiling this product manual. The specification is subject to change without further notice. The product is subject to the actual camera. When the camera is crashed from drop and please restart the camera
Please notice - All products are subject to change without any notice. We take reservations for errors and omissions in the manual.
ALL RIGHTS RESERVED, COPYRIGHT DENVER A/S

www.denver.eu

Electric and electronic equipment and included batteries contains materials, components and substances that can be hazardous to your health and the environment, if the waste material (discarded electric and electronic equipment and batteries) is not handled correctly.
ENG9
Electric and electronic equipment and batteries is marked with the crossed out trash can symbol, seen above. This symbol signifies that electric and electronic equipment and batteries should not be disposed of with other household waste, but should be disposed of separately.
As the end user it is important that you submit your used batteries to the appropriate and designated facility. In this manner you make sure that the batteries are recycled in accordance with legislature and will not harm the environment.
All cities have established collection points, where electric and electronic equipment and batteries can either be submitted free of charge at recycling stations and other collection sites, or be collected from the households. Additional information is available at the technical department of your city.
DENVER A/S
Omega 5A, Soeften
DK-8382 Hinnerup
Denmark
www.facebook.com/denver.eu
Warning: lithium battery inside
Sicherheitshinweise
games: Square game, Push Box, Snake.
(Push "2" for support)
For technical questions, please write to:
support@denver.eu
For all other questions please write to:
denver@denver.eu
BeneLux/France
Denver Benelux BV
Barwoutswaarder 13C+D
3449 HE Woerden
The Netherlands
Phone: +31 348 420 029
E-Mail: support-nl@denver.eu
Spain/Portugal
Denver AS Spain S.A.
Denver Germany GmbH Service
Gutenbergstrasse 1
94036 Passau
Phone: +49 851 379 369 40
repair-germany@denver.eu
Fairfixx GmbH
Repair and service
(for TV, E-Mobility/Hoverboards/Balanceboards,
Smartphones & Tablets)
Tel: +49 851 379 369 69
If your country is not listed above,
please write an email to
support@denver.eu

denver
Denver A/S
Omega 5A, Soeften
DK-8382 Hinnerup
Denmark
denver.eu
facebook.com/denver.eu
Version 1.1