Achim - Toys Mr. Gardener - Free user manual and instructions
Find the device manual for free Achim Mr. Gardener in PDF.

| Product type | Children's wooden playhouse |
| Brand | Mr. Gardener |
| Model | Achim |
| Dimensions (L x D) | 180 x 190 cm |
| Wall thickness | 16 mm |
| Material | Nordic spruce wood |
| Recommended age | 3 to 14 years |
| Maximum weight per user | 50 kg |
| Maximum number of users | 6 |
| Usage | Outdoor only |
| Recommended play area | Minimum 2 m from any barrier or structure |
| Assembly | Delivered unassembled, adult assembly required |
| Safety | Adult supervision required; not suitable for children under 3 years; risk of crushing; do not climb on roof or barriers |
| Ground anchoring | Required, anchors not included |
| Roofing | Roof covering material not included (shingles or bitumen rolls) |
| Painting | Unpainted, requires wood protection treatment |
| Standards | Compliant with EN 71 and Directive 2009/48/EC |
| Warranty | Subject to control number and purchase invoice |
| Maintenance | Check fixings every 6 months; annual inspection; regular painting |
| Spare parts | Use only identical parts supplied by the manufacturer |
Frequently Asked Questions - Achim Mr. Gardener
User questions about Achim Mr. Gardener
0 question about this device. Answer the ones you know or ask your own.
Ask a new question about this device
Download the instructions for your Toys in PDF format for free! Find your manual Achim - Mr. Gardener and take your electronic device back in hand. On this page are published all the documents necessary for the use of your device. Achim by Mr. Gardener.
USER MANUAL Achim Mr. Gardener
Inspection Certificate
Controlecertificaat • Kontrollschein • Bulletin de contrôle • Certificato di controllo • Certificado de control • Kontrollskjema • Kontrol Certifikat • Tarkastustodistus • Besiktningsprotokoll • Kontrolní certifikát • Pârbaudes akts • Apžiūros pažyma • Certyfikat kontrolny • Certificado de Inspeção • Kontrollakt
Art. Nr. EL16-1819
Please keep safely!
Zorgvuldig te bewaren! • Bitte gut aufbewahren! • A bien conserver, s.v.p.! • Da conservare! • ¡A conservar! • Ta vare på denne! • Opbevares sikkert! • Ole hyvä ja säilytä huolella! • Vänligen förvara säkert! • Prosím, pečlivě uschovejte! • Lūdzu, glabājiet drošā vietā! • Laikykite saugiai! • Przechowywać w bezpiecznym miejscu! • Por favor, guarde em segurança! • Palun säilitada hoolsalt!
| English: The product you have purchased was manufactured in accordance with the high quality norms. The product unit has been carefully inspected and packed. In order to avoid possible problems during the assembly carried out by yourself or the building company of your choice, we recommend that you inspect the delivery for its completeness in accordance with the list of pieces before assembly. This inspection must be carried out within 14 days after delivery to your place. Warranty claims are limited to the exchange of defective materials. Defective product parts, which have already been used or painted, are excluded from being replaced. All further claims are excluded! In cases of complaints, please pay attention to the following procedures: Please present this inspection certificate along with the sales receipt to your place of purchase. Only in cases where these documents are presented will the complaint be dealt with quickly and without complications. |
| Dutch: Het door U gekochte product werd vervaardigd overeenkomstig hoge kwaliteitsnormen. Het product werd zorgvuldig gecontroleerd en verpakt. Om tijdens de montage, uitgevoerd door Uzelf of een door U gekozen aannemer, problemen te vermijden, raden we U aan, vóór de montage de levering te controleren op volledigheid in overeenstemming met de onderdelenlijst. Deze controle dient te gebeuren binnen 14 dagen na levering bij U thuis. Garantieclaims zijn beperkt tot het vervangen van defecte onderdelen. Defecte onderdelen die al gebruikt of geschilderd zijn, zijn uitgesloten van vervanging. Alle latere claims zijn uitgesloten! In geval van klachten dient u als volgt te handelen: Toon dit controlecertificaat, samen met Uw aankoopbewijs aan Uw verkoper. Alleen wanneer deze documenten getoond worden, zal de klacht snel en zonder complicaties in behandeling worden genomen. |
| Deutsch: Der von Ihnen gekaufte Artikel wurde nach der hohen Qualitätsnorm gefertigt. Der Bausatz wurde sorgfältig geprüft und verpackt. Um etwaige auftretende Probleme während des Aufbaus durch Sie oder Ihre Aufbaufirma zu vermeiden, kontrollieren Sie bitte die Lieferung auf Vollständigkeit laut Stückliste vor dem Aufbau. Diese Kontrolle muss innerhalb 14 Tagen nach Anlieferung bei Ihnen erfolgen. Ansprüche auf Gewährleistung beschränken sich auf den Austausch von fehlerhaftem Material. Fehlerhafte Bauteile, die bereits verbaut oder gestrichen wurden, sind vom Umtausch ausgeschlossen. Alle weiteren Ansprüche sind ausgeschlossen! Sollte es zu einer Beanstandung kommen, beachten Sie folgende Vorgehensweise: Legen Sie Ihrem Fachhändler diesen Kontrollschein zusammen mit dem Einkaufsbeleg vor. Nur bei Vorlage dieser Unterlagen ist eine schnelle und problemlose Bearbeitung Ihrer Beanstandung möglich. |
| Français: Le produit que vous venez d'acheter a été fabriqué en respectant de hautes normes de qualité. Ce produit a été testé et emballé avec soin. Afin d'éviter des problèmes éventuels pendant la construction par vous-même ou par la société de construction mandatée, nous vous prions de bien vouloir vérifier que toutes les pièces ont été fournies selon la liste des pièces avant que vous ne commenciez la construction. Il vous incombe de faire ce contrôle dans les 14 jours après la fourniture. Les revendications en dédommagement se limitent à l'échange de matériel défectueux. Les pièces défectueuses, déjà construites ou peintes, ne font pas l'objet de l'échange. Toutes les revendications ultérieures ne sont pas prises en compte ! En cas d'une réclamation, veuillez respecter le déroulement suivant : il vous faudra présenter à votre commerçant agréé ce bulletin de contrôle avec le récépissé de l'achat. Ce ne sera que moyennant présentation de ces documents qu'un traitement rapide et sans problème de votre réclamation sera possible! |
| Italiano: La casetta che avete acquistato è stata prodotta secondo la norma di alta qualità. Il kit è stato controllato ed imballato con cura. Per evitare eventuali inconvenienti durante il montaggio, si prega di verificare, prima del montaggio, la completezza della fornitura in base alla distinta dei pezzi. Tale verifica deve essere effettuata entro 14 giorni dalla consegna. Eventuali diritti di garanzia si limitano alla sostituzione di materiale difettoso. Gli elementi difettosi già montati o verniciati sono esclusi dal diritto alla sostituzione. Ogni altro diritto resta escluso! In caso di reclamazione, procedere nel modo seguente: presentare questo certificato di controllo unitamente alla prova d'acquisto al rivenditore. Solo in questo modo la Sua reclamazione potrà essere evasa rapidamente e senza problemi. |
| Español: El producto que ha adquirido ha sido fabricada de acuerdo con normas de alta calidad. Las piezas del producto han sido cuidadosamente inspeccionadas y embaladas. Con el fin de evitar posibles problemas durante el montaje, hecho por usted o por la empresa de construcción de su elección, le recomendamos revisar el paquete entregado, con la lista de piezas, antes de armar el producto. Haga la revisión dentro de 14 días después de recibir el paquete. La garantía se limita a reemplazar las piezas defectuosas. No se reemplazarán las partes defectuosas que ya hayan sido utilizadas o pintadas. ¡No se aceptan otras reclamaciones! En casos de queja, por favor, presente este certificado junto con la factura en el lugar donde hizo la compra. Sólo presentando estos documentos podremos resolver su problema rápidamente y sin complicaciones. |
| Norsk: Produktet du har kjøpt, ble produsert i henhold til høye kvalitetskrav. Produktet har blitt kontrollert nøye og deretter omhyggelig pakket. For å unngå mulige problemer under monteringen, uansett om du gjør det selv eller får en godkjent håndverker til å gjøre det, anbefaler vi at du kontrollerer leveransen mot delelisten for å se om alle delene er inkludert. Denne kontrollen må gjøres innen 14 dager etter at delene ble levert til din adresse. Garantikrav begrenser seg til bytte av defekte deler. Defekte elementer som allerede har blitt brukt eller malt/beiset/limt, vil ikke bli erstattet. Alle andre krav er utelukket! Dersom du har en reklamasjon, vennligst gjør som følger: Lever dette kontrollskjema med kvitteringen til salgsstedet. Bare når du har med disse dokumentene kan klagen behandles raskt og uten komplikasjoner. |
| Dansk: Det købte produkt fremstillet i overensstemmelse med de høje kvalitets krav. Produktet er blevet omhyggeligt inspiceret og pakket. For at undgå eventuelle problemer i løbet af monteringen udført af dig selv eller håndværker af dit eget valg, anbefaler vi, at du undersøger leverancen for fuldstændighed i overensstemmelse med listen over dele før samling. Denne inspektion skal foretages inden 14 dage efter levering til din plads. Garantikrav er begrænset til udveksling af defekte materialer. Defekte produkter, som allerede er brugt eller malet, er udelukket fra at blive erstattet. Alle yderligere krav er udelukket! I tilfælde af klager, skal du være opmærksom på følgende procedurer: Venligst præsentere denne kontrol certifikat sammen med kvitteringen til det sted hvor produktet er købt. Kun i de tilfælde, hvor disse dokumenter er forelagt kan klagen behandles hurtigt og uden komplikationer. |
| Suomi: Ostamasi tuote on valmistettu korkeita laatuvaatimuksia noudattaen, huolella tarkastettu ja pakattu. Jotta pystytys joko itsesi tai valitsemasi rakennuslikkeen toimesta sujuisi ongelmitta, suosittelemme, että tarkistat toimituksen sisällön osaluettelon avulla ennen kokoamisen aloittamista. Tämä tarkistus tulee tehdä 14 päivän kuluessa toimituksesta. Takuuvaaateet rajoittuvat viallisten materiaalien vaihtamiseen. Viallisia osia, joita on jo käytetty ja jotka on maalattu, ei vaihdeta uusiin. Lisävaatimuksia ei huomioida! Mahdollisissa valitustapauksissa toimi seuraavasti: Esitä oheinen tarkastustodistus ja kassakuitti ostopaikassa. Valituksen nopea ja mutkaton |
Assembly, installation and maintenance manual
Playhouse EL16-1819
Width 180 x Depth 190 cm Wall thickness 16 mm

natural_image
White wooden play structure with a black roof and ladder, no text or symbols visibleWARNINGS:
Not suitable for children under 3 years. Risk of crushing. To be used under the direct supervision of an adult. Risk of falling. Only for outdoor domestic use. Keep away from fire. The product is supplied disassembled. Adult assembly required. Intended for children from 3 to 14 years (max 50 kg/user).
Produced by: PALMAKO AS Näituse 25, Tartu 50409 Estonia
The product complies with standard EN 71 & Directive 2009/48/EC.
Attention!
It is not allowed to climb on the barriers and roof of the assembled house.
➢ Caution. Wooden details can contain slight torn grain or sharp ends and edges.
The product is designed for simultaneous use by up to 6 persons.
The house must be anchored to the base surface! It is not allowed to use a house that is not anchored! You must select the anchors (not included in the supplied kit) and the appropriate method of attachment depending on the base surface (see installation manual)!
The supplied kit does not include any roof cover material. Before you begin using the house, you must obtain a suitable roof cover material (bitumen shingles or rolls) and install it in accordance with the manufacturer's instructions! It is not recommended to leave the house without a roof cover in the rain or it will void the warranty!
The product is delivered unfinished.

1 Assembly manual

Dear client,
We are glad that you have decided in favour of our garden house!
Please read the assembly manual carefully before proceeding with the house installation! You will thus avoid problems and will not waste time.
Recommendations:
Keep the house package until its complete assembly in a dry place, but not in direct contact with the ground, protected from weather conditions (moisture, the sun, etc.). Do not keep the house package in a heated room!
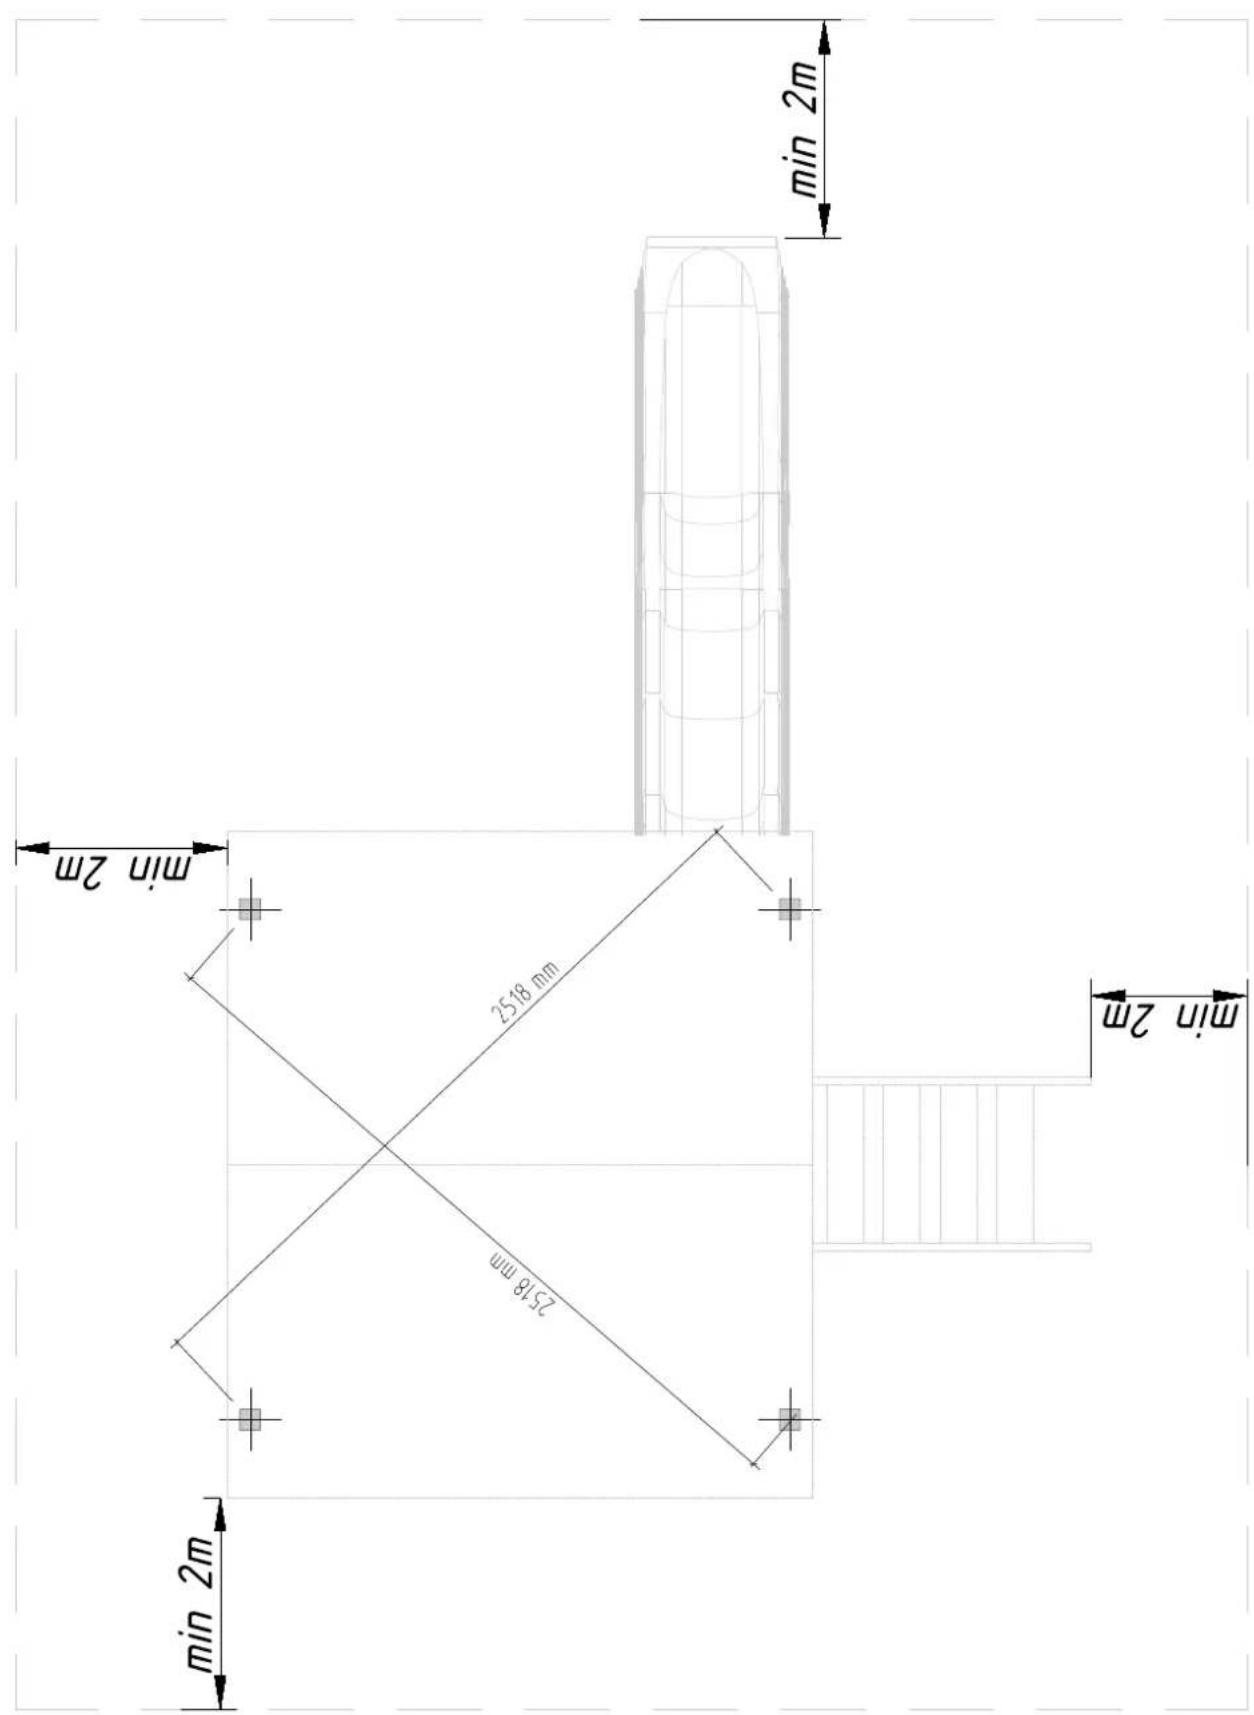
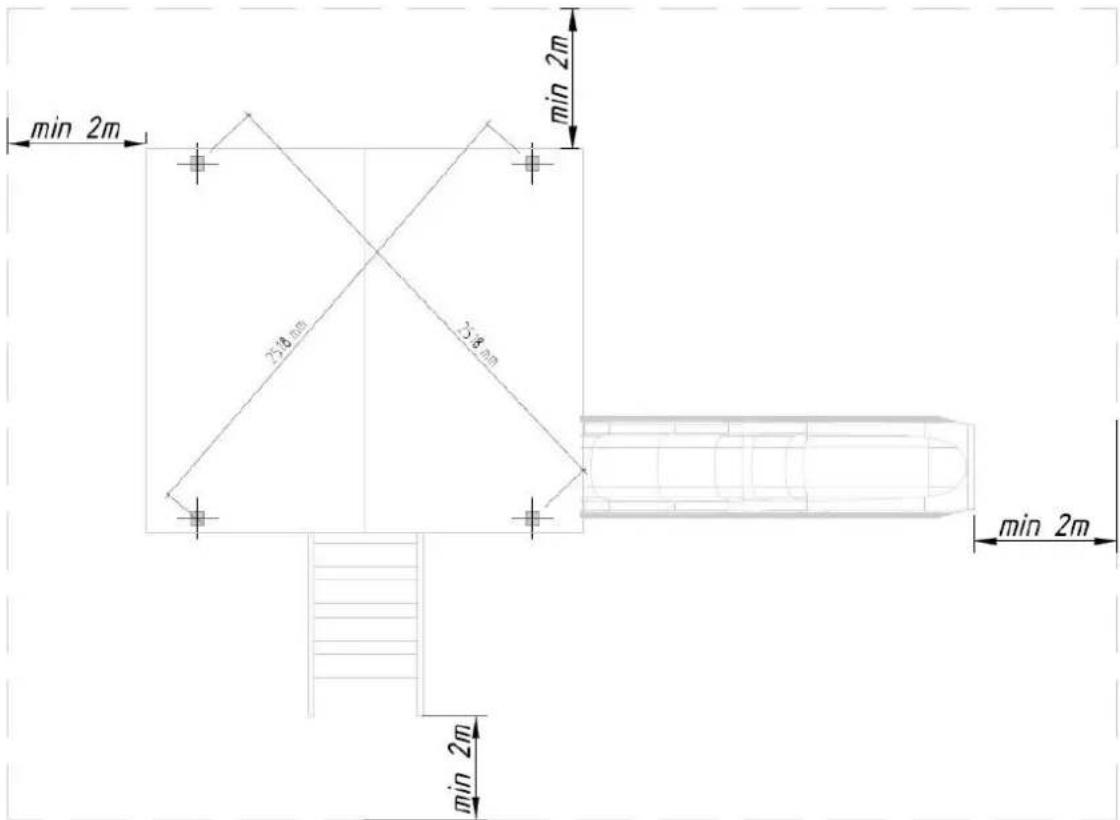
Assemble the product on the smooth surface at least 2m from any construction or barrier such as fence, garage, house, above situated tree branches, clotheslines and electric cables.
When selecting the garden house location, make sure that the house will not be subjected to extreme weather conditions (areas of strong snowfall or winds). The house must be anchored to the base surface!
Since the foundation joists are in constant contact with the ground they must be treated with a special wood preservative. Consult a specialist regarding paints suitable for unprocessed softwood and follow the paint manufacturer's instructions.

Warranty
Your house is made from high quality fir and delivered in the natural (unprocessed) form. If, despite our thorough inspection, you should have complaints, please submit the filled out control sheet and purchase invoice to the product seller.
ATTENTION: Please be sure to keep the documentation accompanying the house package! The control sheet includes the control number of the house. We can only review complaints if you submit the control number of the house to the seller!
The warranty does not cover:
➢ Peculiarities of wood as a natural material
➢ Wooden details already painted (processed with a wood preservative)
Wooden details containing whole branches that do not endanger the stability of the house
Colour tone variations caused by wood structure differences that do not influence wood lifetime
Wooden details containing (caused by drying) small cracks/gaps that do not pass through and do not influence the structure of the house
Twisted wooden details if they can nevertheless be installed
Roof and floor boards that may have on their concealed surfaces some non-planed areas, colour differences and waning
Complaints resulting from an incompetent manner of the installation of the house or the house subsiding due to an incompetently made foundation
Complaints caused by introducing self-initiative changes to the house, such as the deformation of wooden details and doors/windows due to an incompetent manner of wood processing; the attachment of storm braces too rigidly, doorframes being screwed onto wall logs, etc.
The complaints covered by the warranty are satisfied to the extent of replacing the deficient/faulty material. All other demands will be excluded!

Garden house painting and maintenance
Wood is a natural material, growing and adapting depending on weather conditions. Large and small cracks, colour tone differences and changes, as well as a changing structure of wood are not errors, but a result of wood growing and a peculiarity of wood as a natural material.
Unprocessed wood becomes greyish after having been left untouched for a while, and can be turn blue and become mouldy. To protect the wooden details of your garden house, you must immediately process them with a wood preservative.
Attention! The house is supplied without elaborative workmanship. To reduce fire hazard you should use paints or impregnation substances that prevent fire from spreading! Use water-based paints and impregnation substances and avoid solvent-based products!
Consult a specialist regarding paints suitable for unprocessed softwood and follow the paint manufacturer's instructions.
It is not allowed to cover the product with lacquer or paint on which surface the flame spread rate is higher than 20mm/s.
When painting, use high quality tools and paints, follow the paint application manual and manufacturer's safety and usage instructions. Never paint a surface in strong sunlight or rainy weather.
After the house assembly is completed, we recommend for the conclusive finishing a weather protection paint that will protect wood from moisture and UV radiation.
In lengthy periods of dry weather wood can shrink and the screw/bolt spots attachments can become weak. Conduct regular checks and tighten the screws/bolts as necessary (no less frequently than 6 month)! Otherwise the product may become dangerous.
The suitability of the base material, corrosion of accessories and rotting of wooden parts should be checked once a year. Moving parts must be oiled and worn and/or defective parts should be replaced with parts provided by the manufacturer.
➢ Be especially attentive when checking barrier and door attachments.
It is recommended to inspect the house thoroughly once in a year. Regular painting of the house will prolong its useful life substantially.
You should also check the condition of the roof to discover any leaks as early as possible. Eliminate leaks as you find them to prevent rainwater from damaging the roof and other wooden parts of the house.
Attention! For repairing the product use only identical details. The specification of the components can be found from the documentation accompanying the house package.

We wish you total success with the garden house installation and much joy with this house for many years to come!
2 Installation manual
Tools and preparation of components
To assemble the garden house, you will need the following tools:
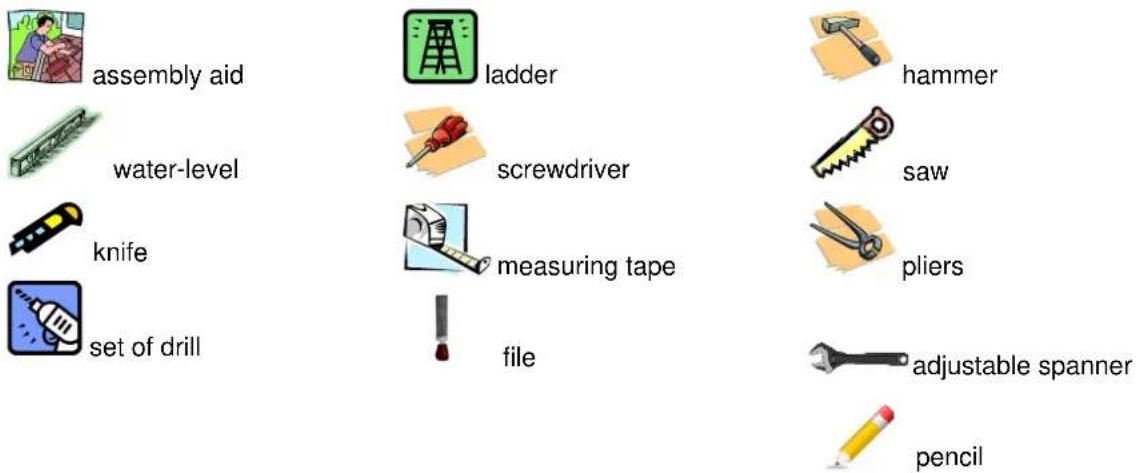
ADVICE: To avoid possible injuries from splinters, we recommend to wear the corresponding protective gloves during the assembly process. To protect your eyes from sawdust, we recommend to wear protective glasses during the assembly process.
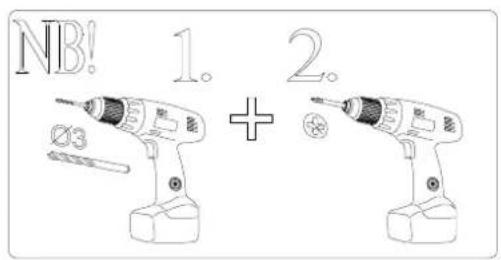
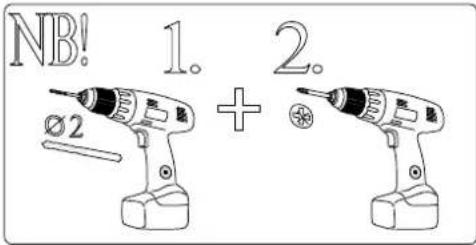
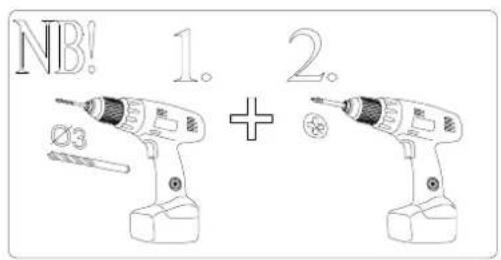
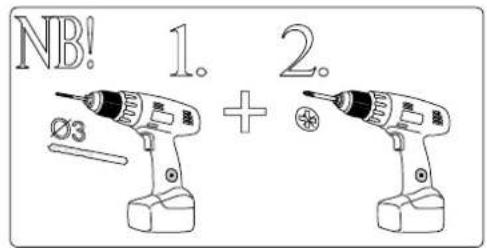
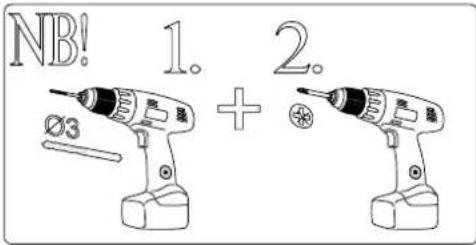
Before screwing, please drill hole in order to avoid cracks in the wood.
All projecting screws and sharp edges must be paned smooth immediately after installation to avoid potential injuries.
Mark on the base surface the spots for the house pillars as indicated in this drawing:
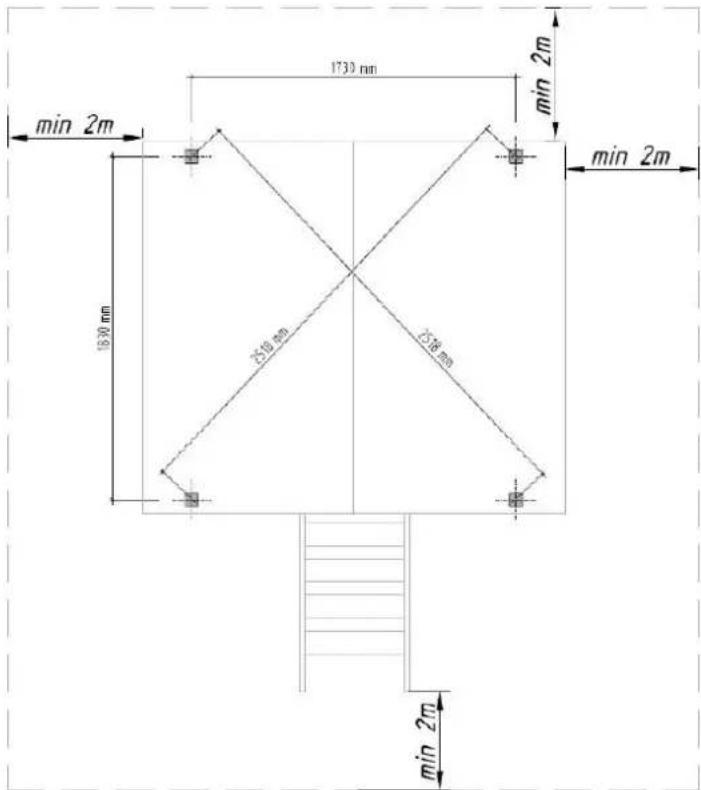
The house must be anchored to the base surface! It is not allowed to use a house that is not anchored! You must select the anchors (not included in the supplied kit) and the appropriate method of attachment depending on the base surface (see installation manual)!
It is not allowed to use ground anchors (no concrete poured) with anchor bolts by attachment to pavement slabs!
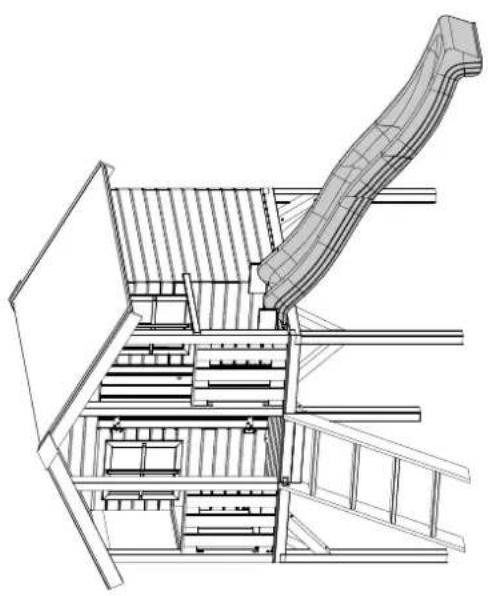
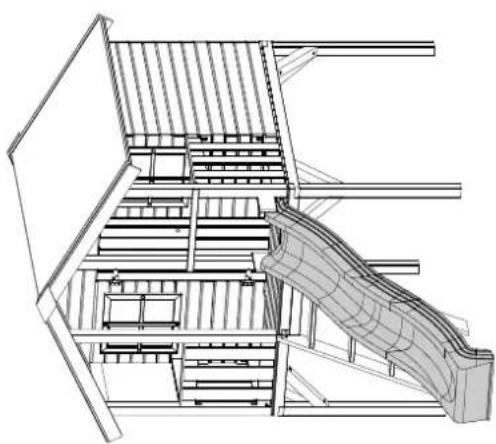
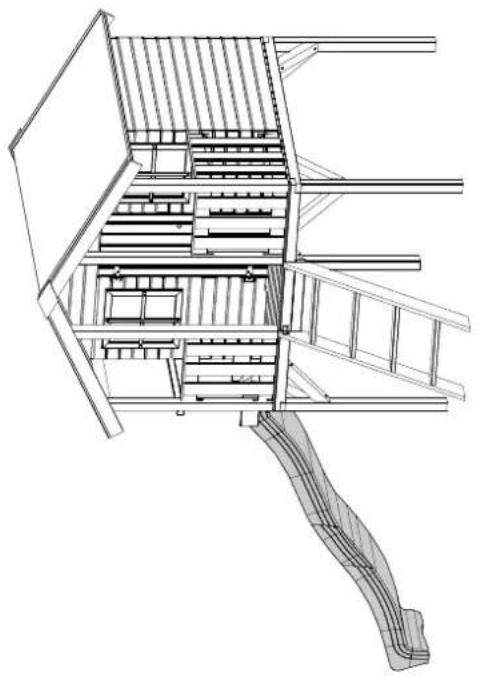
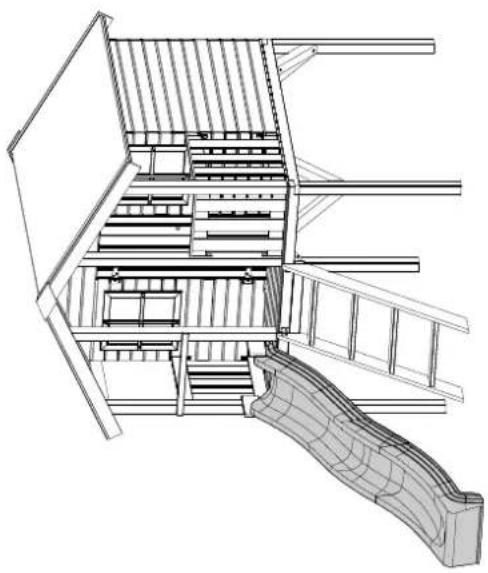
NB! The product with slide can only be considered safe when it is used with the appropriate slide (height from ground surface 1200±50 mm, maximum width 500 mm). When installing the slide leave at least 25 mm (30 mm recommended) clearances on both sides, in order to prevent clothing entrapments during gliding. Providing the product with a suitable slide is the responsibility of the end-seller of the product. The slide that is used must meet the criteria of the EN 71 of the European Safety Standard and go with the given swing set.
We advise the removal and storage of all accessories during the winter because the characteristics of the soil (when frozen) are not suitable for safe play. To avoid heating up of accessories, do not place them facing the sun. In warm weather, check that the seating surface is not too hot.
The house can be installed on either a soft (for instance: lawn) or hard (for instance: pavement slabs) surface.
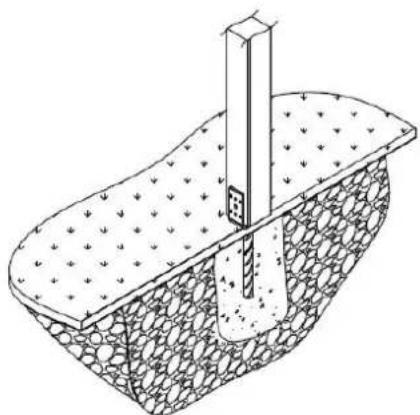
A. Soft surface installation
When installing the house on a soft surface, use concrete forks (4 pcs), manufactured from structural steel S235 and reinforced steel DIN488,BST500.
NB! The concrete forks are not included in the supplied kit!
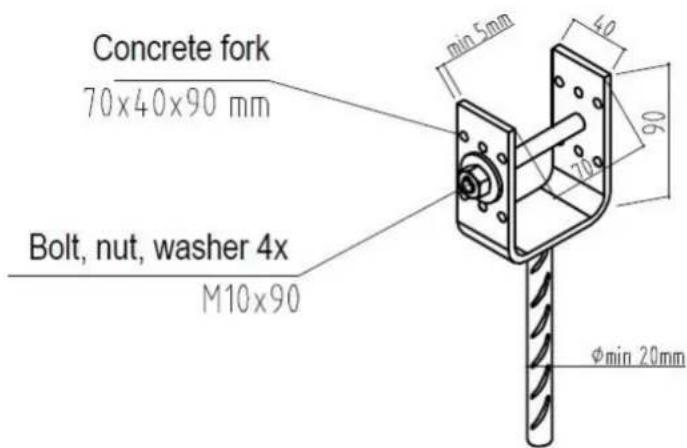
Dig a hole for each support (consult with a local construction company), fill it with concrete and place the concrete forks in the precisely measured spots. Make sure that all the concrete forks are situated at the same height! Allow sufficient time for the concrete to harden. After that put the house on the forks and attach with bolts.
natural_image
Technical line drawing of a cross-section of a layered geological or construction structure with embedded materials (no text or symbols)B. Hard surface installation
When installing the house on a hard surface, use pillar legs (4 pcs), manufactured from structural steel S235, material thickness at least 2 mm.
NB! The pillar legs are not included in the supplied kit!
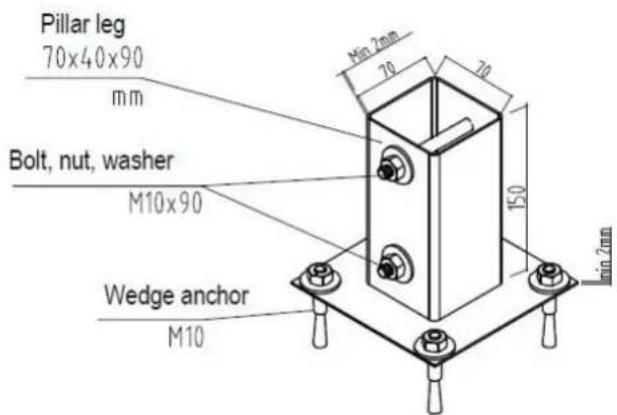
Put the pillar legs on the pillar ends and shift the house to the desired place. Drill holes in the base surface and attach the pillar shoes with wedge anchors. Drill holes in the wooden pillars and attach with bolts.
NB! When installing the house on a hard surface, to reduce fall hazard you should fill the surface under and around the house with mulch or another soft material. You can also use special anti-impact mats designed for playgrounds.

natural_image
Technical line drawing of a structural joint or foundation with embedded components (no text or symbols)
We wish you total success with the garden house installation and much joy with this house for many years to come!
natural_image
White wooden play structure with a black roof and ladder, no text or symbols visibleWARNUNG:
natural_image
Technical line drawing of a foundation or retaining wall with a vertical post and embedded column (no text or symbols)natural_image
Technical line drawing of a structural support structure with embedded columns and a vertical column (no text or symbols)
natural_image
White wooden play structure with black roof and ladder, no text or symbols visibleAVERTISSEMENT :
natural_image
Technical line drawing of a mechanical assembly with a central rod and textured base (no text or symbols)natural_image
Technical line drawing of a structural joint or foundation with embedded components (no text or symbols)
natural_image
White wooden play structure with black roof and ladder, no text or symbols visibleADVERTENCIAS:
natural_image
Technical line drawing of a mechanical assembly with a central rod and textured base (no text or symbols)natural_image
Technical line drawing of a structural joint or foundation with embedded components (no text or symbols)
natural_image
White wooden play structure with black roof, wooden steps, and ladder (no text or symbols)AVVERTENZE:
natural_image
Technical line drawing of a mechanical assembly with a central rod and textured base (no text or symbols)natural_image
Technical line drawing of a structural joint or foundation with embedded components (no text or symbols)
natural_image
White wooden play structure with a black roof and ladder, no text or symbols visibleWAARSCHUWINGEN:
natural_image
Technical line drawing of a foundation or retaining wall with a vertical post and textured base (no text or symbols)natural_image
Technical line drawing of a structural support structure with a vertical column and embedded circular base (no text or symbols)
natural_image
White wooden play structure with black roof and ladder, no text or symbols visibleADVARSLER:
natural_image
Technical line drawing of a mechanical component with a central rod and textured base (no text or symbols)natural_image
Technical line drawing of a structural joint or foundation with embedded components (no text or symbols)
Vi ønsker deg lykke til med det nye hagehuset og håper du får glede av det i mange år!
natural_image
White wooden play structure with a black roof and ladder, no text or symbols visibleADVARSLER:
natural_image
Technical line drawing of a cross-section of a layered geological or construction structure with embedded materials (no text or symbols)natural_image
Technical line drawing of a structural joint or foundation with embedded components (no text or symbols)
natural_image
White wooden play structure with black roof and ladder, no text or symbols visibleVAROITUKSET:
natural_image
Technical line drawing of a cross-section of a geological or construction structure with embedded materials and a central column (no text or symbols)natural_image
Technical line drawing of a structural support structure with embedded columns and a vertical column (no text or symbols)
natural_image
White wooden play structure with black roof and ladder, no text or symbols visibleWARNINGAR:
natural_image
Technical line drawing of a mechanical assembly with a central rod and textured base (no text or symbols)B. Montering på hårt underlag
natural_image
Technical line drawing of a structural support structure with a column and embedded foundation (no text or symbols)
natural_image
White wooden play structure with black roof, wooden steps, and ladder (no text or symbols)VAROVÁNÍ:
natural_image
Technical line drawing of a foundation or retaining wall with a vertical post and textured base (no text or symbols)natural_image
Technical line drawing of a structural joint or foundation with embedded components (no text or symbols)
natural_image
White wooden play structure with a black roof and ladder, no text or symbols visibleBRĪDINĀJUMI:
natural_image
Technical line drawing of a mechanical assembly with a central rod and textured base (no text or symbols)natural_image
Technical line drawing of a structural joint or foundation with embedded column and textured base (no text or symbols)
natural_image
White wooden play structure with a black roof and ladder, no text or symbols visibleISPÉJIMAI:
natural_image
Technical line drawing of a foundation or retaining wall with a vertical post and embedded soil layer (no text or symbols)natural_image
Technical line drawing of a structural support structure with embedded column and textured base (no text or symbols)
Linkime visokeriopos sèkmès jrengiant sodo namelj bei smagiai juo naudotis ilgą laiką!
natural_image
White wooden play structure with a black roof and ladder, no text or symbols visibleOSTRZEŻENIE:
natural_image
Technical line drawing of a cross-section of a layered geological or construction structure with embedded posts and soil layers (no text or symbols)natural_image
Technical line drawing of a structural support structure with a vertical column and embedded foundation (no text or symbols)
natural_image
White wooden play structure with a black roof, wooden steps, and ladder (no text or symbols)AVISOS:
natural_image
Technical line drawing of a mechanical assembly with a central rod and textured base (no text or symbols)natural_image
Technical line drawing of a structural joint or foundation with embedded components (no text or symbols)
natural_image
White wooden play structure with black roof and ladder, no text or symbols visibleHOIATUSED:
natural_image
Technical line drawing of a cross-section of a layered geological or construction structure with embedded columns and a central column (no text or symbols)B. Paigaldamine kövale pinnasele
natural_image
Technical line drawing of a structural support structure with a vertical column and embedded foundation (no text or symbols)
natural_image
Line drawing of a wooden house with stairs and ladder, no text or symbols presentELD16-1819

natural_image
Collection of various hand tools including hammer, screwdriver, power tool, and ladder (no text or symbols visible)| 001. |  | 1167×645×44 | 1 |
| 002. |  | 1167×645×44 | 1 |
| 003. |  | 1800×1167×44 | 1 |
| 004. | 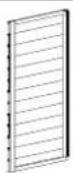 | 1190×1170×44 | 2 |
| 005. | 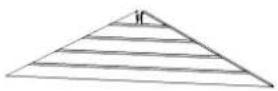 | 1800×448×44 | 2 |
| 006. | 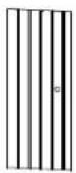 | 1150×482×41 | 1 |
| 007. | [S4X2] | 610×610×32 | 2 |
| 008. | [7742] | 500×610×32 | 2 |
| 009. |  | 70×70×1100 | 4 |
| 010. |  | 70×70×1900 | 2 |
| 011. | 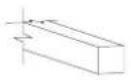 | 70×70×1800 | 2 |
| 012. | 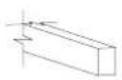 | 70×45×1760 | 1 |
| 013. | 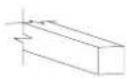 | 70×70×430 | 8 |
| 014. | 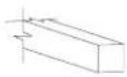 | 70×70×1480 | 2 |
| 015. | 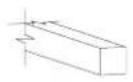 | 70×70×1200 | 2 |
| 016. | 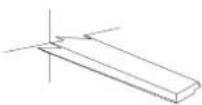 | 16×89×1800 | 22 |
| 017. | 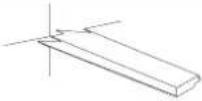 | 16×89×1190 | 44 |
| 018. | 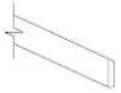 | 19×80×1900 | 4 |
| 019. | 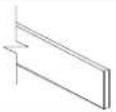 | 16×95×1220 | 4 |
| 020. | 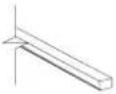 | 16×45×1220 | 4 |
| 021. | 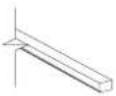 | 16×45×1900 | 2 |
| 022. | 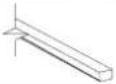 | 16×45×610 | 2 |
| 023. | 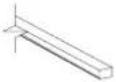 | 16×45×500 | 2 |
| 024. |  | 28×120×1467 | 1 |
| 025. |  | 28×120×1467 | 1 |
| 026. | 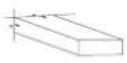 | 28×120×530 | 4 |
| 027. |  | 19×120×266 | 2 |
| 028. | 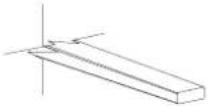 | 12×24×500 | 2 |
| 029. | 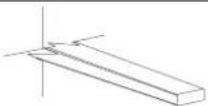 | 12×24×440 | 2 |
| 030. |  | 19×70×576 | 1 |
| 031. | 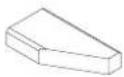 | 16×45×90 | 1 |
| 032. | 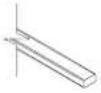 | 25×45×760 | 1 |
| 033. |  | 19×120×230 | 2 |
| 034. |  | 29×45×525 | 4 | |
| 035. |  | 29×45×465 | 4 | |
| F1 | 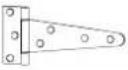 | 80×150 | 2 | |
| F2 |  | 3×16 | 70 | |
| F3 | 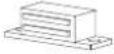 | 46×15×13 | 1 | |
| F4 |  | 40×40×40 | 6 | |
| F5 |  | 40×40×20 | 20 | |
| F6 |  | 6×90 | 40 | |
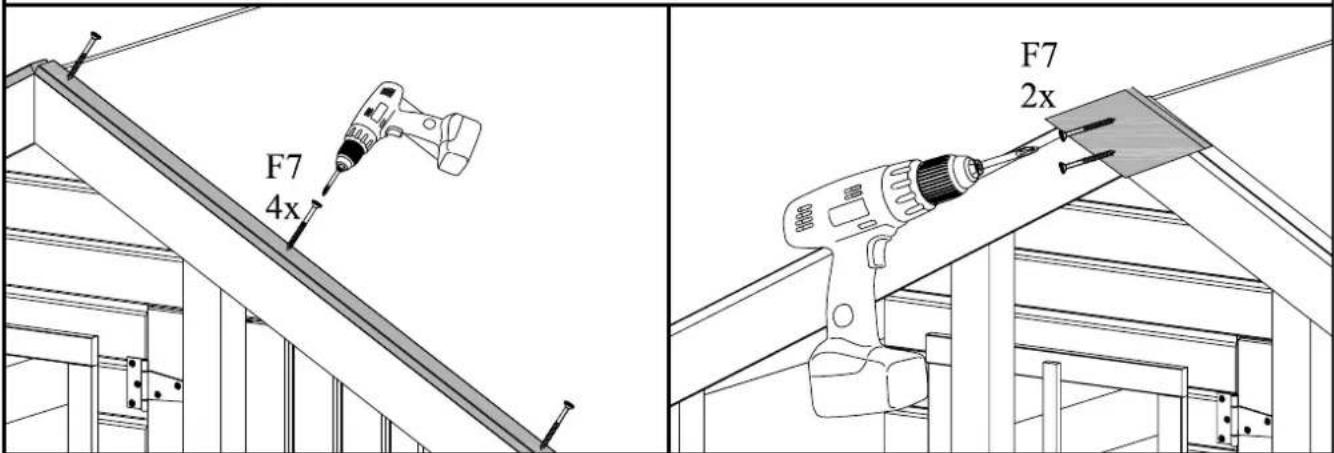
| F7 |  | 3.5×40 | 120 | |
| F8 |  | 4.5×50 | 38 | |
| F9 |  | 3.5×30 | 46 | |
| F10 |  | 5×60 | 6 | |
| F11 |  | 5×40 | 2 | |
| F12 |  | 2.5×50 | 160 | |
| F13 |  | 400×460 | 2 | |
| F14 |  | 1.4×40 | 24 | |
| DE Nicht im Lieferumfang!EN Not included!ES No incluido!FR Non inclus!IT Non incluso! | NO Ikke inkludert!SW Ingår ej!FI Ei sisälly pakettiin!ET Ei sisaldu komplektis! |  | 4 | |
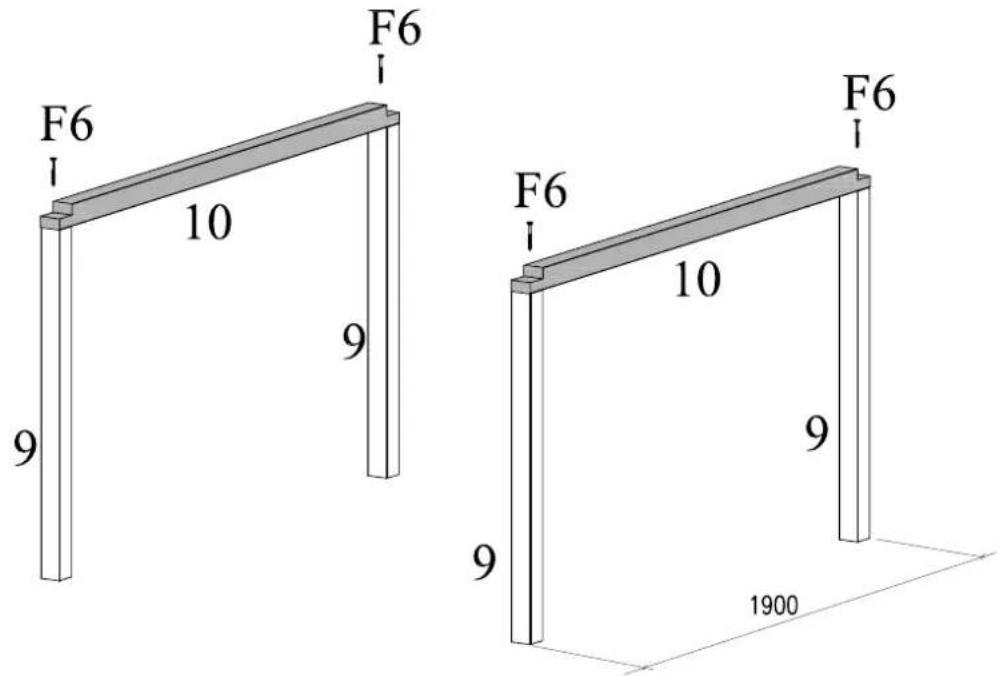
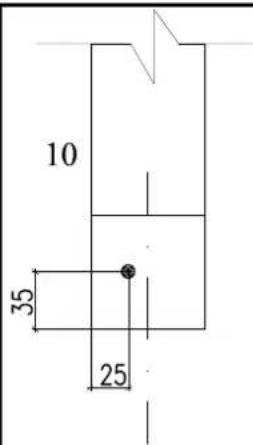
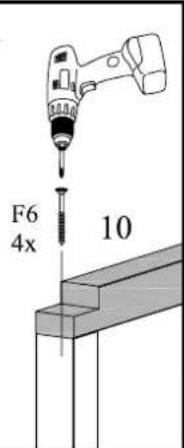
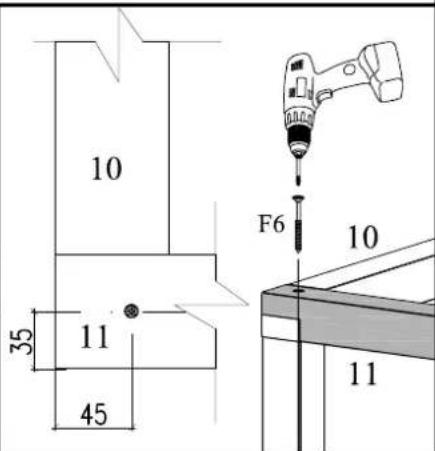
det 9 - 4 pcs
det 10 - 2 pcs
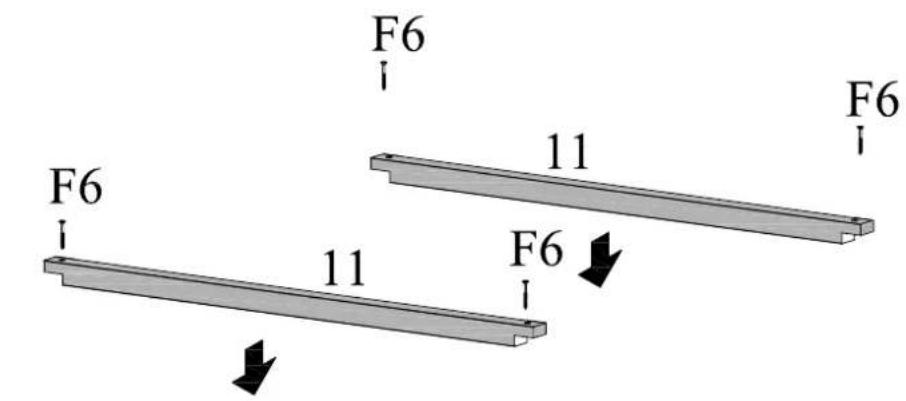
det 11 - 2 pcs
F6 -8 pcs

1

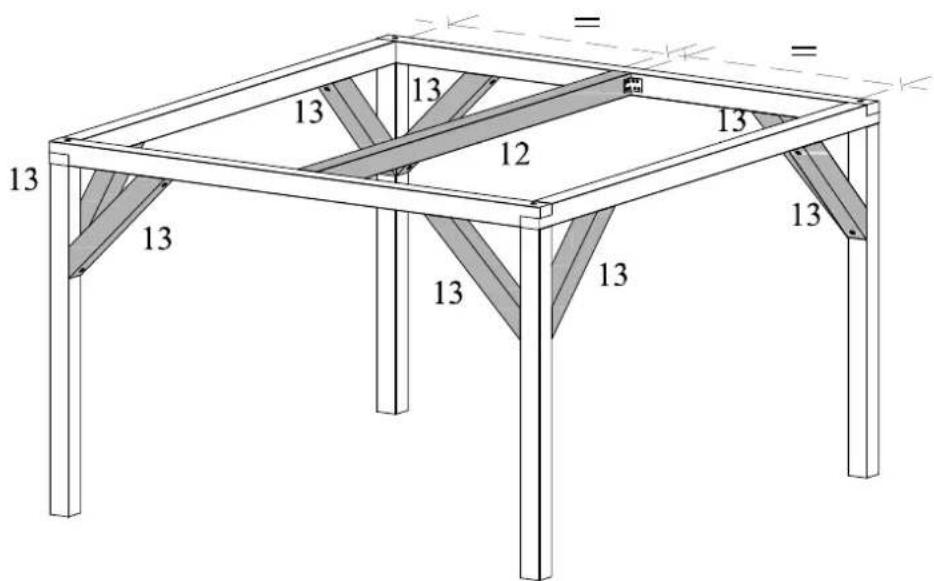
det 12 - 1pcs
det 13 - 8 pcs
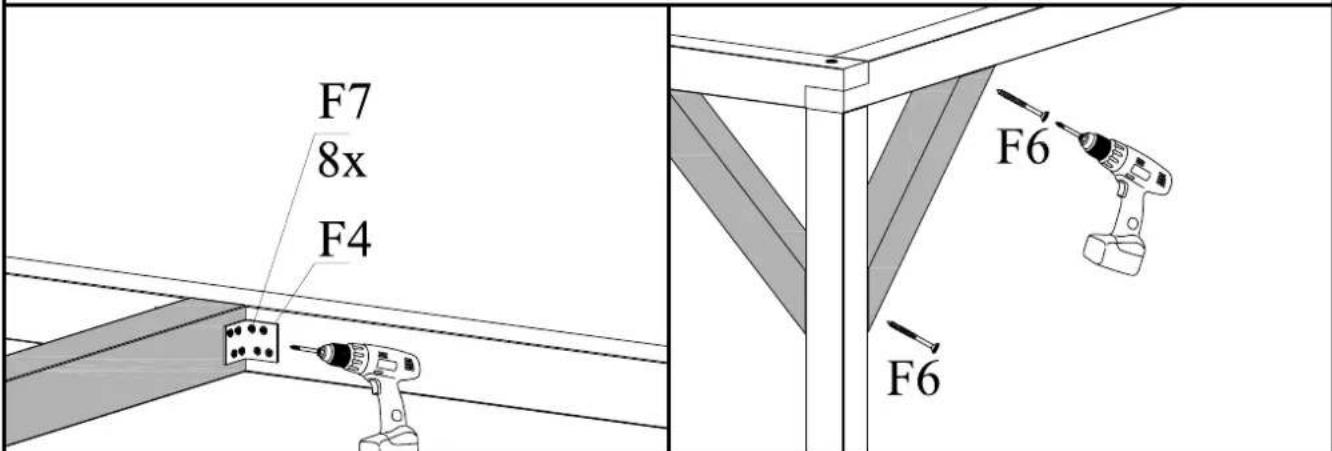
F4 - 4 pcs
F6 - 16 pcs
F7 - 32 pcs
2
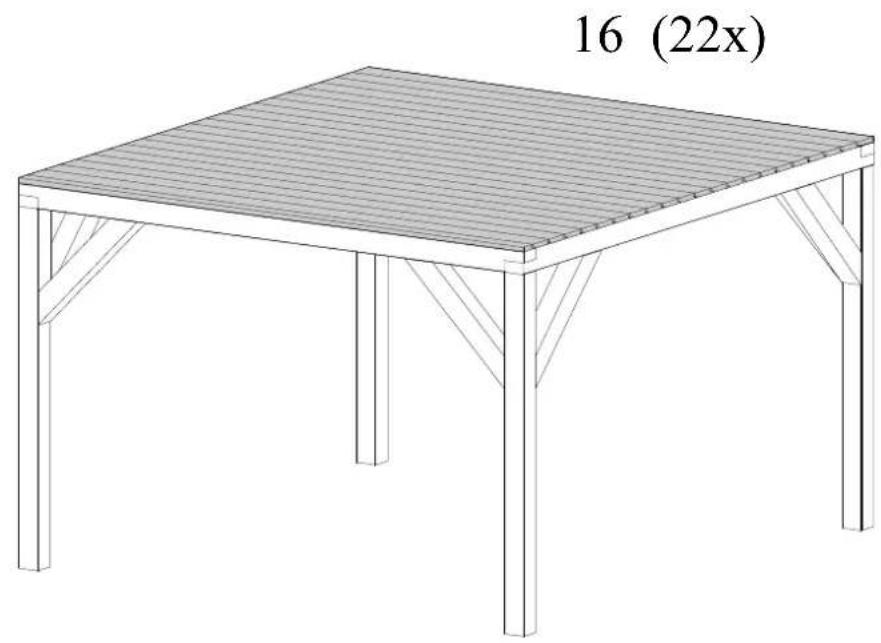
det 16 - 22 pcs
F12 - 66 pcs
3

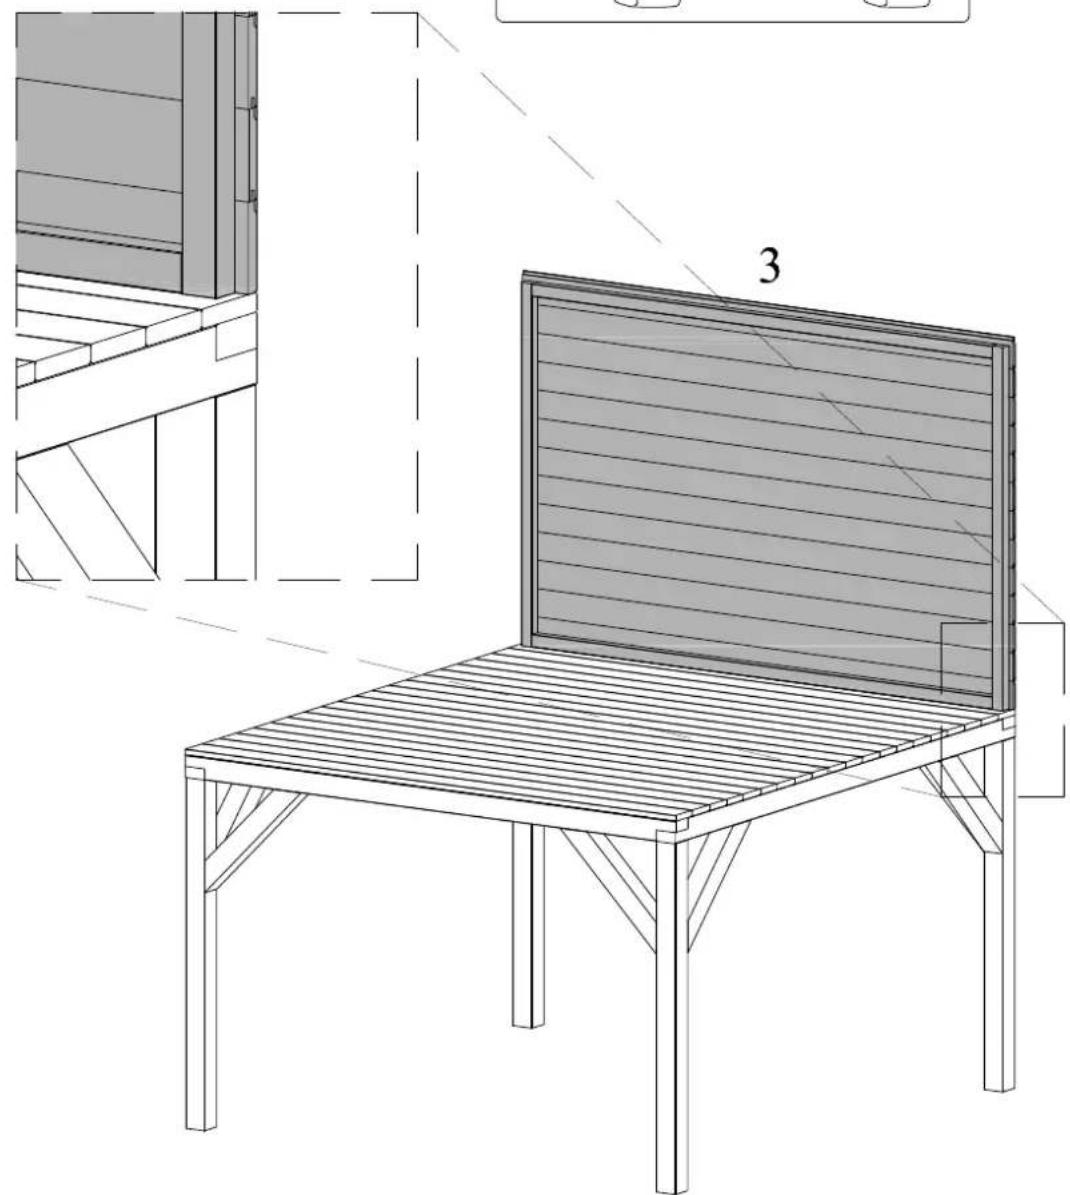
det 3 - 1 pcs F8 - 4 pcs

4
natural_image
Architectural line drawing of a wooden deck table with slatted base and panel, showing structural details (no text or symbols)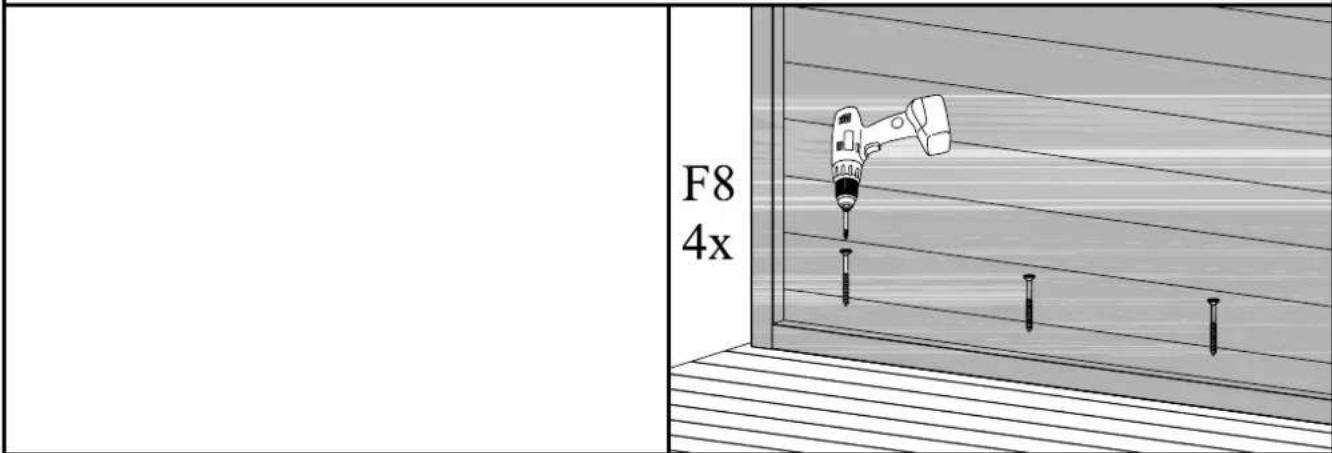
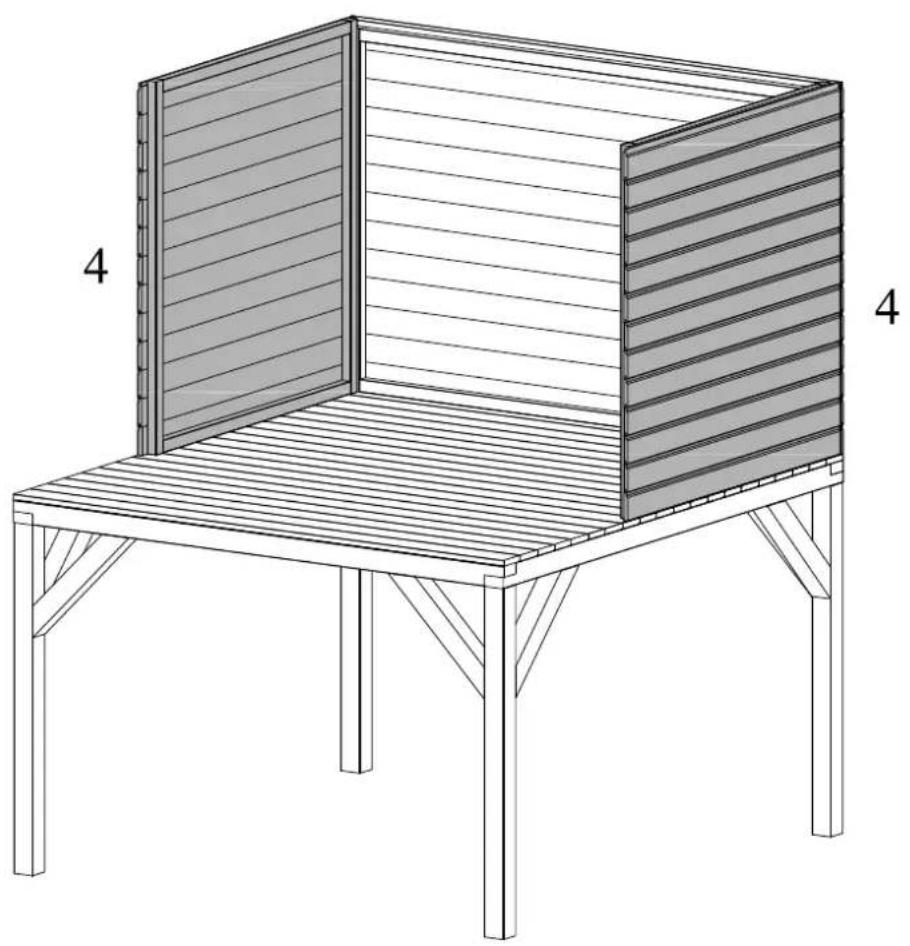
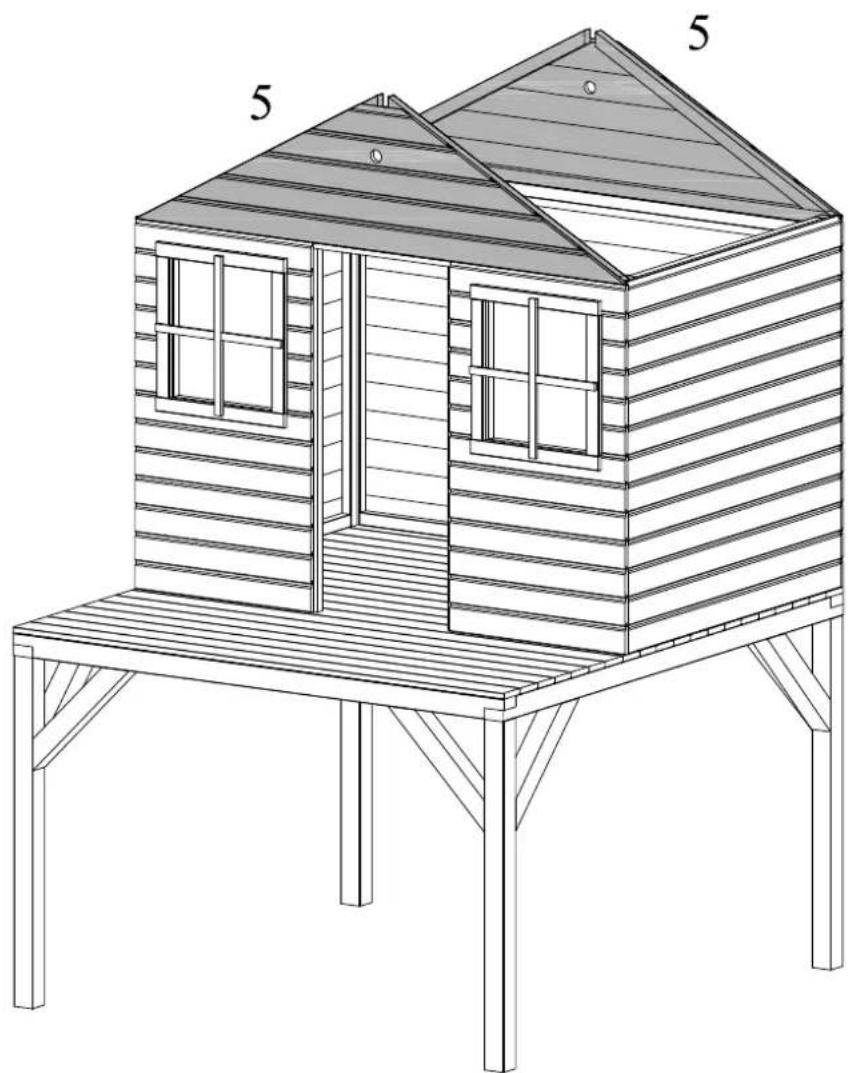
det 4 - 2 pcs F8 - 12 pcs

5
natural_image
Line drawing of a wooden bench with slatted panel and support legs, labeled '4' on both sides (no text or symbols on the structure itself)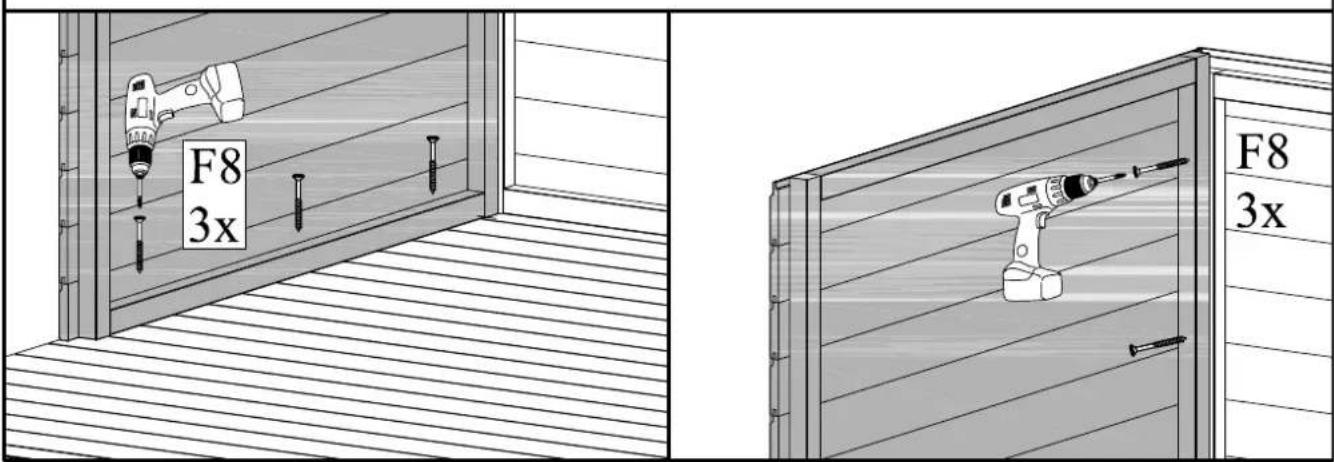
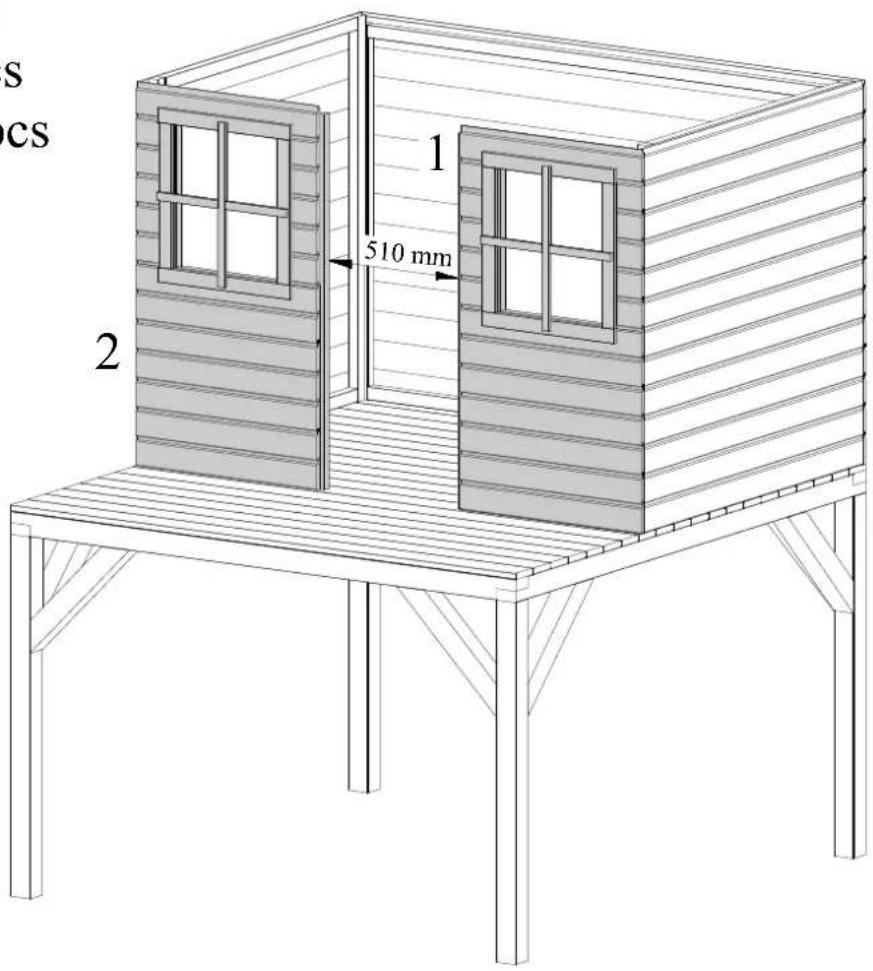
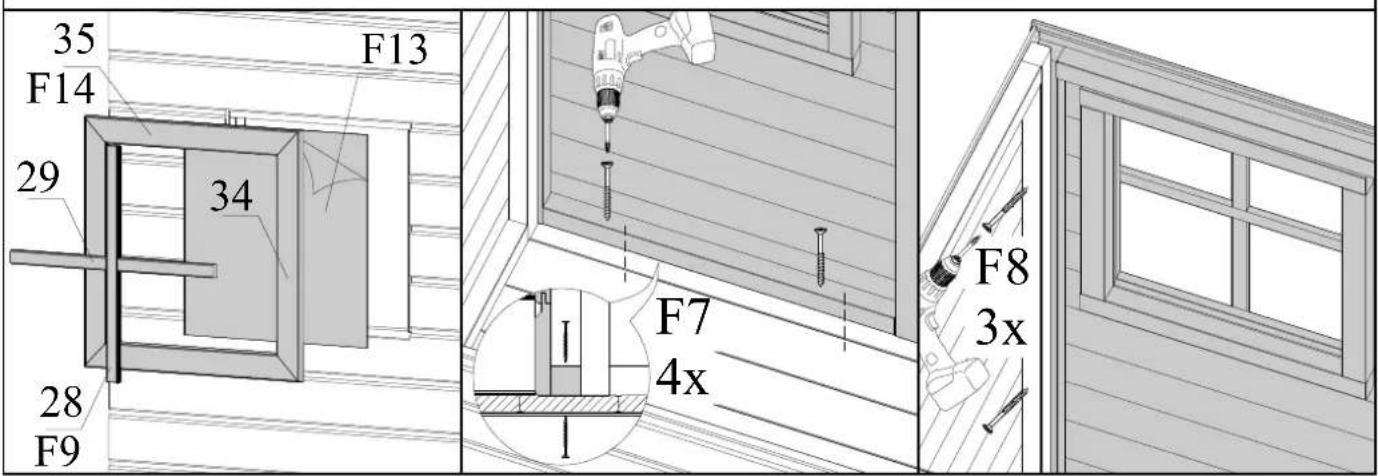
det 1 - 1 pcs
det 2 - 1 pcs
det 28 - 4 pcs
det 29 - 4 pcs
det 34 - 4 pcs
det 35 - 4 pcs
F8 - 6 pcs
F7 - 8 pcs
F9 - 4 pcs
F13 - 2 pcs
F14 - 24 pcs
6
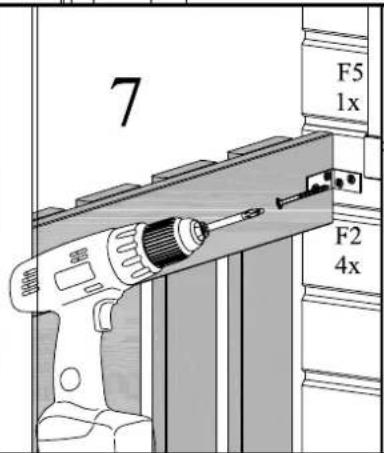
det 5 - 2 pcs
F8 - 8 pcs
F3 - 1 pcs
7
natural_image
Line drawing of a wooden cabin with a gabled roof and two windows, mounted on a deck (no text or symbols)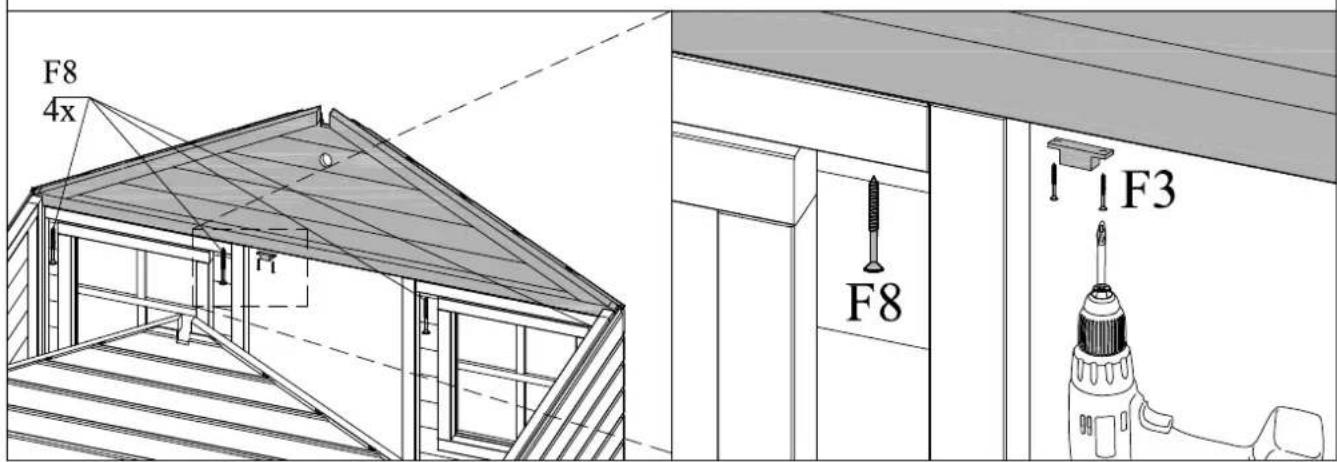
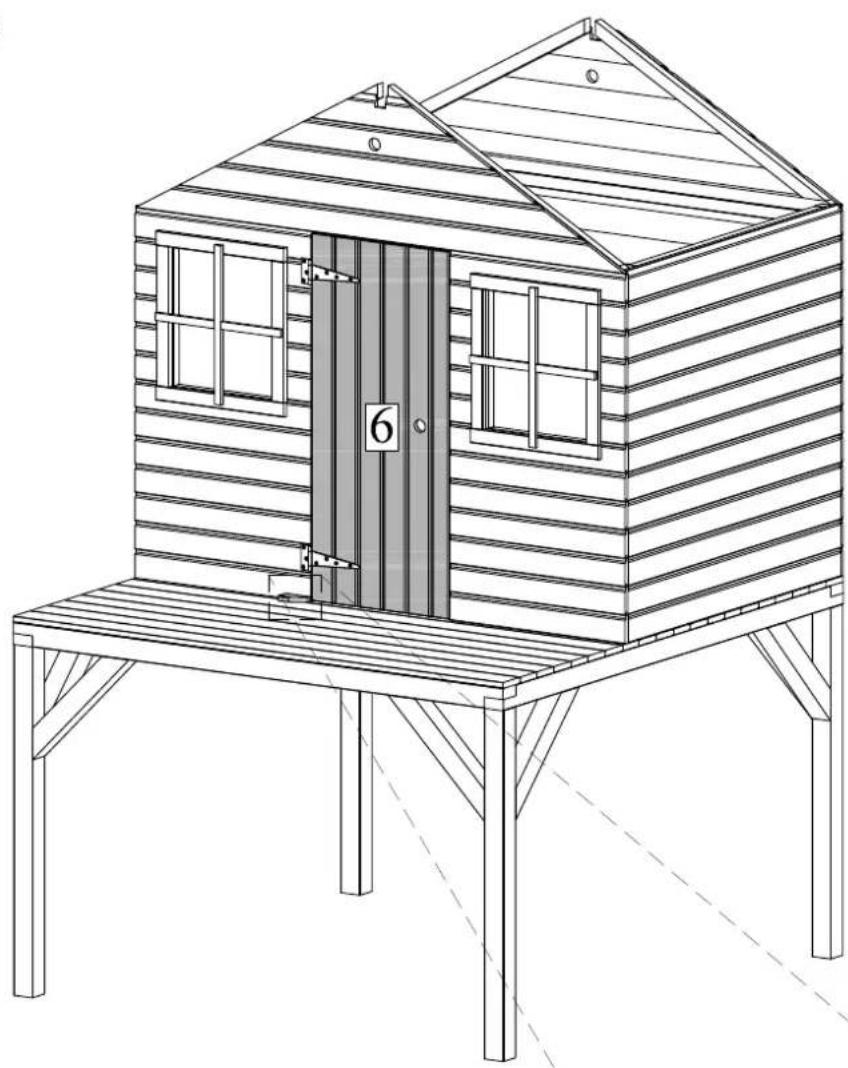
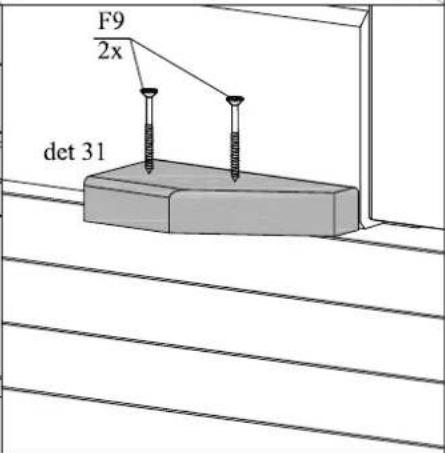
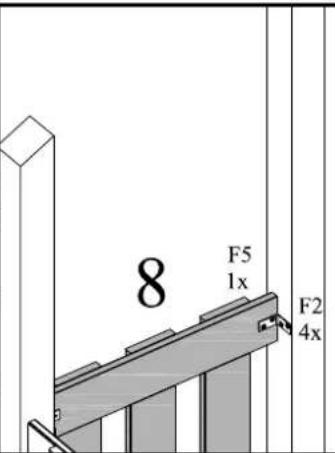
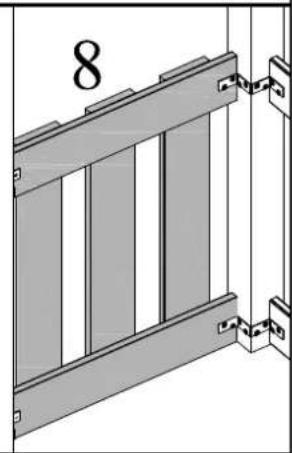
det 6 - 1 pcs det 31 - 1 pcs
F1 - 2 pcs
F2 - 2 pcs
F3 - 1 pcs
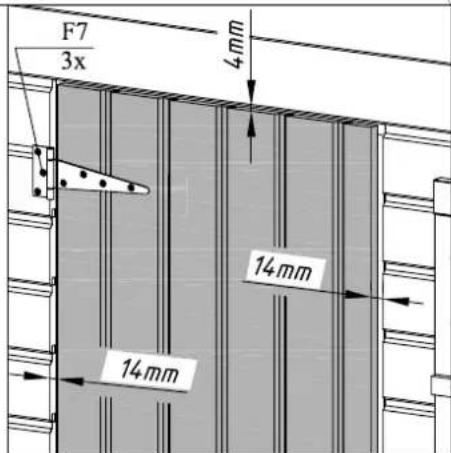
F7 - 12 pcs
F9 - 2 pcs

8
natural_image
Line drawing of a wooden cabin with a door and window, no text or symbols present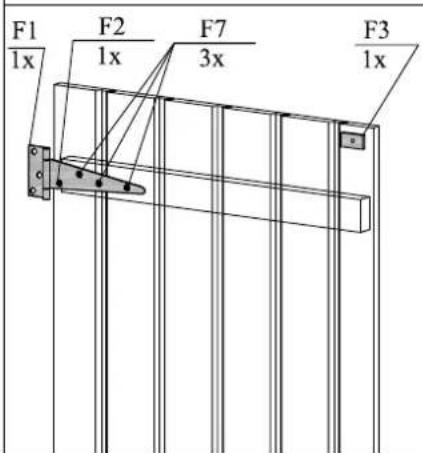
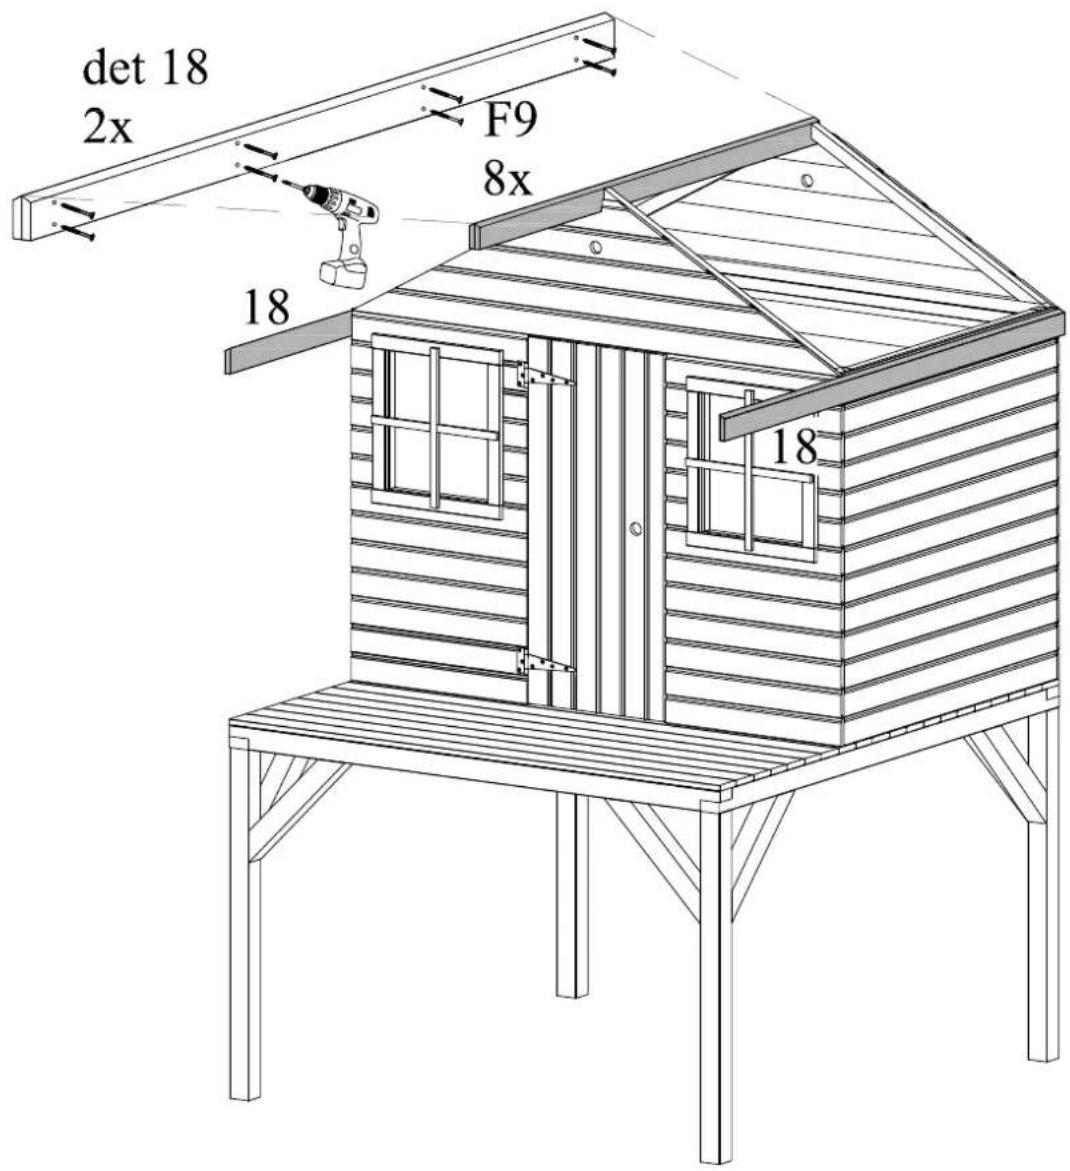
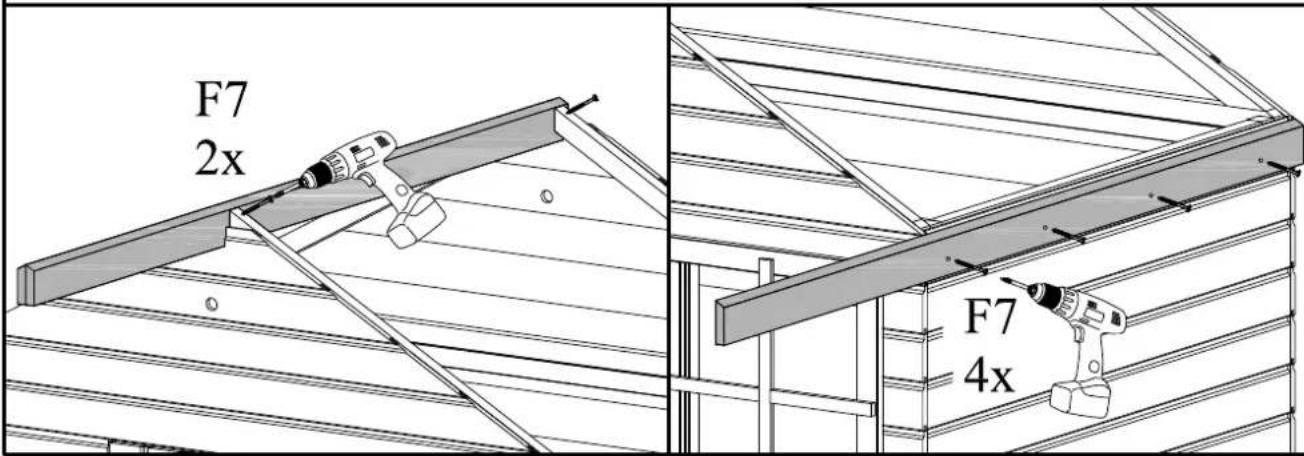
det 18 - 4 pcs
F7 - 10 pcs
F9 - 8 pcs

9
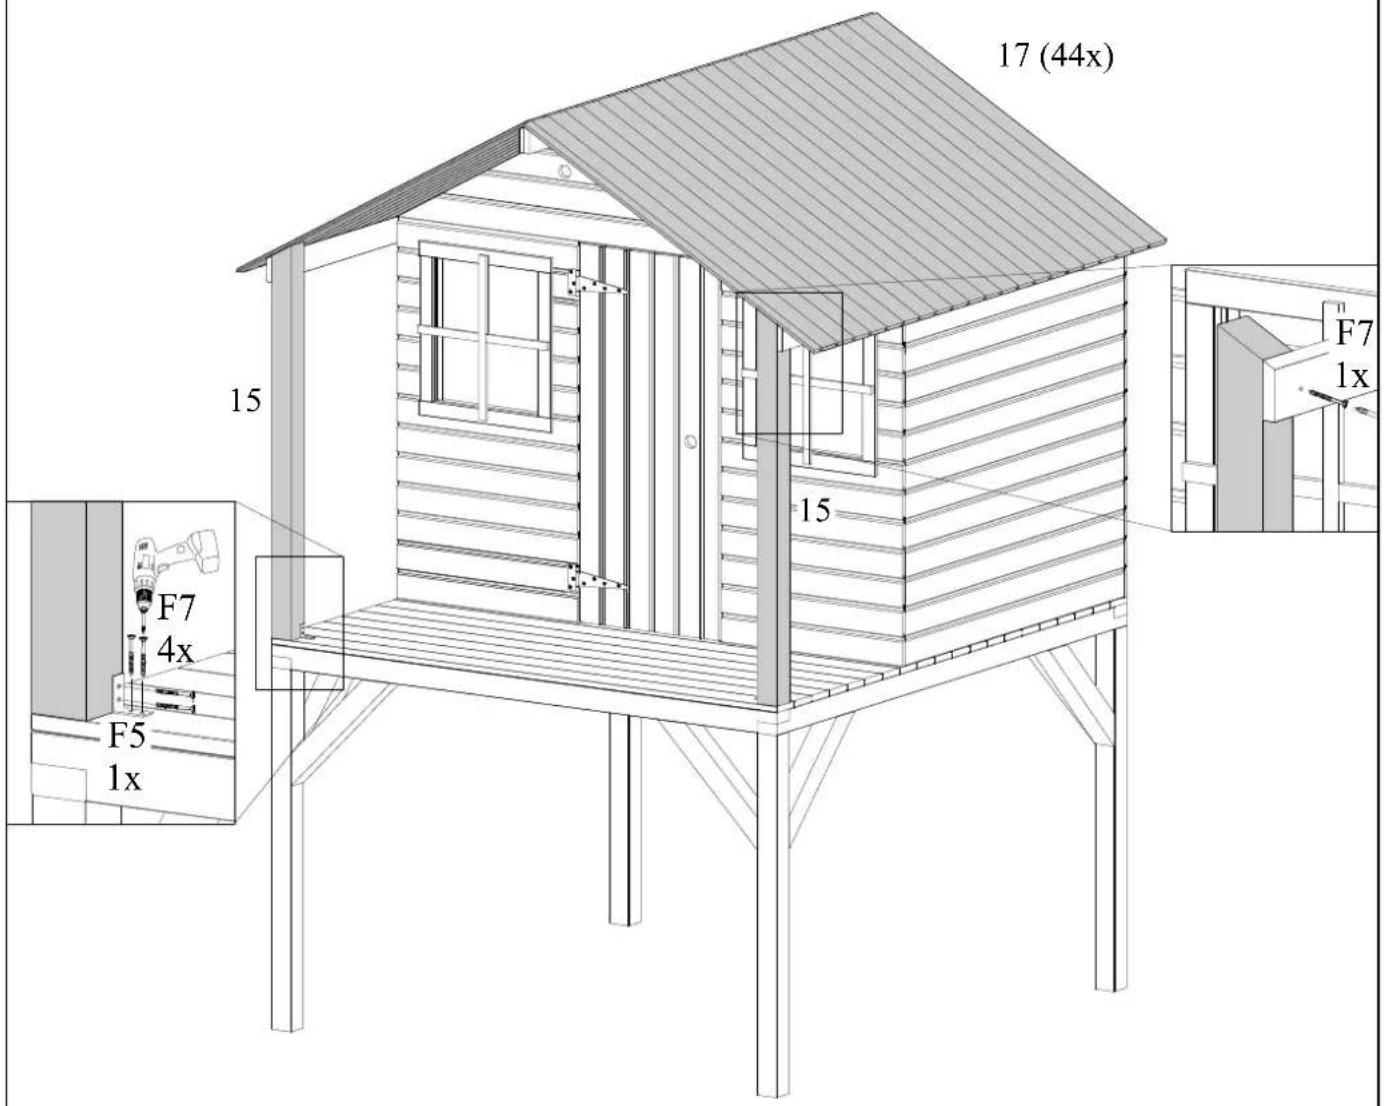
det 15 - 2 pcs
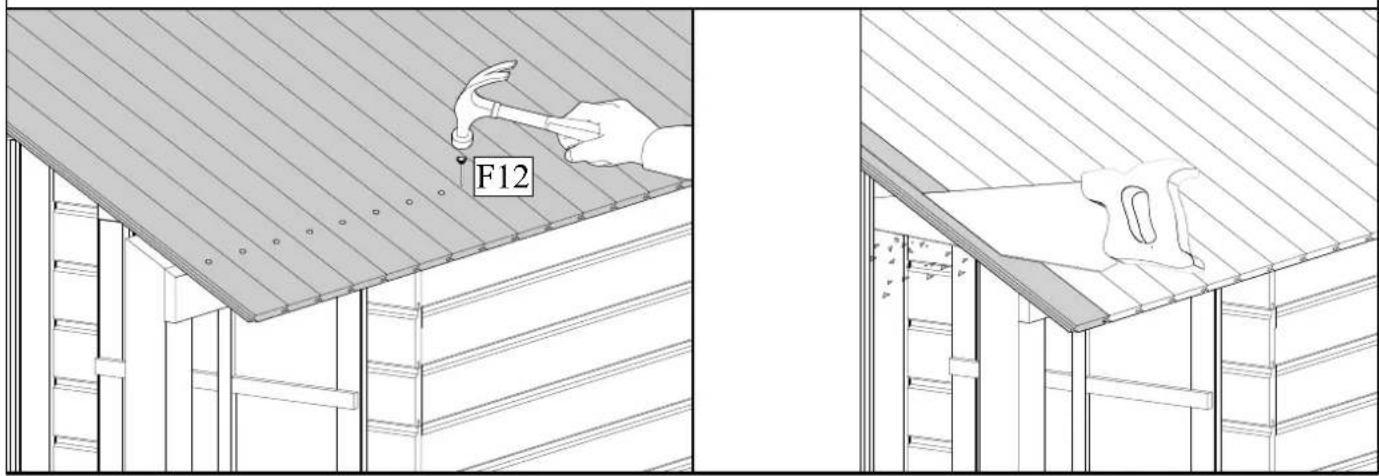
det 17 - 44 pcs
F5 - 2 pcs
F7 - 10 pcs
F12 - 88 pcs
10
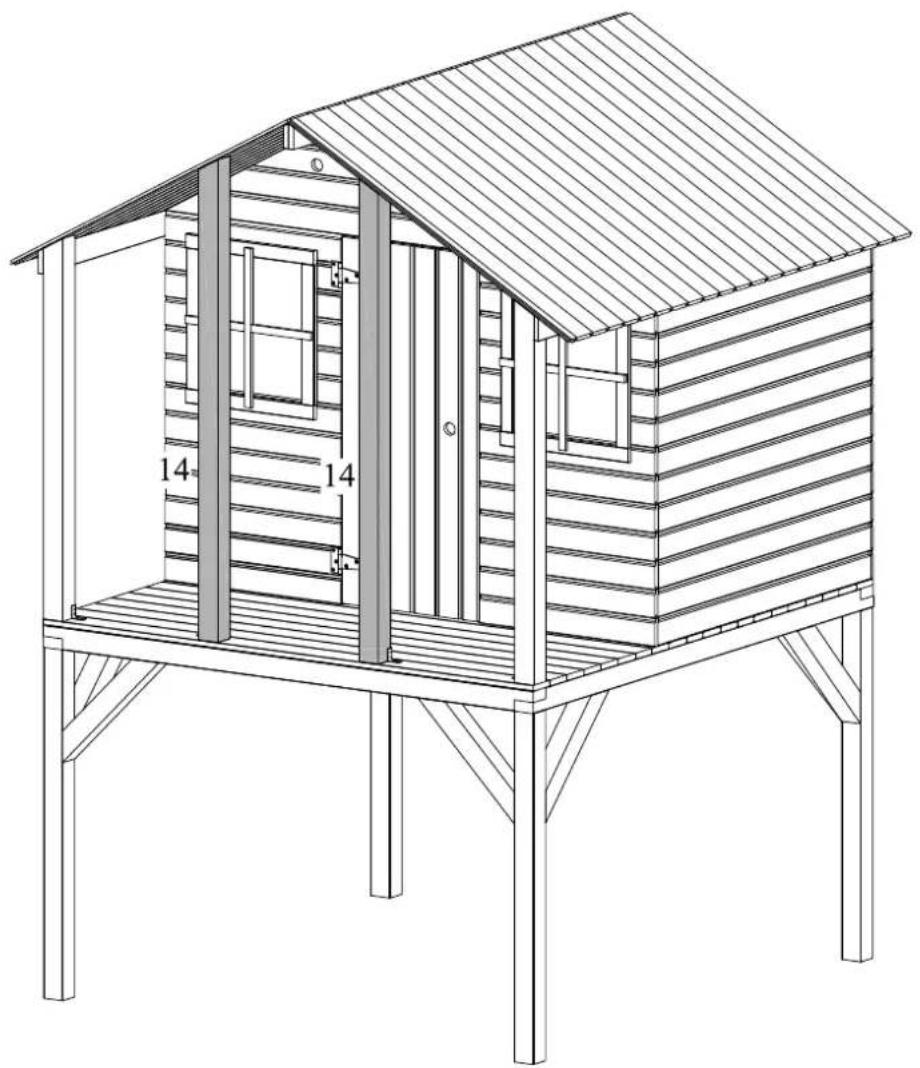
det 14 - 2 pcs
F5 - 2 pcs
F7 - 8 pcs
F8 - 2 pcs

11
natural_image
Architectural line drawing of a two-story wooden house with slatted roof and visible door, no text or symbols present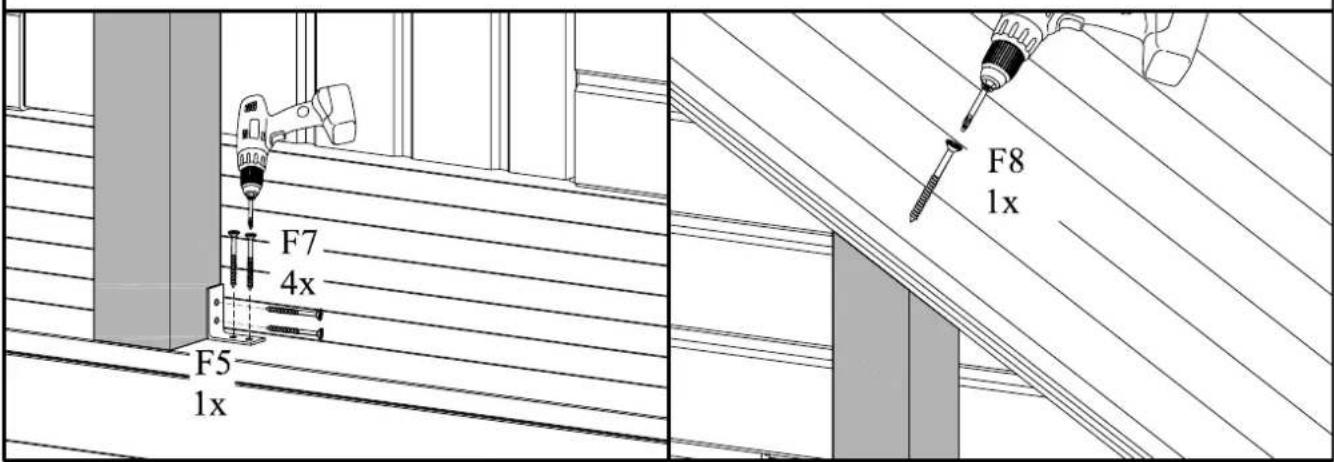
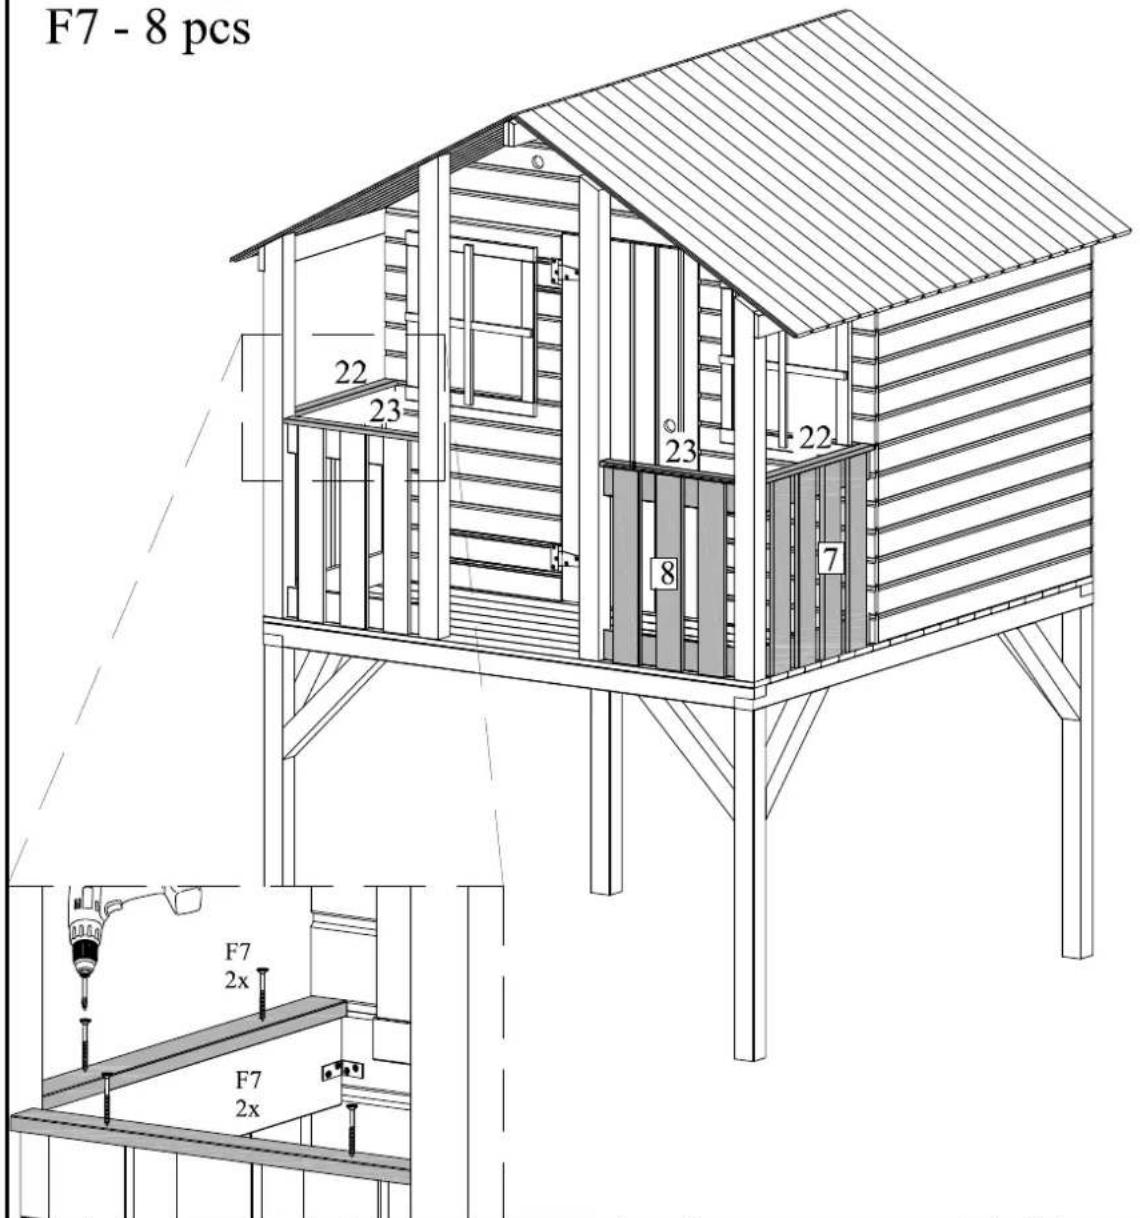
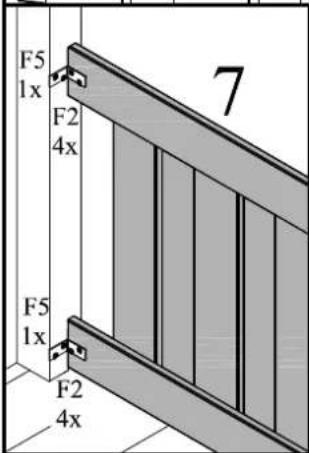
det 7 - 2 pcs
det 8 - 2 pcs
det 22 - 2 pcs
det 23 - 2 pcs
F5 - 16 pcs
F2 - 64 pcs
F7 - 8 pcs
12
natural_image
Architectural diagram of a window frame structure with no text or symbolsEN - Not included in the kit: roof cover material.
natural_image
Pure vertical line diagram with horizontal bars, no text or symbols present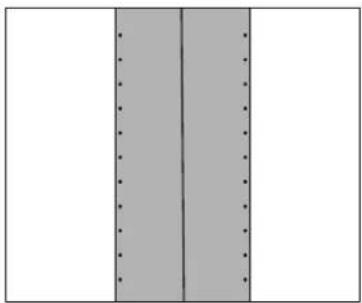
natural_image
Simple diagram with two vertical gray bars and evenly spaced dots, no text or symbols presentdet 19 - 4 pcs
det 21 - 2 pcs
F7 - 16 pcs
F9 - 8 pcs
14

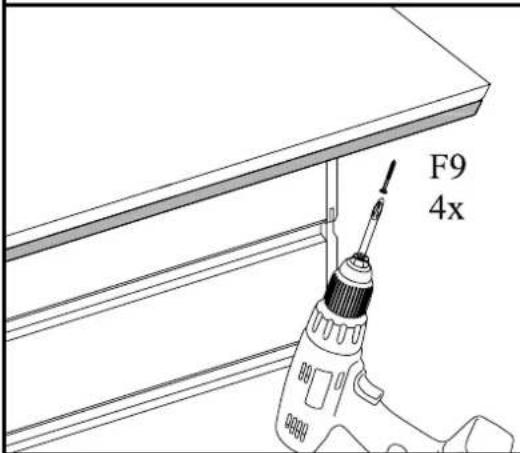
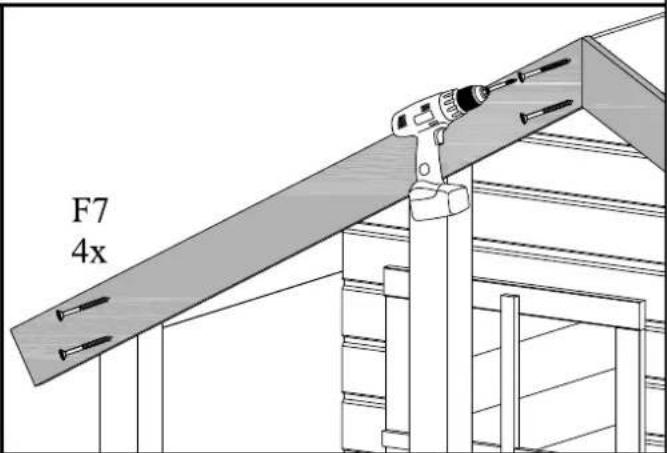
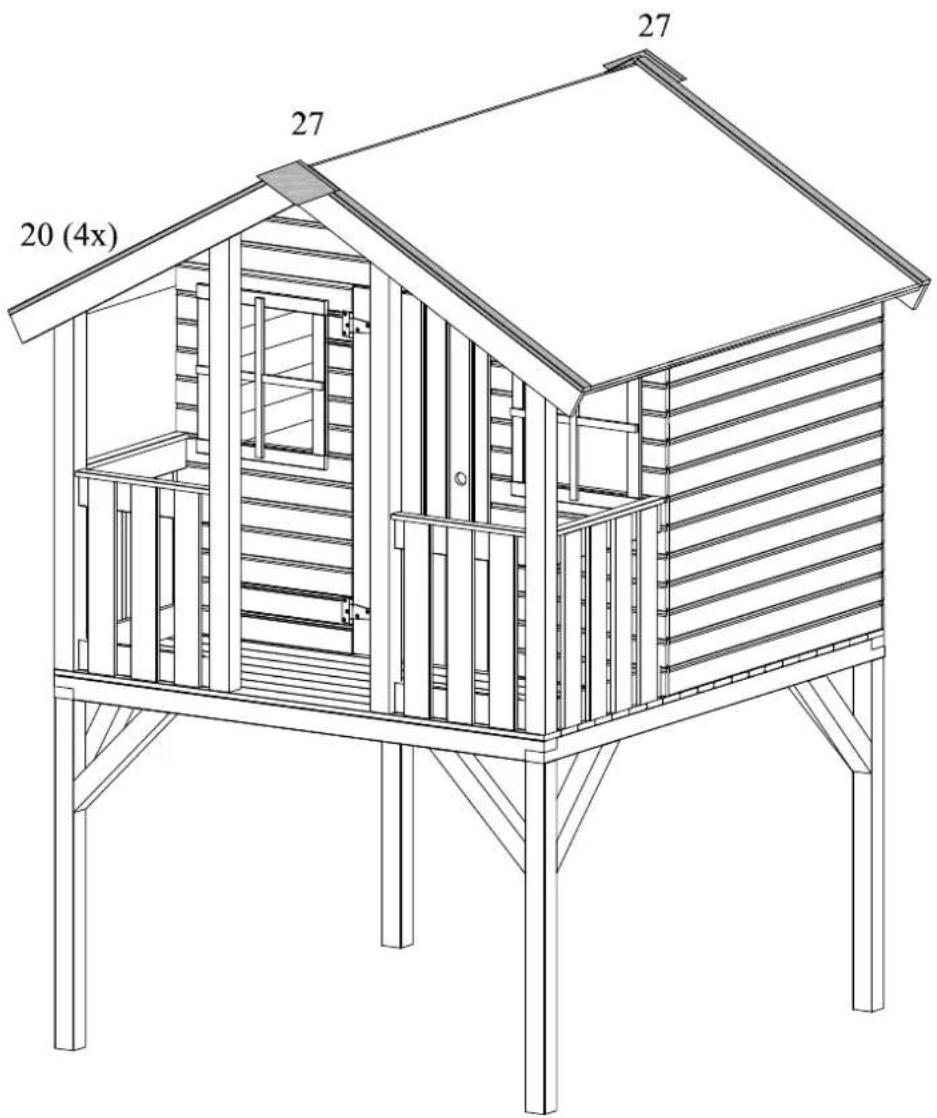
det 20 - 4 pcs
det 27 - 2 pcs
F7 - 16 pcs

15
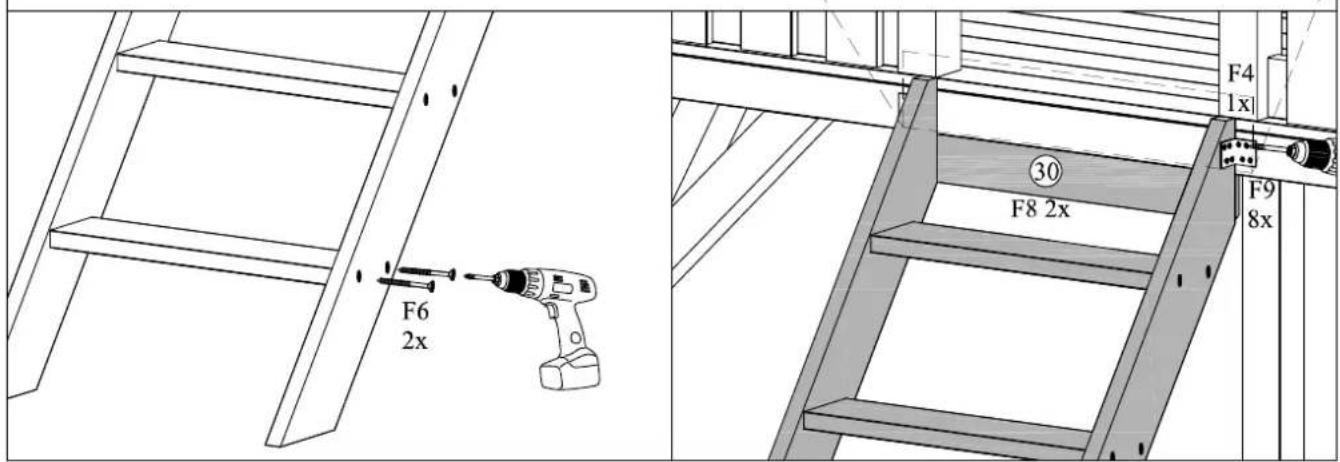
det 24 - 1 pcs
det 25 - 1 pcs
det 26 - 4 pcs
det 30 - 1 pcs
F6 - 16 pcs
F4 - 2 pcs
F9 - 16 pcs
F8 - 2 pcs

16
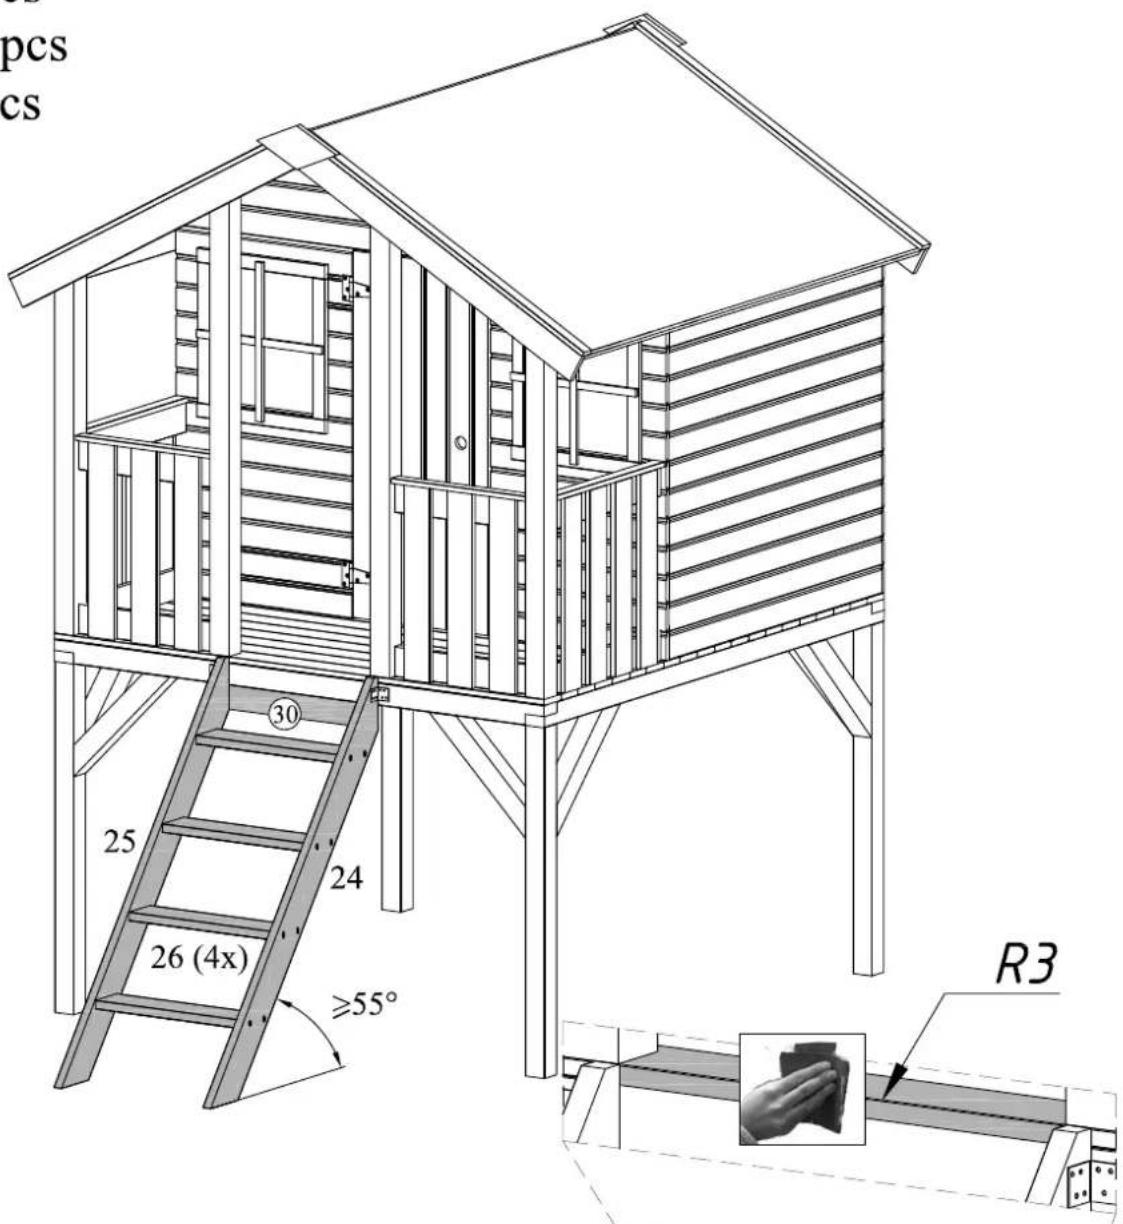
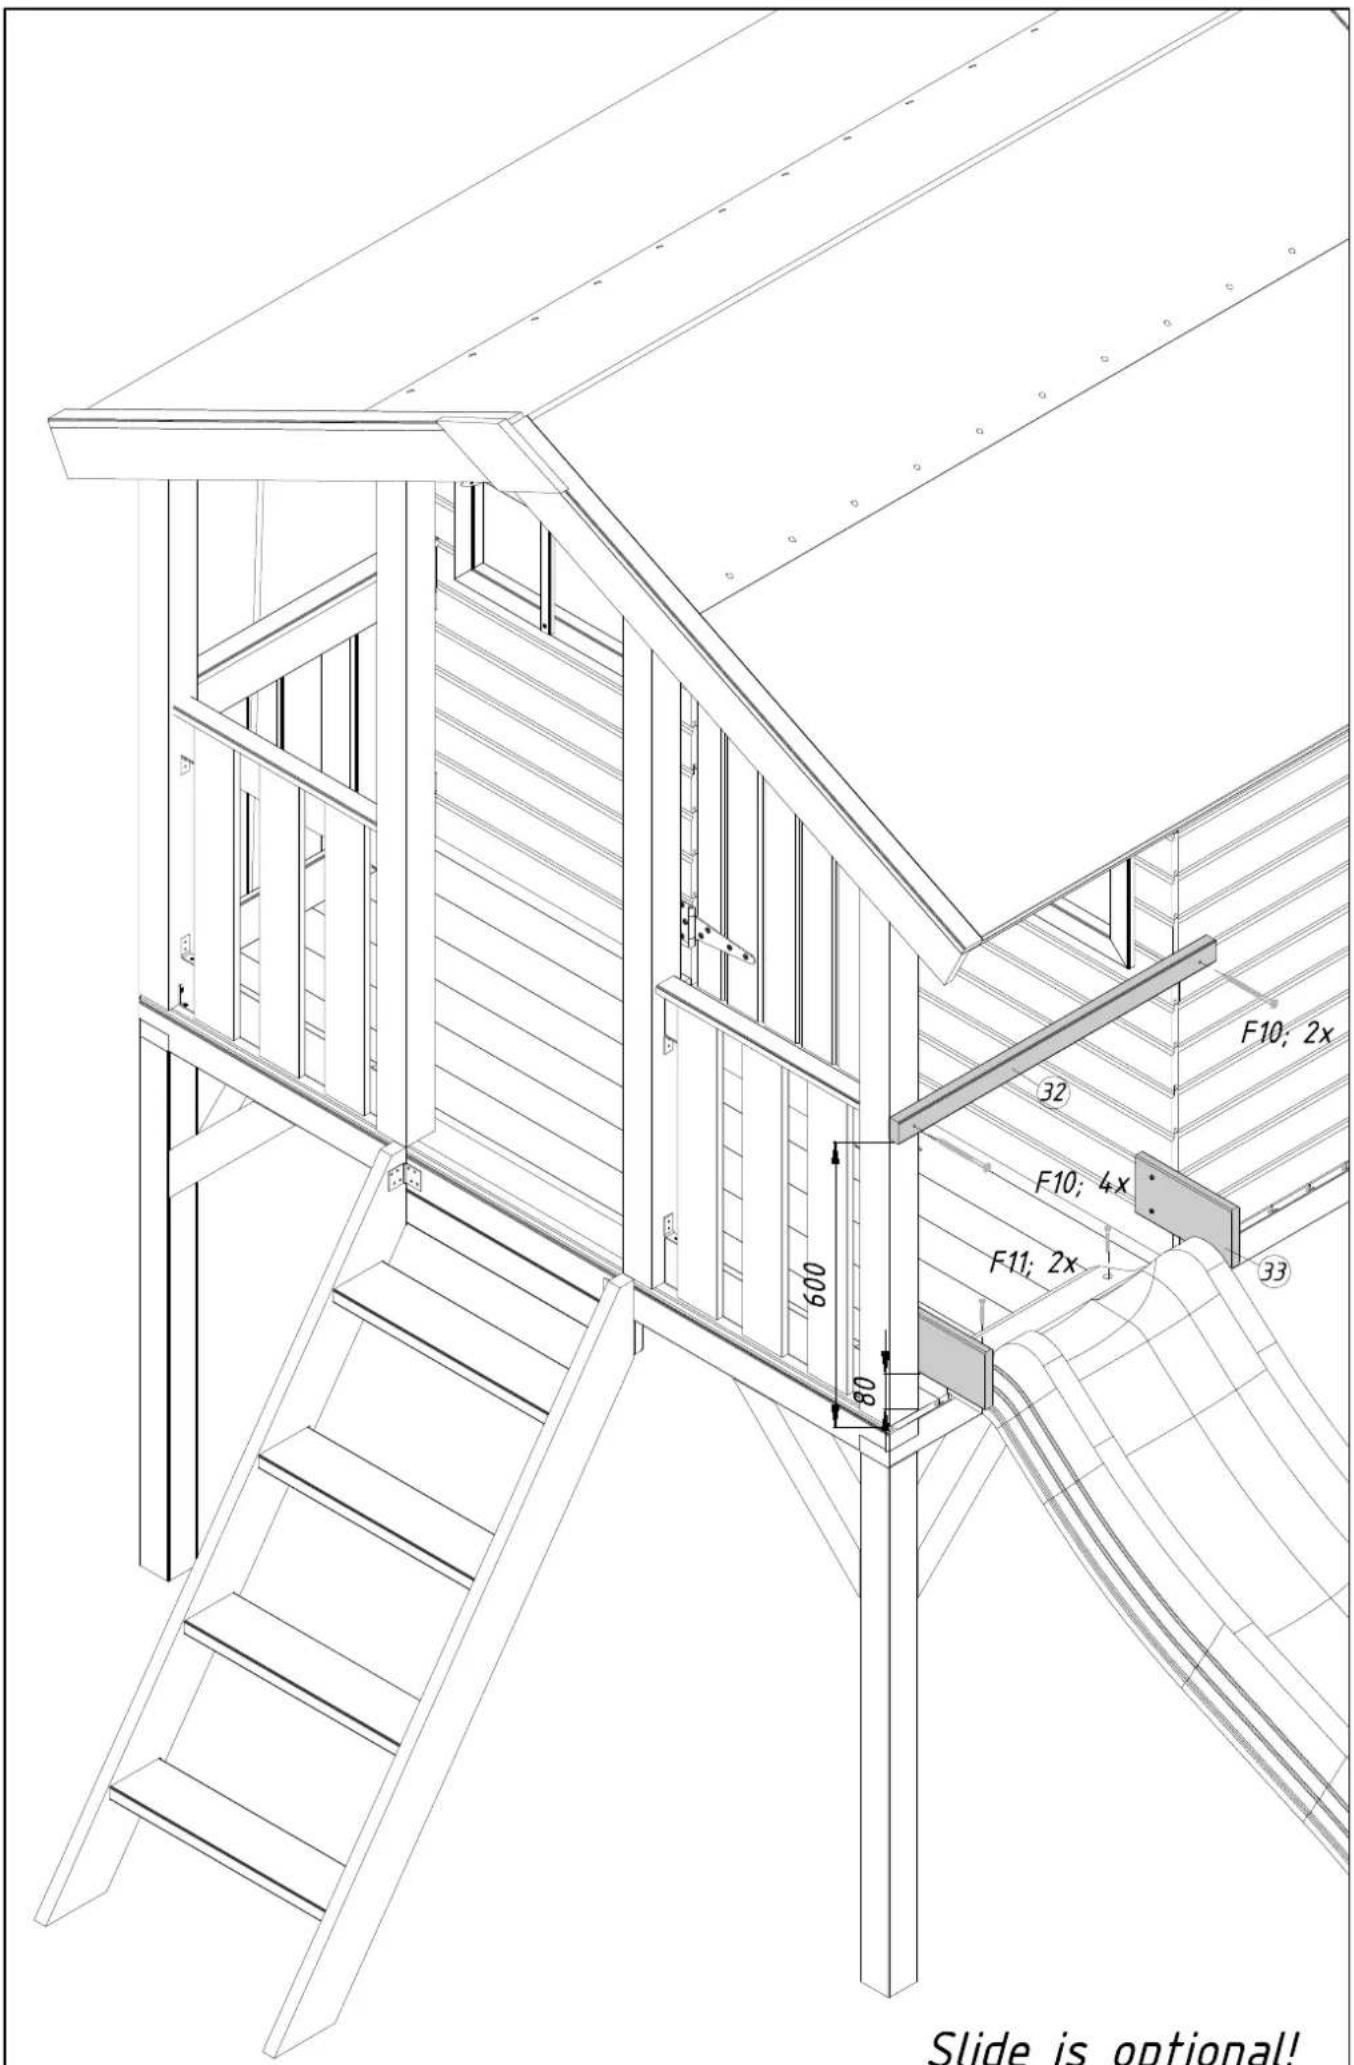
Slide is optional!
 |  |
 |  |