How to turn the SilverCrest SRH 5 C3 radio on and off?
To turn on the radio, press the MODE button. To turn off (standby), press and hold the MODE button for 2 seconds.
How to set the time on the SRH 5 C3 radio?
In standby mode, press and hold the PRESET/SET TIME button for 2 seconds. The hours flash: use TUNE- or TUNE+ to adjust, then confirm with SELECT/SCAN. Repeat for minutes, date, month and year.
How to perform an automatic FM station search?
In FM mode, press and hold MENU/INFO, select Search with TUNE-/+, confirm with SELECT/SCAN. Choose Stations with good reception or All stations, then confirm. The search starts.
How to save a station to memory?
After tuning to the desired station, press and hold PRESET/SET TIME. Use TUNE-/+ to select a memory location (1 to 10), then confirm with SELECT/SCAN. The station is stored.
How to set the alarm on the SRH 5 C3 radio?
In operating mode, press and hold MENU/INFO, select Alarm, then choose Alarm 1 or 2. Set the time, duration, source (buzzer, DAB or FM), repeat and volume. Enable the alarm by selecting Alarm On.
Why is DAB reception poor?
Poor DAB reception may be due to a badly positioned antenna or a weak signal in your area. Fully extend the wire antenna and move the radio to a more open location. Use the Full scan function to scan all available stations.
How to use the sleep timer?
In operating mode, press SNOOZE/SLEEP repeatedly to select the duration (10, 20, 30, 60, 70, 80 or 90 minutes). The sleep symbol is displayed. To cancel, press until Sleep Off appears.
How to charge a USB device with the radio?
Connect a USB cable (not supplied) to the USB port (output 5V/1A) at the back of the radio. Connect the other end to your device. Charging starts automatically. Disconnect the cable after use.
What to do if the radio does not turn on?
Check that the mains power adapter is properly connected to the power outlet and the radio. Ensure the outlet works. If the problem persists, contact After-Sales Service.
How to reset the radio to factory settings?
Press and hold MENU/INFO, select Factory setting with TUNE-/+, confirm with SELECT/SCAN. Choose YES (only with the TUNE- button) and confirm. All personal data will be erased.
User questions about SRH 5 C3 SILVERCREST
3 questions about this device. Answer the ones you know or ask your own.
Ask a new question about this device
Does the SILVERCREST SRH 5 C3 have a USB port?
Frequently Asked Questions -05/26/2026
Response Notice-Facile
Yes, the SILVERCREST SRH 5 C3 has a USB output port that allows you to charge external devices (phone, external battery, etc.). This port delivers a voltage of 5 V with a current of 1 A, for a maximum power of 5 W.
To use this function, simply connect a standard USB cable (not included) to the USB port located on the radio, and then plug the other end into your device. Your device's battery will charge automatically. Once charging is complete, simply unplug the cable from the USB port.
Note that the radio itself is powered via a mains power adapter provided (100-240 V~, 50/60 Hz, output 5 V / 2 A), not via USB. The USB port is therefore exclusively dedicated to charging external devices, making your radio a convenient and portable charging station.
Respond (be the first)
Does the SILVERCREST SRH 5 C3 have Bluetooth?
Frequently Asked Questions -05/26/2026
Response Notice-Facile
No, the SILVERCREST SRH 5 C3 does not have Bluetooth. This SILVERCREST radio is a traditional DAB+/FM receiver without wireless connectivity.
Available Connectivities
This radio offers:
DAB+: 174 to 240 MHz
FM: 87.5 to 108 MHz
USB Port: 5V/1A (to power or charge external devices)
DC Power Port: 5V/2A (powering the radio)
If you need Bluetooth connectivity, this radio is not compatible. You should consider a different model that offers built-in Bluetooth for better connection flexibility with your phone or other devices.
Respond (be the first)
How do I connect my phone to the SILVERCREST SRH 5 C3 radio via Bluetooth?
Frequently Asked Questions -05/26/2026
Response Notice-Facile
The SILVERCREST SRH 5 C3 radio does not have Bluetooth functionality. This model is a traditional DAB+/FM receiver radio without wireless connectivity.
Available connections:
DAB+ reception (174 to 240 MHz)
FM reception (87.5 to 108 MHz)
USB port (5V/1A) for charging external devices
DC power port (5V/2A)
If you want to listen to music from your phone on this radio, you can consider a wired connection via a 3.5 mm cable (audio jack) if an input port is available, or use other methods such as external Bluetooth speakers. For complete specifications, please refer to the manual included in the packaging.
Respond (be the first)
Download the instructions for your Iron in PDF format for free! Find your manual SRH 5 C3 -
SILVERCREST and take your electronic device back in hand. On this page are published all the documents necessary for the use of your device. SRH 5 C3 by SILVERCREST.
USER MANUAL SRH 5 C3 SILVERCREST
DAB+ RADIO SRD F1 B1
DE AT CH
DAB+ RADIO
Operation and safety notes
FR BE
RADIO DAB+
GB/IE Operation and safety notes Page 23
Warnings and symbols used. 24
Introduction 25
Intended use. 25
Scope of delivery. 25
Trademark notices 25
Description of parts. 26
Technical data 26
Safety notes. 27
Initial start-up 29
Switching the product on/off. 29
Mode selection. 29
Volume adjustment. 29
System settings. 29
Full scan. 32
DRC (Dynamic Range Compression) 32
Manual tuning. 32
33
DAB display modes. 33
Preseting currently active station 33
Recalling a preset station. 34
Sleep timer 34
Time setting. 34
Alarm setting. 34
Checking alarm time/Quick alarm setting 35
Snoopze function. 35
Adjusting the brightness of display 35
Charging an external USB device 35
Cleaning and care 36
Storage when not in use. 36
Troubleshooting 36
Glossary 36
Simplified EU declaration of conformity 37
Disposal 37
Warranty 37
Warranty claim procedure.. 38
Service 38
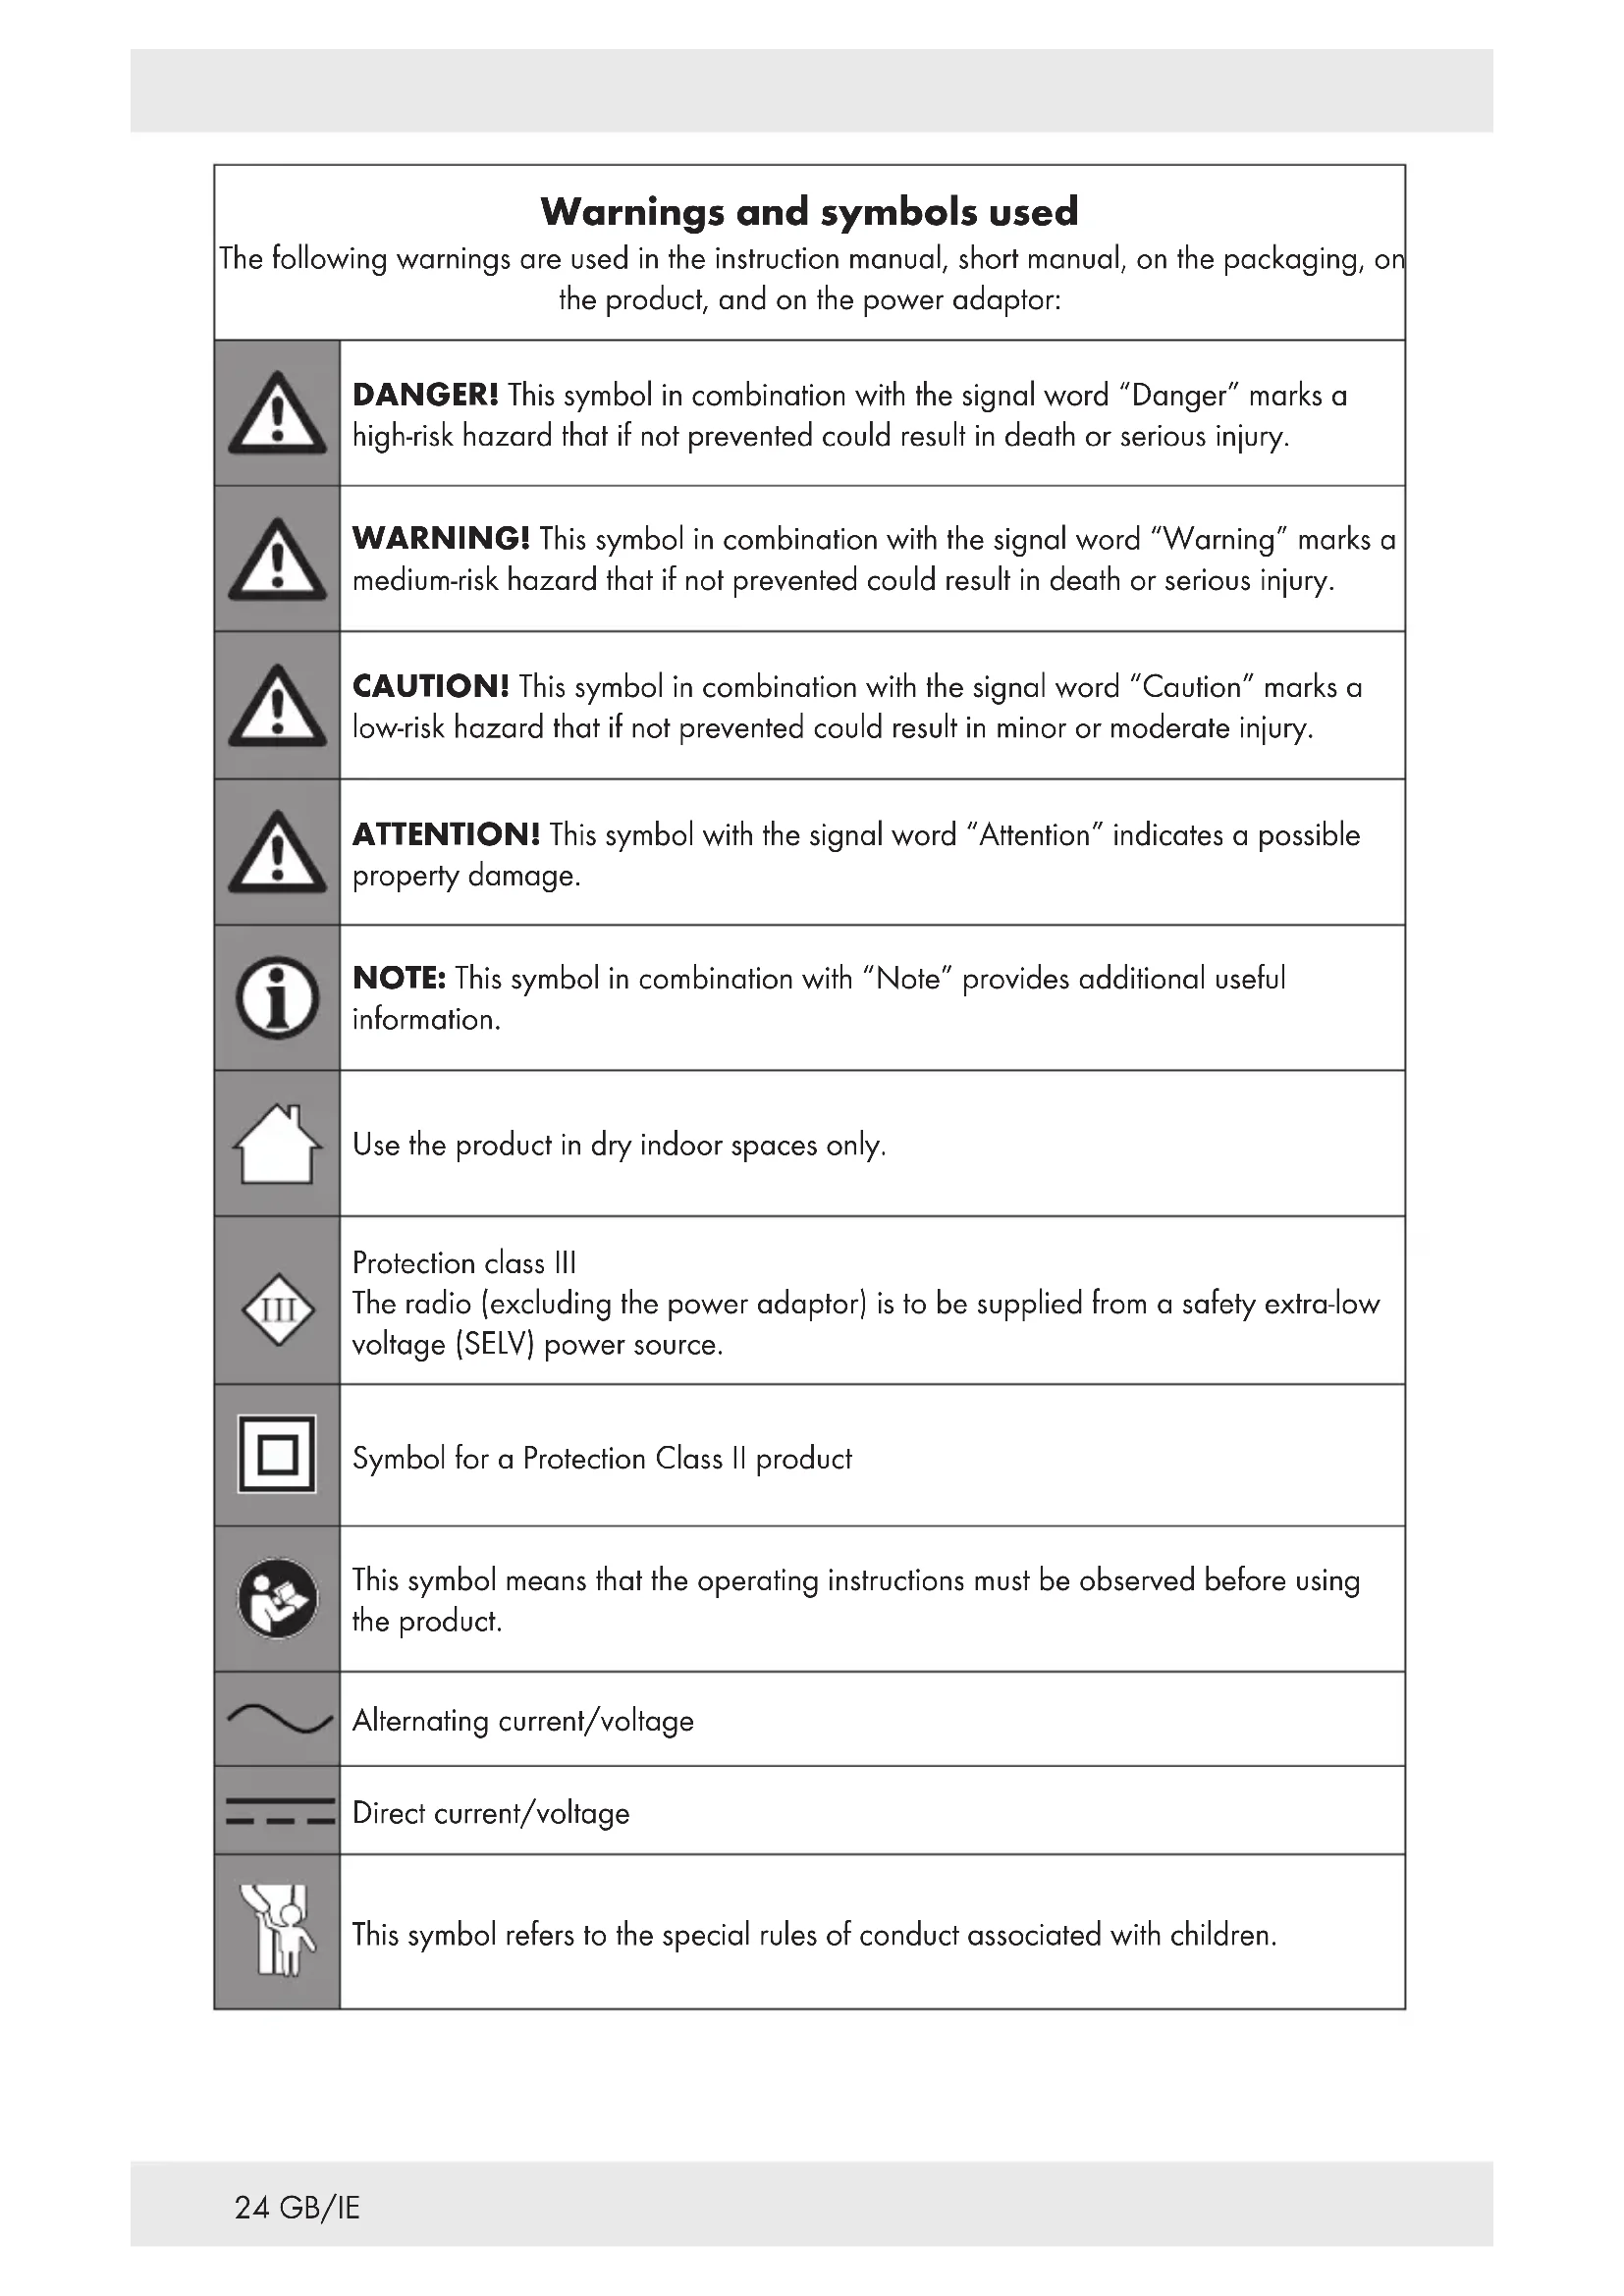
Warnings and symbols used
The following warnings are used in the instruction manual, short manual, on the packaging, on the product, and on the power adaptor:
DANGER! This symbol in combination with the signal word "Danger" marks a high-risk hazard that if not prevented could result in death or serious injury.
WARNING! This symbol in combination with the signal word "Warning" marks a medium-risk hazard that if not prevented could result in death or serious injury.
CAUTION! This symbol in combination with the signal word "Caution" marks a low-risk hazard that if not prevented could result in minor or moderate injury.
ATTENTION! This symbol with the signal word "Attention" indicates a possible property damage.
NOTE: This symbol in combination with "Note" provides additional useful information.
Use the product in dry indoor spaces only.
Protection class III
The radio (excluding the power adaptor) is to be supplied from a safety extra-low voltage (SELV) power source.
Symbol for a Protection Class II product
This symbol means that the operating instructions must be observed before using the product.
~
Alternating current/voltage
---
Direct current/voltage
This symbol refers to the special rules of conduct associated with children.
Polarity of barrel connector
CE
CE mark indicates conformity with relevant EU directives applicable for this product.
DAB+ RADIO
Introduction
We congratulate you on the purchase of your new product. You have chosen a high quality product. The instructions for use are part of the product. They contain important information concerning safety, use and disposal. Before using the product, please familiarise yourself with all of the safety information and instructions for use. Only use the product as described and for the specified applications. If you pass the product on to anyone else, please ensure that you also pass on all the documentation with it.
Intended use
The DAB+ radio (hereinafter called "product") is a consumer electronics device. It is used for the reception and playback of analogue and digital radio programs. This product may only be used privately and not for industrial or commercial purposes. This product may not be used in tropical climates. Any other use is considered improper. Any claims resulting from improper use or due to unauthorised modification of the product will be considered unwarranted. Any such use is at your own risk.
Scope of delivery
After unpacking the product, check if the delivery is complete and if all parts are in good condition. Remove all packing materials before use.
1 DAB+ radio
1 Power adaptor
1 Short manual
If you notice any damage or missing parts, contact the dealer from which you have purchased this product.
Trademark notices
USB is a registered trademark of USB Implementers Forum, Inc.
The SilverCrest trademark and trade name is the property of their respective owners.
Any other names and products are trademarks or registered trademarks of their respective owners.
Description of parts
Please refer to the fold out page.
1 Display
2
3 DC 5V/2A Power adaptor connection socket
4 Wire aerial for radio reception
5 Loudspeaker
6 SNOOZE/SLEEP button
7 Standby/MODE button
8 MENU INFO Menu/Info button
9 ALARM Alarm button
SELECT SCAN Select/Scan button
DIMMER Dimmer button
PRESET Preset/Set time button SET TIME
13 VOL· Reduce volume button
TUNE-Tune - button
15 VOL+ Increase volume button
TUNE+ Tune+ button
17 Power adaptor
18 Short manual
EU version: IVP0500-2000WG
UK version: IVP0500-2000WB
Input voltage: 100-240 V
~
Input AC frequency: 50/60 Hz
Input current: 0.5 A
Output voltage: 5.0 V
---
Output current: 2.0 A
Output power: 10.0 W
Average active efficiency: 78.70 %
Efficiency at low load (10%): 80.95 %
No-load power consumption: 0.10 W
Polarity of barrel connector at output:
◇-◇-◇
Protection class:
II/□
Safety notes
In the case of damage resulting from non-compliance with these operating instructions the guarantee claim becomes invalid!
No liability is accepted for consequential damage! In the case of material damage or personal injury caused by incorrect handling or non-compliance with the safety instructions, no liability is accepted!
Inspect all products for visible damage before use. Never use a damaged product.
The frequency ranges specified in the technical data chapter represent the technical possibilities of the product. Please note that different regulations may exist for freely available frequencies in different countries. Receiving and/or using of the information may be illegal and possibly punishable.
DANGER! RISK OF DEATH AND ACCIDENTS FOR TODDLERS AND CHILDREN!
Packaging materials are not a toy. Never leave children unsupervised with the packaging material. The packaging material represents a danger of suffocation. Children frequently underestimate the dangers. Always keep children away from the packaging material.
This product can be used by children aged from 8 years and above and persons with reduced physical, sensory or mental capabilities, or lack of experience and knowledge if they have been given supervision or instruction concerning use of the product in a safe way and understand the hazards involved. Cleaning and user maintenance shall not be made by children without supervision. Children shall not play with the product. The product is not a toy.
Risk of electric shock!
WARNING! Risk of electric shock! Never open the housing of the product or of the power adaptor. In case of malfunction, repairs are to be conducted by qualified personnel only.
WARNING! Protect the product and the power adaptor from dripping and splashing water. Do not place containers filled with liquids (such as vases or drinks) on or near the product or the power adaptor. Do not immerse any product components in liquids. Never hold the product under running water.
To avoid fire, do not place burning candles on or near the product.
WARNING! Do not touch the power adaptor with wet hands.
CAUTION! Never use a damaged product. If you notice any damage, disconnect the power adaptor immediately from the mains network. Contact your retailer if the product is damaged.
Always turn the product off before disconnecting it from the power supply.
Only use this product with the supplied power adaptor. Only use the supplied power adaptor with this product. Contact your retailer if the power adaptor is damaged. Refer to the technical data of this product.
To avoid damaging the cord, do not place any objects on it or chafe it on sharp edges. Keep it away from hot surfaces and open flames as well.
- Lay out the cord in such a way that no unintentional pulling or tripping over is possible. Keep the power adaptor and its cord out of reach of children.
- When disconnecting the power adaptor from the electrical outlet, do not pull by the connection cord but by the power adaptor.
Do not wrap the connection cord around the product.
- Connect the power adaptor to an electrical outlet that is always easily reachable so that in case of an emergency the plug can be unplugged immediately.
Pull the power adaptor out of the power supply to completely disconnect the product from the mains network.
The power adaptor continues to draw a small amount of electricity, even without the radio being operated, as long as the power adaptor is connected to the power supply. To completely switch off the power adaptor, it must be disconnected from the mains network.
Do not subject the product to physical shock or strong vibrations.
If smoke or unusual sounds are observed, immediately unplug the power adaptor from the power supply.
The power adaptor shall not be covered.
- Disconnect the power adaptor from the power supply when the product is not in use and before cleaning.
- Let the product dry completely before connecting it to the mains supply and before storage. Allow the product to cool down completely before storage.
Do not insert any foreign objects into the product.
Do not expose the product to high temperatures (e.g. in the direct vicinity of a heater).
① NOTE: This product is equipped with rubber feet to protect delicate surfaces. It cannot be ruled out that furniture care agents will attack or damage the rubber feet.
- Initial start-up
Set up the product on a level surface. Do not to cover the ventilation slots and loudspeaker 5 on the top of the product.
Connect the coaxial power connector of the power adaptor to the power adaptor port 3.
Plug the power adaptor into a properly installed mains socket.
The product first displays Time is not set and time 00:00.
A DAB station search is started in the background.
The date and time are set automatically.
After this installation routine, the product is in standby mode.
Fully lay out the antenna 4.
- Switching the product on/off
Switching the product on/off
Switching on
PressMODE
Switching off
Press and hold 7 for 2 seconds (off = standby mode)
Mode selection
During operation, press the MODE button to switch between FM and DAB operation.
Volume adjustment
Volume
Increase
Press VOL+15
Decrease
Press VOL-13
System settings
Switch on the product.
Press and hold MENU/INFO8 for 2 seconds to display the menu.
Press TUNE-14 or TUNE+ 16 to select .
Press SELECT/SCAN 10 to confirm.
Press TUNE-14 or TUNE+ 16 to select from:
System settings
Press TUNE-14 or TUNE+16 = amend values | Press SELECT/SCAN 10 = confirm value or selection | MENU/INFO8=1 step back
Alarm
AL1-AL2 (Choose alarm 1 or alarm 2 to setup)
On time 00:00 (To set the alarm time)
Duration 15-30-45-60-90-120 (To set the alarm duration)
Buzzer - DAB - FM (To set the alarm time)
Daily-Once- Weekends-Weekdays (To set repeat frequency)
Volume:L1-L16
Alarm off - Alarm on
System settings
Press TUNE- 14 or TUNE+ 16 = amend values | Press SELECT/SCAN 10 = confirm value or selection | MENU/INFO 8 = 1 step back
2. Time
↓ Set Time/Date
↓ Set time
↓ Set date
↓ Auto Update (Automatic time update)
↓ No Update (No automatic time update)
↓ Update from FM (Automatic time update from FM)
↓ Update from DAB (Automatic time update from DAB)
↓ Update from Any (Automatic time update from FM or DAB)
↓ Set 12/24 hour (12 or 24 hour display)
↓ Set 24 hour (24 hour display)
↓ Set 12 hour (12 hour display)
↓ Set date format
↓ DD-MM-YYYY ("Day-Month-Year")
↓ MM-DD-YYYY ("Month-Day-Year")
① NOTE: You can also enter time setting mode by pressing and holding PRESET/SET TIME 12 in standby mode.
3. Backlight
↓ On level
↓ High - Medium - Low (Light level)
↓ Night dimmer
↓ NO - YES (YES = backlight will be dimmed from 23:00-04:59)
4. Language
↓ English, Deutsch, Italiano, Français, Nederlands, Espanol, Português, Svenska, Dansk, Norsk, Suomi, Polski.
5. Factory settings (Reset to factory settings)
↓ NO (No reset to factory settings)
↓ YES (Reset to factory settings)
① NOTES:
■ You can only use the button TUNE- 14 to select the option YES.
■ All the previously saved data (stations, time, and alarm settings) will be lost after factory reset.
6. SW version
↓ Version number
FM operation
Switch on the product.
To switch from DAB mode to FM mode, press MODE 7.
Searching stations
Press and hold MENU/INFO 8 for 2 seconds.
Press TUNE-14 or TUNE+ 16 to select .
Press SELECT/SCAN10 to confirm.
Press TUNE-14 or TUNE+ 16 to set:
Menu item Function
Strong station Sets the product to search for stations with strong signal only.
All stations Sets the product to search for all stations.
Press SELECT/SCAN10 to confirm.
Search functions
Choose from 3 scanning functions to select a radio station.
Function Description
Auto scan
Press and hold TUNE-14 or TUNE+16 to start scanning in the desired direction.
Manual scan
Press TUNE-14 or TUNE+16 briefly to search for FM stations manually (each press changes the frequency by 0.05 MHz).
AMS
Press and hold SELECT/SCAN10 to automatically search for stations and to save them in the 10 preset slots of the product. The product starts at the lowest frequency. Depending on reception, not all 10 presets might be assigned. The automatic scan will be stopped, if all 10 preset slots are assigned.
- Saving stations manually
After you have searched a station manually, press and hold PRESET/SET TIME 12.
Press TUNE-14 or TUNE+ 16 to select a preset slot.
Press SELECT/SCAN to confirm the selection.
You can recall a previously saved station by pressing PRESET/SET TIME 12.
Press TUNE-14 or TUNE+ 16 to select the desired station memory.
Press SELECT/SCAN to confirm the selection.
FM display modes
Press MENU/INFO 8 briefly to choose from:
Display Function
Signal strength only
Shows a bar indicating the signal strength.
No Radio Text
Will be displayed, if the radio station does not provide any scrolling message giving real-time information, e.g song title, news headlines, etc.
Program Type
Shows the genre of the programme that is being broadcasted.
Station name Shows the name of the station.
Audio info Shows if the station being received is in mono or stereo mode.
Display Function
Time
Displays the current time provided automatically by the broadcaster.
Date
Displays the current date provided automatically by the broadcaster.
Station frequency Shows the frequency of the station.
Each time MENU/INFO 8 is pressed, the next item is displayed.
DAB operation
Switching to DAB mode: Press 7
Full scan
Perform a complete station search in the DAB mode:
Press and hold MENU/INFO8.
Press TUNE-14 or TUNE+ 16 to select.
① NOTE: You can also start the automatic scan by pressing and holding SELECT/SCAN 10.
Press SELECT/SCAN10 to confirm.
All detected stations are stored automatically in alphabetical order in a station list. You can save up to 10 stations.
Press TUNE-14 or TUNE+ 16 to select the desired station from the list.
Press SELECT/SCAN10 to confirm.
DRC (Dynamic Range Compression)
Use this function to reduce the volume difference between quiet and loud sounds.
Press and hold MENU/INFO8.
Press TUNE-14 or TUNE+ 16 to select .
Press SELECT/SCAN to confirm the selection.
Press TUNE-14 or TUNE+ 16 to select High , Low ,or Off
Press SELECT/SCAN to confirm the selection.
Manual tuning
No sound is emitted by the product while manually tuning. The newly tuned station can be found in the Station list.
Press and hold MENU/INFO8.
Press TUNE-14 or TUNE+ 16 to select .
Press SELECT/SCAN to confirm the selection.
Press TUNE-14 or TUNE+ 16 to select a channel from the station list.
Press SELECT/SCAN to confirm the selection. The signal strength of the current station is displayed.
Press SELECT/SCAN to assign the current station to the selected channel from the station list.
Deleting unavailable stations
Press and hold MENU/INFO 8.
Press TUNE-14 or TUNE+ 16 to select .
Press SELECT/SCAN10 to confirm.
Press TUNE-14 or TUNE+ 16 to select .
Press SELECT/SCAN10 to confirm.
① NOTE: Unavailable stations can only be detected after another complete search (e.g. at a different location). In this case, the affected station is preceded by a question mark. After the "Delete" function has been performed, the correspondingly marked stations are no longer available in the station list.
DAB display modes
Press MENU/INFO 8 briefly to choose from:
Setting Function
No Radio Text
Will be displayed, if the radio station does not provide any scrolling message giving real-time information, e.g song title, news headlines, etc.
Signal strength only
Shows a bar indicating the signal strength.
Program Type
Shows the genre of the programme that is being broadcasted.
Station name Shows the name of the station.
Frequency Displays the frequency of the currently set station.
Signal error Displays the signal error of the currently set station.
Bitrate and Codec Displays the radio mode and the received audio bit rate.
Time
Displays the current time provided automatically by the broadcaster.
Date
Displays the current date provided automatically by the broadcaster.
Each time MENU/INFO 8 is pressed, the next item is displayed.
Presetting currently active station
You can store up to 20 stations (10 FM and 10 DAB).
Press and hold PRESET/SET TIME12.
<#:Empty) appears in the display 1.
Press TUNE-14 or TUNE+ 16 to select a desired station memory.
Press SELECT/SCAN10 to confirm.
The station is stored. Preset # stored appears in the display 1.
① NOTE: Station memories that are already occupied will be overwritten without further notice.
Recalling a preset station
You can recall a previously saved station by pressing PRESET/SET TIME 12.
Press TUNE-14 or TUNE+ 16 to select the desired station memory.
Press SELECT/SCAN10 to confirm.
NOTE: Preset Empty is displayed if the preset number is unoccupied.
Sleep timer
In operation mode:
Press SNOOZE/SLEEP6 repeatedly to choose the sleep time: Sleep off/10/20/30/60/70/80/90 minutes.
When the sleep timer is activated, the sleep timer icon appears in the display.
- Checking the remaining sleep time: During counting down, press SNOOZE/SLEEP 6. The interval remaining is shown in the display.
Cancelling the sleep timer: Press SNOOZE/SLEEP repeatedly until appears in the display.
Time setting
In standby mode, press and hold PRESET/SET TIME 12 for 2 seconds to set the time and date.
- Hour flashes. Press TUNE-14 or TUNE+ 16 to set the desired hours. Press SELECT/SCAN 10 to confirm.
Minute flashes. Press TUNE-14 or TUNE+ 16 to set the desired minutes. Press SELECT/SCAN 10to confirm.
Date flashes. Press TUNE-14 or TUNE+ 16 to set the desired date. Press SELECT/SCAN to confirm.
Month flashes. Press TUNE-14 or TUNE+ 16 to set the desired month. Press SELECT/ SCAN 10 to confirm.
Year flashes. Press TUNE-14 or TUNE+ 16 to set the desired year. Press SELECT/ SCAN 10 to confirm.
When the time is successfully set,
Alarm setting
During operation, press and hold MENU/INFO 8 for 2 seconds to open the menu.
Press TUNE-14 or TUNE+ 16 to select . Press SELECT/SCAN 10 to confirm.
Press TUNE-14 or TUNE+ 16 to select . Press SELECT/SCAN 10 to confirm.
Display: . Press TUNE- [14] or TUNE+ [16] to select or . Press SELECT/SCAN [10] to confirm.
Display: . The hour flashes. Press TUNE- [14] or TUNE+ [16] to set the desired hours. Press SELECT/SCAN [10] to confirm.
Display: . The minutes flash. Press TUNE-14 or TUNE+16 to set the desired minutes. Press SELECT/SCAN 10 to confirm.
Display: . The numbers flash (minutes). Press TUNE-14 or TUNE+16 to set the alarm duration (options: 15/30/45/60/90/120 minutes). Press SELECT/SCAN10 to confirm.
Display: . The source flashes. Press TUNE- 14 or TUNE+ 16 to set the alarm sound . Press SELECT/ SCAN 10 to confirm.
① NOTE: If the alarm source is set to or , set the option (the last listened station) or the desired number of the preset station (for those stations that are stored on presets 1 to 10) by pressing TUNE- [14] or TUNE+ [16]. Press SELECT/SCAN [10] to confirm.
Display flashes. Press TUNE-14 or TUNE+ 16 to set the alarm repetition (Options: Daily, Once, weekends or weekdays). Press SELECT/SCAN 10 to confirm.
NOTE: If the alarm is set to , select the date by pressing TUNE-14 or TUNE+16. Press SELECT/SCAN 10 to confirm.
Press TUNE-14 or TUNE+ 16 to set the volume of the alarm. Press SELECT/SCAN 10 to confirm.
Display flashes. Press TUNE-14 or TUNE+16 to set or . Press SELECT/SCAN 10 to confirm.
When the alarm is successfully set, appears in the display.
NOTES:
When the alarm sounds, press MODE 7 or ALARM 9 to turn the alarm off.
When Alarm 1 sounds, flashes in the display 1.
When Alarm 2 sounds, flashes in the display 1.
The volume gradually increases.
After the alarm duration has elapsed, the product will return to standby mode automatically.
或 D A B alarm: When the alarm sounds, the radio station appears in the display 1.
- Checking alarm time/Quick alarm setting
Press ALARM 9 to check the Alarm 1 and Alarm 2 time respectively.
At Alarm 1 display, press and hold ALARM to set Alarm 1.
At Alarm 2 display, press and hold ALARM to set Alarm 2.
Snoopze function
In ON mode, press SNOOZE/SLEEP 6 while the alarm is ringing. The alarm reactivates after approx. 10 minutes. The remaining snooze time is shown in the display 1.
Adjusting the brightness of display
Press Dimmer 11 to set the brightness of the display (Lo/Med/Hi).
- Charging an external USB device
Connect a USB cable (not included) to the USB port 2.
- Connect the other end of the USB cable to your USB device. The rechargeable battery of your USB device is charged automatically.
Disconnect the USB cable from the USB port 2, when you want to stop charging.
Cleaning and care
Before cleaning: Unplug the product from the power supply.
WARNING! Never immerse the product nor the power adaptor in water or other liquids for cleaning purposes. Never immerse any of the product's components under running water.
Clean the product with a slightly moistened cloth.
Do not allow any water or other liquids enter the product's interior.
- Do not use solvent-based cleaning agents, abrasives, harsh cleaning solutions or hard brushes for cleaning.
Let all parts dry afterwards.
Storage when not in use
Store the product in its original packaging.
Store the product in a dry, secure location away from children.
Troubleshooting
Cause
Solution
The product will not turn on
Check if the power adaptor is properly connected with the socket and the product.
No sound
Adjust the volume.
Disturbed radio reception
Signal reception is too low. Adjust the aerial or move the unit to a stronger signal location.
FM station not found
Weak signal. Search manually.
DAB station not found
No DAB coverage in your area or poor reception. Adjust the position of the aerial.
Glossary
Multiplex: In DAB and DAB + several radio programmes can be transmitted on each frequency. These radio stations are combined in a so-called multiplex. In this multiplex, additional services, such as pictures and text information, can also be transmitted.
■ Signal error: The greater the number of signal errors, the more distorted the audio signal arrives at the product. The built-in error protection can compensate for this to a certain extent without deteriorating the audio quality. Displaying the number of signal errors can be helpful in finding a better location to place the product.
- Simplified EU declaration of conformity
Hereby, OWIM GmbH & Co. KG, Stiftsbergstraße 1, 74167 Neckarsulm, GERMANY, declares that the product (DAB+ radio HG09235) is in compliance with Directives 2014/53/EU, 2011/65/EU and 2009/125/EC.
The full text of the EU declaration of conformity is available at the following internet address:
www.owim.com
Disposal
Packaging:
The packaging is made of environmentally friendly materials, which may be disposed of through your local recycling facilities.
Observe the marking of the packaging materials for waste separation, which are marked with abbreviations (a) and numbers (b) with following meaning: 1-7: plastics/20-22: paper and fi breboard/80-98: composite materials.
Product:
The product and packaging materials are recyclable and are subject to extended producer responsibility.
Dispose them separately, following the illustrated Info-tri (sorting information), for better waste treatment.
The Triman logo is valid in France only.
Contact your local refuse disposal authority for more details of how to dispose of your worn-out product.
acent symbol of a crossed out dustbin on wheels indicates this product is subject to directive 2012/19/EU. This directive states at the end of the life this product must not be disposed of through regular household refuse but must be returned to special collection sites, recycling depots or waste management companies.
This disposal is free of charge to you.
Protect the environment and dispose of properly.
Warranty
The product has been manufactured to strict quality guidelines and meticulously examined before delivery. In the event of product defects you have legal rights against the retailer of this product. Your legal rights are not limited in any way by our warranty detailed below.
The warranty for this product is 3 years from the date of purchase. The warranty period begins on the date of purchase. Please keep the original sales receipt in a safe location. This document is required as your proof of purchase.
Should this product show any fault in materials or manufacture within 3 years from the date of purchase, we will repair or replace it - at our choice - free of charge to you. This warranty becomes void if the product has been damaged, or used or maintained improperly.
The warranty applies to defects in material or manufacture. This warranty does not cover product parts subject to normal wear, thus possibly considered consumables (e.g. batteries) or for damage to fragile parts, e.g. switches, rechargeable batteries or glass parts.
Warranty claim procedure
To ensure quick processing of your case, please observe the following instructions:
Please have the till receipt and the item number (IAN 392260_2201) available as proof of purchase.
You will find the item number on the rating plate, an engraving, on the front page of the instructions for use (bottom left), or as a sticker on the rear or bottom of the product.
If functional or other defects occur, please contact the service department listed either by telephone or by e-mail.
You can return a defective product to us free of charge to the service address that will be provided to you. Ensure that you enclose the proof of purchase (till receipt) and information about what the defect is and when it occurred.
Service
GB Service Great Britain
Tel.: 0800 0569216
E-Mail: owim@lidl.co.uk
IE Service Ireland
Tel.: 1800200736
E-Mail: owim@lidl.ie
C
SNOOZE/SLEEP Touche Snooze
MODE Touche Veille
MENU INFO
Touche Menu/Info
ALARM Touche Alarme
Xiamen Innov Electronics Tech Co., Ltd.
Opis Wartość
OUT 5V/1A puerto USB
DC 5V/2A Conector hembradel adaptador de corriente
Signal strength only
(Csak jelerosseg)
Shranite Iahko do 20 postaj (10 FM in 10 DAB).
Pritisnite in pridržite tipko PRESET/SET TIME 12.
Nazaslonu se prikaze <#: (Empty)>(<#: (Prazno>)
Pritisnite tipko TUNE-14 ali TUNE+ 16, da izberete zeeleno pomnilniško mesto.
Pritisnite tipko SELECT/SCAN10, da nastavitev potrdite.
Postaja je shranjena. Na zaslonu se prikaze Preset # stored (Postaja st. shranjena).
Pooblasceni serviser:
OWIM GmbH & Co. KG
Stiftsbergstraße 1
74167 Neckarsulm
NEMCIJA
Servisna telefonska stevilk: 00386 (0) 80 70 60
Garancijski list
Other manuals SILVERCREST
Discover other manuals and user guides for the brand SILVERCREST
💬 Hi! I'm your manual assistant.I know your SILVERCREST SRH 5 C3.
How can I help you? (use, settings, error codes, maintenance, explaining a step from the manual, etc.)💡 Examples :
• How do I use it ?
• Error code E3 ?
• How do I clean it ?